Hello and welcome to the 3rd installment of the infamous Android Emulator on Windows saga. Despite the combined 3 trillion dollar market cap of Microsoft and Google, this remains to be a problem harder than going to the moon.
Below is the somewhat comprehensive list for Windows (so far as of circa 11/2022)
First make sure you have the latest version of Windows. As of writing, this is Windows 11 22H2 with all updates installed. If you have an older version of Windows, you’ll have to try each one of the below, with possibly different combinations. Otherwise follow from the top until your issue is solved. It is ordered from the easiest/most likely culprit on a decent Windows machine, to the most unlikely cause.
Note that if you’re doing below on a corporate machine, some of the below actions may be blocked by your admin, and/or flag your machine as suspicious activity as some actions intentionally turns off some security features. Depending on your situation, you may want to give a heads-up to your IT/security team.
If your Windows device has Bitlocker enabled on your boot drive contact your IT admin first. Messing with virtualization and boot configuration may trigger bitlocker prompts upon reboot. If you’re working from home,this may mean taking your laptop to the office to get it unlocked by IT, as Windows may refuse to boot without unlocking BitLocker.
To find what is blocking the emulator launch, the surefire way is to open a terminal (cmd or powershell) and launch to from there as below.
First kill any existing emulator.exe instances, adb.exe instances, java.exe instances, qemu instances, android studio instances. Check in task manager to be sure.
The adb relaunches itself so its ok be running. But make sure android studio is not running. It seems to lock files/cache and not flush emulator configs, that may crash the emulator at launch, without any useful logs.
in a terminal
cd your_sdk_locationemulatoremulator.exe -list-avds- this will list what AVDs you have. Find the one you want
emulator.exe -avd your_avd_name -verbose
This will have a long log, and will have some information on what the failure is. If you see a VM heap size being outside of limits, it may say that it it automatically set to lowest or highest value. This is a lie. Open emulator settings and set it to within the limits manually, usually 550MB works. Launch android studio and edit the emulator instance to be within this limit, then close android studio, then wait about 30 seconds before attempting to launch the emulator. For all attempts of launching the emulator below, do not rely on android studio, launch from command line instead.
Note that the emulator editor UI in android studio can corrupt the config at times. If this happens, I don’t know where this is stored, so you may have to delete and re-create the AVD. If this doesn’t work, do not change and configs during AVD creation, then launch it from command line.
If the emulator doesn’t launch, no useful failure logs, yet the emulator.exe exits after a few minutes, you may have android studio running. Exit/Kill Android studio, wait a minute or so and try again. If still fails, reboot.
-
Have an Antivirus (other than Microsoft Defender)?
- Disable it
- Reboot and try to launch the emulator
-
Disable Hypervisor Boot
- open an admin terminal (cmd or powershell)
- run
bcdedit /set hypervisorlaunchtype off - try to launch the emulator. If still broken, try rebooting.
-
If your failure is due to install of HAXM/AMD hypervisor driver failing
- run
systeminfoin a terminal - at the end under
Hyper-V Requirements:if it saysA hypervisor has been detectedthis means emulator cannot launch virtualization. - Open Start > Windows Security > Device Security > Core isolation
- turn off Core Isolation (previously known as Memory Integrity/Isolated User Mode)
- Open
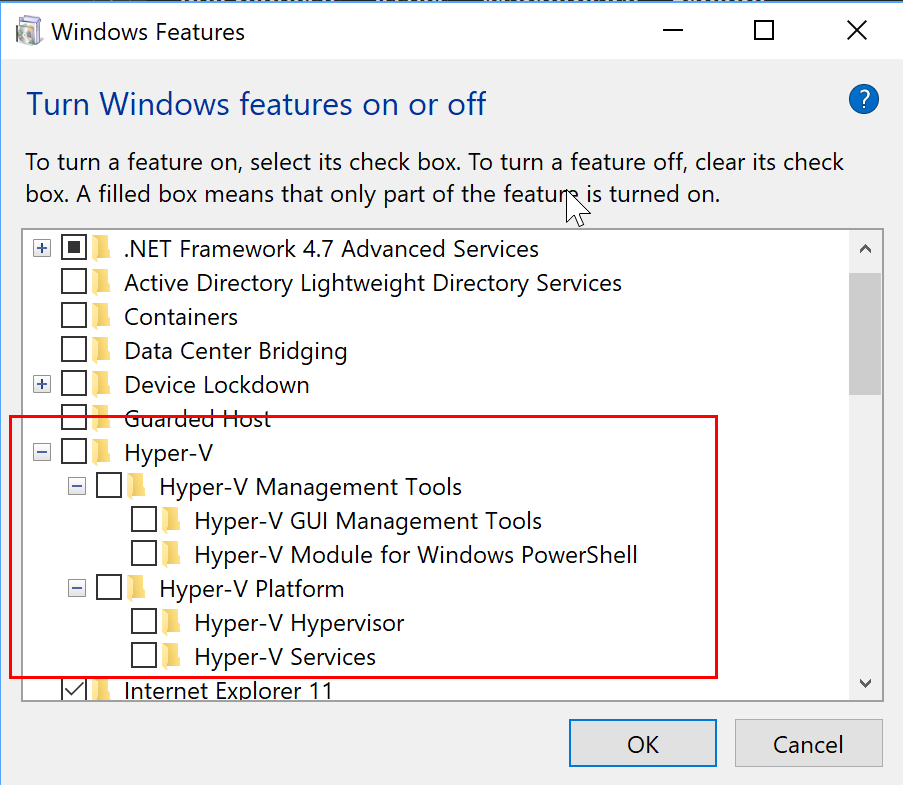
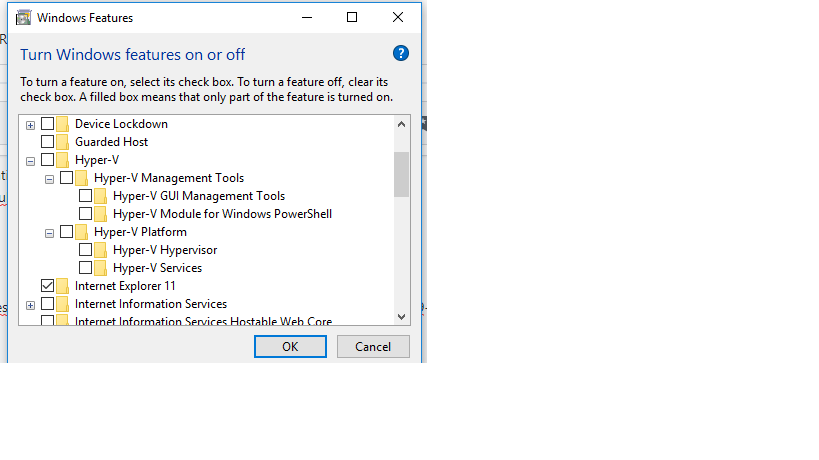
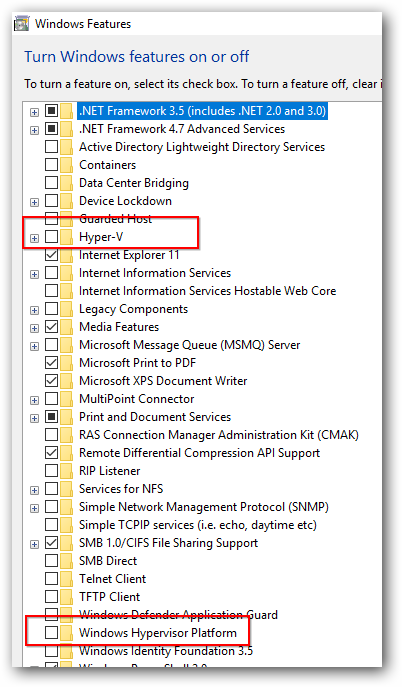
Turn Windows features on or offand disable- Hyper-V Platform
- Hyper-V Management Tools
- Windows Hypervisor Platform
- You can enable them after HAXM/AMD Driver install
- on an admin prompt run
bcdedit /set hypervisorlaunchtype off - reboot
- try to launch the emulator
- run
-
Check BIOS
- go into BIOS/UEFI setup and look for settings like
- VT-x
- VT-d
- Virtualization Technology
- Hardware Virtualization
- Make sure these settings are enabled
- try to launch the emulator
- go into BIOS/UEFI setup and look for settings like
-
Uninstall Docker Desktop
- Some users have reported that uninstalling Docker Desktop fixed their issue.
- It is unclear as to why docker desktop interferes with haxm installation. The reason is probably that it supports running docker images via a Hyper-V backend, and disabling this feature does not remove the hypervisor completely.
- Go to Settings -> Add or remove programs, and uninstall docker desktop
- reboot
- try to launch the emulator
-
Nothing works
- You shouldn’t get here, since Android emulator can now run alongside with Hyper-V if you have ‘Windows Hypervisor Platform’ enabled.
- If nothing above works, as a last resort you can try running Android in a Hyper-V VM and get ADB to connect to it. (Not a solution, but a workaround)
- You can also run android using a third-party emulator like Genimotion.
-
¯(ツ)/¯
- Debug on a physical device
- You can also use Wifi debugging via
adb pair ip:portandadb connect ip:portcommands.
- You can also use Wifi debugging via
- or get a Macbook
- Debug on a physical device
Содержание
- Ошибка установки Intel HAXM — этот компьютер не поддерживает технологию виртуализации Intel (VT-x)
- 11 ответов:
- Как решить проблему с виртуализацией HAXM Intel Android Studio?
- Ошибка установки Intel HAXM. Этот компьютер не поддерживает технологию Intel Virtualization Technology (VT-x)
- ОТВЕТЫ
- Ответ 1
- Ответ 2
- Ответ 3
- Ответ 4
- Ответ 5
- Ответ 6
- Ответ 7
- Ответ 8
- Ответ 9
- Ответ 10
- Ответ 11
- Ответ 12
- Ответ 13
Ошибка установки Intel HAXM — этот компьютер не поддерживает технологию виртуализации Intel (VT-x)
У меня проблема с моей установкой HAXM. Вот в чем дело. Я получил эту ошибку каждый раз, когда я пытался установить HAXM для моего компьютера: 
проблема в том, что мой компьютер поддерживает технологию виртуализации (см. рис ниже). Есть идеи, как исправить эту проблему? 
11 ответов:
просто выполните следующие действия:
- на Панель управления → программа и функция.
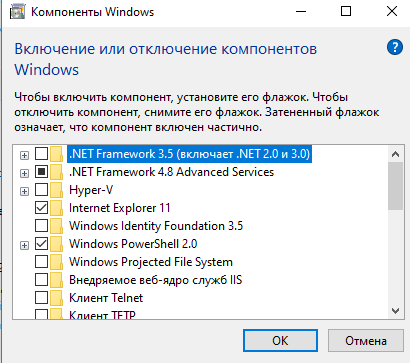
- нажать на кнопку включение и выключение функций окна. Откроется окно.
- убрать Hyper-V опция и перезагрузите систему.
теперь вы можете начать установку HAXM без каких-либо ошибок.
извините, я забыл ответить на этот вопрос. После нескольких дней поиска в Интернете я обнаружил, что эта проблема была вызвана гиперпоточностью (или hyper — v). Я решил отредактировать свой ботинок.ini-файл с возможностью запуска Windows с HyperThreading отключен. Я последовал в этом уроке и теперь все работает замечательно
скорее всего, у вас установлена windows 8 с hyper-v? если да, удалите hyper-v, и ваша проблема исчезнет!
прежде всего убедитесь, что вы Включили технологию виртуализации в вашем BIOS. После перезагрузки компьютера нажмите F1-F12 на клавиатуре и найдите эту опцию.
убедитесь, что вы отключили Hyper-V в Windows 7/Windows 8. Вы можете отключить его в Панели управления -> Программы -> функции Windows
вы можете попробовать отключить антивирусную программу на весь процесс установки. Не забудьте восстановить все антивирусы услуги после установки HAXM.
некоторые люди рекомендуют «холодная» загрузка что:
- отключение виртуализации в BIOS
- перезагрузите компьютер и выключите его
- включить VT в вашем BIOS
- перезагрузите компьютер, выключите его
- вполне вероятно, что теперь может быть разрешено установить HAXM
к сожалению, этот шаг не работает для я
- и последнее, но не менее важное: попробуйте этот обходной патч, выпущенный Intel.
все, что вам нужно сделать, это загрузить пакет, распаковать его, положить его вместе с файлом HAXM installator и запустить .cmd файл входит в пакет — помните, запустите его от имени администратора.
у меня было много из проблем с установкой HAXM и только последний шаг помог мне.
возможно, VT-X не включен в вашем BIOS.
Intel VT-x не включен
в некоторых случаях Intel VT-x может быть отключен в BIOS системы и должен быть включен в программу настройки BIOS. Чтобы получить доступ к настройке BIOS утилита, ключ должен быть нажал во время загрузки компьютера. Этот ключ зависит от того, какой BIOS используется, но обычно это F2, удалить или клавиша Esc. В утилите настройки BIOS Intel VT может быть обозначается терминами «VT», «технология виртуализации» или » VT-d.» Обязательно включите все функции виртуализации.
антивирусное программное обеспечение может помешать установке HAXM. После попытки выяснить , что пошло не так в течение нескольких часов, я нашел странное решение — удаление моего антивирусного программного обеспечения, установка HAXM (который работал), а затем переустановка антивирусного программного обеспечения (Avast в моем случае, но это может произойти и с другими антивирусными программами.
полная проверка, которую я прошел, чтобы получить этот запуск:
- Проверьте функцию «виртуализация» и vt-X биография.
- проверка Hyper-V не установлена.
- проверка погоды vt-X включена в windows с помощью инструмента Intel и инструмента MS (упомянутого в предыдущих сообщениях в этой теме).
- Отключение антивируса, который не помог.
- удаление антивируса (что решило проблему для меня).
во многих случаях некоторые антивирусы также запускают HyperV с запуском окна и не позволяют устанавливать HAXM. Я столкнулся с этой проблемой из — за Avast antivirus. Поэтому я удалил AVAST, а затем HAXM правильно установлен после перезагрузки. Затем я переустановил AVAST.
Так что его просто проверить при установке, как сейчас даже с AVAST установлен обратно, HAXM работает правильно с виртуальной коробки и android эмуляторов.
в окне» включение и выключение компонентов Windows » снимите флажок Hyper-V, а также убедитесь, что платформа гипервизора Windows не отмечена. Включенная платформа гипервизора Windows также может блокировать установку Intel HaxM

в Windows 10 Защитник Windows имеет функцию изоляции ядра, которая использует технологию виртуализации, которая также будет вмешиваться в работу HAXM. Отключите его и повторите попытку. В моем случае отключение его решило мою проблему.
после установки Visual Studio 2013 Update 2 Visual Studio уведомила меня об обновлении эмулятора Windows Phone, которое я установил (это был действительно новый компонент, а не обновление). Оказалось, что это позволило Hyper-V, который сломал HAXM.
решение состояло в том, чтобы удалить эмулятор из программ и компонентов и отключить Hyper-V от функций Windows (поиск «функции Windows» и нажмите «Включить или выключить функции Windows»).
Если вы не найдете опцию Hyper-V в панели управления, как сказано в другом ответ, попробуйте войти в BIOS setup (перезагрузка и нажатие F-12 или ESC или других в зависимости от вашего ПК) и включить виртуализацию, расположенную, вероятно, в параметрах процессора.
Источник
Как решить проблему с виртуализацией HAXM Intel Android Studio?
Суть проблемы после установки Android Studio не устанавливается модуль виртуализации HAXM Intel
Ошибка 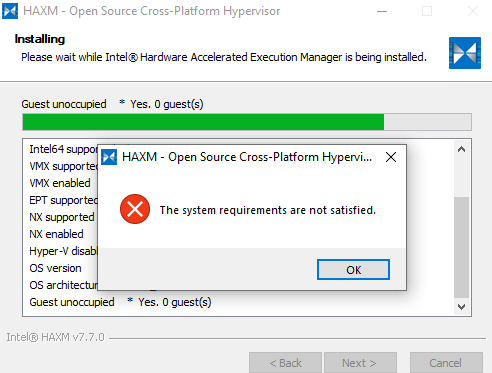
Схема решения 1
Параметры
Виртуализация вкл
VMX — NO
VT-X — NO
Hyper-V — не отключен
EPT — NO 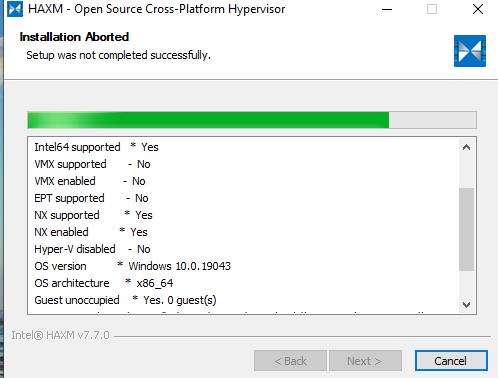
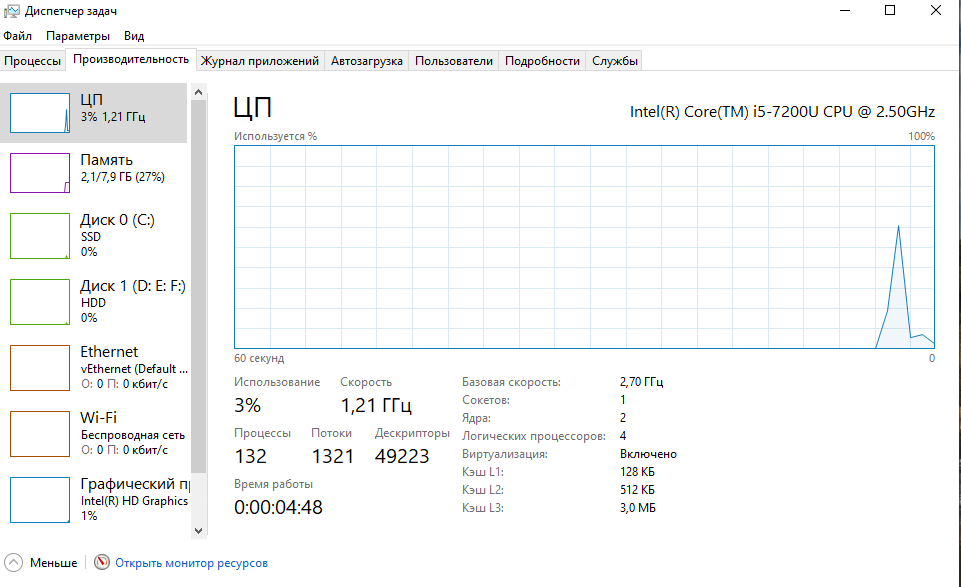
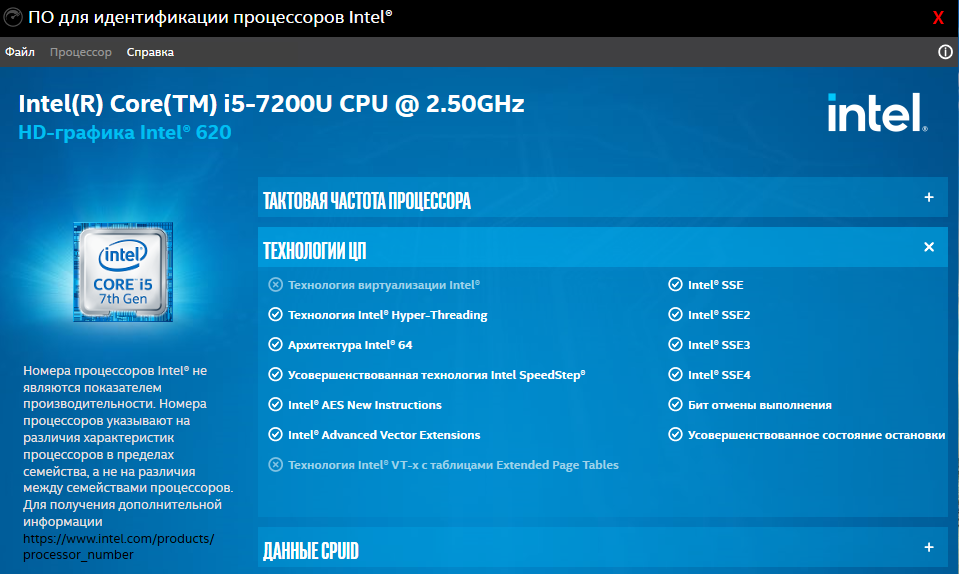
Схема решения 2
Виртуализация- откл
VMX — NO
VT-X — YES
Hyper-V — отключен
EPT — YES 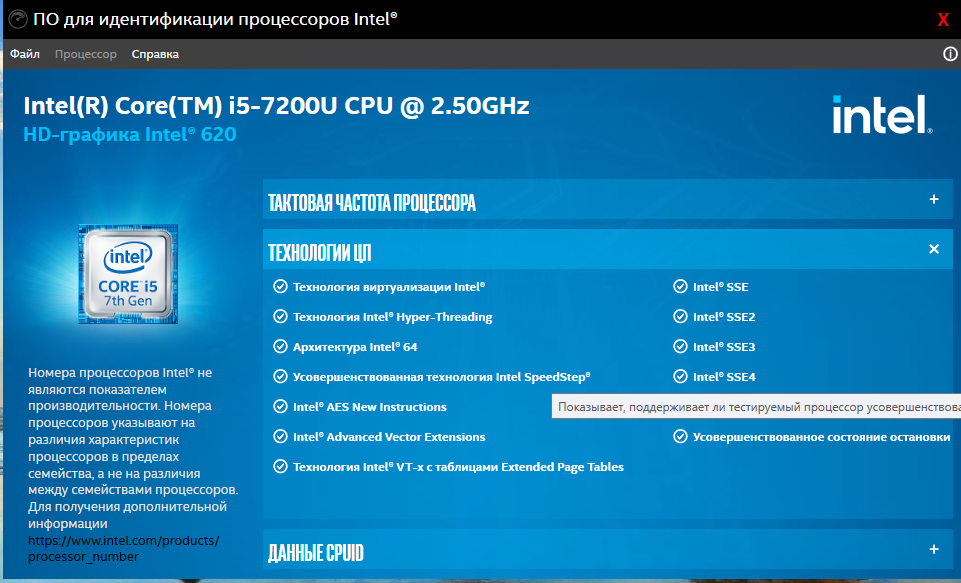

Находил инструкции в которых описано:
1) Hyper-V должен быть отключен
2)Виртуализация (Intel Virtual) включена (устанавливается через BIOS)
3) Процессор Intel должен поддерживать технологии
Все требования успешно сочетаются по инструкции —
на ПРАКТИКЕ все работает по отдельности и естественно эмулятор не хочет запускаться
Выводы
Схема 1
Виртуализация включена через Bios
В таком случае процессором не поддерживаются нужные режимы
Схема 2
Виртуализация отключена через Bios
Процессор поддерживает нужные режимы
В обоих случаях поддержка Hyper-V отключена
Еще находил путь решения изменить Boot List Option с Legacy на UEFI
Структура разделов была ранее MBR поменял на GPT
Итог — не помогло
Вопрос как совместить необходимые требования?
Чтобы работала и виртуализация и требования к процессору.
Источник
Ошибка установки Intel HAXM. Этот компьютер не поддерживает технологию Intel Virtualization Technology (VT-x)
У меня проблема с установкой HAXM. Вот что. Я получил эту ошибку каждый раз, когда пытался установить HAXM для своего компьютера: 
Проблема в том, что мой компьютер поддерживает технологию виртуализации (см. рис. ниже). Любая идея, как решить эту проблему? 
ОТВЕТЫ
Ответ 1
Просто выполните следующие действия:
- Перейдите в Панель управления → Программа и функция.
- Включение и выключение функций Turn Window. Откроется окно.
- Снимите флажок Hyper-V и перезагрузите систему.
Теперь вы можете запустить установку HAXM без каких-либо ошибок.
Ответ 2
Извините, я забыл ответить на этот вопрос. После нескольких дней поиска в Google, эта проблема была вызвана гиперпотоком (или гипер — v). Я решил отредактировать файл boot.ini с возможностью запуска окон с отключением гиперпотока. Я следил за этот учебник, и теперь все работает отлично
Ответ 3
Скорее всего, у вас установлены окна 8 с установленным гипер-v? если да, удалите гипер-v, и ваша проблема исчезнет!
Ответ 4
Прежде всего убедитесь, что вы включили технологию виртуализации в своем BIOS. После перезагрузки компьютера нажмите F1-F12 на клавиатуре и найдите эту опцию.
Убедитесь, что вы отключили Hyper-V в Windows 7/Windows 8. Вы можете отключить его в панели управления → Программы → функции Windows
Вы можете отключить антивирусную программу для всего процесса установки. Не забудьте восстановить все антивирусные службы после установки HAXM.
Некоторые люди рекомендуют холодную загрузку, которая:
- Отключение виртуализации в вашем BIOS
- Перезагрузите компьютер и выключите его.
- Включить VT в BIOS
- Перезагрузите компьютер, выключите его
- Вероятно, теперь может быть разрешено устанавливать HAXM
К сожалению, этот шаг не сработал у меня
- И последнее, но не менее важное: попробуйте этот патч исправления, выпущенный Intel.
Все, что вам нужно сделать, это загрузить пакет, распаковать его, поместить вместе с файлом установки HAXM и запустить .cmd файл, включенный в пакет, — запомните, запустите его как администратор.
У меня было много проблем с установкой HAXM, и мне помог только последний шаг.
Ответ 5
Возможно, VT-X не включен в вашем BIOS.
Intel VT-x не включен
В некоторых случаях Intel VT-x может быть отключен в BIOS системы и должен быть включенным в утилите настройки BIOS. Для доступа к настройке BIOS Утилита, ключ должен быть нажат во время загрузки компьютера. Этот ключ зависит от того, какой BIOS используется, но обычно это F2, Delete или Esc. В утилите настройки BIOS Intel VT может быть определенных терминами «VT», «Технология виртуализации» или «VT-d». Обязательно включите все функции виртуализации.
Ответ 6
Антивирусное ПО может помешать установке HAXM. Попытавшись выяснить, что пошло не так в течение нескольких часов, я нашел странное решение — удаление моего антивирусного программного обеспечения, установку HAXM (который работал), а затем повторная установка антивирусного программного обеспечения (Avast в моем случае, но это может произойти с другими антивирусными программами.
Полная проверка, которую я провела, чтобы запустить эту операцию:
- Проверьте функцию «Виртуализация» и vt-X в BIOS.
- Проверка Hyper-V не установлена.
- Проверка погоды vt-X включена в окнах с помощью инструмента Intel и инструмента MS (упоминается в предыдущих сообщениях в этом потоке).
- Отключение антивируса, который не помог.
- Удаление антивируса (который решил проблему для меня).
Ответ 7
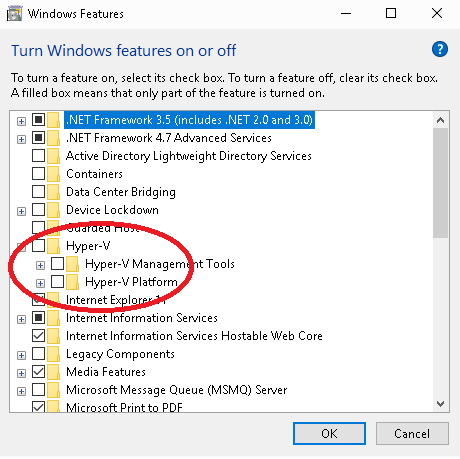
В окне «Включение или выключение Windows-функций» снимите флажок Hyper-V, а также убедитесь, что платформа Windows Hypervisor не установлена. Платформа Windows Hypervisor включена также может блокировать установку Intel HaxM

Ответ 8
В Windows 10 защитник Windows имеет функцию изоляции ядра, которая использует технологию виртуализации, которая также будет прервать работу HAXM. Отключите его и повторите попытку. В моем случае его отключение решило мою проблему.
Ответ 9
Во многих случаях некоторые антивирусы также запускают HyperV с запуском окна и не позволяют устанавливать HAXM. Я столкнулся с этой проблемой из-за антивируса AVAST. Поэтому я удалил AVAST, после чего HAXM правильно установился после перезагрузки. Затем я снова установил AVAST.
Итак, его просто проверка при установке, как сейчас, даже с установленным AVAST, HAXM корректно работает с виртуальными блоками и эмуляторами Android.
Ответ 10
Похоже, что список исправлений растет, даже через 3 года после первоначального вопроса.
Ниже приведен полный список для Windows (до 12/2018)
Проверить BIOS
- войдите в настройку BIOS/UEFI и посмотрите настройки, такие как VT-x, VT-d, технология виртуализации, виртуализация оборудования и убедитесь, что она включена. Если этого параметра нет, обратитесь к производителю и модели, чтобы убедиться, что он поддерживается.
Отключить Hyper-V
- Введите «окна» в меню «Пуск», выберите «Включить или отключить функции Windows».
- Отмените выбор всех параметров, связанных с Hyper-V, нажмите OK, перезагрузите.
- Это разрушит любые виртуальные машины Hyper-V, которые у вас есть, включая любые эмуляторы Windows Phone и все, что у вас есть, для чего требуется Hyper-V
- Требуется перезагрузка
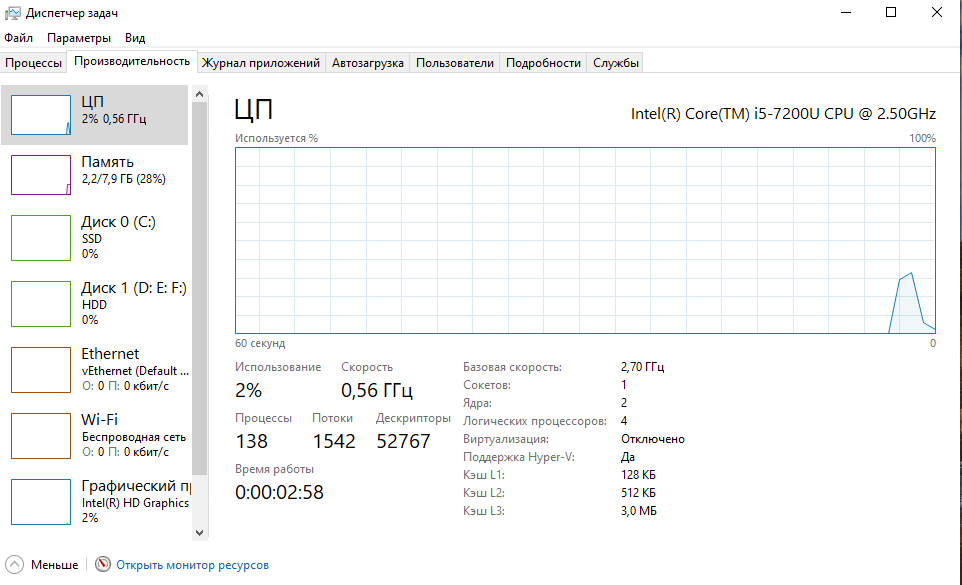
- в командной строке администратора запустите systemifo . Если он показывает, что «гипервизор обнаружен» в соответствии с требованиями Hyper-V, даже после удаления функции Hyper-V у вас может быть включен «Core Isolation». Ниже описано, как отключить его.
- В качестве другого варианта попробуйте включить » Платформа Hypervisor для Windows «, если вы все еще нуждаетесь в поддержке Hyper-V. Больше информации здесь
AMD Ryzen?
- Если ваш процессор AMD Ryzen, вам может потребоваться включить функцию «Windows Hypervisor Platform» так же, как вы отключили Hyper-V выше.
- Если он включен и все еще не работает, попробуйте отключить его. ¯_ (ツ) _/¯
- Требуется перезагрузка
- Попробуйте отключить антивирус.
- AVAST! и некоторые другие препятствуют обнаружению виртуализации. Вы можете включить их после.
- AVAST и некоторые другие также имеют некоторые опции, которые используют изоляцию на основе виртуализации. Либо отключите их, либо временно удалите AV.
Отключить изоляцию сердечника
- Чистая установка Windows 10 1803 включает Core Isolation по умолчанию, которая запускает безопасные процессы внутри виртуального контейнера для обеспечения безопасности. Это мешает обнаружению виртуализации.
- Машины, обновленные с более ранней версии, отключены, но все равно проверьте.
- Перейти в Центр безопасности Windows Defender
- Безопасность устройств> Изоляция ядра> подробнее
- Отключить целостность памяти
- перезагружать
Отключить запуск гипервизора при загрузке
- в командной строке администратора, запустите bcdedit/set hypervisorlaunchtype off
- перезагружать
- отменить запуск bcdedit/set hypervisorlaunchtype auto и перезагрузить
Ничего не работает
- Вы не должны здесь попасть, так как эмулятор Android теперь может работать вместе с Hyper-V, если вы используете «Windows Hypervisor Platform».
- Если ничего более не работает, в крайнем случае вы можете попробовать запустить Android в виртуальной машине Hyper-V и подключить ADB к нему. (Не решение, но обходное решение)
- Вы также можете запустить андроид, используя сторонний эмулятор, такой как Genimotion.
- Отладка на физическом устройстве
Edits/Новые исправления приветствуются.
надеюсь это поможет
Ответ 11
После установки Visual Studio 2013 Update 2 Visual Studio уведомила меня об обновлении эмулятора Windows Phone, который я установил (это был действительно новый компонент, а не обновление). Оказалось, что это позволило Hyper-V, который сломал HAXM.
Решение заключалось в том, чтобы удалить эмулятор из «Программы и компоненты» и отключить Hyper-V из Windows Features (поиск «Возможности Windows» и нажать «Включить или отключить функции Windows» ).
Ответ 12
Если вы не найдете опцию Hyper-V на панели управления, как сказано в других ответах здесь, попробуйте ввести настройку BIOS (перезапуск и нажатие F- 12 или ESC или другое в зависимости от вашего ПК) и включение виртуализации, вероятно, в настройках CPU.
Ответ 13
Если на вашем компьютере установлен процессор AMD Ryzen, вам необходимо выполнить следующие требования к настройке:
- Процессор AMD — Рекомендовано: процессоры AMD® Ryzen ™
- Android Studio 3.2 Beta или выше — загрузите через страницу предварительного просмотра Android Studio
- Эмулятор Android v27.3. 8+ — скачать через Android Studio SDK Manager
- x86 Android Virtual Device (AVD) — создание AVD
- Windows 10 с обновлением апреля 2018
- Включить через функции Windows: «Платформа Windows Hypervisor»
Примечание: есть функции Hyper-V. Вы должны включить платформу Windows Hypervisor, а не Hyper-V. Платформа гипервизора Windows находится внизу
После выполнения условий avd x86 работает без установки haxm
Источник
У меня проблема с моей установкой HAXM. Вот в чем дело. Я получил эту ошибку каждый раз, когда я пытался установить HAXM для моего компьютера:
проблема в том, что мой компьютер поддерживает технологию виртуализации (см. рис ниже). Есть идеи, как исправить эту проблему?
6141
11
11 ответов:
просто выполните следующие действия:
- на Панель управления → программа и функция.
- нажать на кнопку включение и выключение функций окна. Откроется окно.
- убрать Hyper-V опция и перезагрузите систему.
теперь вы можете начать установку HAXM без каких-либо ошибок.
извините, я забыл ответить на этот вопрос. После нескольких дней поиска в Интернете я обнаружил, что эта проблема была вызвана гиперпоточностью (или hyper — v). Я решил отредактировать свой ботинок.ini-файл с возможностью запуска Windows с HyperThreading отключен.
Я последовал в этом уроке и теперь все работает замечательно
скорее всего, у вас установлена windows 8 с hyper-v? если да, удалите hyper-v, и ваша проблема исчезнет!
прежде всего убедитесь, что вы Включили технологию виртуализации в вашем BIOS. После перезагрузки компьютера нажмите F1-F12 на клавиатуре и найдите эту опцию.
убедитесь, что вы отключили Hyper-V в Windows 7/Windows 8. Вы можете отключить его в Панели управления -> Программы -> функции Windows
вы можете попробовать отключить антивирусную программу на весь процесс установки. Не забудьте восстановить все антивирусы услуги после установки HAXM.
некоторые люди рекомендуют «холодная» загрузка что:
- отключение виртуализации в BIOS
- перезагрузите компьютер и выключите его
- включить VT в вашем BIOS
- перезагрузите компьютер, выключите его
- вполне вероятно, что теперь может быть разрешено установить HAXM
к сожалению, этот шаг не работает для я
- и последнее, но не менее важное: попробуйте этот обходной патч, выпущенный Intel.
http://software.intel.com/en-us/blogs/2013/04/25/workaround-patch-for-haxm-installation-error-failed-to-configure-driver-unknown
все, что вам нужно сделать, это загрузить пакет, распаковать его, положить его вместе с файлом HAXM installator и запустить .cmd файл входит в пакет — помните, запустите его от имени администратора.
у меня было много из проблем с установкой HAXM и только последний шаг помог мне.
возможно, VT-X не включен в вашем BIOS.
смотрите документацию Intel HAXM здесь: http://software.intel.com/en-us/articles/installation-instructions-for-intel-hardware-accelerated-execution-manager-windows
Intel VT-x не включен
в некоторых случаях Intel VT-x может быть отключен в BIOS системы и должен
быть включен в программу настройки BIOS. Чтобы получить доступ к настройке BIOS
утилита, ключ должен быть нажал во время загрузки компьютера.
Этот ключ зависит от того, какой BIOS используется, но обычно это
F2, удалить или клавиша Esc. В утилите настройки BIOS Intel VT может быть
обозначается терминами «VT», «технология виртуализации» или » VT-d.»
Обязательно включите все функции виртуализации.
антивирусное программное обеспечение может помешать установке HAXM.
После попытки выяснить , что пошло не так в течение нескольких часов, я нашел странное решение — удаление моего антивирусного программного обеспечения, установка HAXM (который работал), а затем переустановка антивирусного программного обеспечения (Avast в моем случае, но это может произойти и с другими антивирусными программами.полная проверка, которую я прошел, чтобы получить этот запуск:
- Проверьте функцию «виртуализация» и vt-X биография.
- проверка Hyper-V не установлена.
- проверка погоды vt-X включена в windows с помощью инструмента Intel и инструмента MS (упомянутого в предыдущих сообщениях в этой теме).
- Отключение антивируса, который не помог.
- удаление антивируса (что решило проблему для меня).
во многих случаях некоторые антивирусы также запускают HyperV с запуском окна и не позволяют устанавливать HAXM.
Я столкнулся с этой проблемой из — за Avast antivirus.
Поэтому я удалил AVAST, а затем HAXM правильно установлен после перезагрузки.
Затем я переустановил AVAST.Так что его просто проверить при установке, как сейчас даже с AVAST установлен обратно, HAXM работает правильно с виртуальной коробки и android эмуляторов.
в окне» включение и выключение компонентов Windows » снимите флажок Hyper-V, а также убедитесь, что платформа гипервизора Windows не отмечена. Включенная платформа гипервизора Windows также может блокировать установку Intel HaxM
в Windows 10 Защитник Windows имеет функцию изоляции ядра, которая использует технологию виртуализации, которая также будет вмешиваться в работу HAXM. Отключите его и повторите попытку. В моем случае отключение его решило мою проблему.
после установки Visual Studio 2013 Update 2 Visual Studio уведомила меня об обновлении эмулятора Windows Phone, которое я установил (это был действительно новый компонент, а не обновление). Оказалось, что это позволило Hyper-V, который сломал HAXM.
решение состояло в том, чтобы удалить эмулятор из программ и компонентов и отключить Hyper-V от функций Windows (поиск «функции Windows» и нажмите «Включить или выключить функции Windows»).
Если вы не найдете опцию Hyper-V в панели управления, как сказано в другом ответ, попробуйте войти в BIOS setup (перезагрузка и нажатие F-12 или ESC или других в зависимости от вашего ПК) и включить виртуализацию, расположенную, вероятно, в параметрах процессора.
HAXM Installation Failed is a very common error that occurs when installing Android Studio. This guide explains what is Intel HAXM and how to install Intel HAXM. We will also look at various issues that may result in HAXM installation failed error and how to solve them.
Table of Contents
- What is Intel HAXM
- Why HAXM Installation Fails
- Android emulator is already running
- The processor is not Intel-based
- OS Not supported
- Disable the Hyper-V Manager
- Hyper-V might not be disabled
- Virtualization is disabled in Bios
- PC Does not support Virtualisation
- Antivirus interferes with HAXM Installation
- How to Install HAXM
- Installing from Android SDK Manager
- Direct Download & Install
- Check if Intel HAXM Can be installed
- Check if HAXM is installed
- Reference
- Summary
What is Intel HAXM
The HAXM stands for Hardware Accelerated Execution Manager. It is a cross-platform hardware-assisted virtualization engine (hypervisor), The Android Emulator use HAXM in intel platforms to speedup & improve performance
Why HAXM Installation Fails
The Android Studio Installs Intel HAXM when you install Android Studio. But you may get the HAXM Installation Failed message because of the following reasons
- Android emulator is already running
- The processor is not Intel-based
- Unsupported OS
- Hyper-V Manager must be disabled
- Virtualization must be enabled in Bios ( VT-x )
- The PC must support Virtualisation
- Antivirus (Avast) may interfere with HAXM Installation

Android emulator is already running
You should stop the Android emulator, if it is already running.
You can stop it from the AVD Manager. On the action, column click down-arrow on the right and click Stop. This stops the emulator.
Or you can restart the computer.
The processor is not Intel-based
Intel HAXM cannot be used on systems without an Intel processor. Even if the processor is Intel, it still needs to have the support VT-x, EM64T, and Execute Disable Bit
For AMD Based PC, you can use the Hyper-V to run the Android Emulator
OS Not supported
- Supported Windows OS is 7, 8, 8.1 & 10.
- Supported macOS is 10.12, 10.13 & 10.14
- Only 64 bit OS is supported.
Disable the Hyper-V Manager
Hyper-V is another Virtualisation technique just like Intel HAXM. You cannot use both at the same time. Hence, It is necessary to Disable Hyper-V. You can follow these steps to disable Hyper-V
- Go to Control Panel -> Programs and Features -> Turn Windows features on or off
- From the window disable Hyper-V options
- Reboot your machine
Hyper-V might not be disabled
If you have windows 10 features such as Device Guard and Credential Guard is enabled, it can prevent Hyper-V from being completely disabled.
The Device Guard and Credential Guard hardware readiness tool released by Microsoft can disable the said Windows 10 features along with Hyper-V:
- Download the latest version of the Device Guard and Credential Guard hardware readiness tool.
- Unzip
- Open the Command Prompt using Run as administrator
- Run the following command
@powershell -ExecutionPolicy RemoteSigned -Command "X:pathtodgreadiness_v3.6DG_Readiness_Tool_v3.6.ps1 -Disable"- Reboot.
Virtualization is disabled in Bios
If virtualization is disabled in the BIOS, you need to enable it.
Turn off the PC and then turn it On. Press either F2, DEL, F10 ( The key may differ in your PC) key to enter the BIOS at the startup. You will likely to see a message at the startup regarding the key to press to enter the BIOS
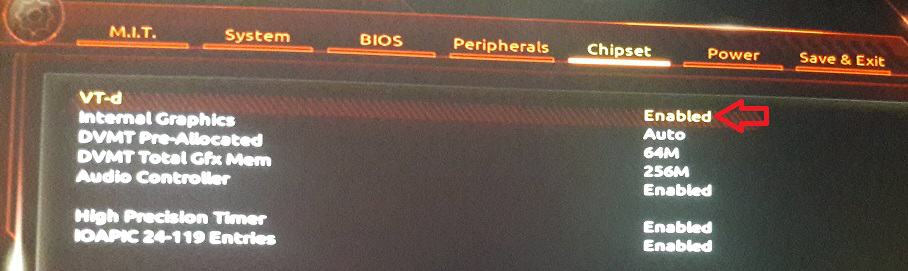
You may see the Virtualisation under any of the following menus.
- Chipset
- Northbridge
- Advanced Chipset Control
- Advanced CPU Configuration
The feature may go by the name
- VT-x
- VT-d (as in the above image)
- Intel Virtualization Technology
- Intel VT
- Virtualization Extensions
- Vanderpool
PC Does not support Virtualisation
Your CPU may not support Virtualisation. You can refer to Does My Processor Support Intel® Virtualization Technology? article to check if your PC Supports Virtualisation
Antivirus interferes with HAXM Installation
The Avast Antivirus interferes with the HAXM installation. It may also slow down the Android Emulator. The workaround is goto Avast Settings > Troubleshooting and uncheck “Use nested virtualization where available” option
How to Install HAXM
There are two ways in which you can install Intel HAXM.
- Using the Android SDK Manager
- Direct Download & Install
Installing from Android SDK Manager
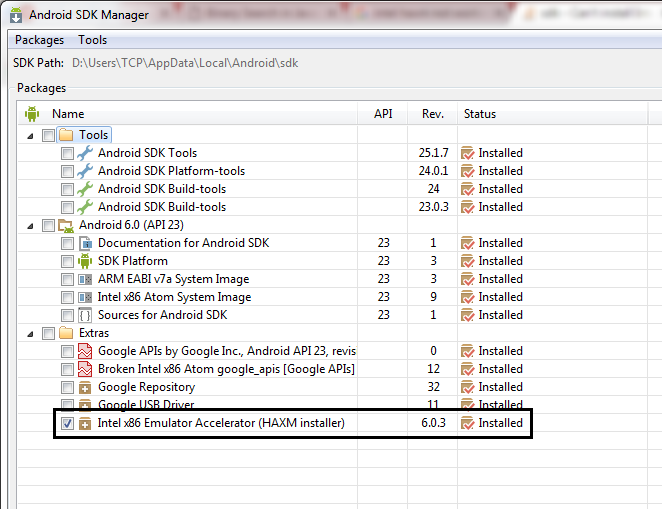
Go to Android SDK Manager (Tools -> SDK Manager) and select SDK Tools. You will find the Intel x86 Emulator Accelerator HAXM installer listed here. Select it and click on OK.
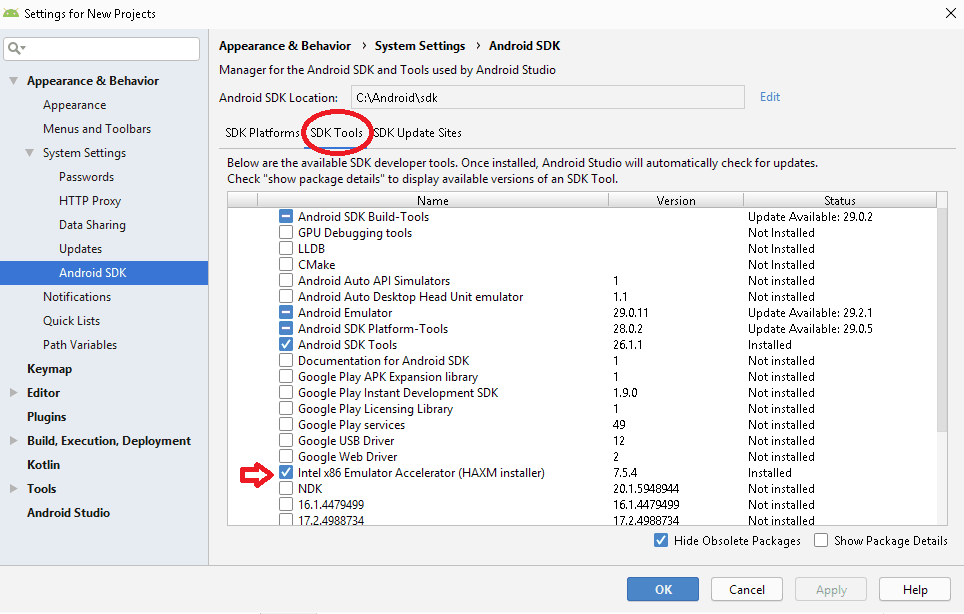
The clicking OK button does not install the HAXM Always. But it will copy the downloaded files to the under the SDK Location/sdk/extras/intel/Hardware_Accelerated_Execution_Manager/
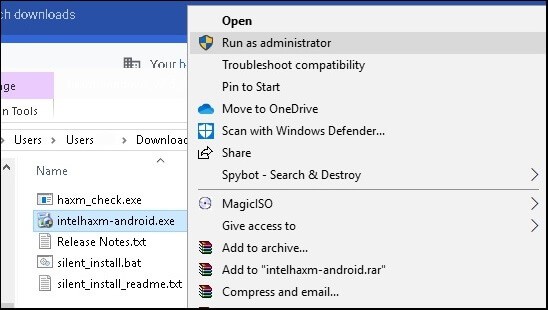
You can then click on the intelhaxm-android.exe to install as shown below
Direct Download & Install
You can directly download the Installer from the link HAXM Releases
Once you unzip the file, you will find the intelhaxm-android.exe
Welcome to the Intel HAXM setup wizard
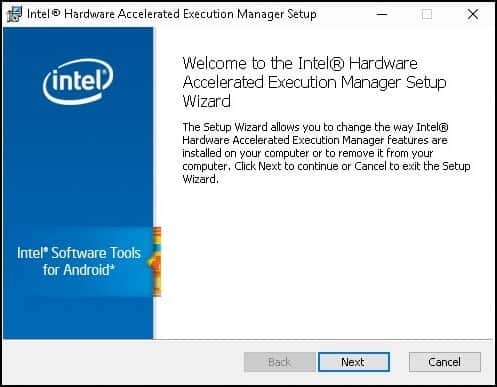
Click on Next to complete the installation.
Check if Intel HAXM Can be installed
Use the haxm_check.exe to check if VT is supported in your PC

Check if HAXM is installed
Finally, you need to check if HAXM is installed and running. You can do it from the command prompt by using the command

Reference
- HAXM
- Direct Download Link of HAXM
- Does My Processor Support Intel® Virtualization Technology?
- Device Guard and Credential Guard hardware readiness tool
- Android Emulator – AMD Processor & Hyper-V Support
- What is HyperVisor
- EM64T
- Execute Disable Bit
- VT-x
Summary
Installing Intel HAXM is a must if you want to run Android Emulator in Windows PC. Without which the Android Emulator will run very slowly. It is installed, when Android Studio is installed, but you get the HAXM Installation Failed error message. The most common error is due to the fact that Virtualisation is not enabled on your PC. Or because HyperVisor is running or the processor is not intel based. We learned how to solve all these issues in this guide

Hi Guys, In this article, we are going to learn about How to solved the HAXM device not found. This is the most common error faced by Android developers. Because of this error, we can’t run Android Virtual Device (AVD). Intel HAXM is mandatory to run Android emulators. so I have to face this error every time when I install Android studio newly on my Laptop.
I Search for some solutions and tried but AVD showing the same error. after trying some of the solutions finally I was able to solve this error in my Window Laptop. So I decided to share this error solution so that it can help others. so let’s start with solutions for how to solved Intel HAXM device not found.
Before going to start check this post How to Install Android Studio and Environment Setup
1. Check HAXM installed on your machine
Check if Intel HAXM Not installed Properly
First, check if Intel HAXM is installed on your system or not. to check this goto Android SDK manager from the Android SDK directory or from Android studio. check if Intel x86 Emulator Accelerator(HAXM installer) is installed or not. if not installed then install it.

If it is already installed then uninstall and reinstall again. If you facing any error while installing then you can download manually using this link.
If you are still getting the following error
Failed to configure driver: unknown error. Failed to open the driver. then you will get the solution at this link.
2. Check Intel Virtualization technology
Check Intel Virtualization technology is enabled or not
Virtualization is disabled then AVD gives an error HAXM device not found. to check this you need to restart your computer and go to BIOS settings and Enabled Intel Virtualization.
Note: Your machine is not supported with Virtualization technology then use the following solutions:
- You can use third-party emulators like Bluestacks, Genymotion, Nox Player, etc.
- Use real device
After trying many solutions error is not gone. so I tried the following solution and it works
3. Install intelhaxm-android
I have already install intelhaxm but it still shows the same error so I install it from the Android SDK directory. here’s the path AndroidSDK/extras/intel/intelhaxm-android.exe. I run this Application and finish the installation. restart Android studio and it works.
If still, you are still facing any issues then let me know in the comment below. I will help you solved it again.
Hope you like this article about How to solved Intel HAXM device not found.
Thank you 🙂
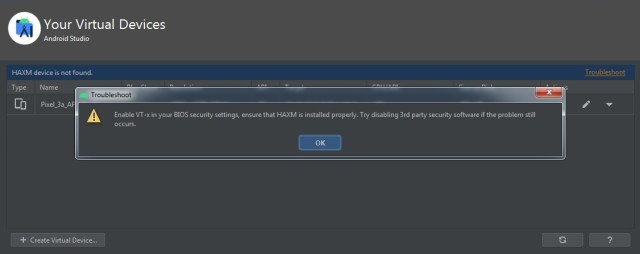
![]()
I continually get an error when trying to install haxm that says:
«This computer does not support Intel Virtualization Technology (VT-x) or it is being exclusively used by Hyper-V.»
When I run «emulator-check.exe accel hyper-v» in a command prompt I get the following:
accel:
0
HAXM is not installed, but Windows Hypervisor Platform is available.
accel
hyper-v:
2
Hyper-V is enabled
Hyper-V
However, Windows shows that it is not enabled:
I’ve even made sure the services were not running and they aren’t.
I’ve double, no triple, checked that virturalization is enabled in the BIOS — it is. I’ve not only restarted but cut power to the machine for a bit too.
I’m running a Lenovo Yoga X1. The processor is an Intel Core i7 6600U.
I’m running it on Windows 10 Enterprise version 1803, build 17134.228. x64
This is happening with version 7.3 of haxm.
I’m seriously at a loss as to what to do in order to install haxm. All the forums say to do the same thing which I’ve already done to no avail. Is it that the check incorrectly detects Hyper-V being enabled? Do I need to uninstall a specific KB?
![]()
Thanks for the detailed description of the issue. It’s similar to one I resolved before: https://issuetracker.google.com/issues/110260335#comment6
The gist of that post is:
Basically, Hyper-V could still be running despite what Turn Windows features on and off reports. To completely turn it off, you will need to disable a Windows Defender feature called HVCI through Windows Defender settings > Device security > Core isolation details > Memory integrity > Off (see attached screenshot). A reboot is required for this change to take effect.

xulilu, awaisharoon, tammaroivan, caferakman, robert-hoff, ManjunathBE, radarsu, mantleCurve, yogeshpaul, himanshuxd, and 17 more reacted with thumbs down emoji
yevmel, BD33, goxr3plus, sampalmer, Masoud-Sh, and jayveedee reacted with heart emoji
![]()
Thanks for the reply. I just checked that and it was already off. Unfortunately, I turned it on while thinking «I’ll just make sure it’s off by seeing if it turns on». (facepalm). Now I have to restart and turn it back off and restart again.  Could there be something else preventing it or causing it to think it’s on?
![]()
Sorry for the very late reply. This is one of the posts I missed during my time off…
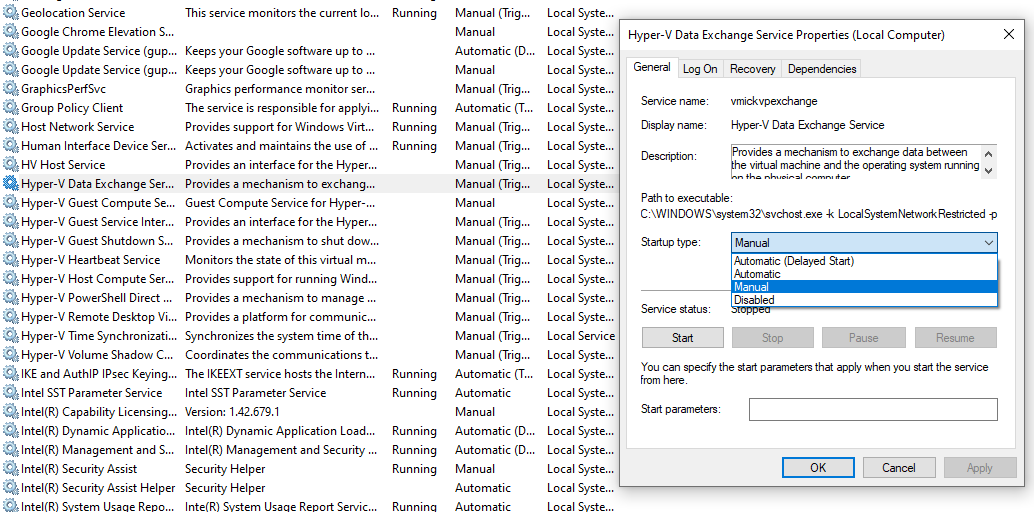
Besides HVCI, I’m not aware of anything else that can prevent Hyper-V from being turned off. One last try: there’s a CLI way to disable Hyper-V, and it may work more reliably than the GUI way (Windows Features dialog).
- Open an elevated (i.e. Run as administrator) Command Prompt.
bcdedit /set hypervisorlaunchtype off- Also make sure HVCI (Windows Defender’s memory integrity setting) is off.
- Reboot.
Albert221, Antimonit, and ashimk reacted with thumbs down emoji
arehman98 and Vicen-te reacted with hooray emoji
komapeb, SEHao, mustafakibar, ghostebony, louislam, hossimo, aetharr, AlvinStanescu, odabalon, DeanFaizal, and 20 more reacted with heart emoji
vitaliidasaev, MSabriDev, Willz01, AndreyIvanski, and arehman98 reacted with rocket emoji
![]()
mahsoommoosa42, gocodeblue, hwulfmeyer, MSabriDev, mesika, arehman98, and SotoiGhost reacted with heart emoji
![]()
![]()
@joshuamataaraya Your CPU definitely supports VT-x. Have you checked whether VT-x is enabled in your BIOS? If you launch the System Information tool from Start menu, it should report whether VT-x is enabled in BIOS:
Hyper-V - Virtualization Enabled in Firmware Yes
You can actually copy the entire System Summary and paste it here, because it also gives us details about your Windows installation. Of course, please feel free to redact irrelevant/personal information.
![]()
I’m also not been able to install HAXM.
You need to use Device Guard and Credential Guard hardware readiness tool as I wrote in previous post.
![]()
Thanks @raphaelning and @jkk88 I’ve used the Device Guard and Credential Guard hardware readiness tool and it’s working now
![]()
Great! Thanks @jkk88 for pointing us to the Device Guard readiness tool. I’m closing this issue now, but if @SqlBenjamin still can’t get Hyper-V completely turned off after using the new tool, we can reopen the issue.
![]()
Hyper-V isn’t showing up for me . I already enabled VT in bios and tried a bunch of things.
![]()
So do you mean you already tried Device Guard readiness tool, disable it?
![]()
What is your output of these command: `
bcdedit /v
sc query intelhaxm
powershell dgreadiness_v3.6DG_Readiness_Tool_v3.6.ps1 -Ready`
![]()
I did pretty much everything mentioned above. But I still get the same error. I am trying to download haxm for androidstudio. I cannot continue without intelhaxm. Things I’ve done are mentioned below.
This is processor specs.
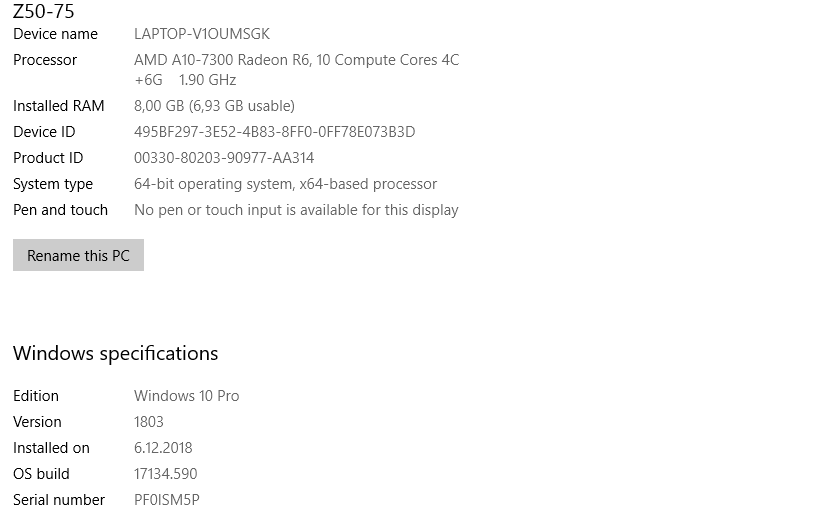
Hyper-v is already disabled from features and in command.

I’ve used the Device Guard and Credential Guard hardware readiness tool as well.

Virtualization is enabled when I check through task manager. But I cannot access enabling virtualization through BIOS setting because it does not show up.

Working for a solution for 5 days but still no progress. I disabled the antivirus program as well. I guess I do something wrong or missing sth important. Is there any other issues that can prevent downloading haxm ?
Helps are appreciated. Thanks.
![]()
I found some kind of trick that worked for me!
Hope it will help you solve your problems too.
At first I enabled Virtualization in the BIOS settings, but when I started Android emulation via Android Studio it failed to use hardware acceleration.
I followed the instructions here:
Open an elevated (i.e. Run as administrator) Command Prompt.
bcdedit /set hypervisorlaunchtype off
Also make sure HVCI (Windows Defender’s memory integrity setting) is off.
Reboot.
but it didn’t work.
Then I read the suggestion here:

and my tick has been disabled all the time.
I enabled it and restarted.
When Windows restarted i ran Android Studio again, just to check it was sending the same error on screen and I got struck seeing that, instead, it was working!!!
So, what worked for me was:
- Running the command in the Command Prompt as Administrator
- Enable virtualization in the BIOS
- Check the following ticks were off

- Enable this option here that was always disabled:

Don’t ask me why but now it works properly.
![]()
Also, I uninstalled intel HAXM in Android Studio in «tools>SDK manager>SDK tools>Intel x86 Emulator Accelerator.
If I try to reinstall it I get the same error as before, but at least now I can Virtualize Android…
![]()
![]()
![]()
My laptop runs on AMD and I have followed all instructions above and I am still unable to run the emulator. Please assist, thanks
![]()
![]()
Just came across this today. After 1903 update, Windows Sandbox has to be also turned off in Windows features. This fixed the problem for me.
![]()
@fakeinc also use Hyper-V platform instead
![]()
bcdedit /set hypervisorlaunchtype off this code worked.
![]()
![]()
A combination of bcdedit /set hypervisorlaunchtype off and disabling Windows Hypervisor Platform in Windows Features worked for me.

![]()
![]()
I had the same issue and guess what once I enabled Hyper-V the problem had been solved. And yes also the message was to disable this feature as recommendation
![]()
I also meet this problem and tried above solutions, but still can’t install.
Then I tried close WSL function and then install successfully.
![]()
For you guys who still have not found the solution to disabling Hyper-v in any of the methods above, I have found another solution.
I would advise people to first try the solutions above, but if you tried everything then do this.
Go to Task Manager, and click on the Services tab. Disable all of the Hyper-V services (Anything usually with «Hyper V» or «HV».
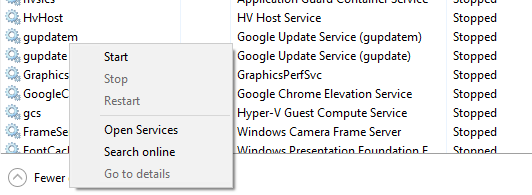
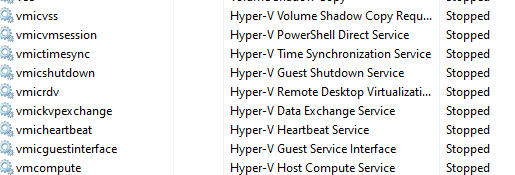

This just stops the processes and can only be brought back manually if triggered. You can fully disable the Hyper V services if you click on the Open Services tab on the bottom of the task manager.

Once you done that.
Try to restart your computer and see if it works. If it still hasn’t worked, then look in your services or processes to see if you missed any running services that are in the background.
![]()
Thanks for your reply. The complete solution had been provided in the section One-time setup of this manual. It is suggested to follow the steps to disable Hyper-V thoroughly.
![]()
I think there should be an official troubleshooting page that represents an organized checklist of things to do when facing this error.
I’m already spending this over an hour and that nasty error message is still on.
![]()
Finally. This solved my issue.
The problem was, in Windows Features you also have to switch off Windows Hypervisor Platform.
![]()
I
Sorry for the very late reply. This is one of the posts I missed during my time off…
Besides HVCI, I’m not aware of anything else that can prevent Hyper-V from being turned off. One last try: there’s a CLI way to disable Hyper-V, and it may work more reliably than the GUI way (Windows Features dialog).
- Open an elevated (i.e. Run as administrator) Command Prompt.
bcdedit /set hypervisorlaunchtype off- Also make sure HVCI (Windows Defender’s memory integrity setting) is off.
- Reboot.
thanks that did the trick for me
![]()
Thanks for your reply. Glad to know you have resolved your issue.
![]()
Sorry for the very late reply. This is one of the posts I missed during my time off…
Besides HVCI, I’m not aware of anything else that can prevent Hyper-V from being turned off. One last try: there’s a CLI way to disable Hyper-V, and it may work more reliably than the GUI way (Windows Features dialog).
- Open an elevated (i.e. Run as administrator) Command Prompt.
bcdedit /set hypervisorlaunchtype off- Also make sure HVCI (Windows Defender’s memory integrity setting) is off.
- Reboot.
Wow really thanks this trick worked for me too 😃
![]()
- CPU: Intel i7-7700K
- BIOS: Virtualization enabled, did previously run docker with Hyper-V just fine
- Hyper-V: Disabled
- Windows Hypervisor Platform: Disabled
- HVCI (Windows Defender’s Memory Integrity): Disabled
- Reboot


Still getting the the following log with errors when trying to install HAXM
Preparing "Install Intel x86 Emulator Accelerator (HAXM installer) (revision: 7.5.6)".
Downloading https://dl.google.com/android/repository/extras/intel/haxm-windows_v7_5_6.zip
"Install Intel x86 Emulator Accelerator (HAXM installer) (revision: 7.5.6)" ready.
Installing Intel x86 Emulator Accelerator (HAXM installer) in C:UsersfurieAppDataLocalAndroidSdkextrasintelHardware_Accelerated_Execution_Manager
"Install Intel x86 Emulator Accelerator (HAXM installer) (revision: 7.5.6)" complete.
"Install Intel x86 Emulator Accelerator (HAXM installer) (revision: 7.5.6)" finished.
Parsing C:UsersfurieAppDataLocalAndroidSdkbuild-tools30.0.0-rc1package.xml
Parsing C:UsersfurieAppDataLocalAndroidSdkcmdline-toolslatestpackage.xml
Parsing C:UsersfurieAppDataLocalAndroidSdkemulatorpackage.xml
Parsing C:UsersfurieAppDataLocalAndroidSdkextrasintelHardware_Accelerated_Execution_Managerpackage.xml
Parsing C:UsersfurieAppDataLocalAndroidSdkpatcherv4package.xml
Parsing C:UsersfurieAppDataLocalAndroidSdkplatform-toolspackage.xml
Parsing C:UsersfurieAppDataLocalAndroidSdkplatformsandroid-28package.xml
Parsing C:UsersfurieAppDataLocalAndroidSdkplatformsandroid-29package.xml
Parsing C:UsersfurieAppDataLocalAndroidSdksourcesandroid-28package.xml
Parsing C:UsersfurieAppDataLocalAndroidSdksourcesandroid-29package.xml
Parsing C:UsersfurieAppDataLocalAndroidSdktoolspackage.xml
Android SDK is up to date.
Running Intel® HAXM installer
Failed to install Intel HAXM. For details, please check the installation log: "C:UsersfurieAppDataLocalTemphaxm_log11.txt"
HAXM installation failed. To install HAXM follow the instructions found at: https://software.intel.com/android/articles/installation-instructions-for-intel-hardware-accelerated-execution-manager-windows
Installer log is located at C:UsersfurieAppDataLocalTemphaxm_log11.txt
Installer log contents:
=== Logging started: 17.03.2020 12:19:05 ===
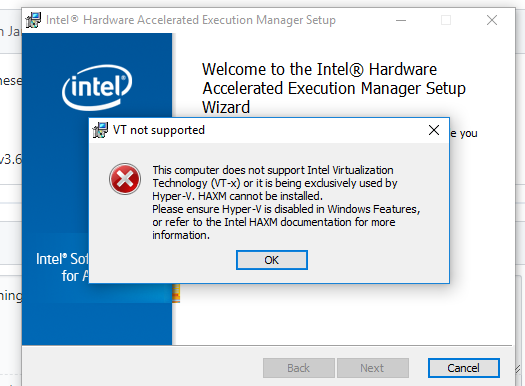
This computer does not support Intel Virtualization Technology (VT-x) or it is being exclusively used by Hyper-V. HAXM cannot be installed.
Please ensure Hyper-V is disabled in Windows Features, or refer to the Intel HAXM documentation for more information.
=== Logging stopped: 17.03.2020 12:19:05 ===
Done
![]()
I found another way to solve this issue. Disable virtualization from BIOS and reboot. Install HAXM independantly, it will give warning that Virtualization is disabled, and the installer will roll back the installation. Go to BIOS and again enable Virtualization, and then reboot and install HAXM. It’s done!
![]()
I have to use this command when I bring up Mac
bcdedit /set hypervisorlaunchtype off
But mobile simulator must be ordered
bcdedit /set hypervisorlaunchtype auto
What exactly should be done to run both at the same time?
![]()
If people are still experiencing this after trying the above hit & miss solutions, this issue should be reopened.
![]()
Also disable Windows Sandbox, I have an off topic question — will HAXM improve Gameloop (Android emulator, probably customized for gaming)?
![]()
@joshuamataaraya Your CPU definitely supports VT-x. Have you checked whether VT-x is enabled in your BIOS? If you launch the System Information tool from Start menu, it should report whether VT-x is enabled in BIOS:
Hyper-V - Virtualization Enabled in Firmware YesYou can actually copy the entire System Summary and paste it here, because it also gives us details about your Windows installation. Of course, please feel free to redact irrelevant/personal information.
Finally! This command and reboot did the job. This AVD tool is pretty terrible for compatibility.
![]()
For me I had to uncheck Windows Hypervisor Plateform as well:

![]()
For you guys who still have not found the solution to disabling Hyper-v in any of the methods above, I have found another solution.
I would advise people to first try the solutions above, but if you tried everything then do this.
Go to Task Manager, and click on the Services tab. Disable all of the Hyper-V services (Anything usually with «Hyper V» or «HV».
This just stops the processes and can only be brought back manually if triggered. You can fully disable the Hyper V services if you click on the Open Services tab on the bottom of the task manager.
Once you done that.
Try to restart your computer and see if it works. If it still hasn’t worked, then look in your services or processes to see if you missed any running services that are in the background.
Had the same issues, tried all solutions here.
Disabling all the Hyper-V services and rebooting worked for me! 🙏🏽
![]()
Update: I tracked the issue down to having the "Isolated Browsing" setting enabled in Windows Security. It uses Application Guard which uses Hyper-V under the hood (even tough Hyper-V is disabled in windows features.
So, if you still have this issue be sure to check that "Windows Defender Application Guard", "Hyper-V" and "Windows Hypervisor Platform" are all disabled in the Windows Features window.
![]()
mirh
mentioned this issue
Apr 29, 2021
![]()
I found some kind of trick that worked for me! Hope it will help you solve your problems too. At first I enabled Virtualization in the BIOS settings, but when I started Android emulation via Android Studio it failed to use hardware acceleration. I followed the instructions here:
Open an elevated (i.e. Run as administrator) Command Prompt.
bcdedit /set hypervisorlaunchtype off
Also make sure HVCI (Windows Defender’s memory integrity setting) is off.
Reboot.
but it didn’t work.Then I read the suggestion here:
I enabled it and restarted. When Windows restarted i ran Android Studio again, just to check it was sending the same error on screen and I got struck seeing that, instead, it was working!!!
So, what worked for me was:
- Running the command in the Command Prompt as Administrator
- Enable virtualization in the BIOS
- Check the following ticks were off
- Enable this option here that was always disabled:
Don’t ask me why but now it works properly.
You Are Amazing it worked for me ! lol dont know why but I’ve been trying for 3 hours and this worked heheh.
![]()
Sorry for the very late reply. This is one of the posts I missed during my time off…
Besides HVCI, I’m not aware of anything else that can prevent Hyper-V from being turned off. One last try: there’s a CLI way to disable Hyper-V, and it may work more reliably than the GUI way (Windows Features dialog).
- Open an elevated (i.e. Run as administrator) Command Prompt.
bcdedit /set hypervisorlaunchtype off- Also make sure HVCI (Windows Defender’s memory integrity setting) is off.
- Reboot.
You beauty man , this worked instantly very well .. i have been looking for this solution for couple of days Thanks alot <3
![]()
weird issues…this should be fixed by google
![]()
Encountered this issue and wasted 30 minutes on it.
The installer should mention HVCI needs to be disabled.
7.8.0 working on Windows 11 with Kaby Lake R.
Here you will get all possible reasons and solution for intel haxm error in android studio.
It is the most common problem faced by android developers. We can’t run Android Virtual Device (AVD) without intel haxm. As I am also an android developer so I face this problem each time I install a new copy of android studio in my laptop. I decided to share the solution for this problem so that it can help other developers.
Also Read: Installing Android Studio and Environment Setup
Below are some possible reasons and solution for intel haxm error. Try all of them one by one, may be any of them will work for you.
Intel HAXM Not Installed Properly
First of all check intel haxm is installed on your system or not. For this open android sdk manager and check it is installed or not.
In case it is installed then maybe there was some error while its installation that’s why it is not working properly.
Just uninstall intel haxm from control panel and download it separately from below link and then install. Make sure to restart your system.
Download: https://software.intel.com/en-us/android/articles/intel-hardware-accelerated-execution-manager
If you are getting error like this “Failed to configure driver: unknown error. Failed to open driver” while installing haxm then you can try this solution.
Virtualization is Not Enabled
In some cases intel haxm not work when virtualization technology is not enabled. You can just enable it by going to BIOS settings.
Virtualization is Not Supported
It may be possible that your pc or laptop doesn’t support virtualization technology. In this case you can try following two solutions.
- You can use third party android emulators like Genymotion, Bluestacks, Nox Player, etc to run and test your app.
- You can also use your real android device by connecting it to your system using USB cable. But make sure the USB Debugging option is enabled in your mobile device.
Use ARM Image
You can use ARM image instead of Intel image to make your AVD. Make sure following package is installed. You can install it by going to SDK manager.

Note: AVD made with ARM image works 10 times slower than made with Intel image. Use this option only when above solutions doesn’t work. That’s why I have given this solution at last. If you are using ARM image AVD then make sure your system have at least 8 GB ram and good processor as it will run really slow.
I am sure at least one solution will work for you. Let me know which solution worked for you. If still you are facing any problem then comment below, I will try to solve it.
Happy Coding!! 🙂 🙂
У меня проблема с установкой HAXM. Вот что. Я получил эту ошибку каждый раз, когда пытался установить HAXM для своего компьютера:
Проблема в том, что мой компьютер поддерживает технологию виртуализации (см. рис. ниже). Любая идея, как решить эту проблему?
Ответ 1
Просто выполните следующие действия:
- Перейдите в Панель управления → Программа и функция.
- Включение и выключение функций Turn Window. Откроется окно.
- Снимите флажок Hyper-V и перезагрузите систему.
Теперь вы можете запустить установку HAXM без каких-либо ошибок.
Ответ 2
Извините, я забыл ответить на этот вопрос. После нескольких дней поиска в Google, эта проблема была вызвана гиперпотоком (или гипер — v). Я решил отредактировать файл boot.ini с возможностью запуска окон с отключением гиперпотока.
Я следил за этот учебник, и теперь все работает отлично
Ответ 3
Скорее всего, у вас установлены окна 8 с установленным гипер-v? если да, удалите гипер-v, и ваша проблема исчезнет!
Ответ 4
-
Прежде всего убедитесь, что вы включили технологию виртуализации в своем BIOS. После перезагрузки компьютера нажмите F1-F12 на клавиатуре и найдите эту опцию.
-
Убедитесь, что вы отключили Hyper-V в Windows 7/Windows 8. Вы можете отключить его в панели управления → Программы → функции Windows
-
Вы можете отключить антивирусную программу для всего процесса установки. Не забудьте восстановить все антивирусные службы после установки HAXM.
-
Некоторые люди рекомендуют холодную загрузку, которая:
- Отключение виртуализации в вашем BIOS
- Перезагрузите компьютер и выключите его.
- Включить VT в BIOS
- Перезагрузите компьютер, выключите его
- Вероятно, теперь может быть разрешено устанавливать HAXM
К сожалению, этот шаг не сработал у меня
- И последнее, но не менее важное: попробуйте этот патч исправления, выпущенный Intel.
http://software.intel.com/en-us/blogs/2013/04/25/workaround-patch-for-haxm-installation-error-failed-to-configure-driver-unknown
Все, что вам нужно сделать, это загрузить пакет, распаковать его, поместить вместе с файлом установки HAXM и запустить .cmd файл, включенный в пакет, — запомните, запустите его как администратор.
У меня было много проблем с установкой HAXM, и мне помог только последний шаг.
Ответ 5
Возможно, VT-X не включен в вашем BIOS.
См. документацию Intel HAXM здесь: http://software.intel.com/en-us/articles/installation-instructions-for-intel-hardware-accelerated-execution-manager-windows
Intel VT-x не включен
В некоторых случаях Intel VT-x может быть отключен в BIOS системы и должен быть включенным в утилите настройки BIOS. Для доступа к настройке BIOS Утилита, ключ должен быть нажат во время загрузки компьютера. Этот ключ зависит от того, какой BIOS используется, но обычно это F2, Delete или Esc. В утилите настройки BIOS Intel VT может быть определенных терминами «VT», «Технология виртуализации» или «VT-d». Обязательно включите все функции виртуализации.
Ответ 6
Антивирусное ПО может помешать установке HAXM.
Попытавшись выяснить, что пошло не так в течение нескольких часов, я нашел странное решение — удаление моего антивирусного программного обеспечения, установку HAXM (который работал), а затем повторная установка антивирусного программного обеспечения (Avast в моем случае, но это может произойти с другими антивирусными программами.
Полная проверка, которую я провела, чтобы запустить эту операцию:
- Проверьте функцию «Виртуализация» и vt-X в BIOS.
- Проверка Hyper-V не установлена.
- Проверка погоды vt-X включена в окнах с помощью инструмента Intel и инструмента MS (упоминается в предыдущих сообщениях в этом потоке).
- Отключение антивируса, который не помог.
- Удаление антивируса (который решил проблему для меня).
Ответ 7
В окне «Включение или выключение Windows-функций» снимите флажок Hyper-V, а также убедитесь, что платформа Windows Hypervisor не установлена. Платформа Windows Hypervisor включена также может блокировать установку Intel HaxM
Ответ 8
В Windows 10 защитник Windows имеет функцию изоляции ядра, которая использует технологию виртуализации, которая также будет прервать работу HAXM. Отключите его и повторите попытку. В моем случае его отключение решило мою проблему.
Ответ 9
Во многих случаях некоторые антивирусы также запускают HyperV с запуском окна и не позволяют устанавливать HAXM.
Я столкнулся с этой проблемой из-за антивируса AVAST.
Поэтому я удалил AVAST, после чего HAXM правильно установился после перезагрузки.
Затем я снова установил AVAST.
Итак, его просто проверка при установке, как сейчас, даже с установленным AVAST, HAXM корректно работает с виртуальными блоками и эмуляторами Android.
Ответ 10
Похоже, что список исправлений растет, даже через 3 года после первоначального вопроса.
Ниже приведен полный список для Windows (до 12/2018)
-
Проверить BIOS
- войдите в настройку BIOS/UEFI и посмотрите настройки, такие как VT-x, VT-d, технология виртуализации, виртуализация оборудования и убедитесь, что она включена. Если этого параметра нет, обратитесь к производителю и модели, чтобы убедиться, что он поддерживается.
-
Отключить Hyper-V
- Введите «окна» в меню «Пуск», выберите «Включить или отключить функции Windows».
- Отмените выбор всех параметров, связанных с Hyper-V, нажмите OK, перезагрузите.
- Это разрушит любые виртуальные машины Hyper-V, которые у вас есть, включая любые эмуляторы Windows Phone и все, что у вас есть, для чего требуется Hyper-V
- Требуется перезагрузка
- в командной строке администратора запустите
systemifo. Если он показывает, что «гипервизор обнаружен» в соответствии с требованиями Hyper-V, даже после удаления функции Hyper-V у вас может быть включен «Core Isolation». Ниже описано, как отключить его. - В качестве другого варианта попробуйте включить » Платформа Hypervisor для Windows «, если вы все еще нуждаетесь в поддержке Hyper-V. Больше информации здесь
-
AMD Ryzen?
- Если ваш процессор AMD Ryzen, вам может потребоваться включить функцию «Windows Hypervisor Platform» так же, как вы отключили Hyper-V выше.
- Если он включен и все еще не работает, попробуйте отключить его. ¯_ (ツ) _/¯
- Требуется перезагрузка
- Отключить антивирус
- Попробуйте отключить антивирус.
- AVAST! и некоторые другие препятствуют обнаружению виртуализации. Вы можете включить их после.
- AVAST и некоторые другие также имеют некоторые опции, которые используют изоляцию на основе виртуализации. Либо отключите их, либо временно удалите AV.
-
Отключить изоляцию сердечника
- Чистая установка Windows 10 1803 включает Core Isolation по умолчанию, которая запускает безопасные процессы внутри виртуального контейнера для обеспечения безопасности. Это мешает обнаружению виртуализации.
- Машины, обновленные с более ранней версии, отключены, но все равно проверьте.
- Перейти в Центр безопасности Windows Defender
- Безопасность устройств> Изоляция ядра> подробнее
- Отключить целостность памяти
- перезагружать
-
Отключить запуск гипервизора при загрузке
- в командной строке администратора, запустите
bcdedit/set hypervisorlaunchtype off - перезагружать
- отменить запуск
bcdedit/set hypervisorlaunchtype autoи перезагрузить
- в командной строке администратора, запустите
-
Ничего не работает
- Вы не должны здесь попасть, так как эмулятор Android теперь может работать вместе с Hyper-V, если вы используете «Windows Hypervisor Platform».
- Если ничего более не работает, в крайнем случае вы можете попробовать запустить Android в виртуальной машине Hyper-V и подключить ADB к нему. (Не решение, но обходное решение)
- Вы также можете запустить андроид, используя сторонний эмулятор, такой как Genimotion.
- ¯_ (ツ) _/¯
- Отладка на физическом устройстве
Edits/Новые исправления приветствуются.
надеюсь это поможет
Ответ 11
После установки Visual Studio 2013 Update 2 Visual Studio уведомила меня об обновлении эмулятора Windows Phone, который я установил (это был действительно новый компонент, а не обновление). Оказалось, что это позволило Hyper-V, который сломал HAXM.
Решение заключалось в том, чтобы удалить эмулятор из «Программы и компоненты» и отключить Hyper-V из Windows Features (поиск «Возможности Windows» и нажать «Включить или отключить функции Windows» ).
Ответ 12
Если вы не найдете опцию Hyper-V на панели управления, как сказано в других ответах здесь, попробуйте ввести настройку BIOS (перезапуск и нажатие F- 12 или ESC или другое в зависимости от вашего ПК) и включение виртуализации, вероятно, в настройках CPU.
Ответ 13
Если на вашем компьютере установлен процессор AMD Ryzen, вам необходимо выполнить следующие требования к настройке:
- Процессор AMD — Рекомендовано: процессоры AMD® Ryzen ™
- Android Studio 3.2 Beta или выше — загрузите через страницу предварительного просмотра Android Studio
- Эмулятор Android v27.3. 8+ — скачать через Android Studio SDK Manager
- x86 Android Virtual Device (AVD) — создание AVD
- Windows 10 с обновлением апреля 2018
- Включить через функции Windows: «Платформа Windows Hypervisor»
Примечание: есть функции Hyper-V… Вы должны включить платформу Windows Hypervisor, а не Hyper-V. Платформа гипервизора Windows находится внизу
После выполнения условий avd x86 работает без установки haxm
Ссылка