|
HTTPS Inspection log «Internal system error in HTTPS inspection due to categorization service error» in SmartConsole |
Technical Level
|
| Solution ID | sk176925 |
Technical Level  |
|
| Product | HTTPS Inspection, Anti-Bot, Anti-Virus, URL Filtering |
| Version | R80.40, R81, R81.10 |
| OS | Gaia |
| Date Created |
2021-12-13 17:49:12.0 |
| Last Modified | 2022-12-22 09:42:56.0 |
Symptoms
-
HTTPS Inspection log in SmartConsole shows:
- Action — Bypass
- HTTPS Validation — Internal system error in HTTPS inspection due to categorization service error
- Description — Bypassing request as configured in engine settings
-
The $FWDIR/log/rad_events/Errors/flow_* files on the Security Gateway contain this error:
[ERROR] handle: 0x… curl_easy_perform() failed: Timeout was reached
- Websites are not categorized correctly.
Cause
Timeout occurs because the values configured in the $FWDIR/conf/rad_conf.C file on the Security Gateway do not match the environment.
Solution
|
Note: To view this solution you need to Sign In |
Содержание
- Internal system error in https inspection due to categorization service timeout
- Are you a member of CheckMates?
- Internal system error in https inspection due to categorization service timeout
- Are you a member of CheckMates?
- Internal system error in https inspection due to categorization service timeout
- Are you a member of CheckMates?
- Internal system error in https inspection due to categorization service timeout
- Are you a member of CheckMates?
- Internal system error in https inspection due to categorization service timeout
- Are you a member of CheckMates?
Internal system error in https inspection due to categorization service timeout
Celebrate 2023 with CheckMates!
CPX 360 2023
The Industry’s Premier Cyber Security Summit and Expo
YOU DESERVE THE BEST SECURITY
Stay Up To Date
CheckMates Go:
Protect Yourself
- CheckMates
- :
- Products
- :
- Quantum
- :
- Management
- :
- CheckPoint Firewall R80.10 stability issues
- Subscribe to RSS Feed
- Mark Topic as New
- Mark Topic as Read
- Float this Topic for Current User
- Bookmark
- Subscribe
- Mute
- Printer Friendly Page
Are you a member of CheckMates?

- Mark as New
- Bookmark
- Subscribe
- Mute
- Subscribe to RSS Feed
- Permalink
- Report Inappropriate Content
I seek help with technical guidance for CheckPoint Firewall R80.10 stability issues. I have upgraded firewall to R80.10. The issues that I have experienced with this version are:
• Internal system error in HTTPS Inspection due to categorization service timeout. When this error occur, firewall will drop all traffic for couple of minutes to an hour.
• URL Filtering blade – Rad service not available. This error occurs most of the time when trying to make any configuration changes to the firewalls. It happens most of the time when I try to switch firewalls running in cluster mode from HA to load sharing
• Log unification error – too many update log, logs has been truncated
Источник
Internal system error in https inspection due to categorization service timeout
Celebrate 2023 with CheckMates!
CPX 360 2023
The Industry’s Premier Cyber Security Summit and Expo
YOU DESERVE THE BEST SECURITY
Stay Up To Date
CheckMates Go:
Protect Yourself
- CheckMates
- :
- Products
- :
- Quantum
- :
- Management
- :
- HTTPS Inspection Error — service Timeout
- Subscribe to RSS Feed
- Mark Topic as New
- Mark Topic as Read
- Float this Topic for Current User
- Bookmark
- Subscribe
- Mute
- Printer Friendly Page
Are you a member of CheckMates?

- Mark as New
- Bookmark
- Subscribe
- Mute
- Subscribe to RSS Feed
- Permalink
- Report Inappropriate Content
I have a cluster of 15400 devices running on R80.40 with the FWMGR at R81. Right now I am one patch behind on both, but they will be upgraded soon.
We have HTTPS inspection enabled and all traffic was going thru (we have fail open) but found out that all of our traffic was also getting an «Internal System Error» and was not actually being inspected. I have seen several posts on here about Error Code 2 and I see one or two of those, but that is not what we see. We are getting «Internal System Error in HTTPS Inspection due to categorization service timeout».
I am guessing this is a new issue since SK176925 which I followed to increase some of the values in the rad.conf.c file was dated 12/13/21.
I followed the instructions in the SK and see a dramatic drop in the errors but am still getting clumps of them. For example we went from all traffic getting the error to now a few times a day I see it with about 40 — 50 log entries in less than a minute. Then it goes back to inspecting for an hour or so before I see another clump.
I am curious as to other people see this type of activity in their logs? I am not sure if this is normal and we are fixed now or if it is still broken and our tweak helped but did not fix the situation.
Also, I created a monitoring job off our network which monitors Checkpoints CWS and Updates pages and frequently get notifications that the sites are not available. I haven’t seen a correlation between the times it is down and the clumps of errors we get, just throwing that out there for no good reason at all.
Источник
Internal system error in https inspection due to categorization service timeout
Celebrate 2023 with CheckMates!
CPX 360 2023
The Industry’s Premier Cyber Security Summit and Expo
YOU DESERVE THE BEST SECURITY
Stay Up To Date
CheckMates Go:
Protect Yourself
- CheckMates
- :
- Products
- :
- General Topics
- :
- messages log error for https inspection
- Subscribe to RSS Feed
- Mark Topic as New
- Mark Topic as Read
- Float this Topic for Current User
- Bookmark
- Subscribe
- Mute
- Printer Friendly Page
Are you a member of CheckMates?
- Mark as New
- Bookmark
- Subscribe
- Mute
- Subscribe to RSS Feed
- Permalink
- Report Inappropriate Content
Has anyone ever seen in their /var/log/messages file the following:
[ERROR]: nrb_rb_https_inspection_get_possible_blades: rulebase structure is corrupt (null)
I am seeing these at the kernel on different firewall workers, and will usually have a connection from an internal IP to an external IP on either port 80 or 443 associated with the line.
Wondering if anyone else has ran into this, and if there was a fix. This is in an R80.40 with JHFA 118.
- Mark as New
- Bookmark
- Subscribe
- Mute
- Subscribe to RSS Feed
- Permalink
- Report Inappropriate Content
I actually remember customer contacting me about this exact message and TAC said to install jumbo 120 and they went away after that. I never really got an explanation what those messages even mean, which would have been nice. O well
- Mark as New
- Bookmark
- Subscribe
- Mute
- Subscribe to RSS Feed
- Permalink
- Report Inappropriate Content
We’re on R80.40 T125 and seeing these messages. 120 has some CPU issues with processes spinning out of control so we went to 125.
- Mark as New
- Bookmark
- Subscribe
- Mute
- Subscribe to RSS Feed
- Permalink
- Report Inappropriate Content
Please take it with TAC.
- Mark as New
- Bookmark
- Subscribe
- Mute
- Subscribe to RSS Feed
- Permalink
- Report Inappropriate Content
Also seeing on T125. It is associated with connectivity issues. We also see a lot of logs with https action of «error» and users get «site not responding»
- Mark as New
- Bookmark
- Subscribe
- Mute
- Subscribe to RSS Feed
- Permalink
- Report Inappropriate Content
Hm. maybe my customer got lucky in their case, but I agree with you. It definitely appears it would be a bigger connectivity issue, for sure.
- Mark as New
- Bookmark
- Subscribe
- Mute
- Subscribe to RSS Feed
- Permalink
- Report Inappropriate Content
In our case, these errors were concurrent with smartlog message «Internal system error in HTTPS Inspection due to categorization service error». Sometimes it would be the exact same source & destinations, other times the timing would be the same down to the second, but the src/dest would be different. Sometimes I also had /var/log/messages entries about corrupt https inspection policy for DNS traffic from VPN users to internal DNS (?).
TAC was telling me the https inspection policy must be corrupt, even though we hadn’t changed anything and hey how can it be corrupt for one second every so many minutes, and not corrupt one second later, and how can setting categorization mode to background «uncorrupt» the https inspection policy?
Today I found new sk176925 about the related error which has cause: » Timeout occurs because the values configured in the $FWDIR/conf/rad_conf.C file on the Security Gateway do not match the environment.»
I found we are indeed seeing the timeout errors mentioned in that SK so I will try out the settings.
Since we made no changes when this started on December 1st, and the issue is intermittent from second to second even, I am reading «timeouts do not match the environment» to mean «Checkpoint’s categorization service is slow» and the solution will mask the fact that the service is slow, and if we put things back to «hold» mode then user experience will be however slow the categorization service is the first time someone in the org visits a particular website.
Источник
Internal system error in https inspection due to categorization service timeout
Celebrate 2023 with CheckMates!
CPX 360 2023
The Industry’s Premier Cyber Security Summit and Expo
YOU DESERVE THE BEST SECURITY
Stay Up To Date
CheckMates Go:
Protect Yourself
- CheckMates
- :
- Products
- :
- Quantum
- :
- Management
- :
- CheckPoint Firewall R80.10 stability issues
- Subscribe to RSS Feed
- Mark Topic as New
- Mark Topic as Read
- Float this Topic for Current User
- Bookmark
- Subscribe
- Mute
- Printer Friendly Page
Are you a member of CheckMates?
- Mark as New
- Bookmark
- Subscribe
- Mute
- Subscribe to RSS Feed
- Permalink
- Report Inappropriate Content
I seek help with technical guidance for CheckPoint Firewall R80.10 stability issues. I have upgraded firewall to R80.10. The issues that I have experienced with this version are:
• Internal system error in HTTPS Inspection due to categorization service timeout. When this error occur, firewall will drop all traffic for couple of minutes to an hour.
• URL Filtering blade – Rad service not available. This error occurs most of the time when trying to make any configuration changes to the firewalls. It happens most of the time when I try to switch firewalls running in cluster mode from HA to load sharing
• Log unification error – too many update log, logs has been truncated
Источник
Internal system error in https inspection due to categorization service timeout
Celebrate 2023 with CheckMates!
CPX 360 2023
The Industry’s Premier Cyber Security Summit and Expo
YOU DESERVE THE BEST SECURITY
Stay Up To Date
CheckMates Go:
Protect Yourself
- CheckMates
- :
- Products
- :
- General Topics
- :
- Inbound HTTPS Inspection — Custom client certifica.
- Subscribe to RSS Feed
- Mark Topic as New
- Mark Topic as Read
- Float this Topic for Current User
- Bookmark
- Subscribe
- Mute
- Printer Friendly Page
Are you a member of CheckMates?
- Mark as New
- Bookmark
- Subscribe
- Mute
- Subscribe to RSS Feed
- Permalink
- Report Inappropriate Content
We have a use case where we need to deploy inbound HTTPS Inspection to a specific web service that uses a non standard port.
Gateways and management are both running R80.40.
Initially we are seeing a Bypass with the following error «Internal system error in HTTPS Inspection (Error Code: 2)»
One of the possible causes is that the root certificate is not trusted, however the customer is using the same cert in other inbound inspection rules without issues.
While troubleshooting we found that the backend application requires the client to send a specific certificate.
Since we are doing a Man-in-the-middle (MITM) for inspection it’s obvious that the connection between the Gateway and the server will have the Check Point self signed certificate, not the one required by the application.
I know that this use case can be solved with an ADC such as F5, Netscaler, A10.
— Can we do it with Check Point? I didn’t find a proper way of using specific client certificates (Not server certs) for specific connections within the admin guides or SKs.
— Can «Internal system error in HTTPS Inspection (Error Code: 2)» be related to this issue? An HTTPS debug is not possible for the moment due to maintenance window requirements.
Источник
This article outlines some recommendations and best practices for easy HTTPS Inspection deployment and usage to help avoid common configuration issues.
Note: To benefit from the latest improvements in security, performance and stability, Check Point always recommends to upgrade to the most recent version (upgrade Security Gateway / upgrade Cluster / upgrade VSX / upgrade 600 appliance / upgrade 1100 appliance / upgrade Security Management Server / upgrade Multi-Domain Security Management Server / upgrade SmartConsole).
Table of Contents:
-
Introduction
-
HTTPS Inspection — Inbound vs. Outbound
-
Gradual Deployment
-
Initial configuration
-
-
Best Practices
-
Configuring certificates
-
Creating the HTTPS Inspection Rule Base
-
Internet connection
-
-
Additional Information
-
Perfect Forward Secrecy Cipher Suites
-
Mobile Applications
-
Update Services
-
Categorized HTTPS vs. HTTPS Inspection
-
-
Performance
-
Debug
-
Notes
-
WSTLSD daemon (SSL handshake)
-
HTTPS Inspection related issues
-
HTTPS Inspection rulebase matching
-
-
Related documentation
-
Related solutions
-
Revision history
(I) Introduction
HTTPS Internet traffic uses the SSL (Secure Sockets Layer) protocol and is encrypted to give data privacy and integrity. However, HTTPS traffic has a possible security risk and can hide illegal user activity and malicious traffic. With HTTPS Inspection, the Security Gateway can inspect the traffic that is encrypted by HTTPS.
The Security Gateway uses certificates and becomes an intermediary between the client computer and the secure web site. All data is kept private in HTTPS Inspection logs. Only administrators with HTTPS Inspection permissions can see all the fields in a log.
HTTPS ratio of internet traffic is constantly growing. However, malicious attacks, dangerous web activity and data loss can hide away from the inspection of the Security Gateway under the SSL layer.
Therefore it is recommended to enable HTTPS Inspection to improve security. By enabling HTTPS Inspection, the Security Gateway will inspect the encrypted parts of the HTTPS traffic.
The HTTPS Inspection Rule Base is a set of rules used to define which HTTPS traffic will be inspected by the Security Gateway. The inspection will be performed by all the Software Blades that support HTTPS Inspection:
- Application Control
- URL Filtering
- IPS
- DLP
- Anti-Virus
- Anti-Bot
(I-1) Introduction: HTTPS Inspection — Inbound vs. Outbound
(I-2) Introduction: Gradual Deployment
When first enabling HTTPS Inspection, it is recommended to use a gradual approach. Starting with few Security Gateways and networks, and expanding from there to cover all Security Gateways and networks. Do this by configuring the HTTPS Inspection rulebase to inspect a single subnet or few subnets. HTTPS Inspection can be enabled on a single Security Gateway at first, and then expanded to additional Security Gateways.
(I-3) Introduction: Initial configuration
Refer to Application Control and URL Filtering Administration Guide (R75.20, R75.40, R75.40VS, R76, R77) — Chapter «Managing Application Control and URL Filtering» — «HTTPS Inspection».
(II) Best Practices
(II-1) Best Practices: Configuring certificates
- Using the entire certificate chain for configuring inspection of incoming traffic
When importing an internal server’s certificate for incoming traffic inspection, it is necessary to include all the intermediate CAs of the chain in the *.p12 file. Inclusion of only the server certificate may cause some browsers to warn about untrusted sites, since some browsers are unable to fetch and validate the complete certificate chain.


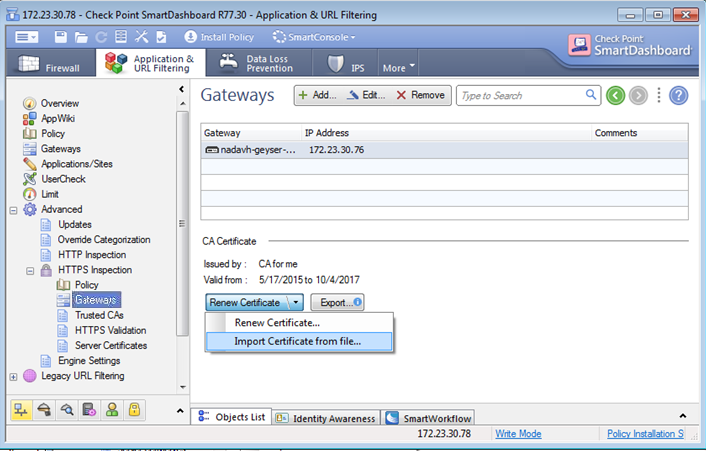
- CA creation/import — Using a CA certificate for HTTPS Inspection of outgoing traffic
When importing an external certificate in SmartDashboard on the blade’s tab — «Advanced» — «HTTPS Inspection» — «Gateways» — «Import Certificate from file...«, it is imperative to use a CA certificate, so that this certificate can be used to sign certificates generated by Security Gateway for outgoing traffic inspection.
Importing a non-CA certificate will result in client browsers refusing the connection.
Notes:- The administrator may generate a CA certificate from the Security Gateway properties — «HTTPS Inspection».
That CA certificate will be used to sign the certificates generated by Security Gateway. - The best practice would be:
- 1) deploy this certificate on the entire organization (usually through GPO for Windows domain)
- 2) export a CA certificate from an existing CA of the organization
- 3) sign a new CA certificate from an existing CA of the organization
- For fastest deployment, the order should be (because computers should probably already use the organization CA):
- 3) sign a new CA certificate from an existing CA of the organization
- 2) export a CA certificate from an existing CA of the organization
- 1) deploy this certificate on the entire organization (usually through GPO for Windows domain)
OR
- 2) export a CA certificate from an existing CA of the organization
- 3) sign a new CA certificate from an existing CA of the organization
- 1) deploy this certificate on the entire organization (usually through GPO for Windows domain)
- For best security, the order should be:
- 3) sign a new CA certificate from an existing CA of the organization
- 1) deploy this certificate on the entire organization (usually through GPO for Windows domain)
- 2) export a CA certificate from an existing CA of the organization
- The administrator may generate a CA certificate from the Security Gateway properties — «HTTPS Inspection».
- Making sure all intermediate certificates in the chain are signed with SHA-256 to avoid browser warnings
For both incoming and outgoing inspection, validate that all intermediate certificates in the chain are signed with SHA-256 (or higher) algorithm.
Otherwise, browsers may warn (either by icon next to the URL, or in other ways) that the connection is not secure enough.
This limitation applies only to intermediate certificates in the chain, and not to root CAs.
(II-2) Best Practices: Creating the HTTPS Inspection Rule Base
- What to Inspect
It is highly recommended to inspect HTTPS traffic from desktop browsers (Outbound HTTPS Inspection).
Users may choose to bypass certain categories due to privacy considerations.
Non-browser HTTPS applications tend to trust their own root CA store and not to trust the certificate generated by the Security Gateway (examples: Google Drive, DropBox).
In addition, non-browser HTTPS applications may use non-standard SSL and therefore cannot be inspected by the Security Gateway.
These limitations are not specific to Check Point.
It is possible to bypass these connections by Server IP address (when available), Client IP address (if there are few clients using these applications), or user identity.
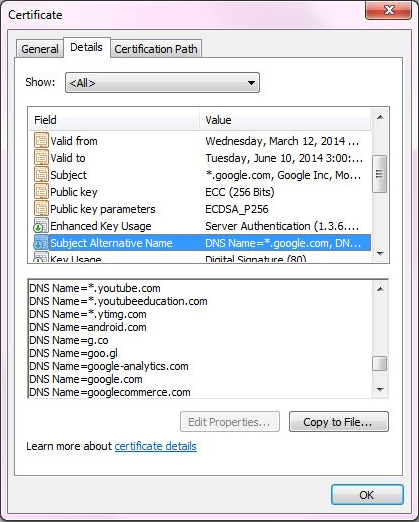
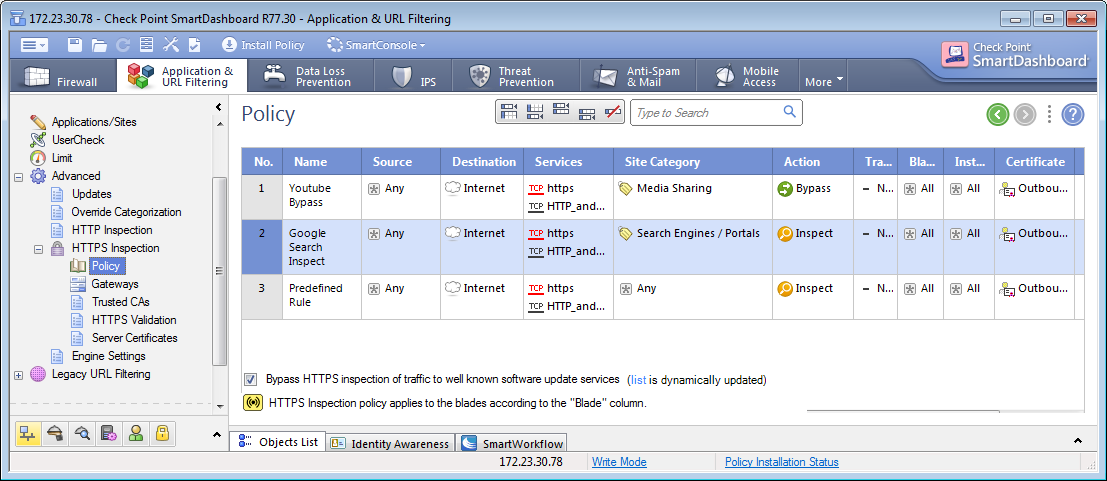
In cases the server uses standard SSL, bypass according to Category/URL can also be used. - Inspection of sites with a multi-category certificate
HTTPS Inspection bypass decisions are based on the server’s certificate.
It is important to note that there are servers that issue a single certificate for several domains from different categories (Search Engines / Portals, Media Sharing, etc.).
For example, see the Google certificate below:
Without SSL decryption, there is no way for the Security Gateway to know the underlying URL and easily categorize the connection.
Yet, in order to enable bypass rules of HTTPS Inspection, it is necessary to determine the site’s category without SSL decryption — site category is resolved according to the FQDN of server’s certificate.
This is a trade-off between usability, connectivity and security, since there are sites that offer many services behind a single certificate, thus sharing the same FQDN among multiple categories.
Therefore, the Site Category is determined by the certificate FQDN and the IP address, which presented the certificate, and should take into account the entire list of servers, which will be bypassed/inspected.
Every connection to servers, which display such a multi-purpose certificate, will be categorized in the same way — the rulebase decision to inspect or bypass a connection will be made according to the category matched to the FQDN of the certificate.
Let us examine the following rulebase:
 Since YouTube and Google Search present the same certificate — the connections to both sites will be matched as if they are both categorized as «
Search Engines» — the bypass rule of YouTube will be ignored.
Therefore, users should take into account that in certain cases, the connections will be matched according to the category of the FQDN.
 Since YouTube and Google Search present the same certificate — the connections to both sites will be matched as if they are both categorized as «
(II-3) Best Practices: Internet connection
Make sure the Security Gateway is connected to the Internet, either directly or through a proxy. Proxy can be defined in the Security Gateway properties, or in the Global Properties.
If there is no Internet connection, then CRL fetch and intermediate CA fetch will fail (this will be logged). The inspection will take place; however, URL-based or Category-based bypassing will not work.
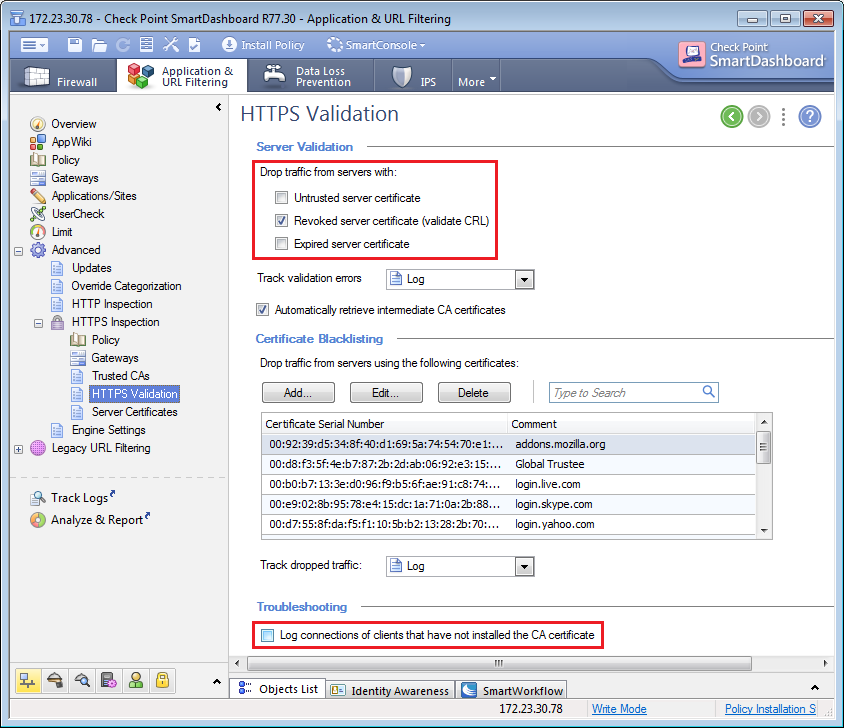
Untrusted certificates and lack of CRLs can be configured as reasons to drop the connection:
Note: Checking the box «Log connections of clients that have not installed the CA certificate» will log connections of clients that have not installed the CA certificate, however it will also log other cases of dropped connections. It is recommended to clear this box.
Note about Bridge interfaces: In order for inspection to work properly, CRL validation is required. Therefore the Security Gateway must have an Internet connection in addition to the bridge interfaces.
(III) Additional Information
(III-1) Additional Information: Perfect Forward Secrecy Cipher Suites
- Perfect Forward Secrecy (PFS) — introduction
Perfect Forward Secrecy (PFS) is a key agreement method that saves the need of transferring shared secrets on the wire, thus guaranteeing secrecy in the future, even if the traffic is recorded in the present.
PFS is widely used in TLS and IKE/IPsec. - Perfect Forward Secrecy (PFS) — ECDHE
Diffie-Hellman (DH) has been the traditional PFS algorithm.
Elliptic curve Diffie-Hellman (ECDH) is a modern PFS algorithm based on Elliptic Curve computations. Same security level of Diffie-Hellman is achieved with much shorter keys in ECDH, so performance is much better.
ECDHE is a protocol that uses Ephemeral ECDH keys.
Some Web servers only accept PFS ciphers (DHE, ECDHE).
ECDHE is fully supported in these versions of Security Gateway (ID 01418393):- R77.30 (ID 01467522) and above
- R77.20 with Jumbo Hotfix Accumulator Take_143 and above (ID 01546352).
For Security Gateways R77.20 and lower, connections to such web servers will fail without a log. An example of such a web server is tumblr.com.
If you encounter such issue, then Contact Check Point Support to get a Hotfix from sk104717 (Issue ID 01418393).
A Support Engineer will make sure the Hotfix is compatible with your environment before providing the Hotfix.
For faster resolution and verification, please collect CPinfo files from the Security Management Server and Security Gateways involved in the case.
Refer to:
- sk104562 — Supported cipher suites for HTTPS Inspection
- sk104717 — HTTPS Inspection Enhancements in R77.30
Note: Some web servers do not accept any of the Security Gateway’s proposals. Connections to such web servers will fail without a log. If you encounter such issue, thencontact Check Point Support for assistance.
(III-2) Additional Information: Mobile Applications
Mobile Applications (non-browser clients) and Mobile browsers do not work well with HTTPS Inspection. These clients cannot be forced to trust the Security Gateway’s Certificate Authority (CA).
Some applications produce warnings, and others simply block the traffic.
It is recommended to either restrict mobile applications traffic for better security, or to create bypass rules for traffic originating from mobile devices (according to Wi-Fi Access Point’s IP address, for example).
(III-3) Additional Information: Update Services
Update services (such as Microsoft updates) are implicitly bypassed in the HTTPS Inspection rulebase.
(III-4) Additional Information: Categorized HTTPS vs. HTTPS Inspection
Starting in R76, «Categorize HTTPS sites» feature (in combination with URL Filtering) lets you categorize a HTTPS site without activating HTTPS inspection to determine the content of the traffic, based on the FQDN of the server’s certificate (SmartDashboard — go to «Application & URL Filtering» tab — in the left pane, go to «Advanced» — go to «Engine Settings» — in the «URL Filtering» section, check the box «Categorize HTTPS sites«).
«Categorize HTTPS sites» feature does not perform inspection on the traffic. Policy, based upon the categorized inspection, should take into account that the confidence level is lower than that of HTTPS Inspection.
When the «Categorize HTTPS sites» option is enabled:
- The server’s certificate is detected and validated
- If the server is trusted, then the DN is extracted from the certificate
- The DN is used to categorize the site
The Categorize HTTPS sites option does not run if:
- HTTPS Inspection is enabled
- There is a proxy between the destination site and the Security Gateway (or the Security Gateway functions as a proxy)
(IV) Performance
HTTPS Inspection creates additional load on Security Gateway’s CPU due to these reasons:
- SSL termination, encrypt/decrypt and active TCP termination that consume CPU resources (Note: The SSL handshake rate was significantly improved in R77.30 — refer to sk103081 and to sk104717).
- Additional traffic is inspected by the security blades.
It is possible to approximate the effect of HTTPS Inspection activation under the following disclaimers:
- Representing a typical, outbound configuration (low or none inbound HTTPS Inspection traffic) with 36% HTTPS.
- Using R77.30 with either NGTP (Firewall, IPS, Application Control, URL Filtering, Anti-Virus, and Anti-Bot), or NGFW (Firewall, IPS and Application Control) software blades for inspection.
- Data Center scenario requires specific modeling.
The rational is that under the disclaimers written above, the impact on required Security Power (SPU) is 60% to 100% higher depending on the enabled software blades (the more blades are already enabled, the smaller the additional impact of HTTPS Inspection will be).
Therefore, when enabling HTTPS Inspection in an existing configuration, the CPU utilization on Security Gateway is expected to increase:
- by factor of 1.6 for NGTP configuration
- by factor of 2 for NGFW configuration
For Check Point Partners: refer to sk108757 — How to estimate the performance impact of HTTPS Inspection using the Appliance Sizing Tool.
(V) Debug
(V-1) Debug: Notes
- Always schedule a maintenance window to run any debug.
- Contact Check Point Support to get exact debug instructions specific to your case.
- In cluster environment, debug must be collected on all members of the cluster.
- To decrease the load on Security Gateway’s CPU, the kernel debug can be started only on specific CoreXL FW Instances only.
The safest way to do so is by starting the kernel debug on CoreXL FW Instance 0:
# fw ctl debug 0
# fw ctl debug -buf 32000
# fw ctl debug -m MODULE + FLAGS
# fw -i 0 ctl kdebug -T -f > /var/log/debug.txt - Refer to Kernel Debug flags (R75.40VS, R76, R77, R77.10, R77.20, R77.30)
(V-2) Debug: WSTLSD daemon
WSTLSD daemon handles SSL handshake for HTTPS Inspected connections.
Refer to sk105559 — How to debug WSTLSD daemon.
Important Note: This kernel debug can cause very high load on Security Gateway’s CPU. Schedule a maintenance window.
- Prepare the debug:
[Expert@HostName:0]# fw ctl debug 0
[Expert@HostName:0]# fw ctl debug -buf 32000
[Expert@HostName:0]# fw ctl debug -m fw + conn drop cptls - Verify the debug:
[Expert@HostName:0]# fw ctl debug -m fw
Output should show debugging buffer size 32000KB and all the debugging options enabled in the previous step. - Start the debug:
[Expert@HostName:0]# fw ctl kdebug -T -f > /var/log/debug.txt - Capture the involved traffic:
Refer to sk30583 — What is FW Monitor?.
It might also be required to capture the traffic with TCPdump. - Replicate the issue:
Make sure the issue was replicated.
Collect all the relevant screenshots / logs that show the issue. - Stop the debug:
Press CTRL+C and run
[Expert@HostName:0]# fw ctl debug 0 - Collect these files:
- /var/log/debug.txt
- /var/log/messages*
- traffic capture(s)
- CPinfo file from the involved Security Gateway(s) / Cluster members
- CPinfo file from the involved Security Management Server / Domain Management Server
(V-4) Debug: HTTPS Inspection rulebase matching
Important Note: This kernel debug can cause very high load on Security Gateway’s CPU. Schedule a maintenance window.
- Prepare the debug:
[Expert@HostName:0]# fw ctl debug 0
[Expert@HostName:0]# fw ctl debug -buf 32000
[Expert@HostName:0]# fw ctl debug -m fw + conn drop
[Expert@HostName:0]# fw ctl debug -m NRB all
[Expert@HostName:0]# fw ctl debug -m WS + connection info module pkt_dump policy session spii ssl_insp vs - Verify the debug:
[Expert@HostName:0]# fw ctl debug -m fw
[Expert@HostName:0]# fw ctl debug -m NRB
[Expert@HostName:0]# fw ctl debug -m WS
Output should show debugging buffer size 32000KB and all the debugging options enabled in the previous step. - Start the debug:
[Expert@HostName:0]# fw ctl kdebug -T -f > /var/log/debug.txt - Capture the involved traffic:
Refer to sk30583 — What is FW Monitor?.
It might also be required to capture the traffic with TCPdump. - Replicate the issue:
Make sure the issue was replicated.
Collect all the relevant screenshots / logs that show the issue. - Stop the debug:
Press CTRL+C and run
[Expert@HostName:0]# fw ctl debug 0 - Collect these files:
- /var/log/debug.txt
- /var/log/messages*
- traffic capture(s)
- CPinfo file from the involved Security Gateway(s) / Cluster members
- CPinfo file from the involved Security Management Server / Domain Management Server
- Firewall Administration Guide (R75.20, R75.40, R75.40VS, R76, R77) — Chapter «Defining an Internet Access Policy» — «HTTPS Inspection»
- Application Control and URL Filtering Administration Guide (R75.20, R75.40, R75.40VS, R76, R77) — Chapter «Managing Application Control and URL Filtering» — «HTTPS Inspection»
- Data Loss Prevention Administration Guide (R75.20, R75.40, R75.40VS, R76, R77) — Chapter «Installation and Configuration» — «HTTPS Inspection»
- IPS Administration Guide (R75.20, R75.40, R75.40VS, R76, R77) — Chapter «Monitoring Traffic» — «HTTPS Inspection»
- Threat Prevention Administration Guide (R76, R77) — Chapter «Using Threat Prevention with HTTPS Traffic»
- Anti-Bot and Anti-Virus Administration Guide (R75.40, R75.40VS) — Chapter «Managing Anti-Bot and Anti-Virus» — «HTTPS Inspection»
Note: These articles require «Advanced» access level or higer.
- Configuration
- sk65123 — HTTPS Inspection FAQ
- sk104717 — HTTPS Inspection Enhancements in R77.30
- sk101223 — MultiCore Support for SSL in R77.20 and above
- sk104562 — Supported cipher suites for HTTPS Inspection
- sk108654 — How to control support for SSLv2 handshake in HTTPS Inspection
- sk108641 — How to Renew or Import a new HTTPS Inspection certificate
- sk90840 — HTTPS Inspection is not supported for IPv6 traffic in R76 / R77 and above
- sk106996 — «HTTP Strict Transport Security» (HSTS) header handling in HTTPS Inspection
- sk74000 — Disabling TLS 1.1 and 1.2 in Portals and HTTPS Inspection
- sk108757 — How to estimate the performance impact of HTTPS Inspection using the Appliance Sizing Tool
- sk97638 — Check Point Processes and Daemons
- Troubleshooting
- sk98348 — Best Practices — Security Gateway Performance
- sk108653 — Security Gateway with enabled HTTPS Inspection crashes repeatedly
- sk92888 — Enabling HTTPS Inspection causes some applications to stop working
- sk108894 — Difficulties in connecting to untrusted sites when both HTTPS Inspection and CoreXL Dynamic Dispatcher are enabled
- sk64166 — HTTPS Inspection logs are misleading
- sk108187 — There are no logs for HTTPS Inspection, although it is enabled and configured for inbound inspection.html
- sk101166 — HTTPS Inspection ignores HTTPS traffic via proxy with authentication
- sk92839 — HTTPS Inspection and ‘X-Forward-For’ (XFF) HTTP header when inspecting proxy traffic
- sk96125 — Windows Update fails when HTTPS Inspection is enabled on Check Point Security Gateway
- sk92870 — Cannot delete the current HTTPS Inspection certificate
- sk98025 — HTTPS inspection with 3rd party certificate shows browser error
- sk92654 — HTTPS traffic is not inspected although HTTPS Inspection is enabled and Identity Awareness is used
- sk101791 — HTTPS Inspection «Bypass» rule that contains Dynamic Object does not work
- sk93184 — Users do not receive UserCheck page for blocked HTTPS content
- sk107325 — No access to HTTPS sites from Firefox when HTTPS Inspection is enabled
- sk102721 — UserCheck page is displayed twice when Application Control and HTTPS Inspection are enabled, and user is redirected from HTTP to HTTPS web site
- sk104095 — RC4 cipher is allowed for Inbound HTTPS inspection
- sk106296 — Not able to connect to HTTPS web sites that use ECDHE cipher suites after upgrading to R77.30
- sk105538 — Security Gateway with enabled HTTPS Inspection might crash during high traffic load
- Debug
- sk105559 — How to debug WSTLSD daemon
Using Threat Prevention with HTTPS Traffic
You can use the HTTPS Inspection feature to unencrypt traffic and let Threat Prevention Software Blades give protections against advanced threats, bots, and other malware.
You can enable HTTPS traffic inspection on Security Gateways to inspect traffic that is encrypted by the Secure Sockets Layer (SSL) protocol. SSL secures communication between internet browser clients and web servers. It supplies data privacy and integrity by encrypting the traffic, based on standard encryption ciphers.
However, SSL has a potential security gap. It can hide illegal user activity and malicious traffic from the content inspection of Security Gateways. One example of a threat is when an employee uses HTTPS (SSL based) to connect from the corporate network to internet web servers. Security Gateways without HTTPS Inspection are unaware of the content passed through the SSL encrypted tunnel. This makes the company vulnerable to security attacks and sensitive data leakage.
The SSL protocol is widely implemented in public resources that include: banking, web mail, user forums, and corporate web resources.
There are two types of HTTPS inspection:
- — To protect internal servers from malicious requests originating from the internet or an external network.
- — To protect an organization from malicious traffic being sent by an internal client to a destination outside of the organization.
The Security Gateway acts as an intermediary between the client computer and the secure web site. The Security Gateway behaves as the client with the server and as the server with the client using certificates.
All data is kept private in HTTPS Inspection logs. This is controlled by administrator permissions. Only administrators with HTTPS Inspection permissions can see all the fields in a log. Without these permissions, some data is hidden.
How it Operates
In outbound HTTPS inspection, when a client in the organization initiates an HTTPS connection to a secure site, the Security Gateway:
- Intercepts the request.
- Establishes a secure connection to the requested web site and validates the site server certificate.
- Creates a new SSL certificate for the communication between the Security Gateway and the client, sends the client the new certificate and continues the SSL negotiation with it.
- Using the two SSL connections:
- It decrypts the encrypted data from the client.
- Inspects the clear text content for all blades set in the Policy.
- Encrypts the data again to keep client privacy as the data travels to the destination web server resource.
In inbound HTTPS inspection, when a client outside of the organization initiates an HTTPS connection to a server behind the organization’s gateway, the Security Gateway:
- Intercepts the request.
- Uses the server’s original certificate and private key to initiate an SSL connection with the client.
- Creates and establishes a new SSL connection with the web server.
- Using the two SSL connections:
- It decrypts the encrypted data from the client.
- Inspects the clear text content for all blades set in the policy.
- Encrypts the data again to keep client privacy as the data travels to the destination server behind the gateway.
Configuring Outbound HTTPS Inspection
To enable outbound HTTPS traffic inspection, you must do these steps:
- Set the Security Gateway for HTTPS Inspection.
- Generate a CA certificate on the Security Management Server or import a CA certificate already deployed in your organization.
- If you created a CA certificate, you must deploy it in the on the client computers. This lets the client computers trust all certificates signed by this certificate.
- Generate an HTTPS inspection policy by defining relevant rules in the HTTPS inspection Rule Base.
- Configure the conditions for dropping traffic from a web site server.
When required, you can update the trusted CA list in the Security Gateway.
Enabling HTTPS Inspection
You must enable HTTPS inspection on each Security Gateway. From > > , select .
The first time you enable HTTPS inspection on one of the Security Gateways, you must create an outbound CA certificate for HTTPS inspection or import a CA certificate already deployed in your organization. This outbound certificate is used by all Security Gateways managed on the Security Management Server.
Creating an Outbound CA Certificate
The outbound CA certificate is saved with a P12 file extension and uses a password to encrypt the private key of the file. The Security Gateways use this password to sign certificates for the sites accessed. You must keep the password as it also used by other Security Management Servers that import the CA certificate to decrypt the file.
After you create an outbound CA certificate, you must export it so it can be distributed to clients. If you do not deploy the generated outbound CA certificate on clients, users will receive SSL error messages in their browsers when connecting to HTTPS sites. You can configure a troubleshooting option that logs suchconnections.
After you create the outbound CA certificate, a certificate object named Outbound Certificate is created. Use this in rules that inspect outbound HTTPS traffic in the HTTPS inspection Rule Base.
To create an outbound CA certificate:
- In SmartDashboard, right-click the Security Gateway object and select Edit.
The Gateway Properties window opens.
- In the navigation tree, select .
- In the HTTPS Inspection page, click .
- Enter the necessary information:
- — Enter the domain name of your organization.
- — Enter the password that is used to encrypt the private key of the CA certificate.
- — Retype the password.
- — Select the date range for which the CA certificate is valid.
- Click .
- Export and deploy the CA certificate.
Exporting a Certificate from the Security Management Server
If you use more than one Security Management Server in your organization, you must first export the CA certificate using the export_https_cert CLI command from the Security Management Server on which it was created before you can import it to other Security Management Servers.
Command syntax:
export_https_cert [-local] | [-s server] [-f certificate file name under FWDIR/tmp][-help]
To export the CA certificate:
On the Security Management Server, run this command:
$FWDIR/bin/export_https_cert -local -f [certificate file name under FWDIR/tmp]
Example
$FWDIR/bin/export_https_cert -local -f mycompany.p12
Exporting and Deploying the Generated CA
To prevent users from getting warnings about the generated CA certificates that HTTPS inspection uses, install the generated CA certificate used by HTTPS inspection as a trusted CA. You can distribute the CA with different distribution mechanisms such as Windows GPO. This adds the generated CA to the trusted root certificates repository on client computers.
When users do standard updates, the generated CA will be in the CA list and they will not receive browser certificate warnings.
To distribute a certificate with a GPO:
- From the window of the Security Gateway, click .
Or
From the > pane in a supported blade, click .
- Save the CA certificate file.
- Use the Group Policy Management Console to add the certificate to the Trusted Root Certification Authorities certificate store.
- Push the Policy to the client computers in the organization.
Note — Make sure that the CA certificate is pushed to the client computer organizational unit.
- Test the distribution by browsing to an HTTPS site from one of the clients and verifying that the CA certificate shows the name you entered for the CA certificate that you created in the field.
Deploying Certificates by Using Group Policy
You can use this procedure to deploy a certificate to multiple client machines by using Active Directory Domain Services and a Group Policy object (GPO). A GPO can contain multiple configuration options, and is applied to all computers that are within the scope of the GPO.
Membership in the local Administrators group, or equivalent, is necessary to complete this procedure.
To deploy a certificate using Group Policy:
- Open the Group Policy Management Console.
- Find an existing GPO or create a new GPO to contain the certificate settings. Make sure the GPO is associated with the domain, site, or organization unit whose users you want affected by the policy.
- Right-click the GPO and select .
The Group Policy Management Editor opens and shows the current contents of the policy object.
- Open > > > .
- Click > .
- Do the instructions in the to find and import the certificate you exported from SmartDashboard.
- In the navigation pane, click and repeat steps 5-6 to install a copy of the certificate to that store
Importing an Outbound CA Certificate
You can import a CA certificate that is already deployed in your organization or import a CA certificate created on one Security Management Server to use on another Security Management Server.
|
|
Note — It is recommended that you use private CA Certificates. |
For each Security Management Server that has Security Gateways enabled with HTTPS inspection, you must:
- Import the CA certificate.
- Enter the password the Security Management Server uses to decrypt the CA certificate file and sign the certificates for users. This password is only used when you import the certificate to a new Security Management Server.
To import a CA certificate:
- If the CA certificate was created on another Security Management Server, export the certificate from the Security Management Server on which it was created.
- In SmartDashboard, right-click a Security Gateway object, select > >
Or
From the > Gatewayspane of a supported blade, click the arrow next to Create Certificate and select .
The Import Outbound Certificate window opens.
- Browse to the certificate file.
- Enter the .
- Click .
- If the CA certificate was created on another Security Management Server, deploy it to clients.
Configuring Inbound HTTPS Inspection
To enable inbound HTTPS traffic inspection:
- Set the Security Gateway for HTTPS Inspection. From > >, select .
- Import server certificates for servers behind the organization Security Gateways.
- Generate an HTTPS inspection policy. Define relevant rules in the HTTPS inspection Rule Base.
- Configure the relevant server certificate in the HTTPS inspection Rule Base.
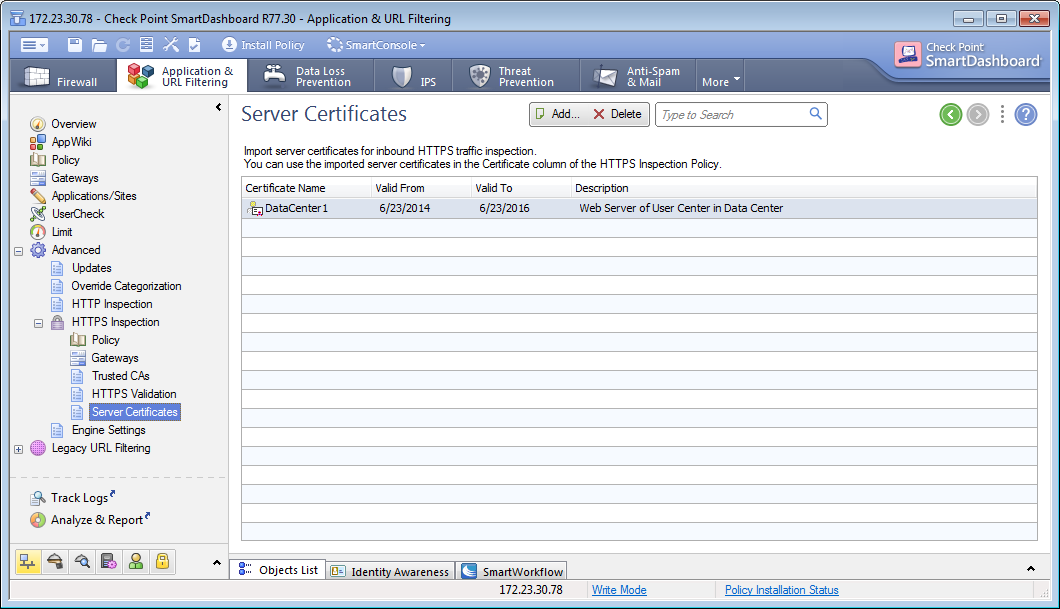
Server Certificates
When a client from outside the organization initiates an HTTPS connection to an internal server, the Security Gateway intercepts the traffic. The Security Gateway inspects the inbound traffic and creates a new HTTPS connection from the gateway to the internal server. To allow seamless HTTPS inspection, the Security Gateway must use the original server certificate and private key.
To enable inbound HTTPS inspection:
- Add the server certificates to the Security Gateway. This creates a server certificate object.
- Add the server certificate object to the column in the HTTPS Inspection Policy, to enforce it in rules.
The Server Certificates window in SmartDashboard has these options:
- — Import a new server certificate. Enter a name for the server certificate, optional comment and import the P12 certificate file.
- — Delete a previously added server certificate. This option does not delete the server certificate option. It only removes it from the Server Certificate list.
- — Enter a key word to search for a server certificate in the list.
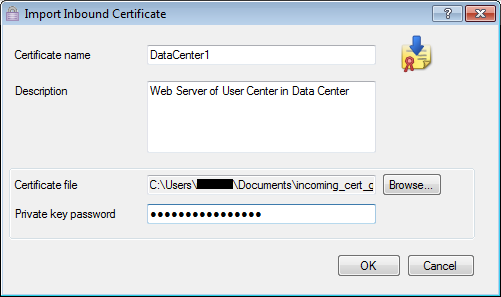
Adding a Server Certificate
When you import a server certificate, enter the same password that was entered to protect the private key of the certificate on the server. The Security Gateway uses this certificate and the private key for SSL connections to the internal servers.
After you import a server certificate (with a P12 file extension) to the Security Gateway, make sure you add the object to the HTTPS Inspection Policy.
Do this procedure for all servers that receive connection requests from clients outside of the organization.
To add a server certificate:
- In SmartDashboard, open > .
- Click .
The Import Certificate window opens.
- Enter a and a (optional).
- Browse to the certificate file.
- Enter the .
- Click .
The Successful Import window opens the first time you import a server certificate. It shows you where to add the object in the HTTPS Inspection Rule Base. Click if you do not want to see the window each time you import a server certificate and .
The HTTPS Inspection Policy
The HTTPS inspection policy determines which traffic is inspected. The primary component of the policy is the Rule Base. The rules use the categories defined in the Application Database, network objects and custom objects (if defined).
The HTTPS Rule Base lets you inspect the traffic on other network blades. The blades that HTTPS can operate on are based on the blade contracts and licenses in your organization and can include:
- Application Control
- URL Filtering
- IPS
- DLP
- Threat Prevention
If you enable Identity Awareness on your Security Gateways, you can also use Access Role objects as the source in a rule. This lets you easily make rules for individuals or different groups of users.
To access the HTTPS inspection Rule Base:
In SmartDashboard, open the Policy page from the specified blade tab:
- For Application Control and URL Filtering, Anti-Bot, Anti-Virus, and IPS — Select > > .
- For DLP — Select > >.
Predefined Rule
When you enable HTTPS inspection, a predefined rule is added to the HTTPS Rule Base. This rule defines that all HTTPS and HTTPS proxy traffic from any source to the internetis inspected on all blades enabled in the Blade column. By default, there are no logs.

Parts of the Rule
The columns of a rule define the traffic that it matches and if that traffic is inspected or bypassed. When traffic is bypassed or if there is no rule match, the traffic continues to be examined by other blades in the Security Gateway.
Number (No.)
The sequence of rules is important because the first rule that matches is applied.
For example, if the predefined rule inspects all HTTPS traffic from any category and the next rule bypasses traffic from a specified category, the first rule that inspects the traffic is applied.
Name
Give the rule a descriptive name. The name can include spaces.
Double-click in the Name column of the rule to add or change a name.
Source
The source is where the traffic originates. The default is Any.
|
|
Important — A rule that blockstraffic, with the and parameters defined as, also blocks traffic to and from the Captive Portal. |
Put your mouse in the column and a plus sign shows. Click the plus sign to open the list of network objects and select one or multiple sources. The source can be an Access Role object, which you can define when Identity Awareness is enabled.
Destination
Choose the destination for the traffic. The default is the , which includes all traffic with the destination of DMZ or external. If you delete the destination value, the rule changes to , which applies to traffic going to all destinations
|
|
Important — A rule that blockstraffic, with the and parameters defined as, also blocks traffic to and from the Captive Portal. |
To choose other destinations, put your mouse in the column and a plus sign shows. Click the plus sign to open the list of network objects and select one or multiple destinations.
Services
By default, HTTPS traffic on port 443 and HTTP and HTTPS proxy on port 8080 is inspected. You can include more services and ports in the inspection by adding them to the services list.
To select other HTTPS/HTTP services, put your mouse in the column and a plus sign shows. Click the plus sign to open the list of services and select a service. Other services, such as SSH are not supported.
Site Category
The Site Category column contains the categories for sites and applications that users browse to and you choose to include. One rule can include multiple categories of different types.
|
|
Important —
|
You can also include custom applications, sites, and hosts. You can select a custom defined application or site object with the Custom button or create a new host or site with the New button at the bottom of the page.
To add site categories to a rule:
Put your mouse in the column and a plus sign shows. Click the plus sign to open the Category viewer. For each category, the viewer shows a description and if there are applications or sites related with it.
- To filter the Available list by categories or custom-defined sites, click the specified button in the toolbar of the viewer. The Available list opens in the left column and then you can add items to the rule.
- To add a category object to the rule, click the checkbox in the Available list.
- To see the details of category without adding it to the rule, click the name of the item in the Available list.
- You can only select a category to add to the rule from the Available list.
- If a category is already in a rule, it will not show in the Category viewer.
- If you know the name of a category, you can search for it. The results will show in the Available list.
- You can add a new host site with the New button.
Adding a New Host Site
You can create a new host site object to use in the HTTPS Rule Base if there is no corresponding existing category. Only the domain name part or hosts part of the URL is supported.
To create a new host site:
- Click the plus icon in the Site Category column.
- In the Category viewer, select .
The window opens.
- Enter a name for the host site.
- Set a color for the host site icon (optional).
- Enter a comment for the host site (optional).
- In , enter a valid URL and click .
- If you used a regular expression in the URL, click .
- Click .
The new host site is added to the list and can be added to the Rule Base.
Action
The action is what is done to the traffic. Click in the column to see the options and select one to add to the rule.
- — The traffic is inspected on the blades set in the column.
- — The traffic of source and destination traffic in rules that include the bypass action are not decrypted and inspected. You can bypass HTTPS inspection for all Check Point objects. This is recommended for Anti-Bot, Anti-Virus, URL Filtering, and IPS updates. Other HTTPS protections that already operate on traffic will continue to work even when the HTTPS traffic is not decrypted for inspection.
Track
Choose if the traffic is logged in SmartView Tracker or if it triggers other notifications. Click in the column and the options open. The options include:
- — Does not record the event
- — Records the event details in SmartView Tracker. This option is useful for obtaining general information on your network traffic. There is one or more log for each session depending on the suppression option.
- — Logs the event and executes a command, such as display a popup window, send an email alert or an SNMP trap alert, or run a user-defined script as defined in >>>
- — Sends an email to the administrator, or runs the mail alert script defined in >>>
- — Sends a SNMP alert to the SNMP GUI, or runs the script defined in >>>
- — Sends one of three possible customized alerts. The alerts are defined by the scripts specified in >>>
Blade
Choose the blades that will inspect the traffic. Click in the column and the options open. The options include:
- Anti-Bot
- Anti-Virus
- Application Control
- Data Loss Prevention
- IPS
- URL Filtering
|
|
Important — The blade options you see are based on the blade contracts and licenses in your organization. |
Install On
Choose which Security Gateways the rule will be installed on. The default is , which means all Security Gateways that have HTTPS inspection enabled. Put your mouse in the column and a plus sign shows. Click the plus sign to open the list of available Security Gateways and select.
Certificate
Choose the certificate that is applicable to the rule. The Security Gateway uses the selected certificate for communication between the Security Gateway and the client.
- — choose the object (default) that reflects the CA certificate you created/imported and deployed on the client machines in your organization.
- — choose the server certificate applicable to the rule. Put your mouse in the column and a plus sign shows. Click the plus sign to open the list of available server certificates and select one. When there is a match to a rule, the Security Gateway uses the selected server certificate to communicate with the source client. You can create server certificates from > > .
Bypassing HTTPS Inspection for Software Update Services
Check Point dynamically updates a list of approved domain names of services from which content is always allowed. This option makes sure that Check Point updates or other 3rd party software updates are not blocked. For example, updates from Microsoft, Java, and Adobe.
To bypass HTTPS inspection for software updates:
- In the HTTPS Inspection > Policy pane, select. This option is selected by default.
- Click to see the list of approved domain names.
Enhanced HTTPS Inspection Bypass
Enhanced HTTPS Inspection Bypass lets the gateway bypass traffic to servers that require client certificate authentication and bypass non-browser applications.
This feature is supported on R77.30 and higher gateways.
To enable enhanced HTTPS inspection:
- In the
$FWDIR/boot/modules/fwkern.conffile on the gateway, add:enhanced_ssl_inspection=1 - Reboot.
You can configure this feature without changing the configuration file, but it does not survive reboot:
In expert mode, run: fw ctl set int enhanced_ssl_inspection 1
Gateways Pane
The pane lists the gateways with HTTPS Inspection enabled. Select a gateway and click Edit to edit the gateway properties. You can also search, add and remove Security Gateways from here.
For each gateway, you see the gateway name, IP address and comments.
In the CA Certificate section, you can the certificate validity date range if necessary and it for distribution to the organization client machines.
If the Security Management Server managing the selected Security Gateway does not have a generated CA certificate installed on it, you can add it with .
- You can import a CA certificate already deployed in your organization.
- You can import a CA certificate from another Security Management Server. Before you can import it, you must first export it from the Security Management Server on which it was created.
Adding Trusted CAs for Outbound HTTPS Inspection
When a client initiates an HTTPS connection to a web site server, the Security Gateway intercepts the connection. The Security Gateway inspects the traffic and creates a new HTTPS connection from the Security Gateway to the designated server.
When the Security Gateway establishes a secure connection (an SSL tunnel) to the designated web site, it must validate the site server certificate.
HTTPS Inspection comes with a preconfigured list of trusted CAs. This list is updated by Check Point when necessary and is automatically downloaded to the Security Gateway. The system is configured by default to notify you when a Trusted CA update file is ready to be installed. The notification in SmartDashboard shows as a pop-up notification or in the window in the Automatic Updates section. After you install the update, make sure to install the policy. You can choose to disable the automatic update option and manually update the Trusted CA list.
If the Security Gateway receives a non-trusted server certificate from a site, by default the user gets a self-signed certificate and not the generated certificate. A page notifies the user that there is a problem with the website security certificate, but lets the user continue to the website.
You can change the default setting to block untrusted server certificates.
The trusted CA list is based on the Microsoft Root Certificate Program.
Automatically Updating the Trusted CA List and Certificate Blacklist
Updates for the trusted CA list and Certificate Blacklist will be published from time to time on the Check Point web site. They are automatically downloaded to the Security Management Server by default. When you are sent a notification that there is an update available, install it and do the procedure. The first notification is shown in a popup balloon once and then in the notification line under >. You can disable automatic updates if necessary.
To update the Trusted CA list and Certificate Blacklist:
- In SmartDashboard, select > .
- In the section, click .
You see the certificates that will be added or removed to the lists and the validity date range of the certificates added to the Trusted CA list.
- Click to confirm the update.
The certificates will be added or removed respectively from the lists.
- Install the Policy.
To disable automatic updates:
- In SmartDashboard, select > .
- In the section, clear the checkbox.
Manually Updating a Trusted CA
To add a trusted CA manually to the Security Gateway, you must export the necessary certificate from a non-trusted web site and then import it into SmartDashboard.
To export a CA certificate to add to the Trusted CAs list:
- Temporarily disable HTTPS inspection on the Security Gateway.
- Install the security policy.
- Browse to the site to get the certificate issued by the CA.
- Go to the Certification Path of the certificate.
- Select the root certificate (the top most certificate in the list).
- In Internet Explorer and Chrome:
- Click .
- From the Details tab, click .
- Follow the wizard steps.
- In Firefox, export the certificate.
To import a CA certificate to the Trusted CAs list:
- In SmartDashboard, open >.
- Click ,browse to the location of the saved certificate and click .
The certificate is added to the trusted CAs list.
- Install the security policy on Security Gateways enabled with HTTPS Inspection.
Saving a CA Certificate
You can save a selected certificate in the trusted CAs list to the local file system.
To export a CA certificate:
- In SmartDashboard, open > .
- Click > .
- Browse to a location, enter a file name and click .
A CER file is created.
HTTPS Validation
Server Validation
When a Security Gateway receives an untrusted certificate from a web site server, the settings in this section define when to drop the connection.
When selected, traffic from a site with an untrusted server certificate is immediately dropped. The user gets an error page that states that the .
When cleared, a self-signed certificate shows on the client machine when there is traffic from an untrusted server. The user is notified that there is a problem with the website’s security certificate, but lets the user continue to the website (default).
When selected, the Security Gateway validates that each server site certificate is not in the Certificate Revocation List (CRL) (default).
If the CRL cannot be reached, the certificate is considered trusted (this is the default configuration). An HTTPS Inspection log is issued that indicates that the CRL could not be reached. This setting can be changed with GuiDBedit. Select > > and change the attributedrop_if_crl_cannot_be_reached from to .
To validate the CRL, the Security Gateway must have access to the internet. For example, if a proxy server is used in the organizational environment, you must configure the proxy for the Security Gateway.
To configure the proxy:
- From the tab, double-click the Security Gateway that requires proxy configuration.
- Select > .
- Select and and enter the proxy IP address.
- Optionally, you can use the default proxy settings.
- Click .
When cleared, the Security Gateway does not check for revocations of server site certificates.
|
|
Important — Make sure that there is a rule in the Rule Base that allows outgoing HTTP from the Security Gateway. |
- When selected, the Security Gateway drops the connection if the server certificate has expired.
- When cleared, the Security Gateway creates a certificate with the expired date. The user can continue to the website (default).
Choose if the server validation traffic is logged in SmartView Tracker or if it triggers other notifications. The options include:
- — Does not record the event.
- — Records the event details in SmartView Tracker
- — Logs the event and executes a command, such as shows a popup window, send an email alert or an SNMP trap alert, or run a user-defined script as defined in >>>
- — Sends an email to the administrator, or runs the mail alert script defined in >>>
- — Sends an SNMP alert to the SNMP GUI, or runs the script defined in >>>
- — Sends one of three possible customized alerts. The alerts are defined by the scripts specified in >>>
- When selected, intermediate CA certificates issued by trusted root CA certificates that are not part of the certificate chain are automatically retrieved using the information on the certificate (default).
- When cleared, a web server certificate signed by an intermediate CA and not sent as part of the certificate chain, is considered untrusted.
Certificate Blacklisting
You can create a list of certificates that are blocked. Traffic from servers using the certificates in the blacklist will be dropped. If a certificate in the blacklist is also in the Trusted CAs list, the blacklist setting overrides the Trusted CAs list.
- — Lets you add a certificate. Enter the certificate serial number (in hexadecimal format HH:HH) and a comment that describes the certificate.
- — Lets you change a certificate in the blacklist.
- — lets you delete a certificate in the blacklist.
- — Lets you search for a certificate in the blacklist.
Choose if the dropped traffic is logged in SmartView Tracker or if it triggers other notifications. The options include:
- — Does not record the event.
- — Records the event details in SmartView Tracker
- — Logs the event and executes a command, such as shows a popup window, send an email alert or an SNMP trap alert, or run a user-defined script as defined in >>>
- — Sends an email to the administrator, or runs the mail alert script defined in >>>
- — Sends an SNMP alert to the SNMP GUI, or runs the script defined in >>>
- — Sends one of three possible customized alerts. The alerts are defined by the scripts specified in >>>
Troubleshooting
Secure connections between a client and server with no traffic create logs in SmartView Tracker labeled as «Client has not installed CA certificate». This can happen when an application or client browser fails to validate the server certificate. Possible reasons include:
- The generated CA was not deployed on clients.
- The DN in the certificate does not match the actual URL (for example, when you browse to https://www.gmail.com, the DN in the certificate states mail.google.com).
- Applications (such as Firefox and anti-viruses) that use an internal trusted CA list (other than Windows). Adding the CA certificate to the Windows repository does not solve the problem.
The option in the HTTPS Validation pane:
- When selected, logs are recorded for secure connections between a client and server with no traffic in SmartView Tracker (default). Logs are recorded only when a server certificate is trusted by the Security Gateway. If the server certificate is untrusted, a self-signed certificate is created and always results in a log labeled as «Client has not installed CA certificate».
- When cleared, logs are not recorded for secure connections without traffic that can be caused by not installing the CA certificate on clients or one of the above mentioned reasons.
HTTP/HTTPS Proxy
You can configure a gateway to be an HTTP/HTTPS proxy. When it is a proxy, the gateway becomes an intermediary between two hosts that communicate with each other. It does not allow a direct connection between the two hosts.
Each successful connection creates two different connections:
- One connection between the client in the organization and the proxy.
- One connection between the proxy and the actual destination.
Proxy Modes
Two proxy modes are supported:
- — All HTTP traffic on specified ports and interfaces is intercepted and sent to a proxy. No configuration is required on the clients.
- — All HTTP/HTTPS traffic on specified ports and interfaces directed to the gateway is sent to a proxy. Configuration of the proxy address and port is required on client machines.
Access Control
You can configure one of these options for forwarding HTTP requests:
- — HTTP/HTTPS traffic from all internal interfaces is forwarded by proxy.
- — HTTP/HTTPS traffic from interfaces specified in the list is forwarded by proxy.
Ports
By default, traffic is forwarded only on port 8080. You can add or edit ports as required.
Advanced
By default, the HTTP header contains the proxy related header. You can remove this header with theoption.
You can also use the Advanced option to configure the that contains the IP address of the client machine. It is not added by default because it reveals the internal client IP.
Logging
The Security Gateway opens two connections, but only the Firewall blade can log both connections. Other blades show only the connection between the client and the gateway. The Destination field of the log only shows the gateway and not the actual destination server. The Resource field shows the actual destination.
To configure a Security Gateway to be an HTTP/HTTPS proxy:
- From the window of a Security Gateway object, select from the tree.
- Select .
- Select the or proxy mode.
Note — If you select mode, make sure to configure the clients to work with the proxy.
- Select to forward HTTP requests from one of these options:
- — Click the plus sign to add specified interfaces or the minus sign to remove an interface.
- To enter more ports on which to forward traffic, select .
- To include the actual source IP address in the HTTP header, select > .
The X-Forward-For header must be configured if traffic will be forwarded to Identity Awareness Security Gateways that require this information for user identification.
- Click .
Security Gateway Portals
The Security Gateway runs a number of web-based portals over HTTPS:
- Mobile web access portal
- SecurePlatform WebUI
- Gaia WebUI
- Identity Awareness (Captive Portal)
- DLP portal
- SSL Network Extender portal
- UserCheck portal
- Endpoint Security portals (CCC)
All of these portals can resolve HTTPS hosts to IPv4 and IPv6 addresses over port 443.
These portals (and HTTPS inspection) support the latest versions of the TLS protocol. In addition to SSLv3 and TLS 1.0 (RFC 2246), the Security Gateway supports:
- TLS 1.1 (RFC 4346)
- TLS 1.2 (RFC 5246)
Support for TLS 1.1 and TLS 1.2 is enabled by default but can be disabled in SmartDashboard (for web-based portals) or GuiDBedit (for HTTPS Inspection).
To configure TLS protocol support for portals:
- In , open .
- In the section, click .
The window opens.
- On the page, set minimum and maximum versions for SSL and TLS protocols.
To Configure TLS Protocol Support for HTTPS inspection:
- In , on the tab, select .
- In the column, select .
- In the column, select the minimum and maximum TLS version values in these fields:
- (default = TLS 1.2)
- (default = SSLv3)
HTTPS Inspection in SmartView Tracker
Logs from HTTPS Inspection are shown in SmartView Tracker. There are two types of predefined queries for HTTPS Inspection logs in SmartView Tracker:
- HTTPS Inspection queries
- Blade queries — HTTPS Inspection can be applied to these blades:
- Application Control
- URL Filtering
- IPS
- DLP
- Anti-Virus
- Anti-Bot
To open SmartView Tracker:
- From the SmartDashboard toolbar, click > .
- With SmartDashboard active, press Control +Shift +.
HTTPS Inspection Queries
These are the predefined queries in > > .
- — Shows all HTTPS traffic that matched the HTTPS Inspection policy and was configured to be logged.
- Shows traffic with connection problems. The Action values are or. The actions are determined by the SSL validation settings for HTTPS Inspection.
HTTPS Validation values are:
- (general SSL protocol problems)
Blade Queries
When applying HTTPS Inspection to a specified blade:
- There is an for each of the blades that can operate with HTTPS Inspection. The query shows all traffic of the specified blade that passed through HTTPS inspection.
- The log in the blade queries includes an . The field value can be inspect or bypass. If the traffic did not go through HTTPS inspection, the field does not show in the log.
Permissions for HTTPS Logs
An administrator must have HTTPS inspection permissions to see classified data in HTTPS inspected traffic.
To set permissions for an administrator in a new profile:
- In the Users and Administrators tree, select an administrator > Edit.
- In the > page in the field, click .
- In the window:
- Enter a for the profile.
- Select and click .
The window opens.
- In the tab, select for permission to see the classified information in the HTTPS Inspection logs.
- Click on all of the open windows.
To edit an existing permissions profile:
- From the SmartDashboard toolbar, select >.
- Select a profile and click .
- Follow the instructions above from step 3.
HTTPS Inspection in SmartEvent
Events from HTTPS Inspection are shown in SmartEvent. There are two types of predefined queries for HTTPS Inspection events in SmartEvent:
- HTTPS Inspection queries for HTTPS validations
- Blade queries — HTTPS Inspection can be applied to these blades:
- Application Control
- URL Filtering
- IPS
- DLP
- Anti-Virus
To open SmartEvent:
- From the SmartDashboard toolbar, click > .
- With SmartDashboard active, press Control +Shift +.
Event Analysis in SmartEvent
SmartEvent supplies advanced analysis tools with filtering, charts, reporting, statistics, and more, of all events that pass through enabled Security Gateways. SmartEvent shows all HTTPS Inspection events.
You can filter the HTTPS Inspection information for fast monitoring on HTTPS Inspection traffic.
- Real-time and history graphs of HTTPS Inspection traffic.
- Graphical incident timelines for fast data retrieval.
- Easily configured custom views to quickly view specified queries.
- Incident management workflow.
SmartEvent shows information for all Software Blades in the environment.
Viewing Information in SmartEvent
There are two types of predefined queries for HTTPS Inspection events in SmartEvent:
- HTTPS Inspection queries
- Blade queries
HTTPS Inspection Queries
- Go to >>> to show the SSL validation events that occurred.
- The and in the event record show if the traffic was detected or rejected due to SSL Validation settings.
Blade Queries
- There is an for each of the blades that can operate with HTTPS Inspection. The query shows all traffic of the specified blade that passed through HTTPS inspection.
- The in the event record in the blade queries includes an . The field value can be inspect or bypass. If the traffic did not go through HTTPS inspection, the field does not show in the event record.
HTTP Inspection on Non-Standard Ports
Applications that use HTTP normally send the HTTP traffic on TCP port 80. Some applications send HTTP traffic on other ports also. You can configure some Software Blades to only inspect HTTP traffic on port 80, or to also inspect HTTP traffic on non-standard ports.
When selected, the Anti-Bot and Anti-Virus policy inspects all HTTP traffic, even if it is sent using nonstandard ports. This option is selected by default. You can configure this option in the tab > pane.
(VIII) Revision history
| Date | Description |
| 31 Jan 2016 |
|
| 10 Dec 2015 |
|
| 18 Nov 2015 |
|
| 13 Nov 2015 |
|
| 12 Nov 2015 |
|
| Give us Feedback |
|
|||
Разработчики и люди, профессионально работающие с веб-приложениями, боятся 500 Internal Server Error. Оптимальный способ её устранения зависит от сервера и того, что на нём запущено. В данной статье приводятся советы по диагностике и исправлению ошибки 500.

- Ошибка 500 Internal Server Error — диагностика
- Ошибка 500 Internal Server Error — устранение на популярных платформах
- Ошибка 500 Internal Server Error — устранение на стороне серверных скриптов
- Попросите помощи у системного администратора
- Ошибку 500 Internal Server Error довольно легко устранить
Важно помнить, что эта ошибка происходит на стороне сервера. Это значит, что HTML-код, выполняемый на стороне клиента, а также JavaScript или любые другие запущенные в браузере объекты, не могут быть причиной, по которой возникает ошибка 500 Internal Server Error. Само название (Internal Server Error – ‘внутренняя ошибка сервера’) говорит о том, что ошибка происходит на сервере.
Многие пользователи устанавливают на свой сервер популярные CMS-системы, такие как WordPress, Joomla, Drupal и они не должны вызывать ошибку 500, если всё настроено правильно. Однако она всё равно всплывает – из-за несовместимости версий, некачественных установок или сбоя прав доступа на сервере.
Вот некоторые распространённые проблемы, которые могут вызывать подобную ошибку в часто используемых CMS:
- Если вы только что обновили движок до новой версии, вероятно, обновление прошло с ошибками и необходимо провести его повторно. Скорее всего, на сайте разработчика есть инструкции, как это правильно сделать.
- Если вы только что активировали новый плагин или новую тему, стоит попробовать отменить эти изменения. Даже профессионально написанные плагины могут конфликтовать с другими и вызывать 500 Internal Server Error nginx
- Если вы обновляли CMS, старые плагины и темы могут быть с ней несовместимы. Единственное, что можно сделать в таком случае — отключать их по очереди, пока ошибка 500 не исчезнет.
- Неправильно заданные права доступа на сервере или ошибки в файле .htaccess. Серверу не удаётся получить доступ к скриптам, файлам и другим ресурсам, поэтому он выдаёт ошибку.
Когда причиной, по которой возникает ошибка 500 Internal Server Error являются скрипты и плагины, лучше всего искать ответы на сайтах их разработчиков.
Другой причиной по которой может возникнуть ошибка 500 Internal Server Error может стать разработка и тестирование собственных скриптов.
Чтобы справиться с такой ошибкой, попробуйте следующие решения:
- Настройка прав на сервере: часто неверная настройка прав доступа к файлу или папке приводит к тому, что сервером выдаётся ошибка 500 Internal Server Error. Из-за того, что ему не удаётся запустить скрипт. Выясните, какие права должны быть настроены, и выставьте их соответствующим образом.
- Превышено время ожидания: возможно, истекло время ожидания ответа от PHP или другого серверного скрипта. Это происходит из-за того, что недоступен определённый ресурс или коде была допущена ошибка, запускающая бесконечный цикл.
- Превышено время ожидания соединения с сервером: если сервер был занят, перезагружался или потерял соединение, скрипт может выдать ошибку 500 Internal Server Error. Возможно, в следующий раз ошибки не будет. Но если ошибка появляется при тестировании, велика вероятность того, что она встретится и пользователям.
- Ошибки в файле .htaccess: в некоторых случаях ошибку 500 может вызывать код, прописанный в файле .htaccess.
- Ошибки в скрипте: если ошибку выдаёт скрипт, можете запросить у него подробную информацию об ошибке. К примеру, в PHP можно включить вывод ошибок на экран или в лог-файл, добавив директиву display_errors. По умолчанию среда выполнения может скрывать ошибки, но это не очень удобно для отладки программы.
В некоторых случаях у разработчиков нет полного контроля над сервером.
Если скрипт запускается на сервере сторонней организации, она может помочь вам в следующем:
- Предоставить документацию о своём сервере и возможных причинах ошибки 500. В зависимости от используемой операционной системы и настройки оборудования, данная ошибка может возникать по разным причинам.
- Попросите службу поддержки хостинга посмотреть лог-файлы с ошибками — системный администратор сможет определить, был ли сервер во время возникновения ошибки загружен или вовсе «упал».
Ошибка 500 Internal Server Error — как исправить? В большинстве случаев причины возникновения ошибки 500 легко исправляются. Проблема заключается в том, что без конкретной информации определение причины возникновения сбоя усложняется. Легче всего справиться с ошибкой, когда разработчик выяснит, что изменилось перед возникновением ошибки.
Не забывайте, что произошедшие изменения могли быть осуществлены и другими людьми — например, администратором сервера. Если же ничего не менялось, вероятно, сам сервер стал причиной возникновения ошибки из-за несовместимости программного обеспечения или проблем с производительностью.
В статье мы расскажем, как исправить ошибку (код состояния) 500 со стороны пользователя и администратора сайта, а также подробно разберём, что такое ошибка запроса 500.
Что такое внутренняя ошибка сервера 500
Код ошибки 5хх говорит о том, что браузер отправил запрос корректно, но сервер не смог его обработать. Что значит ошибка 500? Это проблема сервера, причину которой он не может распознать.
Сообщение об ошибке сопровождается описанием. Самые популярные варианты:
- Внутренняя ошибка сервера 500,
- Ошибка 500 Internal Server Error,
- Временная ошибка (500),
- Внутренняя ошибка сервера,
- 500 ошибка сервера,
- Внутренняя ошибка HTTP 500,
- Произошла непредвиденная ошибка,
- Ошибка 500,
- HTTP status 500 internal server error (перевод ― HTTP статус 500 внутренняя ошибка сервера).
Дизайн и описание ошибки 500 может быть любым, так как каждый владелец сайта может создать свою версию страницы. Например, так выглядит страница с ошибкой на REG.RU:
Как ошибка 500 влияет на SEO-продвижение
Для продвижения сайта в поисковых системах используются поисковые роботы. Они сканируют страницы сайта, проверяя их доступность. Если страница работает корректно, роботы анализируют её содержимое. После этого формируются поисковые запросы, по которым можно найти ресурс в поиске.
Когда поисковый робот сканирует страницу с ошибкой 500, он не изменяет её статус в течение суток. В течение этого времени администратор может исправить ошибку. Если робот перейдёт на страницу и снова столкнётся с ошибкой, он исключит эту страницу из поисковой выдачи.
Проверить, осталась ли страница на прежних позициях, можно с помощью Google Search Console. Если робот исключил страницу из поисковой выдачи, её можно добавить снова.
Код ошибки 500: причины
Если сервер вернул ошибку 500, это могло случиться из-за настроек на web-хостинге или проблем с кодом сайта. Самые распространённые причины:
- ошибки в файле .htaccess,
- неподходящая версия PHP,
- некорректные права на файлы и каталоги,
- большое количество запущенных процессов,
- большие скрипты,
- несовместимые или устаревшие плагины.
Решить проблему с сервером можно только на стороне владельца веб-ресурса. Однако пользователь тоже может выполнить несколько действий, чтобы продолжить работу на сайте.
Что делать, если вы пользователь
Если на определённом ресурсе часто возникает ошибка 500, вы можете связаться с владельцем сайта по инструкции.
Перезагрузите страницу
Удаленный сервер возвращает ошибку не только из-за серьёзных проблем на сервере. Иногда 500 ошибка сервера может быть вызвана небольшими перегрузками сайта.
Чтобы устранить ошибку, перезагрузите страницу с помощью сочетания клавиш:
- на ПК — F5,
- на ноутбуке — Fn + F5,
- на устройствах от Apple — Cmd + R.
Обратите внимание! Если вы приобретаете товары в интернет-магазине и при оформлении заказа появляется 500 Internal Server Error (перевод — внутренняя ошибка сервера), при перезагрузке страницы может создаться несколько заказов. Поэтому сначала проверьте, оформился ли ваш предыдущий заказ. Если нет, попробуйте оформить заказ заново.
Очистите кэш и cookies браузера
Кэш и cookies сохраняют данные посещаемых сайтов и данные аутентификаций, чтобы в будущем загружать веб-ресурсы быстрее. Если на ресурсе уже был статус ошибки 500, при повторном входе на сайт может загружаться старая версия страницы с ошибкой из кэша, хотя на самом деле страница уже работает. Очистить кэш и куки браузера вам поможет инструкция.
Если ни одно из этих действий не решило проблему, значит, некорректно работает сам сервер сайта. Вернитесь на страницу позже, как только владелец решит проблему.
Что делать, если вы владелец сайта
В большинстве случаев устранить проблему может только владелец сайта. Как правило, ошибка связана с проблемами в коде. Реже проблемы могут быть на физическом сервере хостинг-провайдера.
Ниже рассмотрим самые популярные причины и способы решения.
Ошибки в файле .htaccess
Неверные правила в файле .htaccess — частая причина возникновения ошибки. Чтобы это проверить, найдите .htaccess в файлах сайта и переименуйте его (например, в test). Так директивы, прописанные в файле, не повлияют на работу сервера. Если сайт заработал, переименуйте файл обратно в .htaccess и найдите ошибку в директивах. Если вы самостоятельно вносили изменения в .htaccess, закомментируйте новые строки и проверьте доступность сайта.Также может помочь замена текущего файла .htaccess на стандартный в зависимости от CMS.
Найти директиву с ошибкой можно с помощью онлайн-тестировщика. Введите содержимое .htaccess и ссылку на сайт, начиная с https://. Затем нажмите Test:
Произошла непредвиденная ошибка
На экране появится отчёт. Если в .htaccess есть ошибки, они будут выделены красным цветом:
500 ошибка nginx
Активирована устаревшая версия PHP
Устаревшие версии PHP не получают обновления безопасности, работают медленнее и могут вызывать проблемы с плагинами и скриптами. Возможно, для работы вашего веб-ресурса нужна более новая версия PHP. Попробуйте сменить версию PHP на другую по инструкции.
Установлены некорректные права на файлы и каталоги сайта
В большинстве случаев корректными правами для каталогов являются «755», для файлов — «644». Проверьте, правильно ли они установлены, и при необходимости измените права на файлы и папки.
Запущено максимальное количество процессов
На тарифах виртуального хостинга REG.RU установлены ограничения на количество одновременно запущенных процессов. Например, на тарифах линейки «Эконом» установлено ограничение в 18 одновременно запущенных процессов, на тарифах «+Мощность» ― 48 процессов. Если лимит превышен, новый процесс не запускается и возникает системная ошибка 500.
Такое большое число одновременных процессов может складываться из CRON-заданий, частых подключений с помощью почтовых клиентов по протоколу IMAP, подключения по FTP или других процессов.
Чтобы проверить количество процессов, подключитесь по SSH. Выполните команду:
ps aux | grep [u]1234567 |wc -lВместо u1234567 укажите ваш логин хостинга: Как узнать логин хостинга.
Чтобы посмотреть, какие процессы запущены, введите команду:
Вместо u1234567 укажите логин услуги хостинга.
Командная строка отобразит запущенные процессы:
Код ошибки 500
Где:
- u1234567 — логин услуги хостинга,
- 40522 — PID процесса,
- S — приоритет процесса,
- /usr/libexec/sftp-server — название процесса.
Процесс можно завершить командой kill, например:
Вместо 40522 укажите PID процесса.
Чтобы решить проблему, вы также можете:
- увеличить интервал запуска заданий CRON,
- ограничить количество IMAP-соединений в настройках почтового клиента. Подробнее в статье Ограничение IMAP-соединений,
- проанализировать запущенные процессы самостоятельно или обратившись за помощью к разработчикам сайта.
Если вам не удалось самостоятельно устранить ошибку 500, обратитесь в техподдержку.
Скрипты работают слишком медленно
На каждом виртуальном хостинге есть ограничения на время выполнения скрипта. Если за установленное время скрипт не успевает выполниться, возникает ошибка сервера 500. Для решения проблемы обратитесь к разработчику сайта и оптимизируйте скрипты. Если оптимизировать нельзя, перейдите на более мощный вид сервера.
У пользователей VPS есть возможность увеличить максимальное использование оперативной памяти на процесс, но лучше делать скрипты меньшего размера.
Ошибка 500 на сайте, созданном на WordPress
WordPress предлагает много плагинов для создания хорошего сайта. Они значительно расширяют возможности CMS. Однако они же могут нарушать работу сайта и вызывать ошибку 500. Вызвать ошибку могут как недавно установленные плагины, так и старые.
Для начала проверьте, нужно ли обновить плагины. Часто устаревшие плагины перестают работать и вызывают проблемы работы сайта. Если все плагины обновлены, но 500 Internal Server Error остаётся, отключите все плагины, чтобы убедиться, что именно они мешают работе сайта. Как только станет понятно, что виноват один из плагинов, отключайте их по очереди, пока не найдёте тот, который нарушает работу сервера.
Как отключить плагин в WordPress
- 1.
-
2.
Перейдите во вкладку «Плагины» ― «Установленные».
-
3.
Нажмите Деактивировать у плагина, который, как вам кажется, повлиял на работу сайта:
Если все ваши действия не решили проблему или вы не уверены в своих технических знаниях, обратитесь к службе технической поддержки. Сообщите время обнаружения проблемы и опишите все действия, которые вы предприняли перед обращением. Специалисты сделают детальную проверку настроек вашего сайта и при необходимости обратятся к администраторам сервера на стороне хостинг-провайдера.
An HTTP 504 Gateway Timeout error is the most common error encountered by website developers. And in many cases, it can become a real pain.
Generally, it’s difficult to find out the reason for a timeout error because the server response has no helpful information about the error cause.
In this article, we’ll find ways to troubleshoot timeout errors and find solutions for them, while giving you a better understanding of timeout errors and their causes.
What is a 504 Timeout error?
To deeply understand what a 504 Gateway Timeout error is let’s first have a look at server and client relationships.
What happens when the client sends an HTTP request to the server? When the server receives the request, it processes it, and–depending on whether the result is successful or unsuccessful–returns a response with the corresponding HTTP status code in the HTTP response headers.
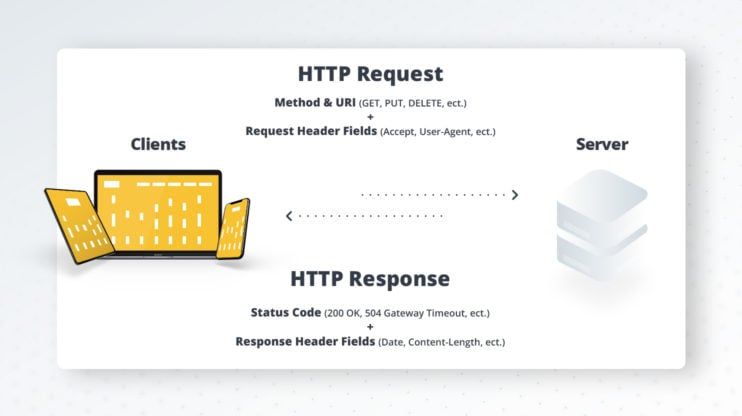
HTTP status codes are a very important part of the conversation between web servers and clients.
You can find the status code in each server response. All HTTP response status codes are separated into five classes or categories. Each status code is a 3-digit number where the first digit defines the class of response, while the last two digits don’t have any classifying or categorizing role. Here is a list of status codes:
- 1xx informational response – the request was received, and is being processed
- 2xx successful – the request was successfully received, understood, and accepted
- 3xx redirection – further action needs to be taken in order to complete the request
- 4xx client error – the request contains bad syntax or can’t be fulfilled
- 5xx server error – the server failed to fulfill an apparently valid request
If the request is processed successfully by the server it’ll return status code 2xx.
For example, the 200 status code indicates that the server understood the request and successfully processed it. A 201 status code indicates that the request was successful and, as a result, the resource has been created.
The 5xx status codes indicate that there are problems with the server. We have a 504 Gateway Timeout error when the server is running as a gateway or a proxy server. This error happens when the server can’t receive a timely response from the upstream server.
If there’s an issue in the server besides a 504 Gateway Timeout error, it often returns one of these status codes:
500 Internal Server Error
A generic error message for an unexpected condition that has no suitable specific message.
501 Not Implemented
The server either doesn’t recognize the request method, or it lacks the ability to fulfill the request.
502 Bad Gateway
The server is acting as a gateway or a proxy and receives an invalid response from the upstream server.
503 Service Unavailable
This code indicates that the server is temporarily unable to process the client’s request because it is overloaded or down for maintenance.
You can come across other 5xx unofficial codes, like 509, 526, 529, 530, 598, etc. The following codes are not specified by any standard.
504 Errors: Appearance
A 504 Gateway Timeout error can appear in different ways. Depending on the operating system, web browser, and device it may have different looks.
Some websites can customize the template of a 504 Gateway Timeout error to make it look more original and less annoying. Here’s a Google example:
Different platforms can change the timeout error message. So you can come across different timeout messages but they all have the same meaning.
- 504 Error
- Gateway Timeout (504)
- HTTP 504
- 504 Gateway Timeout
- Gateway Timeout Error
- HTTP Error 504 – Gateway Timeout
- Error 504 Gateway Timeout
What causes timeout errors?
A 504 error is a server-side error. In other words, the problem is on the server. This error can occur because of networking errors between servers.
But in very rare cases an error can be caused by client-side issues that are connected to your device or your networking device. For example when you’re trying to access a website from your computer and get a timeout error. In this case, there are some tips to solve this error from your end. We’ll go through these tips in the next section.
Client-side troubleshooting strategies
In very rare cases the cause for 504 errors is on your end. Here are very simple ways to fix it.
Reload the page
The first thing that you should do is reload the page and wait for a minute. If the timeout error disappears it means that it was a temporary problem with the actual server or the networking between servers.
Restart network devices
If reloading the page doesn’t give any result, try to restart your device and your network devices such as modem or router. After restarting the devices reload the page. If it works it means that the temporary problem was on your devices. If not try further steps.
Flush DNS cache
The problem can be from your DNS servers. Linux, Windows, and macOS save name resolution information in the form of a DNS cache. You can clear your DNS cache. For flushing cache on Windows, open Windows command prompt and type:
ipconfig /flushdns
In case of success, you have to get the ‘Successfully flushed the DNS resolver Cache’ message.
On macOS you should open the terminal and type
sudo killall -HUP mDNSResponder
There’s no message after processing this command, you can add your own, by running the command in this way
sudo killall -HUP mDNSResponder; dns cleared successfully
Cleaning a DNS cache on Linux differs from macOS and Windows. Different Linux distributions use different DNS services. Some of them are NSCD (Name Service Caching Daemon), dnsmasq, and BIND (Berkeley Internet Name Domain). Open the terminal and depending on your own Linux distribution DNS server use one of these commands to flush DNS cache on Linux:
For an NSCD DNS cache:
sudo /etc/init.d/nscd restart
For a dnsmasq DNS cache:
sudo /etc/init.d/dnsmasq restart
For a BIND DNS cache:
sudo /etc/init.d/named restart
sudo rndc restart
sudo rndc exec
If the terminal asks, enter your password. If this doesn’t help, try the next steps.
Change DNS servers
If cleaning the DNS cache didn’t help then you can change your DNS servers. When you change the DNS servers that your internet-connected device uses, you change your servers, usually assigned by your ISP. You can read this article for more information about changing DNS servers: Change your DNS servers settings.
In case you’re using Cloudflare
Cloudflare returns a 504 error and shows a screen with a 504 error custom template when your origin web server responds with a standard HTTP 504 Gateway Timeout error:
This is because something is wrong with your server. You can try to fix it with the steps that we’ve already described if it doesn’t help connect to your hosting provider.
If the 504 error is from Cloudflare, the screen may look like this:
If the error doesn’t contain the word “Cloudflare”, it means that the problem comes from the actual server. If the error contains the word “Cloudflare”, contactCloudflare support. The same goes for 502 Bad Gateway errors. More about Cloudflare 5xx errors you can find in this article: Troubleshooting Cloudflare 5XX errors.
Server-side troubleshooting strategies
As mentioned the main reasons for 504 Timeout Errors are server-side issues. This can happen due to a variety of reasons: server-side infrastructure, limited server-side parameters, improper firewall configuration, bots, attacks, heavily working PHP scripts, or WordPress imports.
To find out the reason for 504 Timeout Errors you can check your server logs. By checking access logs you can discover if there are any spams from bots. You can also check error logs for information about issues on your website. With 10Web, you can easily do this by going to Hosting Services > Logs. You can select Access Logs, Error Logs, PHP-FPM Logs from the selection at the top of the page.
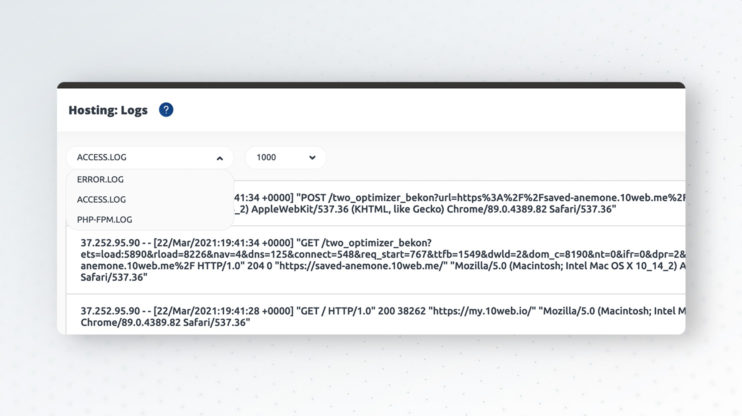
If you have access to your server, you can check server logs. Depending on your web server type (Nginx or Apache) the logs can be in /var/log/nginx or in /var/log/apache2 correspondingly.
Server-side infrastructure
Efficient server-side infrastructure has a huge role in avoiding 504 errors. Many shared hostings don’t provide enough resources for high-traffic websites.
That’s why contrary to shared hostings, we, at10web, provide automated WordPress hosting powered by Google Cloud, allowing us to use Linux containers to isolate the resources provided to you. In other words, the MySQL database is in a separate instance which makes lower load in instances possible; hence, there are less 504 errors. If you face a 504 error write to our customer support and the issue will be solved immediately.
Server-side parameters
The other major reason for a 504 Timeout Error is the number of PHP workers. PHP workers are background processes that are responsible for processing PHP code.
If you have only one PHP worker your site can process only one request at once. But this doesn’t mean that the second request won’t be processed. Instead, the PHP processes will be placed in a queue. Only after processing the first request the PHP processes that are next in line will be processed.
In case all PHP workers are busy and the queue is full, 504 or 502 errors may occur. So it’s very important to understand the exact number of workers that will best serve your needs. Depending on your website type (it can be a simple blog or an eCommerce platform that requires processing non-cached pages) you’ll need a different number of PHP workers. Increasing the number of workers allows your website to serve more concurrent requests.
Improper firewall configuration
Another reason for a 504 Gateway Timeout error can be improper firewall configuration.
A firewall is a network security system that monitors and controls incoming and outgoing network traffic based on predetermined security rules. It typically establishes a barrier between a trusted network and an untrusted network.
In some cases, there can be awkward firewall settings that consider safe and valid content malicious and, consequently, cut off traffic which in turn can lead to 504 Timeout Errors. Check your server error logs to find out if your firewall has improper configs.
Bots & attacks
Many requests from bots or DDoS attacks by hackers may lead to performance issues in your website which can be a reason for timeout errors. To avoid this you can use Cloudflare, a market leader in DDoS protection.
3rd-party plugins & theme
Heavily working PHP scripts that are written in a non-optimal way can be the reason for timeout errors.
If you have a 504 Gateway Timeout error and find that everything is ok with your server configuration, check plugins your and the theme of your WordPress website.
Deactivate all plugins and start activating them one by one to find out the guilty ones. If you can’t open your WordPress admin dashboard because of the error but have file access to WordPress installation, just rename the plugins folder in wp-content. This will deactivate all plugins. For your theme, you can temporarily change the theme to WordPress’ default theme to discover the issue.
504 Gateway Timeout errors can occur due to cron jobs that are running on your server doing heavy tasks. For checking which crons are running, you can use the WP Control plugin which allows you to view and control what’s happening in the WP-Cron system. If you have access to wp-cli you can run this command for checking crons:
wp cron event list
The result will be:
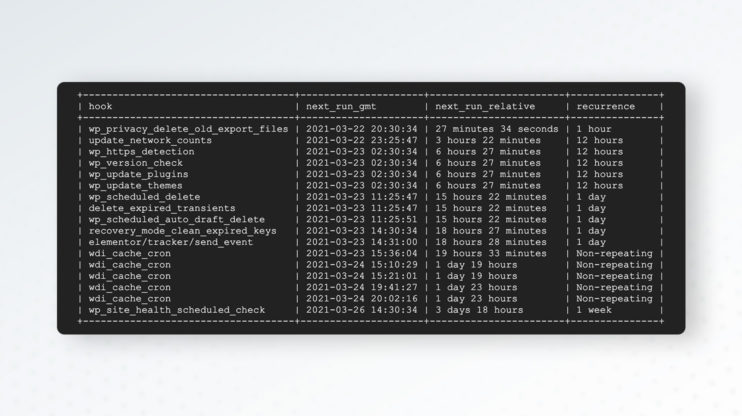
To avoid timeout errors you can configure your wp cron in a way that allows it to run like a real cron. Since wp cron works during the request it has max execution time limitation and, hence, can lead to timeout errors. Read more about this here.
Inefficient database queries can also cause timeout errors. To discover such queries you can use the Query monitor plugin, which is a developer tools panel for WordPress. It enables debugging of database queries, PHP errors, hooks and actions, block editor blocks, enqueued scripts and stylesheets, HTTP API calls, and more.
Another useful tool to find timeout errors is wp profile-command package for wp-cli.This doesn’t come with wp-cli. You have to install it yourself. It gives you profiling information about how long each step of your WordPress website loading process has taken. If you have ssh access to your website, you can easily install it by running this command
wp package install [email protected]:wp-cli/profile-command.git
More info about wp-cli you can find in this article: The Last Guide to WP CLI You’ll Ever Need.
WordPress Imports
The plugins WP All Import or WordPress Importer are widely used by WordPress developers for importing XML, CSV files and images to their websites. If the connection between the server and the client is open for a long time during import it can cause timeout errors.
To solve this problem you can try to import the file by chunk, i.e. by dividing it into smaller files. If you have access to wp-cli you can try this command for importing a file:
wp import example.wordpress.2021-03-23.xml
Server configuration
In this section let’s have a look at specific server-side parameters. Increasing these parameters can help solve 504 timeout issues.
If you want to increase max execution time for your php scripts then change the max_execution_time parameter in your php.ini file
max_execution_time = 300
The default value of max_execution_time is 30 seconds.
If your website is running with an Apache web server you can change the TimeOut directive in the httpd.conf file.
TimeOut seconds
Syntax:
TimeOut seconds
Default: TimeOut 300
Context: server config, virtual host
If your website is running with a standalone Nginx web server with a FastCGI Process Manager (PHP-FPM) you can open /etc/php7.4/fpm/pool.d/www.conf and set
request_terminate_timeout = 300
If you want to increase the time limit for a given site, open the /etc/nginx/sites-available/example.com and increase the fastcgi_read_timeout directive
location ~ .php$ {
include /etc/nginx/fastcgi_params;
fastcgi_pass unix:/var/run/php/php7.4-wplive.sock;
fastcgi_read_timeout 300;
}
To increase the time limit for all sites, open the /etc/nginx/nginx.conf file and
http {
	#...
        fastcgi_read_timeout 300;
	#...
}
After changing params don’t forget to reload PHP FPM and Nginx:
sudo service nginx reload
sudo service php7.4-fpm reload
If you’re using Nginx as a reverse proxy server for Apache then you have to change these directives in your nginx.conf file:
proxy_connect_timeout 600;
proxy_send_timeout 600;
proxy_read_timeout 600;
send_timeout 600;
After increasing params reload Nginx
sudo service nginx reload
What is ERR_CONNECTION_TIMED_OUT?
ERR_CONNECTION_TIMED_OUT means the server is taking too much time to reply.
This error appears when your website is trying to do more than your server can manage. It’s particularly common on shared hosting where your memory limit is restricted.
To fix this you can clear the browser cache or open the page in incognito/private mode. Try all steps mentioned under the section “Client-side troubleshooting”.
Increase your memory limit in wp-config.php. If you don’t have access to your server you can ask your hosting provider to increase your memory limit for you.
Increase the maximum execution time in your php.ini file as we described above or ask your hosting provider.
Cache implementation
The final step of avoiding timeout errors is using caching on your website.
Caching websites has many benefits. It improves website performance and user experience. And it reduces the load in your hosting server.
With 10Web, you can use our hosting cache, which you can enable by heading to Hosting Services > Tools > Website Caching.
For caching you can use different WordPress caching plugins. The popular ones are WP Rocket which improves loading time and W3 Total Cache which improves the SEO and user experience of your site. <!–More info about caching you can find here.–>
Conclusion
In this article, we explored different ways of troubleshooting and fixing a 504 Gateway Timeout error.
While there’s a variety of reasons for a timeout error, we learned that they’re generally caused by server-side problems.
But, of course, non-optimal PHP scripts and database queries and an appropriate number of PHP workers can also have a huge impact on website performance and consequently cause timeout errors.
That was all for now. Feel free to drop a comment and let us know if we managed to provide a suitable way for you to troubleshoot your timeout error!