Содержание
- Invalid BIOS Image на платах Gigabyte
- Unleashing mode что это?
- Advanced Mode в биосе что это?
- MSI Click BIOS 5 установка windows с флешки
- Как исправить Invalid BIOS Image при обновлении BIOS?
- Что делать?
- System bios image invalid or corrupt
- System bios image invalid or corrupt
- System bios image invalid or corrupt
Invalid BIOS Image на платах Gigabyte

Что значит и как исправить ошибку Invalid BIOS Image при обновлении на платах Gigabyte?
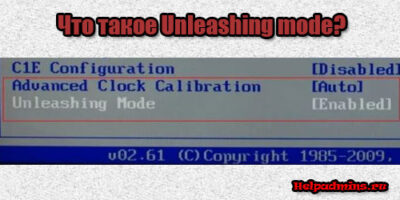
Unleashing mode что это?
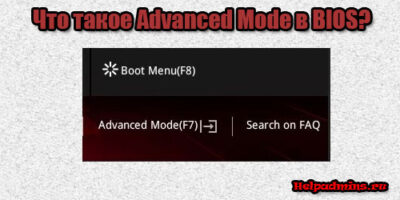
Advanced Mode в биосе что это?
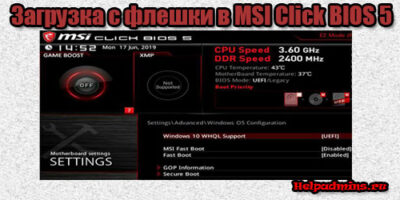
MSI Click BIOS 5 установка windows с флешки
Как исправить Invalid BIOS Image при обновлении BIOS?
На современных материнских платах процедура обновления BIOS уже давно стала рядовой ситуацией. Самая частая причина для чего это делается – установка процессора, который поддерживается только более новыми версиями BIOS.
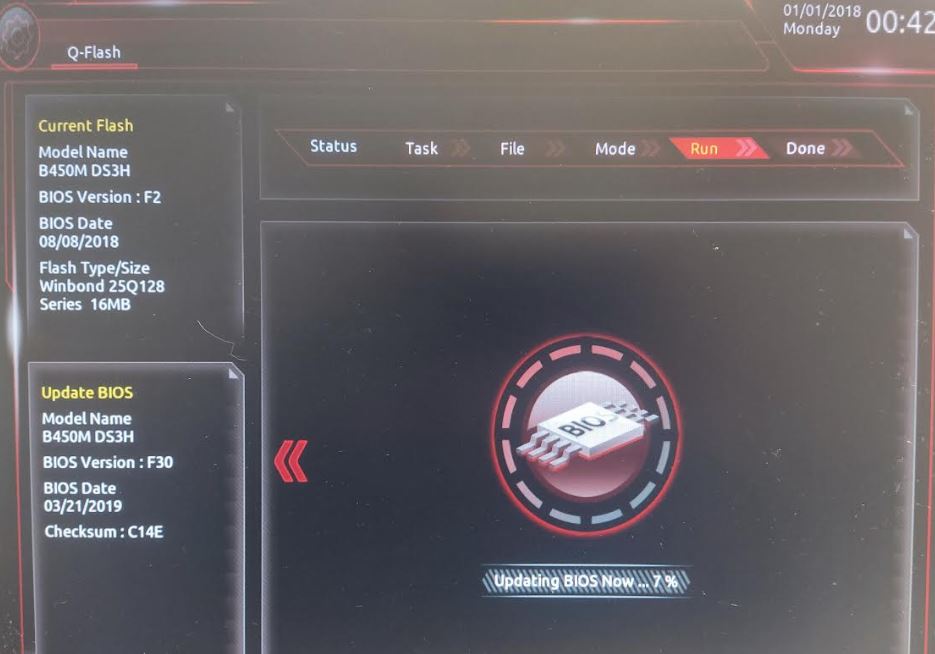
На материнских платах от Gigabyte для обновления BIOS присутствует встроенная утилита Q-Flash. С ее помощью можно всего за несколько кликов мышкой установить последнее обновление BIOS без запуска операционной системы.
Но не всегда эта процедура проходит гладко. Например, частой ошибкой, возникающей в процессе, является “Invalid BIOS Image”. О ней мы и поговорим в этой статье.
Что делать?
Первым делом стоит убедиться, что вы пытаетесь установить BIOS именно для вашей платы. Не поленитесь сверить маркировку своей платы с маркировкой на сайте производителя. Влиять может даже ревизия платы!
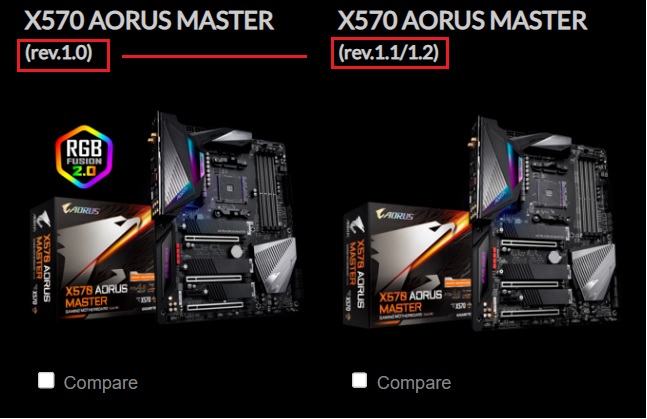
Одна и та же плата, но с разными ревизиями
Если с моделью и ревизией все хорошо, то причина скорее всего в том, что между установленной версией BIOS и той, которую вы пытаетесь поставить, выходило несколько промежуточных версий. И чтобы установить последнюю, нужно последовательно устанавливать предыдущие в порядке возрастания.
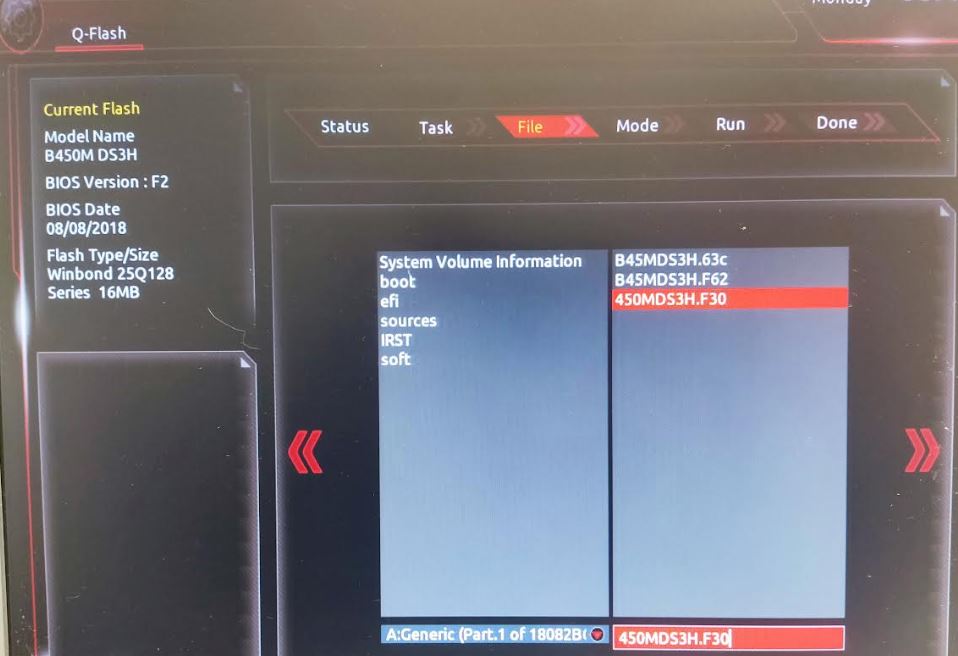
Последовательная установка обновлений BIOS
Например, на плате стоит версия F2, а вы ставите F60, но между ними были версии F10, F20, F30 и F50. В этом случае чтобы обойти ошибку Invalid BIOS Image, нужно сначала установить F10, потом F20 и так далее, пока не дойдете до требуемой F60.

Предупреждение о последовательности обновления BIOS
Только при попытке обновиться с F50 до F60 вы не поймаете ошибку Invalid BIOS Image.
Лучшая благодарность автору — репост к себе на страничку:
Источник
System bios image invalid or corrupt
08-16-2010 11:23 AM — last edited on 08-16-2010 01:50 PM by WendyM
- Mark as New
- Bookmark
- Subscribe
- Permalink
- Flag Post
message says «system BIOS image is invalid or currupt (252) Pleae download patch again. if error continues contact support.»
now what do I do? support will not talk to me without paying. I have had mulitiple problems since this was new in November-nothing has been fully solved. Now I get shut down, shut out. cannot get past the hp blue screen at start up. shuts down spontaneously and often will not come back from sleep. this morning I came back after a 2 hour absence to a black screen with the Reboot and select proper boot device message. this means nothing to me. I have to cold boot and then sometimes repeat on and off for an hour to get it to actually boot back up.
Also, I only play casual games, one player on my machine, not online, the past month all my games are dragging, before this they were fine-the reason I bought a new computer in the first place; that and my 9 year old gateway finally bit the dust after no problems EVER. I sorely regret buying this new machine.
I can follow instructions for dummies. I have installed extra hard drives in my old machine and extra RAM and video cards on my own.
Any advice on how to get this computer to work as it should would be appreciated. I have an online business that this cripples terribly.
Thanks in advance for any help.
Model #: p6210f
Product #: NY544AA-ABA
Serial #: [text removed for privacy]
Software Build #: 94NAv6PrA2
Service ID #: 112-209
PCBRAND: Pavilion
using wired keyboard that came with and Logitech wireless mouse, have scanner and printer attached but not powered on.
Источник
System bios image invalid or corrupt

04-20-2021 04:10 PM — edited 04-20-2021 04:11 PM
- Mark as New
- Bookmark
- Subscribe
- Permalink
- Flag Post
Could you explain me howto upgrade bios in HP Pro 3300MT?
I have try with sp64125.exe and other files presents in HP support web pages but the installation fail.
04-20-2021 06:44 PM
- Mark as New
- Bookmark
- Subscribe
- Permalink
- Flag Post
When I look at your PC’s support page, I see a much newer BIOS update than that one.
Under the W8 driver section, I see version 8.13 dated 19 Dec 2014.
You really should be updating the BIOS using a supported operating system.
None of the BIOS updates were written to be run on Windows 10.
04-25-2021 08:09 AM
- Mark as New
- Bookmark
- Subscribe
- Permalink
- Flag Post
I haven’t W8 installed.
How can I update the bios with W10? Is not possible upgrade it with USB key bootable?
Can you tell me wich file I need to put into USB bootable key to upgrade the PC?
04-25-2021 09:08 AM — edited 04-25-2021 09:08 AM
- Mark as New
- Bookmark
- Subscribe
- Permalink
- Flag Post
I know you don’t have W8 installed, which is why I advised you that it could be risky to update the BIOS in W10.
Your only options would be:
1. Risk updating the BIOS by running the file in W10, knowing that it may not work and completely wreck your PC.
2. Install Windows 7 or Windows 8 and safely update the BIOS using one of those operating systems.
The BIOS updates can only be run in Windows. I used the free 7-zip utility to extract the exe file into a folder, and there are no DOS files. just a Windows flash program.
This is the latest BIOS update file for your PC for Windows 8: v8.13
This is the latest BIOS update file for your PC for Windows 7: v8.06
04-25-2021 10:10 AM
- Mark as New
- Bookmark
- Subscribe
- Permalink
- Flag Post
Isn’t there no solutions with USB bootable key and DOS prompt?
04-25-2021 10:23 AM — edited 04-25-2021 12:14 PM
- Mark as New
- Bookmark
- Subscribe
- Permalink
- Flag Post
EDIT: I find the process below to be even better than a DOS approach to upgrading BIOS. With some HP BIOS updater SoftPaqs once they are unpacked there will be a DOS folder inside. This one does not give you that, and the upgrade of BIOS from within BIOS is less risky and more streamlined in our experience in all cases. Read on.
With older HP workstations and PCs updating the system ROM (BIOS) from within an operating system that the HP BIOS updater was not designed for could be risky. For example, initially we thought the xw and Z workstations could safely updated BIOS using the HP updater program designed to run under W7Pro64. That worked some of the time, but there were a rash of cases of motherboards being bricked if the workstation was running W10Pro64 at the time. HP did some fixes and the problem became less common but still is an issue.
However, there is a safer way. updating BIOS from within BIOS, and I have posted many times in the forum about this. Below are the basics. You can extract the BIOS .bin file (.ROM file) with this information. Here are the steps:
1. Paul gave you the link for the latest BIOS for your 3330 MT. if you copy that, change the extension from .exe to .html you’ll see the HP ReadMe for the SoftPaq. This works for all these .exe files from HP, and click on this to see:
Note that it supersedes SP69169, with release date 12/19/14 and includes functionality for W8Pro64 so it may run fine on W10Pro64. I would not take that risk, however, given what I’ll present below.
2. Updating BIOS from within BIOS requires that your BIOS has been programmed with that capability built in. To confirm that for you I downloaded the latest technical and service manual for your PC, HERE
On page 10 in the BIOS setup section you can see the quote «Flash System ROM Allows you to update the system ROM with a BIOS image file located on removable media». This is the same case for the more advanced HP workstations. your BIOS allows you to update BIOS from within BIOS, before any of the complexities of an operating system come into play. This method is OS-independent. The process runs under the most privative OS your computer can run. BIOS itself.
From this older era of workstations and HP PCs you simply use a smaller FAT32 formatted thumb drive and copy only the .bin (.ROM) file onto it. (EDIT: regarding setting BIOS to factory defaults. I’d probably just try first using what BIOS settings you currently are using, and only change to factory defaults if things don’t work well.) You should have the BIOS set to factory defaults before you do this, have the computer fully off, insert the thumb drive, do a cold boot, navigate into BIOS first page, and in there you should click on «Flash System ROM». BIOS should then know to look for the USB thumb drive, find it, and proceed with the update. Do not rush things. let it fully finish its work.
3. How do you find that critical .bin (.ROM) file? You can do this on any another computer any time to harvest it. download the SoftPaq from the .exe link Paul gave you (get the the latest SP70159 version). Run that on any computer as administrator. this will unpack the SoftPaq. On W10 here I saw a brief flash of what appeared to be a DOS screen. nothing else. Now navigate into the root level of your C drive. There will be a new folder there, SWSetup, and in there will be a «SP70159» folder. Inside that will be the following 4 items, and this image will show when a moderator releases it:
The BIOS version 8.13 file shown above ends with «.ROM». For many of the other higher end workstations it ends with «.bin». Same thing. It is about 8MB in size. That file is the only thing that you copy to the top level of a blank thumb drive for this project. Note that the thumb drive is not bootable. BIOS takes care of using the thumb drive. In the past we have found using a small thumb drive is better than a large one. It only has to hold about 10 MB. so I use an old 256 MG stick, freshly FAT32 formatted.
You may not know that a .bat file is a batch file and can be viewed by changing the extension from .bat to .txt. My system is set up to show extensions of known file type. I change to that in all builds so I can easily see that added bit of info. Below is what the batch file does. Note that this is just for interest. when you do this process with a thumb drive BIOS itself does all the work of flashing the firmware on a motherboard’s BIOS EEPROM chip. But here is what happens if you ran that batch file from within an operating system. You can see that if a new OS such as W10 has any name changes from those included in this small batch file program the upgrade will not work. That is why the upgrade of BIOS from within BIOS is so helpful:
mountvol z: /s
del z:efihpbioscurrent*.bin
copy .PO2_813.ROM z:efihpbioscurrent
mountvol z: /d
safuwin PO2_813.ROM /p /b /n /r /reboot
4. Depending on the BIOS the upgrade may result in one or even more restarts, including in some newer workstations what appears to be a full automatic shutdown and then automatic cold boot, and then some added things. So, give it time. The later Z workstations from the ZX40 generation upwards use a slightly different thumb drive approach. It involves a nesting of several folders with exact names for each, with the .bin file placed in the deepest folder. That approach is not used from the ZX20 generation workstations and backwards in time. Also, earlier BIOS such as in the ZX20 and before does not include full USB3 capabilities so I always plug the USB stick into a USB2 port out of habit.
5. A rare added bit of technique: HP on its initial release of some workstations installed such an early version of BIOS that the upgrade process required use if an intermediate higher level first, and only after that was done could the upgrade to the latest version proceed. I call this a «Step Up» BIOS upgrade, and it is rare to see these days. Some early release ZX20 version 1 workstations with their original BIOS still installed need this. I’m quite sure you’ll not need to deal with that.
Finally, please get back to us when you try this. A quick google search shows the BIOS upgrade process done from within an operating system on these computers has been a source of trouble for many. I have upgraded BIOS from within BIOS many times on many HP consumer PCs and enterprise grade workstations and never have failed.
Источник
System bios image invalid or corrupt
I need to update BIOS on my notebooks.
I used my second computer to creat a BIOS recovery drive on my USB.
I used this way:
Recovering the notebook BIOS using an external storage device
I download recommended version:
sp62234.exe
After step «5. In the Location to Save Files window, click Change .»
The HP System BIOS Update Utility DOSENT opens and i have 2 errors:
1.IHISI: Get support mode fail in SMI!
2. BIOS did not support InsydeFlash!
01-03-2017 06:59 AM — edited 01-03-2017 07:03 AM
- Mark as New
- Bookmark
- Subscribe
- Permalink
- Flag Post
Welcome to the HP Forums 🙂
I would like to take a moment and thank you for using this forum, it is a great place to find answers.
As I understand you are having issues updating BIOS and you cannot create a BIOS recovery drive on the usb due to the ERROR,
I’ve gone through the entire description and found a related HP Forums post during my research to find you Fix, please Click here for details.
If I have helped you resolve the issue, feel free to give me a virtual high-five by clicking the ‘Thumbs Up’ icon below,
Followed by clicking on «Accept as solution» from the drop-down menu on the upper right corner,
Thank you for posting in the HP Support Forum. Have a great day!
Riddle_Decipher
I am an HP Employee
01-28-2018 10:37 PM
- Mark as New
- Bookmark
- Subscribe
- Permalink
- Flag Post
The HP insydeflash utility to creat a flash USB for BIOS update only works on HP’s computers. However, when your BIOS have problem, you cannot boot your computer and obivously you need to use another computer to run this utility, and which is most likely not a HP computer. That’s why we all encounter this problem.
Finally, i found the solution in this youtube: https://youtu.be/O2W6FZ64dmI
Follow the instruction on the youtube to extract the bios file. Then use the HP’s UEFI interface to flash it. You may need to create a UEFI flash usb and copy the bios files to the flash usb.
It spent me a whole day to figure it out! I hope it can help the others!
Источник
Hello, I tried to update the bios with bios file from Gigabyte here : http://www.gigabyte.com/products/product-page.aspx?pid=2959#bios
on 3 different flash drives all FAT32, from bios F7 on up and its a no go no matter what I do ? Currently @ F6c and was trying to remedy Memory timing issue with corsair XMS triple channel ram. I managed to get all 6 sticks of ram working now at the appropriate timings but being unable to flash the bios really REALLY irks me, I did flash it once when I bought the board so I know it can be done just not 4 yrs later 
Other than use the @bios utility which of course would invite disaster, any ideas?
Specs :
1 x GIGABYTE GA-EX58-DS4 LGA 1366 Intel X58 ATX Intel Motherboard
1 x PowerColor AX4850 512MD3-DH Radeon HD 4850 512MB 256-bit GDDR3 PCI Express 2.0 x16 HDCP Ready CrossFireX Support Video Card
1 x OCZ StealthXStream OCZ600SXS 600W ATX12V / EPS12V SLI Ready Active PFC Power Supply
1 x Intel Core i7-920 Bloomfield 2.66GHz LGA 1366 130W Quad-Core Processor BX80601920
2 x CORSAIR XMS3 3GB (3 x 1GB) 240-Pin DDR3 SDRAM DDR3 1333 (PC3 10666) Triple Channel Kit
AFter that if i did use @BIOS, I would be able to recover the system if it gets borked , using the dual bios feature and removing CMOS battery for a period of tiem, correct?
Thnks for looking.
s

Logged
Hi and welcome.
There is no reason why you can’t upgrade the BIOS with QFlash. If you are having a problem, it is probably something that you are doing wrong. The newest full BIOS is F11 or if you want to use a Beta version F12O is available from our website.
http://uk.gigabyte.com/products/product-page.aspx?pid=2959&dl=1#bios
I think that maybe you are trying to use the wrong BIOS as there is no F7 on the list at all. Download the one you want and the unzip it to give you three files. The only one you need to put on your pendrive is the actual BIOS file.
Logged
Gigabyte X58A-UD7
i7 920
Dominators 1600 x6 12GB
6970 2GB
HX850
256GB SSD, Sam 1TB, WDB320GB
Blu-Ray
HAF 932
Gigabyte Z68X-UD5-B3
i7 3770K
Vengeance 1600 16GB
6950 2GB
HCP1200W
Revo Drive x2, 1.5TB WDB RAID0
16x DLRW
StrikeX S7
Full water cooling
3 x 27″ Iiy
Hi , Thanks for responding, I was not clear, I read quite a few posts here and most of the advice said flash oldest up to newest so that is what i did, Yes there is no F7, , hit the wrong key but I did try to flash every bios listed on the link above which is the right page for this mobo, I posted the links so you could check and be sure I was flashing for the right mobo.
bottom line is I can flash NO bios from that link regardless of the order of bios version I flash it. It could be I am not using the right bios, could you check my link? For sure this is my mobo, I can see the numbers on the board under the slot I have done this many times before and many other boards so I’m not a n00b or an idjit but I might be missing something ??
I;m tired , hope this makes sense.
s
Logged
Regarding the motherboard number, it should be printed in white on the board usually somewhere near the centre. Write down this number exactly as seen. Then look on the motherboard at the bottom left hand side near the PCIE slots for the revision number. Again it will be printed in white and will be in the format of REV:1.0 for example. This is important because sometimes there are multiple revisions of the same model of motherboard.
With this information you can then enter the board number into the search box on this page :
http://uk.gigabyte.com/support-downloads/download-center.aspx?kw=GA-81845GV-C
and then choose the correct revision number from the list that is given.
Logged
Gigabyte X58A-UD7
i7 920
Dominators 1600 x6 12GB
6970 2GB
HX850
256GB SSD, Sam 1TB, WDB320GB
Blu-Ray
HAF 932
Gigabyte Z68X-UD5-B3
i7 3770K
Vengeance 1600 16GB
6950 2GB
HCP1200W
Revo Drive x2, 1.5TB WDB RAID0
16x DLRW
StrikeX S7
Full water cooling
3 x 27″ Iiy
Yes that is the link and yes my motherboard is GA-EX58-DS4.
NONE of those bios will flash using Qflash on my board. I get invalid bios image.
Can you help as to the why?
thanks
s
Logged
I can’t imagine why none of the BIOSes will work on your board. Maybe it is corrupted and that is the reason. Try following these instructions to flash the Backup BIOS over the Main BIOS and hopefully that will be alright. You can then upgrade the BIOS properly.
You can kick in the backup BIOS by shutting down the PSU from the wall, then hold down your case power button in and then turn on the power supply button, a few seconds later the board will start, shut off the power supply then. Then you can turn on the power supply again and power up the board normally and DualBIOS will kick in.
Logged
Gigabyte X58A-UD7
i7 920
Dominators 1600 x6 12GB
6970 2GB
HX850
256GB SSD, Sam 1TB, WDB320GB
Blu-Ray
HAF 932
Gigabyte Z68X-UD5-B3
i7 3770K
Vengeance 1600 16GB
6950 2GB
HCP1200W
Revo Drive x2, 1.5TB WDB RAID0
16x DLRW
StrikeX S7
Full water cooling
3 x 27″ Iiy
Yes I tried that too, left it off and cmos battery out over night. Still no love.
I think I am going to try @BIOS utility, Gigabyte tech support actually emailed me with a link to the proper utility for me so Ill let you know how that goes.
In 22 years of tinkering with computers, I have never had this problem. Oh well I’ve never seen everything yet .
Thank You for your assistance
s
Logged
-
#1
I just built my new rig and I have a lot of little issues that I believe can be fixed via a BIOs updated. I’ll try to keep them short. First things first:
Specs:
i7 6700k stock
Gigabyte gaming 7 z170 (rev 1.0) (Firmware F3)
G.SKILL Ripjaws V Series 16GB (2 x 8GB) 288-Pin DDR4 SDRAM DDR4 3200
SAMSUNG 950 PRO SERIES SSD PCIE M.2 512MB (Primary — Win 10 installed)
GTX 780 Stock
750W PSU — Corsair
Windows 10 Pro
1. My boot time is way too slow. The gigabyte screen flashes twice, then a blinking cursor shows up taking all together a good 25-30 seconds before Win 10 boots up. I have the OS installed in PCIE SSD.
2. Samsung magician is giving me read at 1900 mbs and write at 900mbs for the PCIe SSD. Is that correct? I’d assume it should be faster. And under «OS Optimization» is tell me my OS cannot be optimized.
3. I assumed I can fixed the problems by updating the BIOs. I tried to update it via Q-flash and got «invalid BIOs Image» via USB. I also tried with @BIOs. I did try to do it in increments, from F3-F4, but it wouldn’t work. @BIOs would just keep flashing «writing» «erasing» at 0% and eventually fail.
Got scared and didn’t do it again. I’ve formatted it to FAT32 and put all three files on the root of the drive.
Let me know if there’s any other information you guys might need.
-
#5
1. My boot time is way too slow. The gigabyte screen flashes twice, then a blinking cursor shows up taking all together a good 25-30 seconds before Win 10 boots up. I have the OS installed in PCIE SSD.
Did the Bios update fix this problem? I have a similar issue with an Asus z170m-plus that I’m struggling with (also using a samsung 950 pro)
-
- Feb 19, 2013
-
- 11,727
-
- 332
-
- 76,490
- 3,371
-
#2
http://bootableusb.net/create-bootable-dos-usb-drive/
Try it and see if you can boot into DOS.
Flashing the BIOS with EFIflash:
Download the BIOS File for your motherboard and save it to your desktop so that you can find it easily. Double click on the 7Zip file (it is self extracting) and it will put the 3 download files onto your desktop for you. You only need the EFI Flash Exe file and the BIOS File, the Autoexec file can be discarded. Make a note of the BIOS File name as you will need this information later in the process and if you don’t get this part correctly you will not be able to update the BIOS.
Create the Bootable Pendrive using the Rufus program.
Copy the Efiflash exe and BIOS files onto the USB Pendrive
Reboot the PC and press F12 to go to the BOOT Menu.
Select the USB Pendrive and press enter, this will take you into the DOS environment.
At the C:/ prompt type: Efiflash and press enter. This will start the Efiflash tool.
At the C:/ prompt type: efiflash xxxxxx.xx (replace the x’s with the name of your BIOS File that you noted earlier) IMPORTANT: Make sure that you insert a space between the words efiflash and the BIOS name. Also make sure you enter the full point (.) before the BIOS version number. Press enter.
The BIOS Flashing process is now done and there is no further input required. The first stage you will see that the BIOS is being erased. The 2nd stage the BIOS is written and the 3rd stage the BIOS is verified. DO NOT power down or reset the PC whilst this process is happening. Once the BIOS update has been verified the PC will automatically go into a shutdown/restart/shutdown/restart sequence.
-
#3
http://bootableusb.net/create-bootable-dos-usb-drive/
Try it and see if you can boot into DOS.
Flashing the BIOS with EFIflash:
Download the BIOS File for your motherboard and save it to your desktop so that you can find it easily. Double click on the 7Zip file (it is self extracting) and it will put the 3 download files onto your desktop for you. You only need the EFI Flash Exe file and the BIOS File, the Autoexec file can be discarded. Make a note of the BIOS File name as you will need this information later in the process and if you don’t get this part correctly you will not be able to update the BIOS.
Create the Bootable Pendrive using the Rufus program.
Copy the Efiflash exe and BIOS files onto the USB Pendrive
Reboot the PC and press F12 to go to the BOOT Menu.
Select the USB Pendrive and press enter, this will take you into the DOS environment.
At the C:/ prompt type: Efiflash and press enter. This will start the Efiflash tool.
At the C:/ prompt type: efiflash xxxxxx.xx (replace the x’s with the name of your BIOS File that you noted earlier) IMPORTANT: Make sure that you insert a space between the words efiflash and the BIOS name. Also make sure you enter the full point (.) before the BIOS version number. Press enter.
The BIOS Flashing process is now done and there is no further input required. The first stage you will see that the BIOS is being erased. The 2nd stage the BIOS is written and the 3rd stage the BIOS is verified. DO NOT power down or reset the PC whilst this process is happening. Once the BIOS update has been verified the PC will automatically go into a shutdown/restart/shutdown/restart sequence.
I tired that and it got stuck at «loading bios image» or something like that. I waited for 15 minutes and nothing happened.
-
#4
-
#5
1. My boot time is way too slow. The gigabyte screen flashes twice, then a blinking cursor shows up taking all together a good 25-30 seconds before Win 10 boots up. I have the OS installed in PCIE SSD.
Did the Bios update fix this problem? I have a similar issue with an Asus z170m-plus that I’m struggling with (also using a samsung 950 pro)
-
#6
1. My boot time is way too slow. The gigabyte screen flashes twice, then a blinking cursor shows up taking all together a good 25-30 seconds before Win 10 boots up. I have the OS installed in PCIE SSD.
Did the Bios update fix this problem? I have a similar issue with an Asus z170m-plus that I’m struggling with (also using a samsung 950 pro)
Yes. It did. I can boot into windows in ~7 seconds now.
- Advertising
- Cookies Policies
- Privacy
- Term & Conditions
- Topics
Куратор(ы):
DeathBringer
ingviowarr
CodeRush
LS_29
| Автор | Сообщение | |||
|---|---|---|---|---|
|
||||
|
Куратор темы Статус: Не в сети |
Полезные статьи (автор: CodeRush) Открыть для чтения «Устройство файла UEFI BIOS» «Устройство NVRAM в UEFI-совместимых прошивках» «Модификация UEFI BIOS в UEFITool» Софт UEFITool — просмотрщик и редактор UEFI BIOS’ов UEFI утилиты Management Engine ME (Обсуждение), FW и Утилиты Скачать последние версии на GitHub: Обновления для видеоадаптеров 02.01.2019 — В коллекцию добавлены VBIOS + BSF SKL/KBL 1062 Перенос настроек OROM Intel VBIOS — Новая редакция 23.10.2021 GOPUpd v1.9.6.5.k_mod_v0.4.9 — Добавление/обновление EFI GOP Driver для видеокарт на базе AMD и NVIDIA UEFI BIOS Updater — комплект для автоматического обновления EFI, OROM и mCode в UEFI BIOS Все изменения тут [1.79.3] [1,75] [1.70] [Предыдущие версии] Сохраненные статьи с Win-Raid Forum:
• Intel (Converged Security) Trusted Execution Engine: Drivers, Firmware and Tools • Which are the «best» Intel AHCI/RAID drivers? Другие интересности по теме:
• CPUID — CodeName новых процессоров • Добавление NVMe module в BIOS (6-8 Series) • FFS. Считаем контрольные суммы сами (Новое) • FAQ по прошивке и редактор индивидуальных данных BIOS плат ASUS P8xxx и их ROG-аналогов • Потрошим структуру меню Aptio BIOS • Модификация материнских плат 100/200 для поддержки процессоров Coffee Lake 8xxx/9xxx • ASUS Flashback (Новое) Доска объявлений Актуальное 1) В послденее время опять участились жалобы на наличии вируса в пакете UBU, якобы МСЕ,ехе содержит вирус. Поэтому принято решение, что вместо ехе файла теперь будет py исхотдный Пайтона. Чтобы была корректная работа с микодами вам необходимо установить пакет Ptyhon версии 3.7 или выше. А также две библиотеки: https://mega.nz/#F!MSRDxSqR!5etS-te7ZqRQX9Zb25es_A 3) На данный момент рекомендуется использовать UEFITool v0.25.0 (и не выше), до выяснения Мешающие чтению картинки и видео убирайте под спойлер.
|
| Реклама | |
|
Партнер |
|
DenisBob |
|
|
Junior Статус: Не в сети |
DeathBringer писал(а): Если ME обновлять при помощи FWUpdLcl Именно ей и обновлял. Спасибо. |
|
Voyager777 |
|
|
Member Статус: Не в сети |
Привет парни. |
|
Michael_Code |
|
|
Member Статус: Не в сети |
Хочу поменять чип биоса на 16 метровый, Что могу сказать, CodeRush в своё время говорил, это возможно. Где-то есть ссылка, я сейчас, увы, не могу найти. Там перекрёстные ссылки через UEFItool. Удачи, поделись. Я позднее поделюсь его словами дословно. |
|
Voyager777 |
|
|
Member Статус: Не в сети |
Michael_Code писал(а): Лень глядеть, LOM присутствует? эээ, вроде да, это же фрагмент DXE сетевухи, я правильно понимаю? |
|
Michael_Code |
|
|
Member Статус: Не в сети |
эээ, вроде да, это же фрагмент DXE сетевухи, я правильно понимаю? Моё личное мнение — не лезть. Для начала в FIT Последний раз редактировалось DeathBringer 05.04.2020 22:13, всего редактировалось 1 раз. |
|
Rexcor |
|
|
Member Статус: Не в сети |
Тут озадачили версиями микрокодов CPU. HWInfo64 показывает версию CC, а в https://github.com/platomav/CPUMicrocod … ster/Intel есть Цитата: cpu506E3_plat36_ver000000DA_2020-01-09_PRD_68102B04.bin Я так понимаю что это DA версия, то есть новее. Есть защита Intel Bootguard, которая не даёт загрузиться и ругается при изменениях в BIOS, но обновления Intel ME через FWUpdLcl64.exe проходят нормально. Обновления микрокода пройдут нормально или лучше даже не пытаться? |
|
DeathBringer |
|
|
Куратор темы Статус: Не в сети |
Voyager777 Rexcor Добавлено спустя 12 минут 36 секунд: |
|
Rexcor |
|
|
Member Статус: Не в сети |
DeathBringer Ясно, спасибо! |
|
DeathBringer |
|
|
Куратор темы Статус: Не в сети |
Rexcor писал(а): Ещё не придумали как для систем с bootguard BIOS модифицировать хоть как-то? Бесплатных решений не видел. |
|
Rexcor |
|
|
Member Статус: Не в сети |
А платные это замена чипсета? |
|
DeathBringer |
|
|
Куратор темы Статус: Не в сети |
Rexcor писал(а): А платные это замена чипсета? Чипсет-то тут причем? Лучше обратитесь в местный сервис или к проверенным умельцам. За деньги, конечно. |
|
Rexcor |
|
|
Member Статус: Не в сети |
DeathBringer писал(а): Чипсет-то тут причем? Там же без фьюзов чипсета не обошлось же? То есть, включатель или выключатель этой гадости туда записывается на стадии изготовления и далее не удалим никак, только вместе с чипсетом. Мне только один метод известен это купить чистый чипсет, где ничего не записано и перепаять, BootGuard будет всё ещё в прошивке, но будет молчать. |
|
DeathBringer |
|
|
Куратор темы Статус: Не в сети |
Rexcor |
|
Rexcor |
|
|
Member Статус: Не в сети |
И к кому обратиться на тему отключения BootGuard? Если что, речь идёт про Alienware 15 R2. Хочу возможность изменения частоты памяти и таймингов. |
|
LS_29 |
|
|
Куратор темы Статус: Не в сети |
Voyager777 Добавлено спустя 5 минут 16 секунд: DeathBringer писал(а): Кто может подсказать, как по коду VBIOS от Intel определить его версию? Поясни пожалуйста поконкретнее, что именно. |
|
Sav4 |
|
|
Junior Статус: Не в сети |
Postarc писал(а): Что бы иметь возможность прошивать модифицированный биос Gigabyte Z170 последних версий стандартной утилитой Q-Flash и не получать «Invalid BIOS image»: Здравствуйте! Этого пользователя давно не было на форуме, так что буду благодарен всем кто поможет по моему вопросу! |
|
DeathBringer |
|
|
Куратор темы Статус: Не в сети |
LS_29 писал(а): у Интела версии VBIOS всегда в одном месте в обычном глазом читаемом ASCII (dec) формате. Спасибо за помощь — увидел. |
|
dart_raiden |
|
|
Member Статус: Не в сети |
Sav4, а через Flash Programming Tool не проще ли? Он не требует плясок с бубном в отличие от Q-Flash. |
|
Darius13 |
|
|
Member Статус: Не в сети |
Добрый день. |
|
Sav4 |
|
|
Junior Статус: Не в сети |
dart_raiden писал(а): Sav4, а через Flash Programming Tool не проще ли? Он не требует плясок с бубном в отличие от Q-Flash. Боюсь что 7,99мб не заведется при прошивании, поэтому пользуюсь в первую очередь стандартными средствами. Если кто-то поделится положительным опытом прошивания модифицированного биоса с меньшим весом чем был стандартно 8мб, то может осмелюсь попробовать Flash Programming Tool. |
—
Кто сейчас на конференции |
|
Сейчас этот форум просматривают: Google Adsense [Bot], MakYu1 и гости: 20 |
| Вы не можете начинать темы Вы не можете отвечать на сообщения Вы не можете редактировать свои сообщения Вы не можете удалять свои сообщения Вы не можете добавлять вложения |