3ds Max Forum
Welcome to Autodesk’s 3ds Max Forums. Share your knowledge, ask questions, and explore popular 3ds Max topics.
Turn on suggestions
Auto-suggest helps you quickly narrow down your search results by suggesting possible matches as you type.
Showing results for
Search instead for
Did you mean:
-
Back to forum -
Previous -
Next

18458 Views, 16 Replies
01-16-2011
12:15 PM
JPEG — invalid image file header
I am trying to render a file using backburner that was created in Revit 2011 and imported in 3ds Max Design 2011 using FBX. We have the latest version of the FBX plugin and the latest 3ds service pack installed. When we try to render, the rendernodes return the following error: » JPEG — Invalid image file header», and will not complete rendering. We suspect that this might have to do with some of the customized materials made in Revit, but can’t track down the culprit(s). Even if we knew which materials were creating the problem, I’m not sure how we would fix it. Has anyone else run into this problem? If so, were you able to resolve it? Thanks in advance for any suggestions.
-
Back to forum -
Previous -
Next
16 REPLIES 16
![]()
01-17-2011
05:32 AM
probably a bad jpg file.
what i did is open every texture image in photoshop and wait for an opening error. then you got your problem.
www.deanimatiemannen.nl
01-17-2011
05:40 AM
Thanks for the response. Do you mean you checked all the image files in the FBX export folder or in your 3ds Max library?
![]()
01-17-2011
06:19 AM
my project wasn`t revit.
i checked every texture image i used in my file. so materials, envirement etc.
if they are spread all over your HD you can use resource collect (under the utilities tab>more button) but i don`t know if it still works onder 2011….:( i saw a topic about that newly created bug a while back.
good luck
www.deanimatiemannen.nl
![]()
01-17-2011
06:21 AM
oh and the jpeg error could also be a bad tga or someting else. so open every texture nog only the jpg`s
www.deanimatiemannen.nl
![]()
01-18-2011
01:46 PM
I’ve had images in the past with bad file headers and they opened fine in Photoshop. Then you simply resave the file in Photoshop and it gets a new (good) file header and the file is fine. If you have Photoshop, you could create an action to open and save all of the materials you are using in your project. It’s much better if you know which is the problem material though and just resave that one. Opening and saving jpgs is a lossy process, since you are recompressing and already compressed image.
3ds Max 2014, Windows 8 pro 64bit.
NVidia GeForce GTX670
i7 3770K 3.5Ghz , 16Gb CORSAIR Vengeance RAM, other stuff…
01-18-2011
01:54 PM
we have had this problem several times as well.
revit model — linked to 3ds max design 2011.
the bitmaps that come through from revit seem to cause the problem. a few times we also had a revit material with a missing bitmap network path. in the diffuse slot instead of having a bitmap it just says «jpeg image» clearing those has also remedied this invalid image problem.
i would really appreciate an official autodesk person’s response to this… are we doing something wrong here??
01-31-2011
01:36 PM
Completely AGREE with acad-gatsu!
![]()
03-14-2011
03:43 PM
I agree..where is an autodesk rep when you need one? Our office is facing the same issue when linking revit files
![]()
03-15-2011
01:03 AM
Tip. don`t use the revit materials at all. they render much slower because they are set on an higher sample setting.
www.deanimatiemannen.nl
![]()
03-15-2011
07:09 AM
Is there a way to link FBX files and not bring in Revit Materials?

03-15-2011
09:38 AM
Is there a way to link FBX files and not bring in Revit Materials?
I don’t think there’s a way to skip the materials, but you can make your own materials and replace the existing ones. I typically create the main materials that are important, then start making a flat grey material called «Null» that I apply to all the other geometry that we don’t see. In many cases, it all comes in with a Generic material anyway.
Please click Like on any helpful or informative posts!
Chris Medeck Twitter | LinkedIn![]()

07-15-2011
06:52 PM
The path from revit-> max is still bumpy.
Through fbx, there are materials with map nodes that don’t connect to anything.
And when the fbx is unpackaged in 3dsmax the materials that are saved to the .fbm folder are often corrupted.
Often I’ve seen that there are .png and .jpgs of the same image. The jpg is usually the one that is corrupt. An easy solution is to open the png in PS and save it as a jpg over the corrupted image.
www.ramyhanna.com | www.tiltpixel.com
![]()
01-28-2012
01:36 AM
If you are getting error tags while accessing your jpeg images then it is clear indication of corruption in JPEG image files. You will need to perform JPEG repair task to correct this situation. Use third party JPEG repair tool to repair corrupted JPEG image files. It is pretty sure that after repairing the file you will not face any problems in accessing of that files.
07-07-2020
01:05 PM
I just wanted to revive this thread to note that these issues should’ve been fixed already over the years with the newer versions of Revit (and 3ds Max).
However, if you’re still seeing «Invalid header» warnings with .jpg files, I recommend that you try to open the files in Photoshop or a free image viewer, such as IrfanView, then resave them. Thanks!
![]()
Jon A. Bell
Senior Technical Support Specialist, 3ds Max
10-18-2021
06:30 AM
recently i got this error, i am using 3ds max 2022 with backburner 2019.. any other option to solve this problems?
11-03-2022
03:06 AM
Maybe it is too late but… If you try open it with Paint (yes, Paint) and after «Save as…» JPG format, it will works correctly.
![]()
-
Back to forum -
Previous -
Next
Recommended Posts

")
-
- Share
Jpeg — Invalid Image File Header —
Anyone know what causes this error when rendering. I’m rendering a large casino interior animation with multiple bits a pieces from three designers and I keep getting this error message from backburner.
I’m using 3DS Max 2008 w/ Vray Advance 1.5 Service Pack 2
It does it after the frame is rendered — then restarts the frame (over and over). I’ve consolidated my maps, searched through hundreds of materials in the scene. I’m still just trying to do my indirect lighting calculations so I can render.
Thanks,
matt
Link to comment
Share on other sites

-
- Share
It sounds more like it is an error on saving than any of the scene, otherwise it wouldn’t start to render at all. 2 questions…
1) Are you strip rendering, or rendering the entire image at once?
2) Have you tried saving to a TIF?
.
Link to comment
Share on other sites
- Author
-
- Share
I’m rendering the entire scene through Backburner using only my workstation to generate the indirect illumination —so far. It did work for my lighting (it would error and keep progressing through the animation) —but, now it’s not working again. It just keeps erroring and restarting on frame 0.
I’ll try the tiff (first I was saving jpg and now png).
I’m a little stressed, I told our CEO that we’d need a month to do this project and he gave us 13 days to model, light, animate and render the casino interior — and they have already scheduled a client meeting next Wednesday in Canada.
matt
Link to comment
Share on other sites
- Author
-
- Share
Tif isn’t working either.
Link to comment
Share on other sites
-
- Share
…..are you saving to the network via a UNC path using BackBurner?
Link to comment
Share on other sites
- Author
-
- Share
I am saving over the network. My other 3d guy is happily rendering away with the same master file (just shooting another camera path). He’s had a few issues, but not this one since yesterday.
I’m trying to save locally now.
matt
Link to comment
Share on other sites
-
- Share
What happens if you make a very simple scene, with a box, and maybe a daylight system, and send it to render using BackBurner? Do you get the error then?
Link to comment
Share on other sites
- Author
-
- Share
It work fine when I render a basic scene.
Link to comment
Share on other sites
- Author
-
- Share
I’m trying to render it without backburner — I’ll see what happens. We got lots of memory problems yesterday when we didn’t use BB.
matt
Link to comment
Share on other sites
- Author
-
- Share
It rendered frame 0 then Max crashed when it started on the second frame.
Link to comment
Share on other sites
-
- Share
Link to comment
Share on other sites
- Author
-
- Share
How is your RAM usage?
I’ll check. It’s funny because I’m running Dual Quad Core Xeons with 4 Gig of ram. My dedicated 3d guy is only running Dual Core 2 duos with 4 gig or ram and he has far fewer issues than I do on these large files.
The original master file is 140 megs — We strip it down to about 70 megs when we remove the stuff that won’t be visible in the renders.
matt
Link to comment
Share on other sites
- Author
-
- Share
Link to comment
Share on other sites

-
- Share
I get the feeling that this is not a Backburner issue but instead more a case of a corrupt image file. A JPEG is broken into two parts, the header and the scan. If the header is broken, then the entire image won’t load. If the scan is broken, it will load with errors. Seeing as Backburner is returning the error, it sounds like it is failing when it tries to load the corrupt file.
If your colleague has a copy of all the image files you’re using for textures and his renders are working, I’d recommend taking a copy of his files and loading them onto your machine. The other alternative is to locate the corrupt JPEG and trying to repair it.
Link to comment
Share on other sites
- Author
-
- Share
I was scanning my maps in Adobe Bridge and I did find two jpgs that wouldn’t open in Photoshop. I opened other files and renamed using the same name as the corrupted files — I’m rendering right now to see if they are the problem (I took the geometry associated with the maps out though).
matt
Link to comment
Share on other sites
- Author
-
- Share
Okay, i found it — sort of. I hid the geometry in the area that I suspected had the problem and unhid one or two items and rendered. After three or four cycles I found that the materials that SketchUp set up (the solid color maps) where somehow causing the problem. I deleted the maps from the material editor (leaving the standard material that matched the map color) and now it seems to be going.
matt
Link to comment
Share on other sites
- 1 year later…

-
- Share
Your problem coud be the location where you are saving your images, i mean, your render path. If you are doing a Net render, the render path should be a public path. So, on Render Output, save your file in your location «\xxx.xxx.xxx.xxxPublicFolder_name».
Link to comment
Share on other sites
- 5 months later…
-
- Share
I came across this thread because I cant find anymore info about my problem.
I am running MAX 2011; exporting from Revit 2011. Without getting to the BS Materials problem between the two…
I can render and save images from within Max. However, as soon as it goes through backburner i get the Image header problem.
If my local machine can render and save the image… and then i send through backburner and use my local as a server, it wont render, it comes back with the error…
Running all the latest updates.. ITs a clean machine. Just got it.
OH. i can even view all the jpegs saves in the fbx folder through microsoft picture manager. I thought the issue with the header is you cant even see the images… I can see them all…
Any help would be appreciated…
Arkitec
Link to comment
Share on other sites
- 4 weeks later…

-
- Share
This thread is VERY old but i’ve just come across this problem.
1) this is DEFINITELY a corrupt JPEG that’s causing it
2) repair the jpeg (if you can) or replace it
3) corrupt JPEGs will often display in Windows Picture Viewer just fine, making you think the file is fine, but if you open it in Photoshop it will not work. This will prove that the file is dead.
Hope this helps. Cheers,
I came across this thread because I cant find anymore info about my problem.
I am running MAX 2011; exporting from Revit 2011. Without getting to the BS Materials problem between the two…
I can render and save images from within Max. However, as soon as it goes through backburner i get the Image header problem.
If my local machine can render and save the image… and then i send through backburner and use my local as a server, it wont render, it comes back with the error…
Running all the latest updates.. ITs a clean machine. Just got it.
OH. i can even view all the jpegs saves in the fbx folder through microsoft picture manager. I thought the issue with the header is you cant even see the images… I can see them all…
Any help would be appreciated…
Arkitec
Link to comment
Share on other sites
- 1 month later…
![]()
")
-
- Share
Thank you for this response, this helped me alot. Its a bit of a slow process taking them all into photoshop, especially referenced files accross the asset drive however it worked, thank you.
Link to comment
Share on other sites
- 1 month later…
-
- Share
I came across this thread because I cant find anymore info about my problem.
I am running MAX 2011; exporting from Revit 2011. Without getting to the BS Materials problem between the two…
I can render and save images from within Max. However, as soon as it goes through backburner i get the Image header problem.
If my local machine can render and save the image… and then i send through backburner and use my local as a server, it wont render, it comes back with the error…
Running all the latest updates.. ITs a clean machine. Just got it.
OH. i can even view all the jpegs saves in the fbx folder through microsoft picture manager. I thought the issue with the header is you cant even see the images… I can see them all…
Any help would be appreciated…
Arkitec
Arkitec:
Did you ever find your problem JPEGS? I have an identical software setup as you and I am having the same problems. I cannot find any invalid maps / jpegs, but I suspect the error is coming from Revit’s material library? Any help?
Thanks!
Link to comment
Share on other sites
- 4 weeks later…
-
- Share
YES!!!! I got it all working on Friday!
It is a texture from Revit issue… OR at least these were the textures giving me the problem….
I thought I changed ALL my textures to Vray textures. So I couldnt figure out my problem… Here is what I did to get it fixed…
First, I tried to use the resource collector within MAX to see where it would pull all the jpgs from.. This doesnt seem to work all the time.. I did find a script on Script Spot that worked… It pulls even the referenced MAX files which the default collector in MAX doesnt.. Id go download that first..
Second. I opened up Adobe Bridge. I noticed several jpegs where only showing the default jpg image instead of a preview of the texture… These jpegs were from Revit… or the new material library ( I thought I changed all of them in MAX)…
Third, Went back to max… Material Browser. I checked the INCOMPATIBLE radio button and THERE THEY WERE.. The same textures I thought I had replaced… Used select by… changed them to a Vray Material…
That was it! Net Rendered over the weekend… Its so nice to have it back up and running…
Arkitec
Link to comment
Share on other sites
- 2 weeks later…
-
- Share
One thing I’ve noticed with max 2011 is that the asset tracker does not seem to update automatically, and also seemed to not always update when clicking the «refresh» button.
I went through a scene and cleared out any materials associated with Revit, but any .jpg or other bitmap links remained in the asset tracker, even though they were no longer in the scene or material editor. Clicking on those items in the asset tracker, and then choosing to «strip paths» caused the them to disappear completely from the asset tracker list, and no more errors were caused at render.
Link to comment
Share on other sites
Create an account or sign in to comment
You need to be a member in order to leave a comment
Sign in
Already have an account? Sign in here.
Sign In Now
Pictures or images are the way to keep the memorable event of life alive forever. Nowadays, the digital camera has made photography so simple and easy. These cameras are small in size and can be easily movable. A memory card is used to save photos or images and uses JPEG format to save images. However numerous users face an error as jpg invalid image file header while opening their saved pictures. and searching problem about how to solve the jpg invalid image file header problem. These errors arise when the JPG files get corrupt or damage. In this situation, your jpeg files become inaccessible and give warning alerts on the display.
Before we discuss methods to fix invalid image file header 3ds max Let’s discuss its symptoms and the reasons responsible for these errors.
Symptoms that show your Corrupt Images
The following are the symptoms that are noticed when the JPG Files are corrupt or damage.
- Images divide into two or more parts.
- Images become blurry or perverted.
- Modification in color pattern.
- Modification in the shift or structure of the image.
- You can not take a preview.
Reasons for corrupt or damaged JPEG/JPG images
Here are some of the major reasons due to which the JPG or JPEG images get corrupt :
- If JPEG images are edited improperly.
- scanning of JPEG image files is in an incorrect manner.
- If the memory card is not inserted or ejected properly.
- When users eject the memory card during the process of reading/write operations.
- Due to Physical damage in the storage device.
Here in this section, we discussed the reason and symptoms of the error jpg invalid image file header. Now Let’s see how can we detect the damaged jpg files to fix this error and make the jpg file accessible again.
How to find damaged or Corrupt JPEG Files?
Users can fix JPEG Image Error “Invalid Image File Header 3ds max” by identifying the corrupt file and fixing them. Go through the below-given steps carefully to do so.
- The corrupt or damaged JPEG files are usually bigger in size as compare to the good JPEG files i.e, over 100 kb. Identify the files that are bigger in size.
- View files with Windows Paint option and to do so, Tap on Windows icon < Accessories < Paint and then view the image files and save them again in JPEG format.
If you receive any error message in MS Paint, then that means your JPEG image files are badly damaged. And you require to use any other methods to fix the “Invalid Image File Header 3ds max ” error.
Methods to fix the error JPG invalid image file header:
Following are some ways that you can use to resolve your JPG Image issue:-
1. Rename the JPEG files:
It is one of the common and simple methods to repair the JPEG image files. All you need to do is rename the file but don’t modify the extension i.e, .jpeg. Save the file to access it.
2. Image Editors:
If you are still facing problems while viewing the JPEG image files, then try Image Editor software such as Photoshop, Inkscape, and Picasa, etc. View the JPEG files with these editing tools and rename the file. This method will easily resolve your issue.
3. Use“CHKSDSK” command:
As we discussed above due to the bad sectors available on the SD card also cause these errors. So, run the ‘CHKDSK’ command to resolve the error.
- Connect your SD card to the system or computer.
- Tap on Command Prompt and type in the command “CHKDSK (drive letter) / r” in the command window
- The process will find out the errors and repair it
- Once the process is completed you can ensure whether you can access the SD card or not.
The above-discussed method will fix the issue but if you still the face issue then try a professional solution as Photo Recovery Tool. This tool easily resolves the issue “jpg invalid image file header”. This is an extraordinary tool that recovers all the lost photos as well as audio and video files easily.
Conclusion!!
Here in this write-up, we discussed the error jpg invalid image file header and its symptoms, causes along with solutions. Hope now you can easily fix your JPG file issue and access them again.
Invalid Image File Header is a common issue that occurs with JPG/JPEG images. So what does it mean when a picture contains an invalid image file header? How to open an invalid image without an error? Follow this page, you’ll get 5 reliable fixes to repair the invalid images to workable again.
Error: Invalid Image File Header
Accordingly, the file header is a section of data at the beginning of the file, which usually contains the information of bitmap data.
So what is the image file header? It defines the image size, the number of colors, and other information that need to display the image.
What happens if the image file header becomes invalid? As you’ve noticed, when an image contains an invalid image file header, it will become:

- Unopenable
- Corrupted
- Half greyed-out
- Wrong image size
- Losing colors
- Etc.
So how do I fix invalid images, making the images showing up and displaying correctly again? Move on, in the next part, you’ll get fixes.
How to Fix Invalid Image File Header? Here Is What to Do
So how to fix an invalid JPEG image file? And what should you do first when the image becomes invalid? Let’s see:
First, Close Images and Image Editors
- Close the invalid image.
- Copy and save a duplicate edition of the image to a safe location.
- Stop using any image editor.
Next, Pick a Method to Make Invalid Images Usable — 5 Ways
- #Fix 1. Open Image in New Image Editor
- #Fix 2. Change Image Format
- #Fix 3. Unhide Image Extension
- #Fix 4. Open Image in Internet Browser
- #Fix 5. Use Image Repair Tool
Editors Pick:
- For the easiest and effective way out, you should first try Fix 1, 2, 3.
- If nothing works, Fix 5, to repair images with the EaseUS image repair tool is recommended.
Fix 1. Open Invalid Image in A New Image Editor
Time: 1-minute; Difficulty Level: Easy.
Mostly, the Windows computer opens images in the Photos app by default. However, sometimes, when the image contains a rare file format, it may not be able to open it. Instead, it warns with an invalid image file header error.
So the first method to fix this error is to try to open the invalid image in a new image editor:
Step 1. Quit the default image editor or Photos App.
Step 2. Open a new image editor, like Photoshop, Picasa, etc.
Step 3. Check if the image opens or not.

#Fix 2. Change Image Format
Time: 2-minute; Difficulty Level: Easy.
Sometimes, when the image file format is not supported by the computer, the file will become invalid. Converting the file format is a way out.
Here you have two options:
1. Manually Change Image Format
Step 1. Copy the image and paste a duplicate version on your computer.
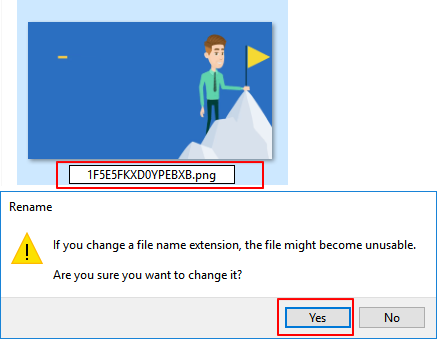
Step 2. Right-click the image and select «Rename».
Step 3. Change its image format to a normal extension, such as JPG, JPEG, PNG, etc.
Step 4. Confirm the changes.
Step 5. Reopen the image with the changed file extension.
2. Use Image File Converter
If you have time, you can also find an image converter, trying to convert the image file extension to a computer-supported format.
Fix 3. Unhide Image Extension
Time: 2-minute; Difficulty Level: Medium.
Another easy way to fix an invalid image file header is to unhide the image file extension. Here are the steps:
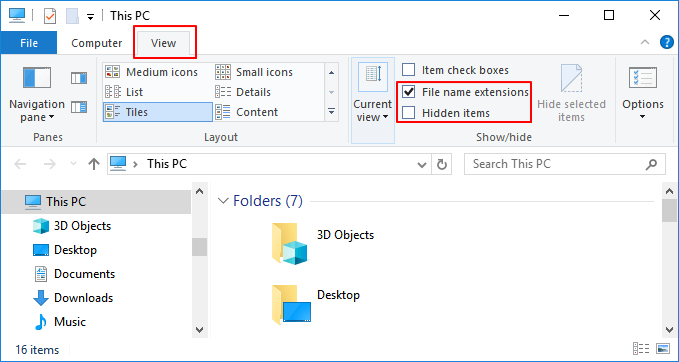
Step 1. Press Windows + E keys to open File Explorer.
Step 2. Go to the View tab, check «File name extensions».
Step 3. Uncheck the «Hidden items» box.
After this, restart the computer and retry to open the image on your PC.
Fix 4. Open Image in Internet Browser
Time: 1-minute; Difficulty Level: Easy.
Sometimes, when the image editor or picture application cannot open your images, you can try to open them in an internet browser.
Here are the steps:
Step 1. Launch an internet browser, such as IE/Edge, Chrome, Opera, Safari, etc.
Step 2. Find and drag the invalid image files into the browser.
Step 3. Check if the image opens.

Fix 5. Use Image Repair Tool
Time: 3-5 minutes; Difficulty Level: Medium;
If you’ve tried all the above methods, but none of them opens your images. The image itself could be corrupted or the image file header is missing.
The last but effective method that you can try is turning to a reliable image repair tool for help. Here, EaseUS EaseUS Data Recovery Wizard — Data Recovery Wizard with its Photo Repair feature can help.
EaseUS Data Recovery Wizard
- Recover lost or deleted files, documents, photos, audio, music, emails effectively
- Repair corrupted images, like JPG, JPEG, GIF, BMP, etc.
- Repair corrupted videos, like MP4, MOV, etc.
Before You Start: Copy and save a duplicate version of the invalid image > Delete the copied version.
Now, follow the steps here to repair your corrupted images with invalid image file header immediately:
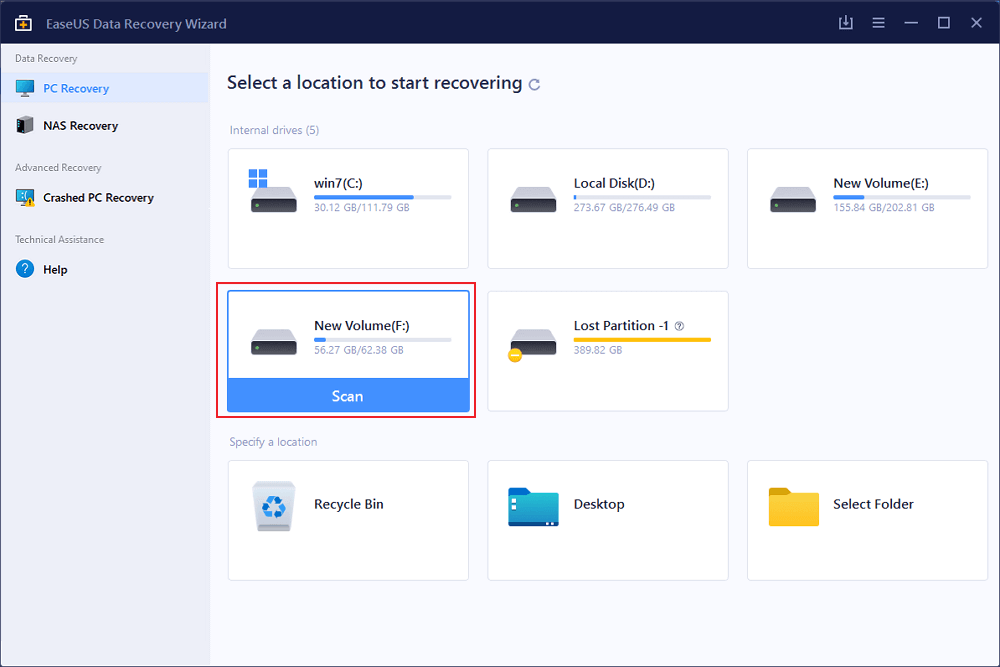
Step 1. Launch EaseUS data recovery software. Select a hard drive that contains broken photos files and click «Scan».
Step 2. Select «Pictures» to find your corrupted phots that can be in a variety of formats, JPEG, JPG, PNG, BMP, and more. Or, you can click «Search files or folders» in the upper right corner to search for files.
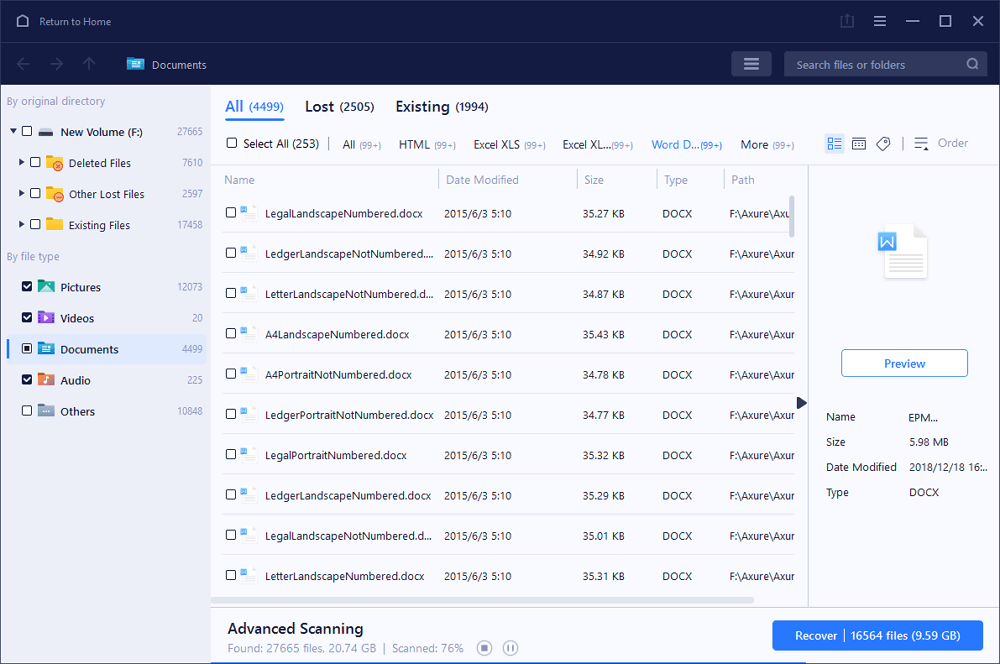
Step 3. Double-click on a damaged picture to repair and preview the file. Then, click «Recover» to save images to a different location.

Video Tutorial of Repairing Invalid Images
Further Readings: How to Protect and Prevent Images Becoming Invalid
After fixing the image with an invalid image file header issue, you may also want to learn how to protect your images properly, right?
And here, we have some tips that you may follow to safely guard your images:
- Back up important images and pictures timely.
- Set a common and widely supported image format.
- Clean up the virus regularly.
Invalid Image Error Is Fixable, Follow to Make Your Images Workable Again
On this page, we explained what is Invalid Image File Header, and how to fix it and make an image openable again in 5 methods.
Which method works the best? Here is Editor’s Pick:
- You should first try Fix 1, Fix 2, and Fix 3.
- If none of them works, let the EaseUS image repair tool help.
Last, to fully protect your images from the invalid error, don’t forget to back up the file and set a common file extension to it.
Invalid Image File Header is a common issue that occurs with JPG/JPEG images. So what does it mean when a picture contains an invalid image file header? How to open an invalid image without an error? Follow this page, you’ll get 5 reliable fixes to repair the invalid images to workable again.
Error: Invalid Image File Header
Accordingly, the file header is a section of data at the beginning of the file, which usually contains the information of bitmap data.
So what is the image file header? It defines the image size, the number of colors, and other information that need to display the image.
What happens if the image file header becomes invalid? As you’ve noticed, when an image contains an invalid image file header, it will become:
- Unopenable
- Corrupted
- Half greyed-out
- Wrong image size
- Losing colors
- Etc.
So how do I fix invalid images, making the images showing up and displaying correctly again? Move on, in the next part, you’ll get fixes.
How to Fix Invalid Image File Header? Here Is What to Do
So how to fix an invalid JPEG image file? And what should you do first when the image becomes invalid? Let’s see:
First, Close Images and Image Editors
- Close the invalid image.
- Copy and save a duplicate edition of the image to a safe location.
- Stop using any image editor.
Next, Pick a Method to Make Invalid Images Usable — 5 Ways
- #Fix 1. Open Image in New Image Editor
- #Fix 2. Change Image Format
- #Fix 3. Unhide Image Extension
- #Fix 4. Open Image in Internet Browser
- #Fix 5. Use Image Repair Tool
Editors Pick:
- For the easiest and effective way out, you should first try Fix 1, 2, 3.
- If nothing works, Fix 5, to repair images with the EaseUS image repair tool is recommended.
Fix 1. Open Invalid Image in A New Image Editor
Time: 1-minute; Difficulty Level: Easy.
Mostly, the Windows computer opens images in the Photos app by default. However, sometimes, when the image contains a rare file format, it may not be able to open it. Instead, it warns with an invalid image file header error.
So the first method to fix this error is to try to open the invalid image in a new image editor:
Step 1. Quit the default image editor or Photos App.
Step 2. Open a new image editor, like Photoshop, Picasa, etc.
Step 3. Check if the image opens or not.
#Fix 2. Change Image Format
Time: 2-minute; Difficulty Level: Easy.
Sometimes, when the image file format is not supported by the computer, the file will become invalid. Converting the file format is a way out.
Here you have two options:
1. Manually Change Image Format
Step 1. Copy the image and paste a duplicate version on your computer.
Step 2. Right-click the image and select «Rename».
Step 3. Change its image format to a normal extension, such as JPG, JPEG, PNG, etc.
Step 4. Confirm the changes.
Step 5. Reopen the image with the changed file extension.
2. Use Image File Converter
If you have time, you can also find an image converter, trying to convert the image file extension to a computer-supported format.
Fix 3. Unhide Image Extension
Time: 2-minute; Difficulty Level: Medium.
Another easy way to fix an invalid image file header is to unhide the image file extension. Here are the steps:
Step 1. Press Windows + E keys to open File Explorer.
Step 2. Go to the View tab, check «File name extensions».
Step 3. Uncheck the «Hidden items» box.
After this, restart the computer and retry to open the image on your PC.
Fix 4. Open Image in Internet Browser
Time: 1-minute; Difficulty Level: Easy.
Sometimes, when the image editor or picture application cannot open your images, you can try to open them in an internet browser.
Here are the steps:
Step 1. Launch an internet browser, such as IE/Edge, Chrome, Opera, Safari, etc.
Step 2. Find and drag the invalid image files into the browser.
Step 3. Check if the image opens.
Fix 5. Use Image Repair Tool
Time: 3-5 minutes; Difficulty Level: Medium;
If you’ve tried all the above methods, but none of them opens your images. The image itself could be corrupted or the image file header is missing.
The last but effective method that you can try is turning to a reliable image repair tool for help. Here, EaseUS EaseUS Data Recovery Wizard — Data Recovery Wizard with its Photo Repair feature can help.
EaseUS Data Recovery Wizard
- Recover lost or deleted files, documents, photos, audio, music, emails effectively
- Repair corrupted images, like JPG, JPEG, GIF, BMP, etc.
- Repair corrupted videos, like MP4, MOV, etc.
Before You Start: Copy and save a duplicate version of the invalid image > Delete the copied version.
Now, follow the steps here to repair your corrupted images with invalid image file header immediately:
Step 1. Launch EaseUS data recovery software. Select a hard drive that contains broken photos files and click «Scan».
Step 2. Select «Pictures» to find your corrupted phots that can be in a variety of formats, JPEG, JPG, PNG, BMP, and more. Or, you can click «Search files or folders» in the upper right corner to search for files.
Step 3. Double-click on a damaged picture to repair and preview the file. Then, click «Recover» to save images to a different location.
Video Tutorial of Repairing Invalid Images
Further Readings: How to Protect and Prevent Images Becoming Invalid
After fixing the image with an invalid image file header issue, you may also want to learn how to protect your images properly, right?
And here, we have some tips that you may follow to safely guard your images:
- Back up important images and pictures timely.
- Set a common and widely supported image format.
- Clean up the virus regularly.
Invalid Image Error Is Fixable, Follow to Make Your Images Workable Again
On this page, we explained what is Invalid Image File Header, and how to fix it and make an image openable again in 5 methods.
Which method works the best? Here is Editor’s Pick:
- You should first try Fix 1, Fix 2, and Fix 3.
- If none of them works, let the EaseUS image repair tool help.
Last, to fully protect your images from the invalid error, don’t forget to back up the file and set a common file extension to it.