You should upgrade or use an alternative browser.
-
#1

-
#2
Did yu try with another file/game
shin mega V has really disapointed people…not well done this one…
-
#3
Você fez algumas alterações antes desse problema?
vc tentou com outro arquivo/jogo
no changes were made…the installation failed with 3 games
no changes were made…the installation failed with 3 games
-
#4
- «INVALID LENGTH» — check the USB-C cable connection to your USB port, try with another USB-C cable, check the integrity of the game file and the SD card for errors, when installing via MTP — try to run DBI in application mode (title override) holding the R button while launching a title.
From official github
Cyan
GBATemp’s lurking knight
-
#6
github FAQ provides different solutions:
— use another USB cable (it seems it worked for me)
— check your game integrity (it installs fine with other apps, so not the problem), or scan the SD for error (I didn’t try)
— use a different launch mode (Applet <-> Application). (I had this issue with Application mode, so that solution wasn’t helpful to me)
I had this issue too since I bought a new USB 3.0 cable, (and/or since I enabled USB3.0 in AMS settings).
I never had the issue before, when I was using the Controller Pro cable (which is not USB3.0).
Last time I used DBI, I disabled USB3.0 in AMS, used Pro controller cable, and used applet mode to launch DBI’s MTP. The game installed without issues, BUT it was only the update, and it was a very small file (not 4GB+), so it maybe didn’t trigger that error.
But github says it’s cable related, probably true.
When using the new cable AND USB3.0 in AMS, I never had any issue when using «copy to SD» instead of «install to SD». Then, you can install the game from SD, but it takes twice the needed space on SD.
Seeing you are already using Applet mode (blue background), and not using USB3.0 support, all I can suggest is copy to SD first, and install later from the SD.
or try an old DBI version (it should work fine with Shinmegaten) and see if there’s a version which break install of big files.
or try another, another cable, the shortest the better?
I don’t know if it’s related too, sometime I had freezes on windows after a transfer/install. I have to wait 1minute until the Explorer’s transfer windows closes, and it freezes switch side if I try to install another file. I have to exit MTP and try again. There’s an open issue#91 on github, but nobody is helping. (asking which version started having this issue, I didn’t try to test all version to report and help either, so I can’t complain…)
Last time I used DBI, I didn’t have that freeze issue… either the cable, usb3 disabled, applet mode, or small files, I don’t know. too many variables.
Aug 5, 2022
Similar threads
![]()
You may also like…
- No one is chatting at the moment.
-

@
x65943:
Finally they are banning teaching gravity in school, little pricks can get back to farming and praising the lord+2
-
@
BigOnYa:
Funny, i remember having to learn cursive writing, square dancing, ebonics… what happen to those? -
@
Veho:
They were replaced by «cell theory».+1
-
@
Veho:
The silly notion that human bodies are composed of «cells» and powered by «mitochondria» and not composed from clay and powered by the soul.+1
-
@
Psionic Roshambo:
My new religion is going to be awesome, orgies and booze and fun rides!+1
-
@
Psionic Roshambo:
Our father who is currently on the water slide, forgive our party and someone turn up that song it’s awesome!+1
-
@
The Real Jdbye:
i don’t recall ever having to learn dancing in school -
@
BigOnYa:
yup in gym class, middle school… we had to pair up boy with girl, random picked, and learn square dancing. Yeee hah! 30+ years ago. -
@
Psionic Roshambo:
Lucky when I was in school we had to learn to hide from nuclear bombs and eat bugs and basic survival skills lol+1
-
@
Psionic Roshambo:
Psi lived in a different lifetime… They made us to be like Rambo lol+1
-
@
Psionic Roshambo:
Sure I can operate most weapons and I know a thousand ways to kill someone, but who teaches us how to live a quiet life?+1
-
@
K3N1:
Stop trying to cancel people ReZ -
@
Psionic Roshambo:
New roofie jello pudding pops. -
@
K3N1:
Did he buy Hogwarts legacy also what an evil man -
@
Psionic Roshambo:
He just needs Harry Potter’s sleep spell -
@
Psionic Roshambo:
Rapius Maximus Sleepy Time Perversio! -
@
K3N1:
Or maybe engorgio so he can actually get someone -
@
K3N1:
Rezsmum told me about them said it’s the perfect size for her stealth toys
![]()
@
K3N1:
Rezsmum told me about them said it’s the perfect size for her stealth toys
Today at 6:49 PM
Для работы проектов iXBT.com нужны файлы cookie и сервисы аналитики.
Продолжая посещать сайты проектов вы соглашаетесь с нашей
Политикой в отношении файлов cookie
Статья написана исключительно для тех людей, у которых появилась шальная мысль приобрести Nintendo Switch. Попробую расписать основные моменты, касающиеся приставки и приобретения игр для нее.
Купить Nintendo Switch меня уговорила девушка.
Байонетта впервые появилась на консолях в 2010 году, а в 2017 году получила переиздание и вышла на ПК. А я получил возможность познакомиться с этим, безусловно, ярким и красивым персонажем. Игру, кстати, так и не прошел, но получил огромное удовольствие от той дури, которая происходила на экране. Вторая часть игры вышла в 2014 году на WiiU, в 2018 году ее переиздали на Nintendo Switch. Тут сработало мое личное правило — нет ПК-версии — нет игры. Я всё сидел и ждал, что вдруг Nintendo издаст ее на ПК, ну вот может к выходу 3 части… Но нет, 3 часть вышла, и по поведению Nintendo стало ясно, что им не интересно делиться своими игрушками со всеми подряд. На ПК другие части Байонетты не выйдут скорее всего никогда. По 3 части игры я посмотрел буквально один стрим, и с первой и до последней минуты это было оно — та же восхитительная дурь на экране, та же яркая и красивая Байонетта. Да, Nintendo продали мне свою консоль одной Байонеттой 3, и мне очень стыдно за это.
Сразу расскажу свое отношение к консолям. Я ПК геймер с солидным игровым стажем и библиотекой игр в Steam. Соответственно, много лет я придерживался простого правила — если игры нет на ПК, то ее не существует. И кстати, был вполне счастлив. Консоли же я считаю тупиковой ветвью игровой эволюции, которая искусственно поддерживается в жизнеспособном состоянии за счет игр-эксклюзивов. Плюс к этому, можно добавить то, что среднестатистический обыватель не разбирается в компьютерном железе, не готов подбирать и собирать свой собственный ПК. Да и вообще может не знать, с какой стороны ПК включается.
В последние годы из-за майнингового бума добавился еще один серьезный фактор, а именно — цена железа. Игровая видеокарта, причем ЛЮБАЯ, недавно стоила совершенно ненормальных денег. Сейчас, благодаря ряду событий на рынке криптовалют, цены на видеокарты значительно упали, и стали, скажем так, более реальными. Но даже сейчас, чтобы собрать средний игровой ПК, человек должен вложить около 70 тысяч рублей (и это без учета покупки монитора), и при этом он совсем не будет уверен, что та или иная игра будет работать на высоких или превосходных настройках графики. Либо же, пользователь покупает полноценное и готовое игровое устройство за 30 тысяч рублей, подключает его к телеку, вставляет в него диск, на котором написано, к примеру Xbox, и он уверен, что эта игра ТОЧНО будет работать на Xbox. It just works, как говорится.
Поскольку с 2022 года мы живем в параллельной реальности, вариантов приобретения Switch было три.
- В любом ларьке электроники за 30 тысяч рублей, с гарантией 12 месяцев. По словам опытного Свичевода — цена неадекватная и значительно завышенная. Параллельный импорт, что вы хотели?
- Б.у. с Авито, с ценами около 20-25 тысяч рублей. С неизвестным техническим состоянием приставки и джойконов, с неизвестным ресурсом аккумулятора. И конечно же без гарантии.
- Заказ на маркетплейсах с доставкой из Китая. 27 тысяч рублей на Озоне, либо 22-23 тысячи с Алиэкспресса. Разумеется, тоже без всякой гарантии.
Я изучил отзывы на АлиЭкспрессе и решил рискнуть. Хотя, сам заказ я риском не считал, т.к. уже имел успешный опыт покупки сложной электроники с Али. Вопрос был только в том, когда и в каком состоянии мне доставит посылку Почта России. Других вариантов доставки почему-то не было. Посылка приехала за 2 недели, в идеальном состоянии.
Начнем с того, что представляет из себя Nintendo Switch. Существует три вида консоли. Стандартный Switch, Switch OLED и Switch Lite. Lite это более дешевая версия, которая имеет ряд ограничений по сравнению с обычными версиями консоли. Ключевыми ее отличиями(или недостатками, как хотите) я бы назвал отсутствие стационарного режима игры и отсутствие возможности отстегнуть геймпады. И по этим причинам я не рассматривал Lite-версию к покупке.
Обычный Switch — это портативная консоль с экраном диагональю 6.2 дюйма (7 дюймов у версии OLED). По бокам располагаются «уши»-геймпады, которые называются джойконы. Джойконы можно отстегнуть от консоли, поставить консоль на стол и играть в настольном формате. А можно подключить Switch к телевизору или другому экрану и получить полноценную стационарную консоль.
Обычный Switch имеет две ревизии, принципиальное отличие между ними — у второй ревизии аккумулятор может прожить до 9 часов, в то время как у первой ревизии приставка просит подзарядки уже после 3 часов игры. Визуально устройства друг от друга никак не отличить, отличаются коробки — у второй ревизии вся коробка ярко-красного цвета. Ну и OLED версия, как следует из названия, получила новый OLED экранчик большей диагонали. Все остальное железо осталось без изменений.
Итак, в комплекте идет:
- игровая консоль
- два джойкона
- держатель для джойконов, который позволяет сделать из них подобие нормального геймпада
- ремешки для джойконов, чтобы эти самые джойконы не улетели при активных играх(есть и такие)
- док-станция, которая позволяет сделать из Свича стационарную консоль и подключить ее к экрану
- HDMI кабель для тех же целей
- адаптер для зарядки, причем не простой. Он имеет два разных вольтажа, один для зарядки самой консоли, второй — для зарядки через док-станцию.
Поскольку мой Switch приехал из Китая, это оказалась версия для Гонконга, которая имеет британскую вилку. Пришлось дополнительно разориться на переходник UK-EU за 299р. При этом, следует особо отметить, что у Nintendo нет региональной привязки устройств. Вы можете купить приставку, предназначенную для любого мирового региона, и она без проблем будет работать с Вашим аккаунтом.
Несмотря на то, что сам Switch вышел в 2017 году, а стоит в нем чип аж 2015 года, сравнивать я его буду с актуальными игровыми устройствами других крупных производителей, а именно с PlayStation 5, Xbox Series и Steam Deck. А куда деваться, если у Nintendo — Switch и есть самое актуальное устройство? Сравнить Switch с конкурентами оказалось довольно сложно из-за его уникальности. Как я говорил, это устройство сразу может быть и портативом, и стационарной игровой системой. А это создает определенные нюансы и в том, сколько устройство стоит, и в том, какие характеристики оно имеет. Но я смог придумать, как мне кажется, хороший способ сравнения всех этих платформ. Сравнивать будем по цене устройств, и тому, что мы получаем за эту цену.
Switch и Steam Deck
Начнем с формата портативного игрового устройства. Steam Deck в нашей параллельной стране наконец стал появляться в продаже, цены начинаются где-то от 40 тысяч рублей за самую бедную комплектацию. При этом брать ее не стоит, потому что объема памяти в 64Гб не хватит, чтобы поставить хотя бы две современные игрушки. Сразу придется думать про расширение памяти, а это прибавка к ценнику. Так что лучше присматриваться к средней версии Steam Deck, а она конечно же будет дороже. Короче, если оценивать расходы на покупку Switch и Steam Deck, то Switch побеждает, причем легко. Зато, если купить Steam Deck, то в Вашем распоряжении будут все ваши игры из библиотеки Steam. У Вас ведь есть игры в Steam?
Сравнение по железу стоит отдельной статьи, и писать ее должны люди поумнее меня, так что этот момент пропустим.
Switch и Xbox
Флагманский Xbox Series X сейчас стоит 55 тысяч рублей. Взрослая производительность за взрослые деньги. Встроенный ССД, поддержка 4к разрешения, до 120 фпс. Ни о чем подобном Switch мечтать не может, в стационарном режиме максимальное разрешение составляет 1920×1080, частота кадров — 60. А вот Xbox Series S это совсем другой разговор. Эта лошадка очень даже неплохо уделывает Switch , потому что стоит ровно столько же — 30 тысяч рублей, но имеет современное железо, которое, конечно слабее Series X, но при этом позволяет запускать игры в 1440р и давать так же до 120фпс. А встроенный ССД на 512Гб легко бьет Нинтендовскую карточку памяти на 32Гб.
Switch и Playstaion 5
Разброс цен, в зависимости от версии, от 60 до 70 тысяч рублей. И на самом деле, все то же самое, что и с Series X — Switch ни в чем не может тягаться с PS5, кроме дешевизны. Потому что по факту это устройства разных поколений. Из-за лени Nintendo, они выехали на трассу на телеге, в то время как Sony — на гоночном болиде. Зато, Вы не сможете положить PS5 в карман и поиграть в нее в дороге.
И вот, наконец мы подходим к очень важному вопросу — а что по играм?
Начнем с очень простой мысли: все платформодержатели — жадные мрази, которые хотят получить много денег. Столько денег, сколько удастся выдоить с игроков. При этом, желательно, вообще ничего не делая. И подписочные сервисы идеально для этого подходят.
Так же, озвучу еще одну мысль — после 2022 года нет простого способа купить игру или оплатить подписку. Все куда-то ушли, в той или иной степени. Теперь те игроки, которые всё же настойчиво хотят отдать свои деньги любому из платформодержателей, должны искать варианты. Поэтому затраты на игры могут сильно различаться.
Я не хотел погружаться в вопрос подписок Xbox и PS, но пришлось это сделать, чтобы сформировать какое-то мнение о подписке Nintendo. Ранее я никогда не интересовался ни консолями, ни нюансами их подписочных сервисов, просто потому что не надо было.
У Sony есть три уровня подписки.
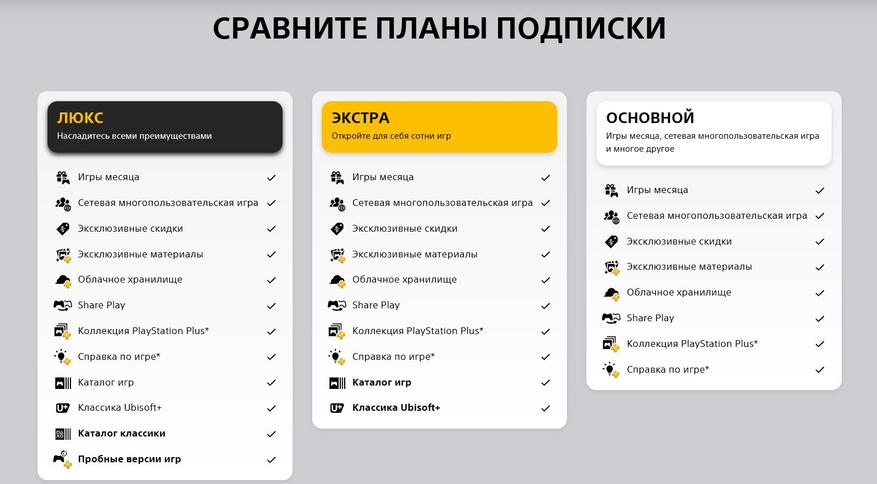
Минимальный PlayStation Plus Essential дает доступ к мультиплееру, к неким «эксклюзивным» скидкам и к играм месяца: каждый месяц Playstation выбирает несколько игр, которые на время становятся бесплатно доступны для пользователей базовой подписки.
Средний уровень PlayStation Plus Extra добавляет целый каталог игр (около 400 игр, если верить их сайту), который пополняется каждый месяц. А так же дает доступ к набору игр от Ubisoft.
Максимальный уровень Deluxe добавляет еще две опции — возможность оценить пробные версии игр, и доступ к старым играм предыдущих поколений Playstation. Которые скорее всего работают через эмуляторы и облачный гейминг. Качество такой игры может быть любым.
У Xbox система подписок чуть более запутанная.
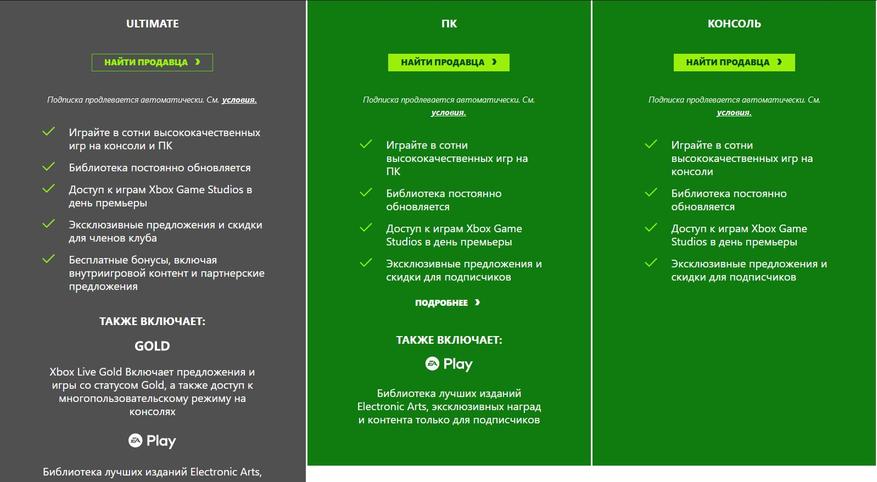
Есть базовая Live Gold, которая полностью эквивалентна PS Plus Essential. Мультиплеер, скидки, доступ к нескольким «играм месяца».
Помимо этого, есть Game Pass — подписочный доступ к библиотеке игр(460 игр на данный момент). Библиотека постоянно пополняется новинками, так же плюсом является то, что в Game Pass эксклюзивы студий MS доступны с первого дня релиза. Еще в Game Pass входит комплект игр от EA. Но не входят фишки Live Gold.
Максимальная Ultimate как раз совмещает в себе первые два варианта.
Но, если Sony просто нужны все ваши деньги, то Xbox попытались сойти за хорошего парня и в 2021 году сделали бесплатным мультиплеер для целого ряда бесплатных и условно-бесплатных сетевых игр:
https://news.xbox.com/en-us/2021/04/21/online-multiplayer-free-to-play-games-unlocked/
И если PlayStation и XBox со своими подписками могут сойти за злого и доброго копа, то Nintendo со своей Nintendo Online — это такой деревенский дурачок. Потому что в обмен на платную подписку Вы получаете сетевой мультиплеер(как и у конкурентов, тут ничего нового), а еще — сотню игр от классических NES и Super NES. Сотню игр возрастом почти как говно мамонта. А если приплатите еще, то получите игры с Сеги, которые работают через кривоватый эмулятор. В общем, не вижу смысла комментировать это «великолепие».
Тут я на минуту отступлю от основного текста. Напомню еще раз — я консолями никогда не интересовался. Они существовали где-то в своей Вселенной, вместе со своими эксклюзивами, подписками и ценами. Но вот сейчас я столкнулся с тем, что на консолях БАЗОВАЯ фунция ПК, а именно — мультиплеер, является платной опцией, и сильно… ошалел. Ошалел от того, что миллионы людей по всему миру много лет платят платформодержателям за то, что на ПК просто есть. На ПК просто есть сетевой мультиплеер в бесплатных и условно-бесплатных играх. Просто есть облачные сохранения. Интересно, кто-то из консольщиков хоть раз пробовал посчитать, сколько потрачено на подписки за годы владения консолями? Да и игры по 5000 рублей, они вроде не сильно дешево выглядят, по сравнению с ценами в Стиме, с распродажами в Стиме, да и простой возможностью иногда приобрести игру бесплатно(надеюсь Вы поняли, о чем я). Ну так и что, ПК все еще дорого?
Ладно, закончили про подписки, попробуем поговорить про приобретение игр. Игры можно покупать в двух форматах — цифра и физические носители. С цифровой версией все понятно — идете в онлайн магазин платформодержателя, покупаете игру, скачиваете. Хаха, разумеется нет, мы же в 2022ом. Навечно. Теперь надо искать варианты. Варианты сводятся к покупке ключей для игр на сторонних площадках. Либо маскировке под любого не-русского гражданина при помощи ВПН и/или смены региона в Вашем профиле.
Кто ты сегодня? Турок? Поляк? Аргентинец?
Онлайн магазин Nintendo называется eShop. И он великолепен. Великолепен полным отсутствием региональных цен для России. Их не было раньше, их нет сейчас, вряд ли они когда-нибудь теперь появятся. Линейка, которой мы будем мерить жадность Nintendo — их вроде бы хит, о котором кричат из каждого утюга — Legend of Zelda: Breath of the Wild. И в Российском eShop-e эта игра стоит 5799 рублей. Ценник, прямо скажем, конский. Бывалые Свичеводы говорят, что я все делаю неправильно, и надо было родиться в Польше. Тут конечно уже поздно что-то исправлять…. Или нет? Если сменить регион Вашего аккаунта Nintendo на Польшу, можно совершить несколько внезапных открытий, главное из которых — Nintendo все-таки умеет в региональные цены! Цена Зельды — 290 злотых, что на сегодняшний день составляет около 4736 рублей. Что тоже чертовски дорого.
Либо, рассмотрим вариант, когда мы покупаем игру на физическом носителе. Надо найти, где желаемая игра есть в наличии, заказать, дождаться доставки. Могут быть варианты с доставкой из другого города или даже страны. Даже близко не похоже на приключение на 20 минут, не так ли? Ладно, давайте присмотримся к БОТВе на физическом носителе. Ведь у физических носителей, кроме недостатков со сложностями доставки к конечному пользователю, есть и положительные стороны. А именно — карточку памяти с игрой можно поменять или продать, если Вы в нее наигрались. Запахло старой доброй Денди, правда? Окей, приценимся к карточке(картриджу) с Зельдой. 5499 рублей. Все еще дорого, но при этом мы наблюдаем крайне парадоксальную картину. Физическая копия игры дешевле, чем цифровая! Да, совсем немного, но дешевле. В моем понимании, затраты на продажу цифровой копии игры равны примерно… нулю. В случае с продажей физического картриджа нужно:
- Произвести картридж
- Произвести упаковку
- Напечатать обложку
- Собрать всё вместе
- Отправить региональному дистрибьютеру
- Чтобы потом дистрбьютер поставил игру в локальные торговые сети
- Где в магазинах, за которые надо платить аренду, работают продавцы, которым надо платить зарплату.
Может быть я еще упустил какие-то этапы, но видите, сколько дополнительных статей расходов? Но цифра дороже. Какая-то японская магия.
На самом деле, с покупкой картриджей для Switch работают все те же варианты, которые я перечислял ранее про саму консоль. Покупку в магазинах электроники уже обсудили, остается еще два способа:
- поиск б.у. картриджей на Авито. И сразу скажу, новинки и хиты Вы там не найдете, или по крайней мере, не найдете дешево.
- заказ с АлиЭкспресса. Да, как оказалось, можно без проблем заказывать игры из Китая. Может быть даже придет евро-версия игры. Хотя я видел отзывы, где человек получал версию для азиатского рынка. но субтитры все равно были на нужном языке.

Ценник на «эталонную» БОТВу у разных продавцов от 3800 до 5800, но мы ж не дураки, и берем для оценки минимальную цену для нашей статистики — 3800р. И потом еще подождать 2-4-6 недель, чтобы посылка добралась из Китая в Россию.
Вроде бы я перечислил все способы приобретения игр на Switch, и результат, скажем прямо — неутешительный. Кажущаяся дешевизна самой консоли с легкостью компенсируется неадекватными ценами на игры. И вот если в случае эксклюзивов от Sony становится сразу видно, за что просят 60-70 долларов. Кинореалистичная графика, открытый мир, долгий(и нудный) сюжет, приключения на много часов. Деньги прямо сыпятся с монитора, когда смотришь на какого-нибудь «Гада Войны«. То в случае с играми от Nintendo, мы видим посредственную графику, во многих играх она вообще откровенно детская. Черт возьми, да в некоторых мобильных играх графика лучше, а игры от Nintendo смотрятся откровенно дешево. Просить за игры такого качества тысячи рублей/50-60-70 долларов… Что же это, если не тотальная жадность? Просто для понимания: на мою десятилетнюю библиотеку в Steam было в сумме затрачено около 50 тысяч рублей. 180 различных игр. Чтобы купить пять игр для Switch мне надо затратить около 20 тысяч рублей. Какие еще нужны комментарии?
Вообще, мое мнение — игры не должны стоить тысячи денег. Игры это развлечение, которое должно быть доступно большому кругу абсолютно разных людей. Человек приходит после тяжелого рабочего дня домой и должен иметь возможность как-то отдохнуть. Игры — это отличный отдых. Но не в том случае, когда чтобы купить игру, надо устроиться на вторую работу (привет бывшему директору Сони).
Кстати, если Вы всерьез собираетесь владеть Switch, то обязательно потребуется купить нормальный геймпад. Судя по многочисленным отзывам в интернете, родные джойконы не отличаются надежностью и долговечностью. Если Вы их сломаете, то по сути сразу потеряете режим портатива до тех пор, пока не отремонтируете джойкон или не купите новый. Да и держалка для джойконов конечно делает их удобней, но не делает из них нормальный полноценный геймпад. Поэтому надо будет купить либо родной Pro controller(8 тысяч рублей), либо геймпад от XBox Series(7-8 тысяч рублей) и хитрый блютуз адаптер(около 1200р с Али), который объяснит Switch, как ему работать с геймпадом от XBox. Короче — опять расходы.
Nintendo Switch стоит покупать только в двух случаях:
- Вы богаты, у Вас всё есть, Вам некуда девать деньги.
- Вы японец, Вас воспитали Марио и Зельда.
Во всех остальных случаях, если Вы хотите поиграть в новые и старые хиты, у Вас нет ПК и Вы ограничены в бюджете, то лучшим и единственным на сегодняшний день предложением является Xbox Series S. Сравнительно недорогое игровое устройство, достаточно производительное, полностью готовое к использованию. В отличие от Switch, где нормальный геймпад НАДО ДОКУПАТЬ, у всех нормальных консолей вменяемый геймпад идет в комплекте. Ну и подписка Xbox Game Pass даст доступ к большому количеству игр за сравнительно небольшие деньги.
Если вдруг в вечном 2022 году у Вас всё еще нет игровой платформы, но есть желание и деньги — просто купите ПК.
Игровая консоль Nintendo Switch в продаже уже больше 5 лет (с 2017-го) и, очевидно, пользуется стабильной популярностью.
Девайс как минимум очень удобный — играть на Switch-е можно и дома (на большом экране), и в мобильном режиме вообще где угодно.
Но всякие сбои, баги, ошибки и прочие неприятности у Switch-а, как известно, тоже случаются. О чем мы повествуем регулярно и, есть такое подозрение, повествовать будем еще не раз.
И в продолжение темы — вот наш большой справочник по кодам ошибок Nintendo Switch, в котором мы постарались собрать все самые распространенные из них. С кратким описанием по каждой из проблем и, разумеется, с предложениями относительно того, что и как в каждом отдельном случае надо делать.
Пост этот мы наверняка будем дополнять (по мере сил и возможностей), но пока получается примерно следующее. Итак, по порядку:
#1 — Проблемы с аппаратной частью консоли
| Код | Описание проблемы | Что делать |
| 2153-0321 | Сбой системы воспроизведения аудио | • пробуем просто включить/выключить опцию «Отключать звук при отсоединенных наушниках«; • если это не помогает, то везем Switch в сервис-центр (СЦ). |
| 2168-0002 | Повреждение консоли или пиратский контент | • проверяем и удаляем любой нелегальный контент, и перезагружаем Switch; • проверяем и устанавливаем последнюю версию прошивки; • если ничего не помогает, везем Switch в СЦ. |
| 2115-0096 | Switch не принимает фигурку Amiibo | • проверяем и устанавливаем последнюю версию прошивки; • проверяем правый джойкон; • выполняем сброс данных Amiibo — [ИНСТРУКЦИЯ] |
| 2153-1540 | Switch не работает | • перезагружаем Switch; • проверяем и устанавливаем последнюю версию прошивки; • если ничего не помогает, везем Switch в СЦ. |
| 2139-0006 | Switch сбоит или не работает | Звоним в СЦ. |
Не пропустите: ОШИБКА 2002-3537 У SWITCH: ЧТО НАДО СДЕЛАТЬ
#2 — Общие проблемы Switch
| Код | Описание проблемы | Что делать |
| 2162-0002 | Switch вылетает | • перезагружаем Switch; • заряжаем джойконы; • проверяем и устанавливаем последнюю версию прошивки; • если ничего не помогает, везем Switch в СЦ. |
| 2813-6838 / 2813-6561 | Код карты eShop не срабатывает | • проверяем и вводим код еще раз (код также должен соответствовать региону); • пишем запрос в службу поддержки. |
| 2801-7199 | Не получается выгрузить контент в Facebook | • проверяем подключение консоли и перезаходим в аккаунт Facebook; • проверяем разрешения на загрузку файлов в настройках аккаунта Facebook; • пробуем выложить контент через некоторое время. |
| 2124-4009 | Не получается зайти на сайт (проблема с подключением к сервису) | • перезагружаем Switch; • проверяем подключение консоли и статус серверов сервиса; • пробуем зайти на сайт через некоторое время. |
| 2124-4517 /2181-4017 | Не получается зайти на сайт (проблема с подключением к сервису) | Пробуем зайти на сайт через некоторое время. |
| 2124-3080 | Не получается зайти в сетевую игру (не работает мультиплеер) | • вероятнее всего сетевая версия игры не доступна в вашем регионе. |
| 2124-4007 | Доступ к онлайн-сервисам заблокирован Nintendo (БАН!) | • пишем запрос в службу поддержки Nintendo [ПОДРОБНЕЕ] |
| 2813-0055 | Switch не принимаем код, поскольку ПО еще не вышло официально | Ждем релиз |
| 2813-1470 | Кредитная карта отклонена | Удаляем карты и затем регистрируем её в eShop заново |
| 2813-0040 | Этот код уже погашен (был введен ранее) | Проверяем код |
| 2005-0005 / 2005-0004 | Проблема сервиса Nintendo | • выключаем Switch полностью (ничего удалять пока не нужно); • включаем Switch, проверяем и обновляем прошивку (если доступна свежая версия); • удаляем любые свежеустановленные дополнения и весь пиратский контент; • пробуем другую (новую) карту MicroSD или форматируем имеющуюся. |
| 2124-0291 | Не получается перенести учетную запись на другой Switch | • проверяем, чтобы учетная запись не была привязана к другой (еще одной консоли); • отвязываем учетку и выполняем перенос еще раз. |
Не пропустите: ОШИБКА 2123-1502 У SWITCH-А ПОСЛЕ ОБНОВЫ: ЧТО МОЖНО СДЕЛАТЬ САМОМУ
#3 — Проблемы с ПО Switch
| Код | Описание проблемы | Что делать |
| 2164-0020 / 2122-0082 | Игра не запускается или вылетает | • меню HOME > выбираем проблемную игру > открываем настройки игры (кнопкой +/-) > Управление данными > Удалить программу; • перезагружаем Switch; • устанавливаем игру заново. |
| 2162-0101 | Игра не запускается | Проверяем версию и обновляем игру |
| 2306-0819 | Онлайн-игры не запускаются | • перезагружаем Switch;• проверяем подключение; • проверяем и обновляем прошивку консоли. |
| 2021-0003 / 2000-0000 / 2101-0002 /2107-0427 | Устаревшее ПО | Проверяем и обновляем |
| 2124-3000 / 2137-1508 | Switch не подключается к онлайн-сервисам из-за устаревшей версии прошивки | Обновляем прошивку консоли |
| 2813-0071 | Switch не подключается к eShop. | Проверяем подключение, перезагружаем консоль и подключаемся по-новой. |
| 2142-1099 / 2155-0400 | Приложение «Родительский контроль» не может подключиться к Интернету | Обновляем прошивку консоли |
Не пропустите: ЕСЛИ MORTAL KOMBAT 11 НА SWITCH ВЫЛЕТАЕТ: ЧТО ДЕЛАТЬ? [АРХИВЪ]
#4 — Проблемы с подключением Switch
| Код | Описание проблемы | Что делать |
| 2110-1100 | Switch не определяет сеть Wi-Fi | • проверяем подключение, перезагружаем консоль и маршрутизатор; • проверяем корректность пароля; • переносим Switch в другое место (где нет помех для подключения и/или поближе к роутеру) и подключаем к Wi-Fi заново; • звоним в СЦ. |
| 2811-7001 | Ошибка онлайн-сервиса (eShop) | • проверяем подключение, перезагружаем консоль и маршрутизатор; • проверяем статус серверов Nintendo. |
| 2110-2004 | Switch не определяет сеть Wi-Fi | • проверяем подключение, перезагружаем консоль и маршрутизатор; • проверяем корректность пароля; • переносим Switch в другое место (где нет помех для подключения и/или поближе к роутеру) и подключаем к Wi-Fi заново; • проверяем и обновляем прошивку маршрутизатора; • звоним в СЦ. |
| 2110-2091 | Сетевой адаптер обнаружен, но Switch не подключается к роутеру | • проверяем качество подключения кабеля Ethernet; • перезагружаем маршрутизатор; • подключаем кабель к другому порту маршрутизатора; • пробуем другой кабель. |
| 2110-2201 / 2110-2214 | Неправильный пароль | • проверяем корректность пароля; • проверяем подключение, перезагружаем консоль и маршрутизатор. |
| 2110-1100 | Switch не видит сеть Wi-Fi (или не настроен USB LAN) | • проверяем подключение, перезагружаем консоль и маршрутизатор; • настраиваем новое беспроводное подключение — [ИНСТРУКЦИЯ]; • переносим Switch в другое место (где нет помех для подключения и/или поближе к роутеру) и подключаем к Wi-Fi заново; |
| 2110-2091 | Switch не подключается к Сети через кабель | • проверяем связь (подключение к Интернету); • перезагружаем маршрутизатор; • проверяем настройки DNS. |
| 2110-2003 | Switch не видит сетевой адаптер | • проверяем связь (подключение к Интернету); • проверяем качество подключения кабеля Ethernet; • перезагружаем маршрутизатор; • подключаем кабель к другому порту маршрутизатора; • пробуем другой кабель. |
| 2110-2004 / 2110-2220 / 2110-2201 / 2110-2214 | Не получается подключиться к определенной сети Wi-Fi | • проверяем подключение, перезагружаем консоль и маршрутизатор; • проверяем корректность пароля; • переносим Switch в другое место (где нет помех для подключения и/или поближе к роутеру) и подключаем к Wi-Fi заново; • проверяем настройки сети. |
| 2110-3127 | Не получается подключиться к определенной сети (Wi-Fi или проводной) | Проверяем настройки DNS |
| 2110-3400 | Не получается подключиться к определенной сети (Wi-Fi или проводной) | Требуется проверка подлинности через браузер (например, согласие с условиями обслуживания или ввод имени пользователя и пароля) |
| 2122-2403 / 2211-0524 | Switch не подключается к интернету | • проверяем подключение, перезагружаем консоль и маршрутизатор; • обновляем прошивку консоли; • перезагружаем Switch. |
| 2811-1006 | Switch не подключается к учетной записи Nintendo | • проверяем подключение, перезагружаем консоль и маршрутизатор; • проверяем корректность пароля; • переносим Switch в другое место (где нет помех для подключения и/или поближе к роутеру) и подключаем к Wi-Fi заново. |
| 2811-5001 / 2811-1028 | Switch не подключается к eShop или другим сервисам | см. выше |
| 2155-8006 | Switch не подключается к учетной записи Nintendo (из-за некорректных настроек DNS) | см. выше |
| 2618-0513 | Сбой подбора игроков в игре | • пробуем еще раз; • проверяем связь; • перезагружаем консоль и маршрутизатор; • проверяем статус серверов игры и Nintendo; • пишем запрос в службу поддержки. |
| 2160-0103 / 2306-0520 / 2618-0006 / 2618-0201 / 2618-0516 | Сбой подключения в игре | • проверяем связь; • перезагружаем консоль и маршрутизатор; • проверяем статус серверов игры и Nintendo; • проверяем настройки DNS; • перезаходим в игру через некоторое время. |
| 2160-0202 | Сбой подключения | • проверяем подключение, перезагружаем консоль и маршрутизатор; • проверяем корректность пароля; • переносим Switch в другое место (где нет помех для подключения и/или поближе к роутеру) и подключаем к Wi-Fi заново; • подключаемся к другой сети Wi-Fi |
| 2155-8006 | Switch не подключается к учетной записи Nintendo (из-за некорректных настроек DNS) | см. выше |
| 2124-8006 / 2137-8006 | Не удается завершить загрузку | см. выше |
| 2810-1224 | Не получается залогиниться | см. выше |
| 2137-0240 | Не удается завершить загрузку | см. выше |
| 2124-8028 | Не получается залогиниться | см. выше |
| 2124-8006-2124-8007 | Сбой подключения | см. выше |
| 2160-8006-2160-8007 | Не удается завершить тес сети | см. выше |
| 2618-0203 | Switch не подключается к учетной записи Nintendo | см. выше |
| 2142-0507 | Приложение «Родительский контроль» не может подключиться к Интернету | см. выше |
Не пропустите: ОШИБКА 2137-8056 В SWITCH: ЧТО ОЗНАЧАЕТ И КАК УСТРАНИТЬ [АРХИВЪ]
#5 — Проблемы на стороне сервера
| Код | Описание | Что делать |
| 2813-0002 | Не получается зайти в eShop — сбой сервиса | Заходим через время |
| 2618-0542 | Не получается зайти в сетевую игру — слишком много игроков | Заходим через время |
| 2613-1400 | Оплата картой не проходит — сбой сервиса | Ждем и потом пробуем еще раз |
| 2306-0811 | Switch не подключается к онлайн-сервису — сбой на стороне сервера | Заходим через время |
| 2801-7002 | Не получается загрузить контент в Twitter — сбой на стороне сервера | Заходим через время |
| 2124-5119 / 2124-5249 | Сбой на стороне серверов Nintendo | Заходим через время |
| 902-5998 | Сервер Nintendo eShop остановлен на ТО | Заходим через время |
| 2810-1500 | Не получается зайти в Facebook | • перезагружаем консоль • перезаходим позже |
| 2124-5002 / 2124-5200 | Не получается зайти в учетную запись Nintendo | Заходим позже |
| 2813-0009 / 2813-1400 / 2813-6835 / 2813-9804 /2813-9712 | Сбой на стороне сервера Nintendo eShop | перезагружаем магазин и/или заходим позже |
| 2811-7503, 2811-7504 | Сбой на стороне сервера Nintendo eShop | Заходим позже |
| 2816-0700 / 2817-0700 | Сбой на стороне сервера | Заходим позже |
Не пропустите: КОГДА ДОК-СТАНЦИЯ SWITCH МИГАЕТ ЗЕЛЕНЫМ И НЕ РАБОТАЕТ: ЧТО ДЕЛАТЬ?
#6 — Проблемы с картой памяти MicroSD
| Код | Описание | Что делать |
| 2002-2049-2002-2064 2002-4690 / 2002-6201 / 2016-0247 / 2016-0602 / 2016-0641 | Ошибка карты памяти на этапе загрузки или обновления игры | • вынимаем карту из слота и затем вставляем снова ставим её на место; • перезагружаем Switch, проверяем версию прошивки и обновляем (если доступна свежая); • выполняем проверку файлов игры — [ИНСТРУКЦИЯ] • форматируем карту (НО учитываем, что при этом все данные с карты будут стёрты без возможности восстановления!); • берем другую/новую MicroSD или ставим игру в память Switch. |
| 2002-2001 /2016-0390 / 2205-0123 | Нет доступа к карте памяти microSD | см. выше |
| 2002-4517 / 2002-4641-2002-4660 /2002-4741-2002-4760 / 2002-0007-2002-0008 /2002-4683 | Не получается скачать игру или прогу из eShop — сбой карты памяти | см. выше |
| 2002-4301-2002-4463 / 2002-3005 /2002-3500-2002-3999 / 2002-0001 /2016-0601 / 2101-0001 / 2107-0445 | Ошибка карты памяти в игре и/или после включения Switch | см. выше |
| 2002-1002 / 2002-2629-2002-2669 | Игра не загружается или не запускается — сбой карты памяти | см. выше |
| 2002-2085 | Switch не распознает карту памяти microSD | см. выше |
| 2005-0003 | Игра не загружается или не запускается — сбой карты памяти | см. выше |
Не пропустите: ЕСЛИ ЛАГАЕТ ЗВУК У SWITCH ПОСЛЕ ПОДКЛЮЧЕНИЯ К ТЕЛЕКУ: ЧТО МОЖНО СДЕЛАТЬ?
#7 — Проблемы Switch в некоторых играх
| Код | Описание | Что делать |
| 2306-0820 | Не запускается Splatoon 2 Global Testfire | Эта «демка» уже недоступна |
| 2-ARVHA-0000 |
Не работает YouTube | ПОДРОБНЕЕ >>> |
| 2-AABQA-1021 | Не получается зайти в сетевую игру в Arms | Проверяем подключение, перезагружаем Switch и перезаходим в игру |
| 2-BABBE-1000 | Не получается зайти в сетевую игру в Ultra Street Fighter 2 | Обновляем игру, проверяем подключение, перезагружаем Switch и перезаходим в игру |
| 2306-0112 | Сбой подключения к серверу в Pokemon Sword and Shield | ПОДРОБНЕЕ >>> |
| 1618-0521 |
Консоль не отвечает в Animal Crossing: New Horizons | ПОДРОБНЕЕ >>> |
Switch game card error is one common error with Nintendo Switch, but it upsets plenty of users. What attributes to Switch card read error? How to troubleshoot it without data missing? In this post, MiniTool will explore these questions together with you.
An Overview of Switch Game Card Error
Nintendo Switch is a video game console, which was released in most areas across the world on March 3, 2017. As a hybrid console, it can be used either on a home console or a portable device. Given to that fact, it is beloved by many gamers.
In order to play more games, gamers would like to insert a game card into the Switch. On the one hand, this achieves the possibility of playing various games without deleting games on the Switch system. On the other hand, it will throw you errors like Switch game card error.
When Nintendo Switch not reading game card error occurs, you can’t play games on the SD card. It is annoying, isn’t it? So, what causes the Nintendo Switch game card error? In fact, this error will occur due to various reasons. It could result from one of the following factors.
- The game card is defective, unreadable or damaged.
- The game card is placed improperly.
- There’s something wrong with the Nintendo Switch console.
- The cartridge is crappy or defective.
The game card error Switch usually comes with the error message “The game card could not be read. Please remove and reinsert it”. Besides, this error will happen in different situations. Here are two common cases.
- A game card is inserted in the Nintendo Switch but the software cannot be started.
- A game card is inserted in the console but a message appears stating “There is nothing inserted in the game card slot”.
To play games on the game card as usual, you need to fix this error properly. How to fix “Nintendo Switch game card could not be read” error without data loss? Well, you can do that by following this full guide.
Tip: In addition to Switch game card error, you may also encounter other errors on Nintendo like error code 2005-0003. Fortunately, you can use this full guide to fix Nintendo Switch error code 2005-0003.
Back up Data before Fixing the Error
If your game card involved in Switch card read error stores your favorite games, you’d better to back up it before fixing the error. By doing so, you will not lose any data and don’t have to reinstall the games.
MiniTool Partition Wizard enables you to back up game card with ease. As a specialized partition manager, it boasts features like extend/move/resize/format/merge/split partitions, change cluster size, check file system, and so forth.
Now, download and install MiniTool Partition Wizard by clicking the buttons below! Then follow the given steps to back up your data.
Free Download Buy Now
Step 1: Remove the game card off the Nintendo Switch console and then connect it to your computer with the help of a card adaptor/reader.
Step 2: Run MiniTool Partition Wizard to enter its main interface.
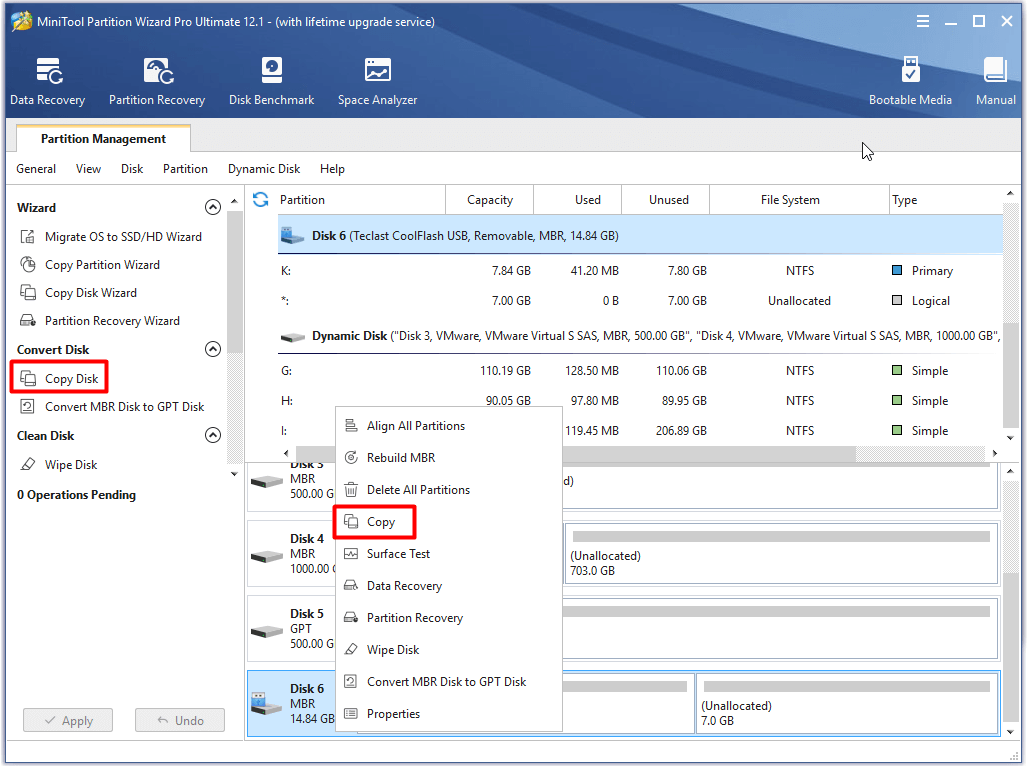
Step 3: Find the connected game card from the listed disks. Then right click it and click on Copy option from the prompted menu. Alternatively, you can also click the target drive and then click Copy Disk in the left pane.
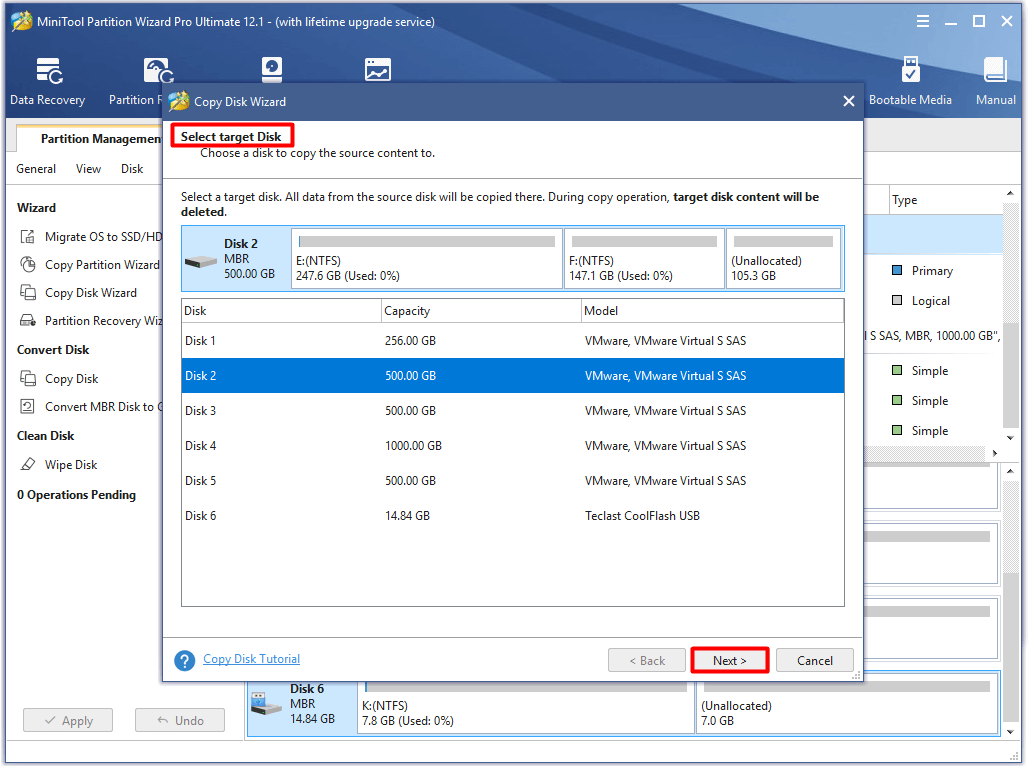
Step 4: In the next window, select a target disk to contain the content of source disk and then click Next. Then you will receive a warning window, which states that the data on the chosen disk will be destroyed during the copy process. After confirming this situation, click Yes to go on.
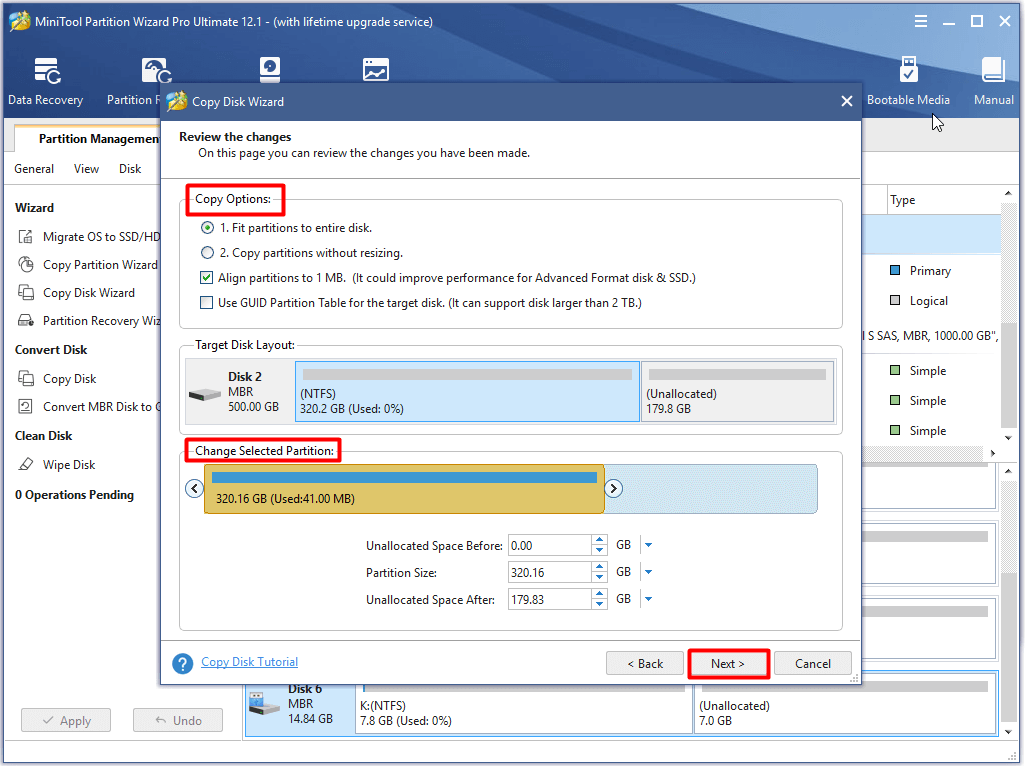
Step 5: Choose Copy Options and change the selected partition accordinng to your demand in this window. Then click Next.
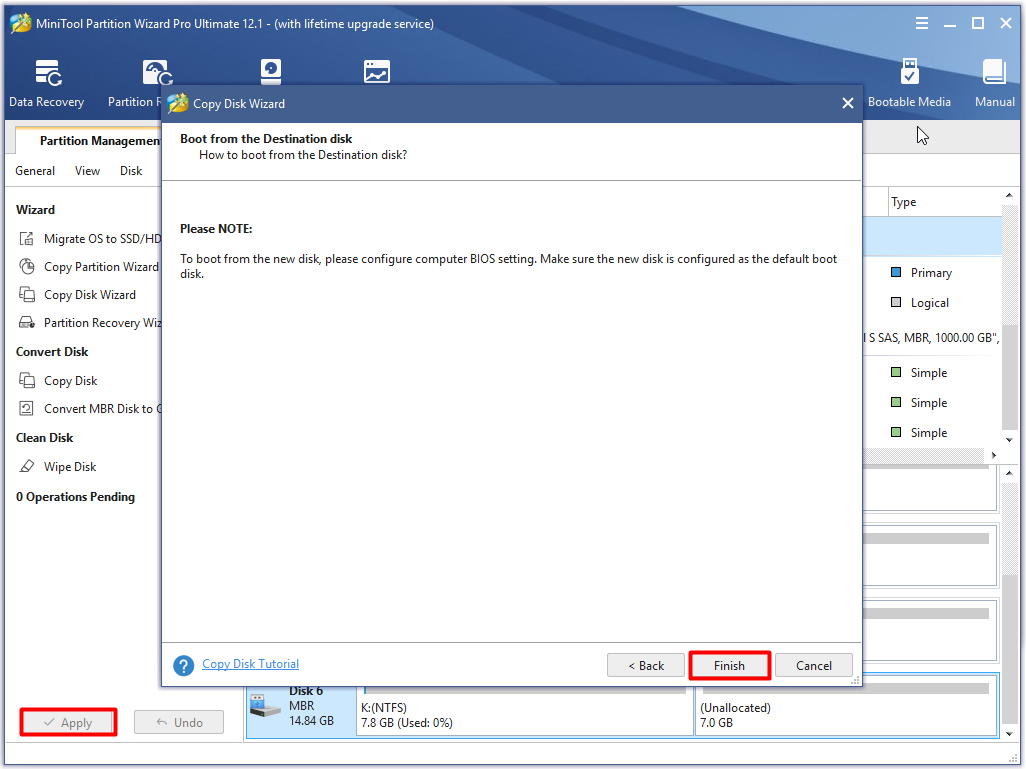
Step 6: Click the Finish button to save the changes. Finally, click on the Apply button to execute the operation.
Now, you can solve Switch game card error with the methods below.
How to Fix Switch Game Card Error
In this section, we will introduce several solutions to the Nintendo Switch game card could not be read error. Now, let’s explore them one by one.
Method 1: Re-insert the Game Card
According to user reports, disconnecting the game card from the console can solve the game card error Switch. This method is simple and easy to operate. Try taking out the game card and wiping the connector strips on the back with a clean and soft cloth.
After that, reinsert the card and check if the Switch game card error is fixed. If not, try other methods immediately.
Method 2: Try Using Another Game Card
If the error still persists after re-inserting the game card, try another card. After taking out the game card, insert a new one. Then check if the error appears. If the error doesn’t show up after the operation, it indicates there are some errors on the currently used game card.
Sometimes you need to take further actions to prove the exact reason for the Nintendo Switch not reading game card error. For instance, the damage on the game card slot of Nintendo may result in the Switch card read error. You can check this by inserting the game card into another properly running Nintendo Switch. If the error occurs, it indicates that it’s the fault of card itself.
Method 3: Repair Damaged Game Card
As you know, the damaged game card will trigger the Nintendo Switch game card error too. For this, we provide you with the following methods to fix it.
Option 1: CHKDSK
First and foremost, you can repair the damaged memory card by using CHKDSK utility. To do this, follow the steps below.
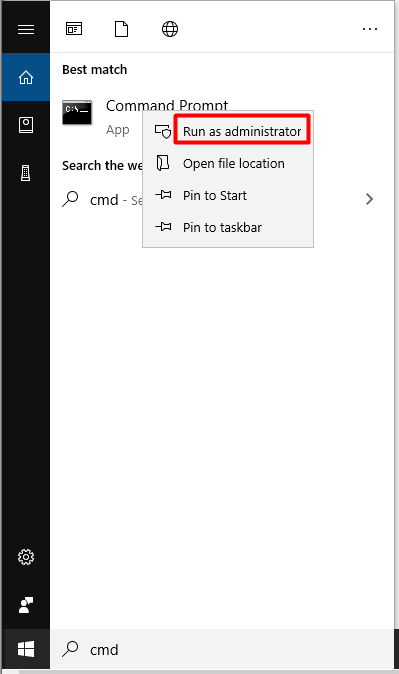
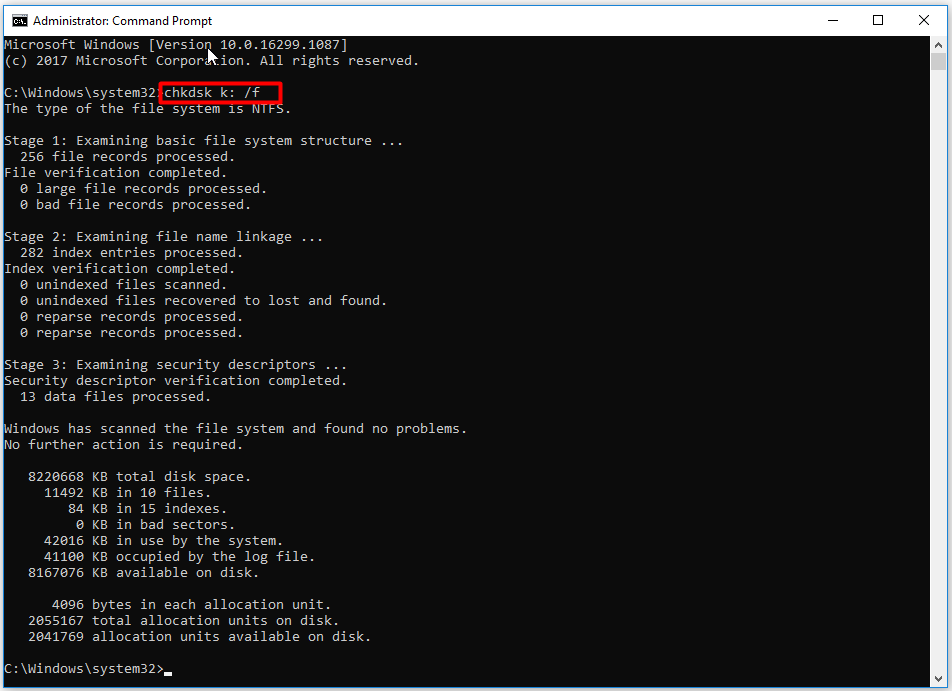
Step 1: Run Command Prompt as administrator from the search box.
- Type cmd in the search box.
- Right click Command Prompt from the search results and then click Run as administrator.
Step 2: In the prompted window, type chkdsk k: /f and then hit the Enter key to execute. Once you click the Enter key, the CHKDSK utility will scan the selected drive immediately. Then you will get the result.
Tip: You can replace the k with your exact drive letter.
Option 2: Format
Alternatively, you can also try formatting unreadable game card to FAT32 to fix the Switch game card error. Here, we recommend you a great SD card formatter – MiniTool Partition Wizard. With this program, you can format your SD card easily.
Free Download Buy Now
Here is a formatting tutorial for you.
Step 1: Connect the SD card to your computer. Run MiniTool Partition Wizard to get its main interface.
Step 2: Right click the target drive and then click on Format option in the elevated menu.
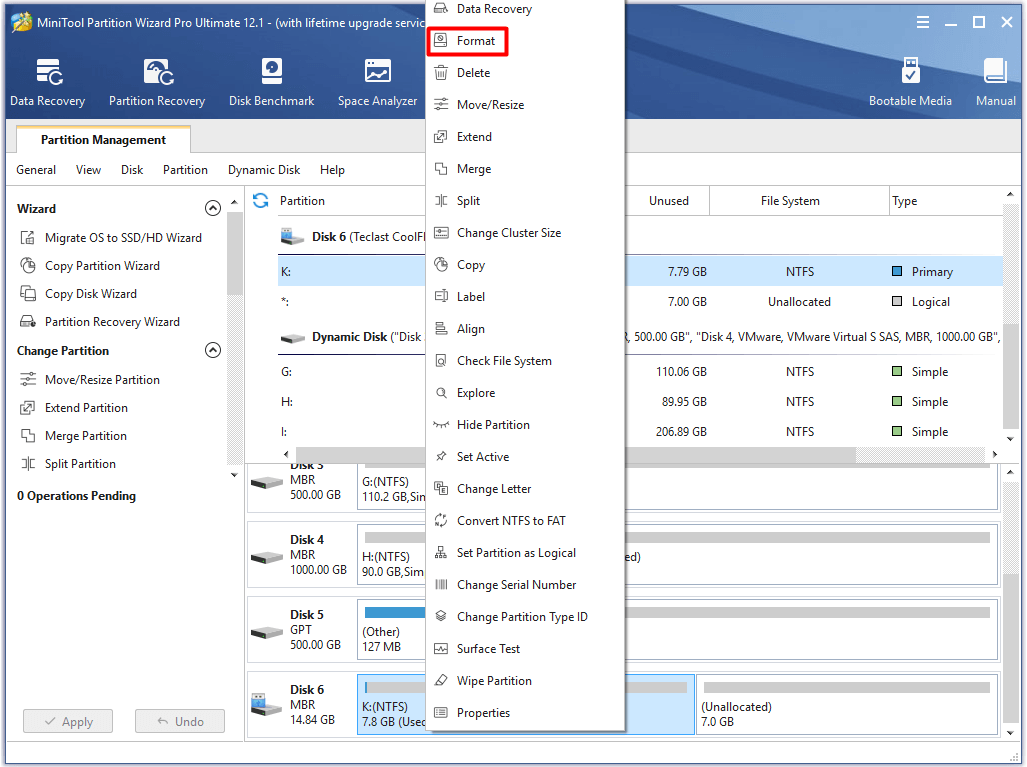
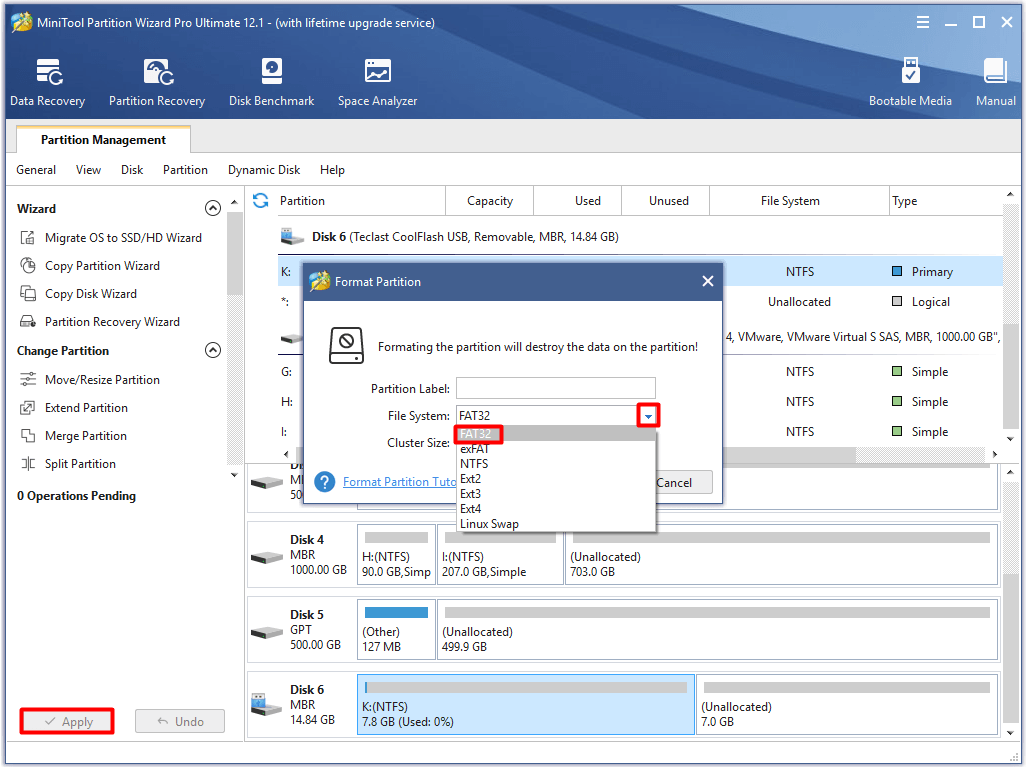
Step 3: Open the dropdown file system menu and choose FAT32. Then, click OK to save the changes. After backing to the interface, click Apply to execute the operation.
Recommended reading: What Does Formatting a Hard Drive Do? Here Are Answers
Option 3: Repair Damaged Nintendo Game Card via Disk Repair Tool
You can also fix a damaged Nintendo game card either by using Windows built-in utility or a third-party tool.
Steps for fixing Nintendo game card via Windows Tool
Step 1: Likewise, connect the game card to your device.
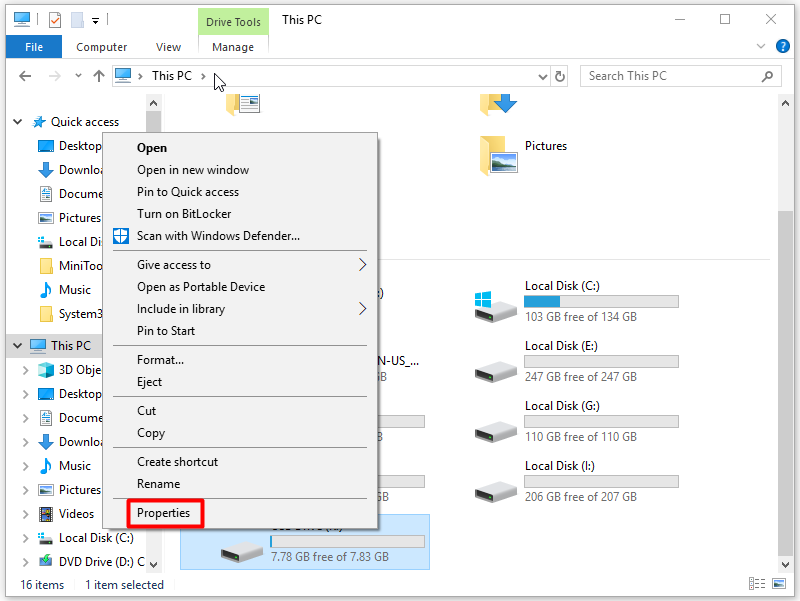
Step 2: Open File Explorer and then navigate to This PC. Move to the right side of the window, and then right click on the connected drive and choose Properties.
Step 3: Navigate to the Tools tab in the prompted window and then click Check. The operation will scan and repair file system errors on the drive automatically.

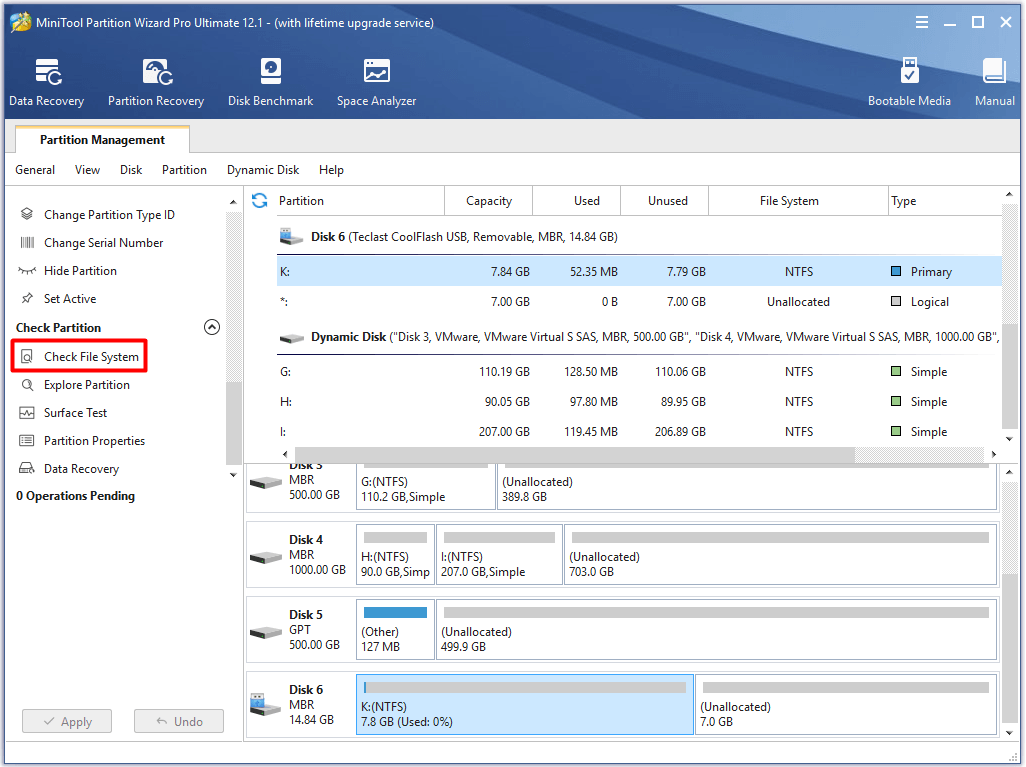
Steps for fixing Nintendo game card via MiniTool Partition Wizard
MiniTool Partition Wizard can also help you check & fix file system errors. You can do that in a few clicks.
Free Download Buy Now
Step 1: After connecting the game card to your computer, launch MiniTool Partition Wizard. Choose the partition on the game card and then click on Check File System feature in the left action panel.
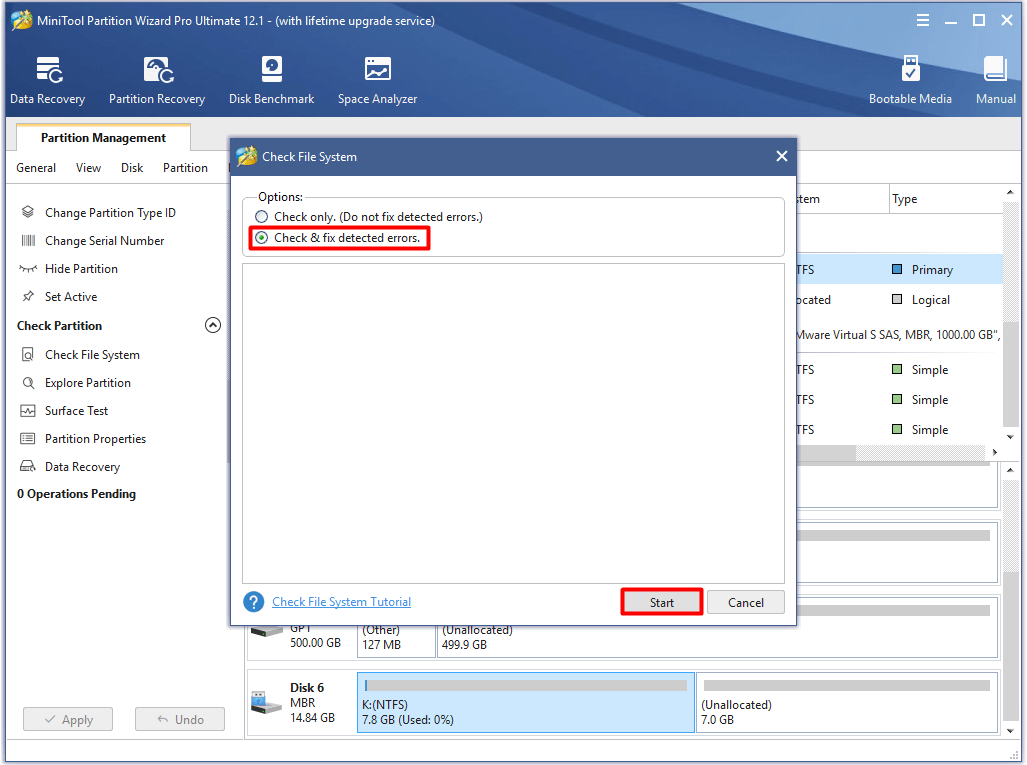
Step 2: Choose the Check & fix detected errors option in the pop-up window and then click on the Start button to begin the process. Wait for a while and then you will receive the result.
Method 4: Update Console to the Latest Version
According to user reports, installing a software update can fix many issues. Hence, you can have a try. You are able to check this with these steps.
Step 1: Move to the Home menu of your Nintendo Switch.
Step 2: Then choose System Settings > System Settings > System. Here you can see the current system version of your Switch. If it isn’t the latest version, click System Update to find and install the latest version.
Step 3: After installing the latest Switch system version, run your console to see if the error is fixed.
This post helped me fix the Nintendo Switch game card error successfully. Are you still bothered by it now? Open this article and then find a method to solve Switch card read error. Click to Tweet
Conclusion
Are you suffered from the Nintendo Switch game card could not be read error? This post provides you with a full fix guide. With the help of this post, you can fix Switch game card error without data loss.
If you have any ideas on the Nintendo Switch not reading game card error, leave your words in the comment area below. You can send your doubts and questions about MiniTool software in an email via supp[email protected].
Switch Game Card Error FAQ
How to fix a corrupted data Switch?
The following methods may repair the corrupted data on Switch.
- Restart the Nintendo Switch console
- Update the Switch system
- Check for software updates for the problematic game
- Check for corrupted data
- Remove problematic software and then reinstall it
- Format/replace/remove the MicroSD card
Can you play games from SD card Switch?
Yes, you can. You can play games directly from the SD card without transferring to the Nintendo Switch system. Besides, if you don’t want to download games to the Switch system, download them to your SD card and then insert the card to the system. In this way, you can enjoy more types of game.
How to change the Nintendo game card?
To change the Nintendo game card smoothly, you can refer to the steps below.
- Open the game card slot cover on the top right side of the Nintendo Switch system.
- Take out the inserted game card gently.
- Hold the new game card and ensure that the label of the card faces the direction of Nintendo Switch screen.
- Slide the game card into the slot until it clicks into place. After inserting it successfully, you will see the icon of the card on the Home menu.
Switch game card error is one common error with Nintendo Switch, but it upsets plenty of users. What attributes to Switch card read error? How to troubleshoot it without data missing? In this post, MiniTool will explore these questions together with you.
An Overview of Switch Game Card Error
Nintendo Switch is a video game console, which was released in most areas across the world on March 3, 2017. As a hybrid console, it can be used either on a home console or a portable device. Given to that fact, it is beloved by many gamers.
In order to play more games, gamers would like to insert a game card into the Switch. On the one hand, this achieves the possibility of playing various games without deleting games on the Switch system. On the other hand, it will throw you errors like Switch game card error.
When Nintendo Switch not reading game card error occurs, you can’t play games on the SD card. It is annoying, isn’t it? So, what causes the Nintendo Switch game card error? In fact, this error will occur due to various reasons. It could result from one of the following factors.
- The game card is defective, unreadable or damaged.
- The game card is placed improperly.
- There’s something wrong with the Nintendo Switch console.
- The cartridge is crappy or defective.
The game card error Switch usually comes with the error message “The game card could not be read. Please remove and reinsert it”. Besides, this error will happen in different situations. Here are two common cases.
- A game card is inserted in the Nintendo Switch but the software cannot be started.
- A game card is inserted in the console but a message appears stating “There is nothing inserted in the game card slot”.
To play games on the game card as usual, you need to fix this error properly. How to fix “Nintendo Switch game card could not be read” error without data loss? Well, you can do that by following this full guide.
Tip: In addition to Switch game card error, you may also encounter other errors on Nintendo like error code 2005-0003. Fortunately, you can use this full guide to fix Nintendo Switch error code 2005-0003.
Back up Data before Fixing the Error
If your game card involved in Switch card read error stores your favorite games, you’d better to back up it before fixing the error. By doing so, you will not lose any data and don’t have to reinstall the games.
MiniTool Partition Wizard enables you to back up game card with ease. As a specialized partition manager, it boasts features like extend/move/resize/format/merge/split partitions, change cluster size, check file system, and so forth.
Now, download and install MiniTool Partition Wizard by clicking the buttons below! Then follow the given steps to back up your data.
Free Download Buy Now
Step 1: Remove the game card off the Nintendo Switch console and then connect it to your computer with the help of a card adaptor/reader.
Step 2: Run MiniTool Partition Wizard to enter its main interface.
Step 3: Find the connected game card from the listed disks. Then right click it and click on Copy option from the prompted menu. Alternatively, you can also click the target drive and then click Copy Disk in the left pane.
Step 4: In the next window, select a target disk to contain the content of source disk and then click Next. Then you will receive a warning window, which states that the data on the chosen disk will be destroyed during the copy process. After confirming this situation, click Yes to go on.
Step 5: Choose Copy Options and change the selected partition accordinng to your demand in this window. Then click Next.
Step 6: Click the Finish button to save the changes. Finally, click on the Apply button to execute the operation.
Now, you can solve Switch game card error with the methods below.
How to Fix Switch Game Card Error
In this section, we will introduce several solutions to the Nintendo Switch game card could not be read error. Now, let’s explore them one by one.
Method 1: Re-insert the Game Card
According to user reports, disconnecting the game card from the console can solve the game card error Switch. This method is simple and easy to operate. Try taking out the game card and wiping the connector strips on the back with a clean and soft cloth.
After that, reinsert the card and check if the Switch game card error is fixed. If not, try other methods immediately.
Method 2: Try Using Another Game Card
If the error still persists after re-inserting the game card, try another card. After taking out the game card, insert a new one. Then check if the error appears. If the error doesn’t show up after the operation, it indicates there are some errors on the currently used game card.
Sometimes you need to take further actions to prove the exact reason for the Nintendo Switch not reading game card error. For instance, the damage on the game card slot of Nintendo may result in the Switch card read error. You can check this by inserting the game card into another properly running Nintendo Switch. If the error occurs, it indicates that it’s the fault of card itself.
Method 3: Repair Damaged Game Card
As you know, the damaged game card will trigger the Nintendo Switch game card error too. For this, we provide you with the following methods to fix it.
Option 1: CHKDSK
First and foremost, you can repair the damaged memory card by using CHKDSK utility. To do this, follow the steps below.
Step 1: Run Command Prompt as administrator from the search box.
- Type cmd in the search box.
- Right click Command Prompt from the search results and then click Run as administrator.
Step 2: In the prompted window, type chkdsk k: /f and then hit the Enter key to execute. Once you click the Enter key, the CHKDSK utility will scan the selected drive immediately. Then you will get the result.
Tip: You can replace the k with your exact drive letter.
Option 2: Format
Alternatively, you can also try formatting unreadable game card to FAT32 to fix the Switch game card error. Here, we recommend you a great SD card formatter – MiniTool Partition Wizard. With this program, you can format your SD card easily.
Free Download Buy Now
Here is a formatting tutorial for you.
Step 1: Connect the SD card to your computer. Run MiniTool Partition Wizard to get its main interface.
Step 2: Right click the target drive and then click on Format option in the elevated menu.
Step 3: Open the dropdown file system menu and choose FAT32. Then, click OK to save the changes. After backing to the interface, click Apply to execute the operation.
Recommended reading: What Does Formatting a Hard Drive Do? Here Are Answers
Option 3: Repair Damaged Nintendo Game Card via Disk Repair Tool
You can also fix a damaged Nintendo game card either by using Windows built-in utility or a third-party tool.
Steps for fixing Nintendo game card via Windows Tool
Step 1: Likewise, connect the game card to your device.
Step 2: Open File Explorer and then navigate to This PC. Move to the right side of the window, and then right click on the connected drive and choose Properties.
Step 3: Navigate to the Tools tab in the prompted window and then click Check. The operation will scan and repair file system errors on the drive automatically.
Steps for fixing Nintendo game card via MiniTool Partition Wizard
MiniTool Partition Wizard can also help you check & fix file system errors. You can do that in a few clicks.
Free Download Buy Now
Step 1: After connecting the game card to your computer, launch MiniTool Partition Wizard. Choose the partition on the game card and then click on Check File System feature in the left action panel.
Step 2: Choose the Check & fix detected errors option in the pop-up window and then click on the Start button to begin the process. Wait for a while and then you will receive the result.
Method 4: Update Console to the Latest Version
According to user reports, installing a software update can fix many issues. Hence, you can have a try. You are able to check this with these steps.
Step 1: Move to the Home menu of your Nintendo Switch.
Step 2: Then choose System Settings > System Settings > System. Here you can see the current system version of your Switch. If it isn’t the latest version, click System Update to find and install the latest version.
Step 3: After installing the latest Switch system version, run your console to see if the error is fixed.
This post helped me fix the Nintendo Switch game card error successfully. Are you still bothered by it now? Open this article and then find a method to solve Switch card read error. Click to Tweet
Conclusion
Are you suffered from the Nintendo Switch game card could not be read error? This post provides you with a full fix guide. With the help of this post, you can fix Switch game card error without data loss.
If you have any ideas on the Nintendo Switch not reading game card error, leave your words in the comment area below. You can send your doubts and questions about MiniTool software in an email via supp[email protected].
Switch Game Card Error FAQ
How to fix a corrupted data Switch?
The following methods may repair the corrupted data on Switch.
- Restart the Nintendo Switch console
- Update the Switch system
- Check for software updates for the problematic game
- Check for corrupted data
- Remove problematic software and then reinstall it
- Format/replace/remove the MicroSD card
Can you play games from SD card Switch?
Yes, you can. You can play games directly from the SD card without transferring to the Nintendo Switch system. Besides, if you don’t want to download games to the Switch system, download them to your SD card and then insert the card to the system. In this way, you can enjoy more types of game.
How to change the Nintendo game card?
To change the Nintendo game card smoothly, you can refer to the steps below.
- Open the game card slot cover on the top right side of the Nintendo Switch system.
- Take out the inserted game card gently.
- Hold the new game card and ensure that the label of the card faces the direction of Nintendo Switch screen.
- Slide the game card into the slot until it clicks into place. After inserting it successfully, you will see the icon of the card on the Home menu.
Dbi nintendo switch драйвер
DBI by duckbill

This guide is based on Brikachu’s work.
The ultimate solution for NSP, NSZ, XCI and XCZ installation along with many more advanced features to enhance your Nintendo Switch experience! DBI supports installation from SD card, via USB MTP, USB cable (using the dbibackend script or dbi-nsw tool), network (using your own http server) and external USB drives.
Copy dbi.nro and dbi.config to your SD card at sdmc:/switch/DBI/ DBI can be then be launched in either applet mode (from Album) or application mode (title override), however it is primarily designed to be used in applet mode.
If you have successfully launched DBI in applet mode you will see a blue background, launching in application mode will display a black background.
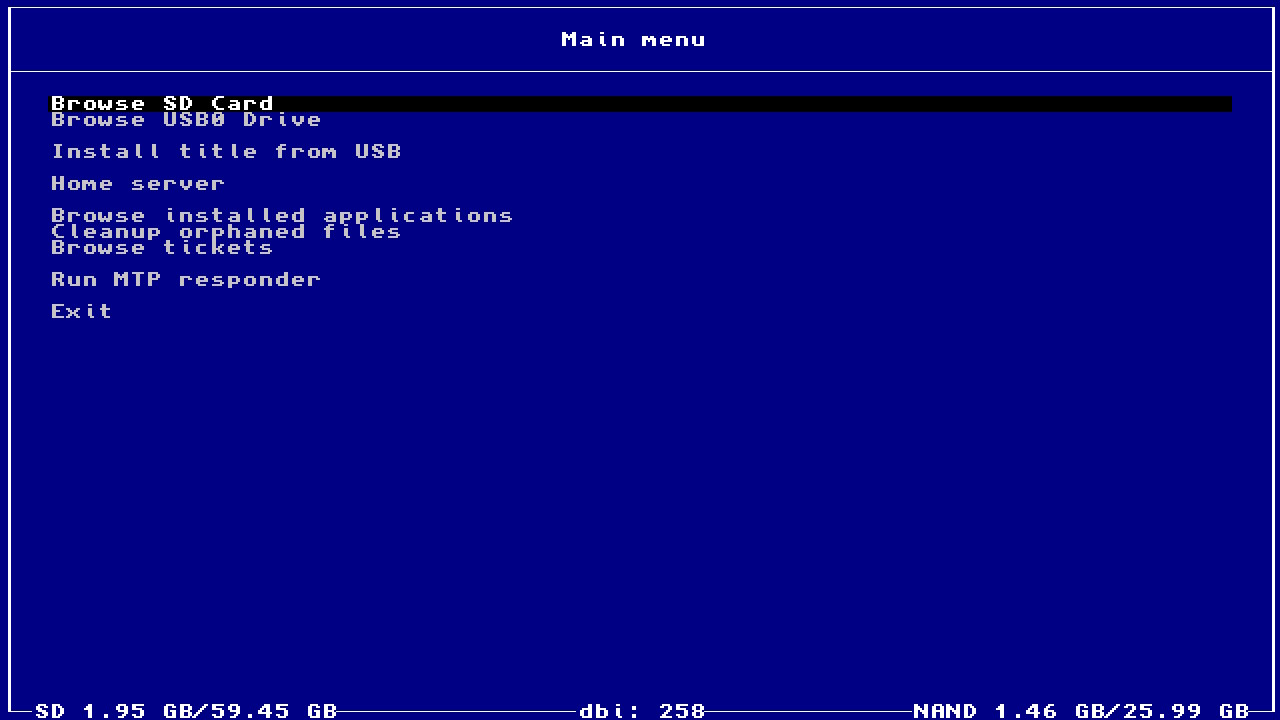
- Browse SD Card — installation of NSP/NSZ/XCI/XCZ files from your SD card
- Browse USB0 Drive — installation of NSP/NSZ/XCI/XCZ files from an external FAT32 or exFAT formatted USB drive (will only appear if a USB drive is connected)
- Install title from USB — installation of NSP/NSZ/XCI/XCZ from a PC via USB 2.0 or 3.0 cable using the included dbibackend script. Main menu hotkey for this option: (Y) button
- Install title from Gamecard — install a game from gamecard to the console’s internal NAND or SD card (will only appear if a gamecard is inserted)
- Home server — install games over your local network (HTTP) using a LAN USB adapter or WiFi network. For full details see Home server
- Browse installed applications — view installed titles including base, update, DLC and whether or not a LayeredFS mod is present. Launch titles directly. Displays your total play time and how many times you’ve launched the title. Check file integrity for errors, transfer game data between internal NAND and SD card, delete individual or multiple titles and their LayeredFS mods with one click, individually remove updates and DLC and use the Reset Required version function to restore the system update check for the selected game back to base. Main menu hotkey for this option: (L) button
- Cleanup orphaned files — removes all orphaned installed content, tickets and pending firmware updates from the system with one click
- Browse tickets — view and manually delete system tickets for games
- Browse saves — view, backup and delete game save data for all games
- Run MTP responder — enables DBI’s internal MTP server to connect the Switch to a PC or to an Android device (Some tested phone/tablet devices: Pixel 3, Xiaomi Mi A1, Lenovo Tab 4 7 «TB-7304X). On your device you will be presented with several virtual MTP drives for installation and many advanced features for file management on your SD card and NAND. Please see Run MTP Responder for a full overview
- Run FTP server — enables DBI’s FTP server for microSD file access on port 5000 or file installation on port 6000
- Exit — exit from the program. Main menu hotkey for this option: (+) button
The bottom left corner of DBI displays the total amount of data currently on your SD card along with the full capacity. The bottom right corner gives you the same information for your NAND’s usable space in HOS.
Bottom center (dbi: XXX) is the DBI version number — you should always use the most recent version.
- (А) — select or confirm
- (B) — cancel, exits the program from the main menu
- (X) — file selection, hotkey for mounting MTP on the main menu (menu option «Run MTP responder«)
- (Y) — invert selection (selects everything if nothing is selected), hotkey for launching USB installation via dbibackend on the main menu (menu option «Install title from USB«)
- (ZL) and (ZR) — scroll pages in menus, scroll through individual games when in detailed game menu
- (L) — on the main menu the hotkey for the menu option «Browse installed applications«
- (R) — change the displayed sort order of files/titles
- (L3) — click left stick to launch games from the application list or detailed game menu
- (+) on the right joycon — display context menus to allow you to perform operations such as deleting, resetting the required firmware version, mounting via MTP and more
- (-) on the left joycon — turn the screen on/off when MTP mode is activated/when installing titles
Browse SD Card / Browse USB0 Drive
Select these options if you want to install games, updates and DLC from files present on your SD card or from an external USB drive. Press (A) to open the folder and (B) to return. After opening the folder containing your installation files use the (X) button to select single or multiple files for installation. The (Y) button inverts your selections and the color of the name of the selected files will change from white to light blue.
Press the (A) button to confirm. A window with installation options will appear:
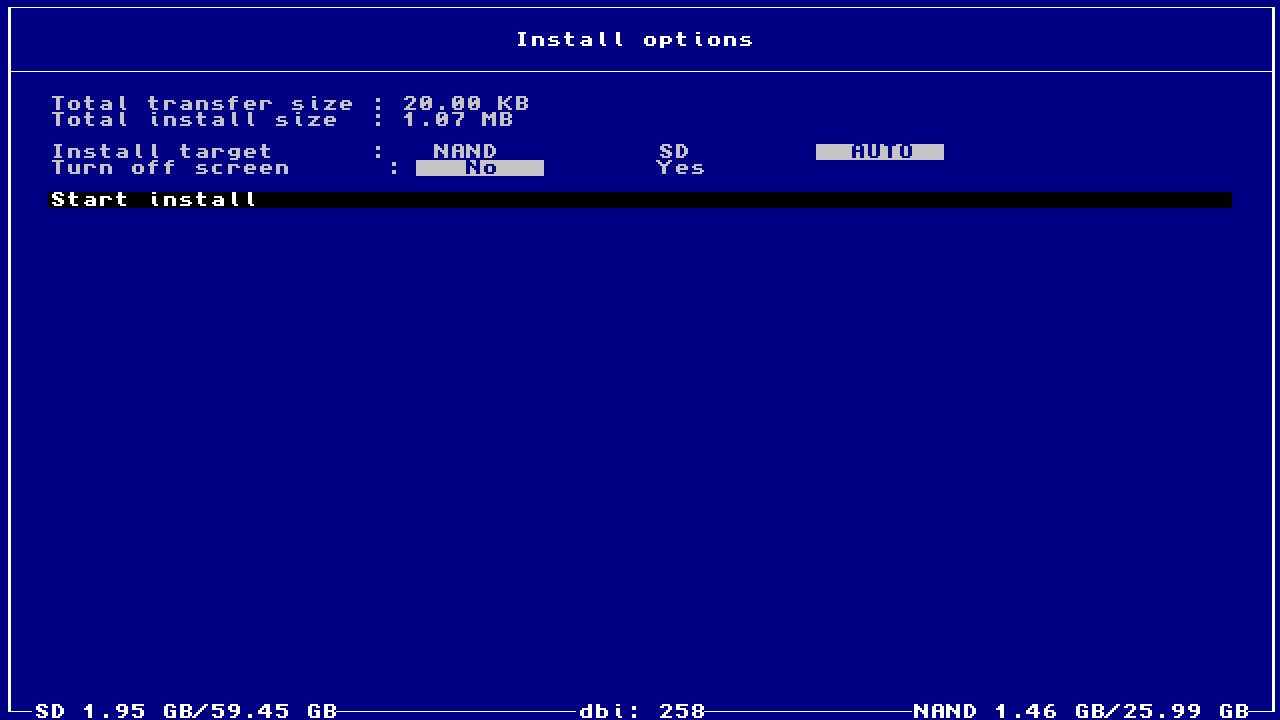
- Total transfer size — the total amount of data (NSP/NSZ/XCI/XCZ files) selected for installation
- Total install size — the amount of free space required to install the selected files
- Install target — select installation location: NAND — internal memory of the Nintendo Switch console, SD — SD card, AUTO — by default this will install to your SD card but if you don’t have enough space the installation will fall back to NAND (internal memory)
- Delete after install — deletes installation files (NSP/NSZ/XCI/XCZ files) from the source after they have been successfully installed; for this to work, the «Read-only» attribute must be removed from files if present. By default files are not deleted. The option is visible only when installing from an SD card/external USB drive
- Turn off screen — turns off the screen during installation to conserve battery, after installation successfully completes the screen will automatically turn back on. This option only works in handheld mode
- Select Start install to begin the installation. After a successful installation «Installation Complete. Press B to return» will appear
DBI will automatically and immediately remove old updates when installing a new update for a game, so you don’t have to worry about the extra space they occupy.
You can also navigate to your homebrew files and launch .nro files directly by highlighting them and pressing (A).
Install title from USB
If you cannot use DBI’s MTP responder this is another convenient method for installing titles over USB. Installing over USB allows you to transfer files directly from your PC for example, which avoids the inconvenience and of having to first move the file to your SD card and then install it.
Main menu hotkey for this option: (Y) button
In order to use this option you will first require dbibackend ( dbibackend.exe for Windows, or the dbibackend script for all operating systems). Launch dbibackend, select the files to install, select Start server, connect a USB-C cable from your PC to your Switch and select Install title from USB in DBI.
From here you can select and install your files on the Switch in the same fashion as using Browse SD Card/Browse USB0 Drive.
To quickly send files or folders with games for installation, right-click on them, select Send from dbibackend and the installation files will be immediately placed in dbibackend’s queue. To configure this in Windows, press Win + R , enter shell: sendto and create a shortcut for dbibackend.exe in the folder.
The «Home server» option will appear if the Network install sources section has been configured in dbi.config. You can specify the name of the option as required in the configuration file.
To install games over your network, edit the dbi.config file located in the sdmc:/switch/DBI/ folder as required. For example:
Install any HTTP server with DirectoryListing enabled on your PC: Apache, Mongoose, Python SimpleHTTP, sheret, rclone, etc.
Example for nginx on Windows: Edit the file /nginx/conf/nginx.conf , registering the address of your Switch in location , instead of the 127.0.0.1 specified in the example (or your entire subnet like 192.168.1.1/24 or 192.168.0.0/16); it can be found on Switch in System Preferences > Internet:
Save the config, run nginx.exe , allow the program to access the network, then copy the desired game to the local /nginx/html/Nintendo/Switch/ folder on your PC, and on the Switch select “Home server”. You will now be presented with the usual interface for installing files and you can start installing files over the network. You can stop the web server via nginx -s stop.
For the server address in dbi.config , you can also use a domain name, for example, your remote VPS — suggested to use with HTTP Basic authentication e.g.: http://user:password@host:port/Nintendo/Switch/
Generate the htpasswd file, put it in /nginx/conf/, then adjust the nginx.conf file as follows:
Login «switch», password «pwd»:
Browse installed applications
In Browse installed applications you can see a list of installed programs, updates and DLC with their occupied space, version (display version and hex version), their titleID, the total game time and the number of launches and the presence of installed LayeredFS mods for the game (for Atmosphére).
Main menu hotkey for this option: (L) button
At the top center, the total number of installed games and the sorting type is displayed.
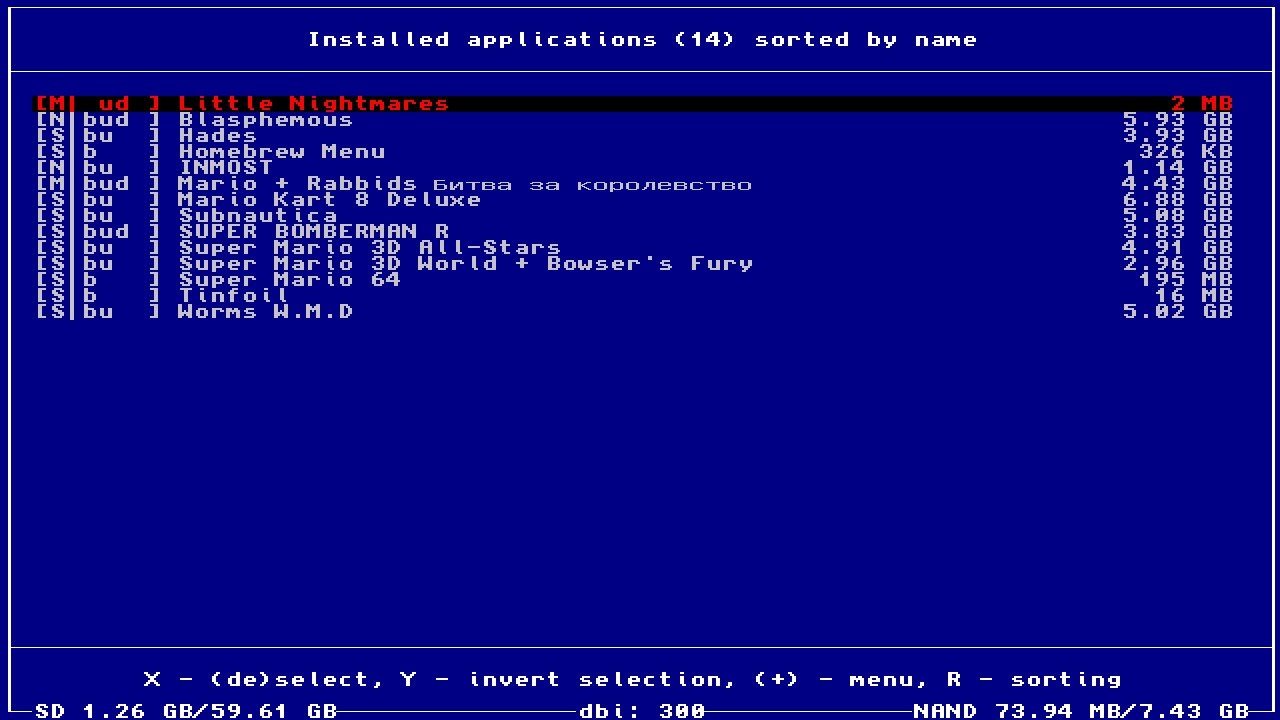
On the left hand side in square brackets, information on the game installation location, installed file type and the presence of LayeredFS mods or cheats is denoted:
- N/S/M — NAND/SD/Mixed — Location of installed files, Mixed denotes that installed files were detected on both NAND and SD card
- b — BASE — the base game
- u — Update — update installed
- d — DLC — DLC installed
- l — LayeredFS mod — LayeredFS mods or cheats for the game were detected at sdmc:/atmosphere/contents/titleID/
You can quick launch a game directly from the list by highlighting it and pressing (L3).
Please note! If the game is highlighted in red only an update and/or DLC is installed, the game itself is NOT installed.
Title context menu
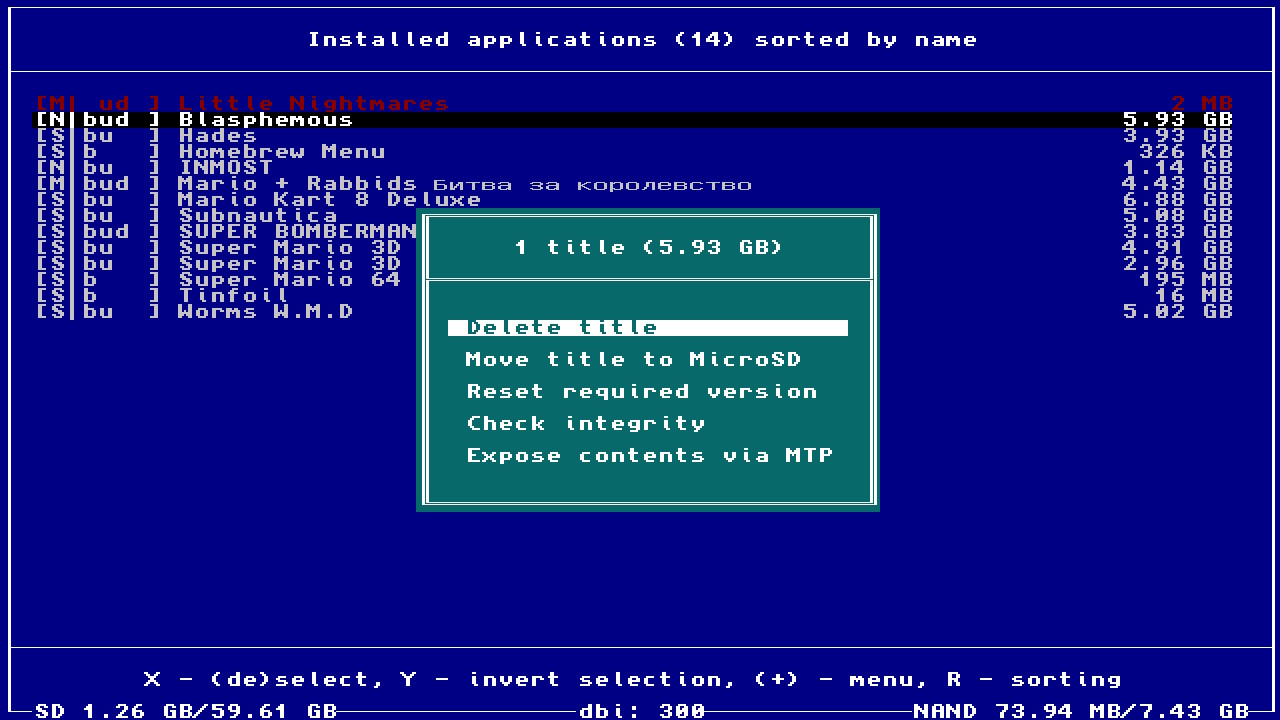
Displayed by clicking on (+) on the selected title(s).
- Delete title — delete selected titles
- Move title to MicroSD/NAND — move the selected titles to SD card or NAND, depending on where the title is currently located. If content is installed to both locations then both options will be displayed
- Reset required version — resets the system version check required to run the title (debug must be enabled in Atmosphere)
- Check integrity — checks the data integrity of the selected titles
- Expose contents via MTP — mount the content of the selected titles via MTP
If you press the (A) button on the title, the detailed game menu will open.
Detailed game menu
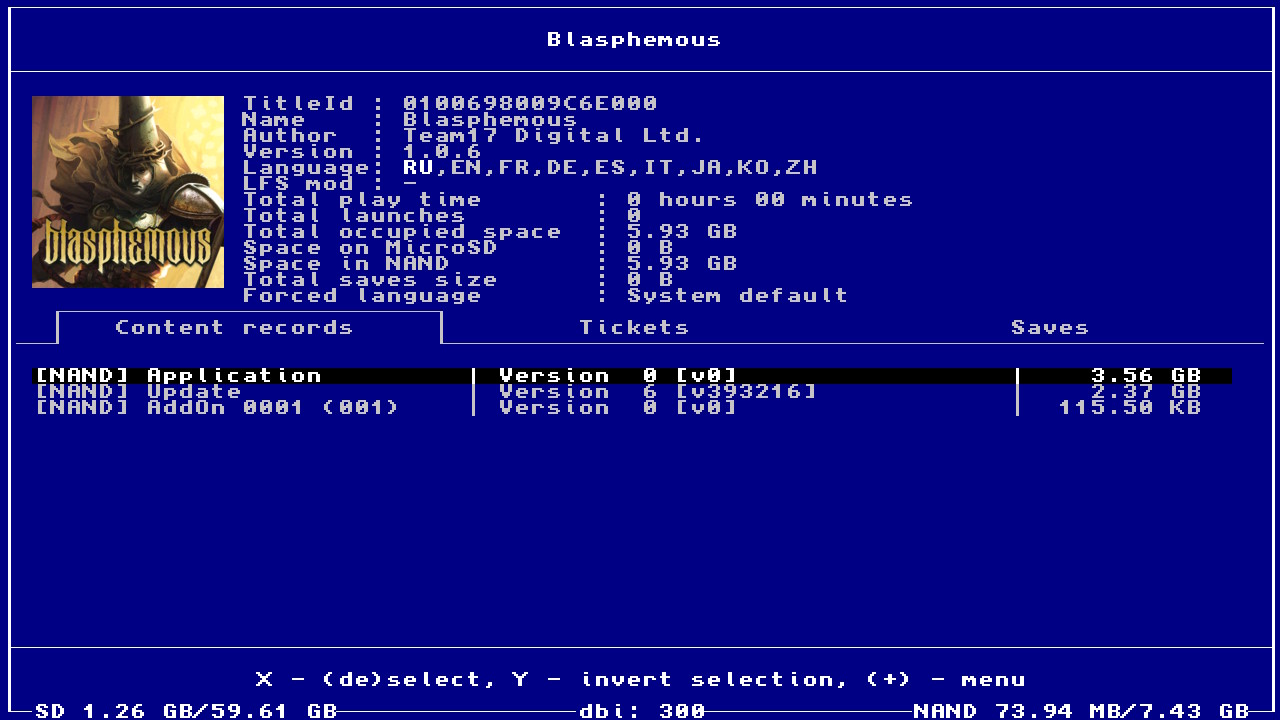
Here you will be presented with the Game icon, TitleID, display title (name), developer/publisher (Author), display version (Version), supported languages (Language) and presence of a LayeredFS mod or cheat (LFS mod).
Here you can also see the amount of time you’ve spent playing the title (Total play time), how many times the game was launched (Total launches), total installation size (Total occupied space) as well as how much space it occupies on NAND (Space in NAND) and/or on SD card (Space on MicroSD), the size of the saves (Total saves size) and what language is active for the game ( Forced Language).
You can quick launch a game directly from here by pressing (L3).
You can quickly scroll through games individually without returning to the installed applications list by using (ZL) and (ZR).
Records context menu
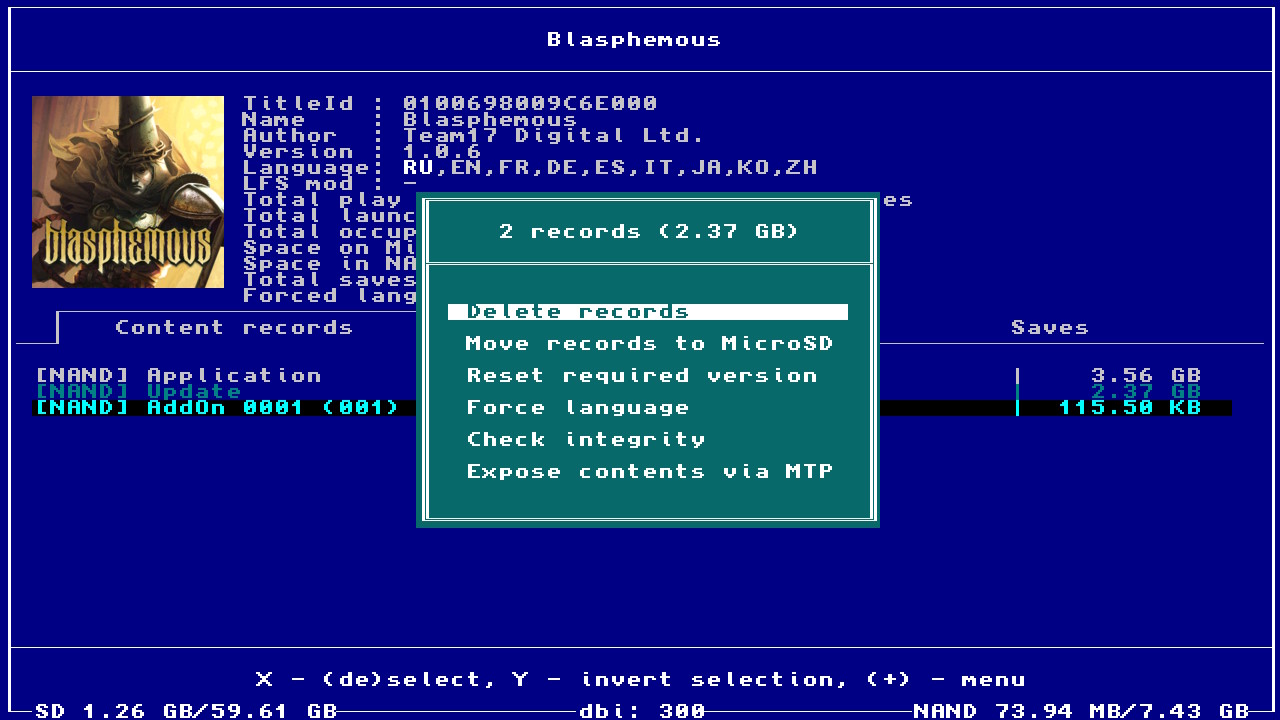
Displayed by clicking on (+) on selected records.
The top of the context window displays the number of selected records and their size.
- Delete record — delete selected entry
- Move records to MicroSD/NAND — move the selected titles to SD card or NAND, depending on where the title is currently located. If content is installed to both locations then both options will be displayed
- Reset required version — reset the system version check required to run the title (debug must be enabled in Atmosphere)
- Force language — allows you to force the game to start in the selected language. By default the game will run based on the system language, if that language is not present in the game then it will run as per the region of the console. The selected language will be displayed next to the game icon in the Forced Language field
- Check integrity — checks data integrity of selected titles
- Expose contents via MTP — mount the content of the selected titles by MTP
Cleanup orphaned files
Cleanup orphaned files automatically cleans up unnecessary game files, files from interrupted/failed game installations, officially downloaded firmware updates and all unused game tickets if found.
View and delete unnecessary game tickets. Ticket (or encrypted title key) is a special encrypted unique information about the rights to launch the content of the game, which is installed in the system during the installation of each game (000 at the end of the titleID) / update (800 at the end of titleID) / of each DLC.
- + means there is an installed game
- [c] — common-ticket (installed game dump or update)
- [p] — personalized ticket (purchased from the game eShop)
Sometimes if a specific error occurs and you know exactly what you are doing, it can be removed from a specific game and its update/DLC.
In most cases it is better not to touch anything here, in order to avoid errors when starting games.
Tickets context menu
Displayed by clicking on (+) on selected tickets
The number of selected tickets is displayed at the top of the context window.
Delete tickets — delete selected tickets
Select same game — highlight all tickets related to the selected game
View, backup and delete saves.
Saves for deleted games are highlighted in yellow.
Saves context menu
Displayed by clicking on (+) on selected saves
The number of selected saves is displayed at the top of the context window
- Backup saves — backup selected saves
- Delete saves — delete selected tickets
- Select same game — highlight all saves related to the selected game
- Select all uninstalled — select all saves for uninstalled games
Run MTP responder
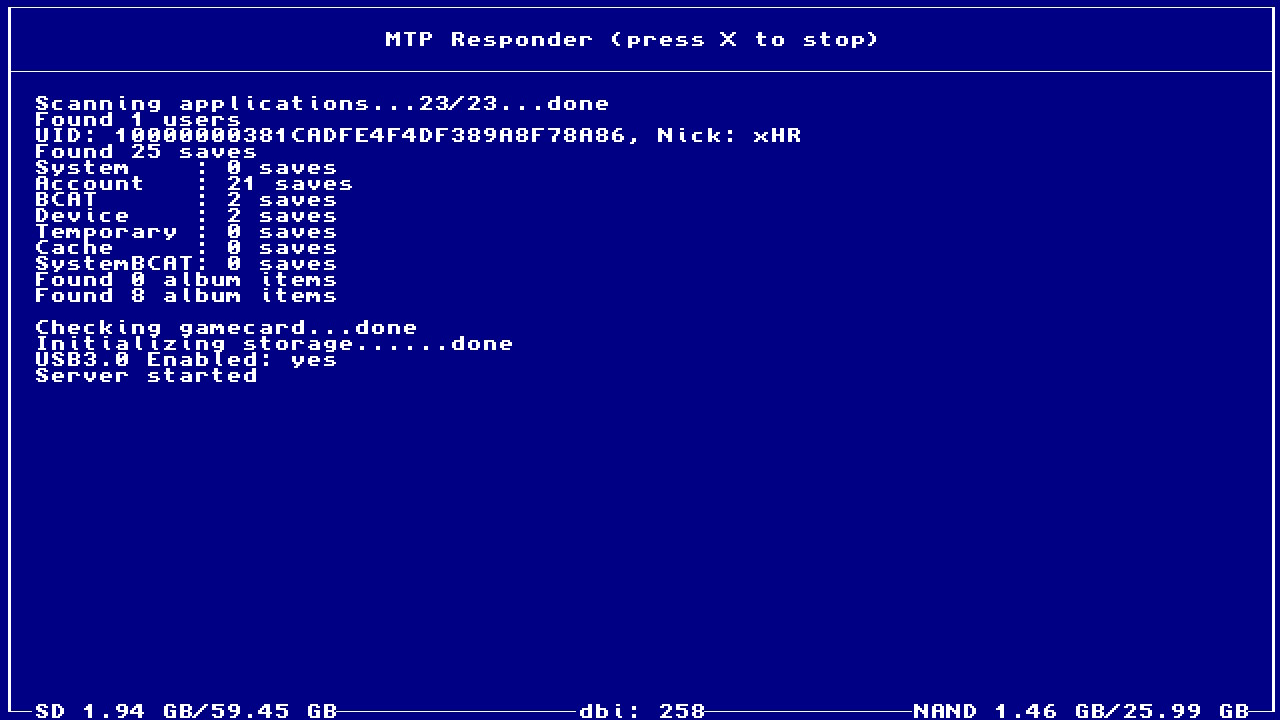
Run MTP responder run the built-in DBI MTP server to connect to your PC or Android device via USB-C OTG (phone/tablet/other devices). Main menu hotkey for this option: (X) button (same button to exit MTP mode). After successfully connecting the USB cable to the PC and starting the MTP server in DBI, you’ll see the following on your computer:
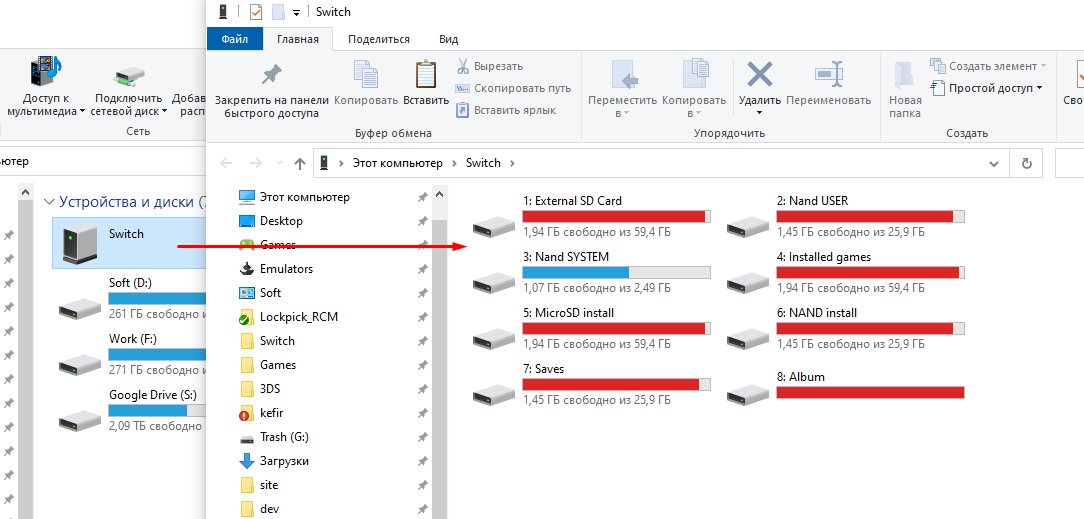
1: External SD Card — for viewing, copying and deleting files and folders from/to a PC and from/to your SD card. Drop a file larger than 4GB onto the SD card and DBI will automatically split the file into an archived folder which allows the Switch to see it as a single file, with this you can for example very easily add a >4GB .XCI for use in SX OS or add a >4GB movie for watching in NXMP or pPlay.
2: NAND User — view and copy files and folders to a PC from the Switch’s internal memory USER partition (this partition is read-only).
3: NAND System — view and copy files and folders to a PC from the Switch’s internal memory SYSTEM partition (the partition is read-only).
4: Installed games — all installed games are displayed from both NAND (internal memory of the Switch) and SD card. To dump installed games to your PC in NSP format, just copy the folder with the name of the game from Installed games to your PC. A common ticket with completely cleared personal information is generated based on your personalized ticket. Your dump will be in separate files — the game itself, the update and any DLC files. If cheats or mods have been installed for the game, they will be located in the Mods & Cheats folder. You can also dump a single combined multicontent file containing the game itself, the update and all DLC, these files are located at the root of the Installed games directory.
5: MicroSD install — Drop or copy your NSP/NSZ/XCI or XCZ files in this folder. When the transfer is complete the game will be installed on the SD card of your console. When installing NSZ or XCZ files, keep in mind that their actual size may differ greatly from their original size after installation: so if for example you start with 2GB free on your SD card and you do not have enough space to install an NSZ of 1GB in size, that is because NSZ and XCZ files are compressed and must be decompressed for installation.
6: NAND install — Drop or copy your NSP/NSZ/XCI or XCZ files in this folder. When the transfer is complete the game will be installed on the internal memory of your console.
7: Saves — Access to all save types stored in the internal memory of the Switch: accounts (Account), system programs (System), Background Content Asymmetric synchronized delivery and Transmission (BCAT, for example: events in ACNH), temporary (Temporary), cache (Cache, for example: addons in DOOM), system BCAT (SystemBCAT) and Device Saves (Device)
Backup, restore and manage save data for both installed and uninstalled games. You can make a backup of them by copying them to a PC and also delete saves that you no longer want or need — to do this open the folder with the name of the game you need, then delete the required save folder. In order to restore saves, copy them to the appropriate folder from your PC. DBI does not require pre-launching the game before restoring a save.
8: Album — direct access to official Album screenshots and videos per game/title, similar to the official feature added in OFW 11.0.0.
9: Gamecard — with a gamecard inserted into the Switch you can dump to .XCI or trimmed .XCI on the PC, along with the update built into it if present. The personal RSA certificate automatically removed and is dumped separately.
After activating the MTP server on the Switch a window will appear with your account nickname and its UID, as well as the number of game saves:
#: Custom Storage — If you have defined a custom virtual MTP drive in the dbi.config file it will appear here.
To turn off the MTP server and exit to the main menu, press either the (X) or (B) button.
Exit — closes DBI and returns to either to hbmenu or bypasses hbmenu to go directly to your homescreen (this is configured in dbi.config). If DBI was launched from a title/forwarder, the program will restart or remain on a black screen
Warnings and errors
- «SIGNATURE: Invalid» / «SIGNATURE: GC-> eShop» / «HASH NOT MATCHED TO META» are NOT ERRORS but notifications about a signature mismatch in headers, for example: conversions, custom NSPs, forwarders
- «HASH MISMATCH» — usually this is NOT an ERROR and the game was simply converted from an .XCI and everything is in order. If there are problems with a file redownload it and verify it with verification tools such as NSCB before installing. If the game still does not start or starts with an error try reinstalling it, or check or replace the USB cable/SD card, or use a different USB port
- «DELTA SKIPPED» — this is NOT an ERROR but a notification that unnecessary and unused delta fragments in the update file were skipped during installation
- «No tickets found. Possibly this NSP was converted from XCI.» — this is NOT an ERROR and the performance of the game will not be affected. This informs you that the files do not include tickets, they may have been dumped from an .XCI file or converted to Standard Crypto
- «WARNING title marked as Application but has AddonContent» — this is NOT an ERROR and usually it indicates a non-standard .NSP homebrew game, for example if an AddonContent flag (DLC) was added to the Application title (main game, v0). If the application starts and works then everything is in order
- «This application base is not stand alone. Make sure you installed update» when installing Sparse Storage games is NOT an ERROR but a reminder that an update is required to launch these types of games. Install the latest update immediately after installing the base game
- “Read: USB communication failed” — check/replace USB cable or try a different USB port on PC
- «Cannot parse content meta. Corrupted file or old firmware» — Either the file is corrupt or your firmware is too outdated to parse the meta file. Verify the file and update to the latest cfw and latest supported firmware version
- «Can not find file for ncaid» — The installation file of the game is corrupt (it does not contain the required .nca from the .cnmt list)
- «Invalid PFS0 magic!» — the file is corrupt, redownload the installation file and check its integrity
- «Invalid NCA magic!» — verify the file and update to the latest cfw and latest supported firmware version
- «Received less data than expected» or «Installation aborted» — data transfer error, check and if necessary replace the USB cable or use a different USB port between the Switch and the PC. Also make sure you have the most recent version of DBI installed
- «std::bad_alloc» — rename the file without special characters and Cyrillic in the filename and path to the file, plus make sure that you are using the latest version of DBI and update to the latest cfw and latest supported firmware version
- «Nothing to install» in the file selection window — rename the file without special characters, hieroglyphs or Cyrillic in the filename and path to the file
- «INVALID LENGTH» — check the USB-C cable connection to your USB port, try with another USB-C cable, verify the integrity of the game file and check the SD card for errors, when installing via MTP — try to run DBI in application mode (title override) holding the R button while launching a title
- «INVALID DECOMPRESSED LENGTH» together with «TRANSFER ERROR» when installing from SD card/external drives/dbibackend — free up more space on the SD card and delete unnecessary files from the card (you may experience this with more than 20,000 files on the SD card)
- «[FAILED] Unknown error» when installing .tik (ticket) — add the latest sigpatches for Atmosphére
- «605: Content or placeholder path not exists» or «SOME CONTENTS ARE MISSING» — broken file system on your SD card, or a non-working/low-quality flash drive. Check it in chkdsk and h2testw, if there are no errors reformat to FAT32
- «Can not create placeholder» — there is not enough space on the SD card/NAND, free up space and try again
- «WARNING! Extra buffers exceeded» — when installing via MTP — try to run DBI in application mode (title override) holding the R button while launching a title or alternatively via NSP forwarder and use a faster microSD card with a different USB cable/port
- «No tickets found but they are required» — incorrect (incomplete, no ticket but with titlerights) dump of the game, use another one
- «SOME CONTENTS ARE MISSING. APPLICATION WILL BE UNUSABLE» — container is incomplete, check the integrity of the game installation file
- «Invalid personalized ticket» — a dump of the game where instead of a common-ticket a personalized ticket from the console on which the game was purchased was included, obtain a proper dump
- «No ES or other sigpatches» — missing, outdated or bad sigpatches, obtain and install the latest versions to the correct locations
The dbi.config file was added starting with version 253. It is located next to DBI.nro and replaces the old flags files dbi.default.ascii and dbi.network.config and also adds several new options for easy customization of settings for the user.
Let’s take a look at its contents:
Homebrew=sdmc:/switch ; Contents=sdmc:/atmosphere/contents ; DBILogs=sdmc:/switch/DBI/logs [MTP custom storages] ; =
Homebrew=sdmc:/switch/ Screenshots=sdmc:/Nintendo/Album/ ; Override for display name ; = [Title name override] ; 010023901191C000=Naheulbeuk»>
- DefaultASCII — true uses the standard font, false activates an alternative font
- UseLibUsbHsFS — true enables libusbhsfs library to activate support for any connected external USB drives, false disables it
- ExitToHomeScreen — when false DBI will exit to hbmenu, when true DBI will exit directly to the Switch’s homescreen
- SavesFolder — folder for storing save dumps
- LogEvents — enable logging for «Install«, «Check integrity» and «Cleanup» events
- LogsFolder — folder for storing logs
- DumpsFolder — folder where game dumps are stored
- AppSorting — options for sorting the list of applications
- SaveSorting — options for sorting saves
- HighlightUpdates — highlights available updates for currently installed titles in DBI’s file browser
- RotateScreen — rotate the screen 180 degrees
- RotateJoycon — rotate controls for rotated screen
- OptimizeClockSpeed — enable or disable SoC frequency optimization when idle, disabled by default. DO NOT exit DBI improperly if enabled (e.g. by pressing the home button from applet mode) as default clock speeds will not be properly restored and your Switch will be laggy due to being in a low performance mode
- VersionsURL — accept a direct link to a file on a remote server, or to a file on a memory card. Examples: https://raw.githubusercontent.com/blawar/titledb/master/versions.txt или sdmc:/versions.txt
- ROSaveFS — browse saves FS in Read-only mode
- ShowUpdateFromHere — show «Update all items from here. » in context menu of file browsers
Visibility of main menu options — customize which options will appear in DBI’s main menu: true — display in main menu, false — hide from main menu.
- BrowseSD — display Browse SD card, to install games from SD card
- BrowseSystem — browse and copy files from SYSTEM partition
- BrowseUser — browse and copy files from USER partition
- USBHost — display Browse USB0 Drive, to install games from a external USB drive if connected
- BackendInstall — display Install title from USB, for installing games from PC via dbibackend
- GameCard — display Install title from Gamecard, to install a game from an inserted gamecard to your console
- Network — display Home server, to install games from a configured home web server
- Local — show or not links to folders from the section Local sources
- BrowseApps — display Browse installed applications, to browse and manage installed applications
- Cleanup — display Cleanup orphaned files, to clean up ‘orphaned’ files from the SD card
- UpdateCheck — display «Check for title updates«, to check for updates and DLC for installed games
- Tickets — display Browse tickets, to manage tickets
- Saves — display Browse saves, to manage save games
- MTP — display Run MTP responder, to start MTP mode
- FTP — display Run FTP server, to start FTP mode
- CalculateLFSSize — enables or disables the size check for LayeredFS mods, if enabled depending on the size of the mod a delay may occur when opening a game’s information screen in Installed applications
- CheckHash — when true, hashes of .nca files are checked when installing games
- ChunkedHTTP — Use chunked HTTP transfer (good in bad environments)
- LogAllFiles — false disables logging of all files in MTP mode, if true all files are logged, even those that are less than 2MB
- ShowCombinedNSPInInstalledGames — false disables display of combined (multi-title .NSP-file) titles
- ShowMACInInstalledGames — false turns off the display of the «Mods & cheats» directory under Installed games in MTP mode, which redirects to the path sdmc:/atmosphere/contents/TITLEID/
- CustomStorages — display custom virtual MTP drives defined by the user under [MTP custom storages]
- EnableNANDInstallOnEmunand — enable or disable the installation of games to emuMMC’s ‘NAND’ (not relevant after the release of Atmosphere 0.19.3)
- TurnOffScreen — automatically turns off the screen when MTP mode is activated
Define which virtual MTP drives will be displayed when MTP Responder is running on PC/Android.
true — display the virtual drive in MTP mode, false — disable the display of the virtual drive in MTP mode
- TurnOffScreen — turn screen off on start FTP mode
Enter your network installation sources for installing games over the network (via WiFi/LAN adapter).
NSP Indexer — address for NSP index page (more info here)
Create menu items with quick access to the folders selected in the config on the memory card, for example:
Homebrew Shortcut=sdmc:/switch will create an item «Homebrew Shortcut» which will open the folder sdmc:/switch
MTP custom storages
Define your own custom virtual MTP drives for quick access to folders on your SD card.
For example: Homebrew=sdmc:/switch In MTP mode, a Homebrew virtual MTP drive will now be available, which will directly open the sdmc:/switch folder on your SD card.
Title name override
Allows you to change the name of the displayed title in DBI itself and in MTP mode (this can be particularly useful for e.g. Japanese games).
For example, if you specify 10023901191C000 = Naheulbeuk , then the application will display just Naheulbeuk instead of The Dungeon of Naheulbeuk: The Amulet of Chaos
Mounting the content of installed titles via MTP
Go to «Browse installed applications» -> Choose apps you need to mount with X -> Press + -> «Expose contents via MTP«
Using DBI to Install Mods
- Connect to your computer via MTP mode in DBI
- Go to Installed Games, in the folder with the name of your game
- Go to Mods & Cheats folder
- Place your mod in the Mods & Cheats folder
- Be careful, you need to ensure that you copy the contents of the titleID folder and not the titleID folder itself! For example, you downloaded a translation for the game Cadence of Hyrule, in the form of the archive Cadence of Hyrule.rar . Inside this archive you see a folder with the titleID of the game — 01000B900D8B0000 . You need to extract the archive, go to the folder 01000B900D8B0000 and copy the entire contents of the folder to Mods & Cheats! Not the folder 01000B900D8B0000 itself, but everything inside it! In this example (and in most cases), that would be the romfs folder
DBI supports USB 3.0. If you are using kefir, then USB 3.0 is active by default. Otherwise, you need to activate this function by uncommenting and editing the Atmosphere system settings configuration file at sdmc:/atmosphere/config/system_settings.ini as follows:
Important — activating USB 3.0 can interfere with bluetooth and 2.4GHz wifi connections. If you experience any connection issues with your wireless controllers or 2.4GHz wifi networks then you should not activate USB 3.0. 5GHz wifi connections should be generally unaffacted.
Thanks to SciresM for hactool (licensed under ISC) — DBI uses some data struct definitions from there
Источник