Содержание
- Fortinet Community
- Technical Tip: VIP policy log action status value is ‘Accept: IP connection error’
- Fortinet Community
- Fortinet Community
- Fortinet Community
- Fortinet Community
- Subscribe to RSS Feed
- Mark as New
- Mark as Read
- Bookmark
- Subscribe
- Printer Friendly Page
- Report Inappropriate Content
Created on 05-09-2020 12:56 AM
Technical Tip: VIP policy log action status value is ‘Accept: IP connection error’
Description
This article describes a potential root cause of action as ‘Accept: IP connection error in VIP policy logs.
Solution
Assume the following scenario:
(Server: 172.31.132.15) —-DMZ FGT wan2 10.5.52.157——- Internet
Consider the server is hosting 172.31.132.15 behind the FortiGate using the VIP configuration.
When the FortiGate wan2 is pinging IP 10.5.52.157, it will get DNAT to 172.31.132.15.
# config firewall vip
edit «test»
set extip 10.5.52.157
set extintf «any»
set portforward enable
set mappedip «172.31.132.15»
set protocol icmp
next
end
# config firewall policy
edit 3
set name «vip»
set srcintf «wan2»
set dstintf «dmz»
set srcaddr «all»
set dstaddr «test»
set action accept
set schedule «always»
set service «PING»
set logtraffic all
next
end
Forward traffic log for the destination 10.5.52.157 and service ping will shortlist all the traffic log of policy 3 in which action of the log shows ‘Accept: IP connection error’.
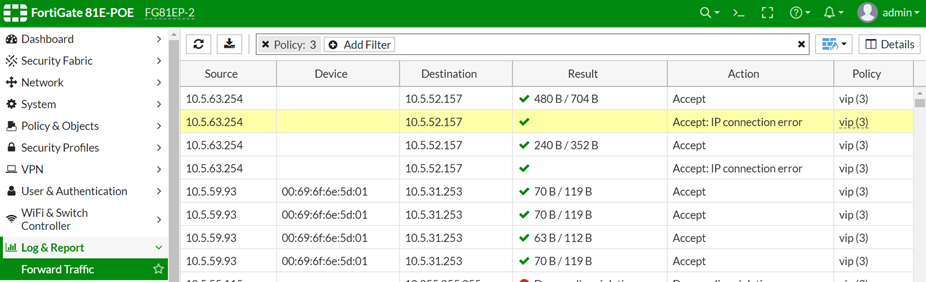
id=20085 trace_id=11 func=print_pkt_detail line=5588 msg=»vd-root:0 received a packet(proto=1, 10.5.63.254:60417->10.5.52.157:2048) from wan2. type=8, code=0, seq=1949.»
id=20085 trace_id=11 func=init_ip_session_common line=5754 msg=»allocate a new session-000b15d1″
id=20085 trace_id=11 func=fw_pre_route_handler line=181 msg=»VIP-172.31.132.15:60417, outdev-wan2″
id=20085 trace_id=11 func=__ip_session_run_tuple line=3409 msg=»DNAT 10.5.52.157:8->172.31.132.15:60417 »
id=20085 trace_id=11 func=vf_ip_route_input_common line=2598 msg=» find a route: flag=04000000 gw-172.31.132.15 via dmz »
id=20085 trace_id=11 func=fw_forward_handler line=781 msg=» Allowed by Policy-3 :»
Check whether FortiGate has learned the MAcaddress of destination IP.
Источник
- Subscribe to RSS Feed
- Mark Topic as New
- Mark Topic as Read
- Float this Topic for Current User
- Bookmark
- Subscribe
- Mute
- Printer Friendly Page
Created on 10-23-2018 09:26 PM
- Mark as New
- Bookmark
- Subscribe
- Mute
- Subscribe to RSS Feed
- Permalink
- Report Inappropriate Content
IP connection error log is displayed.
What is the cause, and how can I fix it?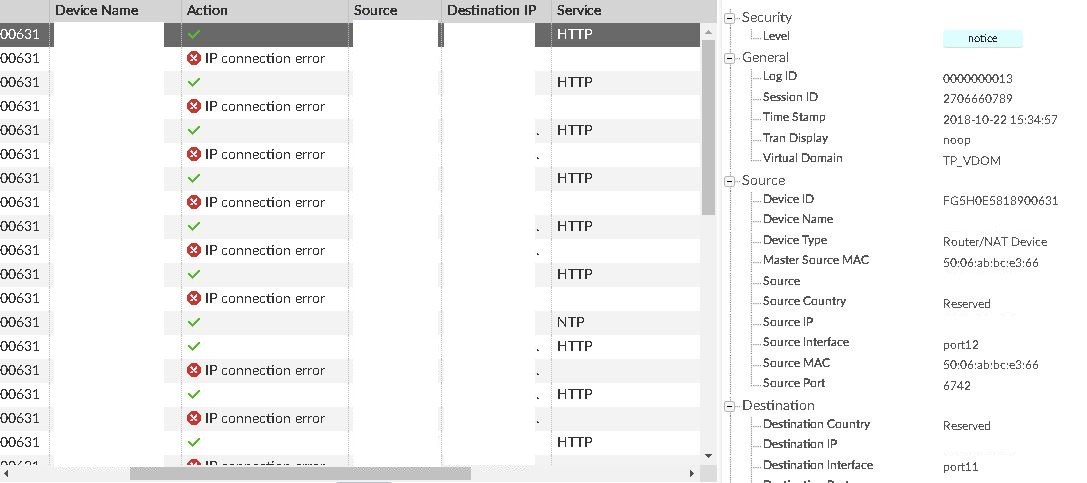

Created on 10-23-2018 10:58 PM
- Mark as New
- Bookmark
- Subscribe
- Mute
- Subscribe to RSS Feed
- Permalink
- Report Inappropriate Content
Created on 10-29-2018 01:35 AM
- Mark as New
- Bookmark
- Subscribe
- Mute
- Subscribe to RSS Feed
- Permalink
- Report Inappropriate Content
I suppose it is a routing issue
If all else fails, use the force !
Created on 09-08-2021 08:51 PM
- Mark as New
- Bookmark
- Subscribe
- Mute
- Subscribe to RSS Feed
- Permalink
- Report Inappropriate Content
If the session is a DNS session (port 53), and the response code isn’t 0.
If the session isn’t a DNS session, then the session received an ICMP packet with error code:
ICMP_DEST_UNREACH ICMP_SOURCE_QUENCH ICMP_TIME_EXCEEDED ICMP_PARAMETERPROB ICMP_REDIRECT
Источник
- Subscribe to RSS Feed
- Mark Topic as New
- Mark Topic as Read
- Float this Topic for Current User
- Bookmark
- Subscribe
- Mute
- Printer Friendly Page
Created on 10-23-2018 09:26 PM
- Mark as New
- Bookmark
- Subscribe
- Mute
- Subscribe to RSS Feed
- Permalink
- Report Inappropriate Content
IP connection error log is displayed.
What is the cause, and how can I fix it?
Created on 10-23-2018 10:58 PM
- Mark as New
- Bookmark
- Subscribe
- Mute
- Subscribe to RSS Feed
- Permalink
- Report Inappropriate Content
Created on 10-29-2018 01:35 AM
- Mark as New
- Bookmark
- Subscribe
- Mute
- Subscribe to RSS Feed
- Permalink
- Report Inappropriate Content
I suppose it is a routing issue
If all else fails, use the force !
Created on 09-08-2021 08:51 PM
- Mark as New
- Bookmark
- Subscribe
- Mute
- Subscribe to RSS Feed
- Permalink
- Report Inappropriate Content
If the session is a DNS session (port 53), and the response code isn’t 0.
If the session isn’t a DNS session, then the session received an ICMP packet with error code:
ICMP_DEST_UNREACH ICMP_SOURCE_QUENCH ICMP_TIME_EXCEEDED ICMP_PARAMETERPROB ICMP_REDIRECT
Источник
Hi,
I’m trying to connect the Client to a VPN Tunnel to use internet, this error keeps popping up when attempting to connect via Remote Access in FortiClient: The server you want to connect requests identification, please choose a certificate and try again. (-5).
My Debug:
FortiGate-VM64 # [131:root:6]allocSSLConn:276 sconn 0x7f5f8640e800 (0:root)
[131:root:6]SSL state:before/accept initialization (192.168.90.50)
[131:root:6]SSL_accept returned 0.
[131:root:6]Destroy sconn 0x7f5f8640e800, connSize=0. (root)
[131:root:7]allocSSLConn:276 sconn 0x7f5f8640e800 (0:root)
[131:root:7]SSL state:before/accept initialization (192.168.90.50)
[131:root:7]SSL state:SSLv3 read client hello A (192.168.90.50)
[131:root:7]SSL state:SSLv3 write server hello A (192.168.90.50)
[131:root:7]SSL state:SSLv3 write certificate A (192.168.90.50)
[131:root:7]SSL state:SSLv3 write server done A (192.168.90.50)
[131:root:7]SSL state:SSLv3 flush data (192.168.90.50)
[131:root:7]SSL state:SSLv3 read client certificate A (192.168.90.50)
[131:root:7]SSL state:SSLv3 read client key exchange A:system lib(192.168.90.50)
[131:root:7]SSL state:SSLv3 read client key exchange A:system lib(192.168.90.50)
[131:root:7]SSL_accept returned 0.
[131:root:9]Destroy sconn 0x7f5f86410800, connSize=0. (root)
I have tried most of what is online possibilities, disabled certificates in CLI, SSLv3, matched it with TLS1.1, and 1.2 in Internet Explorer as well, still same error.
I know it’s certificate related but I’m using a VM of the Firewall, not sure how to get by it..
Thank You
check
Best Answer

Jeff-J

This person is a verified professional.
Verify your account
to enable IT peers to see that you are a professional.
cayenne
It depends if you are using split tunneling or not. If you google what is my IP it will either show the public IP of the remote ISP, or the WAN IP of the Fortigate, again it depends on what you have set for split tunneling.
It will not show the IP 10.212.134.0, the SSLVPN on the Fortigate is just another network interface.
1 found this helpful
thumb_up
thumb_down
View Best Answer in replies below
Read these next…

Snap! — No-Password Logins, Solar Powered Water Filter, Glitch in the Matrix?
Spiceworks Originals
Your daily dose of tech news, in brief.
Welcome to the Snap!
Flashback: February 9, 1996: Introduction of the Bandai Pippin (Read more HERE.)
Bonus Flashback: February 9, 1990: Galileo Probe does a Venus Flyby (Read more HERE.)
You nee…
Roku TV being used as Wallboard Issues
Hardware
Helping someone out at their shop. They have 4 large Roku screens and 2 laptops with dual HDMI ports for video. They are viewing static website business dashboards and PowerPoint. At first all 4 screens connected to wireless, worked for a while but with a…
Charging for SSO
Security
We have SSO set up with around 5 or 6 solution providers via our M365. Not one of them charges for this, they just sent us the documentation.I identified another online service in use by one of our departments which would benefit from using SSO for staff …
Spark! Pro series — 9th February 2023
Spiceworks Originals
Today in History: America meets the Beatles on “The Ed Sullivan Show”
At approximately 8:12 p.m. Eastern time, Sunday, February 9, 1964, The Ed Sullivan Show returned from a commercial (for Anacin pain reliever), and there was Ed Sullivan standing …
Green Brand Rep Wrap-Up: January 2023
Spiceworks Originals
Source Opens a new window Opens a new windowHi, y’all — Chad here. A while back, we used to feature the top posts from our brand reps (aka “Green Gals/Guys/et. al.) in a weekly or monthly wrap-up post. I can’t specifically recall which, as that was ap…


Troubleshooting
This section contains tips to help you with some common challenges of IPsec VPNs.
A VPN connection has multiple stages that can be confirmed to ensure the connection is working properly. It is easiest to see if the final stage is successful first since if it is successful the other stages will be working properly. Otherwise, you will need to work back through the stages to see where the problem is located.
When a VPN connection is properly established, traffic will flow from one end to the other as if both ends were physically in the same place. If you can determine the connection is working properly then any problems are likely problems with your applications.
On some FortiGate units, such as the FortiGate 94D, you cannot ping over the IPsec tunnel without first setting a source-IP. In this scenario, you must assign an IP address to the virtual IPsec VPN interface. Anything sourced from the FortiGate going over the VPN will use this IP address.
If the egress/outgoing interface (determined by kernel route) has an IP address, then use the IP address of the egress/outgoing interface. Otherwise, use the IP address of the first interface from the interface list (that has an IP address).
The first diagnostic command worth running, in any IPsec VPN troubleshooting situation, is the following: diagnose vpn tunnel list
This command is very useful for gathering statistical data such as the number of packets encrypted versus decrypted, the number of bytes sent versus received, the SPI identifier, etc. This kind of information in the resulting output can make all the difference in determining the issue with the VPN.
Another appropriate diagnostic command worth trying is: diagnose debug flow
This command will inform you of any lack of firewall policy, lack of forwarding route, and of policy ordering issues.
Common IPsec VPN problems
The most common IPsec VPN issues are listed below. Please read thoroughly and note that, although the list is extensive, it is not exhaustive.
This section includes support for the following:
l Failed VPN connection attempts l Debug output table l The options to configure policy-based IPsec VPN are unavailable l The VPN tunnel goes down frequently l The pre-shared key does not match (PSK mismatch error) l The SA proposals do not match (SA proposal mismatch) l Pre-existing IPsec VPN tunnels need to be cleared l Other potential VPN issues
Failed VPN connection attempts
If your VPN fails to connect, check the following:
- Ensure that the pre-shared keys match exactly (see The pre-shared key does not match (PSK mismatch error) below).
- Ensure that both ends use the same P1 and P2 proposal settings (seeThe SA proposals do not match (SA proposal mismatch) below).
- Ensure that you have allowed inbound and outbound traffic for all necessary network services, especially if services such as DNS or DHCP are having problems. l Check that a static route has been configured properly to allow routing of VPN traffic.
If you are still unable to connect to the VPN tunnel, run the following diagnostic command in the CLI:
diagnose debug application ike -1 diagnose debug enable
The resulting output may indicate where the problem is occurring. When you are finished, disable the diagnostics by using the following command:
diagnose debug reset diagnose debug disable
View the table below for some assistance in analyzing the debug output.
Debug output table
| Problem | Debug output | Common causes | Common solutions |
| Tunnel is not coming up | Error: negotiation failure | IPsec configuration mismatch | Check phase 1 and 2 settings |
| Error: no SA proposal chosen | IPsec configuration mismatch | Check phase 1 and 2 settings | |
| FortiGate using the wrong
VPN |
Missing or wrong local ID | If there are more than one preshared key dial-up VPN with the same local gateway, use
aggressive mode and different local IDs |
|
| Error: connection expiring due to XAUTH failure | Wrong username, password, or user group | Check user credentials and user group configuration | |
| Error: peer has not completed XAUTH exchange | XAuth is disabled in the client | Fix the client’s XAuth configuration | |
| Tunnel is bouncing | DPD packets lost | ISP issue | Check the ISP connection |
Common IPsec VPN problems
| Problem | Debug output | Common causes | Common solutions |
| Tunnel is up
but traffic does not go through |
Error: No matching IPsec selector, drop | Quick mode selector mismatch | Fix the quick mode selector |
| NAT is enabled | Disable NAT in the firewall policy | ||
| Traffic is not routed to the tunnel | Route or firewall policy misconfiguration | Route-based: traffic must be routed to IPsec virtual interface Policy-based: traffic must match a
firewall policy with action set to IPSEC |
The options to configure policy-based IPsec VPN are unavailable
Go to System > Feature Visibility. Select Show More and turn on Policy-based IPsec VPN.
The VPN tunnel goes down frequently
If your VPN tunnel goes down often, check the Phase 2 settings and either increase the Keylife value or enable Autokey Keep Alive.
The pre-shared key does not match (PSK mismatch error)
It is possible to identify a PSK mismatch using the following combination of CLI commands:
diag vpn ike log filter name <phase1-name> diag debug app ike -1 diag debug enable
This will provide you with clues as to any PSK or other proposal issues. If it is a PSK mismatch, you should see something similar to the following output:
ike 0:TRX:322: PSK auth failed: probable pre-shared key mismatch ike Negotiate SA Error:
The SA proposals do not match (SA proposal mismatch)
The most common problem with IPsec VPN tunnels is a mismatch between the proposals offered between each party. Without a match and proposal agreement, Phase 1 can never establish. Use the following command to show the proposals presented by both parties. diag debug app ike -1 diag debug enable
The resulting output should include something similar to the following, where blue represents the remote VPN device, and green represents the local FortiGate.
responder received SA_INIT msg incoming proposal:
proposal id = 1:
protocol = IKEv2: encapsulation = IKEv2/none type=ENCR, val=AES_CBC (key_len = 256)
Common IPsec VPN problems
type=INTEGR, val=AUTH_HMAC_SHA_96 type=PRF, val=PRF_HMAC_SHA type=DH_GROUP, val=1536.
proposal id = 2:
protocol = IKEv2: encapsulation = IKEv2/none type=ENCR, val=3DES_CBC
type=INTEGR, val=AUTH_HMAC_SHA_2_256_128 type=PRF, val=PRF_HMAC_SHA2_256 type=DH_GROUP, val=1536.
proposal id = 1:
protocol = IKEv2: encapsulation = IKEv2/none type=ENCR, val=AES_CBC (key_len = 128) type=INTEGR, val=AUTH_HMAC_SHA_96 type=PRF, val=PRF_HMAC_SHA type=DH_GROUP, val=1536.
Pre-existing IPsec VPN tunnels need to be cleared
Should you need to clear an IKE gateway, use the following commands:
diagnose vpn ike restart diagnose vpn ike gateway clear
Other potential VPN issues
- Ensure that your FortiGate unit is in NAT/Route mode, rather than Transparent.
- Check your NAT settings, enabling NAT traversal in the Phase 1 configuration while disabling NAT in the security policy. You might need to pin the PAT/NAT session table, or use some of kind of NAT-T keepalive to avoid the expiration of your PAT/NAT translation.
- Ensure that both ends of the VPN tunnel are using Main mode, unless multiple dial-up tunnels are being used.
- Remove any Phase 1 or Phase 2 configurations that are not in use. If a duplicate instance of the VPN tunnel appears on the IPsec Monitor, reboot your FortiGate unit to try and clear the entry.
- If you have multiple dial-up IPsec VPNs, ensure that the peer ID is configured properly on the FortiGate and that clients have specified the correct local ID. Furthermore, in circumstances where multiple remote dialup VPN tunnels exist, each tunnel must have a peer ID set.
- If you are using FortiClient, ensure that your version is compatible with the FortiGate firmware by reading the FortiOS Release Notes. l If you are using Perfect Forward Secrecy (PFS), ensure that it is used on both peers. You can use the diagnose
vpn tunnel list command to troubleshoot this.
- Ensure that the Quick Mode selectors are correctly configured. If part of the setup currently uses firewall addresses or address groups, try changing it to either specify the IP addresses or use an expanded address range. This is especially useful if the remote endpoint is not a FortiGate device.
- If XAUTH is enabled, ensure that the settings are the same for both ends, and that the FortiGate unit is set to Enable as Server.
- Check IPsec VPN Maximum Transmission Unit (MTU) size. A 1500 byte MTU is going to exceed the overhead of the ESP-header, including the additional ip_header,etc. You can use the diagnose vpn tunnel list command to troubleshoot this.
Troubleshooting connection issues
- If your FortiGate unit is behind a NAT device, such as a router, configure port forwarding for UDP ports 500 and 4500.
Troubleshooting connection issues
The following section includes troubleshooting suggestions related to:
l LAN interface connection l Dialup connection l Troubleshooting VPN connections l Troubleshooting invalid ESP packets using Wireshark l Attempting hardware offloading beyond SHA1 l Check Phase 1 proposal settings l Check your routing l Try enabling XAuth
LAN interface connection
To confirm whether a VPN connection over LAN interfaces has been configured correctly, issue a ping or traceroute command on the network behind the FortiGate unit to test the connection to a computer on the remote network. If the connection is properly configured, a VPN tunnel will be established automatically when the first data packet destined for the remote network is intercepted by the FortiGate unit.
If the ping or traceroute fail, it indicates a connection problem between the two ends of the tunnel. This may or may not indicate problems with the VPN tunnel. You can confirm this by going to Monitor > IPsec Monitor where you will be able to see your connection. A green arrow means the tunnel is up and currently processing traffic. A red arrow means the tunnel is not processing traffic, and this VPN connection has a problem.
If the connection has problems, see Troubleshooting VPN connections on page 227.
Dialup connection
A dialup VPN connection has additional steps. To confirm that a VPN between a local network and a dialup client has been configured correctly, at the dialup client, issue a ping command to test the connection to the local network. The VPN tunnel initializes when the dialup client attempts to connect.
If the ping or traceroute fail, it indicates a connection problem between the two ends of the tunnel. This may or may not indicate problems with the VPN tunnel, or dialup client. As with the LAN connection, confirm the VPN tunnel is established by checking Monitor > IPsec Monitor.
Troubleshooting VPN connections
If you have determined that your VPN connection is not working properly through Troubleshooting on page 223, the next step is to verify that you have a phase2 connection.
If traffic is not passing through the FortiGate unit as you expect, ensure the traffic does not contain IPcomp packets (IP protocol 108, RFC 3173). FortiGate units do not allow IPcomp packets, they compress packet payload, preventing it from being scanned.
Testing Phase 1 and 2 connections is a bit more difficult than testing the working VPN. This is because they require diagnose CLI commands. These commands are typically used by Fortinet customer support to discover more information about your FortiGate unit and its current configuration.
Before you begin troubleshooting, you must:
- Configure FortiGate units on both ends for interface VPN l Record the information in your VPN Phase 1 and Phase 2 configurations – for our example here the remote IP
address is 10.11.101.10 and the names of the phases are Phase 1 and Phase 2
- Install a telnet or SSH client such as putty that allows logging of output l Ensure that the admin interface supports your chosen connection protocol so you can connect to your FortiGate unit admin interface.
For this example, default values were used unless stated otherwise.
Obtaining diagnose information for the VPN connection – CLI
- Log into the CLI as admin with the output being logged to a file.
- Stop any diagnose debug sessions that are currently running with the CLI command diagnose debug disable
- Clear any existing log-filters by running
diagnose vpn ike log-filter clear
- Set the log-filter to the IP address of the remote computer (10.11.101.10). This filters out all VPN connections except ones to the IP address we are concerned with. The command is diagnose vpn ike log-filter dst-addr4 10.11.101.10.
- Set up the commands to output the VPN handshaking. The commands are:
diagnose debug app ike 255 diagnose debug enable
- Have the remote FortiGate initiate the VPN connection in the web-based manager by going to VPN > IPsec Tunnels and selecting Bring up.
This makes the remote FortiGate the initiator and the local FortiGate becomes the responder. Establishing the connection in this manner means the local FortiGate will have its configuration information as well as the information the remote computer sends. Having both sets of information locally makes it easier to troubleshoot your VPN connection.
- Watch the screen for output, and after roughly 15 seconds enter the following CLI command to stop the output.
diagnose debug disable
- If needed, save the log file of this output to a file on your local computer. Saving the output to a file can make it easier to search for a particular phrase, and is useful for comparisons.
Troubleshooting a Phase 1 VPN connection
Using the output from Obtaining diagnose information for the VPN connection – CLI, search for the word proposal in the output. It may occur once indicating a successful connection, or it will occur two or more times for an unsuccessful connection — there will be one proposal listed for each end of the tunnel and each possible Troubleshooting connection issues
combination in their settings. For example if 10.11.101.10 selected both Diffie-Hellman Groups 1 and 5, that would be at least 2 proposals set.
A successful negotiation proposal will look similar to
IPsec SA connect 26 10.12.101.10->10.11.101.10:500 config found created connection: 0x2f55860 26 10.12.101.10->10.11.101.10:500 IPsec SA connect 26 10.12.101.10->10.11.101.10:500 negotiating no suitable ISAKMP SA, queuing quick-mode request and initiating ISAKMP SA negotiation initiator: main mode is sending 1st message…
cookie 3db6afe559e3df0f/0000000000000000 out [encryption]
sent IKE msg (ident-i1send): 10.12.101.10:500->10.11.101.10:500, len=264, id=3db6afe559e3df0f/0000000000000000
diaike 0: comes 10.12.101.1:500->10.11.101.1:500,ifindex=26….
Note the phrase “initiator: main mode is sending 1st message…” which shows you the
handshake between the ends of the tunnel is in progress. Initiator shows the remote unit is sending the first message.
Troubleshooting invalid ESP packets using Wireshark
The following section provides information to help debug an encryption key mismatch. The ESP packet invalid error is due to an encryption key mismatch after a VPN tunnel has been established. When an IPsec VPN tunnel is up, but traffic is not able to pass through the tunnel, Wireshark (or an equivalent program) can be used to determine whether there is an encryption mismatch. A mismatch could occur for many reasons, one of the most common is the instability of an ISP link (ADSL, Cable), or it could effectively be any device in the physical connection.
The following information is required to troubleshoot the problem.
- Take a packet sniffer trace on both FortiGates.
- Run the diag vpn tunnel list command a few times on both FortiGates when generating traffic that will pass through the tunnel.
In the following example, the error message was seen on the recipient FortiGate:
date=2010-12-28 time=18:19:35 devname=Kosad_VPN device_id=FG300B3910600118 log_ id=0101037132 type=event subtype=ipsec pri=critical vd=”root” msg=”IPsec ESP” action=”error” rem_ ip=180.87.33.2 loc_ip=121.133.8.18 rem_port=32528 loc_port=4500 out_intf=”port2″ cookies=”88d40f65d555ccaf/05464e20e4afc835″user=”N/A” group=”N/A” xauth_user=”N/A” xauth_ group=”N/A” vpn_tunnel=”fortinet_0″ status=esp_error error_num=Invalid ESP packet detected (HMAC validation failed). spi=c32b09f7 seq=00000012
This is the output of the command diag vpn tunnel list on the FortiGate:
inet ver=1 serial=2 192.168.1.205:4500->121.133.8.18:4500 lgwy=dyn tun=intf mode=auto bound_if=4 proxyid_num=1 child_num=0 refcnt=7 ilast=0 olast=0 stat: rxp=41 txp=56 rxb=4920 txb=3360 dpd: mode=active on=1 idle=5000ms retry=3 count=0 seqno=696 natt: mode=keepalive draft=32 interval=10 remote_port=4500 proxyid=P2_60C_Fortinet proto=0 sa=1 ref=2 auto_negotiate=0 serial=1 src:
0:182.40.101.0/255.255.255.0:0 dst: 0:100.100.100.0/255.255.255.0:0 connection issues
SA: ref=3 options=0000000d type=00 soft=0 mtu=1428 expire=1106 replaywin=0 seqno=15 life: type=01 bytes=0/0 timeout=1777/1800
dec: spi=29a26eb6 esp=3des key=24 bf25e69df90257f64c55dda4069f01834cd0382fe4866ff2 ah=sha1 key=20 38b2600170585d2dfa646caed5bc86d920aed7ff
enc: spi=c32b09f7 esp=3des key=24 0abd3c70032123c3369a6f225a385d30f0b2fb1cd9687ec8 ah=sha1 key=20 214d8e717306dffceec3760464b6e8edb436c6 This is the packet capture from the FortiGate:
How to verify if the original packet has been encrypted correctly
To verify, it is necessary to decrypt the ESP packet using Wireshark. Open the packet capture that is taken from initiator FortiGate using Wireshark. Go to Edit > Preferences, expand Protocol and look for ESP. Select “Attempt to detect/decode encrypted ESP payloads“, and fill in the information for the encryption algorithm and the keys. This information can be obtained from the output of the command diag vpn tunnel list.
If the packet was encrypted correctly using the correct key, then the decryption will be successful and it will be possible to see the original package as shown below:
Repeat the decryption process for the packet capture from the recipient firewall. If the decryption failed using the same key, the packet may be corrupted and the interface should then be checked for CRC or packet errors.
Attempting hardware offloading beyond SHA1
If you are trying to off-load VPN processing to a network processing unit (NPU), remember that only SHA1 authentication is supported. For high levels of authentication such as SHA256, SHA384, and SHA512 hardware offloading is not an option—all VPN processing must be done in software—unless using an NP6 (although the NP4lite variation also supports SHA256, SHA384, and SHA512).
Enable/disable IPsec ASIC-offloading
Much like NPU-offload in IKE phase1 configuration, you can enable or disable the usage of ASIC hardware for IPsec Diffie-Hellman key exchange and IPsec ESP traffic. By default hardware offloading is used. For debugging purposes, sometimes it is best for all the traffic to be processed by software.
config sys global set ipsec-asic-offload [enable | disable] end
Check Phase 1 proposal settings
Ensure that both sides have at least one Phase 1 proposal in common. Otherwise they will not connect. If there are many proposals in the list, this will slow down the negotiating of Phase 1. If its too slow, the connection may timeout before completing. If this happens, try removing some of the unused proposals.
NPU offloading is supported when the local gateway is a loopback interface.
Check your routing
If routing is not properly configured with an entry for the remote end of the VPN tunnel, traffic will not flow properly. You may need static routes on both ends of the tunnel. If routing is the problem, the proposal will likely setup properly but no traffic will flow.
Try enabling XAuth
If one end of an attempted VPN tunnel is using XAuth and the other end is not, the connection attempt will fail. The log messages for the attempted connection will not mention XAuth is the reason, but when connections are failing it is a good idea to ensure both ends have the same XAuth settings. If you do not know the other end’s settings enable or disable XAuth on your end to see if that is the problem.
General troubleshooting tips
Most connection failures are due to a configuration mismatch between the FortiGate unit and the remote peer. In general, begin troubleshooting an IPsec VPN connection failure as follows:
- Ping the remote network or client to verify whether the connection is up. See General troubleshooting tips on page 231.
- Traceroute the remote network or client. If DNS is working, you can use domain names. Otherwise use IP addresses.
- Check the routing behind the dialup client. Routing problems may be affecting DHCP. If this appears to be the case, configure a DHCP relay service to enable DHCP requests to be relayed to a DHCP server on or behind the FortiGate server.
- Verify the configuration of the FortiGate unit and the remote peer. Check the following IPsec parameters: l The mode setting for ID protection (main or aggressive) on both VPN peers must be identical.
- The authentication method (preshared keys or certificates) used by the client must be supported on the FortiGate unit and configured properly.
- If preshared keys are being used for authentication purposes, both VPN peers must have identical preshared keys.
- The remote client must have at least one set of Phase 1 encryption, authentication, and Diffie-Hellman settings that match corresponding settings on the FortiGate unit.
- Both VPN peers must have the same NAT traversal setting (enabled or disabled).
- The remote client must have at least one set of Phase 2 encryption and authentication algorithm settings that match the corresponding settings on the FortiGate unit.
- If you are using manual keys to establish a tunnel, the Remote SPI setting on the FortiGate unit must be identical to the Local SPI setting on the remote peer, and vise versa.
- To correct the problem, see the following table.
VPN troubleshooting tips
| Configuration problem | Correction |
| Mode settings do not match. | Select complementary mode settings. See Phase 1 parameters on page 46. |
| Peer ID or certificate name of the remote peer or dialup client is not recognized by FortiGate
VPN server. |
Check Phase 1 configuration. Depending on the Remote Gateway and Authentication Method settings, you have a choice of options to authenticate FortiGate dialup clients or VPN peers by ID or certificate name (see Phase 1 parameters on page 46).
If you are configuring authentication parameters for FortiClient dialup clients, refer to the Authenticating FortiClient Dialup Clients Technical Note. |
| Preshared keys do not match. | Reenter the preshared key. See Phase 1 parameters on page 46. |
| Phase 1 or Phase 2 key exchange proposals are mismatched. | Make sure that both VPN peers have at least one set of proposals in common for each phase. See Phase 1 parameters on page 46 and Phase 2 parameters on page 66. |
| NAT traversal settings are mismatched. | Select or clear both options as required. See Phase 1 parameters on page 46 and Phase 1 parameters on page 46. |
A word about NAT devices
When a device with NAT capabilities is located between two VPN peers or a VPN peer and a dialup client, that device must be NAT traversal (NAT-T) compatible for encrypted traffic to pass through the NAT device. For more information, see Phase 1 parameters on page 46.
Troubleshooting L2TP and IPsec
This section describes some checks and tools you can use to resolve issues with L2TP-over-IPsec VPNs.
This section includes:
- Quick checks l Mac OS X and L2TP
- Setting up logging
- Using the FortiGate unit debug commands
Quick checks
The table below is a list of common L2TP over IPsec VPN problems and the possible solutions.
L2TP and
| Problem | What to check |
| IPsec tunnel does not come up. | Check the logs to determine whether the failure is in Phase 1 or Phase 2.
Check the settings, including encapsulation setting, which must be transport-mode. Check the user password. Confirm that the user is a member of the user group assigned to L2TP. On the Windows PC, check that the IPsec service is running and has not been disabled. See Troubleshooting L2TP and IPsec on page 232. |
| Tunnel connects, but there is no communication. | Did you create an ACCEPT security policy from the public network to the protected network for the L2TP clients? See Troubleshooting L2TP and IPsec on page 232. |
Mac OS X and L2TP
FortiOS allows L2TP connections with empty AVP host names and therefore Mac OS X L2TP connections can connect to the FortiGate.
Prior to FortiOS 4.0 MR3, FortiOS refused L2TP connections with empty AVP host names in compliance with RFC 2661 and RFC 3931.
Setting up logging
L2TP logging must be enabled to record L2TP events. Alert email can be configured to report L2TP errors.
Configuring FortiGate logging for L2TP over IPsec
- Go to Log & Report > Log Settings.
- Select Event Log.
- Select the VPN activity event check box.
- Select Apply.
Viewing FortiGate logs
- Go to Log & Report > VPN Events.
- Select the Log location if required.
- After each attempt to start the L2TP over IPsec VPN, select Refresh to view logged events.
Using the FortiGate unit debug commands
Viewing debug output for IKE and L2TP
- Start an SSH or Telnet session to your FortiGate unit.
- Enter the following CLI commands
L2TP and diagnose debug application ike -1 diagnose debug application l2tp -1 diagnose debug enable
- Attempt to use the VPN and note the debug output in the SSH or Telnet session.
- Enter the following command to reset debug settings to default:
diagnose debug reset
Using the packet sniffer
- Start an SSH or Telnet session to your FortiGate unit.
- Enter the following CLI command diagnose sniffer packet any icmp 4
- Attempt to use the VPN and note the debug output.
- Enter Ctrl-C to end sniffer operation.
Typical L2TP over IPsec session startup log entries – raw format
2010-01-11 16:39:58 log_id=0101037127 type=event subtype=ipsec pri=notice vd=”root” msg=”progress IPsec Phase 1″ action=”negotiate” rem_ip=172.20.120.151 loc_ip=172.20.120.141 rem_port=500 loc_port=500 out_ intf=”port1″ cookies=”5f6da1c0e4bbf680/d6a1009eb1dde780″ user=”N/A” group=”N/A” xauth_user=”N/A” xauth_ group=”N/A” vpn_tunnel=”dialup_p1″ status=success init=remote mode=main dir=outbound stage=1 role=responder result=OK
2010-01-11 16:39:58 log_id=0101037127 type=event subtype=ipsec pri=notice vd=”root” msg=”progress IPsec Phase 1″ action=”negotiate” rem_ip=172.20.120.151 loc_ip=172.20.120.141 rem_port=500 loc_port=500 out_ intf=”port1″ cookies=”5f6da1c0e4bbf680/d6a1009eb1dde780″ user=”N/A” group=”N/A” xauth_user=”N/A” xauth_ group=”N/A” vpn_tunnel=”dialup_p1″ status=success init=remote mode=main dir=outbound stage=2 role=responder result=OK
2010-01-11 16:39:58 log_id=0101037127 type=event subtype=ipsec pri=notice vd=”root” msg=”progress IPsec Phase 1″ action=”negotiate” rem_ip=172.20.120.151 loc_ip=172.20.120.141 rem_port=500 loc_port=500 out_ intf=”port1″ cookies=”5f6da1c0e4bbf680/d6a1009eb1dde780″ user=”N/A” group=”N/A” xauth_user=”N/A” xauth_ group=”N/A” vpn_tunnel=”dialup_p1″ status=success init=remote mode=main dir=inbound stage=3 role=responder result=DONE
2010-01-11 16:39:58 log_id=0101037127 type=event subtype=ipsec pri=notice vd=”root” msg=”progress IPsec Phase 1″ action=”negotiate” rem_ip=172.20.120.151 loc_ip=172.20.120.141 rem_port=500 loc_port=500 out_ intf=”port1″ cookies=”5f6da1c0e4bbf680/d6a1009eb1dde780″ user=”N/A” group=”N/A” xauth_user=”N/A” xauth_ group=”N/A” vpn_tunnel=”dialup_p1_0″ status=success init=remote mode=main dir=outbound stage=3 role=responder result=DONE
2010-01-11 16:39:58 log_id=0101037129 type=event subtype=ipsec pri=notice vd=”root” msg=”progress IPsec Phase 2″ action=”negotiate” rem_ip=172.20.120.151 loc_ip=172.20.120.141 rem_port=500 loc_port=500 out_ intf=”port1″ cookies=”5f6da1c0e4bbf680/d6a1009eb1dde780″ user=”N/A” group=”N/A” xauth_user=”N/A” xauth_ group=”N/A” vpn_tunnel=”dialup_p1_0″ status=success init=remote mode=quick dir=outbound stage=1 role=responder result=OK
2010-01-11 16:39:58 log_id=0101037133 type=event subtype=ipsec pri=notice vd=”root” msg=”install IPsec SA” action=”install_sa” rem_ip=172.20.120.151 loc_ip=172.20.120.141 rem_port=500 loc_port=500 out_ intf=”port1″ cookies=”5f6da1c0e4bbf680/d6a1009eb1dde780″ user=”N/A” group=”N/A” xauth_user=”N/A” xauth_ group=”N/A” vpn_tunnel=”dialup_p1_0″ role=responder in_spi=61100fe2 out_spi=bd70fca1
2010-01-11 16:39:58 log_id=0101037139 type=event subtype=ipsec pri=notice vd=”root” msg=”IPsec Phase 2 status change” action=”phase2-up” rem_ip=172.20.120.151 loc_ip=172.20.120.141 rem_port=500 loc_port=500 out_intf=”port1″ cookies=”5f6da1c0e4bbf680/d6a1009eb1dde780″ user=”N/A” group=”N/A” xauth_user=”N/A” xauth_group=”N/A” vpn_tunnel=”dialup_p1_0″ phase2_name=dialup_p2
2010-01-11 16:39:58 log_id=0101037138 type=event subtype=ipsec pri=notice vd=”root” msg=”IPsec connection status change” action=”tunnel-up” rem_ip=172.20.120.151 loc_ip=172.20.120.141 rem_port=500 loc_port=500 out_intf=”port1″ cookies=”5f6da1c0e4bbf680/d6a1009eb1dde780″ user=”N/A” group=”N/A” xauth_ user=”N/A” xauth_group=”N/A” vpn_tunnel=”dialup_p1_0″ tunnel_ip=172.20.120.151 tunnel_id=1552003005 tunnel_type=ipsec duration=0 sent=0 rcvd=0 next_stat=0 tunnel=dialup_p1_0
GRE over
2010-01-11 16:39:58 log_id=0101037129 type=event subtype=ipsec pri=notice vd=”root” msg=”progress IPsec Phase 2″ action=”negotiate” rem_ip=172.20.120.151 loc_ip=172.20.120.141 rem_port=500 loc_port=500 out_ intf=”port1″ cookies=”5f6da1c0e4bbf680/d6a1009eb1dde780″ user=”N/A” group=”N/A” xauth_user=”N/A” xauth_ group=”N/A” vpn_tunnel=”dialup_p1_0″ status=success init=remote mode=quick dir=inbound stage=2 role=responder result=DONE
2010-01-11 16:39:58 log_id=0101037122 type=event subtype=ipsec pri=notice vd=”root” msg=”negotiate IPsec Phase 2″ action=”negotiate” rem_ip=172.20.120.151 loc_ip=172.20.120.141 rem_port=500 loc_port=500 out_ intf=”port1″ cookies=”5f6da1c0e4bbf680/d6a1009eb1dde780″ user=”N/A” group=”N/A” xauth_user=”N/A” xauth_ group=”N/A” vpn_tunnel=”dialup_p1_0″ status=success role=responder esp_transform=ESP_3DES esp_auth=HMAC_ SHA1
2010-01-11 16:39:58 log_id=0103031008 type=event subtype=ppp vd=root pri=information action=connect status=success msg=”Client 172.20.120.151 control connection started (id 805), assigned ip 192.168.0.50″
2010-01-11 16:39:58 log_id=0103029013 type=event subtype=ppp vd=root pri=notice pppd is started
2010-01-11 16:39:58 log_id=0103029002 type=event subtype=ppp vd=root pri=notice user=”user1″ local=172.20.120.141 remote=172.20.120.151 assigned=192.168.0.50 action=auth_success msg=”User ‘user1’ using l2tp with authentication protocol MSCHAP_V2, succeeded”
2010-01-11 16:39:58 log_id=0103031101 type=event subtype=ppp vd=root pri=information action=tunnel-up tunnel_id=1645784497 tunnel_type=l2tp remote_ip=172.20.120.151 tunnel_ip=192.168.0.50 user=”user1″ group=”L2TPusers” msg=”L2TP tunnel established”
Troubleshooting GRE over IPsec
This section describes some checks and tools you can use to resolve issues with the GRE-over-IPsec VPN.
Quick checks
Here is a list of common problems and what to verify.
| Problem | What to check |
| No communication with
remote network. |
Use the execute ping command to ping the Cisco device public interface.
Use the FortiGate VPN Monitor page to see whether the IPsec tunnel is up or can be brought up. |
| IPsec tunnel does not come up. | Check the logs to determine whether the failure is in Phase 1 or Phase 2.
Check that the encryption and authentication settings match those on the Cisco device. Check the encapsulation setting: tunnel-mode or transport-mode. Both devices must use the same mode. |
| Tunnel connects, but there is no communication. | Check the security policies. See Troubleshooting GRE over IPsec on page 235.
Check routing. See Troubleshooting GRE over IPsec on page 235. |
Setting up logging
Configuring FortiGate logging for IPsec
- Go to Log & Report > Log Settings.
- Select the Event Logging.
- Select VPN activity event.
- Select Apply.
Viewing FortiGate logs
- Go to Log & Report > VPN Events.
- Select the log storage type.
- Select Refresh to view any logged events.
GRE tunnel keepalives
In the event that each GRE tunnel endpoint has keepalive enabled, firewall policies allowing GRE are required in both directions. The policy should be configured as follows (where the IP addresses and interface names are for example purposes only):
config firewall policy edit < id >
set srcintf “gre” set dstintf “port1” set srcaddr “1.1.1.1” set dstaddr “2.2.2.2” set action accept set schedule “always” set service “GRE”
next
end
Cisco compatible keep-alive support for GRE
The FortiGate can send a GRE keepalive response to a Cisco device to detect a GRE tunnel. If it fails, it will remove any routes over the GRE interface.
Configuring keepalive query – CLI:
config system gre-tunnel edit <id> set keepalive-interval <value: 0-32767> set keepalive-failtimes <value: 1-255>
next
end
GRE tunnel with multicast traffic
If you want multicast traffic to traverse the GRE tunnel, you need to configure a multicast policy as well as enable multicast forwarding.
GRE over
- To configure a multicast policy, use the config firewall multicast-policy
- To enable multicast forwarding, use the following commands:
config system settings set multicast-forward enable
end
Using diagnostic commands
There are some diagnostic commands that can provide useful information. When using diagnostic commands, it is best practice that you connect to the CLI using a terminal program, such as puTTY, that allows you to save output to a file. This will allow you to review the data later on at your own speed without worry about missed data as the diag output scrolls by.
Using the packet sniffer – CLI:
- Enter the following CLI command:
diag sniff packet any icmp 4
- Ping an address on the network behind the FortiGate unit from the network behind the Cisco router.
The output will show packets coming in from the GRE interface going out of the interface that connects to the protected network (LAN) and vice versa. For example:
114.124303 gre1 in 10.0.1.2 -> 10.11.101.10: icmp: echo request
114.124367 port2 out 10.0.1.2 -> 10.11.101.10: icmp: echo request
114.124466 port2 in 10.11.101.10 -> 10.0.1.2: icmp: echo reply
114.124476 gre1 out 10.11.101.10 -> 10.0.1.2: icmp: echo reply
- Enter CTRL-C to stop the sniffer.
Viewing debug output for IKE – CLI:
- Enter the following CLI commands diagnose debug application ike -1 diagnose debug enable
- Attempt to use the VPN or set up the VPN tunnel and note the debug output.
- Enter CTRL-C to stop the debug output.
- Enter the following command to reset debug settings to default:
diagnose debug reset
Having trouble configuring your Fortinet hardware or have some questions you need answered? Check Out The Fortinet Guru Youtube Channel! Want someone else to deal with it for you? Get some consulting from Fortinet GURU!
Don’t Forget To visit the YouTube Channel for the latest Fortinet Training Videos and Question / Answer sessions!
— FortinetGuru YouTube Channel
— FortiSwitch Training Videos
Cybersecurity Videos and Training Available Via: Office of The CISO Security Training Videos
Configuring SSLVPN with FortiGate and FortiClient is pretty easy. Nevertheless problems may occur while establishing or using the SSLVPN connection.
If the negotiation of SSLVPN stops at a specific percentage:
- 10% – there is an issue with the network connection to the FortiGate. Verify that the client is connected to the internet and can reach the FortiGate. Double-check that the FortiClient configuration has set the correct IP and port of the Fortigate.
- 31% – this percentage is also shown as Error -5029. If this message is shown, there is a mismatch in the TLS version. Check, if the TLS version that’s in use by the FortiGate is enabled on your client.
- 40% – there is an issue with the certificates or the TLS negotiation. If you are using the default FortiGate certificate, the client is probably not trusting this certificate. In this case the user is shown a popup window to confirm the validity of the certificate. Make sure that this popup window is not hidden behind other windows. If the client is using CRL or OCSP make sure that the FortiGate certificate can be checked against those protocols.
Additionally, it is possible that the TLS versions of Client and FortiGate are not matching. This KB article describes how to check the TLS versions for SSLVPN on the FortiGate. And this KB article explains how to check the TLS versions on a windows client. - 48% – 2FA issue
- 80% – at this stage the username and password is verified. Please check user/usergroup/portal and firewall policy configuration on the FortiGate. If you are using a remote server you can troubleshoot this communication with the following KB articles: Radius and LDAP. Another reason for a failure at 80% is that you are not using the correct Realm. Please doublecheck that you are addressing the correct Realm.
- 98% – hopefully you are not getting stuck at this point… this problem is most likely caused by a corrupted FortiClient installation and/or OS problems. This can probably be solved by reinstalling the FortiClient software on the computer.
Other error messages
“Unable to establish the VPN connection. The VPN server may be unreachable.”
This message appears if:
– The DNS lookup failed
– The Host could not be contacted (no answer to the TCP SYN packet)
General debugging of the SSLVPN negotiation
The CLI real-time debugger allows monitoring of the SSLVPN negotiation:# diagnose debug enable# diagnose debug application sslvpn -1
(now try to establish the SSLVPN connection)
(once the negotiation is done or stopped you can disable the debugger)# diagnose debug application sslvpn 0
# diagnose debug disable
SSLVPN Timeouts
If the SSLVPN connection is established, but the connection stops after some time, you should double-check the following two timeout values on the FortiGate configuration:# config vpn ssl settings
# set idle-timeout 300
# set auth-timout 28000
The idle-timeout is closing the SSLVPN if the connection is idle for more than 5 minutes (300 seconds). This configuration can be changed in the WebUI (SSL VPN settings) as well.
The auth-timeout is closing the SSLVPN connection based on the the authentication timeout. By default this is set to 8 hours (28800 seconds). So if therefore a SSLVPN connection is stopping after straight 8 hours, even though you are using the tunnel continuously, it’s very likely that you are hitting the authentication timeout.
Error message “SSL_accept failed, 1:unsupported protocol “SSL_accept failed, 5:(null)” at the end.
This message is shown on the “diag deb app sslvpn -1” output, when you try to connect with a FortiClient which license is expired.
Error Message “sslvpn_login_no_matching_policy” combined with “fam_auth_proc_resp:1229 fnbam_auth_update_result return: 3”
This message is shown on the “diag deb app sslvpn -1” output, when an LDAP authentication error causes problems. It may also be the case, that a user can be authenticated against a radius AND an ldap server at the same time (or a local user with a radius/ldap user at the same time). Ensure, that every SSL-VPN enabled user is present in only one group. SSL-VPN has an option that’s called “All Other Users/Groups”. All Other Users/Groups does really contain ALL other users and groups. So as soon as the user is present in the LDAP or RADIUS (even if not on any group and nowhere configured on the FGT), this user can authenticate as SSL-VPN user!
Therefore we recommend you to configure any remote authentication service like SAML, RADIUS and LDAP (and so on) to be configured as restrictive as possible. That means, that only users can authenticate over this service that really need to authenticate on the FGT. Restricting it with group membershits is not enough in this case of SSL VPN.
Additional comments on the FortiClient v6.2
If you are using the free “FortiClient v6.2 VPN(-only)” you have a limited feature set (please refer to FortiClient VPN 6.2) – for example you are not able to perform host-checks. Please make sure that you don’t have any (maybe legacy) host-checks configured in the SSLVPN portal on your FortiGate:# config vpn ssl web portal
# show full | grep -f host-check
Update on IPv6 problems with FOS 6.2 and 6.4
As you can already read in the comments of this article, you can get in problems when the client is using an IPv6 connection or dual stack IPv4/IPv6. In this case you have to disable IPv6 on your client itself or in the SSLVPN settings of your FortiClient (Fortinet KB article).
Additional documentation
- KB-Article with good additional SSLVPN troubleshooting information
- Another KB-Article with great SSLVPN troubleshooting information
- Comprehensive documentation on VPN configuration
82,481 total views, 138 views today