How to compile iperf3 for Windows
4) Copy it in c:cygwin directory , unzip the iperf folder and copy the main directory to this (c:cygwin folder)
5) Open the cygwin shell prompt, go to c:cygwiniperf-3-0.6 directory
6) ./configure -> it should work fine
6) make
============================================
Making all in src
make[1]: Entering directory ‘/cygdrive/c/cygwin/iperf-3.0.6/iperf-3.0.6/src’
make all-am
make[2]: Entering directory ‘/cygdrive/c/cygwin/iperf-3.0.6/iperf-3.0.6/src’
/bin/sh ../libtool —tag=CC —mode=compile gcc -DHAVE_CONFIG_H -I. -g -O2 -Wall -MT cjson.lo -MD -MP -MF .deps/cjson.Tpo -c -o cjson.lo cjson.c
libtool: compile: gcc -DHAVE_CONFIG_H -I. -g -O2 -Wall -MT cjson.lo -MD -MP -MF .deps/cjson.Tpo -c cjson.c -DDLL_EXPORT -DPIC -o .libs/cjson.o
cjson.c: In function ‘cJSON_strcasecmp’:
cjson.c:58:2: warning: array subscript has type ‘char’ [-Wchar-subscripts]
for ( ; tolower(*s1) == tolower(*s2); ++s1, ++s2)
^
cjson.c:58:2: warning: array subscript has type ‘char’ [-Wchar-subscripts]
libtool: compile: gcc -DHAVE_CONFIG_H -I. -g -O2 -Wall -MT cjson.lo -MD -MP -MF .deps/cjson.Tpo -c cjson.c -o cjson.o >/dev/null 2>&1
mv -f .deps/cjson.Tpo .deps/cjson.Plo
/bin/sh ../libtool —tag=CC —mode=compile gcc -DHAVE_CONFIG_H -I. -g -O2 -Wall -MT iperf_api.lo -MD -MP -MF .deps/iperf_api.Tpo -c -o iperf_api.lo iperf_api.c
libtool: compile: gcc -DHAVE_CONFIG_H -I. -g -O2 -Wall -MT iperf_api.lo -MD -MP -MF .deps/iperf_api.Tpo -c iperf_api.c -DDLL_EXPORT -DPIC -o .libs/iperf_api.o
In file included from iperf_api.c:40:0:
iperf_api.h:227:5: error: conflicting types for ‘iprintf’
int iprintf(struct iperf_test *test, const char *format, …) __attribute__ ((format(printf,2,3)));
^
In file included from /usr/include/stdio.h:29:0,
from iperf_api.c:13:
/usr/include/stdio.h:259:5: note: previous declaration of ‘iprintf’ was here
int _EXFUN(iprintf, (const char *, …)
^
iperf_api.c:2583:1: error: conflicting types for ‘iprintf’
iprintf(struct iperf_test *test, const char* format, …)
^
In file included from /usr/include/stdio.h:29:0,
from iperf_api.c:13:
/usr/include/stdio.h:259:5: note: previous declaration of ‘iprintf’ was here
int _EXFUN(iprintf, (const char *, …)
^
Makefile:838: recipe for target ‘iperf_api.lo’ failed
make[2]: *** [iperf_api.lo] Error 1
make[2]: Leaving directory ‘/cygdrive/c/cygwin/iperf-3.0.6/iperf-3.0.6/src’
Makefile:615: recipe for target ‘all’ failed
make[1]: *** [all] Error 2
make[1]: Leaving directory ‘/cygdrive/c/cygwin/iperf-3.0.6/iperf-3.0.6/src’
Makefile:369: recipe for target ‘all-recursive’ failed
make: *** [all-recursive] Error 1
===================================
Got above error , looks like iprintf is defined at two places at /usr/include/stdio.h
Resolution :
search for declaration of iprintf in iperf_api.c files and replace it with another function name iiprintf. I have used Editplus for editing the files. Now search for the the same function iprintf in all files and replace it with iiprintf almost 3 files and 55 places need to be changed.
or use below command (not tested but got from above ref link)
cd ./src
  find ./ -iname "*.[ch]" |xargs -n1 sed -i s'#iprintf#newprintf#g'
7) Again run make , it should pass this time
9) copy /usr/local/bin/iperf3.exe -> to another folder where all files will be kept , lets name it as «iperf306»
10) Now copy below files from C:cygwinbin into iperf306
- cygwin1.dll
- cyggcc_s-1.dll
- cygstdc++-6.dll
11) copy the whole folder iperf306 to another pc and try running it
12) if while starting server or client you get below error , means ipv6 is not supported on the Windows machine.
iperf3: error — unable to start listener for connections: Protocol not available
Try running with -4 option
iperf3,exe -4 -c 198.173.1.1
13) Now server is starting fine but below error came:
iperf3: error — unable to create a new stream: No such file or directory
Still trying to understand the issue , meanwhile if anyone can help , will be just GREAT !
Will update if found solution.
Happy trying !
Updated : Sept 15, 2015
As per suggestions from Daniel in comments I did below changes and compiled the code again. Now it is working fine.
«C:cygwiniperf-3.0.7srciperf_api.c»(2264,24):
char template[] = «/tmp/iperf3.XXXXXX»;
to
char template[] = «./iperf3.XXXXXX»;
Thanks Daniel and Rion for your comments.
Free IEEE 802.11 WLAN Simulator -Pamvotis
A nice simulator to test 802.1e parameters and
Pamvotis is a Wireless LAN Simulator for all the current physical layer extentions of the IEEE 802.11 (IEEE 802.11 a/b/g) standard and for the IEEE 802.11e Draft for Quality of Service in WLANs.
http://www.pamvotis.org/
We can get below statistics from this tool:
- Throughput (bits/sec): The number of bits that a node successfully transmitted in a specific time interval.
- Throughput (packets/sec): The number of packets that a node successfully transmitted in a specific time interval.
- Utilization: The percentage of the channel capacity the node occupied. The utilization is the node’s throughput in bits per second divided by the node’s data rate.
- Retransmission Attempts: The mean number of retransmission attempts (collisions) until the packet is successfully transmitted.
- Media access delay: The delay of a packet from the time it is picked up from the transmitter until it is successfully received from the receiver. This statistic contains the delay due to retransmission attempts and the transmission delay. Note: The statistic is relative to the packet length. Moreover, it does not depend on the node’s packet generation rate, but only on the network load.
- Queuing delay: The delay from the birth of a packet until the transmitter picks it up for transmission. It only contains the time a packet waits in the packet queue. It is relative to the packet generation rate and to the media access delay.
- Total packet delay: The sum of the media access delay and the queuing delay. It is the total delay from the birth of a packet until its reception from the receiver.
- Delay Jitter: The total delay jitter of each node. The delay jitter is the standard deviation of the total packet delay of each node.
- Packet Queue Length: The mean number of packets that wait to be transmitted in the packet queue
ISO/IEC/IEEE 29119 Software Testing -The International Software Testing Standard
The new standard 29119 on software testing is finalized and is evoking responses from various tester communities. If you don’t know about this standard and its controversy read on …
The standard’s description can be found at below site, as its «Standard» it will be paid, so after paying fees only you will be able to get the actual standard.
It says :
========================================================
ISO/IEC/IEEE 29119 Software Testing is an internationally agreed set of standards for software testing that can be used within any software development life cycle or organisation. By implementing these standards, you will be adopting the only internationally-recognised and agreed standards for software testing, which will provide your organisation with a high-quality approach to testing that can be communicated throughout the world. There are currently five standards:
ISO/IEC 29119-1: Concepts & Definitions (published September 2013)
ISO/IEC 29119-2: Test Processes (published September 2013)
ISO/IEC 29119-3: Test Documentation (published September 2013)
ISO/IEC 29119-4: Test Techniques (at DIS stage, anticipating publiation in late 2014)
ISO/IEC 29119-5: Keyword Driven Testing (at CD stage, anticipating publication in 2015)
Plus, based on the processes defined in ISO/IEC/IEEE 29119-2:
ISO/IEC 33063: Process Assessment Model (at DIS stage)
The ISO/IEC/IEEE 29119 standards replace a number of existing software testing standards:
IEEE 829 Test Documentation
IEEE 1008 Unit Testing
BS 7925-1 Vocabulary of Terms in Software Testing
BS 7925-2 Software Component Testing Standard
===========================================================
People who are opposing this says:
1) Costly
2) Will be seen as mandatory skill for testers (may harm individuality and freedom)
3) May loose ability to experiment and try non-conventional ways
4) Once standard is accepted, testers can be held responsible for project failures ( non-compliance)
5) Effort will be more on documentation and process rather than testing
Ref:
Keep Trying, Keep Analyzing !
OSI/ISO network management model- FCAPS
We know about OSI seven layer model and TCP/IP layers, but only few knows about another model which is known as OSI/ISO network management model or the FCAPS model.
FCAPS stands for fault, configuration, accounting, performance and security. These are the five management areas and were initially defined as ISO standard which later got changed into ITU-T standard known as TMN recommendation on Management Functions (M.3400) and can be found at
http://www.itu.int/rec/T-REC-M.3400-200002-I/en
Brief explanation on these functions :
Fault management— Detect, isolate, notify, and correct faults encountered in the network.
Configuration management— Configure aspects of network devices, such as configuration file management, inventory management, and software management.
Accounting management— Collect usage information of network resources.
Performance management— Monitor and measure various aspects of performance so that overall performance can be maintained at a defined level.
Security management— Secure access to network devices, network resources, and services to authorized individuals.
Ref : Wiki, etutorials.org

Running tests before putting ESXi hosts into production is a very good idea as you can often flush out problems before hosts go into production which is much easier to remediate than after they are placed into production and you potentially have multiple hosts in a cluster that have issues and are running production workloads. One of the key areas that you want to give consideration to before placing a host into production is the network. This can flush out improperly configured VLANs, network cards, switch ports, etc. One of the things that is a great area to check before placing a host into production or in troubleshooting ESXi host performance is running tests on network speeds. This helps to determine if there is an issue with poor performance related to a network misconfiguration or some other issue. One of the primary tools that is used across the landscape today in determining network bandwidth and running throughput/speed tests is iPerf. Let’s take a look at how to Run Basic Network Speed Bandwidth Throughput Test Between ESXi Hosts using iPerf to determine/validate speed, bandwidth, etc.
VMware ESXi Includes iPerf Tool
As is covered here by William Lam, the iPerf and specifically the iPerf3 utility has been included natively into ESXi as of ESXi 6.5 Update 2. It is also the tool that is natively used by the new proactive VMware vSAN network tests which helps to instill confidence in the results of the test in terms of reliability and accuracy. If VMware trusts it to base the proactive network testing on, it should be a good tool to use in terms of general network testing.
The great thing about knowing about the iPerf tool being included natively in ESXi is that it can be used for non-vSAN environments for testing. Obviously not everyone may be running vSAN in their environment. Additionally, what if testing needs to be done between hosts that are not in the same vSAN cluster, not stretched, etc? Then iPerf makes perfect sense to be able to use for those use cases.
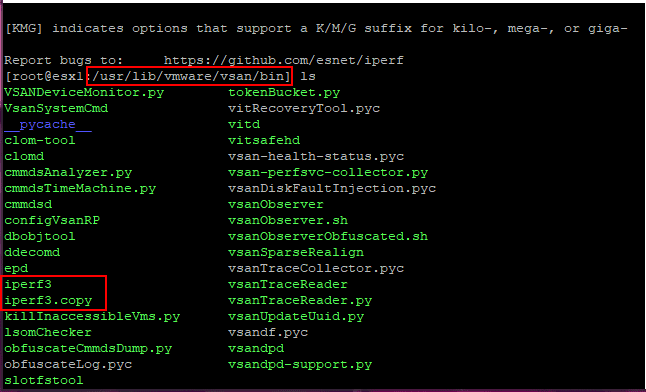
Where is it found? As William detailed in his article, it is found in the /user/lib/vmware/vsan/bin directory. The binaries we are interested in are the following:

- iperf3
- iperf3.copy
What is the point of having both files? You will receive an error that happens on the server side when using the regular iperf3 file, so the iperf3.copy is the file you want to use on the server side and the client ESXi server can use the regular iPerf3 file. The error seen is the following:
- iperf3: error – unable to start listener for connections: Operation not permitted
Now, let’s look at actually running the bandwidth tests between two VMware ESXi hosts to determine network speed, bandwidth, throughput, etc. This involves three steps (optionally).
- Determine the IP address (network card) you want to run the tests between. You can specify this on the server side
- Disable the ESXi firewall on both hosts
- Run the iPerf3 and iPerf3.copy (server) utilities
Below on one of the ESXi hosts, I have navigated to the directory using the SSH command line. As you can see, both the iperf3 and iperf3.copy files exist in the directory.
Using the following command, we can easily get the IP Addresses that are bound to the various VMkernel adapters. This is helpful to know which IP Address to bind to the iperf3.copy listener when running the iperf utility server side.
- esxcli network ip interface ipv4 get
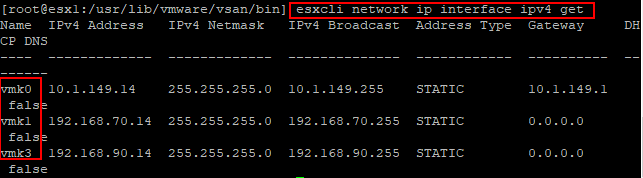
Here, I am using the IP address that is bound to my vMotion network for testing network speed, throughput, bandwidth, etc. As you can see in the following screen clip the -B switch allows you to pass in the IP Address you want to use on the server side.s
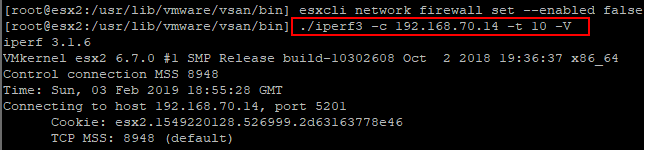
The next thing you can see in the following screen clip is that I have disabled the ESXi firewall, as by default this will stop the iPerf testing.
- esxcli network firewall set –enabled false

On the client side, I have disabled the ESXi firewall as well and have kicked off the client side iperf test using the -t (determines the number of tests) and the -V which determines verbose output.
On the server side, you see the results of the testing. This is a 10 gig network and indeed, we have gotten very close to the expected throughput speed.
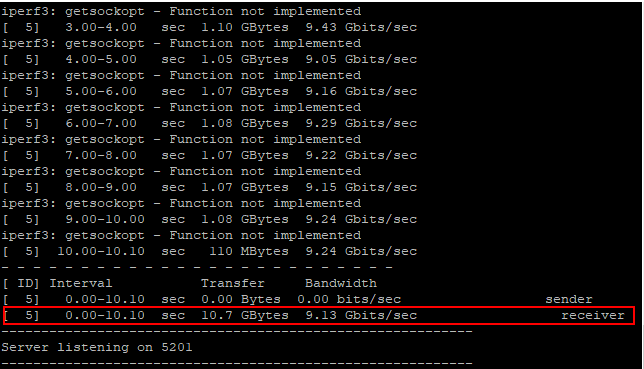
On the client side, we see very similar results matching up to what the ESXi iperf3 server is displaying.
iPerf3 Documentation
A great resource to get started with understanding the various functionality and capabilities of iPerf for the various switch options is the official documentation page. This can be found here:
- https://iperf.fr/iperf-doc.php
Wrapping Up
The ability to Run Basic Network Speed Bandwidth Throughput Test Between ESXi Hosts using the iPerf3 utility is a great way to eliminate the network when trying to pinpoint various issues. Since the utility is now included with ESXi, it provides a great, easy, quick way to see network performance between hosts, or another iPerf client/server endpoint. Even though VMware has included this utility mainly for use with the built-in network performance testing included with vSAN, as shown, the natively included utility can be used as a standalone means of network speed, bandwidth, throughput testing. This is definitely a handy tool to include in bag of troubleshooting tricks to ensure performance at the network layer is what it should be. The great thing with iPerf is that it allows either confirming or disproving the network as the culprit, as it is often blamed for every problem, true or not.
-
#1
I have configured LACP bonds between 2x 10Gig ports and connected them to TrueNAS VM. Now i want to verify the combined 20Gb link between Proxmax and TrueNAS using IPerf. Can anybody help, How to do that?
Iperf is running on TrueNAS, i want to install/configure it on Proxmox Server so its link can be verfied
Last edited: Nov 15, 2021
![]()
aaron
Proxmox Staff Member
-
#2
Start iperf in server mode on one machine and in client mode on the other. For example (iperf3 as I have that installed):
On the server machine
iperf3 -s -B 192.168.0.5 -p 5002
On the client:
iperf3 -c 192.168.0.5 -p 5002
For more details on the parameters check the man pages, e.g. man iperf or man iperf3
-
#3
Start iperf in server mode on one machine and in client mode on the other. For example (iperf3 as I have that installed):
On the server machine
iperf3 -s -B 192.168.0.5 -p 5002On the client:
iperf3 -c 192.168.0.5 -p 5002For more details on the parameters check the man pages, e.g.
man iperforman iperf3
iperf3 -s -B 192.168.0.200 -p 5002
Yes i am running the same command in proxmox server shell but i get the following reply
-bash: iperf3: command not found
![]()
aaron
Proxmox Staff Member
-
#4
Well, then you need to install it
apt install iperf3 should do the trick. Proxmox VE is based on Debian.
-
#5
Well, then you need to install it
apt install iperf3should do the trick. Proxmox VE is based on Debian.
getting this reply after installing and running the previous command
iperf3: error — unable to start listener for connections: Cannot assign requested address
iperf3: exiting
-
#6
iperf3: error — unable to send control message: Bad file descriptor
-
#7
TrueNAS has an ip address 192.168.0.10 while Proxmox Server has ip 192.168.0.50:8006
Will you please now tell me the complete commands to run on TrueNAS and Proxmox server, to check the bandwidth of conection between them using IPerf.
-
#8
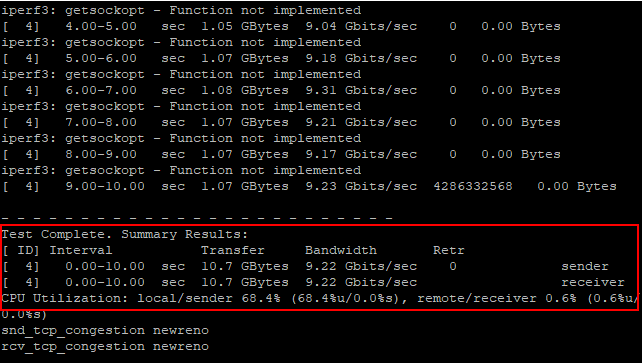
Received following reply after running the following commands:
iperf3 -s on server
iperf3 -c 192.168.0.50 0n TrueNAS.
[ ID] Interval Transfer Bitrate
[ 5] 0.00-1.00 sec 178 KBytes 1.46 Mbits/sec
[ 5] 1.00-2.00 sec 253 KBytes 2.07 Mbits/sec
[ 5] 2.00-3.00 sec 291 KBytes 2.39 Mbits/sec
[ 5] 3.00-4.00 sec 345 KBytes 2.83 Mbits/sec
[ 5] 4.00-5.00 sec 113 KBytes 926 Kbits/sec
[ 5] 5.00-6.00 sec 242 KBytes 1.98 Mbits/sec
[ 5] 6.00-7.00 sec 298 KBytes 2.44 Mbits/sec
[ 5] 7.00-8.00 sec 414 KBytes 3.39 Mbits/sec
[ 5] 8.00-9.00 sec 396 KBytes 3.24 Mbits/sec
[ 5] 9.00-10.00 sec 421 KBytes 3.45 Mbits/sec
[ 5] 10.00-10.24 sec 0.00 Bytes 0.00 bits/sec
— — — — — — — — — — — — — — — — — — — — — — — — —
[ ID] Interval Transfer Bitrate
[ 5] 0.00-10.24 sec 2.88 MBytes 2.36 Mbits/sec receiver
![]()
aaron
Proxmox Staff Member
-
#9
Doesn’t look too good? How is your network setup? Does the PVE and TrueNAS server each have multiple interfaces? How is the network infrastructure in between?
The other day I was looking to get a baseline of the built-in ethernet adapter of my recently upgraded vSphere home lab running on the Intel NUC. I decided to use iPerf for my testing which is a commonly used command-line tool to help measure network performance. I also found a couple of articles from well known VMware community members: Erik Bussink and Raphael Schitz on this topic as well which were quite helpful. Erik’s article here outlines how to run the iPerf Client/Server using a pair of Virtual Machines running on top of two ESXi hosts. Although the overhead of the VMs should be negligible, I was looking for a way to benchmark the ESXi hosts directly. Raphael’s article here looked promising as he found a way to create a custom iPerf VIB which can run directly on ESXi.
I was about to download the custom VIB and I had just remembered that the VSAN Health Check plugin in the vSphere Web Client also provides some proactive network performance tests to be run on your environment. I was curious on what tool was being leveraged for this capability and in doing a quick search on the ESXi filesystem, I found that it was actually iPerf. The iPerf binary is located in /usr/lib/vmware/vsan/bin/iperf and looks to have been bundled as part of ESXi starting with the vSphere 6.0 release from what I can tell.
UPDATE (09/20/22) — As of ESXi 7.0 Update 3 20036589 (possibly earlier), you no longer need to make a copy of the iperf3 utility. You can simply run it from /usr/lib/vmware/vsan/bin/iperf3 and you also do NOT have to lower the security by changing ESXi Advanced Setting execInstalledOnly to FALSE
UPDATE (10/02/18) — It looks like iPerf3 is now back in both ESXi 6.5 Update 2 as well as the upcoming ESXi 6.7 Update 1 release. You can find the iPerf binary under /usr/lib/vmware/vsan/bin/iperf3
One interesting thing that I found when trying to run iPerf in «server» mode is that you would always get the following error:
bind failed: Operation not permitted
The only way I found to fix this issue was to basically copy the iPerf binary to another file like iperf3.copy which it would then allow me to start iPerf in «server» mode. You can do so by running the following command on the ESXi Shell:
cp /usr/lib/vmware/vsan/bin/iperf3 /usr/lib/vmware/vsan/bin/iperf3.copy
Running iPerf in «Client» mode works as expected and the copy is only needed when running in «server» mode. To perform the test, I used both my Apple Mac Mini and the Intel NUC which had ESXi running with no VMs.
I ran the iPerf «Server» on the Intel NUC by running the following command:
/usr/lib/vmware/vsan/bin/iperf3.copy -s -B [IPERF-SERVER-IP]
Note: If you have multiple network interfaces, you can specify which interface to use with the -B option and passing the IP Address of that interface.
I ran the iPerf «Client» on the Mac Mini by running the following command and specifying the address of the iPerf «Server»:
/usr/lib/vmware/vsan/bin/iperf3 -n 800M -c [IPERF-SERVER]
I also disabled the ESXi firewall before running the test, which you can do by running the following command:
esxcli network firewall set —enabled false
Here is a screenshot of my iPerf test running between my Mac Mini and Intel NUC. Hopefully this will come in handy for anyone needing to run some basic network performance tests between two ESXi hosts without having to setup additional VMs.
