![]()
This article is meant as an extension to Angie Jones’ “IntelliJ – Error:java: release version 5 not supported”.
In her article Angie suggest solutions to IntelliJ IDEA showing the error message “release version 5 not supported”. The first two options work within IDEA, but are not sustainable as you will learn later. The last option tackles the actual problem, but only for Maven based builds. To recap, the correct solution for Maven based builds (see also Maven Compiler Plugin), is as follows:
<properties>
    <maven.compiler.source>1.8</maven.compiler.source>
    <maven.compiler.target>1.8</maven.compiler.target>
</properties>
I would like to give some background on the problem and suggest to solve the problem differently.
What is the actual problem?
To find a proper solution for all kind of Java projects, regardless of the build tool, let’s dive into the actual problem.
In its more than 20 years, Java went through several major versions. Each of those introduced a new version of the binaries format and sometimes also language features (e.g. enums in Java 5, lambdas in Java 8, modules in Java 9, var in Java 10, HTTP-2 client Java 11… ). Yet, Java and its virtual machine are highly backwards-compatible. You can take 20 years old binaries and they will run with the latest version of Java just fine (exceptions apply).
The Java compiler, which generates binary files from Java source files supports cross-compiling to various language levels, that is creating these binaries in formats of different Java versions. However, sometimes support for older language levels is dropped. Since Java 9, the compiler cannot generate Java 5 binaries anymore. If the compiler now runs – directly or indirectly through a build tool – with a target version of Java 5 it will show the error message release version 5 not supported.
| The root problem for the error message is, that the Java Development Kit (JDK) is too new to generate old binaries. |
|---|
Proper Solutions
So, your JDK is too new to generate Java 5 binaries. There are two solutions to tackle this problem.
Use an older JDK
As previously mentioned, JDK 9 dropped the support for cross-compiling to Java 5 binaries. This means, as long as you use a JDK 8 or below, you can actually create Java 5 binaries. However, this method is NOT recommended. There should be no reason to stick to Java 5 in a production runtime environment. JDK 5 is not supported since 2015 and security patches are not provided anymore.
Change the desired target language level
Instead of cross-compiling to Java 5 binaries, you should create binaries, that match the version of the Java runtime environment in production. This should be at least Java 8 until 2023 to get security patches. See also Java version history on Wikipedia. However, I recommend to use Java 11 to make use of various new features introduced in-between and staying on an LTS version at the same time.
So, how to change the target version then?
Maven-based projects
For very good reasons Maven is still vastly used in the Java ecosystem. However, Maven is quite old and so are some of the defaults as well. One of which is the language level, that defaults to Java 1.5, regardless of the JDK you use.
In plain Maven projects you can paste the above mentioned code into your build configuration file pom.xml to set the target language level.
<properties>
    <maven.compiler.source>1.8</maven.compiler.source>
    <maven.compiler.target>1.8</maven.compiler.target>
</properties>
In SpringBoot projects, the code slightly changes to
<properties>
    <java.version>1.8</java.version>
</properties>
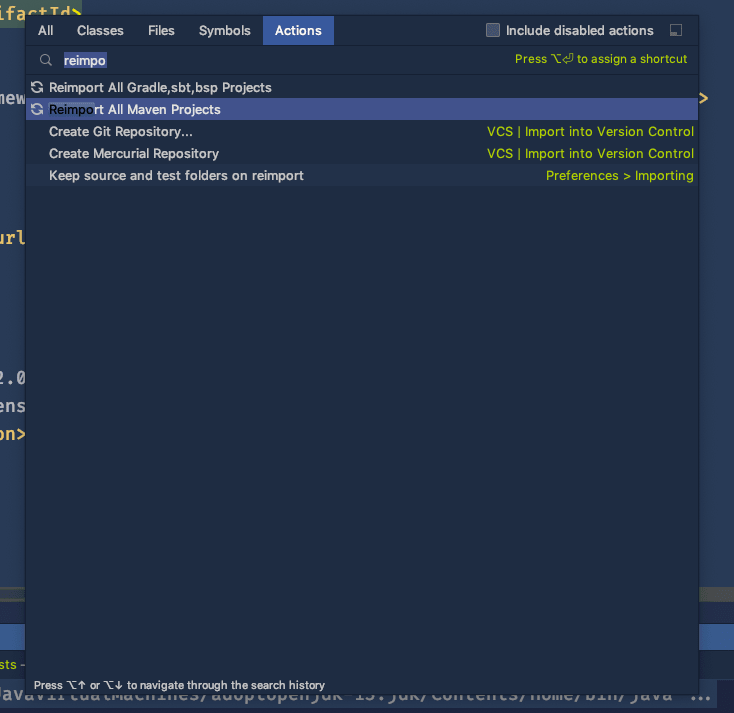
After changing the pom.xml you need to Reimport All Maven Projects in IntelliJ IDEA. The easiest way to do it, is to press cmd+shift+A (shift+ctrl+A on Windows/Linux) and then simply start typing.
Plain IntelliJ IDEA projects
If you did not choose any build system for your Java projects in IntelliJ, you simply need to make sure, the language level is configured according to the project’s JDK. You can do this in the project structure settings. Press cmd+shift+A and start typing to open the settings.
As soon, as you use an JDK 9+ you need to change the target level accordingly.
- Java 9-11: Target level Java 6
- Java 12+: Target level Java 7

Conclusion
In this post I explained the root cause for the error message release 5 version not supported.
One can work around this problem locally by changing IntelliJ project settings. However, if you wanted to solve the problem properly, you need to change the project’s build configuration file. Otherwise on the next import into IntelliJ you will need to change it again. Also, the build might behave differently on each computer. The CI server and others, who didn’t change their IntelliJ IDEA settings, will continue to produce Java 5 binaries. Persisting the language level in the build configuration file will produce stable and foreseeable results across machines.
What do you do when you create a new Maven Java project, and when you run it, you get the following error:
Error:java: error: release version 5 not supported
Sometimes the error could also read as follows:
java: Source option 5 is no longer supported. Use 6 or later.
Luckily for us, the solution is exactly the same!
Solution
Open the project’s pom.xml file and add the following snippet:
<properties>
    <maven.compiler.source>1.8</maven.compiler.source>
    <maven.compiler.target>1.8</maven.compiler.target>
</properties>
Now open the Maven side-panel, and click the Report All Maven Projects button.
You can now successfully run your new Maven Java project.
Additional Notes
The release version 5 not supported error is quite common with newly created projects.
The java error is frequently seen in IntelliJ after a new Maven project has begun and full setup has not been completed.
By default, the project bytecode version is not actually set in Java maven projects.
Therefore it believes that your current version is set to 5.
Open up Project Settings>Build,Execution…>compiler>java compiler and change your bytecode version to your current java version.
An alternative solution
If the above does not work for you when trying to solve the java error: release version 5 not supported in IntelliJ, you can attempt the following alternative:
- Open the IntelliJ preferences dialog.
- Filter the navigation items by typing
compiler. - Move to the Maven->Java Compiler section.
- In the right hand configuration panel, there is a list of modules and their accompanying Java compile versions. This is called the
target bytecode version. - Finally select a version bigger than 1.5.
Note that if there is no version greater than 1.5 available in the above list, then you will need to upgrade your Java Development Kit (JDK) on the local machine.
Once all of these steps have been completed, you may also want to go to the Project Structure contextual menu and select Modules. Under here you will have the option to change each of the module’s language level.
You can also always just update your pom.xml to contain the following:
<properties>
   <java.version>11</java.version>
</properties>
This will fix your java: error: release version 5 not supported problem encountered while trying to run, or execute a Maven Java application in IntelliJ IDEA.
Hello Guys, How are you all? Hope You all Are Fine. Today I am just trying to run my simple java maven project in my IntelliJ IDEA Ultimate And I am facing the following error Error:java: error: release version 5 not supported in IntelliJ IDEA Ultimate. So Here I am Explain to you all the possible solutions here.
Without wasting your time, Let’s start This Article to Solve This Error.
Contents
- How Error:java: error: release version 5 not supported in IntelliJ IDEA Ultimate Occurs ?
- How To Solve Error:java: error: release version 5 not supported in IntelliJ IDEA Ultimate?
- Solution 1: Change target bytecode version
- Solution 2: Add this code in build plugin in POM file
- Solution 3 : try to change the Java version
- Summery
Today I am just trying to run my simple java maven project in my IntelliJ IDEA Ultimate And I am facing the following error.
Error:java: error: release version 5 not supportedHow To Solve Error:java: error: release version 5 not supported in IntelliJ IDEA Ultimate?
- How To Solve Error:java: error: release version 5 not supported in IntelliJ IDEA Ultimate?
To Solve Error:java: error: release version 5 not supported in IntelliJ IDEA Ultimate Open Your IDE Setting. Then Open Build Execution, Deployment Then Select Compiler. Then Just Scroll down to Maven and java compile In the right panel will be a list of modules and their associated java compile version “target bytecode version.” Select a version >1.5. You may need to upgrade your JDK if one is not available. Preferences > Build, Execution, Deployment > Compiler > Java Compiler > Target bytecode version. Setting this value fixed the error for me
- Error:java: error: release version 5 not supported in IntelliJ IDEA Ultimate
To Solve Error:java: error: release version 5 not supported in IntelliJ IDEA Ultimate Open Your IDE Setting. Then Open Build Execution, Deployment Then Select Compiler. Then Just Scroll down to Maven and java compile In the right panel will be a list of modules and their associated java compile version “target bytecode version.” Select a version >1.5. You may need to upgrade your JDK if one is not available. Preferences > Build, Execution, Deployment > Compiler > Java Compiler > Target bytecode version. Setting this value fixed the error for me
Solution 1: Change target bytecode version
- Open Your IDE Setting.
- Then Open Build Excecution, Deployment
- Then Select Compiler.
- Then Just Scroll down to Maven and java compile
- In the right panel will be a list of modules and their associated java compile version “target bytecode version.”
- Select a version >1.5.
- You may need to upgrade your jdk if one is not available.
- Preferences > Build, Execution, Deployment > Compiler > Java Compiler > Target bytecode version. Setting this value fixed the error for me
Solution 2: Add this code in build plugin in POM file
 <properties>
        <java.version>1.8</java.version>
        <maven.compiler.version>3.8.1</maven.compiler.version>
        <maven.compiler.source>1.8</maven.compiler.source>
        <maven.compiler.target>1.8</maven.compiler.target>
    </properties>

    <build>
        <plugins>
            <plugin>
                <groupId>org.apache.maven.plugins</groupId>
                <artifactId>maven-compiler-plugin</artifactId>
                <version>${maven.compiler.version}</version>
                <configuration>
                    <source>${java.version}</source>
                    <target>${java.version}</target>
                </configuration>
            </plugin>
        </plugins>
    </build>
Solution 3 : try to change the Java version
Here First of all set the language level/release versions in pom.xml Like this.
<properties>
  <maven.compiler.source>1.8</maven.compiler.source>
  <maven.compiler.target>1.8</maven.compiler.target>
</properties>
Then Just try to change the Java version.
- Go to File -> Select Project structure -> Select Project -> Then Project SDK -> set It to 11
- Go to File -> Select Project structure -> Select Project -> Select Project language level -> set to 11
- Go to File -> Select Project structure -> Select Project -> Select Modules -> select Sources -> set it to 11
- Go to setting -> Open Build, Execution, Deployment -> Slect Compiler -> Then select Java Compiler -> Change Project bytecode version to 11
- Go to setting -> Open Build, Execution, Deployment -> Slect Compiler -> Then select Java Compiler -> Select Module -> Change it to 11
Summery
It’s all About this issue. Hope all solution helped you a lot. Comment below Your thoughts and your queries. Also, Comment below which solution worked for you?
Also, Read
- SyntaxError: invalid syntax to repo init in the AOSP code.
Эта статья предназначена как дополнение к Энджи Джонс “IntelliJ – Ошибка: java: версия выпуска 5 не поддерживается”.
В своей статье Энджи предлагает решения для IntelliJ IDEA, показывающие сообщение об ошибке “версия выпуска 5 не поддерживается”. Первые два варианта работают в рамках IDEA, но не являются устойчивыми, как вы узнаете позже. Последний вариант решает реальную проблему, но только для сборок на основе Maven. Напомним, что правильное решение для сборок на основе Maven (см. Также Плагин компилятора Maven) заключается в следующем:
Я хотел бы дать некоторую информацию об этой проблеме и предложить решить ее по-другому.
В чем на самом деле проблема?
Чтобы найти правильное решение для всех типов Java-проектов, независимо от инструмента сборки, давайте углубимся в реальную проблему.
За более чем 20-летнюю историю Java прошла через несколько основных версий. Каждый из них представил новую версию формата двоичных файлов, а иногда и языковые функции (например, перечисления в Java 5, лямбды в Java 8, модули в Java 9, var в Java 10, клиент HTTP-2 Java 11 … ). Тем не менее, Java и ее виртуальная машина обладают высокой обратной совместимостью. Вы можете взять двоичные файлы 20-летней давности, и они будут работать с последней версией Java просто отлично (применяются исключения).
Компилятор Java, который генерирует двоичные файлы из исходных файлов Java, поддерживает кросс-компиляцию на различные языковые уровни, то есть создает эти двоичные файлы в форматах разных версий Java. Однако иногда поддержка более старых языковых уровней прекращается. Начиная с Java 9, компилятор больше не может генерировать двоичные файлы Java 5. Если компилятор теперь запускается – прямо или косвенно через средство сборки – с целевой версией Java 5, он покажет сообщение об ошибке release version 5 not supported.
Правильные Решения
Итак, ваш JDK слишком новый, чтобы генерировать двоичные файлы Java 5. Есть два решения для решения этой проблемы.
Используйте более старый JDK
Как упоминалось ранее, JDK9 отказался от поддержки кросс-компиляции в двоичные файлы Java 5. Это означает, что до тех пор, пока вы используете JDK 8 или ниже, вы действительно можете создавать двоичные файлы Java 5. Однако этот метод НЕ рекомендуется. Не должно быть никаких причин придерживаться Java 5 в рабочей среде выполнения. JDK 5 не поддерживается с 2015 года, и исправления безопасности больше не предоставляются.
Измените желаемый уровень целевого языка
Вместо кросс-компиляции в двоичные файлы Java 5 вам следует создавать двоичные файлы, соответствующие версии рабочей среды Java runtime environment. Это должно быть по крайней мере Java 8 до 2023 года, чтобы получить исправления безопасности. Смотрите также Историю версий Java в Википедии. Тем не менее, я рекомендую использовать Java 11, чтобы использовать различные новые функции, введенные между ними, и в то же время оставаться на версии LTS.
Итак, как же тогда изменить целевую версию?
Проекты на основе Maven
По очень веским причинам Maven по-прежнему широко используется в экосистеме Java. Однако Maven довольно старый, как и некоторые настройки по умолчанию. Одним из которых является уровень языка, который по умолчанию равен Java 1.5, независимо от используемого вами JDK.
В обычных проектах Maven вы можете вставить вышеупомянутый код в свой конфигурационный файл сборки pom.xml чтобы установить уровень целевого языка.
В проектах Spring Boot код немного меняется на
После изменения pom.xml вам необходимо повторно импортировать все проекты Maven в IntelliJ IDEA. Самый простой способ сделать это – нажать cmd + shift + A (shift + ctrl + A в Windows/Linux), а затем просто начать печатать.
Простые проекты IntelliJ IDEA
Если вы не выбрали какую-либо систему сборки для своих Java-проектов в IntelliJ, вам просто нужно убедиться, что уровень языка настроен в соответствии с JDK проекта. Вы можете сделать это в настройках структуры проекта. Нажмите cmd +shift +A и начните вводить текст, чтобы открыть настройки. Как только вы используете JDK 9+, вам нужно соответствующим образом изменить целевой уровень.
- Java 9-11: Целевой уровень Java 6
- Java 12+: Целевой уровень Java 7
Вывод
В этом посте я объяснил основную причину сообщения об ошибке версия release 5 не поддерживается. Эту проблему можно обойти локально, изменив настройки проекта IntelliJ. Однако, если вы хотите решить проблему должным образом, вам необходимо изменить файл конфигурации сборки проекта. В противном случае при следующем импорте в IntelliJ вам нужно будет изменить его снова. Кроме того, сборка может вести себя по-разному на каждом компьютере. Сервер CI и другие, которые не изменили свои настройки IntelliJ IDEA, продолжат создавать двоичные файлы Java 5. Сохранение уровня языка в файле конфигурации сборки приведет к стабильным и предсказуемым результатам на разных компьютерах.
Оригинал: “https://dev.to/lopitz/proper-solutions-for-error-java-release-version-5-not-supported-4m5f”
| UnsupportedClassVersionError | |
| java: error: release version 5 not supported | |
| unmappable character (0x8F) for encoding windows-1252 | |
| Другие статьи о Java |
Введение
UnsupportedClassVersionError
Error: A JNI error has occurred, please check your installation and try again
Exception in thread «main» java.lang.UnsupportedClassVersionError: hudson/remoting/Launcher has been compiled by a more recent version of the Java Runtime (class file version 55.0), this version of the Java Runtime only recognizes class file versions up to 52.0
at java.lang.ClassLoader.defineClass1(Native Method)
at java.lang.ClassLoader.defineClass(ClassLoader.java:756)
at java.security.SecureClassLoader.defineClass(SecureClassLoader.java:142)
at java.net.URLClassLoader.defineClass(URLClassLoader.java:468)
at java.net.URLClassLoader.access$100(URLClassLoader.java:74)
at java.net.URLClassLoader$1.run(URLClassLoader.java:369)
at java.net.URLClassLoader$1.run(URLClassLoader.java:363)
at java.security.AccessController.doPrivileged(Native Method)
at java.net.URLClassLoader.findClass(URLClassLoader.java:362)
at java.lang.ClassLoader.loadClass(ClassLoader.java:418)
at sun.misc.Launcher$AppClassLoader.loadClass(Launcher.java:352)
at java.lang.ClassLoader.loadClass(ClassLoader.java:351)
at sun.launcher.LauncherHelper.checkAndLoadMain(LauncherHelper.java:601)
Agent JVM has terminated. Exit code=1
Эта ошибка часто возникает при использовании
Jenkins
версии 2.357 и выше
с работниками на которых установлена восьмая Java. Проверьте версию Java на хосте работника, если
вы подключаете его напрямую и в
Dockerfile
если вы используете работников в
Docker
что является более новым подходом.
java: error: release version 5 not supported
Эта ошибка говорит о том, что вы используете SDK выше 8 а байткод в
который пытаетесь скомпилировать — версии 5.
После восьмой версии Java байткод пятой версии уже не поддерживается.
Это одна из причин по которой версия 8 считается наиболее
«стабильной»
Я не советую менять SDK на 8, лучше поменять target bytecode.
В
IntelliJ IDEA
это можно сделать следующим образом
File → Settings → Build, Execution, Deployment → Compiler
→ Target bytecode version → 14
14 выбирать не обязательно, но вам явно будет нужно что-то выше 5
error: unmappable character (0x8F) for encoding windows-1252
Если у вас в коде комментарии на русском и при компиляции появляется
error: unmappable character (0x8F) for encoding windows-1252
| Программирование на Java | |
| Установка Java | |
| Intellij | |
| Компиляция и запуск Java кода | |
| final | |
| switch | |
| Определить тип переменной | |
| Генератор случайных чисел | |
| Импорт из других классов | |
| Ошибки | |
| Maven | |
| JUnit |