What do you do when you create a new Maven Java project, and when you run it, you get the following error:
Error:java: error: release version 5 not supported
Sometimes the error could also read as follows:
java: Source option 5 is no longer supported. Use 6 or later.
Luckily for us, the solution is exactly the same!
Solution
Open the project’s pom.xml file and add the following snippet:
<properties>
    <maven.compiler.source>1.8</maven.compiler.source>
    <maven.compiler.target>1.8</maven.compiler.target>
</properties>
Now open the Maven side-panel, and click the Report All Maven Projects button.
You can now successfully run your new Maven Java project.
Additional Notes
The release version 5 not supported error is quite common with newly created projects.
The java error is frequently seen in IntelliJ after a new Maven project has begun and full setup has not been completed.
By default, the project bytecode version is not actually set in Java maven projects.
Therefore it believes that your current version is set to 5.
Open up Project Settings>Build,Execution…>compiler>java compiler and change your bytecode version to your current java version.
An alternative solution
If the above does not work for you when trying to solve the java error: release version 5 not supported in IntelliJ, you can attempt the following alternative:
- Open the IntelliJ preferences dialog.
- Filter the navigation items by typing
compiler. - Move to the Maven->Java Compiler section.
- In the right hand configuration panel, there is a list of modules and their accompanying Java compile versions. This is called the
target bytecode version. - Finally select a version bigger than 1.5.
Note that if there is no version greater than 1.5 available in the above list, then you will need to upgrade your Java Development Kit (JDK) on the local machine.
Once all of these steps have been completed, you may also want to go to the Project Structure contextual menu and select Modules. Under here you will have the option to change each of the module’s language level.
You can also always just update your pom.xml to contain the following:
<properties>
   <java.version>11</java.version>
</properties>
This will fix your java: error: release version 5 not supported problem encountered while trying to run, or execute a Maven Java application in IntelliJ IDEA.
 This article is meant as an extension to Angie Jones’ “IntelliJ – Error:java: release version 5 not supported”.
In her article Angie suggest solutions to IntelliJ IDEA showing the error message “release version 5 not supported”. The first two options work within IDEA, but are not sustainable as you will learn later. The last option tackles the actual problem, but only for Maven based builds. To recap, the correct solution for Maven based builds (see also Maven Compiler Plugin), is as follows:
<properties>
    <maven.compiler.source>1.8</maven.compiler.source>
    <maven.compiler.target>1.8</maven.compiler.target>
</properties>
I would like to give some background on the problem and suggest to solve the problem differently.
What is the actual problem?
To find a proper solution for all kind of Java projects, regardless of the build tool, let’s dive into the actual problem.
In its more than 20 years, Java went through several major versions. Each of those introduced a new version of the binaries format and sometimes also language features (e.g. enums in Java 5, lambdas in Java 8, modules in Java 9, var in Java 10, HTTP-2 client Java 11… ). Yet, Java and its virtual machine are highly backwards-compatible. You can take 20 years old binaries and they will run with the latest version of Java just fine (exceptions apply).
The Java compiler, which generates binary files from Java source files supports cross-compiling to various language levels, that is creating these binaries in formats of different Java versions. However, sometimes support for older language levels is dropped. Since Java 9, the compiler cannot generate Java 5 binaries anymore. If the compiler now runs – directly or indirectly through a build tool – with a target version of Java 5 it will show the error message release version 5 not supported.
The root problem for the error message is, that the Java Development Kit (JDK) is too new to generate old binaries.
So, your JDK is too new to generate Java 5 binaries. There are two solutions to tackle this problem.
Use an older JDK
As previously mentioned, JDK 9 dropped the support for cross-compiling to Java 5 binaries. This means, as long as you use a JDK 8 or below, you can actually create Java 5 binaries. However, this method is NOT recommended. There should be no reason to stick to Java 5 in a production runtime environment. JDK 5 is not supported since 2015 and security patches are not provided anymore.
Change the desired target language level
Instead of cross-compiling to Java 5 binaries, you should create binaries, that match the version of the Java runtime environment in production. This should be at least Java 8 until 2023 to get security patches. See also Java version history on Wikipedia. However, I recommend to use Java 11 to make use of various new features introduced in-between and staying on an LTS version at the same time.
So, how to change the target version then?
Maven-based projects
For very good reasons Maven is still vastly used in the Java ecosystem. However, Maven is quite old and so are some of the defaults as well. One of which is the language level, that defaults to Java 1.5, regardless of the JDK you use.
In plain Maven projects you can paste the above mentioned code into your build configuration file pom.xml to set the target language level.
<properties>
    <maven.compiler.source>1.8</maven.compiler.source>
    <maven.compiler.target>1.8</maven.compiler.target>
</properties>
In SpringBoot projects, the code slightly changes to
<properties>
    <java.version>1.8</java.version>
</properties>
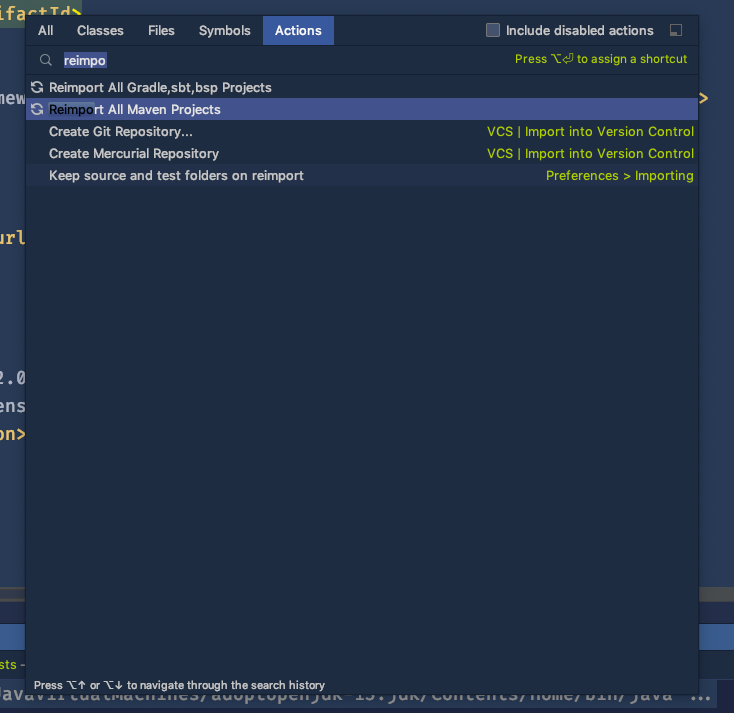
After changing the pom.xml you need to Reimport All Maven Projects in IntelliJ IDEA. The easiest way to do it, is to press cmd+shift+A (shift+ctrl+A on Windows/Linux) and then simply start typing.
Plain IntelliJ IDEA projects
If you did not choose any build system for your Java projects in IntelliJ, you simply need to make sure, the language level is configured according to the project’s JDK. You can do this in the project structure settings. Press cmd+shift+A and start typing to open the settings.
As soon, as you use an JDK 9+ you need to change the target level accordingly.
- Java 9-11: Target level Java 6
- Java 12+: Target level Java 7
Conclusion
In this post I explained the root cause for the error message release 5 version not supported.
One can work around this problem locally by changing IntelliJ project settings. However, if you wanted to solve the problem properly, you need to change the project’s build configuration file. Otherwise on the next import into IntelliJ you will need to change it again. Also, the build might behave differently on each computer. The CI server and others, who didn’t change their IntelliJ IDEA settings, will continue to produce Java 5 binaries. Persisting the language level in the build configuration file will produce stable and foreseeable results across machines.
| UnsupportedClassVersionError | |
| java: error: release version 5 not supported | |
| unmappable character (0x8F) for encoding windows-1252 | |
| Другие статьи о Java |
Введение
UnsupportedClassVersionError
Error: A JNI error has occurred, please check your installation and try again
Exception in thread «main» java.lang.UnsupportedClassVersionError: hudson/remoting/Launcher has been compiled by a more recent version of the Java Runtime (class file version 55.0), this version of the Java Runtime only recognizes class file versions up to 52.0
at java.lang.ClassLoader.defineClass1(Native Method)
at java.lang.ClassLoader.defineClass(ClassLoader.java:756)
at java.security.SecureClassLoader.defineClass(SecureClassLoader.java:142)
at java.net.URLClassLoader.defineClass(URLClassLoader.java:468)
at java.net.URLClassLoader.access$100(URLClassLoader.java:74)
at java.net.URLClassLoader$1.run(URLClassLoader.java:369)
at java.net.URLClassLoader$1.run(URLClassLoader.java:363)
at java.security.AccessController.doPrivileged(Native Method)
at java.net.URLClassLoader.findClass(URLClassLoader.java:362)
at java.lang.ClassLoader.loadClass(ClassLoader.java:418)
at sun.misc.Launcher$AppClassLoader.loadClass(Launcher.java:352)
at java.lang.ClassLoader.loadClass(ClassLoader.java:351)
at sun.launcher.LauncherHelper.checkAndLoadMain(LauncherHelper.java:601)
Agent JVM has terminated. Exit code=1
Эта ошибка часто возникает при использовании
Jenkins
версии 2.357 и выше
с работниками на которых установлена восьмая Java. Проверьте версию Java на хосте работника, если
вы подключаете его напрямую и в
Dockerfile
если вы используете работников в
Docker
что является более новым подходом.
java: error: release version 5 not supported
Эта ошибка говорит о том, что вы используете SDK выше 8 а байткод в
который пытаетесь скомпилировать — версии 5.
После восьмой версии Java байткод пятой версии уже не поддерживается.
Это одна из причин по которой версия 8 считается наиболее
«стабильной»
Я не советую менять SDK на 8, лучше поменять target bytecode.
В
IntelliJ IDEA
это можно сделать следующим образом
File → Settings → Build, Execution, Deployment → Compiler
→ Target bytecode version → 14
14 выбирать не обязательно, но вам явно будет нужно что-то выше 5
error: unmappable character (0x8F) for encoding windows-1252
Если у вас в коде комментарии на русском и при компиляции появляется
error: unmappable character (0x8F) for encoding windows-1252
| Программирование на Java | |
| Установка Java | |
| Intellij | |
| Компиляция и запуск Java кода | |
| final | |
| switch | |
| Определить тип переменной | |
| Генератор случайных чисел | |
| Импорт из других классов | |
| Ошибки | |
| Maven | |
| JUnit |
Содержание
- How to fix Source option 5 is no longer supported. Use 7 or later
- Error
- Maven POM.xml
- Examples
- JDK 14
- Sample pom.xml file
- Verify the fix
- Maven Tutorial
- How to fix the Release Version 5 Not Supported error in IntelliJ
- Solution
- Additional Notes
- An alternative solution
- How to fix the Release Version 5 Not Supported error in IntelliJ
- Solution
- Additional Notes
- An alternative solution
- [SOLVED] Maven: Source option 5 is no longer supported. Use 6 or later.
- Situation 1: New project uses JDK 9+
- Solution 1: Use newer version of maven-compiler-plugin
- Situation 2: Full control over maven-compiler-plugin, source and target compatibility
- Solution 2. Set the proper maven properties
- Ошибка «Вариант источника 5 больше не поддерживается. Используйте 6 или новее »при компиляции Maven
- 4 — Устранение неполадок Java, Eclipse и Maven
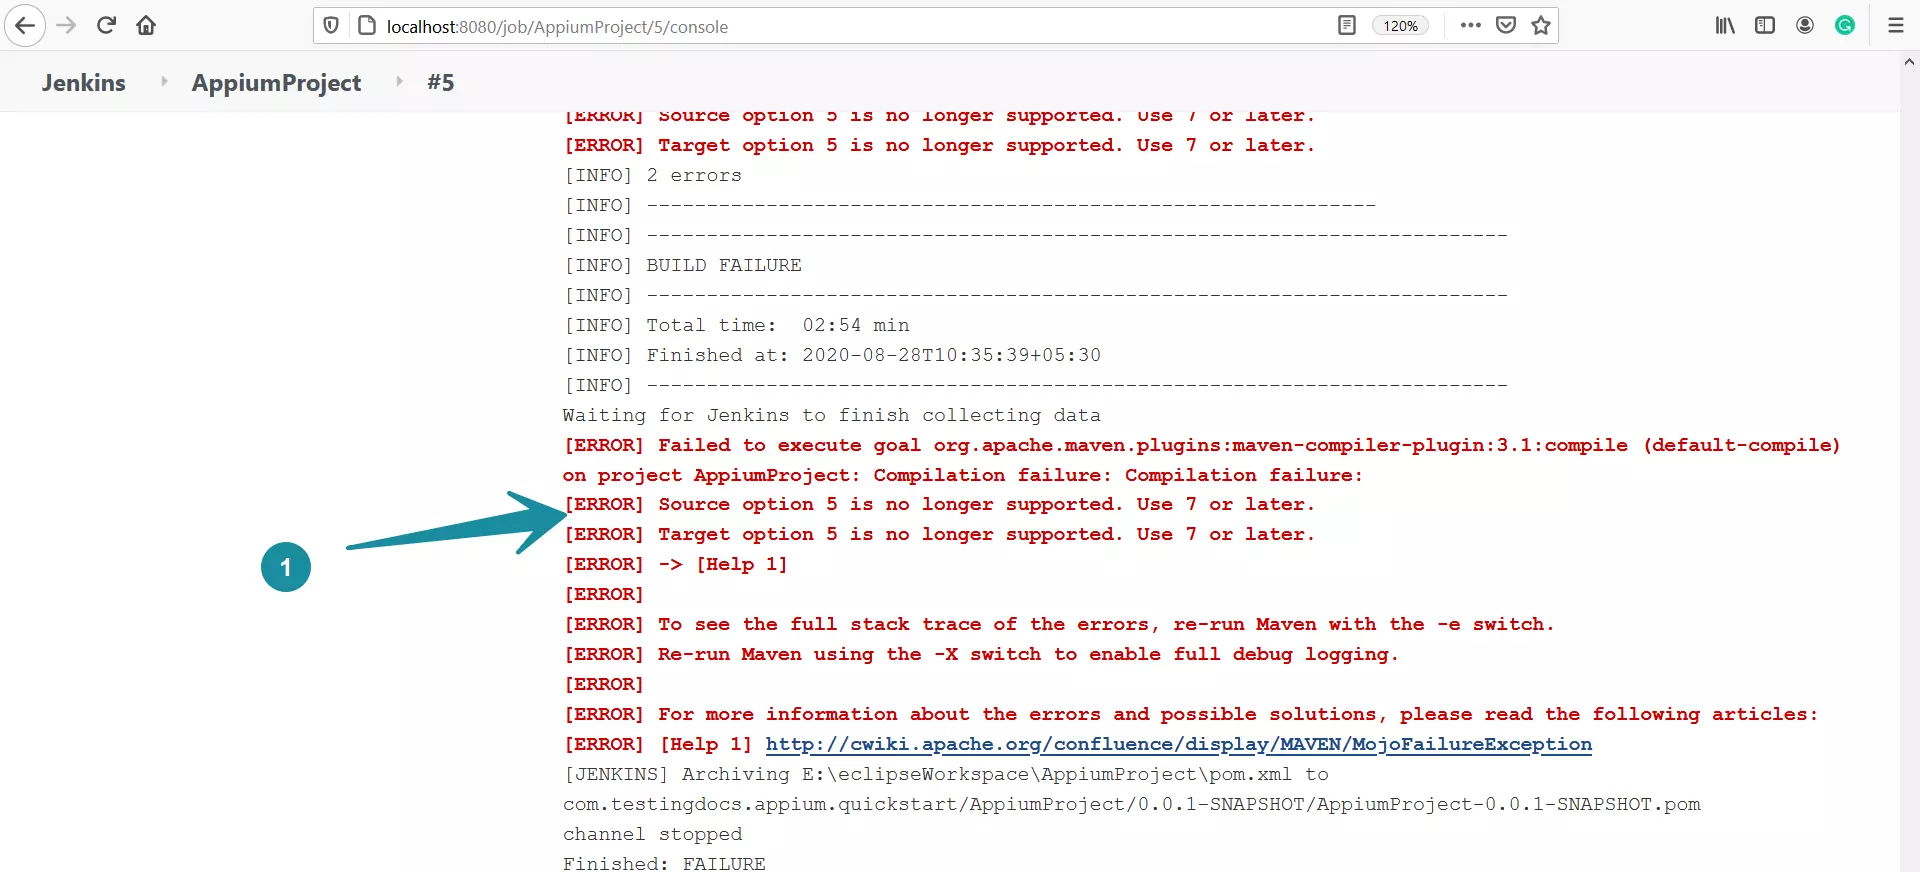
How to fix Source option 5 is no longer supported. Use 7 or later
When we create Maven projects using artifacts and try to run them, we sometimes get the following error. Source option 5 is no longer supported. Use 7 or later. In this post, let’s see the steps involved to fix the error in the Maven project.
The error (Source option 5 is no longer supported) is common when we create a Maven project from the old archetypes. In this case, we need to specify the source and target version to the Maven compiler. We can specify these properties in Maven pom.xml file.
Error
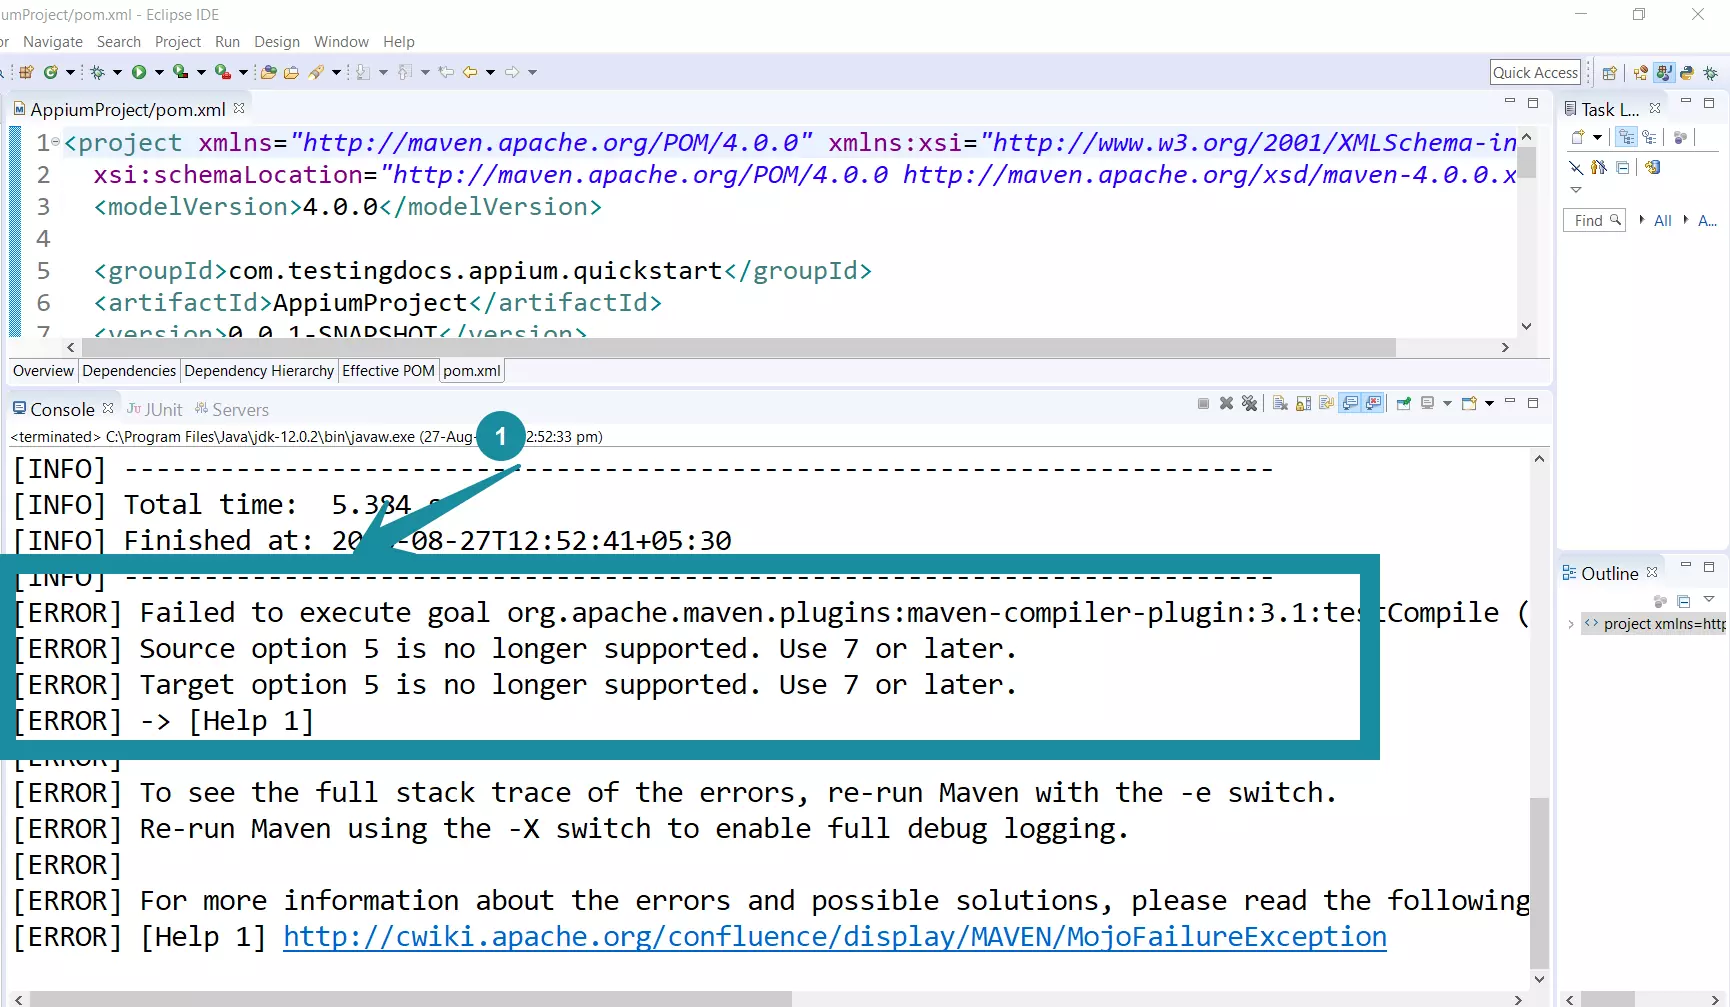
The fix for the problem is to use the latest Java environment for the project that is above JDK 7 or Later.
Identify the JDK version installed on your machine or the version the IDE workspace uses. Update the project build path with the latest library settings.
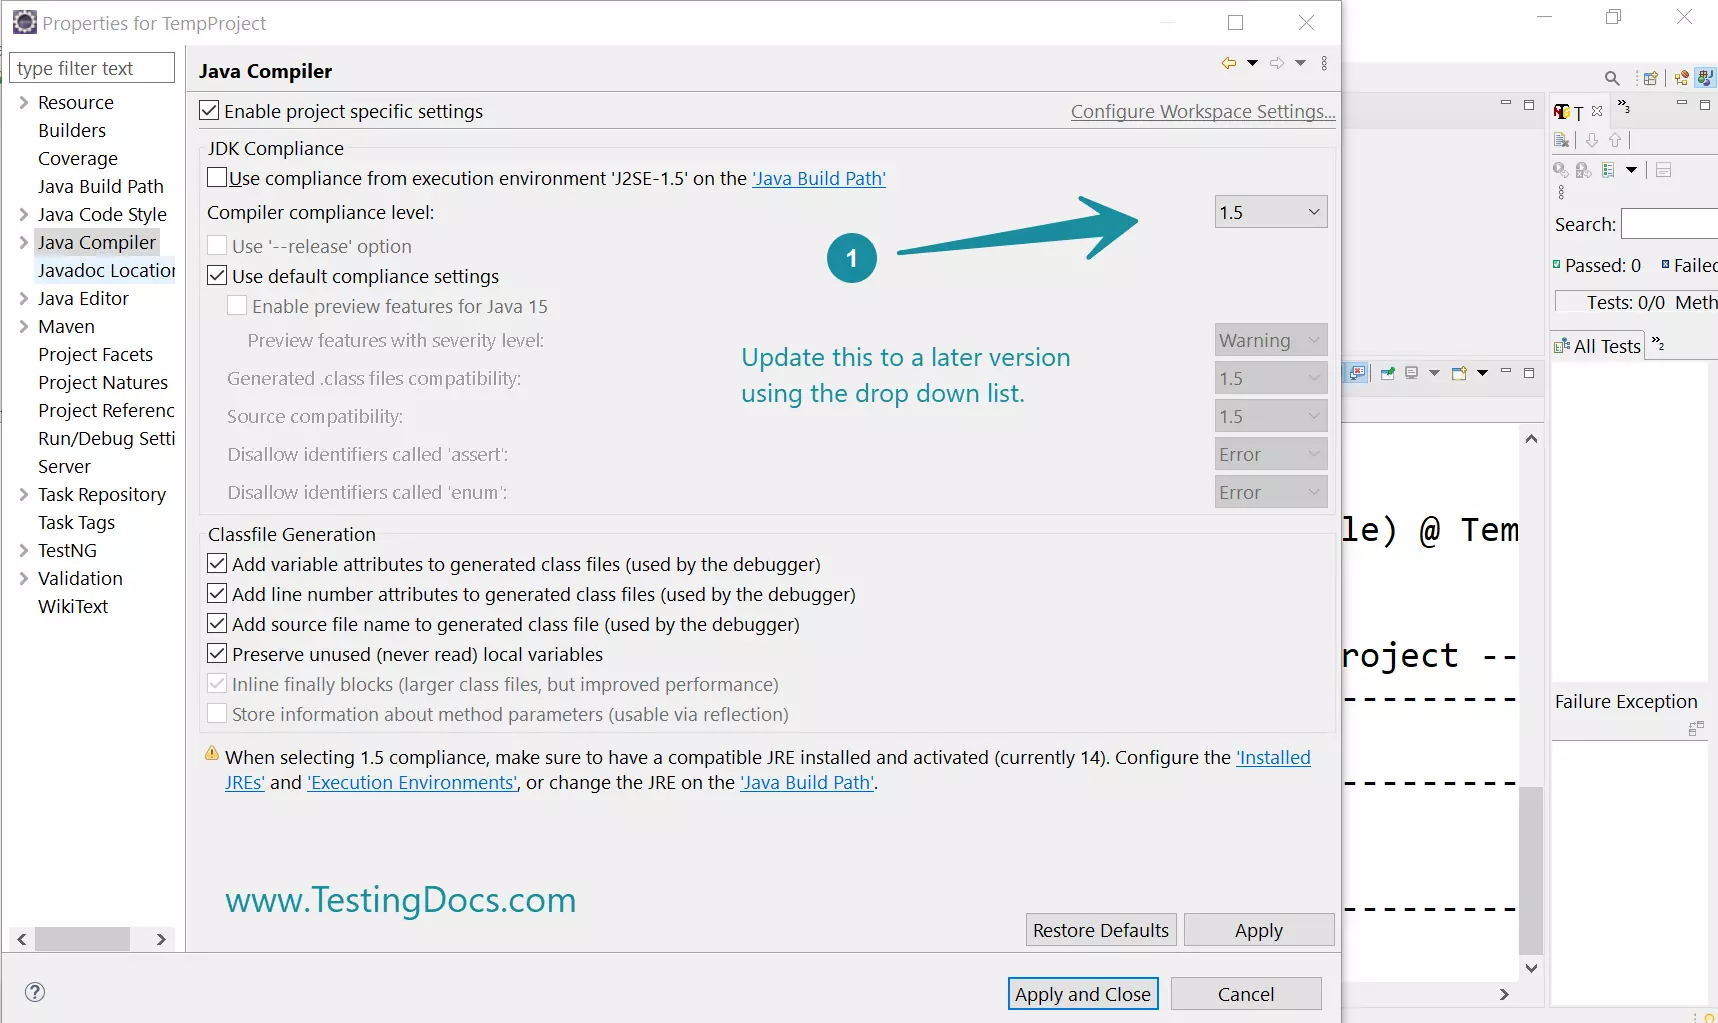
Right-click Project properties >> Java Compiler.
Change the JDK compliance parameters from 1.5 -> 1.7 or above.
Click on the Execution Environments link and select the latest or suitable JDK above JDK 1.7
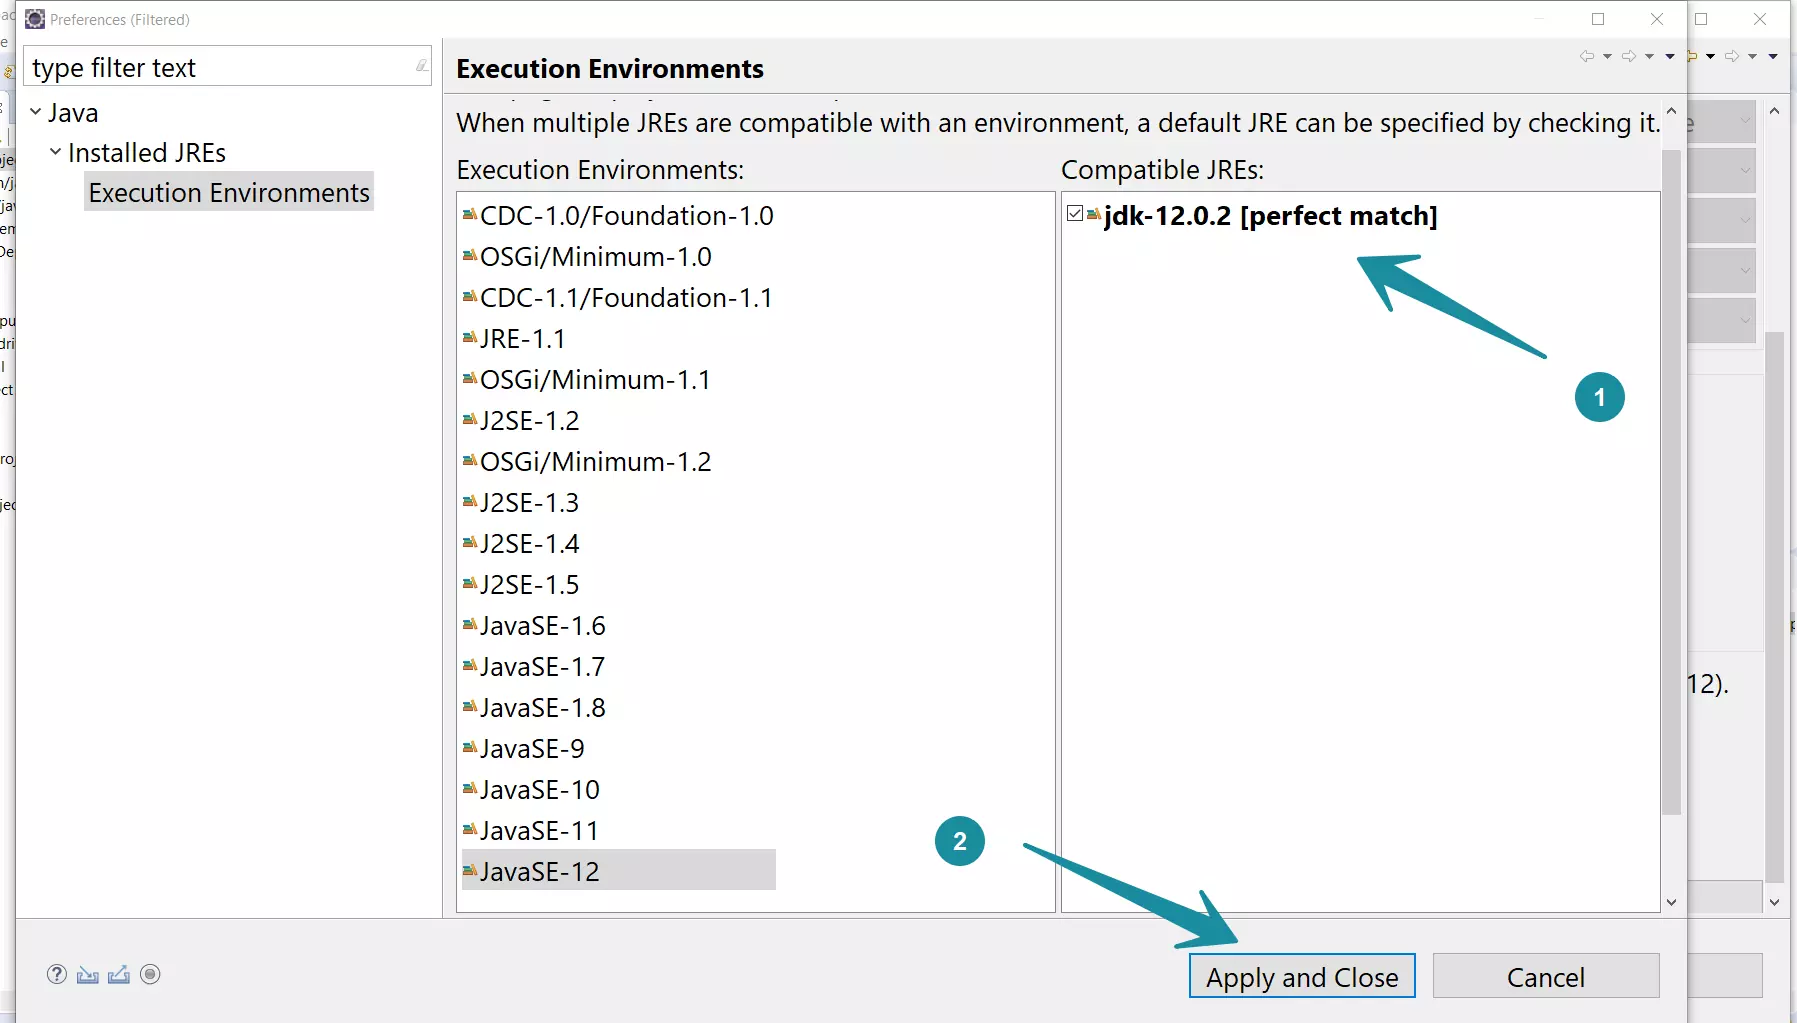
Click on Apply and Close button.
Maven POM.xml
Follow the below steps to avoid this error in the Maven project,
- Check the Java compiler version. (Project-specific settings)
- Workspace settings. (Configure Workspace settings)
- Project build path.
- Maven POM.xml build file.
Examples
For example, to specify JDK 8 we can add the properties like the below to the POM.xml file:
JDK 14
Change the Java compiler and the project build path. After the changes specify the JDK version in the POM.xml Maven build file.
For example, specify the JDK 14 to the Maven pom.xml.
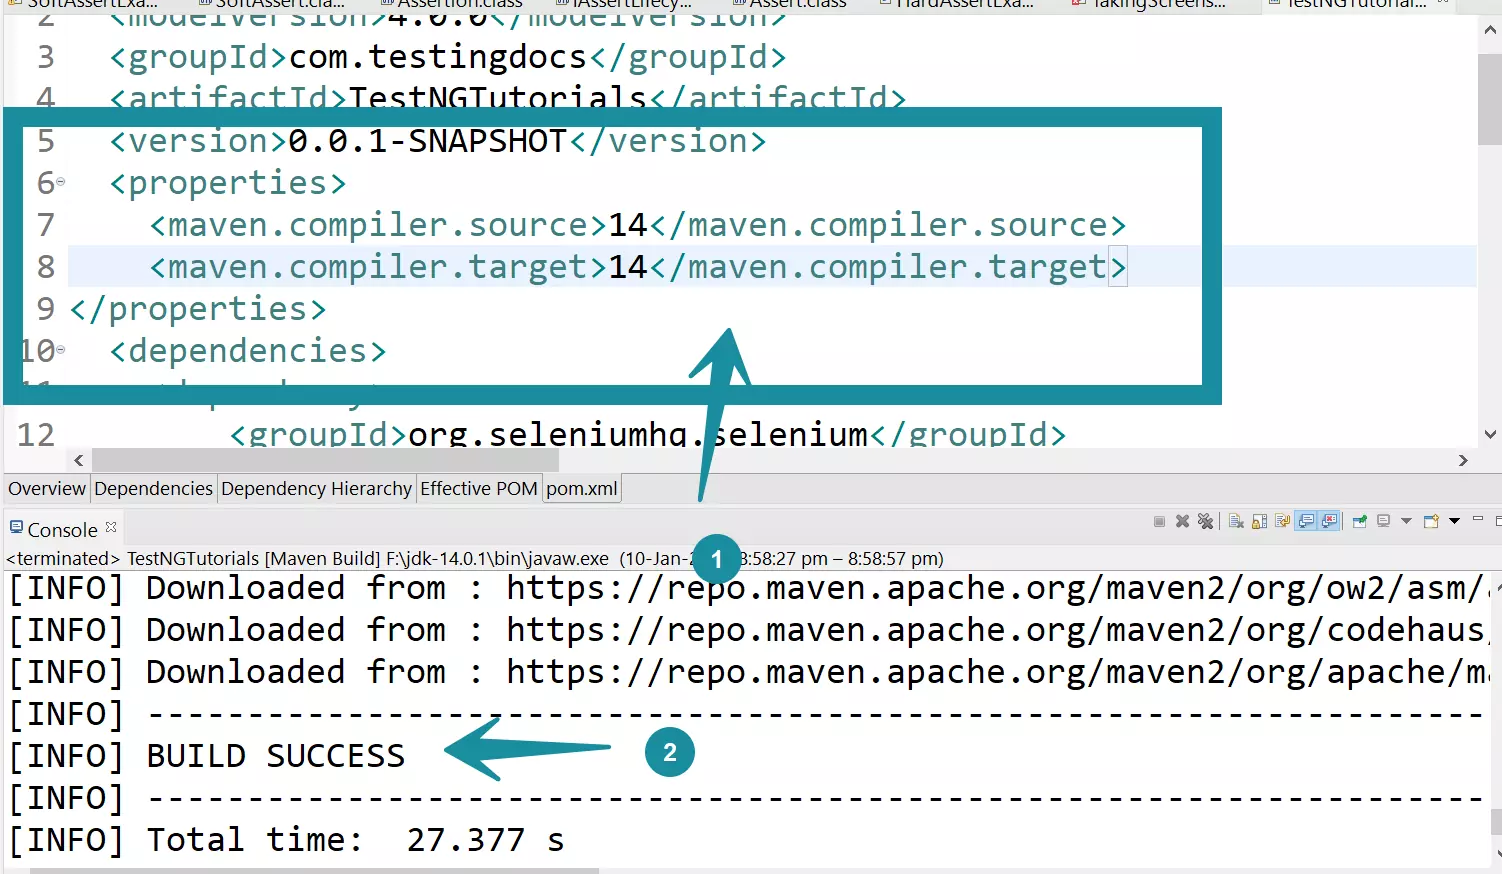
Sample pom.xml file
Sample pom.xml file with JDK 14 version
Verify the fix
Run the Maven project. The error should be fixed now.
After changing the settings and adding the properties information to the pom.xml file. Verify by running the project. In Eclipse IDE, to build the project choose the option
Run As >> Maven Build
Maven Tutorial
Maven tutorial on this website:
For more information on the Maven build tool, visit the official website:
Источник
How to fix the Release Version 5 Not Supported error in IntelliJ

What do you do when you create a new Maven Java project, and when you run it, you get the following error:
Error:java: error: release version 5 not supported
Sometimes the error could also read as follows:
java: Source option 5 is no longer supported. Use 6 or later.
Luckily for us, the solution is exactly the same!
Solution
Open the project’s pom.xml file and add the following snippet:
Now open the Maven side-panel, and click the Report All Maven Projects button.
You can now successfully run your new Maven Java project.
Additional Notes
The release version 5 not supported error is quite common with newly created projects.
The java error is frequently seen in IntelliJ after a new Maven project has begun and full setup has not been completed.
By default, the project bytecode version is not actually set in Java maven projects.
Therefore it believes that your current version is set to 5.
Open up Project Settings > Build , Execution …> compiler > java compiler and change your bytecode version to your current java version.
An alternative solution
If the above does not work for you when trying to solve the java error: release version 5 not supported in IntelliJ, you can attempt the following alternative:
- Open the IntelliJ preferences dialog.
- Filter the navigation items by typing compiler .
- Move to the Maven->Java Compiler section.
- In the right hand configuration panel, there is a list of modules and their accompanying Java compile versions. This is called the target bytecode version .
- Finally select a version bigger than 1.5.
Note that if there is no version greater than 1.5 available in the above list, then you will need to upgrade your Java Development Kit (JDK) on the local machine.
Once all of these steps have been completed, you may also want to go to the Project Structure contextual menu and select Modules . Under here you will have the option to change each of the module’s language level .
You can also always just update your pom.xml to contain the following:
This will fix your java: error: release version 5 not supported problem encountered while trying to run, or execute a Maven Java application in IntelliJ IDEA.
Источник
How to fix the Release Version 5 Not Supported error in IntelliJ
What do you do when you create a new Maven Java project, and when you run it, you get the following error:
Error:java: error: release version 5 not supported
Sometimes the error could also read as follows:
java: Source option 5 is no longer supported. Use 6 or later.
Luckily for us, the solution is exactly the same!
Solution
Open the project’s pom.xml file and add the following snippet:
Now open the Maven side-panel, and click the Report All Maven Projects button.
You can now successfully run your new Maven Java project.
Additional Notes
The release version 5 not supported error is quite common with newly created projects.
The java error is frequently seen in IntelliJ after a new Maven project has begun and full setup has not been completed.
By default, the project bytecode version is not actually set in Java maven projects.
Therefore it believes that your current version is set to 5.
Open up Project Settings > Build , Execution …> compiler > java compiler and change your bytecode version to your current java version.
An alternative solution
If the above does not work for you when trying to solve the java error: release version 5 not supported in IntelliJ, you can attempt the following alternative:
- Open the IntelliJ preferences dialog.
- Filter the navigation items by typing compiler .
- Move to the Maven->Java Compiler section.
- In the right hand configuration panel, there is a list of modules and their accompanying Java compile versions. This is called the target bytecode version .
- Finally select a version bigger than 1.5.
Note that if there is no version greater than 1.5 available in the above list, then you will need to upgrade your Java Development Kit (JDK) on the local machine.
Once all of these steps have been completed, you may also want to go to the Project Structure contextual menu and select Modules . Under here you will have the option to change each of the module’s language level .
You can also always just update your pom.xml to contain the following:
This will fix your java: error: release version 5 not supported problem encountered while trying to run, or execute a Maven Java application in IntelliJ IDEA.
Источник
[SOLVED] Maven: Source option 5 is no longer supported. Use 6 or later.
In General, the cause of the title problem is the incompatibility between the version of JDK used in the project and properties responsible for compatibility of the source and target code. These problems often occur in tandem as it is shown on the following listing:
The tables below contain the supported values of source and target compatibility depending on the JDK version and the default source/target setting depending on the maven-compiler-plugin version.
| JDK Version | source compatibility version | target compatibility |
|---|---|---|
| before JDK9 | 5+ | 6+ |
| JDK9+ | 1.6+ | 1.6+ |
Source and target versions supportted by JDK
| Default version of maven-compiler-plugin | Default version of source compatiblity | Default version of target compatiblity |
|---|---|---|
| before 3.8.0 | 5 | 1.5 |
| 3.8.0+ | 6 | 1.6 |
Default values of source/target set by maven-compiler-plugin
I marked the most common cause of the title problem in red and yellow-red. I mean – using the new version of JDK (eg JDK9), which no longer supports Java 1.5, and the old version of maven-compiler-plugin, which defaults to Java 5 for source / target compatibility.
We already know the cause of the problem, so we can move on to discussing the solutions, because they differ slightly depending on the circumstances.
Situation 1: New project uses JDK 9+
This is the most common situation in which we can get the title errors. It will probably result from the fact that the default projects created do not set source / target compatibility, and in addition it uses an older version of maven-compiler-plugin (older than 3.8.0).
Solution 1: Use newer version of maven-compiler-plugin
We can take advantage of the fact that maven-compiler-plugin starting from 3.8.0 defaults source/target to Java 6 and just explicitly points to the newer version of the plugin. To do this, edit the pom.xml file by adding or updating the section below.
If your application does not need to be compatible with such an old version of Java as 1.6, you can immediately set this value to e.g. 11, to be able to enjoy all the benefits of Java 11.
Situation 2: Full control over maven-compiler-plugin, source and target compatibility
If you want to use a specific version of maven-compiler-plugin or you just want full control over source and target compatibility, you can use the solution below.
Solution 2. Set the proper maven properties
In that case, you can add the following section to pom.xml, which will set the value of source / target compatibility to the value you want – in this case, Java 11 compatibility.
At the end… May I ask you for something?
If I helped you solve your problem, please share this post. Thanks to this, I will have the opportunity to reach a wider group of readers. Thank You
Источник
Ошибка «Вариант источника 5 больше не поддерживается. Используйте 6 или новее »при компиляции Maven

4 — Устранение неполадок Java, Eclipse и Maven
Я получаю следующую ошибку или компилирую $ mvn:
Вот код моего pom.xml:
Я попытался добавить свойства в код pom.xml, но все равно получаю ту же ошибку. Может ли кто-нибудь помочь мне в решении этой проблемы? заранее спасибо
- Failed to execute goal org.apache.maven.plugins:maven-compiler-plugin:3.1:compile это довольно старая версия. Также рассмотрите возможность перехода на 3.8.0. И в этом случае вы можете начать использовать свойство maven.compiler.release = 6 , который является предпочтительным способом компиляции, хотя требует JDK 9 и выше.
- Я пробовал добавить
org.apache.maven.plugins плагин компилятора maven 3.8.0 6 1.8
У меня была такая же проблема, проблема со свойствами. Проверьте свою версию JavaSE в своем проекте, она будет отображаться рядом с папкой системной библиотеки JRE в вашем проекте. Если он равен 1,5, то выдаст ошибку. Скорее всего, у вас будет обновленная версия, поэтому проверьте версию и обновите ее. Я обновил его ниже на основе вашего кода.
Мне помогли эти строки в файле pom.xml
- 1 Это действительно помогло мне Спасибо
- Хотел бы я увидеть это первым!
- Это ничего не дало мне .
- Замените 1.8, например, 11, если вы нацеливаетесь на jdk 11
Также в одном из моих проектов, помимо всех вышеперечисленных ответов, работает еще одна попытка: просто измените Уровень языка в разделе «Модули» Структура проекта [изображение ниже] [
- 3 Это необъяснимое вуду, из-за которого хочется сменить карьеру
Я думаю, вы ошиблись в своем pom.xml:
Теперь, в зависимости от того, используете ли вы командную строку, используйте:
или в любом случае (eclipse ide)
Щелкните правой кнопкой мыши проект Run with maven> build> Goal (compile)
- 1 [Не верно] . Недопустимый исходный и целевой выпуск «1.11». Это должно быть 11, а не 1,11.
- У меня такая же ошибка. Я использовал java 11 и генерировал код, совместимый с 1.8. установка обоих свойств на 1,8 устранила проблему. Я использовал команду mvn clean package для создания файла jar.
Мне это помогло:
- Щелкните правой кнопкой мыши Project.
- Щелкните Путь сборки.
- Щелкните Настроить путь сборки.
- Он открывает окно пути сборки Java.
- Щелкните Компилятор Java слева.
- Он переходит в окно компилятора Java, чтобы установить уровень соответствия компилятора в соответствии с вашей версией jre (например, если версия java — 1.8, тогда выберите 1.8) в качестве выбора.
- Нажмите кнопку [Применить].
- Щелкните по кнопке [OK].
- Щелкните правой кнопкой мыши Project> Maven> Обновить проект.
- Щелкните правой кнопкой мыши Project> Run As> Maven install — файл pom.xml запущен, java-файлы загружаются и устанавливаются в проект.
- Щелкните правой кнопкой мыши Project> Run As> Maven Test — файл pom.xml запущен, java-файлы загружаются и устанавливаются в проект.
Затем вы получили сообщение об успешной сборке, и ваш проект maven успешно создан.
- 1 Eclipse может делать это автоматически. Шаг № 9 должен быть единственным, что нужно сделать, если JDK поддерживает 1.8.
Для нового сетевого компонента Apache он немного отличается от предложения SUPARNA SOMAN.
- Щелкните правой кнопкой мыши свой проект — нажмите » set configuration «и щелкните customize configuration -Откроется новое диалоговое окно .
- В левом углу, где находятся категории, нажмите » Source ‘
- В форме выбора на странице ниже выберите необходимую версию JDK —- см. Изображение для этого последнего шага. Последний шаг, необходимый для изменения версии jdk
У меня была такая же проблема, и я добавил ниже конфигурацию в pom.xml, и она работает.
- Это устранило мою проблему с запуском sonarqube
На MacOS у меня несколько версий
и JAVA_HOME не был определен должным образом, поэтому Maven использовал jdk-12. У меня jdk-11, jdk-8 и jdk-12.
Определить JAVA_HOME использовать jdk-8.
Попробуйте еще раз, теперь maven:
Вот решение, которое мне помогло:
У меня была такая же проблема с источником ошибки, вариант 5 больше не поддерживается, используйте 6 или новее
Итак, я выполнил эти инструкции и проблема Решено
- Открыть свойства проекта (меню «Файл»)
- Измените исходный / двоичный формат на последнюю версию (JDK 7 в моем случае)
Свойства проекта

Исходный / двоичный формат

Очистите и соберите, затем запустите проект
Источник
Hello Guys, How are you all? Hope You all Are Fine. Today I am just trying to run my simple java maven project in my IntelliJ IDEA Ultimate And I am facing the following error Error:java: error: release version 5 not supported in IntelliJ IDEA Ultimate. So Here I am Explain to you all the possible solutions here.
Without wasting your time, Let’s start This Article to Solve This Error.
Contents
- How Error:java: error: release version 5 not supported in IntelliJ IDEA Ultimate Occurs ?
- How To Solve Error:java: error: release version 5 not supported in IntelliJ IDEA Ultimate?
- Solution 1: Change target bytecode version
- Solution 2: Add this code in build plugin in POM file
- Solution 3 : try to change the Java version
- Summery
Today I am just trying to run my simple java maven project in my IntelliJ IDEA Ultimate And I am facing the following error.
Error:java: error: release version 5 not supportedHow To Solve Error:java: error: release version 5 not supported in IntelliJ IDEA Ultimate?
- How To Solve Error:java: error: release version 5 not supported in IntelliJ IDEA Ultimate?
To Solve Error:java: error: release version 5 not supported in IntelliJ IDEA Ultimate Open Your IDE Setting. Then Open Build Execution, Deployment Then Select Compiler. Then Just Scroll down to Maven and java compile In the right panel will be a list of modules and their associated java compile version “target bytecode version.” Select a version >1.5. You may need to upgrade your JDK if one is not available. Preferences > Build, Execution, Deployment > Compiler > Java Compiler > Target bytecode version. Setting this value fixed the error for me
- Error:java: error: release version 5 not supported in IntelliJ IDEA Ultimate
To Solve Error:java: error: release version 5 not supported in IntelliJ IDEA Ultimate Open Your IDE Setting. Then Open Build Execution, Deployment Then Select Compiler. Then Just Scroll down to Maven and java compile In the right panel will be a list of modules and their associated java compile version “target bytecode version.” Select a version >1.5. You may need to upgrade your JDK if one is not available. Preferences > Build, Execution, Deployment > Compiler > Java Compiler > Target bytecode version. Setting this value fixed the error for me
Solution 1: Change target bytecode version
- Open Your IDE Setting.
- Then Open Build Excecution, Deployment
- Then Select Compiler.
- Then Just Scroll down to Maven and java compile
- In the right panel will be a list of modules and their associated java compile version “target bytecode version.”
- Select a version >1.5.
- You may need to upgrade your jdk if one is not available.
- Preferences > Build, Execution, Deployment > Compiler > Java Compiler > Target bytecode version. Setting this value fixed the error for me
Solution 2: Add this code in build plugin in POM file
 <properties>
        <java.version>1.8</java.version>
        <maven.compiler.version>3.8.1</maven.compiler.version>
        <maven.compiler.source>1.8</maven.compiler.source>
        <maven.compiler.target>1.8</maven.compiler.target>
    </properties>

    <build>
        <plugins>
            <plugin>
                <groupId>org.apache.maven.plugins</groupId>
                <artifactId>maven-compiler-plugin</artifactId>
                <version>${maven.compiler.version}</version>
                <configuration>
                    <source>${java.version}</source>
                    <target>${java.version}</target>
                </configuration>
            </plugin>
        </plugins>
    </build>
Solution 3 : try to change the Java version
Here First of all set the language level/release versions in pom.xml Like this.
<properties>
  <maven.compiler.source>1.8</maven.compiler.source>
  <maven.compiler.target>1.8</maven.compiler.target>
</properties>
Then Just try to change the Java version.
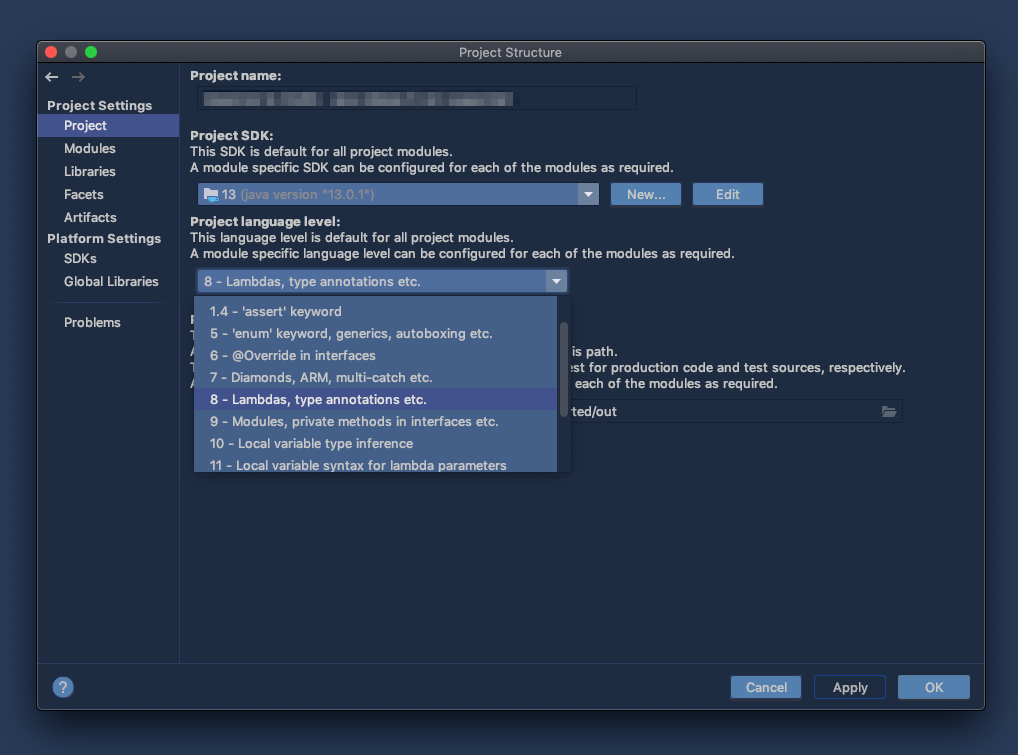
- Go to File -> Select Project structure -> Select Project -> Then Project SDK -> set It to 11
- Go to File -> Select Project structure -> Select Project -> Select Project language level -> set to 11
- Go to File -> Select Project structure -> Select Project -> Select Modules -> select Sources -> set it to 11
- Go to setting -> Open Build, Execution, Deployment -> Slect Compiler -> Then select Java Compiler -> Change Project bytecode version to 11
- Go to setting -> Open Build, Execution, Deployment -> Slect Compiler -> Then select Java Compiler -> Select Module -> Change it to 11
Summery
It’s all About this issue. Hope all solution helped you a lot. Comment below Your thoughts and your queries. Also, Comment below which solution worked for you?
Also, Read
- SyntaxError: invalid syntax to repo init in the AOSP code.