I have installed Java 8 and set my JAVA_HOME and JRE_HOME paths and added %JAVA_HOME% to the start of the path variable.
I created a helloworld.java application and am able to compile it using:
javac helloworld.java
However, when I try to run:
java helloworld
I get the error:
The system cannot find the file C:ProgramDataOracleJavajavapathjava.exe
How can I solve this?
asked Oct 26, 2015 at 20:55
![]()
5
1.Just go to C:ProgramDataOracleJavajavapath
2.You will find there shortcuts for java.exe,javaw.exe,javaws.exe which are pointing to a location where they actually are not existing now
3.Go to the jre location where you have installed java like C:Program FilesJavajre6bin
-
You will find java.exe,javaw.exe,javaws.exe
-
Create shortcuts for these files and replace with the ones which are present in C:ProgramDataOracleJavajavapath.
It works
answered Feb 17, 2016 at 13:47
![]()
1
Just set %JAVA_HOME%/bin to your path variable.
answered Oct 26, 2015 at 21:15
![]()
habhab
1281 silver badge9 bronze badges
2
If you are blocked from modifying system variables from command line, but are able to open up an elevated command prompt, then run a command like this:
setx M JAVA_HOME "C:Program FilesJavajdk1.8.0_25"
But of course, change the directory to point to your installed version of java. Note that the JAVA_HOME path does not point into the bin directory, it stops one level above bin.
answered May 15, 2017 at 18:14
![]()
Janac MeenaJanac Meena
2,93531 silver badges30 bronze badges
I was able to solve this issue. To do so I used the advice from this answer:
Java SE Development Kit 8u25 on a 64-bit Windows 8
Set the following user environment variables (== environment variables of type user variables)
•JAVA_HOME : C:Program FilesJavajdk1.8.0_25
•JDK_HOME  : %JAVA_HOME%
•JRE_HOME  : %JAVA_HOME%jre
•CLASSPATH : .;%JAVA_HOME%lib;%JAVA_HOME%jrelib
•PATH      : your-unique-entries;%JAVA_HOME%bin
(make sure that the longish your-unique-entries does not contain any other references to another Java installation folder.)
![]()
answered Oct 27, 2015 at 8:54
![]()
rni902rni902
3772 gold badges4 silver badges9 bronze badges
Are you trying to run a Java based application or program and getting an error – “The system cannot find the file C:ProgramDataOracleJavajavapathjava.exe”?
It looks like the symlinks are not properly created when you’ve installed Java. When you install Java, it creates symlinks for java.exe, javaw.exe and javaws.exe under “C:ProgramDataOracleJavajavapath”.
If you do not find symlink folder “C:ProgramDataOracleJavajavapath” in your machine, you will get “The system cannot find the file C:ProgramDataOracleJavajavapathjava.exe” error.
There are multiple options to fix this issue.
Update PATH variable with correct Symlink
It could be possible that your new installation changed the path of the “javapath” symlink. If the “javapath” symlink is not found under “C:ProgramDataOracleJavajavapath”, check it under “C:Program Files (x86)Common FilesOracleJava”, if found, update the PATH variable with “C:Program Files (x86)Common FilesOracleJavajavapath”.
Recreate the Symlinks
If you do not find “javapath” symlink under “C:ProgramDataOracleJava”, we’ll restore the symlink folder along with java.exe, javaw.exe and javaws.exe by executing below command:
mklink /d C:ProgramDataOracleJavajavapath "C:Program FilesJavajdk1.8.0_271bin"Update PATH variable with Correct Java Installation Path
If none of the above options work for you, you can try updating the PATH variable with the Java installation folder that you have it under “C:Program FilesJava” and remove “C:ProgramDataOracleJavajavapath”.
If you don’t want to remove the “javapath” entry, at least make sure to that the correct Java path is on top of the list.
For example, “C:Program FilesJavajdk1.8.0_271bin” is the Java Development Path you want to refer. Then you need to make sure that this path is on the top of the PATH list.
Frequently Asked Questions
How to add/update Java installation path under PATH environment variable list?
You can edit this PATH variable by following below steps:
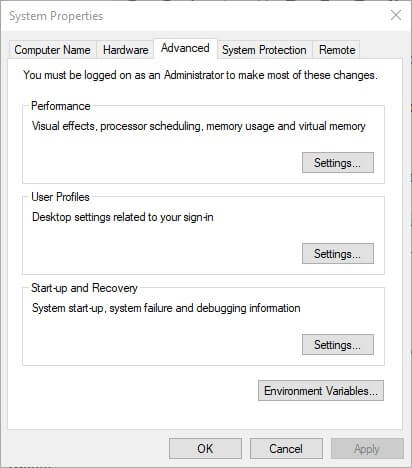
- On your Desktop, right click on “This PC” or “My Computer”
- Select “Properties”, Control Panel will open
- Select “Advanced system settings”, “System Properties” will open
- Click on “Environment Variables” button, which is located at the bottom of “System Properties” dialog box
- “Environment Variables” dialog box will open
- Find “Path” variable under “System variables” section
- Add or Update the correct Java bin PATH
Do I need to set JAVA_HOME?
If you are working on Java Development, then it would be better to set JAVA_HOME as environment variable under “System variables”. Some IDEs or Servers refer to Java development kit using JAVA_HOME variable. So, in the absence variable you might face issues starting the IDE or Server.
Fix the Windows cannot find javaw.exe using the solutions below
by Matthew Adams
Matthew is a freelancer who has produced a variety of articles on various topics related to technology. His main focus is the Windows OS and all the things… read more
Updated on December 13, 2022
Reviewed by
Vlad Turiceanu

Passionate about technology, Windows, and everything that has a power button, he spent most of his time developing new skills and learning more about the tech world. Coming… read more
- Facing the error Windows cannot find javaw.exe is frustrating when trying to launch Java programs.
- To quickly solve it, you can perform a quick malware scan or reinstall Java.
- You can also try to add the Javaw.exe path to the Environment Variable Path.
- Find below step-by-step instructions on how to carry out all these methods.

XINSTALL BY CLICKING THE DOWNLOAD FILE
This software will repair common computer errors, protect you from file loss, malware, hardware failure and optimize your PC for maximum performance. Fix PC issues and remove viruses now in 3 easy steps:
- Download Restoro PC Repair Tool that comes with Patented Technologies (patent available here).
- Click Start Scan to find Windows issues that could be causing PC problems.
- Click Repair All to fix issues affecting your computer’s security and performance
- Restoro has been downloaded by 0 readers this month.
Javaw.exe is a process that launches Java programs (jar files included). However, a Windows cannot find javaw.exe error message can pop up for some users when they try to launch Java software.
The full error message states: Windows cannot find javaw.exe. Make sure you typed the name correctly, and then try again. These are some of the best fixes for that error message.
What is javaw.exe?
Javaw.exe is a process that is part of the Java Runtime Environment (JRE). In essence, the javaw.exe command is the same as java.exe, but javaw.exe does not have an associated console window.
Basically, it’s a non-essential system process that is opened by other programs. We wouldn’t recommend ending or deleting it unless it causes problems.
What to do if javaw.exe is missing on Windows 10?
1. Scan for malware
If you already use Eset Internet Security, open the main window and follow these simple steps:
1. Select Computer scan from the ribbon on the left.
2. Click on the Scan your computer button and wait for the process to complete.
3. When the scan is finished, you will get a report showing the number of scanned, infected, and cleaned objects.
Alternatively, if you do not have Eset Internet Security on your computer, you can still do a full computer scan with its free scanner. You can download it for free and it will thoroughly scan your computer just as we showed in the steps below. You can only run this utility once, but it can be a quick fix if you don’t use an antivirus already.
The reason we recommend Eset Internet Security is because it uses multi-layered protection while being very lightweight. This type of technology ensures faster detection rates so there are higher chances that threats will be blocked or removed before they get a chance to impact your system.
Eset also has good data protection features that protect against any data leaks. It includes specific security features for safer online purchases.
Some PC issues are hard to tackle, especially when it comes to corrupted repositories or missing Windows files. If you are having troubles fixing an error, your system may be partially broken.
We recommend installing Restoro, a tool that will scan your machine and identify what the fault is.
Click here to download and start repairing.
Additional features include parental controls, webcam and microphone protection, and a dedicated anti-malware utility.
If you don’t have it on your device already, we recommend giving it a try. Eset offers 30-day free trials for all versions of its software, so you don’t need to make an investment if you are not satisfied with the product.

Eset Internet Security
Guard your devices with advanced multi-layered protection that keeps all threats at bay.
2. Add the Javaw.exe Path to the Environment Variable Path
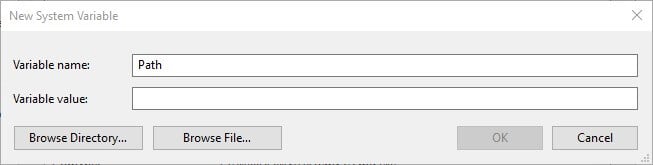
- Press the Windows key + R to launch Run.
- Input sysdm.cpl in Run and click OK to open the window shown directly below.

- Select the Advanced tab.
- Press the Environment Variables button to open the window in the snapshot below.

- Click the New button under System variables to open a New System Variable window.
- Enter Path in the Variable name text box.

- Then, input the exact path of your javaw.exe file. The default javaw.exe path would be something like
C:Program files(x86)javajre7binorC:Program files(x86)javajre8binon 64-bit Windows platforms. - If you’re not sure what path to enter, press the Windows key + Q hotkey to open Cortana. Then enter java in the search box.

- Right-click javaw and select Open file location.
- Thereafter, File Explorer will open the folder that includes javaw.exe. Enter the folder path open in File Explorer into the Variable value text box on the New System Variable window.
- Press the OK button on the New System Variable window.
- Click OK on the Environment Variables window.


The javaw.exe error often arises because Windows can’t find the Java program. So, adding the exact javaw.exe path to system variables often fixes the Windows cannot find javaw.exe error.
Follow the guidelines above to add a new javaw.exe system variable path.
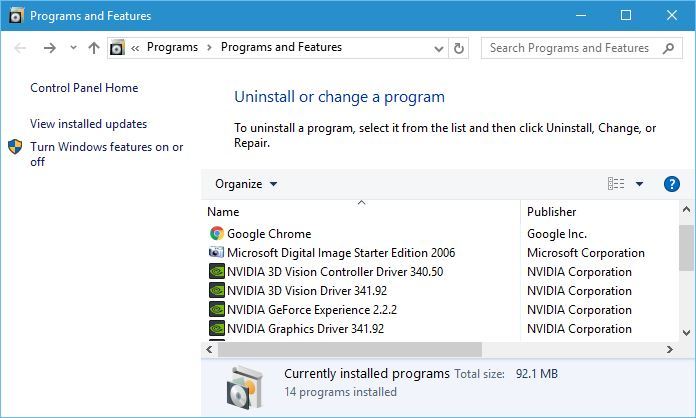
3. Reinstall Java
- Reinstalling Java might also fix the javaw.exe error for users with antiquated Java versions. To reinstall Java, enter appwiz.cpl in Run and click OK.

- Select Java and click Uninstall.
- Select the Yes option on the dialog box that opens.
- Restart Windows after uninstalling Java.
- Download Java installer.
- Click the Java installer file to open the setup window below.

- Press the Install button on that window.
Those are three resolutions that will probably resolve the Windows cannot find javaw.exe error for most users. You may then open your Java program with the javaw.exe error fixed.
Don’t hesitate to follow the topic on our website and check out this Java section too.
If you want to keep up with everything related to this topic, check out our Java section. You can find additional recommendations, fixes, and also.
- Windows cannot find: Fix this error for good [Full Guide]
- Windows 10 Undoing Changes Made to Your Computer [Fix]
- Circular Kernel Context Logger 0xc0000035: 6 Easy Fixes
- Error Opening File for Writing: 9 Methods to Fix This Issue
- Fix: The Local Device Name is Already in Use in Windows 10
Solving glitches is our specialty, so bookmark our Windows 10 Errors Hub if you need assistance with other PC-related problems.
Since your goal is getting this result as quickly as possible, apply the same solutions when dealing with:
- javaw.exe not found – Users describe that they keep seeing the same message on their computer. Since it cannot find a working Java installation, we can only recommend reinstalling it.
- Windows cannot find javaw.exe ASDM – There are times when users may not even get the ASDM Launcher login box. Assuming you’re no stranger to this error, quickly scanning your device is a wise move.
![]()
Newsletter
In this post, we will solve the «Java Runtime Environment not found error». This java error is one of the common errors faced by developers or end-users. Whenever you try to install any software which requires java like eclipse or Minecraft. Also, if you are new to java development, JDK or Java Development Kit is necessary for you.
Following this tutorial will help you to resolve all Java runtime errors. Additionally, you will learn to install, remove and set java variables in Windows10 and Ubuntu.
These are the very common errors you will find related to Java.
- java runtime environment not found
- java runtime environment not found windows 10
- eclipse java runtime environment not found
- eclipse java runtime environment not found path
- java SE runtime environment not found
- java runtime environment not found at bin javaw.exe
- unable to load java runtime environment
- cannot determine a valid java home
- java runtime environment not found mac
Let’s understand some basic concepts of Java runtime first. Check out this post, if you are getting a java command not found error.
Table of Contents
- 1 What is a runtime environment?
- 2 JRE vs JDK
- 3 Java download
- 4 How to install Java runtime environment step by step
- 5 Video tutorial-JRE error solved for Windows
- 6 How to uninstall java from Windows 10
- 7 How to install java runtime environment in Ubuntu 20.04
- 8 Video Tutorial — JRE error solved for Ubuntu
- 9 Frequently Asked Questions (FAQs)
- 10 Ending notes
What is a runtime environment?
Runtime basically means everything you require to run a program. Which includes environment variables, directory structure, common libraries etc. This can also be a virtual machine like
- JRE (Java Runtime Environment)
- CLR (Common Language Runtime) for .net framework
The target would be JRE or CLR for your program, need to decide by you. As soon as you execute any program, it’s in run time.
JRE vs JDK
| JRE | JDK |
|---|---|
| Stands for Java Runtime Environment | Stands for Java development kit |
| To run Java programs, you need JRE | Helps to build Java programs and applets |
| Platform dependent contains libraries and supporting tool | Platform dependent contains tools development and debugging |
| JRE does not contain a development kit. | JDK includes JRE also to execute the program |
What are the causes of the «Java Runtime environment not found» error
- Java is not installed in your system
- Java installation not completed (due to errors)
- Environment variables of Java are not set
- Java conflict due to more than one Java Runtime installation
Because JRE is platform-dependent, I have covered java installation, variable setup and un-installation for Windows and Ubuntu both.
Choose Windows 10 or Ubuntu 20.04 from the post and follow step by step to get java issues resolved.
Java download
Before installation, first, we need to download java —
Step1
Visit oracle.com and download JDK 15 or the latest available for your system. I am downloading it for Windows 10 (64-bit). The latest available versions of java are listed in the screenshot.

How to install Java runtime environment step by step
Let’s solve 1st reason for «Java runtime environment not found», Because java is not installed.
Step2
First, check for any pre-installed java version —
Open the command prompt with «Run as administrator» and run java command.
C:Usersadmin> java --version

How to install java runtime environment in Windows 10
Step3
Once Download completes. Browse to the «jdk-15.0.1_windows-x64_bin.exe» file and double-click on it, to run the installer. Click Next.

Step4
I recommend keeping «C:Program filesjavajdk-15.0.1 (64-bit)» as the default installation folder. Select Next.
You may select different installation folders also. For example, if you are installing a second instance of java software. Click on change and browse for the target folder.

Step5
Let installation complete, it may take a few minutes.

Step6
Click close. Now you are done with java installation on windows 10.

How to set the environment variable for java in windows10
Set the Environment variable for java in windows 10 by these steps —
Step7
Type «environment» in the search window. Click «open» on «Edit the system environment variables«

Step8
Click on Environment variables.

Step9
Select «Path» > Then click Edit.

Step10
Select New > Give path of java installation directory > For example, «C:Program filesjavajdk-15.0.1bin» in my case. If you have selected a different folder for java installation in step4. You can enter your path to the bin folder.
Click OK.

Step11
Set «classpath» for java. Click «New» in the environment variable window. It allows to set up the new environment variables.

Step12
In «Variable name», enter «classpath«. Also in «variable value» provide path to your java installation till «lib» folder. In my case it is «C:program filesjavajdk-15.0lib > Select OK

Close all open environment variables windows by selecting OK.
How to check what version of java I have?
Installation and java variables have been set up. Now, Let’s validate the java installation and version.
Step13
Open the command prompt with «run as administrator» rights in windows 10.

Step14
Run the «java» command to check your Java and JRE (Java Runtime Environment) version.
java --version

Check java SDK version with javac command

Video tutorial-JRE error solved for Windows
«Java Runtime Environment not found» error fixed for windows 10
How to uninstall java from Windows 10
In case, you are not happy with your old java or JRE version and want to install a new. For that, you need to remove the old Java version.
Cleanup of Java from Windows 10 is pretty easy. Follow these steps to remove java from your system.
Step15
Search add or remove programs and click open

Step16
Select the java program and click Uninstall.

Java software will go from the window. You can clean up java variables also, set up in step10 and 11 earlier.
There are two ways to download and install java or JDK in Ubuntu 20.04
A.) Using the apt command
B.) Download the Oracle JDK package and install it manually
Let’s see both options one by one-
A.) How to install java or JRE in Ubuntu 20.04 using the apt command
To install Java in Ubuntu using the repository, Follow these commands
Step17
Update package index using apt command
$ sudo apt update

Step18
Check if you have any old java versions installed in the system. In my case, java is not installed.
$ sudo java -version
output
Command ‘java’ not found, but can be installed with:
sudo apt install openjdk-11-jre-headless # version 11.0.9.1+1-0ubuntu1~20.04, or
sudo apt install default-jre # version 2:1.11-72
———————-output-truncated————————————
Step19
Run the «apt» command to install java or JRE. I will install default-jre version 2:1.11-72 in my Ubuntu system from the list.
$ sudo apt install default-jre

Select «Y» and press Enter. Let installation complete. it will take a few minutes.
Step20
Check the java version
$ sudo java -version
output

How to Remove java from Ubuntu 20.04
Step21
Run apt command to remove JRE package installed. Press Y and then enter.
$ sudo apt autoremove "JRE package name"

B.) How to install the latest java or JDK in Ubuntu 20.04 from oracle (manually)
Step22
Java JRE download steps —
Visit oracle.com and download JDK 15 or the latest available .deb and transfer to your system. I am downloading Debian package jdk-15.0.1_linux-x64_bin.deb.

Alternatively, you can download java using wget command.
$ sudo wget "download link"
Reference output

Step23
Rename the .deb file using mv command, if required. Then install the Debian package using the dpkg command.
Learn more ways to install .deb package.
$ sudo dpkg -i ".deb-file-path"
output

Default installation directory path of java would be «/usr/lib/jvm/jdk-15.0.1/«. So, make a note of it, as it will be required to set up a Java_HOME variable.
How to set the «JAVA_HOME» variable in Ubuntu 20.04
Set the JAVA_HOME variable for all users in Ubuntu by editing the environment file.
Step24
Edit /system/environment file
$ sudo vi /etc/environment
Add path «/usr/lib/jvm/jdk-15.0.1/bin» to the last of the environment file. Then, save and exit.

Run source command to execute changes made in the environment file.
$ sudo source /etc/environment
Step25
Check your java version
$ sudo java -version

Remove java runtime environment package using dpkg command
Step26
Run the dpkg command with the —purge option to completely clean java from Ubuntu 20.04
$ sudo dpkg --purge "package-name"
For example,
$ sudo dpkg --purge jdk-15.0.1

Video Tutorial — JRE error solved for Ubuntu
Video on «How to fix java runtime environment error in Ubuntu 20.04»
Frequently Asked Questions (FAQs)
Where is the java runtime environment on Windows 10?
The default installation folder for java runtime is «C:Program filesjavajdk-15.0.1bin» in the case of windows 10.
What does Java Runtime Environment do?
Java Runtime Environment (JRE) helps to run java programs like the eclipse.
What is the java runtime environment used for?
Java runtime environment helps to run java programs like Tomcat, eclipse and Jenkins.
What is the java runtime environment?
Java runtime environment JRE is a software that runs on the operating system. Which provides class libraries and resources to run java programs.
How to set the java runtime environment in windows 10?
Type «environment» in the search window. Click «open» on «Edit the system environment variables«
Click on Environment variables.
Select «Path» > Then click Edit.
Select New > Give path of java installation directory > For example, «C:Program filesjavajdk-15.0.1bin«
Click OK
Ending notes
I hope after reading this article, you will be able to solve the «Java Runtime Environment not found error». Because majorly reasons for java related errors are, either Java is not installed or the java variable is not set.
if you still have issues, please comment and let me know, I will try to help you.
To start, javaw.exe is an executable file that belongs to the Java Platform and implements an important function related to Java services. It is also known as Java Web Start Launcher. In fact, this process is not essential for Windows, however, different malfunctions may lead to crashes and errors of apps that are run on Java Platform. After failing to launch a Java-based program, you will be presented with a pop-up message saying
“Windows cannot find javaw.exe. Make sure you typed the name correctly, and then try again.”
Apparently, the problem means that javaw.exe is either missing or corrupted. Sometimes such violations may be caused due to manual or malware intervention that could modify the settings. This is why we have prepared a couple of methods that will help you easily solve the problem and continue using java software without errors.

Download Windows Repair Tool
Download Windows Repair Tool

There are special repair utilities for Windows, that can solve problems related to registry corruption, file system malfunction, Windows drivers instability. We recommend you to use Advanced System Repair Pro to fix “Windows cannot find javaw.exe” error in Windows 10.
1. Reinstall or update Java
One of the easiest ways to solve the “Windows cannot find javaw.exe” error is updating or reinstalling Java. This will ensure that you install a clean and latest Java version that can be downloaded from the official website. It does not require a lot of time and can be done via the attached instructions down below:
- Press Windows + R combination, then paste
appwiz.cpltoand click OK. - Among the opened list of apps, find and right-click on Java. Then choose Uninstall.
- Follow the on-screen instructions to complete removal.
- Restart your PC.
- After that, go to the official Java website and download the latest version for your system.
- Open the downloaded file and click on Install.
- Finally, Java has been reinstalled and you can now try to open the conflicting apps.
2. Add the Javaw.exe Path to the Environment Variable Path
Since Windows claims that it failed to find the route of javaw.exe, we can then try to assign the path of the file manually. Rarely Windows fails to identify the location of the file, which needs to be indicated manually as a result. To do this, follow the underneath steps:
- Right-click on This PC, then choose Properties.
- In the opened window, select the Advanced tab and click the Environment Variables button at the bottom.
- After, click the New button under System variables.
- Once the New System Variable window appeared, type Path in the Variable name text box.
- Then, in the Variable Value text box, paste the path of Java location. If you are not sure where it is located, then you can do the following:
- Type
javawinto the searching tab next to the Start menu button. - Right-click on it and choose Open file location.
- You will then see the path of Java, which you can copy and paste into the Variable Value text box
- Once done, click OK to save changes.
Hopefully, Windows will stop failing to find the programs’ path and will finally launch the intended applications without glitches.
3. Scan for malware
As statistics show, malware is now considered one of the most common reasons for many problems on devices. After penetration, it can alter the system settings, therefore, damaging various files that can result in multiple errors. The “Windows cannot find javaw.exe” error is not an exception and can pop up due to the presence of malware. This is why we recommend using Norton Antivirus to scan your device for potential threats. Norton Antivirus is high-quality antivirus program that detects malware, causing system problems. Instead of purchasing the program, first you can try free trial version. Periodically scanning your device is highly important to be aware of your system and prevent unnecessary interventions that can put your device under a risk.
Download Norton Antivirus
4. Run System File Checker (SFC) scan
Especially after removing malware that could change and damage some settings, Windows offers an in-built feature that is able to scan your device for errors and automatically fix them. To do so, run the following:
- Open the Command Prompt by typing
cmdinto the searching tab next to the Start Menu button. - In the appeared console, you should type the
sfc /scannowcommand and click Enter. - After Windows scans for errors and fixes them, you should restart your computer.
These are the most relevant solutions that can be applied for eliminating the “Windows cannot find javaw.exe” error. Most of the steps mentioned in this guide are also effective in solving similar problems since most of the errors are typically related to inner system violations, out-dated, or corrupted software. There are also some utilities that can automatically detect the missing or damaged components and subsequently restore them. However, we insist on downloading such tools only from official/trustworthy websites in order to evade fake offers that can include trojans, viruses, ransomware, and other potentially dangerous malware that can damage your data significantly.
Problem
When trying to execute the model from OPL IDE, I get a «Java.exe — Entry Point Not Found» error, with message «The procedure entry point *** could not be located in the dynamic link library dbkernel.dll»
Symptom
Execute the model from OPL IDE.
Get an error: «Java.exe — Entry Point Not Found»
Cause
This issue occurs when there is a conflict with the dbkernel.dll used by OPL and the one being loaded at runtime. This DLL is provided together with IBM ILOG CPLEX Optimization Studio, or with ILOG OPL among others.
The most common reason for facing the above error is when you have your PATH environment variable pointing to a wrong version of this DLL when running OPL IDE. The IDE searches for the dll among the directories specified by the PATH variable. In particular, each installation of OPL, either as a stand-alone product in earlier versions, or as part of CPLEX Optimization Studio more recently, automatically modifies the PATH variable to include the OPL directories containing DLLs. Therefore, if you install multiple versions of OPL, only the one associated with the last installation will work unless you make a suitable adjustment to the PATH to find the dlls for the version you wish to run.
Resolving The Problem
Check that in your PATH environment variable you do not have:
- Other version of CPLEX (for instance, an older version)
- Other products of ILOG (such as OPL Studio)
- DLL for a non compatible platform of IBM ILOG CPLEX Optimization Studio (such as 64 bits version on a 32 bits machine).
Removing all the above references from the PATH setting will fix the current issue.
Notes:
Setting the environment variables in Windows can be done on the Advanced Tab of the Control Panel.
[{«Product»:{«code»:»SSSA5P»,»label»:»IBM ILOG CPLEX Optimization Studio»},»Business Unit»:{«code»:»BU059″,»label»:»IBM Software w/o TPS»},»Component»:»Computing environment»,»Platform»:[{«code»:»PF033″,»label»:»Windows»}],»Version»:»12.2″,»Edition»:»»,»Line of Business»:{«code»:»LOB10″,»label»:»Data and AI»}}]
Some Windows 10 users attempting to play Magic online against their friends using the XMage application are reporting that they end up seeing the ‘Java Not Found’ error even though they have previously installed the Java Environment.
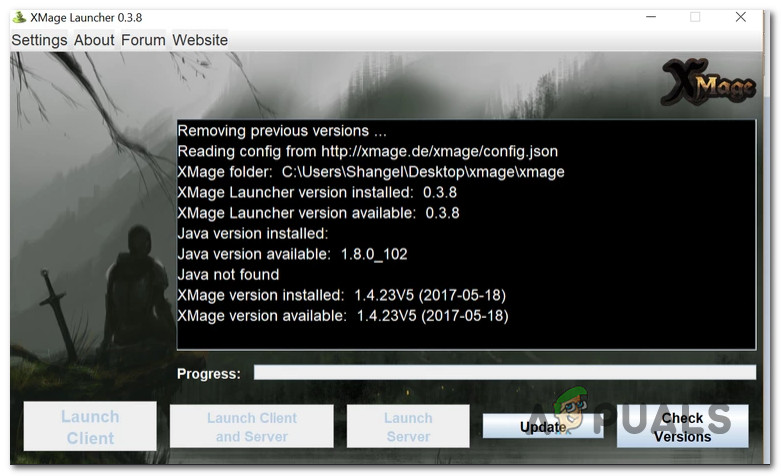
After investigating this particular issue, it turns out that there are several different underlying situations that are known to cause this particular error code. Here’s a list of potential culprits that might be responsible for this issue:
- Corrupted / Improperly installed Java Environment – As it turns out, one of the most common instances that will cause this issue is an inconsistency with the Java installation. In this scenario, you should be able to fix the issue by reinstalling the Java environment.
- Removing remnants from the old java installation – Under certain circumstances, you might expect to see this issue occurring due to a conflict caused by remnants of an older Java installation that is conflicting with the XMage attempts to install the latest version of java. If this scenario is applicable, you should be able to resolve the issue by removing the remnant files before retrying the Java Environment installation.
- Broken Java Environment variable – Another reason why you can expect to encounter this issue is an inconsistency in the java environment variable that makes it impossible for XMage to call upon the required Java dependencies. In this case, you should be able to resolve the issue by fixing the java environment variable from the System screen.
Now that you know every potential culprit that might be responsible for this issue, here’s a list of verified methods that other affected users have successfully used to get to the bottom of this issue:
Method 1: Reinstalling the Java Environment
Since the most common causes that are known to cause the ‘Java Not Found’ with the Xmage program is an inconsistency with the Java installation. Whether this is due to some kind of corruption or you’re seeing this issue because the Java Environment path is different than the one specified in the Home Path, this operation should correct the issue.
Several affected uses have confirmed that reinstalling the entire Java Environment allowed them to finally play Magic using the XMage platform without encountering the same error when using the launcher.
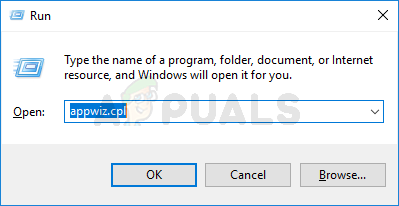
If you haven’t tried this fix yet, follow the instructions below to reinstall the Java environment:
- Start by pressing Windows key + R to open up a Run dialog box. Next, inside the text box, ‘appwiz.cpl’ and press Enter to access the Programs and Features menu.

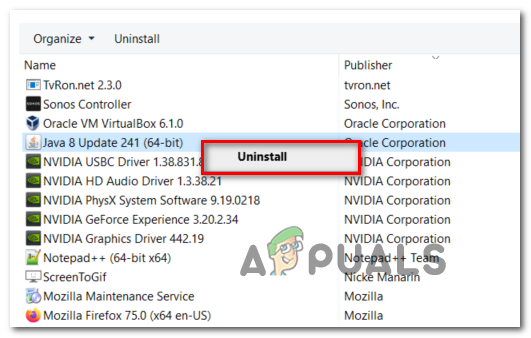
Accessing the Programs and Applications menu - Inside the Programs and Features menu, go ahead and scroll down through the list of installed applications until you locate your current Java installation. Once you find the correct listing, right-click on it and then click on Uninstall from the newly appeared context menu.

Uninstalling the Java environment - Once you’re inside the uninstallation screen, follow the on-screen instructions to complete this process, then reboot your computer and wait for the next startup to complete.
- As soon as your computer boots back up, access the official download page of Java Environment from your default browser and click on the Agree and Start free Download button.

Downloading the latest Java version - After your computer successfully downloads the installer, double-click on JavaSetup, then follow the next instructions to install the latest version of Java.
- After the operation is finally complete, restart your computer and see if the problem is resolved at the next system startup by attempting to launch XMage once again.

In case the launching attempt ends in the same ‘Java Not Found’ error, move down to the next potential fix below.
Method 2: Removing remnants from old Java Installation (if applicable)
As it turns out, you can also expect to encounter the ‘Java Not Found’ error in those instances where your computer contains remnant with an older Java installation that end up interfering with the installation of the latest java version (handled by the XMage program).
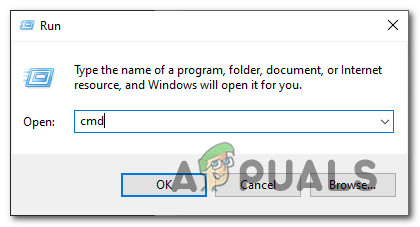
Several affected users that were dealing with the same issue have confirmed that they finally managed to fix the issue after they used an elevated Command Prompt to find the remnant Java filers and delete the main executables before launching XMage once again.
If you haven’t tried this method yet, follow the instructions below to receive step by step instructions:
- Press Windows key + R to open up a Run dialog box. Inside the text box, type ‘cmd’, then press Ctrl + Shift + Enter to open up an elevated Command Prompt window. When you’re prompted by the UAC (User Account Control), click Yes to grant admin access.

Accessing the CMD menu - Once you’re inside the elevated Command prompt menu type the following command and press Enter to discover the exact location of the remnant Java files:
C:> where javaNote: You can also use the following command:
C:> for %i in (javac.exe) do @echo. %~$PATH:i
- Once the location of your previous Java installation is returned, open File Explorer and use it to navigate to the folder in question.
Note: Most commonly the java installation should be located in C:ProgramDataOracleJavajavapath - After you’re inside the correct location, ensure that you delete every executable from the following before restarting your computer:
java.exe
javaw.exe
javaws.exe
- Once your computer boots back up, open the XMage application once again. This time, the program should detect that you’re completely missing the Java Environment installation and will offer to install it for you. If this happens, click Yes to accept, then wait for the operation to complete.
In case the same problem is still occurring even after following the instructions above, move down to the next potential fix below.
Method 3: Fixing the Java Environment Variable
As it turns out, you can also expect to see this particular issue popping up if you have an incorrect Java environment variable that is giving the XMage launcher the impression that the Java dependencies aren’t installed when in fact they are.
If you find yourself in this scenario, you should be able to fix the issue by fetching the location of your Java installation and ensuring that the Java environment variable points to the correct location – This fix was confirmed to work by a lot of affected users.
If you haven’t tried out this fix yet, follow the instructions below:
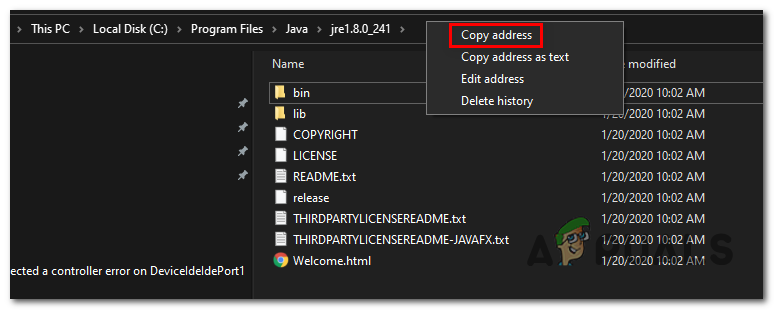
- Start by opening up File Explorer and navigating to the installation path of your Java Environment. Keep in mind that unless you installed the Java environment in a custom location, you will find it in one of the following(depending on your OS-bit architecture):
C:Program FilesJava*Java version* - 64-bit version
C:Program Files (x86)Java*Java version* - 32-bit version
- Inside the correct location, go ahead and right-click on the navigation bar, then choose Copy Address from the newly appeared context menu.

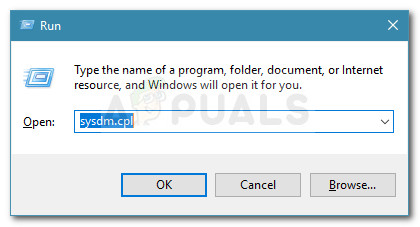
Copying the java address from the correct location - Once you have successfully copied the correct java location to your clipboard, press Windows key + R to open a Run dialog box. Next, type ‘sysdm.cpl’ inside the text box and press Enter to open up the System Properties screen.
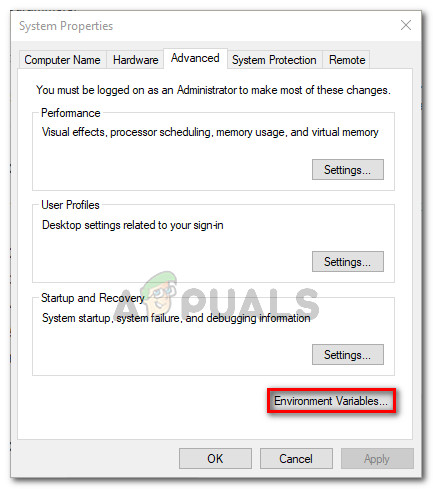
Accessing the System Properties screen - After you are finally inside the System Properties window, access the Advanced tab, then click on Environment Variables from the list of available options.

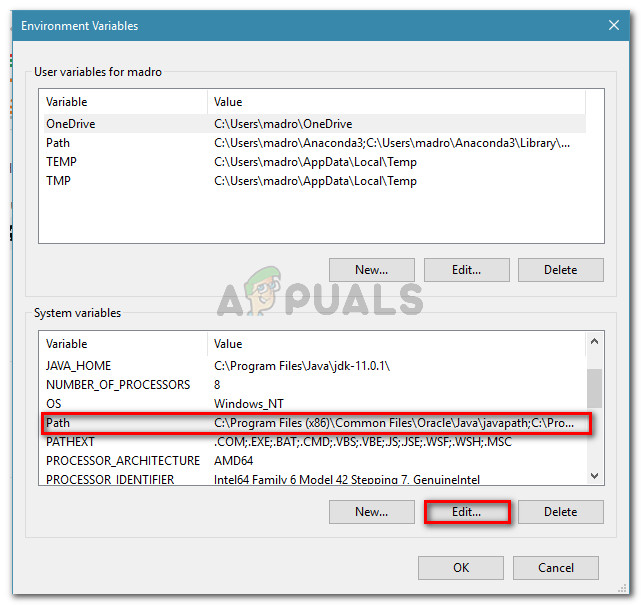
Accessing the Environment Variables menu - When you’re inside the Environment variable window, go to System variables, select the Path option and click the Edit button.

Editing the path variable - After you’re at the next window, search for an environment variable that mentions Java. When you manage to locate the correct entry, change its value to the correct location that you previously identified at step 2.
- Reboot your computer and see if the problem is resolved at the next system startup by launching XMage once again and seeing if the problem is now fixed.

Kevin Arrows
Kevin is a dynamic and self-motivated information technology professional, with a Thorough knowledge of all facets pertaining to network infrastructure design, implementation and administration. Superior record of delivering simultaneous large-scale mission critical projects on time and under budget.
Question
Issue: How to fix the javaw.exe error?
Could you please tell me what is javaw.exe? I keep receiving notification that Windows cannot find this file. Please advice.
Solved Answer
Javaw.exe is a legitimate Windows file that is necessary for the network security and smooth performance of Java-based programs. The file is associated with programs created by Sun Microsystems.[1] The executable can find on all Windows OS versions, Windows Vista, XP, 7, 8, 8.1, and 10.
The file is closely related to Internet Explorer web browser and is set to inform people about important system updates by delivering a pop-up window in the bottom left corner of the screen. However, it can be used by many other programs that use Java to perform specific activities, for instance, chat programs, web browsers, animations, etc.
However, frequently Javaw.exe gets broken and starts delivering error message, such as:
Windows cannot find javaw.exe.
The main reasons why Windows cannot find javaw.exe error occurs can be:
- malware infection;
- corrupted Windows registry entries;
- Javaw.exe was deleted or moved;
- install or uninstall problems with related applications.

According to cyber security experts,“Windows cannot find javaw.exe” error message may indicates a malware infection,[2] which is currently misusing this executable file and makes it work abnormally.
There’s no need to expatiate on the reasons why you should fix Javaw.exe error ASAP, but you must know several facts anyway. First of all, a corrupted file may diminish your PC’s performance severely. That is because one of the crucial system files is taken out, and the rest have to take over its tasks.
Also, it may cause your PC’s system to freeze and crash more frequently. It goes without saying that sometimes you may face difficulties in performing the simplest operations on your machine. Besides, Javaw.exe error continuously prompts emergence of Blue Screen of Death.[3] Finally, this file may start causing issues with registries and other .exe files, so make sure that you react to this issue appropriately. If you want to fix it without putting any effort, then you can download ReimageMac Washing Machine X9 and fix Javaw.exe with one click.
Methods to fix Windows cannot find javaw.exe error
Fix it now!
Fix it now!
To repair damaged system, you have to purchase the licensed version of Reimage Reimage.
The first thing that you should do is to make sure whether Javaw.exe file is installed on your PC. For that, open C:\\Program Files\\Java\\jdk1.5.0_09\\ jre\\ bin\\ and check if the file is located in this directory. If you cannot find this file or it is in a different location, you should check the device for malware.
This video will help you with the issue:
Step 1. Check if your computer is not infected with a virus
Fix it now!
Fix it now!
To repair damaged system, you have to purchase the licensed version of Reimage Reimage.
As we have already mentioned, the most frequent reason for this error is malware infection, so system check with anti-malware should help you to detect the cause and get rid of it.
Therefore, if you receive a pop-up window that informs about missing Javaw.exe error, you should download a reliable anti-spyware, such as Reimage Reimage, and initiate a full system check.
If the culprit of the error is not a virus, Javaw.exe error most probably is triggered by a corrupted Javaw.exe file. To check that, you should open Windows Task Manager and check your PC’s CPU usage. Actually, you should check CPU usage quite frequently. To do that, you have to:
- Click Ctrl+Alt+Del at once and open Task Manager;
- Open Processes tab and find the javaw.exe file.


The genuine javaw.exe file does not consume huge amount of memory, so if the file that you have found uses an excessive amount of memory, most probably you are encountering a fake one.
In case malware is not the culprit of the javaw.exe error, the problem was probably caused by old version of system files. To check and fix that, please try the following methods.
Step 2. Make sure that location to the Environment variable path is correct
Fix it now!
Fix it now!
To repair damaged system, you have to purchase the licensed version of Reimage Reimage.
- Press Win+R keys.
- Type sysdm.cpl in the Run window and click Enter.
- Navigate to the Advanced tab.
- Click on Environment Variable button at the end of the window.
- In the category System Variables click New… button.
- In the Variable name box enter Path.
- In the Variable value type the correct path which by default is C:\Program Files\Java\jre7\bin for java 1.7.x on a 32-bit version of Windows, C:\Program Files (x86)\Java\jre8\bin for java 1.8.x on a 64-bit version of Windows, etc.

Step 3. Reinstall Java
Fix it now!
Fix it now!
To repair damaged system, you have to purchase the licensed version of Reimage Reimage.
First of all, you have to uninstall Java:
- Open Control Panel.
- Navigate to Uninstall a program (or Add/Remove Programs).
- Find Java, select it and click Uninstall button.

Once you uninstall it, go to java.com website and download the latest version of the program which is compatible with your computer.
Step 4. Fix Windows Registry problems
Fix it now!
Fix it now!
To repair damaged system, you have to purchase the licensed version of Reimage Reimage.
The following steps require making changes to Windows Registry. We highly recommend creating backups of the Registry in case something goes wrong.
- Click Win + R.
- In the Run box, enter regedit and click Enter.
- Navigate to HKEY_LOCAL_MACHINE\SOFTWARE\Microsoft\Windows\CurrentVersion\App Paths\javaws.exe.
- Right-click javaw.exe folder and delete it from the system.
- Restart your PC.

In case the methods provided above did not help, we would recommend you to reinstall Internet Explorer because it may be the cause of the javaw.exe error. For this purpose, perform the steps regarding Java removal, except that you have to uninstall Internet Explorer (or another web browser).
Repair your Errors automatically
ugetfix.com team is trying to do its best to help users find the best solutions for eliminating their errors. If you don’t want to struggle with manual repair techniques, please use the automatic software. All recommended products have been tested and approved by our professionals. Tools that you can use to fix your error are listed bellow:
do it now!
Download Fix
Happiness
Guarantee
do it now!
Download Fix
Happiness
Guarantee
Compatible with Microsoft Windows
Compatible with OS X
Still having problems?
If you failed to fix your error using Reimage, reach our support team for help. Please, let us know all details that you think we should know about your problem.
Reimage — a patented specialized Windows repair program. It will diagnose your damaged PC. It will scan all System Files, DLLs and Registry Keys that have been damaged by security threats.Reimage — a patented specialized Mac OS X repair program. It will diagnose your damaged computer. It will scan all System Files and Registry Keys that have been damaged by security threats.
This patented repair process uses a database of 25 million components that can replace any damaged or missing file on user’s computer.
To repair damaged system, you have to purchase the licensed version of Reimage malware removal tool.

A VPN is crucial when it comes to user privacy. Online trackers such as cookies can not only be used by social media platforms and other websites but also your Internet Service Provider and the government. Even if you apply the most secure settings via your web browser, you can still be tracked via apps that are connected to the internet. Besides, privacy-focused browsers like Tor is are not an optimal choice due to diminished connection speeds. The best solution for your ultimate privacy is Private Internet Access – be anonymous and secure online.
Data recovery software is one of the options that could help you recover your files. Once you delete a file, it does not vanish into thin air – it remains on your system as long as no new data is written on top of it. Data Recovery Pro is recovery software that searchers for working copies of deleted files within your hard drive. By using the tool, you can prevent loss of valuable documents, school work, personal pictures, and other crucial files.