import javafx.application.Application;
import javafx.scene.Scene;
import javafx.scene.control.Button;
import javafx.scene.layout.*;
import javafx.event.ActionEvent;
import javafx.event.EventHandler;
import javafx.scene.control.*;
import javafx.stage.Stage;
import javafx.scene.control.Alert.AlertType;
public class Alert_2 extends Application {
public void start(Stage s)
{
s.setTitle("creating alerts");
Button b = new Button("Confirmation alert");
Button b1 = new Button("error alert");
Button b2 = new Button("Information alert");
Button b3 = new Button("Warning alert");
Button b4 = new Button("none alert");
TilePane r = new TilePane();
Alert a = new Alert(AlertType.NONE);
EventHandler<ActionEvent> event = new
EventHandler<ActionEvent>() {
public void handle(ActionEvent e)
{
a.setAlertType(AlertType.CONFIRMATION);
a.setContentText("ConfirmationDialog");
a.show();
}
};
EventHandler<ActionEvent> event1 = new
EventHandler<ActionEvent>() {
public void handle(ActionEvent e)
{
a.setAlertType(AlertType.ERROR);
a.setContentText("error Dialog");
a.show();
}
};
EventHandler<ActionEvent> event2 = new
EventHandler<ActionEvent>() {
public void handle(ActionEvent e)
{
a.setAlertType(AlertType.INFORMATION);
a.setContentText("Information Dialog");
a.show();
}
};
EventHandler<ActionEvent> event3 = new
EventHandler<ActionEvent>() {
public void handle(ActionEvent e)
{
a.setAlertType(AlertType.WARNING);
a.setContentText("Warning Dialog");
a.show();
}
};
EventHandler<ActionEvent> event4 = new
EventHandler<ActionEvent>() {
public void handle(ActionEvent e)
{
Alert a1 = new Alert(AlertType.NONE,
"default Dialog",ButtonType.APPLY);
a1.show();
}
};
b.setOnAction(event);
b1.setOnAction(event1);
b2.setOnAction(event2);
b3.setOnAction(event3);
b4.setOnAction(event4);
r.getChildren().add(b);
r.getChildren().add(b1);
r.getChildren().add(b2);
r.getChildren().add(b3);
r.getChildren().add(b4);
Scene sc = new Scene(r, 200, 200);
s.setScene(sc);
s.show();
}
public static void main(String args[])
{
launch(args);
}
}
- java.lang.Object
-
- java.lang.Enum<Alert.AlertType>
-
- javafx.scene.control.Alert.AlertType
-
- All Implemented Interfaces:
Serializable,Comparable<Alert.AlertType>
- Enclosing class:
- Alert
public static enum Alert.AlertType
extends Enum<Alert.AlertType>
An enumeration containing the available, pre-built alert types that
theAlertclass can use to pre-populate various properties.- Since:
- JavaFX 8u40
-
-
Enum Constant Summary
Enum Constants
Enum Constant Description CONFIRMATIONThe CONFIRMATION alert type configures the Alert dialog to appear in a
way that suggests the content of the dialog is seeking confirmation from
the user.ERRORThe ERROR alert type configures the Alert dialog to appear in a
way that suggests that something has gone wrong.INFORMATIONThe INFORMATION alert type configures the Alert dialog to appear in a
way that suggests the content of the dialog is informing the user of
a piece of information.NONEThe NONE alert type has the effect of not setting any default properties
in the Alert.WARNINGThe WARNING alert type configures the Alert dialog to appear in a
way that suggests the content of the dialog is warning the user about
some fact or action.
-
Method Summary
All Methods Static Methods Concrete Methods
Modifier and Type Method Description static Alert.AlertTypevalueOf(String name)Returns the enum constant of this type with the specified name.
static Alert.AlertType[]values()Returns an array containing the constants of this enum type, in
the order they are declared.-
Methods inherited from class java.lang.Enum
clone, compareTo, equals, finalize, getDeclaringClass, hashCode, name, ordinal, toString, valueOf
-
Methods inherited from class java.lang.Object
getClass, notify, notifyAll, wait, wait, wait
-
-
-
-
Enum Constant Detail
-
NONE
public static final Alert.AlertType NONE
The NONE alert type has the effect of not setting any default properties
in the Alert.
-
INFORMATION
public static final Alert.AlertType INFORMATION
The INFORMATION alert type configures the Alert dialog to appear in a
way that suggests the content of the dialog is informing the user of
a piece of information. This includes an ‘information’ image, an
appropriate title and header, and just an OK button for the user to
click on to dismiss the dialog.
-
WARNING
public static final Alert.AlertType WARNING
The WARNING alert type configures the Alert dialog to appear in a
way that suggests the content of the dialog is warning the user about
some fact or action. This includes a ‘warning’ image, an
appropriate title and header, and just an OK button for the user to
click on to dismiss the dialog.
-
CONFIRMATION
public static final Alert.AlertType CONFIRMATION
The CONFIRMATION alert type configures the Alert dialog to appear in a
way that suggests the content of the dialog is seeking confirmation from
the user. This includes a ‘confirmation’ image, an
appropriate title and header, and both OK and Cancel buttons for the
user to click on to dismiss the dialog.
-
ERROR
public static final Alert.AlertType ERROR
The ERROR alert type configures the Alert dialog to appear in a
way that suggests that something has gone wrong. This includes an
‘error’ image, an appropriate title and header, and just an OK button
for the user to click on to dismiss the dialog.
-
-
Method Detail
-
values
public static Alert.AlertType[] values()
Returns an array containing the constants of this enum type, in
the order they are declared. This method may be used to iterate
over the constants as follows:for (Alert.AlertType c : Alert.AlertType.values()) System.out.println(c);
- Returns:
- an array containing the constants of this enum type, in the order they are declared
-
valueOf
public static Alert.AlertType valueOf(String name)
Returns the enum constant of this type with the specified name.
The string must match exactly an identifier used to declare an
enum constant in this type. (Extraneous whitespace characters are
not permitted.)- Parameters:
name— the name of the enum constant to be returned.- Returns:
- the enum constant with the specified name
- Throws:
IllegalArgumentException— if this enum type has no constant with the specified nameNullPointerException— if the argument is null
-
-
Introduction to JavaFX Alert
In JavaFX, an Alert box is used to alert the user about further process. JavaFX Alert class is a subclass of Dialog class. Alert box in javafx alert the user about information, error messages, confirmation messages and warning messages to let know them the user about what exact dialog popup is about.
There are different ways to alert the user about what happening next. In that, there are 5 Alert types to alert the user.
Types of Alert Box in JavaFX
Below are the points which explain the types of alert box in javaFX:
- None Alert: The None alert types do not set to any default properties.
- Information Alert: The Information alert type informs the user about content information or suggests the user about what is going on in the next process.
- Error Alert: The Error alert type is showing the user about where things went wrong or what is the error with the functionality.
- Confirmation Alert: The Confirmation alert type is asking the user about permission to move further. We have two options available, Yes or If we click Yes means we have granted them permission to move next step of If we click No, then do not move to the next step.
- Warning Alert: The Warning alert type warns the user about some fact or action. The warning does not disturb the further process as like Error.
Methods and Constructors in Alert Box
Below we can see the methods and constructor of alert box:
Methods
- getAlertType(): Gives alert type.
- setAlertType(Alert.AlertType): Setting the alert type.
- getButtonTypes(): Get button type from the Observable list.
- setContentText(String s): Setting the content or text to alert the user about what is the dialog box.
- getContentText(): Gives the content text which we have set.
Constructors
- Alert(Alert.AlertType alertType): Create a new Alert object with an alert type parameter.
- Alert(Alert.AlertType alertType, String string, ButtonType… buttonType): Create new Alert object with alert type, String and Button type parameters.
How does Alert Box work in JavaFX?
Alert box in JavaFX mainly works on the value of alert type which is provided by Alert(AlertType.VALUE) constructor. Accessing JavaFX features user-defined class must extend Application
1.NONE Alert
Alert alertType=new Alert(AlertType.NONE);2. INFORMATION Alert
Alert alertType=new Alert(AlertType.INFORMATION);3. ERROR Alert
Alert alertType=new Alert(AlertType.ERROR);4. CONFIRMATION Alert
Alert alertType=new Alert(AlertType.INFORMATION);5. WARNING Alert
Alert alertType=new Alert(AlertType.WARNING);How to Create Alert Box in Java FX?
Steps to Create Alert Boxes:
Step 1: Create an Alert type
Alert alertType=new Alert(AlertType.TYPE);Step 2: Create a Pane or any other component.
TilePane tilePane=new TilePane ();Step 3: Creating a scene means screen to display output.
Scene screen = new Scene(tilePane, length, width);Step 4: Adding Scene reference screen to the Stage:
stage.setScene(screen);Step 5: showing stage reference with the show () method.
stage.show();Note: 2,3,4 and 5 steps are optional if we want any action classes with alert boxes then use 2,3,4 and 5 steps.
Examples of JavaFX Alert
Below are the examples of JavaFX Alert:
1. Information Alert
Code:
import javafx.application.Application;
import javafx.scene.control.Alert;
import javafx.scene.control.Alert.AlertType;
import javafx.stage.Stage;
public class InformtionAlertType extends Application {
@Override
public void start(Stage outputStage) throws Exception {
Alert alert = new Alert(AlertType.INFORMATION);// line 1
alert.setTitle("Information Dialog Box");// line 2
alert.setHeaderText("This is header section to write heading");// line 3
alert.setContentText("This is body section to write some info!");// line 4
alert.showAndWait(); // line 5
}
public static void main(String args[]) {
launch(args); // line 0
}
}
Output:
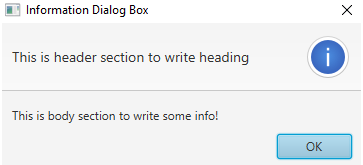
Explanation to the above program: In the above code line 0 calls start method from internal JVM. Line 1 creates an information alert type. Line 2 sets the title to a dialog box. Line 3 sets the header text. Line 4 sets the body text of the dialog box. Line 5 shows the dialog box output. As you can see in the output information dialog box has a predefined image on the right end.
2. Error Alert
Code:
import javafx.application.Application;
import javafx.scene.control.Alert;
import javafx.scene.control.Alert.AlertType;
import javafx.stage.Stage;
public class ErrorAlertType extends Application {
@Override
public void start(Stage outputStage) throws Exception {
Alert alert = new Alert(AlertType.ERROR);// line 1
alert.setTitle("Error Dialog Box");// line 2
alert.setHeaderText("ERROR HEADING");// line 3
alert.setContentText("I am proving what is the error exactly!");// line 4
alert.showAndWait(); // line 5
}
public static void main(String args[]) {
launch(args); // line 0
}
}
Output:
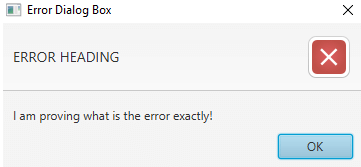
Explanation to the above program: In the above code line 0 calls start method from internal JVM. Line 1 creates an error alert type. Line 2 sets the title to the dialog box. Line 3 sets the header text. Line 4 sets the body text of the dialog box. Line 5 shows the dialog box output. As you can see in the output information dialog box has a predefined image on the right end.
3. Confirmation Alert
Code:
import javafx.application.Application;
import javafx.scene.control.Alert;
import javafx.scene.control.Alert.AlertType;
import javafx.stage.Stage;
public class ConfirmationAlertType extends Application {
@Override
public void start(Stage outputStage) throws Exception {
Alert alert = new Alert(AlertType.CONFIRMATION);// line 1
alert.setTitle("Confirmation Dialog Box");// line 2
alert.setHeaderText("Please Confirm!");// line 3
alert.setContentText("Are you sure want to move further?!");// line 4
alert.showAndWait(); // line 5
}
public static void main(String args[]) {
launch(args); // line 0
}
}
Output:
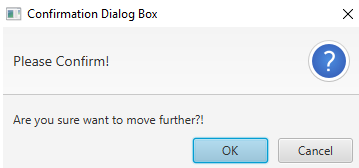
Explanation to the above program: In the above code line 0 calls start method from internal JVM. Line 1 creates a confirmation alert type. Line 2 sets the title to the dialog box. Line 3 sets the header text. Line 4 sets the body text of the dialog box. Line 5 shows the dialog box output. As you can see in the output information dialog box has a predefined image on the right end.
4. Warning Alert
Code:
import javafx.application.Application;
import javafx.scene.control.Alert;
import javafx.scene.control.Alert.AlertType;
import javafx.stage.Stage;
public class WarningAlertType extends Application {
@Override
public void start(Stage outputStage) throws Exception {
Alert alert = new Alert(AlertType.WARNING);// line 1
alert.setTitle("Warning Dialog Box");// line 2
alert.setHeaderText("Warning!");// line 3
alert.setContentText("Some packages may be installed additionally!");// line 4
alert.showAndWait(); // line 5
}
public static void main(String args[]) {
launch(args); // line 0
}
}
Output:
Explanation to the above program: In the above code line 0 calls start method from internal JVM. Line 1 creates a warning alert type. Line 2 sets the title to the dialog box. Line 3 sets the header text. Line 4 sets the body text of the dialog box. Line 5 shows the dialog box output. As you can see in the output information dialog box has a predefined image on the right end.
Recommended Articles
This is a guide to JavaFX Alert. Here we discuss Syntax, methods, and constructors, with how to create and different examples of JavaFX Alert. You can also go through our other related articles to learn more –
- JavaFX Libraries
- JavaFX VBox
- JavaFX FileChooser
- JavaFX TextField

Today’s tutorial demonstrates creating a JavaFX message box in our Java application. The message box can be a confirmation, warning, information, or error alert.
Create JavaFX Message Box
To accomplish the following example code, we use Java version 18, JavaFX version 13 and Netbeans IDE version 13.
Example Code:
//write your package name
package com.mycompany.javafx_messagebox;

//import required libraries
import javafx.application.Application;
import javafx.event.ActionEvent;
import javafx.geometry.Insets;
import javafx.scene.Scene;
import javafx.scene.control.Alert;
import javafx.scene.control.Alert.AlertType;
import javafx.scene.control.Button;
import javafx.scene.layout.TilePane;
import javafx.stage.Stage;

/**
 * JavaFX App
 */
public class App extends Application {

    @Override
    public void start(Stage stage) {

        // create a tile pane
        TilePane r = new TilePane();
        //add padding
        r.setPadding(new Insets(10, 10, 10, 10));

        // an array of button names
        String[] buttonNames = {"Confirmation MessageBox",
                                "Error MessageBox",
                                "Information MessageBox",
                                "Warning MessageBox"};

        //Show no alert at the startup of the program
        Alert alert = new Alert(AlertType.NONE);


        /*
        a loop to create buttons, define actions when
        they are pressed and add them to the tile pane
        */
        for (String s : buttonNames) {
            Button button = new Button(s);

            button.setOnAction((ActionEvent event) -> {
                if (null != button.getText()) {
                    switch (button.getText()) {
                        case "Confirmation MessageBox":
                            // set alert type, title, content text and then show it
                            alert.setAlertType(AlertType.CONFIRMATION);
                            alert.setTitle("Confirmation MessageBox");
                            alert.setContentText("This is a CONFIRMATION "+
                                                 "message for you!");
                            alert.show();
                            break;
                        case "Error MessageBox":
                            // set alert type, title, content text and then show it
                            alert.setAlertType(AlertType.ERROR);
                            alert.setTitle("Error MessageBox");
                            alert.setContentText("This is an ERROR message for you!");
                            alert.show();
                            break;
                        case "Information MessageBox":
                            // set alert type, title, content text and then show it
                            alert.setAlertType(AlertType.INFORMATION);
                            alert.setTitle("Information MessageBox");
                            alert.setContentText("This is a INFORMATION "+
                                                 "message for you!");
                            alert.show();
                            break;
                        case "Warning MessageBox":
                            // set alert type, title, content text and then show it
                            alert.setAlertType(AlertType.WARNING);
                            alert.setTitle("Warning MessageBox");
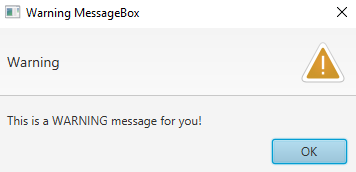
                            alert.setContentText("This is a WARNING message for you!");
                            alert.show();
                            break;
                        default:
                            break;
                    }
                }
            });

            //add button
            r.getChildren().add(button);

        }

        // create a scene
        Scene sc = new Scene(r, 640, 50);

        // set the scene
        stage.setScene(sc);

        //show the stage
        stage.show();

    }//end start method

    //main method
    public static void main(String[] args) {
        launch(args);
    }//end main

}//end App class
Output (main window):
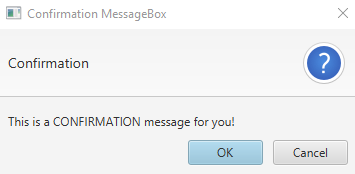
Output (confirmation message box, displayed when we click on Confirmation MessageBox button):
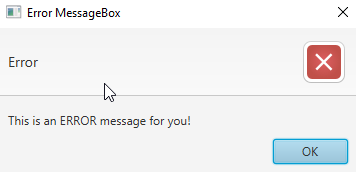
Output (error message box, displayed when we click on Error MessageBox button):
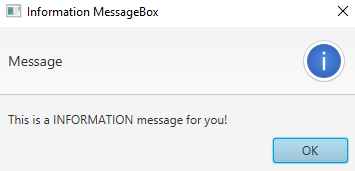
Output (information message box, displayed when we click on Information MessageBox button):
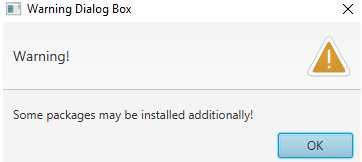
OUTPUT (warning message box, displayed when we click on the Warning MessageBox button):
For this tutorial, we don’t need to make any changes to the module-info.java and pom.xml files. Create a JavaFX project and practice the code given above.
We have a main class named App that extends the Application class (which is standard in Java). You can name the primary launch class (App).
Next, we override the start() method because the App is the child class of the Application class. Remember that the child class needs to implement all abstract functions/methods of the parent class.
After that, we have a start() method that takes one parameter of the Stage type. We are using the Stage type parameter because this is where all visual components JavaFX application will be displayed.
We do not need to create the Stage type object because the JavaFX runtime creates it. The following is the step-by-step explanation of what’s inside the start() method.
-
Create an object of JavaFX
TilePane, which is a layout component and lays out all its child components in the grid of same-sized cells. -
Add margins around the whole grid (
top/right/bottom/left). -
Create an array with the names of all buttons we need for this application.
-
Create an alert message box of type
NONEbecause we do not want to display any message box at the program’s startup. -
Next, we have a
forloop, which iterates over all the button names.- Inside the loop, we create a button of the current name.
- Set an action for that specific button based on the condition. We get the button text and display a message box based on the button name using the
switchstatement.
-
Add the button to the
TilePane. -
Create a scene using the
Sceneclass. -
Set the scene.
-
Finally, show the stage.
Now, it is the main method’s turn. We can launch the JavaFX application without having the main method, but it is useful when we are required to use parameters that are passed to the application using the command line.
This article shows examples of JavaFX 8 dialogs. The Dialog class is defined in the javafx.scene.control package. The Dialog is the base class and it has three specialized subclasses: Alert, ChoiceDialog and TextInputDialog.
1. Overview
A Dialog in JavaFX wraps a DialogPane and provides the necessary API to present it to end users. From the API’s javadoc – DialogPane should be considered to be the root node displayed within a Dialog instance. In this role, the DialogPane is responsible for the placement of headers, graphics, content, and buttons.
The Dialog<R> class has a generic type R, which is used to represent the type of the result property. By default the result type is ButtonType.
1.1. Configuring a Dialog
A dialog can be configured to add buttons, add content, set modality and define the blocking (and non-blocking) nature of the dialog. Various properties can be accessed and set using the dialog’s API – title, header text, content text, location, width/height, resizable and the graphic on the header or content.
Note some properties are set by default; for example all dialog’s are modal and not resizable by default.
1.2. Dialog Events
There are events related to dialog showing and hiding actions. These are defined as DialogEvent class: DIALOG_CLOSE_REQUEST, DIALOG_HIDDEN, DIALOG_HIDING, DIALOG_SHOWING, DIALOG_SHOWN.
There are dialog methods that can be used to capture the event actions. For example, the dialog’s setOnShown(EventHandler<DialogEvent> value) method is run as the DIALOG_SHOWN event occurs on dialog, just after it is shown.
1.3. Result Type Converter
A converter is used to convert the result type. This can be used with custom dialogs. Also, a result converter must be set whenever the dialog’s R type is not Void or ButtonType.
1.4. Other
There are methods to close and hide the dialog.
1.5. Examples
This article has four examples demonstrating the usage of Alert, ChoiceDialog, TextInputDialog and Dialog classes. The examples use pre-built dialogs, except the example with Dialog class has added controls. The example dialogs are configured with some of the above mentioned properties and features.
Note that JavaFX 8u40 (Java SE 8u40) is required to run the examples in this article. The following sections show example code snippets and screenshots. The complete code for all examples is included in the section 6. Download Java Source Code at the bottom of this post.
2. Alert Dialog Example
Alert extends Dialog<ButtonType> class.
The alert dialogs are built using pre-built alert types to pre-populate various properties. The alert types are defined as an enum AlertType. The enum constant values are: CONFIRMATION, ERROR, INFORMATION, NONE and WARNING.
The example details the CONFIRMATION, ERROR and INFORMATION alerts.
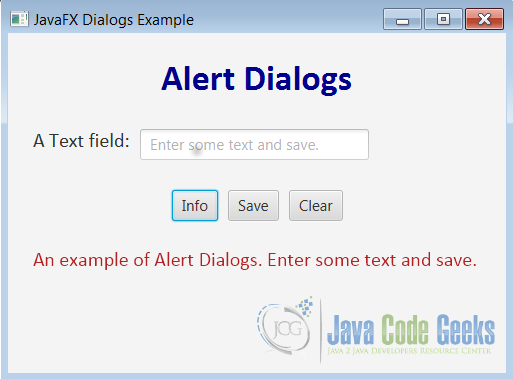
Figure 1: Alert Dialog Example
2.1. Information Alert
From the Alert Dialogs window: Click the Info button to show an information type alert dialog.
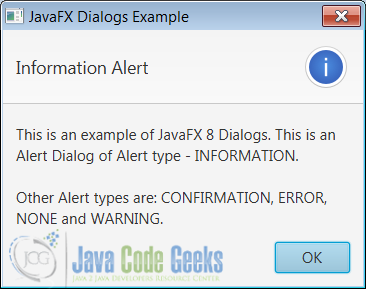
Figure 2: Information Alert Dialog
The following code shows how the dialog is created and displayed:
Alert alert = new Alert(AlertType.INFORMATION);
alert.setTitle(titleTxt);
alert.setHeaderText("Information Alert");
String s ="This is an example of JavaFX 8 Dialogs... ";
alert.setContentText(s);
alert.show();
Note the Alert‘s constructor takes the AlertType as an argument. The show() method displays the dialog; this is a non-blocking method.
Note that the dialog is not modal and is not re-sizeable; this is the dialog’s default behaviour.
Note the header text is set for this alert. The setHeaderText("some text") method sets the specified text as shown in the example’s picture above. In case this is not set, and a default value is set as “Information”.
2.2. Error Alert
From the Alert Dialogs window: Enter some text less than 5 characters in length in the input text field and click the Save button. This shows an error type alert dialog.
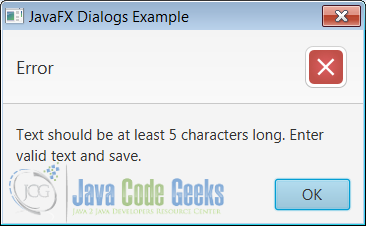
Figure 3: Error Alert Dialog
After closing error alert, note the status message shows “Invalid text entered: …”. The following code shows how the dialog is created and displayed:
String txt = textFld.getText().trim();
String msg = "Text saved: ";
boolean valid = true;

if ((txt.isEmpty()) || (txt.length() < 5)) {

    valid = false;
    Alert alert = new Alert(AlertType.ERROR);
    alert.setTitle(titleTxt);
    String s = "Text should be at least 5 characters long. " + "Enter valid text and save. ";
    alert.setContentText(s);
    alert.showAndWait();
    msg = "Invalid text entered: ";
}

actionStatus.setText(msg + txt);

if (! valid) {

    textFld.requestFocus();
}
The dialog is displayed using the showAndWait() method. This is a blocking method; the code after this method statement does not execute until the dialog is closed. The status message text is set only after the dialog is closed.
2.3. Confirmation Alert
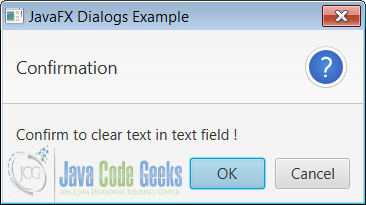
From the Alert Dialogs window: Click the Clear button to show a confirmation type alert dialog.
Figure 4: Confirmation Alert Dialog
Click either OK or Cancel (or ‘X’ in title bar for cancel). If OK is clicked, the input text field in Alert Dialogs window is cleared and gets focus. If Cancel is clicked, the input text field is as before. Note that both the actions close the alert dialog.
The following code shows how the dialog is created, displayed and the dialog result is captured:
Alert alert = new Alert(AlertType.CONFIRMATION);
alert.setTitle(titleTxt);
String s = "Confirm to clear text in text field !";
alert.setContentText(s);

Optional<ButtonType> result = alert.showAndWait();

if ((result.isPresent()) && (result.get() == ButtonType.OK)) {

    textFld.setText("");
    actionStatus.setText("An example of Alert Dialogs. Enter some text and save.");
    textFld.requestFocus();
}
In the above code the showAndWait() method returns Optional<T>; a container object and T is result type. The optional’s isPresent() returns true if a value is present and get() returns the result value – the ButtonType (this is the dialog’s default result). The result value in this case is the dialog’s ButtonType‘s value.
3. Choice Dialog Example
A choice dialog shows a list of choices to the user, from which one item can be picked. The ChoiceDialog<T> extends Dialog<T> class – where T is the type of the items to show to the user, and the type that is returned via Dialog‘s getResult() method when the dialog is dismissed.
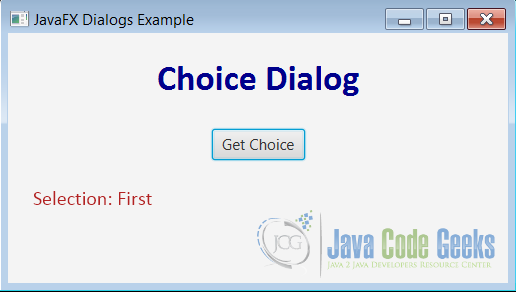
Figure 5 : Choice Dialog Example
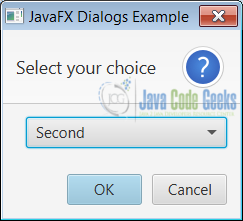
From the Choice Dialog window: Click the Get Choice button to show a choice dialog.
Figure 6: Choice Dialog
Select an item from the choice list. Click OK or Cancel. This closes the dialog. The status message shows your selected choice or cancellation of choice dialog.
The following code shows how the dialog is created, displayed and the result is captured:
The two variables define the dialog’s the choice list data:
private final String [] arrayData = {"First", "Second", "Third", "Fourth"};
private List<String> dialogData;
The code:
dialogData = Arrays.asList(arrayData);

dialog = new ChoiceDialog(dialogData.get(0), dialogData);
dialog.setTitle(titleTxt);
dialog.setHeaderText("Select your choice");

Optional<String> result = dialog.showAndWait();
String selected = "cancelled.";

if (result.isPresent()) {

    selected = result.get();
}

actionStatus.setText("Selection: " + selected);
The choice dialog is constructed using a List collection of type String. The constructor’s first argument defines the choice list’s default value and the second argument is the list item data.
The showAndWait() method returns an optional of type String; this is because the dialog type is String.
4. Text Input Dialog Example
A text input dialog shows an input text field, into which the user can enter some text. TextInputDialog extends Dialog<String> class – note the Dialog‘s type is String and the result Optional‘s type is always a String.
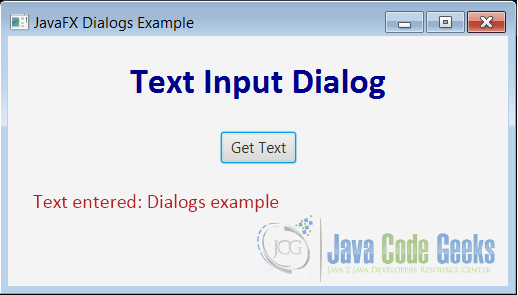
Figure 7 : Text Input Dialog Example
From the Text Input Dialog window: Click the Get Text button to show a text input dialog.
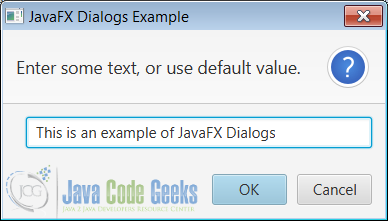
Figure 8 : Text Input Dialog
Enter some text in the text input field. Click OK or Cancel. This closes the dialog. The status message shows the entered (or default) text or cancellation of the text input dialog.
The following code shows how the dialog is created, displayed and the result is captured:
dialog = new TextInputDialog(defaultVal);
dialog.setTitle(titleTxt);
dialog.setHeaderText("Enter some text, or use default value.");

Optional<String> result = dialog.showAndWait();
String entered = "none.";

if (result.isPresent()) {

    entered = result.get();
}

actionStatus.setText("Text entered: " + entered);
The showAndWait() method returns an optional of type String; this is the text value entered in the input text field.
5. A Dialog Example
This example uses the Dialog class to construct a dialog and captures some data (Phone Book). The PhoneBook is defined as a class with two string properties – name and phone number.
Two input text field and a button controls are added to the dialog. The text fields capture the phone book info. The Okay button confirms the entered phone data.
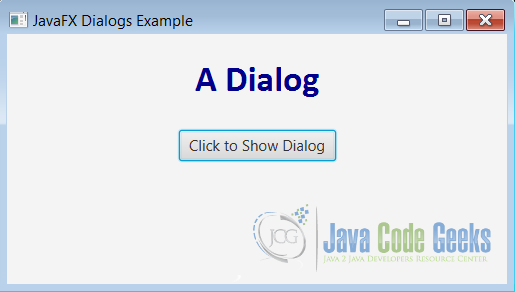
Figure 9 : Dialog Example
From the A Dialog window: Click the Click to Show Dialog button to show a dialog.
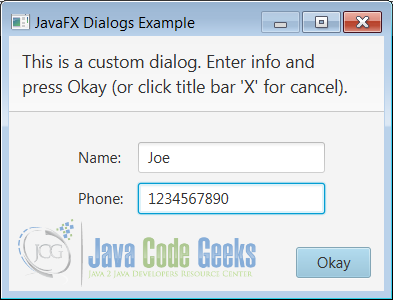
Figure 10 : Dialog
Enter some text in the two text input fields. Click Okay or Cancel. This closes the dialog. The status message shows the entered phone book data or cancellation of the dialog (nothing is displayed in this case).
The following code shows how the dialog is created, displayed and the result is captured:
Dialog<PhoneBook> dialog = new Dialog<>();
dialog.setTitle(titleTxt);
dialog.setHeaderText("This is a custom dialog. Enter info and n" +
    "press Okay (or click title bar 'X' for cancel).");
dialog.setResizable(true);

Label label1 = new Label("Name: ");
Label label2 = new Label("Phone: ");
TextField text1 = new TextField();
TextField text2 = new TextField();

GridPane grid = new GridPane();
grid.add(label1, 1, 1);
grid.add(text1, 2, 1);
grid.add(label2, 1, 2);
grid.add(text2, 2, 2);
dialog.getDialogPane().setContent(grid);

ButtonType buttonTypeOk = new ButtonType("Okay", ButtonData.OK_DONE);
dialog.getDialogPane().getButtonTypes().add(buttonTypeOk);

dialog.setResultConverter(new Callback<ButtonType, PhoneBook>() {
    @Override
    public PhoneBook call(ButtonType b) {

        if (b == buttonTypeOk) {

            return new PhoneBook(text1.getText(), text2.getText());
        }

        return null;
    }
});

Optional<PhoneBook> result = dialog.showAndWait();

if (result.isPresent()) {

    actionStatus.setText("Result: " + result.get());
}
From the above code:
The dialog is constructed of PhoneBook type:
Dialog<PhoneBook> dialog = new Dialog<>();
This is the data type returned by the dialog.
The dialog’s input text field controls are added to a GridPane and the grid pane is added to the dialog:
dialog.getDialogPane().setContent(grid).
A button of pre-defined type is added to the dialog:
ButtonType buttonTypeOk = new ButtonType("Okay", ButtonData.OK_DONE);
dialog.getDialogPane().getButtonTypes().add(buttonTypeOk);
The dialog’s default type is captured, but the dialog needs to return the phone book data entered into it. For this a result converter is defined and set for the dialog.
dialog.setResultConverter(new Callback<ButtonType, PhoneBook>() {
    @Override
    public PhoneBook call(ButtonType b) {

        if (b == buttonTypeOk) {

            return new PhoneBook(text1.getText(), text2.getText());
        }

        return null;
    }
});
The dialog’s showAndWait() method returns a result of PhoneBook type. The phone book details captured in the dialog are shown in the status message of the example’s window after the dialog is closed.
6. Download Java Source Code
This was an example of javafx.scene.control.Dialog

