25.05.2019 |
Категория FAQ
Разберёмся как сделать включение / отключение показа ошибок на сайте. Через админку и через файл htaccess.
Показ ошибок (Notice, Warning, Fatal Error) это важная и нужная функция, хорошо что она есть! Иначе бы вебмастера месяцами искали вручную ошибки в коде своего сайта.
Как включить показ ошибок из админки Joomla 3?
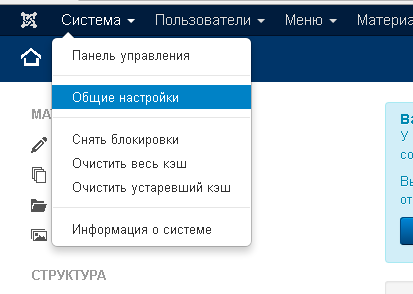
Для этого в админке Joomla переходим «Система — Общие настройки».
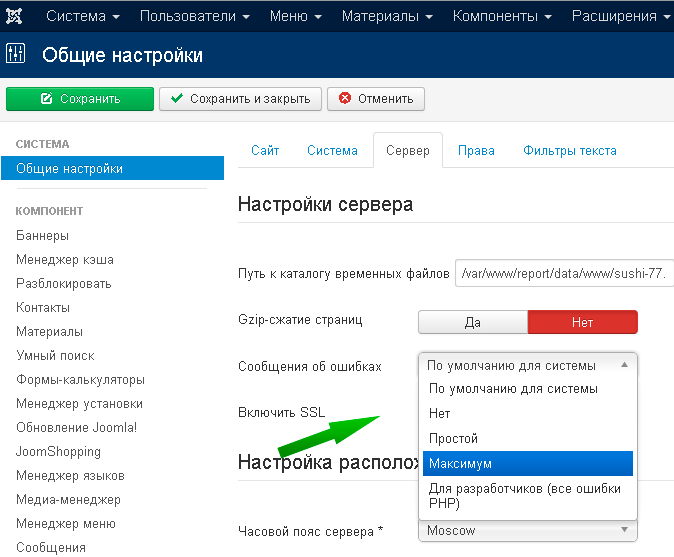
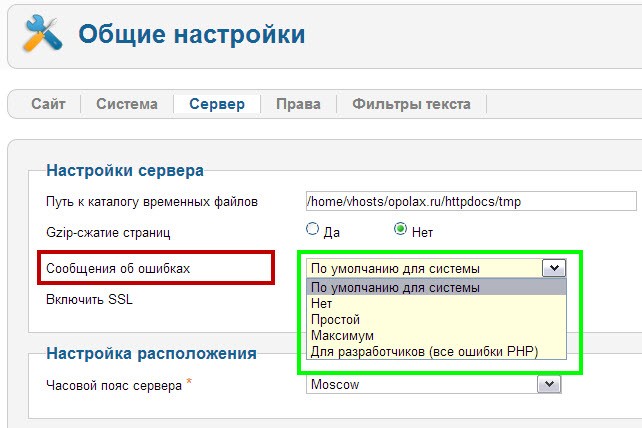
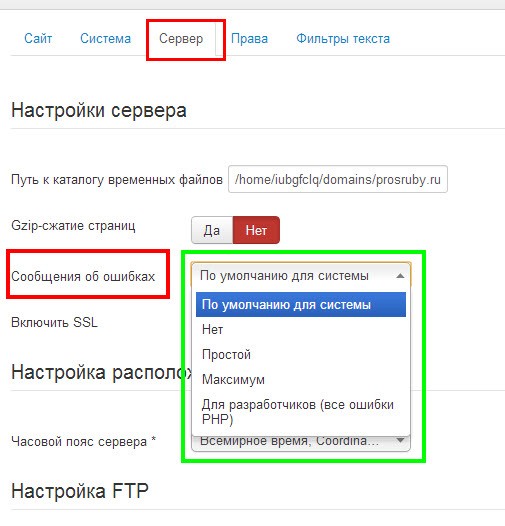
Переходим на вкладку «Сервер», там увидите опцию «Сообщения об ошибках». Выбирайте режим «Максимум».
Сохраняем.
После этого на страницах сайта будут появляться сообщения об ошибках, если таковые имеются. Это полезно, если где-то на сайте у вас появляется белый экран.
После включения показа сообщений об ошибках на белом экране вы увидите тип ошибки и её описание.
По этому описанию можно найти решение в поиске Яндекса или Гугла.
Включение показа ошибок php через configuration.php
Если нет доступа к админке, или она не работает, то показ ошибок можно включить через файл configuration.php, который находиться в корневой папке вашего сайта.
В нём есть директива
public $error_reporting = 'default';
Чтобы включить показ ошибок, измените значение default на maximum
Как включить показ ошибок через .htaccess
Если у вас не Joomla, а свой скрипт или по каким то причинам не получается включить сообщения об ошибках первыми двумя способами, то это можно сделать через файл .htaccess, который также находится в корневой папке вашего сайта.
Открываем .htaccess — обратите внимание точка впереди. Если у вас нет такого файла, то создайте его.
В CMS системах он обычно называется htaccess.txt и его достаточно просто переименовать в .htaccess
В самом верху добавляем строчку:
php_flag display_errors on
А строчка:
php_flag display_errors off
выключает показ ошибок.
Какие сообщения об ошибках php бывают?
Самые частые это:
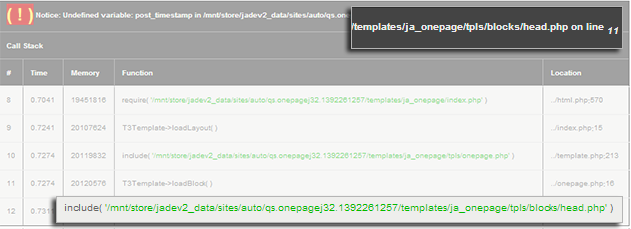
Notice — уведомление о незначительных ошибках в коде. Обычно работоспособность сайта при этом сохраняется.
Просто в шапке выходят такие вот уведомления.
Warning — предупреждение о более серьёзных ошибках. Иногда при таком предупреждении работоспособность сайта также сохраняется, иногда белый экран.
Fatal Error — предупреждение о критических ошибках, при которых выполнение сценариев невозможно. Сопровождается белым экраном.
Отключайте показ ошибок!
После включения и наладки сайта обязательно отключайте показ ошибок. Потому что это НЕ безопасно, да и посетителям сайта их видеть незачем.
Желаю вам всего хорошего!
Содержание
- Как включить показ ошибок в PHP
- Как включить показ ошибок из админки Joomla 3?
- Включение показа ошибок php через configuration.php
- Как включить показ ошибок через .htaccess
- Какие сообщения об ошибках php бывают?
- Отключайте показ ошибок!
- Joomla Error Reporting : Explained
- Arvind Chauhan
- 1. Overview
- 2. When to turn it on?
- 3. How to proceed
- 4. Recommendations
- 5. Live example
- 6. Joomla extension for Error Reporting
- Поиск и вывод PHP ошибок Joomla
- Вступление
- Видимость ошибок в браузере
- Ошибка 500
- Вывод ошибок на рабочем сервере
- Вывод ошибок на локальном сервере
- Вывод ошибок системы в панели Joomla
- Вывод ошибок, режим отладка Joomla 2,5
- Вывод ошибок, режим отладка Joomla 3,x
- Плагин j!Dump Joomla
- Итоги статьи
Как включить показ ошибок в PHP
Разберёмся как сделать включение / отключение показа ошибок на сайте. Через админку и через файл htaccess.
Показ ошибок (Notice, Warning, Fatal Error) это важная и нужная функция, хорошо что она есть! Иначе бы вебмастера месяцами искали вручную ошибки в коде своего сайта.
Как включить показ ошибок из админки Joomla 3?
Для этого в админке Joomla переходим «Система — Общие настройки».
Переходим на вкладку «Сервер», там увидите опцию «Сообщения об ошибках». Выбирайте режим «Максимум».
После этого на страницах сайта будут появляться сообщения об ошибках, если таковые имеются. Это полезно, если где-то на сайте у вас появляется белый экран.
После включения показа сообщений об ошибках на белом экране вы увидите тип ошибки и её описание.
По этому описанию можно найти решение в поиске Яндекса или Гугла.
Включение показа ошибок php через configuration.php
Если нет доступа к админке, или она не работает, то показ ошибок можно включить через файл configuration.php, который находиться в корневой папке вашего сайта.
В нём есть директива
public $error_reporting = ‘default’;
Чтобы включить показ ошибок, измените значение default на maximum
Как включить показ ошибок через .htaccess
Если у вас не Joomla, а свой скрипт или по каким то причинам не получается включить сообщения об ошибках первыми двумя способами, то это можно сделать через файл .htaccess, который также находится в корневой папке вашего сайта.
Открываем .htaccess — обратите внимание точка впереди. Если у вас нет такого файла, то создайте его.
В CMS системах он обычно называется htaccess.txt и его достаточно просто переименовать в .htaccess
В самом верху добавляем строчку:
php_flag display_errors on
php_flag display_errors off
выключает показ ошибок.
Какие сообщения об ошибках php бывают?
Самые частые это:
Notice — уведомление о незначительных ошибках в коде. Обычно работоспособность сайта при этом сохраняется.
Просто в шапке выходят такие вот уведомления.
Warning — предупреждение о более серьёзных ошибках. Иногда при таком предупреждении работоспособность сайта также сохраняется, иногда белый экран.
Fatal Error — предупреждение о критических ошибках, при которых выполнение сценариев невозможно. Сопровождается белым экраном.
Отключайте показ ошибок!
После включения и наладки сайта обязательно отключайте показ ошибок. Потому что это НЕ безопасно, да и посетителям сайта их видеть незачем.
Источник
Joomla Error Reporting : Explained
Arvind Chauhan
1. Overview
Error Reporting is a useful Joomla function to troubleshoot PHP errors on your Joomla site. This function provides some clues about what and where the PHP problems are.
2. When to turn it on?
Got blank/ white screen in your Joomla site frontend? Well, that calls for turning on the error reporting feature. You may also want to disable the URL rewriting (htaccess method) using Apache mod_rewrite under the SEO settings for differential diagnosis of the issue as url rewriting with htaccess file in non-supported server (mod_rewrite not active) also renders blank pages.
3. How to proceed
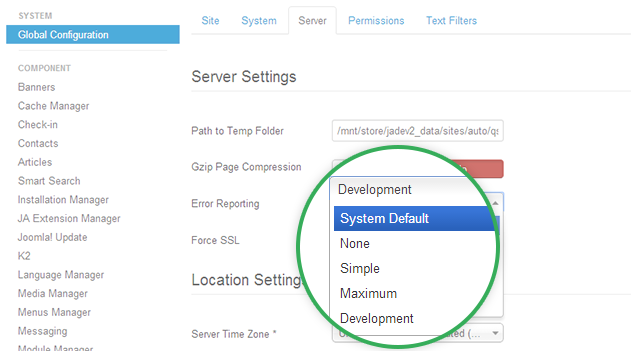
In your Admin Panel, navigate through Global Configuration >> Server tab >> Error Reporting.
Joomla Error Reporting settings
There are several options for you to choose, namely:
- System Default : Joomla will inherit error reporting defaults set in the server (usually in php.ini file).
- None : Choose this option to switch off the Error Reporting so that no notification will be shown. However, when any 3rd party extension overrides Joomla error reporting with their own settings, notifications may still appear.
- Simple : Overrides server settings to give a basic report with warnings only about the fatal errors.
Error Reporting in Simple settings
Error Reporting in Maximum settings
Tip : You can enable the Error Reporting with the configuration.php file. Edit the file and add one of the following numeric values for $error_reporting , which equals to the PHP’s error constants:
- -1 = 0 : No error reporting.
- 30711 = E_ALL &
(E_NOTICE|E_WARNING) : All errors reporting. No warnings or notices.
30711 = E_ALL &
E_NOTICE : All errors and warnings reporting. No notices.
4. Recommendations
For developers error reporting gives them a headstart and they know what they have to fix and where. For regular users, it helps to provide more details to the developer instead of saying «I got blank / white page».
Error reporting should be disabled on an live site as the error reports would be visible to your users and information about your website may be revealed including the absolute path of your website.
Turn it on only when something goes wrong such as a blank page and/or you are debugging your Joomla website. Once the bugs are fixed, change the error reporting settings back to “None”. This is highly recommended for any Joomla website in term of security.
5. Live example
Let’s see how an error would be reported when your Joomla Error Reporting is ON.
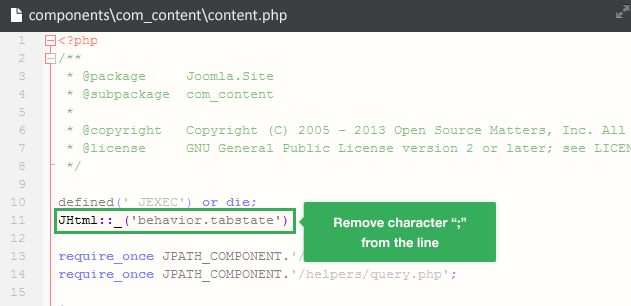
1. Open your_site_root/components/com_content/content.php and remove “;” from line no. 11.
Let’s see how the error would be reported
2. Check your front-end. As your Error Reporting is set as «None», it must be just a blank page.
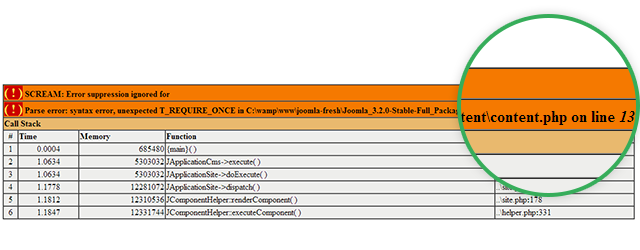
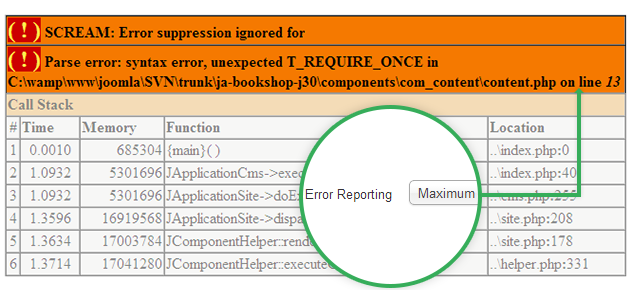
3. Now proceed to turn the Error Reporting to «Maximum» and you can see the exact error.
How the errors is reported with Maximum settings
Tada! That’s how the Error Reporting works.
6. Joomla extension for Error Reporting
You may find some more useful Joomla extensions for error reporting in our Joomla! Extension Directory. Easy Error Reporting would be a handy choice as you can enable the error reports for specific user groups only.
Источник
Поиск и вывод PHP ошибок Joomla
Вступление
Найти ошибку, которая привела к некорректной или фатальной ошибки Joomla одна из самых трудных задач при работе с системой. Пожалуй, невозможно перечислить все вероятные ошибки, которые вы можете теоретически встретить при общении с Joomla. Более правильным будет указать пути, по которым нужно двигаться в поиске ошибок и их отладки.
Основные языки программирования, на которых написана CMS Joomla это два сценарных языка PHP и JavaScript. При этом сценарный язык (анг.scripting language) PHP является основным языком Joomla и, как правило, ошибки, возникающие при работе с Joomla это результат его неправильной (некорректной) работы.
В этой статье я сформулирую первые действия, что сделать сначала, чтобы осуществить правильный поиск ошибок и после найти отладку (способ исправления) «неправильного» скрипта вашей Joomla.
Прежде всего, ошибку нужно увидеть. Речь идет не о результатах ошибки (пропадании сайта и т.п.). Речь идет, как увидеть причину ошибки, если хотите определить диагноз ошибки. От этого зависит дальнейшая отладка системы и исправление ошибки.
Видимость ошибок в браузере
Первое место, где вы видите сообщение о возникшей серьезной ошибке, это ваш рабочий браузер. Вы наверняка встречали при открытии сайтов, вместо страниц сайта пустое окно браузера и в нем цифровая (кодовая) ошибка. И речь не идет об ошибках класса 4×× (Ошибки со стороны клиента), например, ошибка 403-Ничего не найдено. Речь о более серьезных ошибок, начинающихся с цифры «5». Это класса ошибок 5×× (Ошибки со стороны сервера).
Ошибка 500
Ошибка 500 это любая ошибка со стороны сервера, которая не расшифрована в остальных кодах 501-510. Это наиболее часто встречающаяся ошибка, связанная с ошибками в коде системы. Если при работе с системой Joomla вы в браузере видите сообщение об ошибке 500 , эта ошибка выдается сервером Apache и ее причину нужно смотреть в логе ошибок вашего веб-сервера. (О логах ошибок веб-сервера читать ТУТ).
Как правило, из лога ошибок, будет понятно, какой файл системы привел к ошибке. После этого нужно переходить к этому конкретному файлу и решать конкретную, уже локализованную причину ошибки. Но это не всегда так просто. Из журнала лога ошибок, бывает не понятно, какие конкретные действия приводят к ошибке и какой PHP -код ее сформировал.
Вообще говоря, интерпретатор PHP всегда определяет возникающие ошибки. И показ ошибок Вам, изначально, зависит от настроек конкретного сервера. Сервер должен быть настроен так, чтобы интерпретатор PHP имел возможность сообщить об ошибке, а вы могли увидеть это сообщение. Причем интерпретатору должен быть указан вид вывода сообщения об ошибке. Это или окно браузера или запись в журнале ошибок или и то и другое по выбору.
Настройка вывода ошибок зависит от вашего хостинга.
Вывод ошибок на рабочем сервере
На рабочем сервере (коммерческом хостинге) включение вывода ошибок ищите в настройках хостинга. Как правило, вывод ошибок по-умолчанию включен, и вывод ошибок настроен как вывод сообщений в журнал ошибок. Убедитесь, что эта функция сервера включена. Опять-таки, по — умолчанию, не имеет смысла включать на рабочем сервере вывод ошибок на экран. Эти ошибки будут видеть все гости сайта и это лишнее. Однако в критических, аварийных ситуациях, можно воспользоваться временно, выводом ошибок на экран. Об этом чуть ниже.
Вывод ошибок на локальном сервере
На локальном (домашнем) сервере, у вас есть все права на любые настройки сервера и вывод ошибок вы можете настроить сами. Наверное, все готовые платформы локального сервера (OpenServers, Денвер, Xmapp и т.д.) уже настроены на вывод ошибок в журнал и/или на экран. Но в том, то и прелесть локального сервера, вы всегда можете изменить любые его настройки.
Настроить вывод ошибок на локальном сервере нужно в файле php.ini.
Для разрешения вывода ошибок в файле php.ini должна быть строка:
Примечание: NOTICE ошибки это возможные, но не явные ошибки. Например, опечатка, предупреждение о плохом стиле, и.т.п.
Для вывода ошибок в журнал, должна быть строка:
Для вывода ошибок на экран в файле php.ini должна быть строка:
Вывод ошибок на экран, во время старта PHP
Понятно, что замена «on» на «off» все это отключит.
Повторюсь, интерпретатор PHP сам выводит сообщения об ошибках, нужно только разрешить и дать ему возможность (настроить) эти сообщения выводить в журнал на сервере, а при необходимости показывать их на экране.
Но вернемся к рабочим серверам и CMS Joomla. В Joomla есть функция в административной панели сайта, включив которую вы можете выводить ошибки системы на экран.
Вывод ошибок системы в панели Joomla
В CMS Joomla предусмотрено включение режима отладки системы, при которой все, подчеркну ВСЕ, ошибки будут выводиться на экран вместе их возникновения и в режиме реального времени.
Вывод ошибок, режим отладка Joomla 2,5
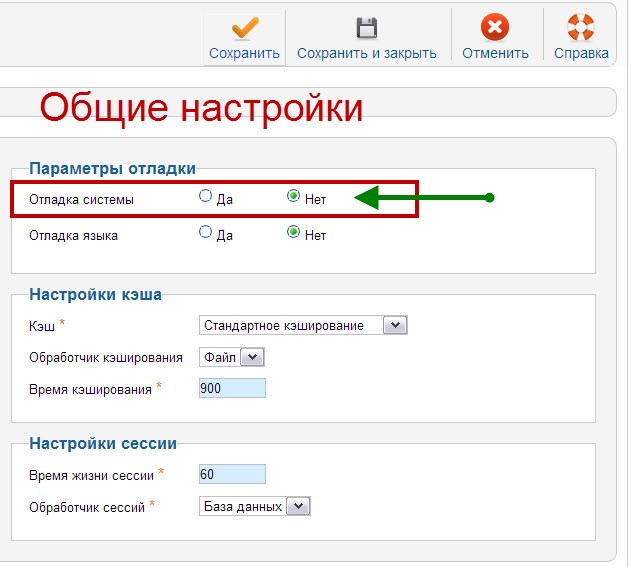
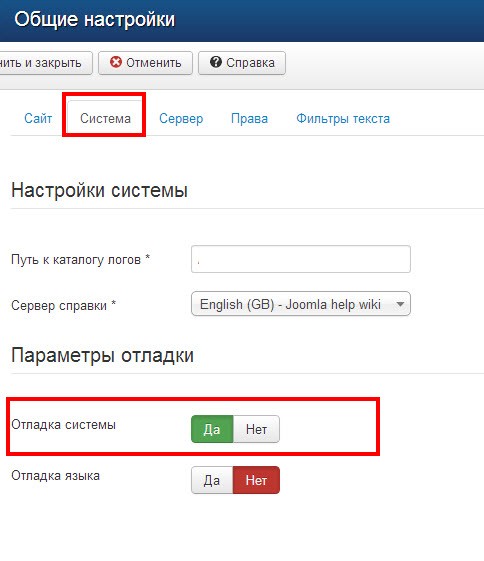
Административная панель сайта ->Меню ->Сайт->Общие настройки->Система
Вывод ошибок, режим отладка Joomla 3,x
Административная панель сайта-> Меню ->Сайт->Общие настройки->Система
В обоих версиях можно настроить, какой режим вывода ошибок во время отладки должен быть.
Включение режима отладки системы Joomla из панели сайта, может не сработать. Это может произойти, если на вашем хостинге такой режим не включен (в файле php.ini). Если у вас нет доступа к файлу php.ini, а потребность включить режим отладки есть, то просто напишите в support вашего хостинга и попросите временно включить режим вывода ошибок. ( Я так и делаю). После устранения ошибки, верните все в исходное состояние, иначе гости вашего сайта будут видеть все ошибки на экране.
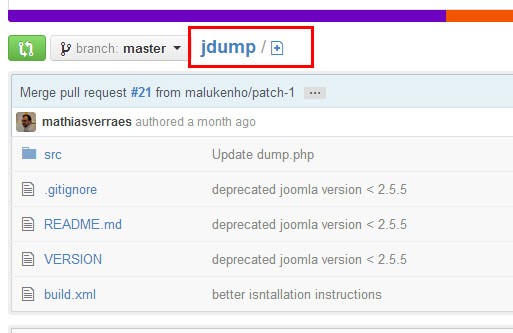
Но и из этой ситуации, есть выход. Есть плагин Joomla, который выводит ошибки системы во всплывающем окне и с видимостью только для вас. Это плагин j!Dump .
Плагин j!Dump Joomla
Это плагин для отладки системы Joomla в реальном времени, с выводом ошибок на экран только для вас. Плагин работает на версиях Joomla 2.5 и 3.х. Устанавливается плагин стандартным способом. В настройках понятен и, по отзывам, вполне работоспособен. На сайте extensions.jоomla.com этот плагин есть.
Итоги статьи
- Итак, при работе с Joomla у вас «выскакивают» ошибки на стороне сервера приводящие к некорректной работе системы или ее отключении (Error). Что делать?
- Если вы не программист и не находитесь в процессе разработки и к этому у вас рабочий (не локальный сервер), то прямиком «идете» на сервер и смотрите журнал ошибок (лог ошибок);
- Если журнал ошибок отсутствует, то в настройках сервера ищите и включаете запись ошибок в журнал;
- Если из журнала не удалось понять причину ошибки, включаете режим «Отладка системы» в административной панели сайта;
- Если режим отладки не включается, обращаетесь в support сервера с просьбой такой режим временно включить. Включается он в файле php.ini;
- Если вы работаете на локальном (домашнем) сервере, то самостоятельно проверьте настройки возможности интерпретатора PHP для вывода, показа и записи PHP ошибок, возникающих при работе. Опять таки, файл php.ini.
Это все, что хотелось сказать про Поиск и вывод PHP ошибок Joomla!
Источник
-
Offline
OlegM
Russian Joomla! Team
Команда форума- Регистрация:
- 12.04.2007
- Сообщения:
- 4 311
- Симпатии:
- 375
- Пол:
- Мужской
Как вручную включить режим отладки в Joomla всех версий: 1.0, 1.5, 1.6-2.5, 3.0-3.1
Файл: configuration.php
Joomla! 1.0
Переменная: $mosConfig_error_reporting
-
$mosConfig_error_reporting = ‘-1’;
Возможные значения:
- 6143 — отображать все ошибки;
- 7 — отображать простые ошибки;
- 0 — выключить (не отображать ошибки);
- -1 — по умолчанию (использовать настройки системы).
Joomla! 1.5
Переменная: $error_reporting
-
var $error_reporting = ‘-1’;
Возможные значения:
- 6143 — отображать все ошибки (по максимуму);
- 7 — отображать простые ошибки;
- 0 — выключить (не отображать ошибки);
- -1 — по умолчанию (использовать настройки системы).
Joomla! 2.5 и 3.0
Переменная: $error_reporting
-
public $error_reporting = ‘default’;
Возможные значения:
- development — отображать все ошибки, включая уведомления (режим отладки для разработчиков);
- maximum — отображать все ошибки (по максимуму);
- simple — отображать простые ошибки;
- none — выключить (не отображать ошибки);
- default — по умолчанию (использовать настройки системы).
Включение консоли отладки (для Joomla 2.5 — 3.0+)
-
public $debug = ‘1’; // 0 — выключено, 1 — включена
Включение отладки языковых файлов
-
public $debug_lang = ‘1’; // 0- выключено, 1 — включено
Данные отладки, отображаемые в консоли, можно настроить в системном плагине отладки System — Debug (Система — Отладка).
В Joomla 3.0 появилась возможность журналирования устаревших функций PHP.
В Joomla 3.1 появилась возможность отображения журнала в консоли отладки.Последнее редактирование: 25.03.2013
-
Offline
OlegM
Russian Joomla! Team
Команда форума- Регистрация:
- 12.04.2007
- Сообщения:
- 4 311
- Симпатии:
- 375
- Пол:
- Мужской
-
Offline
Clear
Недавно здесь
- Регистрация:
- 16.07.2011
- Сообщения:
- 33
- Симпатии:
- 0
- Пол:
- Мужской
Вот какой вопрос, а можно ли вести отладочный журнал и не высвечивать это на сайте, т.е. чтобы все ошибки записывались в журнале а пользователи их не видели?
-
Offline
OlegM
Russian Joomla! Team
Команда форума- Регистрация:
- 12.04.2007
- Сообщения:
- 4 311
- Симпатии:
- 375
- Пол:
- Мужской
По идее ошибки и так записываются в папку logs, если включен плагин журналирования.
А отображаемую отладочную информацию в Joomla 2.5+ можно настроить в плагине Система — Отладка -
Offline
Clear
Недавно здесь
- Регистрация:
- 16.07.2011
- Сообщения:
- 33
- Симпатии:
- 0
- Пол:
- Мужской
Спасибо, но плагин включен а вот в папке logs только index.html, в котором <!DOCTYPE html><title></title>
А я точно знаю что сайт отключался сегодня 3 раза.
В плагине система-отладка такие настройки: 1,2,3. Подскажите, пожалуйста, что нужно поменять и в каком файле будут сохраняться ошибки?
Поделиться этой страницей

This article or section is incomplete, which means it may be lacking information. You are welcome to assist in its completion by editing it as well. If this article or section has not been edited in several days, please consider helping complete the content.
This article was last edited by Cmb (talk| contribs) 55 days ago. (Purge)
This article expands on the information given about Global Configuration in the Joomla online Help and also to provide hints and tips about use of the settings found in this part of the Administrator interface also referred to as the Backend, accessed via:
https://pathtojoomla/administrator
This area is accessible only if you are logged in as a member of a group having the attribute of being Administrators (by default the Super Users group only). Once logged in, to access the page:
- Go to System → Global Configuration or
- Select the Global Configuration icon
from the main control panel.
Overview[edit]
As the name implies, Global Configuration is the area of the Joomla Administrator where a user with Administrator attributes is able to make changes that globally affect the behaviour of the website and alter some settings for the presentation of, and access to, site content.
All the parameters under the Site, System and Server tabs in the Global Configuration are stored as values in the configuration.php file in the root folder of Joomla installation. This file is set up automatically by the software installation process and thus many of the parameters appearing in the Global Configuration screens are best left as their initial settings. Should Joomla be unable to update configuration.php, a message such as Could not save data. Error: Could not write to the configuration file will be displayed, rather than the usual Configuration successfully saved. There are a number of ways of overcoming this problem. Please refer to Cannot Save Global Configuration Changes for more information.
The parameters controlled by the Permissions tab (present only with Joomla v1.6.x and later) differ from those controlled via the other tabs in that they are stored within the website’s database.
The Toolbar[edit]
The Global Configuration toolbar consists of four buttons to enable the user to save changes, move away from the Global Configuration page and call up online Help pages. Toolbars differ between Joomla v1.5.x and the later versions, in respect of naming and order of buttons.
The Joomla 3.x Toolbar[edit]
- Save Saves any changes made under any tab and the Global Configuration screen. It remains open so that editing or checking of global parameters can continue.
- Save & Close As Save, but returns to the Administrator welcome screen.
- Cancel Returns to the Administrator welcome screen without saving any changes to the Global Configuration.
- Help Opens the Help Screen for Global Configuration.
The Site Tab Options[edit]
Note The order in which these items appear on the screen varies slightly between the different versions of Joomla.
Site Settings Group[edit]
This group of options controls a collection of parameters that broadly control the behaviour of the public web pages of the Joomla site.
- Site Name The name of the website. This text provides an single-point of update of the site name and is frequently used by site templates as the header text of each web page.
- Site Offline This setting provides a means of putting a site offline to general users by changing the default setting of No to Yes. When offline the public pages of the website will be replaced by the Offline Message (see below) and a log-in form. Only Administrators are able to log in the site when set to offline using this option. Once logged-in, Administrators are able to see the website and work on it as normal.
- Offline Message The message that will be displayed on the site when the site is offline. It may be changed to provide something more helpful than the default message. This could be a date or time when the site will be back online or the URL of an alternative website that any visitors could use.
- Inline Editing Select if you want inline editing for modules and menu items (support may depend on your template).
- Default Editor The default text editor for use when creating or updating articles on the site. This may be No editor (edit raw HTML code only), one of editors pre-installed in Joomla or an editor installed subsequently as an extension. The editor loaded when a registered site user starts editing text content may be overridden on a user-by-user basis, but in the absence of any such override it will be the Default Editor as set here.
- Default Access Level (only present in Joomla v1.6.x and later) The access level given by default to new content items, menu entries, etc. By default this is Public, but could be changed to other levels if – for example – it was undesirable for newly created items to be visible to all site users. The access level for any items may be overridden when created, or changed at a later point by anyone logged-in with the appropriate permissions.
- Default List Limit This sets the maximum number of items per page in lists displayed in various pages of the Joomla Administrator, although this value may be overridden temporarily within the list pages themselves. By default, this parameter is set to 20 but may be changed to any of a number of values ranging from 5 to 100.
Tip Use a larger value (50 or 100) than the default as it is usually easier to scroll up and down a list on a single page than to move between lots of short pages. Also if all items are on one page, it is much easier to carry out a global search, for example for text in an article title. - Default Feed Limit The number of content items to be shown in any RSS news feeds set up on the website. By default, this is set to 10, although unless the site is very active a smaller number may be better.
- Feed Email Atom and RSS news feeds generated from site content by the Joomla “Syndicate feeds” (“Syndication” in Joomla v1.5.x) site module may include an email address as part of the author’s identity. This parameter determines the source of that email address: the “Author Email” setting will use the email address held on the site for content author, “Site Email” will use the “From email” address set up under the Server tab (see below) for emails generated automatically by the website.
Tip “Site Email” is usually the preferred setting if content syndication is being used on a website. This is because the alternative will expose the content authors’ email addresses to collection by spam lists.
Metadata Settings Group[edit]
This group of options controls the presence or content of several of the metadata entries (i.e. code like <meta name = …. >) in the header of each page of the website. Although not visible to the site user, metadata entries may be used in various ways by web search engines and their appropriate use can significantly aid the search rankings and visibility of a website. Note that several of the following metadata parameters may be overridden for the content categories and individual content items.
- Site Meta Description Text added here appears in web page headers as the description metadata entry. Search engines often use this to provide descriptive text for your web pages in place some (possibly inappropriate) text from the content of the web page. A description of around 20 words is recommended. This metadata entry is omitted from web pages if this entry is blank.
- Site Meta Keywords Words and phrases (separated by commas) added here appear in web page headers as the keywords metadata entry. Search engines may use these words to refine their indexing of the site’s web pages. This metadata entry is omitted from web pages if this entry is blank.
- Content Rights (Only present in Joomla v1.6.x and later.) Text added here appears in web page headers as the rights metadata entry. If appropriate, describe here what rights others have to use this content. This metadata entry is omitted from web pages if this entry is blank.
- Show Author Meta Tag When this parameter is set to Yes an author metadata entry is added to the page header when appropriate, using the content item’s author name as the metadata text.
SEO Settings Group[edit]
SEO is the initialism of Search Engine Optimisation. Settings in this group alter the format of URLs for pages in the website and this may have a significant effect of the search rankings of individual pages, as well as making URLs more human-friendly.
Tip After making any changes to the settings in this group, refresh any of the website’s pages already open in your web browser (usually Ctrl+R will do this). Failure to so this will likely mean that the format of web links internal to the site no longer match that which Joomla is expecting and thus give the appearance of broken links.
Tip Avoid if at all possible altering the SEO Settings once a website is established. Changing any of the first three items below will mean that nearly all of a site’s URLs will also change and result in broken links from other sites and perhaps a temporary drop in search engine rankings.
- Search Engine Friendly URLs Joomla’s internal representation of URLs tends to be lengthy and also difficult to interpret by humans and search engine spiders. This is a typical example of the internal URL for a page displaying a content item: www.example.com/index.php?option=com_content&view=article&id=22&Itemid=437. If this Global Configuration option is set to yes, the URL is modified into a shorter and more meaningful form: www.example.com/index.php/getting-started. The identifying text in the URL (in this case getting_started) is derived from the Alias text set up for each Category, content item and Menu item. The default setting is No.* Use Apache mod_rewrite When this parameter is set to Yes, Joomla will use the mod_rewrite function of Apache web servers to eliminate the index.php part of the URL. When this is in force, the “search engine friendly” URL shown above will become: www.example.com/getting-started.
Note This parameter is set to No by default. It should not be set to Yes unless the web server uses Apache software and has been set up so that mod_rewrite is installed and will work with your website (see here for how to check). Also for this function to work, the htaccess.txt file installed in the root directory of the website (or preferably a copy of it) should be renamed to .htaccess. As an incorrectly configured .htaccess file can easily cause major server errors, please do not modify the .htaccess file unless you understand how it works. - Add Suffix to URL When set to Yes, Joomla will add .html to the end of the most site URLs thus simulating static file-based web content. The URLs shown above will then become: www.example.com/index.php/getting-started.html or www.example.com/getting-started.html. This setting is largely down to personal preference, but bearing in mind that it is easy to confuse .htm and .html suffixes when typing URLs, the advantage may lie with having this feature switched off. The default setting is No.
- Unicode aliases (Only present in Joomla v1.6.x and later.) Choose between Transliteration (No) and Unicode (Yes) aliases. When saving edited content, the former setting attempts to convert, where appropriate, any alias text into the corresponding Latin characters. The latter setting leaves any non-Latin characters in the alias text unchanged. Changing this parameter does not retroactively change aliases, it just changes the behaviour of automatic alias generation for future content editing and creation. Transliteration (No) is the default setting.
- Add Site Name To Page Titles (Only present in Joomla v1.6.x and later.) Appends the site name to page titles in the <title> tag of each web page header. (This text usually appears in the top bar of the web browser window or on the browser tab.) Joomla v1.6.x introduced this feature as an option to either include the site name text before the page title (e.g. Site Name – Page Name) or omit it. With Joomla v1.7.x the options also include inserting the site name after the page name (e.g. Page Name – Site Name) as well as before.
Cookie Settings Group[edit]
Only present in Joomla v1.6.x and later, these settings allow the site cookies to be modified to suit certain circumstances. For the majority of websites these entries may be left blank. The cookie domain may be useful if you want a cookie be valid for several subdomains. The cookie path would have to be set if the cookie should only be valid for a certain subdirectory.
- Cookie Domain Overrides the site’s default cookie domain with the domain added here. The most likely situation when this would be needed is when the Joomla site is “bridged“ with other sites (e.g. forum or e-commerce) in sub-domains of the Joomla site. The default cookie domain may be like www.example.com, but using .example.com (note the leading dot) here will deliver cookies valid for any sub-domain of example.com.
- Cookie Path Overrides the site’s default path for which the cookie is valid with the path added here.
The System Tab Options[edit]
System Settings Group[edit]
- Path to Log Folder The full path to the folder on the server where any logs should be stored by Joomla! or its extensions. This folder location is set up on Joomla installation and should not normally be changed.
- Help Server Select the default source of the information presented when a Help button is clicked. The purpose of this choice is mainly to select the appropriate language variant of the Help service. The choice of Help service may be overridden for individual registered site users.
Debug Settings Group[edit]
- Debug System If set to Yes, Joomla will add debug information on every page below the normal web page area. This information will include various forms of diagnostic information, including the full database queries used in generating the page. The default setting is No. The mix and format of diagnostic information presented by the debug function may be altered by editing the parameters of the Debug — System plug-in (Extensions > Plug-in Manager).
Note the debug information displayed with this parameter set to Yes is visible to all users and thus may be a security risk if used on a public website. The debug information is visible even if Site Offline is set to Yes. - Debug Language If set to Yes, Joomla will activate features designed to help debug language translations for a Joomla site. This includes the addition of language translation information to page debug information (requires Debug System also set to Yes), and markers to show translated content within the web pages themselves. For further information, refer to Debugging a translation.
Cache Settings Group[edit]
- Cache This setting controls whether or not site caching is enabled. When enabled, web pages are held for a period of time in cache storage and are retrieved from there rather than being re-created each time required. Caching is a strategy to reduce the loading presented by busy websites to a web server. The default setting is No.
Tip: When debugging a Joomla site, switch off the cache as it may hide changes to web pages and thus mask the effect of modifications to website code. - Cache Handler This setting defines the mechanism used to manage the cache storage.
- Cache Time This parameter defines the maximum time for which web pages are held in the cache storage before being updated with the current version. The default is 15 minutes.
Session Settings Group[edit]
The session is the data that identifies and relates to a specific website user and that persists as that user moves from page to page.
- Session Lifetime This parameter determines how long it takes until a user is automatically logged off for being inactive. The default setting is 15 minutes, although it can be useful to temporarily lengthen this parameter on development sites to avoid having to repeatedly log back in.
- Session Handler Selects the mechanism used to hold session information between one page request and the next one from the same user. The options are Database (the default) and None. The former stores session information as entries in a table in the site’s Joomla database. The latter uses the session handling mechanism built in to PHP.
The Server Tab Options[edit]
Server Settings Group[edit]
- Path to Temp Folder This is the full path to the folder on the server that Joomla and its extensions will use for temporary file storage. This folder location is set up on Joomla installation and should not normally be changed.
- GZIP Page Compression If set to Yes, the web server will compress the content sent out from your Joomla site. This will speed-up page load times, especially for website users who have a low-bandwidth connection. The default setting is No.
- Error Reporting This parameter sets the level of error reporting to be used by PHP on the Joomla site. It has five options: System Default, None, Simple, Maximum and Development. System Default leaves the level of PHP error reporting to that set up in the server (usually in the php.ini file). None switches off PHP error reporting and Simple, Maximum and Development override the server setting to give a basic level of reporting (for Simple) and the reporting of all errors (Maximum and Development).
Tip Should your Joomla site fail to the extent that it is not possible to use the Administrator page to activate error reporting, you can switch on full PHP error reporting by editing the configuration.php file. Changing the $error_reporting parameter in that file to a value of maximum is the equivalent to setting Error Reporting to Maximum. - Force SSL This parameter has three options: None, Administrator Only, and Entire Site. Using the appropriate setting, this parameter forces any web browser connections to the Backend, or to the complete Joomla site, to use the secure HTTP protocol (HTTPS). The Entire Site setting is appropriate where security of any web transaction (e.g. e-commerce) is important. Ideally there should also be an appropriate certificate in place to verify the identity of your website. The “Administrator Only” setting is ideal for enhancing the security of other types of website as it encrypts Backend content and passwords that could be put to malicious use if intercepted.
Note Before moving away from the default setting of None, it is essential that you verify that the server delivering your website is capable of operating in HTTPS mode.
Location Settings Group[edit]
- Server Time Zone Sets the time zone for use across the website, based on a choice of capital cities. (default is London, UTC 00:00) Internally, Joomla stores the date and time of events as UTC. It then uses Server Time Zone to set the appropriate offset to display time and date information on the website in the server’s local time zone. Note each user also has a time zone parameter that, by default, is the same as the Server Time Zone but that may be changed to reflect the preferred time zone of that user.
FTP Settings Group[edit]
A significant problem with running scripted programs—such as Joomla—on Linux and similar servers is that the files and folders making up the program are not owned by the same identity as the one used to execute the web server code. The files and folders making up the website will usually be put in place on the server by means of FTP and thus will be owned by the personal log-in identity used for FTP access. In contrast, the web server code will be executed by a generic identity used for automatic processes within the server.
Because of this difference between the FTP upload and web server identities, automatic updates of the website code (e.g. installing or updating extensions) will be blocked by the security features that prevent one user’s files being altered by another user.
One solution to this problem is for Joomla to use FTP when installing or deleting files and if this is used it is essential that the FTP credentials are the same as those used when installing the Joomla website.
The FTP option is generally only needed on shared servers using Linux and Unix-like operating systems. The problem does not arise with other operating systems, and on dedicated servers there is the alternative option of changing the ownership and permissions of the website files so that they may be modified by the web server processes.
FTP is also not necessary when the Joomla site has been set up to operate under CGI or FastCGI as the web server process then generally operates under the same identity as the one used for FTP access.
- Enable FTP Setting this to Yes will force Joomla to use FTP when adding, deleting, or updating website files. This is in place of the PHP functions that would normally be used to do this. The default setting is No and should not be changed unless FTP upload is necessary (see the detail above).
- FTP Host The URL to be used for FTP access to the Joomla website files.
- FTP Port Generally 21. You will be advised by your web hosting provider if a different port number needs to be used for FTP access.
- FTP Username The user identity that Joomla will use for FTP access. This must be the same identity as used in setting up the website.
- FTP Password The password for the above user identity.
- FTP Root This is the path from the FTP log-in location to the folder that holds the Joomla site.
Database Settings Group[edit]
These parameters identify the database location, the database and tables within that database that hold configuration and content information for your website. It also includes the username required for accessing the database contents, but not the password associated with that username. Should you need to change the database password, edit the line defining the value of $password in the configuration.php file, which you will find in the Joomla root.
- Database Type This determines the type of the database being used by this Joomla installation and also the type of interface used to access the database. Current versions of Joomla can operate on MySQL, MSSQL and PostgreSQL. For MySQL there are two choices: MySQL and MySQLi. The latter should be used if possible as it should work with all modern implementations of MySQL server and offers a number of advantages over the MySQL interface.[1] For MSSQL also two choices: MS SQL Server and MS SQL Azure.
- Host (Hostname in v1.5,x) The hostname of the database server to be used. In most web hosting situations, the database server is located in the same system as the web server and this parameter should then be set to localhost. Otherwise this setting should be the server name or IP address (e.g. mysql.example.com).
- Database Username (Username in v1.5.x) The username required to access the database carrying the Joomla site’s data tables.
- Database Name (Database in v1.5.x) The name of the database carrying the Joomla site’s data tables.
- Database Table Prefix The prefix applied to the name of the database tables used by this Joomla installation. For Joomla v1.5.x and v1.6.x this is jos_ by default and should another Joomla site have to share the same database, the database tables would be kept separate by setting up this second site with a different prefix – e.g. jos2_. With Joomla v1.7.x the same result is achieved by using a prefix that is a randomly generated alphabetic code and underscore – e.g. vduea_.
Mail Settings Group[edit]
This group is used to set up the sending of emails from the Joomla! website.
- Mailer This sets the mechanism to be used when sending automatically generated emails. The choice is between PHP Mail (the PHP mail() function), Sendmail (an email handling program available in many web servers), or SMTP (a separate email delivery server similar to those used by most email clients). The default setting is PHP Mailer.
- From email (Mail from in v1.5.x) The email address to be used as from address in any outgoing emails generated by the Joomla site.
- From Name This defines the from name in any outgoing emails generated by the Joomla site.
- Disable Mass Mail Select Yes to disable the Mass Mail Users function. Select No to make it active. Mass Mail allows the site to send emails to all or to a specific group of registered users.
The remaining Mail Settings parameters need to be set up only if Mailer is set to SMTP.
- SMTP Authentication Whether or not the external SMTP server requires authentication before accepting outgoing emails. The default is No.
- SMTP Security The form of security required by the SMTP server: None, SSL or TLS. The default is None.
- SMTP Port The IP port to use when connecting to the SMTP server. This will usually be 25 for None, or 465 for SSL or TLS.
- SMTP Username The username to be used when connecting to the SMTP server in SSL or TLS mode. May be left blank if there is no SMTP authentication.
- SMTP Password The password to be used when connecting to the SMTP server in SSL or TLS mode. May be left blank if there is no SMTP authentication.
- SMTP Host The hostname of the SMTP server (e.g. smtp.example.com).
The Text Filters Tab[edit]
These text filter settings will be applied to all text editor fields submitted by users in the selected groups. These filtering options give more control over the HTML your content providers submit. You can be as strict or as liberal as you require to suit your site’s needs. The filtering is opt-in and the default settings provide good protection against markup commonly associated with website attacks.
The Permissions Tab Options[edit]
This tab is only present in Joomla v1.6.x and later as it reflects the enhanced flexibility of access control introduced with v1.6. It provides the means to set up the default permissions for all of the groups of users in terms their ability to edit site content and other settings of the site and to access administrative functions.
There are comprehensive descriptions of the use of the settings under this tab and the general principles of operation and set-up of permissions in Joomla v1.6 and later here: ACL Tutorial for Joomla 3.x.
References[edit]
<references>
- ↑ PHP MySQLi Overview
Вступление
Найти ошибку, которая привела к некорректной или фатальной ошибки Joomla одна из самых трудных задач при работе с системой. Пожалуй, невозможно перечислить все вероятные ошибки, которые вы можете теоретически встретить при общении с Joomla. Более правильным будет указать пути, по которым нужно двигаться в поиске ошибок и их отладки.
Основные языки программирования, на которых написана CMS Joomla это два сценарных языка PHP и JavaScript. При этом сценарный язык (анг.scripting language) PHP является основным языком Joomla и, как правило, ошибки, возникающие при работе с Joomla это результат его неправильной (некорректной) работы.
В этой статье я сформулирую первые действия, что сделать сначала, чтобы осуществить правильный поиск ошибок и после найти отладку (способ исправления) «неправильного» скрипта вашей Joomla.
Прежде всего, ошибку нужно увидеть. Речь идет не о результатах ошибки (пропадании сайта и т.п.). Речь идет, как увидеть причину ошибки, если хотите определить диагноз ошибки. От этого зависит дальнейшая отладка системы и исправление ошибки.
Видимость ошибок в браузере
Первое место, где вы видите сообщение о возникшей серьезной ошибке, это ваш рабочий браузер. Вы наверняка встречали при открытии сайтов, вместо страниц сайта пустое окно браузера и в нем цифровая (кодовая) ошибка. И речь не идет об ошибках класса 4×× (Ошибки со стороны клиента), например, ошибка 403-Ничего не найдено. Речь о более серьезных ошибок, начинающихся с цифры «5». Это класса ошибок 5×× (Ошибки со стороны сервера).
Ошибка 500
Ошибка 500 это любая ошибка со стороны сервера, которая не расшифрована в остальных кодах 501-510. Это наиболее часто встречающаяся ошибка, связанная с ошибками в коде системы. Если при работе с системой Joomla вы в браузере видите сообщение об ошибке 500 , эта ошибка выдается сервером Apache и ее причину нужно смотреть в логе ошибок вашего веб-сервера. (О логах ошибок веб-сервера читать ТУТ).
Как правило, из лога ошибок, будет понятно, какой файл системы привел к ошибке. После этого нужно переходить к этому конкретному файлу и решать конкретную, уже локализованную причину ошибки. Но это не всегда так просто. Из журнала лога ошибок, бывает не понятно, какие конкретные действия приводят к ошибке и какой PHP -код ее сформировал.
Вообще говоря, интерпретатор PHP всегда определяет возникающие ошибки. И показ ошибок Вам, изначально, зависит от настроек конкретного сервера. Сервер должен быть настроен так, чтобы интерпретатор PHP имел возможность сообщить об ошибке, а вы могли увидеть это сообщение. Причем интерпретатору должен быть указан вид вывода сообщения об ошибке. Это или окно браузера или запись в журнале ошибок или и то и другое по выбору.
Настройка вывода ошибок зависит от вашего хостинга.
Вывод ошибок на рабочем сервере
На рабочем сервере (коммерческом хостинге) включение вывода ошибок ищите в настройках хостинга. Как правило, вывод ошибок по-умолчанию включен, и вывод ошибок настроен как вывод сообщений в журнал ошибок. Убедитесь, что эта функция сервера включена. Опять-таки, по — умолчанию, не имеет смысла включать на рабочем сервере вывод ошибок на экран. Эти ошибки будут видеть все гости сайта и это лишнее. Однако в критических, аварийных ситуациях, можно воспользоваться временно, выводом ошибок на экран. Об этом чуть ниже.
Вывод ошибок на локальном сервере
На локальном (домашнем) сервере, у вас есть все права на любые настройки сервера и вывод ошибок вы можете настроить сами. Наверное, все готовые платформы локального сервера (OpenServers, Денвер, Xmapp и т.д.) уже настроены на вывод ошибок в журнал и/или на экран. Но в том, то и прелесть локального сервера, вы всегда можете изменить любые его настройки.
Настроить вывод ошибок на локальном сервере нужно в файле php.ini.
Для разрешения вывода ошибок в файле php.ini должна быть строка:
error_reporting(E_ALL ^ E_NOTICE);// Добавлять сообщения обо всех ошибках, кроме ошибок NOTICE
// Это значение включено по умолчанию в php.ini
Примечание: NOTICE ошибки это возможные, но не явные ошибки. Например, опечатка, предупреждение о плохом стиле, и.т.п.
error_reporting = E_ALL //Вывод всех ошибок//
Для вывода ошибок в журнал, должна быть строка:
log_errors = On
Для вывода ошибок на экран в файле php.ini должна быть строка:
display_errors = On
Вывод ошибок на экран, во время старта PHP
display_startup_errors=On
Понятно, что замена «on» на «off» все это отключит.
Повторюсь, интерпретатор PHP сам выводит сообщения об ошибках, нужно только разрешить и дать ему возможность (настроить) эти сообщения выводить в журнал на сервере, а при необходимости показывать их на экране.
Но вернемся к рабочим серверам и CMS Joomla. В Joomla есть функция в административной панели сайта, включив которую вы можете выводить ошибки системы на экран.
Вывод ошибок системы в панели Joomla
В CMS Joomla предусмотрено включение режима отладки системы, при которой все, подчеркну ВСЕ, ошибки будут выводиться на экран вместе их возникновения и в режиме реального времени.
Вывод ошибок, режим отладка Joomla 2,5
Административная панель сайта ->Меню ->Сайт->Общие настройки->Система
Вывод ошибок, режим отладка Joomla 3,x
Административная панель сайта-> Меню ->Сайт->Общие настройки->Система
В обоих версиях можно настроить, какой режим вывода ошибок во время отладки должен быть.
Включение режима отладки системы Joomla из панели сайта, может не сработать. Это может произойти, если на вашем хостинге такой режим не включен (в файле php.ini). Если у вас нет доступа к файлу php.ini, а потребность включить режим отладки есть, то просто напишите в support вашего хостинга и попросите временно включить режим вывода ошибок. ( Я так и делаю). После устранения ошибки, верните все в исходное состояние, иначе гости вашего сайта будут видеть все ошибки на экране.
Но и из этой ситуации, есть выход. Есть плагин Joomla, который выводит ошибки системы во всплывающем окне и с видимостью только для вас. Это плагин j!Dump.
Плагин j!Dump Joomla
Это плагин для отладки системы Joomla в реальном времени, с выводом ошибок на экран только для вас. Плагин работает на версиях Joomla 2.5 и 3.х. Устанавливается плагин стандартным способом. В настройках понятен и, по отзывам, вполне работоспособен. На сайте extensions.jоomla.com этот плагин есть.
Итоги статьи
- Итак, при работе с Joomla у вас «выскакивают» ошибки на стороне сервера приводящие к некорректной работе системы или ее отключении (Error). Что делать?
- Если вы не программист и не находитесь в процессе разработки и к этому у вас рабочий (не локальный сервер), то прямиком «идете» на сервер и смотрите журнал ошибок (лог ошибок);
- Если журнал ошибок отсутствует, то в настройках сервера ищите и включаете запись ошибок в журнал;
- Если из журнала не удалось понять причину ошибки, включаете режим «Отладка системы» в административной панели сайта;
- Если режим отладки не включается, обращаетесь в support сервера с просьбой такой режим временно включить. Включается он в файле php.ini;
- Если вы работаете на локальном (домашнем) сервере, то самостоятельно проверьте настройки возможности интерпретатора PHP для вывода, показа и записи PHP ошибок, возникающих при работе. Опять таки, файл php.ini.
Это все, что хотелось сказать про Поиск и вывод PHP ошибок Joomla!
©Joomla-abc.ru
Другие статьи
Ошибки Joomla
1. Overview
Error Reporting is a useful Joomla function to troubleshoot PHP errors on your Joomla site. This function provides some clues about what and where the PHP problems are.
2. When to turn it on?
Got blank/ white screen in your Joomla site frontend? Well, that calls for turning on the error reporting feature. You may also want to disable the URL rewriting (htaccess method) using Apache mod_rewrite under the SEO settings for differential diagnosis of the issue as url rewriting with htaccess file in non-supported server (mod_rewrite not active) also renders blank pages.
3. How to proceed
In your Admin Panel, navigate through Global Configuration >> Server tab >> Error Reporting.
Joomla Error Reporting settings
There are several options for you to choose, namely:
- System Default : Joomla will inherit error reporting defaults set in the server (usually in php.ini file).
- None : Choose this option to switch off the Error Reporting so that no notification will be shown. However, when any 3rd party extension overrides Joomla error reporting with their own settings, notifications may still appear.
- Simple : Overrides server settings to give a basic report with warnings only about the fatal errors.
Error Reporting in Simple settings
- Maximum (Recommended) : Overrides server settings to gives full report with all the errors, warnings, notices, deprecated functions call, strict standards on the website.
Error Reporting in Maximum settings
Tip : You can enable the Error Reporting with the configuration.php file. Edit the file and add one of the following numeric values for $error_reporting, which equals to the PHP’s error constants:
-
-1 = 0: No error reporting. -
30711 = E_ALL & ~(E_NOTICE|E_WARNING): All errors reporting. No warnings or notices. -
30711 = E_ALL & ~E_NOTICE: All errors and warnings reporting. No notices. -
30719 = E_ALL: All errors, warnings and notices reporting. -
32767 = E_ALL | E_STRICT: All errors, warnings, notices and strict standards reporting.
4. Recommendations
For developers error reporting gives them a headstart and they know what they have to fix and where. For regular users, it helps to provide more details to the developer instead of saying «I got blank / white page».
Error reporting should be disabled on an live site as the error reports would be visible to your users and information about your website may be revealed including the absolute path of your website.
Turn it on only when something goes wrong such as a blank page and/or you are debugging your Joomla website. Once the bugs are fixed, change the error reporting settings back to “None”. This is highly recommended for any Joomla website in term of security.
5. Live example
Let’s see how an error would be reported when your Joomla Error Reporting is ON.
1. Open your_site_root/components/com_content/content.php and remove “;” from line no. 11.
Let’s see how the error would be reported
2. Check your front-end. As your Error Reporting is set as «None», it must be just a blank page.
3. Now proceed to turn the Error Reporting to «Maximum» and you can see the exact error.
How the errors is reported with Maximum settings
Tada! That’s how the Error Reporting works.
6. Joomla extension for Error Reporting
You may find some more useful Joomla extensions for error reporting in our Joomla! Extension Directory. Easy Error Reporting would be a handy choice as you can enable the error reports for specific user groups only.
7. Further reading
- Sever Settings Group — Joomla! Docs
- error_reporting — PHP.net
- How to turn your error reporting to Maximum — OSTraining
View Posts By Tags
Found this article interesting? Subscribe to our newsletter for more.
Or share this article with your friends
BLOG COMMENTS POWERED BY DISQUS
In our last article, we have discussed how to enable content versioning in Joomla. And today we are going to learn how to enable Debug and error reporting in Joomla 4.
Debug in Joomla 4 is very powerful and important when it comes to figuring out what’s going on with blank pages and or other errors within your Joomla site.
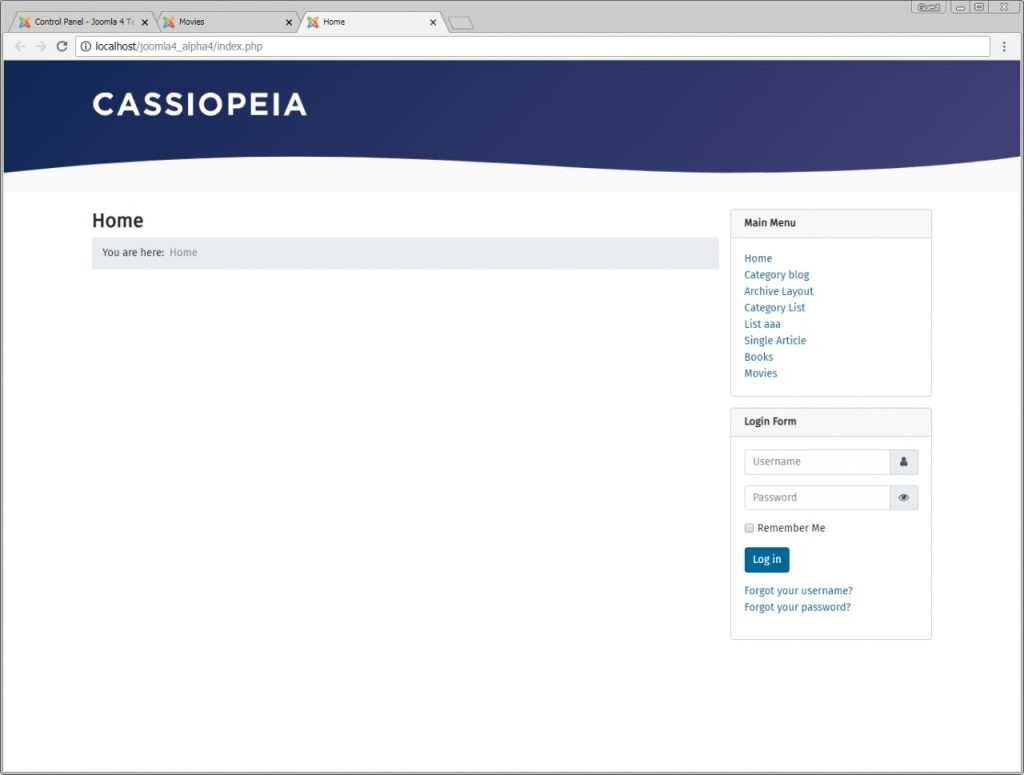
Here is our default Joomla screen.
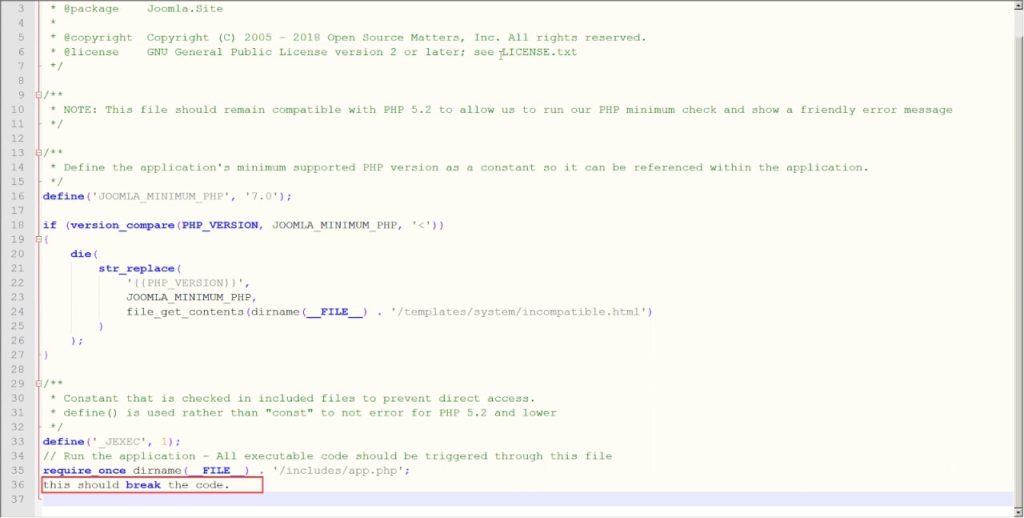
I am going to create an error in one of the Joomla files and we will use the debug and error reporting to navigate and fix through the error.
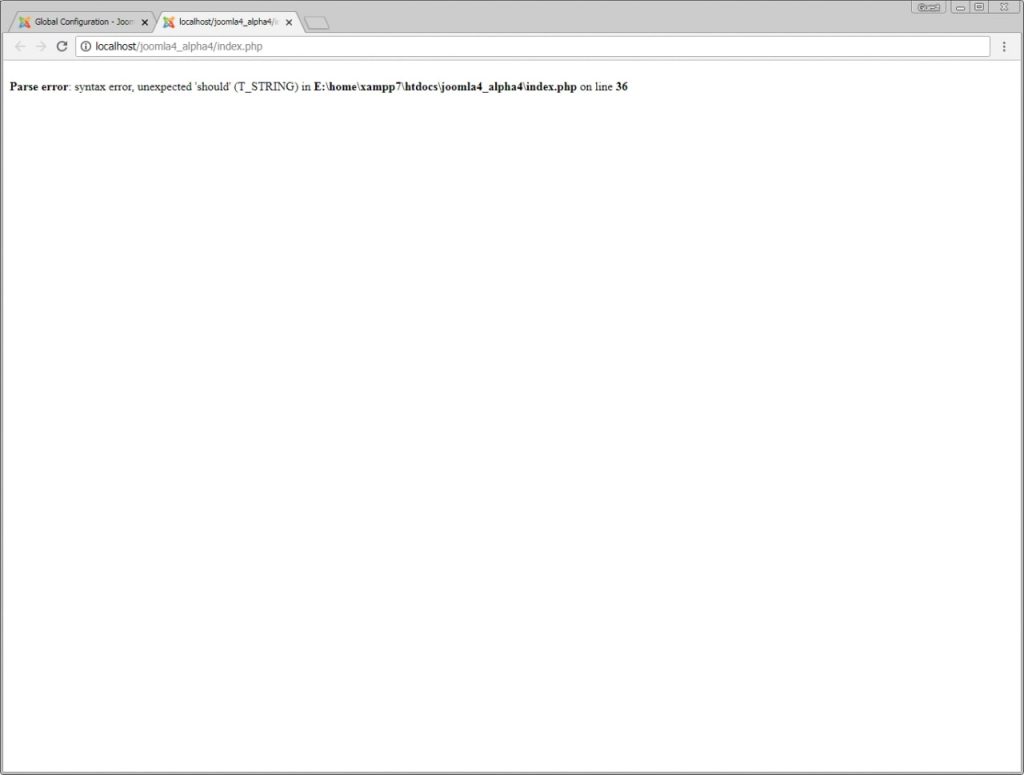
To create an error. I am going to open up the index.php file and write anything down that’s isn’t valid PHP code.
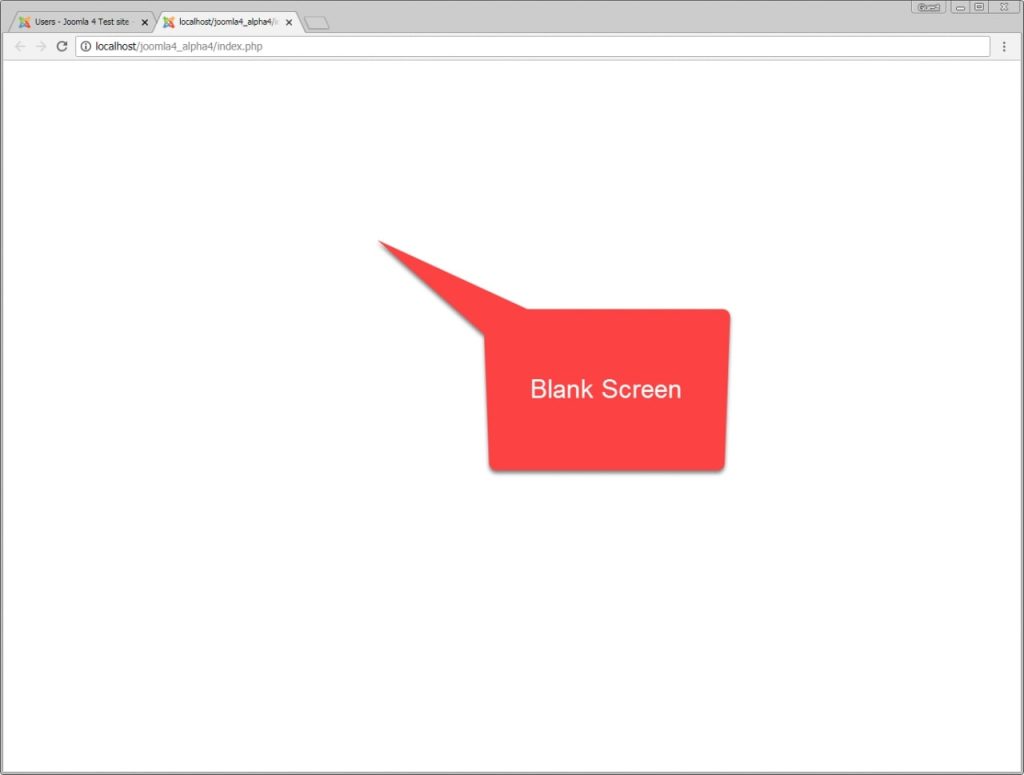
After saving the file, if I try visiting the frontend of the website, we should see the blank page:
Let’s go ahead and enable error reporting real quick and we should start seeing our errors here:
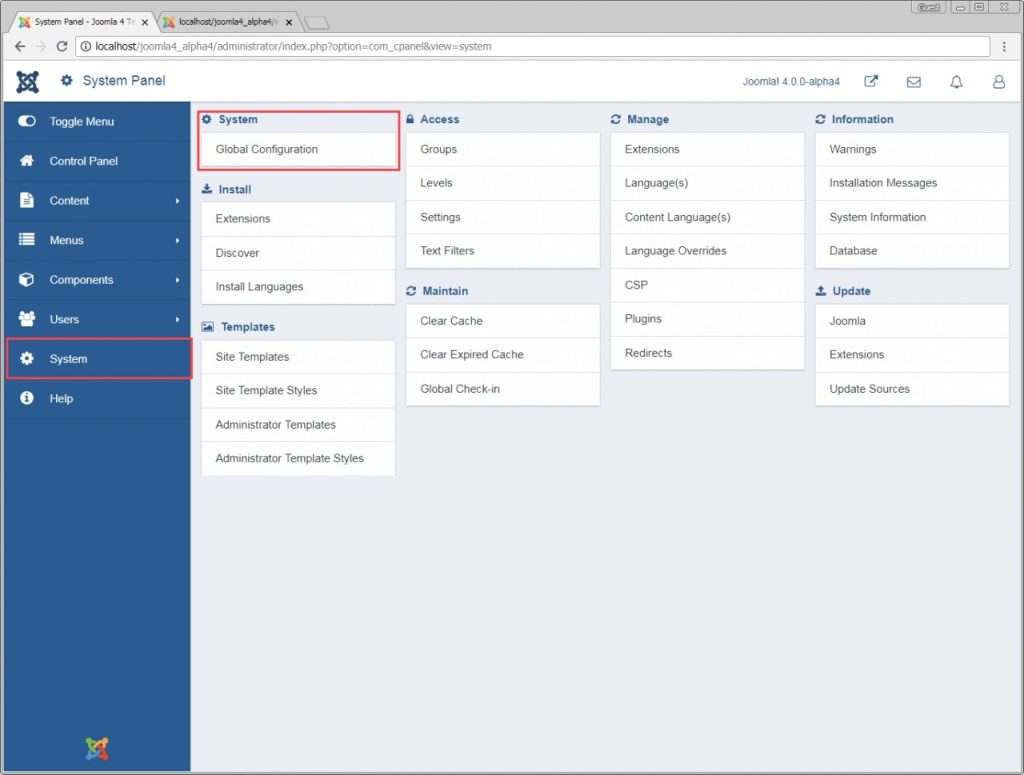
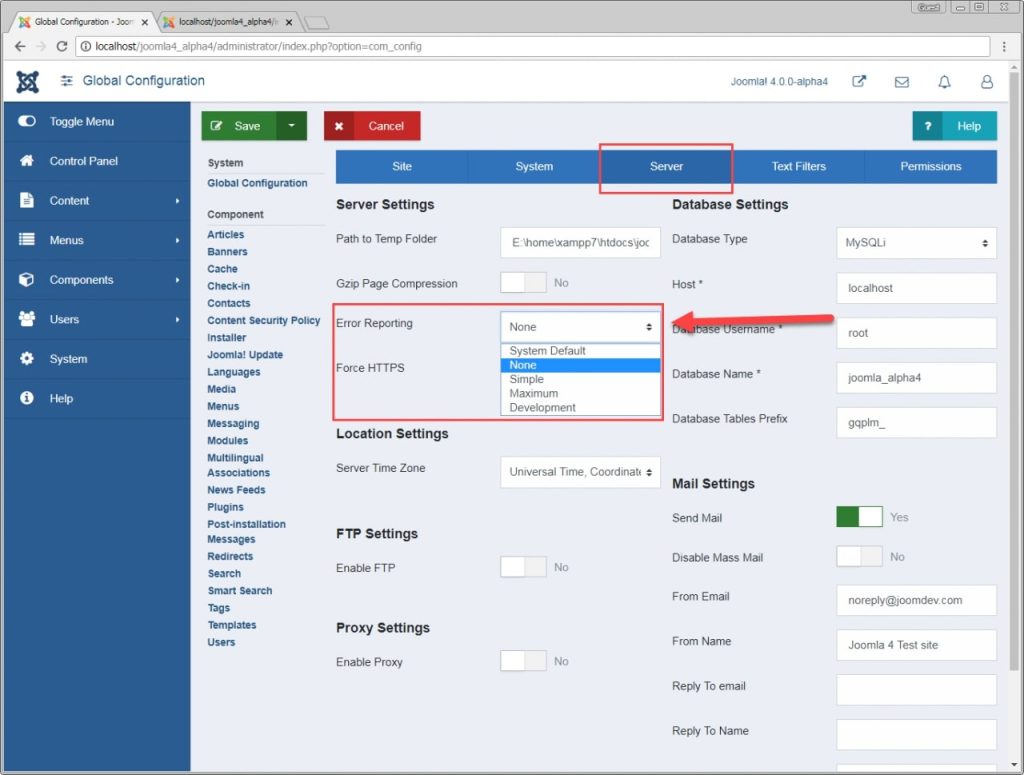
To enable error reporting: Navigate to System >> Global Configuration.
Inside the Global Configuration screen, click the Server tab. And then change error reporting to Maximum (your current value might be System Default or none).
Once done, hit Save.
Now go back and refresh the frontend and you should see an error similar to the one below.
This is very useful for PHP fatal errors where Joomla isn’t able to run at all and you have to fix beforehand in order to even see the Joomla screen working.
Sometimes, you may start experiencing blank or broken pages after installing an extension or upgrading/downgrading PHP version on your server or some similar change, to debug errors like those the Joomla debug would be very very useful.
To create an error like that, I am going to modify the file templates/cassiopeia/index.php.
I am going the following one from
use JoomlaCMSFactory;
To
use JoomlaCMSFactory1;
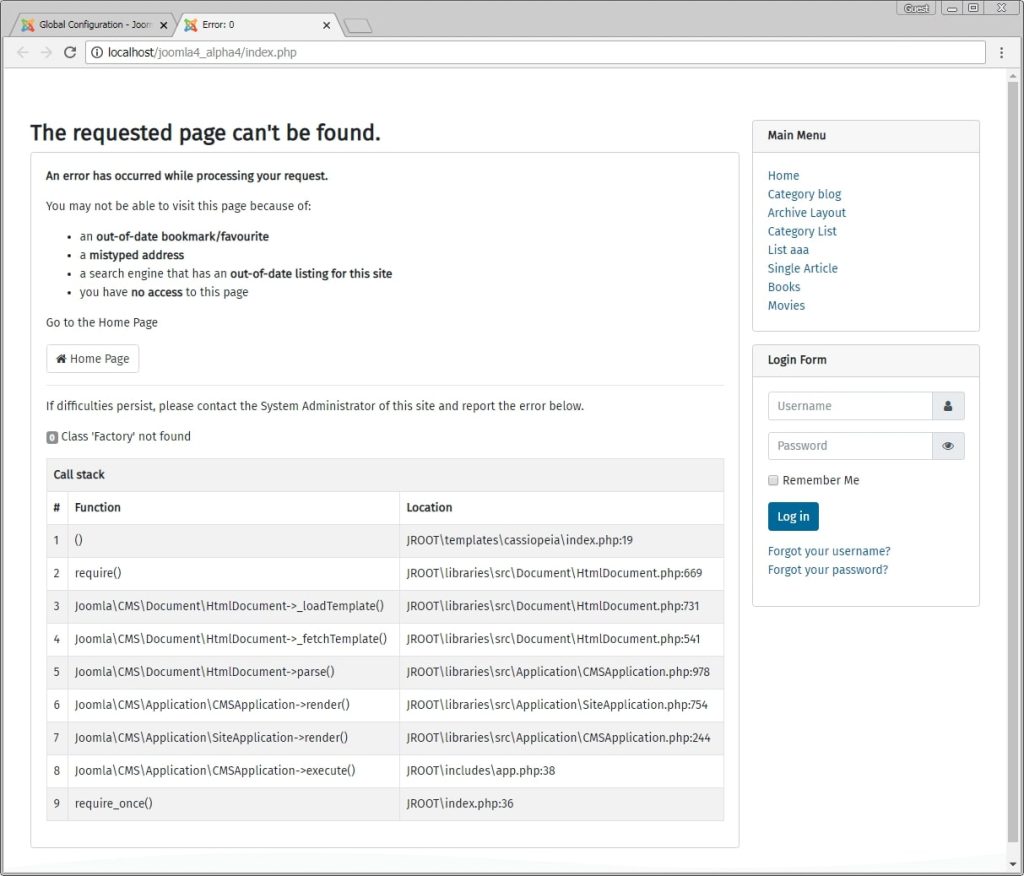
This is just a very small change that calls for a Library that doesn’t exist (just like your outdated extension might be calling for depreciated or removed Joomla code).
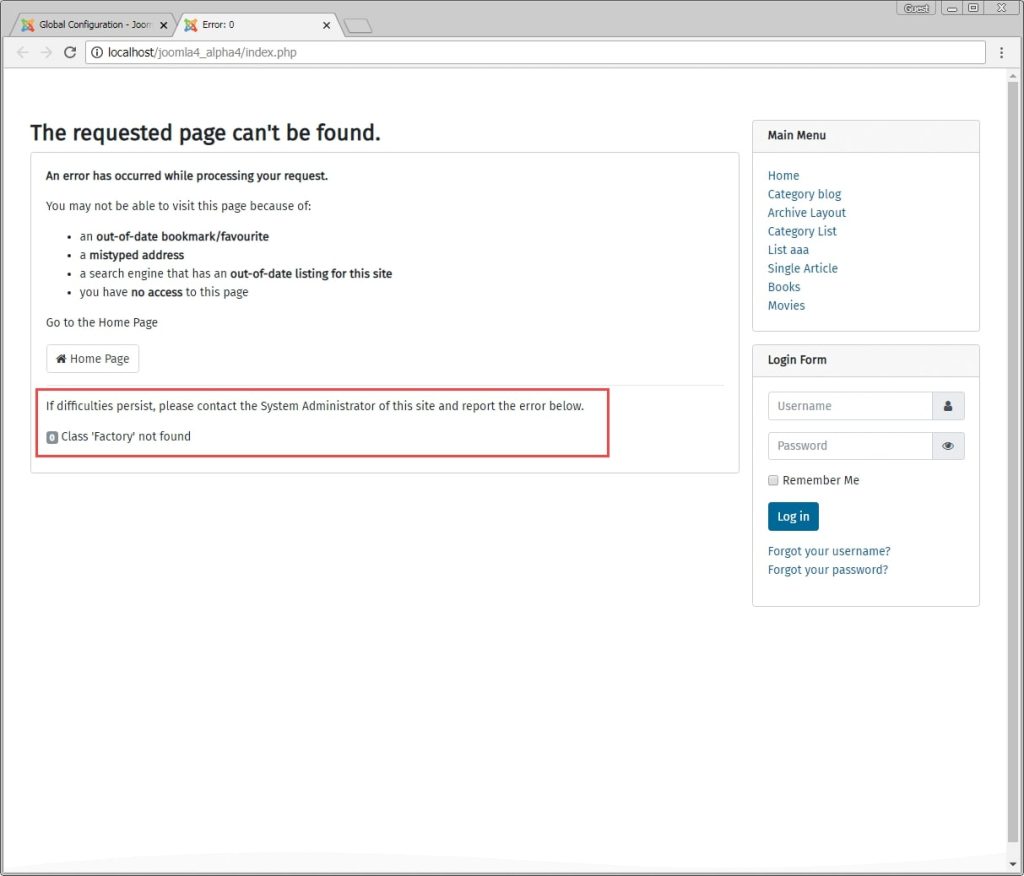
Now, immediately after making this change, If I go ahead and refresh the homepage of my website, I can see the following error screen:
You can see Joomla notifying an error but not much info about where the error is appearing from, this can be very frustrating when working with extensions, where they have hundreds of files but we don’t see an exact location of the file that is causing the error.
The debug in Joomla is very useful at this point.
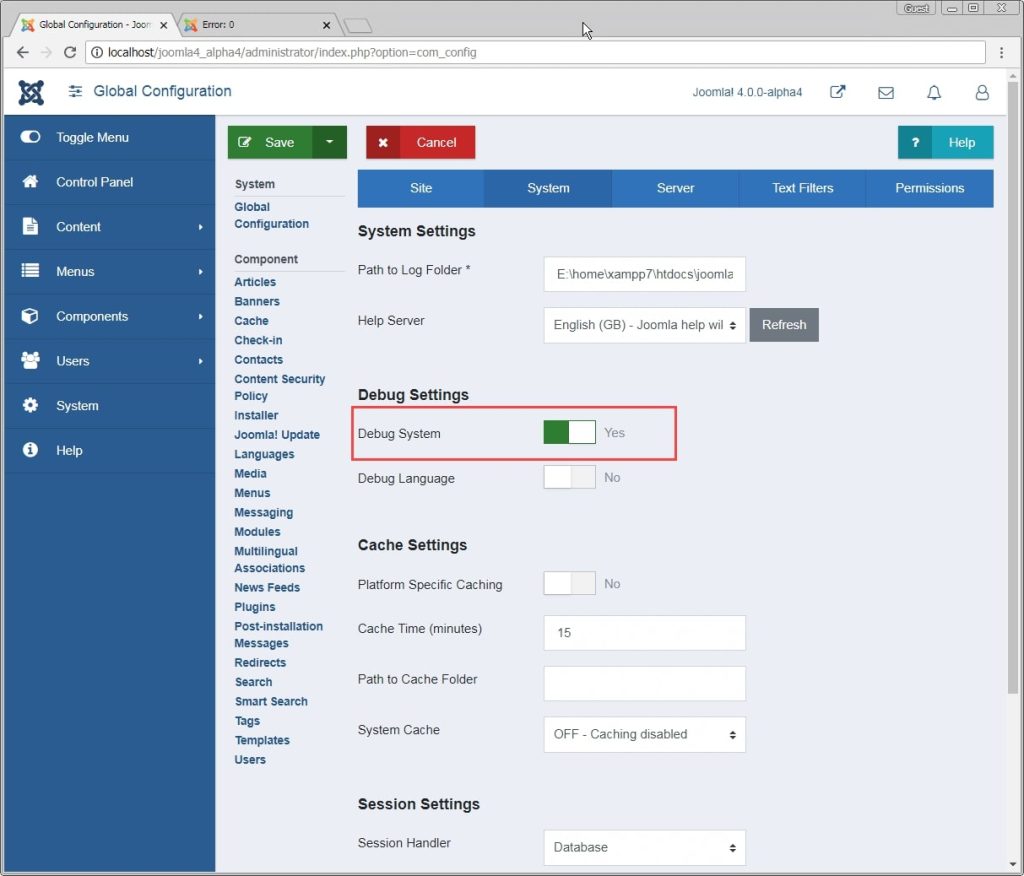
Go ahead and enable the debug using the System >> Global Configuration >> System tab.
Hit Save refresh the frontend.
You will see a whole trace log of the file that is causing the error and how Joomla got to that file.
You can now go to the exact file and add your fix. That’s it, debug and error reporting can be very useful when it comes to debugging blank pages or other Joomla errors.

Joomunited developers are committed to provide the best possible service and make your extension as optimal as possible. We run, on each version, hundreds of some automatic test and of course old school manual testing.
But hey, bug happens! especially in cases where you’ve installed one (or tons of) extensions that causes some type of incompatibility. To keep your Joomla website up and running, our developers want to solve your problem as quickly as possible.
In this post, we will explain how to give the right information to the developer so that he can understand and solve the error quickly.
This post is going to be separated into 3 steps:
- Enable Joomla PHP error reporting
- Identify the PHP errors
- Check for javascript errors
Enable Joomla PHP error reporting
The debug mode is activated on Joomla when developers are troubleshooting some issues. Enabling the debug system allows the developer to see details about how Joomla is rendering your site.
It is really easy to turn on.
Login to your Joomla control panel
Click the Global Configuration link in the left menu
Click the Server tab, it should be on the tabs listed at the top of the page
Under the Server Settings, you will see an option called “Error Reporting” select maximum, and then click Save in the top left of the page.
Take a screenshot of the error. Now that you have set the error reporting to the maximum, you will be able to see PHP errors in the frontend, just take a screenshot of it and add it to the ticket.
The screenshot should include the error and the link where it occurs, including the file name and the error returned.
Different sorts of Joomla PHP errors
Parsing Errors or PHP syntax errors
The parse error occurs if there is a syntax mistake in the script; the output is Parse errors. A parse error stops the execution of the script. There are many reasons for the occurrence of parse errors in PHP. This types of error can prevent your content to be displayed properly or some feature to work, this is very damaging to your Joomla extension experience.
The most common reasons for parse errors are as follows:
- Unclosed quotes
- Missing or Extra parentheses
- Unclosed braces
- Missing semicolon
PHP Fatal errors
These are also critical errors — for example, instantiating an object of a non-existent class, or calling a non-existent function. These errors cause the immediate termination of the script, resulting in a page that won’t be loaded with a blank page and an error message (if Joomla error reporting is activated)
PHP Notices errors
These are small, non-critical errors that PHP encounters while executing a Joomla script — for example, accessing a variable that has not yet been defined (undefined). By default, such errors are not displayed in joomla at all, it will displayed once you active the Joomla error reporting to maximum. On a production website it’s not recommended as it happens very often.
Your page will still be loaded though, without any impact on the content or the Joomla extension feature.
PHP Warnings errors
A warning error does not stop the execution of the script too, warning error not a critical error.
A warning error occurs when, for example, a Joomla extension is passing a wrong parameter in function or we include external file using include() function but the file doesn’t exist.
PHP: Missing file
As the title is stated, a file is missing or can’t be accessed. It could have been simply removed by mistake, or removed after a Joomla extension update but still called. The error message can be a warning, or in some case block the script from being executed, like if I remove the Joomla configuration file, a specific message is returned:

Check for javascript errors
We are going to look for Javascript errors with the Chrome or Firefox console, Depending on your browser its naming is slightly different, but following Chrome and FireFox, we’ll call it the “Console”. In order to open the console just follow these steps:
From your web browser, Right-click on inspect, on the frontend in any part of your site.
Select the «console» tab. The right click will open the developer tools at the right side of the page, click on “Console”
Check for errors, with the console open, reproduce the error that you were expecting and take a look at the console, the errors are red texts that describe where the javascript conflict is located.
If you’ve found a JavaScript error, please take a screenshot of the expanded version of the error to include it to your ticket/post.
Send / Share Your Joomla Issue Reporting
Now that you have all this information, you will help the developer to speed up the process, just go for all the information that you have collected and it to your ticket/post, let’s remember, the items are:
- The screenshots that you’ve taken with the PHP error
- A capture of the JavaScript error
If you follow these steps and send us the correct information, the developer will be able to do a faster debug job and we thank you very much in advance 
Create and Share a New Joomla user Account for Support Purpose
Creating a new admin user is sometimes one quick way to show to the support team what your issue is about. Before starting with that process, a quick reminder that:
- We recommend removing that admin user accounts created for support purpose
- All the information shared with our team are secured and will remain private
In order to create a new user, firstly, you login to your admin site. After logging in successfully, you are in the Joomla dashboard. Then you should go to the left section and click on Users.
You’ll be able to see the Users Dashboard, at the left top will be a green “New” button.
Fill all the information and on the “Assigned user group” tab click on “Super Users”
Finally, click on Save.
The user for support will be created, now just add the credentials to your ticket and everything will be done 

