Overview[edit]
Joomla logging gives you the ability to log messages to files and to the screen (within the Joomla! Debug Console at the bottom of the web page) and the main Joomla class which underpins this is JLog. In the new naming convention this is the Log class within the namespace JoomlaCMSLogLog.
The logging can be controlled dynamically through the Joomla Global Configuration and by configuring the System – Debug plugin (which is shipped with Joomla). Overall these facilities allow you to:
- switch DEBUG logging on or off – so that ordinarily you don’t consume resources needlessly, but you have the logging information to assist troubleshooting when there are issues, for example on a live site which has your extension installed.
- route log messages to a specific log file for your own extension.
- view log messages in the Debug Console – you can select the group of users to which log messages should be displayed, so that on a live site developers can see the messages while other users are unaffected.
- filter Debug Console messages by priority (i.e. INFO, DEBUG, WARNING and so on) and by category. (You are free to define your own categories.)
In addition, the log messages can be translatable into different languages.
The main configuration options relating to logging are shown below.
Switching on debug and display of the Joomla Debug Console is controlled through the global configuration options.

Logging to the general log file is controlled via the Logging tab of the configuration of the Joomla System — Debug plugin. (In the administrator menu, click on Extensions / Plugins, find the System — Debug plugin. Click on it to edit its configurable options).

And the options within the Plugin tab control display on the Joomla Debug Console.

Basic File Logging[edit]
To log a message you use the JLog::add() function. For example:
JLog::add('my error message', JLog::ERROR, 'my-error-category');
Using the new class naming convention use instead:
use JoomlaCMSLogLog;
Log::add('my error message', Log::ERROR, 'my-error-category');
The parameters are
- A message string. You can use translation with these. (For example, JText::_(‘MY_EXTENSION_ERR_MSG’) You can also display the values of variables, provided you convert them into a string format. (For example, using __toString() if the type of the variable supports that.)
- A priority, which can be one of JLog::EMERGENCY, JLog::ALERT, JLog::CRITICAL, JLog::ERROR, JLog::WARNING, JLog::NOTICE, JLog::INFO, JLog::DEBUG (based on the standard syslog / RFC 5424 severity levels – see wikipedia article on syslog).
- A category, which is just a text string. You can define whatever categories you like, but it is best to define them to avoid possible clashes with those of other extensions.
It can be very helpful with troubleshooting problems if you include diagnostic debug messages in your extension. In this case, enclose your log message within a check for JDEBUG:
if (JDEBUG)
{
    JLog::add('my debug message', JLog::DEBUG, 'my-debug-category');
}
Basic Logging Sample Code[edit]
Below is the code for a simple Joomla module which you can install and run to demonstrate use of the logging functionality. If you are unsure about development and installing a Joomla module then following the tutorial at Creating a simple module will help.
In a folder mod_sample_log create the following 2 files:
mod_sample_log.xml
<?xml version="1.0" encoding="utf-8"?>
<extension type="module" version="3.1" client="site" method="upgrade">
    <name>Joomla Log demo</name>
    <version>1.0.1</version>
    <description>Code demonstrating use of Joomla Log class to log messages</description>
    <files>
        <filename module="mod_sample_log">mod_sample_log.php</filename>
    </files>
</extension>
mod_sample_log.php
<?php
defined('_JEXEC') or die('Restricted Access');

use JoomlaCMSLogLog;

Log::add('my error message', Log::ERROR, 'my-error-category');

JLog::add('my old error message', JLog::WARNING, 'my-old-error-category');

echo "Error message logged";
Zip up the mod_sample_log directory to create mod_sample_log.zip.
Within your Joomla administrator go to Install Extensions and via the Upload Package File tab select this zip file to install this sample log module.
Make this module visible by editing it (click on it within the Modules page) then:
- making its status Published
- selecting a position on the page for it to be shown
- on the menu assignment tab specify the pages it should appear on
Check the configuration of the settings shown at the top of this web page. In particular, ensure that the System – Debug plugin is enabled and that Log Almost Everything is set to Yes. Also note where the folder where your log files are stored.
Display your Joomla site and you should then see the sample log module appearing. In your log file folder you should find your error messages in the everything.php file.
Also switch on the debug console and confirm that you can see the error messages in its Log Messages section.
Logging to a Specific Log File[edit]
You can use JLog::addLogger() to set up logging to an additional log file, filtering the log messages to be sent there by priority (the ‘severity level’) and/or category. The parameters of JLog::addLogger() are:
- an array with configuration details – including the name of the log file.
- the severity levels to be logged in that file.
- an array of the categories to be logged in that file. (If parameter 4 is set to true, this array defines the categories which are NOT to be logged in the file.)
- (often omitted) a boolean specifying whether parameter 3 is an include list. (The default, P4 = false) or an exclude list (P4 = true.)
For example, if you have developed a com_helloworld extension you could use the following:
JLog::addLogger(
    array(
         // Sets file name
         'text_file' => 'com_helloworld.log.php'
    ),
    // Sets messages of all log levels to be sent to the file.
    JLog::ALL,
    // The log category/categories which should be recorded in this file.
    // In this case, it's just the one category from our extension.
    // We still need to put it inside an array.
    array('com_helloworld')
);
Then when you log a message, specify the category as com_helloworld, as in the example below
JLog::add(JText::_('COM_HELLOWORLD_ERROR_MESSAGE_123'), JLog::ERROR, 'com_helloworld');
This will result in your log message being written to com_helloworld.log.php. If the System – Debug plugin settings have «Log Almost Everything» set to Yes, the message will appear in the common everything.php log file as well.
Note: You may wish to combine this with the Display error messages and notices section to display visible error notifications to users.
You can also add an additional logger to capture only critical and emergency log notifications:
JLog::addLogger(
    array(
         // Sets file name.
         'text_file' => 'com_helloworld.critical_emergency.php'
    ),
    // Sets critical and emergency log level messages to be sent to the file.
    JLog::CRITICAL + JLog::EMERGENCY,
    // The log category which should be recorded in this file.
    array('com_helloworld')
);
You can also exclude a specific priority level from being included. For example, to log all but DEBUG messages:
JLog::addLogger(
    array(
         // Sets file name.
         'text_file' => 'com_helloworld.all_but_debug.php'
    ),
    // Sets all but DEBUG log level messages to be sent to the file.
    JLog::ALL & ~JLog::DEBUG,
    // The log category which should be recorded in this file.
    array('com_helloworld')
);
The JLog priority levels are implemented as separate bits of an integer, so you can use bitwise operations (bitwise AND, &; and bitwise NOT, ~) to calculate the appropriate log levels. JLog::All is a constant integer which has all the relevant bits set, so that all the Joomla priority levels are included.
Formatting the Log File[edit]
The first parameter to addLogger can have a few optional additional settings in addition to the text_file entry.
There is, for example, the entry text_entry_format, specifying the format of each line in your log file.
The default format is:
'{DATETIME} {PRIORITY} {CATEGORY} {MESSAGE}'
Here is an example of a different format which shows how to omit the category:
JLog::addLogger(
    array(
         // Sets file name.
         'text_file' => 'com_helloworld.critical_emergency.php',
         // Sets the format of each line.
         'text_entry_format' => '{DATETIME} {PRIORITY} {MESSAGE}'
    ),
    // Sets all but DEBUG log level messages to be sent to the file.
    JLog::ALL & ~JLog::DEBUG,
    // The log category which should be recorded in this file.
    array('com_helloworld')
);
In addition to the placeholders shown above in the default string, the following values are available:
   {CLIENTIP}      (this is the IP address of the client)
   {TIME}
   {DATE}
There is an additional optional boolean parameter text_file_no_php, which specifies whether the log file is prepended with the usual prefix of:
   #
   #<?php die('Forbidden.');?>
Note: Usually you should not set this setting to false. Log files should not be readable from the outside. They can provide valuable information about your system for attackers.
Only dabble with this if you know what you’re doing!
Furthermore, if you want to store the log file somewhere other than the logging path configured in the Joomla! settings, there is the text_file_path setting.
Logging to Other Places[edit]
As well as logging to files, you can log to other places as well, such as
- the Joomla message area (where the message is shown if you call
JFactory::getApplication()->enqueueMessage()). - a database table.
- just a simple echo statement.
Of these, probably the most useful is the logging to the message bar, which you can set up via:
JLog::addLogger(array('logger' => 'messagequeue'), JLog::ALL, array('msg-error-cat'));
Then when you do:
JLog::add('an error to display', JLog::ERROR, 'msg-error-cat');
you will get the message copied to the message bar.
Note that Joomla core code sets up logging to the messagequeue for category ‘jerror’, so that if you use this category in your log messages, you will get the message displayed on the message bar. For example:
JLog::add('error copied to message bar', JLog::Error, 'jerror');
will result in the message being shown in the Joomla message area, even though you haven’t explicitly set up a logger to log there.
PSR-3 Logger[edit]
Since version 3.8 Joomla incorporates a logger which adheres to the PSR-3 Logger Interface. This enables libraries which follow this standard recommendation to integrate with the Joomla logging system. To use this, first do:
use JoomlaCMSLogLog;
$psr3Logger = Log::createDelegatedLogger();
This returns an object on which you have available the methods of the PSR-3 LoggerInterface, for example:
$psr3Logger->critical("critical error text", array("category" => "my-critical-category"));
The default Joomla loggers process only the «category» and «date» elements of the context associative array (parameter 2), mapping the values of these elements to the corresponding column in your log file.
Exceptions[edit]
JLog::add() will throw an exception if it can’t write to the log file. To avoid this, you’d have to either wrap the call in another function, or implement your own logger class and then include it with:
JLog::addLogger(
    array(
         // Use mycustomlogger.
         'logger' => 'mycustomlogger',
         'text_file' => 'com_helloworld.errors.php'
    ),
    JLog::ALL,
    array('com_helloworld')
);
Further Reading[edit]
Joomla logging should be used in tandem with PHP exceptions, not as a replacement. See J2.5:Exceptions_and_Logging_in_Joomla_Platform_11.1_and_Joomla_2.5 for backstory on this class and how it arose from the old Joomla PHP4 compatible error classes.
Обзор
Логирование в Joomla дает вам возможность логировать сообщения в файлы и на экран (в консоли отладки Joomla внизу веб-страницы), а основным классом Joomla, который для этого используется, является JLog.
Логирование, в некоторой степени, может контролироваться динамически через общие настройки Joomla и путем настройки плагина «Система — Отладка» (поставляется с Joomla). В целом эти возможности позволяют вам:
- включать или отключать систему отладки — чтобы вы не потребляли ресурсы без необходимости, но при этом у вас оставалась информация для того, чтобы помочь в устранении неполадок, когда есть проблемы. Например, на живом сайте, на котором установлено ваше расширение.
- направлять сообщения логов в определенный файл логов вашего собственного расширения
- просматривать сообщения логов в консоли отладки — вы можете выбрать группу пользователей, для которых должны отображаться сообщения логов, чтобы на живом сайте разработчики могли видеть сообщения, в то время как другие пользователи не затрагивались.
- фильтровать сообщения консоли отладки по приоритету (например, INFO, DEBUG, WARNING и т. д.) и по категориям (вы можете сами определять свои категории).
Кроме того, сообщения логов могут быть переведены на разные языки.
- switch DEBUG logging on or off – so that ordinarily you don’t consume resources needlessly, but you have the logging information to assist troubleshooting when there are issues, for example on a live site which has your extension installed.
- route log messages to a specific log file for your own extension.
- view log messages in the Debug Console – you can select the group of users to which log messages should be displayed, so that on a live site developers can see the messages while other users are unaffected.
- filter Debug Console messages by priority (i.e. INFO, DEBUG, WARNING and so on) and by category. (You are free to define your own categories.)
In addition, the log messages can be translatable into different languages.
Основные параметры конфигурации, относящиеся к ведению логов, показаны ниже.
Включение отладки и отображение консоли отладки Joomla контролируется через общие настройки.
Логирование в общий файл логов контролируется с помощью вкладки Журнал (логи) конфигурации плагина Joomla «Система — Отладка» (в меню администратора нажмите «Расширения / Плагины», найдите плагин «Система — Отладка» и нажмите на него, чтобы изменить его параметры).
Параметры на вкладке «Плагин» контролируют отображение в консоли отладки Joomla.
Базовое логирование в файл
Чтобы отправить сообщение в лог, используйте функцию JLog::add(). Например:
JLog::add('my error message', JLog::ERROR, 'my-error-category');
Using the new class naming convention use instead:
use JoomlaCMSLogLog;
Log::add('my error message', Log::ERROR, 'my-error-category');
Параметры
- Строка сообщения. Вы можете использовать перевод, например, JText::_(‘MY_EXTENSION_ERR_MSG’). Вы также можете отображать значения переменных при условии, что вы конвертируете их в строковый формат (например, с помощью __toString (), если тип переменной это поддерживает).
- Приоритет, который может быть одним из: JLog::EMERGENCY, JLog::ALERT, JLog::CRITICAL, JLog::ERROR, JLog::WARNING, JLog::NOTICE, JLog::INFO, JLog::DEBUG (основано на уровнях серьёзности syslog / RFC 5424 – подробнее в материале Wikipedia о syslog).
- Категория, которая является просто текстовой строкой. Вы можете определить любые категории, которые вам нравятся. Лучше всего определять их, чтобы избежать возможных конфликтов с другими расширениями.
Если вы включите диагностические сообщения отладки в ваше расширение, то это может быть очень полезно при устранении неполадок. В этом случае добавьте к своему лог сообщению проверку на JDEBUG:
if (JDEBUG)
{
    JLog::add('my debug message', JLog::DEBUG, 'my-debug-category');
}
Basic Logging Sample Code
Below is the code for a simple Joomla module which you can install and run to demonstrate use of the logging functionality. If you are unsure about development and installing a Joomla module then following the tutorial at Creating a simple module will help.
In a folder mod_sample_log create the following 2 files:
mod_sample_log.xml
<?xml version="1.0" encoding="utf-8"?>
<extension type="module" version="3.1" client="site" method="upgrade">
    <name>Joomla Log demo</name>
    <version>1.0.1</version>
    <description>Code demonstrating use of Joomla Log class to log messages</description>
    <files>
        <filename module="mod_sample_log">mod_sample_log.php</filename>
    </files>
</extension>
mod_sample_log.php
<?php
defined('_JEXEC') or die('Restricted Access');

use JoomlaCMSLogLog;

Log::add('my error message', Log::ERROR, 'my-error-category');

JLog::add('my old error message', JLog::WARNING, 'my-old-error-category');

echo "Error message logged";
Zip up the mod_sample_log directory to create mod_sample_log.zip.
Within your Joomla administrator go to Install Extensions and via the Upload Package File tab select this zip file to install this sample log module.
Make this module visible by editing it (click on it within the Modules page) then:
- making its status Published
- selecting a position on the page for it to be shown
- on the menu assignment tab specify the pages it should appear on
Check the configuration of the settings shown at the top of this web page. In particular, ensure that the System – Debug plugin is enabled and that Log Almost Everything is set to Yes. Also note where the folder where your log files are stored.
Display your Joomla site and you should then see the sample log module appearing. In your log file folder you should find your error messages in the everything.php file.
Also switch on the debug console and confirm that you can see the error messages in its Log Messages section.
Logging to a Specific Log File
Вы можете использовать JLog::addLogger(), чтобы настроить ведение логов в дополнительный файл логов, отфильтровывая сообщения логов по приоритету (уровень серьезности) и / или категории. Параметры JLog::addLogger():
- массив с деталями конфигурации — включая имя файла логов
- уровни серьезности, которые будут логироваться в этом файле
- массив категорий, которые будут логироваться в этом файле (или если для параметра 4 установлено значение true, тогда этот массив определяет категории, которые НЕ должны регистрироваться в файле)
- (часто пропускается) логическое значение, указывающее, является ли параметр 3 списком включения (по умолчанию P4 = false) или списком исключения (P4 = true)
For example, if you have developed a com_helloworld extension you could use the following:
JLog::addLogger(
    array(
         // Sets file name
         'text_file' => 'com_helloworld.log.php'
    ),
    // Sets messages of all log levels to be sent to the file.
    JLog::ALL,
    // The log category/categories which should be recorded in this file.
    // In this case, it's just the one category from our extension.
    // We still need to put it inside an array.
    array('com_helloworld')
);
Затем, когда вы логируете сообщение, укажите категорию ‘com_helloworld’, как в примере ниже
JLog::add(JText::_('COM_HELLOWORLD_ERROR_MESSAGE_123'), JLog::ERROR, 'com_helloworld');
Это приведет к тому, что ваше сообщение будет записано в com_helloworld.log.php. Если в настройках плагина «Система — Отладка» для параметра «Протоколировать все» задано значение «Да», то это сообщение появится и в общем файле журнала everything.php.
Примечание: Вы можете объединить это с Display error messages and notices для отображения видимых уведомлений об ошибках для пользователей.
Вы также можете добавить дополнительный логгер для сбора только критических и аварийных уведомлений:
JLog::addLogger(
    array(
         // Sets file name.
         'text_file' => 'com_helloworld.critical_emergency.php'
    ),
    // Sets critical and emergency log level messages to be sent to the file.
    JLog::CRITICAL + JLog::EMERGENCY,
    // The log category which should be recorded in this file.
    array('com_helloworld')
);
Вы также можете исключить определенный уровень приоритета от включения в файл логов. Например, чтобы логировать все сообщения кроме DEBUG:
JLog::addLogger(
    array(
         // Sets file name.
         'text_file' => 'com_helloworld.all_but_debug.php'
    ),
    // Sets all but DEBUG log level messages to be sent to the file.
    JLog::ALL & ~JLog::DEBUG,
    // The log category which should be recorded in this file.
    array('com_helloworld')
);
Уровни приоритета JLog реализованы в виде отдельных битов целого числа, поэтому вы можете использовать побитовые операции (побитовое AND, &; и побитовое NOT, ~) для вычисления подходящих уровней логов. JLog::All является постоянным целым числом, в котором установлены все соответствующие биты, поэтому включены все уровни приоритета Joomla.
Форматирование файла логов
Первый параметр addLogger может иметь несколько необязательных дополнительных настроек в дополнение к параметру text_file.
Например, есть параметр text_entry_format, указывающий формат каждой строки в вашем лог файле.
Формат по умолчанию:
'{DATETIME} {PRIORITY} {CATEGORY} {MESSAGE}'
Вот пример другого формата, который показывает, как пропустить категорию:
JLog::addLogger(
    array(
         // Sets file name.
         'text_file' => 'com_helloworld.critical_emergency.php',
         // Sets the format of each line.
         'text_entry_format' => '{DATETIME} {PRIORITY} {MESSAGE}'
    ),
    // Sets all but DEBUG log level messages to be sent to the file.
    JLog::ALL & ~JLog::DEBUG,
    // The log category which should be recorded in this file.
    array('com_helloworld')
);
Помимо заполнителей (placeholders), показанных выше в строке по умолчанию, доступны следующие значения:
   {CLIENTIP}      (this is the IP address of the client)
   {TIME}
   {DATE}
Существует дополнительный необязательный логический параметр text_file_no_php, который указывает, следует ли добавлять в файл логов обычный префикс:
   #
   #<?php die('Forbidden.');?>
Примечание: Обычно вам не следует устанавливать для этого параметра значение false. Файлы логов не должны быть доступны для чтения извне, поскольку они могут предоставить злоумышленникам ценную информацию о вашей системе.
Изменяйте этот параметр, только если вы знаете, что делаете!
Кроме того, если вы хотите сохранить файл логов где-то еще, а не по пути, указанному в общих настройках Joomla, вы можете изменить параметр text_file_path.
Логирование в другие места
Помимо логирования в файлы, вы также можете логировать в другие места, такие как
- область сообщений Joomla (сообщение отображается, если вы вызываете JFactory::getApplication()->enqueueMessage())
- таблица базы данных
- просто echo
Из них, пожалуй, наиболее полезным является логирование в панель сообщений, которое можно настроить следующим образом:
JLog::addLogger(array('logger' => 'messagequeue'), JLog::ALL, array('msg-error-cat'));
Затем, когда вы делаете:
JLog::add('сообщение об ошибке для отображения', JLog::ERROR, 'msg-error-cat');
вы получаете сообщение, скопированное на панель сообщений.
Обратите внимание, что код ядра Joomla настраивает запись в очередь сообщений для категории ‘jerror’, поэтому, если вы используете эту категорию в своих сообщениях журнала, вы получите сообщение, отображаемое на панели сообщений.
Например:
JLog::add ('ошибка скопирована на панель сообщений', JLog::ERROR, 'jerror');
приведет к тому, что сообщение будет отображаться в области сообщений Joomla, даже если вы явно не настроили такое поведение для своего логгера.
PSR-3 Logger
Since version 3.8 Joomla incorporates a logger which adheres to the PSR-3 Logger Interface. This enables libraries which follow this standard recommendation to integrate with the Joomla logging system. To use this, first do:
use JoomlaCMSLogLog;
$psr3Logger = Log::createDelegatedLogger();
This returns an object on which you have available the methods of the PSR-3 LoggerInterface, for example:
$psr3Logger->critical("critical error text", array("category" => "my-critical-category"));
The default Joomla loggers process only the «category» and «date» elements of the context associative array (parameter 2), mapping the values of these elements to the corresponding column in your log file.
Исключения
JLog::add() кидает исключение, если не может записать в файл логов. Чтобы избежать этого, вам придется либо обернуть вызов в другую функцию, либо реализовать свой собственный класс логгера, а затем включить его:
JLog::addLogger(
    array(
         // Use mycustomlogger.
         'logger' => 'mycustomlogger',
         'text_file' => 'com_helloworld.errors.php'
    ),
    JLog::ALL,
    array('com_helloworld')
);
Что ещё почитать
Содержание
- Name already in use
- joomla-developer-docs / docs / en / cms / platform / log.md
- Joomla 4 Log Settings
- Accessing Joomla 4 Log Settings
- Logging Options
- Custom Logging Options
- Where Are My Log Settings Saved?
- The Joomla! Forum™
- Where are the error logs?
- Where are the error logs?
- Re: Where are the error logs?
- Re: Where are the error logs?
- Re: Where are the error logs?
- Re: Where are the error logs?
- Using JLog
- Материал из Joomla! Documentation
- Содержание
- Overview
- Basic File Logging
- Basic Logging Sample Code
- Logging to a Specific Log File
- Formatting the Log File
- Logging to Other Places
- PSR-3 Logger
- Exceptions
- Further Reading
Name already in use
joomla-developer-docs / docs / en / cms / platform / log.md
- Go to file T
- Go to line L
- Copy path
- Copy permalink
Copy raw contents
Copy raw contents
The Log Package
The Joomla Platform includes a Log package that allows for configurable, hook-driven logging to a variety of formats.
The classes included in the Log package are JLog , JLogEntry , JLogger as well as the classes JLoggerDatabase , JLoggerEcho , JLoggerFormattedText , JLoggerMessageQueue , JLoggerSyslog and JLoggerW3C which support formatting and storage. Of all these classes, you will generally only use JLog in your projects.
Logging is a two-step process.
First you must add the add loggers to listen for log messages. Any number of loggers can be configured to listen for log messages based on a priority and a category. For example, you can configure all log messages to be logged to the database, but also set just errors to be logged to a file. To do this, you use the JLog::addLogger method.
After at least one logger is configured, you can then add messages using the JLog::addLogEntry method where you can specify a message, and optionally a priority (integer), category (string) and date.
Before we look at any logging examples, we need to understand what the priority is. The priority is an integer mask and is set using one or more predefined constants in the JLog class. These are:
- JLog::EMERGENCY
- JLog::ALERT
- JLog::CRITICAL
- JLog::ERROR
- JLog::WARNING
- JLog::NOTICE
- JLog::INFO
- JLog::DEBUG
A final constant, JLog::ALL is also available which corresponds to hex FFFF (16 bits). The other constants reserve the first eight bits for system use. This allows the developer the last eight bits, hex 100 to 8000, for custom use if desired. As the values are for masking, they can be mixed using any of the bitwise operators for and, or, not and xor.
By default, loggers are added to listen for JLog::ALL priorities and log entries are added using the JLog::INFO mask.
Logging to files (formattedtext)
A very typical example of logging is the ability to log to a file, and this is the default handler for logging. To do this add the logger and then you can add log messages.
As no logger has been specified in the JLog::addLogger call, the «formattedtext» logger will be used. This will log the message to a file called «error.php» in the log folder specified by the «log_path» configuration variable (in the Joomla CMS, the default is /logs/ ). It will look something like this:
The file is tab-delimited and the default columns are the timestamp, the text representation of the priority, the category and finally the message. The category is empty (a dash) because we didn’t supply it.
To log a different priority, you can use code like:
The log file will now look similar to the following:
Additional options with formattedtext
When adding the «formattedtext» logger, the following options are available to supply in the array you pass to JLog::addLogger .
| Option | Description |
|---|---|
| text_file | Allows you to specify the name of the file to which messages are logged. |
| text_file_path | Allows you to specify the folder path to the file to which messages are logged. |
| text_file_no_php | If set, the PHP die statement will not be added to the file line of the file. |
| text_entry_format | Allows you to change the format of the entire line of the log message in the file. |
Changing the name of the log file
Given the options outlined in the previous section, you can change the name of the file to which you are logging when you add the logger, like this:
Logging different priorities to different files
You can log different types of messages to different files by adding multiple loggers that bind different log priorities to different files. For example, the following code will log all messages except errors to one file, and error messages to a separate file.
Logging specific categories to a file
If you are wanting to collect errors for your specific project, class or extension, you can also bind logging to different categories. For example, the following code could be used in a Joomla extension to just collect errors relating to it.
To log messages to that logger, you would use something similar to the following code:
It is important to note that other loggers, added beyond your control, may also pick up this message.
Splitting up logs by date
Log files can, potentially, get very long over time. A convenient solution to this is to roll logs into different files based on a period of time — an hour, a day, a month or even a year. To do this, you just need to add the date to the file name of the log file. The following example shows you how to do this on a daily basis.
Changing the format of the log message
When you adding a log message, it is written to the file in a default format in the form:
Each field is written in upper case, wrapped in curly braces and separated by tabs. There are a number of other fields that are automatically defined in the «formattedtext» logger that you can take advantage of automatically. These are:
| Field | Description |
|---|---|
| The IP address of the user. | |
| The «Y-m-d» date component of the message datestamp. | |
| The «H:i:s» time component of the message datestamp. |
To modify for the log format to add any or all of these fields, you can add the logger as shown in the following code.
As you can see, you can include or leave out any fields as you require to suit the needs of your project.
You can also add more fields but to do this you need to create and add a JLogEntry object directly. The following example shows you how to do this.
It is strongly recommended that, when using a custom format, you bind the log entries to a specific and unique category, otherwise log files with different format (fields) could become mixed.
Logging to the database
The «database» logger allows you to log message to a database table. The create syntax for the default table is as follows:
To log messages using the «database» logger, you the following code as a guide.
Notice that the example binds the logger to all message priorities, but only those with a category of «dblog».
If you are wanting to store additional information in the message, you can do so using a JSON encoded string. For example:
This makes it possible to retrieve detailed information for display.
Источник
Joomla 4 Log Settings
2 Minutes, 46 Seconds to Read
Joomla 4 logs can be an essential tool when you are troubleshooting website issues. It can provide detailed information about what is happening to your site in the background.
For example, if a script or form is not working as expected, the logs will provide a specific error message. You can then use that error message to research a solution or workaround.
This guide will explain how to access the Joomla 4 log settings, what options are available, and where the log settings are saved.
Accessing Joomla 4 Log Settings
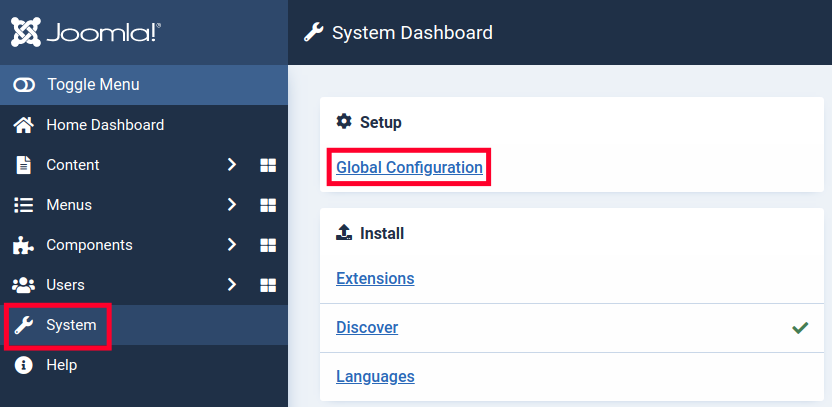
- Login to the Admin Panel for Joomla.
- Click System then the Global Configuration link.

- Click the Logging tab to access the log settings.
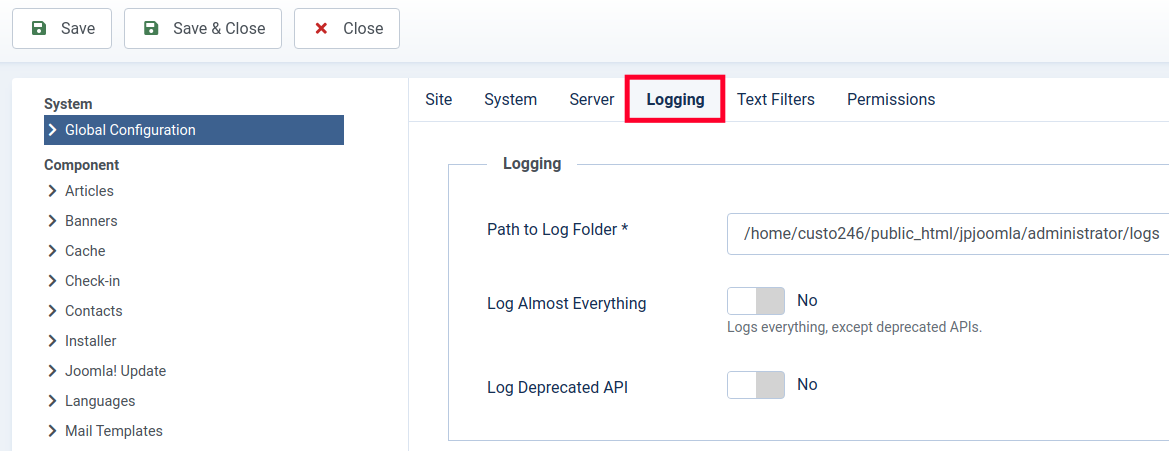
You can then choose your logging options as needed. The available settings are described below.
Logging Options
You will first see the section for standard Logging settings. There you can select what is logged and where the location of the logs will be. This is what it will look like.
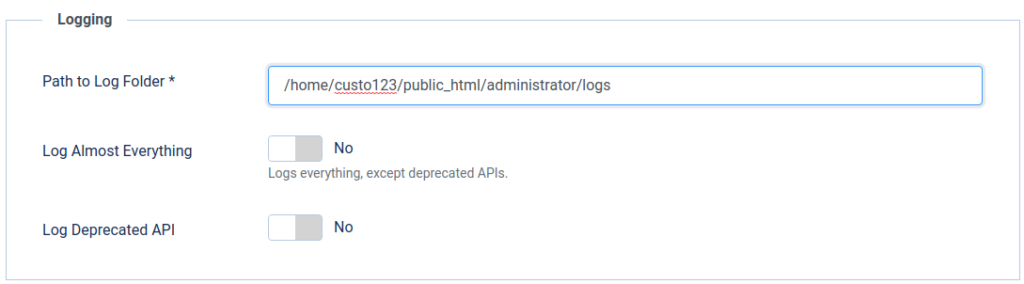
Below is a description of the available options.
| Logging Option | Description |
|---|---|
| Path to Log Folder | This is the folder location where logged events will be located. |
| Log Almost Everything | If this is set to the Yes position, all events will be logged excluding Deprecated API’s. |
| Log Deprecated API | Set this to Yes if you want to log calls from extensions to deprecated API’s. If enabled a deprecated.php file will be created in the “Path to Log Folder”. |
Custom Logging Options
The Custom Logging section is where you can set log priorities or choose which categories are included in the logs. This is what it will look like.
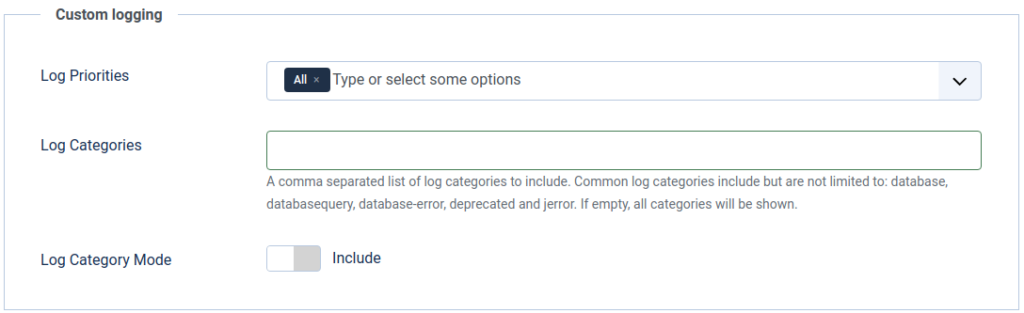
Below is more information about the custom log settings in Joomla.
| Custom Logging Option | Description |
|---|---|
| Log Priorities | This is where you can select your priorities from the drop-down menu. The priority is set based on where it is located on the list. For example, the one furthest left will have a priority of ‘0’ and the next one will have a priority of ‘1’ and so on. When an event is logged, the priority number will be included in the log. |
| Log Categories | Categories entered in this section will either be included or excluded depending on the “Log Category Mode“setting. |
| Log Category Mode | Set this to Include if you want to log categories listed in the “Log Categories” section. Set it to Exclude if don’t want to log categories listed in the “Log Categories” section. |
Where Are My Log Settings Saved?
When you choose your logging settings in the Admin Panel, they are added to the Joomla configuration.php file. But, you can also go there and directly edit them if you are familiar with PHP coding. Here is an example of some of the default Logging settings you will find in the configuration.php file:
Now that you know more about the Joomla 4 log settings, you can begin using them to troubleshoot website problems and events. Check out our Joomla 4 section for more guides to help you build a successful site.
Источник
The Joomla! Forum™
Where are the error logs?
Where are the error logs?
Post by nicole2292 » Tue Apr 29, 2008 7:14 am
My apologies if this is a really dumb question, however I have looked all over the forums and I can’t find an answer.
Are error logs generated specifically for my Joomla site which can be accessed from the admin area or some other way. If so where are they and how do I access / view them?
Thanks in advance,

Re: Where are the error logs?
Post by ircmaxell » Tue Apr 29, 2008 1:26 pm
nicole2292 wrote: Hi Everyone,
My apologies if this is a really dumb question, however I have looked all over the forums and I can’t find an answer.
Are error logs generated specifically for my Joomla site which can be accessed from the admin area or some other way. If so where are they and how do I access / view them?
Thanks in advance,
Anthony Ferrara — Core Team — Development Coordinator — Bug Squad — JSST
http://moovum.com/ — The Bird is in the air! Get Mollom Anti-Spam on your Joomla! website with Moovur.
http://www.joomlaperformance.com For All Your Joomla Performance Needs
Re: Where are the error logs?
Post by nicole2292 » Tue Apr 29, 2008 10:03 pm
Thanks a lot. I know for most my sites which are hosted externally with a web host I can access error logs through Cpanel or similar.
However I am now setting up a new site on a different server in the company I am working for’s server room. I was just unsure how and where the errors for Joomla are recorded or if there was some other way to access them as I don’t have a Cpanel. When Joomla Logs errors does it log to the apache logs or is there a separate log?
Thanks very much.
Re: Where are the error logs?
Post by Geoff » Wed Apr 30, 2008 3:28 am
mod note: moved to general questions
On my sites, the error log is in file called error_log (I think in the public_html folder).
Re: Where are the error logs?
Post by nicole2292 » Wed Apr 30, 2008 5:45 am
Источник
Using JLog
Материал из Joomla! Documentation
Содержание
Overview
Joomla logging gives you the ability to log messages to files and to the screen (within the Joomla! Debug Console at the bottom of the web page) and the main Joomla class which underpins this is JLog. In the new naming convention this is the Log class within the namespace JoomlaCMSLogLog.
The logging can be controlled dynamically through the Joomla Global Configuration and by configuring the System – Debug plugin (which is shipped with Joomla). Overall these facilities allow you to:
- switch DEBUG logging on or off – so that ordinarily you don’t consume resources needlessly, but you have the logging information to assist troubleshooting when there are issues, for example on a live site which has your extension installed.
- route log messages to a specific log file for your own extension.
- view log messages in the Debug Console – you can select the group of users to which log messages should be displayed, so that on a live site developers can see the messages while other users are unaffected.
- filter Debug Console messages by priority (i.e. INFO, DEBUG, WARNING and so on) and by category. (You are free to define your own categories.)
In addition, the log messages can be translatable into different languages.
The main configuration options relating to logging are shown below. Switching on debug and display of the Joomla Debug Console is controlled through the global configuration options.
Logging to the general log file is controlled via the Logging tab of the configuration of the Joomla System — Debug plugin. (In the administrator menu, click on Extensions / Plugins, find the System — Debug plugin. Click on it to edit its configurable options).
And the options within the Plugin tab control display on the Joomla Debug Console.
Basic File Logging
To log a message you use the JLog::add() function. For example:
Using the new class naming convention use instead:
The parameters are
- A message string. You can use translation with these. (For example, JText::_(‘MY_EXTENSION_ERR_MSG’) You can also display the values of variables, provided you convert them into a string format. (For example, using __toString() if the type of the variable supports that.)
- A priority, which can be one of JLog::EMERGENCY, JLog::ALERT, JLog::CRITICAL, JLog::ERROR, JLog::WARNING, JLog::NOTICE, JLog::INFO, JLog::DEBUG (based on the standard syslog / RFC 5424 severity levels – see wikipedia article on syslog).
- A category, which is just a text string. You can define whatever categories you like, but it is best to define them to avoid possible clashes with those of other extensions.
It can be very helpful with troubleshooting problems if you include diagnostic debug messages in your extension. In this case, enclose your log message within a check for JDEBUG:
Basic Logging Sample Code
Below is the code for a simple Joomla module which you can install and run to demonstrate use of the logging functionality. If you are unsure about development and installing a Joomla module then following the tutorial at Creating a simple module will help.
In a folder mod_sample_log create the following 2 files:
Zip up the mod_sample_log directory to create mod_sample_log.zip.
Within your Joomla administrator go to Install Extensions and via the Upload Package File tab select this zip file to install this sample log module.
Make this module visible by editing it (click on it within the Modules page) then:
- making its status Published
- selecting a position on the page for it to be shown
- on the menu assignment tab specify the pages it should appear on
Check the configuration of the settings shown at the top of this web page. In particular, ensure that the System – Debug plugin is enabled and that Log Almost Everything is set to Yes. Also note where the folder where your log files are stored.
Display your Joomla site and you should then see the sample log module appearing. In your log file folder you should find your error messages in the everything.php file.
Also switch on the debug console and confirm that you can see the error messages in its Log Messages section.
Logging to a Specific Log File
You can use JLog::addLogger() to set up logging to an additional log file, filtering the log messages to be sent there by priority (the ‘severity level’) and/or category. The parameters of JLog::addLogger() are:
- an array with configuration details – including the name of the log file.
- the severity levels to be logged in that file.
- an array of the categories to be logged in that file. (If parameter 4 is set to true, this array defines the categories which are NOT to be logged in the file.)
- (often omitted) a boolean specifying whether parameter 3 is an include list. (The default, P4 = false) or an exclude list (P4 = true.)
For example, if you have developed a com_helloworld extension you could use the following:
Then when you log a message, specify the category as com_helloworld, as in the example below
This will result in your log message being written to com_helloworld.log.php. If the System – Debug plugin settings have «Log Almost Everything» set to Yes, the message will appear in the common everything.php log file as well.
Note: You may wish to combine this with the Display error messages and notices section to display visible error notifications to users.
You can also add an additional logger to capture only critical and emergency log notifications:
You can also exclude a specific priority level from being included. For example, to log all but DEBUG messages:
The JLog priority levels are implemented as separate bits of an integer, so you can use bitwise operations (bitwise AND, &; and bitwise NOT,
) to calculate the appropriate log levels. JLog::All is a constant integer which has all the relevant bits set, so that all the Joomla priority levels are included.
Formatting the Log File
The first parameter to addLogger can have a few optional additional settings in addition to the text_file entry.
There is, for example, the entry text_entry_format, specifying the format of each line in your log file.
The default format is:
Here is an example of a different format which shows how to omit the category:
In addition to the placeholders shown above in the default string, the following values are available:
There is an additional optional boolean parameter text_file_no_php, which specifies whether the log file is prepended with the usual prefix of:
Note: Usually you should not set this setting to false. Log files should not be readable from the outside. They can provide valuable information about your system for attackers. Only dabble with this if you know what you’re doing!
Furthermore, if you want to store the log file somewhere other than the logging path configured in the Joomla! settings, there is the text_file_path setting.
Logging to Other Places
As well as logging to files, you can log to other places as well, such as
- the Joomla message area (where the message is shown if you call JFactory::getApplication()->enqueueMessage() ).
- a database table.
- just a simple echo statement.
Of these, probably the most useful is the logging to the message bar, which you can set up via:
Then when you do:
you will get the message copied to the message bar. Note that Joomla core code sets up logging to the messagequeue for category ‘jerror’, so that if you use this category in your log messages, you will get the message displayed on the message bar. For example:
will result in the message being shown in the Joomla message area, even though you haven’t explicitly set up a logger to log there.
PSR-3 Logger
Since version 3.8 Joomla incorporates a logger which adheres to the PSR-3 Logger Interface. This enables libraries which follow this standard recommendation to integrate with the Joomla logging system. To use this, first do:
This returns an object on which you have available the methods of the PSR-3 LoggerInterface, for example:
The default Joomla loggers process only the «category» and «date» elements of the context associative array (parameter 2), mapping the values of these elements to the corresponding column in your log file.
Exceptions
JLog::add() will throw an exception if it can’t write to the log file. To avoid this, you’d have to either wrap the call in another function, or implement your own logger class and then include it with:
Further Reading
Joomla logging should be used in tandem with PHP exceptions, not as a replacement. See J2.5:Exceptions_and_Logging_in_Joomla_Platform_11.1_and_Joomla_2.5 for backstory on this class and how it arose from the old Joomla PHP4 compatible error classes.
Источник
The Log Package
Introduction
The Joomla Platform includes a Log package that allows for configurable,
hook-driven logging to a variety of formats.
The classes included in the Log package are JLog, JLogEntry,
JLogger as well as the classes JLoggerDatabase,
JLoggerEcho, JLoggerFormattedText, JLoggerMessageQueue, JLoggerSyslog
and JLoggerW3C which support formatting and storage. Of all these
classes, you will generally only use JLog in your projects.
Logging is a two-step process.
First you must add the add loggers to listen for log messages. Any
number of loggers can be configured to listen for log messages based on
a priority and a category. For example, you can configure all log
messages to be logged to the database, but also set just errors to be
logged to a file. To do this, you use the JLog::addLogger method.
After at least one logger is configured, you can then add messages using
the JLog::addLogEntry method where you can specify a message, and
optionally a priority (integer), category (string) and date.
Logging priority
Before we look at any logging examples, we need to understand what the
priority is. The priority is an integer mask and is set using one or
more predefined constants in the JLog class. These are:
- JLog::EMERGENCY
- JLog::ALERT
- JLog::CRITICAL
- JLog::ERROR
- JLog::WARNING
- JLog::NOTICE
- JLog::INFO
- JLog::DEBUG
A final constant, JLog::ALL is also available which corresponds to hex
FFFF (16 bits). The other constants reserve the first eight bits for
system use. This allows the developer the last eight bits, hex 100 to
8000, for custom use if desired. As the values are for masking, they can
be mixed using any of the bitwise operators for and, or, not and
xor.
By default, loggers are added to listen for JLog::ALL priorities and log
entries are added using the JLog::INFO mask.
Logging to files (formattedtext)
A very typical example of logging is the ability to log to a file, and
this is the default handler for logging. To do this add the
logger and then you can add log messages.
// Initialise a basic logger with no options (once only).
JLog::addLogger(array());

// Add a message.
JLog::add('Logged');
As no logger has been specified in the JLog::addLogger call, the
«formattedtext» logger will be used. This will log the message to a file
called «error.php» in the log folder specified by the «log_path»
configuration variable (in the Joomla CMS, the default is /logs/). It
will look something like this:
#<?php die('Forbidden.'); ?>
#Date: 2011-06-17 02:56:21 UTC
#Software: Joomla Platform 11.1 Stable [ Ember ] 01-Jun-2011 06:00 GMT

#Fields: datetime   priority    category    message
2011-06-17T03:06:44+00:00   INFO    -   Logged
The file is tab-delimited and the default columns are the timestamp, the
text representation of the priority, the category and finally the
message. The category is empty (a dash) because we didn’t supply it.
To log a different priority, you can use code like:
JLog::add('Logged 3', JLog::WARNING, 'Test');
The log file will now look similar to the following:
2011-06-17T03:06:44+00:00 INFO - Logged
2011-06-17T03:52:08+00:00 WARNING - Logged 2
2011-06-17T03:57:03+00:00 WARNING test Logged 3
Additional options with formattedtext
When adding the «formattedtext» logger, the following options are
available to supply in the array you pass to JLog::addLogger.
| Option | Description |
|---|---|
| text_file | Allows you to specify the name of the file to which messages are logged. |
| text_file_path | Allows you to specify the folder path to the file to which messages are logged. |
| text_file_no_php | If set, the PHP die statement will not be added to the file line of the file. |
| text_entry_format | Allows you to change the format of the entire line of the log message in the file. |
Changing the name of the log file
Given the options outlined in the previous section, you can change the
name of the file to which you are logging when you add the logger, like
this:
// Log to a specific text file.
JLog::addLogger(
	array(
		'text_file' => 'mylogs.php'
	)
);
Logging different priorities to different files
You can log different types of messages to different files by adding
multiple loggers that bind different log priorities to different files.
For example, the following code will log all messages except errors to
one file, and error messages to a separate file.
// Log all message except errors to mylogs.php.
JLog::addLogger(
	array(
		'text_file' => 'mylogs.php'
	),
	JLog::ALL ^ JLog::ERROR
);

// Log errors to myerrors.php.
JLog::addLogger(
	array(
		'text_file' => 'myerrors.php'
	),
	JLog::ERROR
);
Logging specific categories to a file
If you are wanting to collect errors for your specific project, class or
extension, you can also bind logging to different categories. For
example, the following code could be used in a Joomla extension to just
collect errors relating to it.
// Log my extension errors only.
JLog::addLogger(
	array(
		'text_file' => 'com_hello.errors.php'
	),
	JLog::ERROR,
	'com_hello'
);
To log messages to that logger, you would use something similar to the
following code:
JLog::add('Forgot to say goodbye', JLog::ERROR, 'com_hello');
It is important to note that other loggers, added beyond your control,
may also pick up this message.
Splitting up logs by date
Log files can, potentially, get very long over time. A convenient
solution to this is to roll logs into different files based on a period
of time — an hour, a day, a month or even a year. To do this, you just
need to add the date to the file name of the log file. The following
example shows you how to do this on a daily basis.
// Get the date.
$date = JFactory::getDate()->format('Y-m-d');

// Add the logger.
JLog::addLogger(
	array(
		'text_file' => 'com_hello.'.$date.'.php'
	)
);
Changing the format of the log message
When you adding a log message, it is written to the file in a default
format in the form:
{DATETIME} {PRIORITY} {CATEGORY} {MESSAGE}
Each field is written in upper case, wrapped in curly braces and
separated by tabs. There are a number of other fields that are
automatically defined in the «formattedtext» logger that you can take
advantage of automatically. These are:
| Field | Description |
|---|---|
| {CLIENTIP} | The IP address of the user. |
| {DATE} | The «Y-m-d» date component of the message datestamp. |
| {TIME} | The «H:i:s» time component of the message datestamp. |
To modify for the log format to add any or all of these fields, you can
add the logger as shown in the following code.
// Add the logger.
JLog::addLogger(
	array(
		'text_file' => 'com_hello.php',
		'text_entry_format' => '{DATE} {TIME} {CLIENTIP} {CATEGORY} {MESSAGE}'
	)
);
As you can see, you can include or leave out any fields as you require
to suit the needs of your project.
You can also add more fields but to do this you need to create and add a
JLogEntry object directly. The following example shows you how to do
this.
// Add the logger.
JLog::addLogger(
	array(
		'text_file' => 'com_shop.sales.php',
		'text_entry_format' => '{DATETIME} {PRICE} {QUANTITY} {MESSAGE}'
	),
	JLog::INFO,
	'Shop'
);

$logEntry = new JLogEntry('T- Shirt', JLog::INFO, 'Shop');
$logEntry->price = '7.99';
$logEntry->quantity = 10;

JLog::add($logEntry);
It is strongly recommended that, when using a custom format, you bind
the log entries to a specific and unique category, otherwise log files
with different format (fields) could become mixed.
Logging to the database
The «database» logger allows you to log message to a database table. The
create syntax for the default table is as follows:
CREATE TABLE `jos_log_entries` (
	`priority` int(11) DEFAULT NULL,
	`message` varchar(512) DEFAULT NULL,
	`date` datetime DEFAULT NULL,
	`category` varchar(255) DEFAULT NULL,
	KEY `idx_category_date_priority` (`category`,`date`,`priority`)
) ENGINE=InnoDB DEFAULT CHARSET=utf8;
To log messages using the «database» logger, you the following code as a
guide.
// Add the logger.
JLog::addLogger(
	array(
		'logger' => 'database'
	),
	JLog::ALL,
	'dblog'
);

// Add the message.
JLog::add('Database log', JLog::INFO, 'dblog');
Notice that the example binds the logger to all message priorities, but
only those with a category of «dblog».
If you are wanting to store additional information in the message, you
can do so using a JSON encoded string. For example:
// Assemble the log message.
$user = JFactory::getUser();
$log = array(
	'userId' => $user->get('id'),
	'userName' => $user->get('name'),
	'stockId' => 'SKU123',
	'price' => '7.49',
	'quantity' => 10
);

// Add the message.
JLog::add(json_encode($log), JLog::INFO, 'dblog');
This makes it possible to retrieve detailed information for display.
Что такое логи сайта
Вступление
Логи это специальные текстовые файлы с записями всех обращений к сайту. Каждая запись в логе содержит временную метку, короткий ответ сервера и тип запроса. Различаются два типа логов: логи ошибок и логии доступа.
Чаще всего , логи сайта находятся в каталоге сайта в отдельной папке [logs]. В папке [logs],обычно, лежат два файла error_log и access_log.С помощью этих файлов вы всегда можете выяснить ошибку, произошедшую га сайте. Чтобы узнать ошибку нужно примерно вспомнить, когда ошибка возникла и посмотреть записи об ошибках на этот момент.
Журналы ошибок
Журнал access_log
В логе access_log собираются все записи о вошедших на сайт посетителях, в том числе входы поисковых машин и спам ботов. С помощью записей в этих журналах можно посмотреть, с какого IP адреса и когда был сделан вход на сайт, и некоторую информацию об этом посетителе;
Журнал error_log
В логе error_log собираются все ошибки, произошедшие при работе скриптов сайта. Открыв этот файлы можно определить источник и причину ошибки, для её исправления.
Журнал xferlog_regular
В файле xferlog_regular вы найдете записи обо всех изменениях, которые внесены с через FTP клиент. С помощью этих записей, вы можете узнать, какие изменения были сделаны за последнее время по FTP, и с какого IP адреса эти изменения были внесены.Этот лог есть не на всех хостингах.
Как посмотреть и найти ошибку
Чтобы посмотреть ошибки, откройте, для начала, файл error_log.Открыть файл нужно в текстовом редакторе и внимательно изучить записи, обращая внимание на дату и время, когда сделана запись. Вспомните, что вы делали на сайте, какое расширение устанавливали или удаляли, свяжите это по времени с записями в логе и это поможет выявить причину ошибки.
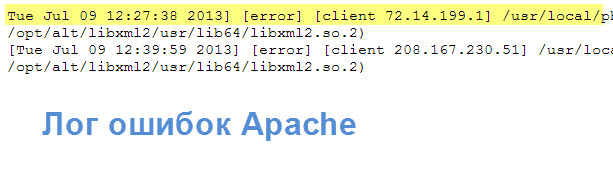
Логи веб-сервера Apache
Кроме логов перечисленных выше, хостинг может предоставлять вам доступ к ошибкам, происходящим на веб-сервере Apache. Ищите отдельную кнопку в административной панели на сервере хостинга, типа «Журнал логов Apache».
Здесь также должно быть два журнала:
- Лог ошибок Apache;
- Лог использования Apache.
Выводы статьи
- Найти, а тем более исправить самостоятельно ошибку на сайте без доступа к записываемым логам домена НЕЛЬЗЯ!
- Если запись логов для домена не ведется, то нужно обратиться в support хостинга, они скажут, как ее включить, или где ее посмотреть.
- Доступ к своим логам не может быть закрыт и не должен стоить дополнительной платы.
- На большинстве хостингах ведутся как минимум, два лога. Лог Error— ошибки в работе скриптов на сайте и Access –лог всех посещений сайта, включая всех ботов.
- В зависимости от настроек хостинга, логии домена могут храниться в разных местах и по-разному архивироваться. Внимательно просмотрите свою панель на сервере или напишите в свой support.
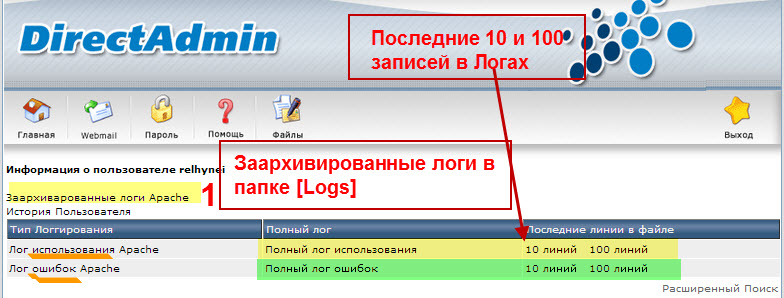
Приведу фото, как организован доступ к логам в DirectAdmin
©Joomla-abc.ru
Другие ошибки Joomla
Ошибки Joomla
Похожие статьи
-
Ошибки класса 4,Client Error
04 сентября 2013
-
Поиск и вывод PHP ошибок Joomla
02 сентября 2013
-
Как расшифровать записи в логе ошибок Apache
10 июля 2013
-
Как расшифровать записи в логе событий по FTP
10 июля 2013
Популярные статьи
-
Перенос сайта Joomla на другой хостинг -
Форма обратной связи Joomla – как создать и разместить на сайте, урок 27 -
Админ панель Joomla — вход, выход, авторизация, восстановление пароля, настройка страницы авторизации, урок 12 -
Компонент Контакты на Joomla сайте, урок 55 -
7 Бесплатных Интернет магазинов на Joomla — расширения для интернет торговли -
Модуль HTML-код Joomla – подробное описание и использование, урок 33 -
Визуальные редакторы Joomla 3: TinyMCE, JCE, CKEditor
Последние статьи
Меню
Joomla уроки
- Админ панель Joomla — вход, выход, авторизация, восстановление пароля, настройка страницы авторизации, урок 12
- Общая настройка меток Joomla — Урок 22
- Установка Joomla 3 на VDS/VPS, выделенный сервер с панелью ISP, урок 9
- Модуль Материалы Последние новости Joomla сайта, урок 41
- Всё о плагинах CMS Joomla! — администрирование, где найти, установка, удаление, урок 30
- 2 программы FTP клиент для создания Joomla сайта – FilleZilla, WinSCP, урок 4
- Общие настройки материалов Joomla — урок 20
Joomla 4 logs can be an essential tool when you are troubleshooting website issues. It can provide detailed information about what is happening to your site in the background.
For example, if a script or form is not working as expected, the logs will provide a specific error message. You can then use that error message to research a solution or workaround.
This guide will explain how to access the Joomla 4 log settings, what options are available, and where the log settings are saved.
- Access Joomla 4 Logging Settings
- Logging Options
- Custom Logging Options
- Where Are My Log Settings Saved?
Accessing Joomla 4 Log Settings
- Login to the Admin Panel for Joomla.
- Click System then the Global Configuration link.

- Click the Logging tab to access the log settings.

You can then choose your logging options as needed. The available settings are described below.
Logging Options
You will first see the section for standard Logging settings. There you can select what is logged and where the location of the logs will be. This is what it will look like.
Below is a description of the available options.
| Logging Option | Description |
|---|---|
| Path to Log Folder | This is the folder location where logged events will be located. |
| Log Almost Everything | If this is set to the Yes position, all events will be logged excluding Deprecated API’s. |
| Log Deprecated API | Set this to Yes if you want to log calls from extensions to deprecated API’s. If enabled a deprecated.php file will be created in the “Path to Log Folder”. |
Custom Logging Options
The Custom Logging section is where you can set log priorities or choose which categories are included in the logs. This is what it will look like.
Below is more information about the custom log settings in Joomla.
| Custom Logging Option | Description |
|---|---|
| Log Priorities | This is where you can select your priorities from the drop-down menu. The priority is set based on where it is located on the list. For example, the one furthest left will have a priority of ‘0’ and the next one will have a priority of ‘1’ and so on. When an event is logged, the priority number will be included in the log. |
| Log Categories | Categories entered in this section will either be included or excluded depending on the “Log Category Mode“setting. |
| Log Category Mode | Set this to Include if you want to log categories listed in the “Log Categories” section. Set it to Exclude if don’t want to log categories listed in the “Log Categories” section. |
Where Are My Log Settings Saved?
When you choose your logging settings in the Admin Panel, they are added to the Joomla configuration.php file. But, you can also go there and directly edit them if you are familiar with PHP coding. Here is an example of some of the default Logging settings you will find in the configuration.php file:
	public $log_path = '/home/custo123/public_html/administrator/logs';
	public $tmp_path = '/home/custo123/public_html/tmp';
	public $log_everything = 0;
	public $log_deprecated = 0;
	public $log_priorities = array('0' => 'all');Where Are My Log Settings Saved?
	public $log_categories = '';
	public $log_category_mode = 0;
Now that you know more about the Joomla 4 log settings, you can begin using them to troubleshoot website problems and events. Check out our Joomla 4 section for more guides to help you build a successful site.
Get the power and performance you need without additional configurations with our Managed VPS Hosting.
простое журналирование
рейтинг: 6.7/10, голосов: 15
Бывают случаи, когда необходимо где-то на сервере вести логи ошибок, либо других важных событий в файл (например брутфорс аккаунтов). Самостоятельно открывать/закрывать файлы, соблюдать форматирование (чтобы читабельность не сбивалась), добавлять даты и прочее — это страшная рутина.
Взять на себя все эти трудности может стандартный класс Joomla — JLog. Он предоставляет удобное API, для работы с лог-файлами. Рассмотрим его работу на примере.
// Подключаем библиотеку JLog
jimport('joomla.error.log');

// Инициализация JLog-объекта, файл логов будет называться "my.log.php"
$log = &JLog::getInstance('my.log.php');

// Добавляем какие-то данные строку в лог
$log->addEntry(array('LEVEL' => '1','STATUS' => 'SOME ERROR:','COMMENT' => 'Your message here'));

// Добавляем еще какие-то данные строку в лог
$log->addEntry(array('LEVEL' => '1','STATUS' => 'Username:','COMMENT' => $username));
В итоге будет записаны в файл по адресу
<siteroot>/logs/my.log.phpСообщения примерно следующего вида
#<?php die('Direct Access To Log Files Not Permitted'); ?>
#Version: 1.0
#Date: 2011-03-20 19:34:20
#Fields: date   time    level   c-ip    status  comment
#Software: Joomla! 1.5.22 Stable [ senu takaa ama woi ] 04-November-2010 18:00 GMT
2011-03-20  19:34:20    1   <nobr>127.0.0.1</nobr>  SOME ERROR: Your message here
2011-03-20  19:34:20    1   <nobr>127.0.0.1</nobr>  Username:   smet.denis
Стоит отметить некоторые моменты
- Текущая дата и IP-адрес были автоматически вписаны в файл
- В шапке стоит защита от прямого чтения лога, поэтому безопаснее будет файл логов называть *.php, либо защищаться с помощью .htaccess
- В шапке сохранена расшифровка лога по полям «#Fields»
Дополнительные параметры для JLog
При инициализации можно явно указывать следующие парметры
getInstance($file, $options, $path)
- $file — имя лог файла, по умолчанию «error.php»
- $options — настройки форматирования логов, по умолчанию будет использваться
«{DATE}t{TIME}t{LEVEL}t{C-IP}t{STATUS}t{COMMENT}», где например STATUS — регистронезависимый ключ из массива для addEntry()
- $path — полный путь до директории с логами сайта, по умолчанию будет использоваться из глобальных настроек Joomla (<siteroot>/logs)
Пример использования
Если лог предвидится большой, то лучше использовать имя лога, зависимое от текущей даты. Например
// Каждый день новый лог файл
define('ERROR_LOG', 'notes.log.'.date('Y_m_d')'.php');
Примечание: Стандартный плагин system/log.php работает по тому же принципу. Если его включить, то будут отслеживаться все неудачные попытки зайти в панель управления.
Содержание
- Name already in use
- joomla-developer-docs / docs / en / cms / platform / log.md
- Using JLog
- Материал из Joomla! Documentation
- Содержание
- Overview
- Basic File Logging
- Basic Logging Sample Code
- Logging to a Specific Log File
- Formatting the Log File
- Logging to Other Places
- PSR-3 Logger
- Exceptions
- Further Reading
Name already in use
joomla-developer-docs / docs / en / cms / platform / log.md
- Go to file T
- Go to line L
- Copy path
- Copy permalink
Copy raw contents
Copy raw contents
The Log Package
The Joomla Platform includes a Log package that allows for configurable, hook-driven logging to a variety of formats.
The classes included in the Log package are JLog , JLogEntry , JLogger as well as the classes JLoggerDatabase , JLoggerEcho , JLoggerFormattedText , JLoggerMessageQueue , JLoggerSyslog and JLoggerW3C which support formatting and storage. Of all these classes, you will generally only use JLog in your projects.
Logging is a two-step process.
First you must add the add loggers to listen for log messages. Any number of loggers can be configured to listen for log messages based on a priority and a category. For example, you can configure all log messages to be logged to the database, but also set just errors to be logged to a file. To do this, you use the JLog::addLogger method.
After at least one logger is configured, you can then add messages using the JLog::addLogEntry method where you can specify a message, and optionally a priority (integer), category (string) and date.
Before we look at any logging examples, we need to understand what the priority is. The priority is an integer mask and is set using one or more predefined constants in the JLog class. These are:
- JLog::EMERGENCY
- JLog::ALERT
- JLog::CRITICAL
- JLog::ERROR
- JLog::WARNING
- JLog::NOTICE
- JLog::INFO
- JLog::DEBUG
A final constant, JLog::ALL is also available which corresponds to hex FFFF (16 bits). The other constants reserve the first eight bits for system use. This allows the developer the last eight bits, hex 100 to 8000, for custom use if desired. As the values are for masking, they can be mixed using any of the bitwise operators for and, or, not and xor.
By default, loggers are added to listen for JLog::ALL priorities and log entries are added using the JLog::INFO mask.
Logging to files (formattedtext)
A very typical example of logging is the ability to log to a file, and this is the default handler for logging. To do this add the logger and then you can add log messages.
As no logger has been specified in the JLog::addLogger call, the «formattedtext» logger will be used. This will log the message to a file called «error.php» in the log folder specified by the «log_path» configuration variable (in the Joomla CMS, the default is /logs/ ). It will look something like this:
The file is tab-delimited and the default columns are the timestamp, the text representation of the priority, the category and finally the message. The category is empty (a dash) because we didn’t supply it.
To log a different priority, you can use code like:
The log file will now look similar to the following:
Additional options with formattedtext
When adding the «formattedtext» logger, the following options are available to supply in the array you pass to JLog::addLogger .
| Option | Description |
|---|---|
| text_file | Allows you to specify the name of the file to which messages are logged. |
| text_file_path | Allows you to specify the folder path to the file to which messages are logged. |
| text_file_no_php | If set, the PHP die statement will not be added to the file line of the file. |
| text_entry_format | Allows you to change the format of the entire line of the log message in the file. |
Changing the name of the log file
Given the options outlined in the previous section, you can change the name of the file to which you are logging when you add the logger, like this:
Logging different priorities to different files
You can log different types of messages to different files by adding multiple loggers that bind different log priorities to different files. For example, the following code will log all messages except errors to one file, and error messages to a separate file.
Logging specific categories to a file
If you are wanting to collect errors for your specific project, class or extension, you can also bind logging to different categories. For example, the following code could be used in a Joomla extension to just collect errors relating to it.
To log messages to that logger, you would use something similar to the following code:
It is important to note that other loggers, added beyond your control, may also pick up this message.
Splitting up logs by date
Log files can, potentially, get very long over time. A convenient solution to this is to roll logs into different files based on a period of time — an hour, a day, a month or even a year. To do this, you just need to add the date to the file name of the log file. The following example shows you how to do this on a daily basis.
Changing the format of the log message
When you adding a log message, it is written to the file in a default format in the form:
Each field is written in upper case, wrapped in curly braces and separated by tabs. There are a number of other fields that are automatically defined in the «formattedtext» logger that you can take advantage of automatically. These are:
| Field | Description |
|---|---|
| The IP address of the user. | |
| The «Y-m-d» date component of the message datestamp. | |
| The «H:i:s» time component of the message datestamp. |
To modify for the log format to add any or all of these fields, you can add the logger as shown in the following code.
As you can see, you can include or leave out any fields as you require to suit the needs of your project.
You can also add more fields but to do this you need to create and add a JLogEntry object directly. The following example shows you how to do this.
It is strongly recommended that, when using a custom format, you bind the log entries to a specific and unique category, otherwise log files with different format (fields) could become mixed.
Logging to the database
The «database» logger allows you to log message to a database table. The create syntax for the default table is as follows:
To log messages using the «database» logger, you the following code as a guide.
Notice that the example binds the logger to all message priorities, but only those with a category of «dblog».
If you are wanting to store additional information in the message, you can do so using a JSON encoded string. For example:
This makes it possible to retrieve detailed information for display.
Источник
Using JLog
Материал из Joomla! Documentation
Содержание
Overview
Joomla logging gives you the ability to log messages to files and to the screen (within the Joomla! Debug Console at the bottom of the web page) and the main Joomla class which underpins this is JLog. In the new naming convention this is the Log class within the namespace JoomlaCMSLogLog.
The logging can be controlled dynamically through the Joomla Global Configuration and by configuring the System – Debug plugin (which is shipped with Joomla). Overall these facilities allow you to:
- switch DEBUG logging on or off – so that ordinarily you don’t consume resources needlessly, but you have the logging information to assist troubleshooting when there are issues, for example on a live site which has your extension installed.
- route log messages to a specific log file for your own extension.
- view log messages in the Debug Console – you can select the group of users to which log messages should be displayed, so that on a live site developers can see the messages while other users are unaffected.
- filter Debug Console messages by priority (i.e. INFO, DEBUG, WARNING and so on) and by category. (You are free to define your own categories.)
In addition, the log messages can be translatable into different languages.
The main configuration options relating to logging are shown below. Switching on debug and display of the Joomla Debug Console is controlled through the global configuration options.
Logging to the general log file is controlled via the Logging tab of the configuration of the Joomla System — Debug plugin. (In the administrator menu, click on Extensions / Plugins, find the System — Debug plugin. Click on it to edit its configurable options).
And the options within the Plugin tab control display on the Joomla Debug Console.
Basic File Logging
To log a message you use the JLog::add() function. For example:
Using the new class naming convention use instead:
The parameters are
- A message string. You can use translation with these. (For example, JText::_(‘MY_EXTENSION_ERR_MSG’) You can also display the values of variables, provided you convert them into a string format. (For example, using __toString() if the type of the variable supports that.)
- A priority, which can be one of JLog::EMERGENCY, JLog::ALERT, JLog::CRITICAL, JLog::ERROR, JLog::WARNING, JLog::NOTICE, JLog::INFO, JLog::DEBUG (based on the standard syslog / RFC 5424 severity levels – see wikipedia article on syslog).
- A category, which is just a text string. You can define whatever categories you like, but it is best to define them to avoid possible clashes with those of other extensions.
It can be very helpful with troubleshooting problems if you include diagnostic debug messages in your extension. In this case, enclose your log message within a check for JDEBUG:
Basic Logging Sample Code
Below is the code for a simple Joomla module which you can install and run to demonstrate use of the logging functionality. If you are unsure about development and installing a Joomla module then following the tutorial at Creating a simple module will help.
In a folder mod_sample_log create the following 2 files:
Zip up the mod_sample_log directory to create mod_sample_log.zip.
Within your Joomla administrator go to Install Extensions and via the Upload Package File tab select this zip file to install this sample log module.
Make this module visible by editing it (click on it within the Modules page) then:
- making its status Published
- selecting a position on the page for it to be shown
- on the menu assignment tab specify the pages it should appear on
Check the configuration of the settings shown at the top of this web page. In particular, ensure that the System – Debug plugin is enabled and that Log Almost Everything is set to Yes. Also note where the folder where your log files are stored.
Display your Joomla site and you should then see the sample log module appearing. In your log file folder you should find your error messages in the everything.php file.
Also switch on the debug console and confirm that you can see the error messages in its Log Messages section.
Logging to a Specific Log File
You can use JLog::addLogger() to set up logging to an additional log file, filtering the log messages to be sent there by priority (the ‘severity level’) and/or category. The parameters of JLog::addLogger() are:
- an array with configuration details – including the name of the log file.
- the severity levels to be logged in that file.
- an array of the categories to be logged in that file. (If parameter 4 is set to true, this array defines the categories which are NOT to be logged in the file.)
- (often omitted) a boolean specifying whether parameter 3 is an include list. (The default, P4 = false) or an exclude list (P4 = true.)
For example, if you have developed a com_helloworld extension you could use the following:
Then when you log a message, specify the category as com_helloworld, as in the example below
This will result in your log message being written to com_helloworld.log.php. If the System – Debug plugin settings have «Log Almost Everything» set to Yes, the message will appear in the common everything.php log file as well.
Note: You may wish to combine this with the Display error messages and notices section to display visible error notifications to users.
You can also add an additional logger to capture only critical and emergency log notifications:
You can also exclude a specific priority level from being included. For example, to log all but DEBUG messages:
The JLog priority levels are implemented as separate bits of an integer, so you can use bitwise operations (bitwise AND, &; and bitwise NOT,
) to calculate the appropriate log levels. JLog::All is a constant integer which has all the relevant bits set, so that all the Joomla priority levels are included.
Formatting the Log File
The first parameter to addLogger can have a few optional additional settings in addition to the text_file entry.
There is, for example, the entry text_entry_format, specifying the format of each line in your log file.
The default format is:
Here is an example of a different format which shows how to omit the category:
In addition to the placeholders shown above in the default string, the following values are available:
There is an additional optional boolean parameter text_file_no_php, which specifies whether the log file is prepended with the usual prefix of:
Note: Usually you should not set this setting to false. Log files should not be readable from the outside. They can provide valuable information about your system for attackers. Only dabble with this if you know what you’re doing!
Furthermore, if you want to store the log file somewhere other than the logging path configured in the Joomla! settings, there is the text_file_path setting.
Logging to Other Places
As well as logging to files, you can log to other places as well, such as
- the Joomla message area (where the message is shown if you call JFactory::getApplication()->enqueueMessage() ).
- a database table.
- just a simple echo statement.
Of these, probably the most useful is the logging to the message bar, which you can set up via:
Then when you do:
you will get the message copied to the message bar. Note that Joomla core code sets up logging to the messagequeue for category ‘jerror’, so that if you use this category in your log messages, you will get the message displayed on the message bar. For example:
will result in the message being shown in the Joomla message area, even though you haven’t explicitly set up a logger to log there.
PSR-3 Logger
Since version 3.8 Joomla incorporates a logger which adheres to the PSR-3 Logger Interface. This enables libraries which follow this standard recommendation to integrate with the Joomla logging system. To use this, first do:
This returns an object on which you have available the methods of the PSR-3 LoggerInterface, for example:
The default Joomla loggers process only the «category» and «date» elements of the context associative array (parameter 2), mapping the values of these elements to the corresponding column in your log file.
Exceptions
JLog::add() will throw an exception if it can’t write to the log file. To avoid this, you’d have to either wrap the call in another function, or implement your own logger class and then include it with:
Further Reading
Joomla logging should be used in tandem with PHP exceptions, not as a replacement. See J2.5:Exceptions_and_Logging_in_Joomla_Platform_11.1_and_Joomla_2.5 for backstory on this class and how it arose from the old Joomla PHP4 compatible error classes.
Источник