validate( [options ] )Returns: Validator
Description: Validates the selected form.
-
validate( [options ] )
-
options
-
debug (default:
false)Enables debug mode. If true, the form is not submitted and certain errors are displayed on the console (will check if a
window.consoleproperty exists). Try to enable when a form is just submitted instead of validation stopping the submit.Example: Prevents the form from submitting and tries to help setting up the validation with warnings about missing methods and other debug messages.
-
submitHandler (default:
native form submit)Callback for handling the actual submit when the form is valid. Gets the form and the submit event as the only arguments. Replaces the default submit. The right place to submit a form via Ajax after it is validated.
Example: Submits the form via Ajax, using jQuery Form plugin, when valid.
1
2
3
4
5
submitHandler: function(form) {Example: Use submitHandler to process something and then using the default submit. Note that «form» refers to a DOM element, this way the validation isn’t triggered again.
1
2
3
4
5
6
submitHandler: function(form) {// do other things for a valid formThe callback gets passed two arguments:
-
form
The form currently being validated, as a DOMElement.
-
event
The submit event instance.
-
-
invalidHandler
Callback for custom code when an invalid form is submitted. Called with an event object as the first argument, and the validator as the second.
Example: Displays a message above the form, indicating how many fields are invalid when the user tries to submit an invalid form.
1
2
3
4
5
6
7
8
9
10
11
12
13
14
15
invalidHandler: function(event, validator) {// 'this' refers to the formvar errors = validator.numberOfInvalids();var message = errors == 1? 'You missed 1 field. It has been highlighted': 'You missed ' + errors + ' fields. They have been highlighted';$("div.error span").html(message);The callback gets passed two arguments:
-
event
A custom event object, since this function is bound as an event handler.
-
validator
The validator instance for the current form.
-
-
ignore (default:
":hidden")Elements to ignore when validating, simply filtering them out. jQuery’s not-method is used, therefore everything that is accepted by not() can be passed as this option. Inputs of type submit and reset are always ignored, so are disabled elements.
Example: Ignores all elements with the class «ignore» when validating.
-
rules (default:
rules are read from markup (classes, attributes, data))Key/value pairs defining custom rules. Key is the name of an element (or a group of checkboxes/radio buttons), value is an object consisting of rule/parameter pairs or a plain String. Can be combined with class/attribute/data rules. Each rule can be specified as having a depends-property to apply the rule only in certain conditions. See the second example below for details.
Example: Specifies a name element as required and an email element as required (using the shortcut for a single rule) and a valid email address (using another object literal).
1
2
3
4
5
6
7
8
9
10
11
// simple rule, converted to {required:true}Example: Specifies a contact element as required and as email address, the latter depending on a checkbox being checked for contact via email.
1
2
3
4
5
6
7
8
9
10
11
12
depends: function(element) {return $("#contactform_email").is(":checked");Example: Configure a rule that requires a parameter, along with a
dependscallback.1
2
3
4
5
6
7
8
9
10
11
12
13
14
15
// at least 15€ when bonus material is included// min needs a parameter passed to itdepends: function(element) {return $("#bonus-material").is(":checked"); -
messages (default:
the default message for the method used)Key/value pairs defining custom messages. Key is the name of an element, value the message to display for that element. Instead of a plain message, another map with specific messages for each rule can be used. Overrides the title attribute of an element or the default message for the method (in that order). Each message can be a String or a Callback. The callback is called in the scope of the validator, with the rule’s parameters as the first argument and the element as the second, and must return a String to display as the message.
Example: Specifies a name element as required and an email element as required and a valid email address. A single message is specified for the name element, and two messages for email.
1
2
3
4
5
6
7
8
9
10
11
12
13
14
15
16
name: "Please specify your name",required: "We need your email address to contact you",Example: Validates the name-field as required and having at least two characters. Provides a callback message using jQuery.validator.format to avoid having to specify the parameter in two places.
1
2
3
4
5
6
7
8
9
10
11
12
13
14
required: "We need your email address to contact you",minlength: jQuery.validator.format("At least {0} characters required!") -
groups
Specify grouping of error messages. A group consists of an arbitrary group name as the key and a space separated list of element names as the value. Use errorPlacement to control where the group message is placed.
Example: Use a table layout for the form, placing error messags in the next cell after the input.
1
2
3
4
5
6
7
8
9
10
11
12
errorPlacement: function(error, element) {if (element.attr("name") == "fname" || element.attr("name") == "lname" ) {error.insertAfter("#lastname");error.insertAfter(element); -
normalizer
Prepares/transforms the elements value for validation.
See normalizer docs for more details. -
onsubmit (default:
true)Validate the form on submit. Set to false to use only other events for validation.
Example: Disables onsubmit validation, allowing the user to submit whatever he wants, while still validating on keyup/blur/click events (if not specified otherwise).
-
onfocusout
Validate elements (except checkboxes/radio buttons) on blur. If nothing is entered, all rules are skipped, except when the field was already marked as invalid.
Set to a Function to decide for yourself when to run validation.
A boolean true is not a valid value.
Example: Disables focusout validation.
The callback gets passed two arguments:
-
element
The element currently being validated, as a DOMElement.
-
event
The event object for this focusout event.
-
-
onkeyup
Validate elements on keyup. As long as the field is not marked as invalid, nothing happens. Otherwise, all rules are checked on each key up event. Set to false to disable.
Set to a Function to decide for yourself when to run validation.
A boolean true is not a valid value.
Example: Disables onkeyup validation.
The callback gets passed two arguments:
-
element
The element currently being validated, as a DOMElement.
-
event
The event object for this keyup event.
-
-
onclick
Validate checkboxes, radio buttons, and select elements on click. Set to false to disable.
Set to a Function to decide for yourself when to run validation.
A boolean true is not a valid value.
Example: Disables onclick validation of checkboxes, radio buttons, and select elements.
The callback gets passed two arguments:
-
element
The element currently being validated, as a DOMElement.
-
event
The event object for this click event.
-
-
focusInvalid (default:
true)Focus the last active or first invalid element on submit via validator.focusInvalid(). The last active element is the one that had focus when the form was submitted, avoiding stealing its focus. If there was no element focused, the first one in the form gets it, unless this option is turned off.
Example: Disables focusing of invalid elements.
-
focusCleanup (default:
false)If enabled, removes the errorClass from the invalid elements and hides all error messages whenever the element is focused. Avoid combination with focusInvalid.
Example: Enables cleanup when focusing elements, removing the error class and hiding error messages when an element is focused.
-
errorClass (default:
"error")Use this class to create error labels, to look for existing error labels and to add it to invalid elements.
Example: Sets the error class to «invalid».
-
validClass (default:
"valid")This class is added to an element after it was validated and considered valid.
Example: Sets the valid class to «success».
-
errorElement (default:
"label")Use this element type to create error messages and to look for existing error messages. The default, «label», has the advantage of creating a meaningful link between error message and invalid field using the for attribute (which is always used, regardless of element type).
Example: Sets the error element to «em».
-
wrapper (default:
window)Wrap error labels with the specified element. Useful in combination with errorLabelContainer to create a list of error messages.
Example: Wrap each error element with a list item, useful when using an ordered or unordered list as the error container.
-
errorLabelContainer
Hide and show this container when validating.
Example: All error labels are displayed inside an unordered list with the ID «messageBox», as specified by the selector passed as errorContainer option. All error elements are wrapped inside a li element, to create a list of messages.
1
2
3
4
5
errorLabelContainer: "#messageBox",submitHandler: function() { alert("Submitted!") } -
errorContainer
Hide and show this container when validating.
Example: Uses an additonal container for error messages. The elements given as the errorContainer are all shown and hidden when errors occur. However, the error labels themselves are added to the element(s) given as errorLabelContainer, here an unordered list. Therefore the error labels are also wrapped into li elements (wrapper option).
1
2
3
4
5
6
errorContainer: "#messageBox1, #messageBox2",errorLabelContainer: "#messageBox1 ul",wrapper: "li", debug:true,submitHandler: function() { alert("Submitted!") } -
showErrors
A custom message display handler. Gets the map of errors as the first argument and an array of errors as the second, called in the context of the validator object. The arguments contain only those elements currently validated, which can be a single element when doing validation on focusout or keyup. You can trigger (in addition to your own messages) the default behaviour by calling this.defaultShowErrors().
Example: Update the number of invalid elements each time an error is displayed. Delegates to the default implementation for the actual error display.
1
2
3
4
5
6
7
8
showErrors: function(errorMap, errorList) {$("#summary").html("Your form contains "+ this.numberOfInvalids()+ " errors, see details below.");this.defaultShowErrors();The callback gets passed two arguments:
-
errorMap
Key/value pairs, where the key refers to the name of an input field, values the message to be displayed for that input.
-
errorList
An array for all currently validated elements. Contains objects with the following two properties:
-
message
The message to be displayed for an input.
-
element
The DOMElement for this entry.
-
-
-
errorPlacement (default:
Places the error label after the invalid element)Customize placement of created error labels. First argument: The created error label as a jQuery object. Second argument: The invalid element as a jQuery object.
Example: Use a table layout for the form, placing error messages in the next cell after the input.
1
2
3
4
5
errorPlacement: function(error, element) {error.appendTo( element.parent("td").next("td") );The callback gets passed two arguments:
-
error
The error label to insert into the DOM.
-
element
The validated input, for relative positioning.
-
-
success
If specified, the error label is displayed to show a valid element. If a String is given, it is added as a class to the label. If a Function is given, it is called with the label (as a jQuery object) and the validated input (as a DOM element). The label can be used to add a text like «ok!».
Example: Add a class «valid» to valid elements, styled via CSS.
1
2
3
4
submitHandler: function() { alert("Submitted!") }Example: Add a class «valid» to valid elements, styled via CSS, and add the text «Ok!».
1
2
3
4
5
6
success: function(label) {label.addClass("valid").text("Ok!")submitHandler: function() { alert("Submitted!") }The callback gets passed two arguments:
-
label
The error label. Use to add a class or replace the text content.
-
element
The element currently being validated, as a DOMElement.
-
-
highlight (default:
Adds errorClass (see the option) to the element)How to highlight invalid fields. Override to decide which fields and how to highlight.
Example: Highlights an invalid element by fading it out and in again.
1
2
3
4
5
6
7
highlight: function(element, errorClass) {$(element).fadeOut(function() {Example: Adds the error class to both the invalid element and its label
1
2
3
4
5
6
7
8
9
10
11
12
highlight: function(element, errorClass, validClass) {$(element).addClass(errorClass).removeClass(validClass);$(element.form).find("label[for=" + element.id + "]")unhighlight: function(element, errorClass, validClass) {$(element).removeClass(errorClass).addClass(validClass);$(element.form).find("label[for=" + element.id + "]").removeClass(errorClass);The callback gets passed three arguments:
-
element
The invalid DOM element, usually an
input. -
errorClass
Current value of the
errorClassoption. -
validClass
Current value of the
validClassoption.
-
-
unhighlight (default:
Removes the errorClass)Called to revert changes made by option highlight, same arguments as highlight.
-
ignoreTitle (default:
false)Set to skip reading messages from the title attribute, helps to avoid issues with Google Toolbar; default is false for compability, the message-from-title is likely to be completely removed in a future release.
Example: Configure the plugin to ignore title attributes on validated elements when looking for messages.
-
-
This method sets up event handlers for submit, focus, keyup, blur and click to trigger validation of the entire form or individual elements. Each one can be disabled, see the onxxx options (onsubmit, onfocusout, onkeyup, onclick). focusInvalid focuses elements when submitting an invalid form.
Use the debug option to ease setting up validation rules, it always prevents the default submit, even when script errors occur.
Use submitHandler to implement your own form submit, eg. via Ajax. Use invalidHandler to react when an invalid form is submitted.
Use rules and messages to specify which elements to validate, and how. See rules() for more details about specifying validation rules.
Use errorClass, errorElement, wrapper, errorLabelContainer, errorContainer, showErrors, success, errorPlacement, highlight, unhighlight, and ignoreTitle to control how invalid elements and error messages are displayed.
Есть множество статей о том, как написать свои правила для плагина jQuery validate, но мало какие из них объясняют внутреннюю работу этого плагина, что мы и обсудим в этой статье.
Это первая часть серии статей «Понимание ненавязчивой валидации Asp.NET MVC»
1. Работа плагина jQuery validate изнутри
2. Понимание Html-кода, сгенерированного ненавязчивой валидацией в ASP.Net MVC
3. Внутренняя работа плагина unobtrusive jQuery validate в ASP.Net MVC.
Что мы узнаем из этой статьи:
1. Как валидировать форму.
2. Сообщения валидации и как они работают.
3. Добавление собственных правил валидации.
4. Что именно происходит, когда мы вызываем метод валидации.
Как валидировать форму
Есть 2 основных способа, чтобы валидировать форму.
1. Использовать имена классов как правила
Как это работает
Мы добавляем к полю, которое нужно провалидировать, html атрибут «class», и это подключит валидацию.
Итак, если нам нужно, чтобы текстовое поле было обязательным мы добавляем в элемент input значение атрибута class = «required»
Html
<form action="/" method="post">
  <input id="Name" type="text" name="Name" value="" class ="required"  />
  <input type="submit" value="Submit" />
</form>
JavaScript
$(document).ready(function() {
  $('form').validate();
});
Так вы можете добавить к определенным классам несколько правил.
Плюсы и минусы такого подхода:
Работает только с правилами, которые не принимают аргументов.
Мы используем html атрибут «class» для того, для чего он не предназначен.
Но его легко установить.
Использование метода «addClassRules»
Использование функции «addClassRules» дает нам возможность использовать составное правило для одного класса.
JavaScript
 $.validator.addClassRules({
  name: {
    required: true,
    minlength: 2
  },
  zip: {
    required: true,
    digits: true,
    minlength: 5,
    maxlength: 5
  }
});
Этот код добавляет 2 новых правила для класса «name» и «zip», и, если у нас есть элемент «input», у которого класс «zip», то к нему применяются правила: его значение является обязательным, пользователь может вводить только цифры и длина должна быть точно 5 символов.
Html
<input class="zip" type="text" name="zipCode" />
Информация: Чтобы использовать собственное сообщение для определенного правила requires в составном правиле, нам нужно придумать псевдоним для правила «required», создать новое правило с этим псевдонимом и установить для него сообщение по умолчанию.
JavaScript
$.validator.addMethod("newrequired", $.validator.methods.required, "new name is required");
Или мы можем использовать html атрибут «title», его значение будет сообщением об ошибке для составного правила.
Заметка: Валидация по имени класса работает только для правил валидации, не принимающих никаких аргументов.
2. Добавление правил как JSON объекта к методу validate()
По названию, вы должны были догадаться, что этот метод валидации принимает объект json, поэтому мы можем определить поля, которые нам нужно валидировать и правила валидации для них.
Html
<form>
  <input id="something" type="text" name="userEmail" />
  <input id="submit" type="submit" value="submit" />
</form>
JavaScript
$('form').validate({
  rules: {
    userEmail: {
      email: true,
      required: true
    }
  }
});
Заметка: Когда мы передаем объект «rules» функции «validate» ключом должно быть значение атрибута «name», а не значение «id». Как можно увидеть в примере: ключ -это «userEmail», значение атрибута «name», а у атрибута «id» другое значение.
Плюсы и минусы этого подхода:
Этот подход дает нам возможность использовать больше правил валидации, которые принимают аргументы, такие как minlength, remote, equalTo и т.д.
Отличный и настраиваемый вручную контроль над всем.
Но пользователь должен делать отдельную функцию «validate» с разными опциями для каждой формы.
Добавление или удаление динамических правил.
Добавление правил
Чтобы добавить правило мы должны использовать метод «rules» для элементов jQuery после того как форма провалидирована и передавать как первый параметр строку «add» и как второй параметр — объект правил, которые мы хотим добавить к этому элементу (также мы можем передавать объект «сообщение» для правил, которые мы добавили).
JavaScript
$('.input').rules('add', {
  required: true,
  messages: {
    required: true
  }
})
Удаление правил
Если мы хотим удалить правило или набор правил, мы передаем строку «remove», как первый параметр для метода «rules», а вторым параметром будет строка, которая содержит правила, которые мы хотим удалить, отделенные пробелом.
JavaScript
$('.input').rules('remove', 'min max');
Подход настройки вручную
JavaScript
var validator = $('form').data('validator');
validator.settings.rules.objectName = {
  required: true
}
Этот подход очень полезен, если у вас есть созданные правила и объекты сообщений, вы можете расширить правила валидатора своими собственными:
JavaScript
$.extend(validator.settings, { rules: rules, messages: messages });
Сообщения валидации и как они работают
Есть три способа настроить сообщение валидации
1. Передать объект «messages» методу «validate». Объект «messages» состоит из пар ключзначение. Ключ — это значение атрибута «name» элемента. Значение — объект, содержащий каждое правило и его сообщение.
JavaScript
$('form').validate({
  rules: {
    userEmail: {
    email: true,
    required: true
    }
  },
  messages: {
    userEmail: {
    email: "Please enter your email",
    required: "*"
    }
  }
});
2. Определить значение атрибута «title» элемента
Html
<input id="Email" title="you have to enter a value" type="text" name="Email" />
3. Использовать сообщение по умолчанию. Когда определяется правило валидации, есть встроенные сообщения по умолчанию для встроенных правил.
Заметка: Эти три способа переопределяют друг друга, основываясь на приоритетности, самый приоритетный — переданный объект «messages», а наименее приоритетный — сообщение по умолчанию.
Добавление собственных правил валидации
Когда мы хотим добавить больше правил валидации, чем определены по умолчанию, мы используем метод
$.validator.addMethod
Этот метод принимает как параметры следующее:
- имя правила;
- функцию, которая осуществляет валидацию;
- сообщение по умолчанию.
Функция, которая производит валидацию, может быть с двумя или тремя параметрами
JavaScript
 function validationMethod (value, element)
// OR
function validationMethod (value, element, params)
Давайте объясню эти параметры.
Значение: значение DOM элемента, который будет валидироваться
Элемент: сам элемент DOM
Параметры: то, что мы передаем как значение. Для этого примера правила валидации — это то, чему должен равняться params.
JavaScript
$('form').validate({
  rules: {
    firstname: {
      compare: {
        type: "notequal",
        otherprop: "lastname"
      }
    }
  }
});
в этом примере params будет равен {type:«notequal», otherprop: «lastname»}
Пример добавления собственного правила:
JavaScript
$.validator.addMethod("notnumbers", function(value, element) {
  return !/[0-9]*/.test(value);
},
"Please don't insert numbers.")
Что именно происходит, когда мы вызываем метод «validate»
Когда мы вызваем метод validate на форме, за кулисами происходит много разных вещей:
Создается объект «validator» со всеми правилами и опциями, присоединенными к форме.
Метод «validate» присоединяет «validator» используя «$.data». Мы можем получить его выбрав форму и вызвав функцию jQuery «$.data» и передать ее «validator». Объект «vaidator» — это все метаданные для валидации, которые дают нам возможность доступа к опциям валидации в любое время жизненного цикла страницы.
Используя этот объект, мы можем изменить во время выполнения опции, которые мы передали методу валидации, такие как добавление или удаление правил, изменение поведения, если поле валидное или невалидное, или даже введение селектора игнорирования.
JavaScript
 //getting the validator
var validator = $("selector").data("validator")
Заметка: Когда вы вызываете метод «validate» на форме, которая уже провалидирована, он вернет только объект «validator», используется также $.data, и все предыдущие опции, переданные методом «validate», будут стерты.
JavaScript
var validator = $(".selector").validate(/* rules will be omitted */)
Присоединение событий формы
Что произойдет, когда мы нажмем submit(отправить форму), и в форме будет введено неверное значение для поля, к которому мы присоединили валидацию. Если одно из полей невалидное, то плагин валидации будет присматриваться к нему более пристально, чтобы проверять, валидное оно или нет, по событиям на этом поле.
Сообытия формы, на которые подписывается плагин — это «click», «focusin», «focusout», «keyup», «submit».
Заметка: Вы можете отключить валидацию по определенным событиям, передав их как ключи в методе validate, и false в качестве значений.
JavaScript
$(".selector").validate({
    onfocusout: false,
     onkeyup: false,
     onclick: false,
     onsubmit: false
});
Перевод статьи Nadeem Khedr «How the jQuery validate plugin works internally». nadeemkhedr.wordpress.com/2012/08/12/how-the-jquery-validate-plugin-works-internally/#goCallValidate
update 01.06.13: добавлены ссылки на другие посты серии
In our previous tutorial, we discussed how to implement basic form validation using some input attributes in HTML5 and a little regex.
In this tutorial, you’ll learn how to use a jQuery plugin to add simple form validation to your website.
Using a jQuery plugin to validate forms serves a lot of purposes. It gives you additional abilities like easily displaying custom error messages and adding conditional logic to jQuery form validation. A validation library can also help you add validation to your HTML forms with minimal or no changes to the markup. The conditions for validity can also be added, removed, or modified at any time with ease.
Getting Started
We’ll use the jQuery Validation Plugin in this tutorial. The plugin offers a lot of features and also helps you define your own validation logic.
Before we can start using the plugin in our fields, we have to include the necessary files in our project. There are two different files to include. The first is the core file, which includes the core features of the plugin, including everything from different validation methods to some custom selectors. The second file contains additional methods to validate inputs like credit card numbers and US-based phone numbers.
You can add these files to your projects via package managers like Bower or NPM. You can also just directly get a CDN link to the files and add them to a script tag on your webpage. Since this is a jQuery-based plugin, you’ll also need to add a link to the jQuery library.
1 |
<script src="https://cdnjs.cloudflare.com/ajax/libs/jquery/3.4.0/jquery.min.js"></script> |
2 |
<script src="https://cdnjs.cloudflare.com/ajax/libs/jquery-validate/1.19.0/jquery.validate.min.js"></script> |
Once you’ve added these files, you can start validating any form with the validate method.
Validating Your First Form
You can start using this plugin without making any significant changes to your markup. The only thing that you might have to change is to add an id or class to the form you want to validate if it doesn’t have one already.
Here is the markup of a basic form that we’ll be validating using the jQuery validate plugin.
1 |
<form id="basic-form" action="" method="post"> |
2 |
<p>
|
3 |
<label for="name">Name <span>(required, at least 3 characters)</span></label> |
4 |
<input id="name" name="name" minlength="3" type="text" required> |
5 |
</p>
|
6 |
<p>
|
7 |
<label for="email">E-Mail <span>(required)</span></label> |
8 |
<input id="email" type="email" name="email" required> |
9 |
</p>
|
10 |
<p>
|
11 |
<input class="submit" type="submit" value="SUBMIT"> |
12 |
</p>
|
13 |
</form>
|
We are using the same attributes that we used in our previous HTML5-based form validation tutorial. The form will still do the validation without us adding any JavaScript. However, using the plugin for validation will let us show the error messages right below the invalid input field. We’ll also be able to style the errors however we want.
To start validating the form with this plugin, simply add the following JavaScript code on the webpage:
1 |
$(document).ready(function() { |
2 |
$("#basic-form").validate(); |
3 |
});
|
This is based on the assumption that you’ve already added the required JavaScript files. Adding those lines of JavaScript will make sure that your form is properly validated and shows all the error messages. Here is a working demo.
The library tries to be as user-friendly as possible by only showing error messages when they’re necessary. For example, if you tab through the name and email fields without actually entering any information, you won’t get any error messages. However, if you try to move to the email field after only entering one character in the name field, you’ll get an error message about entering at least three characters.
The error messages are injected into the DOM using the label element. All of them have an error class, so it’s easy to apply your own styling, as we did in our example. The same is true for invalid inputs, which also get an error class added to them.
Options for the validate() Method
In our previous example, we simply called the validate() method without passing any options to it. However, we can also pass an object to this method along with many options inside that object. The value of these options will determine how the form plugin handles validation, errors, etc.
If you want this plugin to ignore some elements during the validation process, you can do so easily by passing a class or selector to ignore(). The plugin will ignore all form elements with that particular selector when it validates the input.
Add Validation Rules for Input Fields
You can also pass some rules to the validate() method in order to determine how the input values are validated. The value of the rules parameter should be an object with key-value pairs. The key in each case is the name of the element that we want to validate. The value of that key is an object which contains a set of rules which will be used for validation.
You can also add conditional logic to the different fields that you’re validating by using the depends keyword and passing a callback function to it which returns either true or false. Here is an example which uses simple rules to define how the input is validated.
1 |
$(document).ready(function() { |
2 |
$("#basic-form").validate({ |
3 |
rules: { |
4 |
name : { |
5 |
required: true, |
6 |
minlength: 3 |
7 |
},
|
8 |
age: { |
9 |
required: true, |
10 |
number: true, |
11 |
min: 18 |
12 |
},
|
13 |
email: { |
14 |
required: true, |
15 |
email: true |
16 |
},
|
17 |
weight: { |
18 |
required: { |
19 |
depends: function(elem) { |
20 |
return $("#age").val() > 50 |
21 |
}
|
22 |
},
|
23 |
number: true, |
24 |
min: 0 |
25 |
}
|
26 |
}
|
27 |
});
|
28 |
});
|
In the above code snippet, the keys name, age, email and weight are simply the names of input elements. Each key has an object as its value, and the key-value pairs in the object determine how an input field will be validated.
These validation options are similar to the attributes that you can add in the markup of a form. For example, setting required to true will make the element required for form submission. Setting minlength to a value like 3 will force users to enter at least 3 characters in the text input. There are a few other built-in validation methods which are briefly described on the documentation page.
One thing that you should note in the above code is the use of depends to conditionally make the weight a required field if the age is over 50. This is done by returning true in the callback function if the value entered in the age input field is over 50.
Create Your Own Error Messages
This plugin also allows you to set error messages for different validation rules in a form. You begin by setting the value of the messages key to an object with key-value pairs for the input fields and the corresponding error messages.
Here is an example which will display custom error messages for each input field.
1 |
messages : { |
2 |
name: { |
3 |
minlength: "Name should be at least 3 characters" |
4 |
},
|
5 |
age: { |
6 |
required: "Please enter your age", |
7 |
number: "Please enter your age as a numerical value", |
8 |
min: "You must be at least 18 years old" |
9 |
},
|
10 |
email: { |
11 |
email: "The email should be in the format: abc@domain.tld" |
12 |
},
|
13 |
weight: { |
14 |
required: "People with age over 50 have to enter their weight", |
15 |
number: "Please enter your weight as a numerical value" |
16 |
}
|
17 |
}
|
Just like rules, messages rely on the name of the input fields. Each of these input fields will accept an object with key-value pairs as its value. The key in each case is the validation rule which has to be followed. The value is simply the error message that you want to display if a particular rule is violated.
For instance, the age input field will trigger the required error message if left blank. However, it will trigger the number error if you enter anything else besides a number in the input field.
One thing you’ll notice is that the plugin will show a generic error message for validation rules where you haven’t supplied a custom error message. Try filling out different values in the following demo, and you’ll see that the custom and generic error messages show up as expected.
Customizing the Appearance of Error Messages
There are times when you might want to add your own classes to valid and invalid input in order to target them more specifically or for better integration with an existing theme.
You can change the classes which are added to valid or invalid input elements using the errorClass and validClass keys. This can help prevent some unwanted clashes due to reusing the same class name. By default, the error class is assigned to every invalid input element and label. The valid class is assigned to every valid input element.
It’s important to remember that setting errorClass to something like fail-alert will remove the error class from the invalid elements. You’ll have to use errorClass: "error fail-alert" to assign multiple classes to the same element. The same goes for validClass.
There are no additional labels added to the form when users enter a valid input. So the classes from validClass are assigned to the valid input element.
The following code snippet builds upon the previous example to add custom CSS classes and styling to invalid and valid elements.
The only additional JavaScript code is used to assign the classes.
1 |
$(document).ready(function() { |
2 |
$("#basic-form").validate({ |
3 |
errorClass: "error fail-alert", |
4 |
validClass: "valid success-alert", |
5 |
// ... More validation code from previous example
|
Here is the CSS that we’ll use to change the appearance of error messages:
1 |
label.error.fail-alert { |
2 |
border: 2px solid red; |
3 |
border-radius: 4px; |
4 |
line-height: 1; |
5 |
padding: 2px 0 6px 6px; |
6 |
background: #ffe6eb; |
7 |
}
|
8 |
input.valid.success-alert { |
9 |
border: 2px solid #4CAF50; |
10 |
color: green; |
11 |
}
|
In addition to customizing the error messages, we are also adding our own styling to valid input elements. Here is a CodePen demo to show us the final result.
More Options to Change the Plugin Behavior
You can prevent the plugin from validating input fields on key up, click, and other such events by setting the value of onfocusout, onkeyup, or onclick to false. Keep in mind that boolean true is not a valid value for these keys. This basically means that if you want the plugin to validate or lose focus on a key up event, just leave these options untouched.
You also have the option to change the element in which the error appears. By default, the plugin uses the label element to show all error messages, but you can change it to em or any other element using the errorElement key. The error element itself can then be wrapped in another HTML element using the wrapper key.
These are some of the most common options that you’re likely to use when validating forms. However, there are some other validation options that might come in handy if you want to do something like changing the placement of error messages or grouping them all together.
jQuery Form Validation, JavaScript, and jQuery Forms Found on CodeCanyon
Learning how to do simple form validation by yourself is a great skill to have. But you can get even deeper with these useful jQuery and JavaScript form downloads from CodeCanyon:
1. jQuery Step Wizard With Step Form Builder: Timon Step Form


If you want to build a multi-step form, the Timon Step Form download is right for you. It features multiple form elements and transition effects that you can use to customize your work. Timon also has a drag-and-drop builder, meaning you can build your form without needing any coding knowledge. It also has jQuery form validation.
2. Just Forms Advanced


Reading the name of this purchase will let you know exactly what you’re getting here. But there’s more to these forms than meets the eye. The more than 110 included forms are ready for use, or you can use the framework to make a unique form for yourself.
3. Sky Forms


We round out our list with the highly customizable Sky Forms. It comes with modern elements and multiple color schemes. There are also six designed states, including hover, focus, and more. On top of these features and the cross-browser compatibility, there are over 300 vector icons in Sky Forms.
Final Thoughts
In this tutorial, we learned how to take our form validation to the next level using a jQuery plugin. Using simple JavaScript form validation gives us a lot of additional control over basic HTML validation. For instance, you can easily control how and when different error messages appear when an input is filled with invalid values.
Similarly, you can also specify if the plugin should skip validation for some particular elements. I’d strongly recommend that you read the documentation of this plugin and some best practices on how to use it properly.
In our next tutorial, you’ll learn about some more JavaScript-based tools and plugins to help you easily create and validate forms.
And while you’re here, check out some of our other posts on JavaScript forms and form validation!
Did you find this post useful?

Freelancer, Instructor
I am a full-stack developer who also loves to write tutorials. After trying out a bunch of things till my second year of college, I decided to work on my web development skills. Starting with just HTML and CSS, I kept moving forward and gained experience in PHP, JavaScript, and Python.
I usually spend my free time either working on some side projects or traveling around.
- Download sample — 135 KB
- Download sample 1.8.1 — 134 KB
Introduction
This article presents an example of using the jQuery validation plug-in.
Background
The jQuery «Validation Plug-in» is an excellent tool for web pages to validate data entries at the client side using JavaScript. Unfortunately though, it is not easy to find a complete working example of how to use it. This article presents an example to use the jQuery Validation Plug-in. I have tested the example in IE8, Google Chrome, Firefox, and Safari. This example does not run well in IE7 and below. This small article assumes that you have some basic knowledge of jQuery and how to use it. If you are new to jQuery, you can easily find a lot of information on how to use it over the internet.
- * Quick note #1: The attached example does not work well in IE7. This is because the «jquery.validate.min.js» that I used in this example is version 1.5.5. After I finished the article, I found that if you use a newer version «1.8.1», it should work in IE7. You can download the version «1.8.1» from here. — 6/19/2011
- * Quick note #2: Some readers found out that the example does not work on IE at all. It is true after my own test on another computer (not sure why it worked on IE8 in my first test). But if you replace the «1.5.5» version «jquery.validate.min.js» with the version «1.8.1», my test shows that the example also works in IE. I will re-upload a copy using «1.8.1». Thanks for the feedback. — 6/20/2011
- * Quick note #3: Uploaded another copy of the example in the «jQueryValidationExample1.8.1.zip» file. It uses the «1.8.1» version of «jquery.validate.min.js». My tests show that it works on IE7+, Chrome, Safari, and Firefox. If you are interested, you can download both versions and see the difference. Thanks to the readers who pointed out the problems. — 6/20/2011
The Example Visual Studio Solution
The structure of the attached Visual Studio 2010 solution is as follows:
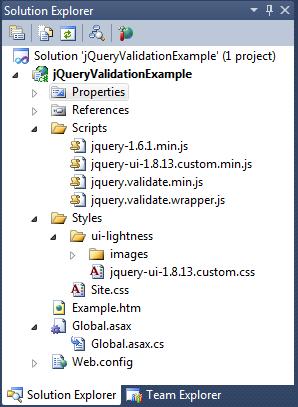
The Validation Plug-in relies on jQuery and jQuery UI to work, so I included the jquery-1.6.1.min.js file from jQuery and the jquery-ui-1.8.13.custom.min.js file from jQuery UI in the Scripts folder. The ui-lightness folder and its contents in the Styles folder are the Style Sheet and the image resources used by jQuery UI. They come with the same download package when you download the «jquery-ui-1.8.13.custom.min.js» file. The «jquery.validate.min.js» file is the jQuery Validation Plug-in. The version used in this example is 1.5.5.
The code that I wrote for this example is in the following files:
- The Example.htm file is the example HTML page to use the jQuery Validation Plug-in through the JavaScript class created in the jquery.validate.wrapper.js file.
- The jquery.validate.wrapper.js file implements a simple JavaScript function that wraps jQuery UI for this example. This function will be used as an Object Oriented class during validation. Object Orientation is not fully supported in JavaScript, but we can somehow simulate it to a certain degree. If you are interested, you can take a look at this link.
- The Site.css file has a simple CSS class that is used to highlight the input controls that fail validation.
I will first introduce the «Example.htm» page and then introduce the JavaScript class in «jquery.validate.wrapper.js«. At last, I will introduce the CSS class in the Site.css file.
The «Example.htm» File
The Example.htm file is implemented as follows:
<!DOCTYPE html PUBLIC "-//W3C//DTD XHTML 1.0 Transitional//EN"
    "http://www.w3.org/TR/xhtml1/DTD/xhtml1-transitional.dtd">
<html xmlns="http://www.w3.org/1999/xhtml">

<head>
<meta http-equiv="Content-Type" content="text/html; charset=utf-8" />
<title>jQuery Validation Example</title>
    <link href="Styles/ui-lightness/jquery-ui-1.8.13.custom.css"
        rel="stylesheet" type="text/css" />
    <link href="Styles/Site.css" rel="stylesheet" type="text/css" />

    <script src="Scripts/jquery-1.6.1.min.js" type="text/javascript"></script>
    <script src="Scripts/jquery-ui-1.8.13.custom.min.js" type="text/javascript"></script>
    <script src="Scripts/jquery.validate.min.js" type="text/javascript"></script>
    <script src="Scripts/jquery.validate.wrapper.js" type="text/javascript"></script>

<script type="text/javascript" language="javascript">

    $(document).ready(function () {
        // 1. prepare the validation rules and messages.
        var rules = {
            textbox1: {
                required: true,
                minlength: 2
            },
            textbox2: "required",
            textbox3: "required"
        };
        var messages = {
            textbox1: {
                required: "textbox1 is required",
                minlength: "textbox1 needs to be at least length 2"
            },
            textbox2: "textbox2 is requried",
            textbox3: "textbox3 is required"
        };

        // 2. Initiate the validator
        var validator
            = new jQueryValidatorWrapper("FormToValidate",
                rules, messages);

        // 3. Set the click event to do the validation
        $("#btnValidate").click(function () {
            if (!validator.validate())
                return;

            alert("Validation Success!");
        });
    });

</script>
</head>

<body>

<form id="FormToValidate" action="#">
<table>
    <tr>
        <td>
            <input type="text" id="textbox1" name="textbox1" />
        </td>
        <td>
            <input type="text" id="textbox2" name="textbox2" />
        </td>
    </tr>
    <tr>
        <td>
            <input type="text" id="textbox3" name="textbox3" />
        </td>
        <td>
            <input type="button" id="btnValidate"
                style="width: 100%" value="Validate" />
        </td>
    </tr>
</table>
</form>

</body>
</html>
This HTML file has three text boxes and a button. The purpose of this example is to validate the content in the text boxes when the button is clicked. To set up the validation, we need to go through three steps in the $(document).ready event.
- Prepare the validation rules and the messages to show if the validation fails.
- Create a validator object by passing the ID of the HTMl Form that contains the text boxes to the
jQueryValidatorWrapperfunction. The validation rules and messages are also passed to this function. ThejQueryValidatorWrapperfunction is implemented in the jquery.validate.wrapper.js file. - Hook up the click event for the button to start validation.
This piece of code is pretty simple, but you should pay some attention to the following:
- All the required JavaScript files and style sheets need to be referenced properly.
- All the text boxes need to have a «
name» attribute. The validation rules and messages are associated with thenameattribute. - All the text boxes to be validated need to be in the HTML Form that is used to create the validator object.
Now let us take a look at the jQueryValidatorWrapper function.
The jQueryValidatorWrapper function is implemented in the jquery.validate.wrapper.js file:
var dialogIdSeed = 1000000000;
function jQueryValidatorWrapper(formId, rules, messages) {


    var dialogId = "V_dia_log" + dialogIdSeed++;
    while ($("#" + dialogId).length != 0) {
        alert(dialogId);
        dialogId = "V_dia_log" + dialogIdSeed++;
    }


    var dialogText = "<div id='" + dialogId
            + "' title='Please correct the errors ...'>"
            + "<ul /></div>";
    $("body").append(dialogText);
    var $dialog = $("#" + dialogId);
    var $ul = $("#" + dialogId + ">ul");

    $dialog.dialog({
        autoOpen: false,
        modal: true,
        close: function (event, ui) {
            $ul.html("");
        }
    });


    var showErrorMessage = false;
    var validator = $("#" + formId).validate({
        onchange: true,
        rules: rules,
        messages: messages,
        errorPlacement: function (error, element) {
            if (showErrorMessage) {
                var li = document.createElement("li")
                li.appendChild(document
                    .createTextNode(error.html()));
                $ul.append(li);
            }
        },
        showErrors: function (errorMap, errorList) {
            this.defaultShowErrors();
            if ((errorList.length != 0) && showErrorMessage) {
                $dialog.dialog('open');
            }
        }
    });


    this.validate = function () {
        showErrorMessage = true;
        var result = validator.form();
        showErrorMessage = false;

        return result;
    };
}
The jQueryValidatorWrapper function does the following:
- It first creates a
divelement and appends it to the DOM. It makes sure that the ID of thedivelement is unique in the web page. Thisdivelement will be used as a dialog box to display the error messages if the validation fails. - It hooks up the validation rules and messages with the HTML Form that will be validated using the jQuery Validation Plug-in.
- At last, it creates a function that starts the validation.
The CSS to Highlight the Failed Input Element
If the validation fails a textbox, we need to highlight it. The CSS class used to highlight the HTML element is implemented in the Site.css file.
.error
{
 border-color:red;
 border-style:solid;
 border-width:1px;
}
The jQuery Validation Plug-in will look for the .error class to apply styles to failed HTML elements. You can implement this CSS class to highlight the failed elements whatever way you want. In this example, if a text box fails validation, I will simply give it a red border.
Run the Example
Now that we have finished reviewing the code, we can test run the web page. Set the Example.htm file as the start up page; we can debug and run the application in Visual Studio.

When the web page first loads, we can see the three text boxes and the Validate button.
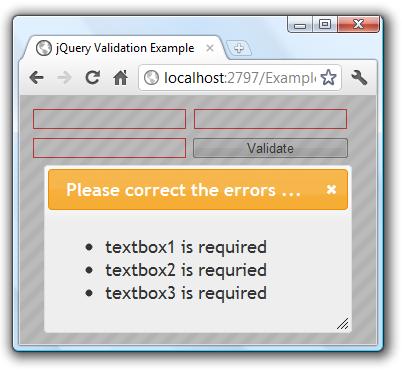
Without typing anything in the text boxes and clicking the Validate button, the validation will fail all the three text boxes. The text boxes are highlighted with red borders and a dialog box shows up asking us to correct the problems.
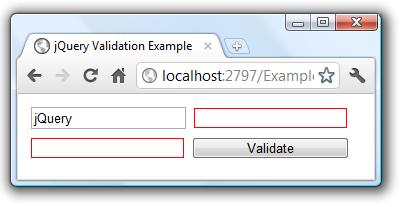
After closing the dialog box, we can type something into the text boxes. You may notice that when the text in a text box becomes valid, the red border disappears.
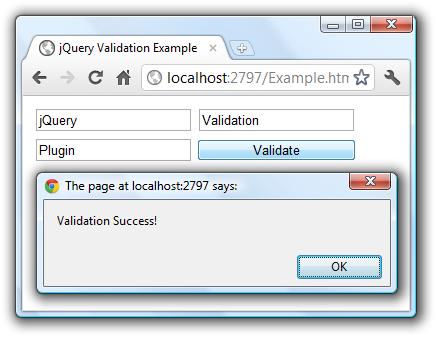
If we give all the three text boxes valid texts, clicking the Validate button shows up the message box telling us that the validation was successful.
Points of Interest
- This article presented an example of using jQuery Validation Plug-in.
- You may have noticed that I insert a
divelement into the DOM in the jquery.validate.wrapper.js file when I initiate the validator. Thisdivelement will be given an ID in the form of «V_dia_log1???..». If you accidentally have an HTML element having an ID of the same pattern in your web page, thejQueryValidatorWrapperfunction will eventually find a unique ID for thedivelement, but it may take some time. If you want to use jquery.validate.wrapper.js as it is in your applications, you should avoid assigning any element in the page an ID of the same pattern. - I have tested the example in IE8, Google Chrome, Firefox, and Safari. This example does not run well in IE7 and below. My test is limited though. If you find anything interesting in your own test, please do not hesitate to let me know and I will appreciate it.
- The attached example does not work well in IE7. It is because the jquery.validate.min.js that I use in this example is version 1.5.5. After I finished the article, I found that if you use a newer version 1.8.1, it should work in IE7. You can download the version 1.8.1 from here.
- I hope you like my postings and I hope this article can help you one way or the other.
History
- First revision: 6-18-2011.
I have been working in the IT industry for some time. It is still exciting and I am still learning. I am a happy and honest person, and I want to be your friend.