Можно столкнуться с рядом проблем, когда вещь становится мала. Это может быть если вы заказали изделие по интернету и не угадали с размером.

Кроме того, можно поправиться в весе или неправильно постирать вещь, после чего она может стать меньше. Не спешите выкидывать одежду, ведь ткань можно растянуть. В этой статье мы рассмотрим, как растянуть купальник в домашних условиях.
Содержание
- Пять способов растянуть купальник
- Как правильно стирать купальник
- Сушка и хранение купальника
Пять способов растянуть купальник
- Если малы плавки, в которые вставлена резинка, намочите трусики и наденьте на спинку стула либо на гладильную доску и оставьте до полного высыхания. В результате резинка растянется;
- Растянуть резинку можно, аккуратно распоров края, где она зашита. Затем вставьте новую, более длинную резинку либо пришейте еще один кусочек резинки;
- Увеличить изделие на один и более размеров можно при помощи шитья и швейной машинки. Для этого подберите подходящую ткань и цвет, сделайте вставки;
- Намочите сплошной или раздельный купальник и натяните на какой-либо предмет. Это может быть спинка стула, кастрюля, ведро и т.д.. Оставьте до полного высыхания. Эластичная ткань, из которой изготавливают купальники, хорошо растягивается при помощи воды;
- Намочите изделие и растяните на гладильной доске до нужного размера. Приколите булавками или другими подручными средствами по краям. Прогладьте утюгом при низкой температуре с изнаночной стороны либо через тонкую хлопчатобумажную ткань. Оставьте на пять-десять минут и повторяйте процедуру, пока не достигните нужного результата.
Как правильно стирать купальник
Чтобы купальник не деформировался и не сел или, наоборот, не слишком растянулся, нужно соблюдать правила ухода за изделием. Кроме того, правильная стирка, глажка и сушка помогут надолго сохранить цвет и первоначальный внешний вид вещи.
Прежде всего, изучите бирку купальника и следуйте рекомендациям. Стирайте и гладьте материал при температуре, которая там указана. Не делайте то, что запрещено на этикетке.
Стирать купальник рекомендуется после каждого использования. Несмотря на то, что он находится в воде, материал все равно сильно пачкается. Выбирайте специальные моющие средства, которые подходят под тип и цвет ткани.
Подходящим вариантом станет жидкий шампунь или гель для стирки. Традиционные порошки приведут к тому, что ткань поблекнет, потеряет эластичность и эстетический внешний вид. Кстати, для стирки можно применять и обычный шампунь для волос или даже средство для мытья посуды.

Купальники на косточках можно стирать только вручную. Остальные изделия стирают в стиральной машине в деликатном режиме при температуре до 35 градусов.
Если стирать при большей температуре, ткань сильно сядет. Поэтому такой способ можно применить, если купальник растянулся или велик по размеру, но не перестарайтесь. Достаточно увеличить температуру до 45-50 градусов.
Цветные, белые и темные купальники обязательно стирайте отдельно. Не используйте при стирке в машине режим отжима и сушки! Если боитесь повредить ткань, стирайте изделия в специальных мешочках, капсулах для бюстгальтера или светлой наволочке. Не применяйте кондиционер! После стирки прополоскайте изделие в прохладной чистой воде и оставьте сохнуть.
Сушка и хранение купальника
Постиранный купальник повесьте на вешалку и оставьте сохнуть на свежем воздухе в тени либо в помещении. Либо изделие можно разложить на сухой махровой простыни или полотенце и оставить сохнуть в горизонтальном положении. Металлические детали протрите сухой тканью.

Не сушите купальник на батарее или на солнце, иначе ткань потеряет цвет и эластичность, а волокна станут ломкими и хрупкими. Чтобы придать изделию приятный аромат, положите рядом с вещью на полочку кусочек ароматного мыла или платок, сбрызнутый духами.
Не оставляйте изделие надолго в мокром виде после купания, лучше сразу же сполосните или постирайте. Не держите вещь долго в полиэтиленовом пакете, иначе вещь деформируется, появится неприятный запах.
Храните купальник без пакета на полке в шкафу с закрытыми дверцами. Как компактно разложить и правильно хранить вещи в шкафу, смотрите по ссылке https://vsepodomu.ru/garderob/kak-khranit-veschi-v-shkafu/.
![]()
Download Article
![]()
Download Article
Whether your bathing suit is too large because you lost weight, bought the wrong size, or stretched out the material over time, you may want to shrink the suit rather than investing in a new one. Bathing suits are most often made of materials like lycra, spandex, polyester, and nylon, which make it harder to shrink the fibers, but it’s not impossible! Try using boiling hot water to soak your suit and then put it through a hot cycle in the dryer, or try ironing a damp suit on low heat to gradually shrink the material. It may require a couple of attempts, but you should be able to shrink your suit down to the size you prefer.
-

1
Turn your suit inside out to protect the pigments as much as possible. Before washing, boiling, and drying your suit, make sure it’s turned inside out. Doing so will keep the colors from running and your suit should maintain its original hues.[1]
- If there are any bra inserts, go ahead and remove them at this time.
-
2
Wash the suit by hand in cool water to clean off any dirt, grime, or oil. Fill up the sink with cool water, and use a mild laundry detergent that doesn’t have any bleach or dyes in it. Wash the bathing suit in the soapy water, then drain the sink and use fresh water to rinse the suit until there are no more suds. If there is residual sunscreen, sweat, oil, sand, or grime on your suit when it goes into the dryer later, that could get baked into the material and make your suit hard and inflexible, so it’s important to clean it beforehand.[2]
- Avoid putting your suit in the washing machine, as the rough tumbling could stretch out the fibers in the suit.
- You can give your swimsuit for dry cleaning.
- A dry cleaner uses different products to wash them, like fabric softeners and brighteners, and the detergent quality is much better.
- This type of washing is not as abrasive as washing in your home washer.
Advertisement
-
3
Soak the suit in boiling water until the water cools to room temperature. Use a kettle, the microwave, or a pot on the stove to boil water (make sure to use a large pot or dish that won’t break from the heat). Submerge the suit completely in the boiling water and let it sit in there until the water cools down, which should take about 15 to 20 minutes.[3]
- The heat from the boiling water should start to shrink the fibers in the suit and prepare it for further shrinkage once it goes into the dryer.
-
4
Place the suit into the dryer on the highest setting available. For optimum shrinkage, use the highest setting and the longest time that you can choose. Avoid drying the suit with a full load of laundry, as you want it to receive the highest blast of heat so that it can shrink down as much as possible.[4]
- Most dryers can run for 60 to 70 minutes before they shut off.
-
5
Let the garment cool to room temperature once the dry cycle is done. Instead of taking the hot garment right out of the machine and putting it on, set it to the side to let it cool off. The elastic can hold a lot of heat and might burn you if you were to put it on right away.[5]
- It shouldn’t take more than 10 minutes for the suit to cool off.
-
6
Repeat the process 2 to 3 more times to gradually shrink the suit. Try the suit on after it has dried completely to see if it’s at the right size yet. If so, that’s great and you’re ready to enjoy your improved suit! If it’s still too big, go ahead and repeat the boiling and drying process a few more times (there’s no need to wash the suit again as it’s already clean).[6]
- If the suit doesn’t shrink enough after 3 washes, it may be time to consider getting it tailored or perhaps just investing in a new suit.
Warning: Don’t use this method too often, as the high heat will eventually dull the color of the suit and can make it less durable.


Advertisement
-
1
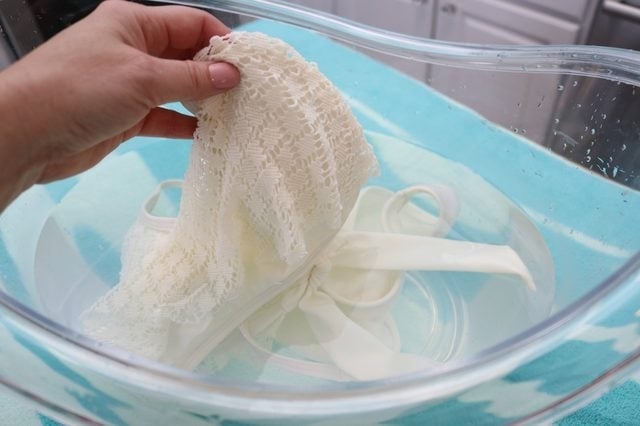
Wash your suit, rinse it out, and thoroughly wring out the excess water. Use cool water and mild laundry detergent that’s free of bleach and added dyes to wash your suit if it isn’t already clean. Fill the sink with cool water and apply the soap directly to your suit. Massage the material in the water to create suds and clean away any grime. Drain the sink, then use fresh water to rinse the suit until no more suds are visible. Squeeze the suit by hand until the suit is just damp instead of drenched.[7]
- If you iron a dirty suit, you are essentially baking in any residual salt, sand, sweat, sunscreen, or lotions you may have come into contact with the last time it was worn.
-
2
Cover the suit with a cotton cloth once it’s on the ironing board. If you don’t have a cotton cloth specifically for ironing, you could also use a handkerchief or some other kind of scrap fabric, just as long as it is clean and made of cotton. Never put the iron directly onto the damp bathing suit, as that will damage the material.[8]
Tip: Even an old pillowcase or sheet will work in a pinch, so don’t feel you need to go out and buy a new cotton cloth if you don’t have one at home.
-
3
Turn the iron on to a low- or medium-heat setting. To avoid damaging the swimsuit, avoid using high heat. It’ll take a little longer to iron and dry the suit, but in the end, your suit will be in better condition.[9]
- You don’t need to fill the steamer basket in the iron for this process. Because the suit is already wet, you won’t need to add moisture to it.
-
4
Iron the suit, pressing down with slow, firm movements. Because you’re using a low-heat setting, be prepared to iron your suit for upwards of 10 minutes. Work systematically from the top to the bottom of the suit, using long, even strokes. Press down with force so that the heat of the iron penetrates through the protective cloth and hits the swimsuit.[10]
- Even though the iron isn’t exuding a ton of heat, still be careful to not catch your fingers or grab the bottom of the iron with your bare hands. It’ll still be hot enough to burn you!
-
5
Flip the suit over from time to time to evenly iron both sides. Make sure to work both sides of the suit so you don’t end up with one side that shrunk and one side that is still the original size. Try flipping the suit over after going from top to bottom completely.[11]
- You may also want to wipe off the ironing board with a clean, dry towel when you flip the suit over. If there is excess moisture on the board, you don’t want it getting absorbed back up into the side you were just working on.
-
6
Continue ironing until almost all of the water has evaporated. It may take 10 minutes or more, so settle in at the ironing board. Continue using adequate pressure and alternating sides so that the suit dries as quickly as possible. Once the majority of the water is gone and the suit is almost completely dry to the touch, you can stop.[12]
- If you dread the idea of ironing for that long, watch a show or listen to some music while you work—it’ll help the time pass more quickly.
-
7
Let the suit air dry the rest of the way before wearing it again. Avoid putting your suit into the sun as the heat could mutate the colors and weaken the elastic. Leave it on the ironing board, or hang it up on a clothesline to let it finish drying. Once it is completely dry to the touch, go ahead and try it on. If it isn’t as small as you’d like, go ahead and repeat the ironing method another 1 to 2 times. If it isn’t shrunken enough after those efforts, it may be time to take it in by hand or invest in a new suit.[13]
- You could pop the suit into the dryer on high heat for about 20 minutes to finish drying it. This could help the material to shrink even more, but letting it air dry will be gentler on the material.


Advertisement
-
1
Wash your swimsuit after every use, whether or not it got wet. Sunscreen, lotions, oils, sand, and sweat all need to be washed away on a regular basis to keep your suit in tiptop condition. You may think if you didn’t go into the water and there’s no chlorine or salt on your suit that it doesn’t need to be washed, but the fibers and elastics will be in much better condition for a longer time if you give the suit a quick wash after every use.[14]
- Build-up of grime can cause the elastic fibers to deteriorate more quickly over time.
-
2
Hand wash your suits in cool water with mild detergent. Avoid using the washing machine if at all possible, as the tumbling motion can stretch your suit and damage the elastic fibers. Use your sink or a bucket to scrub your suit by hand with a mild laundry detergent that is free of bleach and dyes. Once it has been washed, use clean water to thoroughly rinse the suit until all the suds are gone.[15]
Warning: Never use bleach on your suits. You don’t want to get bleach on your skin, plus the bleach will discolor your suit and will also weaken the fabric, making it more likely to tear.
-
3
Hang your suit to dry instead of using the dryer when possible. After your suit has been washed, go ahead and lay it out somewhere to dry. Avoid putting it over a metal pole, like what you might have in your bathroom, as the metal could react with the material and stain it. Instead, use a clothesline and clothespins to hang the suit by its straps.[16]
- A dryer is a great way to shrink a suit, but at the same time, it can also weaken the fibers because of the tumbling and the high heat. It’s something that shouldn’t be used very often so that your suit stays in the best condition possible.
-
4
Keep your drying suit out of the sun to avoid damaging the fibers. It may be super tempting to lay your suit out in the sun to let it dry naturally once you’re finished wearing it, but avoid doing this if you can. In addition to fading the color of your suit, the sun can also weaken the elastic and make your suit less durable over time.[17]
- If on occasion you can’t avoid using the sun to dry your suit, that is okay. Just make it a point to not do it every time.
-
5
Keep your suit away from rough surfaces so the material doesn’t snag. Concrete, pool chairs, and other materials that are often around swimming areas can snag the fibers of your suit, break them, and cause them to weaken over time. Avoid this by laying a towel down before you sit on a chair or on the ground.[18]
- If you don’t have a towel available, pull on a coverup or something similar before you sit down so that your suit doesn’t come into contact with any rough materials.


Advertisement
Ask a Question
200 characters left
Include your email address to get a message when this question is answered.
Submit
Advertisement
-
If these options don’t work for your suit, you may want to consider having the suit tailored or taking it in yourself, especially if it’s still in good condition.
Advertisement
Things You’ll Need
- Mild soap
- Clean bucket or sink
- Teakettle or microwave
- Dryer
- Mild soap
- Cotton cloth
- Ironing board
- Iron
References
About This Article
Article SummaryX
Before you try to shrink a bathing suit in the dryer, turn it inside out, so the colors are less likely to run. If there are bra inserts, take them out as well. Wash the suit by hand in cool water to remove any dirt or grime. Once your suit is clean, submerge it in a pot of boiling water, turn off the heat, and leave the suit to soak until the water cools to room temperature. This will begin to shrink the suit and prepare it for further shrinkage. After 15 to 20 minutes, place the suit into your dryer, and set it to the highest setting and longest time possible. When the dry cycle finishes, let the suit cool off for 10 minutes, then consider repeating the process if it’s still too big. For more tips, like how to shrink a bathing suit by ironing it, scroll down!
Did this summary help you?
Thanks to all authors for creating a page that has been read 170,148 times.
Did this article help you?
![]()
Download Article
![]()
Download Article
Whether your bathing suit is too large because you lost weight, bought the wrong size, or stretched out the material over time, you may want to shrink the suit rather than investing in a new one. Bathing suits are most often made of materials like lycra, spandex, polyester, and nylon, which make it harder to shrink the fibers, but it’s not impossible! Try using boiling hot water to soak your suit and then put it through a hot cycle in the dryer, or try ironing a damp suit on low heat to gradually shrink the material. It may require a couple of attempts, but you should be able to shrink your suit down to the size you prefer.
-
1
Turn your suit inside out to protect the pigments as much as possible. Before washing, boiling, and drying your suit, make sure it’s turned inside out. Doing so will keep the colors from running and your suit should maintain its original hues.[1]
- If there are any bra inserts, go ahead and remove them at this time.
-
2
Wash the suit by hand in cool water to clean off any dirt, grime, or oil. Fill up the sink with cool water, and use a mild laundry detergent that doesn’t have any bleach or dyes in it. Wash the bathing suit in the soapy water, then drain the sink and use fresh water to rinse the suit until there are no more suds. If there is residual sunscreen, sweat, oil, sand, or grime on your suit when it goes into the dryer later, that could get baked into the material and make your suit hard and inflexible, so it’s important to clean it beforehand.[2]
- Avoid putting your suit in the washing machine, as the rough tumbling could stretch out the fibers in the suit.
- You can give your swimsuit for dry cleaning.
- A dry cleaner uses different products to wash them, like fabric softeners and brighteners, and the detergent quality is much better.
- This type of washing is not as abrasive as washing in your home washer.
Advertisement
-
3
Soak the suit in boiling water until the water cools to room temperature. Use a kettle, the microwave, or a pot on the stove to boil water (make sure to use a large pot or dish that won’t break from the heat). Submerge the suit completely in the boiling water and let it sit in there until the water cools down, which should take about 15 to 20 minutes.[3]
- The heat from the boiling water should start to shrink the fibers in the suit and prepare it for further shrinkage once it goes into the dryer.
-
4
Place the suit into the dryer on the highest setting available. For optimum shrinkage, use the highest setting and the longest time that you can choose. Avoid drying the suit with a full load of laundry, as you want it to receive the highest blast of heat so that it can shrink down as much as possible.[4]
- Most dryers can run for 60 to 70 minutes before they shut off.
-
5
Let the garment cool to room temperature once the dry cycle is done. Instead of taking the hot garment right out of the machine and putting it on, set it to the side to let it cool off. The elastic can hold a lot of heat and might burn you if you were to put it on right away.[5]
- It shouldn’t take more than 10 minutes for the suit to cool off.
-
6
Repeat the process 2 to 3 more times to gradually shrink the suit. Try the suit on after it has dried completely to see if it’s at the right size yet. If so, that’s great and you’re ready to enjoy your improved suit! If it’s still too big, go ahead and repeat the boiling and drying process a few more times (there’s no need to wash the suit again as it’s already clean).[6]
- If the suit doesn’t shrink enough after 3 washes, it may be time to consider getting it tailored or perhaps just investing in a new suit.
Warning: Don’t use this method too often, as the high heat will eventually dull the color of the suit and can make it less durable.
Advertisement
-
1
Wash your suit, rinse it out, and thoroughly wring out the excess water. Use cool water and mild laundry detergent that’s free of bleach and added dyes to wash your suit if it isn’t already clean. Fill the sink with cool water and apply the soap directly to your suit. Massage the material in the water to create suds and clean away any grime. Drain the sink, then use fresh water to rinse the suit until no more suds are visible. Squeeze the suit by hand until the suit is just damp instead of drenched.[7]
- If you iron a dirty suit, you are essentially baking in any residual salt, sand, sweat, sunscreen, or lotions you may have come into contact with the last time it was worn.
-
2
Cover the suit with a cotton cloth once it’s on the ironing board. If you don’t have a cotton cloth specifically for ironing, you could also use a handkerchief or some other kind of scrap fabric, just as long as it is clean and made of cotton. Never put the iron directly onto the damp bathing suit, as that will damage the material.[8]
Tip: Even an old pillowcase or sheet will work in a pinch, so don’t feel you need to go out and buy a new cotton cloth if you don’t have one at home.
-
3
Turn the iron on to a low- or medium-heat setting. To avoid damaging the swimsuit, avoid using high heat. It’ll take a little longer to iron and dry the suit, but in the end, your suit will be in better condition.[9]
- You don’t need to fill the steamer basket in the iron for this process. Because the suit is already wet, you won’t need to add moisture to it.
-
4
Iron the suit, pressing down with slow, firm movements. Because you’re using a low-heat setting, be prepared to iron your suit for upwards of 10 minutes. Work systematically from the top to the bottom of the suit, using long, even strokes. Press down with force so that the heat of the iron penetrates through the protective cloth and hits the swimsuit.[10]
- Even though the iron isn’t exuding a ton of heat, still be careful to not catch your fingers or grab the bottom of the iron with your bare hands. It’ll still be hot enough to burn you!
-
5
Flip the suit over from time to time to evenly iron both sides. Make sure to work both sides of the suit so you don’t end up with one side that shrunk and one side that is still the original size. Try flipping the suit over after going from top to bottom completely.[11]
- You may also want to wipe off the ironing board with a clean, dry towel when you flip the suit over. If there is excess moisture on the board, you don’t want it getting absorbed back up into the side you were just working on.
-
6
Continue ironing until almost all of the water has evaporated. It may take 10 minutes or more, so settle in at the ironing board. Continue using adequate pressure and alternating sides so that the suit dries as quickly as possible. Once the majority of the water is gone and the suit is almost completely dry to the touch, you can stop.[12]
- If you dread the idea of ironing for that long, watch a show or listen to some music while you work—it’ll help the time pass more quickly.
-
7
Let the suit air dry the rest of the way before wearing it again. Avoid putting your suit into the sun as the heat could mutate the colors and weaken the elastic. Leave it on the ironing board, or hang it up on a clothesline to let it finish drying. Once it is completely dry to the touch, go ahead and try it on. If it isn’t as small as you’d like, go ahead and repeat the ironing method another 1 to 2 times. If it isn’t shrunken enough after those efforts, it may be time to take it in by hand or invest in a new suit.[13]
- You could pop the suit into the dryer on high heat for about 20 minutes to finish drying it. This could help the material to shrink even more, but letting it air dry will be gentler on the material.
Advertisement
-
1
Wash your swimsuit after every use, whether or not it got wet. Sunscreen, lotions, oils, sand, and sweat all need to be washed away on a regular basis to keep your suit in tiptop condition. You may think if you didn’t go into the water and there’s no chlorine or salt on your suit that it doesn’t need to be washed, but the fibers and elastics will be in much better condition for a longer time if you give the suit a quick wash after every use.[14]
- Build-up of grime can cause the elastic fibers to deteriorate more quickly over time.
-
2
Hand wash your suits in cool water with mild detergent. Avoid using the washing machine if at all possible, as the tumbling motion can stretch your suit and damage the elastic fibers. Use your sink or a bucket to scrub your suit by hand with a mild laundry detergent that is free of bleach and dyes. Once it has been washed, use clean water to thoroughly rinse the suit until all the suds are gone.[15]
Warning: Never use bleach on your suits. You don’t want to get bleach on your skin, plus the bleach will discolor your suit and will also weaken the fabric, making it more likely to tear.
-
3
Hang your suit to dry instead of using the dryer when possible. After your suit has been washed, go ahead and lay it out somewhere to dry. Avoid putting it over a metal pole, like what you might have in your bathroom, as the metal could react with the material and stain it. Instead, use a clothesline and clothespins to hang the suit by its straps.[16]
- A dryer is a great way to shrink a suit, but at the same time, it can also weaken the fibers because of the tumbling and the high heat. It’s something that shouldn’t be used very often so that your suit stays in the best condition possible.
-
4
Keep your drying suit out of the sun to avoid damaging the fibers. It may be super tempting to lay your suit out in the sun to let it dry naturally once you’re finished wearing it, but avoid doing this if you can. In addition to fading the color of your suit, the sun can also weaken the elastic and make your suit less durable over time.[17]
- If on occasion you can’t avoid using the sun to dry your suit, that is okay. Just make it a point to not do it every time.
-
5
Keep your suit away from rough surfaces so the material doesn’t snag. Concrete, pool chairs, and other materials that are often around swimming areas can snag the fibers of your suit, break them, and cause them to weaken over time. Avoid this by laying a towel down before you sit on a chair or on the ground.[18]
- If you don’t have a towel available, pull on a coverup or something similar before you sit down so that your suit doesn’t come into contact with any rough materials.
Advertisement
Ask a Question
200 characters left
Include your email address to get a message when this question is answered.
Submit
Advertisement
-
If these options don’t work for your suit, you may want to consider having the suit tailored or taking it in yourself, especially if it’s still in good condition.
Advertisement
Things You’ll Need
- Mild soap
- Clean bucket or sink
- Teakettle or microwave
- Dryer
- Mild soap
- Cotton cloth
- Ironing board
- Iron
References
About This Article
Article SummaryX
Before you try to shrink a bathing suit in the dryer, turn it inside out, so the colors are less likely to run. If there are bra inserts, take them out as well. Wash the suit by hand in cool water to remove any dirt or grime. Once your suit is clean, submerge it in a pot of boiling water, turn off the heat, and leave the suit to soak until the water cools to room temperature. This will begin to shrink the suit and prepare it for further shrinkage. After 15 to 20 minutes, place the suit into your dryer, and set it to the highest setting and longest time possible. When the dry cycle finishes, let the suit cool off for 10 minutes, then consider repeating the process if it’s still too big. For more tips, like how to shrink a bathing suit by ironing it, scroll down!
Did this summary help you?
Thanks to all authors for creating a page that has been read 170,148 times.
Did this article help you?
Девчонки, я к вам с таким вопросом.
Купила купальник, а низ немного маловат. Верх сидит отлично.
Не хочется его выбрасывать или покупать такой же но на размер больше.
Никто не сталкивался с такой проблемой?
Как можно и можно ли вообще немного растянуть купальник?
Nadezda
Рег.
15.04.2005
Сообщ.
8055
Награды: 3
А если вставить контрастные или в цвет вставки? Или надвязать? Вариантов множество, просто растягивать, по моему смысла нет, а вот надставить по моему очень даже оригинально будет. Вообще вы бы фото купальника поместили, тогда можно было точнее предположить, что с ним можно сделать.
Tauri Verus
Рег.
01.06.2009
Сообщ.
4
вот фотка.
но вообще он мне не настолько маловат, чтобы делать вставки. плюс — пока у меня ещё нет швейной машинки.
Была идея постирать в горячей воде — но хорошо не стала. почитала, что это наоборот приводит к тому, чтобы он сел.

Фиолетовая Кошка
Рег.
10.07.2007
Сообщ.
3286
как вариант можно намочить, натянуть на что-нибудь большое (размером чуть больше чем надо) и дать высохнуть…
а если в поясе резинка, можно её надрезать (или вынуть и заменить на бОльшую)
Zizifus
Рег.
26.10.2008
Сообщ.
4
Посоветовала сотрудница по работе с которой вместе читала тему.
Купите в магазине где продают шторы два металлических кольца надпорите в боковых швах и вставьте кольца, по моему будет симпатично.