Полезная информация:
Настройка графики в Симс 3
Убираем лаги в Симс 3
Моды Симс 3 для производительности игры
Несмотря на то, что игра The Sims 3 уже далеко не новая (первая её часть выпущена аж в 2009 году), на мощных компьютерах играть в Симс 3 не очень удобно. В чем же дело?
Во-первых, дело в самом движке игры. Чем больше выходило новых дополнений, тем больше тормозов и лагов замечали игроки. А всё потому, что движок использует лишь одно ядро процессора. Следовательно, какой бы ни был у вас навороченный компьютер, игра не будет использовать его на максимум.
Во-вторых, в Симс 3 огромный игровой мир, в котором много персонажей, взаимодействий и событий. Игре нужно всё это «запоминать» и подгружать. Кстати, базовая игра, без дополнений совсем не тормозит.
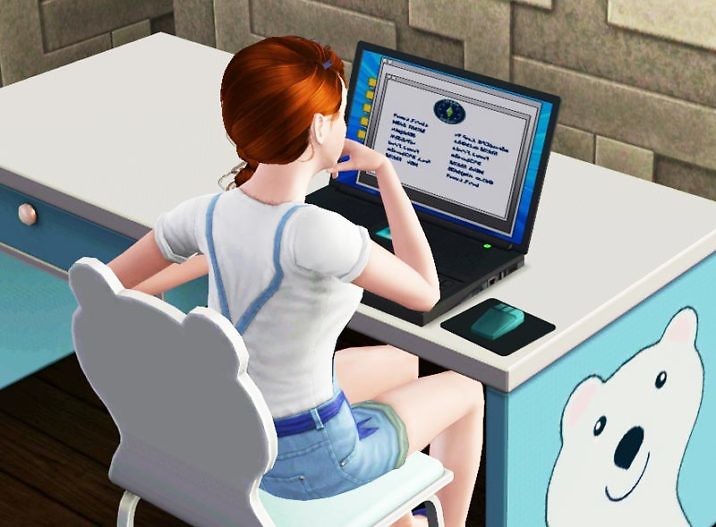
Симс 3 настройка графики
Сначала попытаемся убрать тормоза в Симс 3 при помощи обычных настроек.
Настройка игры:
- Разрешение игры (размер экрана) должно соответствовать разрешению вашего монитора.
- Качество отражения — только зеркала.
- Сглаживание — высокое.
- Видеоэффекты — по своему усмотрению. Они мало влияют на производительность.
- Освещение и тени — можно поставить на среднее.
- Детализация деревьев — среднее, они не так важны в игре.
- Максимальная видимость — среднее.
- Участки в высоком разрешение — один участок. Чтобы игра не подгружала соседние участки, пока вы действуете на одном.
- Качество текстур и детализация персонажей — ставим на максимум. Этот параметр должен быть всегда высоким, ведь он связан с вашими симами и интерьером дома.
Как убрать лаги в Симс 3? Пошаговая инструкция.
Увеличиваем количество оперативной памяти
Пошаговая инструкция по устранению лагов в Симс 3 при помощи увеличения оперативной памяти, используемой в игре (взято с сайта thesims.cc). После этой процедуры игра и правда стала меньше тормозить.
Важно знать:
- Возможно после данной процедуры у вас не будет корректно работать мод Nraas Master Controller (как и у меня).
- Если у вас 4 ГБ оперативной памяти, то этот вариант вам не подойдет, потому что в данном случае Симс 3 и так по умолчанию использует максимальное количество памяти.
Шаг 1. Увеличиваем количество оперативной памяти, которую использует игра.
Открываем папку:
- либо: Electronic ArtsThe Sims 3 GameBin
- либо: Origin GamesThe Sims 3GameBin
Лично у меня эта папка находится здесь:
![]()
Там находится файл «Sims3.ini». Открываем его с помощью блокнота, находим строчку:
MemoryUsageLimit = 20000000
И меняем на:
MemoryUsageLimit =
20000000 (если у вас 4 GB оперативной памяти)
40000000 (у вас 8 GB оперативной памяти)
60000000 (у вас 12 GB оперативной памяти)
80000000 (у вас 16 GB оперативной памяти)
120000000 (у вас 24 GB оперативной памяти)
160000000 (у вас 32 GB оперативной памяти)
320000000 (у вас 64 GB оперативной памяти)
То есть значение делим на 2, потому что нельзя использовать всю оперативную память для игры.
Шаг 2. Патчим игру для использования доступной оперативной памяти:
1. Скачиваем файл — 4GB Patch.
2. Щелкаем по нему правой кнопкой мыши — Запустить от имени администратора.
3. Выбираем и патчим TS3.exe и TS3W.exe (в корне вашей игры)
Шаг 3. Удаляем мусор и ошибки скриптов в сохранениях игры:
- Скачиваем программу Save Cleaner (нужен Net.Framework 4.6)
- Выберите вашу сохраненную игру и нажмите Clean.
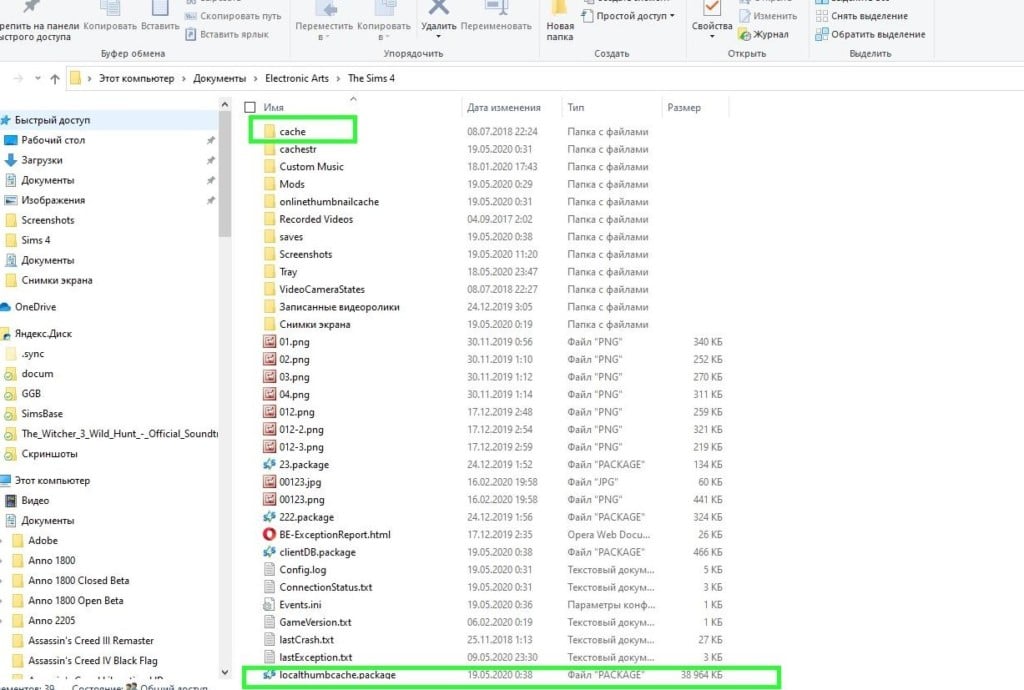
Шаг 4. Удаляем файлы кэша в папке The Sims 3.
Полный путь до папки:
![]()
Удаляем:
- CASPartCache.package
- compositorCache.package
- scriptCache.package
- simCompositorCache.package
Важная информация
После пары дней игры рекомендуется повторить шаги с Save Cleaner и удалять все файлы кэша в Документах. Это позволит избежать ошибок в игре, которые приводят к лагам (особенно во время прокрутки времени х3).
Моды в Симс 3 для производительности игры
Эти моды помогут вам избежать тормозов в Симс 3 (но не забывайте их правильно настраивать в игре). Обратите внимание на настройки по количеству населения. Чем меньше симов, машин и животных в городе, тем меньше тормозов. Рекомендую всем!
Скачать
PLEASE NOTE THAT, IN THIS POST, I WILL GO OVER FIXES THAT WORKED FOR ME AND LET ME PLAY THE SIMS 3 WITH LITTLE TO NO LAG! I OWN ALL PACKS AND ALMOST ALL STORE CONTENT, ALONG WITH A DECENT AMOUNT OF CC/MODS, AND MY GAME ALMOST NEVER LAGS, EVEN ON HIGH SETTINGS.
PLEASE, BACK UP EVERYTHING THAT YOU MODIFY, SO YOU CAN ROLL BACK IN CASE AN ISSUE POPS UP!
We all love The Sims 3; the gameplay, the customization, the amount of content is so massive that everyone has something to do. However, another reocurring feature is lag, freezing and generally unstable performance. There’s a lot of different guides, fixes and options scattered around the Internet, I also made one (on Twitter, of all places!), but these forums seem like a logical option, especially since many players come here anyway to look for help with issues that they experience. I hope that this helps players shave off at least some lag, so we can all enjoy a more stable Sims 3.
The main reason I’m writing this now is the release of The Sims 3 (64-Bit & Metal) for Mac, which has left many Windows users wondering if Windows version is getting the same treatment. This thread has been the main source of information about 64-Bit release for Mac players, but many Windows users have recently expressed concern about a Windows version of the update. As of writing this post, NO UPDATE FOR WINDOWS VERSION OF TS3 HAS BEEN ANNOUNCED. Please, don’t go there asking developers about it. Let Mac users enjoy playing the game that they could never play without issues before.
Now that that is out of the way, I want to state and repeat several things:
- I own all Expansion Packs, Stuff Packs and Store Content with the exception of Roaring Heights and Barnacle Bay.
- These fixes should work for CD, Origin and Steam installations of The Sims 3 for Windows.
- Although these fixes worked for ME, I cannot guarantee that they will work for everyone else.
- I am currently using version 1.67 of The Sims 3, but the game performs similarly to 1.69 that I also tested. Using version 1.67 is a matter of personal preference and convenience.
- I am playing on Asus X560UD laptop, with the following specs:
- CPU: Intel Core i5-8250U (4×1.8GHz)
- GPU: Nvidia GeForce GTX 1050 (4GB)
- RAM: 8GB
- Storage: 480GB SSD
- OS: 64-Bit Windows 10 Pro
- This thread is, obviously, meant for Windows users. I don’t know how The Sims 3 (64-Bit & Metal) for Mac will perform, or what fixes will be compatible.
- BACK UP YOUR SAVES! BACK UP EVERYTHING YOU MODIFY!
1. INSTALL THE BASE GAME, ALL YOUR PACKS & UPDATE THE GAME IF NEEDED!
- If you prefer to install your games from CD, first install the base game, update the game with 1.67 superpatch for all regions, and install all your packs. Once you run the superpatch, it should do its thing and give you a «success» message. Open the launcher and check that the game version is correct.
- If you own the base game and packs on Steam, install it from there, and you should be updated to 1.67; Steam version does not have the 1.69 update.
- If you own the base game and packs on Origin, install it from there; and you should be updated to 1.69 automatically.
2. RUN THE GAME ONCE AND UPDATE YOUR GRAPHICS RULES AND GRAPHICS CARDS FILE SO THE GAME RECOGNIZES YOUR CARDS
If you have just installed the game, run it once to create user files in DocumentsElectronic ArtsThe Sims 3 (or another location, if your Documents folder is somewhere else), since you will need some info from there; specifically from DeviceConfig.log file. If you’ve already played the game and have those files, you don’t have to run it.
Default locations for your GraphicsRules.sgr and GraphicsCards.sgr file are:
- CD: C:Program Files (x86)Electronic ArtsThe Sims 3GameBin
- Steam: C:Program Files (x86)SteamsteamappscommonThe Sims 3GameBin
- Origin: C:Program Files (x86)Origin GamesThe Sims 3GameBin
This is a good, detailed tutorial which can guide you in adding your graphics card info into your game’s database. They also have an attached .zip file which contains GraphicsRules.sgr and GraphicsCards.sgr files that already contain many recent cards. Download them from that thread and check if your card is included there; if it is, you can use those files. As I’ve said before, BACK UP those files before you modify them.
3. LIMIT YOUR FRAME RATE!
The Sims 3, by default, runs without frame rate limitations. On any decent card, it is likely to go past 100 FPS. While that might seem desirable, the game doesn’t actually display that many frames per second, but it still puts more strain on your graphics card than needed. Over time, it might damage your hardware, so it is necessary that you cap the frame rate. 60 FPS is enough for The Sims 3.
At the moment, I’m only able to provide step-by-step instructions for players with Nvidia cards, as I don’t own an AMD card. I believe there are guides for AMD cards available, though.
- Open Nvidia Control Panel. To do this, right-click on your desktop, and select the option Nvidia Control Panel and wait for it to load.
- On the left, select 3D Settings -> Manage 3D Settings.
- In the center window, you will see 2 tabs: Global Settings and Program Settings. Select Program Settings.
- Under Select a program to customize, click on the drop-down menu and look for Sims 3 (ts3.exe), if you installed the game from Origin, or Sims 3 (ts3w.exe), if you installed from CD or Steam. If you don’t see the game listed, click Add and look for TS3.exe or TS3.exe in locations specified in Step 2, or somewhere else if you customized your installation locations.
- Under Select the preferred graphics processor for this program, select High-performance NVIDIA processor.
- Under Specify the settings for this program, look for Max frame rate, and change it to 60 FPS. Then, look for Vertical sync, and turn it On.
- Save those settings.
4. NRAAS MODS (aka LIFESAVERS)
Nraas mods allow players to customize their game even more than an unmodded game allows. Some of them are very helpful with errors, and can improve performance and help with routing issues and other errors that the game produces no matter what. Only three are necessary: MasterController (base and MC Integration), Overwatch and ErrorTrap.
- With MasterController, in addition to being able to manipulate many things in your game, you can force CAS to show up only one swatch per item, to make loading content faster. You can also right-click on any CAS asset (if you open CAS through Nraas) to hide it if you don’t use it.
- Overwatch and ErrorTrap do what their name says, maintain your game and track errors. I recommend that, when they find an error (especially routing errors), you check what causes them and try to resolve them (perhaps a rogue object, or a poorly build house caused the Sim to get stuck).
Nraas mods mentioned here can be found on the list of the common game fixing mods.
5. ELLACHARMED’S FIXED WORLDS
As you might have noticed, EA worlds are filled with routing issues, which can contribute to lag more than any other error. As more Sims are generated, there are more ways they can get stuck and slow the game down.
By default, worlds that come with packs are installed into:
- CD: C:Program Files (x86)Electronic ArtsThe Sims 3/The Sims 3 PackGameDataSharedNon-PackagedWorlds
- Steam: C:Program Files (x86)SteamsteamappscommonThe Sims 3EPXGameDataSharedNon-PackagedWorlds
- Origin: C:Program Files (x86)Origin GamesThe Sims 3EPXXGameDataSharedNon-PackagedWorlds
First, BACK UP original .world files, then place the fixed files in their appropriate locations.
Store worlds, by default, go to: DocumentsElectronic ArtsThe Sims 3InstalledWorlds. Of course, back up the original ones and place the new ones in there.
PLEASE NOTE THAT THESE WORLD FIXES WILL ONLY WORK FOR NEW SAVES, NOT FOR THE EXISTING ONES. YOU MIGHT NOTICE THAT SOME FEATURES IN PRE-FIXED SAVES MIGHT LOOK WEIRD. CONSIDER MOVING YOUR SIMS TO NEW SAVES IF YOU DECIDE TO INSTALL THESE FIXES.
6. DISABLE BLOOM EFFECT
Ok, this might not be the biggest performance boost, but it removes the obnoxious shine that some objects have. So might as well recommend it.
- Find your GraphicsRules.sgr file, back it up, and open it in text editor (Notepad will do). You might have to move it to your desktop first, or else it might not let you save the changes.
- Look for option AdvancedRendering. This determines settings when you enable/disable Advanced Rendering in game options.
- Find the line: prop $ConfigGroup RenderPostProcessEnabled false. It should be under setting $Off by default. Highlight and copy it.
- Paste the line under setting $On so it is used when you enable Advanced Rendering in-game. Save the changes and place the file in Bin folder (if you moved it out of there in step 1).
7. DISABLE ONLINE FEATURES
If you don’t use Shop Mode, disable it in game Options. Log out of your Sims 3 account if you don’t use it. Also, it’s a good idea to disable interactive loading screens, as they might prolong loading times for worlds.
8. INSTALL STORE CONTENT THE SMART WAY
For years, I installed my Store content by dropping everything in Downloads folder and installing everything all at once. As you might expect, that sometimes didn’t work really well. Now, I use this guide to organize and install my Store content in manageable batches and I know what each one contains. I only installed it once and backed it up. Now, if I ever need to reinstall, I just copy and paste it into my user folder and it’s all there.
9. DELETE CACHE FILES
It is a good idea to delete cache files every once in a while. They will regenerate when needed, and that can help in case they ever get corrupted.
Cache files are located in DocumentsElectronic ArtsThe Sims 3 :
- CasPartCache.package
- compositorCache.package
- scriptCache.package
- simCompositorCache.package
- socialCache.package
10. SAVE AS INSTEAD OF SAVE
Whenever possible, use option Save As instead of just Save. This will create a brand new save file for your world, instead of overwriting the same one over and over, which might lead to issues in the future. With Save As, you’ll always get the cleanest save file possible, and you will have backups to go back to in case something goes wrong.
I hope that this guide helps players with lag in their games. These fixes have helped me run my game on High settings with no issues, and I hope they help others experience The Sims 3 in its full, lag free glory. I might update this if I use something new for my game, but for now, I hope that this is enough.
Stay safe and Happy Simming!
В Sims бывает 2 типа зависания и лагов: симуляции и самой игры. Если тупит симуляция, игровой мир долго не откликается на команды игрока: Симы стоят, ничего не делая, очень долго выполняют различные задачи, поздно возвращаются с работы или школы, по несколько часов бездействуют перед тем, как сделать что-то. Если игра Sims зависает, сильно снижается fps, происходит долгая загрузка игровых миров, медленно открывается инвентарь или она периодически на несколько секунд замирает. Это разные проблемы, которые и исправлять придется различными подходами. Вот, что можно попробовать, если завис Sims 3 или Sims 4.
Как исправить лаги симуляции в Sims 4, 3?
Если Симы долго не реагируют на действия, но в конечном итоге откликаются на них, значит симуляция получает слишком много запросов. Из-за неспособности обрабатывать команды в режиме реального времени, они переводятся в режим ожидания. Нужно облегчить задачу внутреннему алгоритму игры и все заработает нормально.
Что стоит попробовать:
- Удалить миры и домохозяйства, которыми игрок все равно не пользуется.
- Убрать неиспользуемые участки и другие предметы из галереи.
- Опустошить инвентарь Симов и уменьшить количество предметов в доме.
- Переехать в меньший дом, где мало предметов искусства и прочего.
- Перейти в автономный режим. Очень часто это срабатывает – нужно перейти в Origin, нажать на одноименную кнопку и выбрать «Автономный режим». Еще можно просто отключить интернет. Еще в настройках самой игры следует перейти в раздел «Другие» и снять галочку с «Доступ к сетевым возможностям», «Уведомлять по сети», «Скрыть сомнительный контент» и «Авто-подключение».

- Установить мод для устранения лагов симуляции. Скачать нужный мод можно здесь в конце страницы. Чтобы его установить, нужно переместить в папку Mods полученные файлы. Затем при включенном режиме Testingcheats в Sims нужно через Shift нажать по персонажу и выбрать «MC Command Center». Далее нужно перейти в «MCCC Settings» – «Gameplay Settings» – «Game Time Speed» и увеличить или снизить скорость.
- Удалить кэш Sims 4 и Origin. Чтобы убрать временные файлы игры, нужно перейти в «Мои документы» в папку Electronic Arts – The Sims 4. Здесь следует удалить папку cache и файл localthumbcache.package. Для удаления кэша Origin стоит открывать папку ProgramData на диске С и раздел с игрой. В данном разделе нужно удалить папки: AchievementCache, CatalogCache, CustomBoxartCache, Download Cache, EntitlementCache, IGOCache и LocalContent. После этой процедуры лучше перезагрузить компьютер.
- Перекинуть своих Симов в новую игру. Это делается через редактор, где нужно выбрать семью, а затем дом для переезда.
- Переместить в корзину файл options.ini, который расположен в папке с игрой.
Что делать при зависании самой игры Sims 3, 4?
Причина, почему Sims зависает может крыться в недостаточной производительности компьютера. Если ваше железо достаточно мощное (превосходит минимальные требования + есть 8 Гб ОЗУ), тогда следует попробовать следующие способы.
Завис Sims 3, 4 – как исправить:
- Удалить моды. Лучше полностью, но можно для теста переименовать папку Mods, добавив к ней _old и запустить игру. Если Sims будет работать стабильно, тогда нужно по одному добавить моды и смотреть результат.
- Исправить ошибки с файлами. Суть способа в том, чтобы переименовать папку с игрой и установить новый игровой клиент. Скорее всего он должен работать нормально. Затем по одной папке берем из старого клиента и переносим в новый. Особенно нужно обращать внимание на saves, Tray, Mods, Custom Music.
- Установить мод для уменьшения зависаний. Он называется MasterController Nraas. Его достаточно долго настраивать, но оно того стоит. Вот видео с подробным описанием мода.
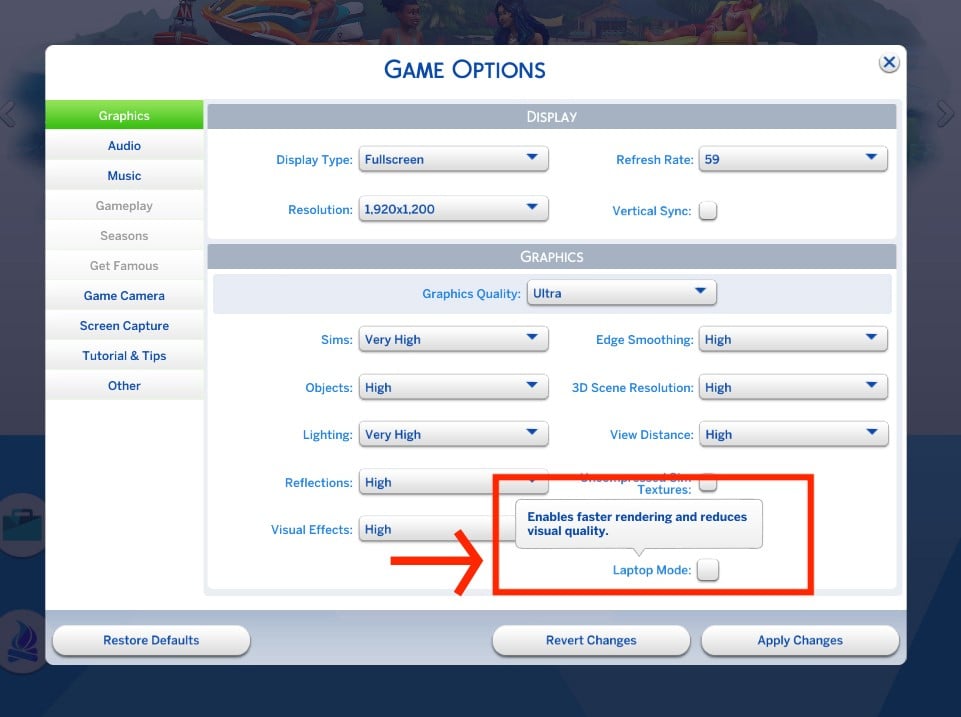
- Отключить «Режим ноутбука». Он активирован по умолчанию и это плохо, ведь тогда игра экономит ресурсы компьютера для снижения расхода батареи. Отсюда могут быть и задержки или лаги. Плюс это может привести к тому, что вместо дискретной видеокарты будет использована интегрированная.
- Снизить качество графики. Особенно важно проверить разрешение в игре. Если оно выше FHD (1920х1080p), лучше вернуть к данным значениям, а «Тип экрана» перевести в «Оконный режим». Дополнительно стоит облегчить нагрузку на систему, установив «Качество графики» в положение «Низкое».
Результатом выполнения перечисленных процедур должно быть исправление лагов симуляции и зависания самой игры Sims 3, Sims 4. Система должна заработать значительно быстрее, а задержки сократятся к нормальным.
Иногда, особенно при долгой игре в одном сохранении, можно столкнуться с различными проблемами: зависания, баги, различные глюки. Ниже я опишу два основных способа, как можно облегчить сохранение, а тем самым — улучшить производительность.
Первый способ.
1. Запускаем игру.
2. Создаем новое сохранение. Город при этом не важен.
3. Заходим в режим Изменения города, сохраняем игру и сразу же выходим из нее.
4. Заходим в папку Saves (Документы — Electronic Arts — The SIms 3 — Saves).
5. Находим папку с новым сохранением (для удобства можно отсортировать по дате (правой кнопкой мыши по любому свободному месту — Сортировка — По дате).
6. Удаляем из папки файл городка. Файл формата: название города+расширение .nhd.
7. Теперь заходим в папку нашего основного сохранения и переносим файл .nhd в папку нового сохранения.
Примечание: Если вам нужны файлы других городков (Университет, город Будущего, городки путешествий), то вы также можете их вставить в новую папку.
Обратите внимание: если вы решите вставить в новую папку только файл основного городка, при этом не перенося другие (городки путешествий и прочее), то вы также сможете с ними взаимодействовать. Однако, если вы полетите в Египет, то ваш «друг» будет вам никем. Иными словами, это будет ваш двойник. Так что, если вам дорог ваш процесс прохождения гробниц и прочее — переносите соответствующие городки тоже.
Также, как дополнительная мера, можно провести дополнительные манипуляции с файлом TravelDB:
1. Заходим в другую семью, за которую вы не играете.
2. Отправляемся в путешествие в любую страну, никаких вещей при этом в багаж класть нежелательно.
3. Сохраняемся.
4. Выходим из игры. Теперь в папке с новым сохранением удаляем или переносим файл TravelDB.
5. Заходим в игру и пробуем отправиться в путешествие вашими симами
Второй способ
Этот способ позволит почистить сохранение детальнее. В нём мы удалим ненужную информацию, которую игра, в последствии, восстановит сама: иконки персонажей, когда вы меняете им облик, а также остальные иконки симов, которых вы встречаете в процессе игры. В этом нам поможет программа s3pe.
1.Запускаем программу. Нажимаем File — Open.
2. Далее у нас появится окно, в котором нужно выбрать нужное сохранение. Идём по пути — Документы — Electronic Arts — The Sims 3 — Saves. Ищем папку с сохранением. У меня это Бриджпорт. Открываем.

3. Активируем поле Tag нажатием на квадратик, вписываем туда SNAP, также активируем Filter Active и теперь нажимаем Set
4.В результате программа нам покажет только нужное содержимое..
5.Нажимаем Resource — Select All. Затем нам нужно их удалить (Resource — Deleted).
Обратите внимание: чем больший вес имеет сохранение — тем дольше процесс.
6. Сохраняем.

Как итог: моё сохранение уменьшилось с 76 мегабайт до 65.
Ещё пара советов, как можно улучшить производительность игры.
1. Установка 4GB Patch.
1.1. Распаковываем архив.
1.2. Запускаем программу.
1.3. Появится окошка выбора .exe файла
1.4. Нам нужен этот путь (также его можно увидеть на картинке выше) — диск D — Origin Games — The Sims 3 — Bin.
Имейте ввиду, что в вашем случае путь установки может различаться. Чтобы его узнать, можно кликнуть по ярлыку игры на рабочем столе правой кнопкой мыши — Открыть расположение файла. Так вы сразу попадёте в нужное место.
1.5.Итак. Предположительно, нужно патчить TS3.exe. Но я бы посоветовал патчить и TS3W.exe: сначала выбираем TS3.exe, получаем уведомление об успешном завершении процесса (ниже), далее выбираем Another file и уже выбираем TS3W.exe. 
2. По пути: Документы — Electronic Arts — The Sims 3. Создаём папку Mods, а в ней — Packages.
2.1. В папку Mods кладём Resource.cfg (прикрепил файл внизу сообщения).
2.2. В папку Packages кидаем эти моды: ErrorTrap, Overwatch, Master Controller и Tempest.
3. Возвращаемся в папку The Sims 3. Теперь мы должны сделать так, чтобы игра не создавала различные иконки одежды и прочего, так как это тоже может влиять на производительность.
3.1. Щёлкаем правой кнопкой мыши по папке FeaturedItems — Свойства.
3.2. Вкладка Безопасность.
3.3. Нажимаем Изменить
3.4. Теперь внизу везде ставим галочки на Запретить. Общая картина, какие шаги вы должны сделать, ниже.
4. По пути установки (у меня это D — Origin Games — The Sims 3 — Bin) открываем файл Sims3.ini.
4.1. Нам нужна строка MemoryUsageLimit = 20000000. Сохраняем файл.
Если у вас мало ОЗУ (2 или 4 ГБ, например), то я бы не рекомендовал увеличивать это значение. Если же у вас 8 ГБ и больше — смело меняйте 2 на 4. Таким образом, игра может брать не 2, а 4 ГБ. Больше смысла ставить просто нет, так игра является 32-битным приложением.
Чтобы узнать, сколько у вас ОЗУ, открываем Диспетчер задач (CTRL+Alt+Delete), либо правой кнопкой по панели задач — Диспетчер задач, далее — вкладка Производительность. В разделе Память будет указано количество уже занятой и количество всей ОЗУ на ПК. У меня это 8 ГБ. Поэтому я поставлю 4.
Диспетчер задач ещё не закрываем, он нам понадобится.
5. Открываем по этому же пути файл Graphic Rules.
5.1. Здесь нам нужна строка seti textureMemory 1024.
5.2. Вместо 1024 пишем количество ГБ вашей видеопамяти. У меня это 2048. Поэтому здесь уже стоит данное значение.
Чтобы узнать количество VRAM, разворачиваем наш Диспетчер задач, ищём раздел Графический процессор. В поле выделенная память будет указано количество используемой и общей видеопамяти.
5.3. В этом же файле ищем строки:
seti cpuLevelUber 4
seti cpuLevelHigh 3
seti cpuLevelMedium 2
seti cpuLevelLow 1
5.4. Меняем их на:
seti cpuLevelUber 4
seti cpuLevelHigh 3
seti cpuLevelMedium 3
seti cpuLevelLow 3
5.5. Сохраняем файл
6. Ставим патч на оптимизацию. Во вкладке Files скачиваем нужную версию патча: если у вас версия Origin, то скачиваем ld_TS3PatchOrigin.zip, если дисковая или Steam-версия, то ld_TS3Patch10.zip.
6.1. Все три файла сразу кидаем в корневую папку игры (папка Bin).
6.2. Открываем текстовый файл TS3Patch.
6.3. Вы можете изменить значение TPS (как я понял, это скорость обработки информации. Если у вас мощный ПК, можно поставить больше, но не больше 1000).
Значение Delay оставляем как есть, а Debug можем поставить 1, если хотим, чтобы перед запуском игры отображалось сообщение, что патч успешно применён и работает.
6.4. FPS Limit выставляем 60 (однако, если позволяют ресурсы ПК и монитор — можно больше). Дело в том, что изначально в игре отключён лимит кадров, что может создавать что-то типа рывков при движении камеры, да и в целом игра может из-за этого тормозить.
6.5. Borderless — это режим игры с рамками или без них (если играете в оконном режиме).
Важное примечание: в архиве присутствует файл TS3PatchLauncher.exe. Игру нужно запускать с него, иначе патч не будет работать. Не волнуйтесь: материалы Store и всё прочее будет работать и вы также по-прежнему сможете загружать их в будущем. Для удобства можно создать ярлык .ехе файла на рабочем столе. Делается это так: правый клик по TS3PatchLauncher — Отправить — Рабочий стол.
Пожалуй, на этом всё. Надеюсь, данный гайд был вам полезен. Удачной игры!
Спасибо за наводку @Chetkaja за предоставленные материалы. Также при составлении гайда был использован материал сайта SimsMIx.
Здесь — ссылка на дополнительные рекомендации для комфортной игры.
Если будут вопросы — задавайте их здесь.

![]()
Resource.cfg.rar
![]()