Процесс исполнения клиент-сервер грузит видеокарту
Разберем, что делать и как исправить, когда процесс исполнения клиент-сервер (csrss.exe) в диспетчере задач показывает высокую нагрузку на видеокарту в Windows 11/10.
Процесс исполнения клиент-сервер или csrss.exe — это официальный процесс Windows, которых 2 штуки, отвечает за графику и другие действия связанные с ней. Он не играет важную роль в графике и не должен грузить графический процессор. Если вы заметили высокую нагрузку на GPU, то разберем способы, как её устранить в Windows 11/10.
1. Отключите планирование GPU
При включенной функции ускорения аппаратного планирования графического процессора, Windows 11/10 расставляет приоритеты над GPU, что может быть причиной высокой нагрузки на видеокарту процессом исполнения клиент-сервер. Чтобы отключить планирование GPU, выполните следующие действия:
- Откройте Параметры > Дисплей > Графика
- Нажмите на Изменение стандартных параметров графики
- Отключите Планирование графического процессора с аппаратным ускорением
- Перезагрузите ПК

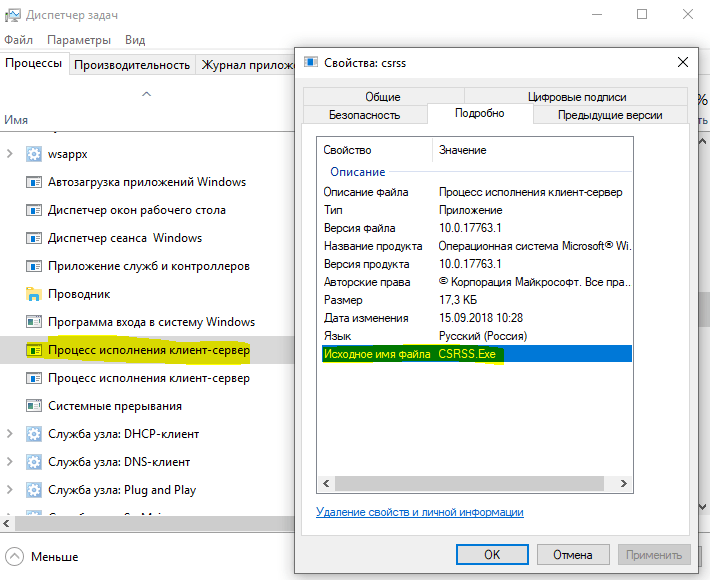
Вирусы могут маскироваться под процесс исполнения клиент-сервер, что может вызывать высокую нагрузку на видеокарту. Нужно проверить находится ли сам процесс csrss.exe по своему пути и проверить ПК на вирусы сканером.
- Нажмите в диспетчере задач правой кнопкой мыши по Процесс исполнения клиент-сервер
- Выберите Открыть расположение файла
- Вы должны попасть по пути C:WindowsSystem32
- Нажмите правой кнопкой мыши по csrss.exe и выберите Свойства
- Во вкладке Подробно убедитесь, что права Microsoft
- Перейдите во вкладку Цифровая подпись, убедитесь, что Microsoft
! После этого скачайте антивирусный сканер DrWeb и проверьте систему на вирусы.
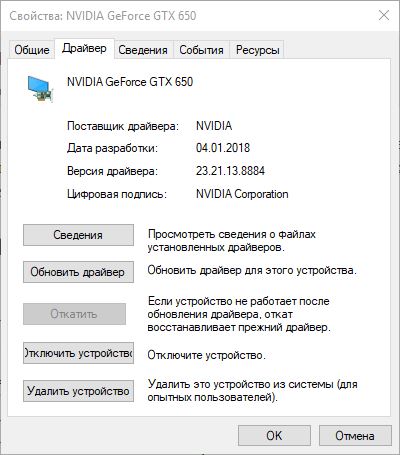
3. Откатить драйвер видеокарты
Windows 11/10 может обновить графический драйвер через центр обновления, что может создать несовместимость и вызывать высокую нагрузку на видеокарту системным процессом исполнения клиент-сервер. Чтобы откатить видеодрайвер, выполните следующие действия:
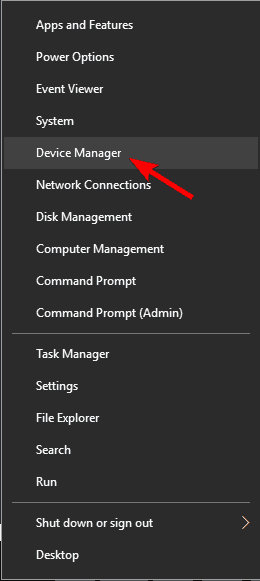
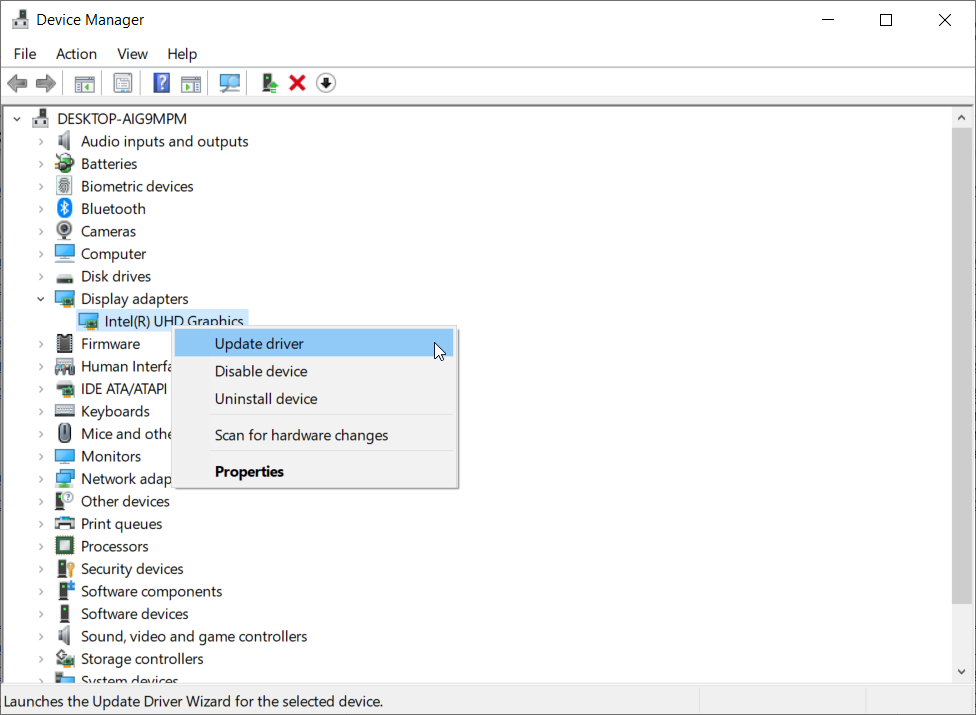
- Нажмите Win+X и выберите Диспетчер устройств
- Разверните графу Видеоадаптеры
- Нажмите правой кнопкой мыши по видеокарте
- Выберите Свойства
- Перейдите во вкладку Драйвер
- Нажмите Откатить, если доступно
4. Обновить видеодрайвер
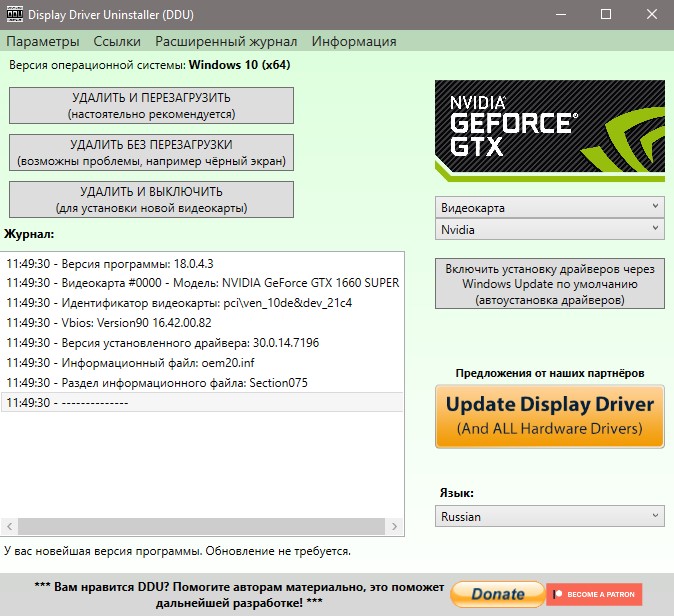
Если вышеперечисленные методы не помогли, то придется правильно обновить драйвер графического процессора, а именно: для начало полностью удалить из системы, потом обновить с официального сайта производителя.
- Как полностью удалить драйвера видеокарты Nvidia, AMD, Intel
- Как обновить драйвер видеокарты Nvidia, AMD, Intel
Смотрите еще:
- Как узнать, какая Видеокарта стоит на ПК или Ноутбуке
- Что такое wuauserv? Как исправить высокое использование процессора
- Wmi provider host (WmiPrvSE.exe): Высокая загрузка ЦП в Windows 10
- dwm.exe: Что это такое и как работает в Windows 10
- Software Reporter Tool — Что это и как исправить нагрузку на ЦП
[ Telegram | Поддержать ]
Если вы уже давно пользуетесь Windows, вы, вероятно, сталкивались с одним или несколькими программами, которые сильно загружают CPU. Некоторые из них не так распространены, другие почти автоматически внедряются в систему. Один из немногих случаев, когда процесс может сильно загрузить ОС, – это Runtime Client Server, известный как «csrss.exe». Он напрямую связан с платформой Windows и обычно требует минимальных ресурсов. Но только не в нашем случае. Многие пользователи сообщают, что после проверки в диспетчере задач они сталкиваются со странным процессом, который занимает 80-100% ЦП. Справедливости ради стоит сказать, что это довольно серьёзная проблема, поэтому нужно избавиться от неё как можно скорее.

Решение проблем при загрузке процессора процессом csrss.exe.
Что представляет собой csrss.exe
Что это за процесс csrss.exe? Он является контроллером консоли Win32 и функций потоковой передачи. В системе Windows API (Application Programming Interface) Win32 представляет собой текстовое окно, которое может использоваться программами без необходимости отображения графики. Что такое csrss.exe в диспетчере задач? Обычно процесс разбивается на несколько потоков, что совместно используют ресурсы в рамках одного процесса и работают на уровне ЦП. Csrss.exe помогает при создании и удалении потоков по мере необходимости. Некоторые части 16-разрядной виртуальной среды MS-DOS и Windows 7 также контролируются файлом csrss.

Расположение файла программы
Csrss.exe – один из основных компонентов систем Windows (подсистема времени выполнения клиент/сервер), ответственный за создание и удаление потоков. Он является частью подсистемы Win32, работающей в так называемом пользовательском режиме – пространстве, доступном как для компонентов, так и для приложений системы. Независимо от количества копий csrss.exe в системе, программа должна находиться внутри системной папки (C:Windowssystem32).
ВАЖНО. Если местоположение процесса отличается, то очень вероятно, что вы имеете дело с вредоносным кодом, маскирующимся как системный процесс.
По умолчанию файл csrss.exe находится в C:WindowsSystem32. Этот процесс был впервые представлен в Windows NT. Его нет в Windows 98 или других операционных системах Windows, выпущенных до версии NT.

Почему служба csrss.exe грузит процессор
Csrss – это пользовательская среда подсистемы Win32. Он обрабатывает пользовательский режим Windows API и графические API-вызовы, передавая их ядру. Следовательно, это довольно уязвимый компонент (поэтому в нём проявляются различные проблемы с производительностью). Причин, почему csrss.exe сильно грузит процессор, может быть достаточно много. Например, чрезмерно большой объём и заполнение Корзины. На современных дисках размер Корзины по умолчанию слишком большой, и 1-2 ГБ в большинстве случаев будет вполне достаточно.
Загрузка процессора также может быть связана с плохой обработкой метрик в программах, что используют множество шрифтов (обычно это текстовые приложения или приложения для редактирования документов, веб-браузеры и другие программы для отображения текста, такие как программы просмотра PDF). Если устройство используется и другими пользователями, проверьте запуск других приложений. Некоторые программы, которые вводят потоки в другие процессы (например, ProcessExplorer) или функции системы захвата (например, брандмауэры), могут плохо взаимодействовать с другими программами и csrss.

Как определить, что это вирус
В первую очередь необходимо убедиться, что файл находится в правильной директории. Для этого запустите Диспетчер задач, нажмите правой кнопкой мыши на процессе и выберите «Перейти к расположению файла». Если проводник откроет вам папку C:WindowsSystem32, тогда вы имеете дело с обычным компонентом системы. В противном случае, скорее всего, это вирус. Дополнительным средством проверки станут антивирусные ПО. Запустите полную или глубокую проверку, после чего приложение покажет вам возможные угрозы.
Как исправить ситуацию
Начнём с рассмотрения наиболее популярной причины ошибки csrss.exe. Системные процессы довольно редко настолько сильно загружают CPU. Есть действительно различные возможные варианты проблем, когда одна из основных служб Windows начинает зависеть от ваших ресурсов, особенно CPU, но чаще всего причина кроется во внешнем факторе. Или, если быть точнее, какой-либо вредоносной программе. С учётом этого мы советуем вам использовать либо Защитник Windows, либо любой сторонний антивирусный инструмент. Рассмотрим функцию сканирования на вирусы, сбои и неисправности на примере Защитника Windows:
- Откройте Защитник Windows из области уведомлений.
- Нажмите Защита от вирусов и угроз.
- Нажмите кнопку «Запустить новое расширенное сканирование».
- Выберите «Проверка автономного Защитника Windows».
- Нажмите «Выполнить сканирование сейчас».

Многие решили проблему, просто удалив свою учётную запись пользователя и создав новую. Поскольку процесс выполнения клиентского сервера частично связан с профилем пользователя, загрузка CPU не является чем-то необычным. Причины этого нежелательного явления кроются в заражении вредоносными программами, которые, как правило, повреждают системные файлы или даже клонируют их. Таким образом, даже несмотря на то, что на данный момент ваш ПК не заражён, ущерб уже может быть нанесён.
Это существенный повод удалить профиль пользователя и попробовать создать новый. Да, вам нужно будет делать резервную копию данных и перенастраивать некоторые незначительные вещи, но проблема должна быть решена. Вот как это сделать за несколько простых шагов:
- В панели поиска Windows введите «Панель управления» и откройте её.
- Откройте «Учётные записи пользователей».
- Выберите «Учётные записи пользователей».
- Нажмите «Управление другой учётной записью».

- Нажмите «Добавить нового пользователя» в окне «Параметры компьютера».
- Выберите «Добавить пользователя для этого компьютера».
- Введите учётные данные для альтернативного профиля пользователя и вернитесь в «Изменение типа учётной записи».
- Откройте вновь созданную учётную запись и нажмите «Изменить тип учётной записи».

- Предоставьте ей права администратора.
- Теперь вернитесь и выберите свой текущий профиль. Создайте резервные копии файлов и папок «Документы» и «Рабочий стол».
- Нажмите «Удалить учётную запись», а затем «Удалить файлы».

- Выйдите из системы и войдите в новую учётную запись пользователя.
- На панели поиска Windows введите «Расширенные параметры» и выберите «Просмотр расширенных параметров системы».
- Перейдите на вкладку «Дополнительно».
- В разделе «Профили пользователей» нажмите «Параметры».
- Удалите учётную запись по умолчанию и сохраните изменения.
- Перезагрузите компьютер, войдите в новый профиль пользователя и перейдите в диспетчер задач, чтобы проверить использование CPU csrss.exe.


В качестве окончательного варианта следует обратиться к восстановлению. Или, если быть более точнее, «Сбросить этот ПК». Эта опция похожа на заводскую перезагрузку, которую мы обычно используем для смартфонов. Она полностью восстанавливает Windows 10 до её начальных значений, сохраняя при этом данные.
- Нажмите Win+I, чтобы вызвать Настройки.
- Откройте окно «Обновление и безопасность».

- Выберите «Восстановление».
- В разделе «Сброс этого ПК» нажмите «Начать».

- Выберите удалить все файлы, и процедура восстановления начнётся.


Вышеописанные способы наверняка помогут избавиться от проблемы, которая приводит к чрезмерной загрузке процессора процессом csrss.exe. При необходимости может потребоваться полная переустановка Windows. Надеемся, что наша статья помогла разобраться в рассматриваемом процессе и теперь вы без проблем сможете понять, почему он грузит процессор.
by Milan Stanojevic
Milan has been enthusiastic about technology ever since his childhood days, and this led him to take interest in all PC-related technologies. He’s a PC enthusiast and he… read more
Updated on March 4, 2022
- As unusual as it may sound, BSoDs are not really harmful for your PC, even though the ntoskrnl.exe critical_process_died message may scare you.
- If you get a csrss.exe BSoD in Windows 10, you definitely need to update your drivers with our software recommendation from this guide.
- Also, if the critical_process_died error still bothers you, you should use a special repair tool that you can find below.
- However, if the critical process died due to overheating, then find out by reading our article on how to uninstall certain software to fix it.
![How to fix Critical_process_died csrss.exe [BSOD]](https://cdn.windowsreport.com/wp-content/uploads/2020/03/Full-fix-Critical_process_died-csrss.exe-BSOD.jpg)
XINSTALL BY CLICKING THE DOWNLOAD FILE
This software will repair common computer errors, protect you from file loss, malware, hardware failure and optimize your PC for maximum performance. Fix PC issues and remove viruses now in 3 easy steps:
- Download Restoro PC Repair Tool that comes with Patented Technologies (patent available here).
- Click Start Scan to find Windows issues that could be causing PC problems.
- Click Repair All to fix issues affecting your computer’s security and performance
- Restoro has been downloaded by 0 readers this month.
Computer errors are a common occurrence, and while certain errors are relatively harmless, others can cause you a lot of problems.
Critical_process_died csrss.exe is a Blue Screen of Death error, and since this error will crash your system every time it appears it’s important to know how to fix it on Windows 10.
The Critical_process_died csrss.exe error can be problematic, and speaking of this error, here are some similar issues reported by the users:
- Critical_process_died Windows 10 won’t boot, won’t boot in Safe Mode – If your system can’t boot due to this problem, it’s possible that there’s an issue with your hardware. But before you replace your hardware, you might want to try reinstalling your system.
- Critical_process_died 0x000000ef – Sometimes this error can be followed by an error code. However, you should be able to fix the problem using one of our solutions.
- Critical_process_died ntoskrnl.exe – Sometimes you might get an error message saying which file caused the problem. If that’s the case, simply do a bit of research and remove the application associated with that file.
- Critical process died overclock, overheat – Overclocking and overheating can also cause this problem, and in order to fix it, be sure to remove all overclock settings.
- Critical process died Avast, Kaspersky – Your antivirus can also cause this issue to occur, and to fix the problem, you’ll need to remove or disable your antivirus.
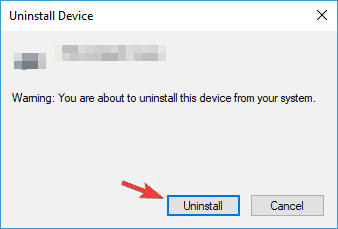
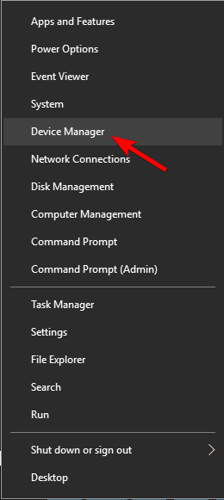
1. Uninstall the problematic software/driver
- Press the Windows Key + X, and select Device Manager from the list.

- Locate the driver that you want to remove, right-click it and choose Uninstall.

- If available, check Delete the driver software for this device and click OK.

- After you delete the driver, restart your PC.
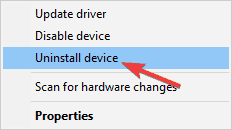
Sometimes the critical_process_died csrss.exe error can be caused by certain software or a driver that you have installed.
To fix this issue, users are suggesting to find and remove the problematic software from your PC. Your antivirus is the common cause for these types of errors, therefore be sure to remove it.
In addition to software, certain drivers can cause this issue to appear. Users reported that Intel Rapid Storage Technology is the common cause for this error, therefore be sure to remove it.
2. Use a repair tool
Sometimes, when we don’t know what errors fall on our PC and overwhelm us, we need a wonderful solution to fix everything effortlessly.
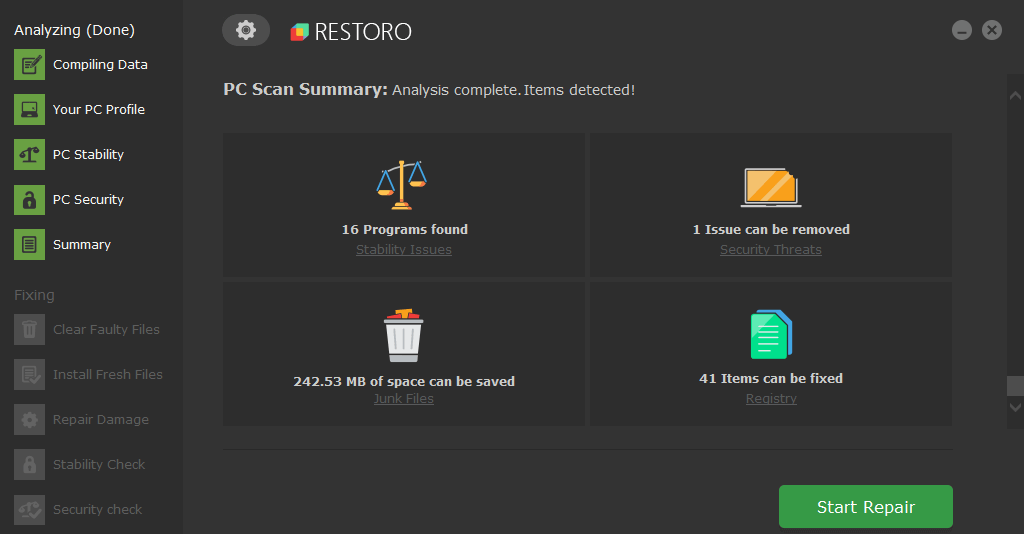
Restoro is powered by an online database that features the latest functional system files for Windows 10 PCs, allowing you to easily replace any elements that can cause a BSoD error.
This software can also help you by creating a restore point before starting the repairs, enabling you to easily restore the previous version of your system if something goes wrong.
This is how you can fix registry errors using Restoro:
- Download and install Restoro.
- Launch the application.
- Wait for the software to identify stability issues and possible corrupted files.
- Press Start Repair.
- Restart your PC for all the changes to take effect.
As soon as the fixing process is completed, your PC should work without problems, and you will not have to worry about BSoD errors or slow response times ever again.
⇒ Get Restoro
Disclaimer: This program needs to be upgraded from the free version in order to perform some specific actions.
3. Turn off the Sleep mode
- Write power settings in the Search bar, and choose the Power & sleep app.
- Navigate to Additional power settings in the Related settings category.

- Locate your current power plan, and click Change plan settings next to it.

- Click Change advanced power settings.

- Go to the Sleep section, and disable all the options.

- After you’re done click Apply and OK to save changes.
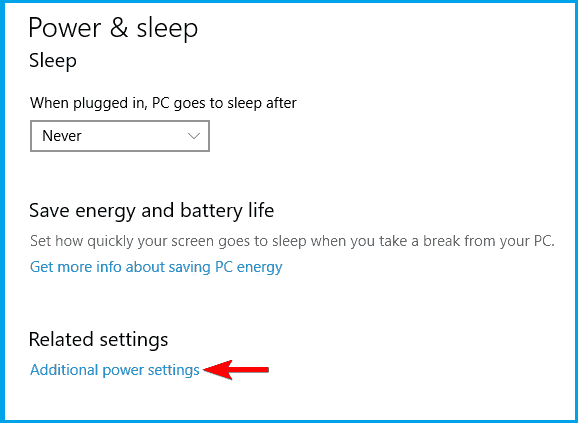
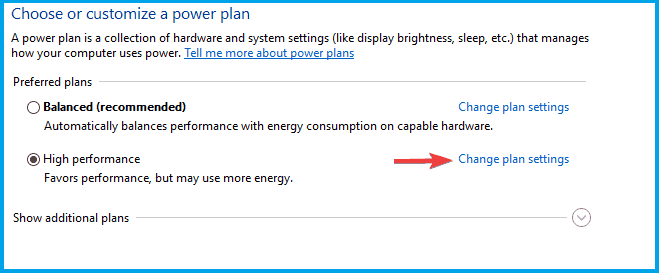
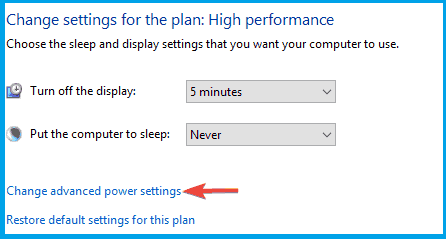
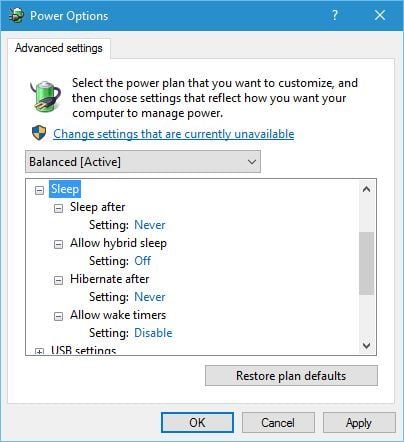
Few users reported that they fixed the critical_process_died csrss.exe error by disabling the Sleep mode. You only have to follow the above steps to get it fixed in no time.
4. Install the latest updates and drivers
4.1 Install the latest updates
- Press Windows Key + I to open the Settings app.
- Navigate to the Update & Security section.
- Click Check for updates button.
Windows will now download the missing updates and install them as soon as you restart your PC.
The simplest way to fix critical_process_died csrss.exe and other Blue Screen of Death errors is to download and install the latest updates through Windows Update.
Many of these updates fix both hardware and software issues, therefore it’s recommended that you install them.
Windows 10 usually downloads the missing updates automatically, but you can always check for updates manually on your own.
4.2 Install the latest drivers
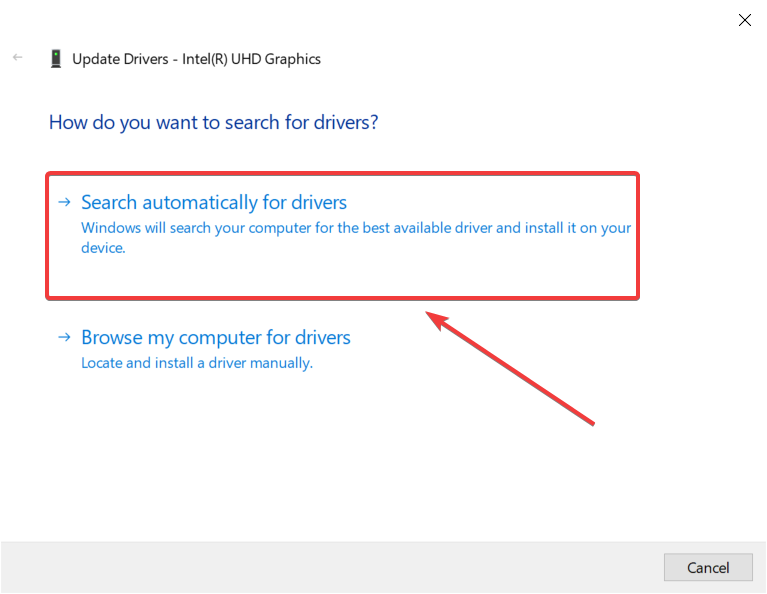
- Press Windows key + X and select Device Manager from the list.

- In Device Manager, expand the proper category for the problematic component.
- Right-click on the driver you want to update and select Update driver.

- Select Search automatically for drivers.

- In a short while, Device Manager will download and install the compatible drivers for the hardware component.
In addition to the latest updates, it’s also recommended to install the latest drivers. Outdated drivers are the common cause for these errors, therefore be sure that you update them.
With little research, you can find which driver is causing this error and update it, but if you can’t find the problematic driver we advise you to update all your drivers.
You can also visit your hardware manufacturer’s website and download the latest drivers for your hardware.
We also recommend a professional tool to automatically download all the outdated drivers on your PC. Driverfix is one of the best options available. It can detect and fix damaged drivers, out-of-date drivers, and missing files on your drivers.
5. Update your BIOS
Some PC issues are hard to tackle, especially when it comes to corrupted repositories or missing Windows files. If you are having troubles fixing an error, your system may be partially broken.
We recommend installing Restoro, a tool that will scan your machine and identify what the fault is.
Click here to download and start repairing.
Your BIOS is in charge of most of your hardware components, and if your BIOS is outdated you might get critical_process_died csrss.exe error. To fix this error users suggest updating your BIOS.
To update BIOS you need to visit your motherboard manufacturer’s website and download the latest version of BIOS.
We have to mention that BIOS update is somewhat an advanced and dangerous procedure, therefore use extra caution if you want to avoid causing permanent damage to your PC.
For detailed instructions on how to update your BIOS, be sure to check your motherboard manual.
6. Remove SATA adapter cradle for your SSD
Some users tend to use SATA adapter cradle for their SSD, but few users reported that SATA adapter cradle can cause this error to appear.
According to users, after removing the SATA adapter cradle and connecting the SSD directly to the motherboard the issue was completely resolved.
7. Perform a System Restore
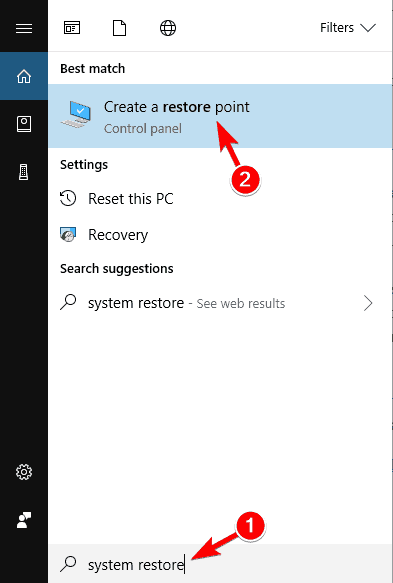
- Press the Windows Key + S, and type system restore.
- Select Create a restore point from the list of results.

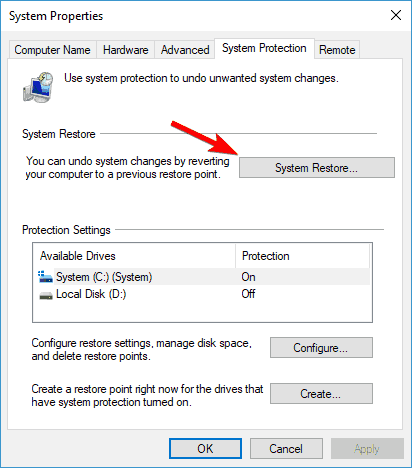
- Click on the System Restore button.

- When System Restore window opens, click Next.

- If available, check Show more restore points option.
- Select the restore point you want to revert, and click Next.
- Follow the instructions on the screen to complete the restoration process.
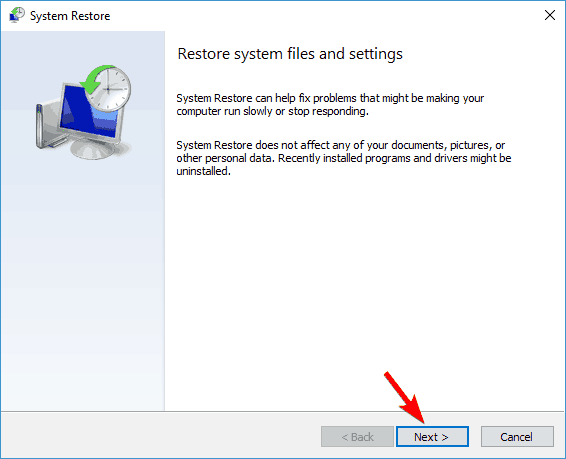
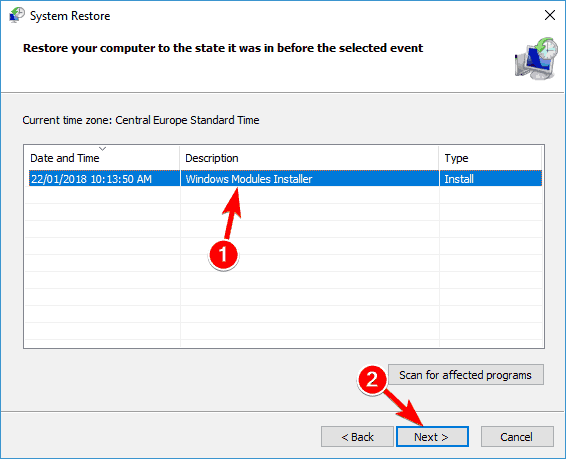
According to users, you might be able to fix this problem by performing System Restore. After the restoration process is finished, check if the problem is still there.
8. Remove problematic applications
In some cases, third-party applications can cause this issue to appear, so you’ll have to remove them.
If this problem started appearing recently, it’s rather likely that a third-party application caused it, so it’s advised to remove any recently installed applications and check if that helps.
Many applications tend to leave leftover files after you remove them, so it might be best that you use uninstaller software.
Third-party uninstallers can detect and remove any lingering files related to your selected app, thus removing it completely from your system.
Most uninstallers can also forcefully remove stubborn software that can’t be removed with Windows settings. This includes malicious or broken apps.
Uninstaller software includes additional optimization features that help you clean your PC. They can detect and remove useless files, broken files, registry entries, temp files, and more.
- Fix: ntoskrnl.exe BSoD errors [Complete Guide]
- System Thread Exception not Handled Ntfs.sys: 6 Easy Fixes
- Invalid Kernel Handle Error: Use These 9 Methods to Fix it
- Runtime Error R6025: Fix it With These 4 Easy Solutions
- Error #268D3: What Is It and How to Remove the Popup
9. Reinstall Windows 10
- Open the Start Menu, click the Power button.
- Press and hold the Shift key and choose Restart.
- Choose Troubleshoot, select Reset this PC, and Remove everything.
- If you’re asked to insert Windows 10 installation media, be sure to do so.
- Select Only the drive where Windows is installed, and select Just remove my files.
- Click the Reset button to start.
- Follow the on-screen instructions to complete the reset.
Once the process is finished, your system will be reinstalled and the problem should be fixed.
According to users, sometimes in order to fix this problem, you need to reset your PC to the default. This process is similar to clean install, so before you perform it, be sure to back up all important files from your system drive.
To perform a reset, you might have to create an installation media, so be sure to do so using Media Creation Tool software.
In case the problem appears after you reset your PC, it’s rather likely that a hardware component is causing this issue.
The most common causes are your RAM and graphics card, so be sure to check them first. If your hardware is the problem, you’ll have to perform a detailed hardware inspection to pinpoint the problem.
Critical_process_died csrss.exe error can cause many problems, but in most cases, you can fix this error by removing the problematic software or by updating your BIOS.
If these solutions don’t work, feel free to try any other fix from this article. Also, leave us your suggestions in the comments section below.
![]()
Newsletter
by Milan Stanojevic
Milan has been enthusiastic about technology ever since his childhood days, and this led him to take interest in all PC-related technologies. He’s a PC enthusiast and he… read more
Updated on March 4, 2022
- As unusual as it may sound, BSoDs are not really harmful for your PC, even though the ntoskrnl.exe critical_process_died message may scare you.
- If you get a csrss.exe BSoD in Windows 10, you definitely need to update your drivers with our software recommendation from this guide.
- Also, if the critical_process_died error still bothers you, you should use a special repair tool that you can find below.
- However, if the critical process died due to overheating, then find out by reading our article on how to uninstall certain software to fix it.
XINSTALL BY CLICKING THE DOWNLOAD FILE
This software will repair common computer errors, protect you from file loss, malware, hardware failure and optimize your PC for maximum performance. Fix PC issues and remove viruses now in 3 easy steps:
- Download Restoro PC Repair Tool that comes with Patented Technologies (patent available here).
- Click Start Scan to find Windows issues that could be causing PC problems.
- Click Repair All to fix issues affecting your computer’s security and performance
- Restoro has been downloaded by 0 readers this month.
Computer errors are a common occurrence, and while certain errors are relatively harmless, others can cause you a lot of problems.
Critical_process_died csrss.exe is a Blue Screen of Death error, and since this error will crash your system every time it appears it’s important to know how to fix it on Windows 10.
The Critical_process_died csrss.exe error can be problematic, and speaking of this error, here are some similar issues reported by the users:
- Critical_process_died Windows 10 won’t boot, won’t boot in Safe Mode – If your system can’t boot due to this problem, it’s possible that there’s an issue with your hardware. But before you replace your hardware, you might want to try reinstalling your system.
- Critical_process_died 0x000000ef – Sometimes this error can be followed by an error code. However, you should be able to fix the problem using one of our solutions.
- Critical_process_died ntoskrnl.exe – Sometimes you might get an error message saying which file caused the problem. If that’s the case, simply do a bit of research and remove the application associated with that file.
- Critical process died overclock, overheat – Overclocking and overheating can also cause this problem, and in order to fix it, be sure to remove all overclock settings.
- Critical process died Avast, Kaspersky – Your antivirus can also cause this issue to occur, and to fix the problem, you’ll need to remove or disable your antivirus.
1. Uninstall the problematic software/driver
- Press the Windows Key + X, and select Device Manager from the list.
- Locate the driver that you want to remove, right-click it and choose Uninstall.
- If available, check Delete the driver software for this device and click OK.
- After you delete the driver, restart your PC.
Sometimes the critical_process_died csrss.exe error can be caused by certain software or a driver that you have installed.
To fix this issue, users are suggesting to find and remove the problematic software from your PC. Your antivirus is the common cause for these types of errors, therefore be sure to remove it.
In addition to software, certain drivers can cause this issue to appear. Users reported that Intel Rapid Storage Technology is the common cause for this error, therefore be sure to remove it.
2. Use a repair tool
Sometimes, when we don’t know what errors fall on our PC and overwhelm us, we need a wonderful solution to fix everything effortlessly.
Restoro is powered by an online database that features the latest functional system files for Windows 10 PCs, allowing you to easily replace any elements that can cause a BSoD error.
This software can also help you by creating a restore point before starting the repairs, enabling you to easily restore the previous version of your system if something goes wrong.
This is how you can fix registry errors using Restoro:
- Download and install Restoro.
- Launch the application.
- Wait for the software to identify stability issues and possible corrupted files.
- Press Start Repair.
- Restart your PC for all the changes to take effect.
As soon as the fixing process is completed, your PC should work without problems, and you will not have to worry about BSoD errors or slow response times ever again.
⇒ Get Restoro
Disclaimer: This program needs to be upgraded from the free version in order to perform some specific actions.
3. Turn off the Sleep mode
- Write power settings in the Search bar, and choose the Power & sleep app.
- Navigate to Additional power settings in the Related settings category.
- Locate your current power plan, and click Change plan settings next to it.
- Click Change advanced power settings.
- Go to the Sleep section, and disable all the options.
- After you’re done click Apply and OK to save changes.
Few users reported that they fixed the critical_process_died csrss.exe error by disabling the Sleep mode. You only have to follow the above steps to get it fixed in no time.
4. Install the latest updates and drivers
4.1 Install the latest updates
- Press Windows Key + I to open the Settings app.
- Navigate to the Update & Security section.
- Click Check for updates button.
Windows will now download the missing updates and install them as soon as you restart your PC.
The simplest way to fix critical_process_died csrss.exe and other Blue Screen of Death errors is to download and install the latest updates through Windows Update.
Many of these updates fix both hardware and software issues, therefore it’s recommended that you install them.
Windows 10 usually downloads the missing updates automatically, but you can always check for updates manually on your own.
4.2 Install the latest drivers
- Press Windows key + X and select Device Manager from the list.
- In Device Manager, expand the proper category for the problematic component.
- Right-click on the driver you want to update and select Update driver.
- Select Search automatically for drivers.
- In a short while, Device Manager will download and install the compatible drivers for the hardware component.
In addition to the latest updates, it’s also recommended to install the latest drivers. Outdated drivers are the common cause for these errors, therefore be sure that you update them.
With little research, you can find which driver is causing this error and update it, but if you can’t find the problematic driver we advise you to update all your drivers.
You can also visit your hardware manufacturer’s website and download the latest drivers for your hardware.
We also recommend a professional tool to automatically download all the outdated drivers on your PC. Driverfix is one of the best options available. It can detect and fix damaged drivers, out-of-date drivers, and missing files on your drivers.
5. Update your BIOS
Some PC issues are hard to tackle, especially when it comes to corrupted repositories or missing Windows files. If you are having troubles fixing an error, your system may be partially broken.
We recommend installing Restoro, a tool that will scan your machine and identify what the fault is.
Click here to download and start repairing.
Your BIOS is in charge of most of your hardware components, and if your BIOS is outdated you might get critical_process_died csrss.exe error. To fix this error users suggest updating your BIOS.
To update BIOS you need to visit your motherboard manufacturer’s website and download the latest version of BIOS.
We have to mention that BIOS update is somewhat an advanced and dangerous procedure, therefore use extra caution if you want to avoid causing permanent damage to your PC.
For detailed instructions on how to update your BIOS, be sure to check your motherboard manual.
6. Remove SATA adapter cradle for your SSD
Some users tend to use SATA adapter cradle for their SSD, but few users reported that SATA adapter cradle can cause this error to appear.
According to users, after removing the SATA adapter cradle and connecting the SSD directly to the motherboard the issue was completely resolved.
7. Perform a System Restore
- Press the Windows Key + S, and type system restore.
- Select Create a restore point from the list of results.
- Click on the System Restore button.
- When System Restore window opens, click Next.
- If available, check Show more restore points option.
- Select the restore point you want to revert, and click Next.
- Follow the instructions on the screen to complete the restoration process.
According to users, you might be able to fix this problem by performing System Restore. After the restoration process is finished, check if the problem is still there.
8. Remove problematic applications
In some cases, third-party applications can cause this issue to appear, so you’ll have to remove them.
If this problem started appearing recently, it’s rather likely that a third-party application caused it, so it’s advised to remove any recently installed applications and check if that helps.
Many applications tend to leave leftover files after you remove them, so it might be best that you use uninstaller software.
Third-party uninstallers can detect and remove any lingering files related to your selected app, thus removing it completely from your system.
Most uninstallers can also forcefully remove stubborn software that can’t be removed with Windows settings. This includes malicious or broken apps.
Uninstaller software includes additional optimization features that help you clean your PC. They can detect and remove useless files, broken files, registry entries, temp files, and more.
- Fix: ntoskrnl.exe BSoD errors [Complete Guide]
- System Thread Exception not Handled Ntfs.sys: 6 Easy Fixes
9. Reinstall Windows 10
- Open the Start Menu, click the Power button.
- Press and hold the Shift key and choose Restart.
- Choose Troubleshoot, select Reset this PC, and Remove everything.
- If you’re asked to insert Windows 10 installation media, be sure to do so.
- Select Only the drive where Windows is installed, and select Just remove my files.
- Click the Reset button to start.
- Follow the on-screen instructions to complete the reset.
Once the process is finished, your system will be reinstalled and the problem should be fixed.
According to users, sometimes in order to fix this problem, you need to reset your PC to the default. This process is similar to clean install, so before you perform it, be sure to back up all important files from your system drive.
To perform a reset, you might have to create an installation media, so be sure to do so using Media Creation Tool software.
In case the problem appears after you reset your PC, it’s rather likely that a hardware component is causing this issue.
The most common causes are your RAM and graphics card, so be sure to check them first. If your hardware is the problem, you’ll have to perform a detailed hardware inspection to pinpoint the problem.
Critical_process_died csrss.exe error can cause many problems, but in most cases, you can fix this error by removing the problematic software or by updating your BIOS.
If these solutions don’t work, feel free to try any other fix from this article. Also, leave us your suggestions in the comments section below.
![]()
Newsletter
Компьютерные ошибки — обычное явление, и, хотя некоторые ошибки относительно безопасны, другие могут вызвать у вас много проблем. Critical_process_died csrss.exe — это ошибка типа « синий экран смерти», и поскольку эта ошибка будет приводить к аварийному завершению работы системы каждый раз, когда она появляется, важно знать, как ее исправить в Windows 10 .
Critical_process_died csrss.exe на Windows 10, как это исправить?
Критическая _process_died csrss.exe может быть проблематичной, и, говоря об этой ошибке, вот некоторые похожие проблемы, о которых сообщили пользователи:
- Critical_process_died Windows 10 не загружается, не загружается в безопасном режиме — если ваша система не может загрузиться из-за этой проблемы, возможно, есть проблема с вашим оборудованием. Но прежде чем заменить свое оборудование, вы можете попробовать переустановить систему.
- Critical_process_died 0x000000ef — Иногда за этой ошибкой может следовать код ошибки. Тем не менее, вы должны быть в состоянии решить проблему, используя одно из наших решений.
- Critical_process_died ntoskrnl.exe — Иногда вы можете получить сообщение об ошибке, сообщающее, какой файл вызвал проблему. Если это так, просто проведите небольшое исследование и удалите приложение, связанное с этим файлом.
- Критический процесс умер, разгон, перегрев — разгон и перегрев также могут стать причиной этой проблемы, и для ее устранения обязательно удалите все настройки разгона.
- Критический процесс умер Avast, Kaspersky — Ваш антивирус также может вызывать эту проблему, и для ее устранения вам необходимо удалить или отключить антивирус.
Решение 1. Проверьте свой антивирус

Другой причиной ошибки Critical_process_died csrss.exe может быть ваше антивирусное программное обеспечение. Ваш антивирус может иногда взаимодействовать с вашей системой, что может привести к появлению таких проблем, как этот.
Чтобы решить эту проблему, рекомендуется отключить антивирус и проверить, помогает ли это. Кроме того, вам может потребоваться удалить антивирусное программное обеспечение полностью, чтобы решить эту проблему. Многие пользователи сообщили, что McAfee вызвал эту проблему, поэтому, если вы используете его, обязательно удалите его.
Если удаление антивируса решит проблему, возможно, стоит подумать о переходе на другое антивирусное решение. На рынке есть много отличных антивирусных инструментов, и если вам нужна максимальная защита, которая не будет мешать вашей системе, мы рекомендуем вам попробовать Bitdefender .
Решение 2. Установите последние обновления и драйверы
Простейший способ исправить crit_process_died csrss.exe и другие ошибки Blue Screen of Death — это загрузить и установить последние обновления через Центр обновления Windows . Многие из этих обновлений устраняют как аппаратные, так и программные проблемы, поэтому рекомендуется их устанавливать.
Windows 10 обычно загружает отсутствующие обновления автоматически, но вы всегда можете проверить наличие обновлений самостоятельно. Для этого выполните следующие действия:
- Нажмите клавишу Windows + I, чтобы открыть приложение «Настройки» .
- Когда откроется приложение «Настройки» , перейдите в раздел « Обновление и безопасность ».

- Нажмите кнопку Проверить наличие обновлений .


Теперь Windows загрузит отсутствующие обновления и установит их, как только вы перезагрузите компьютер.
В дополнение к последним обновлениям также рекомендуется установить последние версии драйверов. Устаревшие драйверы являются частой причиной этих ошибок, поэтому обязательно обновите их.
После небольшого исследования вы можете найти, какой драйвер вызывает эту ошибку, и обновить ее, но если вы не можете найти проблемный драйвер, мы советуем вам обновить все ваши драйверы. Для этого просто посетите веб-сайт производителя вашего оборудования и загрузите последние версии драйверов для вашего оборудования.
Мы также рекомендуем этот сторонний инструмент (на 100% безопасный и протестированный нами) для автоматической загрузки всех устаревших драйверов на ваш ПК.
Решение 3 — Удалите проблемное программное обеспечение / драйвер
Иногда ошибка crit_process_died csrss.exe может быть вызвана определенным программным обеспечением или драйвером, который вы установили. Чтобы решить эту проблему, пользователи предлагают найти и удалить проблемное программное обеспечение с вашего ПК. Ваш антивирус является распространенной причиной таких ошибок, поэтому обязательно удалите его и проверьте, исправляет ли это ошибку.
В дополнение к программному обеспечению, некоторые драйверы могут вызвать эту проблему. Пользователи сообщили, что Intel Rapid Storage Technology является частой причиной этой ошибки, поэтому обязательно ее устраните. Чтобы удалить определенный драйвер, сделайте следующее:
- Нажмите Windows Key + X, чтобы открыть Power User Menu и выберите Диспетчер устройств из списка.
- Когда диспетчер устройств запускается, найдите драйвер, который вы хотите удалить, щелкните его правой кнопкой мыши и выберите « Удалить» .
- Если доступно, установите флажок « Удалить программное обеспечение драйвера для этого устройства» и нажмите « ОК» .
- После удаления драйвера перезагрузите компьютер.


- Читайте также: Исправлено: синий экран после отката Windows 10
Решение 4 — отключить спящий режим
Немногие пользователи сообщили, что они исправили ошибку absolute_process_died csrss.exe, отключив спящий режим . Для этого выполните следующие действия:
- Нажмите Windows Key + S и введите настройки питания . Выберите Power & sleep settings из списка результатов.

- Когда откроется приложение «Настройки» , перейдите к « Дополнительные параметры питания» в категории « Связанные настройки ».
- Появится список доступных схем питания. Найдите свой текущий тарифный план и нажмите « Изменить параметры плана рядом с ним».
- Нажмите Изменить дополнительные параметры питания .
- Зайдите в раздел Sleep и отключите все опции.
- После того, как вы закончите, нажмите Apply и OK, чтобы сохранить изменения.


Решение 5 — Обновите свой BIOS
Ваш BIOS отвечает за большинство ваших аппаратных компонентов, и если ваш BIOS устарел, вы можете получить ошибку критической_процесс_died csrss.exe. Чтобы исправить эту ошибку, пользователи предлагают обновить BIOS. Для обновления BIOS вам необходимо посетить веб-сайт производителя материнской платы и загрузить последнюю версию BIOS.
Мы должны упомянуть, что обновление BIOS — это довольно сложная и опасная процедура, поэтому будьте особенно осторожны, если хотите избежать необратимого повреждения вашего ПК. Для получения подробных инструкций по обновлению BIOS обязательно ознакомьтесь с руководством по материнской плате .
Решение 6 — Снимите подставку адаптера SATA для вашего SSD
Некоторые пользователи, как правило, используют подставку адаптера SATA для своих SSD , но лишь немногие пользователи сообщили, что подставка адаптера SATA может вызвать появление этой ошибки. По словам пользователей, после удаления подставки для адаптера SATA и подключения SSD непосредственно к материнской плате проблема была полностью решена.
Windows не удалось найти файл csrcs.exe — эта ошибка происходит потому что на самом деле это часть вируса или лучше сказать «Троянского коня». Файл искусно маскируется под системный файл csrss.exe, который отвечает за обработку графического набора команд. В основном это графическое завершение работы или старт Windows. Если ваш антивирус удалил файл csrcs.exe, а при загрузке виндовс ругается что нет этого файла – это говорит о том, что не полностью удалился Троянский конь и в системе остались его так называемые «хвосты» или следы жизнедеятельности.
Для удаления следов нахождения на вашем компьютере данного вредоносного ПО нужно сделать следующие манипуляции:
- Запустим любым удобным для вас способом Диспетчер задач: нажмем Выполнить и введем команду taskmgr, либо нажмём сочетание клавиш Win+R и также введем выше описанную команду.
Самый простой способ запуска — это сочетание клавиш Ctrl+Shift+Esc. После того как мы запустили диспетчер задач находим процесс csrCs.exe, а не csrSs.exe. Разница всего в одной букве, поэтому есть вероятность что вас это введет в заблуждение. Когда мы нашли процесс — щелкаем по нему правой кнопкой мыши и нажимаем Завершить дерево процессов, после этого соглашаемся и жмем кнопку .После того как процесс был завершен, мы переходим в каталог C:Windowssystem32
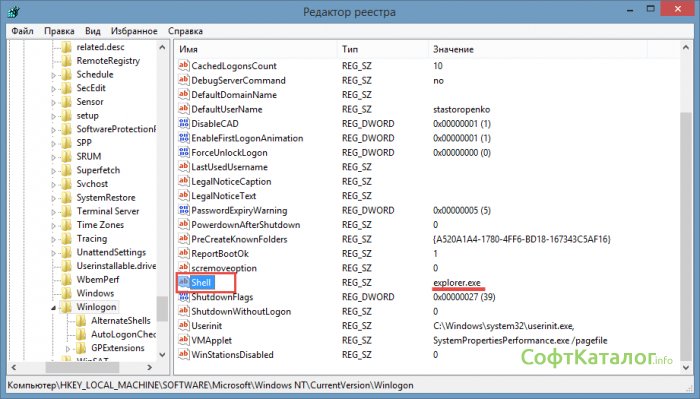
и находим злосчастный файл csrcs.exe и конечно же удаляем его (желательно все это делать с правами администратора). - Следующим действием будет удаление из реестра остатков этого программного обеспечения. Для этого мы нажимаем клавиши Win+R и вводим команду regedit, затем нажимаем кнопку . Данное действие запустить редактор реестра. Его также можно запустить, имея под рукой Total Commander со встроенным редактором реестра. Итак, после тога как запустили редактор заходим в раздел
HKEY_LOCAL_MACHINE SoftwareMicrosoft WindowsCurrentVersion policiesExplorer Runи находим раздел или параметр с искомым значением csrcs.exe. Если нашли, то нажимаем правой кнопкой мыши, выбираем Удалить и идем в следующую ветку реестраHKEY_LOCAL_MACHINE SoftwareMicrosoft Windows NTCurrentVersion Winlogon, которая отвечает за графическую загрузку Windows 7 /8 /XP. В этом разделе мы находим параметр Shell, он должен быть равен explorer.exe если к нему дописан csrcs.exe, то нажимаем правой кнопкой мыши, выбираем Изменить и удаляем лишнее чтобы остался вид explorer.exe.
Но иногда этих путей поиска недостаточно. В редакторе реестра нажимаем кнопку F3 и вводим в поиск искомую строку csrcs либо csrcs.exe. Если поиск дал положительный результат, то удаляем все ветки и параметры, которые связаны с этим вирусом.
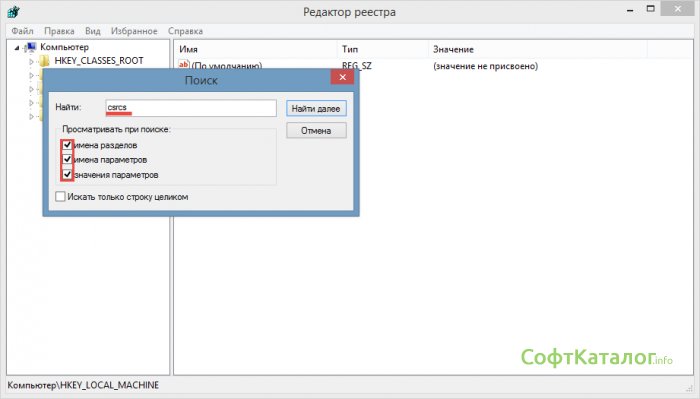
При поиске в реестре обратите внимание на написание того, что ищете: должно быть csrcs.exe, а не csrss.exe. Желательно все это делать в беопасном режиме загрузки вашей операционной системы. Это делается для того, чтобы у вас была возможность удалять ненужные, на ваш взгляд, файлы из системных папок.
После всего проделанного перегружаем наш компьютер и больше не видим ошибки с вязанной с файлом csrcs.exe.