Ошибки с кодами 126, реже 127, ссылаются на то, что «Не найден указанный модуль». Таким образом легко сделать вывод – в Windows 7, 8, 10 недостает какого-то файла. Это действительно часто означает отсутствие DLL-библиотеки, но не всегда. Дело может быть и в других неприятных неполадках с реестром или системой защиты и т. п. Вполне может быть, что все дело и в самой программе, которая этот сбой провоцирует. Мы поможем исправить ошибку (Error 126) своими силами, ничего особо сложного в этом нет. Однако, предупреждаем, что неправильные действия в реестре или при взаимодействии с драйверами могут вызвать негативные последствия для работы операционной системы.
Содержание
- Причины ошибки 126
- Как исправить ошибку 126?
- Способ 1: автоматическое исправление проблем с DLL-файлами
- Способ 2: временно отключаем антивирус
- Способ 3: обновляем Microsoft NET Framework
- Способ 4: переустанавливаем DirectX
- Способ 5: сканируем системные файлы Windows
- Способ 6: восстанавливаем системные реестр
- Способ 7: делаем откат Windows
Причины ошибки 126
Если отображается ошибка 126 «Не найден модуль» – можем сделать вывод о наличии одной из перечисленных ниже проблем:
- отсутствует, не зарегистрирован или поврежден DLL-файл;
- неправильная настройка или нарушение целостности системных файлов;
- некорректная установка программы или она была чем-то прервана;
- повреждение Windows вирусами;
- сбой в системном реестре;
- проблема в драйверах, настройке оборудования или его несовместимости с версией операционной системы.
Как исправить ошибку 126?
Мы разработали серию решений проблемы, одно из них обязано помочь, так как исправляет каждую из перечисленных проблем. Логично, что после устранения неполадки, все должно заработать правильно.
Способ 1: автоматическое исправление проблем с DLL-файлами
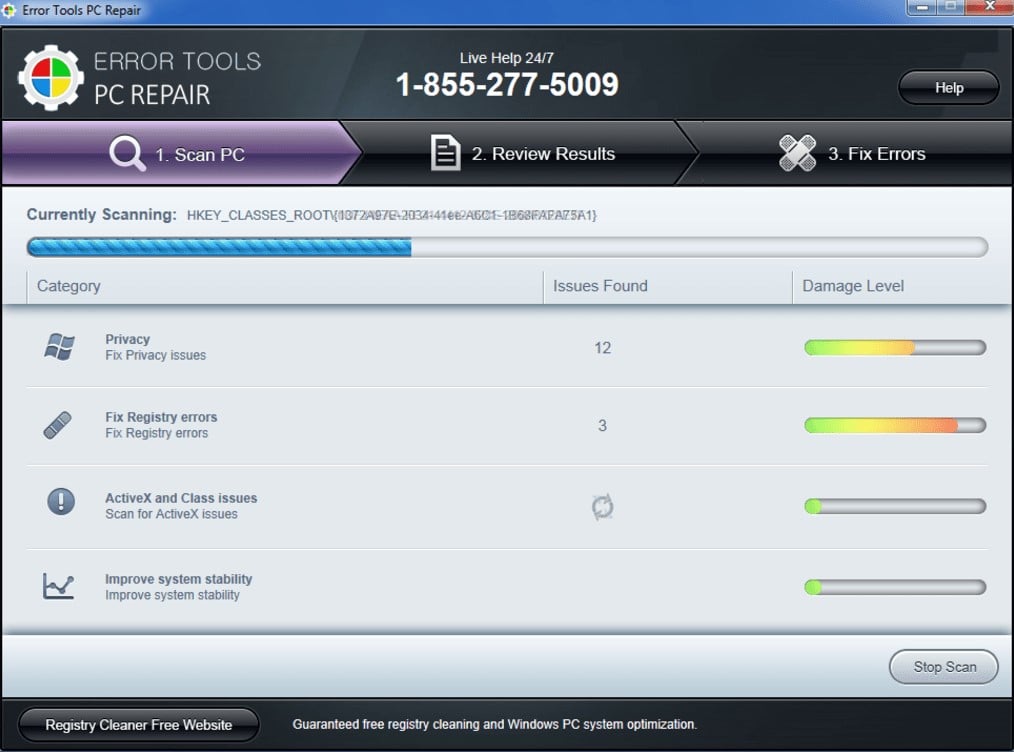
Есть специальная утилита, которая автоматически сканирует системные библиотеки и сравнивает их с эталоном. Если она обнаружит, что какого-то файла или нескольких, недостает, она сама их загрузит. Также происходит анализ битых, поврежденных и модифицированных файлов. Это очень удобно и быстро в сравнении с ручным способом и, что немаловажно, еще и более безопасно. На личном опыте, программа работает стабильно и не устанавливает файлы, зараженные вирусами. Однако любые манипуляции с DLL-библиотеками сложно назвать полностью безопасными.
Инструкция по устранению ошибки 126:
- Загружаем программу Restoro PC Repair Tool. Лучше это делать с официального сайта.
- Устанавливаем и запускаем софт. Нажимаем на кнопку «Начать сканирование» (Start Scan).
- После процедуры анализа системы кликаем по клавише «Восстановить все» (Repair All).
Важное достоинство программы – она оптимизирует компьютер, увеличивая его производительность (если в системе есть какие-то проблемы с DLL). Ее можно оставить в качестве настольного софта, так как утилита решает большой спектр проблем.
Способ 2: временно отключаем антивирус
Есть большая вероятность, что ошибка 126 спровоцирована антивирусной защитой системы. Если в момент установки программы антивирус посчитал один из компонентов угрозой и заблокировал его, он будет отсутствовать, а система писать «Не найден указанный модуль». В целом желательно отключать защиту в момент установки программ, которым доверяем.
Инструкция:
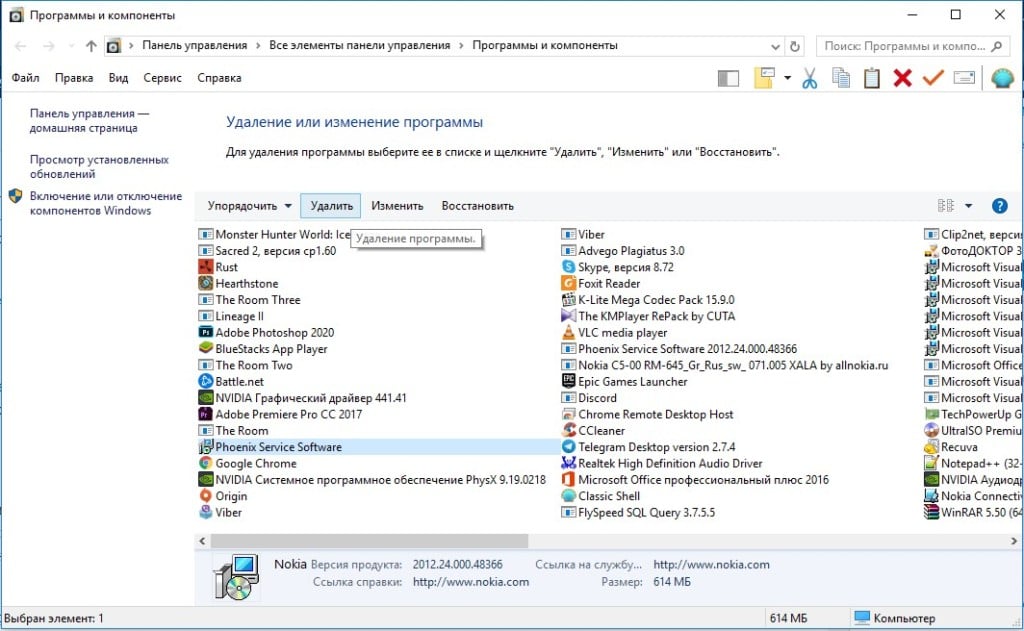
- Выключаем антивирус (встроенный Защитник Windows и/или сторонний).
- Полностью удаляем программу через «Программы и компоненты» (пункт находится в Панели управления).
- Начинаем установку утилиты снова, проверив, что сейчас антивирус не работает.
- Проверяем результат.
Если сейчас программа заработала нормально, рекомендуем открыть антивирус и добавить в список его исключений данный софт. В противном случае со временем ошибка может вернуться, ведь антивирусная защита снова может заблокировать или удалить файл.
Важно! Для максимального результата лучше сделать полное удаление программы. Для этого можем воспользоваться iObit Uninstaller. Софт анализирует систему и ищет остатки файлов приложения, удаляя и их.
Способ 3: обновляем Microsoft NET Framework
Устаревание платформы Microsoft NET Framework нередко приводит к ошибкам с кодом 126 и 127. Благо, это просто решается, достаточно обновить среду. Если дело было в этом, все должно заработать. Скачать актуальную версию NET Framework можем с официального сайта Microsoft.
Способ 4: переустанавливаем DirectX
Очень много DLL-файлов напрямую связаны с DirectX, поэтому есть высокая вероятность, что сообщение «Не найден указанный модуль» относится к данному программному компоненту. Его легко переустановить, так как DirectX тоже распространяет Microsoft совершенно бесплатно и для любых версий, конфигураций операционной системы. С установкой проблем быть не должно, за исключением одного момента – желательно, перед началом инсталляции софта удалить старую версию DirectX.
Способ 5: сканируем системные файлы Windows
Во всех актуальных версиях Windows есть встроенный инструмент анализа системных файлов. Он часто помогает при различных проблемах с DLL-файлами.
Как запустить системные файлы:
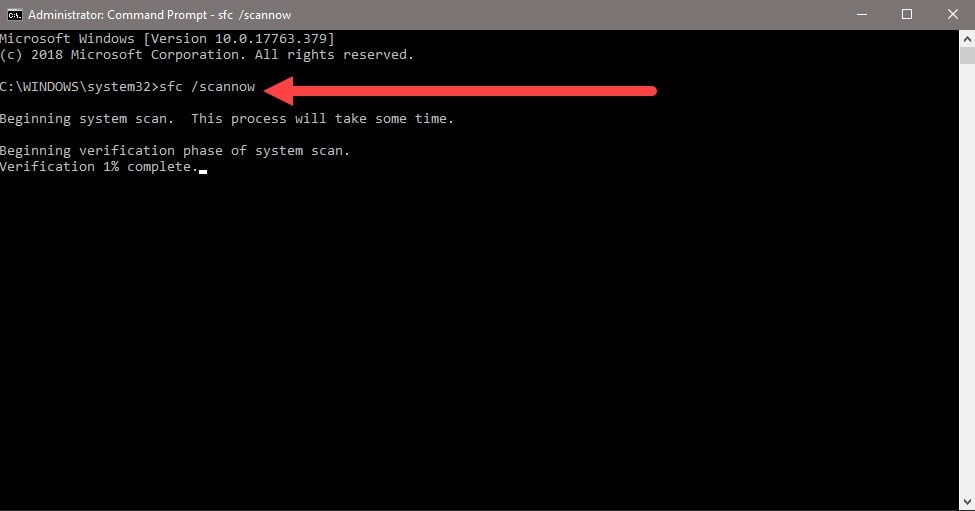
- В поиск Windows вводим cmd и запускаем «Командную строку».
- Вводим команду sfc /scannow.
- Ждем завершения сканирования системы. Все ошибки должны быть исправлены автоматически, если такая возможность есть.
Способ 6: восстанавливаем системные реестр
Ошибка 126 и 127 может быть следствием скопления мусора в реестре или повреждения значений в нем. Одна проблема – вручную все перелистать и исправить просто нереально. Для этого лучше использовать специальные программы, например, Total System Care. В утилите есть все необходимое для анализа системного реестра, его оптимизации и исправления существующих проблем. Еще можем порекомендовать CCleaner. Обе программы справятся со своими задачами.
Способ 7: делаем откат Windows
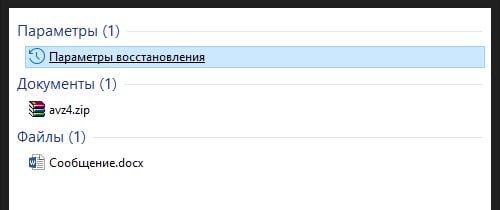
Если никакие ручные способы исправления не помогают, что бывает редко, приходится обратиться к последнему методу и откатить Windows к последнему рабочему состоянию. Иногда файлы DLL могут пропадать из-за удаления программы, и вы можете столкнуться с ошибкой 126. Чтобы устранить ее, воспользуйтесь точками восстановления. Найти «Параметры восстановления» можем через поиск в Windows.
Теперь ошибка с кодом 126 больше не должна беспокоить пользователя как в Windows 7, так и 8, 10. Одна из процедур практически 100% должна исправить проблему. При этом мы не рекомендуем вручную менять DLL-файл, если удалось обнаружить в каком именно проблема. Все из-за чрезмерно высокого шанса загрузить вирус.
I’m using the ‘LoadLibrary’ from the Windows API, when I run the application, it throws me an error code 126. I read that it may be caused by dependencies, I checked what’s wrong with some applications like Dependency Walker, but everything was fine.
LoadLibrary in the application:
            HMODULE dll_mod = LoadLibrary(L"path_to_dll");
            if(dll_mod==NULL){
                std::stringstream error;
                error << "Could not load plugin located at:n" << file_full.toStdString() << "n" << "Error Code: " << GetLastError();
                FreeLibrary(dll_mod);
                return error.str();
            }
Plugin code:
#include "stdafx.h"
#define DLL_EXPORT
#define PLUGIN_STREAM __declspec(dllexport)
#include <iostream>
#include <vector>
using std::vector;
using std::string;
// Init event (After the loading)
extern "C"{
PLUGIN_STREAM int onInit(char* argv){
return 0;
}
PLUGIN_STREAM void pluginInfo(vector<string> & info){
info.push_back("media_event=false");
    info.push_back("status_event=false");
    info.push_back("send_event=true");
    info.push_back("plugin_name='RadioStream'");
    info.push_back("description='This plugin was designed for that people that wants to listen to radio music.nYou can register your radio and play it later, also we have a gallery of radios that you can check.nThis plugin is original of Volt and it's originally implemented in the application.'");
    info.push_back("success:0");
    info.push_back("error:1=Could not open data file");
    info.push_back("error:2=Could not prepare plugin");
    info.push_back("alert:40=Could not connect to that radio");
}
}
![]()
asked Jan 16, 2013 at 15:32
![]()
5
Windows dll error 126 can have many root causes.
The most useful methods I have found to debug this are:
- Use dependency walker to look for any obvious problems (which you
have already done) - Use the sysinternals utility Process Monitor https://learn.microsoft.com/en-us/sysinternals/downloads/procmon from Microsoft to trace all file access while your dll is trying to load. With this utility, you will see everything that that dll is trying to pull in and usually the problem can be determined from there.
![]()
Eric Duminil
52.1k8 gold badges67 silver badges120 bronze badges
answered Jan 16, 2013 at 15:46
![]()
DanSDanS
1,1911 gold badge8 silver badges4 bronze badges
12
This can also happen when you’re trying to load a DLL and that in turn needs another DLL which cannot be not found.
answered Apr 7, 2020 at 3:40
![]()
Shivanshu GoyalShivanshu Goyal
1,3242 gold badges16 silver badges22 bronze badges
This error can happen because some MFC library (eg. mfc120.dll) from which the DLL is dependent is missing in windows/system32 folder.
![]()
bluish
25.7k27 gold badges119 silver badges177 bronze badges
answered Sep 19, 2017 at 9:10
![]()
In my case it was all about character sets v.s. form of loader function. This is visual studio 2019 setting at Project/Properties/Configuration Properties/Advanced/Character Set which has two choices:
1.Use Multi-Byte Character Set ->call it mb

2.Use Unicode Character Set -> call it uc

 My test revealed:
      const char*  fileName =  ".\Debug\Win32\Dll1.dll";

         void* module = LoadLibrary((LPCWSTR)fileName);
         //compiles no mb, compiles uc, uc run fails with 126

         void* module = LoadLibrary((LPCSTR)fileName);
         //compiles mb,runs mb, no uc

         void* module = LoadLibraryA(fileName); //note explicit A
         //compiles mb,runs mb, compiles uc,runs uc

     DWORD lasterror = GetLastError();//0 is ok
Today I banged my head again to 126.
I learned one thing that makes 126 happen again on top of those previous examples is chained loading of java’s virtual machine dll from my_dll. In my case my_dll needs to have jvm.dll marked as «delay loaded».
Setting is at project level:
Configuration Properties/Linker/Input/Delay Loaded Dlls
where I wrote jvm.dll;
This error is something I can repeat.
answered Jun 13, 2022 at 13:03
![]()
1
// PKG Fix - index.js

const isPkg = typeof process.pkg !== 'undefined';
const c_dir = isPkg ? path.dirname(process.execPath) : __dirname;

let soname;
if (os.platform() == 'win32') {
    // Update path to load dependent dlls
    let currentPath = process.env.Path;
    let dllDirectory = path.resolve(path.join(c_dir, "win-x86_64"));
    process.env.Path = dllDirectory + path.delimiter + currentPath;
    soname = path.join(c_dir, "win-x86_64", "libvosk.dll");
} else if (os.platform() == 'darwin') {
    soname = path.join(c_dir, "lib", "osx-universal", "libvosk.dylib");
} else {
    soname = path.join(c_dir, "lib", "linux-x86_64", "libvosk.so");
}
answered Aug 9, 2022 at 20:38
![]()
1
answered Feb 7, 2020 at 18:23
![]()
1
The ‘loadlibrary failed with error 126’ is an error that dates back to the earlier Windows versions (Vista and onwards) but is still reported. The issue is reported when launching an application/game or installing it.

Many programs showed this error. Following are a few examples of such applications, games, utilities:
- Rhinoceros 3D
- Adobe Suite (Photoshop, Illustrator, etc.)
- TrackIRv5
- UltimateDefrag
- Radar ScreenSaver
- Logitech Gaming Keyboard and Headset
- Minecraft
- BluetStacks
- Steam or Steam Games (like Stardew)
- Virtual Box
- PowerAttendantLite
- Blender
- Civilization VI
- ANSYS
- Microsoft Remote Desktop
- MATLAB
Many factors can cause the ‘loadlibrary failed with error 126’ but the following can be regarded as the main culprits:
- Missing Admin Privileges: If the application (like NetBeans) cannot access protected system files or directories due to the absence of admin privileges, it may result in a loadlibrary error.
- Corrupt or Outdated Graphics Driver: If the system’s graphics driver is corrupt or outdated, then its incompatibility with the problematic application may lead to the error 126.
- Dual Graphics Cards: If the system has two graphics cards i.e., a switchable graphics system with one built-in graphics card and the other dedicated, then it can cause the loadlibrary issue if the application modules try to use both cards at the same time.
- Corrupt System Files: If the essential system files are corrupt, then an application may fail to access an essential directory or file, resulting in the loadlibrary failed with error 126.
Launch the Problematic Application as an Administrator
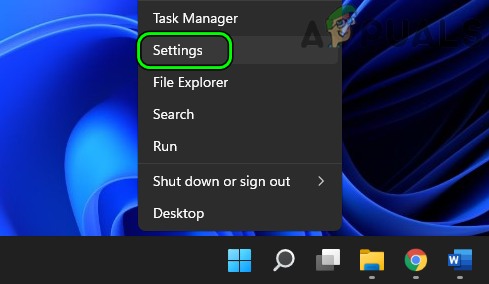
You may encounter the loadlibrary failed with error 126 when the problematic application does not have the privileges to access a protected system resource. In this case, launching the problematic application as an administrator may solve the problem.
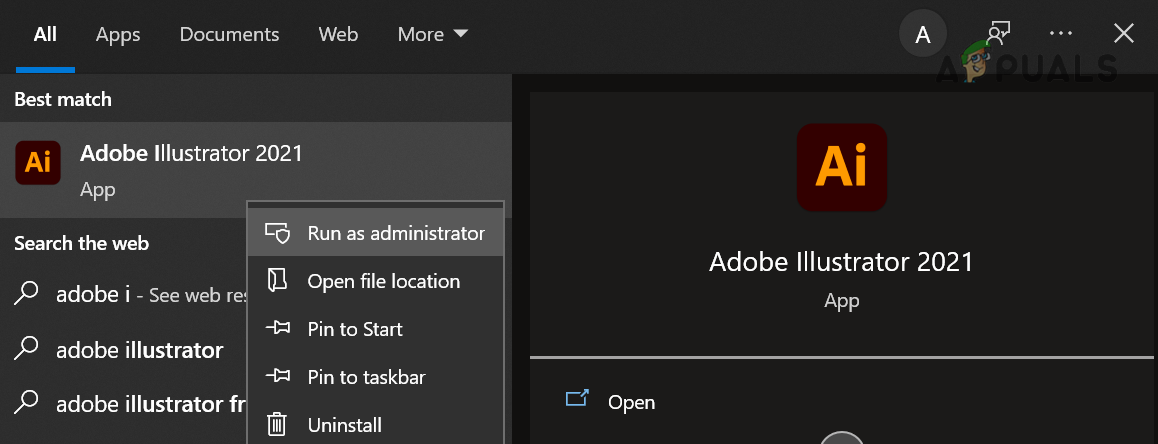
- Right-click on the shortcut icon of the problematic application (or in the search results of the start menu) like Adobe Illustrator.

Run Illustrator as Administrator - Now select Run as Administrator and check if the application launches fines.
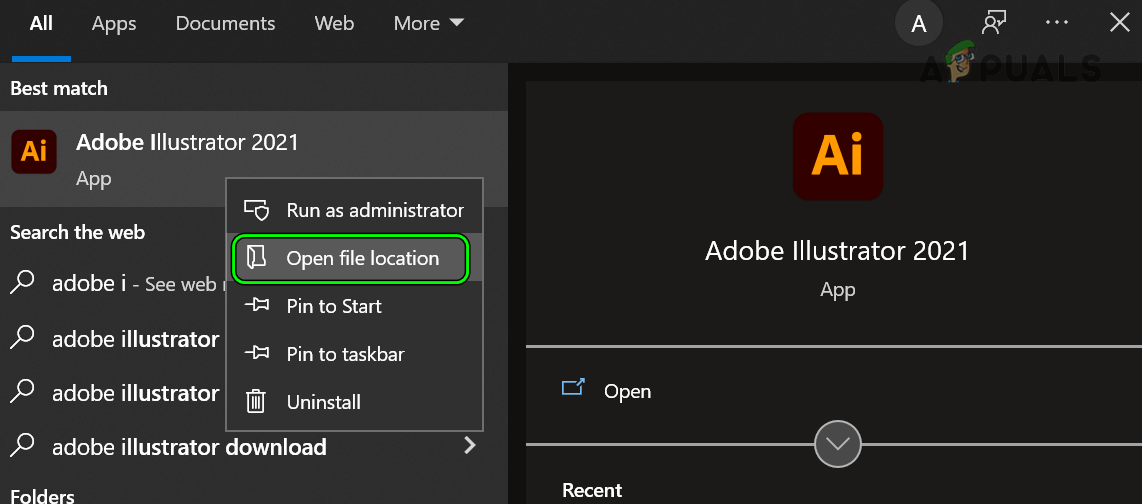
- If so, close the application and again launch it normally (not as administrator) and check if it is working fine.
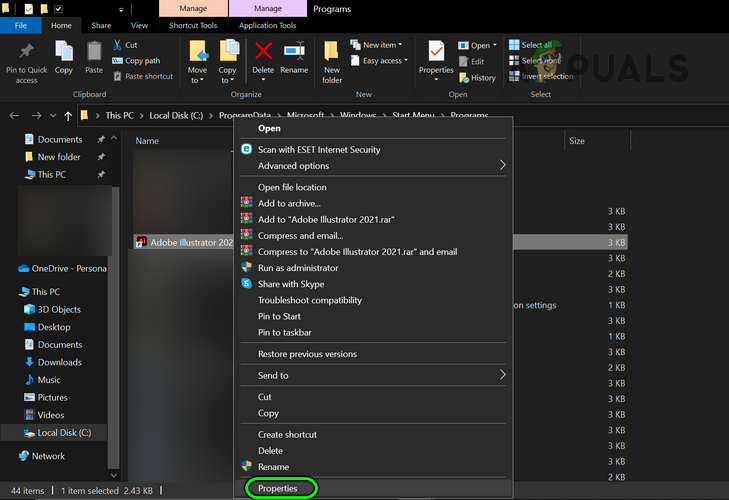
- If not, then right-click on the shortcut of the problematic application (like Adobe Photoshop) and select Properties. In case, the start menu search is used, select Open File Location, right-click on Illustrator, and select Properties.

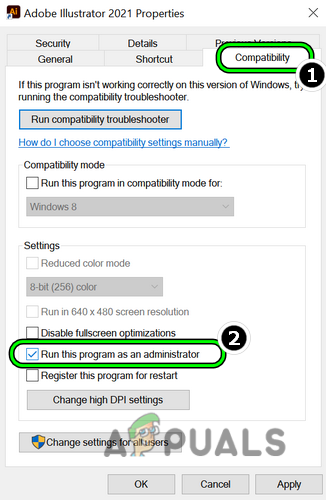
Open File Location of Adobe Illustrator - Now head to the Compatibility tab and checkmark Run This Program as an Administrator.

Open Properties of Adobe Illustrator - Then apply the changes made and launch the application through the shortcut to check if it is clear of the loadlibrary failed error 126.

Check Run This Program as Administrator for Adobe Illustrator
Enable Virtual Super Resolution in the AMD Settings
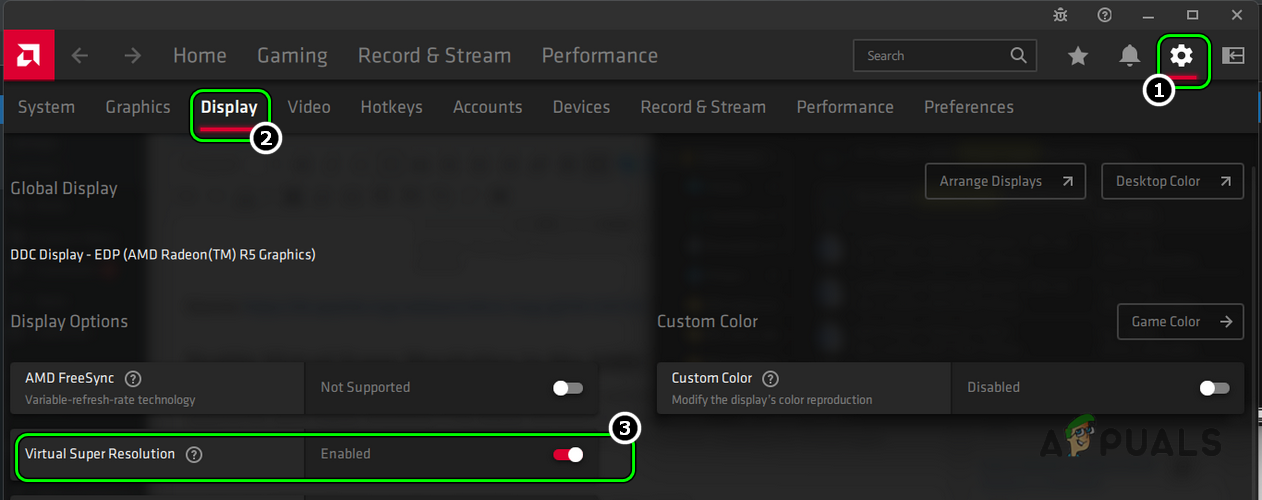
VSR (or Virtual Super Resolution) is an AMD feature that lets an application or game render at higher resolutions (beyond the native display resolution). If the display resolution in use is not compatible with the game (like Civilization VI), then that may cause the loadlibrary error at hand. In this context, enabling the Virtual Super Resolution in the AMD Settings may solve the problem.
- Open the AMD Software and click on Settings (near the top right corner).
- Now head to the Display tab and under Display Options, enable Virtual Super Resolution.

Enable Virtual Super Resolution in AMD Settings - Then launch the problematic game (like Civilization VI) or application and check if the loadlibrary issue is resolved.
Copy the DLL File to the System32 Directory
You may encounter the issue under discussion if an essential DLL file is missing from the System32 directory and copying the same may solve the problem.
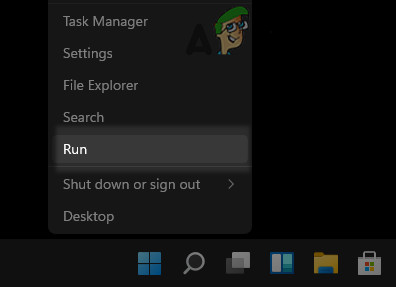
- Right-click Windows and open Run.

Open the Run Command Box from the Quick Access Menu - Now navigate to the following:
C:WindowsSystem32DriverStoreFileRepositoryu0352938.inf_amd64_e098709f94aef08dB352876
- Then copy the atio6axx.dll file and paste it into the following directory:
C:windowssystem32
- Now restart the system and upon restart, launch the problematic application (like ArcMap) to check if it is working fine.
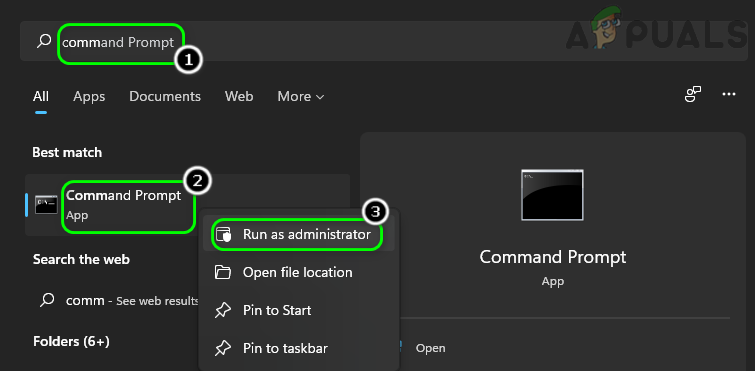
- If not, click Windows, search, right-click Command Prompt, and select Run as Administrator.

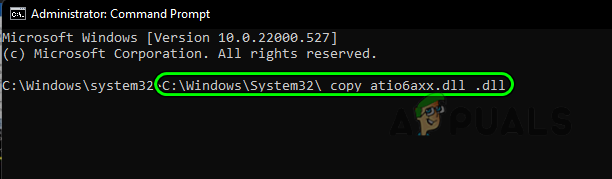
Open Command Prompt as Administrator - Then execute the following (copy/paste the command, otherwise, make sure the spacing is right):
C:WindowsSystem32 copy atio6axx.dll .dll

Copy atio6axx.dll File - Now restart the system and upon restart, check if the loadlibrary error is cleared.
Change the Main Monitor or Disconnect the External Display
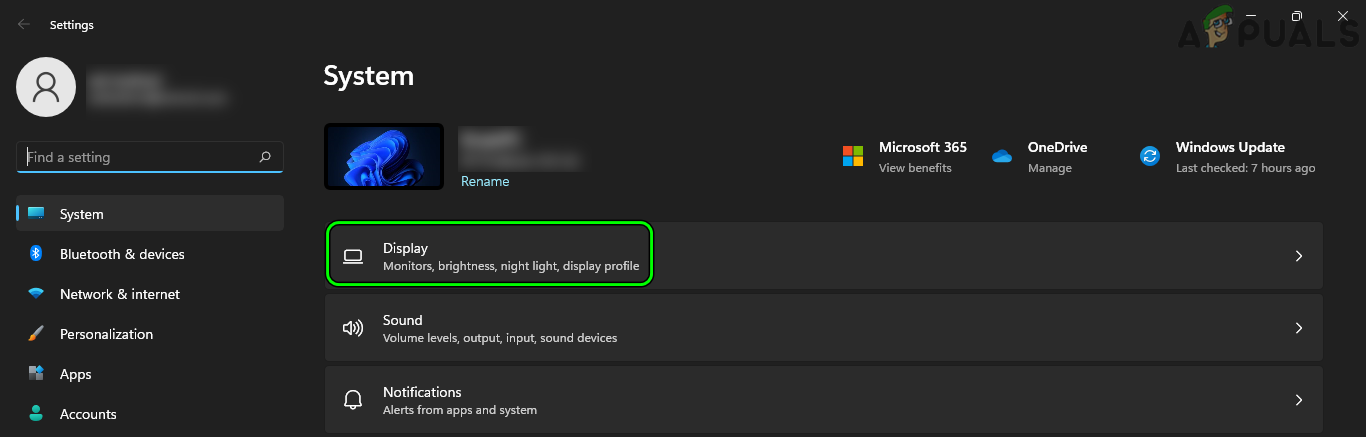
In a multi-display environment, you may encounter the loadlibrary failed error if the main monitor is not the internal display (in case of a laptop) or if the external display is not connected to a dedicated graphics card port but to an on-board graphics card port (in a dual graphics cards setup) as this may cause incompatible resource hogging by the cards. In such a case, changing the main monitor of the system or disconnecting the external display may fix error 126.
- Right-click Windows and open Settings.

Open Windows Settings - Now, in the System tab, open Display and expand Multiple Displays.

Open Display in the System Tab of the Windows Settings - Then select the Internal Display (you may use the Identify button to find out which display belongs to what) and checkmark Make This My Main Display.

Set the Laptop’s Internal Display as the Main Display - Now launch the application in question (like Adobe Photoshop) and check if it is operating fine.
- If not, check if connecting the external display to another port (or swapping monitors’ ports) solves the problem.
- If that did not work, disconnect the external monitor from the system and restart the system.
- Upon restart, launch the problematic application and check if it is working fine. If so, then you may connect back the external monitor.

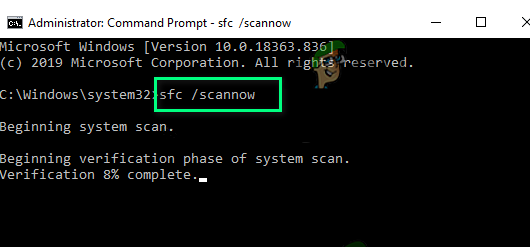
Perform an SFC Scan of the System
The loadlibrary may fail with error 126 if the essential system files are corrupt which may not let an application access an essential system directory or resource. In this case, you may fix the issue by performing an SFC scan of the system.
- Perform an SFC scan of the system and wait till the scan is complete. Make sure to launch the Command Prompt as an administrator. Moreover, this scan may take some time to complete, so try it in your spare time (or overnight).

Perform an SFC Scan - Once the SFC scan is completed, check if the loadlibrary problem is solved.
Perform a Clean Boot of the System
The loadlibrary error might occur if a process/service on the system is interfering with the problematic application’s execution. In such a case, ending the conflicting processes in the Task Manager or performing a clean boot of the system may clear the error 126.
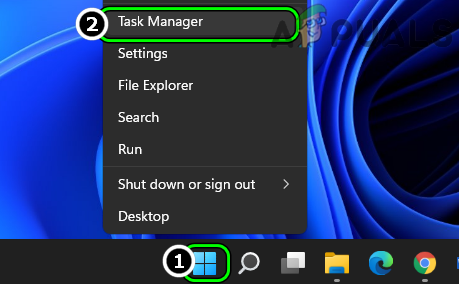
End Conflicting Tasks in the Task Manager
- Right-click Windows and open Task Manager.

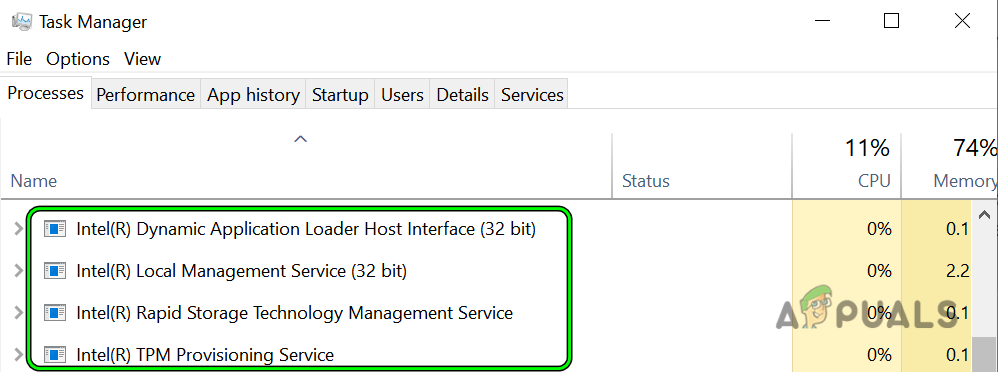
Open the Task Manager of the System Through the Quick Access Menu - Now end all the processes related to Intel and then check if the issue is resolved.

End Intel Related Processes in the Task Manager - If not, then check if ending all the non-essential processes or processes related to the problematic application (like Adobe processes if the issue is occurring with an Adobe application like Photoshop) solves the problem.
Perform a Clean Boot of the System
- Perform a clean boot of the system (make sure to disable Radeon Software in the Startup tab of the Task Manager) and check if the loadlibrary issue is cleared. If so, then you may enable back the processes one by one till the problematic one is found. Once found, either keep it disabled or uninstall it.
- If the issue persists, check if booting the system into the Safe Mode solves the problem.
Uninstall AMD Software
There are many applications (found by clean booting the system) reported to cause the loadlibrary issue but in many instances, users reported that the AMD Software triggered the error. Here, uninstalling the AMD Software may solve the problem.
- Right-click Windows and open Apps & Features.

Open Apps & Features - Now, in front of AMD Software, click on three vertical ellipses and select Uninstall.

Uninstall AMD Software - Then confirm to uninstall AMD Software and follow the prompts on the screen to uninstall it.
- Once uninstalled, restart the system, and upon restart, check if the loadlibrary problem is solved.


Disable the System’s Built-in Graphics Card
You may encounter loadlibrary error 126 if the system has two graphics cards (i.e., one built-in and the other dedicated) and the modules of the applications involved tried to use different cards simultaneously.
For example, if the issue occurs when an RDP session is used to launch Blender and the loadlibrary error is shown, then the issue might have occurred as the RDP session tried to use a built-in graphics card, whereas, Blender was trying to use the dedicated graphics card. In this scenario, disabling the built-in graphics card (after all, dedicated graphics is more powerful and useful) will force the usage of a single card and thus may fix the LoadLibrary error.
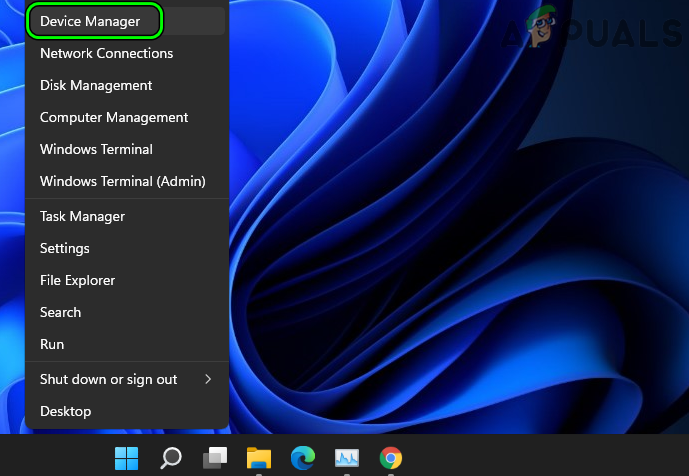
- Right-click Windows and open Device Manager.

Open Device Manager Through the Quick Access Menu - Now expand Display Adapters and right-click on the built-in graphics device (like an Intel one).

Disable Intel Graphics Card in the Device Manager - Then select Disable Device and afterward, confirm to disable the graphics device.
- Now launch the problematic application or pair of applications (like RDP and Blender) and check if the loadlibrary failed error is cleared. Keep in mind, you can enable the built-in graphics device afterward.
- If that did not work, check if disabling and enabling the dedicated graphics card (like an AMD card) solves the problem.

Edit the System’s Group Policy for Remote Connections
If the issue is occurring when a remote connection is used to access the system, then the improper usage of graphics properties of the host may trigger the issue at hand. Here, editing the system’s Group Policy about the remote connection to force the proper usage of the graphics properties may solve the problem.
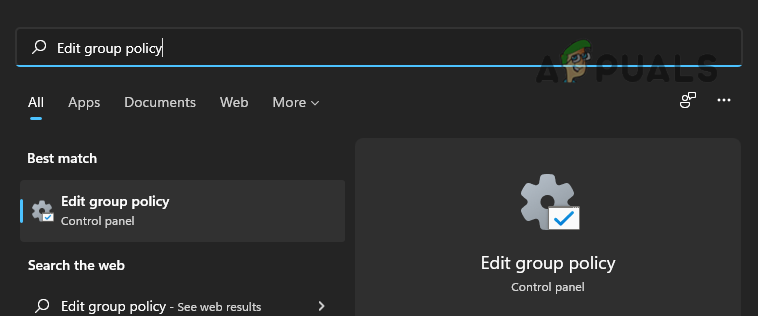
- Click Windows, search, and open Edit Group Policy.

Open Edit Group Policy - Now navigate to the following path:
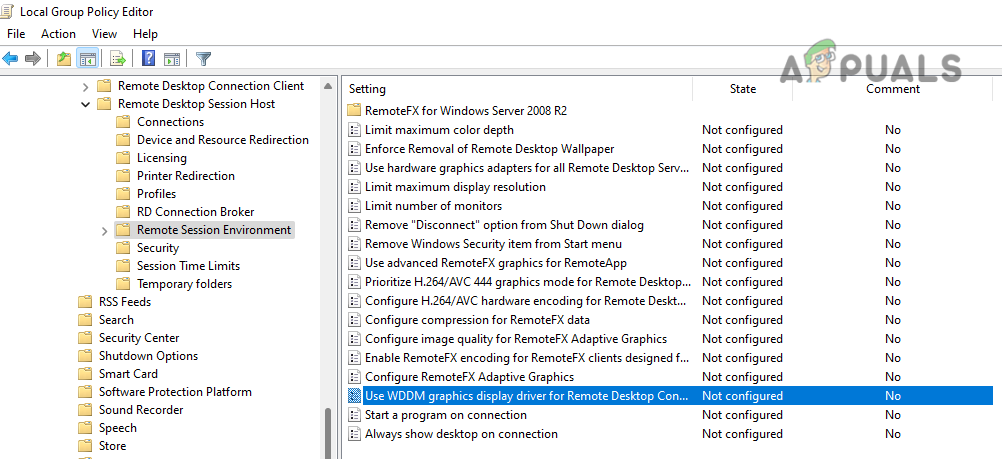
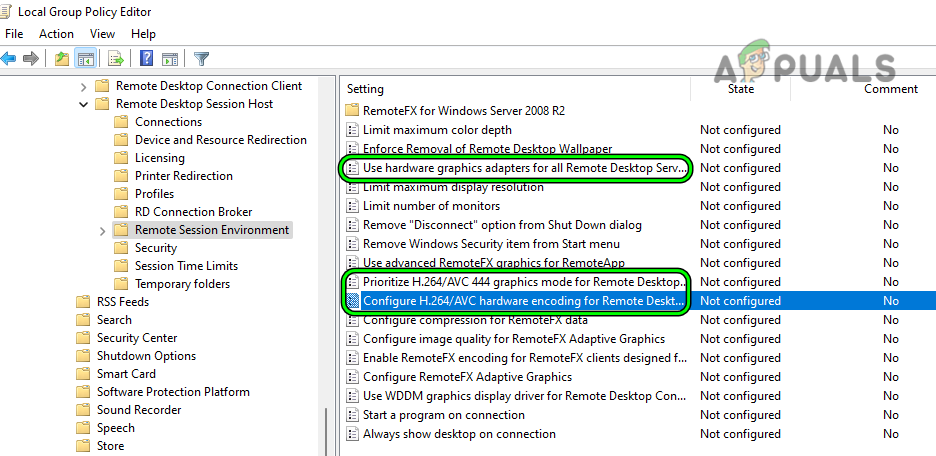
Computer Configuration>> Administrative Templates>> Windows Components>> Remote Desktop Services>> Remote Desktop Session Host>> Remote Session Environment
- Then disable the option of Use WDDM Graphics Display Driver for Remote Desktop Connections and close the editor.

Disable Use WDDM Graphics Display Driver for Remote Desktop Connections in the Group Policy Editor - Now restart the system and upon restart, check if the loadlibrary error 126 is cleared.
- If not, open the Group Policy Editor and make sure the following are set as Enabled:
Use Hardware Graphics Adapters for All Remote Desktop Services

Prioritize H.265/AVC444 Graphics Mode for Remote Desktop Connections

Configure H.264/AVC Hardware Encoding for Remote Desktop Connections

Enable Relevant Graphics Settings in the Group Policy Editor - Then close the Group Policy Editor and restart your system.
- Upon restart, check if the loadlibrary issue is resolved.
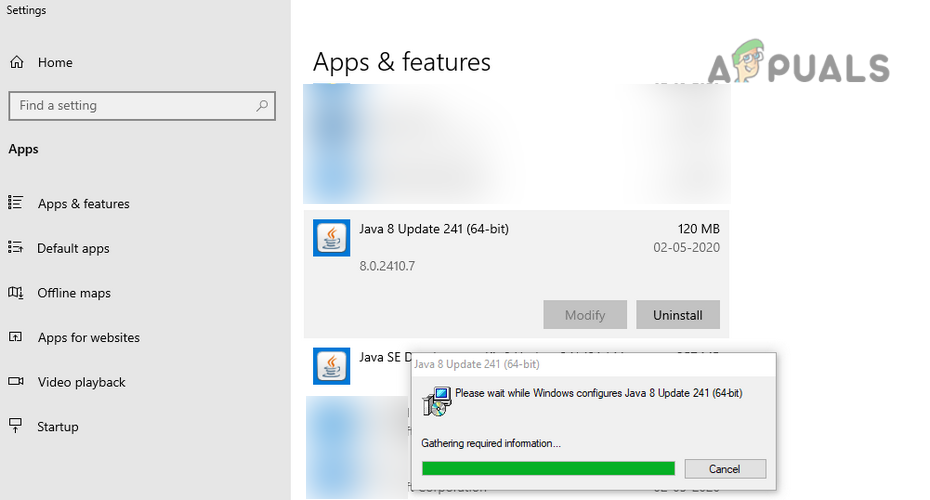
Uninstall A Java Version
If an application (like Minecraft) requires JAVA but the system has two Java versions installed (like a 32-bit and other, 64-bit), then that may break the operation of the application and cause loadlibrary failed with error 126. In this case, uninstalling a Java version may solve the problem.
- Right-click Windows and open Apps & Features.
- Now check if there is more than one Java version installed.
- If so, uninstall the 64-bit version and afterward, restart the system.

Uninstall Java 64-bit Version - Upon restart, check if the system is cleared of the libraryload error.
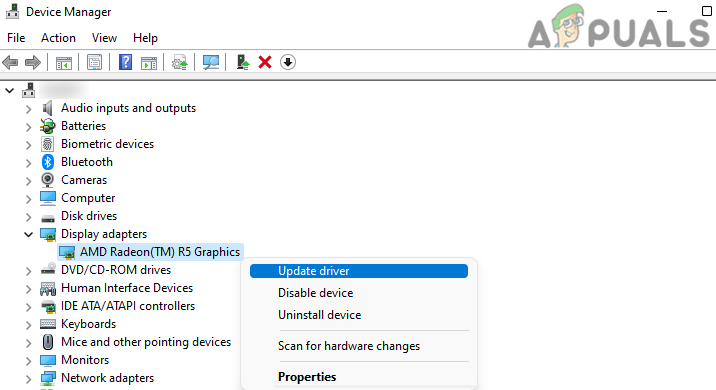
Update or Reinstall the Graphics Driver
You may encounter loadlibrary failed with error 126 if the system’s graphics driver is outdated or corrupt as it can lead to the incompatibility between the other OS modules (like the application showing the error) and the driver. In this scenario, updating the graphics driver to the latest build or reinstalling it may solve the problem.
Update the Graphics Driver Through the Device Manager
- Right-click Windows and open Device Manager.
- Now expand the Display Adapters tab and right-click on the problematic graphics card.
- Then select Update Driver and click on Search Automatically for Drivers.

Update Driver of the Graphics Device in the Device Manager - If an updated driver is available, install it and then restart the system.

Search Automatically for Drivers of the Graphics Device - Upon restart, check if the system is clear of the loadlibrary error.
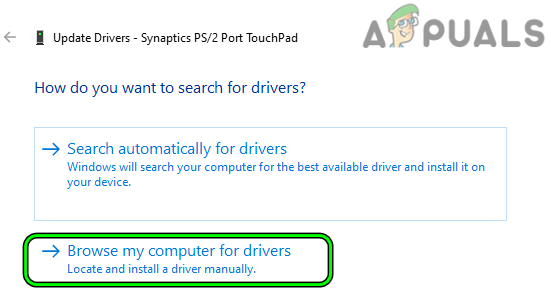
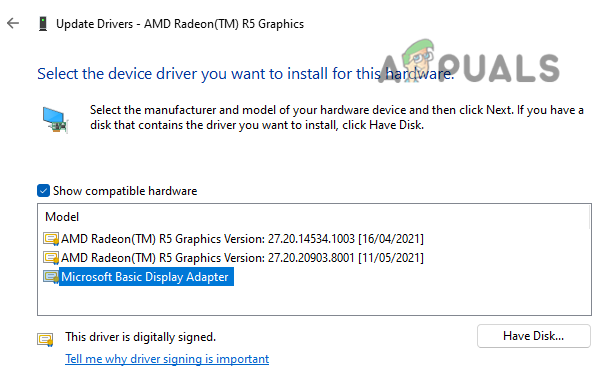
- If not, right-click on the graphics driver in the Display Adapter tab of the Device Manager and select Update Driver.
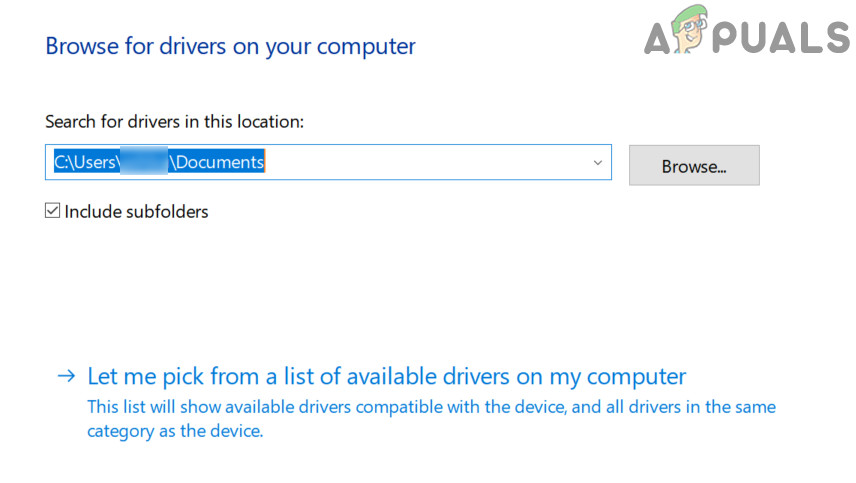
- Now choose to Browse My Computer for Drivers and click on Let Me Pick from a List of Available Drivers on My Computer.

Select Browse My Computer for Drivers When Updating the Touchpad Driver - Then select Microsoft Basic Display Adapter and click on Next.

Let Me Pick from a List of Available Drivers on My Computer - Once the driver is installed, restart your system and upon restart, check if the loadlibrary error 126 is cleared.

Select Microsoft Basic Display Adapter for the Graphics Card

Update the Graphics Driver Through the OEM Website
- Launch a web browser and visit the graphics card OEM website (like AMD).
- Now download the latest graphics driver as per your graphics card and then launch the downloaded driver as an administrator.
- Then follow the prompts on the screen to complete the installation and once done, restart your system.
- Upon restart, check if the loadlibrary issue is resolved.
- If not, navigate to the support page of the OEM’s website (like AMD Support) and download the OEM utility that auto-detects and install updates for the graphics driver (like AMD Auto-Detect and Install Updates for Radeon Graphics and Ryzen Chipset Drivers for Windows).

Download AMD Auto-Detect Utility - Then install that utility as an administrator and afterward, restart your system.
- Upon restart, check if the system is clear of the error 126.

Reinstall the Graphics Driver
- If the above did not work, download the latest graphics driver from the OEM website.
- Then right-click on the graphics card in the Display Adapters tab of the Device Manager and select Uninstall Device.

Uninstall the Graphics Driver in the Device Manager - Now checkmark Attempt to Remove the Drivers for This Device (Windows 10 user might see the option as Delete the Driver Software of This Device) and then click on Uninstall.

Select Attempt to Remove the Driver for This Device and Click on Uninstall for the Graphics Device - Once the driver is uninstalled, restart your system and upon restart, check if the system is clear of the loadlibrary problem.
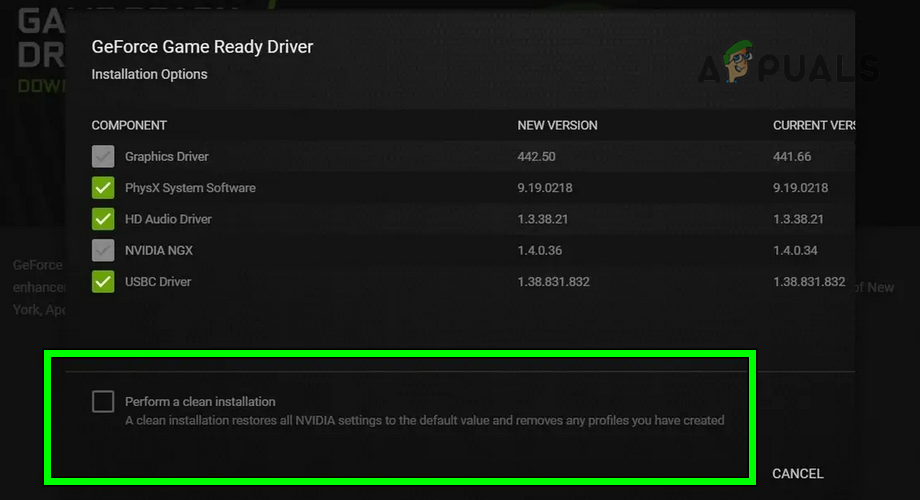
- If not, install the latest graphics driver (not the application like AMD Graphics Software, just install the driver) as an administrator (downloaded earlier) and make sure to select Perform a Clean Install.

Perform a Clean Installation of AMD Drivers - Afterward, restart your system and upon restart, check if the loadlibary failed error is cleared.
- If that did not work, boot the system into the safe mode and uninstall the graphics driver (as discussed earlier).
- Now boot the system into the normal mode and install the latest graphics driver as administrator (downloaded earlier).
- Once done, restart your PC and upon restart, check if the system is clear of the loadlibrary error.
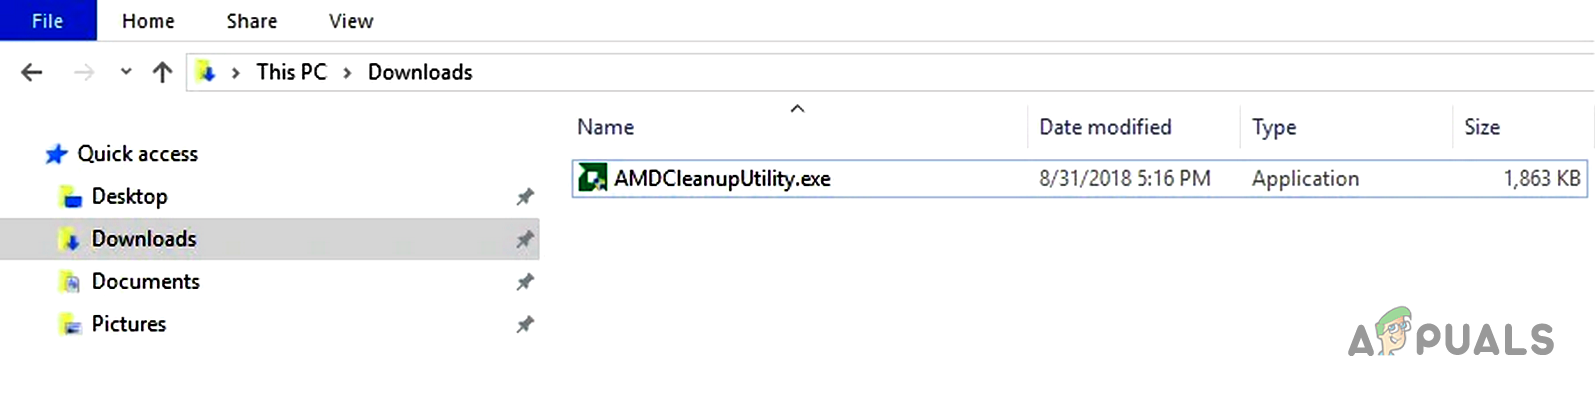
- If the issue persists, check if uninstalling the driver with the OEM utility (like AMD Cleanup Utility) and then reinstall the latest graphics driver as administrator solves the problem.

Launch the AMD Clean Up Utility - If the issue is still there, check if using an older graphics driver (you may download the one from the OEM’s website) solves the problem.


Reinstall the Drivers of the Dual Graphics Cards
In case, the system is using dual graphics cards (like a built-in Intel card and a dedicated AMD card), then reinstalling both the drivers may solve the problem.
- Firstly, make sure to download the latest graphics drivers from the related OEM websites (like Intel and AMD).
- Now, uninstall both the graphics drivers from the system’s Device Manager (as discussed earlier) and right-click on Windows.

Uninstall Intel and AMD Drivers in the Device Manager - Now select Apps & Features and uninstall all applications related to both graphics cards.
- Then install the driver of the built-in graphics card (like an Intel driver) and restart your system.
- Upon restart, install the driver of the dedicated graphics card (like an AMD driver), and afterward, check if the loadlibrary failed issue is resolved.

Perform an In-Place Upgrade of the System’s Windows
If none of the above worked for you, then the issue could be the result of the corrupt installation of Windows (that is beyond repair). In this case, performing an in-place upgrade of the system’s Windows may solve the problem. For elucidation, we will discuss the process for a Windows 11 PC.
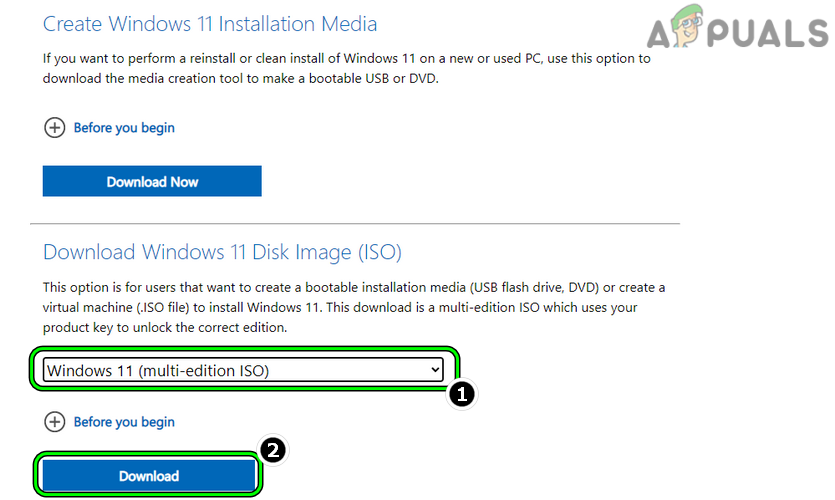
- Launch a web browser and steer to the Windows 11 download page of Microsoft.
- Now, in the section of Download Windows 11 Disk Image (ISO), select Windows 11 in the dropdown and click on Download.

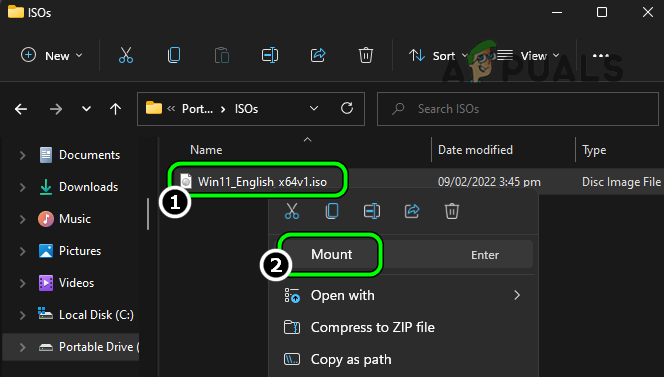
Download the Windows 11 ISO File - Then wait till the download is complete and afterward, right-click on the downloaded ISO.
- Now select Mount and then open the mounted drive through the File Explorer.

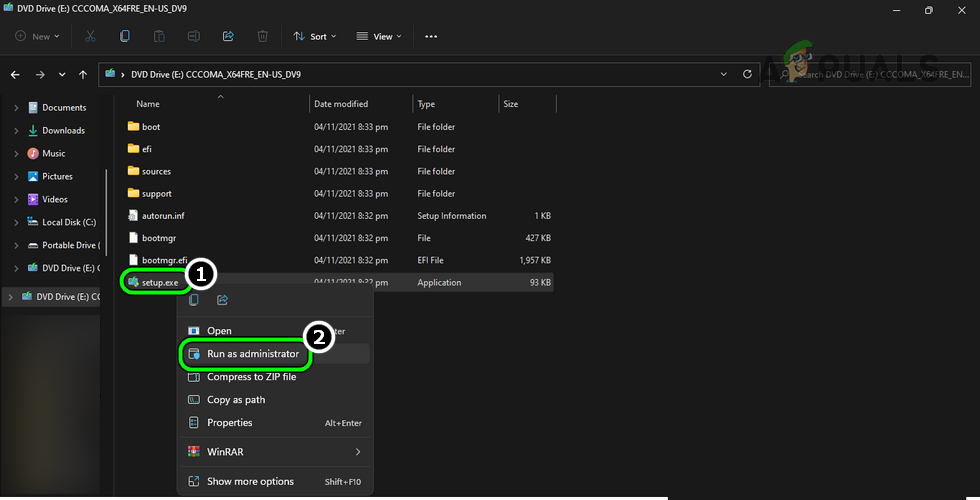
Mount Windows 11 ISO - Then right-click on the Setup file and select Run as Administrator.

Open Windows 11 Setup as Administrator - Now follow the prompts on the screen to complete the process but make sure to select Keep Files, Apps, and Settings.
- Once the in-place upgrade is complete, restart the system and upon restart, hopefully, the system will be cleared of the loadlibrary issue.
The Loadlibrary failed with error 126, 87, 1114 or 1455 has been with Windows since years, and there are reports that people are still facing the problem even in the latest Windows 11. The error message occurs upon launching an application on Windows PC. the accompanying messages may be:
The specified modue could not be found
A dynamic link library (dll) initialization routine failed

There’s a long list of applications affected by this error message. But the most popular among them are:
- Adobe Suite
- BlueStacks
- Minecraft
- Microsoft Remote Desktop
- Virtual Box
- Steam
- Logitech peripherals
- Civilization VI
It’s easy to troubleshoot this problem. Continue with the guide to solve the issue on your system.
What is LoadLibrary?
Says Microsoft – LoadLibrary can be used to load a library module into the address space of the process and return a handle that can be used in GetProcAddress to get the address of a DLL function. LoadLibrary can also be used to load other executable modules. In short – it is a critical OS process that is need to work properly.
What causes the Loadlibrary failed with error on Windows PC
There can be multiple reasons behind the Loadlibrary failed with error 126, 87, 1114 or 1455 in Windows 11/10. But among all, the major reasons triggering the problem are mentioned below.
- If you haven’t provided the problematic applications with administrative rights, you will most likely face the mentioned problem.
- Not having the latest graphics driver update can be another major reason behind the problem. Additionally, a corrupted driver can also trigger the issue.
- If your system features two graphics cards, the problematic application will try to use both of them simultaneously, which will directly cause different problems, including the one in question.
- If the Windows file has been corrupted, you will face the Loadlibrary failed with error on your Windows PC.
Now that you have a piece of prior knowledge about different reasons causing the problem let’s check out how to eliminate them.
Below is a list of all the effective solutions you can try to fix Loadlibrary failed with error 126, 87, 1114 or 1455 on Windows PC.
- Restart the application and PC
- Run the application in administrator mode
- Copy the DLL file to the System32 folder
- Close unnecessary background running applications
- Run the SFC scan
- Download the latest Graphics Driver update
Now, let’s take a look at all these solutions in detail.
1] Restart the application and PC
To begin with, restart the problem at the application all over again. But make sure none of the associated services is running in the background. You can check it by opening the Task Manager and closing all the services associated with the problematic application. Once done, check if the problem is solved or not.
If you are still facing the problem, you can go with restarting the system. As it turns out, the error message can appear due to a temporary glitch. And the best thing you can do to eliminate such glitches is restart your system. Do it, and see if there’s any difference.
2] Run the application in administrator mode
As mentioned, the major reason behind the problem can be the lack of administrative privileges. Most of the applications that throw the mentioned error needs administrative rights to perform normally. But if this isn’t the case, i.e., you haven’t provided the rights, you will face different issues, including the one you’re currently facing. So, grant administrative rights to the application and check if the problem is solved.
- Open the Start Menu by pressing the Windows key.
- In the space provided, type the name of the problematic application and press Enter.
- From the result, right-click on the application and choose Open file location.
- Right-click on the application exe file in the following window and choose the Properties option.
- Click on the Compatibility tab.
- Select Run this program as an administrator.
- Click on Apply > OK.
Now, restart your system, and launch the application. Check if you’re still facing the problem. If yes, try the next solution.
3] Copy the DLL file to the System32 folder
You will face the mentioned problem if the important DLL files are missing from the System32 folder. To solve the problem, you will have to copy-paste the DLL file to the required folder. Here are the steps you need to follow.
Open the Run dialogue box by pressing Windows + R shortcut key.
Copy-paste the below-mentioned location and press the enter key.
C:WindowsSystem32DriverStoreFileRepositoryu0352938.inf_amd64_e098709f94aef08dB352876
In the folder, copy the atio6axx.dll file and paste it in the following location.
C:Windowssystem32
Once done, restart your system and launch the application. Check if the problem continues.
See: Fix vulkan-1.dll not found or missing error
Sometimes, a large number of unnecessary background running applications can also be the primary reason behind the problem. In this case, the best thing to do is close all the background running applications using the Task Manager. Click the Ctrl + Shift + Esc shortcut key to open Task Manager > Right-click on unnecessary applications > End Task.
Now, check if the problem persists. If yes, continue with the guide.
5] Run the SFC scan
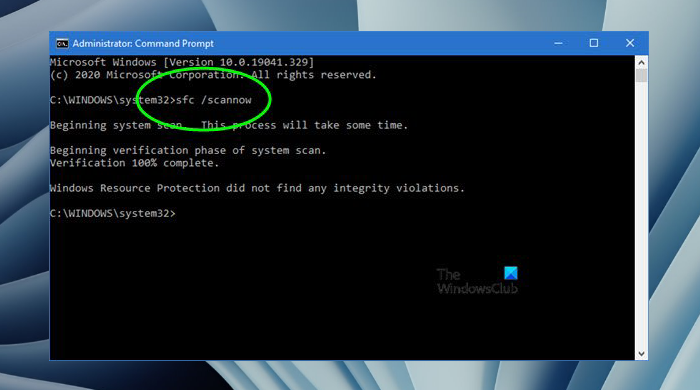
You can run the SFC scan on your Windows PC to fix the Loadlibrary failed with error 126. The SFC scan helps to scan and restore corrupt Windows system files. You can run the SFC scan by following the below steps.
- Open Command Prompt in administrator mode.
- Type the following command and press enter.
sfc /scannow
Wait until the command is executed. Once done, check for the problem.
See: Fix Wireless Display Install Failed Error
6] Download the latest Graphics Driver update
The mentioned error can be caused due to updated or corrupted graphics driver. In either case, the best thing you can do is download the latest graphics driver update. Here are the steps you need to follow to get the work done.
- Check Optional Updates to update the driver.
- Go to the manufacturer’s website and download your driver.
- Update your driver from the Device Manager.
Install the downloaded driver on your system, followed by a simple restart.
Read: Access is Denied error while installing software
How do you fix error code 126 on Minecraft?
It’s very easy to troubleshoot the error code 126 on Minecraft. You can try either of these steps to solve the problem: Run Minecraft in administrator mode, perform Clean Boot, Run SFC scan, and download the latest graphics driver update. If nothing works, you can reinstall the game to solve the problem.
What is Loadlibrary failed with Error 87?
The Loadlibrary failed with Error 87 hawkers due to machine graphics card configuration. In laymen’s terms, the problem indicates that you need to download the latest graphics driver update. It’s very easy to troubleshoot Loadlibrary failed with Error 87.
Read Next: Event ID 307 and 304 with error code 0x801c001d.

- Remove From My Forums
-
Question
-
Hi,
I have a few lines of code:
#include <iostream>
#include <Windows.h> #include <Certsrv.h>
using namespace std; void main()
{ HMODULE hinstDLL;
hinstDLL = LoadLibrary(«Certadm.dll»);
if (NULL == hinstDLL) {
printf(«%dn»,GetLastError());
} }LoadLibrary is failing with error 126. What is wrong in my code. Can anyone help me.
Thanks,
Mini
-
Moved by
Chenchen Li
Wednesday, May 24, 2017 3:11 AM
-
Moved by
All replies
-
Hello,
This forum is for issues related to VSTO add-in. Since your issue is related to C++, I would move this thread into
C++ forum.
Regards,
Celeste
MSDN Community Support
Please remember to click «Mark as Answer» the responses that resolved your issue, and to click «Unmark as Answer» if not. This can be beneficial to other community members reading this thread. If you have any compliments or complaints to
MSDN Support, feel free to contact MSDNFSF@microsoft.com. -
Hi MINI04,
thanks for posting here.
>>LoadLibrary is failing with error 126. What is wrong in my code. Can anyone help me..
The error 126 means Certadm.dll could not be found.
Please specify a full path or a relative path, so that the compiler could find your dll. If the string specifies a module name without a path, the function uses a standard search strategy to find the module.
When no path is specified, the function searches for loaded modules whose base name matches the base name of the module to be loaded. If the name matches, the load succeeds. Otherwise, the function searches for the file.
The first directory searched is the directory containing the image file used to create the calling process. Doing this allows private dynamic-link library (DLL) files associated with a process to be found without adding the process’s installed directory
to the PATH environment variable. If a relative path is specified, the entire relative path is appended to every token in the DLL search path list. To load a module from a relative path without searching any other path, useGetFullPathName to get a nonrelative path and call LoadLibrary with the nonrelative path. For more information on the DLL search order, see
Dynamic-Link Library Search Order.
Hope this could be help of you.
Best Regards,
Sera Yu
MSDN Community Support
Please remember to click «Mark as Answer» the responses that resolved your issue, and to click «Unmark as Answer» if not. This can be beneficial to other community members reading this thread. If you have any compliments or complaints to
MSDN Support, feel free to contact MSDNFSF@microsoft.com.-
Proposed as answer by
Baron Bi
Thursday, May 25, 2017 2:19 AM
-
Proposed as answer by
-
Hi
MINI04,Has your case been solved?
If it has, pleas help to mark answers. If not, just feel free to contact us.
Your understanding and cooperation will be grateful.
Best Regards,
Sera Yu
MSDN Community Support
Please remember to click «Mark as Answer» the responses that resolved your issue, and to click «Unmark as Answer» if not. This can be beneficial to other community members reading this thread. If you have any compliments or complaints to
MSDN Support, feel free to contact MSDNFSF@microsoft.com.
Содержание
- Что делать, если ошибка 126 «Не найден указанный модуль»?
- Причины ошибки 126
- Как исправить ошибку 126?
- Способ 1: автоматическое исправление проблем с DLL-файлами
- Способ 2: временно отключаем антивирус
- Способ 3: обновляем Microsoft NET Framework
- Способ 4: переустанавливаем DirectX
- Способ 5: сканируем системные файлы Windows
- Способ 6: восстанавливаем системные реестр
- Способ 7: делаем откат Windows
- Ошибка 126 не найден указанный модуль – как исправить
- Устранение системной ошибки 126 в установщике модулей Windows
- Не найден указанный модуль: «Ошибка 126» (Error 126)
- Причины возникновения «Ошибка 126: не найден указанный модуль» DLL
- Исправляем «Ошибку 126 (Error 126): не найден указанный модуль DLL» на Windows
- Существуют меры, при которых ваши DLL-файлы всегда будут в безопасности:
- «Не найден указанный модуль»: при загрузке Windows
- Ошибка 126 «Указанный модуль не найден»: при запуске приложения
- «Не найден указанный модуль, ошибка 126»: при подключении USB-накопителей
- Включаем службу «Доступ к НID-устройствам»
Что делать, если ошибка 126 «Не найден указанный модуль»?
Ошибки с кодами 126, реже 127, ссылаются на то, что «Не найден указанный модуль». Таким образом легко сделать вывод – в Windows 7, 8, 10 недостает какого-то файла. Это действительно часто означает отсутствие DLL-библиотеки, но не всегда. Дело может быть и в других неприятных неполадках с реестром или системой защиты и т. п. Вполне может быть, что все дело и в самой программе, которая этот сбой провоцирует. Мы поможем исправить ошибку (Error 126) своими силами, ничего особо сложного в этом нет. Однако, предупреждаем, что неправильные действия в реестре или при взаимодействии с драйверами могут вызвать негативные последствия для работы операционной системы.
Причины ошибки 126
Если отображается ошибка 126 «Не найден модуль» – можем сделать вывод о наличии одной из перечисленных ниже проблем:
- отсутствует, не зарегистрирован или поврежден DLL-файл;
- неправильная настройка или нарушение целостности системных файлов;
- некорректная установка программы или она была чем-то прервана;
- повреждение Windows вирусами;
- сбой в системном реестре;
- проблема в драйверах, настройке оборудования или его несовместимости с версией операционной системы.
Как исправить ошибку 126?
Мы разработали серию решений проблемы, одно из них обязано помочь, так как исправляет каждую из перечисленных проблем. Логично, что после устранения неполадки, все должно заработать правильно.
Способ 1: автоматическое исправление проблем с DLL-файлами
Есть специальная утилита, которая автоматически сканирует системные библиотеки и сравнивает их с эталоном. Если она обнаружит, что какого-то файла или нескольких, недостает, она сама их загрузит. Также происходит анализ битых, поврежденных и модифицированных файлов. Это очень удобно и быстро в сравнении с ручным способом и, что немаловажно, еще и более безопасно. На личном опыте, программа работает стабильно и не устанавливает файлы, зараженные вирусами. Однако любые манипуляции с DLL-библиотеками сложно назвать полностью безопасными.
Инструкция по устранению ошибки 126:
- Загружаем программу Restoro PC Repair Tool. Лучше это делать с официального сайта.
- Устанавливаем и запускаем софт. Нажимаем на кнопку «Начать сканирование» (Start Scan).
- После процедуры анализа системы кликаем по клавише «Восстановить все» (Repair All).

Важное достоинство программы – она оптимизирует компьютер, увеличивая его производительность (если в системе есть какие-то проблемы с DLL). Ее можно оставить в качестве настольного софта, так как утилита решает большой спектр проблем.
Способ 2: временно отключаем антивирус
Есть большая вероятность, что ошибка 126 спровоцирована антивирусной защитой системы. Если в момент установки программы антивирус посчитал один из компонентов угрозой и заблокировал его, он будет отсутствовать, а система писать «Не найден указанный модуль». В целом желательно отключать защиту в момент установки программ, которым доверяем.
- Выключаем антивирус (встроенный Защитник Windows и/или сторонний).
- Полностью удаляем программу через «Программы и компоненты» (пункт находится в Панели управления).
- Начинаем установку утилиты снова, проверив, что сейчас антивирус не работает.
- Проверяем результат.
Если сейчас программа заработала нормально, рекомендуем открыть антивирус и добавить в список его исключений данный софт. В противном случае со временем ошибка может вернуться, ведь антивирусная защита снова может заблокировать или удалить файл.
Важно! Для максимального результата лучше сделать полное удаление программы. Для этого можем воспользоваться iObit Uninstaller. Софт анализирует систему и ищет остатки файлов приложения, удаляя и их.
Способ 3: обновляем Microsoft NET Framework
Устаревание платформы Microsoft NET Framework нередко приводит к ошибкам с кодом 126 и 127. Благо, это просто решается, достаточно обновить среду. Если дело было в этом, все должно заработать. Скачать актуальную версию NET Framework можем с официального сайта Microsoft.
Способ 4: переустанавливаем DirectX
Очень много DLL-файлов напрямую связаны с DirectX, поэтому есть высокая вероятность, что сообщение «Не найден указанный модуль» относится к данному программному компоненту. Его легко переустановить, так как DirectX тоже распространяет Microsoft совершенно бесплатно и для любых версий, конфигураций операционной системы. С установкой проблем быть не должно, за исключением одного момента – желательно, перед началом инсталляции софта удалить старую версию DirectX.
Способ 5: сканируем системные файлы Windows
Во всех актуальных версиях Windows есть встроенный инструмент анализа системных файлов. Он часто помогает при различных проблемах с DLL-файлами.
Как запустить системные файлы:
- В поиск Windows вводим cmd и запускаем «Командную строку».
- Вводим команду sfc /scannow.
- Ждем завершения сканирования системы. Все ошибки должны быть исправлены автоматически, если такая возможность есть.
Способ 6: восстанавливаем системные реестр
Ошибка 126 и 127 может быть следствием скопления мусора в реестре или повреждения значений в нем. Одна проблема – вручную все перелистать и исправить просто нереально. Для этого лучше использовать специальные программы, например, Total System Care. В утилите есть все необходимое для анализа системного реестра, его оптимизации и исправления существующих проблем. Еще можем порекомендовать CCleaner. Обе программы справятся со своими задачами.
Способ 7: делаем откат Windows
Если никакие ручные способы исправления не помогают, что бывает редко, приходится обратиться к последнему методу и откатить Windows к последнему рабочему состоянию. Иногда файлы DLL могут пропадать из-за удаления программы, и вы можете столкнуться с ошибкой 126. Чтобы устранить ее, воспользуйтесь точками восстановления. Найти «Параметры восстановления» можем через поиск в Windows.
Теперь ошибка с кодом 126 больше не должна беспокоить пользователя как в Windows 7, так и 8, 10. Одна из процедур практически 100% должна исправить проблему. При этом мы не рекомендуем вручную менять DLL-файл, если удалось обнаружить в каком именно проблема. Все из-за чрезмерно высокого шанса загрузить вирус.
Источник
Ошибка 126 не найден указанный модуль – как исправить
Автор: Юрий Белоусов · Опубликовано 22.03.2017 · Обновлено 13.04.2017
Ошибка 126 не найден указанный модуль – как исправить
Если при загрузке операционной системы Windows 7 или XP или при запуске некоторых приложений на этой ОС появляется ошибка « System Error. Code: 126. Не найден указанный модуль » или же « LoadLibrary failed with error 126: Не найден указанный модуль », то вам следует сделать ознакомиться с инструкцией.
Устранение системной ошибки 126 в установщике модулей Windows
Для исправления ошибки следует:
- Запустить командную строку от имени администратора. Для этого нужно зайти в меню «Пуск» и вписать команду cmd . Потом правой кнопкой мыши вызвать контекстное меню и нажать «Запуск от имени администратора».

- Затем в появившемся окне с командной строкой следует написать следующую команду:
Для Windows x64: COPY atio6axx.dll .dll
Для Windows x32: COPY atioglxx.dll .dll
(Стоит отметить, что в командной строке не работают клавиши Ctrl+C и Ctrl+V. Поэтому следует вставлять с помощью правой кнопкой мыши, если вы конечно скопировали код, а не прописали вручную).
Затем следует нажать Enter. - Когда запросит подтверждение копирования файла нужно будет написать Yes ;
- Затем прописать или скопировать:
Для Windows x64: copy atio6axx.dll atiogl64.dll
Для Windows x32: copy atioglxx.dll atiogl32.dll - В завершении – перезагрузить компьютер.


Обязательно обратите внимание, что перед вводом команды путь должен быть таким:
Если вдруг пусть указан другой, то нужно сделать следующее:
- Убедиться, что вы запустили командную строку от имени администратора;
- Если путь по-прежнему неправильный, то прописать следующее:
CD /d C:Windowssystem32
И нажать Enter.
А потом следовать инструкции из первой части.
P.S. Если пишет «Не удается найти указанный файл», то фиг его знает как с этим бороться. Если вдруг кто-нибудь найдет решение проблемы, буду признателен за комментарий.
Надеюсь, статья «Ошибка 126 не найден указанный модуль – как исправить» была вам полезна.
Источник
Не найден указанный модуль: «Ошибка 126» (Error 126)
Опубликовано 14.05.2022 · Обновлено 11.01.2023

«Не найден указанный модуль DLL: Ошибка 126 (Error 126)» возникает, когда операционная система не может загрузить или обработать интегральные системные настройки, необходимые для запуска определенной службы на компьютере.
Службы предназначены для того, чтобы операционная система могла выполнять определенные функции, такие как сетевые адаптеры, брандмауэр Windows, удаленный доступ и многое другое.
«Ошибка 126: не найден указанный модуль» («Error 126: The specified module could not be found») — одна из наиболее часто встречающихся ошибок на компьютерах под управлением Windows. Эта ошибка не характерна для какой-либо конкретной программы и может возникнуть при попытке запустить и/или установить что-либо.
Причины возникновения «Ошибка 126: не найден указанный модуль» DLL
Основная причина возникновения «Ошибки 126 (Error 126): не найден указанный модуль» на Windows заключается в том, что Windows не может найти файлы DLL, необходимые для запуска процесса установки, так сказать для динамического связывания и это может произойти по любой из следующих причин:
- Файлы DLL могут отсутствовать в каталоге динамической компоновки вашей системы.
- Необходимые файлы могли быть случайно удалены вами. DLL-файлы находятся в папке Windows на диске C и пользователи не проходят этот путь регулярно, поэтому такая возможность встречается довольно редко.
Наиболее частая причина ошибки 126 — повреждение файлов DLL, они могут быть повреждены из-за множества причин, таких как: ненормальное завершение любого процесса, принудительное закрытие задач, неправильное завершение работы системы, неудачное удаление, вредоносные программы, вирусные атаки и т.д.
- Если файлы DLL не повреждены и не удалены из системы, проблема должна быть в реестре Windows. Все файлы DLL, присутствующие в системе, должны быть зарегистрированы в Windows, но иногда из-за некоторых ошибок в записях реестра эти файлы не регистрируются. Из-за этого файлы DLL не загружаются, когда они необходимы установщику Windows.
Исправляем «Ошибку 126 (Error 126): не найден указанный модуль DLL» на Windows
Существуют меры, при которых ваши DLL-файлы всегда будут в безопасности:
- Запустить проверку диска: попробуйте иногда запускать проверку диска или лучше запланировать проверку диска. Он проанализирует жесткий диск на наличие системных ошибок и повреждений файлов.
- Восстановление файлов вручную: просто перейдите в командную строку и выполните эту команду: SFC SCANNOW. Для выполнения этой команды потребуются права администратора. Он автоматически найдет и исправит ошибки в файлах Windows.
- Обновите антивирус и выполните полное сканирование системы, чтобы удалить из нее вредоносные программы и вирусы.
- Переустановите программное обеспечение, которое вызывает ошибку: он восстановит связанный с ним DLL файл, а также обновит реестр вашей системы.
«Не найден указанный модуль»: при загрузке Windows
При загрузке Windows, такая ошибка появляется, когда отсутствует какой-то файл, который был прописан в автозагрузку, и которого сейчас нет. Можно предположить, что его мог удалить ваш антивирус, распознав в нем вирусное ПО. Такое бывает, хоть и не часто.
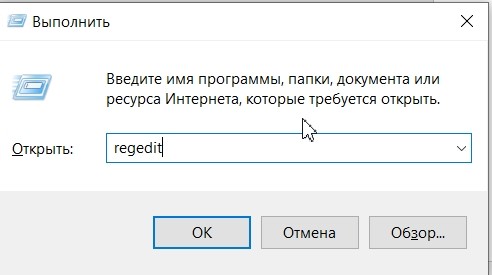
- Запустите редактор реестра: «Win+R» — regedit
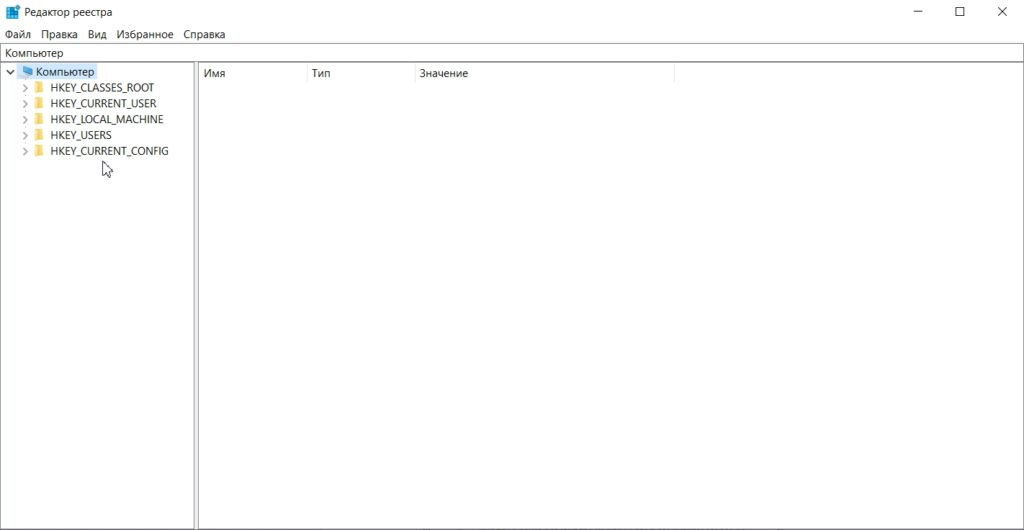
- Перейдите по пути: HKEY_LOCAL_MACHINESOFTWAREMicrosoftWindows NTCurrentVersionWinlogon
- Параметр Shell должен иметь значение explorer.exe. Если обнаружили, какое-то другое значение, тогда удалите его. Точно также нужно поступить с параметром Userinit, который должен иметь значение — C:WindowsSystem32userinit.exe
- После выполненных действий перезагрузите компьютер.
Ошибка 126 «Указанный модуль не найден»: при запуске приложения
Если код ошибки 126 возникает при запуске приложения, как правило, достаточно просто найти рабочую версию приложения и скопировать взамен старого неработающего.
Если говорить о драйверах, то лучшим решением будет посетить сайт производителя и установить последнюю версию. Можно также, при наличии компьютера с подобным ПО, скопировать из него недостающий файл.
«Не найден указанный модуль, ошибка 126»: при подключении USB-накопителей
Есть в любой операционной системе такая служба, которая называется «Доступ к НID-устройствам». Как и любая системная служба, она серьезно влияет на работоспособность системы. Но данная служба имеет непосредственное виляние на большинство USB-устройств.
Часто бывает так, что служба может не запуститься по каким-либо причинам! Соответственно, раз эта служба не запустилась, то возникают проблемы с USB — устройствами. Особенно часто можно столкнуться с такой проблемой в ОС Мicrosoft Windows Ноme Еdition.
Выглядит проблема так: При запуске сервиса «Доступ к НID-устройствам» вылезает ошибка «Служба Доступ к НID-устройствам не запущена. Ошибка 126: не найден указанный модуль». Если такое случилось, не стоит отчаиваться, проблема вполне решаема.
Возможно, что служба просто отключена (бывает так, что служба отключается, хотя раньше она работала). Поэтому, всё что от вас требуется — включить её самостоятельно.
Включаем службу «Доступ к НID-устройствам»
- Для этого надо войти в «Панель управления» и выбрать раздел «Службы».
- Далее, вы увидите большой перечень служб, которые установлены на вашем компьютере. Прокрутите перечень вниз и найдите нужную службу — «Доступ к НID-устройствам».
- Внимательно посмотрите в раздел «Тип запуска» и если надо, то переключите эту службу в режим «Авто» (просто кликните на этой службе два раза левой кнопкой мышки, установите тип в режим «Авто» и нажмите «Применить» и «Ок»). Проблема должна решиться сразу.
Однако, если всё же переключение не помогло, либо служба и так была включена, то можно провести следующие действия:
- Открываем системную папку «Windows» и находим в ней файл Drivers.cab, который расположен в папке «i386».
- Откройте эту папку и извлеките из неё три файла:hidserv.dll, mouclass.sys и mouhid.sys
- Создайте на рабочем столе папку, перетащите в неё эти три файла и перезагрузите систему в «Безопасном режиме».
- Затем войдите в системную папку «Windows» — «system32» и скопируйте туда три файла hidserv.dll, mouclass.sys и mouhid.sys.
- Перезагрузите систему (проблема решается в 99 случаях из 100).
А чтобы с вашим компьютером возникало меньше проблем, необходимо регулярно проводить его оптимизацию и очистку системы, для этого необходимо использовать специализированные программы, которые в полной мере позаботятся о вашем компьютере!
Источник