![]()
Download Article
![]()
Download Article
Your personal Apple ID is what enables you to purchase and download apps, music, videos, and so on from the App Store. Your Apple ID also allows you to sign into services such as iCloud and Find My iPhone. You can change your Apple ID from the «iTunes & App Store» section of the «Settings» app. You can also change your Apple ID password from here, or you can reset your password from the Apple ID website if you’ve forgotten it.
-

1
Open your iPhone’s «Settings» app. This app resembles a grey gear, and should be on your home screen.
- You can tap the «Home» button at any time to return to the home screen from any other page in your iPhone.
-
2
Tap the «iTunes & App Store» option. You’ll find this under the «iCloud» tab.
Advertisement
-
3
Tap the «Apple ID» option. This is at the top of the window. Your current Apple ID email address should be displayed here.
-
4
Tap the «Sign Out» option in the ensuing window. You’ll need to do this for any other Apple products you have if you want to sync all of your devices with the same Apple ID after you change it.
-
5
-
6
Sign in with your Apple ID credentials. These should be the same as the ones for the account you just signed out of.
-
7
Tap «Edit» in the «Account» section. This is at the top of the page.[1]
-
8
Tap the «Change Email Address» option. This should be beneath your current Apple ID.
-
9
Enter your preferred email address. Tap «Continue» when you’re done. Apple will send a confirmation email to your provided email address; the Apple ID site should take you to the confirmation code entry page.
-
10
Open your new Apple ID email. Remember to keep the Apple ID page in the background; you shouldn’t kill it until you’ve entered your confirmation code.
-
11
Open the confirmation email from Apple. The subject line should mention your email change.
- Check your Spam folder (and your «Updates» folder in Gmail) if you don’t see the email within a couple minutes of prompting the email. Some email filters will block or recategorize Apple mail.
-
12
Enter your verification code on the Apple ID site. If your browser permits it, you can copy the code from Apple’s verification email and paste it into the provided field for accuracy’s sake.
-
13
Sign back into your Apple ID account. You can do this by navigating back to the «iTunes & App Store» menu, tapping the «Apple ID» field at the top of the screen, tapping «Sign In» on the ensuing menu, and entering your new Apple ID credentials.
-
14
Update your Apple ID information on any Apple platforms or services you use. This includes phones, tablets, computers, and iTunes and the App Store.[2]


Advertisement
-
1
Open your iPhone’s «Settings» app. This app resembles a grey gear, and should be on your home screen.
-
2
Tap the «iTunes & App Store» option. You’ll find this under the «iCloud» tab.
-
3
Tap the «Apple ID» option. This is at the top of the window. Your current Apple ID email address should be displayed here.
-
4
Tap the «View Apple ID» option in the ensuing window. This will prompt you to enter your Apple ID password.
-
5
Enter your Apple ID password. This should be the same password you use to log into Apple services such as iTunes and the App Store.
-
6
Tap the «Apple ID» option. This is at the top of the screen; tapping it will take you to the official Apple ID account page.
-
7
Sign into your Apple ID account. You’ll need to use your current Apple ID credentials to do so; these should be the same credentials you use for iTunes and the App store.
-
8
Tap «Go» on your keypad. This will take you to your account.
-
9
Tap the «Security» tab. This will prompt a menu with security questions.
-
10
Enter the answers for your security questions. You’ll need to answer two of them. This will allow you access to the Security tab, from which you can change your password.
- If you’ve forgotten your security questions, you can reset them by tapping «Reset Security Questions» at the bottom of the Security menu. You’ll need to enter your Apple ID password; Apple will then send a verification code to your registered phone.
-
11
Tap the «Change Password» option. This will prompt you to enter your current password and preferred password.
-
12
Enter your current password and new password in the pertinent fields. You will have to confirm your new password by typing it twice.
-
13
Tap «Change Password». This will complete the process.
-
14
Update your Apple ID information on any Apple platforms or services you use. This includes phones, tablets, computers, and iTunes and the App Store.[3]


Advertisement
-
1
Open the Apple ID account page. If you can’t remember your Apple ID password, you’ll need to reset it from the official Apple ID site.
- You can also use your computer for this method.
-
2
Tap the «Forgot Apple ID or Password?» text below the login boxes.
-
3
Enter your Apple ID email in the field provided. This should be the email address you use to sign into the Apple ID page and new Apple products.
-
4
Select the «Get an email» option. This option prompts Apple to send you an email with a password reset link.[4]
- You can also choose to enter your security questions, which you set when you created your Apple ID.
-
5
Tap «Continue» to finalize your choice. This will send an email with a password resent link to your Apple email.
-
6
Open your Apple ID email. This should be the same email address you use to log into the Apple ID services.
-
7
Find and open Apple’s password reset email. The subject should say «How to reset your Apple ID password».
- Check your Spam folder (and your «Updates» folder in Gmail) if you don’t see the email within a couple minutes of prompting the email. Some email filters will block or recategorize Apple mail.
-
8
Tap the «Reset now» link in the email. This will take you to an Apple account password reset page on which you will enter your preferred password.
-
9
Type in your new password twice. You’ll need to do this to ensure your passwords match.
-
10
Tap «Reset password» to finalize the process. Your password has now been changed!
-
11
Update your Apple ID information on any Apple platforms or services you use. This includes phones, tablets, computers, and iTunes and the App Store.[5]


Advertisement
Add New Question
-
Question
How do I create a new Apple idea on iPhone?

For iOS 10.2 and earlier, settings, iCloud, and create a new apple ID. From there it should be fairly straightforward.
-
Question
What can I do if I do not remember my Apple ID or password?
You can put the answers to your secret questions in the «forgotten password» area and change your password.
Ask a Question
200 characters left
Include your email address to get a message when this question is answered.
Submit
Advertisement
-
To change the currently logged-in Apple ID on an iPhone, you just need to open the Apple ID menu in Settings, tap the Apple ID field at the top of the screen, and tap «Sign Out». You can log in with a different existing Apple ID from here.
-
Since certain app data is pertinent to your Apple ID, you may lose information like Game Center rankings or Notes if you switch from one existing Apple ID to another (e.g., you allow a friend to log onto their Apple ID whilst on your phone).
Show More Tips
Thanks for submitting a tip for review!
Advertisement
-
Be sure to sign out of your Apple ID on all devices if you ever sell one of them.
-
Your security questions and passwords should be memorable to you and completely nonsensical to anyone else. Try using a combination of letters, numbers, and symbols.
Advertisement
About This Article
Thanks to all authors for creating a page that has been read 46,792 times.
Is this article up to date?
![]()
Download Article
![]()
Download Article
Your personal Apple ID is what enables you to purchase and download apps, music, videos, and so on from the App Store. Your Apple ID also allows you to sign into services such as iCloud and Find My iPhone. You can change your Apple ID from the «iTunes & App Store» section of the «Settings» app. You can also change your Apple ID password from here, or you can reset your password from the Apple ID website if you’ve forgotten it.
-
1
Open your iPhone’s «Settings» app. This app resembles a grey gear, and should be on your home screen.
- You can tap the «Home» button at any time to return to the home screen from any other page in your iPhone.
-
2
Tap the «iTunes & App Store» option. You’ll find this under the «iCloud» tab.
Advertisement
-
3
Tap the «Apple ID» option. This is at the top of the window. Your current Apple ID email address should be displayed here.
-
4
Tap the «Sign Out» option in the ensuing window. You’ll need to do this for any other Apple products you have if you want to sync all of your devices with the same Apple ID after you change it.
-
5
-
6
Sign in with your Apple ID credentials. These should be the same as the ones for the account you just signed out of.
-
7
Tap «Edit» in the «Account» section. This is at the top of the page.[1]
-
8
Tap the «Change Email Address» option. This should be beneath your current Apple ID.
-
9
Enter your preferred email address. Tap «Continue» when you’re done. Apple will send a confirmation email to your provided email address; the Apple ID site should take you to the confirmation code entry page.
-
10
Open your new Apple ID email. Remember to keep the Apple ID page in the background; you shouldn’t kill it until you’ve entered your confirmation code.
-
11
Open the confirmation email from Apple. The subject line should mention your email change.
- Check your Spam folder (and your «Updates» folder in Gmail) if you don’t see the email within a couple minutes of prompting the email. Some email filters will block or recategorize Apple mail.
-
12
Enter your verification code on the Apple ID site. If your browser permits it, you can copy the code from Apple’s verification email and paste it into the provided field for accuracy’s sake.
-
13
Sign back into your Apple ID account. You can do this by navigating back to the «iTunes & App Store» menu, tapping the «Apple ID» field at the top of the screen, tapping «Sign In» on the ensuing menu, and entering your new Apple ID credentials.
-
14
Update your Apple ID information on any Apple platforms or services you use. This includes phones, tablets, computers, and iTunes and the App Store.[2]
Advertisement
-
1
Open your iPhone’s «Settings» app. This app resembles a grey gear, and should be on your home screen.
-
2
Tap the «iTunes & App Store» option. You’ll find this under the «iCloud» tab.
-
3
Tap the «Apple ID» option. This is at the top of the window. Your current Apple ID email address should be displayed here.
-
4
Tap the «View Apple ID» option in the ensuing window. This will prompt you to enter your Apple ID password.
-
5
Enter your Apple ID password. This should be the same password you use to log into Apple services such as iTunes and the App Store.
-
6
Tap the «Apple ID» option. This is at the top of the screen; tapping it will take you to the official Apple ID account page.
-
7
Sign into your Apple ID account. You’ll need to use your current Apple ID credentials to do so; these should be the same credentials you use for iTunes and the App store.
-
8
Tap «Go» on your keypad. This will take you to your account.
-
9
Tap the «Security» tab. This will prompt a menu with security questions.
-
10
Enter the answers for your security questions. You’ll need to answer two of them. This will allow you access to the Security tab, from which you can change your password.
- If you’ve forgotten your security questions, you can reset them by tapping «Reset Security Questions» at the bottom of the Security menu. You’ll need to enter your Apple ID password; Apple will then send a verification code to your registered phone.
-
11
Tap the «Change Password» option. This will prompt you to enter your current password and preferred password.
-
12
Enter your current password and new password in the pertinent fields. You will have to confirm your new password by typing it twice.
-
13
Tap «Change Password». This will complete the process.
-
14
Update your Apple ID information on any Apple platforms or services you use. This includes phones, tablets, computers, and iTunes and the App Store.[3]
Advertisement
-
1
Open the Apple ID account page. If you can’t remember your Apple ID password, you’ll need to reset it from the official Apple ID site.
- You can also use your computer for this method.
-
2
Tap the «Forgot Apple ID or Password?» text below the login boxes.
-
3
Enter your Apple ID email in the field provided. This should be the email address you use to sign into the Apple ID page and new Apple products.
-
4
Select the «Get an email» option. This option prompts Apple to send you an email with a password reset link.[4]
- You can also choose to enter your security questions, which you set when you created your Apple ID.
-
5
Tap «Continue» to finalize your choice. This will send an email with a password resent link to your Apple email.
-
6
Open your Apple ID email. This should be the same email address you use to log into the Apple ID services.
-
7
Find and open Apple’s password reset email. The subject should say «How to reset your Apple ID password».
- Check your Spam folder (and your «Updates» folder in Gmail) if you don’t see the email within a couple minutes of prompting the email. Some email filters will block or recategorize Apple mail.
-
8
Tap the «Reset now» link in the email. This will take you to an Apple account password reset page on which you will enter your preferred password.
-
9
Type in your new password twice. You’ll need to do this to ensure your passwords match.
-
10
Tap «Reset password» to finalize the process. Your password has now been changed!
-
11
Update your Apple ID information on any Apple platforms or services you use. This includes phones, tablets, computers, and iTunes and the App Store.[5]
Advertisement
Add New Question
-
Question
How do I create a new Apple idea on iPhone?
For iOS 10.2 and earlier, settings, iCloud, and create a new apple ID. From there it should be fairly straightforward.
-
Question
What can I do if I do not remember my Apple ID or password?
You can put the answers to your secret questions in the «forgotten password» area and change your password.
Ask a Question
200 characters left
Include your email address to get a message when this question is answered.
Submit
Advertisement
-
To change the currently logged-in Apple ID on an iPhone, you just need to open the Apple ID menu in Settings, tap the Apple ID field at the top of the screen, and tap «Sign Out». You can log in with a different existing Apple ID from here.
-
Since certain app data is pertinent to your Apple ID, you may lose information like Game Center rankings or Notes if you switch from one existing Apple ID to another (e.g., you allow a friend to log onto their Apple ID whilst on your phone).
Show More Tips
Thanks for submitting a tip for review!
Advertisement
-
Be sure to sign out of your Apple ID on all devices if you ever sell one of them.
-
Your security questions and passwords should be memorable to you and completely nonsensical to anyone else. Try using a combination of letters, numbers, and symbols.
Advertisement
About This Article
Thanks to all authors for creating a page that has been read 46,792 times.
Is this article up to date?
Все чаще мне встречаются люди (за последний месяц уже два случая), которые пользуются iPhone или iPad, но не знают данные учетной записи Apple ID (e-mail + пароль), привязанной к устройству.
Они не осознают что лишают себя всех тех прелестей, которые дает нам iPhone и за которые они вообще-то заплатили немалые деньги.
Если вы один из них, дочитайте эту статью до конца! Сегодня я объясню как на iPhone заменить чужой Apple ID на свой собственный, а в конце открою один маленький, но очень полезный секрет.
Давайте выясним почему же так получается. Из моего опыта, причина обычно одна, и сводится она к лени или неохоте разбираться с созданием Apple ID. Вот и получается что при покупке гаджета, люди позволяют какому-то левому дяде из магазина ввести свой Apple ID и пароль при первой регистрации устройства.
Обычно в таких случаях пароль новому владельцу не сообщают. В результате у вас в руках остается устройство, на которое вы не можете устанавливать новые приложения из AppStore и обновлять имеющиеся.
- Необходимо разблокировать iPhone или обойти Activation Lock — читайте эту статью
- Забыли пароль от Apple ID? Восстановите его — инструкция здесь
- В настройках моего iPhone чужой Apple ID! — Что делать?
Так давайте же исправим ситуацию и настроим устройство под себя. Для этого необходимо выполнить три простых шага. Вот они!
Содержание
- ШАГ 1: Зарегистрировать новый Apple ID
- ШАГ 2: Вводим данные Apple ID для услуг iCloud
- ШАГ 3: Вводим данные Apple ID для магазинов iTunes Store и App Store
- Как заменить Apple ID без потери данных на iPhone
ШАГ 1: Зарегистрировать новый Apple ID
Не устаю повторять о том, что Apple ID имеет стратегическое значение при настройке нового iPhone. Об этом я написал в руководстве по регистрации Apple ID, поэтому заострять на этом внимание здесь не буду.
Переходите по ссылке выше и следуйте пошаговой инструкции. Там все просто. Если у вас уже есть учетная запись, переходите ко второму шагу.
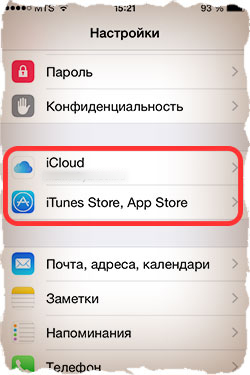
ШАГ 2: Вводим данные Apple ID для услуг iCloud
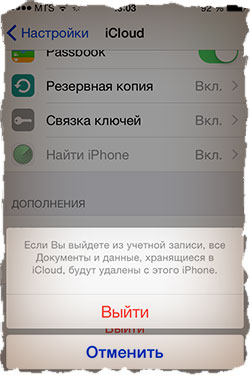
В Настройках iPhone есть как минимум два места куда необходимо ввести данные Apple ID (смотри рисунок выше). Первое из этих мест находится здесь: Настройки > Apple ID > Выйти.
Если вы зашли по этому пути и увидели чужую учетную запись, значит пора звонить бывшему владельцу устройства, или же тому человеку, который ввел эти данные. Вам необходимо узнать пароль.
БЕЗ СООТВЕТСТВУЮЩЕГО ПАРОЛЯ ВЫ НЕ СМОЖЕТЕ ВЫЙТИ ИЗ ЭТОЙ УЧЕТНОЙ ЗАПИСИ! После того как вам его сообщат, необходимо прокрутить экран в самый низ и кликнуть по кнопке «Выйти».

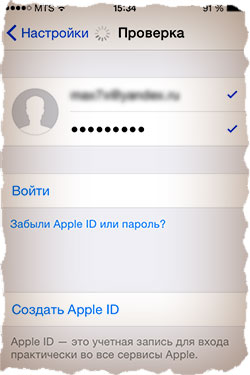
Если поле iCloud оказалось пустым, смело вводим данные своего Apple ID и подтверждаем по кнопке «Войти». Проверка данных может занять около минуты.
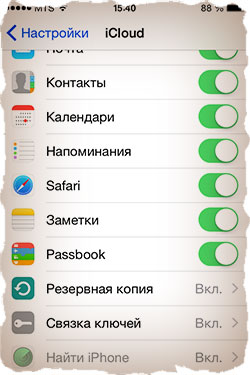
Что мы имеем в итоге? Теперь у вас открыт доступ к облачному хранилищу iCloud (5Гб) и его сервисам. iCloud дает вам возможность хранить резервные копии данных вашего iPhone в облаке (на серверах Apple), а также синхронизировать Контакты, Заметки, Календари и прочую информацию между всеми вашими устройствами. Это очень удобно.
Вам также стала доступна функция «Найти iPhone». Обязательно активируйте ее, т.к. это и есть та стратегическая составляющая о которой я говорил.
Если вдруг вы потеряете или у вас украдут iPhone, с помощью «Найти iPhone» вы сможете удаленно заблокировать устройство, стереть на нем все данные или же найти его на карте мира.
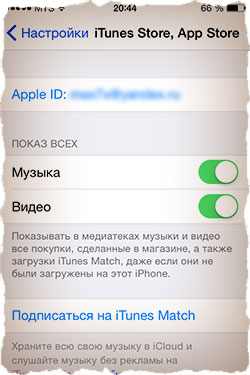
ШАГ 3: Вводим данные Apple ID для магазинов iTunes Store и App Store
Второе место где нам надо ввести данные Apple ID находится здесь: Настройки > Apple ID > Медиаматериалы и покупки. Здесь все подобно второму шагу, но никакие пароли вам не понадобятся.
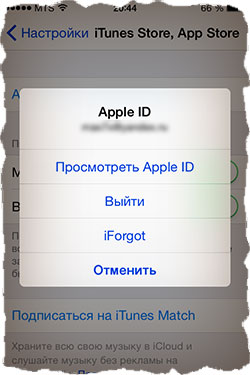
Кликаем по имени учетной записи и из появившегося меню выбираем «Выйти». Затем вводим данные своей учетной записи Apple ID в соответствующие поля и подтверждаем по кнопке «Войти».
Что мы имеем в итоге? Мы указали в Настройках телефона какую учетную запись Apple ID необходимо использовать при совершении покупок в магазинах контента iTunes Store и приложений App Store. Все ваши покупки (как платные так и бесплатные) будут привязаны к вашему Apple ID.
И если вы заплатили деньги за приложение (музыку, передачи и т.п.), потом его удалили, а теперь хотите скачать его еще раз — с вас никто НЕ БУДЕТ взымать плату повторно. Вы платите только один раз!
Запомните то, что я только что сказал, потому как именно на основе этого базируется обещанный ранее секрет. Объясняю ниже…
!!! СЕКРЕТ !!! Если заменить свой Apple ID на чей-то чужой как описано в ШАГЕ 3, то можно АБСОЛЮТНО БЕСПЛАТНО УСТАНОВИТЬ все те ПЛАТНЫЕ ПРИЛОЖЕНИЯ, которые были куплены и привязаны к этому (чужому) Apple ID.
То есть берем Apple ID друга (знакомого), который уже успел накупить приложений, вводим его в настройках своего телефона в Настройки > iTunes Store, App Store. После этого заходим в AppStore и бесплатно качаем все те приложения за которые уже заплатил ваш друг.
После этого можно опять прописать свой Apple ID, при этом приложения, которые вы только что установили, останутся на устройстве и продолжат работать. Единственный нюанс — вы не сможете обновлять эти приложения (но это не так страшно).
На основе этого СЕКРЕТА в интернет процветают так называемые ОБЩИЕ АККАУНТЫ. Суть их сводится к тому что за относительно небольшую плату вам предоставляют данные учетной записи с довольно обширной базой купленных приложений. Более подробно о них я напишу в отдельной статье.
Как заменить Apple ID без потери данных на iPhone
В комментариях к этой статье девушка Светлана спрашивает: «У нас с мужем один Apple ID на двоих. Тот же ID на нашем планшете и компьютере. Хотим сменить ID только на телефоне мужа( у него IPhone 4, у меня — 5) , а все остальные устройства оставить под прежней уч записью. Как это сделать, подскажите, пожалуйста!». Все довольно просто и мы сейчас этот вопрос разберем по полочкам.
На сколько я понимаю, Светлана и ее муж заинтересованны в том чтобы вся информация (контакты, календари и т.п.) на телефоне мужа НЕ была утеряна, а синхронизация в iCloud теперь производилась под другой учетной записью.
В этой ситуации необходимо создать новый Apple ID и ввести данные в Настройках > Apple ID.
А вот для магазина приложений App Store и iTunes Store данные нового Apple ID вводить не обязательно и можно продолжать пользоваться совместным со Светланой аккаунтом, если хотите, конечно.
Если вы замените Apple ID также для магазинов App Store и iTunes Store, то при попытке обновления приложений у вас будут спрашивать данные предыдущей учетной записи.
Светлана, вот инструкция, которую вы просили:
ШАГ 1 — Заходим в Настройки > Apple ID на iPhone мужа.
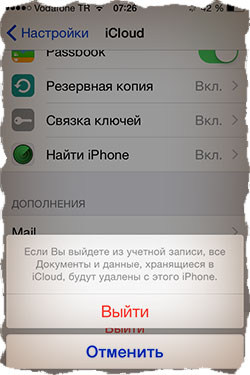
ШАГ 2 — Прокрутите страницу вниз и кликните по надписи «Выйти». Подтвердите еще раз по надписи «Выйти». В версии iOS 7 и ниже необходимо нажать на кнопку «Удалить учетную запись».
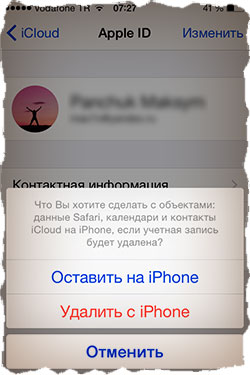
ШАГ 3 — Далее вас спросят что делать с данными, хранящимися на устройстве. Выбираем «Оставить на iPhone«.
ШАГ 4 — Введите пароль от старой учетной записи Apple ID
ШАГ 5 — Перейдите в Настройки > Apple ID и введите данные своего нового Apple ID.
Ничего сложного, как видите.
Как показывает практика, очень много случаев когда у людей случаются совершенно непредсказуемые проблемы с заменой Apple ID. В комментариях ниже мы вместе обсуждаем и пытаемся найти решение для каждого случая отдельно.
Подписывайтесь на наш Telegram, VK.
1 звезда
2 звезды
3 звезды
4 звезды
5 звезд
Иногда есть смысл поменять Apple ID – например, если он зарегистрирован на очень старый адрес электронной почты. Как это сделать, рассказываем в статье.


Чтобы поменять Apple ID, надо найти соответствующую функцию на устройстве Apple или на сайте производителя.

Изменение Apple ID в настройках iPhone и iPad
В настройках устройств iOS вы можете переключиться на другой уже существующий Apple ID или создать совершенно новый. Это можно сделать следующим образом:
- Откройте на вашем устройстве «Настройки» (приложение со значком шестеренки).
- Кликните на свое имя или идентификатор Apple ID.
- Теперь прокрутите до самого низа.
- Нажмите «Выход». Система попросит ввести пароль, чтобы подтвердить этот шаг.
- Теперь вы сможете определить, какие данные вы хотите удалить или сохранить. Измените настройки в соответствии с вашими требованиями и подтвердите, что вы хотите выйти из системы.
- Снова откройте Настройки.
- Выберите «Войти в [устройство]» и войдите в систему, используя данные нового Apple ID.
Как изменить идентификатор Apple ID в браузере
На сайте Apple вы можете изменить Apple ID напрямую, не создавая новую учетную запись:
- Перейдите на страницу appleid.apple.com. Войдите в систему, используя свое имя пользователя и пароль.
- В разделе «Учетная запись» нажмите справа кнопку «Изменить».
- Выберите пункт «Редактировать Apple ID».
- Введите новый адрес электронной почты, который вы хотите использовать в качестве идентификатора Apple ID в будущем. Подтвердите нажатием кнопки «Продолжить».
- На вашу электронную почту придет новое сообщение. По ссылке подтвердите изменение Apple ID. Затем вы сможете снова войти в систему, как обычно.
Читайте также:
- Почему смартфоны быстрее разряжаются зимой?
- Может ли очиститель воздуха задерживать вирусы?=«content_internal_link»>
Была ли статья интересна?