Хотите сменить имя автора в записях WordPress? Иногда возникает такая необходимость и для этого совсем не надо публиковать статью с другой учетной записи сайта. В этой статье я расскажу, как легко поменять автора с помощью пары кликов мышкой.

Содержание
- 1 Перед тем как сменить автора записей в WordPress
- 2 Изменение автора записи в WordPress
- 3 Как быстро изменить автора для нескольких записей в WordPress
- 3.1 Возможно вас заинтересуют эти статьи:
Если вы просто хотите отображать свое имя под каждой записью, написанной другими авторами, то вы готовы следовать инструкциям, представленным в этой статье.
Если вы хотите, чтобы и другие пользователи отображались в качестве авторов, то для начала вам надо убедиться, что у вас есть такая функция.
Вы можете просмотреть и управлять всеми авторами на WordPress, зайдя через админку на страницу Пользователи.

А теперь давайте непосредственно перейдем к тому, как быстро и легко сменить автора записи в WordPress.
Изменение автора записи в WordPress
Сначала вам нужно зайти в окно редактора записи или страницы, где вы хотите изменить имя автора. В правом верхнем углу щелкните здесь по Настройки экрана.

В выпадающем меню проверьте, чтобы напротив опции «Автор» стояла галочка.

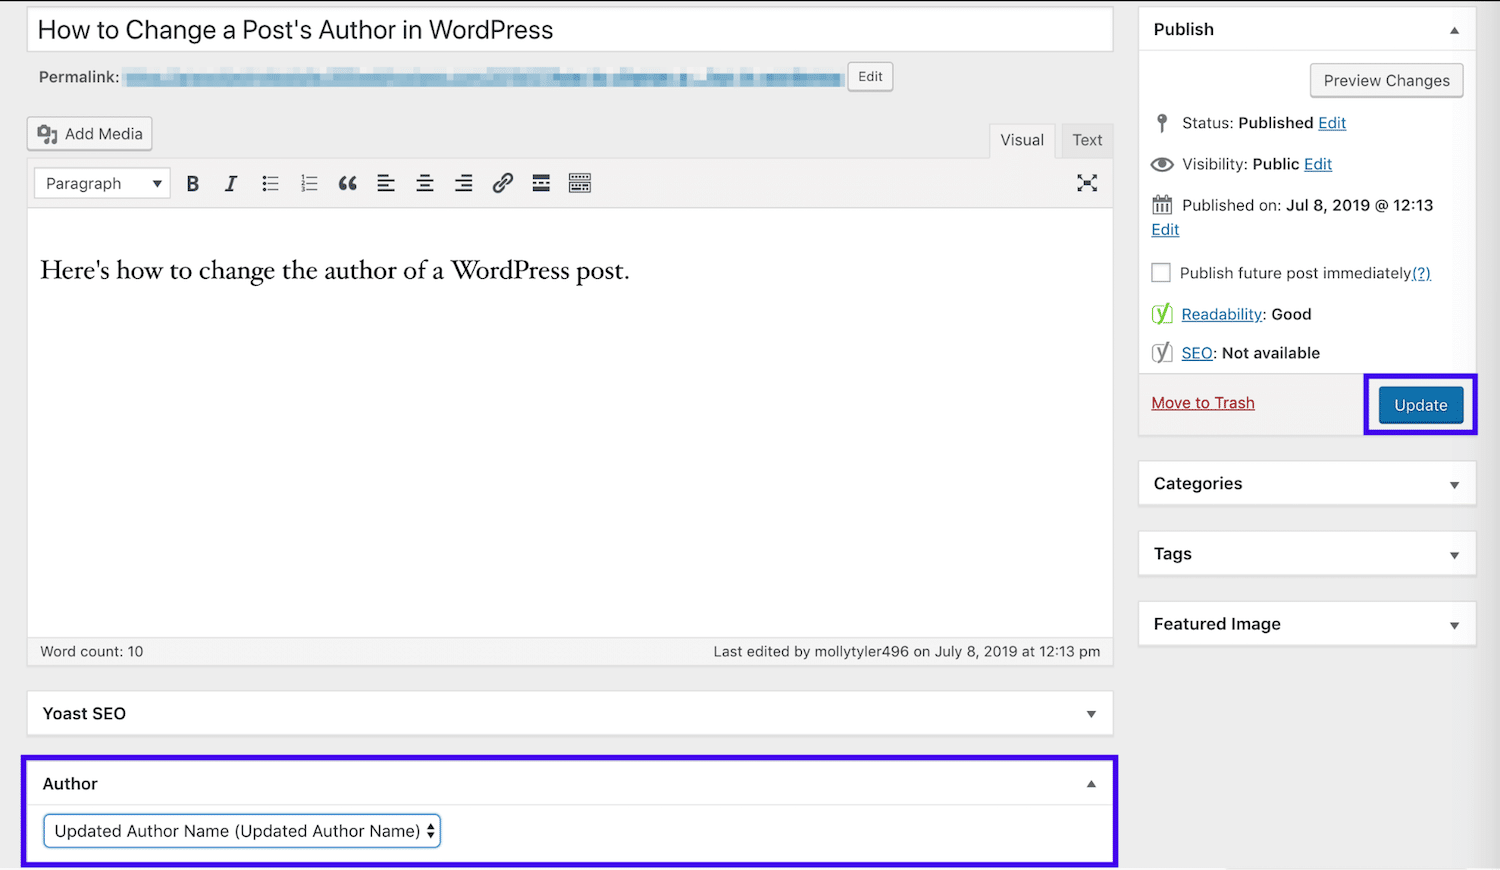
Прокрутите страницу вниз, и вы увидите, что в редакционном окне есть блок «Автор». Щелкните по нему и в выпадающем меню выберите имя необходимого автора.

Для сохранения изменений не забудьте щелкнуть по кнопке «Сохранить» или «Опубликовать».

Вот и все, вы успешно изменили имя автора записи в WordPress.
Как быстро изменить автора для нескольких записей в WordPress
Изменить имя автора через окно редактора записи очень просто, но если вам нужно это проделать для нескольких записей, то это займет достаточно много времени.
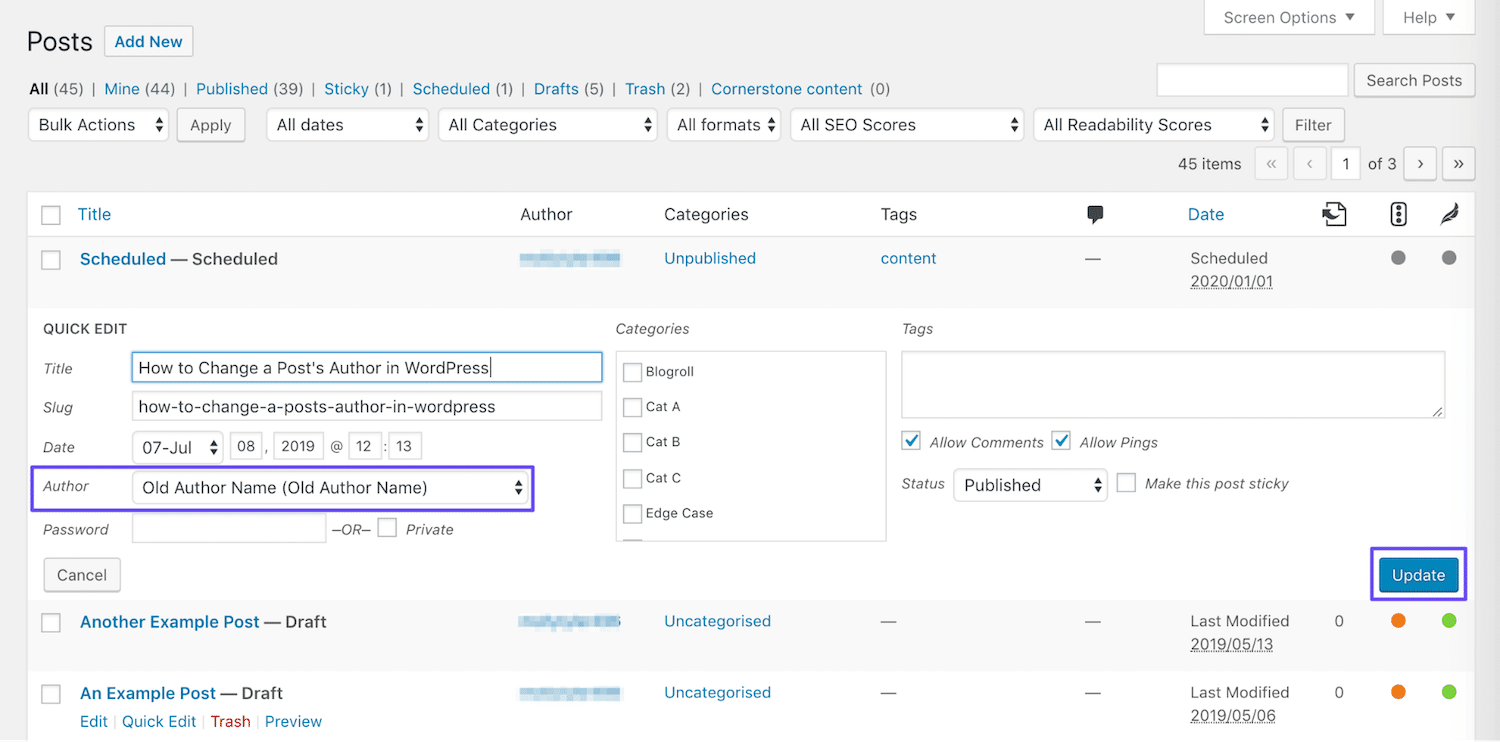
Существует способ сразу изменить имя автора для нескольких записей. Для этого через админку WordPress сайта зайдите в меню Записи, перед вами появится окно со списком всех записей сайта.
По умолчанию WordPress отображает 20 записей на каждой странице, вы можете изменить это количество, зайдя в настройки экрана и выставив необходимое число напротив «Количество элементов на странице».

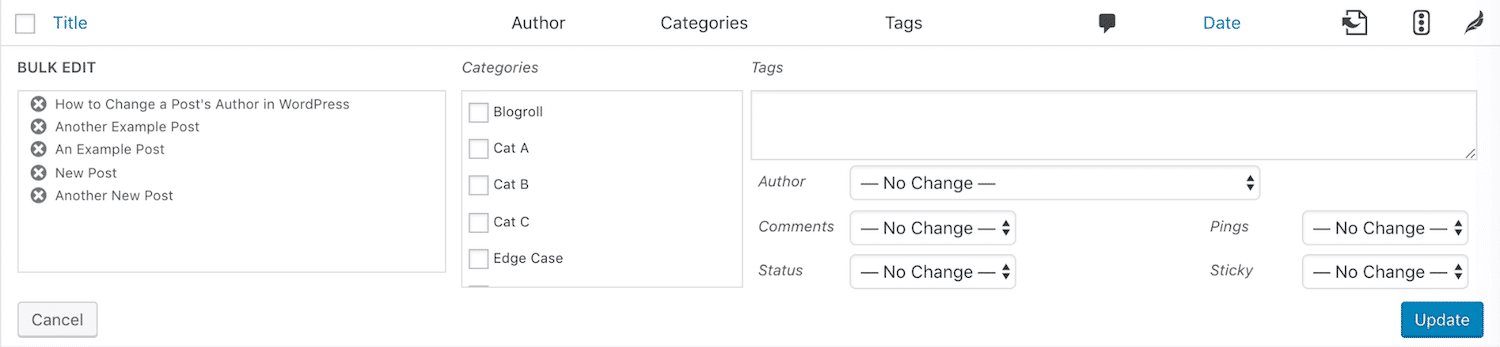
Теперь выберите статьи (поставьте галочки), где вы хотите сменить имя автора. В блоке «Все действия» выберите «Изменить» и щелкните по рядом стоящей кнопке «Применить».

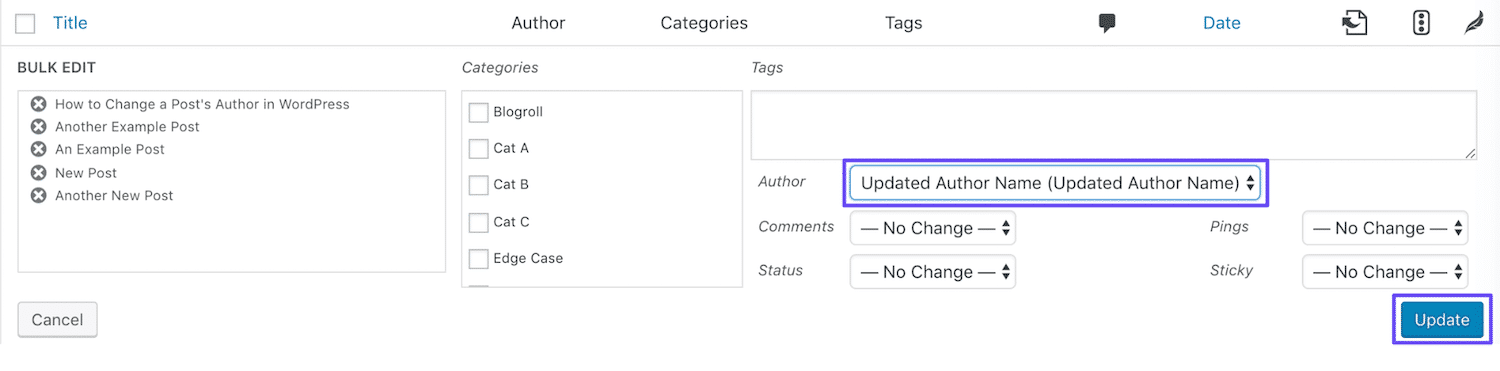
Как только вы это сделаете, перед вами появится метабокс «Массовое редактирование». Напротив бокса «Автор» выберите нужное имя.

Чтобы сохранить все изменения не забудьте щелкнуть по кнопке «Обновить».
Вот и все. Вы сразу сменили имя автора для нескольких записей.
Надеюсь, эта статья вам помогла и теперь вам не составит никакого труда сменить имя автора записей в WordPress. Возможно, вам также будет прочить статью лучшие WordPress плагины по резервному копированию.
Если вам понравилась статья, то не забывайте подписываться на мой YouTube канал, находите меня в ВКонтакте и в твиттере.
There are many circumstances in which you might find yourself needing to change the author of a post in WordPress. However, the platform doesn’t make it immediately clear how to accomplish this task.
Fortunately, there are several methods you can use to change, update, and edit the author of a WordPress post. All you need to know is where to look and which strategy is best suited to your particular situation and needs.
In this post, we’ll discuss some of the circumstances that might lead you to attribute a post to someone other than the original author. Then we’ll walk you through five different ways to do so, and explain when to use each method. Let’s get started!
Why You Might Need to Change a Post’s Author in WordPress
While this may seem like a rarely-needed task, changing a post’s author in WordPress may be necessary in a variety of different situations. This is especially true if you run a large, multi-author content hub.
Many content-heavy sites with more than one author consider posts the property of the publication, rather than individuals. If a writer chooses to leave your site for any reason, you may want to change their posts’ author to the name of a content creator who is still associated with your site.
Similarly, a change in user status may warrant updates to a post’s author. If your screening process involves initially publishing posts under an editor’s name, but you eventually decide to bring the writer on board, you might want to attribute the posts to their creator after the fact.
In other cases, you may want to remove or hide author names altogether. This can give your site a more cohesive identity, as your posts will appear to come from a single source. Plus, single-author sites can benefit from less-cluttered looking posts when the author names are invisible.
Finally, there may be times when you need to change an author’s display name in WordPress. Whether they have undergone a name change, wish to publish their posts under a pen name, or something else entirely, this is a courteous way to respect your authors’ preferences regarding how they’re presented online.
As you can see, the need to change a post’s author in WordPress comes up more frequently than you might expect. Learning how to address all of these situations will help your site run smoothly, and better equip you to maintain its identity and presentation.
How to Change the Author of a Post in WordPress (5 Methods)
Just as there are many reasons you may need to change a post’s author in WordPress, there are also many ways to accomplish the task. Below we’ll cover five methods and discuss the situations they’re each best suited to.
If you like, you can use the following links to jump directly to the section you’re most interested in:
- Change a post’s author to another existing user
- Add a new author and assign existing posts to them
- Remove or hide the author name on your WordPress posts
- Update an author’s display name in WordPress
- Bulk change post authors on your site
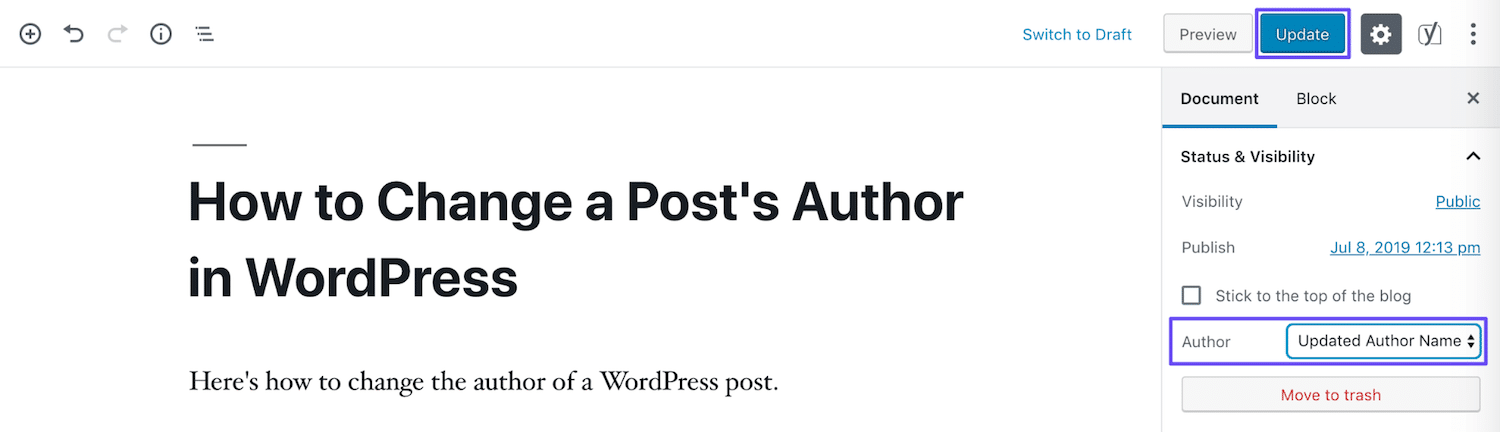
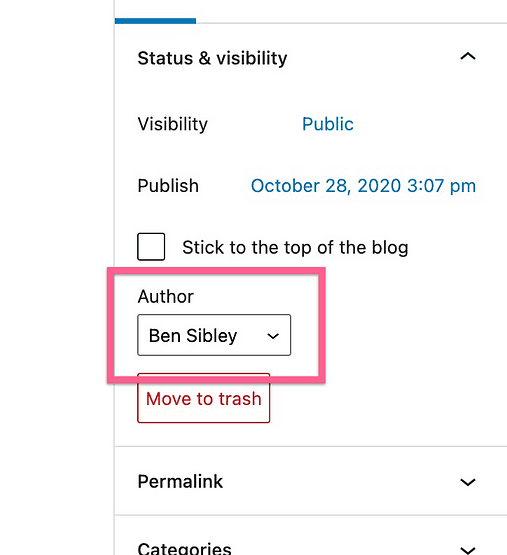
If you’re using the new WordPress Block Editor, changing a published post’s author couldn’t be easier. First, access the post by navigating to Posts > All Posts and clicking on the relevant title.
In the post editor, select the Document tab in the sidebar. Under the Status & Visibility heading, you should see Author followed by a drop-down menu:

From here, you can select the name of any author with an existing account on your WordPress site. It’s important to note that you cannot create a new author from this screen – we’ll cover how to do that later in this post.
Once you’ve selected the new author’s name from the drop-down menu, select Update to make the change live:
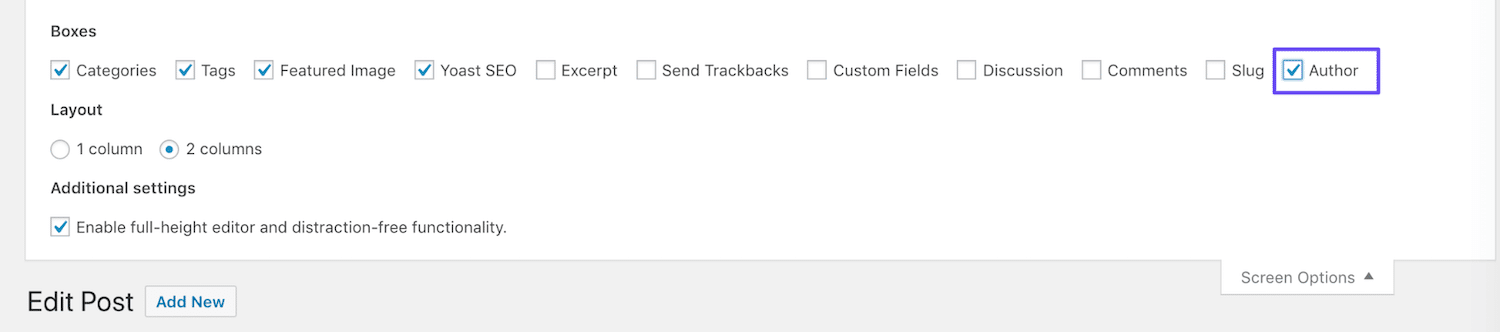
If you’re still using the Classic Editor, the process will look a little different. First, you’ll need to expand the Screen Options menu above the editor:
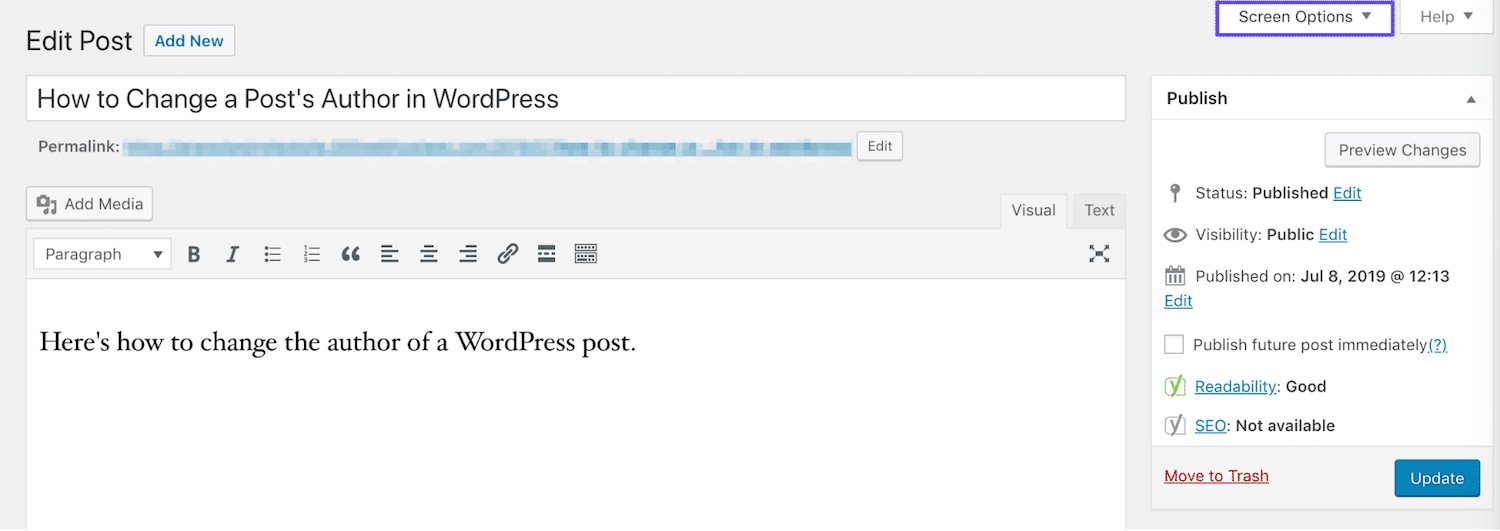
Under Boxes, select the checkbox next to Author:
Then scroll down to the bottom of the editor. Here, you’ll see that there’s now a drop-down menu similar to the one in the Block Editor:
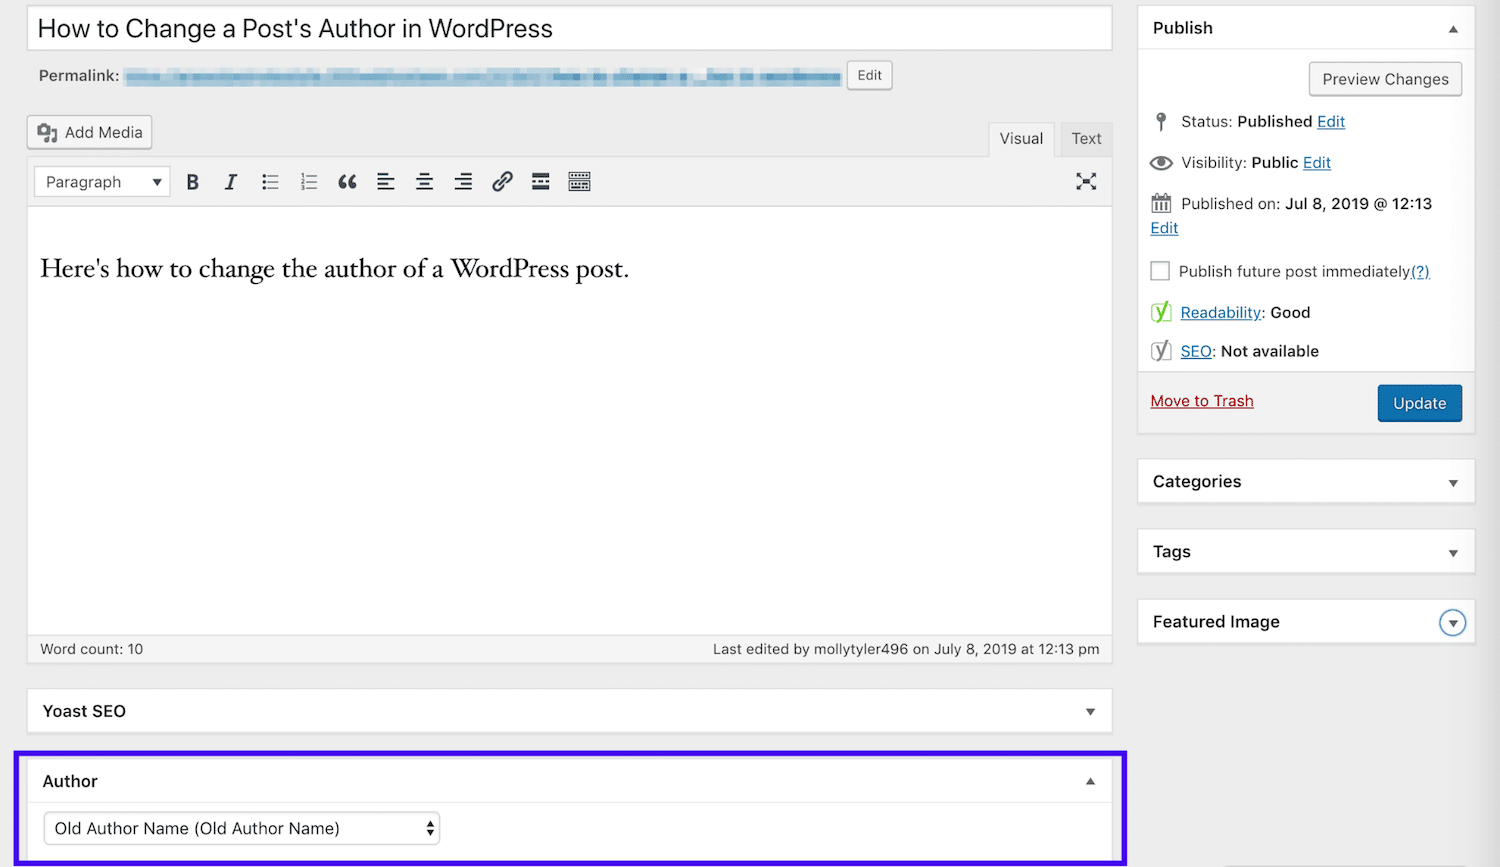
Select the name of the post’s new author, and then click on the Update button to make it official:
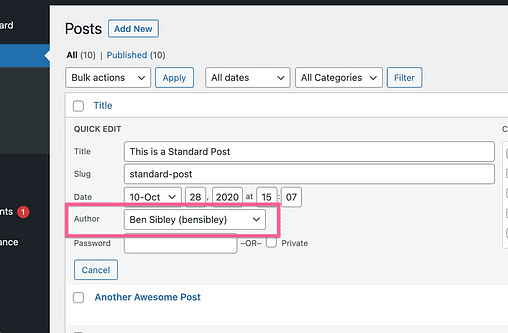
Regardless of which editor you use, you can also change a post’s author using the Quick Edit function in the Posts list. Simply select the Quick Edit option under the post’s title, and then choose the new author from the relevant drop-down menu and click on the Update button:
This method works well if you have a single post you need to reattribute because the original author left your site, or you otherwise have reason to credit a different existing user for the post. Changing a post’s author to a new user, on the other hand, will require a few extra steps.
2. Add a New Author and Assign Existing Posts to Them
In WordPress, you can only attribute a post to an existing author. In other words, there’s no way to create a new author for a post from either of the content editors.
So, let’s say you’re bringing in a new Contributor or Author, and you wish to more accurately attribute posts they’ve written that were published under the name of an Editor or Administrator. You’ll first need to create a user account for the new writer.
It’s worth noting that if you allow frontend user account creation, the post’s new author may already have an account. However, you’ll still need to follow these steps to give them the proper permissions, in order to credit them on their posts.
To handle this task, you’ll need Administrator status on your website. If you’re not a site Administrator, you’ll need to contact one to carry out these steps for you.
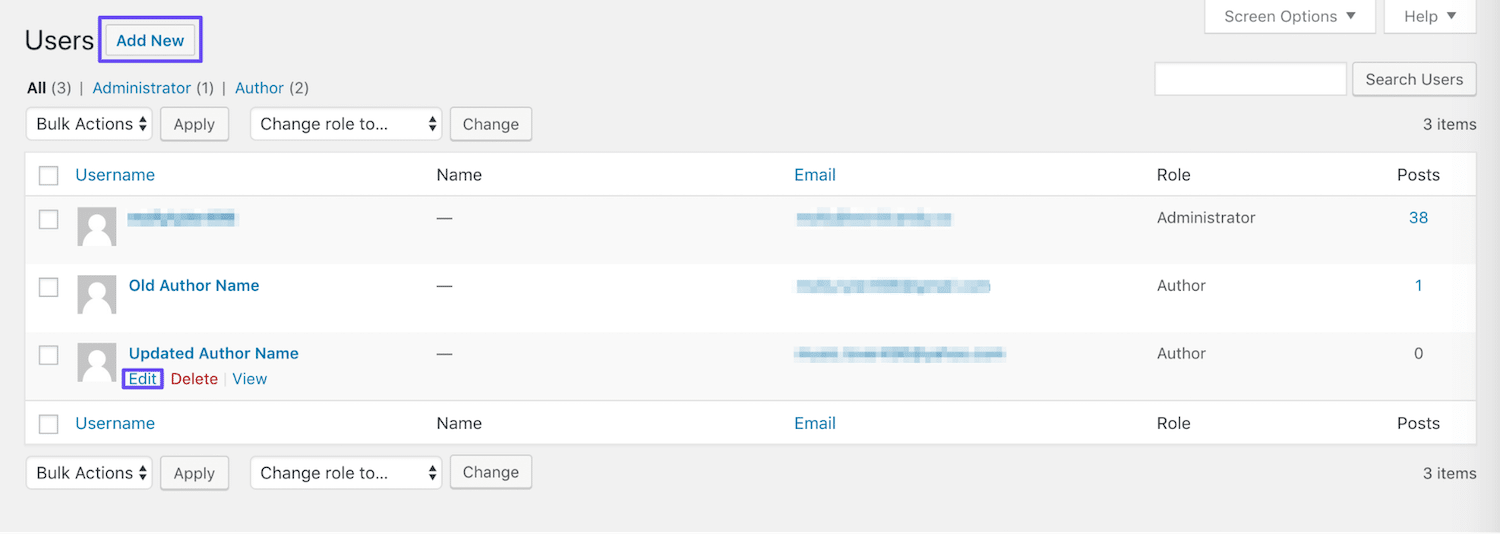
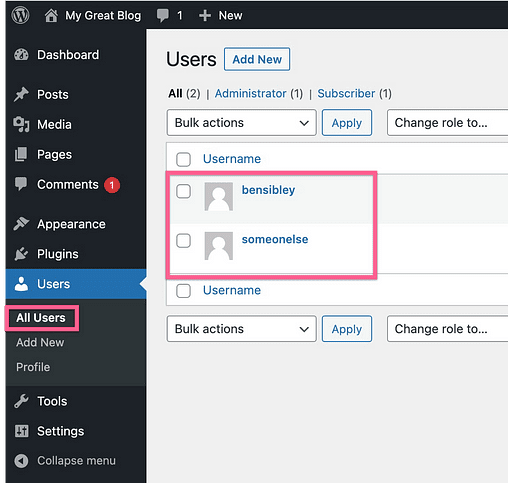
Then, navigate to the Users area of your WordPress dashboard. If you’re creating a new user, click on the Add New button at the top of the screen. If you’re editing a user’s permissions, you can simply select Edit beneath their username:
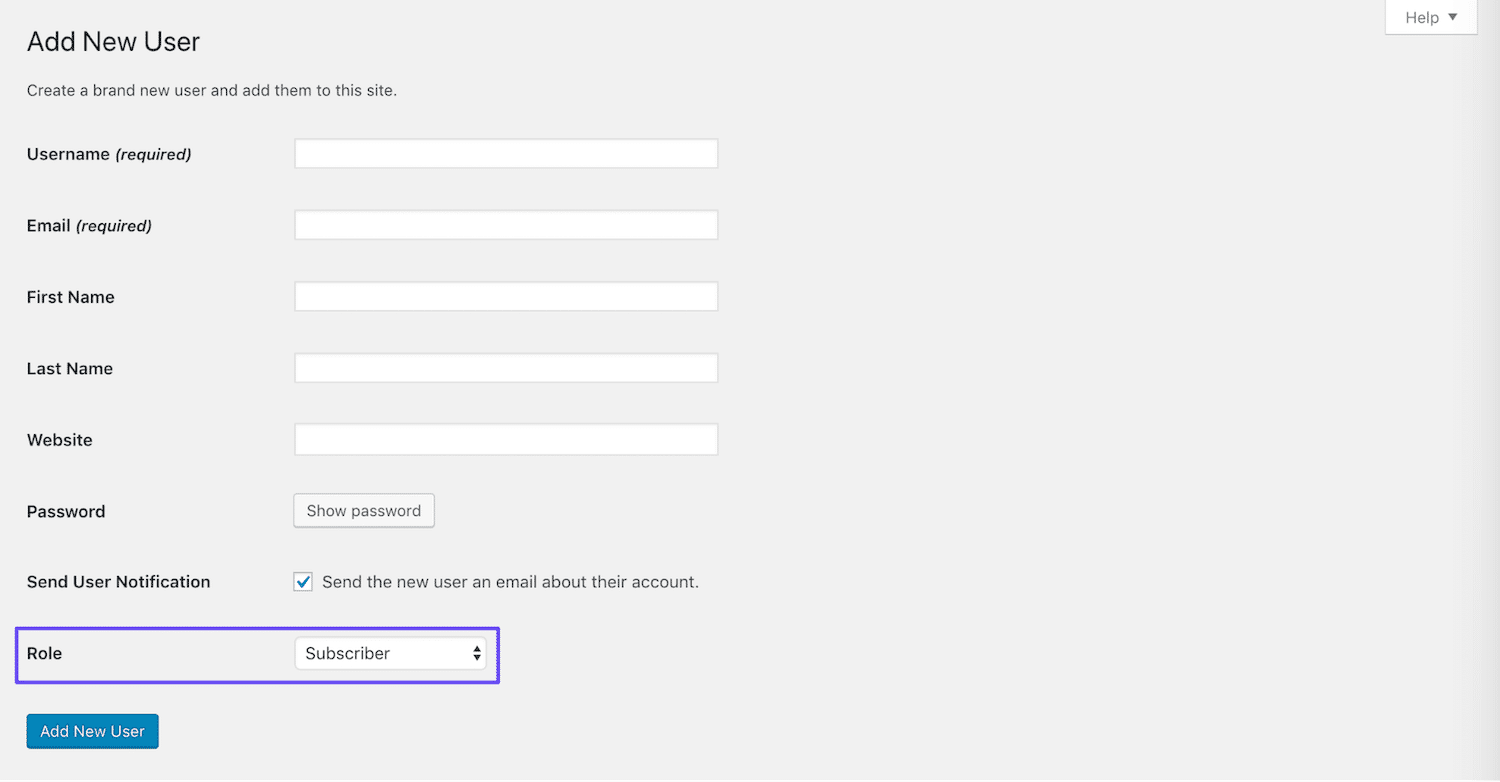
For new users, fill out the required fields and any others you wish to include. Make sure their role is set to Author or Contributor, depending on which is more appropriate:
To edit a user account created on the frontend, you can simply change their role by scrolling down to the relevant drop-down menu on the Edit User screen:
In either case, make sure to save your changes. Once the user has been added and has the proper role, you can attribute posts to them as described in the first method above.
3. Remove or Hide the Author Name on Your WordPress Posts
In some cases, it makes more sense to leave the authors’ names off of your WordPress posts. If you are the only author, removing the name eliminates redundancy and makes your posts less cluttered.
As for multi-author sites, leaving out authors’ names minimizes individuality on your site. You’ll present a more cohesive identity for your site and brand, which could be beneficial in business blogs where you want readers to see your content as originating from the company rather than specific writers.
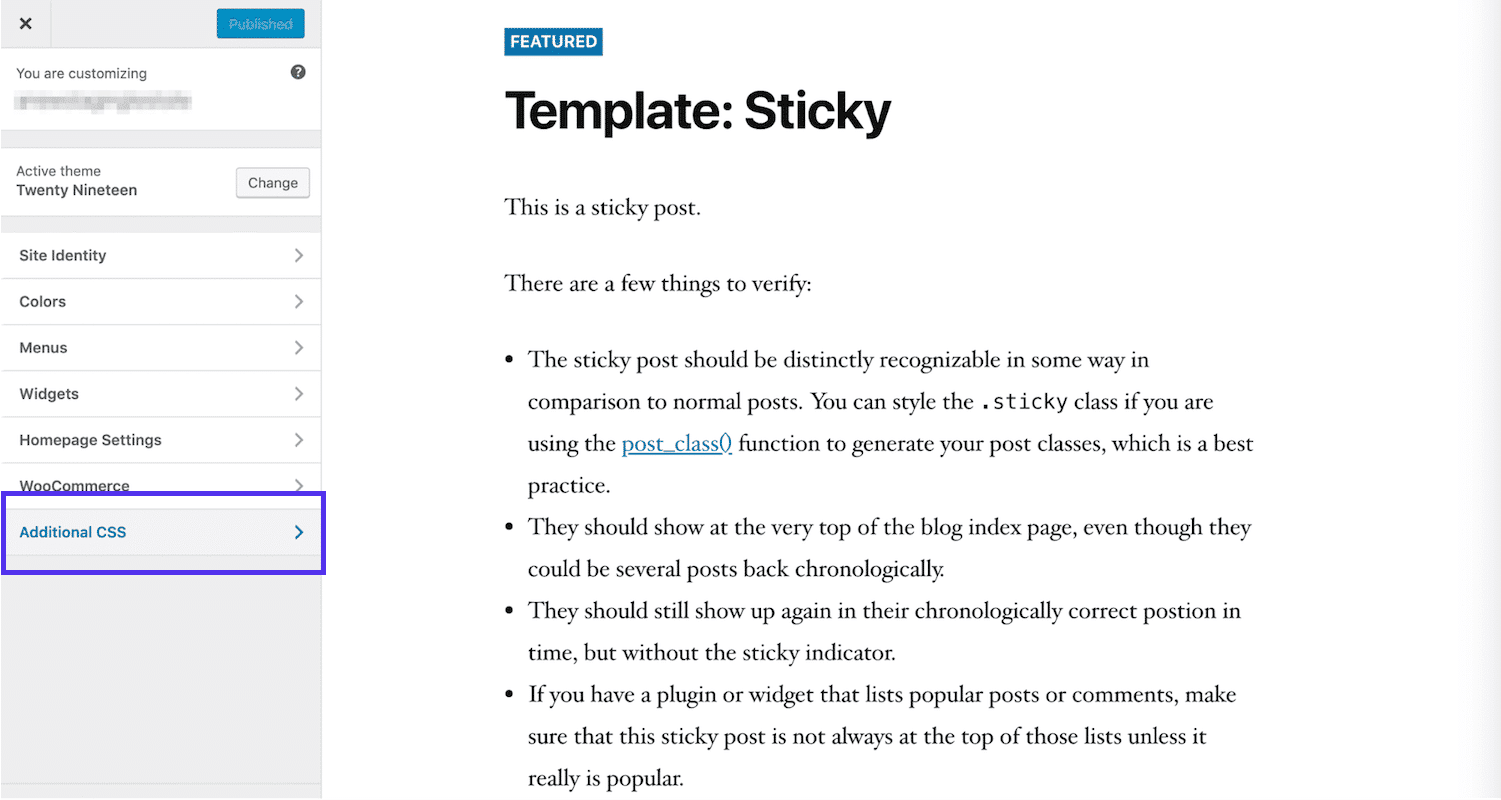
There are two ways to go about hiding author names. To manually remove author information from your posts, you’ll need to edit your site’s theme. Navigate to Appearance > Customize in your dashboard, and then scroll down to the Additional CSS area of the Customizer:
In the field provided, you can add the following code:
/* Remove meta data */
.entry-meta .byline, .entry-meta .cat-links { display: none; }
.entry-meta .posted-on { display: none; }
If that doesn’t do the trick, you can also delete your theme’s metadata code. However, the location of this information varies from theme to theme. You may need to contact the theme’s creator in order to find it. Even then, editing theme files directly is always risky.
Instead, you might want to consider using a plugin that can remove metadata such as author names from your blog posts without touching a line of code. WP Meta and Date Remover is a sound option if you choose to take this route:

Once you’ve installed and activated the plugin, all you have to do is choose whether to hide meta information from the frontend, the back end, or both. Save the settings, and you’ll have a site that appears to be crafted by a single author, even if it isn’t.
4. Update an Author’s Display Name in WordPress
In some cases, what you really need is not to change a post’s author name. Rather, the user who wrote the post in question may simply wish for the posts attributed to them to display a different name than the one that’s currently listed.
This may occur in a variety of situations, including:
- If you want to display a full name instead of a username, to make your posts look more professional.
- When an author has legally changed their name and wants to update their posts to reflect that.
- Instances where an author has decided to use a new name for their posts on your site, in order to maintain consistency across content platforms or to differentiate between them.
- Cases in which you or an author wishes to use a pen name for their posts.
These scenarios warrant a change to the user’s account, rather than to the posts themselves. You can provide the instructions below to any user wishing to make a change to their name or follow these steps yourself for any other user’s account if you have Administrator status.
Access the user’s account settings, by navigating to Users in your WordPress dashboard. Under Name, you’ll see the author’s username as well as fields for their first, last, and nickname:
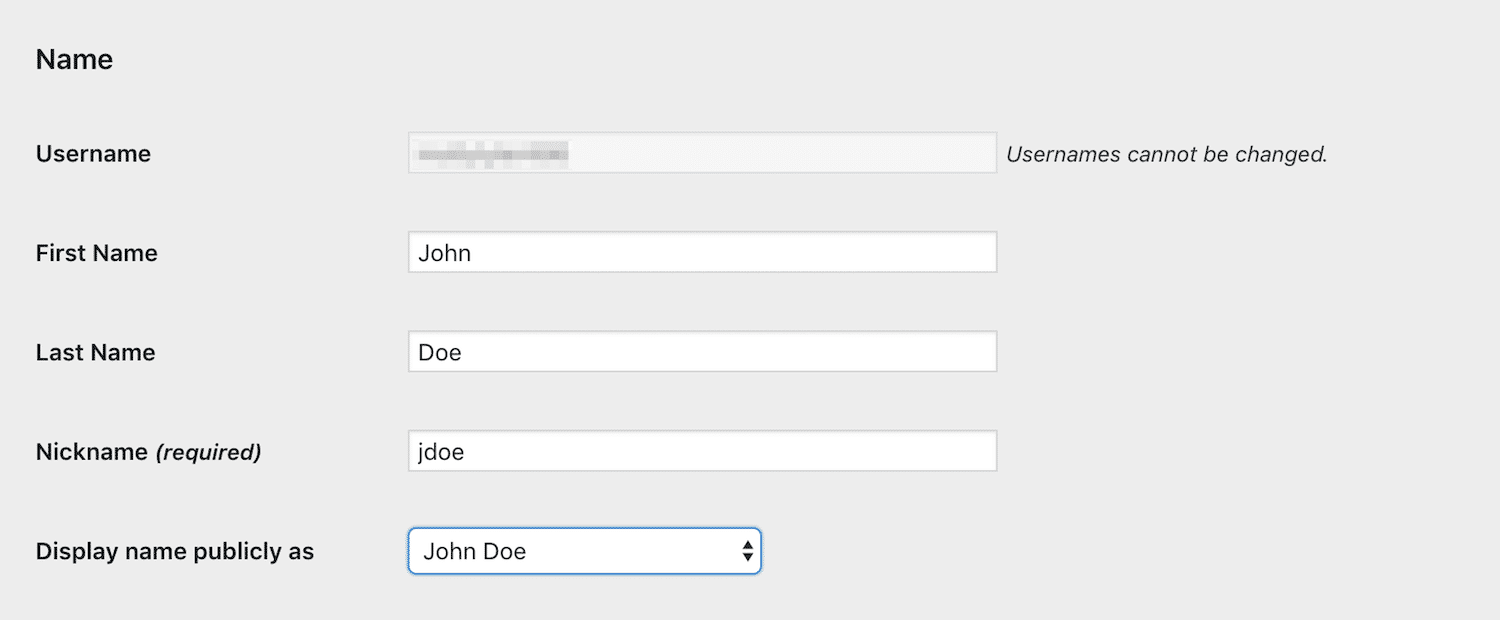
Fill in or change whichever of these fields you like (although you can’t change your username from this page. Here’s how you can change username.). Then, use the drop-down menu beside Display name publicly to select either the username, nickname, first, last, or full name.
Don’t forget to save your changes afterward. This will automatically change the author’s name on all of their posts, using the new display name instead. Often, updating the user’s profile can be the most efficient way to change a post’s author.
5. Bulk Change Post Authors on Your Site
Let’s say you have a situation similar to the one we described in Method #1, i.e. an author has left your site and you wish to reassign their posts to someone who still writes for you. However, instead of a single post, the ex-user has several.
While you could change the author for each individual post your previous contributor left behind, it’s much more efficient to use WordPress’ bulk editing capabilities. This way, you can change the name across all relevant posts with the click of a button.
To do this, navigate to your Posts list in WordPress and select the checkbox next to each of the posts you need to attribute to a new author. Then select Edit from the Bulk Actions drop-down menu:
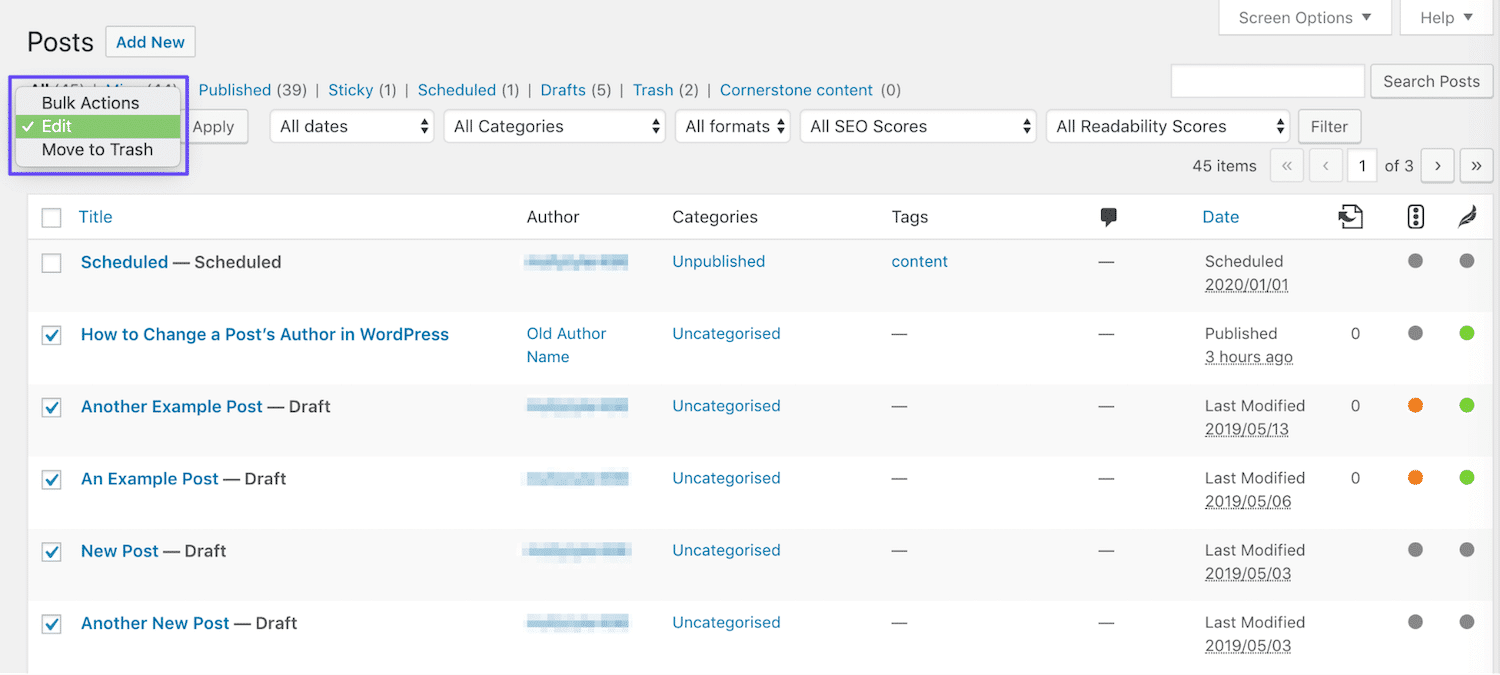
This will open a window much like the one you see when using the Quick Edit function:
Select the appropriate name from the Author drop-down menu, and then click on the Update button. This will update the name of the author on all the posts you selected and make the changes live on your site:
As with the first method, this will only work if you’re attempting to attribute the posts to an existing author. If you want to add a new user to take over the former user’s posts, you’ll first need to follow the steps in Method #2 to create a new user account with the appropriate role.
Additionally, you can’t select multiple authors for the posts you’re bulk editing. So if you want to divide a former contributor’s posts among more than one user, you’ll need to bulk edit the relevant posts for each new author.
How to Change the Author Archive Slug in WordPress
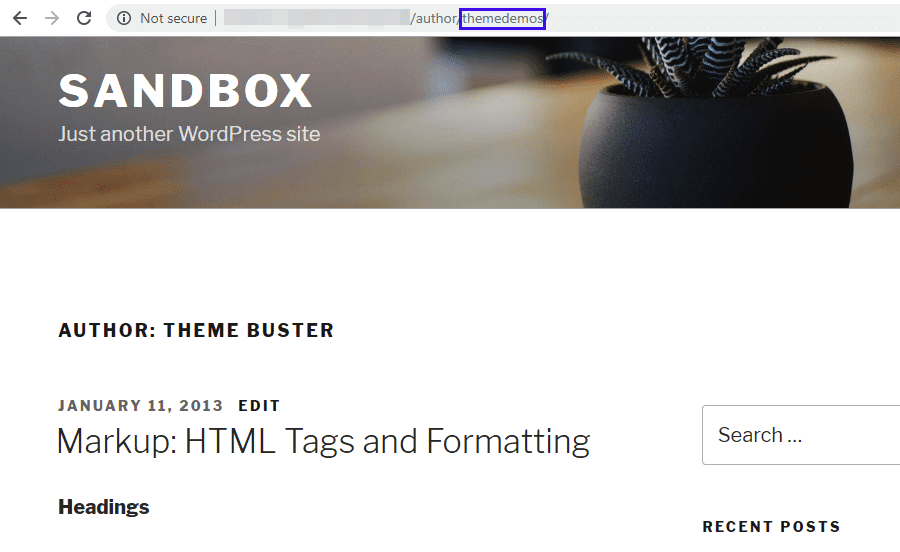
Before we wrap things up, let’s talk about one more tangential aspect of changing authors in WordPress. Sometimes, instead of switching the actual author name, you might just want to change the author ‘slug’ that shows up in the URL for their archive page:
To do this, you can use a free plugin called Edit Author Slug. After installing and activating the plugin, head over to Users > All Users and open up the editing interface for the user you want to work with. Then, scroll to the bottom and find the Author Slug options:
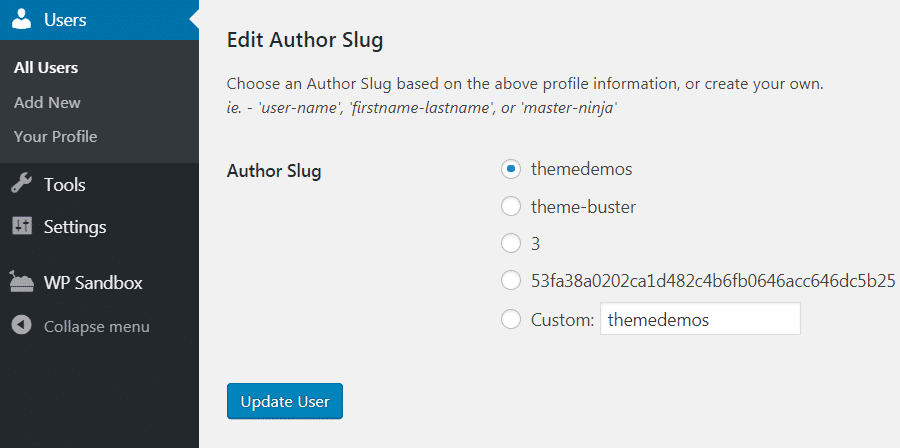
Enter your desired author slug into the Custom box, and then click on Update User. The plugin will automatically update all links pointing to that author’s archive page, using the new slug.
You can also change the default base for your site’s author slug by going to Settings > Edit Author Slug. Enter your desired base into the Author Base box, and select Save Changes at the bottom of the page:
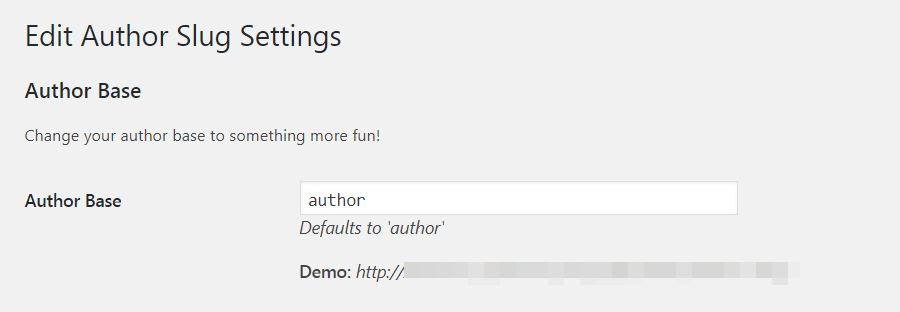
Just be aware that doing this will change every single author URL on your site. This could affect your Search Engine Optimization. As with any time you change your WordPress site’s URL structure, it’s a good idea to implement redirect rules if you change the default base author slug.
Need to reassign content to new users? Learn how to effectively change the authors of your blog posts, pages, and author slugs! 👨🏫🔜👩💻Click to Tweet
Summary
There are a variety of reasons why you may find yourself needing to change the author of a post in WordPress. There are also many ways to do so, which can present its own challenges. You’ll need to determine which method is the best choice for your situation.
To help you decide, we’ve looked at five different routes you can take to update an author’s name for one or more posts in WordPress:
- Change a post’s author to another existing user.
- Add a new author and assign existing posts to them.
- Remove or hide the author name from your WordPress posts.
- Update an author’s display name in WordPress.
- Bulk change post authors on your site.
Get all your applications, databases and WordPress sites online and under one roof. Our feature-packed, high-performance cloud platform includes:
- Easy setup and management in the MyKinsta dashboard
- 24/7 expert support
- The best Google Cloud Platform hardware and network, powered by Kubernetes for maximum scalability
- An enterprise-level Cloudflare integration for speed and security
- Global audience reach with up to 35 data centers and 275 PoPs worldwide
Test it yourself with $20 off your first month of Application Hosting or Database Hosting. Explore our plans or talk to sales to find your best fit.
There are many circumstances in which you might find yourself needing to change the author of a post in WordPress. However, the platform doesn’t make it immediately clear how to accomplish this task.
Fortunately, there are several methods you can use to change, update, and edit the author of a WordPress post. All you need to know is where to look and which strategy is best suited to your particular situation and needs.
In this post, we’ll discuss some of the circumstances that might lead you to attribute a post to someone other than the original author. Then we’ll walk you through five different ways to do so, and explain when to use each method. Let’s get started!
Why You Might Need to Change a Post’s Author in WordPress
While this may seem like a rarely-needed task, changing a post’s author in WordPress may be necessary in a variety of different situations. This is especially true if you run a large, multi-author content hub.
Many content-heavy sites with more than one author consider posts the property of the publication, rather than individuals. If a writer chooses to leave your site for any reason, you may want to change their posts’ author to the name of a content creator who is still associated with your site.
Similarly, a change in user status may warrant updates to a post’s author. If your screening process involves initially publishing posts under an editor’s name, but you eventually decide to bring the writer on board, you might want to attribute the posts to their creator after the fact.
In other cases, you may want to remove or hide author names altogether. This can give your site a more cohesive identity, as your posts will appear to come from a single source. Plus, single-author sites can benefit from less-cluttered looking posts when the author names are invisible.
Finally, there may be times when you need to change an author’s display name in WordPress. Whether they have undergone a name change, wish to publish their posts under a pen name, or something else entirely, this is a courteous way to respect your authors’ preferences regarding how they’re presented online.
As you can see, the need to change a post’s author in WordPress comes up more frequently than you might expect. Learning how to address all of these situations will help your site run smoothly, and better equip you to maintain its identity and presentation.
How to Change the Author of a Post in WordPress (5 Methods)
Just as there are many reasons you may need to change a post’s author in WordPress, there are also many ways to accomplish the task. Below we’ll cover five methods and discuss the situations they’re each best suited to.
If you like, you can use the following links to jump directly to the section you’re most interested in:
- Change a post’s author to another existing user
- Add a new author and assign existing posts to them
- Remove or hide the author name on your WordPress posts
- Update an author’s display name in WordPress
- Bulk change post authors on your site
If you’re using the new WordPress Block Editor, changing a published post’s author couldn’t be easier. First, access the post by navigating to Posts > All Posts and clicking on the relevant title.
In the post editor, select the Document tab in the sidebar. Under the Status & Visibility heading, you should see Author followed by a drop-down menu:
From here, you can select the name of any author with an existing account on your WordPress site. It’s important to note that you cannot create a new author from this screen – we’ll cover how to do that later in this post.
Once you’ve selected the new author’s name from the drop-down menu, select Update to make the change live:
If you’re still using the Classic Editor, the process will look a little different. First, you’ll need to expand the Screen Options menu above the editor:
Under Boxes, select the checkbox next to Author:
Then scroll down to the bottom of the editor. Here, you’ll see that there’s now a drop-down menu similar to the one in the Block Editor:
Select the name of the post’s new author, and then click on the Update button to make it official:
Regardless of which editor you use, you can also change a post’s author using the Quick Edit function in the Posts list. Simply select the Quick Edit option under the post’s title, and then choose the new author from the relevant drop-down menu and click on the Update button:
This method works well if you have a single post you need to reattribute because the original author left your site, or you otherwise have reason to credit a different existing user for the post. Changing a post’s author to a new user, on the other hand, will require a few extra steps.
2. Add a New Author and Assign Existing Posts to Them
In WordPress, you can only attribute a post to an existing author. In other words, there’s no way to create a new author for a post from either of the content editors.
So, let’s say you’re bringing in a new Contributor or Author, and you wish to more accurately attribute posts they’ve written that were published under the name of an Editor or Administrator. You’ll first need to create a user account for the new writer.
It’s worth noting that if you allow frontend user account creation, the post’s new author may already have an account. However, you’ll still need to follow these steps to give them the proper permissions, in order to credit them on their posts.
To handle this task, you’ll need Administrator status on your website. If you’re not a site Administrator, you’ll need to contact one to carry out these steps for you.
Then, navigate to the Users area of your WordPress dashboard. If you’re creating a new user, click on the Add New button at the top of the screen. If you’re editing a user’s permissions, you can simply select Edit beneath their username:
For new users, fill out the required fields and any others you wish to include. Make sure their role is set to Author or Contributor, depending on which is more appropriate:
To edit a user account created on the frontend, you can simply change their role by scrolling down to the relevant drop-down menu on the Edit User screen:
In either case, make sure to save your changes. Once the user has been added and has the proper role, you can attribute posts to them as described in the first method above.
3. Remove or Hide the Author Name on Your WordPress Posts
In some cases, it makes more sense to leave the authors’ names off of your WordPress posts. If you are the only author, removing the name eliminates redundancy and makes your posts less cluttered.
As for multi-author sites, leaving out authors’ names minimizes individuality on your site. You’ll present a more cohesive identity for your site and brand, which could be beneficial in business blogs where you want readers to see your content as originating from the company rather than specific writers.
There are two ways to go about hiding author names. To manually remove author information from your posts, you’ll need to edit your site’s theme. Navigate to Appearance > Customize in your dashboard, and then scroll down to the Additional CSS area of the Customizer:
In the field provided, you can add the following code:
/* Remove meta data */
.entry-meta .byline, .entry-meta .cat-links { display: none; }
.entry-meta .posted-on { display: none; }
If that doesn’t do the trick, you can also delete your theme’s metadata code. However, the location of this information varies from theme to theme. You may need to contact the theme’s creator in order to find it. Even then, editing theme files directly is always risky.
Instead, you might want to consider using a plugin that can remove metadata such as author names from your blog posts without touching a line of code. WP Meta and Date Remover is a sound option if you choose to take this route:
Once you’ve installed and activated the plugin, all you have to do is choose whether to hide meta information from the frontend, the back end, or both. Save the settings, and you’ll have a site that appears to be crafted by a single author, even if it isn’t.
4. Update an Author’s Display Name in WordPress
In some cases, what you really need is not to change a post’s author name. Rather, the user who wrote the post in question may simply wish for the posts attributed to them to display a different name than the one that’s currently listed.
This may occur in a variety of situations, including:
- If you want to display a full name instead of a username, to make your posts look more professional.
- When an author has legally changed their name and wants to update their posts to reflect that.
- Instances where an author has decided to use a new name for their posts on your site, in order to maintain consistency across content platforms or to differentiate between them.
- Cases in which you or an author wishes to use a pen name for their posts.
These scenarios warrant a change to the user’s account, rather than to the posts themselves. You can provide the instructions below to any user wishing to make a change to their name or follow these steps yourself for any other user’s account if you have Administrator status.
Access the user’s account settings, by navigating to Users in your WordPress dashboard. Under Name, you’ll see the author’s username as well as fields for their first, last, and nickname:
Fill in or change whichever of these fields you like (although you can’t change your username from this page. Here’s how you can change username.). Then, use the drop-down menu beside Display name publicly to select either the username, nickname, first, last, or full name.
Don’t forget to save your changes afterward. This will automatically change the author’s name on all of their posts, using the new display name instead. Often, updating the user’s profile can be the most efficient way to change a post’s author.
5. Bulk Change Post Authors on Your Site
Let’s say you have a situation similar to the one we described in Method #1, i.e. an author has left your site and you wish to reassign their posts to someone who still writes for you. However, instead of a single post, the ex-user has several.
While you could change the author for each individual post your previous contributor left behind, it’s much more efficient to use WordPress’ bulk editing capabilities. This way, you can change the name across all relevant posts with the click of a button.
To do this, navigate to your Posts list in WordPress and select the checkbox next to each of the posts you need to attribute to a new author. Then select Edit from the Bulk Actions drop-down menu:
This will open a window much like the one you see when using the Quick Edit function:
Select the appropriate name from the Author drop-down menu, and then click on the Update button. This will update the name of the author on all the posts you selected and make the changes live on your site:
As with the first method, this will only work if you’re attempting to attribute the posts to an existing author. If you want to add a new user to take over the former user’s posts, you’ll first need to follow the steps in Method #2 to create a new user account with the appropriate role.
Additionally, you can’t select multiple authors for the posts you’re bulk editing. So if you want to divide a former contributor’s posts among more than one user, you’ll need to bulk edit the relevant posts for each new author.
How to Change the Author Archive Slug in WordPress
Before we wrap things up, let’s talk about one more tangential aspect of changing authors in WordPress. Sometimes, instead of switching the actual author name, you might just want to change the author ‘slug’ that shows up in the URL for their archive page:
To do this, you can use a free plugin called Edit Author Slug. After installing and activating the plugin, head over to Users > All Users and open up the editing interface for the user you want to work with. Then, scroll to the bottom and find the Author Slug options:
Enter your desired author slug into the Custom box, and then click on Update User. The plugin will automatically update all links pointing to that author’s archive page, using the new slug.
You can also change the default base for your site’s author slug by going to Settings > Edit Author Slug. Enter your desired base into the Author Base box, and select Save Changes at the bottom of the page:
Just be aware that doing this will change every single author URL on your site. This could affect your Search Engine Optimization. As with any time you change your WordPress site’s URL structure, it’s a good idea to implement redirect rules if you change the default base author slug.
Need to reassign content to new users? Learn how to effectively change the authors of your blog posts, pages, and author slugs! 👨🏫🔜👩💻Click to Tweet
Summary
There are a variety of reasons why you may find yourself needing to change the author of a post in WordPress. There are also many ways to do so, which can present its own challenges. You’ll need to determine which method is the best choice for your situation.
To help you decide, we’ve looked at five different routes you can take to update an author’s name for one or more posts in WordPress:
- Change a post’s author to another existing user.
- Add a new author and assign existing posts to them.
- Remove or hide the author name from your WordPress posts.
- Update an author’s display name in WordPress.
- Bulk change post authors on your site.
Get all your applications, databases and WordPress sites online and under one roof. Our feature-packed, high-performance cloud platform includes:
- Easy setup and management in the MyKinsta dashboard
- 24/7 expert support
- The best Google Cloud Platform hardware and network, powered by Kubernetes for maximum scalability
- An enterprise-level Cloudflare integration for speed and security
- Global audience reach with up to 35 data centers and 275 PoPs worldwide
Test it yourself with $20 off your first month of Application Hosting or Database Hosting. Explore our plans or talk to sales to find your best fit.
[Ad_1]
Существует множество сценариев, в которых вам может потребоваться сменить автора публикации или страницы на вашем сайте WordPress. Возможно, вам придется сократить ссылки с автором в своем блоге, или, может быть, вы недавно обновили часть своего контента и хотите отдать дань уважения автору, который внес изменения.
Какой бы ни была причина, по которой вам нужно сменить автора публикации в WordPress, эта универсальная платформа включает несколько способов правильно атрибутировать контент вашего сайта.
Как только вы найдете наиболее подходящую настройку для вашей ситуации, изменить авторство статьи довольно просто.
В этом уроке я покажу вам пять различных способов сменить автора в WordPress. Давайте нырнем!
Метод 1. Измените автора отдельного сообщения на другого существующего пользователя в WordPress.
Сообщения и страницы в WordPress автоматически назначаются пользователям, которые их создают. Однако вы можете легко редактировать автора любого контента прямо из редактора.
Просто откройте Плакат в правой части редактора сообщений разверните Статус и видимость и введите имя пользователя нового автора в соответствующее поле:

Обязательно сохраните или обновите сообщение. Вы также можете добиться того же эффекта, используя Быстрое редактирование вариант на Сообщения экран:

Откройте быстрый редактор статьи, которую вы хотите отредактировать, и выберите пользователя, которому вы хотите назначить этот контент, в соответствующем раскрывающемся меню:

Затем нажмите Обновление. Обратите внимание, что для этого метода вы должны заменить автора существующим пользователем с ролью участника, автора, редактора или администратора.
Если вы хотите назначить сообщения новому пользователю, начните с перехода на Пользователи> Добавить. Заполните необходимую информацию (включая роль пользователя с соответствующими разрешениями), затем зарегистрируйте учетную запись и выполните указанные выше действия, чтобы предоставить этому пользователю авторство.
Метод 2: Массовое изменение авторов сообщений на существующего пользователя
Если вы хотите изменить автора нескольких сообщений, вы можете сделать это с помощью Массовые действия особенность на Сообщения экран. Установите флажок рядом с каждым фрагментом контента, который нужно отредактировать, а затем нажмите Массовые действия> Изменить:

После этого нажмите на Применять кнопка. Это откроет Массовое редактирование варианты, похожие на Быстрое редактирование параметры, которые я показал вам ранее:

Выберите нового автора в Автор раскрывающееся меню, а затем щелкните Обновление. Опять же, это решение работает только для существующих пользователей с соответствующими ролями.
Метод 3: назначьте автора для нового импортированного содержимого
При использовании Инструмент импорта WordPress (Outils> Импорт), вы можете изменить авторство статей, которые вы добавляете на свой сайт. После того, как вы загрузите XML-файл, содержащий ваш контент, вам будет предложено выбрать для него автора:

Вы можете либо импортировать автора, указанного в XML-файле, либо выбрать существующего автора на вашем сайте из раскрывающегося меню. Если вы выберете старую опцию, будет создана новая учетная запись с именем, которое вы вводите в текстовом поле здесь.
Метод 4: обновите отображаемое имя автора WordPress
В некоторых случаях вы можете захотеть сохранить сообщения, связанные с тем же пользователем, который их создал, но измените отображаемое имя, отображаемое во внешнем интерфейсе вашего сайта. Для этого перейдите в Utilisateurs в панели управления WordPress и выберите учетную запись автора.
На следующем экране прокрутите вниз Фaмилия раздел:

Имена пользователей не могут быть изменены, но вы можете добавлять имена, фамилии и псевдонимы для своих пользователей. Затем выберите тот, который вы хотите отображать на веб-интерфейсе, из «Показывать имя публично как» прокручиваемое меню:

Не забудьте сохранить изменения перед тем, как покинуть эту страницу. Имя автора будет автоматически обновляться во всех сообщениях, назначенных этому пользователю.
Метод 5: скрыть имена авторов в WordPress
Наконец, если управление авторством статей на вашем сайте не стоит хлопот, вы можете просто скрыть имена авторов во внешнем интерфейсе вашего сайта. Это также полезный вариант, если весь ваш контент готовит только один копирайтер. Удаление назначения устраняет избыточность.
Самый простой способ сделать это — использовать WP для удаления мета и дат соединять. Установите и активируйте этот инструмент, и он автоматически удалит имена авторов и даты публикации из ваших статей.
Например, вот «Hello, World!» » По умолчанию публиковать перед активацией WP Meta и Date Remover:

А вот тот же пост после активации плагина:

Вы также можете скрыть авторство статей, вручную удалив метаданные из тема вашего сайта. Однако я не рекомендую этот путь, если вы не умеете манипулировать кодом и использовать ребенок тема.
Заключение
Независимо от того, изменились ли вы в своей редакционной команде, недавно выполнили аудит контента или вам нужно управлять авторством статей в WordPress, у вас всегда под рукой есть простое решение. Платформа включает в себя все необходимое для правильной атрибуции контента.
В этом руководстве мы рассмотрели пять способов изменить автора в WordPress:
- Замените автора отдельного сообщения другим существующим пользователем в WordPress, используя настройки редактора блоков или Быстрое редактирование функциональность.
- Массовое изменение авторов сообщений на существующего пользователя с Массовые действия вариант на Сообщения экран.
- Назначьте импортированный контент новому или существующему пользователю с помощью инструмента импорта WordPress.
- Обновить отображаемое имя автора в Utilisateurs Настройки.
- Скрывайте имена авторов в WordPress с помощью плагина WP Meta and Date Remover.
У вас есть вопросы об авторстве постов и страниц в WordPress? Оставьте их нам в разделе комментариев ниже!
[Ad_2]
[Ad_1]
Существует множество сценариев, в которых вам может потребоваться сменить автора публикации или страницы на вашем сайте WordPress. Возможно, вам придется сократить ссылки с автором в своем блоге, или, может быть, вы недавно обновили часть своего контента и хотите отдать дань уважения автору, который внес изменения.
Какой бы ни была причина, по которой вам нужно сменить автора публикации в WordPress, эта универсальная платформа включает несколько способов правильно атрибутировать контент вашего сайта.
Как только вы найдете наиболее подходящую настройку для вашей ситуации, изменить авторство статьи довольно просто.
В этом уроке я покажу вам пять различных способов сменить автора в WordPress. Давайте нырнем!
Метод 1. Измените автора отдельного сообщения на другого существующего пользователя в WordPress.
Сообщения и страницы в WordPress автоматически назначаются пользователям, которые их создают. Однако вы можете легко редактировать автора любого контента прямо из редактора.
Просто откройте Плакат в правой части редактора сообщений разверните Статус и видимость и введите имя пользователя нового автора в соответствующее поле:
Обязательно сохраните или обновите сообщение. Вы также можете добиться того же эффекта, используя Быстрое редактирование вариант на Сообщения экран:
Откройте быстрый редактор статьи, которую вы хотите отредактировать, и выберите пользователя, которому вы хотите назначить этот контент, в соответствующем раскрывающемся меню:
Затем нажмите Обновление. Обратите внимание, что для этого метода вы должны заменить автора существующим пользователем с ролью участника, автора, редактора или администратора.
Если вы хотите назначить сообщения новому пользователю, начните с перехода на Пользователи> Добавить. Заполните необходимую информацию (включая роль пользователя с соответствующими разрешениями), затем зарегистрируйте учетную запись и выполните указанные выше действия, чтобы предоставить этому пользователю авторство.
Метод 2: Массовое изменение авторов сообщений на существующего пользователя
Если вы хотите изменить автора нескольких сообщений, вы можете сделать это с помощью Массовые действия особенность на Сообщения экран. Установите флажок рядом с каждым фрагментом контента, который нужно отредактировать, а затем нажмите Массовые действия> Изменить:
После этого нажмите на Применять кнопка. Это откроет Массовое редактирование варианты, похожие на Быстрое редактирование параметры, которые я показал вам ранее:
Выберите нового автора в Автор раскрывающееся меню, а затем щелкните Обновление. Опять же, это решение работает только для существующих пользователей с соответствующими ролями.
Метод 3: назначьте автора для нового импортированного содержимого
При использовании Инструмент импорта WordPress (Outils> Импорт), вы можете изменить авторство статей, которые вы добавляете на свой сайт. После того, как вы загрузите XML-файл, содержащий ваш контент, вам будет предложено выбрать для него автора:
Вы можете либо импортировать автора, указанного в XML-файле, либо выбрать существующего автора на вашем сайте из раскрывающегося меню. Если вы выберете старую опцию, будет создана новая учетная запись с именем, которое вы вводите в текстовом поле здесь.
Метод 4: обновите отображаемое имя автора WordPress
В некоторых случаях вы можете захотеть сохранить сообщения, связанные с тем же пользователем, который их создал, но измените отображаемое имя, отображаемое во внешнем интерфейсе вашего сайта. Для этого перейдите в Utilisateurs в панели управления WordPress и выберите учетную запись автора.
На следующем экране прокрутите вниз Фaмилия раздел:
Имена пользователей не могут быть изменены, но вы можете добавлять имена, фамилии и псевдонимы для своих пользователей. Затем выберите тот, который вы хотите отображать на веб-интерфейсе, из «Показывать имя публично как» прокручиваемое меню:
Не забудьте сохранить изменения перед тем, как покинуть эту страницу. Имя автора будет автоматически обновляться во всех сообщениях, назначенных этому пользователю.
Метод 5: скрыть имена авторов в WordPress
Наконец, если управление авторством статей на вашем сайте не стоит хлопот, вы можете просто скрыть имена авторов во внешнем интерфейсе вашего сайта. Это также полезный вариант, если весь ваш контент готовит только один копирайтер. Удаление назначения устраняет избыточность.
Самый простой способ сделать это — использовать WP для удаления мета и дат соединять. Установите и активируйте этот инструмент, и он автоматически удалит имена авторов и даты публикации из ваших статей.
Например, вот «Hello, World!» » По умолчанию публиковать перед активацией WP Meta и Date Remover:
А вот тот же пост после активации плагина:
Вы также можете скрыть авторство статей, вручную удалив метаданные из тема вашего сайта. Однако я не рекомендую этот путь, если вы не умеете манипулировать кодом и использовать ребенок тема.
Заключение
Независимо от того, изменились ли вы в своей редакционной команде, недавно выполнили аудит контента или вам нужно управлять авторством статей в WordPress, у вас всегда под рукой есть простое решение. Платформа включает в себя все необходимое для правильной атрибуции контента.
В этом руководстве мы рассмотрели пять способов изменить автора в WordPress:
- Замените автора отдельного сообщения другим существующим пользователем в WordPress, используя настройки редактора блоков или Быстрое редактирование функциональность.
- Массовое изменение авторов сообщений на существующего пользователя с Массовые действия вариант на Сообщения экран.
- Назначьте импортированный контент новому или существующему пользователю с помощью инструмента импорта WordPress.
- Обновить отображаемое имя автора в Utilisateurs Настройки.
- Скрывайте имена авторов в WordPress с помощью плагина WP Meta and Date Remover.
У вас есть вопросы об авторстве постов и страниц в WordPress? Оставьте их нам в разделе комментариев ниже!
[Ad_2]


Вы можете сменить авторов поста всего в два клика.
Более того, он не требует установки каких-либо новых плагинов и работает одинаково для черновиков и опубликованных сообщений.
Однако возможность смены авторов может быть скрыта на вашем сайте.
Из этого туториала Вы узнаете, как изменить авторов постов и получить эту возможность, если она в настоящее время скрыта.
Первым делом нужно посетить редактора поста.
Оказавшись там, вы должны увидеть параметр «Выбор автора» на панели «Статус и видимость».
Используйте раскрывающийся список, чтобы выбрать нового автора и обновить сообщение, чтобы сохранить изменения.
Вы также можете изменить автора с помощью параметров быстрого редактирования в меню «Сообщения».
Вы также можете массово обновлять сообщения здесь и менять автора сразу для 20+ сообщений.
Конечно, вы можете читать эту статью в первую очередь потому, что ваш сайт не отображает эти параметры. Вот как это исправить.
Как исправить отсутствующий вариант
Если вы не видите параметр «Выбор автора» в редакторе сообщений, это значит, что на вашем сайте нет двух или более пользователей с ролью участника или выше.
Давайте разберемся с этим.
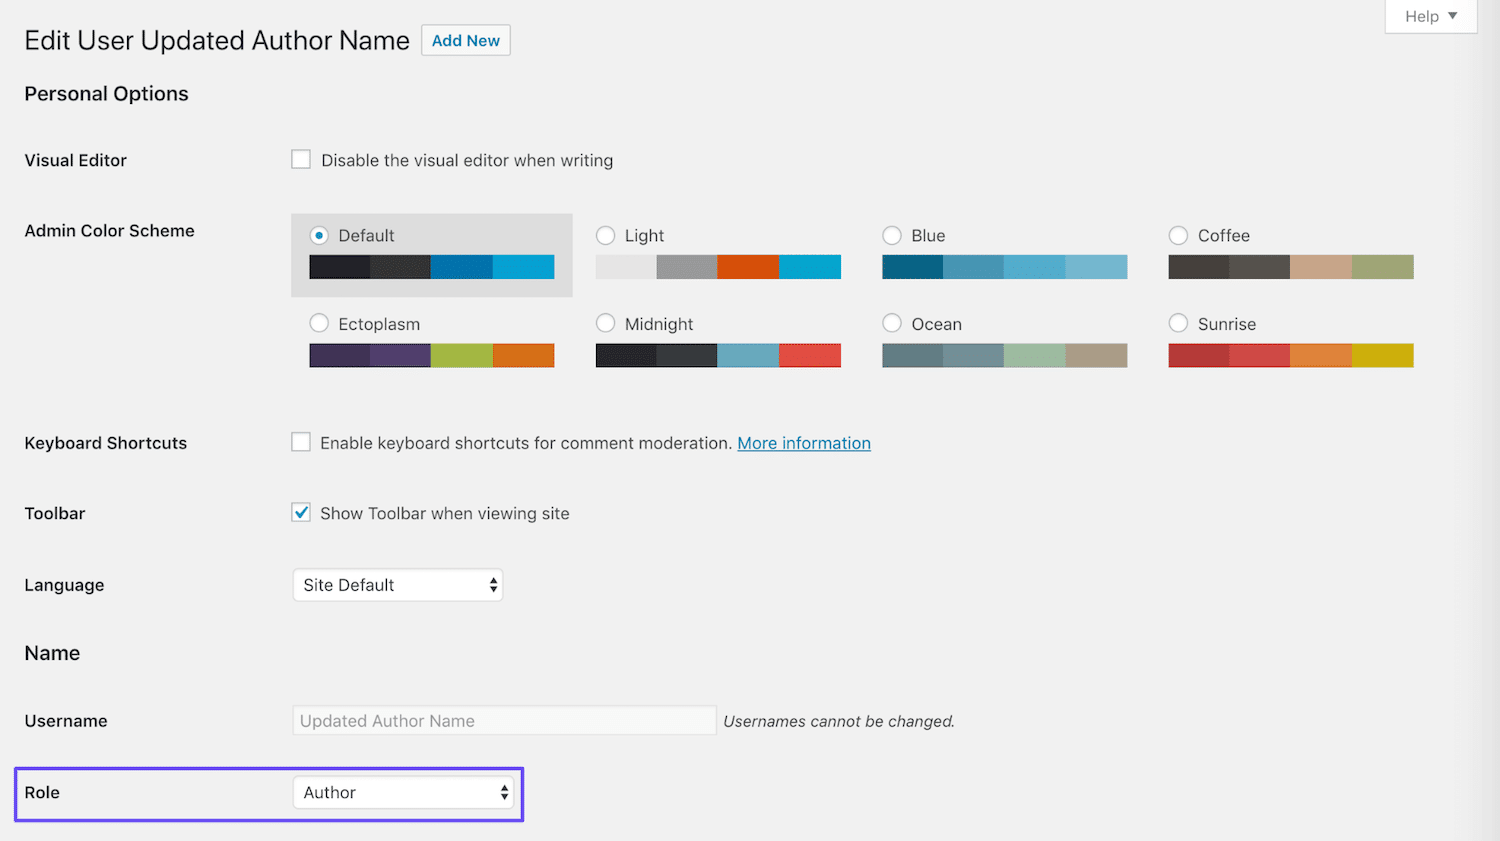
Зайдите в меню «Пользователи» и щелкните пользователя, которому вы хотите присвоить публикацию.
На странице профиля пользователя прокрутите вниз, пока не увидите параметр «Роль» в разделе «Имя».
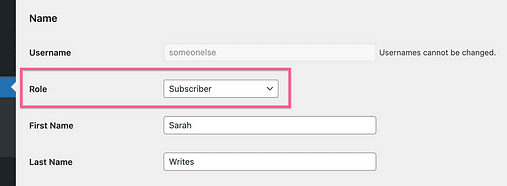
Роли используются для предоставления пользователям различных разрешений на сайте. Роли по умолчанию:
- Подписчик
- Автор
- Автор
- Администратор
Если вы не можете назначить пользователя автором сообщения, скорее всего, его роль установлена на «Подписчик».
Подписчики могут авторизоваться на вашем сайте, но не более того. Эта роль хороша, если у вас есть членский сайт или частный контент, и вы хотите, чтобы люди входили в систему для доступа к нему.
Роль «Участник» позволяет пользователю писать и отправлять сообщения, в то время как роль «Автор» требуется для фактической публикации контента на сайте. Соавторы и авторы могут работать только над своими собственными сообщениями, в то время как роль редактора позволяет пользователю редактировать и публиковать сообщения других. Только администраторы могут устанавливать плагины и темы.
Дайте этому пользователю роль Участника или выше, чтобы он мог выступать в качестве автора, и нажмите кнопку сохранения внизу страницы.

Не давайте никому роль администратора, если вы полностью им не доверяете.
После того, как вы внесете это изменение, возможность выбрать нового автора сразу же появится в редакторе сообщений.
Обязательно сохраните сообщение после смены авторов, и все готово.
Легкое редактирование автора
Я надеюсь, что вы узнали несколько новых вещей о WordPress в этом руководстве.
Если вам понравилось узнавать больше о WordPress, вам также может понравиться наш бесплатный курс электронной почты.
Попробуйте 7-дневный курс электронной почты WordPress Mastery
В 7-дневном курсе вы узнаете много нового о производительности, дизайне и монетизации веб-сайтов. В итоге у вас должен быть более быстрый, привлекательный и прибыльный веб-сайт. И это бесплатно! Так почему бы не попробовать?
Спасибо за то, что прочитали это руководство о том, как изменить автора сообщения WordPress, и, пожалуйста, поделитесь им с кем-нибудь еще, если это помогло вам сегодня.
 Приветствую вас дорогие друзья и читатели блога blogibiznes.ru! Что-то уже давно я не писал статей по созданию сайта на движке Вордпресс. Надо исправляться и сегодня мы продолжим изучение админки WordPress. На этот раз разберемся с разделом “Пользователи” и узнаем, как изменить имя автора на блоге WordPress.
Напомню, что осуществить вход в админку Вордпресс можно по адресу http://ваш блог/wp-admin/.
Итак, заходим в админ-панель Вордпресс и в левом меню выбираем пункт “Пользователи” – “Все пользователи“. Перед нами откроется страница, на которой будет только один пользователь с именем admin.

Такое имя по умолчанию присваивается каждому администратору блога при установке движка и поэтому нам надо обязательно изменить login admin в WordPress, так как иначе потенциальному взломщику останется подобрать только пароль. Кстати, пароль тоже обязательно надо заменить более сложным, что мы сейчас и сделаем.
Чтобы отредактировать профиль любого пользователя, в данном случае администратора, щелкните мышью по его имени или по всплывающей под ним надписи “Редактировать“.
Мы попадаем на страницу настроек профиля администратора сайта. На нее можно также зайти, нажав на кнопку меню “Ваш профиль“.

Здесь можно отключить визуальный редактор при написании статей, выбрать голубую или серую цветовую схему отображения админки WordPress, назначить “горячие клавиши” для работы с комментариями и режим отображения Панели администратора, которая располагается под панелью вкладок браузера.
Далее заполняем поля Имя, Фамилия, Ник (обязательно) и выбираем из выпадающего списка какое имя пользователя отображать на блоге.
По умолчанию в поле Ник будет записано имя admin и только оно будет доступно для отображения на сайте в качестве автора статей и комментариев, поэтому на блоге будет писаться фраза “автор admin”. Понятное дело, если Вы хотите, чтобы читатели блога знали Вас по имени или у Вас популярный и раскрученный в Рунете ник, то ник администратора надо заменить. После этого в качестве автора блога будет отображаться Ваше имя или логин.
Такую замену надо произвести сразу после установки движка WordPress. Дело в том, что при замене имени автора, оно автоматически меняется только во всех статьях на блоге, а в старых комментариях остается неизменным. И тогда придется менять имя вручную в каждом ранее написанном Вами комменте. В следующих же комментариях, как и положено, будет отображаться Ваш новый ник администратора.
Далее заполняем поля E-mail (обязательно) и при желании Сайт и О себе. Если в поле Сайт Вы введете адрес блога, то Ваше имя на блоге будет отображаться как активная ссылка.
Теперь вводим и подтверждаем новый пароль, который будет использоваться для входа в админку WordPress. Пароль должен быть надежным (около 20 символов), ибо от этого во многом зависит безопасность Вашего блога. При выборе пароля используйте индикатор надежности и подсказку.
На этой странице мы все настройки произвели и теперь нажимаем кнопку “Обновить профиль“, чтобы они вступили в силу.
Но все же у нас остался не решенным вопрос: “как изменить Имя пользователя admin в WordPress?” Сделать это из админки блога нам не удастся и поэтому, как это осуществить я расскажу в следующий раз.
А пока разберем еще одну вкладку меню “Пользователи” – “Добавить“.

На открывшейся странице мы можем добавить новых пользователей и установить для них права, которые позволят им производить на сайте те или иные действия. Это может быть полезно, если Вы хотите, чтобы кто-то помогал Вам в наполнении и ведении блога. Для таких пользователей можно, например, назначить роль Автор.
Для создания нового пользователя надо просто заполнить все требуемые поля, по аналогии с настройкой профиля админа и нажать кнопку “Добавить нового пользователя“.
Ну, вот и все на сегодня. Мы рассмотрели раздел “Пользователи” в админ-панели блога. Узнали, как сменить имя автора статей и комментариев на блоге. Сделали еще один шаг на пути к усилению защиты блога, изменив пароль для входа в админку WordPress на более сложный.
А вот как изменить на Вордпресс логин пользователя admin я, как и обещал выше, расскажу в следующей статье. Это очень важный момент, поэтому, чтобы не пропустить, рекомендую подписаться на обновления блога blogibiznes.ru.
Понравилась статья? Нажимай на кнопки: