Вступление
Изменить оформление сайта, можно в файлах активной темы WordPress, а именно в файле под названием style.css. Это простой текстовой файл в расширении CSS. Переводится CSS как Cascading Style Sheets — каскадные таблицы стилей. Согласен, перевод мало о чем говорит. Какими способами можно редактировать CSS сайта WordPress пойдет речь далее.
С одной стороны CSS это расширение текстового файла. С другой стороны CSS это язык программирования, на котором пишется это файл. С третьей стороны CSS это свод правил для задания шрифта, цвета сайта, относительного расположения блоков сайта (влево, центр, право, отступы от верха и низа) и других представлений внешнего вида страниц сайта, которые в этом файле и прописаны.
Сразу замечу, файлы CSS могут иметь пугающие размеры, но в них нет ничего сложного. Это очень простые, хотя и разнообразные, правила, написанные в простом синтаксисе.
Я не собираюсь обучать основам CSS, это отлично делают на специальных сайтах. Нам понадобиться только справочник HTML: http://htmlbook.ru/.
Также замечу, что запоминать все правила CSS наизусть совершенно не обязательно. Достаточно понимать синтаксис написания правил CSS. Этого достаточно, чтобы редактировать файл CSS, да и справочник всегда поможет. Главное знать, что править и как править. Кроме справочника есть инструменты в браузерах, о них чуть ниже, которые позволяют редактировать CSS онлайн.
Где лежит файл style.css WordPress
Несколько прописных истин:
- Каждая тема WordPress имеет свой файл определяющий ее внешний вид.
- Редактирования файла style.css одной темы не затрагивает другие темы установленные на сайт;
- Перед редактированием любых файлов активной темы, сделайте резервную копию сайта, на случай фатальных ошибок редактирования и возвращения сайту рабочего состояния.
А лежит файл style.css WordPress в папке с темой (шаблоном) WP. Полный адрес, одинаков для всех тем: wp-content/themes/название_темы/style.css.
Три способа редактировать CSS сайта WordPress
Предложу три варианта редактирования файла style.css.
Редактирование из панели администратора
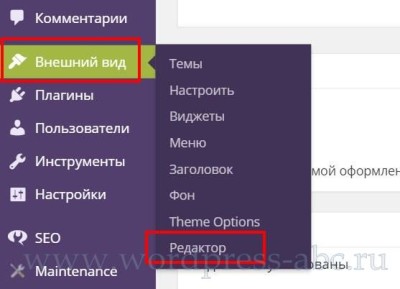
Вам, наверное, известно, что система WordPress имеет внутренний редактор файлов установленных тем. Войти в него можно из консоли сайта через вкладку: Внешний вид→Редактор.
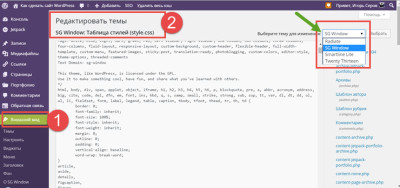
Справа вы видите список файлов темы, в поле редактора открывается содержимое файлов. Если у вас установлено несколько тем, обратите внимание на правый верхний угол. Там есть поле выбора темы. По умолчанию откроется активная тема, но редактировать можно любую установленную тему без её активации.
Совет: Ошибки в редактировании style.css не могут обрушить сайт, вы можете изуродовать только внешний вид. Поэтому, перед прямым редактированием из консоли можно обойтись без резервной копии сайта, достаточно сделать копию самого файла style.css и в случае неудачного редактирования вернуть файлу прежний вид.
Редактирование файла style.css по FTP
Говорят, что есть хостинги, которые не поддерживают редактирование файлов темы из административной панели сайта. Не беда. Можно и на самом деле это правильно, редактировать файл style.css по FTP. Правильно, потому что безопасно и у вас всегда есть оригинальная копия файла.
- Входите в каталог сайта по FTP;
- Добираетесь до wp-content/themes/название_темы/style.css и копируете его на компьютер;
- Далее редактируете его в текстовом редакторе типа Notepad++, сохраняете, оставляя оригинальную копию, и заливаете обратно в каталог. Согласен, немного дольше, но безопаснее и удобнее. Можно спокойно почитать файл и не спеша разобраться с его синтаксисом.
Оба способа редактирования относятся к прямому редактированию, «живого» файла активной темы. У прямого редактирования есть большой недостаток: при обновлении темы все ваши изменения потеряются и тема примет исходный внешний вид. Чтобы этого избежать используется способ дочерней темы.
Дочерняя тема WordPress
Система WordPress позволяет создавать дочерние темы, для родительской активной темы. Дочерняя тема может полностью быть копией родительской темы или с помощью функции import, «забирать» и переопределять стиль родительской темы. То есть, после создания и активации темы наследницы редактируется файл style.css дочерней темы и изменения не пропадают после обновления шаблона. О дочерней теме я писал подробную статью: Зачем нужна дочерняя тема WordPress.
На этом принципе основан и третий способ редактирования стилей.
Редактирование файла style.css с помощью плагинов
Есть несколько плагинов для улучшения редактора файлов темы. Для редактирования стилей мне нравится плагин Jetpack. О плагине я писал подробную статью: Плагин Jetpack заменит 33 плагина WordPress. Плагин очень большой и для редактирования стилей темы нужно активировать модуль Custom CSS.
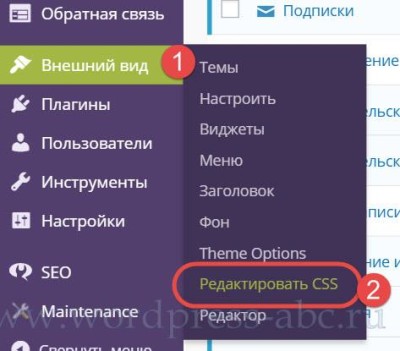
После его активации в меню консоли в пункте Внешний вид появляется вкладка «Редактировать CSS».
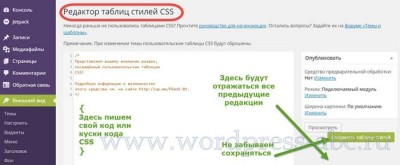
Теперь не нужно редактировать style.css напрямую, достаточно вписать кусок кода css в поле редактора и изменения появятся на сайте. Причем при обновлении темы они не потеряются.
Как понять, что нужно редактировать
Если вы бегло не читаете CSS нужно воспользоваться онлайн инструментами, для чтения CSS и понять, что нужно редактировать.
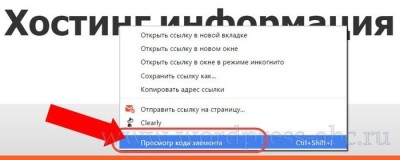
Самый простой инструмент, это инструмент в любом браузере: «Просмотр кода элемента» в Chrom. В других браузерах название похожее. Доступ к инструменту через правую кнопку мыши или короткими клавишами (Ctrl+Shift+I).
Показываю, как им пользоваться:
Например, хотим поменять заголовок сайта.
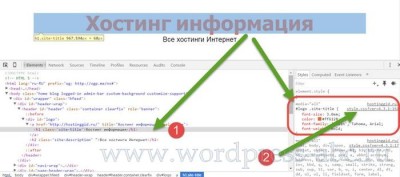
- Наводим на него мышь, через правую кнопку открываем «Код элемента»;
- Видим код HTML в правом поле и код CSS в левом поле;
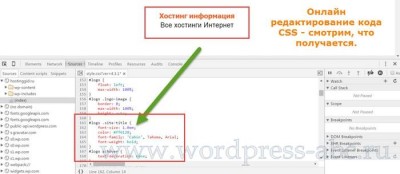
- Можно «наживую» поиграть с кодом CSS и сразу посмотреть, как это выглядит;
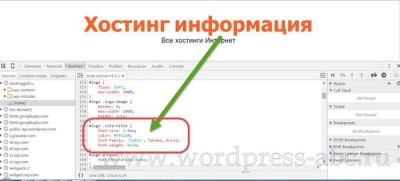
- Чтобы открыть CSS в основном поле, жмем на название файла CSS (на фото цифра 2).
Для примера, я поменял онлайн размер шрифта названия.
Но это еще не все.
- Нашли нужный кусок кода css;
- Копируем его;
- Переносим в текстовой редактор;
- Редактируем и переносим кусок кода в style.css дочерней темы или в поле редактора Jetpack.
- Таким образом, меняем любые стили активной темы.
Полезные ссылки
- Сервис проверки CSS от W3C (формат CSS3): http://jigsaw.w3.org/css-validator/
- Сервис сжатия CSS файлов: 15 Сервисов сжатия CSS файлов.
©www.wordpress-abc.ru
Другие статьи раздела: CMS WordPress
Похожие посты:
Эта функция доступна для сайтов с тарифными планами WordPress.com Premium, Business и eCommerce. Если на вашем сайте действует один из устаревших тарифных планов, этот раздел доступен для плана Pro.
Внешний вид сайта на WordPress.com можно настроить с помощью редактора CSS. Он позволяет добавить ваши собственные стили CSS, которые могут заменить стандартные стили вашей темы.
Содержание
Доступ к редактору CSS
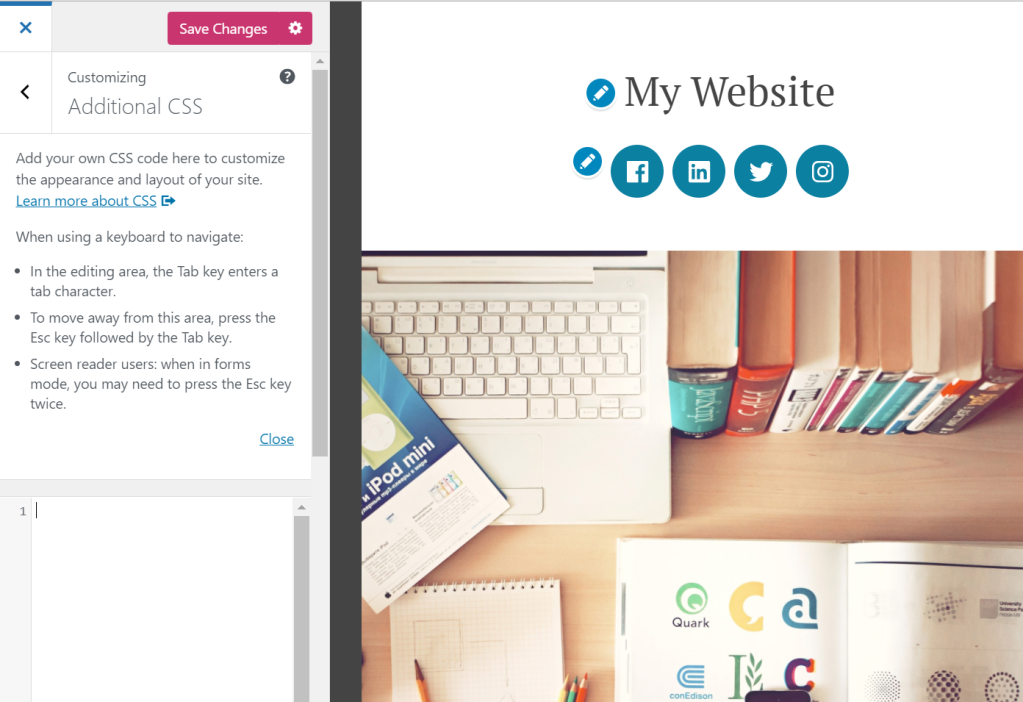
Чтобы открыть редактор CSS, перейдите в раздел Внешний вид → Настроить → Дополнительные CSS:
Предварительный просмотр и сохранение
При добавлении кода CSS на сайт внесённые изменения будут отображаться в окне предварительного просмотра сайта справа, однако они вступят в силу только после нажатия кнопки Сохранить изменения.
Редакции CSS
Сохраняются последние 25 версий CSS. Доступ к ним можно получить, нажав кнопку Посмотреть полную историю в нижней части редактора CSS. Если эта опция не отображается, это говорит о том, что история версий CSS для восстановления отсутствует.

Изменение тем
CSS привязаны к конкретной теме, поэтому большинство из ваших CSS переходят в новую версию, если вы меняете темы. Чтобы просмотреть или восстановить предыдущие CSS, воспользуйтесь ссылкой Редакции CSS.
О CSS
Аббревиатура CSS расшифровывается как Cascading Style Sheets (каскадные таблицы стилей). Это язык разметки, который контролирует внешний вид HTML-элементов на веб-странице. Возможности использования CSS для изменения дизайна веб-сайта практически безграничны, что подтверждает очень популярный проект CSS Zen Garden, который представляет собой презентацию возможностей CSS по изменению внешнего вида отдельно взятого HTML-файла.
Чтобы воспользоваться этой функцией по максимуму, необходимо знать, как работает CSS и HTML, или, по крайней мере, желание учиться. Дополнительные сведения см. в разделе Справка по CSS ниже на этой странице.
Если вы хотите настроить одну из множества тем WordPress.com, но не заинтересованы самостоятельно изучать CSS, мы рекомендуем вам привлечь дизайнера.
Справка по CSS
Если вы только начинаете, вам придется запастись терпением, но CSS — это очень ценный навык, который вам не раз пригодится. В сети есть МНОЖЕСТВО прекрасных ресурсов, которые помогут вам узнать больше о HTML и CSS. Эта полезная серия статей по CSS является хорошей отправной точкой:
- Введение в CSS, или Как заставить страницы выглядеть так, как вам нравится
- Введение в CSS: поиск средств выбора CSS
- Введение в CSS: предварительный просмотр изменений на панели соответствующего правила
Вот несколько советов:
- ИспользуйтеСредство проверки допустимости CSS.
- Воспользуйтесь инструментальными средствами разработки вашего браузера. Для Firefox используйте Инструментальные средства разработки Firefox. Для Google Chrome используйте Инструментальные средства разработки. Для начала посмотрите наши вводные видеоролики по Инструментальным средствам разработки, встроенным в Firefox, Chrome, Safari и Internet Explorer.
Обучающие материалы
- Руководство для новичков CSS Beginner Tutorial от HTML Dog
- Основы CSS от FreeCodeCamp
Дополнительные средства управления CSS
Ширина медиа
Эту опцию следует использовать в том случае, если вы изменили ширину основной области контента с помощью пользовательских CSS. Параметр «Ширина медиа» используется в качестве размера по умолчанию для полноразмерных изображений, когда их вставляют на сайт. Обратите внимание, что он не повлияет на размер некоторых изображений, которые были добавлены до изменения настроек, независимо от того, как они были вставлены, и вам, возможно, придется вставить некоторые из них повторно после изменения настроек.
Начать с чистого листа
По умолчанию пользовательские CSS, которые вы добавляете в редактор CSS, будут загружены после исходных CSS темы, что означает то, что ваши правила могут иметь приоритет и заменять стили темы.
Вы можете полностью отключить исходные CSS темы, выбрав опцию Не использовать исходные CSS темы. Это позволит использовать любую тему WordPress.com в качестве чистого холста для создания дизайна с помощью CSS.Это дополнительная опция, которую следует использовать только в том случае, если вы хотите начать все сначала и создать CSS для своей темы с нуля.
Если вы хотите использовать существующие правила CSS, что является рекомендуемым и наиболее распространённым вариантом, этот параметр можно не включать.
Если вы ищете исходные CSS темы, чтобы использовать их в качестве ориентира, лучше всего использовать инструменты браузера. Большинство современных браузеров имеют встроенный веб-инспектор. Чтобы просмотреть HTML-код элемента и связанных с ним стилей CSS, щёлкните элемент правой кнопкой мыши и выберите опцию «Просмотреть код элемента». Два популярных инструмента для просмотра CSS — это Инструментальные средства разработки Firefox и Инструментальные средства разработки Chrome. Для начала вы можете ознакомиться со страницей поддержки, на которой представлены краткие скринкасты о том, как найти CSS по своей теме с помощью встроенных в браузеры инструментов веб-разработчика.
Препроцессор
WordPress.com поддерживает средства предварительной обработки CSS LESS и Sass (SCSS Syntax). Это дополнительная опция для пользователей, которые желают воспользоваться такими расширениями CSS, как переменные и примеси. Дополнительные сведения см. на сайтах LESS и Sass.
Часто задаваемые вопросы
Могу ли я удалить ссылки, например «Блог на WordPress.com», тему, шрифт или ссылки на панель инструментов?
Все пользователи WordPress.com должны иметь доступ к панели инструментов (тёмная панель, которая появляется в верхней части сайтов WordPress.com после входа в систему). Клиенты, имеющие сайты с поддержкой плагинов, могут обратиться в службу поддержки, чтобы запросить удаление панели инструментов.
Пользователи WordPress.com могут выбрать различные варианты отображения подвала: от минималистичного логотипа WordPress.com до текстового описания, например «Сайт WordPress.com» или «Сайт работает на платформе WordPress.com». В некоторых планах ссылки в подвале можно скрыть. Дополнительную информацию см. в этом руководстве.
Стиль текста подвала (то есть цвета и размер шрифта) можно изменять как угодно, главное, чтобы его можно было прочитать. С помощью CSS в подвал можно добавить дополнительное содержимое, например уведомление об авторских правах.
Могу ли я использовать правила CSS, такие как @import и @font-face?
Да, но только на сайтах с поддержкой плагинов.
Могу ли я использовать веб-шрифты в CSS?
Чтобы настроить шрифты для сайта, выполните следующие действия. При работе с CSS ваш выбор ограничен двумя веб-шрифтами, имеющимися в распоряжении на стороне клиента. Однако с помощью сторонних плагинов можно добавить дополнительные шрифты.
Могу я загружать изображения для того, чтобы использовать их вместе с моими CSS?
Да. Вы можете загрузить изображение в свою библиотеку медиафайлов, затем разместить ссылку на него в виде прямого URL-адреса в своей таблице стилей CSS. Вот простой пример использования фонового изображения в таблице стилей.
div#content{
background-image: url('http://example.files.wordpress.com/1999/09/example.jpg');
}
Что произойдёт, если я откажусь от подписки на свой тарифный план WordPress.com?
Все платные услуги на WordPress.com продлеваются ежегодно. Если вы решите отменить свою подписку, то пользовательские CSS будут сохранены, однако перестанут применяться к вашему сайту. Если вы захотите снова их включить, оплатите подписку, и тогда стили применятся автоматически, но при условии, что вы не меняли темы. Если вы меняли темы, прошлые таблицы CSS можно найти по ссылке «Редакции CSS» над редактором на панели CSS.
WordPress relies heavily on the presentation styles within CSS. With the use of Themes, you have an almost infinite choice of layout options. WordPress Themes make it easy to change your website’s appearance, and open up the field to help you create your own Theme and page layout.
CSS stands for Cascading Style Sheets. It allows you to store style presentation information (like colors and layout) separate from your HTML structure. This allows precision control of your website layout and makes your pages faster and easier to update.
This article briefly describes the use of CSS in WordPress, and lists some references for further information. For information on CSS itself, see the CSS guide from MDN web docs or the CSS reference and tutorials from W3C.
WordPress and CSS
WordPress Themes use a combination of template files, template tags, and CSS files to generate your WordPress site’s look.
Template Files
Template files are the building blocks which come together to create your site. In the WordPress Theme structure, the header, sidebar, content, and footer are all contained within individual files. They join together to create your page.
For example, a theme can have a sidebar present in the multi-post view found on the front page, category, archives, and search pages on your site. Click on any post, you will be taken to the single post view and the sidebar will now be gone. You can choose which parts and pieces appear on your page, and customize them individually, allowing for a different header or sidebar to appear on all pages within a specific category. For a more extensive introduction to Templates, see the template files section in the Theme Developer Handbook.
Template Tags
Template tags are the bits of code which provide instructions and requests for information stored within the WordPress database. Some of these are highly configurable, allowing you to customize the date, time, lists, and other elements displayed on your website. You can learn more about template tags in the Template Tags section of the Theme Developer Handbook.
Stylesheet
The CSS file is where it all comes together. On every template file within your site there are HTML elements wrapped around your template tags and content. In the stylesheet within each Theme are rules to control the design and layout of each HTML element. Without these instructions, your page would simply look like a long typed page. With these instructions, you can move the theme parts around, making your header very long and filled with graphics or photographs, or simple and narrow. Your site can “float” in the middle of the viewer’s screen with space on the left and right, or stretch across the screen, filling the whole page. Your sidebar can be on the right or left, or even start midway down the page. How you style your page is up to you. But the instructions for styling are found in the style.css file within each Theme folder.
Custom CSS in WordPress
Starting with WordPress 4.7, you can now add custom CSS to your own theme from the Appearance Customize Screen, without the need for additional plugins or directly editing themes and child themes. Just choose the Additional CSS tab when customizing your current theme to get started!
Any CSS changes you make will appear in the preview, just like other changes made in the customizer, this means you have time to tweak and perfect the look of your site, without actually changing anything until you are happy with it all!
Keep in mind that the CSS changes are tied in with your theme. This means that if you change to a new theme, your custom CSS styles will no longer be active (of course, if you change back to your previous theme, they will once again be there).
Why use Custom CSS?
There are a few reasons why:
- If you modify a theme directly and it is updated, then your modifications may be lost. By using Custom CSS you will ensure that your modifications are preserved.
- Using Custom CSS can speed up development time.
- Custom CSS is loaded after the theme’s original CSS and thus allows overriding specific CSS statements, without having to write an entire CSS set from scratch.
WordPress Generated Classes
Several classes for aligning images and block elements (div, p, table etc.) were introduced in WordPress 2.5: aligncenter, alignleft and alignright. In addition the class alignnone is added to images that are not aligned, so they can be styled differently if needed.
The same classes are used to align images that have a caption (as of WordPress 2.6). Three additional CSS classes are needed for the captions, and one more for accessibility. Together, the classes are:
/* WordPress Core
-------------------------------------------------------------- */
.alignnone {
    margin: 5px 20px 20px 0;
}

.aligncenter,
div.aligncenter {
    display: block;
    margin: 5px auto 5px auto;
}

.alignright {
    float:right;
    margin: 5px 0 20px 20px;
}

.alignleft {
    float: left;
    margin: 5px 20px 20px 0;
}

a img.alignright {
    float: right;
    margin: 5px 0 20px 20px;
}

a img.alignnone {
    margin: 5px 20px 20px 0;
}

a img.alignleft {
    float: left;
    margin: 5px 20px 20px 0;
}

a img.aligncenter {
    display: block;
    margin-left: auto;
    margin-right: auto;
}

.wp-caption {
    background: #fff;
    border: 1px solid #f0f0f0;
    max-width: 96%; /* Image does not overflow the content area */
    padding: 5px 3px 10px;
    text-align: center;
}

.wp-caption.alignnone {
    margin: 5px 20px 20px 0;
}

.wp-caption.alignleft {
    margin: 5px 20px 20px 0;
}

.wp-caption.alignright {
    margin: 5px 0 20px 20px;
}

.wp-caption img {
    border: 0 none;
    height: auto;
    margin: 0;
    max-width: 98.5%;
    padding: 0;
    width: auto;
}

.wp-caption p.wp-caption-text {
    font-size: 11px;
    line-height: 17px;
    margin: 0;
    padding: 0 4px 5px;
}

/* Text meant only for screen readers. */
.screen-reader-text {
	border: 0;
	clip: rect(1px, 1px, 1px, 1px);
	clip-path: inset(50%);
	height: 1px;
	margin: -1px;
	overflow: hidden;
	padding: 0;
	position: absolute !important;
	width: 1px;
	word-wrap: normal !important; /* Many screen reader and browser combinations announce broken words as they would appear visually. */
}

.screen-reader-text:focus {
	background-color: #eee;
	clip: auto !important;
	clip-path: none;
	color: #444;
	display: block;
	font-size: 1em;
	height: auto;
	left: 5px;
	line-height: normal;
	padding: 15px 23px 14px;
	text-decoration: none;
	top: 5px;
	width: auto;
	z-index: 100000;
	/* Above WP toolbar. */
}
Each Theme should have these or similar styles in its style.css file to be able to display images and captions properly. The exact HTML elements and class and ID values will depend on the structure of the Theme you are using.
Templates and CSS
To help you understand more about how CSS works in relationship to your web page, you may wish to read some of the articles cited in these lists:
- Using Themes – There are also many advanced articles in this list.
- Theme Developer Handbook
WordPress Layout Help
If you are having some problems or questions about your WordPress Theme or layout, begin by checking the website of the Theme author to see if there is an upgrade or whether there are answers to your questions. Here are some other resources:
- Site Design and Layout – Comprehensive list of resources related to site design in WordPress.
- FAQ Layout and Design
CSS Resources
- Finding Your CSS Styles
- CSS Troubleshooting
- CSS Fixing Browser Bugs
- CSS Coding Standards
- CSS Shorthand
- Know Your Sources#CSS
- Conditional Comment CSS
- Validating a Website
Если сайт работает на WordPress, не всегда бывает легко подогнать элементы дизайна под свои нужды: у темы часто не хватает штатных настроек. Как это сделать с помощью CSS, я покажу на примере бесплатной темы своего блога.
Я не профессиональный верстальщик. Моя основная специальность – продвижение сайтов, однако мой опыт в веб-дизайне может оказаться полезным для всех, кто работает с WordPress.
От редакции. Обычно в «Текстерре» делается иначе. Специалист, хорошо знающий CSS и программирование для WordPress, решает такие проблемы за минуты. Но если нужно самому и по-быстрому, эмпирический подход тоже имеет право на жизнь.
Как работают CSS: немного теории
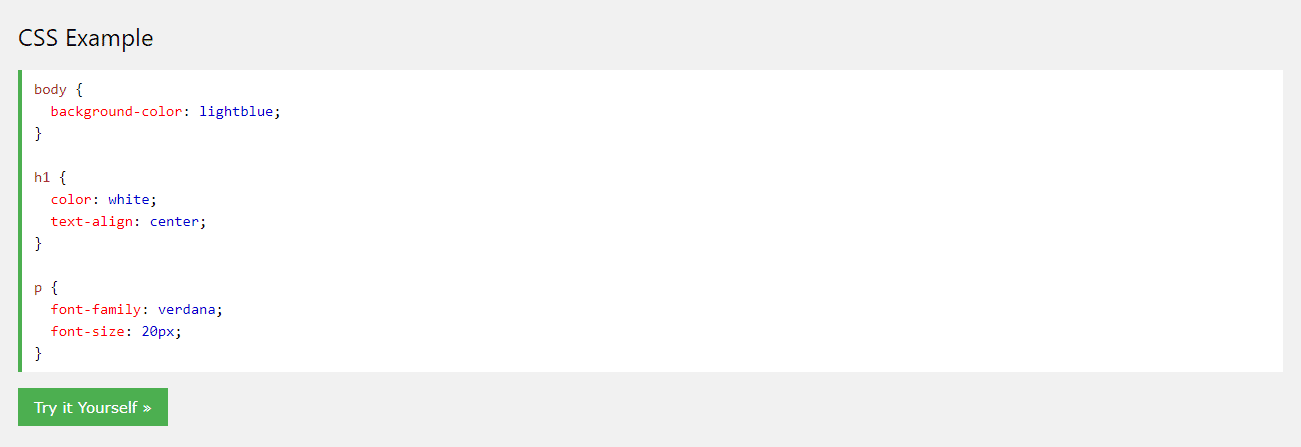
CSS или каскадные таблицы стилей (англ. Cascading Style Sheets) – это набор свойств на специальном языке, с помощью которых описываются типы шрифтов, вид элементов на страницах и правила экранной типографики.
Пример простого стиля
Стиль состоит из селектора и объявления.
	h1, h2, h3 {
	 margin-top: 25 px;
	 margin-bottom: 20 px;
	}
Здесь указано, какую ширину в пикселях имеют верхний и нижний отступ у заголовков h1, h2 и h3 внутри текста веб-страницы. Это вполне очевидно, хоть и по-английски. Как это выглядит на экране, понятно из скриншота.

Файл стилей, который мы будем пытаться изменить, легко отыскать в консоли движка в редакторе темы. Обычно он называется style.css. Идём в левое меню WordPress: Внешний вид → Редактор тем.

Файлов со стилями может быть несколько, но пока нас это не должно смущать – остановимся на главном, со стандартным названием style.css.
Какие бывают атрибуты CSS и за какие элементы дизайна они отвечают
В процессе настройки бывает нужно что-то изменить по мелочи: сдвинуть какой-то элемент, скрыть, поменять цвет или кегль шрифта. На первый взгляд это незначительные исправления, но результат сильно влияет на внешний вид сайта. Все это решается при помощи доработки CSS.
В CSS есть множество наборов различных свойств, и нет смысла перечислять их все. Если интересно, вы можете сами найти их в книгах и в интернете.
Чтобы было понятно, как это работает, рассмотрим несколько простых примеров свойств.
Отступ от верхнего края:
margin-top: 25 px
Все просто. Здесь задан отступ содержимого элемента от его верхнего края в 25 пикселей.
Размер шрифта:
font-size: 17 px
Здесь задан кегль экранного шрифта в 17 пикселей.
Ширина элемента:
width: 100%
Свойство задает относительную ширину элемента в 100 %;
Тем, кто знает английский, описания свойств должны быть интуитивно понятны. Если у вас проблемы с языком, имеет смысл начать с изучения технических терминов или пользоваться словарем.
Что делать, если у темы мало настроек дизайна
Что делать, если вы хотите подкорректировать размеры заголовков, отступы текста и изображений или убрать рамки у виджетов в сайдбаре, а в стандартном меню – только цвета и акценты? Даже если вы не специалист, можно попробовать самому.
Перед тем как приступать, нужно определить, какой именно элемент вы хотите изменить и найти его в консоли браузера. Для этого открываем страницу сайта, где расположен элемент, который требуется отредактировать.

Чтобы увидеть код страницы и получить доступ к редактированию элементов сайта в режиме реального времени, наберите комбинацию клавиш:
- Ctrl + Shift + I в Google Chrome, Opera;
- Ctrl + U в «Яндекс.Браузере», Microsoft Edge;
- Ctrl + Shift + C или F12 в Mozilla Firefox.
Выбираем мышкой нужный нам элемент сайта. Например, находим заголовок в тексте статьи и кликаем на нем правой кнопкой. Во всплывающем меню нажимаем «Просмотреть код». В консоли браузера должны быть открыты вкладки Elements и Styles.

Ищем в консоли нужные нам стили и их параметры. Пробуем изменить параметры и смотрим, к чему это приводит на странице в браузере.

Когда подберете нужное значение параметра, запишите его название в отдельном файле – оно понадобится в дальнейшем. Справа от его кода, во вкладке Styles, серым шрифтом написано имя файла стилей, который мы будем редактировать.

Названия селектора, параметра и файла со стилями нужно сохранить в отдельный файл. Чем больше изменений вы хотите внести в дизайн, тем больше будет у него строк.
Делаем резервную копию стилей
Вы нашли нужные стили и понимаете, что нужно поменять. Самое время сделать резервную копию. Прежде чем вносить какие-то изменения, я рекомендую скопировать начальное содержимое таблиц стилей в отдельные файлы, которые будут храниться у вас на локальном компьютере. Это необходимо для того, чтобы в случае ошибки быстро вернуть первоначальные настройки. Что для этого нужно (по шагам):
- Открыть в консоли WordPress редактор тем.
- Найти актуальную тему в перечне всех доступных на сайте и нажать «Выбрать».
- Использовать нужный файл со стилями.
- Создать на компьютере пустой документ — например, с помощью редактора Word — и скопировать туда из все содержимое стилей из панели управления сайтом.
Ищем стили в редакторе тем и выгружаем содержимое
Следующий этап – поиск селекторов, которые будем редактировать, и перенос содержимого в файл на локальном компьютере. Действуем как при создании резервной копии:
- Заходим в консоль WordPress. Выбираем в левом меню «Редактор тем».
- Выбираем нашу тему из перечня доступных и нажимаем «Выбрать».
- Находим справа нужный нам файл темы со стилями (название этого файла мы записали при поиске в браузере).
- Создаем пустой текстовый документ на локальном компьютере и копируем в него содержимое файла из WordPress.
Ищем и редактируем нужные стили CSS
Редактировать выбранные стили лучше в отдельном файле. На предыдущем шаге мы выгрузили код в отдельный файл. Я использую Microsoft Word. Вы можете взять любой другой текстовый редактор, который считаете удобным. Главное, чтобы у него была функция поиска фрагмента текста.
С помощью команды «Найти» выбираем в тексте селекторы, свойства которых хотим поменять. Сложность в том, что в одном файле стилей может оказаться много селекторов с похожими названиями. Поэтому внимательно сверяем найденный с тем, что был в консоли браузера.

Ищем внутри объявления селектора нужное свойство и меняем параметр.

Обновляем файл стилей, чистим кэш браузера и проверяем результат
Выделяем в нашем файле отредактированный текст щелчком правой кнопки на тексте, открываем меню и выбираем «Копировать».

Выделяем и удаляем все содержимое файла стилей в окне WordPress.

Копируем в пустое окно наш исправленный код при помощи сочетания клавиш Ctrl + V. Нажимаем «Обновить файл».

Когда все готово, заходим в настройки браузера и чистим кэш. Если этого не сделать, на экране отобразится содержимое сайта со старыми стилями.
Теперь можно обновить страницу, где мы смотрели код, и посмотреть изменения. Если что-то не устраивает, начинаем редактировать снова, пока не получится так, как надо.
Меняем ширину контейнера сайта
В современном веб-дизайне используется адаптивная верстка. Чтобы было удобно, на десктопных и мобильных устройствах одна и та же страница имеет разную ширину. Она как бы адаптируется к разрешению экрана.
За адаптивность отвечают каскадные таблицы стилей. В файле styles.css обычно задаются отдельные группы свойств для каждой ширины экрана. При этом используются так называемые контейнеры, отвечающие за ширину контента на экране.

Допустим, вам не нравится, что содержимое сайта растягивается слишком широко или, наоборот, он слишком узкий. Как это изменить в WordPress?
Пример:
Требуется изменить нашу тему так, чтобы ширина отображения на десктопах стала 970 px, на планшетах — 860 px, а контейнер мобильной версии трогать не нужно.
Решение:
Открываем в браузере страницу. Наводим курсор мыши на содержимое в середине, кликаем правой кнопкой и открываем консоль браузера командой «Просмотреть код».
Ищем в коде HTML-тег:
<div class="container"></div>
Все, что нас интересует – атрибуты width правила @media для контейнера. Не буду вдаваться в детали, но именно там задаются нужные настройки ширины. В нашем случае они будут храниться не в styles.css, а в другом файле с именем bootstrap.css. Увидеть это можно в консоли браузера.

Обратите внимание, что если сузить поле консоли браузера, то контейнер сайта растянется и значение @media изменится. Так работает адаптивная верстка.

Теперь стало видно, что контент в левой части налезает на кнопки социальных сетей. Это и есть главная причина, почему его нужно сделать уже.
Идем в редактор и копируем содержимое bootstrap.css в отдельный файл на локальный компьютер. Делаем резервную копию всех стилей.

Ищем в документе Word селектор container. Если верстка адаптивная, выпадет несколько результатов.

Нам надо изменить значение ширины. Ищем селектор контейнера с большим и средним диапазоном значений в пикселях. В нашем случае это выглядит так:
	@media (min-width: 992 px){
		 .container {
		 width: 970px;
		 }
		}
И так:
	@media (min-width: 1 200 px) {
		 .container {
		 width: 1170px;
		 }
		}
Если выставить другие значения width в каждой группе, в итоге получится такой код:
	@media (min-width: 992 px) {
		 .container {
		 width: 860px;
		 }
		}
И такой:
	@media (min-width: 1 200 px) {
		 .container {
		 width: 970px;
		 }
		}

Обновляем содержимое файла внутри WordPress, чистим кэш браузера, загружаем заново страницу сайта. Смотрим, как теперь выглядит контент.

Видим, что отображение содержимого сузилось и текст с картинкой не наезжает на кнопки соцсетей. Вы можете сами поэкспериментировать с шириной и выбрать для своего сайта ту, которая лучше смотрится.
Рекомендую задавать значения чуть меньше, чем максимальная ширина экрана, которую прописал разработчик. Это убережет вас от появления горизонтальной полосы прокрутки.
Заключение
С каскадными таблицами стилей, если вы не специалист, нужно быть аккуратным. Одно неосторожное изменение может вызвать совершенно неожиданный эффект. Чтобы лучше понимать происходящее, поищите информацию в интернете или спросите у знакомых веб-дизайнеров. Этот метод тоже работает 
Эта статья – не полное руководство, а простой, доступный любому способ «на коленке» внести небольшие косметические правки в дизайн блога на WordPress.
Вот общая методика в двух словах:
- Ставим задачу.
- Создаем бэкап файлов со стилями.
- Ищем нужный селектор, атрибут и название файла со стилями в консоли браузера.
- Вносим изменения в файл со стилями.
- Тестируем изменения на сайте и при необходимости повторяем цикл заново.
Берите на вооружение советы, делайте гипотезы и не бойтесь их самостоятельно проверять. И помните, что для успеха бизнеса мало иметь хороший сайт. Эту задачу решает комплексное продвижения в интернете, которым занимаются специалисты агентства «Текстерра».
Want to try editing WordPress CSS, but no idea where to start? With CSS styling, you can edit your site’s appearance globally or on certain pages. Add colors, space out certain elements, design a layout, and basically change exactly how anything in your WordPress theme looks.
If you want to get more familiar with WordPress’ development environment, or just have finer control over your website’s appearance, you’ll need to know how to add CSS in WordPress (plus how to change what’s already there).
By editing your theme and including additional CSS of your own, you’ll be able to optimize each and every visual element on your site. Today, we’ll take a closer look at it.
Ready to start? Let’s do it!
Prefer to watch the video version?
What Is CSS Editing?
CSS stands for Cascading Style Sheets and it’s the most popular web language besides HTML. The two of them go hand-in-hand, as CSS is used to style HTML elements. HTML lays the groundwork of a website’s appearance and CSS is used to further style it.
CSS gives you the ability to make a website responsive, add colors, change fonts, modify the layout, and in general fine-tune a website’s visual presentation. Like HTML and JavaScript, CSS is a frontend client-side language, which means it executes on the user’s end, rather than on the backend server.
When diving into WordPress development, HTML, CSS, JavaScript, and PHP are the languages you’ll need to know. This is what the core CMS is built in, as well as its many themes and plugins.
But even if you’re not a web designer or developer, it’s good to pick up a little CSS, as you can use it to move or style elements on your website, or make small aesthetic changes to your theme to better suit you.
Ready to give your #WordPress site a custom look & feel? 👀 Learn how to use CSS styling to edit colors 🎨, change the layout ✨ & moreClick to Tweet
WordPress and CSS
Within WordPress, CSS is a little bit different. It’s controlled by themes, which are made up of template files, template tags, and of course the CSS stylesheet. Though generated by your theme, all of these are editable by you.
Template files split parts of your website into sections (such as header.php or archive.php), and template tags are used to call on them and other content from your database. These files are actually made up of mostly PHP and HTML, though you could add CSS if you needed to.
What you’re really looking for is the stylesheet, or style.css. To change how your website looks, you’ll need to learn how to add and edit code in this file.
How to Customize Your WordPress Theme with CSS
If you want to customize your theme and change how your site looks with CSS, you’ll need to either add your own code or edit what’s already there. There are ways to add CSS without ever needing to touch any theme files but to change existing theme code, you’ll have to access your site’s stylesheet.
As you make these changes, there’s one thing you should know: when your theme updates, any edits you’ve made to style.css, functions.php, or other theme template files will be erased. In general, you shouldn’t be making direct changes to your website in the editor without using a child theme.
The stylesheet is like a “list of instructions” for your website, setting exactly how it’s styled and how the CSS code is handled. This is where you’ll do the bulk of your editing, but we’ll also show you how to access other theme template files, such as header.php and footer.php.
There are two ways to access your WordPress website’s stylesheet: through the WordPress dashboard or via an FTP client. We’ll cover both of them.
Not comfortable doing this yourself? Consider hiring a WordPress developer to handle that step for you.
Editing WordPress CSS in the Dashboard
The easiest and most convenient way to access your CSS stylesheet is right in the WordPress dashboard. No need to install FTP programs or code editors. You can directly edit any file with syntax highlighting and function documentation built in.
Before you do any major edits to core files, you should always backup your WordPress site. It’s very easy to accidentally make a mistake that could break your site’s appearance if you’re new to CSS, and it could be difficult to figure out how to revert your changes.
Once you’ve made a backup and a child theme, log in to your backend. You can find the editor by going to the menu and clicking Appearance > Theme Editor.
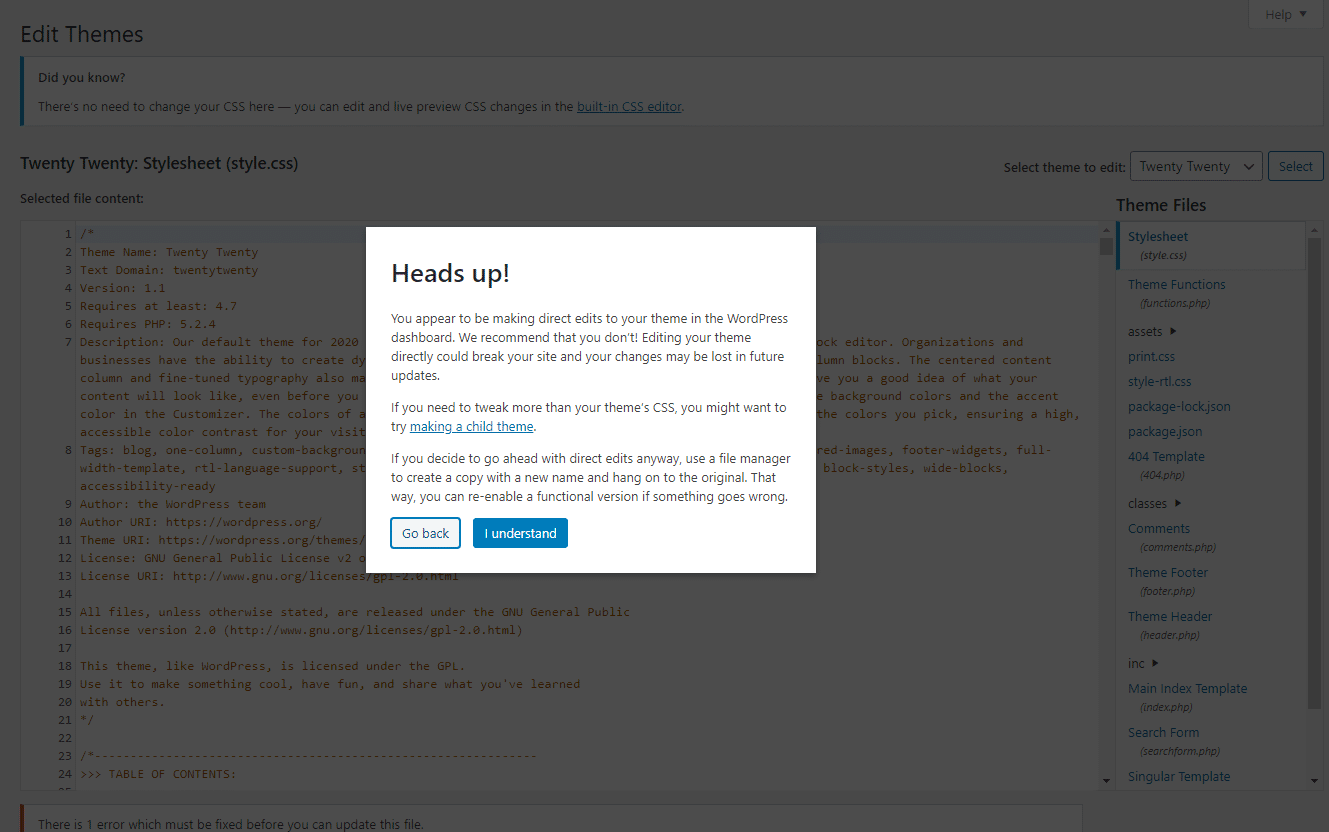
You should see a popup warning you against making direct edits to these files. Don’t worry, just click “I understand”. It’s only a warning to use a child theme and backup your website before you make any major changes. Follow those steps, and it’s safe to edit.
And now you’re in! You should be on the stylesheet by default but look to the menu on the right to view your theme files if not.
Besides style.css, you’ll also have access to template files like functions.php, header.php, and single.php. All of these affect how certain pages on your site act.
But you should familiarize yourself with PHP before diving into these particular files.
Just remember: most CSS changes you make here will be global. For instance, if you change your H1 headers to a certain font, it will take effect for every single page on your site. You’ll need to use special syntax to customize specific pages’ styling.
Edit Theme Files Directly
What if you can’t access the Theme Editor or prefer to do your work over FTP? It’s easier to use the backend editor, but some themes or plugins may disable it. If that’s the case, you’ll need to connect to your website through FTP.
FTP, or File Transfer Protocol, allows you to remotely access and modify a website’s files. The first thing you’ll need to do is download FileZilla or any other FTP client.
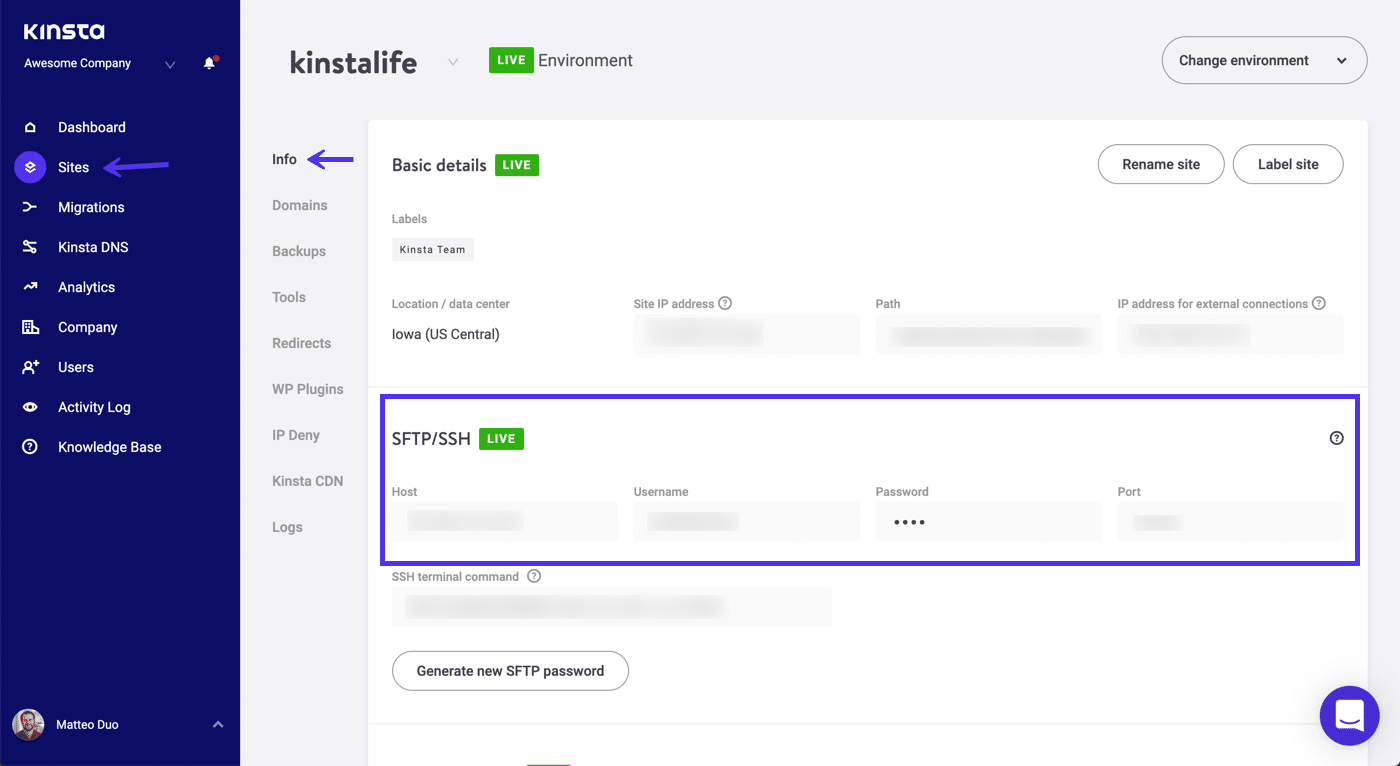
Next, you should contact your host and ask for your FTP credentials (host, port, and username/password if applicable). If your host has a dashboard, you might be able to find them by logging in.
Kinsta users’ credentials are located in the MyKinsta dashboard under Sites > SFTP/SSH.
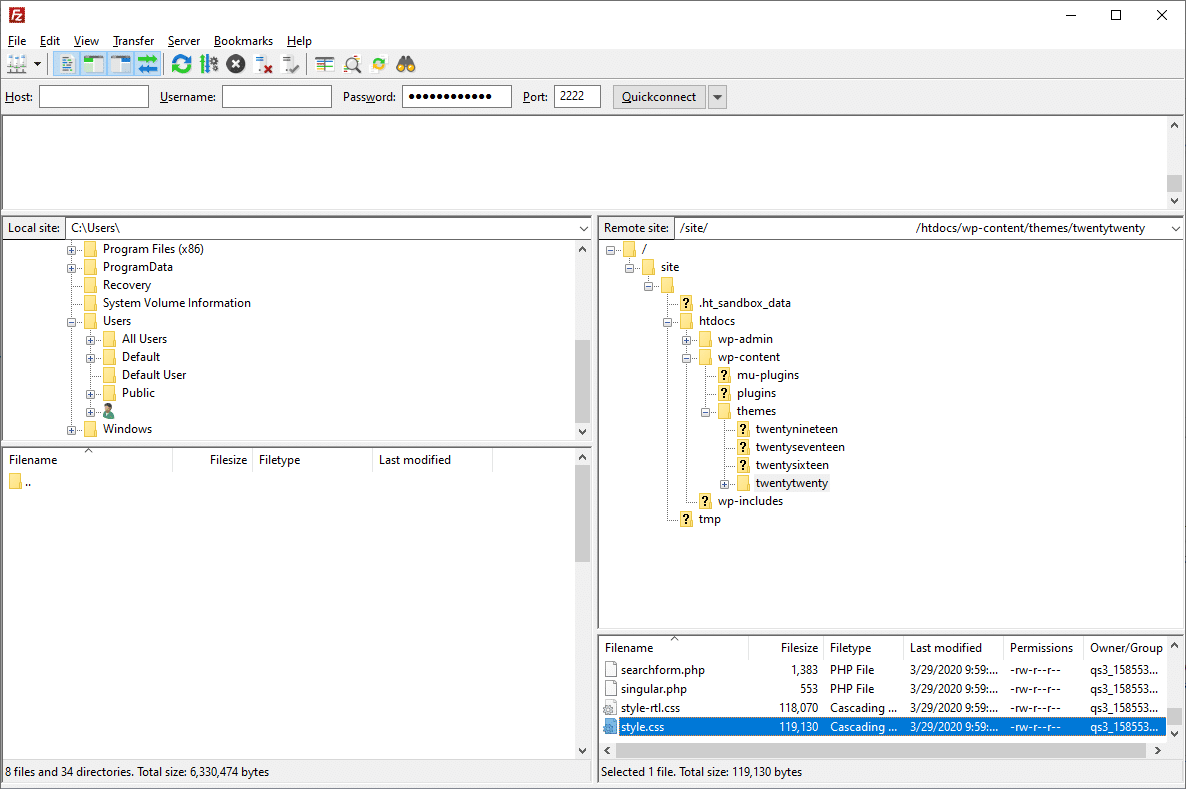
Once you have them, launch your FTP client and enter that information. If it doesn’t work, try putting “sftp://” before the URL in the Host section.
Once you’re in, you can find your style.css file by clicking the wp-content folder to open it, then your theme’s folder (like the Twenty Twenty theme), then scrolling until you see style.css.
Double click to open it (or right-click and select View/Edit) and make your modifications. Remember to save and upload back to the server.
If you need to edit other template files like home.php, single.php, archive.php, you can find them in the same folder as style.css.
Editing your theme files, whether through FTP or the dashboard, isn’t always necessary. In fact, it’s better to avoid doing it if you’re just adding some extra code.
For small additions, here’s the best way to add CSS to your WordPress site.
How to Add Custom CSS in WordPress
If you’re not looking to edit the existing CSS code, and just want to add your own styling instead, it’s strongly suggested to use one of the following methods: WordPress customizer or using a dedicated plugin.
For one, the CSS code added through one of these methods it’s a lot easier to access and use. You don’t need to worry about putting your new CSS in the wrong place or forgetting where you added it if you want to make modifications later.
Also, CSS added through one of these methods won’t be lost when your theme updates (though it may still disappear if you change themes).
This means you don’t need to use a child theme, and if something breaks, all you have to do is remove the CSS you just added.
Do note that you should still keep a backup of your website, as some people have reported occasionally losing their CSS during major updates. Still, this method is a lot more reliable than directly editing theme files.
While you can just add code to style.css and call it a day, if you don’t want to create a child theme, make major edits to existing CSS in your theme, and potentially end up with all your work erased, it’s best to either use the Additional CSS option in the WordPress customizer or install a plugin.
1. Editing CSS Through WordPress Customizer
Instead of using the Theme Editor, try this. Log in to your WordPress backend and click Appearance > Customize to open the theme customization screen. You’ll see a live preview of your website, with options on the left to customize elements like the colors, menus, or other widgets.
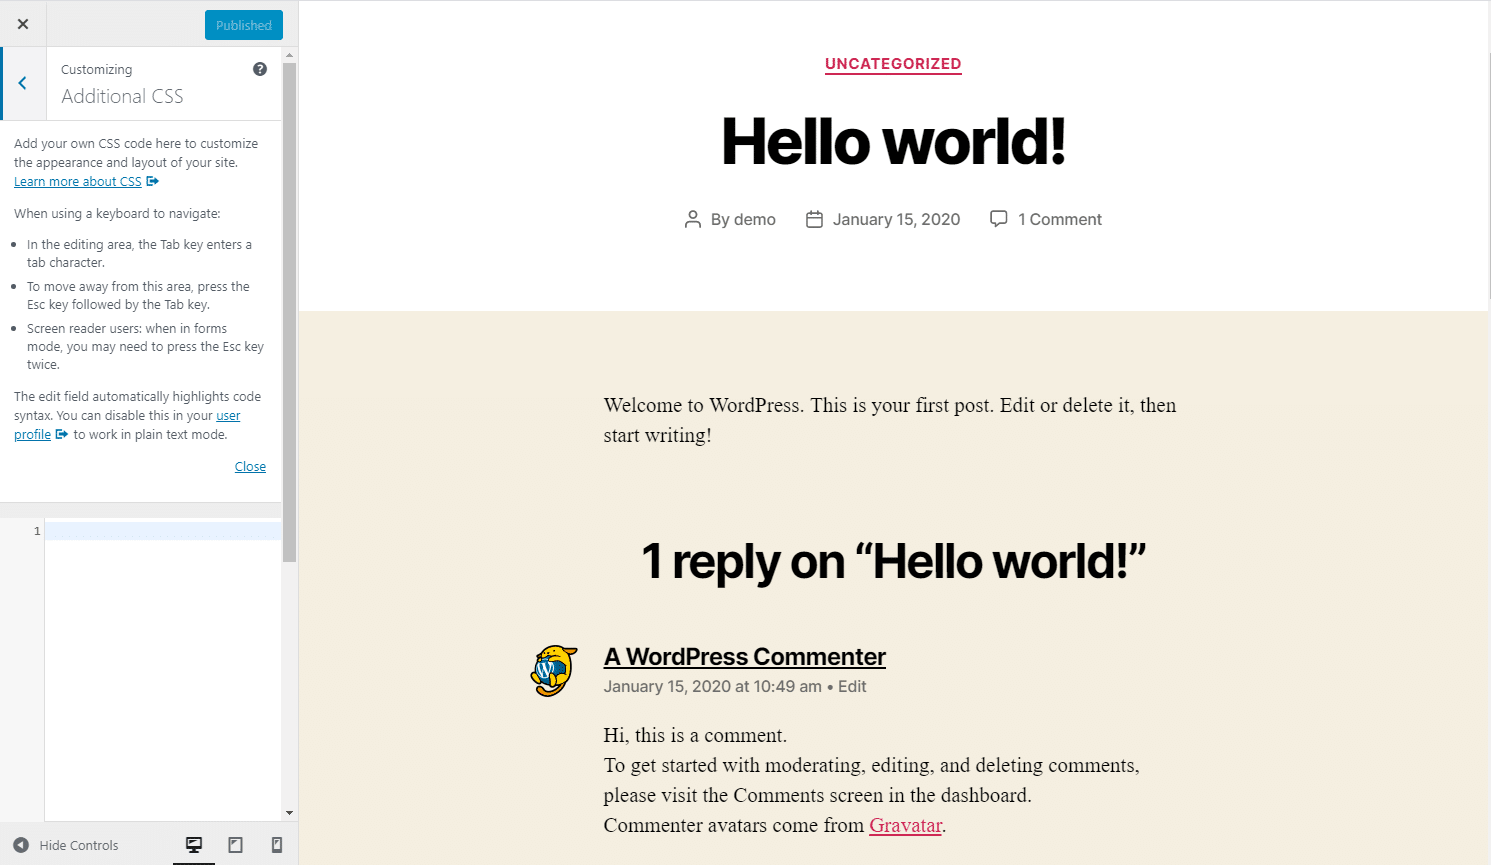
At the very bottom of this menu, you should find the Additional CSS box.
Click to open it. You’ll be taken to a new screen with a code input box and a few instructions. The Additional CSS screen includes syntax highlighting, just like the Theme Editor, along with validation that lets you know if your code is wrong.
Any code you write automatically appears in the preview area on the right unless it has an error (though you can choose to publish it anyway).
When you’re done working, you can publish your code, schedule when it will take effect, or save it as a draft to work on later. You can even get a preview link to share with others.
As you can see, the Additional CSS page is in many ways more powerful than the Theme Editor, and much more suited to adding code than messing with core files.
The CSS code you write here overwrites the default styling of your theme and it doesn’t disappear when your theme updates. If you can’t see it “live” on your preview, double-check you’re using the correct selectors in your CSS code.
Just like with the Theme Editor, CSS is global by default, but you can write code that targets specific pages.
The one downside is that, should you switch themes, anything you’ve written will be erased. Make sure to back up your CSS before moving to a new theme or you might end up losing a lot of work.
If you’re struggling to use this option, or want a solution that works across themes and can more easily target certain pages, you should try a plugin instead.
2. Adding Custom CSS to WordPress Using Plugins
There are a few reasons you might want to use a plugin to add CSS to WordPress. While the function is similar to the Additional CSS menu, styles will usually stick even if you switch/update themes.
You may also enjoy their UI more, or like the extra features like autocompletion. Some plugins even let you build CSS through dropdown menus, rather than having to write it yourself.
Simple Custom CSS
Simple Custom CSS is the most popular CSS editor plugin, due to its ease of use, minimal interface, and lightweight backend. In short, it’s a very small WordPress plugin that packs a big punch.
Setting up is a breeze and you’ll see no negative impact on performance. It works on any theme and includes syntax highlighting and error checking.
Simple Custom CSS and JS
Simple Custom CSS and JS is a good alternative. It also lets you target the header, footer, frontend, or even the admin backend.
SiteOrigin CSS
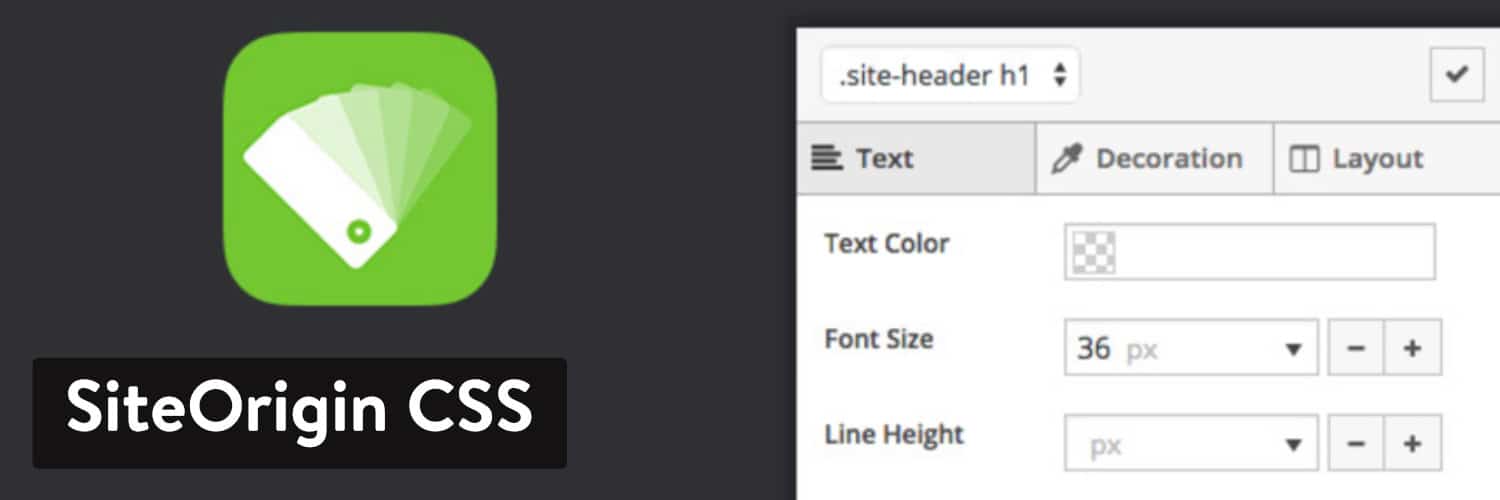
SiteOrigin CSS is another option that also includes a traditional CSS editor. You’re able to switch between it and the visual editor at any time.
WP Add Custom CSS
If you’re struggling to add CSS to specific pages, WP Add Custom CSS adds a custom CSS box to the editing screen, and also comes with global styling.
CSS Hero
You may also want to consider trying a visual CSS editor. These take all the complicated coding and turn it into a series of easy-to-use input fields and dropdown menus which handle all the programming for you.
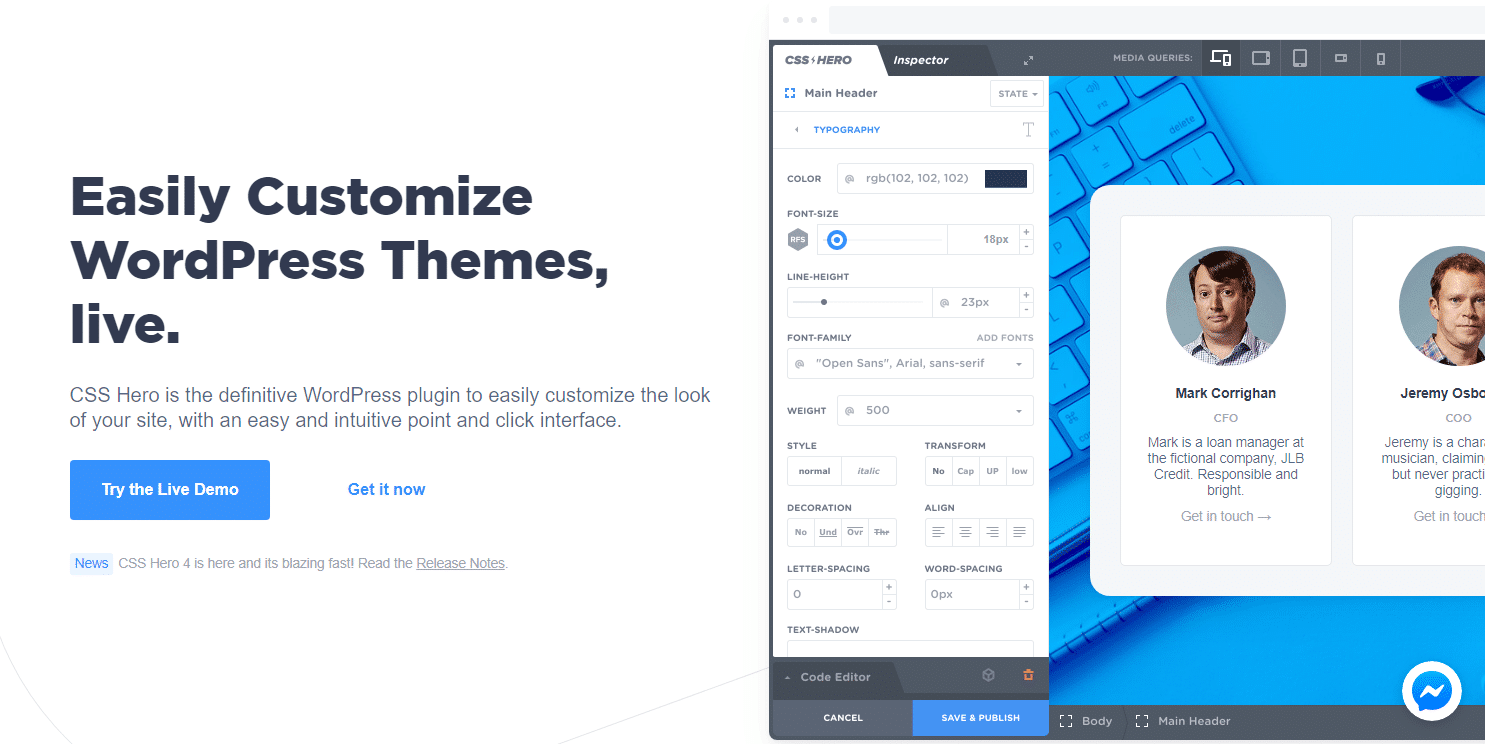
CSS Hero is a premium visual editing plugin with some seriously powerful features (animation, device-specific edits, and non-destructive editing to name a few).
Where to Learn CSS
Ready to dive into CSS for yourself? These beginner tutorials will establish the basics and teach you the syntax you’ll need to know to write your own functional CSS code.
It can be daunting, but unless you’re trying to do something really advanced, CSS isn’t too hard! Simple things like changing the background color or setting font styling are fairly easy, and there are plenty of examples online.
(Suggested reading: 50+ Modern Fonts to Use on Your WordPress Website)
Most programming tutorials you’ll find on the internet are completely free too. There’s plenty of information out there at no/little cost.
Here are a few examples covering the best CSS tutorials for beginners.
- W3Schools CSS Tutorial: There is an absolute ton of information to be found here: in-depth tutorials, examples, and references for you to work with. W3Schools’ tutorials are as simple and easy to follow as possible, so even if you’re a total beginner, this is a great place to start.
- Codeacademy Learn CSS: Through six free hands-on lessons, you’ll learn the basics of CSS. This is no simple video tutorial, but an interactive lesson that has you working with actual code. With the pro version, you also get quizzes and freeform projects to work on.
- Learn CSS in One Hour: Plenty of people want to learn a new programming language, but they just don’t have the time to dedicate. But if you can set aside just one hour, you can learn CSS with this free 20-part course. Even if you’re not a master by the end, you should have a good grasp of the basics.
- Introduction to Basic HTML & CSS for WordPress Users: Looking for something specific to WordPress? If you’ve always struggled with writing HTML and CSS, this course is perfect for you. It’s paid, but comes with 52 lectures and five hours of video to learn from.
Learn how to use CSS to customize & optimize your website, from the colors used to the spaces between elements ✨Click to Tweet
Summary
As a WordPress user, jumping into CSS might be confusing at first. But once you know how to edit your theme files and where to add styling, you should have no more trouble.
Theme files can be edited either from your backend or through FTP to change your site’s appearance, but this should usually be avoided unless you need to edit the existing code.
If you just want to add your own CSS, use the Additional CSS page under Appearance > Customize, or try a plugin if you need something more powerful.
Edits to your stylesheet will be lost upon theme update unless you use a child theme. The same isn’t true for Additional CSS. Your code is safe from updates but don’t forget: only a plugin will retain CSS when you change themes.
Whatever method you choose, you should always keep regular backups of your website, including the stylesheet and custom code you’ve added. Now it’s time to brush up on your CSS basics using the resources we provided.
Happy styling!
Suggested reading: Best Web Design Courses Online
Get all your applications, databases and WordPress sites online and under one roof. Our feature-packed, high-performance cloud platform includes:
- Easy setup and management in the MyKinsta dashboard
- 24/7 expert support
- The best Google Cloud Platform hardware and network, powered by Kubernetes for maximum scalability
- An enterprise-level Cloudflare integration for speed and security
- Global audience reach with up to 35 data centers and 275 PoPs worldwide
Test it yourself with $20 off your first month of Application Hosting or Database Hosting. Explore our plans or talk to sales to find your best fit.
Для внесения изменений во внешний вид сайтов на WordPress часто приходится редактировать код CSS. В этой статье мы рассмотрим несколько способов изменения CSS кода в темах WordPress.
Редактирование файла style.css вашей темы
Самым распространённым спобом редактирования CSS кода вашего сайта WordPress является его изменение в файле style.css вашей активной темы. Все темы в WordPress находятся в директории wp-content/themes и по названию вашей активной темы, вы сможете легко определить в какой директории она располагается.
Для редактирования файла style.css вашей темы вам необходимо иметь доступ к сайту через FTP, или поддержку изменения файлов темы прямо из панели администрирования WordPress. Если изменение файлов из панели администратора поддерживается вашим хостинг провайдером, вы найдёте эту возможность в разделе Внешний вид → Редактор.
Редактор темы в WordPress
Убедитесь, что в списке справа выбран файл style.css (таблица стилей). Редактировать файлы .php таким образом крайне не рекомендуется, поскольку малейшая ошибка может привести к поломке вашего сайта. Более надёжным методом является редактирование через FTP.
Минусом данного подхода является то, что при обновлении темы все ваши изменения пропадут. Во избежании этого мы рекомендуем воспользоваться дочерней темой, или же сторонним плагином для редактирования CSS кода.
Дочерние темы WordPress
Дочерние темы в WordPress позволяют вносить изменения в другие темы, не меняя при этом исходный код оригинальной темы. Кроме таблицы стилей, дочерние темы могут изменять и другие файлы шаблонов в WordPress, но это выходит за рамки данной статьи.
Для создания новой дочерней темы, дайте ей новую папку в директории wp-content/themes и поместите в неё пустой файл с названием style.css. Путь до вашего файла стилей будет выглядеть следующим образом: wp-content/themes/my-child-theme/style.css, где my-child-theme — название нашей новой дочерней темы.
Откройте файл style.css вашей дочерней темы в вашем любимом текстовом редакторе, и впишите в него следующий код:
/**
 * Theme Name: My Child Theme
 * Template: twentytwelve
 */
@import url("../twentytwelve/style.css");

body { background: red; }
Директивой Theme Name мы указываем название нашей дочерней темы, а на следующей строке директивой Template указываем на родительскую тему, которую хотим использовать. В нашем случае это тема Twenty Twelve, которая находится в директории twentytwelve.
После заголовка темы, командой @import мы включаем стили темы Twenty Twelve, а всё что следует ниже — наш собственный CSS код. В нашем случае мы изменяем цвет фона на красный.
Сохраните изменения в файл style.css вашей дочерней темы, и загрузите всю директорию my-child-theme на сервер по FTP. Вы увидите, что ваша новая дочерняя тема доступна при выборе тем в разделе Внешний вид → Темы.
Дочерняя тема WordPress
Таким образом, при редактировании файла style.css вашей дочерней темы все изменения будут отображаться на вашем сайте, а при обновлении родительской темы, ваши наработки не пострадают.
Редактирование CSS с помощью плагина
Ещё одним методом редактирования CSS кода в WordPress является использование плагина. Существует немалое количество плагинов, позволяющих изменять таблицу стилей. Мы рекомендуем бесплатный плагин Jetpack, который содержит модуль Custom CSS.
Редактор CSS в Jetpack
Модуль Custom CSS позволяет редактировать стили прямо из панели администрирования WordPress и не требует FTP доступа или особых настроек хостинг площадки. Custom CSS имеет подсветку и проверку синтаксиса, поддерживает ревизии, а так же несколько CSS препроцессоров (LESS и Sass).
Если у вас возникнут вопросы при работе с любым из выше перечисленных методов, оставьте комментарий и мы постараемся вам помочь.
CSS – это язык стилей, который определяет отображение HTML-страниц. С помощью этого языка Вы можете управлять шрифтами, цветом, размерами, позиционированием и многими другими элементами веб-страницы. Любая современная тема в своей разметке использует CSS. WordPress-шаблоны тоже не являются исключением.
Часто бывает необходимость изменить на сайте какие-то элементы дизайна. Например, размер логотипа, цвет фона или вставить новый блок. Так, многие WordPress-темы для этого имеют специальное окно настроек, которое позволяет легко задать новые параметры отображения для той или иной части сайта.
Но разработчики тем не могут предусмотреть все нюансы дизайна и добавить для них возможность быстрого редактирования. Поэтому часто приходится вносить изменения самому.
Прежде чем приступить к редактированию, откройте страницу с цветами css. Она вам пригодится и избавит от необходимости пользоваться экранной пипеткой.
Редактирование CSS в WordPress
Редактировать язык стилей в WordPress можно несколькими способами. Мы рассмотрим два из них, которые являются наиболее простыми для пользователей.
Редактирование на странице настроек темы
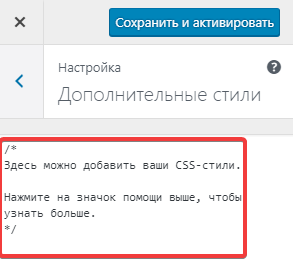
Большинство современных WordPress-тем предусматривают добавление CSS-кода прямо в настройках. Для этого достаточно в админ-панели перейти Внешний вид -> Настроить, выбрать Дополнительные стили и в поле вставить нужный код, после чего кнопку Сохранить и активировать.
Редактирование в админ-панели WordPress
Итак, для редактирования CSS-файлов через админ-панель необходимо перейти Внешний вид -> Редактор. В итоге Вы попадаете в окно редактирования WordPress-тем.
Тут нужно выбрать тему, которую хотите изменить. Далее справа, в списке файлов темы, следует найти и нажать на пункте Таблицы стилей style.css.
Перед Вами отобразится окно редактора, в котором можно редактировать файл стилей.
После внесения всех нужных изменений не забудьте нажать кнопку Обновить файл. Все, Ваши правки применены и отображаются на сайте.
!!! Правки стилей темы предусматривает редактирование ее файлов. При обновлении темы все Ваши изменения будут утеряны. Поэтому рекомендуем Вам использовать дочерние темы.
Нажмите, пожалуйста, на одну из кнопок, чтобы узнать понравилась статья или нет.
Вчера я работал над своей онлайн школой, а точнее над ее дизайном, и на странице курса мне ужасно не нравился цвет кнопки и цвет шрифта на ней. Мне надо было любым способом, решить эту проблему. Конечно же первым делом, я полез в настройки темы, так как шаблон у меня установлен премиальный с кучей разных возможностей, но как оказалось, изменение цветов там не предусмотрено.. И это был шок
За цвета отвечают стили и прописаны они, как правило в файле style.css.
Содержание
- Редактирование CSS через FTP
- Плагин для редактирования CSS
- Как установить плагин
- Как изменить CSS
Редактирование CSS через FTP
Вообще любые файлы в WordPress можно редактировать через FTP проводник, например FileZilla или через своего хостинг провайдера. Найдите файлы стилей, по следующему пути: вашдомен/wp-content/themes/названиевашейтемы/css
В нашем случае необходимо найти файл(ы) с расширением *.css, чаще всего они носят название style.css. Скачайте его, откройте через редактор, лучше всего подойдет Notepad++, скачать можно по ссылке — Полезные программы.
Внесите необходимые правки и закачайте измененный файл обратно на сервер.
Конечно же если вы владеете данным языком программирования, у вас все получится, а если нет, то вы всегда можете найти в просторах интернета всю необходимую информацию по любым правилам CSS, и методом теста проверить любые из них.
Перед редактированием файла, обязательно сделайте его резервную копию.
Как я не раз уже говорил, я всегда ищу более легкие пути, потому что ценю свое время, и всегда делюсь полезными и простыми способами работы на своем блоге, именно поэтому он и носит название Какработать.ру
Так вот, в разделе плагины WordPress, я нашел очень интересный инструмент и называется он CSS Редактор, методом проб, тестов и ошибок я выделил один, который легко справился со своей задачей, а на сколько грациозно и понятно это было …
Работает это следующим образом, вместо того чтобы лезть через FTP в файловую систему, искать, сохранять и редактировать файл стилей, мы просто:
- Запускаем плагин;
- Переходим в визуальный редактор любой страницы нашего сайта;
- Ищем элемент который требует изменений;
- Нажимаем на него путем щелчка левой кнопки мыши и редактируем с помощью встроенного редактора стилей;
- Нажимаем сохранить и готово.
Стили сохраняются отдельно от основного файла и вы всегда сможете вернуть все на старое место, просто удалив строки.
А теперь разберем это действие более подробно.
Как установить плагин
Зайдите в раздел «плагины — добавить новый», через админ панель своего сайта на WordPress. Напишите SiteOrigin CSS, найдите его и нажмите «Установить«, далее «Активировать».
Как изменить CSS
Для того чтобы изменить стиль шаблона, зайдите в раздел «Внешний вид — Custom CSS» и нажмите на иконку «глаз».
У вас откроется простой, визуальный редактор, выберите нужный элемент, который требует редактирования и пробуйте его изменить по своему вкусу.
Если нужный элемент находится не на главной странице сайта, как в моем случае, то просто откройте необходимую страницу, путем вставки нужного url адреса в окно редактора css.
С помощью панели инструментов слева, внесите необходимые изменения и нажмите ✓ галочку, а далее кнопку Save CSS.
Обновите страницу и проверьте результат!
Для того чтобы вернуть все в исходное положение, просто удалите строки, которые появились у вас в окошке редактора.
Честно говоря, мне очень понравился этот плагин, своей простотой и удобством. Думаю вы тоже это оцените. на этом у меня все, надеюсь статья оказалась для вас полезной.

