I am trying to use my custom color for AppBar header. The AppBar has title ‘My AppBar’. I am using white as my primary theme color. It works well for the bar but the ‘title’ of the AppBar is also using same ‘white’ color’
Here is my code:
import React from 'react';
import * as Colors from 'material-ui/styles/colors';
import MuiThemeProvider from 'material-ui/styles/MuiThemeProvider';
import getMuiTheme from 'material-ui/styles/getMuiTheme';
import AppBar from 'material-ui/AppBar';
import TextField from 'material-ui/TextField';

   const muiTheme = getMuiTheme({
  palette: {
    textColor: Colors.darkBlack,
    primary1Color: Colors.white,
    primary2Color: Colors.indigo700,
    accent1Color: Colors.redA200,
    pickerHeaderColor: Colors.darkBlack,
  },
  appBar: {
    height: 60,
  },
});

class Main extends React.Component {
  render() {
    // MuiThemeProvider takes the theme as a property and passed it down the hierarchy
    // using React's context feature.
    return (
      <MuiThemeProvider muiTheme={muiTheme}>
        <AppBar title="My AppBar">
       <div>
   < TextField hintText = "username" / >
    < TextField hintText = "password" / >

    </div>

        </AppBar>
      </MuiThemeProvider>
    );
  }
}

export default Main;
But, the palette styles override the AppBar ‘title’ color and no title is displaying. Should I include something or I have misplaced any ?
And this is my output :

![]()
NearHuscarl
56.8k13 gold badges221 silver badges198 bronze badges
asked Aug 25, 2016 at 6:43
![]()
Sijan BhandariSijan Bhandari
2,8713 gold badges19 silver badges36 bronze badges
If you ant to change your Appbar background in material ui design ….try following code
<AppBar style={{ background: '#2E3B55' }}>
or if you want to apply className then follow this step
first of all make create const var
const style = {

    background : '#2E3B55';
};

<AppBar className={style}>
answered Nov 15, 2018 at 6:37
![]()
0
MUI v5 update
1. Use sx prop
<AppBar sx={{ bgcolor: "green" }}>
2. Set primary.main color in Palette
The Appbar background color uses the primary color provided from the theme by default.
const theme = createTheme({
  palette: {
    primary: {
      main: "#00ff00"
    }
  }
});
3. Set AppBar default styles in styleOverrides
Use this one if you don’t want to touch the primary.main value and potentially affect other components:
const theme = createTheme({
  components: {
    MuiAppBar: {
      styleOverrides: {
        colorPrimary: {
          backgroundColor: "red"
        }
      }
    }
  }
});
answered Oct 23, 2021 at 15:42
![]()
NearHuscarlNearHuscarl
56.8k13 gold badges221 silver badges198 bronze badges
2
From what I see in the material-ui sources, appBar title color is set by palette.alternateTextColor. If you add it to your style definition like that:
const muiTheme = getMuiTheme({
  palette: {
    textColor: Colors.darkBlack,
    primary1Color: Colors.white,
    primary2Color: Colors.indigo700,
    accent1Color: Colors.redA200,
    pickerHeaderColor: Colors.darkBlack,
    alternateTextColor: Colors.redA200
  },
  appBar: {
    height: 60,
  },
});
You should see your title without need to style it manually inside each component.
There are more styling parameters to MuiTheme described here
answered Aug 25, 2016 at 8:24
![]()
MadNatMadNat
3492 silver badges7 bronze badges
2
Create your style using makeStyles():
const useStyles = makeStyles(theme => ({
  root: {
    boxShadow: "none",
    backgroundColor: "#cccccc"
  }
}));
Use the above style in your component:
const classes = useStyles();

<AppBar className={classes.root} />
answered Sep 4, 2019 at 1:46
![]()
WeiWei
7079 silver badges9 bronze badges
1
- Please make theme.js first.
- theme.js
import { red } from '@material-ui/core/colors';
import { createMuiTheme } from '@material-ui/core/styles';

export default createMuiTheme({
  palette: {
    primary: {
      main: '#556cd6',
    },
    secondary: {
      main: '#19857b',
    },
    error: {
      main: red.A400,
    },
    background: {
      default: '#fff',
    },
  },
});
- Add these lines to index.js
import { ThemeProvider } from '@material-ui/core/styles'
import theme from './theme'

ReactDOM.render(
  <ThemeProvider theme={theme}>
    <App />
  </ThemeProvider>,
  document.getElementById('root')
);
<AppBar position='static' color='secondary' elevation={2}>
  ...
</AppBar>
*** important ***
secondary: {
  main: '#19857b',
},

color='secondary'
answered Apr 29, 2021 at 11:06
![]()
noveltyznoveltyz
3074 silver badges9 bronze badges
1
Finally, I came to know about titleStyle for styling title in AppBar.
const titleStyles = {
  title: {
    cursor: 'pointer'

  },
  color:{
    color: Colors.redA200
  }
};
 <AppBar title={<span style={titleStyles.title}>Title</span>} titleStyle={titleStyles.color}> .............
</AppBar>
answered Aug 25, 2016 at 7:37
![]()
Sijan BhandariSijan Bhandari
2,8713 gold badges19 silver badges36 bronze badges
By default it uses palette’s contrastText prop (v3):
const theme = createMuiTheme({
  palette: {
    primary: {
      contrastText: 'rgba(0,0,0,0.8)'
    }
  },
});
answered Sep 21, 2018 at 10:24
![]()
first of all, add const to the file. Then apply to the line u need as following shown.
const styles = { button: { margin: 15,}, appBarBackground:{ background : '#2E3B55' }};
Then add it to the line as shown down
 style={styles.button}
 style={styles.appBarBackground}
answered May 18, 2020 at 8:09
![]()
You cat add this inline your code
<AppBar title="My AppBar" style={{ backgroundColor: '#2196F3' }} >
or if your css
import './home.css';
put this to your code
.title {
text-align: left;
background-color: black !important;}
Hope to help.
answered Oct 8, 2019 at 13:56
![]()
superupsuperup
1,51712 silver badges11 bronze badges
Working on @NearHuscarl answer. If you want the styles to be applied no matter which appbar color you are on: E.g. <Appbar color="secondary" or <Appbar color="primary". You could alternatively use the root property:
const theme = createTheme({
  components: {
    MuiAppBar: {
      root: {
        colorPrimary: {
          backgroundColor: "red"
        }
      }
    }
  }
});
The difference is the root keyword
answered Dec 19, 2021 at 10:13
![]()
hanssshansss
3014 silver badges4 bronze badges
You can set the background color directly using sx property
<AppBar variant='elevated' sx={{backgroundColor:'#19857b'}}>
![]()
answered Aug 27, 2022 at 20:52
![]()
Material-UI AppBar is a useful component for positioning titles, hamburger menus, admin buttons, and more. Styling the AppBar background color, text color, positioning, font, and any other CSS property is a common need and can be tricky to figure out.
This demo will show several methods for customizing the AppBar, with a particular focus on setting text and background color.
Code Sandbox link with full React code is in the Resources section.
Method 1: Styling AppBar With Classes

Material-UI has a built-in classes API for styling. Here’s an example of using that for styling AppBar background color and border:
The classes:
const useStyles = makeStyles((theme) => ({
  abRoot: {
    backgroundColor: "red"
  },
  abStatic: {
    border: "solid blue 2px"
  }
})
);
And the JSX:
<AppBar
  position="static"
  style={{ borderRadius: "80px" }}
  classes={{
    root: classes.abRoot,
    positionStatic: classes.abStatic
  }}
>
The classes API abstracts away from the DOM and the actual classes names on the elements. It is fairly powerful and usually accomplishes the goal.
To get the full list of targetable classes, see the docs here. The docs also list the names of the classes as they are actually found in the DOM, which will be used in method two.
Here’s how to use AppBar with the Drawer component nested underneath, and here’s how to style the MUI Drawer. The AppBar also works well for containing the Tab component.
Method 2: Overriding AppBar Styles With Global Class Name (and Adding Sticky Position)

Material-UI’s global class name system allows precise targeting of components. In this AppBar example, the AppBar wraps a Toolbar. I target the Toolbar only when the AppBar has a global class of “sticky” in the JSS below. “Sticky” is applied by the position prop.
const StyledAppBar = withStyles((theme) => ({
  root: {
    backgroundColor: theme.palette.secondary.light,
    "&.MuiAppBar-positionSticky": {
      margin: "40px 20px 0px 20px",
      width: "calc(100% - 40px)",
      "& .MuiToolbar-root": {
        color: "green",
        "& .MuiButtonBase-root": {
          fontSize: 24
        }
      }
    }
  }
}))(AppBar);
Furthermore, I precisely target Button components within the Toolbar and update fontSize.

In the DOM, notice the .MuiAppBar-positionSticky in the header, .MuiToolbar-root in the first div, and .MuiButtonBase-root in the buttons. Notice in the withStyles code if there is a space between the & and the ., that tells the selector its looking for a child component. If there is no space, like &.MuiAppBar-positionSticky, then it is not looking for a child (the AppBar-root and the MuiAppBar-positionSticky are applied to the same element).
This method also keeps the JSX very clean.
return (
  <StyledAppBar position="sticky" color={"secondary"} elevation={6}>
    //Children Toolbar and buttons
  </StyledAppBar>
);
Notice also that I add box shadow via the elevation prop. Elevation is available on many components in Material-UI, even when it is not stated in the API docs.
Take a look at the live demo in the Code Sandbox below. Notice how the sticky header works…simply add the prop mentioned above, and the AppBar is fixed to the top of the viewport.
Also, I added margin to the left and right. However, it wasn’t as simple as ‘just’ setting margin. By default, AppBar has width: 100%. I had to override this width in the .MuiAppBar-positionSticky selector and add width: "calc(100% - 40px)". This is a calculation that ensures there is ‘room’ for the margin. Otherwise, adding margin simply kicks the AppBar over.
Finally, I swapped the menu icon out for a logo. If you want to add a logo to the AppBar, a simple way to do it is to place the logo as the first child in the Toolbar, which is in the AppBar.
Method 3: Styling AppBar with Custom Theming

Custom theming in Material-UI is simply the modification of the existing theme palette to use whatever colors you specify. In our case:
const customTheme = createMuiTheme({
  palette: {
    secondary: {
      main: "#F5BD1F",
      contrastText: "#6a0dad "
    }
  }
});
This method changes the AppBar background color without any specific targeting of the background CSS property. Same goes for the text color. Instead, AppBar is built to use the main and contrastText colors of whatever color scheme is chosen in the color prop (in this case, secondary).
And the JSX:
return (
  <ThemeProvider theme={customTheme}>
    <AppBar position="static" color={"secondary"}>
      //...Toolbar, etc
    </AppBar>
  </ThemeProvider>
);
Don’t forget to wrap AppBar in your ThemeProvider, and to pass in the customTheme const. Note that any children inside AppBar will be affected by the custom theme.
Also, make sure you don’t wrap additional components that you don’t want to have the customTheme.
Resources
Test your JavaScript knowledge with these 50 challenging interview questions!
View Code Sandbox Here.
(My Codesandbox is a fork from this demo in the docs.)
MUI AppBar Docs:
https://material-ui.com/api/app-bar/
https://material-ui.com/components/app-bar/
Every now and again you come across one of those tasks as a coder that should take 2 seconds of your time and yet somehow manages to take half a day. Trying to change the Material UI Appbar color was one of those today. The answer though, as ever, is very simple, but finding the answer was not. So the next time I’m online trying to find how to change the Mui Appbar color, hopefully this post will show up and save me (and hopefully you) a ton of time! The solution involves using a custom theme, so this post also explains how to use a theme in your Material UI website.
Table of contents
- Set up your App.js file
- Target MuiAppbar to modify the Appbar Colour
- Adding a custom theme to modify the Mui appbar color
- Use the theme in the App.js file
- The full code – appbar color example
- Related:
Set up your App.js file
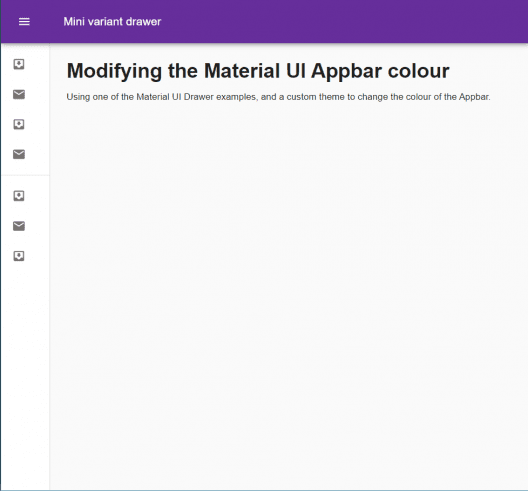
Using the code for the Mini Variant Drawer example from the Material UI v4 documentation, copy that code and put it in your App.js file (I’ve included the full code at the bottom of this post, in case you want to cut to the chase). This sample code will give you a mini variant side Drawer menu, an Appbar, and an area for your main content.
Target MuiAppbar to modify the Appbar Colour
To modify the appbar colour you use a custom theme and target the MuiAppbar property using this code:
//add this to a custom theme file

 .....

 overrides: {
    MuiAppBar: {
      colorPrimary: {
        backgroundColor: "#662E9B",
      },
    },
 },

 .....
Adding a custom theme to modify the Mui appbar color
Next create a custom theme file that includes the code described above. Add a new theme folder and a new file called theme.js, and add this code to it.
import { createTheme } from "@material-ui/core/styles";

const myTheme = createTheme({
  root: {
    display: "flex",
  },
  typography: {
    fontFamily: "Lato, Arial",
    fontSize: 12,
    h1: {
      fontFamily: "Lato, Arial",
      fontSize: 30,
      fontWeight: 700,
    },
    h2: {
      fontFamily: "Lato, Arial",
      fontSize: 20,
      fontWeight: 700,
      paddingBottom: 20,
    },
  },
  overrides: {
    MuiAppBar: {
      colorPrimary: {
        backgroundColor: "#662E9B",
      },
    },
  },
});

export default createTheme(myTheme);
Now you need to reference the theme file from the App.js file, and add some code to use the theme.
Use the theme in the App.js file
In App.js, add a reference to Material UI ThemeProvider and to the custom theme file :
import { ThemeProvider } from "@material-ui/core/styles";
import customtheme from "./style/theme";
Now wrap the main content in a <ThemeProvider> that use your theme:
...

return (
    <ThemeProvider theme={customtheme}>
    <div className={classes.root}>
      //main content

    </div>
	  </ThemeProvider>
  );
}
If you save your changes you should see your MUI Appbar background color change – that means the custom theme is being used!
The full code – appbar color example
import React from "react";
import clsx from "clsx";
import { ThemeProvider } from "@material-ui/core/styles";
import { makeStyles, useTheme } from "@material-ui/core/styles";
import Drawer from "@material-ui/core/Drawer";
import AppBar from "@material-ui/core/AppBar";
import Toolbar from "@material-ui/core/Toolbar";
import List from "@material-ui/core/List";
import CssBaseline from "@material-ui/core/CssBaseline";
import Typography from "@material-ui/core/Typography";
import Divider from "@material-ui/core/Divider";
import IconButton from "@material-ui/core/IconButton";
import MenuIcon from "@material-ui/icons/Menu";
import ChevronLeftIcon from "@material-ui/icons/ChevronLeft";
import ChevronRightIcon from "@material-ui/icons/ChevronRight";
import ListItem from "@material-ui/core/ListItem";
import ListItemIcon from "@material-ui/core/ListItemIcon";
import ListItemText from "@material-ui/core/ListItemText";
import InboxIcon from "@material-ui/icons/MoveToInbox";
import MailIcon from "@material-ui/icons/Mail";
import customtheme from "./style/theme";

const drawerWidth = 240;

const useStyles = makeStyles((theme) => ({
  root: {
    display: "flex",
  },
  appBar: {
    zIndex: theme.zIndex.drawer + 1,
    transition: theme.transitions.create(["width", "margin"], {
      easing: theme.transitions.easing.sharp,
      duration: theme.transitions.duration.leavingScreen,
    }),
  },
  appBarShift: {
    marginLeft: drawerWidth,
    width: `calc(100% - ${drawerWidth}px)`,
    transition: theme.transitions.create(["width", "margin"], {
      easing: theme.transitions.easing.sharp,
      duration: theme.transitions.duration.enteringScreen,
    }),
  },
  menuButton: {
    marginRight: 36,
  },
  hide: {
    display: "none",
  },
  drawer: {
    width: drawerWidth,
    flexShrink: 0,
    whiteSpace: "nowrap",
  },
  drawerOpen: {
    width: drawerWidth,
    transition: theme.transitions.create("width", {
      easing: theme.transitions.easing.sharp,
      duration: theme.transitions.duration.enteringScreen,
    }),
  },
  drawerClose: {
    transition: theme.transitions.create("width", {
      easing: theme.transitions.easing.sharp,
      duration: theme.transitions.duration.leavingScreen,
    }),
    overflowX: "hidden",
    width: theme.spacing(7) + 1,
    [theme.breakpoints.up("sm")]: {
      width: theme.spacing(9) + 1,
    },
  },
  toolbar: {
    display: "flex",
    alignItems: "center",
    justifyContent: "flex-end",
    padding: theme.spacing(0, 1),
    // necessary for content to be below app bar
    ...theme.mixins.toolbar,
  },
  content: {
    flexGrow: 1,
    padding: theme.spacing(3),
  },
  overrides: {
    MuiAppBar: {
      colorPrimary: {
        backgroundColor: "orange",
      },
    },
  },
}));

export default function MiniDrawer() {
  const classes = useStyles();
  const theme = useTheme();
  const [open, setOpen] = React.useState(false);

  const handleDrawerOpen = () => {
    setOpen(true);
  };

  const handleDrawerClose = () => {
    setOpen(false);
  };

  return (
    <ThemeProvider theme={customtheme}>
      <div className={classes.root}>
        <CssBaseline />
        <AppBar
          position="fixed"
          className={clsx(classes.appBar, {
            [classes.appBarShift]: open,
          })}
        >
          <Toolbar>
            <IconButton
              color="inherit"
              aria-label="open drawer"
              onClick={handleDrawerOpen}
              edge="start"
              className={clsx(classes.menuButton, {
                [classes.hide]: open,
              })}
            >
              <MenuIcon />
            </IconButton>
            <Typography variant="h6" noWrap>
              Mini variant drawer
            </Typography>
          </Toolbar>
        </AppBar>
        <Drawer
          variant="permanent"
          className={clsx(classes.drawer, {
            [classes.drawerOpen]: open,
            [classes.drawerClose]: !open,
          })}
          classes={{
            paper: clsx({
              [classes.drawerOpen]: open,
              [classes.drawerClose]: !open,
            }),
          }}
        >
          <div className={classes.toolbar}>
            <IconButton onClick={handleDrawerClose}>
              {theme.direction === "rtl" ? (
                <ChevronRightIcon />
              ) : (
                <ChevronLeftIcon />
              )}
            </IconButton>
          </div>
          <Divider />
          <List>
            {["Inbox", "Starred", "Send email", "Drafts"].map((text, index) => (
              <ListItem button key={text}>
                <ListItemIcon>
                  {index % 2 === 0 ? <InboxIcon /> : <MailIcon />}
                </ListItemIcon>
                <ListItemText primary={text} />
              </ListItem>
            ))}
          </List>
          <Divider />
          <List>
            {["All mail", "Trash", "Spam"].map((text, index) => (
              <ListItem button key={text}>
                <ListItemIcon>
                  {index % 2 === 0 ? <InboxIcon /> : <MailIcon />}
                </ListItemIcon>
                <ListItemText primary={text} />
              </ListItem>
            ))}
          </List>
        </Drawer>
        <main className={classes.content}>
          <div className={classes.toolbar} />
          <Typography variant="h1" gutterBottom>
            Modifying the Material UI Appbar colour
          </Typography>
          <Typography paragraph>
            Using one of the Material UI Drawer examples, and a custom theme to
            change the colour of the Appbar.
          </Typography>
        </main>
      </div>
    </ThemeProvider>
  );
}
The theme file looks like this:
import { createTheme } from "@material-ui/core/styles";

const myTheme = createTheme({
  root: {
    display: "flex",
  },
  palette: {
    primary: {
      main: "#1987c9",
    },
  },
  typography: {
    fontFamily: "Lato, Arial",
    fontSize: 12,
    h1: {
      fontFamily: "Lato, Arial",
      fontSize: 30,
      fontWeight: 700,
    },
    h2: {
      fontFamily: "Lato, Arial",
      fontSize: 20,
      fontWeight: 700,
      paddingBottom: 20,
    },
  },
  overrides: {
    MuiAppBar: {
      colorPrimary: {
        backgroundColor: "#662E9B",
      },
    },
  },
});

export default createTheme(myTheme);
React Material UI App bar component allows us to create a header, logo, title, and navigation at top of our React Application. In this article, we’ll explore how to use the Material UI App Bar component and we’ll demonstrate a few examples of how to use it. lists. What we are learning.
In this tutorial we have three objects, First, learn how to add navigation, second add a media query to hide in navigation on a small screen, and third how to style the Material UI App Bar component. Let’s get started.
Introduction to React Material UI App Bar component
Materials UI library is one of the most popular and provides the developer with reusable UI components that help the developer to use ready-made components, fast development, and one best UI designs. The App Bar component is mostly used in our application heading to display navigation, logo, action, and search related to the current screen.
App Bar component has different props like position and by adding position=’fixed’ make App Bar component at a fixed position at the top, even we scroll, the position of App Bar remain same.
Let’s first create React material project, install and configure the material UI and icon library,
npx create-react-app material-app-bar
cd material-app-bar
npm install @mui/material @emotion/react @emotion/styled
Material UI prefers and recommends using Roboto font in mind. So be sure to follow these instructions. We need to add Google Web Fonts and Google font icons in the head section of public/index.html
<link rel="stylesheet"
      href="https://fonts.googleapis.com/css?family=Roboto:300,400,500,700&display=swap"/>
<link rel="stylesheet" href="https://fonts.googleapis.com/icon?family=Material+Icons"/>
React Material UI Appbar Example
Let’s demonstrate the first example of the Material App Bar example, here is a screenshot of our basic example.

Here is an example of an App Bar component we have used material icons, Typography, Avatar, and other material components. Let’s create a component called Navbar.jsx and add the following code for our Basic Material App Bar example.
import React from 'react';
import AppBar from '@mui/material/AppBar';
import Box from '@mui/material/Box';
import Toolbar from '@mui/material/Toolbar';
import Typography from '@mui/material/Typography';
import IconButton from '@mui/material/IconButton';
import MenuIcon from '@mui/icons-material/Menu';
import Avatar from '@mui/material/Avatar';

const styles = {
  flex: {
    flex: 1,
  },
};

const Navbar = () => {
  return (
    <>
      <Box sx={styles.flex}>
        <AppBar position='sticky' disablegutters='true'>
          <Toolbar>
            <IconButton color='inherit' aria-label='Menu'>
              <MenuIcon />
            </IconButton>
            <Typography variant='title' color='inherit' sx={styles.flex}>
              Edupala
            </Typography>
            <Avatar
              sx={{ width: 40, height: 40 }}
              alt='edupala profile'
              src='https://miro.medium.com/max/1400/0*0fClPmIScV5pTLoE.jpg'
            />
          </Toolbar>
        </AppBar>
      </Box>
      <Typography m={2} spacing={2}>
        Testin Lorem ipsum dolor sit amet consectetur adipisicing elit. Maxim mollitia, molestiae quas vel sint commodi repudiandae consequuntur  voluptatum laborum numquam blanditiis harum quisquam eius sed odit fugiat iusto fuga praesentium optio, eaque rerum! Provident similique accusantium nemo autem.
      </Typography>
    </>
  );
};

export default Navbar;
In this example, we have used position props attribute value as sticky, and fixed is the default value. Material UI Appbar position props can have the following value.
- Fixed by default
- Sticky
- Static
AppBar props position with Fixed issues
Using the AppBar component with props position fixed will make our AppBar fixed position and even if we scroll content down but AppBar will always be visible. But there is one issue, as position fixed has a higher z-index than regular content, this makes some of our top content below the AppBar will be hidden below it, and here is an example of it.

We can see that some of the content below is hidden under the Appbar component when we used the position as fixed. We can fix this problem in many different ways.
- Changing the AppBar component props position fixed to sticky as we used before.
- Second, add some top margin to our content next to the AppBar component.
We already fixed using position sticky in the first example and now let’s solved the position fixed hide issues using the Material UI Box component with some margin at the top.
....
import Box from "@mui/material/Box";

const Navbar = () => {
  return (
    <>
      <Box sx={styles.flex}>
        <AppBar position="fixed" disablegutters="true">
          <Toolbar>
              // Some content
          </Toolbar>
        </AppBar>
      </Box>
      <Box sx={(theme) => theme.mixins.toolbar} />
      <Typography m={2} spacing={2}>
        Testin Lorem ipsum dolor sit amet consectetur adipisicing elit .....

      </Typography>
    </>
  );
};

export default Navbar;
We have used Box and assigned it with mixins with toolbar from the default theme, thus it adds default style.
React Material UI AppBar color
Like any other Material UI component, we can easily change the Material UI AppBar color, in the previous example, the blue color is the primary and default color. Let’s add different colors using Material color, let’s add secondary color for AppBar component, and here is a screenshot of it.

...
<Box sx={styles.flex}>
        <AppBar color="secondary" position="fixed" disablegutters="true">
          <Toolbar>
              .....
         <Toolbar>
     </AppBar>
</Box>
Let’s add custom colors from the Material color, and change the color to orange.

import orange from "@mui/material/colors/orange";

...
const styles = {
  customColor: {
    backgroundColor: orange[500],
  },
};

const Navbar = () => {
  return (
    <>
      <Box sx={styles.flex}>
        <AppBar sx={styles.customColor} position="fixed" disablegutters="true">
          <Toolbar>
          // some code
          </Toolbar>
        </AppBar>
      </Box>
    </>
  );
};
React Material UI App bar Hide on scroll
Sometimes our application, wants the App Bar component to hide while scrolling vertically down, thus providing more space for content. With Material UI, we can easily hide in the Material UI library, while users scroll down we should listen to the scroll event of the browser window object.
Let’s create a new component Navbar2, in this component we listen to the scroll bar event and hide the AppBar component while scrolling, and here is our example screenshot.
import * as React from "react";
import PropTypes from "prop-types";
import AppBar from "@mui/material/AppBar";
import Avatar from "@mui/material/Avatar";
import Box from "@mui/material/Box";
import Container from "@mui/material/Container";
import CssBaseline from "@mui/material/CssBaseline";
import IconButton from "@mui/material/IconButton";
import MenuIcon from "@mui/icons-material/Menu";
import useScrollTrigger from "@mui/material/useScrollTrigger";
import Slide from "@mui/material/Slide";
import Toolbar from "@mui/material/Toolbar";
import Typography from "@mui/material/Typography";

function HideOnScroll(props) {
  const { children, window } = props;
  const trigger = useScrollTrigger({
    target: window ? window() : undefined,
  });

  return (
    <Slide appear={false} direction="down" in={!trigger}>
      {children}
    </Slide>
  );
}

HideOnScroll.propTypes = {
  children: PropTypes.element.isRequired,
  window: PropTypes.func,
};

const Navbar2 = (props) => {
  return (
    <React.Fragment>
      <CssBaseline />
      <HideOnScroll {...props}>
        <AppBar>
          <Toolbar>
            <IconButton color="inherit" aria-label="Menu">
              <MenuIcon />
            </IconButton>
            <Typography variant="title" color="inherit" sx={{ flexGrow: 1 }}>
              Edupala
            </Typography>
            <Avatar
              sx={{ width: 40, height: 40 }}
              alt="edupala profile"
              src="https://miro.medium.com/max/1400/0*0fClPmIScV5pTLoE.jpg"
            />
          </Toolbar>
        </AppBar>
      </HideOnScroll>
      <Toolbar />
      <Container>
        <Box sx={{ my: 2 }}>
          <div>
            {new Array(400).fill(null).map((v, i) => (
              <p key={i}>{i}</p>
            ))}
          </div>
        </Box>
      </Container>
    </React.Fragment>
  );
};

export default Navbar2;
We wrapped a custom component HideOnScroll, in this component we listen to window scrolling events, whenever scrolling happens we slide the AppBar component down using the Slide component. Our code is the same as before except we add a hide scrolling wrapper component on the AppBar component.
Material UI Navbar Or Material UI Navigation
Material UI doesn’t have a Navbar component, we can use the AppBar component and add navigation to it. Let’s create a Material UI navbar example. In this example let’s create a pages folder and add three pages, Home, About, and Contact here is the screenshot of our Material UI Navigation example.
Step for adding React UI Navigation
We need to install the react-router-dom library and also need some pages. Here is a step we need to use to make Material UI Navigation.
- Let’s create a project and install Material UI and Icon libraries
- We also need react-router-dom and install it.
- Create a pages folder and add all pages, in our case Home, About, and Contact
- Create theme.jsx where we add Material theme configuration and styling.
- Custom NavBar component to Have Responsive Navigation.
npm i react-router-domCreating Pages is easy and adds some dummy data, in our App.js file we add Router configuration and import the Navbar component for Navigation.
import { BrowserRouter as Router, Routes, Route } from "react-router-dom";
import Navbar from "./components/Navbar";
import Home from "./pages/Home";
import About from "./pages/About";
import Contact from "./pages/Contact";

function App() {
  return (
    <Router>
      <Navbar />
      <Routes>
        <Route exact path="/" element={<Home />} />
        <Route path="/about" element={<About />} />
        <Route path="/contact" element={<Contact />} />
      </Routes>
    </Router>
  );
}

export default App;
In components/theme.js let’s add Material UI style configuration
import { createTheme } from "@mui/material/styles";

const white = "#ffffff";

export const theme = createTheme({
     ...
    palette: {
        common: {
            white: `${white}`
        }
      },
});
I tried to create Navigation using Material UI Tabs and the Tab component is working perfectly but assigning colors other than primary and second on textColor of shows a warning, as I was trying to add white color from theme.js. If you have some idea how to add custom color on Material Tab, please to me know in the comments. We use the Link component from React-router-dom and add our own style to it.
Add code for Material UI Navigation, we have used different Material components, I highlighted all code needed for Navigation and others are for styling and popup menu.
import React, { useState } from "react";
import AppBar from "@mui/material/AppBar";
import Button from "@mui/material/Button";
import Toolbar from "@mui/material/Toolbar";
import IconButton from "@mui/material/IconButton";
import Typography from "@mui/material/Typography";
import InputBase from "@mui/material/InputBase";
import Badge from "@mui/material/Badge";
import MenuItem from "@mui/material/MenuItem";
import Menu from "@mui/material/Menu";
import MenuIcon from "@mui/icons-material/Menu";
import AccountCircle from "@mui/icons-material/AccountCircle";
import MailIcon from "@mui/icons-material/Mail";
import NotificationsIcon from "@mui/icons-material/Notifications";
import MoreIcon from "@mui/icons-material/MoreVert";
import { styled } from "@mui/material";
import { theme } from "./Theme";
import { Box } from "@mui/material";
import { Link } from "react-router-dom";

const Search = styled("div")(({ theme }) => ({
  backgroundColor: "#f3f5fb",
  padding: "0 2px",
  borderRadius: theme.shape.borderRadius,
  width: "100%",
  position: "relative",
  "&:hover": {
    backgroundColor: theme.palette.common.blue,
  },
  [theme.breakpoints.up("sm")]: {
    marginLeft: theme.spacing.unit * 3,
    width: "auto",
  },
}));

const styles = {
  root: {
    width: "100%",
    marginBottom: "10px",
  },
  title: {
    display: "none",
    [theme.breakpoints.up("sm")]: {
      display: "block",
    },
  },
  tabContainer: {
    marginLeft: "auto",
  },
  destopContainer: {
    display: "none",
    [theme.breakpoints.up("md")]: {
      display: "flex",
    },
  },
  mobileContainer: {
    display: "flex",
    [theme.breakpoints.up("md")]: {
      display: "none",
    },
  },
};

const pages = [
  { name: "Home", url: "/" },
  { name: "About", url: "/about" },
  { name: "Contact", url: "/contact" },
];

const Navbar = () => {
  const [anchorEl, setAnchorEl] = useState(null);
  const [mobileMoreAnchorEl, setMobileMoreAnchorEl] = useState(null);

  const isMenuOpen = Boolean(anchorEl);
  const isMobileMenuOpen = Boolean(mobileMoreAnchorEl);

  const handleProfileMenuOpen = (event) => {
    setAnchorEl(event.currentTarget);
  };

  const handleMenuClose = () => {
    setAnchorEl(null);
    handleMobileMenuClose();
  };

  const handleMobileMenuOpen = (event) => {
    setMobileMoreAnchorEl(event.currentTarget);
  };

  const handleMobileMenuClose = () => {
    setMobileMoreAnchorEl(null);
  };

  const renderMenu = () => {
    return (
      <Menu
        anchorEl={anchorEl}
        anchorOrigin={{ vertical: "top", horizontal: "right" }}
        transformOrigin={{ vertical: "top", horizontal: "right" }}
        open={isMenuOpen}
        onClose={handleMenuClose}
      >
        <MenuItem onClick={handleMenuClose}>Profile</MenuItem>
        <MenuItem onClick={handleMenuClose}>My account</MenuItem>
      </Menu>
    );
  };

  const renderMobileMenu = () => {
    return (
      <Menu
        anchorEl={mobileMoreAnchorEl}
        anchorOrigin={{ vertical: "top", horizontal: "right" }}
        transformOrigin={{ vertical: "top", horizontal: "right" }}
        open={isMobileMenuOpen}
        onClose={handleMobileMenuClose}
      >
        <MenuItem>
          <IconButton color="inherit">
            <Badge badgeContent={4} color="secondary">
              <MailIcon />
            </Badge>
          </IconButton>
          <p>Messages</p>
        </MenuItem>
        <MenuItem>
          <IconButton color="inherit">
            <Badge badgeContent={11} color="secondary">
              <NotificationsIcon />
            </Badge>
          </IconButton>
          <p>Notifications</p>
        </MenuItem>
        <MenuItem onClick={handleProfileMenuOpen}>
          <IconButton color="inherit">
            <AccountCircle />
          </IconButton>
          <p>Profile</p>
        </MenuItem>
      </Menu>
    );
  };

  return (
    <Box sx={styles.root}>
      <AppBar position="static">
        <Toolbar sx={{ display: "flex", justifyContent: "space-between" }}>
          <IconButton color="inherit" aria-label="Open drawer">
            <MenuIcon />
          </IconButton>
          <Typography sx={styles.title} variant="h6" color="inherit" noWrap>
            EDUPALA REACT TUTORIAL
          </Typography>
          <Search>
            <InputBase placeholder="search ..." />
          </Search>

          <Box sx={styles.destopContainer}>
            {pages.map((page, index) => (
              <Link
                key={index}
                to={page.url}
                style={{
                  padding: "6px 4px",
                  color: "white",
                  textDecoration: "none",
                }}
              >
                {page.name}
              </Link>
            ))}

            <IconButton color="inherit">
              <Badge badgeContent={17} color="secondary">
                <NotificationsIcon />
              </Badge>
            </IconButton>
            <IconButton
              aria-owns={isMenuOpen ? "material-appbar" : undefined}
              aria-haspopup="true"
              onClick={handleProfileMenuOpen}
              color="inherit"
            >
              <AccountCircle />
            </IconButton>
          </Box>
          <Box sx={styles.mobileContainer}>
            <IconButton
              aria-haspopup="true"
              onClick={handleMobileMenuOpen}
              color="inherit"
            >
              <MoreIcon />
            </IconButton>
          </Box>
        </Toolbar>
      </AppBar>
      {renderMenu()}
      {renderMobileMenu()}
    </Box>
  );
};

export default Navbar;
Our navigation contains Menu, title, searchBar, and Navigation.
I had added React Material MUI responsive menu in stackblitz.com
Conclusion
In this tutorial, we learn the Material AppBar component, in detail and how to add different components for Logo, Avatar, action, and navigation on it. We also learn how to customize its styles. I hope you got some idea if you really like it please share it with others and on social networks, this will boost me to add more content.
Related React Tutorial
- Guide to Using and Creating React material UI grid.
- How to implement React table and its component?
- When and how to use React Context API?
- React Axios for HTTP method with REST API
- React router navigate outside component.
- How to implement React routing using react-router-dom?
| product | title | components | githubLabel | materialDesign |
|---|---|---|---|---|
|
material-ui |
App Bar React component |
AppBar, Toolbar, Menu |
component: app bar |
https://m2.material.io/components/app-bars-top |
The App Bar displays information and actions relating to the current screen.
The top App bar provides content and actions related to the current screen. It’s used for branding, screen titles, navigation, and actions.
It can transform into a contextual action bar or be used as a navbar.
{{«component»: «modules/components/ComponentLinkHeader.js»}}
Basic App bar
{{«demo»: «ButtonAppBar.js», «bg»: true}}
App bar with menu
{{«demo»: «MenuAppBar.js», «bg»: true}}
App bar with responsive menu
{{«demo»: «ResponsiveAppBar.js», «bg»: true}}
App bar with search field
A side searchbar.
{{«demo»: «SearchAppBar.js», «bg»: true}}
Responsive App bar with Drawer
{{«demo»: «DrawerAppBar.js», «bg»: true,»iframe»: true}}
App bar with a primary search field
A primary searchbar.
{{«demo»: «PrimarySearchAppBar.js», «bg»: true}}
Dense (desktop only)
{{«demo»: «DenseAppBar.js», «bg»: true}}
Prominent
A prominent app bar.
{{«demo»: «ProminentAppBar.js», «bg»: true}}
Bottom App bar
{{«demo»: «BottomAppBar.js», «iframe»: true, «maxWidth»: 400}}
Fixed placement
When you render the app bar position fixed, the dimension of the element doesn’t impact the rest of the page. This can cause some part of your content to be invisible, behind the app bar. Here are 3 possible solutions:
- You can use
position="sticky"instead of fixed. ⚠️ sticky is not supported by IE11. - You can render a second
<Toolbar />component:
function App() {
  return (
    <React.Fragment>
      <AppBar position="fixed">
        <Toolbar>{/* content */}</Toolbar>
      </AppBar>
      <Toolbar />
    </React.Fragment>
  );
}
- You can use
theme.mixins.toolbarCSS:
const Offset = styled('div')(({ theme }) => theme.mixins.toolbar);

function App() {
  return (
    <React.Fragment>
      <AppBar position="fixed">
        <Toolbar>{/* content */}</Toolbar>
      </AppBar>
      <Offset />
    </React.Fragment>
  );
}
Scrolling
You can use the useScrollTrigger() hook to respond to user scroll actions.
Hide App bar
The app bar hides on scroll down to leave more space for reading.
{{«demo»: «HideAppBar.js», «iframe»: true, «disableLiveEdit»: true}}
Elevate App bar
The app bar elevates on scroll to communicate that the user is not at the top of the page.
{{«demo»: «ElevateAppBar.js», «iframe»: true, «disableLiveEdit»: true}}
Back to top
A floating action button appears on scroll to make it easy to get back to the top of the page.
{{«demo»: «BackToTop.js», «iframe»: true, «disableLiveEdit»: true}}
useScrollTrigger([options]) => trigger
Arguments
-
options(object [optional]):options.disableHysteresis(bool [optional]): Defaults tofalse. Disable the hysteresis. Ignore the scroll direction when determining thetriggervalue.options.target(Node [optional]): Defaults towindow.options.threshold(number [optional]): Defaults to100. Change thetriggervalue when the vertical scroll strictly crosses this threshold (exclusive).
Returns
trigger: Does the scroll position match the criteria?
Examples
import useScrollTrigger from '@mui/material/useScrollTrigger';

function HideOnScroll(props) {
  const trigger = useScrollTrigger();
  return (
    <Slide in={!trigger}>
      <div>Hello</div>
    </Slide>
  );
}
Enable color on dark
Following the Material Design guidelines, the color prop has no effect on the appearance of the app bar in dark mode.
You can override this behavior by setting the enableColorOnDark prop to true.
{{«demo»: «EnableColorOnDarkAppBar.js», «bg»: true}}