Overview
The EditText is the standard text entry widget in Android apps. If the user needs to enter text into an app, this is the primary way for them to do that.

There are many important properties that can be set to customize the behavior of an EditText. Several of these are listed below. Check out the official text fields guide for even more input field details.
Usage
An EditText is added to a layout with all default behaviors with the following XML:
<EditText
    android:id="@+id/et_simple"
    android:layout_height="wrap_content"
    android:layout_width="match_parent">
</EditText>
Note that an EditText is simply a thin extension of the TextView and inherits all of the same properties.
Retrieving the Value
Getting the value of the text entered into an EditText is as follows:
EditText simpleEditText = (EditText) findViewById(R.id.et_simple);
String strValue = simpleEditText.getText().toString();
Customizing the Input Type
By default, any text contents within an EditText control is displayed as plain text. By setting inputType, we can facilitate input of different types of information, like phone numbers and passwords:
<EditText
    ...
    android:inputType="phone">
</EditText>
Most common input types include:
| Type | Description |
|---|---|
| textUri | Text that will be used as a URI |
| textEmailAddress | Text that will be used as an e-mail address |
| textPersonName | Text that is the name of a person |
| textPassword | Text that is a password that should be obscured |
| textVisiblePassword | Text, next button, and no microphone input |
| number | A numeric only field |
| phone | For entering a phone number |
| date | For entering a date |
| time | For entering a time |
| textMultiLine | Allow multiple lines of text in the field |
You can set multiple inputType attributes if needed (separated by ‘|’)
<EditText
  android:inputType="textCapSentences|textMultiLine"
/>
You can see a list of all available input types here.
Further Entry Customization
We might want to limit the entry to a single-line of text (avoid newlines):
<EditText
  android:maxLines="1"
  android:lines="1"
/>
You can limit the characters that can be entered into a field using the digits attribute:
<EditText
  android:inputType="number"
  android:digits="01"
/>
This would restrict the digits entered to just «0» and «1». We might want to limit the total number of characters with:
<EditText
  android:maxLength="5"
/>
Using these properties we can define the expected input behavior for text fields.
Adjusting Colors
You can adjust the highlight background color of selected text within an EditText with the android:textColorHighlight property:
<EditText
    android:textColorHighlight="#7cff88"
/>
with a result such as this:

Displaying Placeholder Hints
You may want to set the hint for the EditText control to prompt a user for specific input with:
<EditText
    ...
    android:hint="@string/my_hint">
</EditText>
which results in:
Changing the bottom line color
Assuming you are using the AppCompat library, you can override the styles colorControlNormal, colorControlActivated, and colorControlHighlight:
<style name="Theme.App.Base" parent="Theme.AppCompat.Light.DarkActionBar">
    <item name="colorControlNormal">#d32f2f</item>
    <item name="colorControlActivated">#ff5722</item>
    <item name="colorControlHighlight">#f44336</item>
</style>
If you do not see these styles applied within a DialogFragment, there is a known bug when using the LayoutInflater passed into the [onCreateView()](http://developer.android.com/reference/android/app/Fragment.html#onCreateView(android.view.LayoutInflater, android.view.ViewGroup, android.os.Bundle)) method.
The issue has already been fixed in the AppCompat v23 library. See this guide about how to upgrade. Another temporary workaround is to use the Activity’s layout inflater instead of the one passed into the onCreateView() method:
  public View onCreateView(LayoutInflater inflater, ViewGroup container, Bundle savedInstanceState) {
        View view = getActivity().getLayoutInflater().inflate(R.layout.dialog_fragment, container);
  }
Listening for EditText Input
Check out the basic event listeners cliffnotes for a look at how to listen for changes to an EditText and perform an action when those changes occur.
Displaying Floating Label Feedback
Traditionally, the EditText hides the hint message (explained above) after the user starts typing. In addition, any validation error messages had to be managed manually by the developer.

Starting with Android M and the design support library, the TextInputLayout can be used to setup a floating label to display hints and error messages. First, wrap the EditText in a TextInputLayout:
<com.google.android.material.textfield.TextInputLayout
    android:id="@+id/username_text_input_layout"
    android:layout_width="match_parent"
    android:layout_height="wrap_content">

    <EditText
        android:id="@+id/etUsername"
        android:layout_width="wrap_content"
        android:layout_height="wrap_content"
        android:layout_centerHorizontal="true"
        android:layout_centerVertical="true"
        android:ems="10"
        android:hint="Username" />

</com.google.android.material.textfield.TextInputLayout>
Now the hint will automatically begin to float once the EditText takes focus as shown below:
We can also use the TextInputLayout to display error messages using the setError and setErrorEnabled properties in the activity at runtime:
private void setupFloatingLabelError() {
    final TextInputLayout floatingUsernameLabel = (TextInputLayout) findViewById(R.id.username_text_input_layout);
    floatingUsernameLabel.getEditText().addTextChangedListener(new TextWatcher() {
        // ...
        @Override
        public void onTextChanged(CharSequence text, int start, int count, int after) {
            if (text.length() > 0 && text.length() <= 4) {
                floatingUsernameLabel.setError(getString(R.string.username_required));
                floatingUsernameLabel.setErrorEnabled(true);
            } else {
                floatingUsernameLabel.setErrorEnabled(false);
            }
        }
        @Override
        public void beforeTextChanged(CharSequence s, int start, int count,
                                      int after) {
            // TODO Auto-generated method stub
        }

        @Override
        public void afterTextChanged(Editable s) {

        }
    });
}
Here we use the addTextChangedListener to watch as the value changes to determine when to display the error message or revert to the hint.
Adding Character Counting
TextInputLayout can expose a character counter for an EditText defined within it. The counter will be rendered below the EditText and can change colors of both the line and character counter if the maximum number of characters has been exceeded:
The TextInputLayout simply needs to define app:counterEnabled and app:CounterMaxLength in the XML attributes. These settings can also be defined dynamically through setCounterEnabled() and setCounterMaxLength():
<com.google.android.material.textfield.TextInputLayout
    android:layout_width="match_parent"
    android:layout_height="wrap_content"
    app:counterEnabled="true"
    app:counterMaxLength="10"
    app:counterTextAppearance="@style/counterText"
    app:counterOverflowTextAppearance="@style/counterOverride">
    <EditText
       android:layout_width="wrap_content"
       android:layout_height="wrap_content"
       android:hint="Username"
       android:layout_centerHorizontal="true"
       android:layout_centerVertical="true"
       android:ems="10"
       android:hint="Username" />
</com.google.android.material.textfield.TextInputLayout>
Adding Password Visibility Toggles
If you use an EditText with an input password type, you can also enable an icon that can show or hide the entire text using the passwordToggleEnabled attribute. You can also change the default eye icon with passwordToggleDrawable attribute or the color hint using the passwordToggleTint attribute. See the TextInputLayout attributes for more details.
<com.google.android.material.textfield.TextInputLayout
        android:id="@+id/username_text_input_layout"
        app:passwordToggleEnabled="true"
        android:layout_width="match_parent"
        android:layout_height="wrap_content">

        <EditText
            android:id="@+id/etUsername"
            android:layout_width="wrap_content"
            android:layout_height="wrap_content"
            android:layout_centerHorizontal="true"
            android:layout_centerVertical="true"
            android:ems="10"
            android:inputType="textPassword"
            android:hint="Username" />

    </com.google.android.material.textfield.TextInputLayout>
Styling TextInputLayout
Make sure you have the app namespace (xmlns:app="http://schemas.android.com/apk/res-auto" defined in your outer layout. You can type appNS as a shortcut in Android Studio to be declared.
The hint text can be styled by defining app:hintTextAppearance, and the error text can be changed with app:errorTextAppearance. The counter text and overflow text can also have their own text styles by defining app:counterTextAppearance and app:counterOverflowTextAppearance. We can use textColor, textSize, and fontFamily to help change the color, size, or font (place inside styles.xml):
<style name="counterText">
  <item name="android:textColor">#aa5353cc</item>
</style>

<style name="counterOverride">
  <item name="android:textColor">#ff0000</item>
</style>
Providing Auto-complete
Check out the official text fields guide for a step-by-step on how to setup autocomplete for the entry.
References
- http://developer.android.com/guide/topics/ui/controls/text.html
- http://code.tutsplus.com/tutorials/android-user-interface-design-edittext-controls—mobile-7183
- http://www.codeofaninja.com/2012/01/android-edittext-example.html
- http://www.tutorialspoint.com/android/android_edittext_control.htm
- http://developer.android.com/reference/android/widget/EditText.html
- http://android-developers.blogspot.com/2015/10/android-support-library-231.html?linkId=17977963
In some situations, we should change edit text bottom line color according to background color. This example demonstrate about how to change line color in EditText.
Step 1 − Create a new project in Android Studio, go to File ⇒ New Project and fill all required details to create a new project.
Step 2 − Add the following code to res/layout/activity_main.xml.
<?xml version="1.0" encoding="utf-8"?>
<LinearLayout xmlns:android="http://schemas.android.com/apk/res/android"
   android:id="@+id/parent"
   xmlns:tools="http://schemas.android.com/tools"
   android:layout_width="match_parent"
   android:layout_height="match_parent"
   tools:context=".MainActivity"
   android:gravity="center"
   android:orientation="vertical">
   <EditText
      android:id="@+id/editText"
      android:hint="Bottom line color change"
      android:layout_width="wrap_content"
      android:backgroundTint="@android:color/holo_green_light"
      android:layout_height="wrap_content" >
   </EditText>
</LinearLayout>
In the above code, we have taken edit text, To change line color use the following code for edit text —
android:backgroundTint="@android:color/holo_green_light"
We can change color as per project requirement. we have taken green color for sample.
Step 3 − Add the following code to src/MainActivity.java
package com.example.andy.myapplication;
import android.os.Build;
import android.os.Bundle;
import android.support.annotation.RequiresApi;
import android.support.v7.app.AppCompatActivity;
public class MainActivity extends AppCompatActivity {
   int view = R.layout.activity_main;
   @RequiresApi(api = Build.VERSION_CODES.JELLY_BEAN)
   @Override
   protected void onCreate(Bundle savedInstanceState) {
      super.onCreate(savedInstanceState);
      setContentView(view);
   }
}
Let’s try to run your application. I assume you have connected your actual Android Mobile device with your computer. To run the app from android studio, open one of your project’s activity files and click Run Eclipse Run Icon icon from the toolbar. Select your mobile device as an option and then check your mobile device which will display your default screen −

In the above result, we have changed line color.
Click here to download the project code
For API 21 (Lollipop) and above, just set the color of property backgroundTint on the EditText
<android.support.v7.widget.AppCompatEditText
    android:layout_width="match_parent"
    android:layout_height="wrap_content"
    android:hint="Enter some inputs"
    android:backgroundTint="#0c53e2"/>
For Pre Lollipop, API 21 and below.
The quick and easy way.
<style name="MyEditTextStyle2" parent="Widget.AppCompat.EditText">
    <item name="colorControlActivated">#dc8f41</item>
    <item name="colorControlNormal">#d11472</item>
</style>
<EditText
    android:theme="@style/MyEditTextStyle2"
    android:layout_width="match_parent"
    android:layout_height="wrap_content"
    android:hint="Enter some inputs" />
The more complex way but with more control and customization if needed.
<style name="MyEditTextStyle" parent="Widget.AppCompat.EditText">
    <item name="colorControlActivated">#dc8f41</item>
</style>
text_box_underline.xml
<?xml version="1.0" encoding="utf-8"?>
<layer-list xmlns:android="http://schemas.android.com/apk/res/android">
    <item android:top="-4dp" android:left="-4dp" android:right="-4dp">
        <shape android:shape="rectangle">
            <stroke android:width="3dp" android:color="#dc8f41" />
        </shape>
    </item>
</layer-list>
text_box_underline_activated.xml
<?xml version="1.0" encoding="utf-8"?>
<layer-list xmlns:android="http://schemas.android.com/apk/res/android">
    <item android:top="-4dp" android:left="-4dp" android:right="-4dp">
        <shape android:shape="rectangle">
            <stroke android:width="3dp" android:color="#dc8f41" />
        </shape>
    </item>
</layer-list>
text_box_underline_selector.xml
<?xml version="1.0" encoding="utf-8"?>
<selector xmlns:android="http://schemas.android.com/apk/res/android">
    <item android:state_enabled="true" android:state_focused="true"
        android:drawable="@drawable/text_box_underline_activated" />
    <item android:drawable="@drawable/text_box_underline" />
</selector>
Assign the selector to the background of the EditText.
<EditText
    android:theme="@style/MyEditTextStyle"
    android:layout_width="match_parent"
    android:layout_height="30dp"
    android:hint="Enter some inputs"
    android:background="@drawable/text_box_underline_selector"/>
References:
http://stackoverflow.com/questions/14542557/android-different-edittext-backgrounds-for-different-states-using-shapes-select
http://stackoverflow.com/questions/26574328/changing-edittext-bottom-line-color-with-appcompat-v7
http://stackoverflow.com/questions/24677414/how-to-change-line-color-in-edittext
Search within Codexpedia

Custom Search
Search the entire web
Custom Search
Recently, when I was writing some little Demo review basics, when I used EditText, I suddenly found that I hardly noticed the color of its cursor and underline before, so I spent a lot of time and read many blogs. Now I will summarize and share the harvest.
1. First impression: native EditText
We need to modify the native EditText, first of all, of course, we need to understand its true face. Create a new project in Android Studio that lets MainActivity inherit from AppCompatActivity (why do we do this, let’s talk about it later), and then place an EditText in the layout of MainActivity:
<LinearLayout xmlns:android="http://schemas.android.com/apk/res/android"
    xmlns:app="http://schemas.android.com/apk/res-auto"
    android:orientation="vertical"
    xmlns:tools="http://schemas.android.com/tools"
    android:layout_width="match_parent"
    android:layout_height="match_parent"
    tools:context="com.lindroid.edittext.MainActivity">

    <EditText
        android:hint="Primitive EditText"
        android:layout_width="match_parent"
        android:layout_height="wrap_content" />


</LinearLayout>
Operating the project, careful observation can see that the cursor and underline are pink. Now let’s go step by step and change its cursor color first. 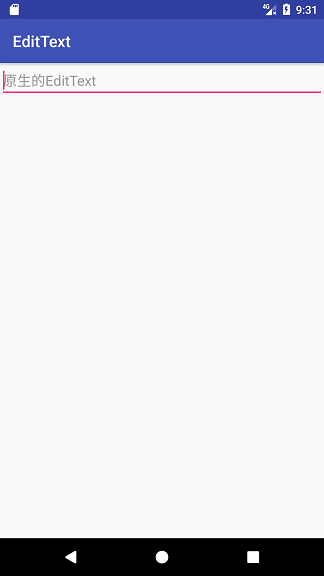
2. Custom cursor color
EditText has an attribute: android:textCursorDrawable, which is used to set the cursor style. In order to deepen our understanding, we will do a small experiment first: set textCursorDrawable to @null, which means removing the default style of the system, but we all remember that the attribute of the hidden cursor is android:cursorVisible, so what will the time scale look like? You can set different colors for text (android:textColor) and prompt text (android:textColorHint property), and when running, you will find that the color of the cursor is the same as that of the text.
After understanding the role of android:textCursorDrawable, we can create a cursor_color.xml file under the drawable resource folder, which reads as follows
<?xml version="1.0" encoding="utf-8"?>
<shape xmlns:android="http://schemas.android.com/apk/res/android"
    android:shape="rectangle">
    <size android:width="2dp" />
    <solid android:color="@android:color/holo_blue_light" />
</shape>
The color of the cursor is light blue with a width of 2 dp. Place a new EditText under the native EditText:
    <EditText
        android:textCursorDrawable="@drawable/cursor_color"
        android:hint="Custom cursor color"
        android:layout_width="match_parent"
        android:layout_height="wrap_content" />
The operation results are as follows: 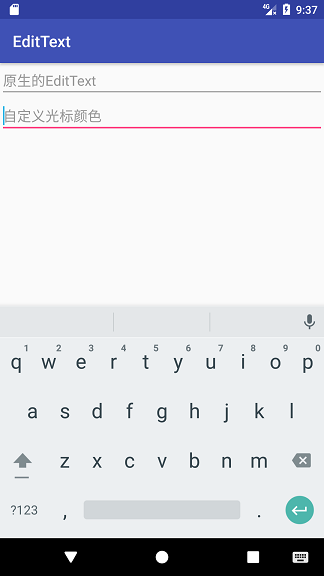
3. EditText after background cancellation
In Section 2, we set the attribute android:textCursorDrawable to «@null» and find that the cursor style will change to the same color as the text. What if we set the background of the entire EditText to «@null»? We can add an EditText and add the attribute android:background=»@null»:

As you can see, although the cursor’s style has not changed, the underline has disappeared, but in addition, EditText’s margin has disappeared. If the cursor is not blinking, it looks like a TextView at first glance.
This is how some custom EditText underscoring tutorials work on the Web. First remove the background, and then add a horizontal line below. This operation is not impossible, but in order to be beautiful, it is necessary to reset the spacing value.
4. Custom Subject Modification Underline
Remember when we created MainActivity, we inherited AppCompatActivity? Here’s the answer. This is done to use the Material Design style in the appcompat-v7 package. For example, we can create a new MyEditText style in the Styles.xml file:
    <style name="MyEditText" parent="Theme.AppCompat.Light">
        <item name="colorControlNormal">@android:color/darker_gray</item>
        <item name="colorControlActivated">@android:color/holo_orange_dark</item>
    </style>
ColorControl Normal denotes the default color of the control, and colorControl Activated denotes the color when the control is activated, so that we can set the color when EditText is not selected and when it is selected, respectively. Here I set the selected color to orange.
Add an EditText to activity_main.xml, and add the android:theme=»@style/MyEditText» attribute. The effect is as follows:

As you can see, the color of the cursor and underline will be changed, but the spacing will remain.
5. Global modification of EditText color
The previous approach is to modify an EditText. If you need to change all the colors of the EditText in the project, the workload will be too heavy. Is there any way to settle the situation?
I don’t know if you’ve found out yet. Why does EditText default to a grumpy pink? In fact, you set up several other controls (such as ProgressBar, Switch, etc.) whose colors are basically powdery. Just take a look at styles.xml, and the code for AppTheme is as follows:
    <style name="AppTheme" parent="Theme.AppCompat.Light.DarkActionBar">
        <!
        <item name="colorPrimary">@color/colorPrimary</item>
        <item name="colorPrimaryDark">@color/colorPrimaryDark</item>
        <item name="colorAccent">@color/colorAccent</item>
    </style>
Did you see? The colour Accent inside is the cockroach pink. In order to understand these three colors, I specially found a picture: 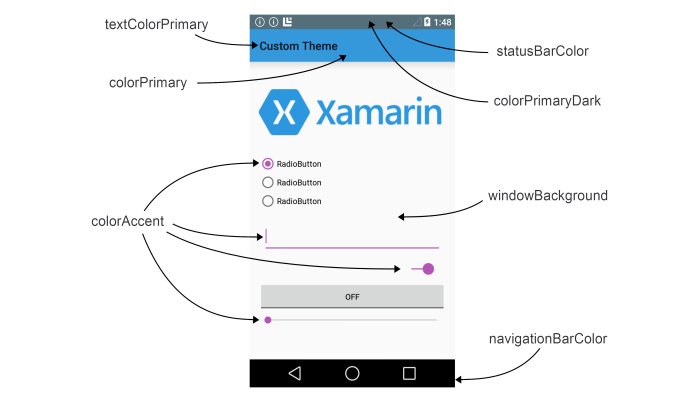
6. Customize underscores when inheriting Activity
Previous custom underlining operations are based on the premise of inheriting AppCompat Activity. If you change to Activity and then run on Android phones below 5.0, the effect is as follows: 
The Material Design style disappeared and the color of the cursor could be changed, but the color of the underline could not be changed. So we have to think of other ways.
EditText is an input box, which we can understand as follows: Underline is nothing more than adding a line to the lower border of the input box. This can be done with layer-list (layer) in Android. Create two new XML files: et_underline_unselected.xml and et_underline_selected.xml. The former is the background when EditText was selected, and the latter is the background when it was not selected:
et_underline_unselected.xml
<?xml version="1.0" encoding="utf-8"?>
<layer-list xmlns:android="http://schemas.android.com/apk/res/android">
    <item
        android:bottom="0dp"
        android:left="-2dp"
        android:right="-2dp"
        android:top="-2dp">
        <shape>
            <solid android:color="@android:color/transparent" />
            <stroke
                android:width="1dp"
                android:color="@android:color/darker_gray" />
            <padding android:bottom="4dp" />
        </shape>
    </item>

</layer-list>
et_underline_selected.xml
<?xml version="1.0" encoding="utf-8"?>
<layer-list xmlns:android="http://schemas.android.com/apk/res/android">

    <item
        android:bottom="0dp"
        android:left="-2dp"
        android:right="-2dp"
        android:top="-2dp">
        <shape>
            <solid android:color="@android:color/transparent" />
            <stroke
                android:color="@android:color/holo_green_light"
                android:width="2dp" />
            <padding android:bottom="4dp" />

        </shape>
    </item>

</layer-list>
I think of layer-list as a list of layers. Shape is an item in the list. Since we only need a horizontal line in the bottom border, we set it to a negative value except for the bottom margin of the list. There should be a little distance between the cursor and the underline, so set the inner margin below the shape to 4dp. Of course, the underline width is a little wider when selected.
Create a new Second Activity in the project, inherit from Activity, and then place two EditText s in the layout file. The background s are set to «@null» and the cursor is in our previous light blue.
<LinearLayout xmlns:android="http://schemas.android.com/apk/res/android"
    xmlns:app="http://schemas.android.com/apk/res-auto"
    xmlns:tools="http://schemas.android.com/tools"
    android:layout_width="match_parent"
    android:layout_height="match_parent"
    android:orientation="vertical"
    tools:context="com.lindroid.edittext.SecondActivity">

    <EditText
        android:id="@+id/editText1"
        android:layout_width="match_parent"
        android:layout_height="wrap_content"
        android:layout_margin="3dp"
        android:background="@null"
        android:hint="custom EditText Underline 1"
        android:textCursorDrawable="@drawable/cursor_color" />

    <EditText
        android:id="@+id/editText2"
        android:layout_width="match_parent"
        android:layout_height="wrap_content"
        android:layout_margin="3dp"
        android:background="@null"
        android:hint="custom EditText Underline 2"
        android:textCursorDrawable="@drawable/cursor_color" />
</LinearLayout>
Then set EditText’s listening events in the code
        /**Initialize EditText, default unchecked**/
        editText1.setBackgroundResource(R.drawable.et_underline_unselected);
        editText2.setBackgroundResource(R.drawable.et_underline_unselected);
        /**The first EditText focus listening event**/
        editText1.setOnFocusChangeListener(new View.OnFocusChangeListener() {
            @Override
            public void onFocusChange(View v, boolean hasFocus) {
                if (hasFocus) {
                    Log.e(TAG, "EditText1 Getting Focus");
                    editText1.setBackgroundResource(R.drawable.et_underline_selected);

                } else {
                    Log.e(TAG, "EditText1 Losing focus");
                    editText1.setBackgroundResource(R.drawable.et_underline_unselected);
                }
            }
        });
        /**The second EditText focus listening event**/
        editText2.setOnFocusChangeListener(new View.OnFocusChangeListener() {
            @Override
            public void onFocusChange(View v, boolean hasFocus) {
                if (hasFocus) {
                    Log.e(TAG, "EditText2 Getting Focus");
                    editText2.setBackgroundResource(R.drawable.et_underline_selected);

                } else {
                    Log.e(TAG, "EditText2 Losing focus");
                    editText2.setBackgroundResource(R.drawable.et_underline_unselected);
                }
            }
        });
Note that all EditText s should be set to run first. The effect is as follows: 
The effect is that we implemented it, but then the code in Activity is too lengthy, so we can encapsulate the selected and unselected states into the state selector. Create a new et_underline_selector.xml file under the drawable folder:
<?xml version="1.0" encoding="utf-8"?>
<selector xmlns:android="http://schemas.android.com/apk/res/android">
    <item android:state_focused="false" android:drawable="@drawable/et_underline_unselected"/>
    <item android:state_focused="true" android:drawable="@drawable/et_underline_selected"/>
</selector>
android:state_focused indicates whether the control is focused. Then set android:background=»@drawable/et_underline_selector» in the layout file, and delete the focus listening code of Activity. Running, you can see the same effect.
7. Postscript
This is the end of the article, but I still have a lot to learn. Some of the knowledge in the article may be inadequate or wrong because of my personal understanding. Welcome to make corrections!
Because the code here is relatively simple, the project will not be uploaded, you start knocking, I believe there is no problem.
Reference
Android EditText Change Border Color
Android’s Method of Changing EditText Underline Color Style

При разработке приложения для Android, хотелось бы сохранить цветовую схему элементов. Рассмотрим как это сделать для элемента EditText.
Шаг 1. Подготовка
Создадим обычный Android проект и добавим два элемента EditText:
<EditText
       android:layout_width="match_parent"
       android:layout_height="wrap_content"
       android:id="@+id/editText" />

<EditText
       android:layout_width="match_parent"
       android:layout_height="wrap_content"
       android:id="@+id/editText2"
       android:paddingTop="50dp"/>
Зачем нам два элемента EditText? Что бы наглядно увидеть состояние элемента. На самом деле их 5:
1. default – стандартное;
2. active – активное;
3. focused – сфокусированное;
4. disable – запрещенное;
5. disable_focused – запрещенное сфокусированное.
но мы рассмотрим первые два, для остальных всё аналогично.
Итак, запустим приложение и на нашем Layout’е увидим два EditText‘а. Если мы захотим что то написать в одном из них и нажмем на него – состояние элемента станет Active:

Предположим, что для сохранения цветовой схемы в приложении, выделение линии EditText’а в активном состоянии должно быть фиолетовым (#5b009c). С этого момента всё стало не так просто, как хотелось бы 
Покопавшись в SDK, можно найти найти такой ресурс:

Это исходник для поля EditText. По периметру изображения есть красные и черные полосы, отвечающие за изменение размера. То есть, если EditText требуется увеличить по ширине, из картинки выбирается кусок, помеченный черными полосками сверху и снизу и растягивается по длине. При этом в растягивании участвует только определенная область, тем самым не изменяя размер углам EditTex’а. Аналогично изменяется и по высоте. Красные линии – это обязательные отступы.
Итак, мы хотим изменить цвет для активного элемента. Можно перерисовать это изображение и загрузить в проект, но ведь не все дружат с графическими редакторами или может быть просто лень 
Для этих целей есть отличный web-сервис: Android Holo Colors Generator
В поле Theme Name следует указать название темы оформление, я назову EditTextStyle. Далее выбираем цвет:

И ниже значение EditText ставим на “YES”.
Как видим ниже, сервис сгенерировал для нас ресурсы:

Осталось только их скачать и добавить в проект. Жмем на кнопку “Download .ZIP” и переходим к следующему шагу.
Шаг 2. Прикручиваем кастомный стиль
Распакуем полученный архив и посмотрим, что в нем есть. Нас будут интересовать только папки Drawable:

Расфасуем наши ресурсы по папкам проекта. Тут всё просто, и в итоге выглядит вот так:
![MyApp - [E__temp_IdeaProjects_MyApp] - [app] - ..._app_src_main_res_layout_activity_main.xml - IntelliJ IDEA 13.1.2 2014-07-11 11.50.05](https://devcolibri.com/cp/wp-content/uploads/2014/07/MyApp-E__temp_IdeaProjects_MyApp-app-..._app_src_main_res_layout_activity_main.xml-IntelliJ-IDEA-13.1.2-2014-07-11-11.50.05.png)
Структура имени файлов такова: [edittextstyle]_[textfield_activated]_[holo_light].[9].png
- [edittextstyle] – имя нашей темы;
- [textfield_activated] – полное название состояния;
- [holo_light] – имя родительской темы;
- [9] – номер ресурса в SDK.
Однако, само по себе приложение не поймет что нужно брать именно эти ресурсы и поэтому следует явно указать это. Создадим папку “drawable” а в ней файл “edittextstyle_edit_text_holo_light.xml” (если очень лень, то можно конечно всё это взять с архива.. но это же слишком просто, верно?)
Что нужно написать в этом файле? “Там уже всё написано” – скажите вы.. Но ведь следует в этом разобраться!
Как правило хорошего тона и юзабилити приложения, следует давать пользователю обратную связь, в нашем же случае это показать какой элемент сейчас активен. Для реализации такой обратной связи используется паттерн Selector. Суть Selector’а — это задание различного стилевого оформления для различных состояний выбираемого элемента.
Внутри Selector’a находятся элементы Item, а внутри Item – атрибуты, которые говорят, имеет ли элемент активное/фокусированное/запрещенное состояние и ссылку на соответствующий ресурс.
<?xml version="1.0" encoding="utf-8"?>

<selector xmlns:android="http://schemas.android.com/apk/res/android">
    <item
            android:state_window_focused="false"
            android:state_enabled="true"
            android:drawable="@drawable/edittextstyle_textfield_default_holo_light" />
    <item
            android:state_window_focused="false"
            android:state_enabled="false"
            android:drawable="@drawable/edittextstyle_textfield_disabled_holo_light" />
    <item
            android:state_enabled="true"
            android:state_focused="true"
            android:drawable="@drawable/edittextstyle_textfield_activated_holo_light" />
    <item
            android:state_enabled="true"
            android:state_activated="true"
            android:drawable="@drawable/edittextstyle_textfield_focused_holo_light" />
    <item
            android:state_focused="true"
            android:drawable="@drawable/edittextstyle_textfield_disabled_focused_holo_light" />
</selector>
Ничего не работает?
Действительно, при запуске приложения ничего не изменится. Почему так? Потому что мы не указали элементам EditText на нашем Layout’е, что нужно использовать эти стили. Открываем activity_main.xml и дописываем в каждый элемент EditText следующий атрибут:
android:background="@drawable/edittextstyle_edit_text_holo_light"
Проверим работу приложения:

Ура! Все работает, можно наградить себя печеньками
Лайфхак
Что бы не потерять наш цвет и использовать его где то в других местах, я добавил значение в файле strings.xml
<color name="my_color">#5b009c</color>
PS:
Если вы были внимательны, то должны были заметить, что сервис Android Holo Colors Generator позволяет кастомизировать цвета не только для элемента EditText, но также и для других элементов.
Конечно, это довольно таки простой способ кастомизации, существуют более серьезные методы решения этой задачи. Например можно все прорисовать с помощью графики:
<?xml version="1.0" encoding="utf-8"?>
<shape xmlns:android="http://schemas.android.com/apk/res/android"
 android:shape="rectangle" android:padding="10dp">
<solid android:color="#4C000000"/>
    <corners android:bottomRightRadius="5dp"
             android:bottomLeftRadius="5dp"
             android:topLeftRadius="5dp"
             android:topRightRadius="5dp"/>
</shape>
Тут придется повозится больше, однако в таком случае у нас есть практически безграничные возможности отрисовки, но это уже совсем другая история…
- None Found