In this article, we shall see how to change or switch between Multiple Background colors in Tkinter.
Radiobutton:
Radiobutton is a widget that lets us choose an option from multiple options. Tkinter provides Radiobutton using which we can display multiple options in our GUI application.
Syntax:
tk.Radiobutton(text=some_name,value=give_name_that_of_text,variable=Tkinter_Variable)
for option in [“Brown”,”Black”,”Orange”,”Green”,”Red”]:
rd = tk.Radiobutton(root,text=”%s” %option,value=option,variable=choice)
rd.pack()
In order to display a Variable for each Radiobutton, we shall initialize Tkinter String Variable. Using String Variable we can perform the set and get method. Initially using String Variable we shall initialize Purple as the default color.
Syntax:
var = tk.StringVar()
choice = tk.StringVar(root,"purple") # initialize

# after button click:
color = choice.get()
Canvas:
A Tkinter canvas can be used to draw in a window, create images and add color.
canva = tk.Canvas(root,bg="purple")
canva.place(x=-1,y=-1,width=300,height=300)
The place() method is a layout manager that is used to place a widget within the GUI window.
Button:
The button is used to trigger events in the GUI applications. You can add a command as the argument which calls the function to be executed on a button click. In simple words, Button is used to toggle events.
btn = tk.Button(text=”Change BG”,command=trigger_some_change,bd=4)
btn.pack()
bd argument means border. And the pack is also a layout manager that is used to display the widget on GUI following in specific order.
Example:
Python3
import tkinter as tk
root = tk.Tk()
root.geometry("300x300")
root.resizable(False, False)
def change():
color = choice.get()
canva.configure(bg=color)
choice = tk.StringVar(root, "purple")
canva = tk.Canvas(root, bg="purple")
canva.place(x=-1, y=-1, width=300, height=300)
for option in ["Brown", "Black", "Orange", "Green", "Red"]:
tk.Radiobutton(root, text="%s" % option, value=option,
variable=choice, padx=10, pady=5).pack()
tk.Button(text="Change BG", command=change, bd=4).place(x=100, y=180)
root.mainloop()
Output:
Скачайте код уроков с GitLab: https://gitlab.com/PythonRu/tkinter-uroki
Работа с цветами
В примерах из прошлых материалов цвета задавались с помощью их названий: например, white, blue или yellow. Эти значения передаются в виде строк параметрам foreground и background, которые изменяют цвет текста и фона виджета соответственно.
Названия цветов дальше уже привязываются к RGB-значениям (аддитивной модели, которая представляет цвета за счет комбинации интенсивности красного, зеленого и синего цветов). Этот перевод делается на основе таблицы, которая отличается от платформы к платформе. Если же нужно отображать один и тот же цвет на разных платформах, то можно передавать RGB-значение в параметры виджета.
Следующее приложение показывает, как можно динамически менять параметры foreground и background у метки, которая демонстрирует зафиксированный текст:
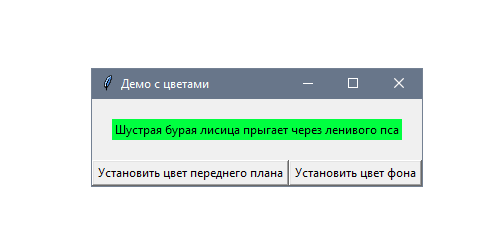
Цвета определены в формате RGB и выбираются с помощью нативного модального окна. На следующем скриншоте представлено диалоговое окно из Windows 10:
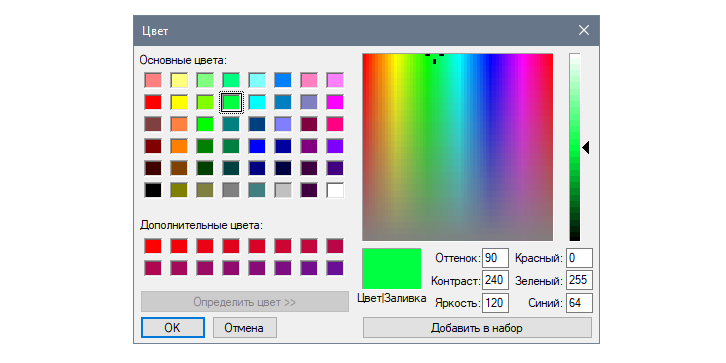
Традиционно будем работать с настройками виджета с помощью кнопок — по одной для каждого параметра. Основное отличие по сравнению с предыдущими примерами в том, что значения могут быть прямо выбраны с помощью диалогового окна askcolor из модуля tkinter.colorchooser:
from functools import partial
import tkinter as tk

from tkinter.colorchooser import askcolor

class App(tk.Tk):

    def __init__(self):

        super().__init__()

        self.title("Демо с цветами")

        text = "Шустрая бурая лисица прыгает через ленивого пса"

        self.label = tk.Label(self, text=text)

        self.fg_btn = tk.Button(self, text="Установить цвет текста",

                                command=partial(self.set_color, "fg"))

        self.bg_btn = tk.Button(self, text="Установить цвет фона",

                                command=partial(self.set_color, "bg"))

        self.label.pack(padx=20, pady=20)

        self.fg_btn.pack(side=tk.LEFT, fill=tk.BOTH, expand=True)

        self.bg_btn.pack(side=tk.LEFT, fill=tk.BOTH, expand=True)

    def set_color(self, option):

        color = askcolor()[1]

        print("Выбрать цвет:", color)

        self.label.config(**{option: color})

if __name__ == "__main__":

    app = App()

    app.mainloop()
Если нужно проверить RGB-значение выбранного цвета, то его можно вывести в консоль при подтверждении выбора. Если же ничего не было выбрано, то и консоль останется пустой.
Как работает настройка цвета
Обе кнопки используют функцию partial в качестве обратного вызова. Это инструмент из модуля functools, который создает новый вызываемый объект. Он ведет себя как оригинальная функция, но с некоторыми зафиксированными аргументами. Возьмем в качестве примера такую инструкцию:
tk.Button(self, command=partial(self.set_color, "fg"), ...)
Предыдущая инструкция выполняет то же действие, что и следующая:
tk.Button(self, command=lambda: self.set_color("fg"), ...)
Так делается для того, чтобы переиспользовать метод set_color() из модуля functools. Это особенно полезно в более сложных сценариях, например, когда нужно создать несколько функций, и очевидно, что некоторые аргументы заданы заранее.
Нужно лишь помнить тот нюанс, что foreground и background кратко записаны как fg и bg. Эти строки распаковываются с помощью ** при настройке виджета в инструкции:
def set_color(self, option):

        color = askcolor()[1]

        print("Выбрать цвет:", color)

        self.label.config(**{option: color}) # same as (fg=color)

                                or (bg=color)
askcolor возвращает кортеж с двумя элементами, которые представляют собой выбранный цвет. Первый — кортеж цветов из RGB-значений, а второй — шестнадцатеричное представление в виде строки. Поскольку первый вариант не может быть прямо передан в параметры виджета, используется второй.
Если нужно преобразовать название цвета в RGB-формат, можно использовать метод winfo_rgb() из предыдущего виджета. Поскольку он возвращает кортеж целых чисел от 0 до 65535, которые представляют 16-битные RGB-значения, их можно конвертировать в более привычное представление #RRGGBB, сдвинув вправо 8 битов:
rgb = widget.winfo_rgb("lightblue")

red, green, blue = [x>>8 for x in rgb]

print("#{:02x}{:02x}{:02x}".format(red, green, blue))
В предыдущем коде использовался {:02x} для форматирования каждого целого числа в два шестнадцатеричных.
Задание шрифтов виджета
В Tkinter можно менять шрифт виджета на кнопках, метках и записях. По умолчанию он соответствует системному, но его можно поменять с помощью параметра font.
Следующее приложение позволяет пользователю динамически менять тип шрифта и его размер для статического текста. Попробуйте разные значения, чтобы увидеть результаты настройки:
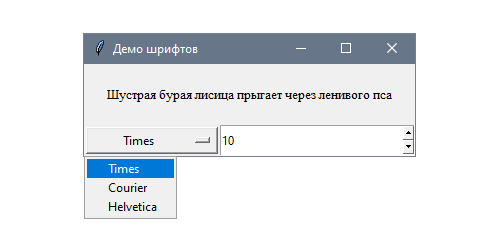
В данном случае для настройки используются два вида виджетов: выпадающее меню со списком шрифтов и поле ввода с предустановленными вариантами Spinbox для выбора размера:
import tkinter as tk
class App(tk.Tk):
def __init__(self):
super().__init__()
self.title("Демо шрифтов")
text = "Шустрая бурая лисица прыгает через ленивого пса"
self.label = tk.Label(self, text=text)
self.family = tk.StringVar()
self.family.trace("w", self.set_font)
families = ("Times", "Courier", "Helvetica")
self.option = tk.OptionMenu(self, self.family, *families)
self.size = tk.StringVar()
self.size.trace("w", self.set_font)
self.spinbox = tk.Spinbox(self, from_=8, to=18,
textvariable=self.size)
self.family.set(families[0])
self.size.set("10")
self.label.pack(padx=20, pady=20)
self.option.pack(side=tk.LEFT, fill=tk.BOTH, expand=True)
self.spinbox.pack(side=tk.LEFT, fill=tk.BOTH, expand=True)
def set_font(self, *args):

    family = self.family.get()

    size = self.size.get()

    self.label.config(font=(family, size))
if __name__ == "__main__":
app = App()
app.mainloop()
Стоит обратить внимание, что у переменных Tkinter есть некоторые значения по умолчанию, которые привязаны к каждому полю.
Как работает настройка шрифтов?
Кортеж FAMILIES включает три типа шрифтов, которые Tk гарантированно поддерживает на всех платформах: Times (Times New Roman), Courier и Helvetica. Между ними можно переключаться с помощью виджета OptionMenu, который привязан к переменной self.family.
Подобный подход используется также для того, чтобы задать размер шрифта в Spinbox. Обе переменных вызывают метод, который меняет шрифт метки:
def set_font(self, *args):
family = self.family.get()
size = self.size.get()
self.label.config(font=(family, size))
Кортеж, который передается в font, также может определять один или несколько следующих параметров шрифта: полужирный, стандартный, курсивный, подчеркнутый или перечеркнутый:
widget1.config(font=("Times", "20", "bold"))

widget2.config(font=("Helvetica", "16", "italic underline"))
Полный список всех доступных шрифтов, которые доступны для платформы, можно получить с помощью метода families() из модуля tkinter.font. Поскольку сперва нужно создать экземпляр окна root, можно использовать следующий скрипт:
import tkinter as tk

from tkinter import font

root = tk.Tk()

print(font.families())
Tkinter не вернет ошибку при попытке использовать шрифт не из списка, но попробует подобрать похожий.
Модуль tkinter.font включает класс Font, который можно переиспользовать в нескольких виджетах. Основное преимущество изменения экземпляра font в том, что в таком случае он затрагивает все виджеты, в которых был использован.
Работа с классом Font напоминает работу с дескрипторами шрифтов. Например, этот скрипт создает полужирный шрифт Courier размером 18 пикселей:
from tkinter import font

courier_18 = font.Font(family="Courier", size=18, weight=font.BOLD)
Чтобы получить или изменить значение, можно использовать методы cget и configure:
family = courier_18.cget("family")

courier_18.configure(underline=1)
Использование параметров базы данных
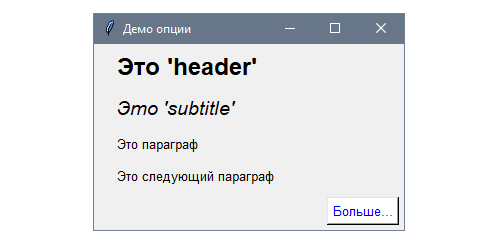
В Tkinter есть понятие базы данных параметров. Этот механизм используется для настройки внешнего вида приложения без определения параметров для каждого виджета. Это позволяет отделить некоторые параметры виджета от индивидуальной настройки, предоставив стандартизированные значения по умолчанию на основе иерархии виджетов.
В этом примере построим приложение, включающее несколько виджетов с разными стилями, которые будут определены в базе данных параметров:
Добавим кое-какие параметры с помощью метода option_add(), который доступен из всех классов виджетов:
import tkinter as tk

class App(tk.Tk):

    def __init__(self):

        super().__init__()

        self.title("Демо опции")

        self.option_add("*font", "helvetica 10")

        self.option_add("*header.font", "helvetica 18 bold")

        self.option_add("*subtitle.font", "helvetica 14 italic")

        self.option_add("*Button.foreground", "blue")

        self.option_add("*Button.background", "white")

        self.option_add("*Button.activeBackground", "gray")

        self.option_add("*Button.activeForeground", "black")

        self.create_label(name="header", text="Это 'header'")

        self.create_label(name="subtitle", text="Это 'subtitle'")

        self.create_label(text="Это параграф")

        self.create_label(text="Это следующий параграф")

        self.create_button(text="Больше...")

    def create_label(self, **options):

        tk.Label(self, **options).pack(padx=20, pady=5, anchor=tk.W)

    def create_button(self, **options):

        tk.Button(self, **options).pack(padx=5, pady=5, anchor=tk.E)


if __name__ == "__main__":

    app = App()

    app.mainloop()
Вместо настройки шрифтов, foreground и background и других параметров Tkinter будет использовать значения по умолчанию из базы.
Как работают стили для виджетов
Начнем с объяснения каждого вызова option_add. Первый из них добавляет параметр, который задает атрибут font для всех виджетов — звездочка представляет любое название приложения:
self.option_add("*font", "helvetica 10")
Следующий вызов ограничивает вызов для элементов с именем header. Чем он конкретнее, тем выше приоритет. Это же имя позже используется при создании экземпляра с меткой name="header":
self.option_add("*header.font", "helvetica 18 bold")
То же применимо и к self.option_add("*subtitle.font", "helvetica 14 italic"), где каждый параметр соответствует своему экземпляру виджета.
Следующие параметры используют имя класса Button вместе имени экземпляра. Таким образом можно ссылаться на все виджеты конкретного класса, чтобы задать для них значения по умолчанию:
self.option_add("*Button.foreground", "blue")

self.option_add("*Button.background", "white")

self.option_add("*Button.activeBackground", "gray")

self.option_add("*Button.activeForeground", "black")
База параметров использует иерархию виджетов для определения параметров, которые будут применяться к каждому экземпляру, поэтому в случае вложенных контейнеров они также могут быть использованы для ограничения параметров, у которых выше приоритет.
Эти параметры не применяются к существующим виджетам, а лишь к тем, которые были созданы после изменения базы данных. Таким образом всегда рекомендуется вызывать option_add() в начале приложения.
Есть несколько примеров, где один приоритетнее предыдущего:
*Frame*background: работает для фона всех виджетов во фрейме.*Frame.background: фон всех фреймов.*Frame.myButton.background: фон виджетаmyButton.*myFrame.myButton.background: фон виджетаmyButtonвнутри контейнераmyFrame.
Чтобы не добавлять параметры в коде, их можно определить в отдельном текстовом файле в таком формате:
*font: helvetica 10

*header.font: helvetica 18 bold

*subtitle.font: helvetica 14 italic

*Button.foreground: blue

*Button.background: white

*Button.activeBackground: gray

*Button.activeForeground: black
Этот файл затем загружается в приложение с помощью метода option_readfile() и заменяет все вызовы к option_add(). В этом примере предположим, что файл называется my_options_file и что находится он в одной папке с кодом:
def __init__(self):

    super().__init__()

    self.title("Options demo")

    self.option_readfile("my_options_file")

    # ...
Если такого файла не существует или его формат неверный, Tkinter вернет ошибку TclError.
In this Python tutorial, we will learn how to implement colors using Python Tkinter. Let us understand in detail Python Tkinter colors with the points:
- Python Tkinter Colors
- Python Tkinter Colors RGB
- Python Tkinter Color Text
- Python Tkinter Color Button
- Python Tkinter Color Chooser
- Python Tkinter Color Label
- Python Tkinter Color Transparent
- Python Tkinter Color Window
Colors play an important role in the UI/UX of the application. It adds a professional touch to the application and helps in engaging the user for a longer time.
- Every color has some thought behind it, selecting the right color for an application is an art & it takes time to master it.
- Red symbolizes an error, green means okay or done, yellow means something is incomplete, etc.
- Every color has two things and the developer/user can provide either of them:
- color name: ‘white smoke’, ‘red’, ‘floral white’, ‘blue’, etc
- color code: #F5F5F5, #FF0000, #FFFAF0, 0000FF, etc
Read: Python Tkinter Autocomplete
Python Tkinter Colors RGB
Python Tkinter does not support input of colors in RGB format but we can create a workaround that accepts inputs in a RGB format.
- In the below program, you can notice that we have created a function that accepts user input and it adds pound sign (#) as prefix and byte code as a suffix.
- Now while providing the background color we have used this function and provided the RGB values.
from tkinter import *


def rgb_hack(rgb):
    return "#%02x%02x%02x" % rgb


ws = Tk()
ws.title('PythonGuides')
ws.geometry('400x300')
ws.config(bg=rgb_hack((255, 0, 122)))
ws.mainloop()
Output:
In this output, you can see that window has a color passed in the code in a RGB format.

Read: Python Tkinter Mainloop with Examples
Python Tkinter Color Text
In this section, we will learn how to set the color of the Text in Python Tkinter.
- foreground or fg is the option that accepts the color input from the user and sets the font or text color.
- This option is common in almost all the widgets and can be applied on the text of any widget.
- In our example, we will be implementing color on the Text box widget. By default the Text color is blue but we will change it to Blue.
from tkinter import *

ws = Tk()
ws.title('PythonGuides')
ws.config(bg='#D9D8D7')
ws.geometry('400x300')

tb = Text(
    ws,
    width=25,
    height=8,
    font=('Times', 20),
    wrap='word',
    fg='#4A7A8C'
)
tb.pack(expand=True)

ws.mainloop()
Output of Python Tkinter Color Text
In this output, we have changed the default color of the text from black to light blue.

Read: Python Tkinter Scrollbar
Python Tkinter Color Button
In this section, we will learn how to change the color of the Button and button text in Python Tkinter.
- Button widget in Python Tkinter has mainly three colors applied on it.
- Button Text Color
- Button background Color
- Button color when clicked
- Button text color can be changed by using keyword foreground or fg.
- Button background color can be changed by using keyword background or bg is used.
- Button color when clicked can be changed by using keyword activebackground and to change color of text use activeforeground.
- In our example, we have demonstrated button that changes color when pointer is hovered over it.
from tkinter import *

ws = Tk()
ws.titlSelect colorSelect colore('PythonGuides')
ws.config(bg='#D9D8D7')
ws.geometry('400x300')

Button(
    ws,
    text='Download',
    font=('Times', 20),
    padx=10,
    pady=10,
    bg='#4a7abc',
    fg='yellow',
    activebackground='green',
    activeforeground='white'
    ).pack(expand=True)

ws.mainloop()
Output:
In this output, a button has a background color as light-blue and yellow text. When the mouse is hovered-over it, the button changes to a green background and white foreground or text color.

Read: Python Tkinter Text Box Widget
Python Tkinter Color Chooser
In this section, we will learn to create a color chooser using python tkinter.
- Python Tkinter provides colorchooser module using which color toolbox can be displayed.
- Color chooser allows users to choose colors from the color tray.
- colorchooser returns the RGB code with hexadecimal color code in the tuple format.
- In our example, we will create an application that allows users to choose any color from the color tray, and then that color will be displayed on the label.
from tkinter import *
from tkinter import colorchooser

def pick_color():
    color = colorchooser.askcolor(title ="Choose color")
    color_me.config(bg=color[1])
    color_me.config(text=color)


ws = Tk()
ws.title('PythonGuides')
ws.geometry('400x300')

color_me = Label(
    ws,
    text='(217, 217, 217) #d9d9d9',
    font = ('Times', 20),
    relief = SOLID,
    padx=20,
    pady=20
)
color_me.pack(expand=True)
button = Button(
    ws,
    text = "Choose Color",
    command = pick_color,
    padx=10,
    pady=10,
    font=('Times', 18),
    bg='#4a7a8c'
    )
button.pack()

ws.mainloop()
Output:
In this output, you can see that when the user clicks on the choose color button then a color tray is pop-up. and the label changes color to the selected color.

This is how to use a color chooser in Python Tkinter.
Read: grid() method in Python Tkinter
Python Tkinter Color Label
In this section, we will learn how to change color of a Label widget in Python Tkinter.
- Label in Python Tkinter is a widget that is used to display text and images on the application.
- We can apply color on the Label widget and Label Text.
- To color the widget label, the background or bg keyword is used, and to change the text color of the label widget, the foreground or fg keyword is used.
- In this example, we have a colored label widget and label text.
from tkinter import *

ws = Tk()
ws.title('PythonGuides')
ws.config(bg='#D9D8D7')
ws.geometry('400x300')

Label(
    ws,
    text='This text is displayed n using Label Widget',
    font=('Times', 20),
    padx=10,
    pady=10,
    bg='#4a7abc',
    fg='yellow'
    ).pack(expand=True)

ws.mainloop()
In this output, Label widget is painted with light blue and Label text with yellow

Read: Python Tkinter OptionMenu
Python Tkinter Color Transparent
In this section, we will learn how to set the color to transparent in Python Tkinter. In other words, removing all the colors from the background so that background things start appearing through the window.
- The first step in the process is to set the background color to the window using the config keyword.
- now provide the same background color in the wm_attributes()
- Here is the implementation of Python Tkinter Color Transparent.
from tkinter import *

ws = Tk()
ws.title('PythonGuides')
ws.geometry('400x300')

ws.config(bg='#4a7a8c')

ws.wm_attributes('-transparentcolor','#4a7a8c')

ws.mainloop()
Here is the output of Python Tkinter Color Transparent
In this output, the application is transparent and the color you are seeing is the background color of the desktop.

Python Tkinter Color Window
In this section, we will learn how to color the main window of Python Tkinter.
- In Python Tkinter, we can change the default settings of the widget by changing the configuration.
- To change the configuration we can use the keyword config or configure.
from tkinter import *

ws = Tk()
ws.title('PythonGuides')
ws.geometry('400x300')
ws.config(bg='#116562')

ws.mainloop()
Output:
In this output, window color is changed displayed. Default color of Python Tkinter window is Light Gray, but we have changed it to see green.

You may like the following Python Tkinter tutorials:
- Python NumPy zeros + Examples
- Check if NumPy Array is Empty in Python
- Python NumPy Random
- Registration form in Python using Tkinter
- Extract text from PDF Python
- BMI Calculator Using Python Tkinter
- Python Tkinter Image
- Create a Snake Game in Python Tkinter
In this tutorial, we have learned how to use color in Python Tkinter. Also, we have covered these topics.
- Python Tkinter Colors
- Python Tkinter Colors Example
- Python Tkinter Colors RGB
- Python Tkinter Color Text
- Python Tkinter Color Button
- Python Tkinter Color Chooser
- Python Tkinter Color Label
- Python Tkinter Color Transparent
- Python Tkinter Color Window

Python is one of the most popular languages in the United States of America. I have been working with Python for a long time and I have expertise in working with various libraries on Tkinter, Pandas, NumPy, Turtle, Django, Matplotlib, Tensorflow, Scipy, Scikit-Learn, etc… I have experience in working with various clients in countries like United States, Canada, United Kingdom, Australia, New Zealand, etc. Check out my profile.