How it works
Here’s what you need to know before getting started with the navbar:
- Navbars require a wrapping
.navbarwith.navbar-expand{-sm|-md|-lg|-xl|-xxl}for responsive collapsing and color scheme classes. - Navbars and their contents are fluid by default. Change the container to limit their horizontal width in different ways.
- Use our spacing and flex utility classes for controlling spacing and alignment within navbars.
- Navbars are responsive by default, but you can easily modify them to change that. Responsive behavior depends on our Collapse JavaScript plugin.
- Ensure accessibility by using a
<nav>element or, if using a more generic element such as a<div>, add arole="navigation"to every navbar to explicitly identify it as a landmark region for users of assistive technologies. - Indicate the current item by using
aria-current="page"for the current page oraria-current="true"for the current item in a set.
Supported content
Navbars come with built-in support for a handful of sub-components. Choose from the following as needed:
.navbar-brandfor your company, product, or project name..navbar-navfor a full-height and lightweight navigation (including support for dropdowns)..navbar-togglerfor use with our collapse plugin and other navigation toggling behaviors.- Flex and spacing utilities for any form controls and actions.
.navbar-textfor adding vertically centered strings of text..collapse.navbar-collapsefor grouping and hiding navbar contents by a parent breakpoint.- Add an optional
.navbar-scrollto set amax-heightand scroll expanded navbar content.
Here’s an example of all the sub-components included in a responsive light-themed navbar that automatically collapses at the lg (large) breakpoint.
<nav class="navbar navbar-expand-lg navbar-light bg-light">
  <div class="container-fluid">
    <a class="navbar-brand" href="#">Navbar</a>
    <button class="navbar-toggler" type="button" data-bs-toggle="collapse" data-bs-target="#navbarSupportedContent" aria-controls="navbarSupportedContent" aria-expanded="false" aria-label="Toggle navigation">
      <span class="navbar-toggler-icon"></span>
    </button>
    <div class="collapse navbar-collapse" id="navbarSupportedContent">
      <ul class="navbar-nav me-auto mb-2 mb-lg-0">
        <li class="nav-item">
          <a class="nav-link active" aria-current="page" href="#">Home</a>
        </li>
        <li class="nav-item">
          <a class="nav-link" href="#">Link</a>
        </li>
        <li class="nav-item dropdown">
          <a class="nav-link dropdown-toggle" href="#" id="navbarDropdown" role="button" data-bs-toggle="dropdown" aria-expanded="false">
            Dropdown
          </a>
          <ul class="dropdown-menu" aria-labelledby="navbarDropdown">
            <li><a class="dropdown-item" href="#">Action</a></li>
            <li><a class="dropdown-item" href="#">Another action</a></li>
            <li><hr class="dropdown-divider"></li>
            <li><a class="dropdown-item" href="#">Something else here</a></li>
          </ul>
        </li>
        <li class="nav-item">
          <a class="nav-link disabled" href="#" tabindex="-1" aria-disabled="true">Disabled</a>
        </li>
      </ul>
      <form class="d-flex">
        <input class="form-control me-2" type="search" placeholder="Search" aria-label="Search">
        <button class="btn btn-outline-success" type="submit">Search</button>
      </form>
    </div>
  </div>
</nav>
This example uses background (bg-light) and spacing (my-2, my-lg-0, me-sm-0, my-sm-0) utility classes.
Brand
The .navbar-brand can be applied to most elements, but an anchor works best, as some elements might require utility classes or custom styles.
Text
Add your text within an element with the .navbar-brand class.
<!-- As a link -->
<nav class="navbar navbar-light bg-light">
  <div class="container-fluid">
    <a class="navbar-brand" href="#">Navbar</a>
  </div>
</nav>

<!-- As a heading -->
<nav class="navbar navbar-light bg-light">
  <div class="container-fluid">
    <span class="navbar-brand mb-0 h1">Navbar</span>
  </div>
</nav>
Image
You can replace the text within the .navbar-brand with an <img>.
<nav class="navbar navbar-light bg-light">
  <div class="container">
    <a class="navbar-brand" href="#">
      <img src="/docs/5.0/assets/brand/bootstrap-logo.svg" alt="" width="30" height="24">
    </a>
  </div>
</nav>
Image and text
You can also make use of some additional utilities to add an image and text at the same time. Note the addition of .d-inline-block and .align-text-top on the <img>.
<nav class="navbar navbar-light bg-light">
  <div class="container-fluid">
    <a class="navbar-brand" href="#">
      <img src="/docs/5.0/assets/brand/bootstrap-logo.svg" alt="" width="30" height="24" class="d-inline-block align-text-top">
      Bootstrap
    </a>
  </div>
</nav>
Nav
Navbar navigation links build on our .nav options with their own modifier class and require the use of toggler classes for proper responsive styling. Navigation in navbars will also grow to occupy as much horizontal space as possible to keep your navbar contents securely aligned.
Add the .active class on .nav-link to indicate the current page.
Please note that you should also add the aria-current attribute on the active .nav-link.
<nav class="navbar navbar-expand-lg navbar-light bg-light">
  <div class="container-fluid">
    <a class="navbar-brand" href="#">Navbar</a>
    <button class="navbar-toggler" type="button" data-bs-toggle="collapse" data-bs-target="#navbarNav" aria-controls="navbarNav" aria-expanded="false" aria-label="Toggle navigation">
      <span class="navbar-toggler-icon"></span>
    </button>
    <div class="collapse navbar-collapse" id="navbarNav">
      <ul class="navbar-nav">
        <li class="nav-item">
          <a class="nav-link active" aria-current="page" href="#">Home</a>
        </li>
        <li class="nav-item">
          <a class="nav-link" href="#">Features</a>
        </li>
        <li class="nav-item">
          <a class="nav-link" href="#">Pricing</a>
        </li>
        <li class="nav-item">
          <a class="nav-link disabled" href="#" tabindex="-1" aria-disabled="true">Disabled</a>
        </li>
      </ul>
    </div>
  </div>
</nav>
And because we use classes for our navs, you can avoid the list-based approach entirely if you like.
<nav class="navbar navbar-expand-lg navbar-light bg-light">
  <div class="container-fluid">
    <a class="navbar-brand" href="#">Navbar</a>
    <button class="navbar-toggler" type="button" data-bs-toggle="collapse" data-bs-target="#navbarNavAltMarkup" aria-controls="navbarNavAltMarkup" aria-expanded="false" aria-label="Toggle navigation">
      <span class="navbar-toggler-icon"></span>
    </button>
    <div class="collapse navbar-collapse" id="navbarNavAltMarkup">
      <div class="navbar-nav">
        <a class="nav-link active" aria-current="page" href="#">Home</a>
        <a class="nav-link" href="#">Features</a>
        <a class="nav-link" href="#">Pricing</a>
        <a class="nav-link disabled" href="#" tabindex="-1" aria-disabled="true">Disabled</a>
      </div>
    </div>
  </div>
</nav>
You can also use dropdowns in your navbar. Dropdown menus require a wrapping element for positioning, so be sure to use separate and nested elements for .nav-item and .nav-link as shown below.
<nav class="navbar navbar-expand-lg navbar-light bg-light">
  <div class="container-fluid">
    <a class="navbar-brand" href="#">Navbar</a>
    <button class="navbar-toggler" type="button" data-bs-toggle="collapse" data-bs-target="#navbarNavDropdown" aria-controls="navbarNavDropdown" aria-expanded="false" aria-label="Toggle navigation">
      <span class="navbar-toggler-icon"></span>
    </button>
    <div class="collapse navbar-collapse" id="navbarNavDropdown">
      <ul class="navbar-nav">
        <li class="nav-item">
          <a class="nav-link active" aria-current="page" href="#">Home</a>
        </li>
        <li class="nav-item">
          <a class="nav-link" href="#">Features</a>
        </li>
        <li class="nav-item">
          <a class="nav-link" href="#">Pricing</a>
        </li>
        <li class="nav-item dropdown">
          <a class="nav-link dropdown-toggle" href="#" id="navbarDropdownMenuLink" role="button" data-bs-toggle="dropdown" aria-expanded="false">
            Dropdown link
          </a>
          <ul class="dropdown-menu" aria-labelledby="navbarDropdownMenuLink">
            <li><a class="dropdown-item" href="#">Action</a></li>
            <li><a class="dropdown-item" href="#">Another action</a></li>
            <li><a class="dropdown-item" href="#">Something else here</a></li>
          </ul>
        </li>
      </ul>
    </div>
  </div>
</nav>
Forms
Place various form controls and components within a navbar:
<nav class="navbar navbar-light bg-light">
  <div class="container-fluid">
    <form class="d-flex">
      <input class="form-control me-2" type="search" placeholder="Search" aria-label="Search">
      <button class="btn btn-outline-success" type="submit">Search</button>
    </form>
  </div>
</nav>
Immediate child elements of .navbar use flex layout and will default to justify-content: space-between. Use additional flex utilities as needed to adjust this behavior.
<nav class="navbar navbar-light bg-light">
  <div class="container-fluid">
    <a class="navbar-brand">Navbar</a>
    <form class="d-flex">
      <input class="form-control me-2" type="search" placeholder="Search" aria-label="Search">
      <button class="btn btn-outline-success" type="submit">Search</button>
    </form>
  </div>
</nav>
Input groups work, too. If your navbar is an entire form, or mostly a form, you can use the <form> element as the container and save some HTML.
<nav class="navbar navbar-light bg-light">
  <form class="container-fluid">
    <div class="input-group">
      <span class="input-group-text" id="basic-addon1">@</span>
      <input type="text" class="form-control" placeholder="Username" aria-label="Username" aria-describedby="basic-addon1">
    </div>
  </form>
</nav>
Various buttons are supported as part of these navbar forms, too. This is also a great reminder that vertical alignment utilities can be used to align different sized elements.
<nav class="navbar navbar-light bg-light">
  <form class="container-fluid justify-content-start">
    <button class="btn btn-outline-success me-2" type="button">Main button</button>
    <button class="btn btn-sm btn-outline-secondary" type="button">Smaller button</button>
  </form>
</nav>
Text
Navbars may contain bits of text with the help of .navbar-text. This class adjusts vertical alignment and horizontal spacing for strings of text.
<nav class="navbar navbar-light bg-light">
  <div class="container-fluid">
    <span class="navbar-text">
      Navbar text with an inline element
    </span>
  </div>
</nav>
Mix and match with other components and utilities as needed.
<nav class="navbar navbar-expand-lg navbar-light bg-light">
  <div class="container-fluid">
    <a class="navbar-brand" href="#">Navbar w/ text</a>
    <button class="navbar-toggler" type="button" data-bs-toggle="collapse" data-bs-target="#navbarText" aria-controls="navbarText" aria-expanded="false" aria-label="Toggle navigation">
      <span class="navbar-toggler-icon"></span>
    </button>
    <div class="collapse navbar-collapse" id="navbarText">
      <ul class="navbar-nav me-auto mb-2 mb-lg-0">
        <li class="nav-item">
          <a class="nav-link active" aria-current="page" href="#">Home</a>
        </li>
        <li class="nav-item">
          <a class="nav-link" href="#">Features</a>
        </li>
        <li class="nav-item">
          <a class="nav-link" href="#">Pricing</a>
        </li>
      </ul>
      <span class="navbar-text">
        Navbar text with an inline element
      </span>
    </div>
  </div>
</nav>
Color schemes
Theming the navbar has never been easier thanks to the combination of theming classes and background-color utilities. Choose from .navbar-light for use with light background colors, or .navbar-dark for dark background colors. Then, customize with .bg-* utilities.
<nav class="navbar navbar-dark bg-dark">
  <!-- Navbar content -->
</nav>

<nav class="navbar navbar-dark bg-primary">
  <!-- Navbar content -->
</nav>

<nav class="navbar navbar-light" style="background-color: #e3f2fd;">
  <!-- Navbar content -->
</nav>
Containers
Although it’s not required, you can wrap a navbar in a .container to center it on a page–though note that an inner container is still required. Or you can add a container inside the .navbar to only center the contents of a fixed or static top navbar.
<div class="container">
  <nav class="navbar navbar-expand-lg navbar-light bg-light">
    <div class="container-fluid">
      <a class="navbar-brand" href="#">Navbar</a>
    </div>
  </nav>
</div>
Use any of the responsive containers to change how wide the content in your navbar is presented.
<nav class="navbar navbar-expand-lg navbar-light bg-light">
  <div class="container-md">
    <a class="navbar-brand" href="#">Navbar</a>
  </div>
</nav>
Placement
Use our position utilities to place navbars in non-static positions. Choose from fixed to the top, fixed to the bottom, or stickied to the top (scrolls with the page until it reaches the top, then stays there). Fixed navbars use position: fixed, meaning they’re pulled from the normal flow of the DOM and may require custom CSS (e.g., padding-top on the <body>) to prevent overlap with other elements.
Also note that .sticky-top uses position: sticky, which isn’t fully supported in every browser.
<nav class="navbar navbar-light bg-light">
  <div class="container-fluid">
    <a class="navbar-brand" href="#">Default</a>
  </div>
</nav><nav class="navbar fixed-top navbar-light bg-light">
<div class="container-fluid">
<a class="navbar-brand" href="#">Fixed top</a>
</div>
</nav><nav class="navbar fixed-bottom navbar-light bg-light">
<div class="container-fluid">
<a class="navbar-brand" href="#">Fixed bottom</a>
</div>
</nav><nav class="navbar sticky-top navbar-light bg-light">
<div class="container-fluid">
<a class="navbar-brand" href="#">Sticky top</a>
</div>
</nav>Add .navbar-nav-scroll to a .navbar-nav (or other navbar sub-component) to enable vertical scrolling within the toggleable contents of a collapsed navbar. By default, scrolling kicks in at 75vh (or 75% of the viewport height), but you can override that with the local CSS custom property --bs-navbar-height or custom styles. At larger viewports when the navbar is expanded, content will appear as it does in a default navbar.
Please note that this behavior comes with a potential drawback of overflow—when setting overflow-y: auto (required to scroll the content here), overflow-x is the equivalent of auto, which will crop some horizontal content.
Here’s an example navbar using .navbar-nav-scroll with style="--bs-scroll-height: 100px;", with some extra margin utilities for optimum spacing.
<nav class="navbar navbar-expand-lg navbar-light bg-light">
  <div class="container-fluid">
    <a class="navbar-brand" href="#">Navbar scroll</a>
    <button class="navbar-toggler" type="button" data-bs-toggle="collapse" data-bs-target="#navbarScroll" aria-controls="navbarScroll" aria-expanded="false" aria-label="Toggle navigation">
      <span class="navbar-toggler-icon"></span>
    </button>
    <div class="collapse navbar-collapse" id="navbarScroll">
      <ul class="navbar-nav me-auto my-2 my-lg-0 navbar-nav-scroll" style="--bs-scroll-height: 100px;">
        <li class="nav-item">
          <a class="nav-link active" aria-current="page" href="#">Home</a>
        </li>
        <li class="nav-item">
          <a class="nav-link" href="#">Link</a>
        </li>
        <li class="nav-item dropdown">
          <a class="nav-link dropdown-toggle" href="#" id="navbarScrollingDropdown" role="button" data-bs-toggle="dropdown" aria-expanded="false">
            Link
          </a>
          <ul class="dropdown-menu" aria-labelledby="navbarScrollingDropdown">
            <li><a class="dropdown-item" href="#">Action</a></li>
            <li><a class="dropdown-item" href="#">Another action</a></li>
            <li><hr class="dropdown-divider"></li>
            <li><a class="dropdown-item" href="#">Something else here</a></li>
          </ul>
        </li>
        <li class="nav-item">
          <a class="nav-link disabled" href="#" tabindex="-1" aria-disabled="true">Link</a>
        </li>
      </ul>
      <form class="d-flex">
        <input class="form-control me-2" type="search" placeholder="Search" aria-label="Search">
        <button class="btn btn-outline-success" type="submit">Search</button>
      </form>
    </div>
  </div>
</nav>
Responsive behaviors
Navbars can use .navbar-toggler, .navbar-collapse, and .navbar-expand{-sm|-md|-lg|-xl|-xxl} classes to determine when their content collapses behind a button. In combination with other utilities, you can easily choose when to show or hide particular elements.
For navbars that never collapse, add the .navbar-expand class on the navbar. For navbars that always collapse, don’t add any .navbar-expand class.
Toggler
Navbar togglers are left-aligned by default, but should they follow a sibling element like a .navbar-brand, they’ll automatically be aligned to the far right. Reversing your markup will reverse the placement of the toggler. Below are examples of different toggle styles.
With no .navbar-brand shown at the smallest breakpoint:
<nav class="navbar navbar-expand-lg navbar-light bg-light">
  <div class="container-fluid">
    <button class="navbar-toggler" type="button" data-bs-toggle="collapse" data-bs-target="#navbarTogglerDemo01" aria-controls="navbarTogglerDemo01" aria-expanded="false" aria-label="Toggle navigation">
      <span class="navbar-toggler-icon"></span>
    </button>
    <div class="collapse navbar-collapse" id="navbarTogglerDemo01">
      <a class="navbar-brand" href="#">Hidden brand</a>
      <ul class="navbar-nav me-auto mb-2 mb-lg-0">
        <li class="nav-item">
          <a class="nav-link active" aria-current="page" href="#">Home</a>
        </li>
        <li class="nav-item">
          <a class="nav-link" href="#">Link</a>
        </li>
        <li class="nav-item">
          <a class="nav-link disabled" href="#" tabindex="-1" aria-disabled="true">Disabled</a>
        </li>
      </ul>
      <form class="d-flex">
        <input class="form-control me-2" type="search" placeholder="Search" aria-label="Search">
        <button class="btn btn-outline-success" type="submit">Search</button>
      </form>
    </div>
  </div>
</nav>
With a brand name shown on the left and toggler on the right:
<nav class="navbar navbar-expand-lg navbar-light bg-light">
  <div class="container-fluid">
    <a class="navbar-brand" href="#">Navbar</a>
    <button class="navbar-toggler" type="button" data-bs-toggle="collapse" data-bs-target="#navbarTogglerDemo02" aria-controls="navbarTogglerDemo02" aria-expanded="false" aria-label="Toggle navigation">
      <span class="navbar-toggler-icon"></span>
    </button>
    <div class="collapse navbar-collapse" id="navbarTogglerDemo02">
      <ul class="navbar-nav me-auto mb-2 mb-lg-0">
        <li class="nav-item">
          <a class="nav-link active" aria-current="page" href="#">Home</a>
        </li>
        <li class="nav-item">
          <a class="nav-link" href="#">Link</a>
        </li>
        <li class="nav-item">
          <a class="nav-link disabled" href="#" tabindex="-1" aria-disabled="true">Disabled</a>
        </li>
      </ul>
      <form class="d-flex">
        <input class="form-control me-2" type="search" placeholder="Search" aria-label="Search">
        <button class="btn btn-outline-success" type="submit">Search</button>
      </form>
    </div>
  </div>
</nav>
With a toggler on the left and brand name on the right:
<nav class="navbar navbar-expand-lg navbar-light bg-light">
  <div class="container-fluid">
    <button class="navbar-toggler" type="button" data-bs-toggle="collapse" data-bs-target="#navbarTogglerDemo03" aria-controls="navbarTogglerDemo03" aria-expanded="false" aria-label="Toggle navigation">
      <span class="navbar-toggler-icon"></span>
    </button>
    <a class="navbar-brand" href="#">Navbar</a>
    <div class="collapse navbar-collapse" id="navbarTogglerDemo03">
      <ul class="navbar-nav me-auto mb-2 mb-lg-0">
        <li class="nav-item">
          <a class="nav-link active" aria-current="page" href="#">Home</a>
        </li>
        <li class="nav-item">
          <a class="nav-link" href="#">Link</a>
        </li>
        <li class="nav-item">
          <a class="nav-link disabled" href="#" tabindex="-1" aria-disabled="true">Disabled</a>
        </li>
      </ul>
      <form class="d-flex">
        <input class="form-control me-2" type="search" placeholder="Search" aria-label="Search">
        <button class="btn btn-outline-success" type="submit">Search</button>
      </form>
    </div>
  </div>
</nav>
External content
Sometimes you want to use the collapse plugin to trigger a container element for content that structurally sits outside of the .navbar . Because our plugin works on the id and data-bs-target matching, that’s easily done!
Collapsed content
Toggleable via the navbar brand.
<div class="collapse" id="navbarToggleExternalContent">
  <div class="bg-dark p-4">
    <h5 class="text-white h4">Collapsed content</h5>
    <span class="text-muted">Toggleable via the navbar brand.</span>
  </div>
</div>
<nav class="navbar navbar-dark bg-dark">
  <div class="container-fluid">
    <button class="navbar-toggler" type="button" data-bs-toggle="collapse" data-bs-target="#navbarToggleExternalContent" aria-controls="navbarToggleExternalContent" aria-expanded="false" aria-label="Toggle navigation">
      <span class="navbar-toggler-icon"></span>
    </button>
  </div>
</nav>
When you do this, we recommend including additional JavaScript to move the focus programmatically to the container when it is opened. Otherwise, keyboard users and users of assistive technologies will likely have a hard time finding the newly revealed content — particularly if the container that was opened comes before the toggler in the document’s structure. We also recommend making sure that the toggler has the aria-controls attribute, pointing to the id of the content container. In theory, this allows assistive technology users to jump directly from the toggler to the container it controls–but support for this is currently quite patchy.
Sass
Variables
$navbar-padding-y:                  $spacer * .5;
$navbar-padding-x:                  null;

$navbar-nav-link-padding-x:         .5rem;

$navbar-brand-font-size:            $font-size-lg;
// Compute the navbar-brand padding-y so the navbar-brand will have the same height as navbar-text and nav-link
$nav-link-height:                   $font-size-base * $line-height-base + $nav-link-padding-y * 2;
$navbar-brand-height:               $navbar-brand-font-size * $line-height-base;
$navbar-brand-padding-y:            ($nav-link-height - $navbar-brand-height) * .5;
$navbar-brand-margin-end:           1rem;

$navbar-toggler-padding-y:          .25rem;
$navbar-toggler-padding-x:          .75rem;
$navbar-toggler-font-size:          $font-size-lg;
$navbar-toggler-border-radius:      $btn-border-radius;
$navbar-toggler-focus-width:        $btn-focus-width;
$navbar-toggler-transition:         box-shadow .15s ease-in-out;
$navbar-dark-color:                 rgba($white, .55);
$navbar-dark-hover-color:           rgba($white, .75);
$navbar-dark-active-color:          $white;
$navbar-dark-disabled-color:        rgba($white, .25);
$navbar-dark-toggler-icon-bg:       url("data:image/svg+xml,<svg xmlns='http://www.w3.org/2000/svg' viewBox='0 0 30 30'><path stroke='#{$navbar-dark-color}' stroke-linecap='round' stroke-miterlimit='10' stroke-width='2' d='M4 7h22M4 15h22M4 23h22'/></svg>");
$navbar-dark-toggler-border-color:  rgba($white, .1);

$navbar-light-color:                rgba($black, .55);
$navbar-light-hover-color:          rgba($black, .7);
$navbar-light-active-color:         rgba($black, .9);
$navbar-light-disabled-color:       rgba($black, .3);
$navbar-light-toggler-icon-bg:      url("data:image/svg+xml,<svg xmlns='http://www.w3.org/2000/svg' viewBox='0 0 30 30'><path stroke='#{$navbar-light-color}' stroke-linecap='round' stroke-miterlimit='10' stroke-width='2' d='M4 7h22M4 15h22M4 23h22'/></svg>");
$navbar-light-toggler-border-color: rgba($black, .1);

$navbar-light-brand-color:                $navbar-light-active-color;
$navbar-light-brand-hover-color:          $navbar-light-active-color;
$navbar-dark-brand-color:                 $navbar-dark-active-color;
$navbar-dark-brand-hover-color:           $navbar-dark-active-color;
Loop
Responsive navbar expand/collapse classes (e.g., .navbar-expand-lg) are combined with the $breakpoints map and generated through a loop in scss/_navbar.scss.
// Generate series of `.navbar-expand-*` responsive classes for configuring
// where your navbar collapses.
.navbar-expand {
  @each $breakpoint in map-keys($grid-breakpoints) {
    $next: breakpoint-next($breakpoint, $grid-breakpoints);
    $infix: breakpoint-infix($next, $grid-breakpoints);

    // stylelint-disable-next-line scss/selector-no-union-class-name
    &#{$infix} {
      @include media-breakpoint-up($next) {
        flex-wrap: nowrap;
        justify-content: flex-start;

        .navbar-nav {
          flex-direction: row;

          .dropdown-menu {
            position: absolute;
          }

          .nav-link {
            padding-right: $navbar-nav-link-padding-x;
            padding-left: $navbar-nav-link-padding-x;
          }
        }

        .navbar-nav-scroll {
          overflow: visible;
        }

        .navbar-collapse {
          display: flex !important; // stylelint-disable-line declaration-no-important
          flex-basis: auto;
        }

        .navbar-toggler {
          display: none;
        }
      }
    }
  }
}
Just add an id to the HTML navbar, such as:
<nav id="navbar-yellow" class="navbar navbar-default navbar-fixed-top" role="navigation">
With this id you can style the navbar color, but also the links and dropdowns
Examples applied to different types of navbars
Black
Yellow
Darkblue
Red (Cherry)
Darkgreen
Here is the CSS
/*
 * Black navbar style
 */
#navbar-black.navbar-default { /* #3C3C3C - #222222 */
    font-size: 14px;
    background-color: rgba(34, 34, 34, 1);
    background: -webkit-linear-gradient(top, rgba(60, 60, 60, 1) 0%, rgba(34, 34, 34, 1) 100%);
    background: linear-gradient(to bottom, rgba(60, 60, 60, 1) 0%, rgba(34, 34, 34, 1) 100%);
    border: 0px;
    border-radius: 0;
}
#navbar-black.navbar-default .navbar-nav>li>a:hover,
#navbar-black.navbar-default .navbar-nav>li>a:focus,
#navbar-black.navbar-default .navbar-nav>li>ul>li>a:hover,
#navbar-black.navbar-default .navbar-nav>li>ul>li>a:focus,
#navbar-black.navbar-default .navbar-nav>.active>a,
#navbar-black.navbar-default .navbar-nav>.active>a:hover,
#navbar-black.navbar-default .navbar-nav>.active>a:focus {
    color: rgba(255, 255, 255, 1);
    background-color: rgba(0, 0, 0, 1);
    background: -webkit-linear-gradient(top, rgba(0, 0, 0, 1) 0%, rgba(0, 0, 0, 1) 100%);
    background: linear-gradient(to bottom, rgba(0, 0, 0, 1) 0%, rgba(0, 0, 0, 1) 100%);
}
#sidebar-black, #column-black {
      background-color: #222222;
}
#navbar-black.navbar-default .navbar-toggle {
    border-color: #222222;
}
#navbar-black.navbar-default .navbar-toggle:hover,
#navbar-black.navbar-default .navbar-toggle:focus {
    background-color: #3C3C3C;
}
#navbar-black.navbar-default .navbar-nav>li>a,
#navbar-black.navbar-default .navbar-nav>li>ul>li>a,
#navbar-black.navbar-default .navbar-brand {
    color: #999999;
}
#navbar-black.navbar-default .navbar-toggle .icon-bar,
#navbar-black.navbar-default .navbar-toggle:hover .icon-bar,
#navbar-black.navbar-default .navbar-toggle:focus .icon-bar {
    background-color: #ffffff;
}

/*
 * Red navbar style
 */
#navbar-red.navbar-default { /* #990033 - #cc0033 */
    font-size: 14px;
    background-color: rgba(153, 0, 51, 1);
    background: -webkit-linear-gradient(top, rgba(204, 0, 51, 1) 0%, rgba(153, 0, 51, 1) 100%);
    background: linear-gradient(to bottom, rgba(204, 0, 51, 1) 0%, rgba(153, 0, 51, 1) 100%);
    border: 0px;
    border-radius: 0;
}
#navbar-red.navbar-default .navbar-nav>li>a:hover,
#navbar-red.navbar-default .navbar-nav>li>a:focus,
#navbar-red.navbar-default .navbar-nav>li>ul>li>a:hover,
#navbar-red.navbar-default .navbar-nav>li>ul>li>a:focus,
#navbar-red.navbar-default .navbar-nav>.active>a,
#navbar-red.navbar-default .navbar-nav>.active>a:hover,
#navbar-red.navbar-default .navbar-nav>.active>a:focus {
    color: rgba(51, 51, 51, 1);
    background-color: rgba(255, 255, 255, 1);
    background: -webkit-linear-gradient(top, rgba(255, 255, 255, 1) 0%, rgba(255, 255, 255, 1) 100%);
    background: linear-gradient(to bottom, rgba(255, 255, 255, 1) 0%, rgba(255, 255, 255, 1) 100%);
}
#sidebar-red, #column-red {
      background-color: #990033;
}
#navbar-red.navbar-default .navbar-toggle {
    border-color: #990033;
}
#navbar-red.navbar-default .navbar-toggle:hover,
#navbar-red.navbar-default .navbar-toggle:focus {
    background-color: #cc0033;
}
#navbar-red.navbar-default .navbar-nav>li>a,
#navbar-red.navbar-default .navbar-nav>li>ul>li>a,
#navbar-red.navbar-default .navbar-brand {
    color: #999999;
}
#navbar-red.navbar-default .navbar-toggle .icon-bar,
#navbar-red.navbar-default .navbar-toggle:hover .icon-bar,
#navbar-red.navbar-default .navbar-toggle:focus .icon-bar {
    background-color: #ffffff;
}

/*
 * Darkblue navbar style
 */
#navbar-darkblue.navbar-default { /* #003399 - #0033cc */
    font-size: 14px;
    background-color: rgba(51, 51, 153, 1);
    background: -webkit-linear-gradient(top, rgba(51, 51, 204, 1) 0%, rgba(51, 51, 153, 1) 100%);
    background: linear-gradient(to bottom, rgba(51, 51, 204, 1) 0%, rgba(51, 51, 153, 1) 100%);
    border: 0px;
    border-radius: 0;
}
#navbar-darkblue.navbar-default .navbar-nav>li>a:hover,
#navbar-darkblue.navbar-default .navbar-nav>li>a:focus,
#navbar-darkblue.navbar-default .navbar-nav>li>ul>li>a:hover,
#navbar-darkblue.navbar-default .navbar-nav>li>ul>li>a:focus,
#navbar-darkblue.navbar-default .navbar-nav>.active>a,
#navbar-darkblue.navbar-default .navbar-nav>.active>a:hover,
#navbar-darkblue.navbar-default .navbar-nav>.active>a:focus {
    color: rgba(51, 51, 51, 1);
    background-color: rgba(255, 255, 255, 1);
    background: -webkit-linear-gradient(top, rgba(255, 255, 255, 1) 0%, rgba(255, 255, 255, 1) 100%);
    background: linear-gradient(to bottom, rgba(255, 255, 255, 1) 0%, rgba(255, 255, 255, 1) 100%);
}
#sidebar-darkblue, #column-darkblue {
    background-color: #333399;
}
#navbar-darkblue.navbar-default .navbar-toggle {
    border-color: #333399;
}
#navbar-darkblue.navbar-default .navbar-toggle:hover,
#navbar-darkblue.navbar-default .navbar-toggle:focus {
    background-color: #3333cc;
}
#navbar-darkblue.navbar-default .navbar-nav>li>a,
#navbar-darkblue.navbar-default .navbar-nav>li>ul>li>a,
#navbar-darkblue.navbar-default .navbar-brand {
    color: #999999;
}
#navbar-darkblue.navbar-default .navbar-toggle .icon-bar,
#navbar-darkblue.navbar-default .navbar-toggle:hover .icon-bar,
#navbar-darkblue.navbar-default .navbar-toggle:focus .icon-bar {
    background-color: #ffffff;
}

/*
 * Darkgreen navbar style
 */
#navbar-darkgreen.navbar-default { /* #006633 - #009933 */
    font-size: 14px;
    background-color: rgba(0, 102, 51, 1);
    background: -webkit-linear-gradient(top, rgba(0, 153, 51, 1) 0%, rgba(0, 102, 51, 1) 100%);
    background: linear-gradient(to bottom, rgba(0, 153, 51, 1) 0%, rgba(0, 102, 51, 1) 100%);
    border: 0px;
    border-radius: 0;
}
#navbar-darkgreen.navbar-default .navbar-nav>li>a:hover,
#navbar-darkgreen.navbar-default .navbar-nav>li>a:focus,
#navbar-darkgreen.navbar-default .navbar-nav>li>ul>li>a:hover,
#navbar-darkgreen.navbar-default .navbar-nav>li>ul>li>a:focus,
#navbar-darkgreen.navbar-default .navbar-nav>.active>a,
#navbar-darkgreen.navbar-default .navbar-nav>.active>a:hover,
#navbar-darkgreen.navbar-default .navbar-nav>.active>a:focus {
    color: rgba(51, 51, 51, 1);
    background-color: rgba(255, 255, 255, 1);
    background: -webkit-linear-gradient(top, rgba(255, 255, 255, 1) 0%, rgba(255, 255, 255, 1) 100%);
    background: linear-gradient(to bottom, rgba(255, 255, 255, 1) 0%, rgba(255, 255, 255, 1) 100%);
}
#sidebar-darkgreen, #column-darkgreen {
    background-color: #006633;
}
#navbar-darkgreen.navbar-default .navbar-toggle {
    border-color: #006633;
}
#navbar-darkgreen.navbar-default .navbar-toggle:hover,
#navbar-darkgreen.navbar-default .navbar-toggle:focus {
    background-color: #009933;
}
#navbar-darkgreen.navbar-default .navbar-nav>li>a,
#navbar-darkgreen.navbar-default .navbar-nav>li>ul>li>a,
#navbar-darkgreen.navbar-default .navbar-brand {
    color: #999999;
}
#navbar-darkgreen.navbar-default .navbar-toggle .icon-bar,
#navbar-darkgreen.navbar-default .navbar-toggle:hover .icon-bar,
#navbar-darkgreen.navbar-default .navbar-toggle:focus .icon-bar {
    background-color: #ffffff;
}

/*
 * Yellow navbar style
 */
#navbar-yellow.navbar-default { /* #99ff00 - #ccff00 */
    font-size: 14px;
    background-color: rgba(153, 255, 0, 1);
    background: -webkit-linear-gradient(top, rgba(204, 255, 0, 1) 0%, rgba(153, 255, 0, 1) 100%);
    background: linear-gradient(to bottom, rgba(204, 255, 0, 1) 0%, rgba(153, 255, 0, 1) 100%);
    border: 0px;
    border-radius: 0;
}
#navbar-yellow.navbar-default .navbar-nav>li>a:hover,
#navbar-yellow.navbar-default .navbar-nav>li>a:focus,
#navbar-yellow.navbar-default .navbar-nav>li>ul>li>a:hover,
#navbar-yellow.navbar-default .navbar-nav>li>ul>li>a:focus,
#navbar-yellow.navbar-default .navbar-nav>.active>a,
#navbar-yellow.navbar-default .navbar-nav>.active>a:hover,
#navbar-yellow.navbar-default .navbar-nav>.active>a:focus {
    color: rgba(51, 51, 51, 1);
    background-color: rgba(255, 255, 255, 1);
    background: -webkit-linear-gradient(top, rgba(255, 255, 255, 1) 0%, rgba(255, 255, 255, 1) 100%);
    background: linear-gradient(to bottom, rgba(255, 255, 255, 1) 0%, rgba(255, 255, 255, 1) 100%);
}
#sidebar-yellow, #column-yellow {
    background-color: #99ff00;
}
#navbar-yellow.navbar-default .navbar-toggle {
    border-color: #99ff00;
}
#navbar-yellow.navbar-default .navbar-toggle:hover,
#navbar-yellow.navbar-default .navbar-toggle:focus {
    background-color: #ccff00;
}
#navbar-yellow.navbar-default .navbar-nav>li>a,
#navbar-yellow.navbar-default .navbar-nav>li>ul>li>a,
#navbar-yellow.navbar-default .navbar-brand {
    color: #999999;
}
#navbar-yellow.navbar-default .navbar-toggle .icon-bar,
#navbar-yellow.navbar-default .navbar-toggle:hover .icon-bar,
#navbar-yellow.navbar-default .navbar-toggle:focus .icon-bar {
    background-color: #ffffff;
}
Improve Article
Save Article
Improve Article
Save Article
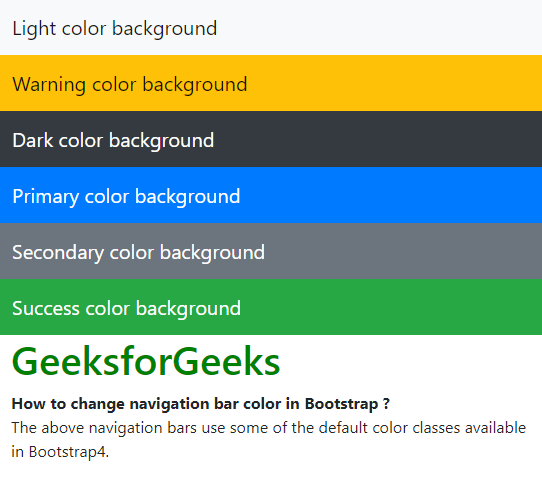
The navigation bar color can be changed in Bootstrap using 2 methods:
Method 1: Using the inbuilt color classes
Changing the text color
The text color of the navigation bar can be changed using two inbuilt classes:
- navbar-light: This class will set the color of the text to dark. This is used when using a light background color.
- navbar-dark: This class will set the color of the text to light. This is used when using a dark background color.
Changing the background color:
Bootstrap 4 has a few inbuilt classes for the colors of any background. These can be used to set the color of the background of the navigation bar. The various background classes available are:
- .bg-primary: This sets the color to the primary color.
- .bg-secondary: This sets the color to the secondary color.
- .bg-success: This sets the color to the success color.
- .bg-danger: This sets the color to the danger color.
- .bg-warning: This sets the color to the warning color.
- .bg-info: This sets the color to the info color.
- .bg-light: This sets the color to the light color.
- .bg-dark: This sets the color to the dark color.
- .bg-white: This sets the color to the white color.
- .bg-transparent: This sets the navbar to be transparent.
Example:
html
<!DOCTYPE html>
<html>
<head>
<title>
How to change navigation bar color in Bootstrap ?
</title>
<link rel="stylesheet" href=
</head>
<body>
<nav class="navbar navbar-light bg-light">
<a class="navbar-brand" href="#">
Light color background
</a>
</nav>
<nav class="navbar navbar-light bg-warning">
<a class="navbar-brand" href="#">
Warning color background
</a>
</nav>
<nav class="navbar navbar-dark bg-dark">
<a class="navbar-brand" href="#">
Dark color background
</a>
</nav>
<nav class="navbar navbar-dark bg-primary">
<a class="navbar-brand" href="#">
Primary color background
</a>
</nav>
<nav class="navbar navbar-dark bg-secondary">
<a class="navbar-brand" href="#">
Secondary color background
</a>
</nav>
<nav class="navbar navbar-dark bg-success">
<a class="navbar-brand" href="#">
Success color background
</a>
</nav>
<div class="container">
<h1 style="color: green">GeeksforGeeks</h1>
<b>
How to change navigation bar color in Bootstrap ?
</b>
<p>The above navigation bars use some of the
default color classes available in Bootstrap4.</p>
</div>
</body>
</html>
Output:
Method 2: Creating a custom class for the navigation bar
A custom class can be created to specify the background color and the text color of the navbar. This class is styled using CSS according to the required values. The names of the classes are kept in a manner to override the inbuilt navigation bar classes.
The background color is set by directly specifying the background-color property with the color needed.
html
/* Modify the background color */
.navbar-custom {
background-color: lightgreen;
}
The navbar text and the brand text color can be set using the .navbar-text and .navbar-brand classes. These are the inbuilt navigation bar classes that are be overridden by using the same class name. The text color is specified using the color property.
html
/* Modify brand and text color */
.navbar-custom .navbar-brand,
.navbar-custom .navbar-text {
color: green;
}
Example:
html
<!DOCTYPE html>
<html>
<head>
<title>
How to change navigation bar color in Bootstrap ?
</title>
<link rel="stylesheet"
href=
<style>
/* Modify the background color */
.navbar-custom {
background-color: lightgreen;
}
/* Modify brand and text color */
.navbar-custom .navbar-brand,
.navbar-custom .navbar-text {
color: green;
}
</style>
</head>
<body>
<nav class="navbar navbar-custom">
<a class="navbar-brand" href="#">
Custom color background navbar
</a>
</nav>
<div class="container">
<h1 style="color: green">GeeksforGeeks</h1>
<b>How to change navigation bar
color in Bootstrap ?</b>
<p>The above navigation bar uses a
custom class for changing the colors.</p>
</div>
</body>
</html>
Output:

Improve Article
Save Article
Improve Article
Save Article
The navigation bar color can be changed in Bootstrap using 2 methods:
Method 1: Using the inbuilt color classes
Changing the text color
The text color of the navigation bar can be changed using two inbuilt classes:
- navbar-light: This class will set the color of the text to dark. This is used when using a light background color.
- navbar-dark: This class will set the color of the text to light. This is used when using a dark background color.
Changing the background color:
Bootstrap 4 has a few inbuilt classes for the colors of any background. These can be used to set the color of the background of the navigation bar. The various background classes available are:
- .bg-primary: This sets the color to the primary color.
- .bg-secondary: This sets the color to the secondary color.
- .bg-success: This sets the color to the success color.
- .bg-danger: This sets the color to the danger color.
- .bg-warning: This sets the color to the warning color.
- .bg-info: This sets the color to the info color.
- .bg-light: This sets the color to the light color.
- .bg-dark: This sets the color to the dark color.
- .bg-white: This sets the color to the white color.
- .bg-transparent: This sets the navbar to be transparent.
Example:
html
<!DOCTYPE html>
<html>
<head>
<title>
How to change navigation bar color in Bootstrap ?
</title>
<link rel="stylesheet" href=
</head>
<body>
<nav class="navbar navbar-light bg-light">
<a class="navbar-brand" href="#">
Light color background
</a>
</nav>
<nav class="navbar navbar-light bg-warning">
<a class="navbar-brand" href="#">
Warning color background
</a>
</nav>
<nav class="navbar navbar-dark bg-dark">
<a class="navbar-brand" href="#">
Dark color background
</a>
</nav>
<nav class="navbar navbar-dark bg-primary">
<a class="navbar-brand" href="#">
Primary color background
</a>
</nav>
<nav class="navbar navbar-dark bg-secondary">
<a class="navbar-brand" href="#">
Secondary color background
</a>
</nav>
<nav class="navbar navbar-dark bg-success">
<a class="navbar-brand" href="#">
Success color background
</a>
</nav>
<div class="container">
<h1 style="color: green">GeeksforGeeks</h1>
<b>
How to change navigation bar color in Bootstrap ?
</b>
<p>The above navigation bars use some of the
default color classes available in Bootstrap4.</p>
</div>
</body>
</html>
Output:
Method 2: Creating a custom class for the navigation bar
A custom class can be created to specify the background color and the text color of the navbar. This class is styled using CSS according to the required values. The names of the classes are kept in a manner to override the inbuilt navigation bar classes.
The background color is set by directly specifying the background-color property with the color needed.
html
/* Modify the background color */
.navbar-custom {
background-color: lightgreen;
}
The navbar text and the brand text color can be set using the .navbar-text and .navbar-brand classes. These are the inbuilt navigation bar classes that are be overridden by using the same class name. The text color is specified using the color property.
html
/* Modify brand and text color */
.navbar-custom .navbar-brand,
.navbar-custom .navbar-text {
color: green;
}
Example:
html
<!DOCTYPE html>
<html>
<head>
<title>
How to change navigation bar color in Bootstrap ?
</title>
<link rel="stylesheet"
href=
<style>
/* Modify the background color */
.navbar-custom {
background-color: lightgreen;
}
/* Modify brand and text color */
.navbar-custom .navbar-brand,
.navbar-custom .navbar-text {
color: green;
}
</style>
</head>
<body>
<nav class="navbar navbar-custom">
<a class="navbar-brand" href="#">
Custom color background navbar
</a>
</nav>
<div class="container">
<h1 style="color: green">GeeksforGeeks</h1>
<b>How to change navigation bar
color in Bootstrap ?</b>
<p>The above navigation bar uses a
custom class for changing the colors.</p>
</div>
</body>
</html>
Output:
Bootstrap 5 Navbar component
Documentation and examples for powerful, responsive navigation header — MDB navbar.
Includes support for branding, navigation, and more, including support for our collapse
plugin.

Video tutorial
Basic example
A basic example of the navbar with the most common elements like link, search form, brand, and
dropdown. All of them are explained in detail in the
supported content section.
Note: this example uses
color
(bg-light) and
spacing
(my-2, my-lg-0, me-sm-0, my-sm-0) utility
classes.
How it works
Here’s what you need to know before getting started with the navbar:
-
Navbars require a wrapping
.navbarwith
.navbar-expand{-sm|-md|-lg|-xl|-xxl}for responsive collapsing and
color scheme classes. -
Navbars and their contents are fluid by default. Change the
container to limit their horizontal width in different
ways. -
Use our
spacing and
flex utility classes for controlling spacing
and alignment within navbars. -
Navbars are responsive by default, but you can easily modify them to change that. Responsive
behavior depends on our Collapse JavaScript plugin. -
Ensure accessibility by using a
<nav>element or, if using a more generic element such as a
<div>, add arole="navigation"to every navbar to explicitly
identify it as a landmark region for users of assistive technologies. -
Indicate the current item by using
aria-current="page"for the current page or
aria-current="true"for the current item in a set.
Supported content
Navbars come with built-in support for a handful of sub-components. Choose from the following
as needed:
.navbar-brandfor your company, product, or project name.-
.navbar-navfor a full-height and lightweight navigation (including support for
dropdowns). -
.navbar-togglerfor use with our collapse plugin and other
navigation toggling
behaviors. - Flex and spacing utilities for any form controls and actions.
.navbar-textfor adding vertically centered strings of text.-
.collapse.navbar-collapsefor grouping and hiding navbar contents by a parent
breakpoint.
Apart from listed above, navbar supports also components like breadcrumbs, forms, buttons,
icons, flags, avatars, badges, and a few more.
Brand
The .navbar-brand can be applied to most elements, but an anchor works best, as
some elements might require utility classes or custom styles.
Adding images to the .navbar-brand will likely always require custom styles or
utilities to properly size. Here are some examples to demonstrate.
Nav
Navbar navigation links build on our
.nav options with their own modifier class and require the use of
toggler classes for proper responsive styling.
Navigation in navbars will also grow to occupy as much horizontal space as
possible
to keep your navbar contents securely aligned.
Active states—with .active—to indicate the current page can be applied directly
to .nav-links or their immediate parent .nav-items.
Please note that you should also add the
aria-current attribute on the .nav-link itself.
And because we use classes for our navs, you can avoid the list-based approach entirely if
you like.
Forms
Place various form controls and components within a navbar:
Immediate child elements of .navbar use flex layout and will default to
justify-content: space-between. Use additional
flex utilities
as needed to adjust this behavior.
White form for dark theme.
Buttons
Various buttons are supported as part of these navbar forms, too. This is also a great
reminder that vertical alignment utilities can be used to align different sized elements.
Text
Navbars may contain bits of text with the help of
.navbar-text. This class adjusts vertical alignment and horizontal spacing for
strings of text.
Mix and match with other components and utilities as needed.
Dropdown
You can also use dropdowns in your navbar nav. Dropdown menus require a wrapping element for
positioning, so be sure to use separate and nested elements for
.nav-item and .nav-link as shown below.
Learn more about dropdowns in our
dropdown docs.
Breadcrumb
Very common use case — breadcrumb in the navbar.
Icons
Choose from hundreds of our
icons and simply add them to the navbar.
Note: We add .d-flex .flex-row classes to keep the icons
inline when the navbar is collapsed. Without this, they will stack one under another.
Badges
Badges can be very useful for presenting
counters, for example in the shopping cart.
Notifications
You can mix icon with dropdown and create a notification dropdown to indicate important news
for visitors. Add
.hidden-arrow class to hide a dropdown arrow.
Flags
Use dropdown together with
flags to create a language switch.
Avatar
By combining simple image and dropdown you can create an avatar with typical user options.
Content alignment
To align navbar content to the right or left use
me-auto or ms-auto classes. For content centering use
flexbox
utilities.
Left aligned
Add .me-auto class next to the .navbar-nav to align the content to
the left.
Right aligned
Add .ms-auto class next to the .navbar-nav to align the content to
the right.
Centered
Remove .ms-auto or .me-auto class and add
.justify-content-center next to the .navbar-collapse to center the
content.
Colors
Sample colors
Theming the navbar has never been easier thanks to the combination of theming classes and
background-color utilities. Choose from .navbar-light for use with
light background colors, or .navbar-dark for dark background colors. Then,
customize with .bg-* utilities.
See also our
color docs
to learn more about colors.
Secondary icons
The secondary icons on a white background give a light, soft look. They are also helpful in keeping the navbar and sidenav appear consistent as they are the same color as the icons in sidenav.
Add .link-secondary class to the link to change the color.
Containers
Although it’s not required, you can wrap a navbar in a
.container to center it on a page–though note that an inner container is still
required. Or you can add a container inside the .navbar to only center the
contents of a fixed or static top navbar.
Use any of the responsive containers to change how wide the content in your navbar is
presented.
Placement
Use our
position utilities
to place navbars in non-static positions. Choose from fixed to the top, fixed to the bottom,
or stickied to the top (scrolls with the page until it reaches the top, then stays there).
Fixed navbars use position: fixed, meaning they’re pulled from the normal flow of
the DOM and may require custom CSS (e.g., padding-top on the
<body>) to prevent overlap with other elements.
Also note that
.sticky-top uses position: sticky, which
isn’t fully supported in every browser.
Responsive behaviors
Navbars can use .navbar-toggler, .navbar-collapse, and
.navbar-expand{-sm|-md|-lg|-xl|-xxl} classes to determine when their content
collapses behind a button. In combination with other utilities, you can easily choose when to
show or hide particular elements.
For navbars that never collapse, add the
.navbar-expand class on the navbar. For navbars that always collapse, don’t add
any .navbar-expand class.
Toggler
Navbar togglers are left-aligned by default, but should they follow a sibling element like a
.navbar-brand, they’ll automatically be aligned to the far right. Reversing
your markup will reverse the placement of the toggler. Below are examples of different
toggle styles.
With no .navbar-brand shown at the smallest breakpoint:
With a brand name shown on the left and toggler on the right:
With a toggler on the left and brand name on the right:
External content
Sometimes you want to use the collapse plugin to trigger a container element for content
that structurally sits outside of the
.navbar. Because our plugin works on the id and
data-mdb-target matching, that’s easily done!
Collapsed content
Toggleable via the navbar brand.
Advanced examples
Advanced examples of navbars usage.
Facebook style
A typical example of Facebook navbar usage — 3 columns with icons and distinctive
notifications plus a search field on the left.
Improve Article
Save Article
Improve Article
Save Article
Bootstrap 5 Navbar Color schemes is used to customize a navbar using navbar light and dark themes, along with background color utilities.
Bootstrap 5 Navbar Color schemes Classes: No special classes are used in Navbar Color schemes. We have an article on the Background colors that can be used to give styles to Navbar, Please refer to Bootstrap 5 Background Color to learn more.
Syntax:
<nav class="navbar navbar-* bg-#">
    Content
</nav>
Note: Where, * can be substituted with light or dark, and # can be substituted with a color utility like primary, light, danger, success, etc
Example 1: In this example, we will learn about the navbar-light theme along with the light background utility
HTML
<!DOCTYPE html>
<html lang="en">
<head>
<link href=
rel="stylesheet">
</head>
<body>
<div class="w-4 m-3">
<h1 class="text-success">
GeeksforGeeks
</h1>
<h3>Navbar Color schemes </h3>
<nav class="navbar navbar-light bg-light ">
<div>
<a class="navbar-brand" href="#">
Java
</a>
<a class="navbar-brand" href="#">
Stack
</a>
<a class="navbar-brand" href="#">
Queue
</a>
</div>
</nav>
</div>
</body>
</html>
Output:

Example 2: In this example, we will learn about the navbar-dark theme along with the warning background utility.
HTML
<!DOCTYPE html>
<html lang="en">
<head>
<link href=
rel="stylesheet">
</head>
<body>
<div class="w-4 m-3">
<h1 class="text-success">
GeeksforGeeks
</h1>
<h3>Navbar Color schemes</h3>
<nav class="navbar navbar-dark bg-warning ">
<div>
<a class="navbar-brand" href="#">
Java
</a>
<a class="navbar-brand" href="#">
Stack
</a>
<a class="navbar-brand" href="#">
Queue
</a>
</div>
</nav>
</div>
</body>
</html>
Output

References: https://getbootstrap.com/docs/5.0/components/navbar/#color-schemes
Bootstrap 5 Navbars
A navigation bar is a navigation header that is placed at the top of the
page:
Basic Navbar
With Bootstrap, a navigation bar can extend or collapse, depending on the
screen size.
A standard navigation bar is created with the .navbar
class, followed by a responsive collapsing class: .navbar-expand-xxl|xl|lg|md|sm
(stacks the navbar vertically on xxlarge, extra large, large, medium or small screens).
To add links inside the navbar, use either an <ul> element
(or a <div>) with class="navbar-nav".
Then add <li> elements with a .nav-item class
followed by an <a> element with a .nav-link class:
Example
<!— A grey horizontal navbar that becomes
vertical on small screens —>
<nav class=»navbar navbar-expand-sm
bg-light»>
<div class=»container-fluid»>
<!— Links —>
<ul class=»navbar-nav»>
<li class=»nav-item»>
<a class=»nav-link» href=»#»>Link
1</a>
</li>
<li class=»nav-item»>
<a class=»nav-link» href=»#»>Link
2</a>
</li>
<li class=»nav-item»>
<a class=»nav-link» href=»#»>Link
3</a>
</li>
</ul>
</div>
</nav>
Try it Yourself »
Vertical Navbar
Remove the .navbar-expand-* class to create a navigation bar
that will always be vertical:
Example
<!— A grey
vertical navbar —>
<nav class=»navbar
bg-light»>
…
</nav>
Try it Yourself »
Centered Navbar
Add the .justify-content-center class to
center the navigation bar:
Example
<nav class=»navbar navbar-expand-sm
bg-light justify-content-center»>
…
</nav>
Try it Yourself »
Colored Navbar
Use any of the .bg-color classes to change the background color of the navbar (.bg-primary,
.bg-success.bg-info, .bg-warning, .bg-danger, .bg-secondary, .bg-dark and .bg-light)
Tip: Add a white text color to all links in the navbar with the .navbar-dark class, or use the .navbar-light class to add a
black text color.
Example
<!— Grey with black text —>
<nav class=»navbar navbar-expand-sm bg-light navbar-light»>
<div class=»container-fluid»>
<ul class=»navbar-nav»>
<li class=»nav-item»>
<a class=»nav-link
active»
href=»#»>Active</a>
</li>
<li
class=»nav-item»>
<a class=»nav-link» href=»#»>Link</a>
</li>
<li class=»nav-item»>
<a class=»nav-link» href=»#»>Link</a>
</li>
<li class=»nav-item»>
<a class=»nav-link
disabled» href=»#»>Disabled</a>
</li>
</ul>
</div>
</nav>
<!— Black background with white text —>
<nav class=»navbar navbar-expand-sm bg-dark navbar-dark»>…</nav>
<!— Blue
background with white text —>
<nav class=»navbar navbar-expand-sm
bg-primary navbar-dark»>…</nav>
Try it Yourself »
Active/disabled state: Add the .active class to an
<a> element to highlight the current link, or the .disabled class to indicate that the link is un-clickable.
Brand / Logo
The .navbar-brand class is used to highlight the brand/logo/project name of your page:
Example
<nav class=»navbar navbar-expand-sm bg-dark navbar-dark»>
<div
class=»container-fluid»>
<a class=»navbar-brand»
href=»#»>Logo</a>
</div>
</nav>
Try it Yourself »
When using the .navbar-brand class with images, Bootstrap
5 will automatically style the image to fit the navbar vertically.
Example
<nav class=»navbar navbar-expand-sm bg-dark navbar-dark»>
<div
class=»container-fluid»>
<a class=»navbar-brand»
href=»#»>
<img src=»logo.png»
alt=»Avatar Logo» style=»width:40px;» class=»rounded-pill»>
</a>
</div>
</nav>
Try it Yourself »
Navbar Text
Use the .navbar-text class to vertical align any elements inside the navbar that are not links (ensures proper padding
and text color).
Example
<nav class=»navbar navbar-expand-sm bg-dark navbar-dark»>
<div
class=»container-fluid»>
<span
class=»navbar-text»>Navbar text</span>
</div>
</nav>
Try it Yourself »
Very often, especially on small screens, you want to hide the navigation
links and replace them with a button that should reveal them when clicked on.
To create a collapsible navigation bar, use a button with class="navbar-toggler",. Then wrap the
data-bs-toggle="collapse" and data-bs-target="#thetarget"
navbar content (links, etc) inside a <div> element with class="collapse navbar-collapse",
followed by an id that matches the data-bs-target of the button: «thetarget«.
Example
<nav class=»navbar navbar-expand-sm bg-dark navbar-dark»>
<div
class=»container-fluid»>
<a class=»navbar-brand»
href=»#»>Logo</a>
<button class=»navbar-toggler»
type=»button» data-bs-toggle=»collapse» data-bs-target=»#collapsibleNavbar»>
<span class=»navbar-toggler-icon»></span>
</button>
<div class=»collapse navbar-collapse» id=»collapsibleNavbar»>
<ul class=»navbar-nav»>
<li
class=»nav-item»>
<a
class=»nav-link» href=»#»>Link</a>
</li>
<li class=»nav-item»>
<a class=»nav-link» href=»#»>Link</a>
</li>
<li class=»nav-item»>
<a class=»nav-link» href=»#»>Link</a>
</li>
</ul>
</div>
</div>
</nav>
Try it Yourself »
Tip: You can also remove the .navbar-expand-md class to ALWAYS hide navbar links and display the toggler button.
Navbar With Dropdown
Navbars can also hold dropdown menus:
Example
<li class=»nav-item dropdown»>
<a class=»nav-link dropdown-toggle»
href=»#» role=»button» data-bs-toggle=»dropdown»>Dropdown</a>
<ul
class=»dropdown-menu»>
<li><a class=»dropdown-item»
href=»#»>Link</a></li>
<li><a class=»dropdown-item»
href=»#»>Another link</a></li>
<li><a
class=»dropdown-item» href=»#»>A third link</a></li>
</ul>
</li>
Try it Yourself »
Navbar Forms and Buttons
You can also include forms inside the navigation bar:
Example
<nav class=»navbar navbar-expand-sm navbar-dark bg-dark»>
<div
class=»container-fluid»>
<a class=»navbar-brand»
href=»javascript:void(0)»>Logo</a>
<button
class=»navbar-toggler» type=»button» data-bs-toggle=»collapse»
data-bs-target=»#mynavbar»>
<span
class=»navbar-toggler-icon»></span>
</button>
<div class=»collapse navbar-collapse» id=»mynavbar»>
<ul class=»navbar-nav me-auto»>
<li class=»nav-item»>
<a class=»nav-link» href=»javascript:void(0)»>Link</a>
</li>
<li class=»nav-item»>
<a class=»nav-link» href=»javascript:void(0)»>Link</a>
</li>
<li class=»nav-item»>
<a class=»nav-link» href=»javascript:void(0)»>Link</a>
</li>
</ul>
<form class=»d-flex»>
<input
class=»form-control me-2″ type=»text» placeholder=»Search»>
<button class=»btn btn-primary» type=»button»>Search</button>
</form>
</div>
</div>
</nav>
Try it Yourself »
Fixed Navigation Bar
The navigation bar can also be fixed at the top or at the bottom of the page.
A fixed navigation bar stays visible in a fixed position (top or bottom)
independent of the page scroll.
The .fixed-top class makes the navigation bar fixed at
the top:
Example
<nav class=»navbar navbar-expand-sm bg-dark navbar-dark fixed-top»>
…
</nav>
Try it Yourself »
Use the .fixed-bottom class to make the navbar stay at
the bottom of the page:
Example
<nav class=»navbar navbar-expand-sm bg-dark navbar-dark fixed-bottom»>
…
</nav>
Try it Yourself »
Use the .sticky-top class to make the navbar fixed/stay at
the top of the page when you scroll past it. Note:
This class does not work in IE11 and earlier (will treat it as position:relative).
Example
<nav class=»navbar navbar-expand-sm bg-dark navbar-dark sticky-top»>
…
</nav>
Try it Yourself »
Add a fully-functional, responsive navbar to your website with minimal code.
The Bootstrap 5 navbar is a simple wrapper for positioning branding, navigation, and other elements into a navigation header.
Basic Navbar
Here’s an explanation:
- Wrap everything inside a
navelement with the.navbarclass and a.navbar-expand{-sm|-md|-lg|-xl|-xxl}class, along with a color scheme. - For the togglable menu on smaller devices, use a
buttonelement with.navbar-toggler. To display the «hamburger», use the.navbar-toggler-iconclass on aspanelement. - For a list of links, use a
ulwith the.navbar-navclass. - For each individual list item, use
liwith.nav-item. - For the individual links use
awith.nav-link.
Navbars with Dropdowns
You can add dropdown menus to your navbar. Just add the dropdown code to a li element with the .dropdown class applied.
Current Page
Use the .active class to mark a link as the current page or section (apply it to the li).
Also add a span with .sr-only to communicate this to screen readers.
Alignment
You can use any of the spacing utilities (such as me-auto) or any of the flexbox alignment utilities (such as .justify-content-end) to align elements within the navbar.
The flexbox classes take their names from the actual flexbox property/value declaration. This makes it easy to guess the name of the most appropriate class for a given situation.
You can also add a responsive abbreviation to effect an alignment only on certain viewport sizes. For example, .justify-content-lg-end applies justify-content: end on large devices and up.
Colors
Bootstrap provides various options for adding color to navbars. The way it works is, you specify light or dark (via .navbar-light or .navbar-dark), then specify a color. Color can be specified either via one of Bootstrap’s color classes (eg, .bg-primary, .bg-dark), or by specifying your own color with CSS (eg, using background-color).
The previous examples already specify the navbar color. Here are some more examples.
Primary Color, Light
Here, we use .bg-primary along with .navbar-light:
Primary Color, Dark
Here, we use .bg-primary along with .navbar-dark:
Custom Color
To specify your own custom color, omit any .bg-* class (eg, remove .bg-primary) and add your own color using CSS.
Fixed Navbars
You can fix a navbar to the top or bottom of the viewport by using either .fixed-top or .fixed-bottom.
Fixed Top
Fixed Bottom
Padding Required
When using fixed navbars, you will usually need to add padding to compensate for the height of the navbar (otherwise the navbar will hide your content).
For example, for a «fixed top» navbar, try this:
And for «fixed bottom»:
You can adjust these values as required.

Bootstrap 5 is in alpha when this is written and it’s subject to change.
Bootstrap is a popular UI library for any JavaScript apps.
In this article, we’ll look at how to customize navbars with Bootstrap 5.
Text
We can add text to our navbars.
For example, we can write:
<nav class="navbar navbar-light bg-light">
  <div class="container-fluid">
    <span class="navbar-text">
      Lorem ipsum dolor sit amet, consectetur adipiscing elit.
    </span>
  </div>
</nav>
to add the text.
We add the navbar-text class to style the text to fit the navbar.
Also, we can mix and match other utility classes as we wish:
<nav class="navbar navbar-expand-lg navbar-light bg-light">
  <div class="container-fluid">
    <a class="navbar-brand" href="#">App</a>
    <button class="navbar-toggler" type="button" data-toggle="collapse" data-target="#navbarText" aria-controls="navbarText" aria-expanded="false" aria-label="Toggle navigation">
      <span class="navbar-toggler-icon"></span>
    </button>
    <div class="collapse navbar-collapse" id="navbarText">
      <ul class="navbar-nav mr-auto mb-2 mb-lg-0">
        <li class="nav-item">
          <a class="nav-link active" href="#">Home</a>
        </li>
        <li class="nav-item">
          <a class="nav-link" href="#">Profile</a>
        </li>
        <li class="nav-item">
          <a class="nav-link" href="#">Settings</a>
        </li>
      </ul>
      <span class="navbar-text">
        more text
      </span>
    </div>
  </div>
</nav>
We have a navbar with a brand and nav item.
We add the mr-auto to add right margin to our nav.
And we have the mb-2 and mb-lg-0 classes to change the bottom margin depending on the width of the screen.
If it’s large, then there’s no bottom margin.
Color Schemes
The color schemes of navbar can also change.
We can add the navbar-dark and bg-dark classes to make the navbar dark.
navbar-dark and bg-primary classes make the navbar blue.
We can also apply our own styles.
For example, we can write:
<nav class="navbar navbar-dark bg-dark">
  <div class="container-fluid">
    <a class="navbar-brand" href="#">App</a>
    <button class="navbar-toggler" type="button" data-toggle="collapse" data-target="#navbarText" aria-controls="navbarText" aria-expanded="false" aria-label="Toggle navigation">
      <span class="navbar-toggler-icon"></span>
    </button>
    <div class="collapse navbar-collapse" id="navbarText">
      <ul class="navbar-nav mr-auto mb-2 mb-lg-0">
        <li class="nav-item">
          <a class="nav-link active" href="#">Home</a>
        </li>
        <li class="nav-item">
          <a class="nav-link" href="#">Profile</a>
        </li>
        <li class="nav-item">
          <a class="nav-link" href="#">Settings</a>
        </li>
      </ul>
    </div>
  </div>
</nav>
to add a dark navbar.
The classes are applied to the root navbar element.
We can also apply our own navbar color:
<nav class="navbar navbar-light" style="background-color: lightblue">
  <div class="container-fluid">
    <a class="navbar-brand" href="#">App</a>
    <button class="navbar-toggler" type="button" data-toggle="collapse" data-target="#navbarText" aria-controls="navbarText" aria-expanded="false" aria-label="Toggle navigation">
      <span class="navbar-toggler-icon"></span>
    </button>
    <div class="collapse navbar-collapse" id="navbarText">
      <ul class="navbar-nav mr-auto mb-2 mb-lg-0">
        <li class="nav-item">
          <a class="nav-link active" href="#">Home</a>
        </li>
        <li class="nav-item">
          <a class="nav-link" href="#">Profile</a>
        </li>
        <li class="nav-item">
          <a class="nav-link" href="#">Settings</a>
        </li>
      </ul>
    </div>
  </div>
</nav>
We added the style attribute to do that.
Containers
We can add a container class to center the nav bar on the page.
For example, we can write:
<div class="container">
  <nav class="navbar navbar-expand-lg navbar-light bg-light">
    <div class="container-fluid">
      <a class="navbar-brand" href="#">App</a>
    </div>
  </nav>
</div>
Then we’ll get some margins around the page.
Also, we can use any responsive containers to change the width of the navbar:
<nav class="navbar navbar-expand-lg navbar-light bg-light">
  <div class="container-md">
    <a class="navbar-brand" href="#">App</a>
  </div>
</nav>
We added the navbar-expand-lg class to make it expand when the screen hits the lg breakpoint or wider.
Placement
The placement of the navbar can also be changed.
For example, we can write:
<nav class="navbar fixed-top navbar-light bg-light">
  <div class="container-fluid">
    <a class="navbar-brand" href="#">Fixed Navbar</a>
  </div>
</nav>
Then we have the fixed-top class to make the navbar stick to the top.
To keep the navbar at the bottom of the screen, we can write:
<nav class="navbar fixed-bottom navbar-light bg-light">
  <div class="container-fluid">
    <a class="navbar-brand" href="#">Fixed Navbar</a>
  </div>
</nav>
The fixed-bottom class keeps the navbar at the bottom.
We can also use the sticky-top class to make it stick to the top:
<nav class="navbar sticky-top navbar-light bg-light">
  <div class="container-fluid">
    <a class="navbar-brand" href="#">Fixed Navbar</a>
  </div>
</nav>
Conclusion
We can place our navbar and its content the way we want with various classes.
Web developer specializing in React, Vue, and front end development.
View Archive