Given a transparent PNG displaying a simple shape in white, is it possible to somehow change the color of this through CSS? Some kind of overlay or what not?
![]()
John Slegers
44k22 gold badges200 silver badges168 bronze badges
asked Sep 14, 2011 at 11:53
4
You can use filters with -webkit-filter and filter:
Filters are relatively new to browsers but supported in over 90% of browsers according to the following CanIUse table: https://caniuse.com/#feat=css-filters
You can change an image to grayscale, sepia and lot more (look at the example).
So you can now change the color of a PNG file with filters.
body {
    background-color:#03030a;
    min-width: 800px;
    min-height: 400px
}
img {
    width:20%;
    float:left;
     margin:0;
}
/*Filter styles*/
.saturate { filter: saturate(3); }
.grayscale { filter: grayscale(100%); }
.contrast { filter: contrast(160%); }
.brightness { filter: brightness(0.25); }
.blur { filter: blur(3px); }
.invert { filter: invert(100%); }
.sepia { filter: sepia(100%); }
.huerotate { filter: hue-rotate(180deg); }
.rss.opacity { filter: opacity(50%); }
<!--- img src http://upload.wikimedia.org/wikipedia/commons/thumb/e/ec/Mona_Lisa%2C_by_Leonardo_da_Vinci%2C_from_C2RMF_retouched.jpg/500px-Mona_Lisa%2C_by_Leonardo_da_Vinci%2C_from_C2RMF_retouched.jpg -->
<img alt="Mona Lisa" src="https://images.pexels.com/photos/40997/mona-lisa-leonardo-da-vinci-la-gioconda-oil-painting-40997.jpeg?auto=compress&cs=tinysrgb&dpr=3&h=750&w=1260" title="original">
<img alt="Mona Lisa" src="https://images.pexels.com/photos/40997/mona-lisa-leonardo-da-vinci-la-gioconda-oil-painting-40997.jpeg?auto=compress&cs=tinysrgb&dpr=3&h=750&w=1260" title="saturate" class="saturate">
<img alt="Mona Lisa" src="https://images.pexels.com/photos/40997/mona-lisa-leonardo-da-vinci-la-gioconda-oil-painting-40997.jpeg?auto=compress&cs=tinysrgb&dpr=3&h=750&w=1260" title="grayscale" class="grayscale">
<img alt="Mona Lisa" src="https://images.pexels.com/photos/40997/mona-lisa-leonardo-da-vinci-la-gioconda-oil-painting-40997.jpeg?auto=compress&cs=tinysrgb&dpr=3&h=750&w=1260" title="contrast" class="contrast">
<img alt="Mona Lisa" src="https://images.pexels.com/photos/40997/mona-lisa-leonardo-da-vinci-la-gioconda-oil-painting-40997.jpeg?auto=compress&cs=tinysrgb&dpr=3&h=750&w=1260" title="brightness" class="brightness">
<img alt="Mona Lisa" src="https://images.pexels.com/photos/40997/mona-lisa-leonardo-da-vinci-la-gioconda-oil-painting-40997.jpeg?auto=compress&cs=tinysrgb&dpr=3&h=750&w=1260" title="blur" class="blur">
<img alt="Mona Lisa" src="https://images.pexels.com/photos/40997/mona-lisa-leonardo-da-vinci-la-gioconda-oil-painting-40997.jpeg?auto=compress&cs=tinysrgb&dpr=3&h=750&w=1260" title="invert" class="invert">
<img alt="Mona Lisa" src="https://images.pexels.com/photos/40997/mona-lisa-leonardo-da-vinci-la-gioconda-oil-painting-40997.jpeg?auto=compress&cs=tinysrgb&dpr=3&h=750&w=1260" title="sepia" class="sepia">
<img alt="Mona Lisa" src="https://images.pexels.com/photos/40997/mona-lisa-leonardo-da-vinci-la-gioconda-oil-painting-40997.jpeg?auto=compress&cs=tinysrgb&dpr=3&h=750&w=1260" title="huerotate" class="huerotate">
<img alt="Mona Lisa" src="https://images.pexels.com/photos/40997/mona-lisa-leonardo-da-vinci-la-gioconda-oil-painting-40997.jpeg?auto=compress&cs=tinysrgb&dpr=3&h=750&w=1260" title="opacity" class="rss opacity">Source
![]()
MaxiGui
6,1054 gold badges16 silver badges33 bronze badges
answered Jan 5, 2014 at 12:03
![]()
РАВИРАВИ
11.1k6 gold badges29 silver badges39 bronze badges
19
You might want to take a look at Icon fonts. http://css-tricks.com/examples/IconFont/
EDIT: I’m using Font-Awesome on my latest project. You can even bootstrap it. Simply put this in your <head>:
<link href="//netdna.bootstrapcdn.com/font-awesome/3.2.1/css/font-awesome.min.css" rel="stylesheet">

<!-- And if you want to support IE7, add this aswell -->
<link href="//netdna.bootstrapcdn.com/font-awesome/3.2.1/css/font-awesome-ie7.min.css" rel="stylesheet">
And then go ahead and add some icon-links like this:
<a class="icon-thumbs-up"></a>
Here’s the full cheat sheet
—edit—
Font-Awesome uses different class names in the new version, probably because this makes the CSS files drastically smaller, and to avoid ambiguous css classes.
So now you should use:
<a class="fa fa-thumbs-up"></a>
EDIT 2:
Just found out github also uses its own icon font: Octicons
It’s free to download. They also have some tips on how to create your very own icon fonts.
![]()
ChatGPT
5,23211 gold badges49 silver badges69 bronze badges
answered Nov 13, 2012 at 8:15
![]()
Jules ColleJules Colle
10.9k7 gold badges58 silver badges65 bronze badges
3
The simplest one line that worked for me:
filter: opacity(0.5) drop-shadow(0 0 0 blue);
You can adjust opacity from 0 to 1 to make color lighter or darker.
answered Nov 8, 2018 at 10:43
![]()
RehmatRehmat
2,0332 gold badges22 silver badges27 bronze badges
8
I’ve been able to do this using SVG filter. You can write a filter that multiplies the color of source image with the color you want to change to. In the code snippet below, flood-color is the color we want to change image color to (which is Red in this case.) feComposite tells the filter how we’re processing the color. The formula for feComposite with arithmetic is (k1*i1*i2 + k2*i1 + k3*i2 + k4) where i1 and i2 are input colors for in/in2 accordingly. So specifying only k1=1 means it will do just i1*i2, which means multiplying both input colors together.
Note: This only works with HTML5 since this is using inline SVG. But I think you might be able to make this work with older browser by putting SVG in a separate file. I haven’t tried that approach yet.
Here’s the snippet:
<svg xmlns="http://www.w3.org/2000/svg" version="1.1" width="60" height="90" style="float:left">
  <defs>
    <filter id="colorMask1">
      <feFlood flood-color="#ff0000" result="flood" />
      <feComposite in="SourceGraphic" in2="flood" operator="arithmetic" k1="1" k2="0" k3="0" k4="0" />
    </filter>
  </defs>
  <image width="100%" height="100%" xlink:href="http://i.stack.imgur.com/OyP0g.jpg" filter="url(#colorMask1)" />
</svg>
<svg xmlns="http://www.w3.org/2000/svg" version="1.1" width="60" height="90" style="float:left">
  <defs>
    <filter id="colorMask2">
      <feFlood flood-color="#00ff00" result="flood" />
      <feComposite in="SourceGraphic" in2="flood" operator="arithmetic" k1="1" k2="0" k3="0" k4="0" />
    </filter>
  </defs>
  <image width="100%" height="100%" xlink:href="http://i.stack.imgur.com/OyP0g.jpg" filter="url(#colorMask2)" />
</svg>
<svg xmlns="http://www.w3.org/2000/svg" version="1.1" width="60" height="90" style="float:left">
  <defs>
    <filter id="colorMask3">
      <feFlood flood-color="#0000ff" result="flood" />
      <feComposite in="SourceGraphic" in2="flood" operator="arithmetic" k1="1" k2="0" k3="0" k4="0" />
    </filter>
  </defs>
  <image width="100%" height="100%" xlink:href="http://i.stack.imgur.com/OyP0g.jpg" filter="url(#colorMask3)" />
</svg>
answered Sep 23, 2015 at 9:52
![]()
4
Yes 
Surfin’ Safari — Blog Archive » CSS Masks
WebKit now supports alpha masks in CSS. Masks allow you to overlay the content of a box with a pattern that can be used to knock out portions of that box in the final display. In other words, you can clip to complex shapes based off the alpha of an image.
[…]
We have introduced new properties to provide Web designers with a lot of control over these masks and how they are applied. The new properties are analogous to the background and border-image properties that already exist.-webkit-mask (background) -webkit-mask-attachment (background-attachment) -webkit-mask-clip (background-clip) -webkit-mask-origin (background-origin) -webkit-mask-image (background-image) -webkit-mask-repeat (background-repeat) -webkit-mask-composite (background-composite) -webkit-mask-box-image (border-image)
![]()
answered Sep 14, 2011 at 11:58
![]()
benhowdle89benhowdle89
36.4k67 gold badges201 silver badges327 bronze badges
2
Think I have a solution for this that’s a) exactly what you were looking for 5 years ago, and b) is a bit simpler than the other code options here.
With any white png (eg, white icon on transparent background), you can add an ::after selector to recolor.
.icon {
    background: url(img/icon.png); /* Your icon */
    position: relative; /* Allows an absolute positioned psuedo element */
}

.icon::after{
    position: absolute; /* Positions psuedo element relative to .icon */
    width: 100%; /* Same dimensions as .icon */
    height: 100%;
    content: ""; /* Allows psuedo element to show */
    background: #EC008C; /* The color you want the icon to change to */
    mix-blend-mode: multiply; /* Only apply color on top of white, use screen if icon is black */
}
See this codepen (applying the color swap on hover): http://codepen.io/chrscblls/pen/bwAXZO
answered Sep 30, 2016 at 16:54
![]()
chrscbllschrscblls
5652 gold badges7 silver badges16 bronze badges
3
In most browsers, you can use filters :
-
on both
<img>elements and background images of other elements -
and set them either statically in your CSS, or dynamically using JavaScript
See demos below.
<img> elements
You can apply this technique to a <img> element :
#original, #changed {
    width: 45%;
    padding: 2.5%;
    float: left;
}

#changed {
    -webkit-filter : hue-rotate(180deg);
    filter : hue-rotate(180deg);
}
<img id="original" src="http://i.stack.imgur.com/rfar2.jpg" />
<img id="changed" src="http://i.stack.imgur.com/rfar2.jpg" />Background images
You can apply this technique to a background image :
#original, #changed {
    background: url('http://i.stack.imgur.com/kaKzj.jpg');
    background-size: cover;
    width: 30%;
    margin: 0 10% 0 10%;
    padding-bottom: 28%;
    float: left;
}

#changed {
    -webkit-filter : hue-rotate(180deg);
    filter : hue-rotate(180deg);
}
<div id="original"></div>
<div id="changed"></div>JavaScript
You can use JavaScript to set a filter at runtime :
var element = document.getElementById("changed");
var filter = 'hue-rotate(120deg) saturate(2.4)';
element.style['-webkit-filter'] = filter;
element.style['filter'] = filter;#original, #changed {
margin: 0 10%;
width: 30%;
float: left;
background: url('http://i.stack.imgur.com/856IQ.png');
background-size: cover;
padding-bottom: 25%;
}<div id="original"></div>
<div id="changed"></div>answered Mar 11, 2016 at 20:04
![]()
John SlegersJohn Slegers
44k22 gold badges200 silver badges168 bronze badges
1
The img tag has a background property just like any other. If you have a white PNG with a transparent shape, like a stencil, then you can do this:
<img src= 'stencil.png' style= 'background-color: red'>
answered Sep 14, 2011 at 11:58
![]()
4
When changing a picture from black to white, or white to black the hue rotate filter does not work, because black and white are not technically colors. Instead, black and white color changes (from black to white or vice-versa) must be done with the invert filter property.
.img1 {
filter: invert(100%);
}
answered Apr 26, 2020 at 0:24
![]()
I found this while googling, I found best working for me…
HTML
<div class="img"></div>
CSS
.img {
background-color: red;
width: 60px;
height: 60px;
-webkit-mask-image: url('http://i.stack.imgur.com/gZvK4.png');
}
http://jsfiddle.net/a63b0exm/
answered Oct 10, 2018 at 20:12
![]()
2
Answering because I was looking for a solution for this.
the pen in @chrscblls answer works well if you have a white or black background, but mine wasn’t. Aslo, the images were generated with ng-repeat, so I couldn’t have their url in my css AND you can’t use ::after on img tags.
So, I figured a work around and thought it might help people if they too stumble here.
So what I did is pretty much the same with three main differences:
- the url being in my img tag, I put it(and a label) in another div on which ::after will work.
- the ‘mix-blend-mode’ is set at ‘difference’ instead of ‘multiply’ or ‘screen’.
- I added a ::before with exactly the same value so the ::after would do the ‘difference’ of the ‘difference’ made by the ::before and cancelled it-self.
To change it from black to white or white to black the background color need to be white.
From black to colors, you can choose whatever color.
From white to colors tho, you’ll need to choose the opposite color of the one you want.
.divClass{
position: relative;
width: 100%;
height: 100%;
text-align: left;
}
.divClass:hover::after, .divClass:hover::before{
position: absolute;
width: 100%;
height: 100%;
background: #FFF;
mix-blend-mode: difference;
content: "";
}
Since I posted this answer I made an other pen using a different method :
* {
box-sizing: border-box;
}
body {
background-color: CadetBlue;
font-family: "Lato", sans-serif;
text-align: center;
}
button {
display: flex;
justify-content: center;
min-width: 182px;
padding: 0.5em 1em;
margin: 2em auto;
cursor: pointer;
pointer-events: auto;
border-radius: 4px;
border: none;
background: #85b5b7;
box-shadow: 0 6px #6fa8aa;
}
label {
font-weight: 400;
font-size: 24px;
margin: auto 0;
color: white;
}
.icon {
height: 64px;
width: 64px;
background-color: white;
-webkit-mask-repeat: no-repeat;
mask-repeat: no-repeat;
-webkit-mask-position: left center;
mask-position: left center;
-webkit-mask-size: auto 48px;
mask-size: auto 48px;
mask-mode: luminance;
-webkit-mask-image: url("https://upload.wikimedia.org/wikipedia/commons/thumb/d/d1/Bubbles-alt-icon.png/640px-Bubbles-alt-icon.png");
mask-image: url("https://upload.wikimedia.org/wikipedia/commons/thumb/d/d1/Bubbles-alt-icon.png/640px-Bubbles-alt-icon.png");
}
button label span {
color: #395f60;
}
button:hover {
color: #395f60;
transform: translatey(4px);
box-shadow: 0 2px #6fa8aa;
}
button:hover .icon {
background-color: #395f60;
}<button>
<div class="icon"></div>
<label> white to <span>color</span></label>
</button>answered Mar 24, 2017 at 19:12
![]()
SalixSalix
1,2708 silver badges13 bronze badges
4
/* change image color to white */
filter: invert(100%) sepia(16%) saturate(7463%) hue-rotate(222deg) brightness(119%) contrast(115%);
/* change image color to red */`
filter: invert(16%) sepia(99%) saturate(7404%) hue-rotate(4deg) brightness(95%) contrast(118%);
/* change image color to green */
filter: invert(26%) sepia(89%) saturate(1583%) hue-rotate(95deg) brightness(96%) contrast(106%);
/* change image color to blue */
filter: invert(10%) sepia(90%) saturate(5268%) hue-rotate(245deg) brightness(109%) contrast(155%);
answered Jun 28, 2022 at 1:37
![]()
2
I required a specific colour, so filter didn’t work for me.
Instead, I created a div, exploiting CSS multiple background images and the linear-gradient function (which creates an image itself). If you use the overlay blend mode, your actual image will be blended with the generated «gradient» image containing your desired colour (here, #BADA55)
.colored-image {
background-image: linear-gradient(to right, #BADA55, #BADA55), url("https://i.imgur.com/lYXT8R6.png");
background-blend-mode: overlay;
background-size: contain;
width: 200px;
height: 200px;
}<div class="colored-image"></div>answered Apr 10, 2017 at 7:22
![]()
rolznzrolznz
7599 silver badges16 bronze badges
2
Use this great codepen example that you insert your hex color value and it returns the needed filter to apply this color to png
CSS filter generator to convert from black to target hex color
for example i needed my png to have the following color #EF8C57
then you have to apply the following filter to you png
Result:
filter: invert(76%) sepia(30%) saturate(3461%) hue-rotate(321deg) brightness(98%) contrast(91%);
![]()
Sven Eberth
3,02712 gold badges23 silver badges28 bronze badges
answered Jun 30, 2021 at 22:05
![]()
2
body{
background: #333 url(/images/classy_fabric.png);
width: 430px;
margin: 0 auto;
padding: 30px;
}
.preview{
background: #ccc;
width: 415px;
height: 430px;
border: solid 10px #fff;
}
input[type='radio'] {
-webkit-appearance: none;
-moz-appearance: none;
width: 25px;
height: 25px;
margin: 5px 0 5px 5px;
background-size: 225px 70px;
position: relative;
float: left;
display: inline;
top: 0;
border-radius: 3px;
z-index: 99999;
cursor: pointer;
box-shadow: 1px 1px 1px #000;
}
input[type='radio']:hover{
-webkit-filter: opacity(.4);
filter: opacity(.4);
}
.red{
background: red;
}
.red:checked{
background: linear-gradient(brown, red)
}
.green{
background: green;
}
.green:checked{
background: linear-gradient(green, lime);
}
.yellow{
background: yellow;
}
.yellow:checked{
background: linear-gradient(orange, yellow);
}
.purple{
background: purple;
}
.pink{
background: pink;
}
.purple:checked{
background: linear-gradient(purple, violet);
}
.red:checked ~ img{
-webkit-filter: opacity(.5) drop-shadow(0 0 0 red);
filter: opacity(.5) drop-shadow(0 0 0 red);
}
.green:checked ~ img{
-webkit-filter: opacity(.5) drop-shadow(0 0 0 green);
filter: opacity(.5) drop-shadow(0 0 0 green);
}
.yellow:checked ~ img{
-webkit-filter: opacity(.5) drop-shadow(0 0 0 yellow);
filter: opacity(.5) drop-shadow(0 0 0 yellow);
}
.purple:checked ~ img{
-webkit-filter: opacity(.5) drop-shadow(0 0 0 purple);
filter: opacity(.5) drop-shadow(0 0 0 purple);
}
.pink:checked ~ img{
-webkit-filter: opacity(.5) drop-shadow(0 0 0 pink);
filter: opacity(.5) drop-shadow(0 0 0 pink);
}
img{
width: 394px;
height: 375px;
position: relative;
}
.label{
width: 150px;
height: 75px;
position: absolute;
top: 170px;
margin-left: 130px;
}
::selection{
background: #000;
}<div class="preview">
<input class='red' name='color' type='radio' />
<input class='green' name='color' type='radio' />
<input class='pink' name='color' type='radio' />
<input checked class='yellow' name='color' type='radio' />
<input class='purple' name='color' type='radio' />
<img src="https://i.stack.imgur.com/bd7VJ.png"/>
</div>Source: https://codepen.io/taryaoui/pen/EKkcu
answered Sep 13, 2019 at 14:57
![]()
Mahdi BashirpourMahdi Bashirpour
16.1k12 gold badges112 silver badges142 bronze badges
Try this:
-webkit-filter: brightness(0) invert(1);
filter: brightness(0) invert(1);
![]()
Hedam
2,17426 silver badges53 bronze badges
answered Apr 29, 2021 at 2:37
![]()
The solution that worked for me was using filter: drop-shadow
filter: drop-shadow works differently than regular box-shadow.
filter one applies shadow to real shape (so it supports transparent images).
The trick now is to ‘hide’ real image and show only the shadow.
https://jsfiddle.net/d4m8x0qb/2

Note that my use case is modifying icons colors into one, solid color, so this approach works for me, but might not for other use cases
answered Dec 13, 2021 at 9:23
![]()
Adam PietrasiakAdam Pietrasiak
12.4k8 gold badges75 silver badges91 bronze badges
There’s no need for a whole font set if you only need one icon, plus I feel it being more «clean» as an individual element. So, for this purpose, in HTML5 you can place a SVG directly inside the document flow. Then you can define a class in your .CSS stylesheet and access its background color with the fill property:
Working fiddle:
http://jsfiddle.net/qmsj0ez1/
Note that, in the example, I’ve used :hoverto illustrate the behaviour; if you just want to change color for the «normal» state, you should remove the pseudoclass.
answered Aug 12, 2014 at 11:58
![]()
PerePere
1,05812 silver badges20 bronze badges
To literally change the color, you could incorporate a CSS transition with a -webkit-filter where when something happens you would invoke the -webkit-filter of your choice. For example:
img {
-webkit-filter:grayscale(0%);
transition: -webkit-filter .3s linear;
}
img:hover
{
-webkit-filter:grayscale(75%);
}
answered Jun 3, 2015 at 20:15
![]()
beta208beta208
6071 gold badge6 silver badges18 bronze badges
You could use filter: hue-rotate(Ndeg), but if the image is black and white, the hue will never change.
However, you could combine it with filter: sepia(100). That will add color to the image that the hue-rotate filter CAN change.
Sepia adds a rather desaturated color, so enhance that a bit with filter: saturate(50); That makes it a deeper color that hue-rotate can better work with.
Then combine them all together:
filter: sepia(100) saturate(50) hue-rotate(280deg)
Then experiment with the rotation degrees until you find your preferred color.
answered Sep 20, 2022 at 16:13
![]()
KWallaceKWallace
1,50214 silver badges24 bronze badges
- If the image is simple like vector images, you can converted to SVG and do CSS changes there.
- Another option make the image PNG, and change a specific color to transparent (like cut-outs) and change the background color using CSS.
answered Dec 11, 2022 at 22:37
![]()
JaiderJaider
13.8k5 gold badges71 silver badges82 bronze badges
Самый легкий способ для изменения цвета PNG изображения — это использование свойства filter.
Свойство filter применяет визуальные эффекты к элементу (изображению).
Оно имеет следующие значения:
filter: none | blur() | brightness() | contrast() | drop-shadow() | grayscale() | hue-rotate() | invert() | opacity() | saturate() | sepia() | url() | initial | inherit;С помощью этих значений мы можем изменить цвет изображения.
Фильтры являются новыми для браузеров и поддерживаются только очень современными браузерами. Можно использовать фильтры вместе с -Webkit-filter для Safari, Google Chrome и Opera.
Давайте попробуем пошагово изменить цвет изображения:
- Скопируйте и вставьте ссылку изображения в основную часть (body section). Здесь мы создаем две изображения с классами «image1» и «image2».
<body>
<img class = "image1" src="https://www.sccpre.cat/mypng/detail/122-1229311_bird-feathers-flying-macaw-wings-birds-with-white.png"
width="500px" height="250px" alt="filter applied" />
<img class = "image2" src="https://www.sccpre.cat/mypng/detail/122-1229311_bird-feathers-flying-macaw-wings-birds-with-white.png"
width="500px" height="250px" alt="filter applied" />
</body>Теперь добавляем стили к классам «Image1» и «Image2».
- Задайте ширину этих изображений с помощью свойства width.
- Добавьте свойство filter, чтобы изменить цвет изображения.
- Используйте значение «invert», которое инвертирует первое изображение. Здесь устанавливаем 100% для полного инвертирования изображения.
- Используйте значение «sepia» (100%), которое превращает второе изображение полностью в сепию.
<style>
img {
width:40%;
float:left;
}
.image1 {
filter: invert(100%);
-webkit-filter:invert(100%);
}
.image2 {
filter: sepia(100%);
-webkit-filter: sepia(100%);
}
</style>Посмотрим, каким получился результат:
Пример
<!DOCTYPE html>
<html>
<head>
<title>Измените цвет изображения</title>
<style>
img {
width:40%;
float:left;
}
.image1 {
filter: invert(100%);
-webkit-filter: invert(100%);
}
.image2 {
filter: sepia(100%);
-webkit-filter: sepia(100%);
}
</style>
</head>
<body>
<h2>Измените цвет PNG изображения</h2>
<img class="image1" src="https://www.sccpre.cat/mypng/detail/122-1229311_bird-feathers-flying-macaw-wings-birds-with-white.png" width="500px" height="250px" alt="filter applied" />
<img class="image2" src="https://www.sccpre.cat/mypng/detail/122-1229311_bird-feathers-flying-macaw-wings-birds-with-white.png"
width="500px" height="250px" alt="filter applied" />
</body>
</html>Рассмотрим другой пример, где использованы восемь значений свойства filter:
Пример
<!DOCTYPE html>
<html>
<head>
<title>Заголовок документа</title>
<style>
body {
background-color:#03030a;
min-width: 800px;
min-height: 400px
}
img {
width:20%;
float:left;
margin:0;
}
/*Filter styles*/
.saturate {
filter: saturate(3);
-webkit-filter: saturate(3);
}
.grayscale {
filter: grayscale(100%);
-webkit-filter: grayscale(100%);
}
.contrast {
filter: contrast(160%);
-webkit-filter: contrast(160%);
}
.brightness {
filter: brightness(0.25);
-webkit-filter:brightness(0.25);
}
.blur {
filter: blur(3px);
-webkit-filter: blur(3px);
}
.invert {
filter: invert(100%);
-webkit-filter: invert(100%);
}
.sepia {
filter: sepia(100%);
-webkit-filter: sepia(100%);
}
.huerotate {
filter: hue-rotate(180deg);
-webkit-filter: hue-rotate(180deg);
}
.opacity {
filter: opacity(50%);
-webkit-filter: opacity(50%);
}
</style>
</head>
<body>
<h2>Измените цвет PNG изображения</h2>
<img alt="Mona Lisa" src="http://i.stack.imgur.com/OyP0g.jpg" title="original">
<img alt="Mona Lisa" src="http://i.stack.imgur.com/OyP0g.jpg" title="saturate" class="saturate">
<img alt="Mona Lisa" src="http://i.stack.imgur.com/OyP0g.jpg" title="grayscale" class="grayscale">
<img alt="Mona Lisa" src="http://i.stack.imgur.com/OyP0g.jpg" title="contrast" class="contrast">
<img alt="Mona Lisa" src="http://i.stack.imgur.com/OyP0g.jpg" title="brightness" class="brightness">
<img alt="Mona Lisa" src="http://i.stack.imgur.com/OyP0g.jpg" title="blur" class="blur">
<img alt="Mona Lisa" src="http://i.stack.imgur.com/OyP0g.jpg" title="invert" class="invert">
<img alt="Mona Lisa" src="http://i.stack.imgur.com/OyP0g.jpg" title="sepia" class="sepia">
<img alt="Mona Lisa" src="http://i.stack.imgur.com/OyP0g.jpg" title="huerotate" class="huerotate">
<img alt="Mona Lisa" src="http://i.stack.imgur.com/OyP0g.jpg" title="opacity" class="opacity">
</body>
</html>Можете также применить следующую технику:
- Укажите <div> элементы в основной части. Установите IDs для вашего div элемента. Здесь имеем ID «original» и «changed».
<body>
<div id="original"></div>

<div id="changed"></div>
</body>
Начните применить стили для IDs. Установите filter: hue-rotate; к ID "changed- Начните применить стили для IDs. Установите filter: hue-rotate; к ID «changed».
#changed {
-webkit-filter : hue-rotate(180deg);
filter : hue-rotate(180deg);
}Результат будет выглядеть следующим образом:
Пример
<!DOCTYPE html>
<html>
<head>
<title>Измените цвет изображения</title>
<style>
#original, #changed {
background: url('https://image.freepik.com/free-photo/orange-red-siamese-fighting-fish-betta-splendens-isolated-white-background_51519-539.jpg');
background-size: cover;
width: 30%;
margin: 0 10% 0 10%;
padding-bottom: 28%;
float: left;
}
#changed {
-webkit-filter : hue-rotate(180deg);
filter : hue-rotate(180deg);
}
</style>
</head>
<body>
<h2>Измените цвет PNG изображения</h2>
<div id="original"></div>
<div id="changed"></div>
</body>
</html>Given a transparent PNG displaying a simple shape in white, is it possible to somehow change the color of this through CSS? Some kind of overlay or what not?
![]()
John Slegers
44k22 gold badges200 silver badges168 bronze badges
asked Sep 14, 2011 at 11:53
4
You can use filters with -webkit-filter and filter:
Filters are relatively new to browsers but supported in over 90% of browsers according to the following CanIUse table: https://caniuse.com/#feat=css-filters
You can change an image to grayscale, sepia and lot more (look at the example).
So you can now change the color of a PNG file with filters.
body {
background-color:#03030a;
min-width: 800px;
min-height: 400px
}
img {
width:20%;
float:left;
margin:0;
}
/*Filter styles*/
.saturate { filter: saturate(3); }
.grayscale { filter: grayscale(100%); }
.contrast { filter: contrast(160%); }
.brightness { filter: brightness(0.25); }
.blur { filter: blur(3px); }
.invert { filter: invert(100%); }
.sepia { filter: sepia(100%); }
.huerotate { filter: hue-rotate(180deg); }
.rss.opacity { filter: opacity(50%); }<!--- img src http://upload.wikimedia.org/wikipedia/commons/thumb/e/ec/Mona_Lisa%2C_by_Leonardo_da_Vinci%2C_from_C2RMF_retouched.jpg/500px-Mona_Lisa%2C_by_Leonardo_da_Vinci%2C_from_C2RMF_retouched.jpg -->
<img alt="Mona Lisa" src="https://images.pexels.com/photos/40997/mona-lisa-leonardo-da-vinci-la-gioconda-oil-painting-40997.jpeg?auto=compress&cs=tinysrgb&dpr=3&h=750&w=1260" title="original">
<img alt="Mona Lisa" src="https://images.pexels.com/photos/40997/mona-lisa-leonardo-da-vinci-la-gioconda-oil-painting-40997.jpeg?auto=compress&cs=tinysrgb&dpr=3&h=750&w=1260" title="saturate" class="saturate">
<img alt="Mona Lisa" src="https://images.pexels.com/photos/40997/mona-lisa-leonardo-da-vinci-la-gioconda-oil-painting-40997.jpeg?auto=compress&cs=tinysrgb&dpr=3&h=750&w=1260" title="grayscale" class="grayscale">
<img alt="Mona Lisa" src="https://images.pexels.com/photos/40997/mona-lisa-leonardo-da-vinci-la-gioconda-oil-painting-40997.jpeg?auto=compress&cs=tinysrgb&dpr=3&h=750&w=1260" title="contrast" class="contrast">
<img alt="Mona Lisa" src="https://images.pexels.com/photos/40997/mona-lisa-leonardo-da-vinci-la-gioconda-oil-painting-40997.jpeg?auto=compress&cs=tinysrgb&dpr=3&h=750&w=1260" title="brightness" class="brightness">
<img alt="Mona Lisa" src="https://images.pexels.com/photos/40997/mona-lisa-leonardo-da-vinci-la-gioconda-oil-painting-40997.jpeg?auto=compress&cs=tinysrgb&dpr=3&h=750&w=1260" title="blur" class="blur">
<img alt="Mona Lisa" src="https://images.pexels.com/photos/40997/mona-lisa-leonardo-da-vinci-la-gioconda-oil-painting-40997.jpeg?auto=compress&cs=tinysrgb&dpr=3&h=750&w=1260" title="invert" class="invert">
<img alt="Mona Lisa" src="https://images.pexels.com/photos/40997/mona-lisa-leonardo-da-vinci-la-gioconda-oil-painting-40997.jpeg?auto=compress&cs=tinysrgb&dpr=3&h=750&w=1260" title="sepia" class="sepia">
<img alt="Mona Lisa" src="https://images.pexels.com/photos/40997/mona-lisa-leonardo-da-vinci-la-gioconda-oil-painting-40997.jpeg?auto=compress&cs=tinysrgb&dpr=3&h=750&w=1260" title="huerotate" class="huerotate">
<img alt="Mona Lisa" src="https://images.pexels.com/photos/40997/mona-lisa-leonardo-da-vinci-la-gioconda-oil-painting-40997.jpeg?auto=compress&cs=tinysrgb&dpr=3&h=750&w=1260" title="opacity" class="rss opacity">Source
![]()
MaxiGui
6,1054 gold badges16 silver badges33 bronze badges
answered Jan 5, 2014 at 12:03
![]()
РАВИРАВИ
11.1k6 gold badges29 silver badges39 bronze badges
19
You might want to take a look at Icon fonts. http://css-tricks.com/examples/IconFont/
EDIT: I’m using Font-Awesome on my latest project. You can even bootstrap it. Simply put this in your <head>:
<link href="//netdna.bootstrapcdn.com/font-awesome/3.2.1/css/font-awesome.min.css" rel="stylesheet">
<!-- And if you want to support IE7, add this aswell -->
<link href="//netdna.bootstrapcdn.com/font-awesome/3.2.1/css/font-awesome-ie7.min.css" rel="stylesheet">
And then go ahead and add some icon-links like this:
<a class="icon-thumbs-up"></a>
Here’s the full cheat sheet
—edit—
Font-Awesome uses different class names in the new version, probably because this makes the CSS files drastically smaller, and to avoid ambiguous css classes.
So now you should use:
<a class="fa fa-thumbs-up"></a>
EDIT 2:
Just found out github also uses its own icon font: Octicons
It’s free to download. They also have some tips on how to create your very own icon fonts.
![]()
ChatGPT
5,23211 gold badges49 silver badges69 bronze badges
answered Nov 13, 2012 at 8:15
![]()
Jules ColleJules Colle
10.9k7 gold badges58 silver badges65 bronze badges
3
The simplest one line that worked for me:
filter: opacity(0.5) drop-shadow(0 0 0 blue);
You can adjust opacity from 0 to 1 to make color lighter or darker.
answered Nov 8, 2018 at 10:43
![]()
RehmatRehmat
2,0332 gold badges22 silver badges27 bronze badges
8
I’ve been able to do this using SVG filter. You can write a filter that multiplies the color of source image with the color you want to change to. In the code snippet below, flood-color is the color we want to change image color to (which is Red in this case.) feComposite tells the filter how we’re processing the color. The formula for feComposite with arithmetic is (k1*i1*i2 + k2*i1 + k3*i2 + k4) where i1 and i2 are input colors for in/in2 accordingly. So specifying only k1=1 means it will do just i1*i2, which means multiplying both input colors together.
Note: This only works with HTML5 since this is using inline SVG. But I think you might be able to make this work with older browser by putting SVG in a separate file. I haven’t tried that approach yet.
Here’s the snippet:
<svg xmlns="http://www.w3.org/2000/svg" version="1.1" width="60" height="90" style="float:left">
<defs>
<filter id="colorMask1">
<feFlood flood-color="#ff0000" result="flood" />
<feComposite in="SourceGraphic" in2="flood" operator="arithmetic" k1="1" k2="0" k3="0" k4="0" />
</filter>
</defs>
<image width="100%" height="100%" xlink:href="http://i.stack.imgur.com/OyP0g.jpg" filter="url(#colorMask1)" />
</svg>
<svg xmlns="http://www.w3.org/2000/svg" version="1.1" width="60" height="90" style="float:left">
<defs>
<filter id="colorMask2">
<feFlood flood-color="#00ff00" result="flood" />
<feComposite in="SourceGraphic" in2="flood" operator="arithmetic" k1="1" k2="0" k3="0" k4="0" />
</filter>
</defs>
<image width="100%" height="100%" xlink:href="http://i.stack.imgur.com/OyP0g.jpg" filter="url(#colorMask2)" />
</svg>
<svg xmlns="http://www.w3.org/2000/svg" version="1.1" width="60" height="90" style="float:left">
<defs>
<filter id="colorMask3">
<feFlood flood-color="#0000ff" result="flood" />
<feComposite in="SourceGraphic" in2="flood" operator="arithmetic" k1="1" k2="0" k3="0" k4="0" />
</filter>
</defs>
<image width="100%" height="100%" xlink:href="http://i.stack.imgur.com/OyP0g.jpg" filter="url(#colorMask3)" />
</svg>answered Sep 23, 2015 at 9:52
![]()
4
Yes
Surfin’ Safari — Blog Archive » CSS Masks
WebKit now supports alpha masks in CSS. Masks allow you to overlay the content of a box with a pattern that can be used to knock out portions of that box in the final display. In other words, you can clip to complex shapes based off the alpha of an image.
[…]
We have introduced new properties to provide Web designers with a lot of control over these masks and how they are applied. The new properties are analogous to the background and border-image properties that already exist.-webkit-mask (background) -webkit-mask-attachment (background-attachment) -webkit-mask-clip (background-clip) -webkit-mask-origin (background-origin) -webkit-mask-image (background-image) -webkit-mask-repeat (background-repeat) -webkit-mask-composite (background-composite) -webkit-mask-box-image (border-image)
![]()
answered Sep 14, 2011 at 11:58
![]()
benhowdle89benhowdle89
36.4k67 gold badges201 silver badges327 bronze badges
2
Think I have a solution for this that’s a) exactly what you were looking for 5 years ago, and b) is a bit simpler than the other code options here.
With any white png (eg, white icon on transparent background), you can add an ::after selector to recolor.
.icon {
background: url(img/icon.png); /* Your icon */
position: relative; /* Allows an absolute positioned psuedo element */
}
.icon::after{
position: absolute; /* Positions psuedo element relative to .icon */
width: 100%; /* Same dimensions as .icon */
height: 100%;
content: ""; /* Allows psuedo element to show */
background: #EC008C; /* The color you want the icon to change to */
mix-blend-mode: multiply; /* Only apply color on top of white, use screen if icon is black */
}
See this codepen (applying the color swap on hover): http://codepen.io/chrscblls/pen/bwAXZO
answered Sep 30, 2016 at 16:54
![]()
chrscbllschrscblls
5652 gold badges7 silver badges16 bronze badges
3
In most browsers, you can use filters :
-
on both
<img>elements and background images of other elements -
and set them either statically in your CSS, or dynamically using JavaScript
See demos below.
<img> elements
You can apply this technique to a <img> element :
#original, #changed {
width: 45%;
padding: 2.5%;
float: left;
}
#changed {
-webkit-filter : hue-rotate(180deg);
filter : hue-rotate(180deg);
}<img id="original" src="http://i.stack.imgur.com/rfar2.jpg" />
<img id="changed" src="http://i.stack.imgur.com/rfar2.jpg" />Background images
You can apply this technique to a background image :
#original, #changed {
background: url('http://i.stack.imgur.com/kaKzj.jpg');
background-size: cover;
width: 30%;
margin: 0 10% 0 10%;
padding-bottom: 28%;
float: left;
}
#changed {
-webkit-filter : hue-rotate(180deg);
filter : hue-rotate(180deg);
}<div id="original"></div>
<div id="changed"></div>JavaScript
You can use JavaScript to set a filter at runtime :
var element = document.getElementById("changed");
var filter = 'hue-rotate(120deg) saturate(2.4)';
element.style['-webkit-filter'] = filter;
element.style['filter'] = filter;
#original, #changed {
margin: 0 10%;
width: 30%;
float: left;
background: url('http://i.stack.imgur.com/856IQ.png');
background-size: cover;
padding-bottom: 25%;
}<div id="original"></div>
<div id="changed"></div>answered Mar 11, 2016 at 20:04
![]()
John SlegersJohn Slegers
44k22 gold badges200 silver badges168 bronze badges
1
The img tag has a background property just like any other. If you have a white PNG with a transparent shape, like a stencil, then you can do this:
<img src= 'stencil.png' style= 'background-color: red'>
answered Sep 14, 2011 at 11:58
![]()
4
When changing a picture from black to white, or white to black the hue rotate filter does not work, because black and white are not technically colors. Instead, black and white color changes (from black to white or vice-versa) must be done with the invert filter property.
.img1 {

  filter: invert(100%);

}
answered Apr 26, 2020 at 0:24
![]()
I found this while googling, I found best working for me…
HTML
<div class="img"></div>
CSS
.img {
  background-color: red;
  width: 60px;
  height: 60px;
   -webkit-mask-image: url('http://i.stack.imgur.com/gZvK4.png');
}
http://jsfiddle.net/a63b0exm/
answered Oct 10, 2018 at 20:12
![]()
2
Answering because I was looking for a solution for this.
the pen in @chrscblls answer works well if you have a white or black background, but mine wasn’t. Aslo, the images were generated with ng-repeat, so I couldn’t have their url in my css AND you can’t use ::after on img tags.
So, I figured a work around and thought it might help people if they too stumble here.
So what I did is pretty much the same with three main differences:
- the url being in my img tag, I put it(and a label) in another div on which ::after will work.
- the ‘mix-blend-mode’ is set at ‘difference’ instead of ‘multiply’ or ‘screen’.
- I added a ::before with exactly the same value so the ::after would do the ‘difference’ of the ‘difference’ made by the ::before and cancelled it-self.
To change it from black to white or white to black the background color need to be white.
From black to colors, you can choose whatever color.
From white to colors tho, you’ll need to choose the opposite color of the one you want.
.divClass{
   position: relative;
   width: 100%;
   height: 100%;
   text-align: left;
}
.divClass:hover::after, .divClass:hover::before{
   position: absolute;
   width: 100%;
   height: 100%;
   background: #FFF;
   mix-blend-mode: difference;
   content: "";
}
Since I posted this answer I made an other pen using a different method :
* {
  box-sizing: border-box;
}

body {
  background-color: CadetBlue;
  font-family: "Lato", sans-serif;
  text-align: center;
}
button {
  display: flex;
  justify-content: center;
  min-width: 182px;
  padding: 0.5em 1em;
  margin: 2em auto;
  cursor: pointer;
  pointer-events: auto;
  border-radius: 4px;
  border: none;
  background: #85b5b7;
  box-shadow: 0 6px #6fa8aa;
}
label {
  font-weight: 400;
  font-size: 24px;
  margin: auto 0;
  color: white;
}

.icon {
  height: 64px;
  width: 64px;
  background-color: white;
  -webkit-mask-repeat: no-repeat;
          mask-repeat: no-repeat;
  -webkit-mask-position: left center;
          mask-position: left center;
  -webkit-mask-size: auto 48px;
          mask-size: auto 48px;
          mask-mode: luminance;
  -webkit-mask-image: url("https://upload.wikimedia.org/wikipedia/commons/thumb/d/d1/Bubbles-alt-icon.png/640px-Bubbles-alt-icon.png");
          mask-image: url("https://upload.wikimedia.org/wikipedia/commons/thumb/d/d1/Bubbles-alt-icon.png/640px-Bubbles-alt-icon.png");
}
button label span {
  color: #395f60;
}
button:hover {
  color: #395f60;
  transform: translatey(4px);
  box-shadow: 0 2px #6fa8aa;
}
button:hover .icon {
  background-color: #395f60;
}
<button>
<div class="icon"></div>
<label> white to <span>color</span></label>
</button>answered Mar 24, 2017 at 19:12
![]()
SalixSalix
1,2708 silver badges13 bronze badges
4
/* change image color to white */
filter: invert(100%) sepia(16%) saturate(7463%) hue-rotate(222deg) brightness(119%) contrast(115%);

/* change image color to red */`
filter: invert(16%) sepia(99%) saturate(7404%) hue-rotate(4deg) brightness(95%) contrast(118%);

/* change image color to green */
filter: invert(26%) sepia(89%) saturate(1583%) hue-rotate(95deg) brightness(96%) contrast(106%);

/* change image color to blue */
filter: invert(10%) sepia(90%) saturate(5268%) hue-rotate(245deg) brightness(109%) contrast(155%);
answered Jun 28, 2022 at 1:37
![]()
2
I required a specific colour, so filter didn’t work for me.
Instead, I created a div, exploiting CSS multiple background images and the linear-gradient function (which creates an image itself). If you use the overlay blend mode, your actual image will be blended with the generated «gradient» image containing your desired colour (here, #BADA55)
.colored-image {
        background-image: linear-gradient(to right, #BADA55, #BADA55), url("https://i.imgur.com/lYXT8R6.png");
        background-blend-mode: overlay;
        background-size: contain;
        width: 200px;
        height: 200px;
    }
<div class="colored-image"></div>answered Apr 10, 2017 at 7:22
![]()
rolznzrolznz
7599 silver badges16 bronze badges
2
Use this great codepen example that you insert your hex color value and it returns the needed filter to apply this color to png
CSS filter generator to convert from black to target hex color
for example i needed my png to have the following color #EF8C57
then you have to apply the following filter to you png
Result:
filter: invert(76%) sepia(30%) saturate(3461%) hue-rotate(321deg) brightness(98%) contrast(91%);
![]()
Sven Eberth
3,02712 gold badges23 silver badges28 bronze badges
answered Jun 30, 2021 at 22:05
![]()
2
body{
  background: #333 url(/images/classy_fabric.png);
  width: 430px;
  margin: 0 auto;
  padding: 30px;
}
.preview{
  background: #ccc;
  width: 415px;
  height: 430px;
  border: solid 10px #fff;
}

input[type='radio'] {
  -webkit-appearance: none;
  -moz-appearance: none;
  width: 25px;
  height: 25px;
  margin: 5px 0 5px 5px;
  background-size: 225px 70px;
  position: relative;
  float: left;
  display: inline;
  top: 0;
  border-radius: 3px;
  z-index: 99999;
  cursor: pointer;
  box-shadow: 1px 1px 1px #000;
}

input[type='radio']:hover{
  -webkit-filter: opacity(.4);
  filter: opacity(.4);
}

.red{
  background: red;
}

.red:checked{
  background: linear-gradient(brown, red)
}

.green{
  background: green;
}

.green:checked{
  background: linear-gradient(green, lime);
}

.yellow{
  background: yellow;
}

.yellow:checked{
  background: linear-gradient(orange, yellow);
}

.purple{
  background: purple;
}

.pink{
  background: pink;
}

.purple:checked{
  background: linear-gradient(purple, violet);
}

.red:checked ~ img{
  -webkit-filter: opacity(.5) drop-shadow(0 0 0 red);
  filter: opacity(.5) drop-shadow(0 0 0 red);
}

.green:checked ~ img{
  -webkit-filter: opacity(.5) drop-shadow(0 0 0 green);
  filter: opacity(.5) drop-shadow(0 0 0 green);
}

.yellow:checked ~ img{
  -webkit-filter: opacity(.5) drop-shadow(0 0 0 yellow);
  filter: opacity(.5) drop-shadow(0 0 0 yellow);
}

.purple:checked ~ img{
  -webkit-filter: opacity(.5) drop-shadow(0 0 0 purple);
  filter: opacity(.5) drop-shadow(0 0 0 purple);
}

.pink:checked ~ img{
  -webkit-filter: opacity(.5) drop-shadow(0 0 0 pink);
  filter: opacity(.5) drop-shadow(0 0 0 pink);
}


img{
  width: 394px;
  height: 375px;
  position: relative;
}

.label{
  width: 150px;
  height: 75px;
  position: absolute;
  top: 170px;
  margin-left: 130px;
}

::selection{
  background: #000;
}
<div class="preview">
<input class='red' name='color' type='radio' />
<input class='green' name='color' type='radio' />
<input class='pink' name='color' type='radio' />
<input checked class='yellow' name='color' type='radio' />
<input class='purple' name='color' type='radio' />
<img src="https://i.stack.imgur.com/bd7VJ.png"/>
</div>Source: https://codepen.io/taryaoui/pen/EKkcu
answered Sep 13, 2019 at 14:57
![]()
Mahdi BashirpourMahdi Bashirpour
16.1k12 gold badges112 silver badges142 bronze badges
Try this:
 -webkit-filter: brightness(0) invert(1);
 filter: brightness(0) invert(1);
![]()
Hedam
2,17426 silver badges53 bronze badges
answered Apr 29, 2021 at 2:37
![]()
The solution that worked for me was using filter: drop-shadow
filter: drop-shadow works differently than regular box-shadow.
filter one applies shadow to real shape (so it supports transparent images).
The trick now is to ‘hide’ real image and show only the shadow.
https://jsfiddle.net/d4m8x0qb/2
Note that my use case is modifying icons colors into one, solid color, so this approach works for me, but might not for other use cases
answered Dec 13, 2021 at 9:23
![]()
Adam PietrasiakAdam Pietrasiak
12.4k8 gold badges75 silver badges91 bronze badges
There’s no need for a whole font set if you only need one icon, plus I feel it being more «clean» as an individual element. So, for this purpose, in HTML5 you can place a SVG directly inside the document flow. Then you can define a class in your .CSS stylesheet and access its background color with the fill property:
Working fiddle:
http://jsfiddle.net/qmsj0ez1/
Note that, in the example, I’ve used :hoverto illustrate the behaviour; if you just want to change color for the «normal» state, you should remove the pseudoclass.
answered Aug 12, 2014 at 11:58
![]()
PerePere
1,05812 silver badges20 bronze badges
To literally change the color, you could incorporate a CSS transition with a -webkit-filter where when something happens you would invoke the -webkit-filter of your choice. For example:
img {
    -webkit-filter:grayscale(0%);
    transition: -webkit-filter .3s linear;
    }
img:hover
    {
    -webkit-filter:grayscale(75%);
    }
answered Jun 3, 2015 at 20:15
![]()
beta208beta208
6071 gold badge6 silver badges18 bronze badges
You could use filter: hue-rotate(Ndeg), but if the image is black and white, the hue will never change.
However, you could combine it with filter: sepia(100). That will add color to the image that the hue-rotate filter CAN change.
Sepia adds a rather desaturated color, so enhance that a bit with filter: saturate(50); That makes it a deeper color that hue-rotate can better work with.
Then combine them all together:
filter: sepia(100) saturate(50) hue-rotate(280deg)
Then experiment with the rotation degrees until you find your preferred color.
answered Sep 20, 2022 at 16:13
![]()
KWallaceKWallace
1,50214 silver badges24 bronze badges
- If the image is simple like vector images, you can converted to SVG and do CSS changes there.
- Another option make the image PNG, and change a specific color to transparent (like cut-outs) and change the background color using CSS.
answered Dec 11, 2022 at 22:37
![]()
JaiderJaider
13.8k5 gold badges71 silver badges82 bronze badges
Given a transparent PNG displaying a simple shape in white, is it possible to somehow change the color of this through CSS? Some kind of overlay or what not?
![]()
John Slegers
44k22 gold badges200 silver badges168 bronze badges
asked Sep 14, 2011 at 11:53
4
You can use filters with -webkit-filter and filter:
Filters are relatively new to browsers but supported in over 90% of browsers according to the following CanIUse table: https://caniuse.com/#feat=css-filters
You can change an image to grayscale, sepia and lot more (look at the example).
So you can now change the color of a PNG file with filters.
body {
background-color:#03030a;
min-width: 800px;
min-height: 400px
}
img {
width:20%;
float:left;
margin:0;
}
/*Filter styles*/
.saturate { filter: saturate(3); }
.grayscale { filter: grayscale(100%); }
.contrast { filter: contrast(160%); }
.brightness { filter: brightness(0.25); }
.blur { filter: blur(3px); }
.invert { filter: invert(100%); }
.sepia { filter: sepia(100%); }
.huerotate { filter: hue-rotate(180deg); }
.rss.opacity { filter: opacity(50%); }<!--- img src http://upload.wikimedia.org/wikipedia/commons/thumb/e/ec/Mona_Lisa%2C_by_Leonardo_da_Vinci%2C_from_C2RMF_retouched.jpg/500px-Mona_Lisa%2C_by_Leonardo_da_Vinci%2C_from_C2RMF_retouched.jpg -->
<img alt="Mona Lisa" src="https://images.pexels.com/photos/40997/mona-lisa-leonardo-da-vinci-la-gioconda-oil-painting-40997.jpeg?auto=compress&cs=tinysrgb&dpr=3&h=750&w=1260" title="original">
<img alt="Mona Lisa" src="https://images.pexels.com/photos/40997/mona-lisa-leonardo-da-vinci-la-gioconda-oil-painting-40997.jpeg?auto=compress&cs=tinysrgb&dpr=3&h=750&w=1260" title="saturate" class="saturate">
<img alt="Mona Lisa" src="https://images.pexels.com/photos/40997/mona-lisa-leonardo-da-vinci-la-gioconda-oil-painting-40997.jpeg?auto=compress&cs=tinysrgb&dpr=3&h=750&w=1260" title="grayscale" class="grayscale">
<img alt="Mona Lisa" src="https://images.pexels.com/photos/40997/mona-lisa-leonardo-da-vinci-la-gioconda-oil-painting-40997.jpeg?auto=compress&cs=tinysrgb&dpr=3&h=750&w=1260" title="contrast" class="contrast">
<img alt="Mona Lisa" src="https://images.pexels.com/photos/40997/mona-lisa-leonardo-da-vinci-la-gioconda-oil-painting-40997.jpeg?auto=compress&cs=tinysrgb&dpr=3&h=750&w=1260" title="brightness" class="brightness">
<img alt="Mona Lisa" src="https://images.pexels.com/photos/40997/mona-lisa-leonardo-da-vinci-la-gioconda-oil-painting-40997.jpeg?auto=compress&cs=tinysrgb&dpr=3&h=750&w=1260" title="blur" class="blur">
<img alt="Mona Lisa" src="https://images.pexels.com/photos/40997/mona-lisa-leonardo-da-vinci-la-gioconda-oil-painting-40997.jpeg?auto=compress&cs=tinysrgb&dpr=3&h=750&w=1260" title="invert" class="invert">
<img alt="Mona Lisa" src="https://images.pexels.com/photos/40997/mona-lisa-leonardo-da-vinci-la-gioconda-oil-painting-40997.jpeg?auto=compress&cs=tinysrgb&dpr=3&h=750&w=1260" title="sepia" class="sepia">
<img alt="Mona Lisa" src="https://images.pexels.com/photos/40997/mona-lisa-leonardo-da-vinci-la-gioconda-oil-painting-40997.jpeg?auto=compress&cs=tinysrgb&dpr=3&h=750&w=1260" title="huerotate" class="huerotate">
<img alt="Mona Lisa" src="https://images.pexels.com/photos/40997/mona-lisa-leonardo-da-vinci-la-gioconda-oil-painting-40997.jpeg?auto=compress&cs=tinysrgb&dpr=3&h=750&w=1260" title="opacity" class="rss opacity">Source
![]()
MaxiGui
6,1054 gold badges16 silver badges33 bronze badges
answered Jan 5, 2014 at 12:03
![]()
РАВИРАВИ
11.1k6 gold badges29 silver badges39 bronze badges
19
You might want to take a look at Icon fonts. http://css-tricks.com/examples/IconFont/
EDIT: I’m using Font-Awesome on my latest project. You can even bootstrap it. Simply put this in your <head>:
<link href="//netdna.bootstrapcdn.com/font-awesome/3.2.1/css/font-awesome.min.css" rel="stylesheet">
<!-- And if you want to support IE7, add this aswell -->
<link href="//netdna.bootstrapcdn.com/font-awesome/3.2.1/css/font-awesome-ie7.min.css" rel="stylesheet">
And then go ahead and add some icon-links like this:
<a class="icon-thumbs-up"></a>
Here’s the full cheat sheet
—edit—
Font-Awesome uses different class names in the new version, probably because this makes the CSS files drastically smaller, and to avoid ambiguous css classes.
So now you should use:
<a class="fa fa-thumbs-up"></a>
EDIT 2:
Just found out github also uses its own icon font: Octicons
It’s free to download. They also have some tips on how to create your very own icon fonts.
![]()
ChatGPT
5,23211 gold badges49 silver badges69 bronze badges
answered Nov 13, 2012 at 8:15
![]()
Jules ColleJules Colle
10.9k7 gold badges58 silver badges65 bronze badges
3
The simplest one line that worked for me:
filter: opacity(0.5) drop-shadow(0 0 0 blue);
You can adjust opacity from 0 to 1 to make color lighter or darker.
answered Nov 8, 2018 at 10:43
![]()
RehmatRehmat
2,0332 gold badges22 silver badges27 bronze badges
8
I’ve been able to do this using SVG filter. You can write a filter that multiplies the color of source image with the color you want to change to. In the code snippet below, flood-color is the color we want to change image color to (which is Red in this case.) feComposite tells the filter how we’re processing the color. The formula for feComposite with arithmetic is (k1*i1*i2 + k2*i1 + k3*i2 + k4) where i1 and i2 are input colors for in/in2 accordingly. So specifying only k1=1 means it will do just i1*i2, which means multiplying both input colors together.
Note: This only works with HTML5 since this is using inline SVG. But I think you might be able to make this work with older browser by putting SVG in a separate file. I haven’t tried that approach yet.
Here’s the snippet:
<svg xmlns="http://www.w3.org/2000/svg" version="1.1" width="60" height="90" style="float:left">
<defs>
<filter id="colorMask1">
<feFlood flood-color="#ff0000" result="flood" />
<feComposite in="SourceGraphic" in2="flood" operator="arithmetic" k1="1" k2="0" k3="0" k4="0" />
</filter>
</defs>
<image width="100%" height="100%" xlink:href="http://i.stack.imgur.com/OyP0g.jpg" filter="url(#colorMask1)" />
</svg>
<svg xmlns="http://www.w3.org/2000/svg" version="1.1" width="60" height="90" style="float:left">
<defs>
<filter id="colorMask2">
<feFlood flood-color="#00ff00" result="flood" />
<feComposite in="SourceGraphic" in2="flood" operator="arithmetic" k1="1" k2="0" k3="0" k4="0" />
</filter>
</defs>
<image width="100%" height="100%" xlink:href="http://i.stack.imgur.com/OyP0g.jpg" filter="url(#colorMask2)" />
</svg>
<svg xmlns="http://www.w3.org/2000/svg" version="1.1" width="60" height="90" style="float:left">
<defs>
<filter id="colorMask3">
<feFlood flood-color="#0000ff" result="flood" />
<feComposite in="SourceGraphic" in2="flood" operator="arithmetic" k1="1" k2="0" k3="0" k4="0" />
</filter>
</defs>
<image width="100%" height="100%" xlink:href="http://i.stack.imgur.com/OyP0g.jpg" filter="url(#colorMask3)" />
</svg>answered Sep 23, 2015 at 9:52
![]()
4
Yes
Surfin’ Safari — Blog Archive » CSS Masks
WebKit now supports alpha masks in CSS. Masks allow you to overlay the content of a box with a pattern that can be used to knock out portions of that box in the final display. In other words, you can clip to complex shapes based off the alpha of an image.
[…]
We have introduced new properties to provide Web designers with a lot of control over these masks and how they are applied. The new properties are analogous to the background and border-image properties that already exist.-webkit-mask (background) -webkit-mask-attachment (background-attachment) -webkit-mask-clip (background-clip) -webkit-mask-origin (background-origin) -webkit-mask-image (background-image) -webkit-mask-repeat (background-repeat) -webkit-mask-composite (background-composite) -webkit-mask-box-image (border-image)
![]()
answered Sep 14, 2011 at 11:58
![]()
benhowdle89benhowdle89
36.4k67 gold badges201 silver badges327 bronze badges
2
Think I have a solution for this that’s a) exactly what you were looking for 5 years ago, and b) is a bit simpler than the other code options here.
With any white png (eg, white icon on transparent background), you can add an ::after selector to recolor.
.icon {
background: url(img/icon.png); /* Your icon */
position: relative; /* Allows an absolute positioned psuedo element */
}
.icon::after{
position: absolute; /* Positions psuedo element relative to .icon */
width: 100%; /* Same dimensions as .icon */
height: 100%;
content: ""; /* Allows psuedo element to show */
background: #EC008C; /* The color you want the icon to change to */
mix-blend-mode: multiply; /* Only apply color on top of white, use screen if icon is black */
}
See this codepen (applying the color swap on hover): http://codepen.io/chrscblls/pen/bwAXZO
answered Sep 30, 2016 at 16:54
![]()
chrscbllschrscblls
5652 gold badges7 silver badges16 bronze badges
3
In most browsers, you can use filters :
-
on both
<img>elements and background images of other elements -
and set them either statically in your CSS, or dynamically using JavaScript
See demos below.
<img> elements
You can apply this technique to a <img> element :
#original, #changed {
width: 45%;
padding: 2.5%;
float: left;
}
#changed {
-webkit-filter : hue-rotate(180deg);
filter : hue-rotate(180deg);
}<img id="original" src="http://i.stack.imgur.com/rfar2.jpg" />
<img id="changed" src="http://i.stack.imgur.com/rfar2.jpg" />Background images
You can apply this technique to a background image :
#original, #changed {
background: url('http://i.stack.imgur.com/kaKzj.jpg');
background-size: cover;
width: 30%;
margin: 0 10% 0 10%;
padding-bottom: 28%;
float: left;
}
#changed {
-webkit-filter : hue-rotate(180deg);
filter : hue-rotate(180deg);
}<div id="original"></div>
<div id="changed"></div>JavaScript
You can use JavaScript to set a filter at runtime :
var element = document.getElementById("changed");
var filter = 'hue-rotate(120deg) saturate(2.4)';
element.style['-webkit-filter'] = filter;
element.style['filter'] = filter;#original, #changed {
margin: 0 10%;
width: 30%;
float: left;
background: url('http://i.stack.imgur.com/856IQ.png');
background-size: cover;
padding-bottom: 25%;
}<div id="original"></div>
<div id="changed"></div>answered Mar 11, 2016 at 20:04
![]()
John SlegersJohn Slegers
44k22 gold badges200 silver badges168 bronze badges
1
The img tag has a background property just like any other. If you have a white PNG with a transparent shape, like a stencil, then you can do this:
<img src= 'stencil.png' style= 'background-color: red'>
answered Sep 14, 2011 at 11:58
![]()
4
When changing a picture from black to white, or white to black the hue rotate filter does not work, because black and white are not technically colors. Instead, black and white color changes (from black to white or vice-versa) must be done with the invert filter property.
.img1 {
filter: invert(100%);
}
answered Apr 26, 2020 at 0:24
![]()
I found this while googling, I found best working for me…
HTML
<div class="img"></div>
CSS
.img {
background-color: red;
width: 60px;
height: 60px;
-webkit-mask-image: url('http://i.stack.imgur.com/gZvK4.png');
}
http://jsfiddle.net/a63b0exm/
answered Oct 10, 2018 at 20:12
![]()
2
Answering because I was looking for a solution for this.
the pen in @chrscblls answer works well if you have a white or black background, but mine wasn’t. Aslo, the images were generated with ng-repeat, so I couldn’t have their url in my css AND you can’t use ::after on img tags.
So, I figured a work around and thought it might help people if they too stumble here.
So what I did is pretty much the same with three main differences:
- the url being in my img tag, I put it(and a label) in another div on which ::after will work.
- the ‘mix-blend-mode’ is set at ‘difference’ instead of ‘multiply’ or ‘screen’.
- I added a ::before with exactly the same value so the ::after would do the ‘difference’ of the ‘difference’ made by the ::before and cancelled it-self.
To change it from black to white or white to black the background color need to be white.
From black to colors, you can choose whatever color.
From white to colors tho, you’ll need to choose the opposite color of the one you want.
.divClass{
position: relative;
width: 100%;
height: 100%;
text-align: left;
}
.divClass:hover::after, .divClass:hover::before{
position: absolute;
width: 100%;
height: 100%;
background: #FFF;
mix-blend-mode: difference;
content: "";
}
Since I posted this answer I made an other pen using a different method :
* {
box-sizing: border-box;
}
body {
background-color: CadetBlue;
font-family: "Lato", sans-serif;
text-align: center;
}
button {
display: flex;
justify-content: center;
min-width: 182px;
padding: 0.5em 1em;
margin: 2em auto;
cursor: pointer;
pointer-events: auto;
border-radius: 4px;
border: none;
background: #85b5b7;
box-shadow: 0 6px #6fa8aa;
}
label {
font-weight: 400;
font-size: 24px;
margin: auto 0;
color: white;
}
.icon {
height: 64px;
width: 64px;
background-color: white;
-webkit-mask-repeat: no-repeat;
mask-repeat: no-repeat;
-webkit-mask-position: left center;
mask-position: left center;
-webkit-mask-size: auto 48px;
mask-size: auto 48px;
mask-mode: luminance;
-webkit-mask-image: url("https://upload.wikimedia.org/wikipedia/commons/thumb/d/d1/Bubbles-alt-icon.png/640px-Bubbles-alt-icon.png");
mask-image: url("https://upload.wikimedia.org/wikipedia/commons/thumb/d/d1/Bubbles-alt-icon.png/640px-Bubbles-alt-icon.png");
}
button label span {
color: #395f60;
}
button:hover {
color: #395f60;
transform: translatey(4px);
box-shadow: 0 2px #6fa8aa;
}
button:hover .icon {
background-color: #395f60;
}<button>
<div class="icon"></div>
<label> white to <span>color</span></label>
</button>answered Mar 24, 2017 at 19:12
![]()
SalixSalix
1,2708 silver badges13 bronze badges
4
/* change image color to white */
filter: invert(100%) sepia(16%) saturate(7463%) hue-rotate(222deg) brightness(119%) contrast(115%);
/* change image color to red */`
filter: invert(16%) sepia(99%) saturate(7404%) hue-rotate(4deg) brightness(95%) contrast(118%);
/* change image color to green */
filter: invert(26%) sepia(89%) saturate(1583%) hue-rotate(95deg) brightness(96%) contrast(106%);
/* change image color to blue */
filter: invert(10%) sepia(90%) saturate(5268%) hue-rotate(245deg) brightness(109%) contrast(155%);
answered Jun 28, 2022 at 1:37
![]()
2
I required a specific colour, so filter didn’t work for me.
Instead, I created a div, exploiting CSS multiple background images and the linear-gradient function (which creates an image itself). If you use the overlay blend mode, your actual image will be blended with the generated «gradient» image containing your desired colour (here, #BADA55)
.colored-image {
background-image: linear-gradient(to right, #BADA55, #BADA55), url("https://i.imgur.com/lYXT8R6.png");
background-blend-mode: overlay;
background-size: contain;
width: 200px;
height: 200px;
}<div class="colored-image"></div>answered Apr 10, 2017 at 7:22
![]()
rolznzrolznz
7599 silver badges16 bronze badges
2
Use this great codepen example that you insert your hex color value and it returns the needed filter to apply this color to png
CSS filter generator to convert from black to target hex color
for example i needed my png to have the following color #EF8C57
then you have to apply the following filter to you png
Result:
filter: invert(76%) sepia(30%) saturate(3461%) hue-rotate(321deg) brightness(98%) contrast(91%);
![]()
Sven Eberth
3,02712 gold badges23 silver badges28 bronze badges
answered Jun 30, 2021 at 22:05
![]()
2
body{
background: #333 url(/images/classy_fabric.png);
width: 430px;
margin: 0 auto;
padding: 30px;
}
.preview{
background: #ccc;
width: 415px;
height: 430px;
border: solid 10px #fff;
}
input[type='radio'] {
-webkit-appearance: none;
-moz-appearance: none;
width: 25px;
height: 25px;
margin: 5px 0 5px 5px;
background-size: 225px 70px;
position: relative;
float: left;
display: inline;
top: 0;
border-radius: 3px;
z-index: 99999;
cursor: pointer;
box-shadow: 1px 1px 1px #000;
}
input[type='radio']:hover{
-webkit-filter: opacity(.4);
filter: opacity(.4);
}
.red{
background: red;
}
.red:checked{
background: linear-gradient(brown, red)
}
.green{
background: green;
}
.green:checked{
background: linear-gradient(green, lime);
}
.yellow{
background: yellow;
}
.yellow:checked{
background: linear-gradient(orange, yellow);
}
.purple{
background: purple;
}
.pink{
background: pink;
}
.purple:checked{
background: linear-gradient(purple, violet);
}
.red:checked ~ img{
-webkit-filter: opacity(.5) drop-shadow(0 0 0 red);
filter: opacity(.5) drop-shadow(0 0 0 red);
}
.green:checked ~ img{
-webkit-filter: opacity(.5) drop-shadow(0 0 0 green);
filter: opacity(.5) drop-shadow(0 0 0 green);
}
.yellow:checked ~ img{
-webkit-filter: opacity(.5) drop-shadow(0 0 0 yellow);
filter: opacity(.5) drop-shadow(0 0 0 yellow);
}
.purple:checked ~ img{
-webkit-filter: opacity(.5) drop-shadow(0 0 0 purple);
filter: opacity(.5) drop-shadow(0 0 0 purple);
}
.pink:checked ~ img{
-webkit-filter: opacity(.5) drop-shadow(0 0 0 pink);
filter: opacity(.5) drop-shadow(0 0 0 pink);
}
img{
width: 394px;
height: 375px;
position: relative;
}
.label{
width: 150px;
height: 75px;
position: absolute;
top: 170px;
margin-left: 130px;
}
::selection{
background: #000;
}<div class="preview">
<input class='red' name='color' type='radio' />
<input class='green' name='color' type='radio' />
<input class='pink' name='color' type='radio' />
<input checked class='yellow' name='color' type='radio' />
<input class='purple' name='color' type='radio' />
<img src="https://i.stack.imgur.com/bd7VJ.png"/>
</div>Source: https://codepen.io/taryaoui/pen/EKkcu
answered Sep 13, 2019 at 14:57
![]()
Mahdi BashirpourMahdi Bashirpour
16.1k12 gold badges112 silver badges142 bronze badges
Try this:
-webkit-filter: brightness(0) invert(1);
filter: brightness(0) invert(1);
![]()
Hedam
2,17426 silver badges53 bronze badges
answered Apr 29, 2021 at 2:37
![]()
The solution that worked for me was using filter: drop-shadow
filter: drop-shadow works differently than regular box-shadow.
filter one applies shadow to real shape (so it supports transparent images).
The trick now is to ‘hide’ real image and show only the shadow.
https://jsfiddle.net/d4m8x0qb/2
Note that my use case is modifying icons colors into one, solid color, so this approach works for me, but might not for other use cases
answered Dec 13, 2021 at 9:23
![]()
Adam PietrasiakAdam Pietrasiak
12.4k8 gold badges75 silver badges91 bronze badges
There’s no need for a whole font set if you only need one icon, plus I feel it being more «clean» as an individual element. So, for this purpose, in HTML5 you can place a SVG directly inside the document flow. Then you can define a class in your .CSS stylesheet and access its background color with the fill property:
Working fiddle:
http://jsfiddle.net/qmsj0ez1/
Note that, in the example, I’ve used :hoverto illustrate the behaviour; if you just want to change color for the «normal» state, you should remove the pseudoclass.
answered Aug 12, 2014 at 11:58
![]()
PerePere
1,05812 silver badges20 bronze badges
To literally change the color, you could incorporate a CSS transition with a -webkit-filter where when something happens you would invoke the -webkit-filter of your choice. For example:
img {
-webkit-filter:grayscale(0%);
transition: -webkit-filter .3s linear;
}
img:hover
{
-webkit-filter:grayscale(75%);
}
answered Jun 3, 2015 at 20:15
![]()
beta208beta208
6071 gold badge6 silver badges18 bronze badges
You could use filter: hue-rotate(Ndeg), but if the image is black and white, the hue will never change.
However, you could combine it with filter: sepia(100). That will add color to the image that the hue-rotate filter CAN change.
Sepia adds a rather desaturated color, so enhance that a bit with filter: saturate(50); That makes it a deeper color that hue-rotate can better work with.
Then combine them all together:
filter: sepia(100) saturate(50) hue-rotate(280deg)
Then experiment with the rotation degrees until you find your preferred color.
answered Sep 20, 2022 at 16:13
![]()
KWallaceKWallace
1,50214 silver badges24 bronze badges
- If the image is simple like vector images, you can converted to SVG and do CSS changes there.
- Another option make the image PNG, and change a specific color to transparent (like cut-outs) and change the background color using CSS.
answered Dec 11, 2022 at 22:37
![]()
JaiderJaider
13.8k5 gold badges71 silver badges82 bronze badges
Это статья про веб-технологии и CSS — штуку, благодаря которой наши сайты выглядят красиво. Раньше CSS был простым инструментом оформления веб-страниц: можно было поменять цвет текста, фона, выровнять картинки или настроить расположение элементов на странице. Сейчас современный CSS может гораздо больше:
- раскрашивать текст по диагонали,
- рисовать что-то с анимацией,
- работать с переменными,
- делать визуальные эффекты.
А ещё он может поменять цвет любого элемента на странице — перекрасить его в сепию, сделать чёрно-белым или добавить насыщенности. Про это и будет сегодняшняя статья.
Меняем оттенок цвета
Каждое изображение на экране состоит из пикселей, у каждого пикселя свой цвет. Цветов много, но их все можно представить в виде цветового круга оттенков. А если этот круг разбить на секторы, то можно понять, как поменяется тот или иной цвет, если мы повернём этот круг на сколько-то градусов:

Например, если мы возьмём красный цвет, который лежит на нуле градусов, и повернём его на 60 градусов против хода часовой стрелки, то получим жёлтый цвет, а если на 120, то он превратится в зелёный. В это же время синий пиксель, который лежал на 240 градусах, после первого смещения превратится в фиолетовый (240 + 60 = 300), а после второго — в красный (240 + 120 = 360, или 0).
Зная это, мы можем пропорционально менять все цвета в изображении, просто поворачивая его на нужное количество градусов по кругу оттенков. Для этого в CSS используется команда filter: hue-rotate(), где в скобках указываются градусы, на которые поворачиваем круг. Например:
filter: hue-rotate(120deg); ← поворачиваем круг на 120 градусов
filter: hue-rotate(-60deg); ← поворачиваем круг на 60 градусов в обратном направлении
Для примера поменяем цвета у эмодзи из стандартного набора:

А вот простой код, который за это отвечает:
<!DOCTYPE html>
<html lang="en" >
<head>
<meta charset="UTF-8">
<title>Меняем цвета и оттенки</title>
<style type="text/css">
body {
font-size: 3rem;
}
.green-to-red {
/* вращаем круг в противоположную сторону */
filter: hue-rotate(-120deg);
}
.red-to-green,
.green-to-blue {
filter: hue-rotate(120deg);
}
.red-to-yellow {
filter: hue-rotate(60deg);
}
body {
margin: 0;
display: grid;
/* размещаем всё по центру */
place-content: center;
min-height: 100vh;
}
html, body {
/* белый фон */
background: #fff;
}
</style>
</head>
<body>
<p>Зелёный → красный:
<br>
♻️ ✅ ❎ 🐍 🥦 → <span class="green-to-red">♻️ ✅ ❎ 🐍 🥦</span>
</p>
<p>Зелёный → синий:
<br>
♻️ ✅ ❎ 🐍 🥦 → <span class="green-to-blue">♻️ ✅ ❎ 🐍 🥦</span>
</p>
<p>Красный → зелёный:
<br>
❤️ ❌ 🚗 🌶 🚨 → <span class="red-to-green">❤️ ❌ 🚗 🌶 🚨</span>
</p>
<p>Красный → жёлтый:
<br>❤️ ❌ 🚗 🌶 🚨 → <span class="red-to-yellow">❤️ ❌ 🚗 🌶 🚨</span>
</p>
</body>
</html>Сепия, чёрно-белое фото и насыщенность
Сепия — это имитация старой напечатанной фотографии, когда всё состоит из оттенков коричневого цвета (сепии). Чтобы сделать такой эффект, используют команду filter: sepia(100%). Если нужно сохранить некоторые оттенки цветов, можно ослабить фильтр и указать, например, не 100%, а 50%:
Для перевода в чёрно-белый оттенок используют команду filter: grayscale(), где в скобках указывают число от 0 до 1. Например, фильтр с параметром 0,5 приглушит все цвета наполовину, а с единицей — сделает полноценную чёрно-белую картинку:

Насыщенность цветов управляется командой filter: saturate() по такому принципу:
- если в скобках единица, то насыщенность не меняется;
- если меньше единицы — цвета приглушаются и всё работает так же, как и команда
filter: grayscale(); - если больше — цвета становятся насыщеннее в такое количество раз.
Например, если поставить насыщенность 0, то фото станет чёрно-белым, как в предыдущем случае, а если 3 — все цвета станут в 3 раза насыщеннее:

<html lang="ru" >
<head>
<meta charset="UTF-8">
<title>Сепия, чёрно-белое фото и насыщенность
</title>
<style type="text/css">
body {
margin: 20px;
}
img {
max-width: 48vw;
}
.sepia-50 {
filter: sepia(75%);
}
.sepia-100 {
filter: sepia(100%);
}
.bw-50 {
filter: grayscale(0.5);
}
.bw-100 {
filter: grayscale(1);
}
.sat-0 {
filter: saturate(0);
}
.sat-50 {
filter: saturate(0.5);
}
.sat-300 {
filter: saturate(3);
}
</style>
</head>
<body>
<h2>Сепия 50%</h2>
<img src="pic.jpg">
<img src="pic.jpg" class="sepia-50">
<h2>Сепия 100%</h2>
<img src="pic.jpg">
<img src="pic.jpg" class="sepia-100">
<h2>Чёрно-белое 50%</h2>
<img src="pic.jpg">
<img src="pic.jpg" class="bw-50">
<h2>Чёрно-белое 100%</h2>
<img src="pic.jpg">
<img src="pic.jpg" class="bw-100">
<h2>Насыщенность 0%</h2>
<img src="pic.jpg">
<img src="pic.jpg" class="sat-0">
<h2>Насыщенность 50%</h2>
<img src="pic.jpg">
<img src="pic.jpg" class="sat-50">
<h2>Насыщенность 300%</h2>
<img src="pic.jpg">
<img src="pic.jpg" class="sat-300">
</body>
</html>Что дальше
Постепенно приближаемся к тому, чтобы сделать свой графический редактор в браузере. А если вы умеете работать со слайдерами и управлять CSS-переменными, то можете уже сами сделать первую версию такого редактора.
Вёрстка:
Кирилл Климентьев
11 ответов
Вы можете использовать фильтры -webkit-filter и filter:
Фильтры очень новы для браузеров и поддерживают только в современных браузерах.
Вы можете изменить изображение в оттенки серого, сепия и многое другое (посмотрите на пример).
Теперь вы можете теперь изменить цвет PNG файла с фильтрами.
body {
    background-color:#03030a;
    min-width: 800px;
    min-height: 400px
}
img {
    width:20%;
    float:left;
     margin:0;
}
/*Filter styles*/
.saturate { filter: saturate(3); }
.grayscale { filter: grayscale(100%); }
.contrast { filter: contrast(160%); }
.brightness { filter: brightness(0.25); }
.blur { filter: blur(3px); }
.invert { filter: invert(100%); }
.sepia { filter: sepia(100%); }
.huerotate { filter: hue-rotate(180deg); }
.rss.opacity { filter: opacity(50%); }
<!--- img src http://upload.wikimedia.org/wikipedia/commons/thumb/e/ec/Mona_Lisa%2C_by_Leonardo_da_Vinci%2C_from_C2RMF_retouched.jpg/500px-Mona_Lisa%2C_by_Leonardo_da_Vinci%2C_from_C2RMF_retouched.jpg -->
<img alt="Mona Lisa" src="http://i.stack.imgur.com/OyP0g.jpg" title="original">
<img alt="Mona Lisa" src="http://i.stack.imgur.com/OyP0g.jpg" title="saturate" class="saturate">
<img alt="Mona Lisa" src="http://i.stack.imgur.com/OyP0g.jpg" title="grayscale" class="grayscale">
<img alt="Mona Lisa" src="http://i.stack.imgur.com/OyP0g.jpg" title="contrast" class="contrast">
<img alt="Mona Lisa" src="http://i.stack.imgur.com/OyP0g.jpg" title="brightness" class="brightness">
<img alt="Mona Lisa" src="http://i.stack.imgur.com/OyP0g.jpg" title="blur" class="blur">
<img alt="Mona Lisa" src="http://i.stack.imgur.com/OyP0g.jpg" title="invert" class="invert">
<img alt="Mona Lisa" src="http://i.stack.imgur.com/OyP0g.jpg" title="sepia" class="sepia">
<img alt="Mona Lisa" src="http://i.stack.imgur.com/OyP0g.jpg" title="huerotate" class="huerotate">
<img alt="Mona Lisa" src="http://i.stack.imgur.com/OyP0g.jpg" title="opacity" class="rss opacity">Источник
ravi
05 янв. 2014, в 13:38
Поделиться
Возможно, вы захотите взглянуть на значки шрифтов. http://css-tricks.com/examples/IconFont/
EDIT: Я использую Font-Awesome в своем последнем проекте. Вы можете даже загрузить его. Просто поставьте это в свой <head>:
<link href="//netdna.bootstrapcdn.com/font-awesome/3.2.1/css/font-awesome.min.css" rel="stylesheet">

<!-- And if you want to support IE7, add this aswell -->
<link href="//netdna.bootstrapcdn.com/font-awesome/3.2.1/css/font-awesome-ie7.min.css" rel="stylesheet">
И затем перейдите и добавьте некоторые ссылки на иконки, подобные этому:
<a class="icon-thumbs-up"></a>
Здесь полный чит-лист
— редактировать —
Font-Awesome использует разные имена классов в новой версии, возможно потому, что это делает файлы CSS значительно меньше и избегает двусмысленных классов CSS.
Итак, теперь вы должны использовать:
<a class="fa fa-thumbs-up"></a>
ИЗМЕНИТЬ 2:
Только что выяснилось, что github также использует собственный шрифт значка: Octicons
Он бесплатный для загрузки. У них также есть несколько советов по как создавать собственные шрифты значков.
Jules Colle
13 нояб. 2012, в 08:19
Поделиться
Тег img имеет свойство фона, как и любое другое. Если у вас белый PNG с прозрачной формой, например, трафарет, вы можете сделать это:
<img src= 'stencil.png' style= 'background-color: red'>
Kirill G
14 сен. 2011, в 13:15
Поделиться
Да:)
Surfin ‘Safari — Архив блога» Маски CSS
WebKit теперь поддерживает альфа-маски в CSS. Маски позволяют накладывать содержимое окна с шаблоном, который можно использовать для вырезания частей этого окна на конечном дисплее. Другими словами, вы можете кликать на сложные фигуры, основанные на альфе изображения.
[…]
Мы внедрили новые свойства, чтобы обеспечить веб-дизайнерам большой контроль над этими масками и их применение. Новые свойства аналогичны свойствам фона и пограничного изображения, которые уже существуют.-webkit-mask (background) -webkit-mask-attachment (background-attachment) -webkit-mask-clip (background-clip) -webkit-mask-origin (background-origin) -webkit-mask-image (background-image) -webkit-mask-repeat (background-repeat) -webkit-mask-composite (background-composite) -webkit-mask-box-image (border-image)
benhowdle89
14 сен. 2011, в 13:22
Поделиться
Думаю, у меня есть решение для этого: а) именно то, что вы искали 5 лет назад, и б) немного проще, чем другие варианты кода здесь.
С любым белым png (например, белый значок на прозрачном фоне) вы можете добавить a:: after селектор, чтобы перекрасить.
.icon {
background: url(img/icon.png); /* Your icon */
position: relative; /* Allows an absolute positioned psuedo element */
}
.icon::after{
position: absolute; /* Positions psuedo element relative to .icon */
width: 100%; /* Same dimensions as .icon */
height: 100%;
content: ""; /* Allows psuedo element to show */
background: #EC008C; /* The color you want the icon to change to */
mix-blend-mode: multiply; /* Only apply color on top of white, use screen if icon is black */
}
См. этот код (применение swap цвета при наведении): http://codepen.io/chrscblls/pen/bwAXZO
chrscblls
30 сен. 2016, в 17:02
Поделиться
В большинстве браузеров вы можете использовать фильтры:
-
для обоих элементов
<img>и фоновых изображений других элементов -
и установите их как статически в вашем CSS, либо динамически используя JavaScript
См. демонстрации ниже.
<img> элементы
Вы можете применить эту технику к элементу <img>:
#original, #changed {
width: 45%;
padding: 2.5%;
float: left;
}
#changed {
-webkit-filter : hue-rotate(180deg);
filter : hue-rotate(180deg);
}<img id="original" src="http://i.stack.imgur.com/rfar2.jpg" />
<img id="changed" src="http://i.stack.imgur.com/rfar2.jpg" />Фоновые изображения
Вы можете применить эту технику к фоновому изображению:
#original, #changed {
background: url('http://i.stack.imgur.com/kaKzj.jpg');
background-size: cover;
width: 30%;
margin: 0 10% 0 10%;
padding-bottom: 28%;
float: left;
}
#changed {
-webkit-filter : hue-rotate(180deg);
filter : hue-rotate(180deg);
}<div id="original"></div>
<div id="changed"></div>JavaScript
Вы можете использовать JavaScript для установки фильтра во время выполнения:
var element = document.getElementById("changed");
var filter = 'hue-rotate(120deg) saturate(2.4)';
element.style['-webkit-filter'] = filter;
element.style['filter'] = filter;#original, #changed {
margin: 0 10%;
width: 30%;
float: left;
background: url('http://i.stack.imgur.com/856IQ.png');
background-size: cover;
padding-bottom: 25%;
}<div id="original"></div>
<div id="changed"></div>John Slegers
11 март 2016, в 20:08
Поделиться
Я смог сделать это с помощью SVG-фильтра. Вы можете написать фильтр, который умножает цвет исходного изображения на цвет, который вы хотите изменить. В нижеприведенном фрагменте кода флуд-цвет — цвет, который мы хотим изменить цвет изображения (в данном случае это красный). FeComposite сообщает фильтру, как мы обрабатываем цвет. Формула feComposite с арифметикой равна (k1 * i1 * i2 + k2 * i1 + k3 * i2 + k4), где i1 и i2 — входные цвета для in/in2 соответственно. Поэтому указание только k1 = 1 означает, что он будет делать только i1 * i2, что означает одновременное умножение обоих входных цветов.
Примечание. Это работает только с HTML5, поскольку используется встроенный SVG. Но я думаю, что вы сможете сделать эту работу со старым браузером, поставив SVG в отдельный файл. Я еще не пробовал этот подход.
Вот фрагмент:
<svg xmlns="http://www.w3.org/2000/svg" version="1.1" width="60" height="90" style="float:left">
  <defs>
    <filter id="colorMask1">
      <feFlood flood-color="#ff0000" result="flood" />
      <feComposite in="SourceGraphic" in2="flood" operator="arithmetic" k1="1" k2="0" k3="0" k4="0" />
    </filter>
  </defs>
  <image width="100%" height="100%" xlink:href="http://i.stack.imgur.com/OyP0g.jpg" filter="url(#colorMask1)" />
</svg>
<svg xmlns="http://www.w3.org/2000/svg" version="1.1" width="60" height="90" style="float:left">
  <defs>
    <filter id="colorMask2">
      <feFlood flood-color="#00ff00" result="flood" />
      <feComposite in="SourceGraphic" in2="flood" operator="arithmetic" k1="1" k2="0" k3="0" k4="0" />
    </filter>
  </defs>
  <image width="100%" height="100%" xlink:href="http://i.stack.imgur.com/OyP0g.jpg" filter="url(#colorMask2)" />
</svg>
<svg xmlns="http://www.w3.org/2000/svg" version="1.1" width="60" height="90" style="float:left">
  <defs>
    <filter id="colorMask3">
      <feFlood flood-color="#0000ff" result="flood" />
      <feComposite in="SourceGraphic" in2="flood" operator="arithmetic" k1="1" k2="0" k3="0" k4="0" />
    </filter>
  </defs>
  <image width="100%" height="100%" xlink:href="http://i.stack.imgur.com/OyP0g.jpg" filter="url(#colorMask3)" />
</svg>Vasan Jiaramaneetwesin
23 сен. 2015, в 10:22
Поделиться
Мне нужен определенный цвет, поэтому фильтр не работал у меня.
Вместо этого я создал div, используя несколько фоновых изображений CSS и функцию линейного градиента (которая сама создает изображение). Если вы используете режим наложения наложения, ваше фактическое изображение будет смешано с созданным «градиентным» изображением, содержащим нужный вам цвет (здесь, # BADA55)
.colored-image {
background-image: linear-gradient(to right, #BADA55, #BADA55), url("https://i.imgur.com/lYXT8R6.png");
background-blend-mode: overlay;
background-size: contain;
width: 200px;
height: 200px;
}<div class="colored-image"></div>pyre
10 апр. 2017, в 07:24
Поделиться
Нет необходимости в наборе всего шрифта, если вам нужен только один значок, плюс я чувствую, что он более «чист» как отдельный элемент. Итак, для этой цели в HTML5 вы можете разместить SVG непосредственно внутри потока документов. Затем вы можете определить класс в вашей таблице стилей .CSS и получить доступ к его цвету фона с помощью свойства fill:
Рабочая скрипка:
http://jsfiddle.net/qmsj0ez1/
Обратите внимание, что в примере я использовал :hover для иллюстрации поведения; если вы просто хотите изменить цвет для «нормального» состояния, вы должны удалить псевдокласс.
Pere
12 авг. 2014, в 12:20
Поделиться
Отвечая, потому что я искал решение для этого.
ручка в ответе @chrscblls работает хорошо, если у вас белый или черный фон, но у меня не было. Aslo, изображения были сгенерированы с помощью ng-repeat, поэтому я не мог иметь свой url в моем css И вы не можете использовать:: after на img-тегах.
Итак, я решил заняться и подумал, что это может помочь людям, если они тоже наткнутся здесь.
Так что я сделал почти то же самое с тремя основными отличиями:
- url находится в моем теге img, я положил его (и метку) в другой div, на котором:: после работы.
- ‘mix-blend-mode’ устанавливается в ‘difference’ вместо ‘multiply’ или ‘screen’.
- Я добавил a:: before с точно таким же значением, чтобы:: after выполнил «разницу» «различия», сделанных:: before и отменил сам.
Чтобы изменить цвет с черного на белый или белый на черный, цвет фона должен быть белым.
От черного до цвета вы можете выбрать любой цвет.
От белого до цвета tho вам нужно выбрать противоположный цвет того, который вы хотите.
.divClass{
   position: relative;
   width: 100%;
   height: 100%;
   text-align: left;
}
.divClass:hover::after, .divClass:hover::before{
   position: absolute;
   width: 100%;
   height: 100%;
   background: #FFF;
   mix-blend-mode: difference;
   content: "";
}
Salix
24 март 2017, в 20:03
Поделиться
Чтобы буквально изменить цвет, вы можете включить переход CSS с фильтром -webkit, где, когда что-то произойдет, вы будете использовать фильтр -webkit по вашему выбору. Например:
img {
    -webkit-filter:grayscale(0%);
    transition: -webkit-filter .3s linear;
    }
img:hover
    {
    -webkit-filter:grayscale(75%);
    }
beta208
03 июнь 2015, в 20:44
Поделиться
Ещё вопросы
- 0Почему JQuery создает избыточные элементы <p> </ p> с этой строкой html?
- 0Извлечь headerText из JSON в результаты div, основываясь на выборе из выпадающего списка
- 0Синтаксис Sql для создания хеша
- 1Как обрабатываются обзоры приложений в магазинах приложений для iPhone / Android / Blackberry
- 1Python Tkinter GUI формат грязной печати
- 1Разделить файл на тестовый файл и обучающий файл с помощью Weka
- 0«Unread_bytes» потока говорит 0, но не 0
- 1Python регулярное выражение вырезать строку шаблона
- 1Android: получение пользовательской трансляции при нажатии кнопки в виджете
- 0Как я могу получить значение ключа headerText из JSON в результате div
- 0Как я могу получить данные из двух HTML Div, используя preg_match?
- 1Не удалось подключить поток во время выполнения Android
- 0Используйте imagick и php, чтобы создать миниатюру изображения в выпадающем списке
- 1Null Coalescing для строки в Int
- 1Получение местоположения сетки во время выполнения в codebehind
- 1Почему словари (dict_items) поддерживают объединение (__or__), а не дополнение (__add__)?
- 0изменить отображаемое имя ячейки в выводе sql запроса
- 0Статистика сети LinkedIn API говорит: «Доступ к сети запрещен», хотя я предоставил r_network
- 0Как загрузить изображения тоже phpmyadmin ASP.Net
- 0Как выровнять кнопки (в разных формах) по горизонтали в IE7
- 1Отправьте запятые в значении для файла cookie HttpWebRequest
- 1Панды — Разделение текста с помощью разделителя
- 0Создание шаблонных классов с параметрами шаблона
- 1XMLParser выдает ошибку » Невозможно установить значение свойства undefined »
- 1Понимание примера Arraydapter
- 1Почему свойство TotalCount в общей папке всегда возвращает 0 элементов?
- 1Мониторинг файлов WMI с использованием C #
- 1Android — RadioButton и RadioGroup
- 0Случайный элемент с вероятностью из таблицы SQL в Java
- 1Преобразовать исключение HttpException в ответ HTTP 404 (страница не найдена)
- 0Встроенный шрифт в изображение base64
- 0Служба недоступна при использовании 2 вызовов CURL на разные URL — PHP
- 0Массив удалить родительские массивы после декодирования json
- 0Почему первая вкладка размещена неправильно?
- 1Как получить определенный дочерний элемент (ы) из узла базы данных Firebase вместо моментального снимка всего в узле?
- 1Путаница в привязке свойств XAML
- 0Как обрабатывать двоичные целые числа в средстве оценки выражений
- 1Highcharter — переместить метку данных в верхнюю часть столбца
- 0используйте тег для отправки формы на другую страницу
- 0Создать ввод по нажатию кнопки с angularJS
- 1Как использовать комбинацию значений столбцов для фильтрации данных и создания подмножеств?
- 0При использовании DOM в цикле: Uncaught TypeError: Невозможно прочитать свойство ‘флажок’ с нулевой ошибкой
- 1Spannable от Android
- 1Java лучший способ хранить значения из матрицы int по конкретным значениям
- 0Я хочу изменить результат выборки данных в codeigniter
- 0как получить выбранную вкладку на форме отправить в JQuery UI вкладки
- 0Как разрешить одно разрешение, а не другое, используя побитовую систему?
- 0Перекрывающиеся div (да, снова!)
- 1Я хочу build + запускать новые сборки приложения без подключения к телефону. Есть ли способ загрузить и запустить APK-файлы из приложения для Android?
- 0Могу ли я написать запрос в командной строке MySQL, который сообщает мне количество байтов во всех таблицах базы данных?
Это статья про веб-технологии и CSS — штуку, благодаря которой наши сайты выглядят красиво. Раньше CSS был простым инструментом оформления веб-страниц: можно было поменять цвет текста, фона, выровнять картинки или настроить расположение элементов на странице. Сейчас современный CSS может гораздо больше:
А ещё он может поменять цвет любого элемента на странице — перекрасить его в сепию, сделать чёрно-белым или добавить насыщенности. Про это и будет сегодняшняя статья.
Меняем оттенок цвета
Каждое изображение на экране состоит из пикселей, у каждого пикселя свой цвет. Цветов много, но их все можно представить в виде цветового круга оттенков. А если этот круг разбить на секторы, то можно понять, как поменяется тот или иной цвет, если мы повернём этот круг на сколько-то градусов:
Например, если мы возьмём красный цвет, который лежит на нуле градусов, и повернём его на 60 градусов против хода часовой стрелки, то получим жёлтый цвет, а если на 120, то он превратится в зелёный. В это же время синий пиксель, который лежал на 240 градусах, после первого смещения превратится в фиолетовый (240 + 60 = 300), а после второго — в красный (240 + 120 = 360, или 0).
Зная это, мы можем пропорционально менять все цвета в изображении, просто поворачивая его на нужное количество градусов по кругу оттенков. Для этого в CSS используется команда filter: hue-rotate(), где в скобках указываются градусы, на которые поворачиваем круг. Например:
filter: hue-rotate(120deg); ← поворачиваем круг на 120 градусов filter: hue-rotate(-60deg); ← поворачиваем круг на 60 градусов в обратном направлении
Для примера поменяем цвета у эмодзи из стандартного набора:
А вот простой код, который за это отвечает:
Сепия, чёрно-белое фото и насыщенность
Сепия — это имитация старой напечатанной фотографии, когда всё состоит из оттенков коричневого цвета (сепии). Чтобы сделать такой эффект, используют команду filter: sepia(100%) . Если нужно сохранить некоторые оттенки цветов, можно ослабить фильтр и указать, например, не 100%, а 50%:
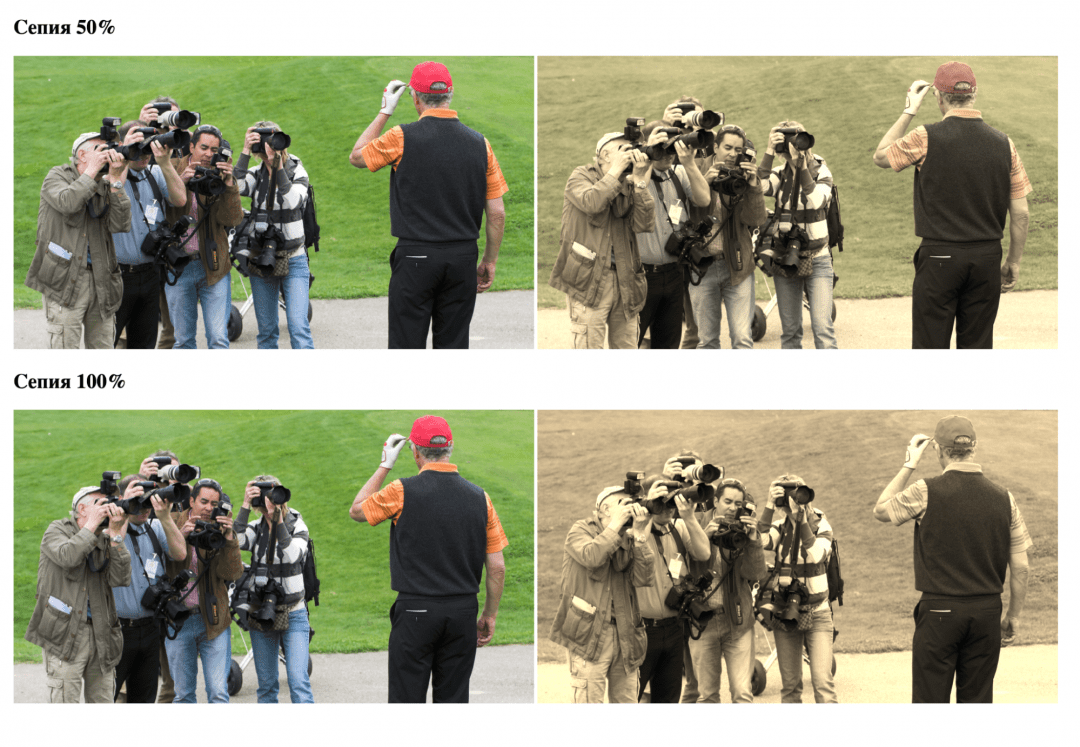 Фото из статьи в Википедии про фотографию. На 50% ещё виден красный оттенок у кепки и зёлёный у травы
Для перевода в чёрно-белый оттенок используют команду filter: grayscale() , где в скобках указывают число от 0 до 1. Например, фильтр с параметром 0,5 приглушит все цвета наполовину, а с единицей — сделает полноценную чёрно-белую картинку:
Насыщенность цветов управляется командой filter: saturate() по такому принципу:
- если в скобках единица, то насыщенность не меняется;
- если меньше единицы — цвета приглушаются и всё работает так же, как и команда filter: grayscale();
- если больше — цвета становятся насыщеннее в такое количество раз.
Например, если поставить насыщенность 0, то фото станет чёрно-белым, как в предыдущем случае, а если 3 — все цвета станут в 3 раза насыщеннее:
Что дальше
Постепенно приближаемся к тому, чтобы сделать свой графический редактор в браузере. А если вы умеете работать со слайдерами и управлять CSS-переменными, то можете уже сами сделать первую версию такого редактора.
Как через css поменять цвет png изображения?

Смотря что именно должно получиться. Вы бы скриншоты приложили. Например, если совсем примитивно надо, то просто полупрозрачный png и менять фон дива под ним.
UPD
Исходя из скриншота:
Сделайте png, только инвертированными. Фон иконки совпадает с фоном сайта, а контур изображения прозрачный. И меняйте цвет фона дива, в котором находится иконка.
Как изменить цвет png в css
Completing the CAPTCHA proves you are a human and gives you temporary access to the web property.
What can I do to prevent this in the future?
If you are on a personal connection, like at home, you can run an anti-virus scan on your device to make sure it is not infected with malware.
If you are at an office or shared network, you can ask the network administrator to run a scan across the network looking for misconfigured or infected devices.
Another way to prevent getting this page in the future is to use Privacy Pass. Check out the browser extension in the Chrome Web Store.
Cloudflare Ray ID: 725cc34fd87c773d • Your IP: Click to reveal 109.70.150.94 • Performance & security by Cloudflare