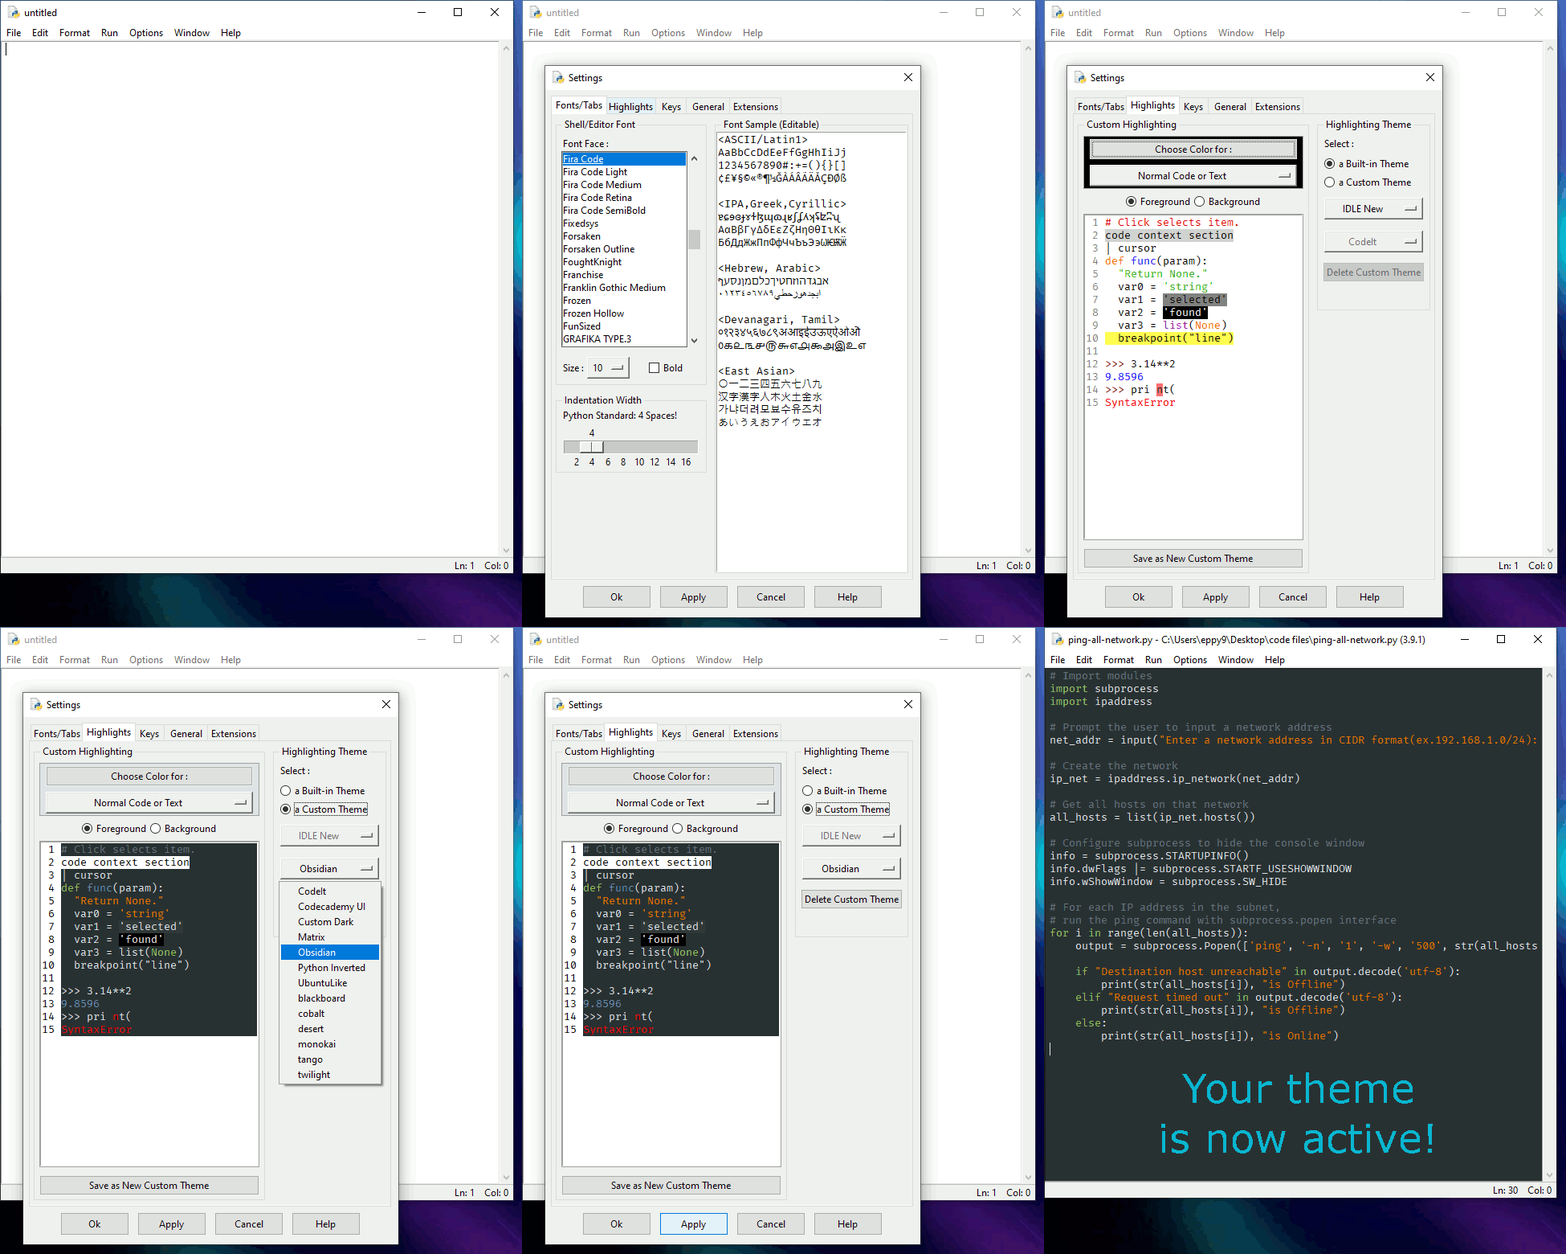
For text window backgrounds, go to Options => IDLE Preferences => Highlighting tab. Save the builtin theme (both are the same) as a custom theme, with a new name. Change the background of each element with a white background to the color you want. Hit Apply or OK. Alternatively, copy the following into <HOMEDIR>/.idlerc/config-highlight.cfg (which may or may not exist already) and change #ffffff to your desired color.
[Custom Light]
normal-foreground= #000000
normal-background= #ffffff
keyword-foreground= #ff7700
keyword-background= #ffffff
builtin-foreground= #900090
builtin-background= #ffffff
comment-foreground= #dd0000
comment-background= #ffffff
string-foreground= #00aa00
string-background= #ffffff
definition-foreground= #0000ff
definition-background= #ffffff
hilite-foreground= #000000
hilite-background= gray
break-foreground= black
break-background= #ffff55
hit-foreground= #ffffff
hit-background= #000000
error-foreground= #000000
error-background= #ff7777
#cursor (only foreground can be set, restart IDLE)
cursor-foreground= black
#shell window
stdout-foreground= blue
stdout-background= #ffffff
stderr-foreground= red
stderr-background= #ffffff
console-foreground= #770000
console-background= #ffffff
We just added an IDLE Dark theme with a deep cobalt blue background. For this, leave #002240 as is or change to another dark color.
[Custom Dark]
comment-foreground = #dd0000
console-foreground = #ff4d4d
error-foreground = #FFFFFF
hilite-background = #7e7e7e
string-foreground = #02ff02
stderr-background = #002240
stderr-foreground = #ffb3b3
console-background = #002240
hit-background = #fbfbfb
string-background = #002240
normal-background = #002240
hilite-foreground = #FFFFFF
keyword-foreground = #ff8000
error-background = #c86464
keyword-background = #002240
builtin-background = #002240
break-background = #808000
builtin-foreground = #ff00ff
definition-foreground = #5e5eff
stdout-foreground = #c2d1fa
definition-background = #002240
normal-foreground = #FFFFFF
cursor-foreground = #ffffff
stdout-background = #002240
hit-foreground = #002240
comment-background = #002240
break-foreground = #FFFFFF
We are planning to add a means to change all the normal backgrounds at once. Being able to affect dialogs will be a later project.
Раздел: Статьи /
Питон /
|
|
Все способы изучить Python
Каждый раз, изучая какую-то новую науку, мы задаёмся вопросом — где взять обучающие материалы. Конечно, сегодня нам помогает в этом Интернет. Но иногда на поиски уходит очень много времени, а нужного результата мы не получаем… Собрал для вас кучу полезных ссылок для изучения Python. не благодарите ))) |
Среда разработки IDLE Shell достаточно проста, если сравнивать с другими средствами разработки, такими как Delphi или Visual Studio, или со средствами разработки на Python от сторонних разработчиков. Однако и её тоже не помешает настроить под свои предпочтения.
Основные настройки можно оставить со значениями по умолчанию. Настроить под себя для начала следует, разве что, подсветку синтаксиса и параметры шрифта.
Настройки IDLE выполняются в окне настроек, которое вызывается через меню
OPTIONS - CONFIGURE IDLE
Окно настроек содержит пять вкладок (страниц):
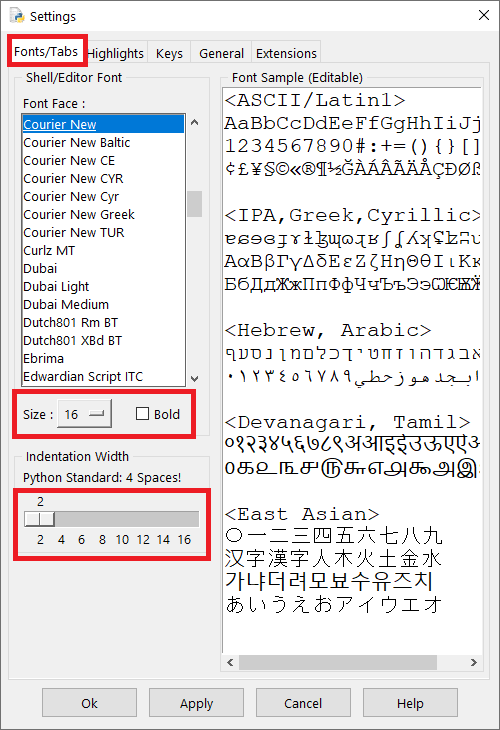
Рис. 1-3-1. Окно настроек IDLE: вкладка ШРИФТЫ И ТАБУЛЯЦИЯ
Шрифты и табуляция
На первой вкладке FONTS/TABS (шрифты/табуляция) можно выбрать шрифт и установить размер табуляции.
Для исходных кодов лучше выбирать моноширинный шрифт (шрифт с одинаковой шириной всех символов). Я предпочитаю Courier New.
Ниже (под списком шрифтов) можно выбрать размер шрифта, а также сделать его жирным.
Справа предварительный просмотр выбранного шрифта.
Также вы можете установить размер табуляции (то есть на какое количество пробелов будет перемещаться курсор при нажатии на клавишу ТАВ). Значение по умолчанию равно 4. Но я всегда ставлю 2, чтобы код не расползался в ширину при наличии множества вложенных блоков.
Подсветка синтаксиса
Я работаю в разных средах разработки с разными языками. И практически в каждой среде разработки свои предпочтения по цвету ключевых слов, строк, цифр и т.п. Но мне не нравится, когда подсветка синтаксиса отличается от привычной. Поэтому, когда я устанавливаю какую-то новую IDE, то я первым делом настраиваю цвета текста в редакторе исходного кода.
Если это ваш первый язык программирования, то можете здесь ничего не менять (вам пока без разницы), можете привыкнуть и к стандартным цветам.
Но если захотите изменить, то переходите на вкладку HIGHLIGHTS (подсветка), и устанавливайте цвета, какие вам больше нравятся:
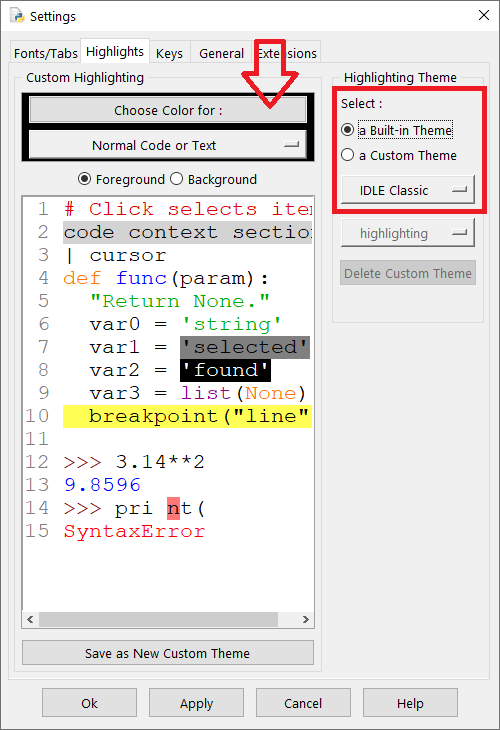
Рис. 1-3-2. Окно настроек IDLE: вкладка ПОДСВЕТКА СИНТАКСИСА
Если в группе SELECT вы выберите “a Built-in Theme” (встроенные темы), то установится подсветка по умолчанию. В этом случае можно будет выбрать одну из трёх предустановленных тем:
- IDLE Classic
- IDLE Dark
- IDLE New
Если же вы выберите “a Custom Theme” (пользовательская тема), то можете установить свои цвет текста и цвет фона для любого доступного элемента (для ключевых слов, для чисел, для строк и т.п.). Вы можете создать несколько собственных тем.
После того, как вы вдоволь наиграетесь с выбором цветов, надо щёлкнуть по кнопке APPLY, чтобы изменения вступили в силу. Если вы создали свою тему, то её нужно сохранить с помощью кнопки “Save as New Custom Theme”.
Цвета изменяются отдельно для текста (Foreground) и для фона (Background). Для изменения текста или фона должен быть выбран соответствующий переключатель (см. рис. 1-3-2).
Чтобы установить цвет для элемента — щёлкните по кнопке с надписью “Choose Color For” и в открывшемся окне установите нужный цвет.
Под этой кнопкой расположена кнопка выбора элемента, а надпись на этой кнопке указывает на название выбранного элемента. Если щёлкнуть по этой кнопке, то появится список доступных элементов.
Чтобы выбрать элемент для изменения цвета, можно также щёлкнуть по элементу в окне предварительного просмотра.
Остальные три вкладки рассматривать не будем — для начинающих они пока не нужны.
Если что-то осталось непонятным, то посмотрите видео:
|
|
Учимся программировать на Python
Python — один из самых востребованных языков программирования. Подпишитесь на бесплатную рассылку и получайте статьи и видео о программировании на Python. |
Dark Theme in Python IDLE – Version 2.7
Python is a high- level, general-purpose, interactive, interpreted and object-oriented programming language. It was developed in 1991. As Python allows the programmer to write programs and instruction using fewer lines of codes, it has caught the attention of Millions of Developers.
If you are a Python Developer and especially a night-owl programmer, this hack is for you which will transform your Python IDLE 3.8 in Dark Theme which will reduce your eye strain in low light conditions. If you want to feel Monokai Theme of Sublime Text, then go ahead and add the Dark theme to your Python IDLE 3.8 and save your eyes.
What is Python IDLE?
Python IDLE which stands for “Integrated Development and Learning Environment” is an integrated development environment (IDE) for Python Programming Language and is by default installed with the Python installer for Windows.
You can open Python IDLE from the Start menu in the Windows Operating System by searching for ‘IDLE’.
In the case of Python distributions for Linux and macOS, Python IDLE is not available by default.
For Ubuntu Linux, You can install the Python IDLE with the help of the following command:
$ sudo apt-get install idle
Python IDLE is used for executing single line python statements. Developers basically use Python IDLE to develop, modify, execute and debug Python scripts. Python IDLE provides a fully-featured and efficient text editor to write Python scripts. It also includes some awesome features like syntax highlighting, autocompletion and smart indent. Developers love IDLE as it provides the debugger with stepping and breakpoints features.
You can download Python from it’s an official site which automatically comes with Python IDLE.
Also Read: Top Free Python Udemy Courses
Why you should add dark theme to your Python IDLE?
The programmers are the main source of income for eye doctors 🙁
The dark themes are getting more and popular nowadays for night-owl programmers. Some people just like the vibe, while others use dark themes simply to reduce eye strain and save battery.
Pros:
- Dark themes can reduce eye strain in low-light conditions, more specifically at night time.
- High contrast between foreground and background reduces eye strain.
- Syntax highlighting on Python IDLE can be easier to read with dark themes like monokai.
Adopt Dark Theme and Happy Coding while protecting your most precious organ – ‘Eye’!
Python IDLE Dark Theme Code [Monokai Theme]:
Below is the code for adding Dark Theme in Python IDLE which you will require in the next section describing steps for adding a dark theme to your python IDLE.
The Monokai Theme code changes the syntax highlighting and various text editor component’s colors including foreground and background.
[monokai]
normal-foreground= #F8F8F2

normal-background= #272822

keyword-foreground= #F92672

keyword-background= #272822

builtin-foreground= #66D9EF

builtin-background= #272822

comment-foreground= #75715E

comment-background= #272822

string-foreground= #E6DB74

string-background= #272822

definition-foreground= #A6E22E

definition-background= #272822

hilite-foreground= #F8F8F2

hilite-background= gray

break-foreground= black

break-background= #ffff55

hit-foreground= #F8F8F2

hit-background= #171812

error-foreground= #ff3338

error-background= #272822

cursor-foreground= #F8F8F2

stdout-foreground= #DDDDDD

stdout-background= #272822

stderr-foreground= #ff3338

stderr-background= #272822

console-foreground= #75715E

console-background= #272822
Steps to Add Dark Theme to Your Python IDLE:
1). Open Python Folder from the path you selected during installing Python. In this case it is ( C:Python38-32 )
2). In Python38-32 Folder, search for Lib and double click on it.
3). In the Lib folder, search for idlelib folder and double click on it.
4). In idlelib folder, search for CONFIG-HIGHLIGHT.DEF file and open it with any text editor tool like Notepad.
5). In the CONFIG-HIGHLIGHT.DEF file, paste the Monokai Code given in the above section. Save and close the file.
6). Now Restart your system, Open Python IDLE, From the menu bar select Options -> Configure IDLE -> Highlighting & You will see the monokai theme in Highlighting themes section. Select Monokai theme and Enjoy 🙂
7). Do share this Post if your love your new Python IDLE Look <3, DO share this post in your developer circles as sharing is caring.
Link to Video Tutorial “How to Get dark theme in Python IDLE[3.8]”: https://www.youtube.com/watch?v=4pTRBH5Pa9g
Conclusion:
Finally concluding this article subjected, How to Get dark theme in Python IDLE and execute python scripts like a pro without spoiling your eyes.
We have included the topics; What is Python IDLE?, How to install Python IDLE on your System?, Why you need to add a dark theme to your python IDLE? and Steps to add a dark theme to your python IDLE.
I hope this piece helped you and satisfies the reason for you being here, and if you have any queries or questions related to this thread, then please make a comment below and let me help you with that concern.
Happy Coding and protect your Eyes!
For more information on concepts covered in this lesson, you can check out:
- IdleX: IDLE Extensions for Python
00:00
How to Customize Python IDLE. There are many ways that you can give IDLE a visual style that suits you. The default look and feel is based on the colors in the Python logo.
00:12
If you don’t like how anything looks, then you can almost always change it. To access the customization window, select Options → Configure IDLE from the menu on Windows and Linux, or IDLE → Preferences on macOS.
00:32
To preview the result of a change you want to make, press Apply. When you’re done customizing IDLE, press Ok to save your changes or Cancel if you want to discard them.
00:44
There are multiple ways to customize IDLE. This lesson will focus on five of them: fonts, highlights, keys, windows, and shell and editor. Extending the functionality of IDLE is a subject all on its own.
01:01
If you’d like to learn more about customizing IDLE using extensions, check out the link seen on-screen. The first tab on the preferences window allows you to change font size and font style.
01:14
You can change the font to almost any style you’d like, depending on what’s installed on your operating system. The font settings window is seen on-screen.
01:23
You can use the scrolling window to select the font you prefer. I recommend you select a fixed-width font, such as Courier New or any of the freely available dedicated programming-orientated fonts, which are clear, fixed-width, and have other features dedicated to clean-looking code editing. Pick a font size that’s large enough for you to see well.
01:44
You can also click the checkbox next to Bold to toggle whether or not all text appears in bold.
01:51
The second customization tab will let you change highlights. Syntax highlighting is an important feature of any IDE that highlights the syntax of the language you’re working in.
02:03
This helps you visually distinguish between the different Python constructs and the data used in your code. IDLE allows you to fully customize the appearance of your Python code.
02:13
It comes pre-installed with three different highlight themes: IDLE CLassic, IDLE Dark,
02:22
and IDLE New.
02:26
You can select from these pre-installed themes or create your own custom theme right in this window. Unfortunately, IDLE doesn’t allow you to install custom themes from a file.
02:36
You have to create custom themes from this window. To do so, start changing the colors for different items. Select an item, and then press Choose Color for:.
02:48
You’ll be brought to a color picker where you can select the exact color that you want to use. You’ll then be prompted to save this theme as a new custom theme, and you can enter a name of your choosing.
02:59
You can then continue changing the colors of different items if you’d like. Remember to press Apply to see your changes in action.
03:08
The third customization tab lets you map different keypresses to actions, also known as keyboard shortcuts. These are a vital component of your productivity. Whenever you use an IDE, you can either come up with your own keyboard shortcuts, or you can use the ones that come with IDLE.
03:25
The pre-installed shortcuts are a good place to start. The keyboard shortcuts are listed in alphabetical order by action. They’re listed in the format action — <Shortcut>, where action is what will happen when you press the key combination in <Shortcut>.
03:39
If you want to use a built-in key set and select a mapping that matches your operating system. Pay close attention to the different keys and make sure your keyboard has them.
03:49
The customization of keyboard shortcuts is very similar to the customization of syntax-highlighting colors. Unfortunately, IDLE doesn’t allow you to install custom keyboard shortcuts from a file.
04:00
You must create them from the Keys tab. Select one pair from the list and press Get New Keys for Selection. A new window will pop up. Here, you can use the checkboxes and scrolling menu to select the combination of keys that you want to use for the shortcut on-screen.
04:18
You can see the dedent command being changed to use Shift and Tab, which is consistent with many other editors. As with highlights, once you create a custom key entry, you’ll be prompted to save a new custom key set, as seen on-screen.
04:34
The fourth tab of the customization window is a place for small general changes. Here you can customize things like the window size and whether the shell or the file editor opens first when you start Python IDLE.
04:47
Most of the things in this window are not that exciting to change, but they will be useful when you do need them. This window will also let you change how many spaces are used for each indentation level. By default, this will be set to the PEP 8 standard of four spaces.
05:02
You can change this to make the width of your code more or less spread out to your liking. The next tab has some options to do with the editor and shell.
05:13
Auto-Squeeze will reduce large amounts of text to a single button, which can be clicked to view that text. This can be useful if you have a script which is producing a great deal of output.
05:28
Double-clicking the squeeze notification shows the full text, as seen on-screen.
05:34
There are other options here for the editor, one of which may be useful is to show line numbers in new windows.
05:43
In the next section of the course, we’ll take a look back at what you’ve covered.
In this post I will teach you how to use custom color schemes with IDLE, Python’s built-in IDE. Using custom IDLE themes is a great way to make your editor more intuitive and boost your productivity by adjusting how IDLE highlights your code. Personally I find it much harder to write my code if my editor has an uncomfortable or straining color theme. Too much contrast between the background and foreground can be very straining on your eyes and make it difficult to read your own code. A theme that doesn’t work well for you can be confusing or simply unintuitive, as you may be expecting a certain piece of code to be highlighted in one color, but your IDE is using a totally different style. Perhaps your code comments are being shown in a bright red when you would like them to be more subdued.
To select between the default themes, go to Options > Configure IDLE and navigate to the Highlights tab. On the right side of the panel, there will be two radio buttons to choose between default themes or custom ones. Choose your theme from the dropdown list and click the Apply button at the bottom of the window. The theme is now activated and you will see the changes in your IDLE window.
You can also make changes to your themes in the Highlights tab. Under “Custom Highlighting” you will see a dropdown list where you can select a particular item to edit. For each item, you can edit both the foreground and background color by clicking the “Choose Color for:” button with either “Foreground” or “Background” selected. You can see a preview of your changes on the left side of the window. When you’re finished editing the highlight colors, click on the button labeled “Save as New Custom Theme” underneath the preview pane, and enter a name for your theme, then click Save.
Now, on to the themes files. If you prefer to edit your themes via the Settings menu, then you don’t need to mess with these files. But if you find a theme on the internet that you want to use, then this is how you will install them.
The default built-in themes are located in a file called config-highlight.def, which on Windows will be located in your Python installation directory with a location such as C:Python39Libidlelibconfig-highlight.def . You should not edit this file, as it only serves to define the default themes – but if you want to base your custom theme on one of these, then you can copy them from here and paste your new version into the custom themes file discussed in the next paragraph.
On Windows, the file you want to edit to add new highlight themes is C:Users<USERNAME>.idlercconfig-highlight.cfg. On most Linux distros this file will be located in your home directory at <home_directory>/.idlerc/config-highlight.cfg. You may have to create it if it doesn’t already exist; but if you have saved any custom themes from the Settings menu in IDLE, then the file will be here. Note the different extension – the filenames are similar, but the custom themes file has a .cfg extension while the built-in themes file has a .def extension.
To sum it up, the 2 files in question are:
- Built-in themes –
config-highlight.def - Custom themes –
config-highlight.cfg
A custom highlight theme will look something like this, which you will copy & paste into config-highlight.cfg :
[Obsidian]
definition-foreground = #678CB1
error-foreground = #FF0000
string-background = #293134
keyword-foreground = #93C763
normal-foreground = #E0E2E4
comment-background = #293134
hit-foreground = #E0E2E4
builtin-background = #293134
stdout-foreground = #678CB1
cursor-foreground = #E0E2E4
break-background = #293134
comment-foreground = #66747B
hilite-background = #2F393C
hilite-foreground = #E0E2E4
definition-background = #293134
stderr-background = #293134
hit-background = #000000
console-foreground = #E0E2E4
normal-background = #293134
builtin-foreground = #E0E2E4
stdout-background = #293134
console-background = #293134
stderr-foreground = #FB0000
keyword-background = #293134
string-foreground = #EC7600
break-foreground = #E0E2E4
error-background = #293134
Copy this theme definition into your config-highlight.cfg file, with a blank line separating each theme. The colors for each item are in hex format, and the name of the theme will be in brackets at the beginning of each theme definition. The next time you open IDLE, it will read your custom highlight themes automatically and you will be able to select them in the Preferences window.
I have uploaded for you a sample themes file containing several custom themes. Place the config file at C:Users<USERNAME>.idlercconfig-highlight.cfg (if using Linux, then ~/.idlerc/config-highlight.cfg ). I did not create the themes in it, so please appreciate the efforts of the original authors. You are free to use it as you wish.


![How to Get Dark Theme in Python IDLE[3.8] How to Get Dark Theme in Python IDLE[3.8]](https://codehexz.com/wp-content/uploads/2019/10/Copy-of-IDLE-696x392.png)


![How to Get dark theme in Python IDLE[3.8] - Step 1](https://codehexz.com/wp-content/uploads/2019/10/image6-300x69.png)
![How to Get dark theme in Python IDLE[3.8] - Step 2](https://codehexz.com/wp-content/uploads/2019/10/image7-300x102.png)
![How to Get dark theme in Python IDLE[3.8] - Step 3](https://codehexz.com/wp-content/uploads/2019/10/image8-300x101.png)
![How to Get dark theme in Python IDLE[3.8] - Step 4](https://codehexz.com/wp-content/uploads/2019/10/image9-300x196.png)
![How to Get dark theme in Python IDLE[3.8] - Step 5](https://codehexz.com/wp-content/uploads/2019/10/image10-300x243.png)
![How to Get dark theme in Python IDLE[3.8] - Step 6](https://codehexz.com/wp-content/uploads/2019/10/image13-300x169.png)
![How to Get dark theme in Python IDLE[3.8] - Step 7](https://codehexz.com/wp-content/uploads/2019/10/image14-300x123.png)
