![]()
Download Article
![]()
Download Article
Roses are a classic flower used in floral arrangements, but sometimes you need a certain color you just can’t get anywhere. With a little bit of water, food coloring, and time, however, you can make your rose almost any color you want. The most common way of dyeing roses is by dipping the stem into colored water, and letting the rose soak up the dye. You can also dip the flower head directly into the water if you are in a hurry, however.
-

1
Purchase some white roses. Dye will show up the best on white roses. If you use colored roses, the dye will add to whatever color is already there. For example, if you try to dye a yellow rose blue, you will get green.
-
2
Cut the stem at a 45 degree angle with shears or a sharp knife. Hold the stem under water as you cut it down to 10 to 12 inches (25.4 to 30.5 centimeters). Cutting the stem at an angle will prevent it from sitting flat against the bottom of the cup. Cutting it under water will prevent air bubbles from forming. Both of these will help the rose absorb the dye better.[1]
- Take this time to trim off any thorns and leaves as well.
- Cut the stems shorter if you want the roses to soak up the dye faster. This will also help the roses turn out brighter.[2]
Advertisement
-
3
Place the rose in a vase filled with plain water. Leave the rose in the water as you prepare the dye bath. If you want to make a bouquet, you can cut more roses. Work one rose at a time, and place it into the vase as you finish cutting it.
-
4
Prepare your dye bath. Fill a cup with ½ cup (120 milliliters) of warm water. Stir in 20 to 30 drops of food coloring or liquid watercolor.[3]
If you want something more subtle, use 5 to 10 drops and 1 cup (240 milliliters) of water instead.[4]
-
5
Set the rose into the water, then wait for it to change color. This will take at least 4 hours, so be patient! The longer you wait, the deeper the color will become. After 4 hours or so, the rose will take on a pastel color. If you want it to be a deeper color, you will have to wait 1 to 2 days. Keep in mind that the roses will be streaky and speckled.[5]
- Rose petals will have small veins. They will look darker after you finish dyeing the rose. If this bothers you, leave the rose in the dye longer.[6]
- For an interesting effect, dye the rose in one color for about 3 hours, then put it in a different color for 2 hours, then a third color for 1 hour.[7]
- Rose petals will have small veins. They will look darker after you finish dyeing the rose. If this bothers you, leave the rose in the dye longer.[6]
-
6
Place the rose into a vase filled with fresh water. Once the rose is the color you want it to be, take the rose out of the dye, and place it into a vase filled with fresh water. If you want to help the rose last longer, add some floral preservative into the water.


Advertisement
-
1
Buy some white roses. Dye only adds to what color is already there; it does not replace color. If you want the dye to come out true to its color, you should use white roses.
-
2
Cut the stem down at an angle. Use a sharp knife to cut the stem down until they are 10 to 12 inches (25.4 to 30.5 centimeters) long. Make sure that the bottom is cut at a slight angle. Take this time to trim off any leaves, thorns, and buds as well.[8]
-
3
Split the stem halfway. Set the rose down on a cutting board or cutting mat. Use a sharp craft blade to cut the stem in half lengthwise. Stop when you are halfway up the stem.[9]
If you are using shorter glasses, you can split the stems only 3 inches (7.6 centimeters).[10]
- If your rose had a very thick stem to begin with, you can cut the stem into three or four sections instead.[11]
- If you snap the stem by mistake, cut the entire stem down to 5 to 6 inches (12.7 to 15.2 centimeters), and dye it a single color.[12]
- If your rose had a very thick stem to begin with, you can cut the stem into three or four sections instead.[11]
-
4
Place the rose into a vase filled with clear water. At this point, you can cut and split more roses, or move onto the next step.
-
5
Fill 2 to 4 cups with warm water. You will need ½ cup (120 milliliters) of warm water. How many cups you use depends on how many sections you cut your rose stem into. You will need one cup per section. Use cups that have straight walls.[13]
- Roses drink up warm water more quickly than cool water.
-
6
Stir your desired dyes into the cups. You will need 20 to 30 drops of food coloring for each cup. If you can’t find food coloring, you can use liquid watercolor instead. Use a different color for each cup.[14]
-
7
Place the split rose stem into the cups. Move the cups close together first, so that the rims are touching. Carefully spread apart the split rose stem. Place each section into a separate cup. Make sure that the stem is submerged in the dye as far as it will go.
-
8
Wait for the rose to change colors. The longer you let the rose sit in the dye, the deeper the color will become. If you want a pastel color, wait at least 4 hours. If you want a deeper color, wait several days.[15]
- These roses won’t end up with each petal a different color. They will be dyed in sections, like a pie chart.[16]
- Rose petals have veins in them, which will look darker. If you want them to be less visible, leave the rose in the water for twice the recommended time.[17]
- These roses won’t end up with each petal a different color. They will be dyed in sections, like a pie chart.[16]
-
9
Transfer the rose to a vase filled with fresh water. If you want to, you can trim down the split end until the stem is whole again. To help you rose last even longer, still some floral preservative into the water first. Keep in mind, however, that some of the dye may leak back into the water and make it change color.


Advertisement
-
1
Choose a white rose. Dye only adds to the color that is already there. If you use a colored rose, the dye may end up a different color, or it may not show up at all. For best results, use a rose that is fully open.[18]
This method is suitable for both fresh and dried roses.[19]
-
2
Trim the stem, leaves, and thorns. Use a sharp knife to cut the base of the stem off as an angle. Next, trim off any leaves, thorns, and buds. Place the rose into a vase filled with clear water while you prepare the dye in the next step.
- Hold the stem under water while you cut it. This will help prevent air bubbles, which can clog up the stem and prevent the rose from drinking.
-
3
Prepare the dye bath in a bucket. How you prepare the dye depends on the type of dye you are using. Ink, food coloring, and fabric dye are all suitable options. If you can find floral dye, such as Dip It, you will get even better results. Choose your preferred dye, then prepare it in one of the following ways:[20]
- Mix ink or food coloring into 1 gallon (3.8 liters) of water. Stir in 1 tablespoon (13 grams) of alum.
- Mix fabric dye in 1 gallon (3.8 liters) of water. Use enough dye to get the color you want.
- Prepare floral dye according to the instructions on the package.
-
4
Dip the rose into the dye for 2 to 3 seconds. Hold the rose upside-down by the stem, then dip the flower part into the dye. Swirl it around so that every petal gets coated. You only need to leave it in the dye for about 2 to 3 seconds.[21]
- This method is different from the typical dyeing methods. You are only dipping the flower part into the dye, not the stem
-
5
Lift the rose out. Hold it upside down over the bucket so that the excess dye can drip back. Give the rose a gentle shake, if you need to, but be careful not to get droplets of dye on anything that might get stained.
-
6
Rinse the rose under clear water. Give it another shake to get rid of any extra water. If the color comes out too dark, rinse it under water a little longer. Keep in mind that the color will lighten as the rose dries.[22]
-
7
Set the rose into a vase so that it can dry. If the rose didn’t turn out dark it enough, let it dry completely first, then repeat the dyeing process.[23]
While the rose dries, you can dye more roses, if you need to. Don’t get impatient, however; if you use the rose while the dye is still wet, you will risk staining your skin, clothing, and other items in your arrangement.- If you dyed a fresh rose, make sure that you fill the vase with water so that it doesn’t wilt. Dried roses do not need water, however.
-
8
Use the rose(s) in your floral arrangement. If you are using fresh roses, be sure to add a packet of floral preservative into the water. This will help the roses last longer. Because you only dyed the flower part, you do not have to worry about the dye leaching back into the water. This means that you can use a clear vase without worrying about the water changing color.


Advertisement
Add New Question
-
Question
Can I use these for cake decorating?

Yes, but only if you used food coloring. Dip-dyed roses are not recommended, because the dye may come off of the petals. Trim the stem down to a couple of inches/centimeters. If you want to, you can stick it into a bud vase before inserting it into the cake.
-
Question
If I put white roses in black dye, will they be black?
Yes. The white flowers will absorb the black-dyed water and would turn out black.
-
Question
Can I dye live roses that are still in potting soil and not cut flowers?
Of course. Just put some of the dye in the water you give the flowers every day.
See more answers
Ask a Question
200 characters left
Include your email address to get a message when this question is answered.
Submit
Advertisement
Video
-
If you put the dyed roses into clear water, the color may fade over time.[24]
-
Be sure to use fresh roses. Wilted ones won’t take up the dye as well.[25]
-
Remove any leaves, thorns, and mini stems. They will only rot in the water and make it murky.[26]
Show More Tips
Advertisement
-
Some dyes can be harsh on the environment.
Advertisement
Things You’ll Need
- Fresh white roses
- Sharp knife or shears
- Small cups
- Water
- Food coloring
- Vase
- Fresh white roses
- Sharp knife or shears
- Sharp knife or razor blade
- Small cups
- Water
- Food coloring
- Vase
- Fresh or dried white roses
- Bucket
- Water
- Preferred dye
- Vase
References
About This Article
Article SummaryX
To dye roses, start by getting some white roses and cutting their stems under water at an angle to help the rose absorb the dye better. Next, place the roses in a vase filled with plain water while you prepare your dye bath of warm water and food coloring or liquid watercolor. Then, set the roses upright in the dyed water so the stems can absorb the color. Wait 4 hours to 2 days, or until you achieve the desired color. To learn how to dip-dye roses, keep reading!
Did this summary help you?
Thanks to all authors for creating a page that has been read 224,192 times.
Reader Success Stories
-

Lynette Payne
Feb 6, 2021
«My husband saw on Facebook a lady dunked the roses in tomato sauce, then in like a jelly and put it on a baking…» more
Did this article help you?
![]()
Download Article
![]()
Download Article
Roses are a classic flower used in floral arrangements, but sometimes you need a certain color you just can’t get anywhere. With a little bit of water, food coloring, and time, however, you can make your rose almost any color you want. The most common way of dyeing roses is by dipping the stem into colored water, and letting the rose soak up the dye. You can also dip the flower head directly into the water if you are in a hurry, however.
-
1
Purchase some white roses. Dye will show up the best on white roses. If you use colored roses, the dye will add to whatever color is already there. For example, if you try to dye a yellow rose blue, you will get green.
-
2
Cut the stem at a 45 degree angle with shears or a sharp knife. Hold the stem under water as you cut it down to 10 to 12 inches (25.4 to 30.5 centimeters). Cutting the stem at an angle will prevent it from sitting flat against the bottom of the cup. Cutting it under water will prevent air bubbles from forming. Both of these will help the rose absorb the dye better.[1]
- Take this time to trim off any thorns and leaves as well.
- Cut the stems shorter if you want the roses to soak up the dye faster. This will also help the roses turn out brighter.[2]
Advertisement
-
3
Place the rose in a vase filled with plain water. Leave the rose in the water as you prepare the dye bath. If you want to make a bouquet, you can cut more roses. Work one rose at a time, and place it into the vase as you finish cutting it.
-
4
Prepare your dye bath. Fill a cup with ½ cup (120 milliliters) of warm water. Stir in 20 to 30 drops of food coloring or liquid watercolor.[3]
If you want something more subtle, use 5 to 10 drops and 1 cup (240 milliliters) of water instead.[4]
-
5
Set the rose into the water, then wait for it to change color. This will take at least 4 hours, so be patient! The longer you wait, the deeper the color will become. After 4 hours or so, the rose will take on a pastel color. If you want it to be a deeper color, you will have to wait 1 to 2 days. Keep in mind that the roses will be streaky and speckled.[5]
- Rose petals will have small veins. They will look darker after you finish dyeing the rose. If this bothers you, leave the rose in the dye longer.[6]
- For an interesting effect, dye the rose in one color for about 3 hours, then put it in a different color for 2 hours, then a third color for 1 hour.[7]
- Rose petals will have small veins. They will look darker after you finish dyeing the rose. If this bothers you, leave the rose in the dye longer.[6]
-
6
Place the rose into a vase filled with fresh water. Once the rose is the color you want it to be, take the rose out of the dye, and place it into a vase filled with fresh water. If you want to help the rose last longer, add some floral preservative into the water.
Advertisement
-
1
Buy some white roses. Dye only adds to what color is already there; it does not replace color. If you want the dye to come out true to its color, you should use white roses.
-
2
Cut the stem down at an angle. Use a sharp knife to cut the stem down until they are 10 to 12 inches (25.4 to 30.5 centimeters) long. Make sure that the bottom is cut at a slight angle. Take this time to trim off any leaves, thorns, and buds as well.[8]
-
3
Split the stem halfway. Set the rose down on a cutting board or cutting mat. Use a sharp craft blade to cut the stem in half lengthwise. Stop when you are halfway up the stem.[9]
If you are using shorter glasses, you can split the stems only 3 inches (7.6 centimeters).[10]
- If your rose had a very thick stem to begin with, you can cut the stem into three or four sections instead.[11]
- If you snap the stem by mistake, cut the entire stem down to 5 to 6 inches (12.7 to 15.2 centimeters), and dye it a single color.[12]
- If your rose had a very thick stem to begin with, you can cut the stem into three or four sections instead.[11]
-
4
Place the rose into a vase filled with clear water. At this point, you can cut and split more roses, or move onto the next step.
-
5
Fill 2 to 4 cups with warm water. You will need ½ cup (120 milliliters) of warm water. How many cups you use depends on how many sections you cut your rose stem into. You will need one cup per section. Use cups that have straight walls.[13]
- Roses drink up warm water more quickly than cool water.
-
6
Stir your desired dyes into the cups. You will need 20 to 30 drops of food coloring for each cup. If you can’t find food coloring, you can use liquid watercolor instead. Use a different color for each cup.[14]
-
7
Place the split rose stem into the cups. Move the cups close together first, so that the rims are touching. Carefully spread apart the split rose stem. Place each section into a separate cup. Make sure that the stem is submerged in the dye as far as it will go.
-
8
Wait for the rose to change colors. The longer you let the rose sit in the dye, the deeper the color will become. If you want a pastel color, wait at least 4 hours. If you want a deeper color, wait several days.[15]
- These roses won’t end up with each petal a different color. They will be dyed in sections, like a pie chart.[16]
- Rose petals have veins in them, which will look darker. If you want them to be less visible, leave the rose in the water for twice the recommended time.[17]
- These roses won’t end up with each petal a different color. They will be dyed in sections, like a pie chart.[16]
-
9
Transfer the rose to a vase filled with fresh water. If you want to, you can trim down the split end until the stem is whole again. To help you rose last even longer, still some floral preservative into the water first. Keep in mind, however, that some of the dye may leak back into the water and make it change color.
Advertisement
-
1
Choose a white rose. Dye only adds to the color that is already there. If you use a colored rose, the dye may end up a different color, or it may not show up at all. For best results, use a rose that is fully open.[18]
This method is suitable for both fresh and dried roses.[19]
-
2
Trim the stem, leaves, and thorns. Use a sharp knife to cut the base of the stem off as an angle. Next, trim off any leaves, thorns, and buds. Place the rose into a vase filled with clear water while you prepare the dye in the next step.
- Hold the stem under water while you cut it. This will help prevent air bubbles, which can clog up the stem and prevent the rose from drinking.
-
3
Prepare the dye bath in a bucket. How you prepare the dye depends on the type of dye you are using. Ink, food coloring, and fabric dye are all suitable options. If you can find floral dye, such as Dip It, you will get even better results. Choose your preferred dye, then prepare it in one of the following ways:[20]
- Mix ink or food coloring into 1 gallon (3.8 liters) of water. Stir in 1 tablespoon (13 grams) of alum.
- Mix fabric dye in 1 gallon (3.8 liters) of water. Use enough dye to get the color you want.
- Prepare floral dye according to the instructions on the package.
-
4
Dip the rose into the dye for 2 to 3 seconds. Hold the rose upside-down by the stem, then dip the flower part into the dye. Swirl it around so that every petal gets coated. You only need to leave it in the dye for about 2 to 3 seconds.[21]
- This method is different from the typical dyeing methods. You are only dipping the flower part into the dye, not the stem
-
5
Lift the rose out. Hold it upside down over the bucket so that the excess dye can drip back. Give the rose a gentle shake, if you need to, but be careful not to get droplets of dye on anything that might get stained.
-
6
Rinse the rose under clear water. Give it another shake to get rid of any extra water. If the color comes out too dark, rinse it under water a little longer. Keep in mind that the color will lighten as the rose dries.[22]
-
7
Set the rose into a vase so that it can dry. If the rose didn’t turn out dark it enough, let it dry completely first, then repeat the dyeing process.[23]
While the rose dries, you can dye more roses, if you need to. Don’t get impatient, however; if you use the rose while the dye is still wet, you will risk staining your skin, clothing, and other items in your arrangement.- If you dyed a fresh rose, make sure that you fill the vase with water so that it doesn’t wilt. Dried roses do not need water, however.
-
8
Use the rose(s) in your floral arrangement. If you are using fresh roses, be sure to add a packet of floral preservative into the water. This will help the roses last longer. Because you only dyed the flower part, you do not have to worry about the dye leaching back into the water. This means that you can use a clear vase without worrying about the water changing color.
Advertisement
Add New Question
-
Question
Can I use these for cake decorating?
Yes, but only if you used food coloring. Dip-dyed roses are not recommended, because the dye may come off of the petals. Trim the stem down to a couple of inches/centimeters. If you want to, you can stick it into a bud vase before inserting it into the cake.
-
Question
If I put white roses in black dye, will they be black?
Yes. The white flowers will absorb the black-dyed water and would turn out black.
-
Question
Can I dye live roses that are still in potting soil and not cut flowers?
Of course. Just put some of the dye in the water you give the flowers every day.
See more answers
Ask a Question
200 characters left
Include your email address to get a message when this question is answered.
Submit
Advertisement
Video
-
If you put the dyed roses into clear water, the color may fade over time.[24]
-
Be sure to use fresh roses. Wilted ones won’t take up the dye as well.[25]
-
Remove any leaves, thorns, and mini stems. They will only rot in the water and make it murky.[26]
Show More Tips
Advertisement
-
Some dyes can be harsh on the environment.
Advertisement
Things You’ll Need
- Fresh white roses
- Sharp knife or shears
- Small cups
- Water
- Food coloring
- Vase
- Fresh white roses
- Sharp knife or shears
- Sharp knife or razor blade
- Small cups
- Water
- Food coloring
- Vase
- Fresh or dried white roses
- Bucket
- Water
- Preferred dye
- Vase
References
About This Article
Article SummaryX
To dye roses, start by getting some white roses and cutting their stems under water at an angle to help the rose absorb the dye better. Next, place the roses in a vase filled with plain water while you prepare your dye bath of warm water and food coloring or liquid watercolor. Then, set the roses upright in the dyed water so the stems can absorb the color. Wait 4 hours to 2 days, or until you achieve the desired color. To learn how to dip-dye roses, keep reading!
Did this summary help you?
Thanks to all authors for creating a page that has been read 224,192 times.
Reader Success Stories
-
Lynette Payne
Feb 6, 2021
«My husband saw on Facebook a lady dunked the roses in tomato sauce, then in like a jelly and put it on a baking…» more
Did this article help you?
Практическая магия: как изменить цвет у цветов
Хочется чёрных роз и синих тюльпанов? Прочти этот материал и узнай, как окрасить цветы самостоятельно!

Shutterstock
Нам всем иногда хочется разнообразия или того требует случай. Цветы бывают разных сорт, цветов и форм, но даже возможности природы не безграничны. Чтобы создать букет того цвета, который тебе нравится, совсем не обязательно обладать специальными навыками ботаники: всё гораздо проще.
РЕКЛАМА – ПРОДОЛЖЕНИЕ НИЖЕ
Рассказываем, как изменять цвета цветов в бытовых условиях и радоваться воплощению новых креативных идей!
Как изменять цвета цветов в домашних условиях
Существует 2 основных метода, которые помогут окрасить бутоны в необходимый цвет.
Поменять цвета у цветов возможно при помощи пищевого красителя или краски. А для цветов, растущих под открытым небом или в горшках, применяются специальные красящие удобрения.
Как поменять цвет цветов при помощи красителя
В живых цветах происходит процесс транспирации: испарения молекул воды из клеток растения. Если в жидкость добавить инородное вещество, то тяжёлые частицы красящего пигмента остаются внутри цветка, тес самым подарив ему новый цвет.
Этот принцип и лежит в основе метода с применением пищевого красителя.
РЕКЛАМА – ПРОДОЛЖЕНИЕ НИЖЕ
Такой метод прекрасно подходит для окрашивания роз, гортензий, орхидей и тюльпанов.
Для того, чтобы изменить цвет цветов, пошагово выполни следующие действия:
- Возьми белый цветок и подрежь его стебель на 1-2 см косым срезом, чтобы растение могло интенсивно впитывать жидкость.
- Добавь в вазу с водой 20-30 капель пищевого красителя, который обычно используется в кондитерском деле. Натуральный краситель позволяет создать насыщенный цвет: чем больше капель будет добавлено в воду, тем насыщеннее получится оттенок.
- Поставь букет в вазу и жди, когда лепестки приобретут новый окрас. Скорость смены цвета зависит от сорта конкретных растений. Кустовые цветы (например, розы) могут окрашиваться в течение нескольких дней, травянистые (тюльпаны и нарциссы) меняют цвет достаточно быстро.
РЕКЛАМА – ПРОДОЛЖЕНИЕ НИЖЕ
Как изменить цвет цветов при помощи флористической краски
Для того, чтобы изменить цвет бутонов краской, необходимо приобрести флористический пигмент, который чаще всего продаётся в аэрозольном виде. Флористы используют аэрозоль для окрашивания букетов, венков, композиций из сухоцветов и для создания тематического декора из растений.
РЕКЛАМА – ПРОДОЛЖЕНИЕ НИЖЕ
- Аэрозоль наносится согласно специальной инструкции на упаковке, такой способ подходит для окрашивания не только срезанных цветов, но и для горшковых.
- Для того, чтобы окрашенные цветы держали цвет как можно дольше, поливай растение пигментированной водой.
- Такой метод наиболее эффективен для создания чёрных и синих букетов из роз.
РЕКЛАМА – ПРОДОЛЖЕНИЕ НИЖЕ
Как изменить цвет цветов в саду
- Изменить окрас цветов, растущих в саду или домашних условиях вполне реально! Самыми удобными цветами для окрашивания считаются гортензии и хризантемы.
- Эти цветы меняют цвет в зависимости от кислотности почвы, из которой произрастают.
- Для того, чтобы розовая или зелёная гортензия выросла голубого цвета, необходимо
- Попробуй применить алюмокалиевые квасцы ( 3-4г/1 литр воды), сульфат железа или алюминия.
- Можно закопать в почве самые обычные ржавые гвозди или удобрять цветы золой каменного угля. Существуют и профессиональные красители, которые используют селекционеры для того, чтобы выращивать цветы с необычными лепестками.
Как изменять цвет цветов: основные правила
- Используй только совсем свежие цветы, поскольку они быстрее реагируют на изменение цвета.
- В тёплой воде быстрее происходит химическая реакция окрашивания, но температура не должна быть слишком высокой, чтобы не навредить растениям.
- Не убирай цветы из вазы с разведённым красителем до тех пор, пока бутоны полностью не изменят цвет.
- Для получения наибольшего эффекта лучше всего использовать светлые цветы: их лепестки более податливы для подобного эксперимента. Тёмные цветы чуть дольше меняют цвет, но окрашивание, тем не менее, возможно.
- Оставь ёмкость с цветами в хорошо освещённом помещении: свет играет огромную роль в химическом процессе внутри растений. Чем светлее в комнате, тем быстрее цветы приобретут нужный окрас.
- Не бойся лишить цветы аромата: красители никак не влияют на запах растений, поэтому даже окрашенный букет будет благоухать ничуть не хуже своих натуральных собратьев.
Понадобилось мне составить букет из разноцветных роз. Как-то так оказалось, что в данный момент окрашенных роз в цветочных магазинах нет. И, как их красить знают только — из балончика. Начитавшись интернета, потому решились на эксперимент…
Итак, Эксперимент: КАК ПОКРАСИТЬ РОЗУ?
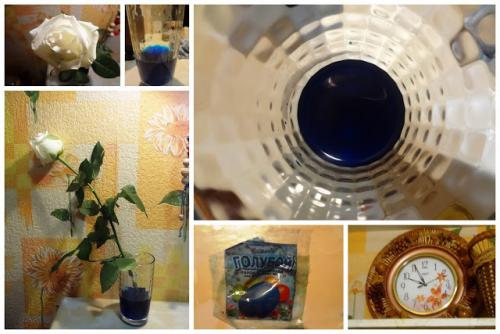
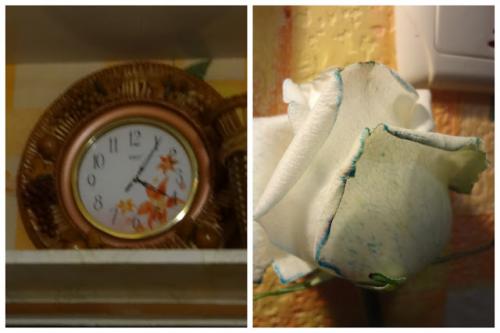
Я воспользовалась следующей 1 Вам потребуются розы светлого оттенка (лучше всего брать белые розы), а также пищевой краситель нужного цвета. Также подготовьте стеклянные емкости для цветов и чистую воду. 2 Растворите в воде пищевой краситель. Добавляйте красителя столько, чтобы только окрасить воду, но не сгустить ее консистенцию. Кончики стеблей роз отрежьте острым ножом или ножницами, стараясь не сдавливать ствол. Срезание стеблей нужно для того, чтобы окраска произошла быстрее. 3 Окрашенную воду залейте в емкость или вазу, а затем поставьте в нее розы. Теперь вам нужно каждый день наблюдать за изменениями цвета лепестков. На следующий день вы заметите первые результаты окраски. 4 Чем сильнее концентрация красителя в воде – тем ярче будет окраска вашей розы. Также вы можете смешивать разные красители, получая новые оригинальные оттенки, а затем собирать букеты из окрашенных и обыкновенных роз, создавая фантазийные сочетания. И, вот, что у меня вышло (фотоотчет согласно инструкции):1. Этап первый: приготовление красящего раствора и розы, день первый — 21.50 01.12.12.
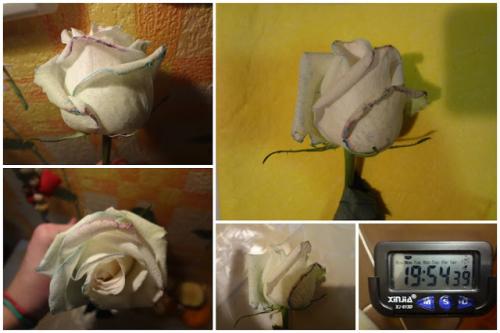
2. День второй — прошло 24 часа. Краешки наружных лепестков чуть-чуть окрасились в синий цвет.
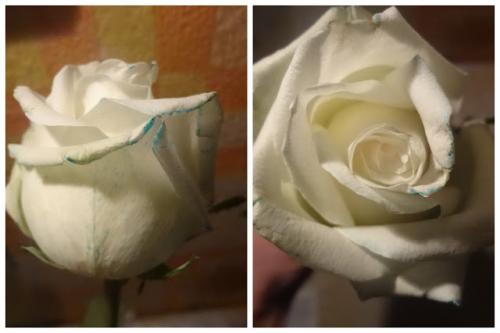
Обрезали снова стебель и поставили обратно, ждем дальше =)
3. На следующий день в 12 часов (это прошло 1.5 дня с начала окраски) края розочки окрасились еще больше
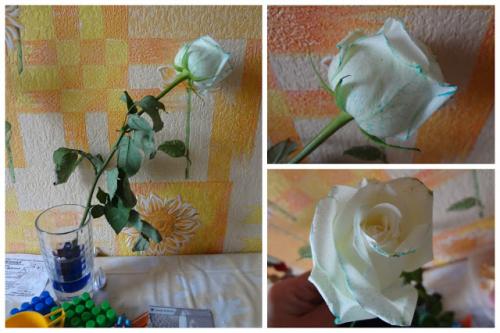
4. Чтобы ускорить процесс (и проверить новый метод): взяли шприц, чернила-1 кубик (фиолетовые, чтобы видеть разницу) и ввели их в цветок. Вытерли капельку- ждем. Кстати, воду, в которой стояла розочка, так оставили синей- снова обновили стебель
5. Через 3 часа на розе были видны уже изменения со второй покраски — После синей окантовки лепестка стал проступать фиолетовый цвет
6. В этот же: третий день с начала и первый с момента второй (фиолетовой, прошло 7 часов) покраски цветок стал выглядеть так: фиолетовая окантовка стала более ярче
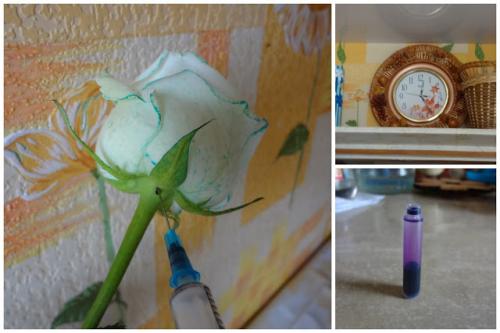
7. Чтобы углубить эксперимент, ввели в цветок черные чернила с другой стороны стебля. Ждем.
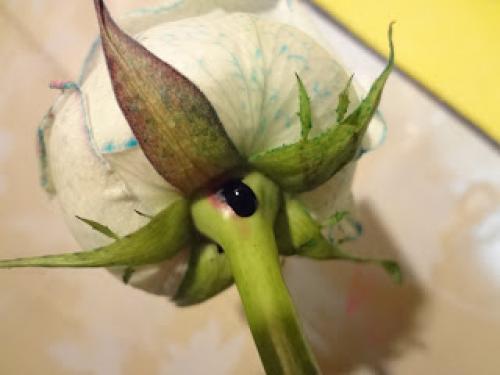
В итоге, проявилась тонкая полоска черного цвета.Дальше, я немного закинула эту идею и роза печально уснула…
Вывод:
В общем, желаемый эффект достигнут- действительно, в результате подкрашивания воды окончания лепестков роз окрашиваются в желаемый цвет. Пищевая краска, у меня, лучше принялась, чем чернила. Но насыщенного и полного окрашивания у меня не вышло — может, потому, что я нетерпеливо отнеслась к процессу. Если вводить красящее вещество под цветок — эффект будет быстрее. Теперь, как только мне будут попадаться цветы — обязательно продолжу цветовые цветочные опыты… =) А пока… запасемся теорией =) Но вышеобозначенный сайт оптимистично гласил, что … 5 Освоив несложную технологию окраски роз, впоследствии вы сможете красить цветы сразу в несколько разных оттенков – например, розу можно покрасить сразу двумя цветами, расщепив стебель вдоль на две части и поместив их в разные вазочки, каждая из которых наполнена водой разного цвета. 6 Кроме того, цвет воды в вазе можно менять ежедневно – это даст необычный эффект на лепестках. 7 Для равномерной и красивой окраски избегайте перепадов температуры в помещении, где находятся цветы, и всегда срезайте стебель, прежде чем помещать цветок в краситель – свежий срез лучше впитывает воду.
Всем удачи! Экспериментов и побольше цветов в Вашей Жизни!
Синие розы, как сделать. Как сделать синюю розу в домашних условиях
Технология окрашивания синих роз в процессе роста известна с древнейших времен. Первый случай окрашивания, известный человечеству, восходит еще к XII веку! Он был описан в книге испанского писателя на арабском языке. Там упомянуты розы цвета лазури, которые окрашивали путём добавления краски в кору корней.
Сегодня “превратить” белые розы в синие можно в домашних условиях. Рассмотрим, как придать обычному цветку экзотический оттенок .
Для создания синей розы вам понадобятся:
Белая или кремовая роза
Емкость (идеально подойдет ваза для цветов)
Синяя краска для цветов (заменить можно пищевым красителем или чернилами)
Этапы создания синей розы
Выберите свежую розу кремового или белого цвета. Желательно, чтобы она не была предварительно пропитана консервантами и водой. Ведь сухая роза намного быстрее впитает краску.
Удалите шипы и листья, чтобы они не окрасились вместе с бутоном. Старайтесь при этом не травмировать стебель.
Налейте в емкость воду комнатной температуры и разведите в ней синюю краску.
Положите розу в емкость с разведенной водой. Периодически подрезайте стебель цветка, так краска будет быстрее впитываться.
Ожидайте 5-6 часов. Уже через два часа вы заметите изменения. Сначала синий цвет начнет проступать пятнышками, а затем распределится по всему бутону.
Если вы хотите получить более глубокий цвет — подождите еще. Рекомендуется держать розу в растворе не более 12 часов.
Советы
Количество краски зависит от того, насколько густой цвет вы хотите получить. Чем больше красителя вы добавите, тем насыщеннее будет оттенок.
Если вы хотите сделать синюю розу быстрее — воспользуйтесь баллончиком с краской. Однако в этом случае цветок не сохранит свой первозданный аромат.
Чем отличается окрашенная роза от купленной в магазине
При изготовлении синей розы в домашних условиях учтите, что такой цветок не простоит долго. Она может получится как синей, так и голубой. Цвет распределится неравномерно. Букет из роз, окрашенных самостоятельно, не стоит кому-либо дарить, эти цветы уже не свежие. К тому же букет может запачкать одежду, что вряд ли обрадует получателя.
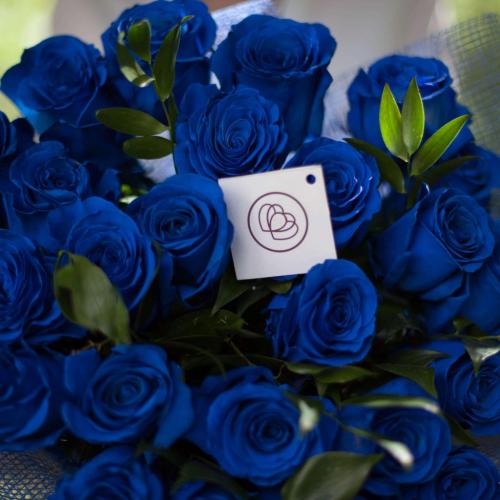
Вот что думают по этому поводу флористы крупного интернет-магазина цветов: “Если вы хотите поэкспериментировать дома, то превратить обычную белую розу в синюю просто. Только бутон окрасится неравномерно и быстро завянет. Этот цветок сильно отличается от продукции из нашего магазина. Синие розы из каталога https://semicvetic.com/internet-magazin/cveti/rozy/sinie_rozy/ изначально выращены с добавлением пигмента. Бутон равномерно окрашен и остается свежим до 10 дней”. Эквадорские розы окрашиваются в процессе роста. Поэтому пигмент не травмирует цветок.
Сделать синюю розу в домашних условиях очень просто. Мы уверены, что процесс окрашивания вам понравится. И вы сможете вживую увидеть, как белый цветок постепенно становится синим. Но этот способ интересен только для домашних поделок. Самодельные синие розы не подойдут для подарка. Если вы хотите подарить синие розы, то выбирайте эквадорские.
Синие розы, как выращивают. Как вырастить синюю розу
Долгие годы садоводы пытались вывести синие розы, в процессе изысканий были получены даже черные необычные цветы. Решение этой проблемы было найдено только в конце двадцатого века.
история вопроса
еще в начале двадцатого века в германии были выведены фиалковые розы, их цвет был далек от насыщенного синего, к тому же цвели они весьма неохотно и редко, так что популярности эти цветы не снискали. после многолетних бесплодных попыток лучших цветоводов вывести синие розы, они превратились в символ несбыточной мечты, став синонимом невозможности.
Цветочный рынок ждал появления синих роз очень долго, поэтому некоторые производители решили справиться с этой проблемой механически и принялись раскрашивать белые розы в синий цвет.
К концу двадцатого века появилась возможность исследовать цветы и растения на генетическом уровне, это позволило установить причину неудач в выведении синих роз. Исследования показали, что абсолютно у всех видов роз отсутствует пигмент дельфинидин, который отвечает за синий цвет.
Работы по выделению синих генов из анютиных глазок начались в 1990 году, целых четырнадцать лет понадобилось исследователям, чтобы правильно внедрить его в гены розы. Первую синюю розу назвали Suntory Blue Rose Applause в честь той японской компании, которая спонсировала исследования и разработку. С 2008 года такие розы поступили в свободную продажу после одобрения комитета по защите окружающей среды.
как самостоятельно окрасить цветок розы в синий цвет?
поскольку выведенные синие розы непросто найти в маленьких цветочных магазинах, да и стоят они довольно дорого, можно воспользоваться простым способом, который многие производители использовали еще в середине двадцатого века. этот способ очень простой, занимает от двенадцати часов до суток.
Вам понадобится белая роза и чернила. С розы желательно предварительно удалить все листья, иначе они тоже посинеют, к тому же замедлят окрашивание бутона. В небольшую банку налейте примерно полстакана чистой воды комнатной температуры, добавьте туда чернила. Перемешайте получившийся раствор, он должен быть примерно на тон темнее желаемого цвета розы. Срежьте стебель по диагонали на сантиметр, чтобы вода лучше впитывалась. Установите розу в подкрашенную воду на двенадцать-пятнадцать часов. Стебель должен быть погружен примерно на три сантиметра. Регулярно проверяйте, как идет процесс окрашивания, поскольку она может впитать слишком много краски. Когда цветок окрасится, поместите его в вазу с обычной водой.