I’m using Qt with Python, and I’ve got a mainwindow with a status bar at the bottom. I can display a message in the bar using a QLabel, and set the color of that message using something like "<font color="green">In progress</font>" for the QLabel text.
I would like to also put a temporary message in the status bar, and assign a color to that message as well. However since it’s not a QLabel this time (I’m using QStatusBar::showMessage which just takes a QString) I can’t change the color anymore. The tags above are not recognized and the entire string "<font color="green">In progress</font>" is shown in gray.
Does anyone have any ideas?
![]()
Jens A. Koch
38.9k13 gold badges110 silver badges137 bronze badges
asked Apr 26, 2011 at 19:06
To set the background or text color for a QStatusBar, change it’s styleSheet before showing the message:
    self.status.setStyleSheet("QStatusBar{padding-left:8px;background:rgba(255,0,0,255);color:black;font-weight:bold;}")
    self.status.showMessage("Error Cannot determine filepath", msecs= 5000)
on init, connect the QStatusBar’s messageChanged(QString) to a statusChanged() function.
    def statusChanged(self, args):
        '''If there are no arguments (the message is being removed)
        change the background back to transparent/ text back to black'''
        if not args:
            self.status.setStyleSheet("QStatusBar{padding-left:8px;background:rgba(0,0,0,0);color:black;font-weight:bold;}")
T
answered Nov 28, 2013 at 21:19
![]()
Unfortunately, QStatusBar::showMessage() doesn’t support rich text formatting. This was even reported as a feature request long time ago, but it seems it didn’t get enough attention.
I think your best bet is to either stick with plain text messages or manipulate your existing QLabel directly. This would require some additional work to handle temporary status changes, so it’s your call to decide if it’s worth the trouble.
![]()
Linville
3,5241 gold badge30 silver badges41 bronze badges
answered Apr 26, 2011 at 19:53
![]()
Karol J. PiczakKarol J. Piczak
5851 gold badge5 silver badges24 bronze badges
2
If your showMessages text will be all of the same color, you can define it in the palette of QStatusBar via QtDesigner(window text color) for temporary messages, and then use the QLabel color for normal and permanent messages of different colors.
answered Jul 23, 2012 at 17:58
![]()
1
The shortest solution I could find for this problem so far:
    ui->statusBar->setStyleSheet("color: red");
    ui->statusBar->showMessage("Your error message", 2000);
    QTimer::singleShot(2000, [this]{ ui->statusBar->setStyleSheet("color: black"); });
It’s not 100% clean though — if another message of this kind is triggered during the 2 seconds of the timer run time, then the color possibly changes back too early. But in practice this will hardly be of any relevance.
answered Feb 8, 2017 at 7:38
![]()
kyboskybos
214 bronze badges
You can also subclass QStatusBar and implemented «colored» status messages, something like (in C++):
class QStatusBarX : public QStatusBar
{
  public:

  QStatusBarX::QStatusBarX(QWidget * parent = 0)
  {
  }

  QStatusBarX::~QStatusBarX(void)
  {
  }

  void showMessageGreen(const QString & message)
  {
    this->setStyleSheet("color: green");
    this->showMessage(message);
  }
};
answered Jan 25, 2017 at 10:00
![]()
SAADSAAD
7491 gold badge9 silver badges23 bronze badges
in Python use
self.statusBar().setStyleSheet("color : pink")
answered Jan 7, 2021 at 1:05
![]()
When it comes to developing graphical user interface (GUI) applications with Python and PyQt, some of the most useful and versatile graphical elements that you’ll ever use are menus, toolbars, and status bars.
Menus and toolbars can make your applications look polished and professional, presenting users with an accessible set of options, while status bars allow you to display relevant information about the application’s status.
In this tutorial, you’ll learn:
- What menus, toolbars, and status bars are
- How to create menus, toolbars, and status bars programmatically
- How to populate Python menu and toolbar using PyQt actions
- How to use status bars to display status information
In addition, you’ll learn some programming best practices that you can apply when creating menus, toolbars, and status bars with Python and PyQt. If you’re new to GUI programming with PyQt, then you can check out Python and PyQt: Building a GUI Desktop Calculator.
You can download the code and resources for the sample application that you’ll build in this tutorial by clicking on the box below:
Building Python Menu Bars, Menus, and Toolbars in PyQt
A menu bar is a region of a GUI application’s main window that holds menus. Menus are pull-down lists of options that provide convenient access to your application’s options. For example, if you were creating a text editor, then you might have some of the following menus in your menu bar:
- A File menu that provides some of the following menu options:
- New for creating a new document
- Open for opening an existing document
- Open Recent for opening recent documents
- Save for saving a document
- Exit for exiting the application
- An Edit menu that provides some of the following menu options:
- Copy for copying some text
- Paste for pasting some text
- Cut for cutting some text
- A Help menu that provides some of the following menu options:
- Help Content for launching to user’s manual and help content
- About for launching an About dialog
You can also add some of these options to a toolbar. A toolbar is a panel of buttons with meaningful icons that provide fast access to the most commonly used options in an application. In your text editor example, you could add options like New, Open, Save, Copy, and Paste to a toolbar.
In this section, you’ll learn the basics of how to add menu bars, menus, and toolbars to your GUI applications with Python and PyQt.
Before going any further, you’ll create a sample PyQt application that you’ll use throughout this tutorial. In each section, you’ll add new features and functionalities to this sample application. The application will be a main window–style application. This means that it’ll have a menu bar, a toolbar, a status bar, and a central widget.
Open your favorite code editor or IDE and create a Python file called sample_app.py. Then add the following code to it:
import sys

from PyQt5.QtCore import Qt
from PyQt5.QtWidgets import QApplication, QLabel, QMainWindow

class Window(QMainWindow):
    """Main Window."""
    def __init__(self, parent=None):
        """Initializer."""
        super().__init__(parent)
        self.setWindowTitle("Python Menus & Toolbars")
        self.resize(400, 200)
        self.centralWidget = QLabel("Hello, World")
        self.centralWidget.setAlignment(Qt.AlignHCenter | Qt.AlignVCenter)
        self.setCentralWidget(self.centralWidget)

if __name__ == "__main__":
    app = QApplication(sys.argv)
    win = Window()
    win.show()
    sys.exit(app.exec_())
Now sample_app.py contains all the code that you need for creating your sample PyQt application. In this case, Window inherits from QMainWindow. So, you’re building a main window–style application.
In the class initializer .__init__(), you first call the parent class’s initializer using super(). Then you set the title of the window using .setWindowTitle() and resize the window using .resize().
The window’s central widget is a QLabel object that you’ll use to show messages in response to certain user actions. These messages will display at the center of the window. To do this, you call .setAlignment() on the QLabel object with a couple of alignment flags.
If you run the application from your command line, then you’ll see the following window on your screen:
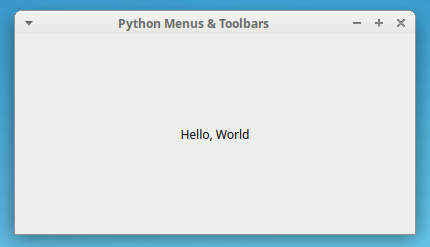
That’s it! You’ve created a main window–style application with Python and PyQt. You’ll use this sample application for all the upcoming examples in this tutorial.
Creating Toolbars
A toolbar is a movable panel that holds buttons and other widgets to provide fast access to the most common options of a GUI application. Toolbar buttons can display icons, text, or both to represent the task that they perform. The base class for toolbars in PyQt is QToolBar. This class will allow you to create custom toolbars for your GUI applications.
When you add a toolbar to a main window–style application, the default position is at the top of the window. However, you can place a toolbar in any one of the following four toolbar areas:
| Toolbar Area | Position in Main Window |
|---|---|
Qt.LeftToolBarArea |
Left side |
Qt.RightToolBarArea |
Right side |
Qt.TopToolBarArea |
Top |
Qt.BottomToolBarArea |
Bottom |
Toolbar areas are defined as constants in PyQt. If you need to use them, then you have to import Qt from PyQt5.QtCore and then use fully qualified names just like in Qt.LeftToolBarArea.
There are three ways to add toolbars to your main window application in PyQt:
-
QMainWindow.addToolBar(title)creates a new and emptyQToolBarobject and sets its window title totitle. This method inserts the toolbar into the top toolbar area and returns the newly created toolbar. -
QMainWindow.addToolBar(toolbar)inserts aQToolBarobject (toolbar) into the top toolbar area. -
QMainWindow.addToolBar(area, toolbar)inserts aQToolBarobject (toolbar) into the specified toolbar area (area). If the main window already has toolbars, thentoolbaris placed after the last existing toolbar. Iftoolbaralready exists in the main window, then it will only be moved toarea.
If you use one of the last two options, then you need to create the toolbar by yourself. To do this, you can use one of the following constructors:
QToolBar(parent)QToolBar(title, parent)
In both cases, parent represents the QWidget object that will hold the ownership of the toolbar. You’ll commonly set the toolbar ownership to the window in which you’re going to use the toolbar. In the second constructor, title will be a string with the toolbar’s window title. PyQt uses this window title to build a default context menu that allows you to hide and show your toolbars.
Now you can go back to your sample application and add the following method to Window:
from PyQt5.QtWidgets import QToolBar
# Snip...

class Window(QMainWindow):
    # Snip...
    def _createToolBars(self):
        # Using a title
        fileToolBar = self.addToolBar("File")
        # Using a QToolBar object
        editToolBar = QToolBar("Edit", self)
        self.addToolBar(editToolBar)
        # Using a QToolBar object and a toolbar area
        helpToolBar = QToolBar("Help", self)
        self.addToolBar(Qt.LeftToolBarArea, helpToolBar)
First, you import QToolBar from PyQt5.QtWidgets. Then, in ._createToolBars(), you first create the File toolbar using .addToolBar() with a title. Next, you create a QToolBar object with the title "Edit" and add it to the toolbar using .addToolBar() without passing a toolbar area. In this case, the Edit toolbar is placed at the top toolbar area. Finally, you create the Help toolbar and place it in the left toolbar area using Qt.LeftToolBarArea.
The final step to make this work is to call ._createToolBars() from the initializer of Window:
class Window(QMainWindow):
    """Main Window."""
    def __init__(self, parent=None):
        # Snip...
        self._createToolBars()
The call to ._createToolBars() inside the initializer of Window will create three toolbars and add them to your main window. Here’s how your application looks now:

Now you have two toolbars right below the menu bar and one toolbar along the left side of the window. Each toolbar has a double dotted line. When you move the mouse over the dotted lines, the pointer changes to a hand. If you click and hold on the dotted line, then you can move the toolbar to any other position or toolbar area on the window.
If you right-click a toolbar, then PyQt will show a context menu that will allow you to hide and show existing toolbars according to your needs.
So far, you have three toolbars on your application’s window. These toolbars are still empty—you’ll need to add some toolbar buttons to make them functional. To do that, you can use PyQt actions, which are instances of QAction. You’ll learn how to create actions in PyQt in a later section. For now, you’ll learn how to use icons and other resources in your PyQt applications.
Using Icons and Resources in PyQt
The Qt library includes the Qt resource system, which is a convenient way of adding binary files such as icons, images, translation files, and other resources to your applications.
To use the resource system, you need to list your resources in a resource collection file, or a .qrc file. A .qrc file is an XML file that contains the location, or path, of each resource in your file system.
Suppose that your sample application has a resources directory containing the icons that you want to use in the application’s GUI. You have icons for options like New, Open, and so on. You can create a .qrc file containing the path to each icon:
<!DOCTYPE RCC><RCC version="1.0">
<qresource>
    <file alias="file-new.svg">resources/file-new.svg</file>
    <file alias="file-open.svg">resources/file-open.svg</file>
    <file alias="file-save.svg">resources/file-save.svg</file>
    <file alias="file-exit.svg">resources/file-exit.svg</file>
    <file alias="edit-copy.svg">resources/edit-copy.svg</file>
    <file alias="edit-cut.svg">resources/edit-cut.svg</file>
    <file alias="edit-paste.svg">resources/edit-paste.svg</file>
    <file alias="help-content.svg">resources/help-content.svg</file>
</qresource>
</RCC>
Each <file> entry must contain the path to a resource in your file system. The specified paths are relative to the directory containing the .qrc file. In the above example, the resources directory needs to be in the same directory as the .qrc file.
alias is an optional attribute that defines a short alternative name that you can use in your code to get access to each resource.
Once you have the resources for your application, you can run the command-line tool pyrcc5 targeting your .qrc file. pyrcc5 is shipped with PyQt and must be fully functional on your Python environment once you have PyQt installed.
pyrcc5 reads a .qrc file and produces a Python module that contains the binary code for all your resources:
$ pyrcc5 -o qrc_resources.py resources.qrc
This command will read resources.qrc and generate qrc_resources.py containing the binary code for each resource. You’ll be able to use those resources in your Python code by importing qrc_resources.
Here’s a fragment of the code in qrc_resources.py that corresponds to your resources.qrc:
# -*- coding: utf-8 -*-

# Resource object code
#
# Created by: The Resource Compiler for PyQt5 (Qt v5.9.5)
#
# WARNING! All changes made in this file will be lost!

from PyQt5 import QtCore

qt_resource_data = b"
x00x00x03xb1
x3c
x73x76x67x20x78x6dx6cx6ex73x3dx22x68x74x74x70x3a
...
With qrc_resources.py in place, you can import it into your application and refer to each resource by typing a colon (:) and then either its alias or its path. For example, to access file-new.svg with its alias, you would use the access string ":file-new.svg". If you didn’t have an alias, you would access it by its path with the access string ":resources/file-new.svg".
If you have aliases, but for some reason you want to access a given resource by its path instead, then you might have to remove the colon from the access string in order to make this work properly.
To use the icons in your actions, you first need to import your resources module:
Once you’ve imported the module that contains your resources, you can use the resources in your application’s GUI.
To create an icon using the resources system, you need to instantiate QIcon, passing the alias or the path to the class constructor:
newIcon = QIcon(":file-new.svg")
In this example, you create a QIcon object with the file file-new.svg, which is in your resources module. This provides a convenient way of using icons and resources throughout your GUI application.
Now go back to your sample application and update the last line of ._createMenuBar():
from PyQt5.QtGui import QIcon

import qrc_resources
# Snip...

class Window(QMainWindow):
    # Snip...
    def _createMenuBar(self):
        menuBar = self.menuBar()
        # Using a QMenu object
        fileMenu = QMenu("&File", self)
        menuBar.addMenu(fileMenu)
        # Using a title
        editMenu = menuBar.addMenu("&Edit")
        # Using an icon and a title
        helpMenu = menuBar.addMenu(QIcon(":help-content.svg"), "&Help")
For this code to work, you first need to import QIcon from PyQt5.QtGui. You also need to import qrc_resources. In the last highlighted line, you add an icon to helpMenu using help-content.svg from your resources module.
If you run your sample application with this update, then you’ll get the following output:
![]()
The application’s main window now shows an icon on its Help menu. When you click the icon, the menu shows the text Help. Using icons in a menu bar isn’t a common practice, but PyQt allows you to do it anyway.
Creating Actions for Python Menus and Toolbars in PyQt
PyQt actions are objects that represent a given command, operation, or action in an application. They’re useful when you need to provide the same functionality for different GUI components such as menu options, toolbar buttons, and keyboard shortcuts.
You can create actions by instantiating QAction. Once you’ve created an action, you need to add it to a widget to be able to use it in practice.
You also need to connect your actions to some functionality. In other words, you need to connect them to the function or method that you want to run when the action is triggered. This will allow your application to perform operations in response to user actions in the GUI.
Actions are quite versatile. They allow you to reuse and keep in sync the same functionality across menu options, toolbar buttons, and keyboard shortcuts. This provides a consistent behavior throughout the application.
For example, users might expect the application to perform the same action when they click the Open… menu option, click the Open toolbar button, or press Ctrl+O on their keyboard.
QAction provides an abstraction that allows you to track the following elements:
- The text on menu options
- The text on toolbar buttons
- The help tip on a toolbar option (tooltip)
- The What’s This help tip
- The help tip on a status bar (status tip)
- The keyboard shortcut associated with options
- The icon associated with menu and toolbar options
- The action’s
enabledordisabledstate - The action’s
onoroffstate
To create actions, you need to instantiate QAction. There are at least three general ways to do that:
QAction(parent)QAction(text, parent)QAction(icon, text, parent)
In all three cases, parent represents the object that holds the ownership of the action. This argument can be any QObject. A best practice is to create actions as children of the window in which you’re going to use them.
In the second and third constructors, text holds the text that the action will display on a menu option or a toolbar button.
The text of an action displays differently on menu options and toolbar buttons. For example, the text &Open... displays as Open… in a menu option and as Open in a toolbar button.
In the third constructor, icon is a QIcon object that holds the action’s icon. This icon will be displayed on the left side of the text in a menu option. The position of the icon in a toolbar button depends on the toolbar’s .toolButtonStyle property, which can take one of the following values:
| Style | Button Display |
|---|---|
Qt.ToolButtonIconOnly |
Only the icon |
Qt.ToolButtonTextOnly |
Only the text |
Qt.ToolButtonTextBesideIcon |
Text beside the icon |
Qt.ToolButtonTextUnderIcon |
Text under the icon |
Qt.ToolButtonFollowStyle |
Follows the general style of the underlying platform |
You can also set the action’s text and icon using their respective setter methods, .setText() and .setIcon().
Here’s how you can create some actions for your sample application using the different constructors of QAction:
from PyQt5.QtWidgets import QAction
# Snip...

class Window(QMainWindow):
    # Snip...
    def _createActions(self):
        # Creating action using the first constructor
        self.newAction = QAction(self)
        self.newAction.setText("&New")
        # Creating actions using the second constructor
        self.openAction = QAction("&Open...", self)
        self.saveAction = QAction("&Save", self)
        self.exitAction = QAction("&Exit", self)
        self.copyAction = QAction("&Copy", self)
        self.pasteAction = QAction("&Paste", self)
        self.cutAction = QAction("C&ut", self)
        self.helpContentAction = QAction("&Help Content", self)
        self.aboutAction = QAction("&About", self)
In ._createActions(), you create a few actions for your sample application. These actions will allow you to add options to the application’s menus and toolbars.
Note that you’re creating actions as instance attributes, so you can access them from outside ._createActions() using self. This way, you’ll be able to use these actions on both your menus and your toolbars.
The next step is to call ._createActions() form the initializer of Window:
class Window(QMainWindow):
    """Main Window."""
    def __init__(self, parent=None):
        # Snip...
        self._createActions()
        self._createMenuBar()
        self._createToolBars()
If you run the application now, then you won’t see any change on the GUI. That’s because actions don’t get displayed until they’re added to a menu or toolbar. Note that you call ._createActions() before you call ._createMenuBar() and ._createToolBars() because you’ll be using these actions on your menus and toolbars.
If you add an action to a menu, then the action becomes a menu option. If you add an action to a toolbar, then the action becomes a toolbar button. That’s the topic for the next few sections.
Adding Options to a Toolbars in PyQt
Toolbars are a quite useful component when it comes to building GUI applications with Python and PyQt. You can use a toolbar to present your users with a quick way to get access to the most commonly used options in your application. You can also add widgets like spin boxes and combo boxes to a toolbar for allowing the user to directly modify some properties and variables from the application’s GUI.
In the following few sections, you’ll learn how to add options or buttons to your toolbars using actions and also how to add widgets to a toolbar with .addWidget().
Populating Toolbars With Actions
To add options or buttons to a toolbar, you need to call .addAction(). In this section, you’ll rely on the variation of .addAction() that QToolBar inherits from QWidget. So, you’ll call .addAction() with an action as an argument. This will allow you to share your actions between menus and toolbars.
When you’re creating toolbars, you’ll commonly face the problem of deciding what options to add to them. Typically, you’ll want to add only the most frequently used actions to your toolbars.
If you return to your sample application, then you’ll remember that you added three toolbars:
- File
- Edit
- Help
In the File toolbar, you can add options like the following:
- New
- Open
- Save
In the Edit toolbar, you can add the following options:
- Copy
- Paste
- Cut
Normally, when you want to add buttons to a toolbar, you first select the icons that you want to use on each button. This isn’t mandatory, but it’s a best practice. Once you’ve selected the icons, you need to add them to their corresponding actions.
Here’s how you can add icons to the actions of your sample application:
class Window(QMainWindow):
    # Snip...
    def _createActions(self):
        # File actions
        self.newAction = QAction(self)
        self.newAction.setText("&New")
        self.newAction.setIcon(QIcon(":file-new.svg"))
        self.openAction = QAction(QIcon(":file-open.svg"), "&Open...", self)
        self.saveAction = QAction(QIcon(":file-save.svg"), "&Save", self)
        self.exitAction = QAction("&Exit", self)
        # Edit actions
        self.copyAction = QAction(QIcon(":edit-copy.svg"), "&Copy", self)
        self.pasteAction = QAction(QIcon(":edit-paste.svg"), "&Paste", self)
        self.cutAction = QAction(QIcon(":edit-cut.svg"), "C&ut", self)
        # Snip...
To add icons to your actions, you update the highlighted lines. In the case of newAction, you use .setIcon(). In the rest of the actions, you use the constructor with an icon, a title, and a parent object as arguments.
Once your selected actions have icons, you can add these actions to their corresponding toolbar by calling .addAction() on the toolbar object:
class Window(QMainWindow):
    # Snip...
    def _createToolBars(self):
        # File toolbar
        fileToolBar = self.addToolBar("File")
        fileToolBar.addAction(self.newAction)
        fileToolBar.addAction(self.openAction)
        fileToolBar.addAction(self.saveAction)
        # Edit toolbar
        editToolBar = QToolBar("Edit", self)
        self.addToolBar(editToolBar)
        editToolBar.addAction(self.copyAction)
        editToolBar.addAction(self.pasteAction)
        editToolBar.addAction(self.cutAction)
With this update to ._createToolBars(), you add buttons for the New, Open, and Save options to the File toolbar. You also add buttons for the Copy, Paste, and Cut options to the Edit toolbar.
If you run your sample application now, then you’ll get the following window on your screen:

The sample application now shows two toolbars with a few buttons each. Your users can click these buttons to get quick access to the application’s most commonly used options.
Note that, since you share the same actions between your menus and toolbars, the menu options will also display the icons on their left side, which is a big win in terms of productivity and resource use. This is one of the advantages of using PyQt actions to create menus and toolbars with Python.
Adding Widgets to a Toolbar
In some situations, you’ll find it useful to add specific widgets like spin boxes, combo boxes, or others to a toolbar. A common example of this is the combo boxes that most word processors use to allow the user to change the font of a document or the size of a selected text.
To add widgets to a toolbar, you first need to create the widget, setup its properties and then call .addWidget() on the toolbar object passing the widget as an argument.
Suppose you want to add a QSpinBox object to the Edit toolbar of your sample application to allow the user to change the size of something, which could be the font size. You need to update ._createToolBars():
from PyQt5.QtWidgets import QSpinBox
# Snip...

class Window(QMainWindow):
    # Snip...
    def _createToolBars(self):
        # Snip...
        # Adding a widget to the Edit toolbar
        self.fontSizeSpinBox = QSpinBox()
        self.fontSizeSpinBox.setFocusPolicy(Qt.NoFocus)
        editToolBar.addWidget(self.fontSizeSpinBox)
Here, you first import the spin box class. Then you create a QSpinBox object, set its focusPolicy to Qt.NoFocus, and finally add it to your Edit toolbar.
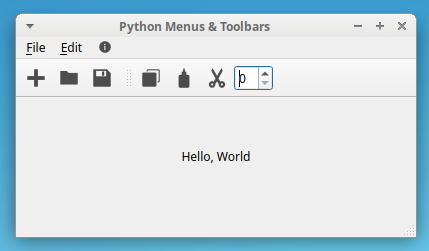
Now, if you run the application, then you’ll get the following output:

Here, the Edit toolbar shows a QSpinBox object that your users can use to set the size of the font or any other numeric property on your application.
Customizing Toolbars
PyQt toolbars are quite flexible and customizable. You can set a bunch of properties on a toolbar object. Some of the most useful properties are shown in the following table:
| Property | Feature Controlled | Default Setting |
|---|---|---|
allowedAreas |
The toolbar areas in which you can place a given toolbar | Qt.AllToolBarAreas |
floatable |
Whether you can drag and drop the toolbar as an independent window | True |
floating |
Whether the toolbar is an independent window | True |
iconSize |
The size of the icons displayed on the toolbar buttons | Determined by the application’s style |
movable |
Whether you can move the toolbar within the toolbar area or between toolbar areas | True |
orientation |
The orientation of the toolbar | Qt.Horizontal |
All these properties have an associated setter method. For example, you can use .setAllowedAreas() to set allowedAreas, .setFloatable() to set floatable, and so on.
Now, suppose you don’t want your users to move the File toolbar around the window. In this case, you can set movable to False using .setMovable():
class Window(QMainWindow):
    # Snip...
    def _createToolBars(self):
        # File toolbar
        fileToolBar = self.addToolBar("File")
        fileToolBar.setMovable(False)
        # Snip...
The highlighted line makes the magic here. Now your users can’t move the toolbar around the application’s window:

The File toolbar doesn’t show the double dotted line anymore, so your users won’t be able to move it. Note that the Edit toolbar is still movable. You can change other properties on your toolbars using this same approach and customize them according to your needs.
Organizing Menu and Toolbar Options
To add clarity and improve the user experience in your GUI applications, you can organize menu options and toolbar buttons using separators. A separator renders as a horizontal line that delimits, or separates, menu options or as a vertical line that separates toolbar buttons.
To insert or add a separator to a menu, submenu, or toolbar object, you can call .addSeparator() on any of these objects.
For example, you can use a separator to separate the Exit option on your File menu from the rest of the options just to make clear that Exit isn’t logically related to the rest of the options on the menu. You can also use a separator to separate the Find and Replace option on your Edit menu from the rest of the options following the same rule.
Go to your sample application and update ._createMenuBar() like in the following code:
class Window(QMainWindow):
    # Snip...
    def _createMenuBar(self):
        # File menu
        # Snip...
        fileMenu.addAction(self.saveAction)
        # Adding a separator
        fileMenu.addSeparator()
        fileMenu.addAction(self.exitAction)
        # Edit menu
        # Snip...
        editMenu.addAction(self.cutAction)
        # Adding a separator
        editMenu.addSeparator()
        # Find and Replace submenu in the Edit menu
        findMenu = editMenu.addMenu("Find and Replace")
        # Snip...
In the first highlighted line, you add a separator between the Save and the Exit options in the File menu. In the second highlighted line, you add a separator that separates the Find and Replace option from the rest of the options in the Edit menu. Here’s how these additions work:

Your File menu now shows a horizontal line that separates the Edit option from the rest of the options in the menu. The Edit menu also shows a separator at the end of the pull-down list of options. The coherent use of separator can subtly improve the clarity of your menus and toolbars, making your GUI applications more user-friendly.
As an exercise, you can go to the definition of ._createToolBars() and add a separator that separates the QSpinBox object from the rest of the options on the toolbar.
Connecting Signals and Slots in Menus and Toolbars
In PyQt, you use signals and slots to provide functionality to your GUI applications. PyQt widgets emit signals every time an event such as a mouse click, a keypress, or a window resizing, occurs on them.
A slot is a Python callable that you can connect to a widget’s signal to perform some actions in response to user events. If a signal and a slot are connected, then the slot will be called automatically every time the signal is emitted. If a given signal isn’t connected to a slot, then nothing will happen when the signal is emitted.
To make your menu options and toolbar buttons launch some operations when the user clicks on them, you need to connect the signals of the underlying actions with some custom or built-in slots.
QAction objects can emit a variety of signals. However, the most commonly used signal in menus and toolbars is .triggered(). This signal is emitted every time the user clicks a menu option or a toolbar button. To connect .triggered() with a slot, you can use the following syntax:
action = QAction("Action Text", parent)
# Connect action's triggered() with a slot
action.triggered.connect(slot)
In this example, slot is a Python callable. In other words, slot can be a function, a method, a class, or an instance of a class that implements .__call__().
You already have a set of actions in your sample application. Now you need to code the slots that you’ll call every time the user clicks a menu option or a toolbar button. Go to the definition of Window and add the following methods:
class Window(QMainWindow):
    # Snip...
    def newFile(self):
        # Logic for creating a new file goes here...
        self.centralWidget.setText("<b>File > New</b> clicked")

    def openFile(self):
        # Logic for opening an existing file goes here...
        self.centralWidget.setText("<b>File > Open...</b> clicked")

    def saveFile(self):
        # Logic for saving a file goes here...
        self.centralWidget.setText("<b>File > Save</b> clicked")

    def copyContent(self):
        # Logic for copying content goes here...
        self.centralWidget.setText("<b>Edit > Copy</b> clicked")

    def pasteContent(self):
        # Logic for pasting content goes here...
        self.centralWidget.setText("<b>Edit > Paste</b> clicked")

    def cutContent(self):
        # Logic for cutting content goes here...
        self.centralWidget.setText("<b>Edit > Cut</b> clicked")

    def helpContent(self):
        # Logic for launching help goes here...
        self.centralWidget.setText("<b>Help > Help Content...</b> clicked")

    def about(self):
        # Logic for showing an about dialog content goes here...
        self.centralWidget.setText("<b>Help > About...</b> clicked")
These methods will play the role of the slots of your sample application. They’ll be called every time the user clicks the corresponding menu option or toolbar button.
Once you have the slots that provide the functionality, you need to connect them with the action’s .triggered() signal. This way, the application will perform actions in response to the user events. To make these connections, go to the sample application and add the following method to Window:
class Window(QMainWindow):
    # Snip...
    def _connectActions(self):
        # Connect File actions
        self.newAction.triggered.connect(self.newFile)
        self.openAction.triggered.connect(self.openFile)
        self.saveAction.triggered.connect(self.saveFile)
        self.exitAction.triggered.connect(self.close)
        # Connect Edit actions
        self.copyAction.triggered.connect(self.copyContent)
        self.pasteAction.triggered.connect(self.pasteContent)
        self.cutAction.triggered.connect(self.cutContent)
        # Connect Help actions
        self.helpContentAction.triggered.connect(self.helpContent)
        self.aboutAction.triggered.connect(self.about)
This method will connect all your actions’ .triggered() signals with their respective slots or callbacks. With this update, your sample application will display a message on the QLabel object that you set as a central widget telling you what menu option or toolbar button was clicked.
In the case of exitAction, you connect its triggered() signal with the built-in slot QMainWindow.close(). This way, if you select File → Exit, then your application will close.
Finally, go to the initializer of Window and add a call to ._connectActions():
class Window(QMainWindow):
    """Main Window."""
    def __init__(self, parent=None):
        # Snip...
        # self._createContextMenu()
        self._connectActions()
With this final update, you can run the application again. Here’s how all these changes work:

If you click a menu option, a toolbar button, or a context menu option, then the label at the center of the application’s window shows a message indicating the action that was executed. This functionality isn’t very useful outside of a learning context, but it gives you an idea of how to make your applications perform real-world actions when the user interacts with the GUI.
Finally, when you select File → Exit, the application closes because the .triggered() signal of exitAction is connected to the built-in slot QMainWindow.close().
As an exercise, you can try to create custom slots for the Find… and Replace… options in the Find and Replace submenu and then connect their .triggered() signals to those slots to make them live. You can also experiment with the slots that you coded in this section and try to do new things with them.
Defining Keyboard Shortcuts for Menu and Toolbar Options
Keyboard shortcuts are an important feature in a GUI application. A keyboard shortcut is a key combination that you can press in your keyboard to quickly access some of the most common options in an application.
Here are some examples of keyboard shortcuts:
- Ctrl+C copies something to the clipboard.
- Ctrl+V pastes something from the clipboard.
- Ctrl+Z undoes the last operation.
- Ctrl+O opens files.
- Ctrl+S saves files.
In the section below, you’ll learn how to add keyboard shortcuts to your application to improve your user’s productivity and experience.
Using Key Sequences
So far, you’ve learned that QAction is a versatile class for populating menus and toolbars. QAction also provides a user-friendly way of defining keyboard shortcuts for your menu options and toolbar buttons.
QAction implements .setShortcut(). This method takes a QKeySequence object as an argument and returns a keyboard shortcut.
QKeySequence provides several constructors. In this tutorial, you’ll learn about two of them:
-
QKeySequence(ks, format)takes a string-based key sequence (ks) and a format (format) as arguments and creates aQKeySequenceobject. -
QKeySequence(key)takes aStandardKeyconstant as an argument and creates aQKeySequenceobject that matches that key sequences on the underlying platform.
The first constructor recognizes the following strings:
"Ctrl""Shift""Alt""Meta"
You can create string-based key sequences by combining these strings with letters, punctuation marks, digits, named keys (Up, Down, Home), and function keys ("Ctrl+S", "Ctrl+5", "Alt+Home", "Alt+F4"). You can pass up to four of these string-based key sequences in a comma-separated list.
The second constructor is handy if you’re developing a multi-platform application and want to stick to the standard keyboard shortcuts for each platform. For example, QKeySequence.Copy will return the platform’s standard keyboard shortcut for copying objects to the clipboard.
With this general background on how to define keyboard shortcuts for actions in PyQt, you can get back to your sample application and add some shortcuts. To do this, you need to update ._createActions():
from PyQt5.QtGui import QKeySequence
# Snip...

class Window(QMainWindow):
    # Snip...
    def _createActions(self):
        # File actions
        # Snip...
        # Using string-based key sequences
        self.newAction.setShortcut("Ctrl+N")
        self.openAction.setShortcut("Ctrl+O")
        self.saveAction.setShortcut("Ctrl+S")
        # Edit actions
        # Snip...
        # Using standard keys
        self.copyAction.setShortcut(QKeySequence.Copy)
        self.pasteAction.setShortcut(QKeySequence.Paste)
        self.cutAction.setShortcut(QKeySequence.Cut)
        # Snip...
You first need to import QKeySequence. Inside ._createActions(), the first three highlighted lines create keyboard shortcuts using a string-based key sequence. This is a quick way of adding keyboard shortcuts to your action. In the second three highlighted lines, you use QKeySequence to supply standard keyboard shortcuts.
If you run the sample application with these additions, then your menus will look like this:

Your menu options now show a keyboard shortcut on their right side. If you press any of these key combinations, then you’ll execute the corresponding action.
Using Keyboard Accelerators
There’s another alternative that you can use to add keyboard shortcuts, or keyboard accelerators, to the menu options of your applications.
You might have noticed that when you set the text for a menu or a menu option, you commonly insert an ampersand symbol (&) in the text. You do this so the letter immediately after the ampersand will be underlined when displayed in the text of the menu or menu option. For example, if you place an ampersand before the letter F in the title of a File menu ("&File"), then the F will be underlined when the menu title is displayed.
In the case of a menu bar, using the ampersand allows you to invoke any menu by pressing Alt in combination with the underlined letter in the menu title.
Once you’ve launched a menu, you can access any menu option by pressing the underlined letter in the text of the option. For example, in File you can access the Exit option by pressing the letter E.
This feature will allow you to provide quick keyboard accelerators for users who prefer to use their keyboard to work with your applications. This technique is especially useful for options that don’t provide an explicit keyboard shortcut.
Creating Menus and Toolbars: Best Practices and Tips
When you’re creating menus and toolbars with Python and PyQt, you should follow some standards that are generally considered best practices in GUI programming. Here’s a quick list:
-
Arrange your menus in the generally accepted order. For example, if you have a File menu, then it should be the first menu from left to right. If you have an Edit menu, then it should be the second. Help should be the rightmost menu, and so on.
-
Populate your menus with common options for the type of application you’re developing. For example, in a text editor, File menus commonly include options like New, Open, Save, and Exit. Edit menus often include options like Copy, Paste, Cut, Undo, and so on.
-
Use standard keyboard shortcuts for common options. For example, use Ctrl+C for Copy, Ctrl+V for Paste, Ctrl+X for Cut, and so on.
-
Use separators to separate unrelated options. These visual cues will make your application easier to navigate.
-
Add ellipses (
...) to the title of options that launch additional dialogs. For example, use Save As… instead of Save As, About… instead of About, and so on. -
Use ampersands (
&) in your menu options to provide convenient keyboard accelerators. For example,"&Openinstead of"Open","&Exit"instead of"Exit".
If you follow these guidelines, then your GUI applications will provide a familiar and inviting experience for your users.
Building Python Status Bars in PyQt
A status bar is a horizontal panel that is usually placed at the bottom of the main window in a GUI application. Its primary purpose is to display information about the current status of the application. The status bar can also be divided into sections to show different information on each section.
According to the Qt documentation, there are three types of status indicators:
-
Temporary indicators take up almost the entire status bar for a short time to display tooltip texts, menu entries, and other time-sensitive information.
-
Normal indicators take up a part of the status bar and display information that users may want to reference periodically, such as word counts in a word processor. These may be briefly hidden by temporary indicators.
-
Permanent indicators are always displayed in the status bar, even when a temporary indicator is activated. They’re used to show important information about the current mode of the application, such as when the Caps Lock key has been pressed.
You can add a status bar to your main window–style application using one of the following options:
-
Call
.statusBar()on yourQMainWindowobject..statusBar()creates and returns an empty status bar for the main window. -
Create a
QStatusBarobject, then call.setStatusBar()on your main window with the status bar object as an argument. That way,.setStatusBar()will set your status bar object as the main window’s status bar.
Here you have two alternative implementations for adding a status bar to your sample application:
# 1. Using .statusBar()
def _createStatusBar(self):
    self.statusbar = self.statusBar()

# 2. Using .setStatusBar()
def _createStatusBar(self):
    self.statusbar = QStatusBar()
    self.setStatusBar(self.statusbar)
Both implementations produce the same result. However, most of the time you’ll use the first implementation for creating your status bars. Note that for the second implementation to work, you need to import QStatusBar from PyQt5.QtWidgets.
Add one of the above implementations to your application’s Window and then call ._createStatusBar() in the class initializer. With these additions, when you run your application again, you’ll see a window like this:
Your application now has a status bar at the bottom of its main window. The status bar is almost invisible, but if you look closely, then you’ll notice a small dotted triangle on the bottom-right corner of the window.
Showing Temporary Status Messages
The main purpose of a status bar is to present status information to the users of your application. To show temporary status messages in a status bar, you need to use QStatusBar.showMessage(). This method takes the following two arguments:
messageholds a status indicator message as a string.timeoutholds the number of milliseconds that the message will be shown on the status bar.
If timeout is 0, which is its default value, then the message remains on the status bar until you call .clearMessage() or .showMessage() on the status bar.
If there’s an active message on your status bar and you call .showMessage() with a new message, then the new message will obscure or replace the old one.
Go to your sample application and add the following line to ._createStatusBar():
class Window(QMainWindow):
    # Snip...
    def _createStatusBar(self):
        self.statusbar = self.statusBar()
        # Adding a temporary message
        self.statusbar.showMessage("Ready", 3000)
The final line in ._createStatusBar() will make your application show a Ready message on the application’s status bar for 3000 milliseconds:

When you run the application, the status bar shows the message Ready. After 3000 milliseconds, the message disappears and the status bar gets cleared and ready to show a new status message.
Showing Permanent Messages in Status Bars
You can also show permanent messages on your application’s status bar. A permanent message keeps the user informed about some general state of the application. For example, in a text editor, you might want to show a permanent message with information about the text encoding of the currently opened file.
To add permanent messages to your status bars, you use a QLabel object to hold the message. Then you add the label to the status bar by calling .addPermanentWidget(). This method permanently adds the given widget to the current status bar. The widget’s parent is set to the status bar.
.addPermanentWidget() takes the following two arguments:
widgetholds the widget object that you want to add to the status bar. Some commonly used widgets on this role areQLabel,QToolButton, andQProgressBar.stretchis used to compute a suitable size for the widget as the status bar grows and shrinks. It defaults to0, which means that the widget is going to take the minimum amount of space.
Keep in mind that a permanent widget won’t be obscured or replaced by temporary messages. .addPermanentWidget() locates widgets at the right side of the status bar.
Say you want to turn your sample application into a text editor, and you want to add a message to the status bar that shows information about the word count of the current file. To do that, you can create a method called .getWordCount() and then add a permanent message using .addPermanentWidget() and a QLabel object:
class Window(QMainWindow):
    # Snip...
    def getWordCount(self):
        # Logic for computing the word count goes here...
        return 42
This method adds the logic for computing the word count in the currently opened document. Now, you can show this information as a permanent message:
class Window(QMainWindow):
    # Snip...
    def _createStatusBar(self):
        self.statusbar = self.statusBar()
        # Adding a temporary message
        self.statusbar.showMessage("Ready", 3000)
        # Adding a permanent message
        self.wcLabel = QLabel(f"{self.getWordCount()} Words")
        self.statusbar.addPermanentWidget(self.wcLabel)
In the last two lines, you first create a QLabel object (wcLabel) to hold the message about the word count. To create the message, you use an f-string, in which you insert a call to .getWordCount() to get the word count information. Then you add the label to the status bar using .addPermanentWidget().
In this case, you create the QLabel object as an instance attribute because the word count needs to be updated according to the changes that the user makes to the current file.
If you run the application with this update, then you’ll see the word count message on the right side of the status bar:

The status bar shows a message that informs the user about the word count in a hypothetical current file. The ability to present the user with permanent information or other options in the status bar is quite useful and can help you to greatly improve the user experience for your applications.
Adding Help Tips to Actions
When it comes to creating GUI applications, it’s important to offer help tips to your users about specific functionalities on the application’s interface. Help tips are short messages that provide a quick guide to the user about some of the options that the application offers.
PyQt actions allow you to define the following kinds of help tips:
-
Status tips are help tips that the application shows on the status bar when the user hovers the mouse pointer over a menu option or a toolbar button. By default, a status tip contains an empty string.
-
Tooltips are help tips that the application shows as floating messages when the user hovers their mouse pointer over a toolbar button or widget. By default, a tooltip contains text that identifies the action at hand.
To learn how help tips work, you can add some status tips and tooltips to your sample application. Go to ._createActions() and add the following lines of code:
class Window(QMainWindow):
    # Snip...
    def _createActions(self):
        # File actions
        # Snip...
        self.saveAction.setShortcut("Ctrl+S")
        # Adding help tips
        newTip = "Create a new file"
        self.newAction.setStatusTip(newTip)
        self.newAction.setToolTip(newTip)
        # Edit actions
        self.copyAction = QAction(QIcon(":edit-copy.svg"), "&Copy", self)
        # Snip...
The three highlighted lines set the message "Create a new file" as the status and tooltip for the New option. If you run the application now, then you’ll see that the New option shows a short but descriptive help tip to the user:

When you click the File menu and hold your mouse pointer on New, you can see the help tip message shown on the left side of the status bar. On the other hand, if you move the mouse pointer over the New toolbar button, then you can see the message on the status bar and also as a small floating box next to the mouse pointer.
In general, adding help tips to your Python menus and toolbars is considered a best practice. It will make your GUI applications easier for users to navigate and learn. As a final exercise, you can continue adding help tips to the rest of the actions of your sample application and see how it looks after you’re done.
Conclusion
Menus, toolbars, and status bars are common and important graphical components of most GUI applications. You can use them to provide your user with a quick way to access the application’s options and functionalities. They also make your applications look polished and professional and provide a great experience to your users.
In this tutorial, you’ve learned how to:
- Programmatically create menus, toolbars, and status bars
- Use PyQt actions to populate your menus and toolbars
- Provide status information by using a status bar
Along the way, you’ve learned some best programming practices that are worth considering when it comes to adding and using menus, toolbars, and status bars in your GUI applications.
You’ve also coded a sample application in which you applied all your knowledge on menus and toolbars. You can get the full source code and other resources for that application by clicking on the box below:
QMainWindow object reserves a horizontal bar at the bottom as the status bar. It is used to display either permanent or contextual status information.
There are three types of status indicators −
Temporary − Briefly occupies most of the status bar. For example, used to explain tool tip texts or menu entries.
Normal − Occupies part of the status bar and may be hidden by temporary messages. For example, used to display the page and line number in a word processor.
Permanent − It is never hidden. Used for important mode indications. For example, some applications put a Caps Lock indicator in the status bar.
Status bar of QMainWindow is retrieved by statusBar() function. setStatusBar() function activates it.
self.statusBar = QStatusBar()
self.setStatusBar(self.statusBar)
Methods of QStatusBar Class
| Sr.No. | Methods & Description |
|---|---|
| 1 |
addWidget() Adds the given widget object in the status bar |
| 2 |
addPermanentWidget() Adds the given widget object in the status bar permanently |
| 3 |
showMessage() Displays a temporary message in the status bar for a specified time interval |
| 4 |
clearMessage() Removes any temporary message being shown |
| 5 |
removeWidget() Removes specified widget from the status bar |
Example
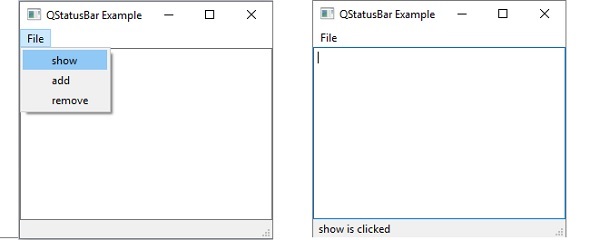
In the following example, a top level QMainWindow has a menu bar and a QTextEdit object as its central widget.
Window’s status bar is activated as explained above.
Menu’s triggered signal is passed to processtrigger() slot function. If ‘show’ action is triggered, it displays a temporary message in the status bar as −
if (q.text() == "show"):
   self.statusBar.showMessage(q.text()+" is clicked",2000)
The message will be erased after 2000 milliseconds (2 sec). If ‘add’ action is triggered, a button widget is added.
if q.text() == "add":
   self.statusBar.addWidget(self.b)
Remove action will remove the button from the status bar.
if q.text() == "remove":
   self.statusBar.removeWidget(self.b)
   self.statusBar.show()
The complete code is as follows −
import sys
from PyQt5.QtCore import *
from PyQt5.QtGui import *
from PyQt5.QtWidgets import *

class statusdemo(QMainWindow):
   def __init__(self, parent = None):
      super(statusdemo, self).__init__(parent)

      bar = self.menuBar()
      file = bar.addMenu("File")
      file.addAction("show")
      file.addAction("add")
      file.addAction("remove")
      file.triggered[QAction].connect(self.processtrigger)
      self.setCentralWidget(QTextEdit())

      self.statusBar = QStatusBar()
      self.b = QPushButton("click here")
      self.setWindowTitle("QStatusBar Example")
      self.setStatusBar(self.statusBar)

   def processtrigger(self,q):

      if (q.text() == "show"):
         self.statusBar.showMessage(q.text()+" is clicked",2000)

      if q.text() == "add":
         self.statusBar.addWidget(self.b)

      if q.text() == "remove":
         self.statusBar.removeWidget(self.b)
         self.statusBar.show()

def main():
   app = QApplication(sys.argv)
   ex = statusdemo()
   ex.show()
   sys.exit(app.exec_())

if __name__ == '__main__':
   main()
The above code produces the following output. Status bar shows caption of selected menu button −
pyqt_basic_widgets.htm