The text-decoration-color CSS property sets the color of decorations added to text by text-decoration-line.
The color applies to decorations, such as underlines, overlines, strikethroughs, and wavy lines like those used to mark misspellings, in the scope of the property’s value.
Try it
CSS does not provide a direct mechanism for specifying a unique color for each line type. This effect can nevertheless be achieved by nesting elements, applying a different line type to each element (with the text-decoration-line property), and specifying the line color (with text-decoration-color) on a per-element basis.
Syntax
/* <color> values */
text-decoration-color: currentcolor;
text-decoration-color: red;
text-decoration-color: #00ff00;
text-decoration-color: rgba(255, 128, 128, 0.5);
text-decoration-color: transparent;

/* Global values */
text-decoration-color: inherit;
text-decoration-color: initial;
text-decoration-color: revert;
text-decoration-color: revert-layer;
text-decoration-color: unset;
Values
<color>-
The color of the line decoration.
Accessibility concerns
It is important to ensure that the contrast ratio between the color of the text, the background the text is placed over, and the text decoration line is high enough that people experiencing low vision conditions will be able to read the content of the page. Color contrast ratio is determined by comparing the luminosity of the text and background color values.
Color alone should not be used to convey meaning. For example, change of text and text-decoration-color alone is not enough to indicate a link has focus.
- WebAIM: Color Contrast Checker
- MDN Understanding WCAG, Guideline 1.4 explanations
- Understanding Success Criterion 1.4.3 | W3C Understanding WCAG 2.0
Formal definition
| Initial value | currentcolor |
|---|---|
| Applies to | all elements. It also applies to ::first-letter and ::first-line. |
| Inherited | no |
| Computed value | computed color |
| Animation type | a color |
Formal syntax
text-decoration-color =
  <color>
Examples
Basic example
<p>
  This paragraph has <s>some erroneous text</s> inside it that I want to call
  attention to.
</p>
p {
  text-decoration-line: underline;
  text-decoration-color: cyan;
}

s {
  text-decoration-line: line-through;
  text-decoration-color: red;
  text-decoration-style: wavy;
}
Specifications
| Specification |
|---|
| CSS Text Decoration Module Level 3 # text-decoration-color-property |
Browser compatibility
BCD tables only load in the browser
See also
- When setting multiple line-decoration properties at once, it may be more convenient to use the
text-decorationshorthand property instead. - The
<color>data type - Other color-related properties:
background-color,border-color,outline-color,text-decoration-color,text-emphasis-color,text-shadow,caret-color, andcolumn-rule-color - Applying color to HTML elements using CSS
В HTML есть несколько тегов, которые помогают обратить внимание на текст — подчеркнуть, выделить его или акцентировать на чём-то внимание. У таких тегов есть стили по умолчанию, и к некоторым из них мы давно привыкли.
Например, мы знаем, что обычно все ссылки на сайте подчёркнуты, текст внутри тега <del>никому не нужен перечёркнут, а всё, что находится внутри тега <mark>, выделено жёлтым цветом.
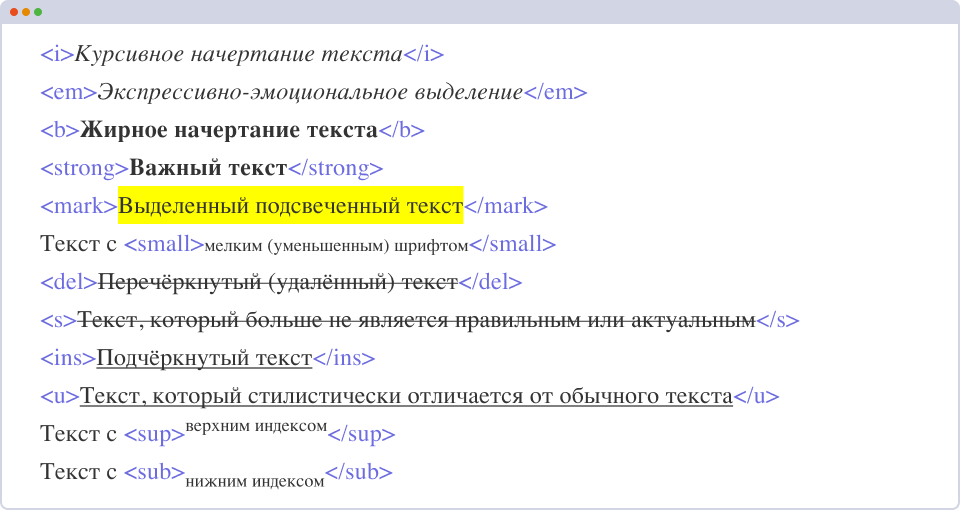
Но с помощью text-decoration текст можно даже подчеркнуть сверху (что? да!). Давайте разберёмся, как это сделать.
Свойство text-decoration
Значения text-decoration:
line-through— зачёркивание посередине текста;overline— надчёркивание, над текстом;underline— подчёркивание, под текстом;none— не используется декор;inherit— наследуется.
Например, свойство для подчёркнутого текста записывается просто как
.underline-text {
    text-decoration: underline;
}
text-decoration — это сокращённая форма записи для набора CSS-свойств text-decoration-line, text-decoration-color, text-decoration-style и text-decoration-thickness. Перечисленные свойства используются для более тонкой настройки параметров подчёркивания.
text-decoration-line
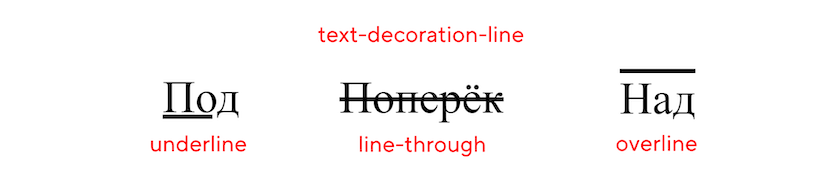
text-decoration-line — отвечает за тип линии: подчёркнуто, перечёркнуто, без подчёркивания, подчёркивание над текстом, а не под ним.
text-decoration-line: underline; /* обычное подчёркивание */text-decoration-line: line-through; /* текст перечёркнут */text-decoration-line: overline; /* подчёркивание над текстом */text-decoration-line может принимать сразу несколько значений, например, text-decoration-line: underline line-through;. В этом случае у текста будет подчёркивание и зачёркивание.
text-decoration-color
text-decoration-color управляет цветом подчёркивания. По умолчанию он, то есть цвет подчёркивания, совпадает с цветом текста.
<style>
    .red-line {
        text-decoration: underline dotted red;
    }
</style>

<p class="red-line">Красная пунктирная линия</p>
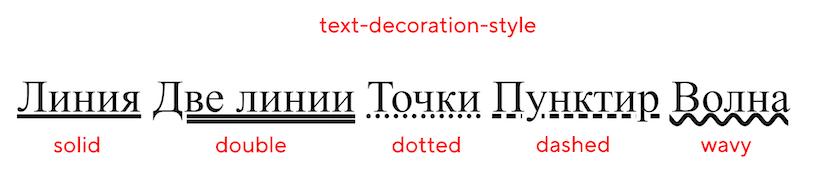
text-decoration-style
Стиль линии (сплошная, волнистая, точками, тире и другие) настраивается через CSS-свойство text-decoration-style.
solid— обычная сплошная линия;double— двойная линия;dotted— пунктирная линия (пунктир из точек);dashed— тоже пунктирная линия, но пунктир из коротких линий;wavy— волнистая линия.
text-decoration-thickness
text-decoration-thickness задаёт толщину линии.
text-decoration-thickness: 5px;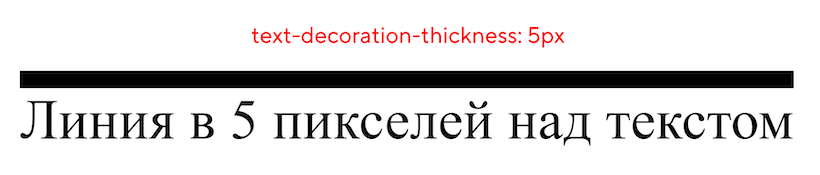

text-underline-offset
До недавнего времени внешним видом подчёркивания управляли только эти четыре CSS-свойства (text-decoration-line, text-decoration-color, text-decoration-style и text-decoration-thickness). Но были ситуации, когда перечисленных свойств было недостаточно. К примеру, нужно реализовать выделение активного пункта меню на сайте:
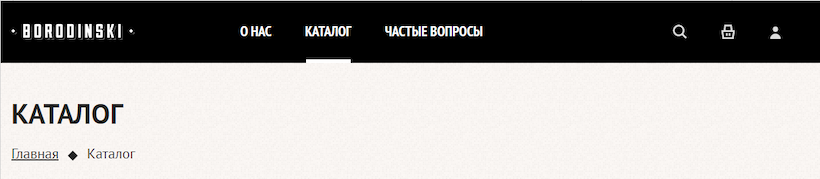
Если использовать только text-decoration, нужное подчёркивание не реализовать. Его, конечно, можно добавить за счёт нижней границы, стилизации через псевдоэлементы или другими странными методами.
Но всё упростилось с появлением text-underline-offset. Свойство устанавливает смещение подчёркивания от его исходного положения и используется в связке со свойством text-decoration.
<li class="site-navigation-item">
  <a class="site-navigation-link active">Каталог</a>
</li>
.active {
color: #ffffff;
text-decoration: underline;
text-decoration-color: #ffffff;
/* Тут определяем параметры для подчёркивания */
}У свойства text-underline-offset хорошая браузерная поддержка, оно работает в большинстве современных браузеров, кроме Firefox под Android.
Как узнать параметры нестандартного подчёркивания
Все параметры для подчёркивания будем доставать из макета в Figma.
Нам нужны два параметра — расстояние от текста до линии и толщина линии. Цвет подчёркивания обычно совпадает с цветом текста, поэтому специально искать этот параметр обычно не нужно.
Расстояние от текста до линии
Чтобы измерить расстояние между объектами, достаточно выбрать первый объект, нажать Alt/Option и навести на второй. Выделяем текстовый слой и с зажатой клавишей Alt/Option наводим курсор мыши на линию подчёркивания. В тултипе оранжевого цвета выводится количество пикселей между текстом и объектом, на который навели. В нашем случае — это значение 20.
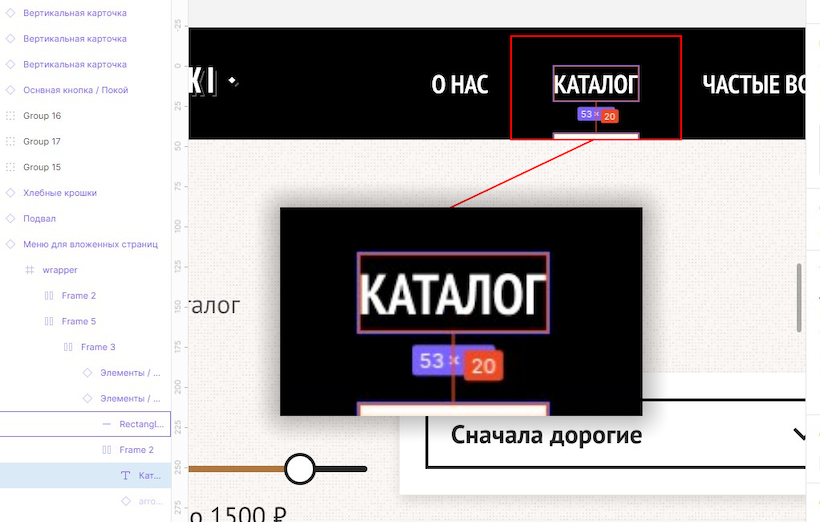
Запишем это значение в CSS-свойство text-underline-offset:
.active
  color: #ffffff;
  text-decoration: underline;
  /* Смещаем подчёркивание на 20 пикселей вниз */
  text-underline-offset: 20px;
}
Толщина линии подчеркивания
Выделим объект с подчёркиванием. После этого на панели справа, на вкладке Inspect найдём свойства объекта. Нас интересует свойство Height (высота).

Свойство отображается и в разделе Properties, и в разделе Code. В примере толщина подчёркивания — 4 пикселя. Напомним, в CSS толщиной подчёркивания управляет свойство text-decoration-thickness. Допишем в правило определение толщины подчёркивания:
.active {
  color: #ffffff;
  text-decoration: underline;
  text-underline-offset: 20px;
  /* Толщина подчёркивания — 4 пикселя */
  text-decoration-thickness: 4px;
}
А теперь давайте сравним с помощью расширения Perfect Pixel макет и полученную вёрстку.
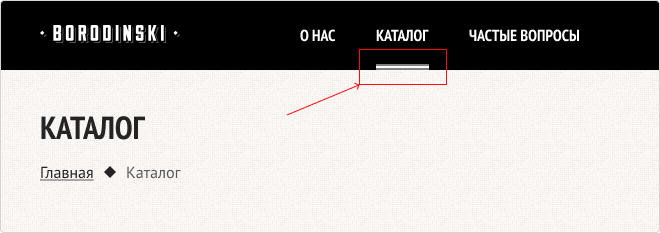
Это произошло из-за того, что по умолчанию отступ отсчитывается от базовой линии текста, а Фигма показывает расстояние от нижней границы текстового блока.
💡 Базовая линия — эта линия на которой буквы «стоят». Она проходит по самому нижнему краю букв c плоской нижней частью.

Способов решить задачу (имеется в виду попасть в макет) несколько.
1) Обновить границы слоя, чтобы они соответствовали базовой линии. Этот способ измерения предлагает сама Фигма в документации. В Фигме есть возможность текстовому блоку задать Fixed Size.
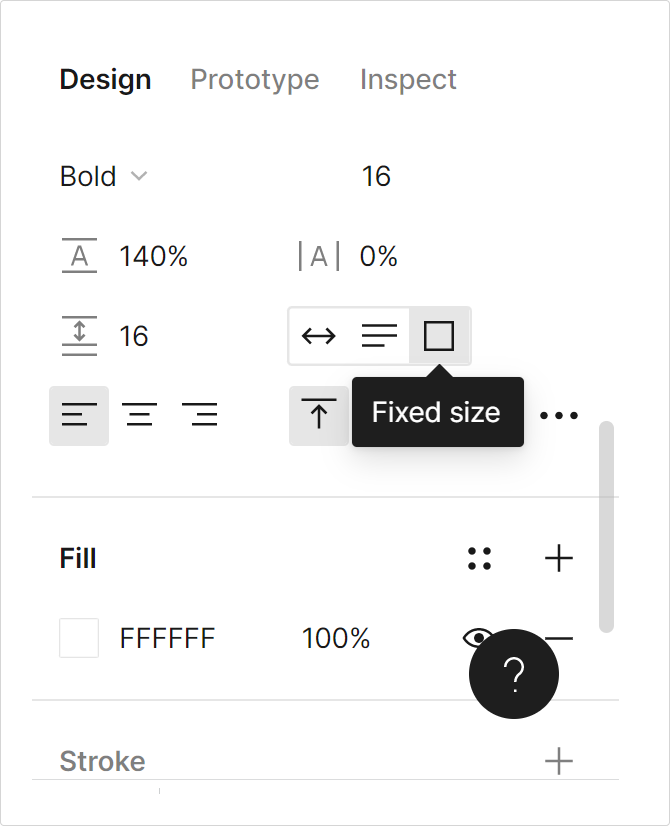
Но у этого способа есть минус. Если изменится размер шрифта, либо поменяется содержимое текстового блока, ломается раскладка макета. Это разрушительный для макета способ. Придётся высоту блоку заново устанавливать. Куда удобнее оставить автоматическую высоту для него.
2) Использовать новое CSS-свойство text-underline-position со значением under. В этом случае базовая «нулевая» позиция будет установлена не по базовой линии, а по нижней границе блока,
и text-underline-offset будет отсчитываться от того же базового положения, что и в редакторе Figma.
.active {
  color: #ffffff;
  text-decoration: underline;
  text-underline-offset: 20px;
  text-decoration-thickness: 4px;

  /* «Нулевая» позиция установлена по нижней границе блока */
  text-underline-position: under;
}
💡 Поддержка свойства text-underline-position
На этом всё — пробуйте, экспериментируйте и изучайте вёрстку, а мы вам в этом поможем.
Возможно ли сделать подчеркивание текста в css цветом отличным от цвета текста?
Чтобы получилось вот так: 
-
Вопрос заданболее трёх лет назад
-
5970 просмотров
Если нужно соответствие макету (непрерывная линия) — использовать border-bottom.
Если нужно просто подчеркивание текста — использовать text-decoration: underline.
Но в последнем случае иметь в виду что некоторые браузеры используют text-decoration-skip: ink по умолчанию — линия будет прерываться для элементов выходящих за базовую линию. (Например под буквами «p» на верхней строке).
Пригласить эксперта
Здесь скорей всего используется < hr > со стилями, а так вот
p {
text-decoration: underline;
text-decoration-color: red;
}
text-decoration: underline;
text-decoration-color: aquamarine;
-
Показать ещё
Загружается…
10 февр. 2023, в 23:29
5000 руб./за проект
10 февр. 2023, в 23:26
6000 руб./за проект
10 февр. 2023, в 23:18
10000 руб./за проект
Минуточку внимания
text-decoration-color
Свойство CSS text-decoration-color устанавливает цвет украшений, добавляемых к тексту с помощью text-decoration-line .
Цвет применяется к украшениям,таким как подчеркивания,надчеркивания,зачеркивания и волнистые линии,например,используемые для обозначения опечаток,в объеме стоимости имущества.
Try it
CSS не предоставляет прямого механизма для указания уникального цвета для каждого типа линии. Тем не менее, этот эффект может быть достигнут путем вложения элементов, применения разных типов линий к каждому элементу (с помощью свойства text-decoration-line ) и указания цвета строки (с text-decoration-color ) для каждого элемента.
Syntax
text-decoration-color: currentcolor;
text-decoration-color: red;
text-decoration-color: #00ff00;
text-decoration-color: rgba(255, 128, 128, 0.5);
text-decoration-color: transparent;


text-decoration-color: inherit;
text-decoration-color: initial;
text-decoration-color: revert;
text-decoration-color: revert-layer;
text-decoration-color: unset;
Values
Accessibility concerns
Formal definition
Formal syntax
text-decoration-color = <color>
Examples
Basic example
<p>This paragraph has <s>some erroneous text</s>
    inside it that I want to call attention to.</p>
p {
  text-decoration-line: underline;
  text-decoration-color: cyan;
}

s {
  text-decoration-line: line-through;
  text-decoration-color: red;
  text-decoration-style: wavy;
}
Specifications
Browser compatibility
| Desktop | Mobile | |||||||||||
|---|---|---|---|---|---|---|---|---|---|---|---|---|
| Chrome | Edge | Firefox | Internet Explorer | Opera | Safari | WebView Android | Chrome Android | Firefox для Android | Opera Android | Safari на IOS | Samsung Internet | |
text-decoration-color |
57 |
79 |
36 6-39 |
No |
44 |
12.1 8 |
57 |
57 |
36 6-39 |
43 |
12.2 8 |
7.0 |
See also
- При одновременной установке нескольких свойств декорирования линий может быть удобнее использовать вместо этого свойство сокращения
text-decoration. -
<color>тип данных - Другие цветов , связанные свойства:
background-color,border-color,outline-color,text-decoration-color,text-emphasis-color,text-shadow,caret-color, иcolumn-rule-color - Применение цвета к элементам HTML с помощью CSS
CSS
-
text-combine-upright
Свойство text-combine-upright CSS устанавливает комбинацию символов в единое пространство Это используется для получения эффекта,известного как tate-chū-yoko (縦中横).
-
text-decoration
Свойство text-decoration сокращенного CSS задает внешний вид декоративных линий Текстовые украшения рисуются через элементы-потомки.
-
text-decoration-line
CSS-свойство text-decoration-line устанавливает вид,который используется элементом,например,подчеркивание-overline.
-
text-decoration-skip
Экспериментальный:Эта технологияПеред использованием продукции внимательно проверьте таблицу совместимости браузеров.
Устанавливает цвет линии, которая добавляется через свойство text-decoration.
Краткая информация
| Значение по умолчанию | Совпадает с цветом текста |
|---|---|
| Наследуется | Нет |
| Применяется | Ко всем элементам |
| Анимируется | Да |
Синтаксис
text-decoration-color: <цвет>Синтаксис
| Описание | Пример | |
|---|---|---|
| <тип> | Указывает тип значения. | <размер> |
| A && B | Значения должны выводиться в указанном порядке. | <размер> && <цвет> |
| A | B | Указывает, что надо выбрать только одно значение из предложенных (A или B). | normal | small-caps |
| A || B | Каждое значение может использоваться самостоятельно или совместно с другими в произвольном порядке. | width || count |
| [ ] | Группирует значения. | [ crop || cross ] |
| * | Повторять ноль или больше раз. | [,<время>]* |
| + | Повторять один или больше раз. | <число>+ |
| ? | Указанный тип, слово или группа не является обязательным. | inset? |
| {A, B} | Повторять не менее A, но не более B раз. | <радиус>{1,4} |
| # | Повторять один или больше раз через запятую. | <время># |
Значения
См. цвет.
Песочница
Винни-Пух был всегда не прочь немного подкрепиться, в особенности часов в одиннадцать утра, потому что в это время завтрак уже давно окончился, а обед ещё и не думал начинаться. И, конечно, он страшно обрадовался, увидев, что Кролик достаёт чашки и тарелки.
div {
  padding: 10px;
  text-decoration: underline;
  text-decoration-color: {{ playgroundValue }};
}
Пример
<!DOCTYPE html>
<html>
<head>
<meta charset=»utf-8″>
<title>text-decoration-color</title>
<style>
a {
text-decoration-color: red;
}
</style>
</head>
<body>
<a href=»page/1.html»>Ссылка с подчёркиванием</a>
</body>
</html>
В данном примере ссылки подчёркиваются красной линией.
Объектная модель
Объект.style.textDecorationColor
Примечание
Firefox до версии 36 поддерживает свойство -moz-text-decoration-color.
Safari поддерживает свойство -webkit-text-decoration-color.
Спецификация
| Спецификация | Статус |
|---|---|
| CSS Text Decoration Module Level 3 | Возможная рекомендация |
Спецификация
Каждая спецификация проходит несколько стадий одобрения.
- Recommendation (Рекомендация) — спецификация одобрена W3C и рекомендована как стандарт.
- Candidate Recommendation (Возможная рекомендация) — группа, отвечающая за стандарт, удовлетворена, как он соответствует своим целям, но требуется помощь сообщества разработчиков по реализации стандарта.
- Proposed Recommendation (Предлагаемая рекомендация) — на этом этапе документ представлен на рассмотрение Консультативного совета W3C для окончательного утверждения.
- Working Draft (Рабочий проект) — более зрелая версия черновика после обсуждения и внесения поправок для рассмотрения сообществом.
- Editor’s draft (Редакторский черновик) — черновая версия стандарта после внесения правок редакторами проекта.
- Draft (Черновик спецификации) — первая черновая версия стандарта.
Браузеры
| 79 | 57 | 44 | 8 | 6 | 36 |
| 80 | 6 | 36 | 46 | 8 |
Браузеры
В таблице браузеров применяются следующие обозначения.
- — элемент полностью поддерживается браузером;
- — элемент браузером не воспринимается и игнорируется;
- — при работе возможно появление различных ошибок, либо элемент поддерживается с оговорками.
Число указывает версию браузреа, начиная с которой элемент поддерживается.
См. также
Рецепты
![]()
Хочешь знать больше про веб?
Подпишись на наш телеграм-канал TechRocks WEB-разработка?
Подписаться
×
Перевод статьи «CSS Underline: 20+ Examples».
При создании ссылок или анимаций для кнопок меню у вас может возникнуть необходимость использовать подчеркивание. Из этой статьи вы узнаете о нескольких способах создать эффект подчеркивания с использованием CSS-свойств text-decoration, border-bottom, background-image, box-shadow, а также при помощи SVG.
CSS-свойство text-decoration
Свойство text-decoration — самый простой способ подчеркнуть текст. Но этому способу не хватает настраиваемости, и это проблема. Более продвинутые в этом смысле способы подчеркивания мы рассмотрим чуть дальше по тексту.
Давайте посмотрим, как при помощи text-decoration можно сделать простое подчеркивание.
Свойство text-decoration — это сокращенный вариант записи трех других свойств:
text-decoration-line(указывается обязательно): определяет, где должна проходить линия подчеркивания. Возможные значения — overline (над текстом), underline (под текстом), underline overline (и над текстом, и под ним), line-through (перечеркивание текста).text-decoration-style: определяет стиль линии. Возможные значения — solid (простая прямая линия), dotted (линия из точек), dashed (пунктирная линия), wavy (волнистая линия), double (двойная линия).text-decoration-color: определяет цвет линии. Указываться может по-разному, например, #ccc, blue, currentColor.
Вот несколько примеров:

Чтобы убрать подчеркивание, нужно просто указать text-decoration: none.
Если вы хотите добавить подчеркивание, которое будет появляться только при наведении курсора, используйте следующие CSS-правила:
a { text-decoration: none; }
a:hover { text-decoration: underline; }
Альтернативой свойству text-decoration может послужить свойство border-bottom. С его помощью вы также можете задать внутренний отступ (padding) и отодвинуть линию подчеркивания от текста. В следующем примере первая ссылка создана при помощи свойства text-decoration, а вторая — при помощи border-bottom:

a:nth-of-type(1) {
  color: #32557f;
  text-decoration: underline #32557f dashed;
}

a:nth-of-type(2) {
  color: #32557f;
  text-decoration: none;
  border-bottom: 2px dashed #32557f;
  padding-bottom: 3px;
}
А теперь давайте перейдем к более интересным способам подчеркнуть текст.
Градиентное подчеркивание
При помощи свойства background: linear-gradient и других свойств фона можно создать градиентное подчеркивание. Вот пример:

background: linear-gradient(to left, #f69ec4, #f9dd94 100%);
background-position: 0 100%;
background-size: 100% 2px;
background-repeat: repeat-x;
Почитать больше о градиентах можно в статье «CSS Gradients: 8 Examples of Usage».
Короткое подчеркивание
CSS позволяет делать подчеркивание любой ширины и высоты. Оно может быть и короче слова или ссылки. Например, если вам нужно создать короткое подчеркивание, чтобы выделить начало предложения или заголовок, можно использовать псевдоэлемент ::after со свойством border-bottom.

<p>Sharks are a <a href="#">group of elasmobranch fish</a> characterized by a cartilaginous skeleton, five to seven gill slits on the sides of the head, and pectoral fins that are not fused to the head.</p>
a::after {
  content: "";
  display: block;
  width: 32px;
  padding-top: 3px;
  border-bottom: 2px solid #f9dd94;
}
Вы также можете установить толщину линии, например 2 px (в примере — border-bottom: 2px solid #f9dd94;).
Подчеркивание «маркером»
При помощи свойства transform можно сделать короткое подчеркивание скошенной линией.

h1 {
  padding: 30px 0 8px;
  position: relative;
}

h1::before {
  content: "";
  position: absolute;
  left: 7%;
  bottom: 16px;
  width: 150px;
  height: 14px;
  transform: skew(-12deg) translateX(-50%);
  background: rgba(238,111,87,0.5);
  z-index: -1;
}
Также можно сделать подчеркивание «маркером» длинного куска текста. Пример, на который меня вдохновил Codepen.io/Ash:

Общие правила:
body {
  padding: 4rem;
}

.box {
  padding: 2rem;
  max-width: 14rem;
  background-color: #f2f2f2;
  border-radius: 4px;
  max-width: 50rem;
}
Правила, касающиеся этого подчеркивания:
:root {
  /* The intrinsic width of the underline stroke (in pixels). This is
   * the same as the height of the cap images. Don't specify the
   * units! This is because of some of the calculations we do later on. */
  --underline-intrinsic-width: 8;

  /* The actual width of the underline stroke we want to render (in pixels).
   * You can modify this, and the sizing and positioning should be calculated
   * accordingly. Again, Don't specify the units! */
  --underline-width: 12;

  /* The color used to draw the underline. It should match the color
   * used in the cap images... unfortunately we can't modify the SVG
   * fill via CSS because it's a background image. */
  --underline-color: #f1a1e3;

  /* We need to know the width of the cap images so that we
   * can position everything on the x axis accordingly. */
  --underline-cap-width: 4px;

  /* The border is positioned relative to the bottom of the line.
   * We can move it upwards a little to create an overlap effect. */
  --underline-offset-y: -2px;

  /* The padding to add to the x axis. By default, the caps would be
   * aligned with the beginning and end of the line. */
  --underline-padding-x: 0.12em;
}

.text {
  display: inline;
  --underline-width-scale: calc(var(--underline-width) / var(--underline-intrinsic-width));
  padding: 0 calc(var(--underline-padding-x) + calc(var(--underline-cap-width) * var(--underline-width-scale)));
  box-decoration-break: clone;
  background-repeat: no-repeat;
  color: #32557f;
  background-image:
    linear-gradient(180deg, var(--underline-color), var(--underline-color)),
    var(--cap-image-left),
    var(--cap-image-right);
  background-position-x:
    calc(var(--underline-cap-width) * var(--underline-width-scale)),
    0,
    100%;
  background-position-y: calc(100% - var(--underline-offset-y) * -1);
  background-size:
    calc(100% - calc(var(--underline-cap-width) * var(--underline-width-scale) * 2)) calc(var(--underline-width) * 1px),
    auto calc(var(--underline-width) * 1px),
	auto calc(var(--underline-width) * 1px);

  font-size: 3rem;
  font-weight: bold;
  --underline-width: 20;
  --underline-offset-y: -2px;
  /* The cap images to use that form the left and right shape.*/
  --cap-image-left: url(https://files-6lc03kjqt.now.sh/left-2.svg);
  --cap-image-right: url(https://files-e7gkh52mq.now.sh/right-2.svg);
}
Подчеркивание заголовка
Чтобы подчеркнуть заголовок, можно использовать свойство text-decoration: underline;, но при помощи свойства border-bottom можно сделать красивее. Правда, в последнем случае вам нужно добавить display: inline;, чтобы подчеркивание не было длиннее самого слова.

h1 {
  display: inline;
  border-bottom: 3px solid #f9dd94;
}
Многострочное подчеркивание
Допустим, мы хотим создать подчеркивание нескольких строк текста. Для этого подойдут не все способы.
В приведенных ниже примерах использовано свойство background-image, поскольку оно позволяет захватить несколько строк. И хотя вы можете использовать настоящие изображения, в нашем случае это просто линия. Мы используем линейный градиент, чтобы генерировать изображение.

<p><span>Sharks are a group of elasmobranch fish characterized by a cartilaginous skeleton, five to seven gill slits on the sides of the head, and pectoral fins that are not fused to the head.</span></p>
p {
  margin: 0 auto;
  line-height: 1.5em;
}

span {
  background-image: linear-gradient(to right, #f9dd94 0%, #f9dd94 100%);
  background-repeat: repeat-x;
  background-position: 0 100%;
  background-size: 100% 3px;
}
background-repeat: repeat-x; делает подчеркивание горизонтальным.
Если изменять второе значение в background-position: 0 100%;, можно регулировать, насколько далеко от верха должно быть подчеркивание.
Также можно менять второе значение в background-size: 100% 3px;, чтобы подобрать нужную высоту подчеркивания.
Кроме того, можно сделать так, чтобы многострочное подчеркивание показывалось только при наведении курсора.

Вот разметка:
<p>Sharks are a group of elasmobranch fish characterized by a <a href="#">cartilaginous skeleton, five to seven gill slits on the sides of the head, and pectoral fins that are not fused to the head.</a></p>
- Для начала нужно удалить дефолтное значение
text-decoration. - Использование
background-imageпозволяет охватить несколько строк. Поскольку мы хотим, чтобы подчеркивание было того же цвета, что и ссылка, мы используем currentColor и для начала, и для конца градиента. currentColor велит браузеру использовать цвет элемента из основного свойства цвета. - При помощи
background-positionмы задаем позицию изображения в нижнем левом углу. В нашем примере 0% означает горизонтальное позиционирование, а 100% — вертикальное. Также мы отключаемbackground-repeat, чтобы предотвратить создание нескольких экземпляров изображения. Эти два свойства можно записывать при помощи короткого формата записи (background: no-repeat 0 100%;). - При помощи
background-sizeмы указываем нулевую ширину и высоту в 2 px. Нулевая ширина означает, что подчеркивание будет видимым только при наведении. - Устанавливаем для свойства
transitionзначение background-size и скорость изменения 0,3 секунды. - При наведении курсора на ссылку мы меняем ширину изображения на 100%. Таким образом текст становится полностью подчеркнутым, а кроме того создается анимация.
Вот полный код:
p a {
  color: #32557f;
  text-decoration: none;
  background:  no-repeat 0 100%;
  background-image: linear-gradient(currentColor, currentColor);
  background-size: 0% 2px;
  transition: background-size .3s ease;
}

p a:hover, a:focus {
  background-size: 100% 2px;
}
See the Pen
Multi-line Animated Underline by Shark (@sharkcoder)
on CodePen.
Использование изображений в качестве подчеркивания в CSS
Для стилизации подчеркивания в CSS также можно использовать изображения (в формате SVG или PNG). Ниже приведены примеры (на основе CodePen автор John D. Jameson).
Подчеркивание звездочками:

body {
  line-height: 1.6;
}

p {
  background-image: url("https://s3-us-west-2.amazonaws.com/s.cdpn.io/78779/star.svg");
  background-position: 0 1.3em;
  background-size: 10px 9px;
  background-repeat: repeat-x;
}
Сердечками:

body {
  line-height: 1.8;
}

p {
  background-image: url("https://s3-us-west-2.amazonaws.com/s.cdpn.io/78779/heart.png");
  background-position: 0 1.4em;
  background-size: 15px 9px;
  color: #e8665f;
  background-repeat: repeat-x;
}
Анимированное подчеркивание при наведении
Давайте теперь создадим анимированное подчеркивание для кнопок меню. Нам понадобится следующая разметка:
<ul>
  <li><a href="#">About</a></li>
  <li><a href="#">Portfolio</a></li>
  <li><a href="#">Blog</a></li>
  <li><a href="#">Contact</a></li>
</ul>
Вот общие стили для четырех примеров (специфические стили будут приведены ниже):
body {
  padding: 100px 50px;
  font-family: "Quicksand", sans-serif;
  font-size: 30px;
  line-height: 1.3;
  color: #fff;
  background-color: #7eb4e2;
}

ul {
  margin: 100px auto 0;
  list-style: none;
  display: flex;
  flex-direction: column;
  justify-content: space-between;
  text-align: center;
  padding: 0;
  max-width: 600px;
}

@media screen and (min-width: 600px) {
    ul {
        flex-direction: row;
    }
}
Мы удаляем стандартное значение text-decoration и добавляем границу (border) при помощи псевдоэлементов CSS. Используя свойство CSS transition, мы анимируем этот border.
Анимированное подчеркивание при наведении № 1

li {
  position: relative;
  padding: 15px 0;
}

a {
  color: #fff;
  text-transform: uppercase;
  text-decoration: none;
  letter-spacing: 0.15em;
  display: inline-block;
  padding: 15px 20px;
  position: relative;
}

a::after {
  content: "";
  position: absolute;
  bottom: 0;
  left: 50%;
  display: block;
  background: none repeat scroll 0 0 transparent;
  height: 2px;
  width: 0;
  background: #fff;
  transition: width 0.3s ease 0s, left 0.3s ease 0s;
}

a:hover::after {
  width: 100%;
  left: 0;
}
See the Pen
Animated underline on hover #1 by Shark (@sharkcoder)
on CodePen.
Анимированное подчеркивание при наведении № 2

li {
  position: relative;
  padding: 30px;
}

a {
  color: #fff;
  text-transform: uppercase;
  text-decoration: none;
  letter-spacing: .25em;
  display: inline-block;
  padding: 15px;
  position: relative;
}

a:hover::after {
  width: 100%;
  right: 0;
}

a::after {
  background: none repeat scroll 0 0 transparent;
  bottom: 0;
  content: "";
  display: block;
  height: 4px;
  right: 0;
  position: absolute;
  background: linear-gradient(to left, #f69ec4, #f9dd94 100%);
  transition: width .5s ease 0s, right .5s ease 0s;
  width: 0;
}
See the Pen
Animated underline on hover #2 by Shark (@sharkcoder)
on CodePen.
Анимированное подчеркивание при наведении № 3

ul {
  margin: 40px;
  padding: 0 40px;
  background-color: #32557f;
  min-width: 200px;
}

a {
  display: inline-block;
  text-decoration: none;
  color: #fff;
  font-size: 18px;
  letter-spacing: 2px;
  text-transform: uppercase;
  position: relative;
  transition: all 0.4s ease;
  padding: 30px;
}

a::after {
  content: "";
  position: absolute;
  height: 2px;
  background-color: #f69ec4;
  width: 0;
  left: 50%;
  bottom: 0;
  transform: translateX(-50%);
  transition: 0.5s cubic-bezier(0.68, -0.55, 0.265, 1.55) all;
}

a:hover { color: #f69ec4; }
a:hover::after { width: 100%; }
See the Pen
Animated underline on hover #3 by Shark (@sharkcoder)
on CodePen.
Анимированное подчеркивание при наведении № 4

a {
  text-decoration: none;
  margin: 10px;
  display: inline-block;
  color: #f9dd94 ;
}

a::before,
a::after {
  content: "";
  height: 4px;
  background: #32557f;
  display: block;
  transition: width 0.3s ease-in-out;
  margin: 0 auto;
}

a::before { width: 100%; }
a::after { width: 0; }

a:hover::before { width: 0; }
a:hover::after { width: 100%; }
See the Pen
Animated underline on hover #4 by Shark (@sharkcoder)
on CodePen.
Анимированное подчеркивание, созданное при помощи свойства box-shadow
Подчеркивание также можно создать при помощи свойства box-shadow, которое добавляет тень к HTML-элементу. При наведении тень может увеличиваться. Посмотрите на пример:

<p>Sharks are a group of <a href="#">elasmobranch fish</a> characterized by a <a href="#">cartilaginous skeleton</a>, five to seven gill slits on the sides of the head, and <a href="#">pectoral fins</a> that are not fused to the head.</p>
a {
  text-decoration: none;
  box-shadow: inset 0 -2px 0 rgba(50,85,127,0.5), 0 2px 0 rgba(50,85,127,0.5);
  transition: box-shadow .3s;
  color: inherit;
  overflow: hidden;
}

a:hover {
  box-shadow: inset 0 -30px 0 rgba(50,85,127,0.5), 0 2px 0 rgba(50,85,127,0.5);
}
See the Pen
Animated underline with the box-shadow property by Shark (@sharkcoder)
on CodePen.
Здесь мы добавили к элементу <a> две тени:
insetменяет тень с внешней (outset) на внутреннюю0 -30px 0 rgba(50,85,127,0.5): 0 — это смещение по горизонтали, -30px — смещение по вертикали, 0 — радиус размытия, а rgba(50,85,127,0.5) — полупрозрачная голубая тень.0 2px 0 rgba(50,85,127,0.5): 0 — смещение по горизонтали, 2px — смещение по вертикали, 0 — радиус размытия.
Почитать больше о тенях можно здесь.
Подчеркивание «от руки», анимированное при наведении
Наконец, давайте создадим необычные подчеркивания, которые будут проявляться при наведении курсора. Первое будет напоминать подчеркивание от руки, а второе — выделение маркером от руки.
Подобные эффекты мы создадим при помощи масштабируемой векторной графики (SVG). У нас будет HTML-элемент для SVG и блок для текста со ссылками (выбирайте или .ink-svgline, или .link-svgmarker).
Общая структура:
<div class="svg-wrap">
    <!-- Invisible SVG block -->
</div>
<section class="link-svgline">
    <!-- First SVG example -->
</section>
<section class="link-svgmarker">
    <!-- Second SVG example -->
</section>
Заменяем комментарий «Invisible SVG block» («Невидимый SVG-блок») на следующий код:
<svg viewBox="0 0 400 20" xmlns="http://www.w3.org/2000/svg">
  <path id="svg_line" d="m 1.986,8.91 c 55.429038,4.081 111.58111,5.822 167.11781,2.867 22.70911,-1.208 45.39828,-0.601 68.126,-0.778 28.38173,-0.223 56.76079,-1.024 85.13721,-1.33 24.17379,-0.261 48.42731,0.571 72.58115,0.571"></path>
</svg>
<svg viewBox="0 0 400 60" xmlns="http://www.w3.org/2000/svg">
  <path id="svg_marker" d="m 3.518915,27.827324 c 55.429038,4.081 111.581115,5.822 167.117815,2.867 22.70911,-1.208 45.39827,-0.601 68.126,-0.778 28.38172,-0.223 56.76078,-1.024 85.13721,-1.33 24.17378,-0.261 48.4273,0.571 72.58114,0.571"></path>
</svg>
Вот правила CSS, позволяющие спрятать этот элемент:
.svg-wrap {
  position: absolute;
  width: 0px;
  height: 0px;
  overflow: hidden;
}
А эти правила будут общими для обоих примеров:
body {
  padding: 100px 50px;
  font-family: "Quicksand", sans-serif;
  font-size: 30px;
  line-height: 1.8;
  color: #fff;
  background-color: #7eb4e2;
}

a {
  color: #404d5b;
  text-decoration: none;
  outline: none;
}

section {
  position: relative;
  z-index: 1; /* needed for setting pseudo-element z-index */
  overflow: hidden;
  backface-visibility: hidden;
}

section a {
  position: relative;
  display: inline-block;
  outline: none;
  color: #404d5b;
  vertical-align: bottom;
  text-decoration: none;
  white-space: nowrap;
}

section a::before,
section a::after {
  pointer-events: none;
  backface-visibility: hidden;
  font-smoothing: antialiased;
}
Первый пример подчеркивания с использованием SVG:

Заменяем комментарий «First SVG example» следующим кодом (используйте любой свой текст, главное — не меняйте структуру классов):
<p>Sharks are a group of <a href="#">elasmobranch fish<svg class="link-svgline"><use xlink:href="#svg_line"></use></svg></a> characterized by a <a href="#">cartilaginous skeleton<svg class="link-svgline"><use xlink:href="#svg_line"></use></svg></a> five to seven gill slits on the sides of the head, and <a href="#">pectoral fins<svg class="link-svgline"><use xlink:href="#svg_line"></use></svg></a> that are not fused to the head.</p>
CSS:
.link-svgline a svg.link-svgline {
  position: absolute;
  top: 100%;
  left: 0;
  overflow: hidden;
  margin: 0;
  width: 100%;
  height: 20px;
  transition: stroke-dashoffset 0.3s ease-in-out;
  transform: translateY(-90%);
  fill: none;
  stroke: #b1d474;
  stroke-width: 5;
  stroke-dasharray: 400px;
  stroke-dashoffset: 400px;
}

.link-svgline a:hover svg.link-svgline {
  stroke-dashoffset: 0px;
}
Второй пример подчеркивания с использованием SVG:

Заменяем комментарий «Second SVG example» следующим кодом:
<p>Sharks are a group of <a href="#">elasmobranch fish<svg class="link-svgline"><use xlink:href="#svg_marker"></use></svg></a> characterized by a <a href="#">cartilaginous skeleton<svg class="link-svgline"><use xlink:href="#svg_marker"></use></svg></a> five to seven gill slits on the sides of the head, and <a href="#">pectoral fins<svg class="link-svgline"><use xlink:href="#svg_marker"></use></svg></a> that are not fused to the head.</p>
CSS:
.link-svgmarker a svg.link-svgline {
  position: absolute;
  top: 100%;
  left: 0;
  z-index: -1;
  overflow: hidden;
  margin: 0;
  width: 100%;
  height: 60px;
  opacity: 0.5;
  transition: stroke-dashoffset 0.3s ease-in-out;
  transform: translateY(-100%);
  fill: none;
  stroke: #f0f567;
  stroke-width: 36;
  stroke-dasharray: 400px;
  stroke-dashoffset: 400px;
}

.link-svgmarker a:hover svg.link-svgline {
  stroke-dashoffset: 0px;
}
See the Pen
“Handwritten” Animated Underline on Hover by Shark (@sharkcoder)
on CodePen.
На последние два примера меня вдохновило Tympanus demo.

1. Introduction
This subsection is non-normative.
This module covers text decoration, i.e. decorating the glyphs
of the text once typeset according to font and typographic rules.
(See [CSS-TEXT-3] and [CSS-FONTS-3].)
Such features are traditionally used not only for purely decorative purposes,
but also in some cases to show emphasis, for honorifics,
and to indicate editorial changes such as insertions, deletions, and misspellings.
CSS Levels 1 and 2 only defined very basic line decorations (underlines, overlines, and strike-throughs)
appropriate to Western typographical traditions.
Level 3 of this module adds the ability to change
the color, style, position, and continuity of these decorations,
and also introduces emphasis marks (traditionally used in East Asian typography),
and shadows (which were proposed then deferred from Level 2).
1.1. Module Interactions
This module replaces and extends the text-decorating
features defined in [CSS2] chapter 16.
1.2. Value Definitions
This specification follows the CSS property definition conventions from [CSS2] using the value definition syntax from [CSS-VALUES-3].
Value types not defined in this specification are defined in CSS Values & Units [CSS-VALUES-3].
Combination with other CSS modules may expand the definitions of these value types.
In addition to the property-specific values listed in their definitions,
all properties defined in this specification
also accept the CSS-wide keywords as their property value.
For readability they have not been repeated explicitly.
1.3. Terminology
The terms character, letter, and content language as used in this specification are defined in [CSS-TEXT-3].
Other terminology and concepts used in this specification are defined
in [CSS2] and [CSS-WRITING-MODES-4].
2. Line Decoration: Underline, Overline, and Strike-Through
The following properties describe line decorations that are added to the content of an element.
When specified on or propagated to an inline box,
that box becomes a decorating box for that decoration,
applying the decoration to all its fragments.
The decoration is then further propagated to any in-flow block-level boxes that split the inline
(see CSS2.1 section 9.2.1.1).
When specified on or propagated to a block container that establishes an inline formatting context,
the decorations are propagated to an anonymous inline box that wraps all the in-flow inline-level children of the block container.
When specified on or propagated to a ruby container,
the decorations are propagated only to the ruby base.
For all other box types,
the decorations are propagated to all in-flow children.
Note that text decorations are not propagated to any out-of-flow descendants,
nor to the contents of atomic inline-level descendants such as inline blocks and inline tables.
They are also not propagated to inline children of inline boxes,
although the decoration is applied to such boxes.
Underlines, overlines, and line-throughs are drawn only for non-replaced inline boxes,
and are drawn across all text (including white space, letter spacing, and word spacing)
except spacing (white space, letter spacing, and word spacing) at the beginning and end of a line. Atomic inlines, such as images and inline blocks, are not decorated.
Margins, borders, and padding of the decorating box are always skipped,
however the margins, border, and padding of descendant inline boxes are not.
Note that CSS 2.1 required skipping margins, borders, and padding always.
In this level, by default only the margins, borders, and padding of the decorating box are skipped.
In the future CSS2.1 may be updated to match this new default.
Also, control over decorating leading/trailing spaces is expected in Level 4,
and will be applied by default to the HTML ins and del elements.
UAs may interrupt underlines and overlines where the line would cross glyph ink
and to some distance to either side of the glyph outline;
this behavior is not controllable in this level,
but will be further defined in Level 4.
Line-throughs must remain continuous, however.

Skipping Glyph Ink
When the UA interrupts underlines or overlines at glyph boundaries,
the shape of the line at that boundary should
follow the shape of the glyph.
Note, this specification intentionally does not mandate a particular method
for “following the shape” of the glyph
so that UAs can take appropriate measures to handle
aesthetic and performance considerations.
For example,
a UA could assume square line endings below a certain size threshold
for performance reasons;
or use trapezoidal endings to approximate curves,
especially on thinner line decorations.
In terms of aesthetic considerations,
the UA might also consider what happens when the glyph boundary
intersects only part of the line thickness
or is slanted close to the horizontal—following the curve exactly
could result in typographically-awkward wisps of underline.
Whether to show the line within enclosed areas of a glyph is yet
another consideration.

Hiding the portion of the underline within the bowl gives a cleaner look to the type,
while the curved ends of the underline outside it
suggest the continuity of the underline through the letter
by hugging its outer contour.
Relatively positioning a descendant moves all text decorations
applied to it along with the descendant’s text; it does not affect
calculation of the decoration’s initial position on that line.
The visibility property, text-shadow, filters, and other graphical transformations
likewise also affect all text decorations applied to that box—including decorations propagated from an ancestor box—and do not affect the calculation of their initial positions or thicknesses.
(In the case of line decorations drawn over an atomic inline
or across the margins/borders/padding of a non-replaced inline box,
they are analogously associated with the affected atomic inline / non-replaced inline box
rather than with the decorating box.)
In the following style sheet and document fragment:
blockquote { text-decoration: underline; color: blue; }
em { display: block; }
cite { color: fuchsia; }
<blockquote>
 <p>
  <span>
   Help, help!
   <em> I am under a hat! </em>

   <cite> —GwieF </cite>
  </span>
 </p>
</blockquote>
…the underlining for the blockquote element is propagated to an
anonymous inline box that surrounds the span element, causing
the text «Help, help!» to be blue, with the blue underlining from
the anonymous inline underneath it, the color being taken from the
blockquote element. The <em>text</em> in the em block is also underlined, as it is in an in-flow block to
which the underline is propagated. The final line of text is fuchsia,
but the underline underneath it is still the blue underline from the
anonymous inline element. 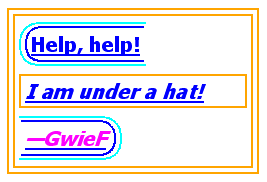 This diagram shows the boxes involved in the example above. The
rounded aqua line represents the anonymous inline element wrapping
the inline contents of the paragraph element, the rounded blue line
represents the span element, and the orange lines represent the
blocks.
Note: Line decorations are propagated through the box tree,
not through inheritance,
and thus have no effect on descendants
when specified on an element with display: contents.
2.1. Text Decoration Lines: the text-decoration-line property
| Name: | text-decoration-line |
|---|---|
| Value: | none | [ underline || overline || line-through || blink ] |
| Initial: | none |
| Applies to: | all elements |
| Inherited: | no (but see prose, above) |
| Percentages: | n/a |
| Computed value: | specified keyword(s) |
| Canonical order: | per grammar |
| Animation type: | discrete |
Specifies what line decorations, if any, are added to the element.
Values have the following meanings:
- none
- Neither produces nor inhibits text decoration.
- underline
- Each line of text is underlined.
- overline
- Each line of text has a line over it (i.e. on the opposite
side from an underline). - line-through
- Each line of text has a line through the middle.
- blink
- The text blinks (alternates between visible and invisible).
Conforming user agents may simply not blink the text.
Note that not blinking the text is one technique to satisfy checkpoint 3.3 of WAI-UAAG.
This value is deprecated in favor of Animations [CSS-ANIMATIONS-1].
Note: In vertical writing modes, text-underline-position can cause the underline and overline to switch sides.
This allows the position of underlines to key off of language-specific preferences
automatically.
2.2. Text Decoration Style: the text-decoration-style property
| Name: | text-decoration-style |
|---|---|
| Value: | solid | double | dotted | dashed | wavy |
| Initial: | solid |
| Applies to: | all elements |
| Inherited: | no |
| Percentages: | n/a |
| Computed value: | specified keyword |
| Canonical order: | per grammar |
| Animation type: | discrete |
This property specifies the style of the line(s) drawn for
text decoration specified on the element. Values have the
same meaning as for the border-style
properties [CSS-BACKGROUNDS-3]. wavy indicates a wavy line.
The style of text decorations must remain the same on all decorations originating from a given element,
even if descendant boxes have different specified styles.
2.3. Text Decoration Color: the text-decoration-color property
| Name: | text-decoration-color |
|---|---|
| Value: | <color> |
| Initial: | currentcolor |
| Applies to: | all elements |
| Inherited: | no |
| Percentages: | n/a |
| Computed value: | computed color |
| Canonical order: | per grammar |
| Animation type: | by computed value type |
This property specifies the color of text decoration (underlines
overlines, and line-throughs) set on the element with text-decoration-line.
The color of text decorations must remain the same on all decorations originating from a given element,
even if descendant boxes have different specified colors.
2.4. Text Decoration Shorthand: the text-decoration property
| Name: | text-decoration |
|---|---|
| Value: | <‘text-decoration-line’> || <‘text-decoration-style’> || <‘text-decoration-color’> |
| Initial: | see individual properties |
| Applies to: | see individual properties |
| Inherited: | see individual properties |
| Percentages: | see individual properties |
| Computed value: | see individual properties |
| Animation type: | see individual properties |
| Canonical order: | per grammar |
This property is a shorthand for setting text-decoration-line, text-decoration-color,
and text-decoration-style in one declaration.
Omitted values are set to their initial values.
Note: A text-decoration declaration that omits
both the text-decoration-color and text-decoration-style values
is backwards-compatible with CSS Levels 1 and 2.
The following example underlines unvisited links with a solid blue
underline in CSS1 and CSS2 UAs and a navy dotted underline in CSS3 UAs.
:link {
  color: blue;
  text-decoration: underline;
  text-decoration: navy dotted underline; /* Ignored in CSS1/CSS2 UAs */
}
Note: The shorthand purposefully omits the text-underline-position property,
which is a language/writing-system–dependent setting that keys off the content,
so that it can cascade and inherit independently
from the (uninherited) stylistic settings of the text-decoration shorthand.
2.5. Text Underline Position: the text-underline-position property
| Name: | text-underline-position |
|---|---|
| Value: | auto | [ under || [ left | right ] ] |
| Initial: | auto |
| Applies to: | all elements |
| Inherited: | yes |
| Percentages: | n/a |
| Computed value: | specified keyword(s) |
| Canonical order: | per grammar |
| Animation type: | discrete |
This property sets the position of an underline specified on the element.
(It does not affect underlines specified by ancestor elements.)
If left or right is specified alone, auto is also implied.
The following example styles modern Chinese, Japanese, and Korean
texts with the appropriate underline positions in both horizontal
and vertical text:
:root:lang(ja), [lang|=ja], :root:lang(ko), [lang|=ko] { text-underline-position: under right; }
:root:lang(zh), [lang|=zh] { text-underline-position: under left; }
Values have the following meanings:
- auto
-
The user agent may use any algorithm to determine the
underline’s position; however it must be placed at or under
the alphabetic baseline.Note: It is suggested that the default underline position
be close to the alphabetic baseline,
unless that would either cross subscripted (or otherwise lowered) text
or draw over glyphs from Asian scripts such as Han or Tibetan
for which an alphabetic underline is too high:
in such cases, shifting the underline lower
or aligning to the em box edge as described for under may be more appropriate.
A typical “alphabetic” underline is positioned just below the alphabetic baseline
- under
-
The underline is positioned under the element’s text content.
In this case the underline usually does not cross the descenders.
(This is sometimes called “accounting” underline.)
This value can be combined with left or right if a particular side is preferred in vertical typographic modes.Because text-underline-position inherits, and is not reset
by the text-decoration shorthand, the following example
switches the document to use under underlining, which can
be more appropriate for writing systems with long, complicated
descenders. It is also often useful for mathematical or chemical
texts that use many subscripts.:root { text-underline-position: under; }Note: The under value does not guarantee
that the underline will not conflict with glyphs,
as some fonts have descenders or diacritics
that extend below the font’s descent metrics. - left
- In vertical typographic modes, the underline is aligned as for under, except it is always aligned to the left edge of the text.
If this causes the underline to be drawn on the «over» side of
the text, then an overline also switches sides and is drawn on
the «under» side. - right
- In vertical typographic modes, the underline is aligned as for under, except it is always aligned to the right edge of the text.
If this causes the underline to be drawn on the «over» side of
the text, then an overline also switches sides and is drawn on
the «under» side.

In vertical typographic modes, the text-underline-position values left and right allow placing the underline on either
side of the text. (In horizontal typographic modes, both values are
treated as auto.)
The exact position and thickness of line decorations is UA-defined in this level.
However, for underlines and overlines
the UA must use a single thickness and position on each line
for the decorations deriving from a single decorating box.
 vs.
vs. 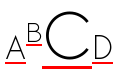
Correct and incorrect rendering of <u>A<sup>B</sup><big>C</big>D</u>
Note, since line decorations can span elements with varying font sizes and
vertical alignments, the best position for a line decoration is not
necessarily the ideal position dictated by the decorating box.
For example, an overline positioned to a small font
will effectively become a line-through if the element contains text in a significantly larger font-size.
Even for underlines, if the text is not aligned to the alphabetic baseline
(for example, in vertical typesetting styles,
text is aligned by its central baseline by default [CSS-WRITING-MODES-4])
an underline will cut through descendant text of a larger font-size.
UA consideration of descendant content will therefore result in better typography.
Due to the central baseline alignment of vertical text,
a left-side underline on small vertical text will cut through the text
of a child with a larger font size.
The underline is not allowed to be broken,
but adjusting its position further to the left
properly accommodates all of the underlined text.
UAs must adjust line positions
to match the shifted metrics of decorating boxes shifted
with vertical-align values other than baseline [CSS2] or subscripted/superscripted via font-variant-position [CSS-FONTS-3],
but must not adjust the line position or thickness
in response to descendants of a decorating box that are so styled.
This allows superscripts and subscripts to be properly decorated
(underlined, struck through, etc.)
but prevents them from distorting or breaking the positioning of such decorations on their ancestors.
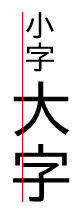
![]()
Example of underline applied to superscripted text vs. underline applied to text containing a superscript
Some font formats (such as OpenType) can offer information
about the appropriate position of a line decoration.
The UA should use such information
(such as the underline thickness,
or appropriate alphabetic underline position)
from the font wherever appropriate.
Note: Typically, OpenType font metrics give the position
of an alphabetic underline;
in some cases (especially in CJK fonts),
it gives the position of a under left underline.
(In this case, the font’s underline metrics typically
touch the bottom edge of the em box).
The UA may but is not required to correct for incorrect font metrics.
3. Emphasis Marks
East Asian documents traditionally use small symbols next to each glyph to emphasize
a run of text. For example:
![]()
Accent emphasis (shown in blue for clarity) applied to Japanese text
The text-emphasis shorthand, and its text-emphasis-style and text-emphasis-color longhands,
can be used to apply such marks to the text.
The text-emphasis-position property, which inherits separately,
allows setting the emphasis marks’ position with respect to the text.
3.1. Emphasis Mark Style: the text-emphasis-style property
| Name: | text-emphasis-style |
|---|---|
| Value: | none | [ [ filled | open ] || [ dot | circle | double-circle | triangle | sesame ] ] | <string> |
| Initial: | none |
| Applies to: | text |
| Inherited: | yes |
| Percentages: | n/a |
| Computed value: | the keyword none, a pair of keywords representing the shape and fill, or a string |
| Canonical order: | per grammar |
| Animation type: | discrete |
This property applies emphasis marks to the element’s text.
Values have the following meanings:
- none
- No emphasis marks.
- filled
- The shape is filled with solid color.
- open
- The shape is hollow.
- dot
- Display small circles as marks.
The filled dot is U+2022 ‘•’, and the open dot is U+25E6 ‘◦’. - circle
- Display large circles as marks.
The filled circle is U+25CF ‘●’, and the open circle is U+25CB ‘○’. - double-circle
- Display double circles as marks.
The filled double-circle is U+25C9 ‘◉’, and the open double-circle is U+25CE ‘◎’. - triangle
- Display triangles as marks.
The filled triangle is U+25B2 ‘▲’, and the open triangle is U+25B3 ‘△’. - sesame
- Display sesames as marks.
The filled sesame is U+FE45 ‘﹅’, and the open sesame is U+FE46 ‘﹆’. - <string>
- Display the given string as marks.
Authors should not specify more than one character in <string>.
The UA may truncate or ignore strings consisting of more than one grapheme cluster.
If a shape keyword is specified but neither of filled nor open is
specified, filled is assumed. If only filled or open is specified,
the shape keyword computes to circle in horizontal typographic modes and sesame in vertical typographic modes.
The marks should be drawn using the element’s font settings
with the addition of the ruby feature
and the size scaled down 50%.
However, since not all fonts have all these glyphs,
and some fonts use inappropriate sizes for emphasis marks in these code points,
the UA may opt to use a font known to be good for emphasis marks,
or the marks may instead be synthesized by the UA.
Marks must remain upright in vertical typographic modes:
like CJK characters, they do not rotate to match the writing mode.
The orientation of marks in horizontal typographic modes of vertical writing modes is undefined in this level
(but may be defined in a future level if definitive use cases arise).
Note: One example of good fonts for emphasis marks is Adobe’s open source Kenten Generic OpenType Font,
which is specially designed for the emphasis marks.
The marks are drawn once for each typographic character unit.
However, emphasis marks are not drawn for:
- Word separators or other characters that
belong to the Unicode separator classes (Z*).
(But note that emphasis marks are drawn for a space
that combines with any combining characters.) -
Punctuation—specifically,
any characters that belong to the
Unicode P* general category and
do notNFKDnormalize [UAX15] to
any of the following symbols:# U+0023 NUMBER SIGN % U+0025 PERCENT SIGN ‰ U+2030 PER MILLE SIGN ‱ U+2031 PER TEN THOUSAND SIGN ٪ U+066A ARABIC PERCENT SIGN ؉ U+0609 ARABIC-INDIC PER MILLE SIGN ؊ U+060A ARABIC-INDIC PER TEN THOUSAND SIGN & U+0026 AMPERSAND ⁊ U+204A TIRONIAN SIGN ET @ U+0040 COMMERCIAL AT § U+00A7 SECTION SIGN ¶ U+00B6 PILCROW SIGN ⁋ U+204B REVERSED PILCROW SIGN ⁓ U+2053 SWUNG DASH 〽️ U+303D PART ALTERNATION MARK - Characters belonging to the Unicode classes for control codes
and unassigned characters (Cc, Cf, Cn).
Note: Control over which characters are marked will be added in Level 4.
(The list of punctuation may also be further refined,
particularly for non-CJK punctuation.)
3.2. Emphasis Mark Color: the text-emphasis-color property
| Name: | text-emphasis-color |
|---|---|
| Value: | <color> |
| Initial: | currentcolor |
| Applies to: | text |
| Inherited: | yes |
| Percentages: | n/a |
| Computed value: | computed color |
| Canonical order: | per grammar |
| Animation type: | by computed value type |
This property specifies the foreground color of the emphasis marks.
Note: currentcolor keyword computes to itself
and is resolved to the value of color after inheritance is performed.
This means text-emphasis-color by default matches the text color even as color changes across elements.
3.3. Emphasis Mark Shorthand: the text-emphasis property
| Name: | text-emphasis |
|---|---|
| Value: | <‘text-emphasis-style’> || <‘text-emphasis-color’> |
| Initial: | see individual properties |
| Applies to: | see individual properties |
| Inherited: | see individual properties |
| Percentages: | see individual properties |
| Computed value: | see individual properties |
| Animation type: | see individual properties |
| Canonical order: | per grammar |
This property is a shorthand for setting text-emphasis-style and text-emphasis-color in one declaration.
Omitted values are set to their initial values.
Note that text-emphasis-position is not reset in this
shorthand. This is because typically the shape and color vary, but the
position is consistent for a particular language throughout the document.
Therefore the position should inherit independently.
3.4. Emphasis Mark Position: the text-emphasis-position property
| Name: | text-emphasis-position |
|---|---|
| Value: | [ over | under ] && [ right | left ]? |
| Initial: | over right |
| Applies to: | text |
| Inherited: | yes |
| Percentages: | n/a |
| Computed value: | specified keyword(s) |
| Canonical order: | per grammar |
| Animation type: | discrete |
This property describes where emphasis marks are drawn at.
If [ right | left ] is omitted, it defaults to right.
The values have following meanings:
- over
- Draw marks over the text in horizontal typographic modes.
- under
- Draw marks under the text in horizontal typographic modes.
- right
- Draw marks to the right of the text in vertical typographic modes.
- left
- Draw marks to the left of the text in vertical typographic modes.
Emphasis marks are drawn exactly as if each character was
assigned the mark as its ruby annotation text with the ruby position
given by text-emphasis-position and the ruby alignment as centered.
Note that this position may be adjusted if it would conflict
with underline or overline decorations.
The effect of emphasis marks on the line height is the same as for
ruby text.
If emphasis marks are applied to characters
for which ruby is drawn in the same position as the emphasis mark,
the emphasis marks are placed outside the ruby.
This includes auto-hidden and empty ruby annotations.
Emphasis marks applied to 4 characters, with ruby also on 2 of them
Some editors prefer to hide emphasis marks when they conflict with ruby.
In HTML, this can be done with the following style rule:
ruby { text-emphasis: none; }
Some other editors prefer to hide ruby when they conflict with emphasis marks.
In HTML, this can be done with the following pattern:
em { text-emphasis: dot; } /* Set text-emphasis for <em> elements */
em rt { display: none; }   /* Hide ruby inside <em> elements */
4. Text Shadows: the text-shadow property
| Name: | text-shadow |
|---|---|
| Value: | none | [ <color>? && <length>{2,3} ]# |
| Initial: | none |
| Applies to: | text |
| Inherited: | yes |
| Percentages: | n/a |
| Computed value: | either the keyword none or a list, each item consisting of three absolute lengths plus a computed color |
| Canonical order: | per grammar |
| Animation type: | as shadow list |
This property accepts a comma-separated list of shadow effects
to be applied to the text of the element.
Values are interpreted as for box-shadow [CSS-BACKGROUNDS-3].
(But note that spread values and the inset keyword are not allowed.)
Each layer shadows the element’s text and all its text decorations
(composited together).
The shadow effects are applied front-to-back:
the first shadow is on top.
The shadows may thus overlay each other,
but they never overlay the text itself.
The shadow must be painted at a stack level
between the element’s border and/or background (if present)
and the elements text and text decoration.
UAs should avoid painting text shadows over text
in adjacent elements belonging to the same stack level and stacking context.
(This may mean that the exact stack level of the shadows depends
on whether the element has a border or background:
the exact stacking behavior of text shadows is thus UA-defined.)
It is undefined whether a given shadow layer shadows
each glyph or decoration independently
or if the text and/or decorations are flattened and then shadowed.
Unlike box-shadow, text shadows are not clipped to the shadowed shape
and may show through if the text is partially-transparent.
Like box-shadow, text shadows do not influence layout,
and do not trigger scrolling
or increase the size of the scrollable overflow area.
Note: The painting order of shadows defined here is the opposite
of that defined in the 1998 CSS2 Recommendation.
The text-shadow property applies to both the ::first-line and ::first-letter pseudo-elements.
5. Painting Text Decorations
5.1. Painting Order of Text Decorations
As in [CSS2], text decorations are drawn immediately over/under the text they decorate,
in the following order (bottommost first):
- shadows (text-shadow)
- underlines (text-decoration)
- overlines (text-decoration)
- text
- emphasis marks (text-emphasis)
- line-through (text-decoration)
Where line decorations are drawn across box decorations or atomic inlines,
they are drawn over non-positioned content and just below any positioned descendants
(immediately below layer #8 in CSS2.1 Appendix E).
5.2. Overflow of Text Decorations
Text decorations that leak outside a box are considered ink overflow:
they do not extend the scrollable overflow area. [css-overflow-3]
Appendix A: Acknowledgements
This specification would not have been possible without the help from:
Ayman Aldahleh, Bert Bos, Tantek Çelik, Stephen Deach, John Daggett,
Martin Dürst,
Laurie Anna Edlund, Ben Errez, Yaniv Feinberg, Arye Gittelman, Ian
Hickson, Martin Heijdra, Richard Ishida, Masayasu Ishikawa,
Michael Jochimsen, Eric LeVine, Ambrose Li, Håkon Wium Lie, Chris Lilley,
Ken Lunde, Nat McCully, Shinyu Murakami, Paul Nelson, Chris Pratley, Marcin Sawicki,
Arnold Schrijver, Rahul Sonnad, Michel Suignard, Takao Suzuki,
Frank Tang, Chris Thrasher, Etan Wexler, Chris Wilson, Masafumi Yabe
and Steve Zilles.
Appendix B: Default UA Stylesheet
This appendix is informative,
and is to help UA developers to implement default stylesheet,
but UA developers are free to ignore or change.
/* typical styling of HTML */
blink {
  text-decoration-line: blink;
}
s, strike, del {
  text-decoration: line-through;
}
u, ins, :link, :visited {
  text-decoration: underline;
}
abbr[title], acronym[title] {
  text-decoration: dotted underline;
}

/* disable inheritance of text-emphasis marks to ruby text:
  emphasis marks should only apply to base text */
rt { text-emphasis: none; }

/* set language-appropriate default emphasis mark position */
:root:lang(zh), [lang|=zh] { text-emphasis-position: under right; }
[lang|=ja], [lang|=ko]     { text-emphasis-position: over right; }

/* set language-appropriate default underline position */
:root:lang(ja), [lang|=ja],
:root:lang(mn), [lang|=mn],
:root:lang(ko), [lang|=ko] { text-underline-position: right; }
:root:lang(zh), [lang|=zh] { text-underline-position: left;  }
/* auto is chosen (implied) above instead of under
   due to content-compatibility concerns */
If you find any issues, recommendations to add, or corrections,
please send the information to www-style@w3.org with [css-text-decor] in the subject line.
While text-decoration-line: blink can’t be fully reproduced with other existing properties,
authors can achieve a very similar effect with the following CSS:
@keyframes blink {
  0% {
    visibility: hidden;
    animation-timing-function: step-end;
  }
  25%, 100% {
    visibility: visible;
  }
}
blink {
  animation: blink 1s infinite;
}
Appendix C:
Changes
Changes since the August 2019 Candidate Recommendation
Changes include:
- Clarify that text-shadow animates as a shadow list like box-shadow.
(Issue 4375) - Be explicit about properties that apply to text.
(Issue 5303) - Minor editorial fixes.
Changes since the July 2018 Candidate Recommendation
Changes include:
- Clarified that text decoration overflow is ink overflow.
(Issue 3272) - Fixed inconsistencies in sample text-underline-position rules.
(Issue 3441) - Cleaned up “Computed value” lines to match new conventions.
A Disposition of Comments is available.
Changes since the August 2013 Candidate Recommendation
Significant changes include:
- Deferred text-decoration-skip to Level 4 to allow for major changes.
Defined behavioral defaults in prose.
(Issue 1, Issue 22, Issue 26) - Specified that line-throughs are unaffected by ink-skipping feature.
(Issue 24) - Recommended that when ink is skipped, line endings conform to the glyph shape.
(Issue 30) - Updated writing-mode–sensitive conditions to depend on typographic mode,
to account for addition of sideways-lr and sideways-rl values to writing-mode property.
Marked orientation of emphasis marks under sideways-lr and sideways-rl undefined.
(Issue 10, Issue 20) - Made [ right | left ] option of text-emphasis-position optional,
defaulting to right.
(Issue 17) - Made text-underline-position imply auto instead of under when only left or right is specified.
(Issue 18) - Changed text decoration to skip leading and trailing spaces.
(Issue 6) - Noted that the positions of ruby annotations may be adjusted
to avoid conflicts with text decorations.
(Issue 21) - Changed initial value of text-shadow to be
currentColor.
(Issue 28) - Fixed error in “Computed value” line for text-shadow.
(Issue 7) - Fixed canonical order of text-shadow values to match implementations.
(Issue 35) -
Defined positioning of emphasis marks with respect to auto-hidden and empty ruby annotations.
(Issue 9)If emphasis marks are applied to characters
for which ruby is drawn in the same position as the emphasis mark,
the emphasis marks are placed outside the ruby.
This includes auto-hidden and empty ruby annotations. - Made text-emphasis skip punctuation by default.
(Issue 16) - Added rule to apply ruby to emphasis marks’ font.
(Issue 13) - Various corrections and improvements to the default UA rules
for text-emphasis-position and text-underline-position.
(Issue 11, Issue 12, Issue 18, Issue 19, Issue 36)
Conformance requirements are expressed with a combination of
descriptive assertions and RFC 2119 terminology. The key words “MUST”,
“MUST NOT”, “REQUIRED”, “SHALL”, “SHALL NOT”, “SHOULD”, “SHOULD NOT”,
“RECOMMENDED”, “MAY”, and “OPTIONAL” in the normative parts of this
document are to be interpreted as described in RFC 2119.
However, for readability, these words do not appear in all uppercase
letters in this specification.
All of the text of this specification is normative except sections
explicitly marked as non-normative, examples, and notes. [RFC2119]
Examples in this specification are introduced with the words “for example”
or are set apart from the normative text with class="example",
like this:
Informative notes begin with the word “Note” and are set apart from the
normative text with class="note", like this:
Note, this is an informative note.
Advisements are normative sections styled to evoke special attention and are
set apart from other normative text with <strong class="advisement">, like
this: UAs MUST provide an accessible alternative.
A style sheet is conformant to this specification
if all of its statements that use syntax defined in this module are valid
according to the generic CSS grammar and the individual grammars of each
feature defined in this module.
A renderer is conformant to this specification
if, in addition to interpreting the style sheet as defined by the
appropriate specifications, it supports all the features defined
by this specification by parsing them correctly
and rendering the document accordingly. However, the inability of a
UA to correctly render a document due to limitations of the device
does not make the UA non-conformant. (For example, a UA is not
required to render color on a monochrome monitor.)
An authoring tool is conformant to this specification
if it writes style sheets that are syntactically correct according to the
generic CSS grammar and the individual grammars of each feature in
this module, and meet all other conformance requirements of style sheets
as described in this module.
So that authors can exploit the forward-compatible parsing rules to
assign fallback values, CSS renderers must treat as invalid (and ignore
as appropriate) any at-rules, properties, property values, keywords,
and other syntactic constructs for which they have no usable level of
support. In particular, user agents must not selectively
ignore unsupported component values and honor supported values in a single
multi-value property declaration: if any value is considered invalid
(as unsupported values must be), CSS requires that the entire declaration
be ignored.
Once a specification reaches the Candidate Recommendation stage,
non-experimental implementations are possible, and implementors should
release an unprefixed implementation of any CR-level feature they
can demonstrate to be correctly implemented according to spec.
To establish and maintain the interoperability of CSS across
implementations, the CSS Working Group requests that non-experimental
CSS renderers submit an implementation report (and, if necessary, the
testcases used for that implementation report) to the W3C before
releasing an unprefixed implementation of any CSS features. Testcases
submitted to W3C are subject to review and correction by the CSS
Working Group.
For this specification to be advanced to Proposed Recommendation,
there must be at least two independent, interoperable implementations
of each feature. Each feature may be implemented by a different set of
products, there is no requirement that all features be implemented by
a single product. For the purposes of this criterion, we define the
following terms:
The specification will remain Candidate Recommendation for at least
six months.