|
Файлы формата dds |
|
19.07.2014 в 22:37:00, сообщение № 1 Offline
Surasu Проверенные Исследователь 49 постов
Наконец-то этот раздел пригодился И так, я делаю эту краткую инструкцию, потому что у пользователей появились проблемы в редактировании текстур из мода Кровавые лица — Перерождение. Я надеюсь, что вопросов по типу «а где скачать фотошоп» или «как открыть файл» тут не будет, и что раз вы взялись за это, то с самостоятельной сменой цвета у картинки вы справитесь Для начала вам понадобится программа Photoshop и плагин Texture Tools for Adobe Photoshop от NVIDIA. После его установки вы сможете открывать dds-файлы. 1. Скачиваем текстуры и разархивируем их;
4. Далее редактируем текстуру, как вам нравится.
DXT 3 и 5 существенных различий не имеют, разница в оптимизации качества текстур. DXT5 более качественно сжимает текстуры, что позволяет экономить видеопамять. 6. Выбираете нужный формат и жмёте Save.
|
|
19.07.2014 в 23:04:05, сообщение № 2 Offline
Surasu Проверенные Исследователь 49 постов
Цитата uriahheep ( Вот где собака была зарыта!!!!!!!!! А я мучался!!!! Дьявол кроется в деталях
|
|
21.07.2014 в 18:17:03, сообщение № 3 Offline
Барс Проверенные Эксперт 1212 постов За статью спасибо всегда мучался с DDS в фотошопе.
|
|
29.09.2014 в 14:57:30, сообщение № 4 Offline
Sirius Модмейкеры Исследователь 47 постов В этой программе можно только работать с текстурами, то есть изменять цвет и вид брони и одежды — я правильно понял? А если я хочу конвертировать броню, созданную под один реплейсер для какого-нибудь другого реплейсера и добавить физику с анимацией, какую программу мне использовать?
|
|
02.07.2016 в 15:21:00, сообщение № 5 Online
crafty77 Локализатор На все руки мастер 831 постов Спасибо! Помогли решить проблему с периодическим появлением черного тела у ГГ)))
|
|
23.09.2017 в 00:25:22, сообщение № 6 Online
crafty77 Локализатор На все руки мастер 831 постов Ребят, подскажите как убрать блеск с части брони
|
|
23.09.2017 в 01:56:02, сообщение № 7 Online
crafty77 Локализатор На все руки мастер 831 постов Вопрос решился путем затемнения альфа-канала выделенной области в PS:
|
|
22.10.2017 в 05:11:08, сообщение № 8 Offline
Cherickov Проверенные Горожанин 1 постов А что с нормалями то делать в Fallout есть несколько текстур : _N.dds,_c.DDs,_S.DDs -и т.д и т.п. Кто-нибудь может это разьяснить
|
|
11.11.2017 в 18:42:15, сообщение № 9 Offline
avelnord Модмейкеры Труженик 142 постов Всем привет! Подскажите пожалуйста! Проблема такая: как выделить сложный рисунок (кружево) в альфа-канале диффузной карты. Стирать ластиком долго, муторно и не точно. Раньше как-то делал, но не могу вспомнить…
|
|
11.11.2017 в 21:35:53, сообщение № 10 Offline
avelnord Модмейкеры Труженик 142 постов ąnizórđą, Нет, Вы не правильно поняли вопрос или я не правильно его задал. Когда мы создаём диффузную карту с альфа-каналом, то он белый. А мне надо чтобы он весь был чёрный (прозрачный), а рисунок (кружево) — белым. Когда большие рисунки, я просто канал заливал чёрным, и потом рисунок очищал ластиком. Но знаю, что есть метод быстрого добавления рисунка в альфа-канал. Давно как-то делал…
|
|
11.11.2017 в 22:58:56, сообщение № 11 Offline
Dexus Проверенные Эксперт 4136 постов
Цитата avelnord ( Проблема такая: как выделить сложный рисунок (кружево) в альфа-канале диффузной карты. Стирать ластиком долго, муторно и не точно. Раньше как-то делал, но не могу вспомнить… Открываете текстуру, затем — Выделение(Всё), Выделение(Инверсия), загрузить выделенную область(предупреждение проигнорировать), сохранить выделенную область.
|
|
12.11.2017 в 06:59:32, сообщение № 12 Offline
avelnord Модмейкеры Труженик 142 постов ąnizórđą, Dexus, Спасибо! Разобрался.
|
|
29.10.2018 в 07:34:40, сообщение № 13 Offline
Zelemhan77 Проверенные Исследователь 45 постов Проблема лишь в том, что ФШ нужен весьма древний, так как в новых версиях данный плагин не работает.
|
|
02.11.2019 в 13:06:20, сообщение № 14 Offline
Вальтэр Модмейкеры Горожанин 6 постов Совершенно согласен с Zelemhan77 пришлось поставить фотошоп 2012 вместо 2019 так как этот плагин отказался работать на новой версии шопа.
|
|
03.11.2019 в 00:36:41, сообщение № 15 Offline
Dexus Проверенные Эксперт 4136 постов Вальтэр, лови ссыль!) .dds Plugin for Photoshop CC у меня установлен PS CC 2018, но должен работать и на более поздних версиях))
|


Лирика:
Все текстуры для игр от Bethesda, и, в частности, Skyrim представлены в формате .dds. Этот формат может содержать внутри себя несколько размеров одной и той же текстуры. Любой размер текстуры использовать нельзя, только: 8, 16, 32, 64, 128, 256, 1024, 2048 и так далее. Все ресурсы запакованы в .bsa архивы с соответствующими названиями. Текстуры ещё называют картами. Каждая диффузная карта (цветная текстура) сопровождается, как минимум, картой нормалей — normal map, исключение составляют текстуры для эффектов и им подобные. Про карты нормалей хорошо написано на 
Лучше отметить всё так, как на изображении, кроме последней галки, тут на ваше усмотрение: хотите каждый раз видеть это окно, оставляйте галку, не хотите — убирайте. Пункт Load MIP Maps отвечает за открытие всех или одного размера текстуры, рекомендую выключить его. Все размеры нам открывать не нужно, они автоматически сгенерируются при сохранении текстуры.
Изменяем текстуру. Этот пункт я сейчас не буду разворачивать, нас интересуют только настройки.
Теперь сохраняем. Тут немножко посложнее окно выскочит:

Разберём его поподробнее:
Верхний выпадающий список содержит настройки оптимизации и наличиеотсутствие альфа-канала и его тип. Все пункты нас не интересуют, только 4
DXT1 RGB — его выбираем для всех текстур без альфа-канала
DXT5 ARGB — для всех текстур с альфа-каналом
8.8.8 RGB — сохранение без сжатия и альфа-канала
8.8.8.8 ARGB — без сжатия с альфа-каналом
Последние 2 пункта эксплуатировать особо не стоит, ибо вес текстуры получится гораздо больше, они оправданы для текстур с очень плавными переходами цвета на больших площадях (например, карта нормалей для лиц, если сохранить со сжатием, то на лицах персонажей появятся некрасивые артефакты)
Далее, нас интересует пункт генерации дополнительных размеров:
Generate MIP Maps — с доп. размерами (самый распространённый вариант)
Use Existing MIP Maps — выбрать доп. размеры самостоятельно
No MIP Maps — без доп. размеров
При сохранении с генерацией доп. размеров можно выбрать в выпадающем списке рядом: All (все возможные) или указать желаемое количество. Я всегда ставлю All.
Всё остальное, если вы не настроены на эксперименты, оставляем как на прилагаемом выше изображении, для наших целей оно в настройке не нуждается.

-
#1
Приветствую тебя читатель. В данном мануале мы разберем как изменить текстуру внутри любого DLC файла.
Первым делом приведу список программ и инструментов которые я использовал:
- Adobe Photoshop + установленный плагин — Intel® Texture Works Plugin
- Основная программа для моддинга в GTA V — OpenIV
- Пример DLC который будем редактировать — Tesla Cybertruck
Открываем наш .rpf файл с помощью программы OpenIV и видим структуру:

Нам нужны файлы формата — YTD
Именно в них «сидят» все текстуры определенного элемента DLC.
Жмем 2 раза на cybertruck.ytd и видим внутри текстуры автомобиля:

Далее для редактирования самой картинки текстуры, необходимо экспортировать ее в другой формат.
Для этого жмем экспортировать (одну конкретную текстуру) или экспортировать все.
Программа предлагает сохранить файл DDS формата, выбираем нужное место и сохраняем.
Затем уже файл формата DDS мы можем открывать напрямую через Adobe Photoshop (при наличии установленного плагина) изменять и сохранять его обратно.
После того как вы изменили файл необходимо запаковать текстуры обратно.
В окне OpenIV переходим в режим редактирования, соглашаемся на автоматическое сохранение DLC после изменения:

Затем удаляем старый cybertruck.ytd (предварительно сохраните его содержимое в отдельную папку чтобы не потерять).
В программе OpenIV нажимаем ПКМ по пустой области справа и выбираем в контекстном окне: Создать — Texture dictionary (.ytd)
Создаем файл с таким же названием как и было до удаления (cybertruck.ytd) и жмем OK.
Теперь снова жмем 2 раза на новый, только что созданный файл — .ytd и видим новое окно:
В нем мы импортируем все текстуры которые были, а также те которые мы изменяли. Жмем Сохранить.

Закрываем OpenIV, заходим в игру. Если вы сделали все правильно при заходе в GTA 5 увидите свою измененную текстуру:

Если данная статья была вам полезна — поставьте лайк и я напишу еще парочку мануалов по другим модификациям DLC-файлов.
Последнее редактирование: 5 Июл 2021
-
#2
DDS не обязательно, при экспорте там можно выбрать формат png. Отредактировать его и залить заменяя существующий. При заливе в текстуры авто файл png автоматом становится DDS.
-
#3
DDS не обязательно, при экспорте там можно выбрать формат png. Отредактировать его и залить заменяя существующий. При заливе в текстуры авто файл png автоматом становится DDS.
В пейнте тоже можно рисовать, зачем фотошоп тогда
DDS — оптимизированный формат, специально для игр, специально для GPU.
Atom
Активный участник
-
#4

Выскакивает такая фигня, мучаюсь уже 3 час, кто-то сталкивался с такой проблемой?
| This article has been updated for ME3Explorer v3.0. |
| Kfreon created and develops TPF/DDS Tools for ME3Explorer. |
| TPF Tools permanently alters your game files and cannot be used to install textures without first generating a texture tree. See Getting Started and Texplorer before continuing. |

TPF/DDS Tools («TPF Tools» for short) is the toolset’s user-friendly texture installation utility. With it, new textures can be permanently installed into all three games.
TPF Tools is compatible with Texmod TPFs and an assortment of image file formats. It also has the ability to use and create a new format, the «METPF». Last, but not least, TPF Tools has the ability to «autofix» improperly formatted textures loaded into the program, and can bundle textures into new TPFs or METPFs for distribution.
Background[]
TPF Tool’s first iteration was an amalgamation of Saltisgood’s TPF Viewer, and the old TPF-To-MOD functionality in Texplorer. TPF Viewer allowed the contents of a TPF to be viewed without prior extraction, and the TPF-to-MOD function allowed direct conversion from TPF to MOD files. The mature version of TPF Tools has expanded on these functions several times over, and is one of the most-used tools in the toolset today.
Before using TPF Tools for the first time, it’s helpful to become familiar with basic information regarding how textures are handled in the trilogy. This will help you better understand the textures you’re loading, portions of the GUI, and error messages in the tool. Consult Textures in Mass Effect for details. Similarly, An Intro to Mass Effect Mods provides additional information on TPF, MOD, and DDS files, while also explaining details about mod install order and more.
Preparation[]
TPF Tools is a simple tool to learn, but a significant amount of preparation is required before it may be used.
If you want to install new textures into your official BioWare DLC, they must be extracted prior to installation. To do this, see the ME3Explorer Setup Guide.
Treebuilding
TPFs/DDSes may be loaded into TPF Tools without a texture tree for viewing, but to install textures, a tree must be present for the desired game. Consult Texplorer on how to build a tree for each game in the trilogy.
Texture Files
| Versions of TPF Tools in ME3Explorer v2.0+ are not compatible with MOD files. See the FAQ below on how to deal with this. |
TPF Tools is compatible with the following file types: BMP, DDS, JPG/JPEG, METPF, PNG, and TPF. To use the tool, you must have access to one or more of these files, either extracted from the game and edited yourself, or as downloaded from a hosting site like Nexusmods. For more information about valid file types and mod formats for the trilogy, see An Intro to Mass Effect Mods.
Usage[]
TPF Tools’s interface is less technical than Texplorer’s, but there’s still a lot of information present. This section steps through the GUI, explains how to use the tool, and clarifies how to combat issues with incompatible textures.
Load File
TPF Tools has two main panes that will be empty when opened. To populate the panes, either drag and drop the desired file or use Load and navigate to the necessary location on your computer.
Unlike a majority of other tools in the toolset, TPF Tools has a somewhat interactive interface. Hovering the mouse over certain GUI elements triggers a tooltip that describes their purpose. Going to Help > Toggle Help Tooltips on the top-left, shows all tooltips at once. Clicking the Wiki Article option brings you to this page.
The Left Pane displays the following features:
- Top Menu — Contains a variety of options that will be covered in different parts of this article.
- Check/Uncheck All — Checks/unchecks all textures in the main branch of the tree, controlling texture manipulation.
- Main Area — Displays the loaded textures. Provides a thumbnail and name for each, and warns about the texture’s validity. Also depicts the Texmod.def/MEResults.log file, which is used when creating a TPF/METPF. The toolset reads this information, but the file isn’t «installed», as it’s not a texture. Arrow keys can be used to navigate through the textures.
- Context Menu — Allows individual, texture-specific operations.
- Bottom Menu — Operations that generally affect all textures.
- Progress Bar — Fills and displays status updates as operations are performed (e.g, «15/20 textures installed», «Autofix complete.»).
TPF/DDS Tools r749, just opened.
TPF Tools just after loading a TPF.
The Right Pane displays the following features:
- Texture Tree Indicators — Indicate whether existing texture trees are present for each game. When using it for the first time prior to a Texplorer scan, they will be red, as no trees are present. All indicators for games you have installed and want to mod should be green. To generate trees, refer to the Texplorer article.
- Game Path Indicators — Similar to the Texture Tree Indicators, all indicators for games you have installed and want to mod should be green. If this isn’t the case, it means you likely haven’t used the ME3Explorer Setup Guide to properly set up ME3Explorer. Do this now, and don’t proceed until the path for the game you want to mod is detected properly.
- Game Modding Indicator — This defaults to Mass Effect 3. If you wish to mod a different game, just click it to cycle between all three games in the trilogy. This must be done prior to Analyzing (see below); the button will stay locked after analysis is complete.
- File Pathing and Mod Authorship — Just underneath the indicators. Specifies the path and name of the loaded TPF/selected file. When a TPF is loaded, the Comment area contains information from the mod author.
- Texture Details — Compares the selected texture to its counterpart in the game files. Properties on the left are for the loaded texture, properties on the right are for the existing game texture. Formats should always match; mipmaps and size won’t in the case of higher resolution textures. The hash field is editable, in the case of a mismatch (this should be rare). For more details on hashes, consult the Texplorer article.
- Preview Tab — Enlarges the texture name highlighted in blue, allowing for closer inspection. The preview scales with the window.
- PCC Tab — Displays all PCCs that reference that texture. These can be selected/deselected to control which files are modified with the new texture. To select/deselect all, use the Check All/Uncheck button. The buttons on the bottom of the pane provide multiple ways to save information about the PCCs, based upon whether a PCC is checked or highlighted. A subsection of checked/unchecked PCCs can be highlighted blue by clicking on them.
- Copy All to Clipboard, copies all PCC names to the clipboard.
- Export, exports all checked PCC names to a TXT file.
- Copy Checked to Clipboard is a misnomer. This copies all highlighted PCC names to the clipboard, allowing the user to save a subset of PCCs on the list, without having to modify installation parameters.
- Tool Version and Toolset Authorship — On the bottom right.
TPF Tools window after selecting a texture inside a TPF.
TPF with no texture errors loaded into TPF Tools.
Loose texture with correct hash in name.
Successful hash match for replacement texture.
Analyze + Configure
Once you’re certain your game paths are correct, the proper texture trees are present, a file is loaded, and you’ve had time to orient yourself in the GUI, it’s time to configure your texture installation parameters.
It’s important to understand that none of the configuration options affect the loaded file itself. The TPF/texture file as it exists on your HDD is not affected; changes are saved to a temporary location and applied upon installation, only.
- Analyze with Texplorer — This is the first step. Clicking Analyze with Texplorer uses the Texplorer tree to match the loaded textures to those in the selected game. Only textures in the tree can be matched (see Texplorer). When a match is found, the texture file name changes to match the tree name. Raw textures (DDS, BMP, PNG, JPG) must have hashes for the corresponding vanilla texture in their file name. TPFs come pre-built with these hashes. Every time additional textures are loaded, they must be re-analyzed to find their match in the tree.
- Address Duplicates. — When loading more than one TPF in TPF Tools, it’s possible multiple copies of the same texture will be present. These textures will have an expandable node to their left and need to be dealt with prior to installation. For more details, see the FAQ.
- Autofix — Improperly formatted textures are tagged with arrows («>», «<«) and a brief description. Consult the FAQ on this page for specific details on various error types. These textures MUST be fixed either manually or via Autofix, and made «valid» before installation. The toolset will not install invalid textures. Some important details about using Autofix:
- It’s not perfect. There are several bugs covered in the FAQ. Before using it, be sure you know what type of error you have, and whether it’s affected by a current bug.
- Like many texture modifications, it can be lossy. Expect a minor deterioration in quality.
- Conversions to DXT5 can be hit or miss, depending on how the alpha is handled. For more information on alpha, see Textures in Mass Effect.
- Autofix cannot fix the «NOT FOUND IN TREE» error. See the FAQ for details on this error.
- The presence of File Duplicates complicates autofix significantly. Be certain you consult the FAQ for details.
- Individual textures can be selected and fixed with Autofix, or Run Autofix ALL can be used to fix all/most invalid textures.
- Change Hash — Most users won’t need to change hashes, but this feature can be handy for copying and pasting a hash into Texplorer’s Search Bar. Consult the FAQ below for details on when to modify this field.
- Replace — Replaces the highlighted texture with another of the user’s choosing. The replacement texture should be the same proportion and format, and have proper mipmaps. Navigate to the proper location on your PC to replace the texture.
| Dimension checks fail with when using Replace. Therefore, use this feature cautiously, and be 100% certain your new texture is the exact same aspect ratio as the original. |
- Select PCCs — This is the bread-and-butter of TPF Tools. You can choose exactly which PCCs will use the new texture. Base game, BioWare DLC, DLC mod, whatever. Check the ones you want, de-check the ones you don’t. You must do this for each texture. All PCCs are checked by default; most users will want to leave them as such.
Simple TPF containing an improperly formatted texture.
Single texture loaded with no hash in the name.
Autofixed TPF of Joker’s teeth.
Selecting various PCCs in TPF Tools.
Install Textures
Clean TPF ready for installation.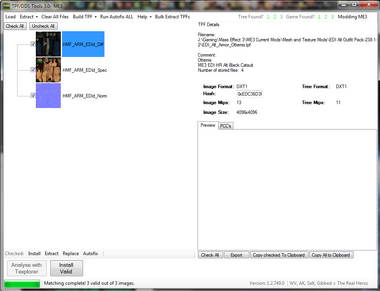
Only proceed with texture installation when you have met ALL of the following criteria:
- All texture errors except «NOT IN TREE» have been recitifed. If any errors remain, those textures will not be installed.
- Any textures tagged with «NOT IN TREE» are for a DLC you don’t own — or you don’t wish to install that texture.
- You have dealt with any textures that have File Duplicates (expandable nodes).
- You have unchecked any textures you aren’t interested in using.
- You have customized PCCs for each texture, or prefer to install to all necessary PCCs.
When all the above are true, proceed with one the following options:
- Install Valid installs all valid textures in the Main Area.
- Install installs only checked textures.
After installation, the base game and all extracted DLC will be autotoc’d, and the Progress Bar will indicate completion. Use Clear All Files to clear the Main Area of all textures and load more, or close the tool if finished.
Other Operations
In addition to texture installation, TPF Tools has functions for texture extraction and TPF creation. These tend to be geared toward mod authors, but are appropriate for more advanced users, as well.
- Texture Extraction — Extracting textures is useful if they need additional editing or manual repair via Image Engine. There are four ways to extract textures loaded into the tool:
- Bulk Extract TPFs — Asks you to browse to a folder and will extract all TPFs in that folder into separate subfolders.
- Extract (Bottom Menu) — Extracts all checked textures.
- Extract (Top Menu) — There are three options within this menu, all of which are self-explanatory.
- TPF Building — Building new TPFs is convenient for multiple reasons, including bundling for distribution, creating compatibility, archiving (for potential re-installation), and more. Prior to using this feature, textures must be analyzed and matched to proper hashes. Once analyzed, Build TPF is capable of doing the following:
- Loose textures can be bundled into a single TPF.
- Textures from multiple TPFs can be merged into the same TPF.
- An existing TPF can be customized with new install options.
- Use the All Textures and Only Checked options to help customize TPF creation. Do NOT load a manually created DEF/LOG file. The toolset creates this from the settings you specify in the tool during creation.
- Keep in mind that since hashes must be matched to use the feature, textures from DLC that are not installed, cannot be bundled into new TPFs.
FAQs[]
All common questions and issues related to TPF Tools. For general FAQs about textures, see Troubleshooting: Textures.
LOADING — TPF Tools gets stuck attempting to load my texture trees.
This may be due two things:
- Your current texture trees are too old and incompatible. Rebuild them with Texplorer.
- The toolset cache is corrupted, likely from repeated ME3Explorer or game installations. Navigate to C:UsersYourNameAppdataLocalWV and delete all contents inside this folder.
LOADING — One or more of my textures are tagged with «NOT ANALYZED».
Click Analyze with Texplorer.
LOADING — TPF Tools locks up when I try to load a MOD file.
This is a bug in the current stable, ME3Explorer v2.0. Get around this by loading the MOD file in ModMaker and using it to extract the textures. After this, look them up in Texplorer and modify the file names to include the hashes. Finally, load the raw, renamed textures in TPF Tools.
ANALYZING — One or more of my textures are tagged with «MIPS».
| TPF Tools will not fix V8U8 textures with MIPS errors. These will need to be extracted and fixed manually in Image Engine. |
Just click Autofix. This should re-format the texture to make it compatible with the vanilla game. If successful, the MIPs tag will disappear and the Status bar at the bottom will indicate «Autofix Complete». For more information about MIPs, read this article.
Loaded files with mipmap and format errors.
Aspect ratio error in TPF Tools.
Autofix failing to fix an aspect ratio error.
If Autofix fails, your only choice is to extract the texture and edit it manually for compatibility. This will be the exception to the rule; Autofix works quite well generally.
ANALYZING — One or more of my textures are tagged with «FORMAT».
Similar to the FAQ above for MIPs, this means the tagged texture is not in the same format as the game’s texture.
Click Autofix to reformat; you can follow the same instructions as above if it fails.
ANALYZING — One or more of my textures are tagged with «ASPECT RATIO» or «DIMENSIONS».
These are both problems with the texture’s size. «Aspect ratio» means the modded texture doesn’t share the same aspect ratio as the game’s texture. «Dimensions» means that the size is simply incorrect. Either the length or width could be off by a pixel or more.
Autofix can only fix very minor issues with aspect ratio and dimensions (off by a few pixels). In general, it would be safer to extract the texture and fix it in a photo editor.
ANALYZING — One or more of my textures are tagged with «NOT FOUND IN TREE».
This means the texture isn’t present in your current texture tree. It may or may not be a problem and can have four causes:
- The mod author assigned the wrong hash to the texture, preventing TPF Tools from matching it to the correct texture in your tree.
- You ran Texplorer’s scan on texture-modified files, so your tree contains modified, non-vanilla hashes for this texture (and all others that were modded prior to the scan).
- The texture is for a BioWare DLC you have, but have not extracted. Only extracted DLC can be scanned by Texplorer.
- The texture is for a BioWare DLC or DLC mod that you don’t have installed.
All but the first are problems you can address:
- To solve the first issue, search for the texture in Texplorer and edit the hash in TPF Tools so that it matches your tree.
- To solve the second issue, vanilla your game and re-build your tree on vanilla files.
- To solve the third issue, use the Getting Started guide to extract your BioWare DLC.
The fourth scenario does not need special action. TPF Tools will ignore the invalid files upon texture install.
ANALYZING — I have «Duplicate» textures. What do I do?
There are two causes of Duplicate Textures. Only the second scenario is cause for concern and needs to be dealt with prior to texture installation.
A Tree Duplicate occurs when multiple textures in the game have different names but share the same hash. Their file names will be italicized in the Main Area, but they can be safely ignored.
File Duplicates occur when multiple modded textures affecting the same hash (game texture) are loaded into the tool at the same time. When this happens, TPF Tools will display a collapsible node to the left of the Primary texture. Expand the node and you can see all alternatives to choose from.
If you wish to use the Primary texture, you don’t need to make any changes. If you prefer to use one of the others, select it, and then click on Promote Duplicate. However, before doing this, it’s important to know TPF Tools has several bugs associated with the presence of duplicates:
- Promoting a duplicate will uncheck all textures in the main area.
- Presence of file duplicates can trigger incorrect «DIMENSIONS» errors.
- When clicking between duplicates, the image preview may remain unaffected.
- Autofix will only fix a duplicate if it’s the Primary texture, and will ignore any other duplicates.
- Loading file duplicates after initial analysis and then re-analyzing will often leave the new duplicates tagged with the «NOT ANALYZED» error.
To avoid these bugs, it can be wise to first find out if you have any duplicates, and then load the version of the texture you want to install, separately.
ANALYZING — Is there anything I can do about modified hashes?
The best thing to do is revert to vanilla and re-build your tree. This will ensure all textures and hashes are vanilla.
If you are 100% certain you only need to swap out a texture or two, it’s possible to use the editable hash feature in TPF Tools to change the hash to match your existing tree. Just do the following:
- Load up the new textures you want to use in TPF Tools; use the directions on this page to analyze, etc.
- Select the texture with the incorrect hashes (which will be tagged «Not found in tree»).
- Look up the name for this texture in Texplorer and copy its existing hash.
- Paste the new hash for the selected texture into TPF Tools. Hit Enter for good measure.
- Install the new texture.
INSTALLING — Are there any texture load/install limits?
Yes and no. The more textures you load to install at once, the harder it will be to track down any errors that occur. Ultra HD (4K) textures will put a larger strain on the tool, so loading too many at a time could lead to problems. We suggest experimenting to see what you (and your PC) are comfortable with.
[]
Section reserved for relevant tutorials.
| Kfreon’s forum tutorial for TPF/DDS Tools 3.0 contributed to the creation of this article. |
| This article has been updated for ME3Explorer v3.0. |
| Kfreon created and develops TPF/DDS Tools for ME3Explorer. |
| TPF Tools permanently alters your game files and cannot be used to install textures without first generating a texture tree. See Getting Started and Texplorer before continuing. |
TPF/DDS Tools («TPF Tools» for short) is the toolset’s user-friendly texture installation utility. With it, new textures can be permanently installed into all three games.
TPF Tools is compatible with Texmod TPFs and an assortment of image file formats. It also has the ability to use and create a new format, the «METPF». Last, but not least, TPF Tools has the ability to «autofix» improperly formatted textures loaded into the program, and can bundle textures into new TPFs or METPFs for distribution.
Background[]
TPF Tool’s first iteration was an amalgamation of Saltisgood’s TPF Viewer, and the old TPF-To-MOD functionality in Texplorer. TPF Viewer allowed the contents of a TPF to be viewed without prior extraction, and the TPF-to-MOD function allowed direct conversion from TPF to MOD files. The mature version of TPF Tools has expanded on these functions several times over, and is one of the most-used tools in the toolset today.
Before using TPF Tools for the first time, it’s helpful to become familiar with basic information regarding how textures are handled in the trilogy. This will help you better understand the textures you’re loading, portions of the GUI, and error messages in the tool. Consult Textures in Mass Effect for details. Similarly, An Intro to Mass Effect Mods provides additional information on TPF, MOD, and DDS files, while also explaining details about mod install order and more.
Preparation[]
TPF Tools is a simple tool to learn, but a significant amount of preparation is required before it may be used.
If you want to install new textures into your official BioWare DLC, they must be extracted prior to installation. To do this, see the ME3Explorer Setup Guide.
Treebuilding
TPFs/DDSes may be loaded into TPF Tools without a texture tree for viewing, but to install textures, a tree must be present for the desired game. Consult Texplorer on how to build a tree for each game in the trilogy.
Texture Files
| Versions of TPF Tools in ME3Explorer v2.0+ are not compatible with MOD files. See the FAQ below on how to deal with this. |
TPF Tools is compatible with the following file types: BMP, DDS, JPG/JPEG, METPF, PNG, and TPF. To use the tool, you must have access to one or more of these files, either extracted from the game and edited yourself, or as downloaded from a hosting site like Nexusmods. For more information about valid file types and mod formats for the trilogy, see An Intro to Mass Effect Mods.
Usage[]
TPF Tools’s interface is less technical than Texplorer’s, but there’s still a lot of information present. This section steps through the GUI, explains how to use the tool, and clarifies how to combat issues with incompatible textures.
Load File
TPF Tools has two main panes that will be empty when opened. To populate the panes, either drag and drop the desired file or use Load and navigate to the necessary location on your computer.
Unlike a majority of other tools in the toolset, TPF Tools has a somewhat interactive interface. Hovering the mouse over certain GUI elements triggers a tooltip that describes their purpose. Going to Help > Toggle Help Tooltips on the top-left, shows all tooltips at once. Clicking the Wiki Article option brings you to this page.
The Left Pane displays the following features:
- Top Menu — Contains a variety of options that will be covered in different parts of this article.
- Check/Uncheck All — Checks/unchecks all textures in the main branch of the tree, controlling texture manipulation.
- Main Area — Displays the loaded textures. Provides a thumbnail and name for each, and warns about the texture’s validity. Also depicts the Texmod.def/MEResults.log file, which is used when creating a TPF/METPF. The toolset reads this information, but the file isn’t «installed», as it’s not a texture. Arrow keys can be used to navigate through the textures.
- Context Menu — Allows individual, texture-specific operations.
- Bottom Menu — Operations that generally affect all textures.
- Progress Bar — Fills and displays status updates as operations are performed (e.g, «15/20 textures installed», «Autofix complete.»).
TPF/DDS Tools r749, just opened.
TPF Tools just after loading a TPF.
The Right Pane displays the following features:
- Texture Tree Indicators — Indicate whether existing texture trees are present for each game. When using it for the first time prior to a Texplorer scan, they will be red, as no trees are present. All indicators for games you have installed and want to mod should be green. To generate trees, refer to the Texplorer article.
- Game Path Indicators — Similar to the Texture Tree Indicators, all indicators for games you have installed and want to mod should be green. If this isn’t the case, it means you likely haven’t used the ME3Explorer Setup Guide to properly set up ME3Explorer. Do this now, and don’t proceed until the path for the game you want to mod is detected properly.
- Game Modding Indicator — This defaults to Mass Effect 3. If you wish to mod a different game, just click it to cycle between all three games in the trilogy. This must be done prior to Analyzing (see below); the button will stay locked after analysis is complete.
- File Pathing and Mod Authorship — Just underneath the indicators. Specifies the path and name of the loaded TPF/selected file. When a TPF is loaded, the Comment area contains information from the mod author.
- Texture Details — Compares the selected texture to its counterpart in the game files. Properties on the left are for the loaded texture, properties on the right are for the existing game texture. Formats should always match; mipmaps and size won’t in the case of higher resolution textures. The hash field is editable, in the case of a mismatch (this should be rare). For more details on hashes, consult the Texplorer article.
- Preview Tab — Enlarges the texture name highlighted in blue, allowing for closer inspection. The preview scales with the window.
- PCC Tab — Displays all PCCs that reference that texture. These can be selected/deselected to control which files are modified with the new texture. To select/deselect all, use the Check All/Uncheck button. The buttons on the bottom of the pane provide multiple ways to save information about the PCCs, based upon whether a PCC is checked or highlighted. A subsection of checked/unchecked PCCs can be highlighted blue by clicking on them.
- Copy All to Clipboard, copies all PCC names to the clipboard.
- Export, exports all checked PCC names to a TXT file.
- Copy Checked to Clipboard is a misnomer. This copies all highlighted PCC names to the clipboard, allowing the user to save a subset of PCCs on the list, without having to modify installation parameters.
- Tool Version and Toolset Authorship — On the bottom right.
TPF Tools window after selecting a texture inside a TPF.
TPF with no texture errors loaded into TPF Tools.
Loose texture with correct hash in name.
Successful hash match for replacement texture.
Analyze + Configure
Once you’re certain your game paths are correct, the proper texture trees are present, a file is loaded, and you’ve had time to orient yourself in the GUI, it’s time to configure your texture installation parameters.
It’s important to understand that none of the configuration options affect the loaded file itself. The TPF/texture file as it exists on your HDD is not affected; changes are saved to a temporary location and applied upon installation, only.
- Analyze with Texplorer — This is the first step. Clicking Analyze with Texplorer uses the Texplorer tree to match the loaded textures to those in the selected game. Only textures in the tree can be matched (see Texplorer). When a match is found, the texture file name changes to match the tree name. Raw textures (DDS, BMP, PNG, JPG) must have hashes for the corresponding vanilla texture in their file name. TPFs come pre-built with these hashes. Every time additional textures are loaded, they must be re-analyzed to find their match in the tree.
- Address Duplicates. — When loading more than one TPF in TPF Tools, it’s possible multiple copies of the same texture will be present. These textures will have an expandable node to their left and need to be dealt with prior to installation. For more details, see the FAQ.
- Autofix — Improperly formatted textures are tagged with arrows («>», «<«) and a brief description. Consult the FAQ on this page for specific details on various error types. These textures MUST be fixed either manually or via Autofix, and made «valid» before installation. The toolset will not install invalid textures. Some important details about using Autofix:
- It’s not perfect. There are several bugs covered in the FAQ. Before using it, be sure you know what type of error you have, and whether it’s affected by a current bug.
- Like many texture modifications, it can be lossy. Expect a minor deterioration in quality.
- Conversions to DXT5 can be hit or miss, depending on how the alpha is handled. For more information on alpha, see Textures in Mass Effect.
- Autofix cannot fix the «NOT FOUND IN TREE» error. See the FAQ for details on this error.
- The presence of File Duplicates complicates autofix significantly. Be certain you consult the FAQ for details.
- Individual textures can be selected and fixed with Autofix, or Run Autofix ALL can be used to fix all/most invalid textures.
- Change Hash — Most users won’t need to change hashes, but this feature can be handy for copying and pasting a hash into Texplorer’s Search Bar. Consult the FAQ below for details on when to modify this field.
- Replace — Replaces the highlighted texture with another of the user’s choosing. The replacement texture should be the same proportion and format, and have proper mipmaps. Navigate to the proper location on your PC to replace the texture.
| Dimension checks fail with when using Replace. Therefore, use this feature cautiously, and be 100% certain your new texture is the exact same aspect ratio as the original. |
- Select PCCs — This is the bread-and-butter of TPF Tools. You can choose exactly which PCCs will use the new texture. Base game, BioWare DLC, DLC mod, whatever. Check the ones you want, de-check the ones you don’t. You must do this for each texture. All PCCs are checked by default; most users will want to leave them as such.
Simple TPF containing an improperly formatted texture.
Single texture loaded with no hash in the name.
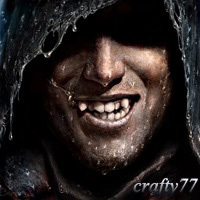
Autofixed TPF of Joker’s teeth.
Selecting various PCCs in TPF Tools.
Install Textures
Clean TPF ready for installation.
Only proceed with texture installation when you have met ALL of the following criteria:
- All texture errors except «NOT IN TREE» have been recitifed. If any errors remain, those textures will not be installed.
- Any textures tagged with «NOT IN TREE» are for a DLC you don’t own — or you don’t wish to install that texture.
- You have dealt with any textures that have File Duplicates (expandable nodes).
- You have unchecked any textures you aren’t interested in using.
- You have customized PCCs for each texture, or prefer to install to all necessary PCCs.
When all the above are true, proceed with one the following options:
- Install Valid installs all valid textures in the Main Area.
- Install installs only checked textures.
After installation, the base game and all extracted DLC will be autotoc’d, and the Progress Bar will indicate completion. Use Clear All Files to clear the Main Area of all textures and load more, or close the tool if finished.
Other Operations
In addition to texture installation, TPF Tools has functions for texture extraction and TPF creation. These tend to be geared toward mod authors, but are appropriate for more advanced users, as well.
- Texture Extraction — Extracting textures is useful if they need additional editing or manual repair via Image Engine. There are four ways to extract textures loaded into the tool:
- Bulk Extract TPFs — Asks you to browse to a folder and will extract all TPFs in that folder into separate subfolders.
- Extract (Bottom Menu) — Extracts all checked textures.
- Extract (Top Menu) — There are three options within this menu, all of which are self-explanatory.
- TPF Building — Building new TPFs is convenient for multiple reasons, including bundling for distribution, creating compatibility, archiving (for potential re-installation), and more. Prior to using this feature, textures must be analyzed and matched to proper hashes. Once analyzed, Build TPF is capable of doing the following:
- Loose textures can be bundled into a single TPF.
- Textures from multiple TPFs can be merged into the same TPF.
- An existing TPF can be customized with new install options.
- Use the All Textures and Only Checked options to help customize TPF creation. Do NOT load a manually created DEF/LOG file. The toolset creates this from the settings you specify in the tool during creation.
- Keep in mind that since hashes must be matched to use the feature, textures from DLC that are not installed, cannot be bundled into new TPFs.
FAQs[]
All common questions and issues related to TPF Tools. For general FAQs about textures, see Troubleshooting: Textures.
LOADING — TPF Tools gets stuck attempting to load my texture trees.
This may be due two things:
- Your current texture trees are too old and incompatible. Rebuild them with Texplorer.
- The toolset cache is corrupted, likely from repeated ME3Explorer or game installations. Navigate to C:UsersYourNameAppdataLocalWV and delete all contents inside this folder.
LOADING — One or more of my textures are tagged with «NOT ANALYZED».
Click Analyze with Texplorer.
LOADING — TPF Tools locks up when I try to load a MOD file.
This is a bug in the current stable, ME3Explorer v2.0. Get around this by loading the MOD file in ModMaker and using it to extract the textures. After this, look them up in Texplorer and modify the file names to include the hashes. Finally, load the raw, renamed textures in TPF Tools.
ANALYZING — One or more of my textures are tagged with «MIPS».
| TPF Tools will not fix V8U8 textures with MIPS errors. These will need to be extracted and fixed manually in Image Engine. |
Just click Autofix. This should re-format the texture to make it compatible with the vanilla game. If successful, the MIPs tag will disappear and the Status bar at the bottom will indicate «Autofix Complete». For more information about MIPs, read this article.
Loaded files with mipmap and format errors.
Aspect ratio error in TPF Tools.
Autofix failing to fix an aspect ratio error.
If Autofix fails, your only choice is to extract the texture and edit it manually for compatibility. This will be the exception to the rule; Autofix works quite well generally.
ANALYZING — One or more of my textures are tagged with «FORMAT».
Similar to the FAQ above for MIPs, this means the tagged texture is not in the same format as the game’s texture.
Click Autofix to reformat; you can follow the same instructions as above if it fails.
ANALYZING — One or more of my textures are tagged with «ASPECT RATIO» or «DIMENSIONS».
These are both problems with the texture’s size. «Aspect ratio» means the modded texture doesn’t share the same aspect ratio as the game’s texture. «Dimensions» means that the size is simply incorrect. Either the length or width could be off by a pixel or more.
Autofix can only fix very minor issues with aspect ratio and dimensions (off by a few pixels). In general, it would be safer to extract the texture and fix it in a photo editor.
ANALYZING — One or more of my textures are tagged with «NOT FOUND IN TREE».
This means the texture isn’t present in your current texture tree. It may or may not be a problem and can have four causes:
- The mod author assigned the wrong hash to the texture, preventing TPF Tools from matching it to the correct texture in your tree.
- You ran Texplorer’s scan on texture-modified files, so your tree contains modified, non-vanilla hashes for this texture (and all others that were modded prior to the scan).
- The texture is for a BioWare DLC you have, but have not extracted. Only extracted DLC can be scanned by Texplorer.
- The texture is for a BioWare DLC or DLC mod that you don’t have installed.
All but the first are problems you can address:
- To solve the first issue, search for the texture in Texplorer and edit the hash in TPF Tools so that it matches your tree.
- To solve the second issue, vanilla your game and re-build your tree on vanilla files.
- To solve the third issue, use the Getting Started guide to extract your BioWare DLC.
The fourth scenario does not need special action. TPF Tools will ignore the invalid files upon texture install.
ANALYZING — I have «Duplicate» textures. What do I do?
There are two causes of Duplicate Textures. Only the second scenario is cause for concern and needs to be dealt with prior to texture installation.
A Tree Duplicate occurs when multiple textures in the game have different names but share the same hash. Their file names will be italicized in the Main Area, but they can be safely ignored.
File Duplicates occur when multiple modded textures affecting the same hash (game texture) are loaded into the tool at the same time. When this happens, TPF Tools will display a collapsible node to the left of the Primary texture. Expand the node and you can see all alternatives to choose from.
If you wish to use the Primary texture, you don’t need to make any changes. If you prefer to use one of the others, select it, and then click on Promote Duplicate. However, before doing this, it’s important to know TPF Tools has several bugs associated with the presence of duplicates:
- Promoting a duplicate will uncheck all textures in the main area.
- Presence of file duplicates can trigger incorrect «DIMENSIONS» errors.
- When clicking between duplicates, the image preview may remain unaffected.
- Autofix will only fix a duplicate if it’s the Primary texture, and will ignore any other duplicates.
- Loading file duplicates after initial analysis and then re-analyzing will often leave the new duplicates tagged with the «NOT ANALYZED» error.
To avoid these bugs, it can be wise to first find out if you have any duplicates, and then load the version of the texture you want to install, separately.
ANALYZING — Is there anything I can do about modified hashes?
The best thing to do is revert to vanilla and re-build your tree. This will ensure all textures and hashes are vanilla.
If you are 100% certain you only need to swap out a texture or two, it’s possible to use the editable hash feature in TPF Tools to change the hash to match your existing tree. Just do the following:
- Load up the new textures you want to use in TPF Tools; use the directions on this page to analyze, etc.
- Select the texture with the incorrect hashes (which will be tagged «Not found in tree»).
- Look up the name for this texture in Texplorer and copy its existing hash.
- Paste the new hash for the selected texture into TPF Tools. Hit Enter for good measure.
- Install the new texture.
INSTALLING — Are there any texture load/install limits?
Yes and no. The more textures you load to install at once, the harder it will be to track down any errors that occur. Ultra HD (4K) textures will put a larger strain on the tool, so loading too many at a time could lead to problems. We suggest experimenting to see what you (and your PC) are comfortable with.
[]
Section reserved for relevant tutorials.
| Kfreon’s forum tutorial for TPF/DDS Tools 3.0 contributed to the creation of this article. |
На чтение 3 мин Просмотров 99 Опубликовано 26.10.2022
Обновлено 26.10.2022
Не все изображения используют стандартный формат jpeg. Для открытия файлов с другими более редкими расширениями потребуются специальные приложения. Одним из таких редких форматов является DDS.
Содержание
- Что за файл DDS?
- Программы для открытия
- XnView
- Paint.NET
- Photoshop
Что за файл DDS?
DDS, или Direct Draw Surface, используется для хранения растровых изображений. Это расширение было создано компанией Microsoft для запуска DirectX. Он часто используется для хранения текстур или 3D-моделей.
Этот формат используется для сжатия изображений без потери качества. Вы можете столкнуться с ним при работе с 3D-реакторами или играми, использующими трехмерную графику. Он помогает обрабатывать растровые изображения в режиме онлайн.
Этот же файл используется для отображения графики в игровых консолях, таких как Xbox или Sony Play Station. В нем хранятся различные карты, модели объектов или персонажей и уровни. Это же расширение используется для хранения обоев рабочего стола Windows.
Большинство видеокарт поддерживают технологию сжатия текстур DXTn. С его помощью можно сэкономить память и тем самым повысить производительность компонента. Эта технология позволяет наслаждаться мощными играми без потери качества изображения.
Программы для открытия
Формат DDS является довольно популярным. Поэтому у вас не возникнет проблем с его открытием. Его нельзя открыть стандартными средствами операционной системы, но можно загрузить дополнительное бесплатное программное обеспечение.
XnView
XnView — это графический редактор, позволяющий открывать файлы различных форматов, включая файлы DDS. Приложение имеет платную и бесплатную версию, но их функциональность не отличается. Пользователю также понравится интуитивно понятный интерфейс.
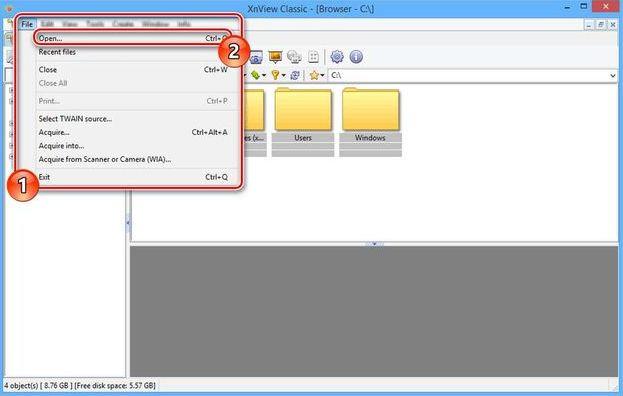
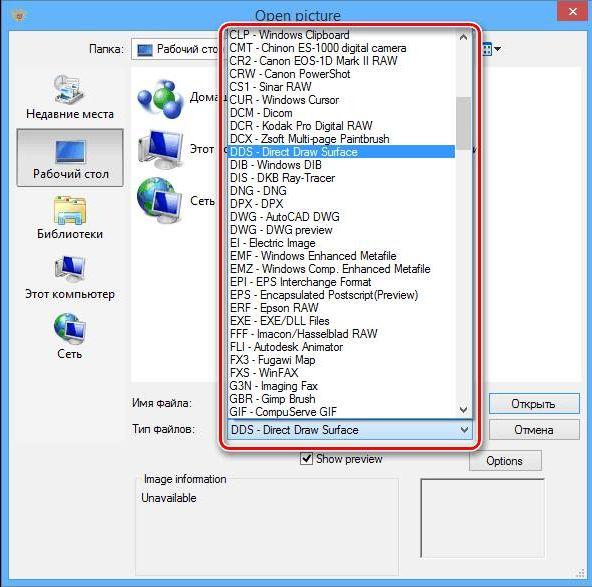
Чтобы открыть файл DDS, выполните следующие действия:
- Запустите приложение и перейдите на вкладку Файл — Открыть.

- Выберите соответствующий тип файла.

- Перейдите в папку с нужным документом и откройте его.


Растровое изображение будет отображено на экране.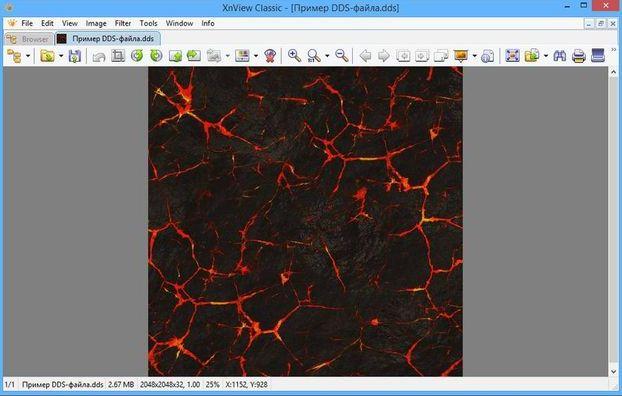
Конвертация документов Word в pdf — программы, конвертеры и онлайн-сервисы
Этот редактор идеально подходит для просмотра графики. Однако лучше не редактировать их в этом приложении. Если вы внесете какие-либо изменения, качество может пострадать.
Paint.NET
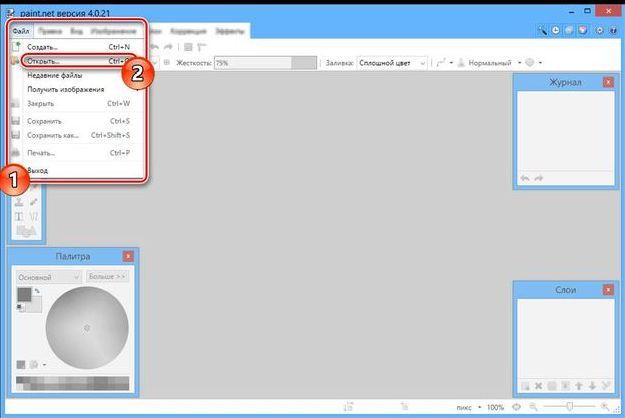
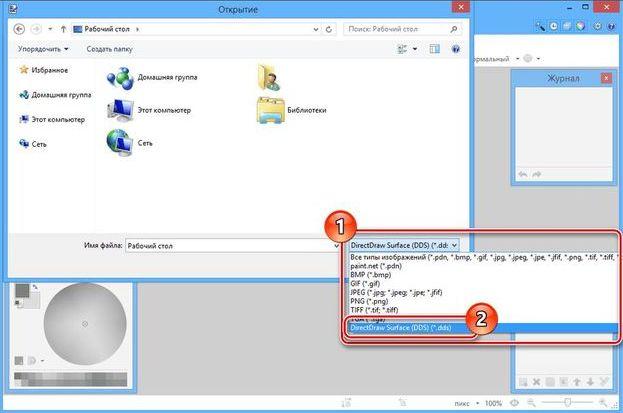
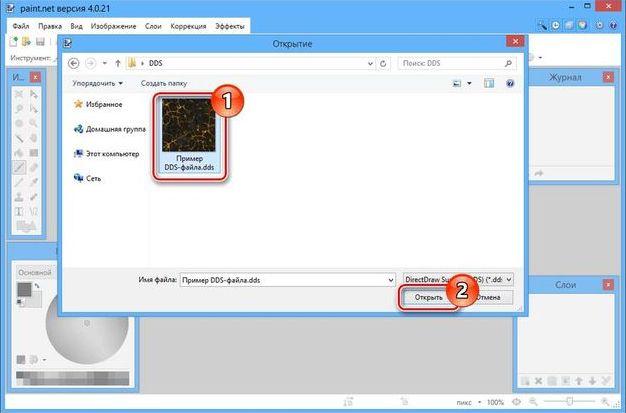
Paint.NET — это своего рода упрощенная версия Photoshop и GIMP. В нем вы найдете множество полезных функций, включая открытие и редактирование изображений DDS. Чтобы открыть формат DDS, просто следуйте инструкциям:
- Запустите приложение и перейдите в меню Файл — Открыть.

- В соответствующем поле измените формат на нужный. Вы можете выбрать «Все файлы».

- Перейдите к папке с нужным документом.

Инструмент является бесплатным и доступен на русском языке. У него также есть значительное преимущество. Пользователь может установить дополнительные плагины для добавления новых функций в программу.
Photoshop
Открыть файл DDS для редактирования можно также с помощью Photoshop. Однако это требует установки дополнительного плагина сжатия текстур DXTC. Затем пользователь может просматривать и редактировать изображение.
При работе с документами не имеет значения, сжаты они или нет. При сохранении и работе с документом необходимо использовать цветовую схему RGB.