 Хотел бы навести маленькую статью заметку о том, как можно редактировать (вносить изменения) deb пакеты. Рано или поздно каждый администратор сталкивается с нуждой сборки или редактирования установочных пакетов. К примеру, мы используем pound в роли фронт-енда для https. По умолчанию, он пишет все логи в syslog.log, и для того, чтобы он писал в свой собственный файл, нужно внести изменения не только в pound, но и в syslog конфигурацию. Плюс нужно добавить ротейт логов. Чтобы каждый раз не проделывать все изменения после установки, мы можем добавить все нужные файлы конфигураций и папки в deb-пакет pound-а, и уже устанавливать его вместо репозиторного.
Будем редактировать pound под дистрибутивом Ubuntu 16.04.
Для того, чтобы загрузить пакет из репозитория без установки можно использовать следующею команду.
root@dpkg:~# apt download pound
После этого, у нас в рабочей директории появиться пакет pound.
root@dpkg:~# ls -l pound_2.6-6.1_amd64.deb
-rw-r--r-- 1 root root 92604 May  7  2015 pound_2.6-6.1_amd64.deb
Посмотрим из каких файлов состоит этот пакет.
root@dpkg:~# dpkg -c pound_2.6-6.1_amd64.deb
drwxr-xr-x root/root         0 2015-05-07 00:26 ./
drwxr-xr-x root/root         0 2015-05-07 00:26 ./usr/
drwxr-xr-x root/root         0 2015-05-07 00:26 ./usr/sbin/
-rwxr-xr-x root/root     14560 2015-05-07 00:26 ./usr/sbin/poundctl
-rwxr-xr-x root/root    103456 2015-05-07 00:26 ./usr/sbin/pound
drwxr-xr-x root/root         0 2015-05-07 00:26 ./usr/share/
drwxr-xr-x root/root         0 2015-05-07 00:26 ./usr/share/doc/
drwxr-xr-x root/root         0 2015-05-07 00:26 ./usr/share/doc/pound/
-rw-r--r-- root/root      1272 2015-05-07 00:26 ./usr/share/doc/pound/changelog.Debian.gz
-rw-r--r-- root/root      5782 2011-12-28 15:57 ./usr/share/doc/pound/FAQ.gz
-rw-r--r-- root/root       681 2014-10-20 00:11 ./usr/share/doc/pound/copyright
-rw-r--r-- root/root     12826 2011-12-28 15:57 ./usr/share/doc/pound/README.gz
drwxr-xr-x root/root         0 2015-05-07 00:26 ./usr/share/doc/pound/examples/
-rw-r--r-- root/root      7068 2011-12-28 15:57 ./usr/share/doc/pound/examples/z2_2_5_1.py.gz
-rw-r--r-- root/root      9166 2011-12-28 15:57 ./usr/share/doc/pound/examples/z2_2_6_1.py.gz
drwxr-xr-x root/root         0 2015-05-07 00:26 ./usr/share/man/
drwxr-xr-x root/root         0 2015-05-07 00:26 ./usr/share/man/man8/
-rw-r--r-- root/root     11133 2015-05-07 00:26 ./usr/share/man/man8/pound.8.gz
-rw-r--r-- root/root      1024 2015-05-07 00:26 ./usr/share/man/man8/poundctl.8.gz
drwxr-xr-x root/root         0 2015-05-07 00:26 ./etc/
drwxr-xr-x root/root         0 2015-05-07 00:26 ./etc/init.d/
-rwxr-xr-x root/root      2061 2014-10-20 00:20 ./etc/init.d/pound
drwxr-xr-x root/root         0 2015-05-07 00:26 ./etc/pound/
-rw-r--r-- root/root       927 2015-05-07 00:26 ./etc/pound/pound.cfg
Мы хотим, чтобы pound писал логи в папку /var/log/pound. Также нужно сразу добавить logrotate для этой папки, чтобы лог-файлы не росли до заоблачных размеров.
Следовательно, нам нужно добавить в deb пакет папку с логфайлом, конфигурацию для logrotat-а и конфигурацию для syslog.
Распакуем deb пакет.
root@dpkg:~# dpkg-deb -x pound_2.6-6.1_amd64.deb pound_folder/
root@dpkg:~# ls pound_folder/
etc  usr
Теперь переходим в новосозданную папку и добавляем все нужных папки и конфигурации.
Для начала добавляем папку для логов
root@dpkg:~# cd pound_folder/

root@dpkg:~/pound_folder# mkdir -pv var/log/pound
mkdir: created directory 'var'
mkdir: created directory 'var/log'
mkdir: created directory 'var/log/pound'

root@dpkg:~/pound_folder# touch var/log/pound/pound.log
Далее добавляем конфигурацию для logrotate.
root@dpkg:~/pound_folder# mkdir -pv etc/logrotate.d
mkdir: created directory 'etc/logrotate.d'

root@dpkg:~/pound_folder# vim etc/logrotate.d/pound
…
/var/log/pound/pound.log {
    daily
    dateext
    dateformat .%Y-%m-%d
    rotate 30
    notifempty
    missingok
    compress
    create 0644 syslog adm
    copytruncate
…
Теперь добавим конфигурацию для syslog (чтобы pound писал в свой файлик).
root@dpkg:~/pound_folder# mkdir -pv etc/rsyslog.d
mkdir: created directory 'etc/rsyslog.d'

root@dpkg:~/pound_folder# vim etc/rsyslog.d/pound.conf
…
local0.*                        -/var/log/pound/pound.log
…
Осталось только подправить конфигурация самого pound-а.
root@dpkg:~/pound_folder#  vim etc/pound/pound.cfg
…
LogFacility local0
…
На этом приготовления завершены. Теперь нужно добавить описание для нашего пакета (control-information есть обязательным для всех deb пакетов). Его можно извлечь из скаченного пакета и обязательно поместить в нашу с именем DEBIAN.
root@dpkg:~/pound_folder# dpkg-deb -e ../pound_2.6-6.1_amd64.deb ./DEBIAN

root@dpkg:~/pound_folder# tree DEBIAN/
DEBIAN/
├── conffiles
├── control
├── md5sums
├── postinst
├── postrm
└── prerm
Также, извлечь информацию о пакете и дерево файлов можно было одной командой:
root@dpkg:~# dpkg-deb -R pound_2.6-6.1_amd64.deb pound_folder/
Теперь редактируем DEBIAN/control файл.
root@dpkg:~/pound_folder# vim DEBIAN/control
…
Package: my-pound
Version: 2.6-6.1
Architecture: amd64
Maintainer: alex
Original-Maintainer: Brett Parker <iDunno@sommitrealweird.co.uk>
Installed-Size: 232
Depends: libc6 (>= 2.14), libpcre3, libssl1.0.0 (>= 1.0.0)
Section: net
Priority: extra
Homepage: http://www.apsis.ch/pound/
Description: reverse proxy, load balancer and HTTPS front-end for Web servers
 Pound was developed to enable distributing the load among several Web-servers
 and to allow for a convenient SSL wrapper for those Web servers that do not
 offer it natively.
…
Также добавим m5sum каждого добавленного файла.
root@dpkg:~/pound_folder# md5sum etc/logrotate.d/pound >> DEBIAN/md5sums
root@dpkg:~/pound_folder# md5sum etc/rsyslog.d/pound.conf >> DEBIAN/md5sums
root@dpkg:~/pound_folder# md5sum var/log/pound/pound.log >> DEBIAN/md5sums

root@dpkg:~/pound_folder# tail -5 DEBIAN/md5sums
aabd8125f84d54348ecacb3db49b8e7c  usr/share/man/man8/pound.8.gz
3f28a8e93815524fd805c8be51aaa29c  usr/share/man/man8/poundctl.8.gz
a5412406ce20f98671b4b8876da6aa29  etc/logrotate.d/pound
a326a3e96bfdb8921e48e1b13ca57477  etc/rsyslog.d/pound.conf
d41d8cd98f00b204e9800998ecf8427e  var/log/pound/pound.log
Теперь осталось собрать новый пакет (название пакета я изменил просто для примера).
root@dpkg:~/pound_folder# dpkg-deb -b ../pound_folder ../my-pound_2.6-6.1_amd64.deb
dpkg-deb: building package 'my-pound' in '../my-pound_2.6-6.1_amd64.deb'
Посмотрим какие файлы в нашем новом пакете.
root@dpkg:~# dpkg -c my-pound_2.6-6.1_amd64.deb
drwxr-xr-x root/root         0 2016-10-30 15:35 ./
drwxr-xr-x root/root         0 2016-10-30 15:14 ./etc/
drwxr-xr-x root/root         0 2015-05-07 00:26 ./etc/init.d/
-rwxr-xr-x root/root      2061 2014-10-20 00:20 ./etc/init.d/pound
drwxr-xr-x root/root         0 2016-10-30 15:11 ./etc/logrotate.d/
-rw-r--r-- root/root       174 2016-10-30 15:11 ./etc/logrotate.d/pound
drwxr-xr-x root/root         0 2016-10-30 15:16 ./etc/pound/
-rw-r--r-- root/root       946 2016-10-30 15:16 ./etc/pound/pound.cfg
drwxr-xr-x root/root         0 2016-10-30 15:18 ./etc/rsyslog.d/
-rw-r--r-- root/root        58 2016-10-30 15:18 ./etc/rsyslog.d/pound.conf
drwxr-xr-x root/root         0 2015-05-07 00:26 ./usr/
drwxr-xr-x root/root         0 2015-05-07 00:26 ./usr/sbin/
-rwxr-xr-x root/root     14560 2015-05-07 00:26 ./usr/sbin/poundctl
-rwxr-xr-x root/root    103456 2015-05-07 00:26 ./usr/sbin/pound
drwxr-xr-x root/root         0 2015-05-07 00:26 ./usr/share/
drwxr-xr-x root/root         0 2015-05-07 00:26 ./usr/share/doc/
drwxr-xr-x root/root         0 2015-05-07 00:26 ./usr/share/doc/pound/
drwxr-xr-x root/root         0 2015-05-07 00:26 ./usr/share/doc/pound/examples/
-rw-r--r-- root/root      7068 2011-12-28 15:57 ./usr/share/doc/pound/examples/z2_2_5_1.py.gz
-rw-r--r-- root/root      9166 2011-12-28 15:57 ./usr/share/doc/pound/examples/z2_2_6_1.py.gz
-rw-r--r-- root/root     12826 2011-12-28 15:57 ./usr/share/doc/pound/README.gz
-rw-r--r-- root/root       681 2014-10-20 00:11 ./usr/share/doc/pound/copyright
-rw-r--r-- root/root      5782 2011-12-28 15:57 ./usr/share/doc/pound/FAQ.gz
-rw-r--r-- root/root      1272 2015-05-07 00:26 ./usr/share/doc/pound/changelog.Debian.gz
drwxr-xr-x root/root         0 2015-05-07 00:26 ./usr/share/man/
drwxr-xr-x root/root         0 2015-05-07 00:26 ./usr/share/man/man8/
-rw-r--r-- root/root      1024 2015-05-07 00:26 ./usr/share/man/man8/poundctl.8.gz
-rw-r--r-- root/root     11133 2015-05-07 00:26 ./usr/share/man/man8/pound.8.gz
drwxr-xr-x root/root         0 2016-10-30 14:55 ./var/
drwxr-xr-x root/root         0 2016-10-30 14:55 ./var/log/
drwxr-xr-x root/root         0 2016-10-30 15:08 ./var/log/pound/
-rw-r--r-- root/root         0 2016-10-30 15:08 ./var/log/pound/pound.log
Как видим, все наши файлы есть в сборке.
Теперь можно установить новый пакет.
root@dpkg:~# dpkg -i my-pound_2.6-6.1_amd64.deb
Selecting previously unselected package my-pound.
(Reading database ... 92007 files and directories currently installed.)
Preparing to unpack my-pound_2.6-6.1_amd64.deb ...
Unpacking my-pound (2.6-6.1) ...
Setting up my-pound (2.6-6.1) ...
Processing triggers for systemd (229-4ubuntu11) ...
Processing triggers for ureadahead (0.100.0-19) ...
Processing triggers for man-db (2.7.5-1) ...

root@dpkg:~# dpkg -l | grep pound
ii  my-pound                           2.6-6.1                           amd64        reverse proxy, load balancer and HTTPS front-end for Web servers
Теперь внесем пару изменений и стартуем pound
root@dpkg:~# vim /etc/default/pound
…
startup=1
…

root@dpkg:~# chown syslog:adm /var/log/pound/pound.log
root@dpkg:~# /etc/init.d/rsyslog restart
root@dpkg:~# /etc/init.d/pound start
Проверяем 443 порт.
root@dpkg:~# curl https://localhost
curl: (35) gnutls_handshake() failed: An unexpected TLS packet was received.

root@dpkg:~# ls -l /var/log/pound/
total 4
-rw-r--r-- 1 syslog adm 198 Oct 30 16:00 pound.log
Как видим, pound не настроен, поэтому выдал ошибку и залогировал ее в свой лог файл.
Осталось проверить logrotate.
root@dpkg:~# logrotate -v -f /etc/logrotate.d/pound
reading config file /etc/logrotate.d/pound
Handling 1 logs
rotating pattern: /var/log/pound/pound.log  forced from command line (30 rotations)
empty log files are not rotated, old logs are removed
considering log /var/log/pound/pound.log
  log needs rotating
rotating log /var/log/pound/pound.log, log->rotateCount is 30
Converted ' .%Y-%m-%d' -> '.%Y-%m-%d'
dateext suffix '.2016-10-30'
glob pattern '.[0-9][0-9][0-9][0-9]-[0-9][0-9]-[0-9][0-9]'
glob finding old rotated logs failed
copying /var/log/pound/pound.log to /var/log/pound/pound.log.2016-10-30
truncating /var/log/pound/pound.log
compressing log with: /bin/gzip

root@dpkg:~# ls -l /var/log/pound/
total 4
-rw-r--r-- 1 syslog adm   0 Oct 30 16:02 pound.log
-rw-r--r-- 1 syslog adm 136 Oct 30 16:00 pound.log.2016-10-30.gz

root@dpkg:~# curl https://localhost
curl: (35) gnutls_handshake() failed: An unexpected TLS packet was received.

root@dpkg:~# ls -l /var/log/pound/
total 8
-rw-r--r-- 1 syslog adm  78 Oct 30 16:02 pound.log
-rw-r--r-- 1 syslog adm 136 Oct 30 16:00 pound.log.2016-10-30.gz
Все отлично, лог заротейтился, потом мы проверили или пишется лог в новый файл – все ок.
На этом все. Как создавать пакет с новым названием для поддержки мультиверсионности можно почитать здесь
The answer to #3 and #4 is that you should put the package in hold status once you’ve installed your version. This tells the Debian package management system to «hold» any future changes to this package, in effect lets you manage the package manually.
From the Debian FAQ:
7.11 What is meant by unknown, install, remove, purge and hold in the package status?
These «want» flags tell what the user wanted to do with a package (as indicated either by the user’s actions in the «Select» section of dselect, or by the user’s direct invocations of dpkg).
Their meanings are:
unknown — the user has never indicated whether he wants the package>
install — the user wants the package installed or upgraded
remove — the user wants the package removed, but does not want to remove any existing configuration files.
purge — the user wants the package to be removed completely, including its >configuration files.
hold — the user wants this package not to be processed, i.e., he wants to keep the >current version with the current status whatever that is.
7.12 How do I put a package on hold?
There are three ways of holding back packages, with dpkg, aptitude or with dselect.
With dpkg, you have to export the list of package selections, with:
dpkg —get-selections * > selections.txt
Then edit the resulting file selections.txt, change the line containing the package you wish to hold, e.g. libc6, from this:
libc6 install
to this:
libc6 hold
Save the file, and reload it into dpkg database with:
dpkg —set-selections < selections.txt
With aptitude, you can hold a package using
aptitude hold package_name
and remove the hold with
aptitude unhold package_name
With dselect, you have to enter the [S]elect screen, find the package you wish to hold in >its present state, and press the
=' key (orH’). The changes will go live immediately >after you exit the [S]elect screen.
Note: People have found issues with the aptitude hold command, so imho you should prefer the dpkg command to hold the package. Alternatively, you could hold the package via the Synaptic package manager GUI interface (Package > Lock Version). My preference is to use dpkg because it has worked well for me.
You already have a good answer for the rest so I’ll not venture my opinion on those.
Deb пакеты очень удобный инструмент, особенно если знаешь как его использовать. Попробую поделиться собственным опытом в данном вопросе.
Подготовка
Чтобы начать создавать deb пакеты, нужно установить несколько пакетов:
$ sudo apt-get install dh_make
Подготовка папки с исходниками
Для того, чтобы dh_make и другие утилиты могли работать с папкой с исходниками, нужно привести ее в специфичный вид.
Папка должна называться имяпакета-версия. Т.е. если у меня есть папка Plugins с программой версии 0.1, то я создаю папку с именем plugins-0.1.
$ ls
VKSPlugins
$ mv VKSPlugins/ libvksplugins-0.1
$ ls
libvksplugins-0.1
Теперь нужно создать архив с этой папкой. Архив должен содержать в имени *.orig.tar.gz, т.е.:
$ tar -zcf libvksplugins_0.1.orig.tar.gz libvksplugins-0.1
$ ls
libvksplugins-0.1 libvksplugins_0.1.orig.tar.gz
Последний подготовительный шаг, это создание в папке с исходниками папки debian со множеством служебных файлов. Чтобы это сделать, нужно выполнить команду:
$ cd libvksplugins-0.1/
$ dh_make
Type of package: single binary, indep binary,
multiple binary, library, kernel module, kernel patch?
[s/i/m/l/k/n] l
Maintainer name : User Name
Email-Address : user@name.ru
Date : Wed, 19 Aug 2015 14:55:53 +0300
Package Name : libvksplugins
Version : 0.1
License : blank
Type of Package : Single
Hit <enter> to confirm:
Skipping creating ../libvksplugins_0.1.orig.tar.gz because it already exists
Done. Please edit the files in the debian/ subdirectory now. plugins
uses a configure script, so you probably don’t have to edit the Makefiles.
В процессе выполнения этой команды будет задан вопрос о том, какой тип архива мы создаем, самый простой это single.
О типе пакета
На самом деле документация говорит, выбирать вариант только single. Т.к. я не смог понять всех требований к пакету типа library но меня вполне устраивает результат, то описание и дальше пойдет про пакет типа library.
Настройка пакета
Вся настройка пакета происходит путем редактирования файлов в каталоге debian. Рассмотрим те файлы, которые будем использовать:
- changelog — история пакета.
- control — главный конфиг пакета;
- rules — аналог Makefile для пакета;
Кроме этих файлов, в папке debian будет создано много файлов *.ex которые являются примерами для конфигурации различных вещей, но мы не будем их использовать и поэтому их нужно удалить.
changelog
Данный файл содержит историю изменения пакета и текущую версию пакета. Посмотрим на его содержимое:
$ cat changelog
libvksplugins (0.1-1) unstable; urgency=low

* Initial release (Closes: #nnnn) <nnnn is the bug number of your ITP>

-- User Name <user@name.ru> Wed, 19 Aug 2015 15:03:51 +0300
В начале идет название пакета — libvksplugins, затем его версия. Версия делиться на две части символом «-». Первая часть показывает версию программы в пакете, вторая «ревизию» пакета. Ревизия это версия пакета, т.е. если раньше такого пакета не было, то ревизия равна 1. Если же пакет с такой версией программы уже был, но в нем произошли изменения, то ревизия увеличивается.
Слово unstable показывает, что пакет является не стабильным, т.е. он не был протестирован должным образом на машинах пользователей.
Надпись urgency=low показывает срочность изменения. Т.к. срочности нет, то значение равно low. Если бы, мы делали пакет для исправления серьезной уязвимости или ошибки, то значение можно было бы установить в high.
После первой строки идет пустая строка, а за ней первая запись:
* Initial release (Closes: #nnnn) <nnnn is the bug number of your ITP>
В Debian, changelog используется для автоматического закрытия ошибок в системах отслеживания ошибок в программных продуктах. Т.к. в данном случае, я не использую такую систему, то эта строка принимает вид:
* Initial release
Замечание
При проверке пакета программой lintian, отсутствие Closes: #XXXX считается ошибкой.
Последняя строка является подписью человека, сделавшего запись. В ней содержится имя и адрес, а также дата изменения.
После установки deb пакета, файл changelog устанавливается в
/usr/share/doc/<пакет>/changelog.Debian.gz
control
Файл debian/control является главным конфигом, при создании deb пакета. Вот пример такого файла:
$ cat control
Source: libvksplugins
Priority: optional
Maintainer: User Name <user@name.ru>
Build-Depends: debhelper (>= 9), cmake
Standards-Version: 3.9.5
Section: libs
Homepage: <insert the upstream URL, if relevant>
#Vcs-Git: git://anonscm.debian.org/collab-maint/plugins.git
#Vcs-Browser: http://anonscm.debian.org/?p=collab-maint/plugins.git;a=summary

Package: libvksplugins-dev
Section: libdevel
Architecture: any
Depends: libvkspluginsBROKEN (= ${binary:Version}), ${misc:Depends}
Description: <insert up to 60 chars description>
 <insert long description, indented with spaces>

Package: libvkspluginsBROKEN
Architecture: any
Depends: ${shlibs:Depends}, ${misc:Depends}
Description: <insert up to 60 chars description>
 <insert long description, indented with spaces>
Видно, что файл разбит на секции при помощи пустых строк. Каждая секция описывает один пакет, создаваемый из папки с исходниками. Рассмотрим их по порядку:
Source Данная секция говорит о том, что нужно создать пакет исходных кодов. Параметром указано libvksplugins, это значит, что пакет исходных кодов будет называться libvksplugins.
Priority Эта секция устанавливает приоритет пакета. Т.к. система может прекрасно обойтись без нового пакета, то значение секции установлено в optional. Т.е. этот пакет не обязателен для установки. Подробнее о приоритетах написано здесь.
Maintainer Эта секция описывает контакты человека, создающего пакет. Ее формат довольно прост и дополнительного описание не требует.
Build-Depends Одна из самых важных секций, устанавливающая зависимости пакета. Зависимости, указанные в данной секции должны быть выполнены, чтобы можно было собрать пакет. Т.е. список зависимостей для сборки и установки могут отличаться.
Видно, что в зависимостях стоят debhelper (>= 9), cmake. Зависимость debhelper (>= 9) ставиться для всех пакетов по умолчанию. Она нужна для корректной работы программ вида dh_*.
Второй элемент cmake был добавлен потому, что папка с исходниками содержала файл CMakeLists.txt, т.е. для сборки используется система сборки CMake. Для того, чтобы узнать, какие зависимости есть у программы, можно почитать ее документацию. Кроме этого, можно воспользоваться командой dpkg-depcheck. Данная команда должна запускаться так:
$ dpkg-depcheck -d ./configure
Но, т.к. при использовании CMake нет скрипта конфигурирования, то я использую ее так:
$ mkdir build && cd build
$ dpkg-depcheck -d cmake ../
.....
Packages needed:
libxml2:amd64
cmake
libkrb5support0:amd64
language-pack-ru-base
libnettle4:amd64
.....
libedit2:amd64
libtasn1-6:amd64
qt4-qmake
libgssapi-krb5-2:amd64
libhcrypto4-heimdal:amd64
.....
libroken18-heimdal:amd64
libsqlite3-0:amd64
libqt4-dev
libssl1.0.0:amd64
.....
Из примечательных тут можно отметить:
cmake

qt4-qmake

libqt4-dev
Остальные являются зависимостями данных. Причем, cmake уже есть в списке зависимостей сборки. В принципе, можно его оставить как есть или указать используемую версию:
$ apt-cache show cmake | grep Version:
Version: 2.8.12.2-0ubuntu6
При этом в CMakeLists.txt указана версия cmake, которую нужно использовать:
$ cat CMakeLists.txt | grep cmake_minimum
cmake_minimum_required(VERSION 2.8.4)
Я думаю, что разработчику виднее, и поэтому указываю версию из CMakeLists.txt. Для Qt 4 все понятно с номерами версий, но для очистки совести проверим и их версии:
$ apt-cache show qt4-qmake | grep Version:
Version: 4:4.8.6+git49-gbc62005+dfsg-1ubuntu1.1
Version: 4:4.8.6+git49-gbc62005+dfsg-1ubuntu1
$ apt-cache show libqt4-dev | grep Version:
Version: 4:4.8.6+git49-gbc62005+dfsg-1ubuntu1.1
Version: 4:4.8.6+git49-gbc62005+dfsg-1ubuntu1
Т.е. для Qt 4 указываем версию 4.8.6:
Build-Depends: debhelper (>= 9), cmake (>= 2.8.4), qt4-qmake (>= 4.8.6), libqt4-dev (>= 4.8.6)
Standards-Version Версия стандарта, в соответствии с которым создан файл. Это значение не нужно менять.
Section. Секция для пакета, т.е. группа пакетов, выполняющая одну задачу. В Политике Debian разделе 2.4 этот вопрос описан более подробно.
Homepage Домашняя страница проекта. Т.к. данный код писал я и у него нет страницы, просто удаляю эту строку.
Vcs-* Ссылки на репозитории проекта. Их у меня тоже нет, поэтому удаляю эти строки.
Другие пакеты После секции файла, где описывается пакет с исходниками, идут секции, которые описывают другие пакеты, создаваемые из пакета с исходниками. Схема создания пакетов:
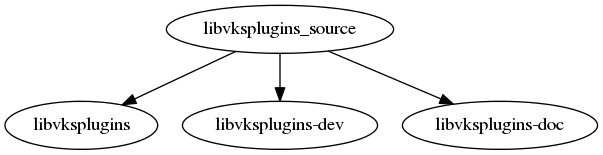
Из схемы видно, что из исходников программы, я хочу получить 4 пакета:
- пакет с исходными кодами;
- пакет с бинарником (самой библиотекой);
- пакет для разработки (заголовочные файлы);
- пакет с документацией.
Возникает вопрос, зачем так много пакетов? Ответов на него может быть несколько, если прочитать соответствующие обсуждения на stackoverflow.com то основная идея разбиения в том, что большинству пользователей не нужны заголовочные файлы и документация, поэтому разделение этих файлов способствует снижению нагрузки на сеть и скорости установки программ.
Мой персональный ответ на данный вопрос, заключается в том, что такое разбиение помогает структурировать программу по тому, как я хочу с ней работать. Для разработки я поставлю dev пакет, а для использования нет.
Кроме описанных выше пакетов, можно создать dbg пакет с отладочной сборкой программы. Это может пригодиться, если программа падает и у Вас есть под рукой отладчик. Однако, я так и не смог понять как это делать. Документация не дает ответа на этот вопрос. Если делать так как описано в ней, то я либо получаю пустой пакет либо получаю кучу ошибок при сборке.
Схема на рисунке выше показывает, что пакет с исходниками называется libvksplugins_source, однако, в файле control указано, что пакет с исходниками будет называться libvksplugins. На самом деле, он действительно будет называться libvksplugins, а пакет с бинарниками, будет называться libvksplugins… deb. Суть этой путаницы в том, что пакет с исходниками представляет собой tar архив и служебные файлы, тогда как пакет бинарников это архив с расширение deb.
Настройка пакета библиотеки Посмотрим внимательно на описание пакета библиотеки:
Package: libvksplugins

Architecture: any

Depends: ${shlibs:Depends}, ${misc:Depends}

Description: Library for creating plugins with VKS 2

 This library provides a mechanism for creating plugins

 to use in project VKS 2.
Параметр Architecture устанавливает архитектуру собираемого пакета. Значение any означает, что после сборки бинарников нужная архитектура будет подставлена системой сборки. Т.е. на 64х битной машине, получится пакет …_amd64… а на 32х битной пакет …_i386….
Для пакетов, содержащих скрипты или тексты, нужно указывать значение как all.
Третья строка, описывает зависимости создаваемого пакета. Вот как она описана в 4й главе Руководства начинающего разработчика Debian:
Утилита dh_shlibdeps вычисляет зависимости двоичного пакета от общих библиотек. Она генерирует список исполняемых файлов ELF и общих библиотек, которые находит для каждого двоичного пакета. Этот список подставляется вместо ${shlibs:Depends}.
Утилита dh_perl вычисляет зависимости Perl. Она генерирует список зависимостей от perl или perlapi для каждого двоичного пакета. Этот список подставляется вместо ${perl:Depends}.
Некоторые команды пакета debhelper могут добавлять зависимости к вашему генерируемому пакету. Каждая команда генерирует список необходимых пакетов для каждого двоичного пакета. Этот список подставляется вместо
${misc:Depends}.Утилита dh_gencontrol генерирует файл DEBIAN/control для каждого двоичного пакета, заменяя ${shlibs:Depends}, ${perl:Depends}, ${misc:Depends} и т.д на полученные значения.
Т.е. эта строка говорит о том, что сборщик пакета сам определит зависимости.
Последний раздел данной секции это описание пакета. Первая строка содержит кратное описание, последующие строки содержат более подробное описание. Подробное описание, должно иметь определенный формат:
- строка должна начинаться с пробела;
- строка не должна быть длиннее 80 символов;
- пустая строка должна начинаться с пробела и состоять из символа точки.
Настройка пакета заголовочных файлов Пакет с заголовочными файлами, будет называться libvksplugins-dev, вот его описание:
Package: libvksplugins-dev

Section: libdevel

Architecture: any

Depends: libvksplugins (= ${binary:Version}), ${misc:Depends}

Description: Development package for libvksplugins

 This package provides development files for

 library libvksplugins.

 .

 Also, it contains pkg-config file, to use.
В данном примере, интересна строка Depends. В ней указано, что данный пакет будет зависеть от пакета библиотеки libvksplugins, причем (= ${binary:Version}) говорит о том, что необходимо строгое совпадение версий бинарного пакета и пакета разработчика. Это важный момент потому, что заголовочные файлы должны строго соответствовать бинарникам.
Настройка пакета документации Вместе с библиотекой поставляется документация, чтобы она была в отдельном пакете, добавляем его описание:
Package: libvksplugins-doc

Architecture: all

Depends: ${shlibs:Depends}, ${misc:Depends}

Description: Documentation for libvksplugins

 Package contains html documentation files for libvksplugins
Тут должно быть все понятно.
rules
Данный файл является аналогом Makefile для сборки пакетов. По умолчанию, он создается в таком виде:
$ cat rules
#!/usr/bin/make -f
# See debhelper(7) (uncomment to enable)
# output every command that modifies files on the build system.
#DH_VERBOSE = 1
# see EXAMPLES in dpkg-buildflags(1) and read /usr/share/dpkg/*
DPKG_EXPORT_BUILDFLAGS = 1
include /usr/share/dpkg/default.mk
# see FEATURE AREAS in dpkg-buildflags(1)
#export DEB_BUILD_MAINT_OPTIONS = hardening=+all
# see ENVIRONMENT in dpkg-buildflags(1)
# package maintainers to append CFLAGS
#export DEB_CFLAGS_MAINT_APPEND = -Wall -pedantic
# package maintainers to append LDFLAGS
#export DEB_LDFLAGS_MAINT_APPEND = -Wl,--as-needed
# main packaging script based on dh7 syntax
%:
      dh $@
# debmake generated override targets
# This is example for Cmake (See http://bugs.debian.org/641051 )
#override_dh_auto_configure:
# dh_auto_configure --
# -DCMAKE_LIBRARY_PATH=$(DEB_HOST_MULTIARCH)
Видно, что это bash скрипт с синтаксисом Makefile. Единственная интересная конструкция здесь это
%:
     dh $@
Это шаблон, который для всех целей вызывает dh команду с передачей аргументов ей. Для сборки пакета важно, чтобы текст dh $@ начитался с символа табуляции. Т.е. отступ это не пробелы, а табуляция.
Т.к. исходники используют систему сборки CMake, то нужно изменить эту запись следующим образом:
%:
     dh $@ --buildsystem=cmake
Содержимое пакетов
После того, как мы указали в debian/control какие пакеты мы хотим получить, нужно указать какие файлы в какой пакет помещать. Для этого, для каждого названия пакета из файла control, нужно создать в папке debian два файла. Первый должен называться пакет.dirs, а второй пакет.install. Суть файлов в том, что первый указывает, какие папки нужно создать для пакета, а второй, какие файлы включить в пакет.
Посмотрим на их содержимое:
$ cat libvksplugins-dev.dirs
usr/lib
usr/include
$ cat libvksplugins-dev.install
usr/include/*
usr/lib/lib*.a
usr/lib/lib*.so
usr/lib/pkgconfig/*
usr/share/pkgconfig/*
Важный момент, отсутствие начальной дроби в путях и отсутствие дроби в конце пути к папке. Проверив, куда CMake устанавливает файлы библиотеки, можно сформировать такие файлы:
$ for item in $(ls libvksplugins*); do echo "$item:"; cat $item; done
libvksplugins-dev.dirs:
usr/include/dep572
usr/lib/pkgconfig

libvksplugins-dev.install:
usr/include/dep572/plugins/*
usr/lib/dep572/lib*.so
usr/lib/pkgconfig/*

libvksplugins.dirs:
usr/lib/dep572

libvksplugins-doc.dirs:
usr/share/doc/libplugins-0.1

libvksplugins-doc.install:
usr/share/doc/libplugins-0.1/*.tgz

libvksplugins.install:
usr/lib/dep572/lib*.so.*
Завершение настройки
Т.к. исходники мои, то никаких дополнительных описаний и ограничений copyright у меня нет, поэтому я удаляю все лишние файлы из каталога debian.
Сборка пакетов
После настройки, сборка пакетов происходит довольно просто, нужно в папке проекта (которая включает подпапку debian) выполнить команду:
$ dpkg-buildpackage -rfakeroot -us -uc
Параметры -us -uc говорят о том, что не нужно подписывать gpg ключом созданные пакеты. Их можно не использовать, если настроен ключ подписи gpg по умолчанию. Как указать ключ подписи по умолчанию, я тоже не понял. Если все прошло хорошо, то у нас поваляется набор пакетов в папке выше:
$ ls -l ../
итого 748
drwxrwxr-x 10 user user   4096 авг.  20 10:46 libvksplugins-0.1
-rw-rw-r--  1 user user   2210 авг.  20 10:47 libvksplugins_0.1-1_amd64.changes
-rw-r--r--  1 user user   6418 авг.  20 10:47 libvksplugins_0.1-1_amd64.deb
-rw-rw-r--  1 user user   1504 авг.  20 10:46 libvksplugins_0.1-1.debian.tar.xz
-rw-rw-r--  1 user user   1008 авг.  20 10:46 libvksplugins_0.1-1.dsc
-rw-rw-r--  1 user user  36713 авг.  19 14:52 libvksplugins_0.1.orig.tar.gz
-rw-r--r--  1 user user   3262 авг.  20 10:47 libvksplugins-dev_0.1-1_amd64.deb
-rw-r--r--  1 user user 699564 авг.  20 10:47 libvksplugins-doc_0.1-1_all.deb
Заключение
Если вы дочитали до сюда — значит вы любите читать.
Этот текст является результатом моего опыта внедрения deb пакетов на работе. Опыт показал, что наличие сетевого репозитория (reprepro) и внимательное отслеживание версий, позволяют без проблем обновлять и тестировать различные версии ПО на парке из 30 машин с системами Astra Linux 1.3, 1.4 и Эльбрус ОС.
The primary command to manipulate deb packages is dpkg-deb.
To unpack the package, create an empty directory and switch to it, then run dpkg-deb to extract its control information and the package files. Use dpkg-deb -b to rebuild the package.
mkdir tmp
dpkg-deb -R original.deb tmp
# edit DEBIAN/postinst
dpkg-deb -b tmp fixed.deb
Beware that unless your script is running as root, the files’ permissions and ownership will be corrupted at the extraction stage. One way to avoid this is to run your script under fakeroot. Note that you need to run the whole sequence under fakeroot, not each dpkg-deb individually, since it’s the fakeroot process that keeps the memory of the permissions of the files that can’t be created as they are.
fakeroot sh -c '
  mkdir tmp
  dpkg-deb -R original.deb tmp
  # edit DEBIAN/postinst
  dpkg-deb -b tmp fixed.deb
'
Rather than mess with permissions, you can keep the data archive intact and modify only the control archive. dpkg-deb doesn’t provide a way to do that. Fortunately, deb packges are in a standard format: they’re ar archives. So you can use ar to extract the control archive, modify its files, and use ar again to replace the control archive by a new version.
mkdir tmp
cd tmp
ar p ../original.deb control.tar.gz | tar -xz
# edit postinst
cp ../original.deb ../fixed.deb
tar czf control.tar.gz *[!z]
ar r ../fixed.deb control.tar.gz
You should add a changelog entry and change the version number if you modify anything in the package. The infrastructure to manipulate Debian packages assumes that if two packages have the same name and version, they’re the same package. Add a suffix to the debian_revision part at the end of the version number; for sorting reasons the suffix should start with ~, e.g. 1.2.3-4.1 becomes 1.2.3-4.1~johnjumper1.
Instead of using shell tools, you can use Emacs. The dpkg-dev-el package (which is its own upstream as this is a native Debian package) contains modes to edit .deb files and to edit Debian changelogs. Emacs can be used interactively or scripted.
The answer to #3 and #4 is that you should put the package in hold status once you’ve installed your version. This tells the Debian package management system to «hold» any future changes to this package, in effect lets you manage the package manually.
From the Debian FAQ:
7.11 What is meant by unknown, install, remove, purge and hold in the package status?
These «want» flags tell what the user wanted to do with a package (as indicated either by the user’s actions in the «Select» section of dselect, or by the user’s direct invocations of dpkg).
Their meanings are:
unknown — the user has never indicated whether he wants the package>
install — the user wants the package installed or upgraded
remove — the user wants the package removed, but does not want to remove any existing configuration files.
purge — the user wants the package to be removed completely, including its >configuration files.
hold — the user wants this package not to be processed, i.e., he wants to keep the >current version with the current status whatever that is.
7.12 How do I put a package on hold?
There are three ways of holding back packages, with dpkg, aptitude or with dselect.
With dpkg, you have to export the list of package selections, with:
dpkg —get-selections * > selections.txt
Then edit the resulting file selections.txt, change the line containing the package you wish to hold, e.g. libc6, from this:
libc6 install
to this:
libc6 hold
Save the file, and reload it into dpkg database with:
dpkg —set-selections < selections.txt
With aptitude, you can hold a package using
aptitude hold package_name
and remove the hold with
aptitude unhold package_name
With dselect, you have to enter the [S]elect screen, find the package you wish to hold in >its present state, and press the
=' key (orH’). The changes will go live immediately >after you exit the [S]elect screen.
Note: People have found issues with the aptitude hold command, so imho you should prefer the dpkg command to hold the package. Alternatively, you could hold the package via the Synaptic package manager GUI interface (Package > Lock Version). My preference is to use dpkg because it has worked well for me.
You already have a good answer for the rest so I’ll not venture my opinion on those.
Ответ № 3 и № 4 заключается в том, что вы должны перевести пакет в состояние удержания после установки вашей версии. Это говорит системе управления пакетами Debian «хранить» любые будущие изменения в этом пакете, что позволяет вам управлять пакетом вручную.
Из FAQ по Debian:
7.11 Что подразумевается под неизвестным, устанавливать, удалять, очищать и удерживать в статусе пакета?
Эти флаги «хотят» сообщают, что пользователь хотел сделать с пакетом (как указано в действиях пользователя в разделе «Выбор» dselect или в прямых вызовах пользователя dpkg).
Их значения:
неизвестно — пользователь никогда не указывал, хочет ли он посылку>
установить — пользователь хочет, чтобы пакет был установлен или обновлен
удалить — пользователь хочет удалить пакет, но не хочет удалять существующие файлы конфигурации.
purge — пользователь хочет, чтобы пакет был полностью удален, включая его> файлы конфигурации.
hold — пользователь хочет, чтобы этот пакет не обрабатывался, т. е. он хочет сохранить текущую версию с текущим статусом, какой бы она ни была.
7.12 Как мне поставить пакет на удержание?
Существует три способа удержания пакетов с помощью dpkg, aptitude или с помощью dselect.
С помощью dpkg вы должны экспортировать список выбранных пакетов:
dpkg —get-selections *> selections.txt
Затем отредактируйте полученный файл selections.txt, измените строку, содержащую пакет, который вы хотите сохранить, например, libc6, из этого:
libc6 установить
к этому:
libc6 hold
Сохраните файл и перезагрузите его в базу данных dpkg:
dpkg —set-selections <selections.txt
С помощью aptitude вы можете держать пакет, используя
aptitude hold имя_пакета
и снять трюм с
aptitude unhold package_name
С помощью dselect вы должны войти в экран выбора [S], найти пакет, в котором вы хотите сохранить> его текущее состояние, и нажать клавишу
=' key (orH’). Изменения вступят в силу немедленно> после выхода из экрана выбора [S].
Примечание. Люди обнаружили проблемы с командой aptitude hold , поэтому имхо вы должны предпочесть, чтобы команда dpkg удерживала пакет. Кроме того, вы можете удерживать пакет через графический интерфейс диспетчера пакетов Synaptic (Package> Lock Version). Я предпочитаю использовать dpkg, потому что он хорошо сработал для меня.
У вас уже есть хороший ответ для остальных, поэтому я не буду рисковать своим мнением по этому поводу.
Introduction
Debian Package tool dpkg is used on Debian, Ubuntu, Kali, Linux Mint,
and other Debian based Linux distributions.
This tutorial covers the basics of creating custom .deb packages
and managing them with dpkg and apt.
We will cover the process of creating your own deb file to distribute
your package easily.
It is aimed at people who are interested in learning the basics of
creating and managing packages in Debian based distributions.
Read more about
The .deb file format
A .deb file is a Debian package, but really it is just a standard
Unix archive (.ar) file.
The dpkg tool is the Debian package manager and apt is a higher level
tool for managing packages which uses dpkg under the hood.
List installed packages
List packages with dpkg or apt:
dpkg -l       # List installed packages
dpkg -s mypkg # Get status of specific package

apt list --installed # List installed packages
apt list # List *all* packages in available repos
Create a package
You can make and distribute your own .deb package very easily.
To start fresh, create a new directory named after your package.
For example, mypkg.
This directory will store the package metadata and the package contents.
Inside the project directory, there needs to be one special
directory (DEBIAN) with one special file inside it (control).
Read more about
Debian control file fields.
# Minimum required structure for a package
mypkg-1.0.0/     # Directory
└── DEBIAN/      # Directory
    └── control  # File
A more practical example with a post-installation script:
mypkg/             # Directory
├── DEBIAN/        # Directory
│   └── control    # Control file
│   └── postinst   # Post install script
├── etc/my.ini     # Optionally any other files that you need to include
└── opt/mylib/     # on the destination system during installation
This is a minimal example of the DEBIAN/control file:
Package: mypkg
Version: 1.0.0
Maintainer: Your Name <you@example.com>
Description: My test package, please ignore
Homepage: https://github.com/username/projectname
Architecture: all
Depends: git, python3 (>=3.5), openjdk-8-jre-headless|openjdk-8-jre|openjdk-8-jdk-headless|openjdk-8-jdk
The Depends line is optional, but frequently needed.
The example above shows how to add multiple dependencies,
how to specify a minimum version with python3,
and how to add a dependency that is satisfied by one of many options.
There are many versions of java listed and any one will satisfy the requirement.
If none of them are installed, it will start from the first
one in the list and try to install it.
This way, it will work if the user has version 8 of the JDK or JRE in full or headless variant.
If none of them are installed it will install the smallest version (the headless jre).
Build the package by running dpkg -b on the project directory like this:
# Build mypkg directory in to .deb package
dpkg -b ./mypkg ./mypkg_1.0.0-0_amd64.deb

# Naming format: <name>_<version>-<release>_<arch>.deb
# Version is the version number of the app being packaged
# Release number is the version number of the *packaging* itself.
# The release number might increment if the package maintainer
# updated the packaging, while the version number of the application
# being packaged did not change.

# Inspect information like size, version, dependencies
dpkg -I mypkg.deb
# Example output of `dpkg -i mypkg.deb`

new debian package, version 2.0.
size 666 bytes: control archive=301 bytes.
    238 bytes,     6 lines      control
Package: mypkg
Version: 1.0.0
Maintainer: Your Name <you@example.com>
Description: My test package, please ignore
Architecture: all
Depends: git, python3 (>= 3.5), openjdk-8-jre-headless|openjdk-8-jre|openjdk-8-jdk-headless|openjdk-8-jdk
It’s a special little package, but it’s lonely without any files
to install.
Normally a package has some contents like a shared library, man pages,
documentation, an executable program, or systemd service files.
The next thing we’ll need to do is add files to the package.
Some examples of things you might include are:
- an executable or a shell script launcher in
/usr/local/bin/ - man pages in
/usr/share/man - configuration files in
/etc/ - libraries in
/usr/local/lib - header files in
/usr/local/include
In this example, we’ll add a shell launch script for a Java JAR file:
/usr/bin/mylauncher
#!/bin/bash
# Launch script to kick off Java JAR (/usr/bin/mylauncher)

java -jar /usr/share/java/myapp.jar "$@"
Be sure to chmod +x the script and place it in the
mypkg/usr/local/bin/ directory.
Configuration files
List configuration files in DEBIAN/conffiles
This will allow configuration files to optionally remain when
uninstalling (remove vs purge).
It also prevents updates from overwriting configuration files.
Example DEBIAN/conffiles:
/etc/myapp.conf
/etc/some/other/conf.ini
Pre/post install scripts
Examples:
DEBIAN/preinst
DEBIAN/postinst
An example DEBIAN/postinst script:
#!/bin/bash
# This `DEBIAN/postinst` script is run post-installation
mkdir /dir/needed/for/package
Package interrelationships
There are some other variables you can specify in the control file:
DependsRecommendsSuggestsBreaksConflictsProvidesReplacesEnhances
These can be useful to warn people if your package conflicts with another
package that is already installed.
You can also replace or enhance existing packages.
If other packages would make your package work better,
you can recommend and suggest other packages when the user installs your
package.
Read more about package interrelationship fields.
Print package information
You can use dpkg and apt-cache to get some information about
packages.
# Print details about a package file (size, version, dependencies)
dpkg -I mypkg.deb

# Print status (is it installed?)
dpkg -s <package_name>

# Show package info (even uninstalled ones from repos)
apt-cache show <package_name>
Print package contents
If you want to review the contents of a .deb package before installing
it, you can print the contents with the -c flag.
dpkg -c mypkg-1.0.0-0_amd64.deb
Extract package contents
If you want to extract the contents of a .deb file,
use the -X flag for verbose extraction,
or -x for quiet extraction.
dpkg -X mypkg-1.0.0-0_amd64.deb /where/to/exctact/
Install a package
Usually, two options are available for installing .deb packages.
One is dpkg and the other is apt which is built on top of dpkg.
If you don’t have the dependencies installed you will have to install them
yourself if you use dpkg -i.
Alternatively, you can use apt.
I recommend using apt because it still uses dpkg under the hood,
but it handles dependencies and is more user-friendly.
# Install package along with any dependencies it needs
sudo apt install ./mypkg.deb

# Install package, ignore and warn about unmet dependencies
sudo dpkg -i mypkg.deb

# If you need to install dependencies that were not
# installed because you used `dpkg -i` instead of `apt install`
sudo apt --fix-broken install

# Get status of package
dpkg -s mypkg
Searching for packages in apt repositories
You can use apt-cache to search for packages
in your apt repositories. These will need to be
installed with apt install though not dpkg.
Search like this:
apt-cache search alien
Uninstall a package
You can uninstall a package using remove but it will leave the
configuration files.
To also remove the configuration files, use purge.
dpkg --remove package_name # Leaves config files
dpkg --purge package_name  # Removes config files too

# Or with apt
apt remove package_name
apt purge package_name
Listing files that belong to a package
This can be useful when trying to figure out what the
executable file names are in /usr/bin or when trying
to find local documentation.
# List all files that are included in the `ruby` package
dpkg -L ruby
dpkg -L ruby2.5-doc
Find which package owns a file
If you have a file on your system and you want to see if it belongs to a
package, you can use dpkg -S <filepath> to see which package owns it.
You can also use apt-file search <filename> to see which packages in
the repositories contain a file with that name.
For example «What package created this /etc/qwerty.conf file?» or
«Which package owns this executable?», or
«Which packages do I need to install to get gl.h?» can be answered with:
# Figure out which package owns a specific file
dpkg -S /etc/qwerty.conf
dpkg -S /usr/bin/python3

# Search apt repositories for packages that contain file
# Find any package that includes a `gl.h`
apt-file search "gl.h"
Security notes
Only Use trusted packages and repositories only.
You install packages with root privileges and you will be giving
full reign on your machine with a package. Do not run any package
you are not 100% confident it is from a trusted source.
GPG signing is a good way to ensure integrity and authenticity, that is,
it has not been modified and the package came from the expected author.
You can learn more about how to sign files with GPG in my
GPG Basics Tutorial.
GPG is a great cryptography tool to be familiar with and worth taking
the time to learn it. You can also use it to encrypt emails so only
the intended recipient can read it, encrypting archives or PDFs,
verifying signatures from others, and and many other practical uses.
Convert a .deb to .rpm and other formats
If you need a RedHat .rpm file to install in CentOS, RedHat, or Fedora,
you can use the alien tool to convert packages.
http://joeyh.name/code/alien/
sudo apt install alien

alien --help

alien --to-rpm my_pkg.deb
Some other options are:
-d, --to-deb   Generate a Debian deb package (default).
-r, --to-rpm   Generate a Red Hat rpm package.
    --to-slp   Generate a Stampede slp package.
-l, --to-lsb   Generate a LSB package.
-t, --to-tgz   Generate a Slackware tgz package.
Debhelper tool
I do not have much experience with this tool but it is worth a mention.
The debhelper tool provides some utility and code generation features.
Here is how you can install it and explore more.
sudo apt install debhelper
man dh

# See what tools are available by entering
dh_<tab><tab> # Get the autocomplete options

# Generate a new Debian package template
sudo apt install dh-make
# From inside a directory w/ name like: mypkg-1.0.0
dh_make --createorig
Conclusion
You should now feel comfortable working with and creating
your own Debian packages, how to get information about a package,
how to find which package a file belongs to, and other common tasks.