Содержание статьи
- Как настроить DPI на мышке
- Как изменить dpi на любой мышке
- Как изменить скорость мышки на Windows
- Увеличить скорость
- Уменьшить скорость
Как настроить DPI на мышке
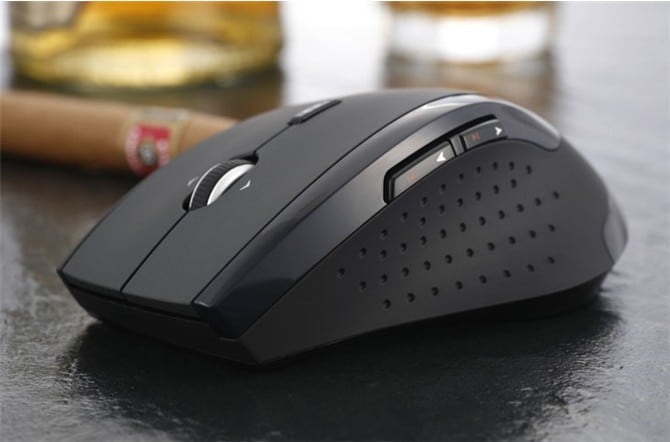
Для начала стоит разобраться в том, что же такое вообще дпи. Эта таинственная аббревиатура расшифровывается как Dots Per Inchs, что простыми словами означает количество точек, преодолеваемое мышкой во время её перемещения. Одним словом, это чувствительность аксессуара, которая не слишком существенна во время простого использования, но играет огромную роль для тех, кто играет в игры или пользуется такими программами как Photoshop.
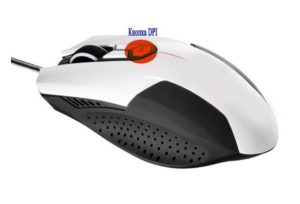
Но если у вас не такое продвинутое устройство, переживать не стоит. Нужно всего лишь знать, как поменять DPI на мышке.
Сделать это можно двумя способами: с помощью специальной кнопки, которая присутствует далеко не на каждой модели и стандартными средствами системы Windows.
ВАЖНО! Обратите внимание, что настроить чувствительность можно всё же в пределах возможностей каждой отдельной мышки. Сделать так, чтобы самая дешёвая офисная мышь «летала» наподобие дорогой геймерской вряд ли получится.
Как изменить dpi на любой мышке
Несмотря на то что очень многое зависит именно от модели устройство, попробовать хоть немного изменить DPI с помощью операционной системы.
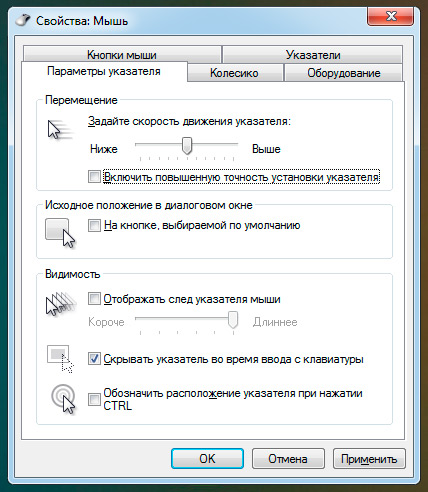
- Для этого понадобится перейти в настройки мыши. Они находятся в панели управления — выберите пункт «Мыши».
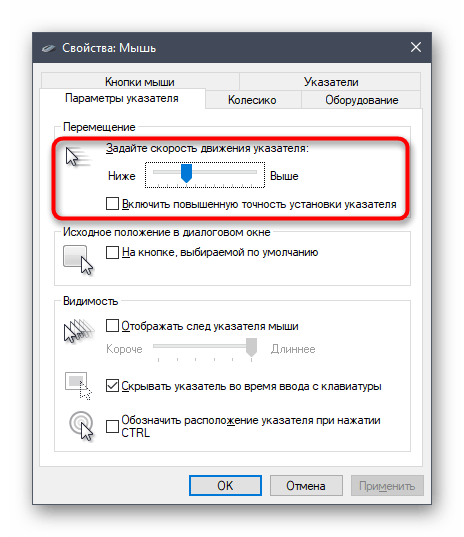
- После этого следует установить ползунок скорости ровно на середину и выключить повышенную точность установки показателя, чтобы у Windows не было возможности влиять на скорость перемещения курсора.
ВАЖНО! Обратите внимание, что иногда чувствительность также называют словом «сенса» от английского «sencitivity». Это название больше распространено среди геймеров и людей, которые хорошо разбираются в компьютерах и других устройствах.
- Затем попробуйте найти параметр «Скорость движения указателя». Он поможет изменить системные настройки мыши и получить некоторый эффект. Важно понимать, что в этом случае значительного улучшения ждать не стоит — мышь останется такой же, какой и была. Изменяется лишь внутренние характеристики, установленные в самом компьютере.
Кроме того, при настройке DPI не следует перебарщивать — в этом случае пользоваться мышью станет довольно сложно. Курсор станет передвигаться очень быстро и малейшее движение будет выглядеть так, как будто вы только что дёрнули устройство из одной стороны в другую.
И тогда придётся искать способ, как уменьшить сенсу на мышке. Регулировать чувствительность можно также и в играх. Большинство геймерских мышей оснащены специальной инструкцией по настройке или даже имеют специальное программное обеспечение для этой цели.
Кроме того, настройка в операционной системе Windows может быть и более детальной. Рассмотрим подробнее всё, что можно сделать с DPI мыши, если её чувствительность вас не устраивает.
Как изменить скорость мышки на Windows
Изменить можно не только скорость перемещения курсора в виндовс, а именно дипиай, но и другие, более узкие параметры: скорость прокрутки текста, щелчка или другое. Для того чтобы разобраться во всех этих тонкостях, придётся внимательно изучать предлагаемые в Панели управления настройки.
Разные модели компьютеров, а также версии операционной системы, могут иметь иногда существенные, а иногда лишь мелкие отличия. Поэтому если вы хотите идеально настроить мышь под себя, то нужно действовать методом проб и ошибок. Многое также зависит от производителя и модели самой мышки.
Увеличить скорость
Увеличить скорость работы может быть необходимо в случае с двойным щелчком. Это одна из наиболее часто используемых команд, которые выставлены в Windows. Но иногда приходится сталкиваться с тем, что щелчок не срабатывает или программа открывается слишком долго. Возможно, проблема в механическом повреждении или загрязнении устройства, но будет нелишним попытаться просто увеличить скорость щелчка.
- Для этого перейдите в настройки и выберите параметр «Мышь».
- На первой вкладке «Кнопки» вы увидите пункт «Скорость двойного щелчка». Именно с его помощью можно решить проблему с долгим открыванием самых разных программ. Очевидно, что никакого механического вмешательства больше не потребуется.
Чтобы изменить скорость перемещения и чувствительность, в общем, необходимо перетянуть соответствующий ползунок вправо. Большинство пользователей уверяют, что комфортная работа получается тогда, когда он стоит чуть вправо от середины. Но в данном случае настройки индивидуальны — попробуйте несколько положений бегунка и выберите для себя лучшее.
Уменьшить скорость
Если же скорость нужно уменьшить, то ползунок передвигается влево. Таким образом можно значительно изменить чувствительность и скорость работы мыши.
Некоторые производители, в большинстве случаев, те, кто производит геймерские модели, предлагают вместе с устройством специальное программное обеспечение. Оно представляет собой программу, в которой можно дополнительно изменить самые разные настройки мышки.
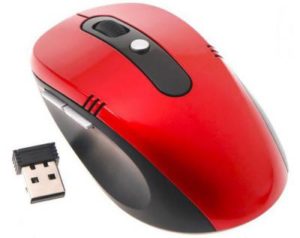
Теперь вы знаете, что такое DPI компьютерной мышки, для чего нужен этот параметр и как его изменить. Обладая этими знаниями, вы сможете сделать своё устройство идеально подходящим для себя, а также поймёте, стоит ли приобретать дорогостоящую модель, если есть возможность значительно повысить комфортность использования самостоятельно.
Если ваша мышь не имеет доступных кнопок DPI, просто запустите центр управления мышью и клавиатурой, выберите мышь, которую вы хотите использовать, выберите основные настройки, найдите настройку чувствительности мыши и внесите соответствующие изменения.
Большинство профессиональных геймеров используют настройку DPI от 400 до 800.
Как изменить dpi мыши в Windows?
На ЖК-дисплее мыши на короткое время отобразится новое значение разрешения. Если ваша мышь не оснащена кнопками динамического изменения разрешения, запустите Microsoft Mouse and Keyboard Center, выберите используемую мышь, щелкните основные настройки, найдите «Чувствительность» и внесите изменения.
Как проверить DPI мыши?
Если вы все еще не можете найти DPI вашей мыши, используйте этот онлайн-анализатор DPI, чтобы приблизить значение. Чтобы использовать его, вам сначала нужно зайти в настройки мыши Windows (Панель управления> Оборудование и звук> Мышь) и щелкнуть вкладку «Параметры указателя».
Как изменить настройки мыши в Windows 10?
Изменение скорости мыши. Чтобы изменить скорость курсора мыши или трекпада в Windows 10, сначала запустите приложение «Настройки» из меню «Пуск» и выберите «Устройства». На экране «Устройства» выберите «Мышь» в списке разделов слева, а затем выберите «Дополнительные параметры мыши» в правой части экрана.
Что такое хороший DPI для мыши?
1600 DPI
Какой DPI я должен использовать мышью?
Точек на дюйм (DPI) — это показатель чувствительности мыши. Чем выше DPI мыши, тем дальше будет перемещаться курсор на экране при перемещении мыши. Мышь с более высоким значением DPI обнаруживает меньшие движения и реагирует на них. Более высокий DPI не всегда лучше.
Как мне изменить DPI на моей мыши Redragon?
Изменение DPI
- Откройте программное обеспечение мыши Redragon и перейдите на вкладку «DPI».
- Обратите внимание, что мышь имеет 5 профилей по умолчанию DPI1-DPI5. С помощью этой вкладки вы можете изменить настройки DPI до 16400 DPI для каждого профиля мыши.
- Нажмите «Применить».
Как изменить dpi мыши на fortnite?
Отключение ускорения мыши
- Введите «настройки мыши» в строку поиска Windows.
- Выберите «Изменить настройки мыши».
- Щелкните «Дополнительные параметры мыши».
- Выберите вкладку «Параметры указателя».
- Снимите флажок «Повышение точности указателя».
Как увеличить чувствительность мыши?
Чтобы изменить скорость перемещения указателя мыши, в разделе «Движение» переместите ползунок «Выбрать скорость указателя» в сторону «Медленно» или «Быстро».
Изменение настроек мыши
- Откройте «Свойства мыши», нажав кнопку «Пуск». , а затем щелкните Панель управления.
- Перейдите на вкладку «Кнопки» и выполните одно из следующих действий:
- Нажмите кнопку ОК.
Как вы рассчитываете DPI?
DPI цифрового изображения рассчитывается путем деления общего количества точек в ширину на общее количество дюймов в ширину ИЛИ путем вычисления общего количества точек в высоту на общее количество в дюймах в высоту.
Чем выше DPI, тем лучше для FPS?
Мышь с более высоким значением DPI обнаруживает меньшие движения и реагирует на них. Более высокий DPI не всегда лучше. С другой стороны, более высокий параметр DPI помогает вашей мыши обнаруживать более мелкие движения и реагировать на них, чтобы вы могли точнее указывать на объекты. Например, предположим, что вы играете в шутер от первого лица.
Какой у меня разрешение экрана?
Dpi, что означает количество точек на дюйм, является ключевым понятием при использовании компьютерной графики. Ваш компьютер, несомненно, использует разрешение монитора 96 точек на дюйм. Это значение можно изменить на 120 dpi или любое другое значение dpi. Фактически, большинство программ и веб-страниц предполагают, что на мониторе вашего ПК установлено разрешение 96 dpi.
Как откалибровать мышь в Windows 10?
Попасть туда:
- Перейдите в Панель управления Windows.
- Откройте меню мыши.
- Откройте драйвер тачпада (если на него есть ссылка).
- Установите скорость указателя на макс.
- Перейдите на вкладку параметров указателя в окне свойств мыши.
- Переместите ползунок скорости указателя до упора вправо и снимите флажок «Повысить точность указателя».
Как изменить кнопки мыши в Windows 10?
Для этого сначала откройте меню «Пуск», щелкнув или нажав кнопку «Пуск» в нижнем левом углу рабочего стола. Затем щелкните или коснитесь «Настройки», чтобы открыть приложение. В приложении «Настройки» щелкните или коснитесь «Устройства». В левой части окна выберите «Мышь», чтобы получить доступ к настройкам конфигурации мыши.
Как назначить клавиши кнопкам мыши?
Чтобы переназначить кнопку для конкретной программы
- Используя мышь, которую вы хотите настроить, запустите Microsoft Mouse and Keyboard Center.
- Выберите настройки для конкретного приложения.
- Нажмите кнопку «Добавить» и выберите нужную программу.
- В списке команд кнопки выберите команду.
Означает ли более высокий DPI лучшее качество?
Более высокое разрешение означает более высокое разрешение. Разрешение — это не «размер», но его часто путают с ним, потому что изображения с более высоким разрешением часто больше, но это не обязательно так. Печать: стандартно 300 dpi, иногда допустимо 150, но никогда не меньше, в некоторых случаях можно увеличить.
Что такое мышь с самым высоким dpi?
Новый датчик Logitech — безусловно, самый интересный и важный компонент G502. 12,000 точек на дюйм — это почти бессмысленное число, но Logitech также обещает возможность отслеживания со скоростью 300 дюймов в секунду, быстрее, чем вы когда-либо реалистично двигаете мышью.
Dpi — это то же самое, что и чувствительность?
DPI — это разрешение, а чувствительность — это прежде всего скорость перемещения курсора. Более высокий DPI (точек на дюйм) означает, что курсор будет более плавным и точным для определения точных точек, как при снайперской стрельбе. Мыши с более высоким DPI имеют больше инкрементов, с которыми считывает светодиод или лазер, так сказать, более плотное сканирование.
Какой DPI использует фейкер?
Настоящее имя Факера — Ли Сан Хёк (이상혁). Faker использует BenQ XL2430T с частотой обновления 240 Гц и разрешением 1920 × 1080. Faker использует CORSAIR SABRE с DPI 3500 и чувствительностью в игре 70.
Как мне изменить свой DPI?
Первое, что вам нужно сделать, это убедиться в правильности настроек чувствительности мыши в Windows. Перейдите в Панель управления> Мышь> Вкладка параметров указателя — и примените перечисленные настройки. Затем вы хотите узнать, на каком DPI (точек на квадратный дюйм) работает ваша мышь, и изменить его на значение где-то между 400-500.
Какой DPI используют профи Fortnite?
Настройки Fortnite Pro — в комплекте с чувствительностью, настройкой игры и снаряжением
| Имя игрока | мышь | Точек на дюйм |
|---|---|---|
| пелена | Logitech G303 | 400 |
| дакотаз | Logitech G502 | 2400 |
| Саммит1g | Последняя мышь | 400 |
| Доктор DisRespect | BenQ ZOWIE ZA11 | 400 |
Еще 26 рядов
Как изменить чувствительность фортнайта?
Чтобы изменить чувствительность мыши в Fortnite, щелкните 3 строки в правом верхнем углу, затем выберите значок шестеренки, чтобы открыть меню настроек. В верхней части экрана щелкните значок шестеренки, чтобы просмотреть настройки игры. Отрегулируйте чувствительность мыши в соответствии с вашими предпочтениями, затем нажмите «Применить» в правом нижнем углу.
Можете ли вы изменить чувствительность мыши?
Когда вы узнаете, как получить доступ к окну свойств мыши, вы можете настроить чувствительность мыши, например указатель, двойной щелчок или скорость колеса. Нажмите кнопку «Пуск» и выберите «Панель управления». Введите «мышь» в поле поиска и нажмите «Мышь», чтобы открыть окно свойств мыши.
Как повысить чувствительность мыши в Beyond Max Windows 10?
Как повысить чувствительность мыши в Windows 10?
- Нажмите Windows Key + S и войдите в панель управления. Выберите Панель управления из списка результатов.
- После открытия панели управления выберите «Мышь» из списка параметров.
- Откроется окно свойств мыши.
- После настройки скорости мыши нажмите «ОК» и «Применить», чтобы сохранить изменения.
Почему моя мышь щелкает дважды?
Для пользователей Windows. Наиболее вероятная причина заключается в том, что скорость двойного щелчка мыши установлена слишком высоко или слишком низко. Если установлено очень низкое значение, и вы щелкаете кнопкой мыши один раз, а затем снова щелкаете ее вскоре после этого, мышь может интерпретировать это как двойной щелчок вместо этого.
Какие две кнопки находятся на боковой стороне моей мыши?
Используйте боковые кнопки мыши. Многие новые компьютерные мыши также имеют кнопки сбоку от мыши. Эти кнопки можно запрограммировать на что угодно. Однако по умолчанию левую кнопку большого пальца можно использовать для возврата на веб-страницу.
Как называются боковые кнопки мыши?
Под дополнительными кнопками здесь мы подразумеваем две дополнительные кнопки сбоку от компьютерной мыши. Обычно эти кнопки запрограммированы как кнопки «Вперед» и «Назад». Кроме того, большинство современных игр называют их кнопкой мыши 4 и кнопкой мыши 5.
Как отключить среднюю кнопку мыши в Windows 10?
Как отключить неактивное колесо прокрутки в Windows 10
- Шаг 1: перейдите в меню «Пуск», перейдите в «Настройки».
- Шаг 2: Щелкните раздел «Устройства». Шаг 3 :
- Шаг 4: Нажмите кнопку «Вкл.» В разделе «Прокрутка неактивных окон при наведении на них курсора». Вы также можете включить или отключить колесо прокрутки мыши в Windows 10 с помощью реестра.
Фото в статье «Wikimedia Commons» https://commons.wikimedia.org/wiki/File:Logitech_M210_-_LED,_lens_and_optical_mouse_sensor-2426.jpg
Содержание
- Способ 1: Кнопка на самой мышке
- Способ 2: ПО от производителя устройства
- Способ 3: Штатные средства Windows
- Вопросы и ответы
Способ 1: Кнопка на самой мышке
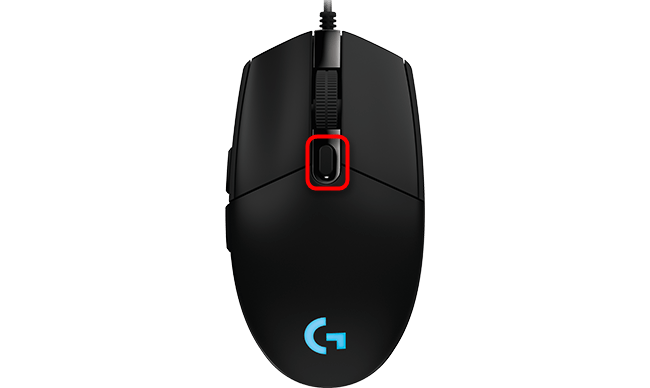
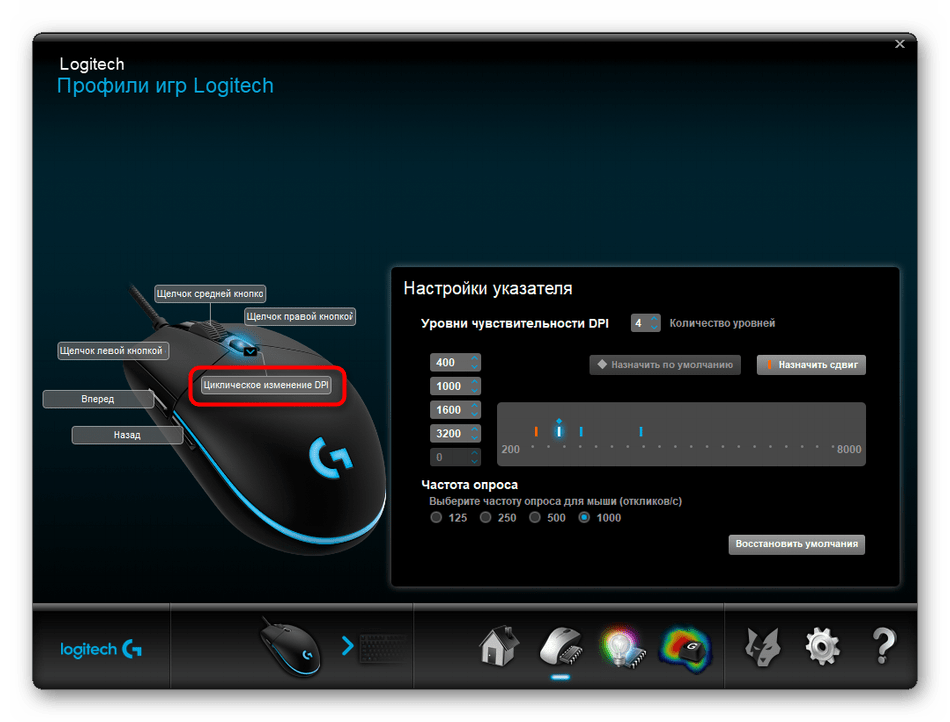
Если речь идет об игровой мыши или продвинутой офисной, скорее всего, на ее корпусе должна находиться специально отведенная кнопка, позволяющая менять DPI. По умолчанию с каждым нажатием она будет увеличивать скорость до конца цикла, а затем вернет ее на самое минимальное значение, поэтому вы можете сделать одно или несколько нажатий и поводить курсор по рабочему столу, чтобы оценить изменения. В большинстве случаев рассматриваемая кнопка находится чуть ниже колеса, что вы можете увидеть на представленной далее иллюстрации.
При использовании фирменного программного обеспечения от производителей мыши, что чаще всего касается обладателей геймерских девайсов, после изменения часто чувствительности всплывает уведомление, отображающее текущее значение в DPI.

Способ 2: ПО от производителя устройства
Этот вариант подходит обладателям игровых мышей, поскольку офисные редко совместимы с программами от разработчиков, а некоторые даже не создают их, так как настройка чувствительности не предусмотрена. Если вы еще не установили графическую составляющую драйвера устройства, потребуется сделать это, о чем более детально на примере мышей от Logitech читайте в отдельной статье на нашем сайте по ссылке ниже.
Подробнее: Загрузка драйверов для компьютерной мышки Logitech
После успешной настройки операционной системы для работы с периферийным оборудованием, можно смело переходить к изменению DPI. Опять же на примере фирменного программного обеспечения от Logitech рассмотрим, как выполняется этот процесс.
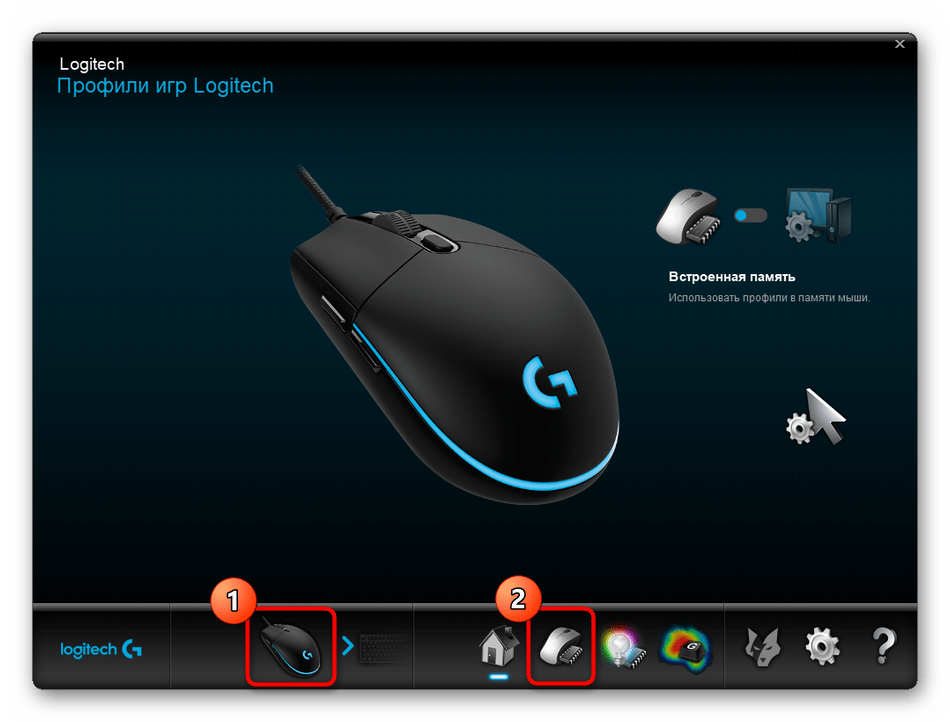
- Обычно драйвер функционирует фоном, а открыть окно управления им можно через значок на панели задач.
- При использовании нескольких устройств от одной компании, например, клавиатуры и мыши, потребуется сначала выбрать настраиваемый девайс, а затем перейти в его свойства.
- В отдельном блоке будут отображаться настройки указателя. Там вы можете указать переключаемые уровни чувствительности, установить текущее значение и задать сдвиги, которые происходят при нажатии по упомянутой ранее кнопке. Помните, что всегда можно вернуть все значения по умолчанию, нажав кнопку сброса изменений.
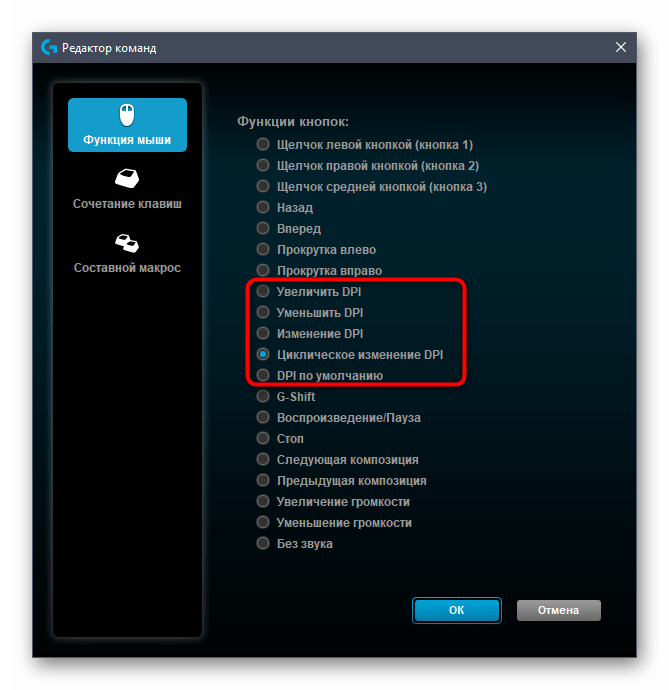
- Саму кнопку, отвечающую за изменение DPI, тоже можно настроить через меню драйвера. Просто дважды щелкните по ее строке.
- В ее редакторе отметьте маркером функцию, которую будет выполнять кнопка. Их перечень меняется в зависимости от ПО разработчиков.
Способ 3: Штатные средства Windows
Этот вариант станет единственным доступным для тех пользователей, кто не имеет возможности изменить DPI мыши из-за отсутствия соответствующего ПО или когда сам производитель не предусмотрел такую настройку. Однако через стандартные возможности операционной системы не получится отследить показатель DPI — можно лишь отрегулировать скорость движения указателя. Детальнее об этом читайте далее.
Подробнее: Изменение чувствительности мыши в Windows
Еще статьи по данной теме:
Помогла ли Вам статья?
FAQ
1. Using Programmable Keys on Keyboards
PROGRAMMABLE G KEYS
The eight “G” keys are programmable for user defined macros. If a certain keystroke combination (such as Ctrl + V) is useful in a particular program or game, you can assign it to a G key.
How to program the keys:
Step 1 – Press the red (upper right) double circle key to begin macro recording
Step 2 – Select and press any of the G1-G8 keys
Step 3 – Enter your keystroke combination (such as Ctrl + V) (* up to 42 keys)
Step 4 – Press the red (upper right) double circle key to finalize macro recording
* See manual for macro playback speed options.
2. Using Interchangable WSAD & Arrow Keys Functionality
[W] [A] [S] [D] KEYS
To interchange the function of direction key, please do the procedure below:
Step 1 – Press and hold the [FN] key
Step 2 – Press the [W] key to interchange the function of the four letter keys [W] [A] [S] [D] and four direction keys [UP] [DOWN] [LEFT] [RIGHT]
Step 3 – Repeat the above operation and restore the previous setting
Gaming Keyboards
3. Using Mouse Software
To find the installed software, here are the steps that you can follow:
- Go to Start button
- Click All programs
- Click 5-button mouse
- Click Driver Configuration
- Mouse icon will appear on your taskbar
- Double Click the icon and you can program the buttons
It has 33 options for button configuration:
- Click
- Auto Scroll
- Right Click
- Back Command
- Forward Command
- Copy
- Cut
- Paste
- Mark
- Double Click
- Delete
- Open my Computer
- WWW
- Scroll Repeat Up
- Scroll Repeat Down
- Application Switch
- Close Window
- Scroll Left
- Scroll Right
- Redo
- Undo
- Run…
- Start Menu
- Word
- Excel
- Power Point
- Calculator
- Log off
- Maximize
- Minimize
- Zoom –
- Zoom +
4. Recording Mouse Macros using Macro Manager
For drivers and manuals for your specific device, click Download Product Manuals & Drivers
MACRO RECORDING
If you want to use and record actions using Macros please complete the following steps.
Step 1 – Click the button that you want to use.
Step 2 – Got to Macro -> Macro Manager
Step 3 – Record the actions that you want to use. For example, if you need to record continuously pressing the left or right click, click on Mouse Actions located at the bottom right corner, and then click [Left button] or [Right button].
Step 4 – When you want to cancel the process, press the stop button to cancel this function.
5. Common Connection Issues with Mice & Keyboards
For drivers and manuals for your specific device, click Download Product Manuals & Drivers
CONNECTION QUICK FIX
Try to use a different USB port and restart your PC. If the problem persists, contact customer support.
NOT RECOGNIZED
Please note that our products run without any driver software for XP&WIN7&WIN8, the driver software is only designed for customized functions and settings. When plugged into PC, (5~30 seconds) it starts working after all the lights are turned on.
If WINDOWS did not identify the mouse, please choose “YES” when installing is prompted until finished.
If the “Firewall” prompts when installing, please choose “YES” until finished. Then restart your computer, it will work after the mouse information is loaded.
6. How to Bind Keys, Change DPI Settings, or Change Lighting on Mice
BINDING KEYS
- Open the Redragon mouse software and go to the “MAIN tab”
- Choose the button you want to customize
- Click the button and a menu list will appear
- If the key that you want to bind is not in the list, choose single key for single key command (i.e. [ENTER]) and Combo Key for key combination commands (i.e. [CTRL]+[ALT]+{DELETE])
- Click “Apply”
CHANGING DPI
- Open the Redragon mouse software and go to the “DPI tab”
- Note that the mouse has 5 default profiles DPI1-DPI5. You can change the DPI settings up to 16400 DPI of every profile of the mouse using this tab
- Click “Apply”
CHANGING LIGHT SETTINGS
- Open the Redragon mouse software and go to the “Light tab”
- Note that the mouse has 5 default profiles. You can change the Light settings from 16 million LED color options.
- Click “Apply”
7. Wireless Mouse FAQs
The wireless mouse needs a USB receiver to be plugged in to your computer. Often, this nano receiver is stored in the bottom of the mouse when not in use. Simply plug this in to your computer and you are good to go.
Some wireless mice are born without power buttons. They still manage to live a healthy life, and this is in fact quite normal.
- The mouse will automatically hibernate wand shut down to conserve power after eight minutes without use.
- Press any button to wake the mouse.
DPI mouse (dpi stands for dots-per-second) indicator is used to test your mouse’s sensitivity, enabling you to adjust your mouse’s cursor speed by adjusting how many pixels per second it moves. Understanding your DPI is particularly useful when playing video games or using software where you want to be precise when placing your cursor. It also makes it much easier to use widescreen monitors and multiple displays.
Generally, DPI mouse is the standard used to measure the mouse sensitivity, expressed as the number of DPIs (dots per linear inch) that a device can detect. By changing the DPI, you can instantly adjust pointer speed for precision tasks, such as in-game targeting or photo editing.
This article will present how you can check your mouse DPI and change it on Windows 10.
What is the DPI Mouse?
A mouse’s DPI is the standard used to measure the mouse sensitivity, expressed as the number of DPIs (dpi stands for dots per linear inch) that a device can detect. By changing the DPI count, you can instantly adjust the mouse cursor or pointer speed for precision tasks, such as in-game targeting or photo editing.
Mouse DPI is also a measurement used to show how many pixels your mouse can move when you move your mouse cursor one inch. For example, if your mouse has 1600 DPI (low dpi mice), moving it exactly one inch (2.54 cm) will move the cursor to 1600 pixels on your screen.
The higher your DPI (dots per inch), the more sensitive your mouse is. For example, any modern gaming mouse has high dpi standards of up to 20,000 on high dpi mice. This may seem unpleasant. However, many people using large or multiple displays love being able to move the cursor faster or improve cursor speed.
While most people aren’t concerned about DPI count, it’s important for those playing video games. Especially in First Person Shooter (FPS) titles, many theorize about the perfect DPI setting to aim precisely.
Below are several ways to change your DPI settings, then check your current DPI to remember which setting works best.
How to change your Mouse DPI in Windows 10
So, How do I change mouse sensitivity (DPI)?
Many people want to modify their current DPI setting to achieve higher or lower sensitivity. You can gain more comfort and operate your device better. Having perfect sensitivity allows you to get things done better and enjoy your gaming experience even more.
The process of changing your mouse’s DPI (dots per inch) varies based on your type of mouse. Office mice usually have no more than two buttons — the left and right mouse buttons, — whereas a dedicated gaming mouse has somewhere between 4 and 8 buttons.
If your mouse has DPI on-the-fly buttons, press one of the DPI On-the-fly buttons to create new settings for each DPI button. The mouse LCD will briefly display the new DPI setting. On the other hand, if your mouse doesn’t have DPI on-the-fly buttons, start Microsoft Mouse and Keyboard Center, select the mouse you are using, click basic settings, locate Sensitivity, make your changes.
Let’s look at this in detail below:
Method #1: Change sensitivity of mouse in the Settings app
This method mostly applies to mice with no dedicated DPI button. Luckily, the Windows 10 developers didn’t forget people who use simpler computer mice and gave everyone the option to switch mouse dpi, hence their sensitivity easily.
Note: While you won’t know the exact number right away, you can use the methods described in the next section to determine your new DPI (dots per inch). You can switch dpi to a higher dpi or lower it.
Using the Windows Settings app, you can easily adjust your DPI settings and levels.
- Click on the Windows icon in the bottom-left of your screen to bring up the Start menu, then choose “Settings app.” You can also use the Windows + I keyboard shortcut to go to the settings app.
- Click on the “Devices” tile.
- Switch to the “Mouse” tab using the left-side panel.
- Click on the “Additional mouse options” link at the bottom of the page or in the right-side panel.
- Switch to the “Pointer Options” tab using the header menu of the Mouse Properties window.
- Adjust the speed of your mouse with the slider under ‘Motion’ on high-resolution screen. Moving the slider head to the left will make your mouse slower while moving it to the right will increase its speed.
- We recommend turning off the “Enhance pointer precision” setting, as it’s capable of messing up your DPI.
- Click the OK button. You should immediately see the change in mouse speed when you try to scroll the mouse cursor and see the cursor speed.
Method #2: Adjust sensitivity in the video game itself
Many video games allow you to adjust your sensitivity in-game and adjust it to a higher dpi or lower it. This allows you to use one general DPI for operating your system normally, then set up different sensitivity settings for different games.
While the setting is located in different menus for each game, you can generally follow these steps to find where you can change your in-game mouse scrolling sensitivity.
- Launch the game you want to change your sensitivity in and wait for it to load entirely.
- Locate the menu that says either “Options” or “Settings,” usually available from the title screen.
- You should be able to locate a menu that says “Controls.” If this menu is missing, chances are that you can’t directly adjust the sensitivity of the mouse from the game you opened.
- Look for the sensitivity slider and adjust it until you feel comfortable with the speed.
Method #3: Use the DPI changer button on your gaming mice
Any gaming mouse has a button dedicated to changing your DPI on-the-fly, which you can adjust to higher dpi or lower. You can adjust your DPI between various presets, which may or may not be customizable depending on your mouse, no matter your application.
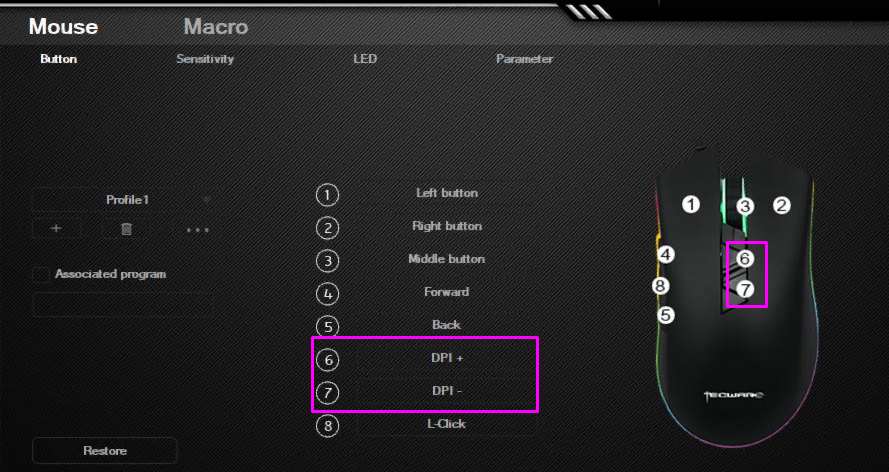
The DPI button is usually located below the scrolling wheel. It’s relatively small compared to the other buttons and sometimes even has the word “DPI” written on it as well.
You can cycle through the preset DPI settings that gradually get higher and higher by pressing the button once. Some mice may offer two buttons to increase it to higher dpi or decrease the DPI instead of cycling. And some high dpi mice might need lowering when you change from gaming to normal work. Or use gaming mice (gaming mice are mice designed for gaming) strictly for gaming.
Unsure of which button is responsible for your DPI? We recommend searching for the box your mouse came in, which usually has visual labels for each button on your mouse. You can also hop online and start looking for your model on the manufacturer’s website.
How to check your Mouse DPI
At the moment of writing, there’s no dedicated Windows 10 application for checking your DPI that comes with the system itself. This is an issue, as many people would love to get a clear and simple understanding of their mouse gadget’s DPI.
Don’t feel discouraged, though — there are many other ways to check what DPI you’re rolling with. Simply follow our instructions below to identify and make changes to your mouse gadget’s DPI.
Method #1: Check the manufacturer’s specifications
This method mostly applies to branded mice. Most major brands list their products on a website, complete with a set of specifications and images. This is mostly used to get customers interested, however, it can help those who’ve already purchased the product as well.
In this example, we’ll look at the Razer Mamba Elite mouse and determine its DPI. This process is similar for every mouse. However, some manufacturers don’t have a website or technical information about their products.
- Head over to the manufacturer’s website. In our case, we navigated to the official Razer website.
- Use the built-in search engine to find your mouse model.
- Locate the technical specifications and check the DPI count written on the website.
If you can’t find your mouse on the manufacturer’s website, we suggest getting in touch with customer support. Many brands offer support through e-mail or the phone.
Method #2: Use Microsoft Paint
This might seem like a silly way to determine your DPI. However, it works near perfectly. Since MS Paint comes with the ability to see the pixel your cursor is at, you’re able to do a little experiment to find a somewhat accurate measurement of your DPI.
- Open MS Paint by searching for it in your taskbar or your list of applications.
- Set your zoom level to 100%.
- Select any brush tool and place your cursor to the far left of the screen. In the bottom-left, the first number should show 0.
- Hold the left mouse button and move your mouse around 2-3 inches. Look at the first number in the bottom-left without moving your mouse and note it down.
- Repeat this process multiple times, then find the average of each measurement. This is your DPI.
Method #3: Install the correct mouse drivers
Most branded computer mice and any high dpi mouse come with the manufacturer’s own driver software. This allows you to completely customize how the hardware behaves, even if it has extra buttons and features.
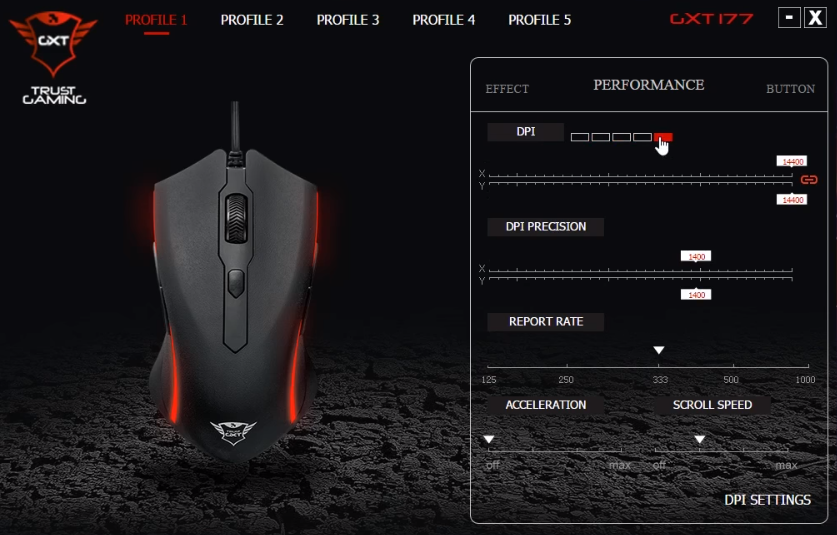
Installing the right mouse driver may give you the option to check your DPI. Again, we’ll be using a branded Trust GXT 177 Rivan RGB Gaming Mouse for this example.
- Head over to the manufacturer’s website. In our case, we navigated to the official Trust website.
- Use the search engine to find your product.
- Look for a section to download the driver software, then choose your operating system.
- Install the driver and launch the software. You should be able to locate a section dedicated to DPI settings, allowing you to see the DPI of your mouse.
Note: Not every manufacturer and mouse has dedicated driver software except on a gaming mouse. However, it’s worth checking in case you want to make personalized changes.
Conclusion
We hope this article helped you with the DPI issues on both high dpi and low dpi mice. You now know what dpi stands for (dpi stands for dots per inch) and that a mouse’s DPI is flexible — you don’t have to stick to one setting. Make sure to dedicate different mouse dpi settings or options for different activities to control cursor speed.
For more tech support and tips, visit our help center, subscribe to our email list, and receive tech updates, offers, and discounts at your comfort.
You May Also Like:
» How to Fix Mouse Lag on Windows 10
» How to Turn Off Mouse Acceleration Completely in Windows 10
» How to Fix Keyboard Typing Wrong Characters in Windows 10
» How to Fix Your Keyboard Not Working in Windows 10
»How To Change Your Mouse Cursor on Windows 10/11

