29
Share
Tweet
Казалось бы, что на компактных полностью автоматических камерах сделать качественные даблы с другом невозможно: пленка будет пересвечена и всё будет не в жилу. Но, на самом деле, сделать это не сложнее готовки завтрака.
DX-код — это специальная маркировка пленки типа 135 и APS. Кто хоть раз рассматривал катушку пленки меня поймёт. Выглядит как таблица 6×2, составленная из черных и белых прямоугольников. Белые прямоугольники представляют собой открытый металл кассеты и проводят электрический ток. Чёрные прямоугольники являются закрашенными областями и не проводят ток. Из этой таблицы фотоаппарат может получить данные о чувствительности плёнки, количестве кадров и фотографической широте — хотя нас интересует только чувствительность.

В различных фотоаппаратах стоят разные считыватели DX-кода, в совсем простых камерах на 2 датчика, в более сложных — на 3, 4 и 5. В зависимости от количества датчиков камера считывает разный диапазон значений в ISO: от 100 до 400 (2 датчика), от 100 до 800 (3 датчика), от 50 до 3200 (4 датчика) и от 25 до 5000 (5 датчиков). Хотя всё может варьироваться от камере к камере и это лучше уточнять в инструкции к аппарату.


В общем суть правильных даблов в данном случае состоит в том, чтобы камера считывала не те значения ISO какие изначально стоят на катушке, а те, что нужны нам (например, если пленка 100 ISO для даблов нужно выставить 200). Так что же нужно нужно сделать, чтобы камера считывала нужную нам чувствительность?
Подделать её!

Если поле, нужное вам, должно быть чистым — сотрите чернение ножом или ножницами, в общем чем вам удобнее. Если поле наоборот должно быть с чернением — наклейте маленький кусочек изоленты. Всё!
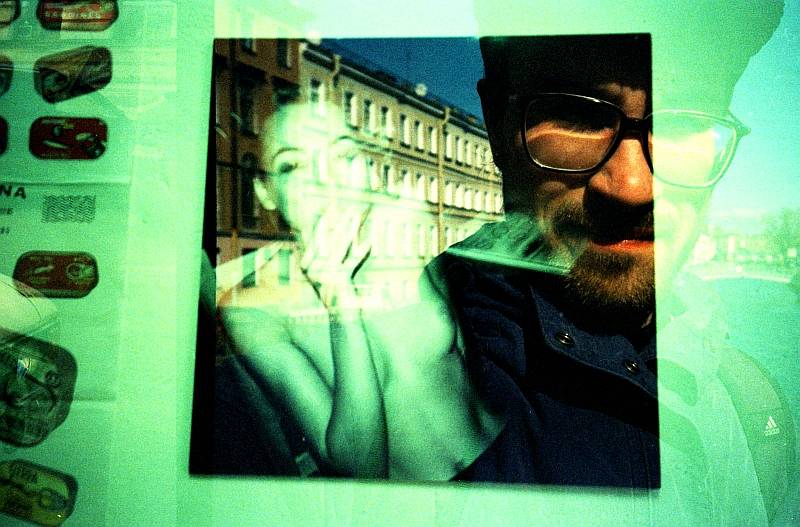
Напоследок я покажу несколько кадров, которые мы сделали вместе с plavaliznaem. Он снимал на Olympus Mju-II, а я на Olympus Stylus Zoom DLX.


written by mcrstar on 2012-05-16 #gear #tutorials #tipster #135 #dx # # # #35 # # #dx
29 Likes
alexkon, zharenkov, hybriddoll, alexyz, vodny, ditchbitch, z790406, annette_vinichenko, lomography-russia, khandama, hey_god, konbiw, 1122, fullofgooseberries, usha_berg, bird_of_hope, goodzen, chourique, paranoid_expectation, gotoarizona, life_on_mars, aton, feeeper, fish300, fishbone, mcrstar, mousya, pawlikdoc & plavaliznaem.
More Interesting Articles
-
Sonder: Everyone Has a Story
written by cheeo on 2023-02-09 #culture
Everyone is the main character in their own story, you are living yours just like the next person. Sonder is the realisation of this phenomenon. Let’s take a look at some photos that remind us of this wonderful word.
8
Share
Tweet
-
Moments in Analogue with Julie O’Brian
2023-02-09
#gear #people
Julie O’Brian lives in Galway, Ireland and shoots with a myriad of Lomography cameras and film. She shared some of her favourite shots with us here!
7
Share
Tweet
-
Taiwan Through the Eyes of Young Film Enthusiast Lee Chun-Tin
written by sylvann on 2023-02-08 #people #places
In this interview, 22-year-old film enthusiast Lee Chun-Tin (@trickstergaumer) shares his reasons for taking up film, points us his favorite places in his hometown and tells us what it’s like to document his youth through film photography in Taiwan.
12
Share
Tweet
-
Shop News
The Fisheye Baby is Back

Whilst the Fisheye Baby 110 is small and simple, don’t let that fool you – it delivers truly breathtaking Lomographic snapshots full of vignettes, light leaks and good old analogue charm.
-
«Sensation» by Anne-Fleur Sire with the LomoChrome Purple 2021 Pétillant
written by florinegarcin on 2023-02-07 #gear #people
«It is always a surprise to see what the film allows: the creation of a dreamy and soft universe without having to use many subterfuges.» — Anne-Fleur Sire tells us about her experience with the new formula of our color shifting LomoChrome Purple film.
4
Share
Tweet
-
South Korea on LomoChrome Turquoise by Carla Dief
written by melissaperitore on 2023-02-06 #gear #places #videos
Turning your everyday shots into out-of-this-world scenes: today we see how LomoAmiga Carla Dief used this film to transform South Korea into an even more magical country with the LomoChrome Turquoise film.
8
Share
Tweet
-
Garon Kiesel’s Gorgeously Grainy 110 Film Zine
written by eloffreno on 2023-02-06 #gear #culture #people
Garon Kiesel (a.k.a @grain_or_die on Instagram) sat down to tell us all about his latest zine featuring his 110 shots made with the Diana Baby 110 Camera.
8
Share
Tweet
-
Shop News
Get Inspired by the the Lomo’Instant Automat Vivian Ho Edition

Forget the ordinary, make the world extraordinary with this special edition Lomo’Instant Automat Camera with lenses featuring a colorful illustration by Hong Kong artist, Vivian Ho! Estimated to ship-out in December 2022 for the EU and the US!
-
In-Depth: The Importance Of Looking Deeply At Photography
written by eparrino on 2023-02-05 #culture
How fast do you think our brains can interpret an image? With attention spans decreasing we explore how this is impacting our ability to absorb and appreciate photography.
12
Share
Tweet
-
Music and Film Photography – An Interview with Indie Rock Band Cheats
written by soundfoodaround on 2023-02-05 #culture #people
In this interview we’re catching up with Filipino indie rock band Cheats. They tell us why for them film photography and music are inseparable art forms and give us their tips for shooting film at live concerts.
4
Share
Tweet
-
Dylan Overhouse’s Analogue Journey With The Diana F+
written by rocket_fries0036 on 2023-02-04 #gear #people #places
Dylan Overhouse started his journey with the Diana F+ three years ago and has been hooked on film photography ever since. He talks to us about what he’s learned and shares his tips for shooting with the Diana.
15
Share
Tweet
-
Shop News
Exclusive and Elegant — The Lomo’Instant Wide Monte Carlo Edition

Glistening sports cars crunch on the gravel as they pull up the iconic driveway. Stilettos click on polished marble floors and diamond-encrusted jewelry sparkles on elegantly dressed figures. With a refined black leather and silver metallic design, this sharp and sophisticated ultra-wide instant camera is dressed to impress.
-
Around the World in Analogue: Fiji
written by sylvann on 2023-02-03 #culture #people #places
Film photographer Stephen Hutchison returns to Around the World in Analogue with stories and photos of the South Pacific Oceanic country of Fiji.
9
Share
Tweet
-
The Diana F+ — A Quick History of the Analogue Icon
written by cheeo on 2023-02-02 #gear
Let’s take a quick look at the Diana’s rich and colorful history from its humble beginnings in 1960s Hong Kong to becoming a worldwide phenomenon.
23
Share
Tweet
-
@Aciano on His Cyberpunk Inspired Photos of Moscow at Night
written by rocket_fries0036 on 2023-02-02 #gear #places #tutorials
With the dystopian and cyberpunk genres ever present in our media today we take a look at Lomographer @acian, and his «Neo Moscow » shots of his city on winter nights.
13
Share
Tweet
-
Find Out More About


Молодёжь, увлечённая плёночной фотографией, по большей части щёлкает свои плёнки не на «механику», которой надо учиться, а на так называемые «мыльницы», реже — на любительские или полупрофессиональные зеркалки в программном полуавтоматическом или автоматическом режиме. Это понятно, так проще и не надо заморачиваться по поводу iso плёнки (про ИСО у нас есть отдельная статья!) и подбора экспопар «выдержка/диафрагма» в зависимости от освещённости объекта. Всё как «на цифре», как на смартфоне: просто щёлкаешь и всё, «зато какие картинки потом обалденные — плёнка — одно слово»!
Но оставим в стороне лирику. Мало кто из молодёжи знает, как эти самые «мыльницы» и прочие автоматы считывают плёнку и «узнают» о том, какая экспозиция нужна в зависимости от количества света, который она получает. В далёких 80-х плёночного ХХ века производители узкой 35-мм плёнки придумали так называемый DX-код, которым стали маркировать все кассеты стандарта 135 для этой плёнки. Кому интересно, погуглите на досуге, узнайте подробности.

Посмотрите на кассету вашей плёнки, наверняка видели эти неведомые чёрно-белые знаки рядом со штрих-кодом. Это, как раз, та самая служебная информация для фотоаппаратов, снабжённых контактами для считывания DX-кода и автоматической настройки своих фото-сенсоров под чувствительность плёнки. Откройте заднюю крышку вашего аппарата и присмотритесь к отсеку, где должна лежать кассета вашей плёнки, и если у вас автоматическая камера, то увидите эти самые контакты, которые позволяют вам не задумываться о технических премудростях фотографии, а просто щёлкать и всё…
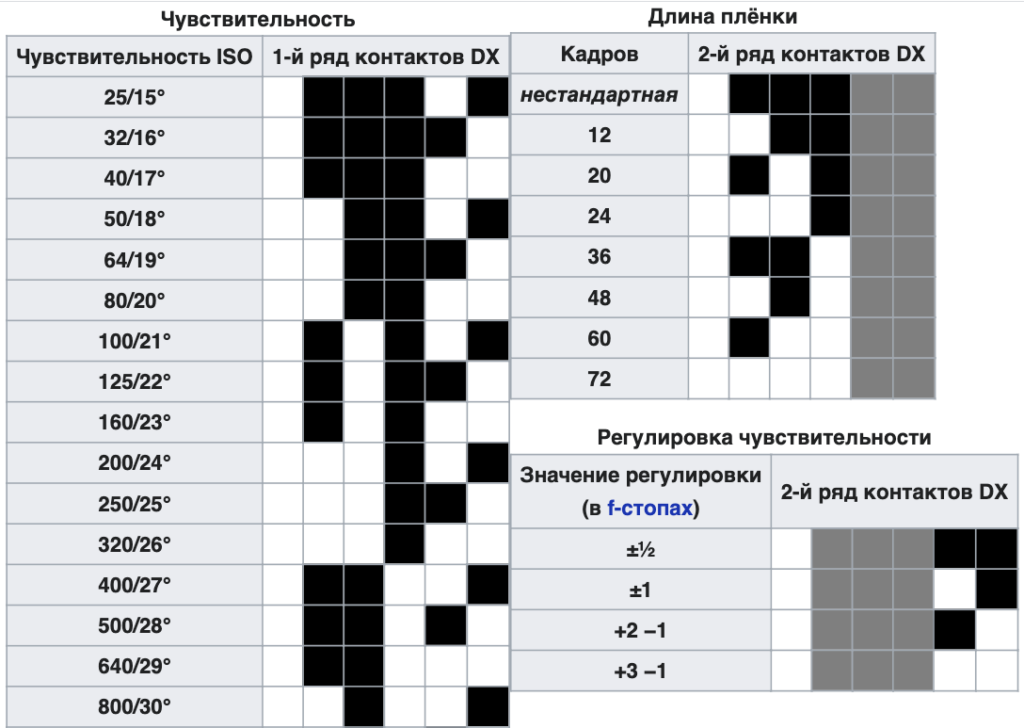
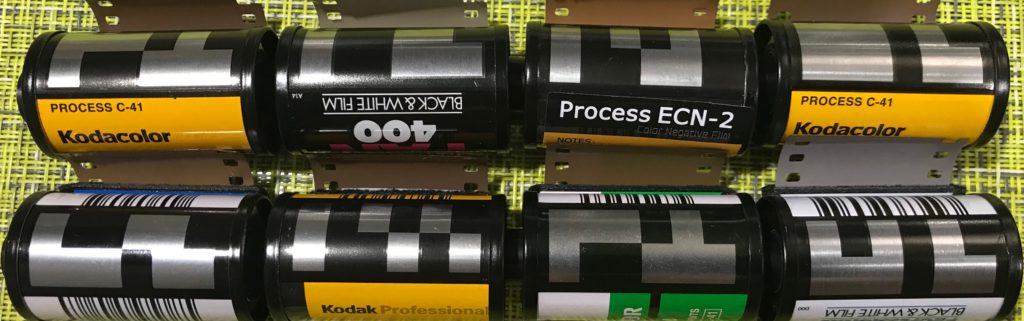
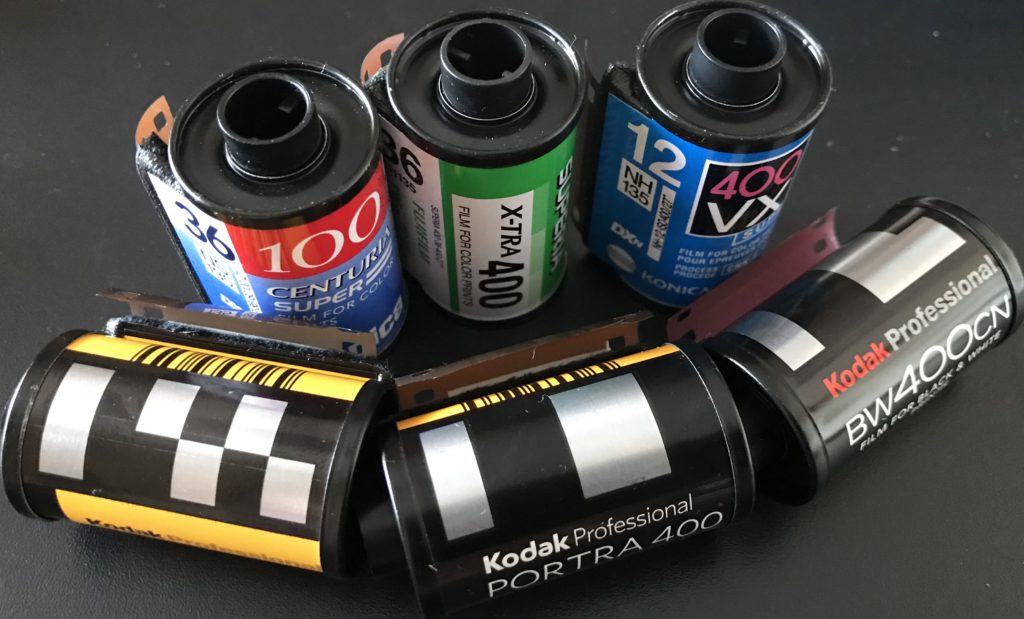
Для правильного чтения DX-кода поверните вашу кассету кончиком плёнки вверх, эмульсией к себе, тыльной стороной наружу и под плёнкой и штрих-кодом увидите те самые чёрно-белые знаки: сравните сочетания чёрных и белых квадратиков с рисунком на таблице DX-кодов с примерами (вверху). На фото внизу — кассеты с самым распространённым, популярным стандартом фотоплёнки — 200/36 exp., они встречаются чаще всего: универсальная светочувствительность ISO 200 — 1-й (верхний) ряд контактов DX — подряд три белых квадратика, потом чередование чёрного, белого и чёрного, 2-й (нижний) ряд контактов DX — это длина плёнки — 36 кадров обозначены как белый квадратик, два чёрных, снова белый (за ним ещё два белых в том же ряду — это «регулировка чувствительности» — допуск в пере- и недоэкспонировании для продвинутых автоматов, не для «мыльниц»).
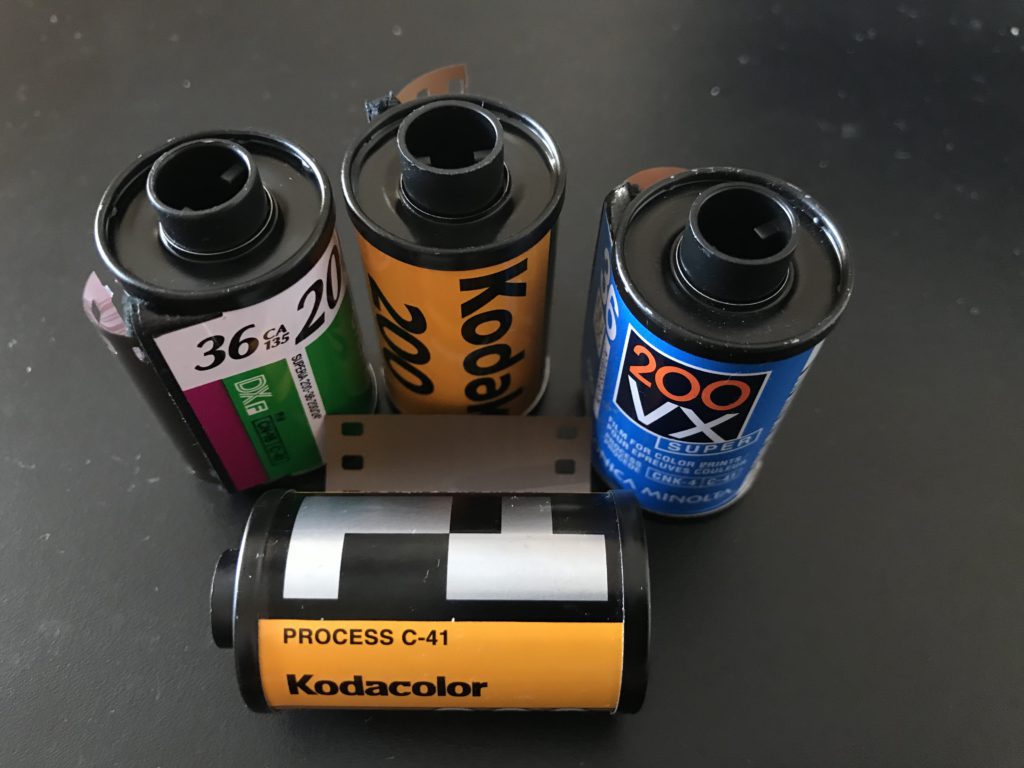
С такими знаниями вы теперь можете прочитать DX-маркировку других кассет (см. следующее фото внизу): для плёнок с высокой чувствительностью — ISO 400 (хороши в вечернее время и в помещениях) — белый, два чёрных, два белых, чёрный квадратик, и для плёнок с меньшей чувствительностью — ISO 100 (для съёмок днём на природе, например) — чередование белый, чёрный, белый, чёрный, белый, чёрный. Обратите внимание на длину в 12 кадров, как правило, это самые недорогие плёнки — хороши для учёбы, тренировок и тестирования на разных экспопарах (об этом на наших уроках, такие плёнки для тренировок выдаём нашим ученикам бесплатно!) — можно быстро отснять, сразу проявить и увидеть результат, причём проявить плёнку можно прямо в классе!
PostScriptum. Для тех, кто пока не умеет фотографировать в мануальном режиме: плёнка, которую мы самостоятельно наматываем на катушки в наши кассеты, соответствуют их маркировке по DX-коду. Приходите со своими мыльницами-автоматами, убедитесь в этом сами, щёлкайте на здоровье! Ещё лучше освоить механику ретро-фотоаппарата, понять сколько света нужно вашей плёнки и не зависеть от DX-маркировки кассеты. Премудростям правильного подбора экспопар научим за полдня!
Институт труда, Иркутск. 7 января 2021 г.
Introduction: DIY Film DX Code Labels
Do you have a stuborn film camera that takes the ISO information from the DX code on the canister?
Do you want to push/pull your film, but your camera doesn’t let you override the ISO value?
Did you buy cheap film with no DX encoding in the canisters?
I have the solution for you!
Some might scrape the paint to uncover the metal contacts. However, I find it very time consuming.
I prefer to make DX labels and stick them to the canisters.
More information on DX encoding:
Wikipedia
DX encoding simulator
If you find something wrong in this instructable, please tell me.
Step 1: Tools and Materials Needed
To follow this instructable you will need:
— Aluminium foil
— Clear plastic adhesive sheet
— Adhesive tape
— Scisors
— X-acto knife
— Printer, to print the label layout.
Step 2: Print Layout
In this step you have to transfer the pattern onto the paper backing of the adhesive sheet.
You can use the attached pdf files to print the patterns.
I used a cardboard sheet and taped the adhesive sheet, so I could feed it through the printer.
But you can also print a regular sheet of paper and then manually trace over onto the adhesive sheet.
Then you have to:
1- Cut the label.
2- Remove the black areas with an X-acto knife.
3- Bend in half. It will make it easier for the next step.
Step 3: Assemble Labels
Now, cut a piece of foil roughly the size of the label. Don’t worry with precise measurements.
Use the bend on the label to peel apart only half of the paper backing.
Then stick the foil to the exposed adhesive of the label. Make sure you match the edge of the foil with the bend you previously made.
Peel apart the remaining paper, and fold the label over the foil.
Then cut away the excess foil, following the edges of the adhesive paper.
Finally, don’t forget to note the direction of the label and the ISO value with a permanent marker. I usually use the barcode side as a reference.
Step 4: Use It
Now you just have to stick the label to your film canister. Use two small pieces of tape on each side of the label.
Do not cover the exposed foil!
To verify if the contacts are touching correctly the label, place the film in the camera and wiggle it a little.
Take out the film and look at the foil. It should have the markings of the contacts.
Now go have fun and shoot!
Be the First to Share
Recommendations
Как Поменять Dx Код На Катушке С Пленкой ( Или Как Изменить Iso Фотопленки)
Аналоговая Фотография
HD
04:37
Как Поменять Dx Код На Катушке С Пленкой ( Или Как Изменить Iso Фотопленки)
![]()
Дата публикации:
20.12.2018 23:56
Продолжительность:
04:37
Ссылка:
https://thewikihow.com/video_4Hd_unbm6-g
Действия:
Источник:
Описание
Подписывайтесь на наш Telegram канал!@thewikihowоткрытьМониторим видео тренды 24/7
Что еще посмотреть на канале Аналоговая Фотография
Фото обложки и кадры из видео
Как Поменять Dx Код На Катушке С Пленкой ( Или Как Изменить Iso Фотопленки), Аналоговая Фотография
https://thewikihow.com/video_4Hd_unbm6-g
Аналитика просмотров видео на канале Аналоговая Фотография
Гистограмма просмотров видео «Как Поменять Dx Код На Катушке С Пленкой ( Или Как Изменить Iso Фотопленки)» в сравнении с последними загруженными видео.
Теги:
Dx
Dx Код
Iso
Фотопленка
Как Изменить Dx
Как Поменять Iso
Как Снимать На Пленку
Тасма
Тип 42
Снимем Пленку С Другим Исо
Похожие видео
06:30
56 880 просмотров.

06:01
165 просмотров.

03:52
21 911 просмотров.

02:35
8 850 просмотров.

02:51
3 860 просмотров.

06:29
972 просмотра.

05:08
51 241 просмотр.

04:49
3 906 просмотров.

04:48
1 356 просмотров.