
Upgrade your bot’s messages and make them a little more custom using embeds!

When your Discord bot responds to your server, you don’t always want a boring default message to be sent back. Maybe you have links or images that you want to send back in chat. With Python and Discord.py, this is super easy to do in your Discord bot!
Python Discord Bots: Formatting Text: How to add rich formatting to Python Discord bots
Note: This is tested on version 1.4.1 of the Discord.py module. You will encounter issues if you are using a version lower than 1.0. It is recommended that you migrate your code to a more current version.
Building Embeds
Embeds in Discord are simple and have a very clean, formatted look to them. In this tutorial we will go through how to create an embed and customize every part of it.
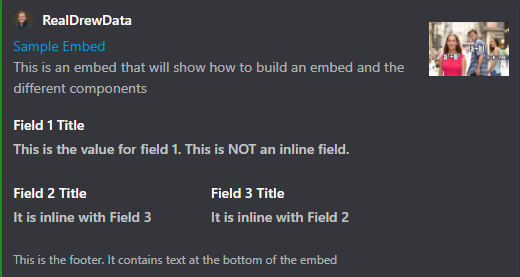
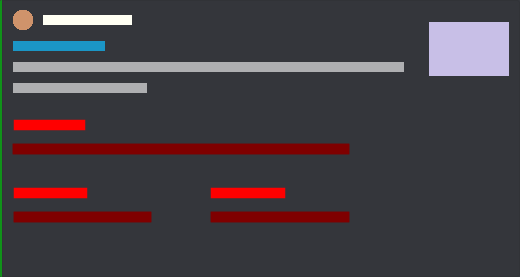
The embed below is similar to what we will be making. It has a lot going on. There are multiple pictures, links, and text fields that we are able to edit.
You’ll know how to make this embed by the end of the tutorial!
Creating the Initial Embed
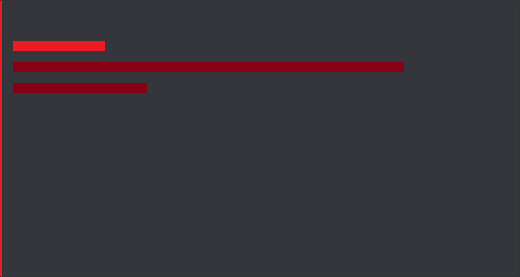
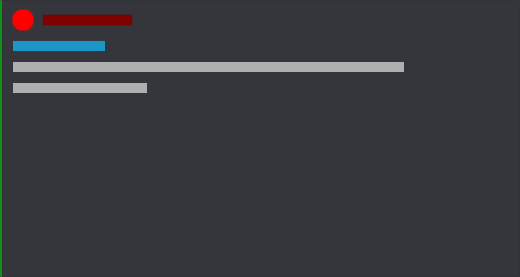
Title, Description, and color (color is the bar to the left side)
When creating an embed, you need to initialize an embed object using the Embed() function from the discord package. We will be using 4 arguments to get started:
-
title: a string to set the title. This is the first line on our blank embed
-
url: a string to set the link for the title. When you click on title in the final embed it will take you to this link
-
description: a string to set the description. This is the darker 2 red lines above
-
color: a color object. This will color the left edge of the embed.
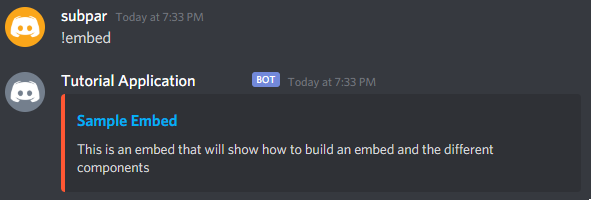
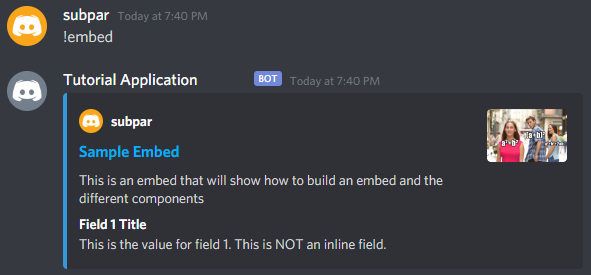
Let’s create a new command in the bot code. Call it embed. All this command will do is build the embed and send it to the channel. In the command build the initial embed object like so:
    @client.command()
    async def embed(ctx):
        embed=discord.Embed(title="Sample Embed", url="https://realdrewdata.medium.com/", description="This is an embed that will show how to build an embed and the different components", color=0xFF5733)
        await ctx.send(embed=embed)
Start the bot. Go to the server where you joined your bot. Send the embed command we just created. Your bot will return the embed to you!
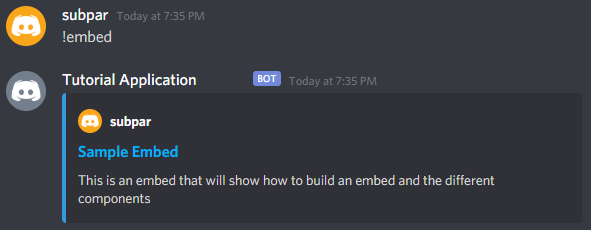
You have multiple options when it comes to colors. You can continue to look up HEX color codes with a tool like Google’s Color Picker, or you can use the built in colors inside discord.Color. To use the built in colors, you just use the classmethod of that color’s name. To turn the example blue, you would change it like this (change in bold):
    @client.command()
    async def embed(ctx):
        embed=discord.Embed(title="Sample Embed", url="https://realdrewdata.medium.com/", description="This is an embed that will show how to build an embed and the different components", color=**discord.Color.blue()**)
        await ctx.send(embed=embed)
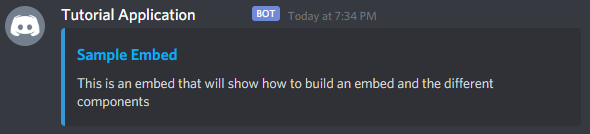 Now the embed is blue!
A full list of the color classmethods available for color in Discord.py are available in the documentation.
Adding an Author
The author is the text at the very top, and the icon is the circle next to that. Once we have our initial embed object, we can use the .set_author() method on it to add the information for the author. For the author, there are 3 arguments to know:
-
name: a string with the author’s name
-
url: a string with a link for the author text
-
icon_URL: a string with the URL location of the picture to use in the author icon
In action, this will look something like this:
embed.set_author(name="RealDrewData", url="https://twitter.com/RealDrewData", icon_url="https://pbs.twimg.com/profile_images/1327036716226646017/ZuaMDdtm_400x400.jpg")
Running the bot and using the command in Discord will return the embed with the author information filled in.
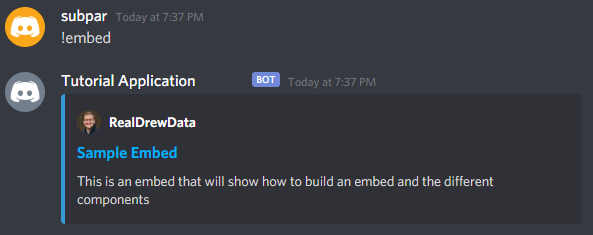
If you want the author name and icon to be the person who called the command, you can pull that information from the ctx, or context of the command. ctx.author.display_name will pull the username (or nickname if they have one set for the guild) of the person who used the embed command. ctx.author.avatar_url will retrieve the URL of their avatar to use in the embed (changes in bold).
embed.set_author(name=**ctx.author.display_name**, url="[https://twitter.com/RealDrewData](https://twitter.com/RealDrewData)", icon_url=**ctx.author.avatar_url**)
Once the .set_author method is updated, you will see that the icon and author name are updated to match the person who called the embed function.
Thumbnails
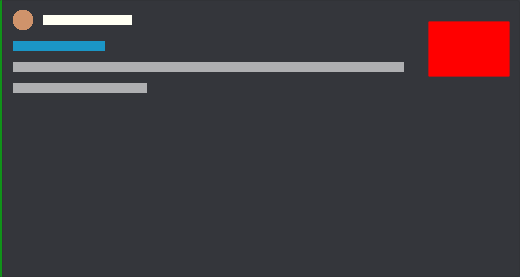
Our next step will be to add the thumbnail. This is the image that goes at the top right of the embed. To add this, we will use the .set_thumbnail() method on our initial embed object. The .set_thumbnail() method takes a single argument that we need to know about:
- url: a string with the URL location of the picture to use for the embed picture
In action, it will look like this:
embed.set_thumbnail(url="https://i.imgur.com/axLm3p6.jpeg")
Simple as that, our embed now has a thumbnail at the to right.

Adding Fields
When creating embeds, you have the ability to create a number of text fields with more information. To add these fields, we will use the .add_field() method on our embed object. There are 3 arguments that this method can take that you need to know about:
-
name: a string with the title of the field
-
value: a string with the body text of the field
-
inline: boolean specifying whether the field is inline
Our code will look like this to add a field:
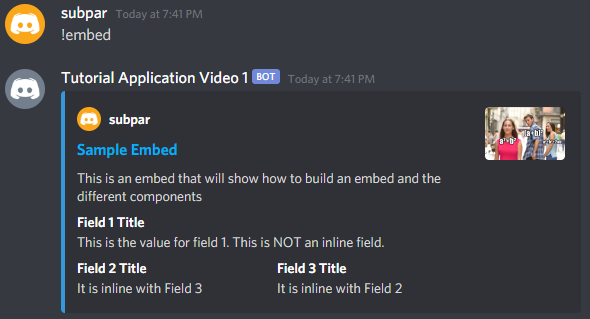
embed.add_field(name="Field 1 Title", value="This is the value for field 1. This is NOT an inline field.", inline=False)
Field 1 is not inline, meaning that it will take up the entire line of the embed. If we want to put multiple fields next to each other, we can set inline=True. This will put the next 2 fields we create on the same line. The code will look like this:
    embed.add_field(name="Field 2 Title", value="It is inline with Field 3", inline=True)
    embed.add_field(name="Field 3 Title", value="It is inline with Field 2", inline=True)
And our resulting embed has both fields on the same line.
Adding a Footer
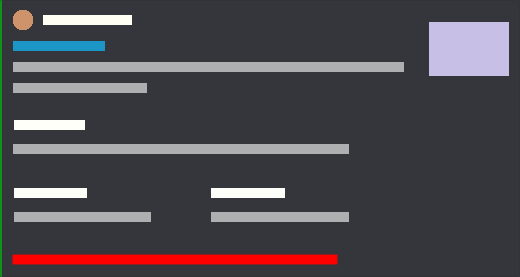
The final part to customize on our embed is the footer. This is done by using the .set_footer() method on the embed object. This method has only 1 argument, but it is a good place to play around and use information from the ctx variable to enhance it.
- text: a string with text to display in the footer
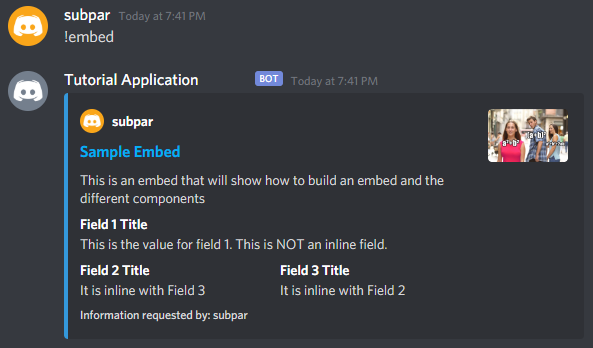
A simple footer is added by doing something like this:
embed.set_footer(text="This is the footer. It contains text at the bottom of the embed")
And the result:
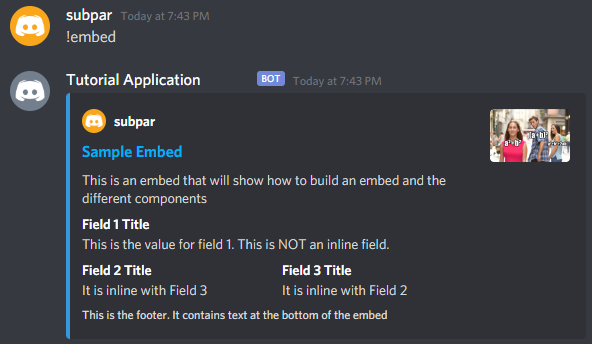
We can also do some simple string formatting to customize the text with information from ctx. To have it say “Information requested by: subpar”, we can type the sentence with {} as a placeholder for the name variable. Using the .format() string method, we can replace the placeholder with ctx.author.display_name. (Changes in bold)
embed.set_footer(text=**"Information requested by: {}".format(ctx.author.display_name)**)
When we request the embed now, we will see this output:
Conclusion
In this post you learned how to create an embed, adding features such as an author, thumbnail, and fields to make it look more interesting. Experiment with the different elements and get your embeds exactly how you like them.
If you are still having trouble creating your own embed, check out the visual embed creator put together by orels1. It has an easy to use interface that allows you to preview your embed and get the code to quickly implement it in your Discord bot.
Code Reference
#### Create the initial embed object ####
embed=discord.Embed(title="Sample Embed", url="https://realdrewdata.medium.com/", description="This is an embed that will show how to build an embed and the different components", color=0x109319)

# Add author, thumbnail, fields, and footer to the embed
embed.set_author(name="RealDrewData", url="https://twitter.com/RealDrewData", icon_url="https://pbs.twimg.com/profile_images/1327036716226646017/ZuaMDdtm_400x400.jpg")

embed.set_thumbnail(url="https://i.imgur.com/axLm3p6.jpeg")

embed.add_field(name="Field 1 Title", value="This is the value for field 1. This is NOT an inline field.", inline=False)
embed.add_field(name="Field 2 Title", value="It is inline with Field 3", inline=True)
embed.add_field(name="Field 3 Title", value="It is inline with Field 2", inline=True)

embed.set_footer(text="This is the footer. It contains text at the bottom of the embed")


#### Useful ctx variables ####
## User's display name in the server
ctx.author.display_name

## User's avatar URL
ctx.author.avatar_url

# Embeds
If you have been around on Discord for a bit, chances are you have seen these special messages, often sent by bots.
They can have a colored border, embedded images, text fields, and other fancy properties.
In the following section, we will explain how to compose an embed, send it, and what you need to be aware of while doing so.
# Embed preview
Here is an example of how an embed may look. We will go over embed construction in the next part of this guide.

08/14/2021
Some description here
Regular field title
Some value here
Inline field title
Some value here
Inline field title
Some value here
Inline field title
Some value here

# Using the embed constructor
discord.js features the MessageEmbed (opens new window) utility class for easy construction and manipulation of embeds.
TIP
You don’t need to include all the elements showcased above. If you want a simpler embed, leave some out.
The .setColor() method accepts an integer, HEX color string, an array of RGB values or specific color strings. You can find a list of them at the discord.js documentation (opens new window).
.addBlankField() was a convenience method to add a spacer to the embed. To add a blank field you can now use .addField('u200b', 'u200b') instead.
The above example chains the manipulating methods to the newly created MessageEmbed object.
If you want to modify the embed based on conditions, you will need to reference it as the constant exampleEmbed (for our example).
# Attaching images
You can use the .attachFiles() method to upload images alongside your embed and use them as source for embed fields that support image urls. The method accepts the source file as file path FileOptions (opens new window), BufferResolvable (including a URL to an external image), or Attachment objects inside an array.
You can then reference and use the images inside the embed itself with attachment://fileName.extension.
TIP
If you plan to attach the same image repeatedly, consider hosting it online and providing the URL in the respective embed field instead. This also makes your bot respond faster since it doesn’t need to upload the image with every response depending on it.
WARNING
If the images don’t display inside the embed but outside of it, double-check your syntax to make sure it’s as shown above.
# Using an embed object
TIP
You don’t need to include all the elements showcased above. If you want a simpler embed, leave some out.
If you want to modify the embed object based on conditions, you will need to reference it directly (as exampleEmbed for our example). You can then (re)assign the property values as you would with any other object.
# Attaching images
You can upload images with your embedded message and use them as source for embed fields that support image urls by constructing a MessageAttachment (opens new window) from them to send as message option alongside the embed. The attachment parameter takes a BufferResolvable or Stream including the URL to an external image.
You can then reference and use the images inside the embed itself with attachment://fileName.extension.
TIP
If you plan to attach the same image repeatedly, consider hosting it online and providing the URL in the respective embed field instead. This also makes your bot respond faster since it doesn’t need to upload the image with every response depending on it.
WARNING
If the images don’t display inside the embed but outside of it, double-check your syntax to make sure it’s as shown above.
# Resending and editing
We will now explain how to edit embedded message content and resend a received embed.
# Resending a received embed
To forward a received embed you retrieve it from the messages embed array (message.embeds) and pass it to the MessageEmbed constructor. The constructed MessageEmbed can then be edited before sending it again.
WARNING
We deliberately create a new Embed here instead of just modifying message.embeds[0] directly to keep the cache valid. If we were not to do this, the embed in cache on the original message would diverge from what the actual embed looks like, which can result in unexpected behavior down the line!
# Editing the embedded message content
To edit the content of an embed you need to pass a new MessageEmbed structure or embed object to the messages .edit() method.
If you want to build the new embed data on a previously sent embed template, make sure to read the caveats in the previous section.
# Notes
- To display fields side-by-side, you need at least two consecutive fields set to
inline - The timestamp will automatically adjust the timezone depending on the user’s device
- Mentions of any kind will only render correctly in field values and descriptions
- Mentions in embeds will not trigger a notification
- Embeds allow masked links (e.g.
[Guide](https://discordjs.guide/ 'optional hovertext')), but only in description and field values
# Embed limits
There are a few limits to be aware of while planning your embeds due to the API’s limitations. Here is a quick reference you can come back to:
- Embed titles are limited to 256 characters
- Embed descriptions are limited to 4096 characters
- There can be up to 25 fields
- A field’s name is limited to 256 characters and its value to 1024 characters
- The footer text is limited to 2048 characters
- The author name is limited to 256 characters
- The sum of all characters from all embed structures in a message must not exceed 6000 characters
- A bot can have one embed per message
- A webhook can have ten embeds per message
Source: Discord API documentation (opens new window)
Эмбед — особый формат сообщений. Есть миф, что их могут (без модификаций и селфботов) отправлять только боты, однако это не так. Вы уже сталкивались с эмбедами, когда делились с друзьями сайтами или видео c Youtube.
Эмбеды есть следующих типов:
| Тип | Доступен для | Описание | Пример | Настройка |
|---|---|---|---|---|
| rich | Боты, вебхуки (для пользователей только с модификациями/селфботами) | Самый красивый и многофункциональный вид эмбедов |  |
Через API |
| link | Все | Появляется при отправлении ссылки без <> |  |
Создателем сайта |
| video | Все | Появляется при отправлении ссылки на видео без <> |  |
Создателем сайта |
Как прислать эмбед?
Способ для ботов (rich)
API
См. документацию
JavaScript
См. документацию
Python
См. документацию
Discord Bot Maker
1. Для начала нам нужно создать команду, у нас это будет тест-эмбеда-для-вики

2. Потом, нажмите «Create» и нажмите на «Send Message», потом выберите категорию «Messaging» и там выберите «Create Embed Messagse»
2 шаг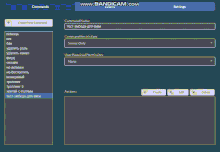
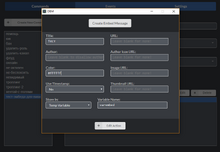
2.1. Вписываем заголовок эмбеда, URL, Автора, цвет, изображение. Потом пишем в «Variable Name», например, «varembed» и сохраняем.
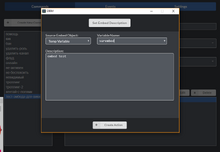
3. Нажимаем опять кнопку «Create», выбираем ту же самую категорию и выбираем уже «Set Embed Description».
3.1. Вписываем «Variable Name», который мы написали в прошлом событии, у нас это был «varembed», вписываем.
3.2. А дальше просто пишем, что у нас будет в эмбеде, у нас это «embed test».
4. Дальше создаём ещё одно событие в команде, выбираем также «Messaging», но функцию уже выбираем «Send Embed Message».
4.1. Вписываем «Variable Name», в нашем случае это «varembed». Потом можем выбрать куда сообщение придёт и готово!
Эмбед с помощью Discord Bot Maker был создан, осталось запустить вашего бота и продемонстрировать эту команду.
BetterDiscord
В интернете можно найти плагин, который сможет отсылать эмбеды (типа link), в данном случае опишется плагин «Safe Embed Generator».
1. Скачиваем плагин по ссылке *клик*.
1.1 Перекидываем в папку с плагинами, на Windows %APPDATA%RoamingBetterDiscordplugins, на Linux $HOME/.config/BetterDiscord/plugins
1.2 Подключаем его в настройках пользователя во вкладке «Plugins».
Создаём (Генерируем) эмбед
1. Нажимаем на кнопку ![]() в поле ввода сообщения.
в поле ввода сообщения.
2. Когда вы видите это, не бойтесь. Заполняйте всё как вам надо, сбоку появится превью эмбеда. Как и в Discord Bot Maker тут можно выбрать цвет, картинку, автора, заголовок.

3. Когда вы всё заполнили, можете нажимать «Send», и у вас отправится эмбед!
