
Customizing your .bashrc file can greatly improve your workflow and increase your productivity.
The .bashrc is a standard file located in your Linux home directory. In this article I will show you useful .bashrc options, aliases, functions, and more.
The main benefits of configuring the .bashrc file are:
- Adding aliases allows you to type commands faster, saving you time.
- Adding functions allows you to save and rerun complex code.
- It displays useful system information.
- It customizes the Bash prompt.
How to Get Started with Editing .bashrc
Here’s how you can edit the .bashrc file with a text editor:
$ vim ~/.bashrcYou can add date and time formatting to bash history.
HISTTIMEFORMAT="%F %T "# Output
$ history
1017 20210228 10:51:28 uptime
1019 20210228 10:52:42 free -m
1020 20210228 10:52:49 tree --dirsfirst -F
1018 20210228 10:51:38 xrandr | awk '/*/{print $1}'Add this line to ignore duplicate commands in the history.
HISTCONTROL=ignoredupsTo set the number of lines in active history and to set the number of lines saved in Bash history, add these two lines.
HISTSIZE=2000
HISTFILESIZE=2000
You can set your history to append instead of overwriting Bash history. shopt stands for «shell options».
shopt -s histappendTo see all the default shell options, run shopt -p.
# Output

$ shopt -p

shopt -u autocd
shopt -u assoc_expand_once
shopt -u cdable_vars
shopt -u cdspell
shopt -u checkhash
shopt -u checkjobs
shopt -s checkwinsize
[...]
Create some variables to add color to the Bash prompt like this:
blk='[33[01;30m]'   # Black
red='[33[01;31m]'   # Red
grn='[33[01;32m]'   # Green
ylw='[33[01;33m]'   # Yellow
blu='[33[01;34m]'   # Blue
pur='[33[01;35m]'   # Purple
cyn='[33[01;36m]'   # Cyan
wht='[33[01;37m]'   # White
clr='[33[00m]'      # Reset
This is for the Vim lovers. This will allow you to use vim commands on the command line. This is always the first line I add to my .bashrc.
set -o viHow to Create Aliases in .bashrc
You can use aliases for commands you run a lot. Creating aliases will allow you to type faster, saving time and increasing productivity.
The syntax for creating an alias is alias <my_alias>='longer command'. To find out which commands would make good aliases, run this command to see a list of the top 10 commands you run most.
$ history | awk '{cmd[$2]++} END {for(elem in cmd) {print cmd[elem] " " elem}}' | sort -n -r | head -10
# Output

171 git
108 cd
62 vim
51 python3
38 history
32 exit
30 clear
28 tmux
28 tree
27 ls
Since I use Git a lot, that would be a great command to create an alias for.
# View Git status.
alias gs='git status'

# Add a file to Git.
alias ga='git add'

# Add all files to Git.
alias gaa='git add --all'

# Commit changes to the code.
alias gc='git commit'

# View the Git log.
alias gl='git log --oneline'

# Create a new Git branch and move to the new branch at the same time.
alias gb='git checkout -b'

# View the difference.
alias gd='git diff'
Here are some other useful aliases:
# Move to the parent folder.
alias ..='cd ..;pwd'

# Move up two parent folders.
alias ...='cd ../..;pwd'

# Move up three parent folders.
alias ....='cd ../../..;pwd'
# Press c to clear the terminal screen.
alias c='clear'
# Press h to view the bash history.
alias h='history'
# Display the directory structure better.
alias tree='tree --dirsfirst -F'
# Make a directory and all parent directories with verbosity.
alias mkdir='mkdir -p -v'# View the calender by typing the first three letters of the month.
alias jan='cal -m 01'
alias feb='cal -m 02'
alias mar='cal -m 03'
alias apr='cal -m 04'
alias may='cal -m 05'
alias jun='cal -m 06'
alias jul='cal -m 07'
alias aug='cal -m 08'
alias sep='cal -m 09'
alias oct='cal -m 10'
alias nov='cal -m 11'
alias dec='cal -m 12'# Output
$ mar
March 2021
Su Mo Tu We Th Fr Sa
1 2 3 4 5 6
7 8 9 10 11 12 13
14 15 16 17 18 19 20
21 22 23 24 25 26 27
28 29 30 31
Functions are great for more complicated code when an alias won’t work.
Here’s the basic function syntax:
function funct_name() {
	# code;
}
This is how you can find the largest files in a directory:
function find_largest_files() {
    du -h -x -s -- * | sort -r -h | head -20;
}
# Output

Downloads $ find_largest_files

709M	systemrescue-8.00-amd64.iso
337M	debian-10.8.0-amd64-netinst.iso
9.1M	weather-icons-master.zip
6.3M	Hack-font.zip
3.9M	city.list.json.gz
2.8M	dvdrental.tar
708K	IMG_2600.JPG
100K	sql_cheat_sheet_pgsql.pdf
4.0K	repeating-a-string.txt
4.0K	heart.svg
4.0K	Fedora-Workstation-33-1.2-x86_64-CHECKSUM
[...]
You can also add colors to the Bash prompt and display the current Git branch like this:
# Display the current Git branch in the Bash prompt.

function git_branch() {
    if [ -d .git ] ; then
        printf "%s" "($(git branch 2> /dev/null | awk '/*/{print $2}'))";
    fi
}

# Set the prompt.

function bash_prompt(){
    PS1='${debian_chroot:+($debian_chroot)}'${blu}'$(git_branch)'${pur}' W'${grn}' $ '${clr}
}

bash_prompt

Grep (search) through your history for previous run commands:
function hg() {
    history | grep "$1";
}
# Output
$ hg vim
305 2021-03-02 16:47:33 vim .bashrc
307 2021-03-02 17:17:09 vim .tmux.confThis is how you start a new project with Git:
function git_init() {
    if [ -z "$1" ]; then
        printf "%sn" "Please provide a directory name.";
    else
        mkdir "$1";
        builtin cd "$1";
        pwd;
        git init;
        touch readme.md .gitignore LICENSE;
        echo "# $(basename $PWD)" >> readme.md
    fi
}
# Output
$ git_init my_project
/home/brandon/my_project
Initialized empty Git repository in /home/brandon/my_project/.git/You can also get the weather report on the command line. This requires the package curl, jq, and an API key from Openweathermap. Read the Openweathermap API documentation in order to configure the URL correctly to get the weather in your location.
Install curl and jq with these commands:
$ sudo apt install curl jq

# OR

$ sudo dnf install curl jq
function weather_report() {
local response=$(curl --silent 'https://api.openweathermap.org/data/2.5/weather?id=5128581&units=imperial&appid=<YOUR_API_KEY>')
local status=$(echo $response | jq -r '.cod')
# Check for the 200 response indicating a successful API query.
case $status in
200) printf "Location: %s %sn" "$(echo $response | jq '.name') $(echo $response | jq '.sys.country')"
printf "Forecast: %sn" "$(echo $response | jq '.weather[].description')"
printf "Temperature: %.1f°Fn" "$(echo $response | jq '.main.temp')"
printf "Temp Min: %.1f°Fn" "$(echo $response | jq '.main.temp_min')"
printf "Temp Max: %.1f°Fn" "$(echo $response | jq '.main.temp_max')"
;;
401) echo "401 error"
;;
*) echo "error"
;;
esac
}# Output
$ weather_report
Location: "New York" "US"
Forecast: "clear sky"
Temperature: 58.0°F
Temp Min: 56.0°F
Temp Max: 60.8°FHow to Print System Information in .bashrc
You can display useful system information when you open the terminal like this:
clear

printf "n"
printf "   %sn" "IP ADDR: $(curl ifconfig.me)"
printf "   %sn" "USER: $(echo $USER)"
printf "   %sn" "DATE: $(date)"
printf "   %sn" "UPTIME: $(uptime -p)"
printf "   %sn" "HOSTNAME: $(hostname -f)"
printf "   %sn" "CPU: $(awk -F: '/model name/{print $2}' | head -1)"
printf "   %sn" "KERNEL: $(uname -rms)"
printf "   %sn" "PACKAGES: $(dpkg --get-selections | wc -l)"
printf "   %sn" "RESOLUTION: $(xrandr | awk '/*/{printf $1" "}')"
printf "   %sn" "MEMORY: $(free -m -h | awk '/Mem/{print $3"/"$2}')"
printf "n"
Output:
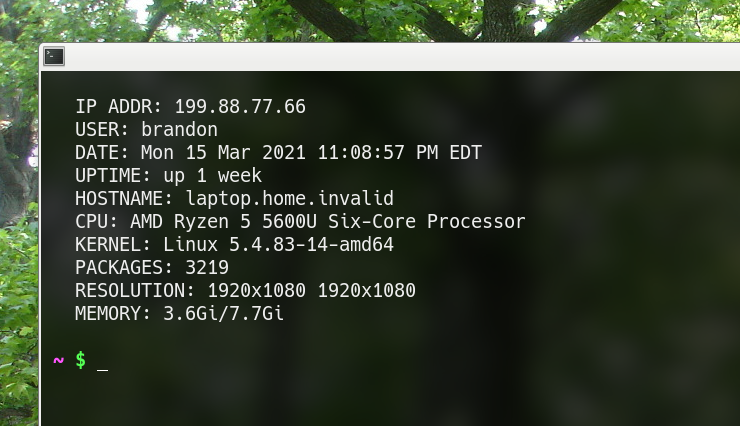
Source the .bashrc file to make the changes take effect:
$ source ~/.bashrcHere are all these custom .bashrc settings together. On a new system I paste any customization below the default code in the .bashrc file.
######################################################################
#
#
#           ██████╗  █████╗ ███████╗██╗  ██╗██████╗  ██████╗
#           ██╔══██╗██╔══██╗██╔════╝██║  ██║██╔══██╗██╔════╝
#           ██████╔╝███████║███████╗███████║██████╔╝██║
#           ██╔══██╗██╔══██║╚════██║██╔══██║██╔══██╗██║
#           ██████╔╝██║  ██║███████║██║  ██║██║  ██║╚██████╗
#           ╚═════╝ ╚═╝  ╚═╝╚══════╝╚═╝  ╚═╝╚═╝  ╚═╝ ╚═════╝
#
#
######################################################################

set -o vi

HISTTIMEFORMAT="%F %T "

HISTCONTROL=ignoredups

HISTSIZE=2000

HISTFILESIZE=2000

shopt -s histappend

blk='[33[01;30m]'   # Black
red='[33[01;31m]'   # Red
grn='[33[01;32m]'   # Green
ylw='[33[01;33m]'   # Yellow
blu='[33[01;34m]'   # Blue
pur='[33[01;35m]'   # Purple
cyn='[33[01;36m]'   # Cyan
wht='[33[01;37m]'   # White
clr='[33[00m]'      # Reset

alias gs='git status'

alias ga='git add'

alias gaa='git add --all'

alias gc='git commit'

alias gl='git log --oneline'

alias gb='git checkout -b'

alias gd='git diff'

alias ..='cd ..;pwd'

alias ...='cd ../..;pwd'

alias ....='cd ../../..;pwd'

alias c='clear'

alias h='history'

alias tree='tree --dirsfirst -F'

alias mkdir='mkdir -p -v'

alias jan='cal -m 01'
alias feb='cal -m 02'
alias mar='cal -m 03'
alias apr='cal -m 04'
alias may='cal -m 05'
alias jun='cal -m 06'
alias jul='cal -m 07'
alias aug='cal -m 08'
alias sep='cal -m 09'
alias oct='cal -m 10'
alias nov='cal -m 11'
alias dec='cal -m 12'

function hg() {
    history | grep "$1";
}

function find_largest_files() {
    du -h -x -s -- * | sort -r -h | head -20;
}

function git_branch() {
    if [ -d .git ] ; then
        printf "%s" "($(git branch 2> /dev/null | awk '/*/{print $2}'))";
    fi
}

# Set the prompt.
function bash_prompt(){
    PS1='${debian_chroot:+($debian_chroot)}'${blu}'$(git_branch)'${pur}' W'${grn}' $ '${clr}
}

bash_prompt

function git_init() {
    if [ -z "$1" ]; then
        printf "%sn" "Please provide a directory name.";
    else
        mkdir "$1";
        builtin cd "$1";
        pwd;
        git init;
        touch readme.md .gitignore LICENSE;
        echo "# $(basename $PWD)" >> readme.md
    fi
}

function weather_report() {

    local response=$(curl --silent 'https://api.openweathermap.org/data/2.5/weather?id=5128581&units=imperial&appid=<YOUR_API_KEY>')

    local status=$(echo $response | jq -r '.cod')

    case $status in

        200) printf "Location: %s %sn" "$(echo $response | jq '.name') $(echo $response | jq '.sys.country')"
             printf "Forecast: %sn" "$(echo $response | jq '.weather[].description')"
             printf "Temperature: %.1f°Fn" "$(echo $response | jq '.main.temp')"
             printf "Temp Min: %.1f°Fn" "$(echo $response | jq '.main.temp_min')"
             printf "Temp Max: %.1f°Fn" "$(echo $response | jq '.main.temp_max')"
            ;;
        401) echo "401 error"
            ;;
        *) echo "error"
            ;;

    esac

}

clear

printf "n"
printf "   %sn" "IP ADDR: $(curl ifconfig.me)"
printf "   %sn" "USER: $(echo $USER)"
printf "   %sn" "DATE: $(date)"
printf "   %sn" "UPTIME: $(uptime -p)"
printf "   %sn" "HOSTNAME: $(hostname -f)"
printf "   %sn" "CPU: $(awk -F: '/model name/{print $2}' | head -1)"
printf "   %sn" "KERNEL: $(uname -rms)"
printf "   %sn" "PACKAGES: $(dpkg --get-selections | wc -l)"
printf "   %sn" "RESOLUTION: $(xrandr | awk '/*/{printf $1" "}')"
printf "   %sn" "MEMORY: $(free -m -h | awk '/Mem/{print $3"/"$2}')"
printf "n"
Conclusion
In this article you learned how to configure various .bashrc options, aliases, functions, and more to greatly improve your workflow and increase your productivity.
Follow me on Github | Dev.to.
Learn to code for free. freeCodeCamp’s open source curriculum has helped more than 40,000 people get jobs as developers. Get started
Customizing your .bashrc file can greatly improve your workflow and increase your productivity.
The .bashrc is a standard file located in your Linux home directory. In this article I will show you useful .bashrc options, aliases, functions, and more.
The main benefits of configuring the .bashrc file are:
- Adding aliases allows you to type commands faster, saving you time.
- Adding functions allows you to save and rerun complex code.
- It displays useful system information.
- It customizes the Bash prompt.
How to Get Started with Editing .bashrc
Here’s how you can edit the .bashrc file with a text editor:
$ vim ~/.bashrcYou can add date and time formatting to bash history.
HISTTIMEFORMAT="%F %T "# Output
$ history
1017 20210228 10:51:28 uptime
1019 20210228 10:52:42 free -m
1020 20210228 10:52:49 tree --dirsfirst -F
1018 20210228 10:51:38 xrandr | awk '/*/{print $1}'Add this line to ignore duplicate commands in the history.
HISTCONTROL=ignoredupsTo set the number of lines in active history and to set the number of lines saved in Bash history, add these two lines.
HISTSIZE=2000
HISTFILESIZE=2000
You can set your history to append instead of overwriting Bash history. shopt stands for «shell options».
shopt -s histappendTo see all the default shell options, run shopt -p.
# Output

$ shopt -p

shopt -u autocd
shopt -u assoc_expand_once
shopt -u cdable_vars
shopt -u cdspell
shopt -u checkhash
shopt -u checkjobs
shopt -s checkwinsize
[...]
Create some variables to add color to the Bash prompt like this:
blk='[33[01;30m]'   # Black
red='[33[01;31m]'   # Red
grn='[33[01;32m]'   # Green
ylw='[33[01;33m]'   # Yellow
blu='[33[01;34m]'   # Blue
pur='[33[01;35m]'   # Purple
cyn='[33[01;36m]'   # Cyan
wht='[33[01;37m]'   # White
clr='[33[00m]'      # Reset
This is for the Vim lovers. This will allow you to use vim commands on the command line. This is always the first line I add to my .bashrc.
set -o viHow to Create Aliases in .bashrc
You can use aliases for commands you run a lot. Creating aliases will allow you to type faster, saving time and increasing productivity.
The syntax for creating an alias is alias <my_alias>='longer command'. To find out which commands would make good aliases, run this command to see a list of the top 10 commands you run most.
$ history | awk '{cmd[$2]++} END {for(elem in cmd) {print cmd[elem] " " elem}}' | sort -n -r | head -10
# Output

171 git
108 cd
62 vim
51 python3
38 history
32 exit
30 clear
28 tmux
28 tree
27 ls
Since I use Git a lot, that would be a great command to create an alias for.
# View Git status.
alias gs='git status'

# Add a file to Git.
alias ga='git add'

# Add all files to Git.
alias gaa='git add --all'

# Commit changes to the code.
alias gc='git commit'

# View the Git log.
alias gl='git log --oneline'

# Create a new Git branch and move to the new branch at the same time.
alias gb='git checkout -b'

# View the difference.
alias gd='git diff'
Here are some other useful aliases:
# Move to the parent folder.
alias ..='cd ..;pwd'

# Move up two parent folders.
alias ...='cd ../..;pwd'

# Move up three parent folders.
alias ....='cd ../../..;pwd'
# Press c to clear the terminal screen.
alias c='clear'
# Press h to view the bash history.
alias h='history'
# Display the directory structure better.
alias tree='tree --dirsfirst -F'
# Make a directory and all parent directories with verbosity.
alias mkdir='mkdir -p -v'# View the calender by typing the first three letters of the month.
alias jan='cal -m 01'
alias feb='cal -m 02'
alias mar='cal -m 03'
alias apr='cal -m 04'
alias may='cal -m 05'
alias jun='cal -m 06'
alias jul='cal -m 07'
alias aug='cal -m 08'
alias sep='cal -m 09'
alias oct='cal -m 10'
alias nov='cal -m 11'
alias dec='cal -m 12'# Output
$ mar
March 2021
Su Mo Tu We Th Fr Sa
1 2 3 4 5 6
7 8 9 10 11 12 13
14 15 16 17 18 19 20
21 22 23 24 25 26 27
28 29 30 31
Functions are great for more complicated code when an alias won’t work.
Here’s the basic function syntax:
function funct_name() {
	# code;
}
This is how you can find the largest files in a directory:
function find_largest_files() {
    du -h -x -s -- * | sort -r -h | head -20;
}
# Output

Downloads $ find_largest_files

709M	systemrescue-8.00-amd64.iso
337M	debian-10.8.0-amd64-netinst.iso
9.1M	weather-icons-master.zip
6.3M	Hack-font.zip
3.9M	city.list.json.gz
2.8M	dvdrental.tar
708K	IMG_2600.JPG
100K	sql_cheat_sheet_pgsql.pdf
4.0K	repeating-a-string.txt
4.0K	heart.svg
4.0K	Fedora-Workstation-33-1.2-x86_64-CHECKSUM
[...]
You can also add colors to the Bash prompt and display the current Git branch like this:
# Display the current Git branch in the Bash prompt.

function git_branch() {
    if [ -d .git ] ; then
        printf "%s" "($(git branch 2> /dev/null | awk '/*/{print $2}'))";
    fi
}

# Set the prompt.

function bash_prompt(){
    PS1='${debian_chroot:+($debian_chroot)}'${blu}'$(git_branch)'${pur}' W'${grn}' $ '${clr}
}

bash_prompt
Grep (search) through your history for previous run commands:
function hg() {
    history | grep "$1";
}
# Output
$ hg vim
305 2021-03-02 16:47:33 vim .bashrc
307 2021-03-02 17:17:09 vim .tmux.confThis is how you start a new project with Git:
function git_init() {
    if [ -z "$1" ]; then
        printf "%sn" "Please provide a directory name.";
    else
        mkdir "$1";
        builtin cd "$1";
        pwd;
        git init;
        touch readme.md .gitignore LICENSE;
        echo "# $(basename $PWD)" >> readme.md
    fi
}
# Output
$ git_init my_project
/home/brandon/my_project
Initialized empty Git repository in /home/brandon/my_project/.git/You can also get the weather report on the command line. This requires the package curl, jq, and an API key from Openweathermap. Read the Openweathermap API documentation in order to configure the URL correctly to get the weather in your location.
Install curl and jq with these commands:
$ sudo apt install curl jq

# OR

$ sudo dnf install curl jq
function weather_report() {
local response=$(curl --silent 'https://api.openweathermap.org/data/2.5/weather?id=5128581&units=imperial&appid=<YOUR_API_KEY>')
local status=$(echo $response | jq -r '.cod')
# Check for the 200 response indicating a successful API query.
case $status in
200) printf "Location: %s %sn" "$(echo $response | jq '.name') $(echo $response | jq '.sys.country')"
printf "Forecast: %sn" "$(echo $response | jq '.weather[].description')"
printf "Temperature: %.1f°Fn" "$(echo $response | jq '.main.temp')"
printf "Temp Min: %.1f°Fn" "$(echo $response | jq '.main.temp_min')"
printf "Temp Max: %.1f°Fn" "$(echo $response | jq '.main.temp_max')"
;;
401) echo "401 error"
;;
*) echo "error"
;;
esac
}# Output
$ weather_report
Location: "New York" "US"
Forecast: "clear sky"
Temperature: 58.0°F
Temp Min: 56.0°F
Temp Max: 60.8°FHow to Print System Information in .bashrc
You can display useful system information when you open the terminal like this:
clear

printf "n"
printf "   %sn" "IP ADDR: $(curl ifconfig.me)"
printf "   %sn" "USER: $(echo $USER)"
printf "   %sn" "DATE: $(date)"
printf "   %sn" "UPTIME: $(uptime -p)"
printf "   %sn" "HOSTNAME: $(hostname -f)"
printf "   %sn" "CPU: $(awk -F: '/model name/{print $2}' | head -1)"
printf "   %sn" "KERNEL: $(uname -rms)"
printf "   %sn" "PACKAGES: $(dpkg --get-selections | wc -l)"
printf "   %sn" "RESOLUTION: $(xrandr | awk '/*/{printf $1" "}')"
printf "   %sn" "MEMORY: $(free -m -h | awk '/Mem/{print $3"/"$2}')"
printf "n"
Output:
Source the .bashrc file to make the changes take effect:
$ source ~/.bashrcHere are all these custom .bashrc settings together. On a new system I paste any customization below the default code in the .bashrc file.
######################################################################
#
#
#           ██████╗  █████╗ ███████╗██╗  ██╗██████╗  ██████╗
#           ██╔══██╗██╔══██╗██╔════╝██║  ██║██╔══██╗██╔════╝
#           ██████╔╝███████║███████╗███████║██████╔╝██║
#           ██╔══██╗██╔══██║╚════██║██╔══██║██╔══██╗██║
#           ██████╔╝██║  ██║███████║██║  ██║██║  ██║╚██████╗
#           ╚═════╝ ╚═╝  ╚═╝╚══════╝╚═╝  ╚═╝╚═╝  ╚═╝ ╚═════╝
#
#
######################################################################

set -o vi

HISTTIMEFORMAT="%F %T "

HISTCONTROL=ignoredups

HISTSIZE=2000

HISTFILESIZE=2000

shopt -s histappend

blk='[33[01;30m]'   # Black
red='[33[01;31m]'   # Red
grn='[33[01;32m]'   # Green
ylw='[33[01;33m]'   # Yellow
blu='[33[01;34m]'   # Blue
pur='[33[01;35m]'   # Purple
cyn='[33[01;36m]'   # Cyan
wht='[33[01;37m]'   # White
clr='[33[00m]'      # Reset

alias gs='git status'

alias ga='git add'

alias gaa='git add --all'

alias gc='git commit'

alias gl='git log --oneline'

alias gb='git checkout -b'

alias gd='git diff'

alias ..='cd ..;pwd'

alias ...='cd ../..;pwd'

alias ....='cd ../../..;pwd'

alias c='clear'

alias h='history'

alias tree='tree --dirsfirst -F'

alias mkdir='mkdir -p -v'

alias jan='cal -m 01'
alias feb='cal -m 02'
alias mar='cal -m 03'
alias apr='cal -m 04'
alias may='cal -m 05'
alias jun='cal -m 06'
alias jul='cal -m 07'
alias aug='cal -m 08'
alias sep='cal -m 09'
alias oct='cal -m 10'
alias nov='cal -m 11'
alias dec='cal -m 12'

function hg() {
    history | grep "$1";
}

function find_largest_files() {
    du -h -x -s -- * | sort -r -h | head -20;
}

function git_branch() {
    if [ -d .git ] ; then
        printf "%s" "($(git branch 2> /dev/null | awk '/*/{print $2}'))";
    fi
}

# Set the prompt.
function bash_prompt(){
    PS1='${debian_chroot:+($debian_chroot)}'${blu}'$(git_branch)'${pur}' W'${grn}' $ '${clr}
}

bash_prompt

function git_init() {
    if [ -z "$1" ]; then
        printf "%sn" "Please provide a directory name.";
    else
        mkdir "$1";
        builtin cd "$1";
        pwd;
        git init;
        touch readme.md .gitignore LICENSE;
        echo "# $(basename $PWD)" >> readme.md
    fi
}

function weather_report() {

    local response=$(curl --silent 'https://api.openweathermap.org/data/2.5/weather?id=5128581&units=imperial&appid=<YOUR_API_KEY>')

    local status=$(echo $response | jq -r '.cod')

    case $status in

        200) printf "Location: %s %sn" "$(echo $response | jq '.name') $(echo $response | jq '.sys.country')"
             printf "Forecast: %sn" "$(echo $response | jq '.weather[].description')"
             printf "Temperature: %.1f°Fn" "$(echo $response | jq '.main.temp')"
             printf "Temp Min: %.1f°Fn" "$(echo $response | jq '.main.temp_min')"
             printf "Temp Max: %.1f°Fn" "$(echo $response | jq '.main.temp_max')"
            ;;
        401) echo "401 error"
            ;;
        *) echo "error"
            ;;

    esac

}

clear

printf "n"
printf "   %sn" "IP ADDR: $(curl ifconfig.me)"
printf "   %sn" "USER: $(echo $USER)"
printf "   %sn" "DATE: $(date)"
printf "   %sn" "UPTIME: $(uptime -p)"
printf "   %sn" "HOSTNAME: $(hostname -f)"
printf "   %sn" "CPU: $(awk -F: '/model name/{print $2}' | head -1)"
printf "   %sn" "KERNEL: $(uname -rms)"
printf "   %sn" "PACKAGES: $(dpkg --get-selections | wc -l)"
printf "   %sn" "RESOLUTION: $(xrandr | awk '/*/{printf $1" "}')"
printf "   %sn" "MEMORY: $(free -m -h | awk '/Mem/{print $3"/"$2}')"
printf "n"
Conclusion
In this article you learned how to configure various .bashrc options, aliases, functions, and more to greatly improve your workflow and increase your productivity.
Follow me on Github | Dev.to.
Learn to code for free. freeCodeCamp’s open source curriculum has helped more than 40,000 people get jobs as developers. Get started
Оболочка Bash впечатляет, но требует некоторой работы. В этом руководстве мы рассмотрим, как вы можете улучшить работу с терминалом, изменив и улучшив файл BashRC. Прежде чем редактировать файл BashRC, запустите эту команду в терминале, чтобы безопасно создать резервную копию:
cp .bashrc bashrc-bak
Завершение истории
Одна из потрясающих особенностей альтернативы Bash «Fish» — это способность быстро определять, что вы набираете, во время набора текста. Эта функция позволяет очень легко запоминать прошлые команды и операции. К сожалению, Bash не может сделать это из коробки, и если вы хотите запомнить команду, вы застряли при просмотре файла истории — до сих пор.
Как оказалось, есть способ имитировать эту замечательную функцию Fish в Bash, просто отредактировав BashRC. Откройте файл с помощью Nano и добавьте следующее, чтобы включить быстрый поиск в истории;
nano ~/.bashrc
Внутри вашего файла BashRC найдите «# Пользовательские псевдонимы и функции» и вставьте под ним следующий код. Имейте в виду, что многие дистрибутивы Linux настраивают файл BashRC, поэтому вы можете не найти эту строку. Вообще говоря, код должен идти в самый конец файла.
bind '"e[A": history-search-backward'
bind '"e[B": history-search-forward'
Приведенный выше код привяжет возможность быстро просматривать историю Bash, нажимая клавиши со стрелками влево или вправо на клавиатуре. Нажмите Ctrl + O, чтобы сохранить, и Ctrl + X, чтобы выйти. Закройте терминал и снова откройте его, чтобы увидеть внесенные вами изменения.
Лучшее ведение журнала
Как и большинство терминальных оболочек, Bash для удобства сохраняет файл со всем, что вы вводите в него. Это, безусловно, полезная функция, но ее раздражает сортировка файла из-за дубликатов. Если одна и та же команда появляется снова и снова, это может затруднить поиск вещей в истории Bash, которые вы действительно хотите видеть. Чтобы решить эту проблему, рассмотрите возможность добавления этого редактирования в ~ / .bashrc, которое активно удаляет повторяющиеся команды, улучшая то, как Bash обрабатывает историю команд.
nano ~/.bashrc
Внутри Nano вставьте этот код:
export HISTCONTROL=ignoredups
Справка по командам в стиле Zsh
В оболочке Zsh легко открыть любое руководство по командам терминала, быстро нажав Alt + H на клавиатуре. В Bash доступ к руководству осуществляется командой man. Достаточно сказать, что Zsh намного лучше. Чтобы добавить эту функциональность в оболочку Bash, добавьте ее в конец ~ / .bashrc.
bind '"eh": "C-aebedC-ye#man C-yC-mC-pC-pC-aC-dC-e"'
Авто CD
Отличная особенность Zsh — это возможность автоматически записывать компакт-диск в каталог. Вместо того, чтобы постоянно вызывать cd somedirectory. Хотя использовать команду CD внутри Bash, безусловно, несложно, набирать ее снова и снова может утомительно, чтобы перемещаться повсюду.
Откройте файл ~ / .bashrc с помощью Nano и вставьте в него этот код.
...
shopt -s autocd
...
Сохраните редактирование с помощью Nano, нажав Ctrl + O, и выйдите из редактора с помощью Ctrl + X. Закройте терминал и снова откройте его. С этого момента, чтобы перейти в новый каталог, введите путь к папке без компакт-диска перед ним. Например:
/usr/bin/
Улучшение заполнения вкладки
Одна из лучших функций Bash, о которой многие пользователи не знают, — это автозавершение. По умолчанию Bash может автоматически выполнять команду. Чтобы использовать его, начните вводить первые несколько букв команды, каталога и т. Д., А Bash заполнит остальные. Проблема в том, что эта версия автозавершения табуляции требует доработки. Он не идеален, пропускает вещи и иногда категорически отказывается работать.
К счастью, есть быстрый способ улучшить завершение табуляции в Bash. В отличие от других правок в руководстве, этот раздел довольно прост и требует только установки пакета. Откройте терминал и установите пакет завершения bash.
Ubuntu
sudo apt install bash-completion
Debian
sudo apt install bash-completion
Arch Linux
sudo pacman -S bash-completion
Fedora
sudo dnf install bash-completion
OpenSUSE
sudo zypper install bash-completion
В этом руководстве мы внесли много изменений в файл ~ / .bashrc. В результате ваш терминал Bash работает иначе. Эти модификации, несомненно, делают Bash более современным и полезным, но не для всех. Некоторые могут предпочесть способ работы Bash без изменений.
К счастью, в начале этого руководства мы создали резервную копию исходного файла ~ / .bashrc. Создание резервной копии позволяет очень легко отменить изменения, сделанные в этом руководстве. Чтобы восстановить резервную копию, откройте терминал и начните с удаления нового файла ~ / .bashrc.
rm ~/.bashrc
Избавившись от измененного файла, можно безопасно восстановить старую резервную копию.
cp bashrc-bak .bashrc
Выполнение этой команды CP восстановит файл в исходное состояние. Перезагрузите компьютер, чтобы внести изменения.
Настройка bash терминала под себя
Сегодня, в очередной раз разбираясь с работой в консоли Линукс я решил, для удобства немного подредактировать свой файл .bashrc Данный фаил отвечает за то что выводится на экран во время нашей работы в bash. Вообще настроек в bash существует достаточно много и я ещё не со всеми разобрался, да и не все пока разбирал. Например я пока не разбирал цветную настройку консоли. А знаю что консоль можно разукрасить практически как новогоднюю Ёлку. Но всему своё время.
Изменений в файле «.bashrc» на сегодня я хоть и сделал не так и много, но это уже позволяет значительно упростить мою работу и обучение работе с консолью.
Файл «.bashrc» находится в нашей домашней директории вот здесь ~/.bashrc, как видите знак тильды указывает на то что фаил находится в Вашей домашней директории, как я это уже говорил ранее в статье, когда описывал команды для передвижения по директориям в системе Линукс, в консоли. Точка с которой начинается название файла говорит нам о том что файл скрыт. Дабы в него не лазили те кто совершенно ничего не понимают в своей операционной системе и не наделали в нем глупостей. Те же кто стремится к тому чтобы узнать о своей операционной системе больше, как и я, а так же быть не только пользователем в своей системе, но и иметь возможность сделать с неё все что угодно, всегда могут в него попасть и подредактировать. Конечно для этого необходимо знать что необходимо делать, но это уже такое, если человеку что-либо интересно со временем он узнает. Как говорится если ты что-либо делаешь один день, ты новичок. Если ты что-либо делаешь десять тысяч дней, ты уже мастер.
Что-то я в философию ударился, хорошо что когда-то было научился печатать в слепую и сейчас записываю практически с той же скоростью что и думаю. Давайте просмотрим в консоли, наш скрытый фаил. Для этого откроем его в консольном текстовом редакторе, в том который вы используете. Я лично использую консольный текстовый редактор vim, раньше потратил достаточно много времени на его изучение и мне в нем очень комфортно работать. Если он у вас установлен наберите в консоли.
Если консольный текстовый редактор vim у вас не установлен, можете воспользоваться другими например vi, либо nano ну или любым другим. Например вот так
Вот мы видим настройки с которыми работает наш bash, их мы и будем корректировать. )) Меня первый раз это слегка испугало, много всего и ничего непонятно. Затем немного почитал, ну и соответственно узнал немного больше.
Первое что я решил исправить это то, что если открываешь окно терминала и вводишь какие-либо команды, а затем открываешь ещё одно окно и тоже вводишь команды. То в истории команд второго терминала, не будут находится команды которые мы только что вводили в первом терминале. Так же если вы закроете терминал, в котором первом работали, а затем второй открытый, то все команды первого терминала потеряются. Мне лично это не нравится и это я исправил прежде всего.
Вводим вот такие строки, для того чтобы в историю вписывались все команды
shopt -s histappend
PROMT_COMMAND=’history -a’
Далее увеличиваем размер истории команд терминала. Для этого находим такую строку. Различаться она может лишь цифрами.
Пятьсот команд в истории чрезвычайно мало. Меняем цифру 500 на 10000. Будет выглядеть вот так.
Далее говорим терминалу чтобы не вносил в историю копии команд. Для этого добавляем вот такую строку.
export HISTCONTROL=ignoredups
Делаем так, чтобы можно было переходить в каталог без написания команды cd, просто написав путь к каталогу. Чтобы это сделать необходимо добавить вот такую строку.
Указываем системе чтобы исправляла мелкие ошибки, в написании путей к директориям, в аргументах к команде cd. Работоспособность особо не проверял, но насколько знаю работает лишь с командой cd. Как описывается может исправить ошибку например если Вы введете путь /ect/init.d вместо /etc/init.d Все равно думаю будет полезно.
Запрещаем выход из консоли если в ней есть выполняющиеся задания. Это временами бывает полезным.
Указываем терминалу исправлять мелкие ошибки в написании имен директорий, при автодополнении.
Делаем возможным использование маски. Позволяет использовать конструкцию вида ** которая обозначает все файлы, начиная с текущего каталога. Очень полезно бывает для поиска определенных файлов. Например для того чтобы просмотреть все файлы в домашнем каталоге с расширением flv мне в домашнем каталоге достаточно набрать ls **/*.flv. Так же удобно находить и другие файлы. Например свою коллекцию музыки в mp3 формате.
Вот и для начала все. То как показывать часы при запуске терминала и многое другое, я опишу в следующий раз. Как сам это окончу и решусь описать.
Why modify your .bashrc?
There may come a time when you want to customize your default login environment. If you always load the same module when logging in, or want to add other definitions for your login shell to process, that means editing the .bashrc file in your home directory. This runtime configuration file is processed (or ‘sourced’) by bash, the default shell on the FASRC cluster, when you log into a node and by your jobs when they run. Any time a new shell is created by your user, this file is sourced.
As you might imagine, you need to be very careful not to break your .bashrc or you may not be able to log in. If that should happen, contact us and we can copy in a default .bashrc for you so you’re able to log in again.
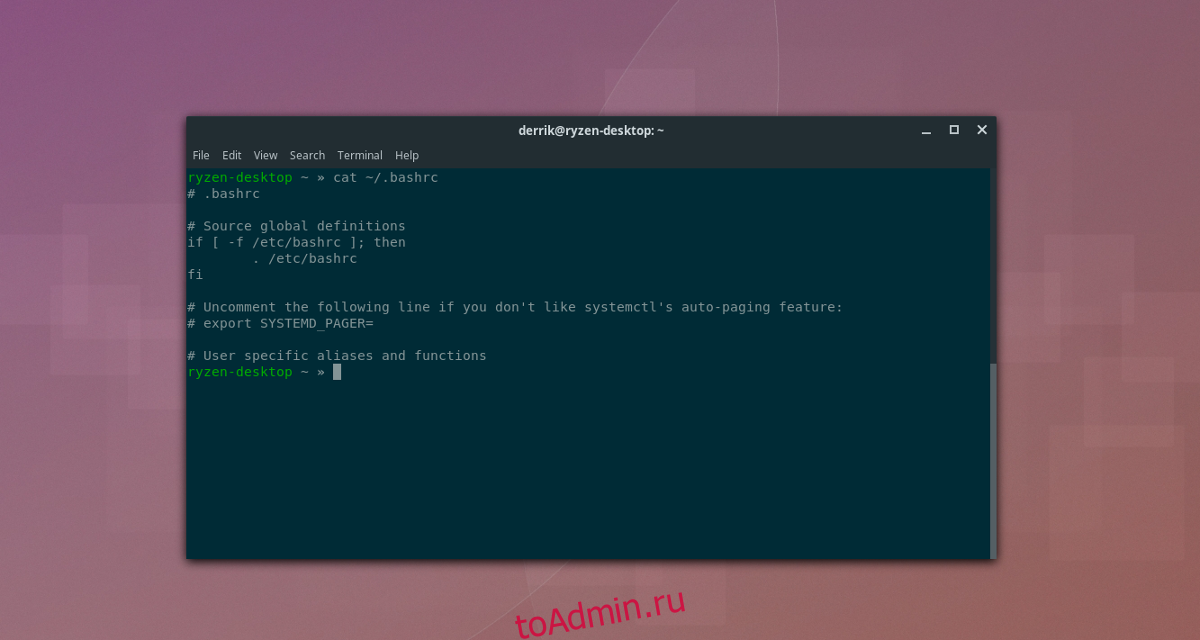
The default FASRC .bashrc file contains the following:
# .bashrc
# Source global definitions
if [ -f /etc/bashrc ]; then
. /etc/bashrc
fi
# User specific aliases and functions
After the # User specific aliases and functions section is where you should put any customizations of your .bashrc as that will cause them to run after the global definitions have been sourced.The # Source global definitions section is where the default cluster-wide definitions are sourced. The /etc/bashrc file includes definitions necessary to make your jobs and other interactions run properly across the cluster. Please do not remove this section as you will run into problems as a result.
For instance, your .bashrc may contain the old module definitions calls. If you see source new-modules.sh, that’s what that is. You can leave or remove is as it’s benign, but we recommend removing it to avoid any confusion.
Editing your .bashrc
In order to edit your .bashrc, you’ll need to be comfortable with a command-line editor such as nano (probably the easiest to get started with) or vim (aka vi). You may also be able to edit the file using your SFTP client of choice, but experiences may vary. We’ll assume here that you’re using nano.
From a login or other node on the cluster, type nano ~/.bashrc to open the file in the nano editor. My .bashrc has already been added to, so you’ll see additional definitions below the# User specific aliases and functions section.
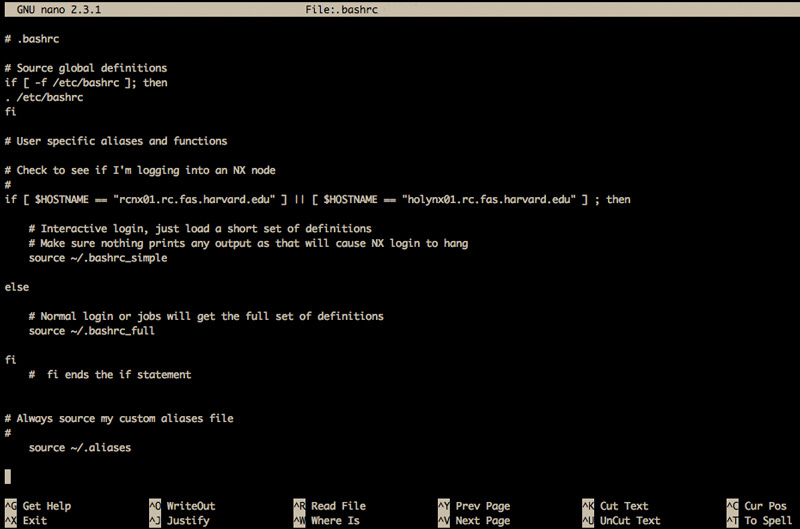
Let’s look at what those additions do and how they fit into the larger bash login environment. And we’ll add one more.
# .bashrc# Source global definitions if [ -f /etc/bashrc ]; then . /etc/bashrc fi
> THE USER’S DEFINITIONS
# User specific aliases and functions
>> MY CODE TO CHECK WHETHER I’M LOGGING INTO A SPECIFIC SERVER
# Check to see if I'm logging into a particular node
#
if [ $HOSTNAME == "somenode01.rc.fas.harvard.edu" ] || [ $HOSTNAME == "somenode02.rc.fas.harvard.edu" ] ; then
>> IF YES, THEN SOURCE A SHORT SET OF ADDITIONAL DEFINITIONS
# Interactive login, just load a short set of definitions
# Make sure nothing prints any output as that will cause SFTP to hang
source ~/.bashrc_simple
else
>> IF NO, THEN SOURCE MY FULL SET OF DEFINITIONS (MODULES, etc.)
# Normal login or jobs will get the full set of definitions
source ~/.bashrc_full
fi
# fi ends the if statement
>> DONE. FI IS THE BASH COMMAND THAT TERMINATES AN IF STATEMENT
>> I HAVE A SET OF ALIASES THAT I ALWAYS WANT SOURCED NO MATTER WHERE I LOG IN
# Always source my custom aliases file last
#
source ~/.aliases
>> LET’S SAY I WANT TO ALWAYS LOAD THE GIT MODULE REGARDLESS OF WHERE I LOG IN
>> YOU CAN ADD A MODULE LOAD STATEMENT AT THE END (NOT RECOMMENDED)
  # Always load the git module when I log in

#
module load git
>> BUT IT’S BETTER TO PUT ALL YOUR MODULE LOADS INTO A FUNCTION
>> THEN ANY TIME YOU NEED TO LOAD THEM ALL, YOU SIMPLY CALL THE FUNCTION
# Load my module favorites by invoking ‘mymodules’
#
function mymodules {
module load git
module load Anaconda/5.0.1-fasrc01
}
You’re free to experiment with your .bashrc, but please do remember that you can break your access while doing so. A good practice to mitigate this is to open two shells before editing your .bashrc so that, if you break your login environment, you’re still logged into that other shell (.bashrc is only sourced on login, so that shell will be ‘normal’) and can likely fix or revert the damage from there. It’s a good idea to make a copy of your working .bashrc first before editing it.
If SFTP is failing because your .bashrc causes output to STDOUT (echo, etc.)
You can try wrapping your interactive needs inside a statement that tests for an interactive shell. This may not work 100% of the time:
if [ -z "$PS1" ]; then

# non-interactive stuff, if any, here

else

# interactive stuff here

fi
Portal Module Search
Intro to Software on the FASRC cluster

В следующей статье мы рассмотрим, как изменить файл bashrc. Этим мы добьемся скрыть или изменить имя пользователя и хост приглашения пользователя Bash. Некоторые люди одержимы конфиденциальностью и вашей безопасностью. Они никогда ничего не раскрывают о вашей личности в Интернете. Если вы один из них, вам понравится этот небольшой совет, чтобы немного защитить вашу конфиденциальность.
Если вы блоггер или технический писатель, вам почти наверняка понадобится иногда загружать скриншоты вашего терминала Gnu / Linux на свои веб-сайты и в блоги. И, как знают все пользователи Gnu / Linux, терминал покажет наше имя пользователя и хост.
Если вы один из тех, кто занимается обучением и делится снимками экрана своего терминала, и вас также беспокоят вопросы конфиденциальности и безопасности, наиболее практично просто создать другую учетную запись пользователя как admin @ demo или user @ example.. Мы можем использовать эти учетные записи для создания руководств или видеороликов и загрузки их в наш блог или социальные сети, не беспокоясь о данных, отображаемых терминалом. Но есть и другие варианты, как мы увидим ниже.
Ваше имя пользователя / хост может быть слишком крутым, поэтому вы можете не захотеть, чтобы другие копировали его и использовали как свое собственное. С другой стороны, ваше имя пользователя / имя хоста может быть слишком странным, плохим или содержать оскорбительные символы, поэтому вам не интересно их видеть. В таких случаях вам может помочь этот небольшой совет. скрыть или изменить свое имя пользователя @ localhost в терминале.
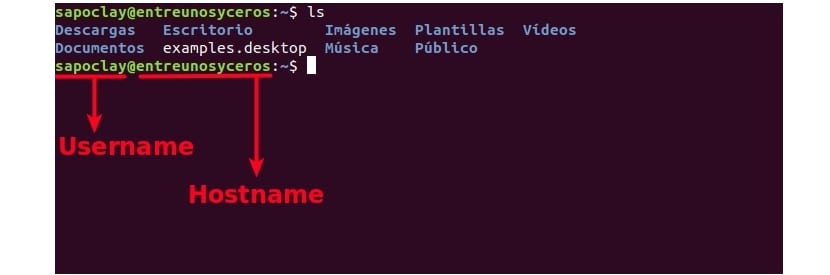
На предыдущем скриншоте видно, что в моем терминале имя пользователя «sapoclay» и «entreunosyceros »- мое имя хозяина.
Индекс
- 1 Скрыть «username @ localhost:» с помощью файла bashrc
- 2 Измените «username @ localhost:» с помощью файла bashrc.
- 3 Получить настройки для bashrc через Интернет
Скрыть «username @ localhost:» с помощью файла bashrc
Для начала отредактируем наш файл «~ / .bashrc». Я собираюсь использовать Редактор Vim для этого, но каждый использует тот, который им больше всего нравится. В моем случае после открытия терминала (Ctrl + Alt + T) я собираюсь написать следующую команду:
vi ~/.bashrc
После открытия мы нажимаем клавиши «Esc» и «i». В режиме вставки мы добавим в конец файла следующее:
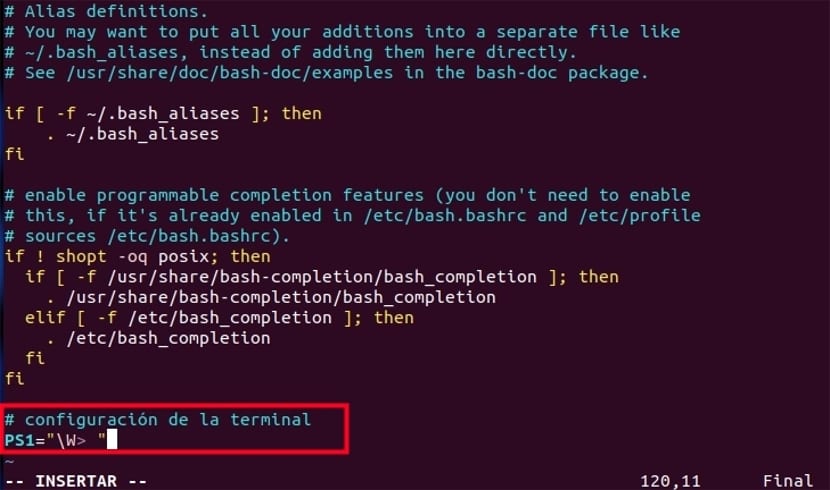
PS1="W> "
Чтобы выйти из файла, как всегда в vim, мы должны нажать клавишу ‘Esc‘ а потом напишите: wq сохранить и закрыть файл.
Вернувшись в консоль, нам придется выполните следующую команду, чтобы изменения вступили в силу:
source ~/.bashrc

Мы сразу увидим изменения. Теперь мы больше не будем видеть часть user @ localhost. Будет виден только символ ~>.
Измените «username @ localhost:» с помощью файла bashrc.
Если то, что вы ищете, — это не скрыть часть user @ localhost, но если вы ищете измените приглашение bash к чему-то более интересному и значительному, нам придется вернуться к редактировать файл ~ / .bashrc. Из терминала (Ctrl + Alt + T), как и в предыдущем примере, напишем:
vi ~/.bashrc
Откройте файл и активируйте режим вставки, мы добавим следующую строку в конце того же самого:
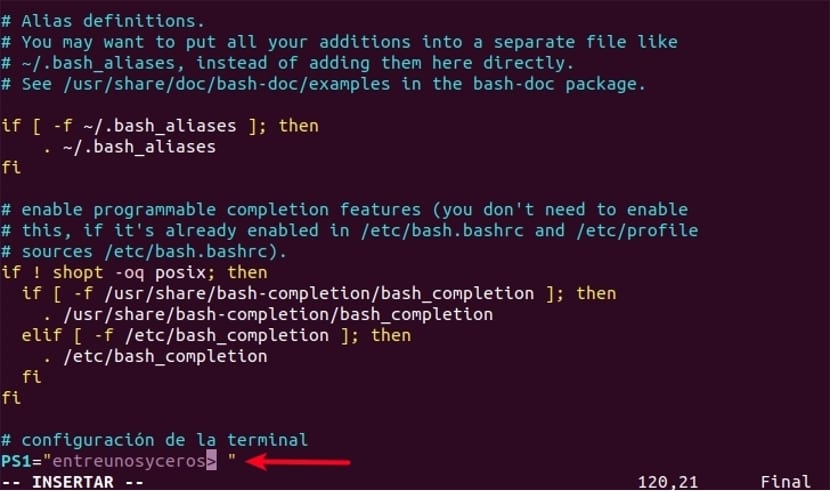
PS1="entreunosyceros> "
Заменяет «Entreunosyceros»С любой комбинацией букв по вашему выбору. Когда он у вас есть, нажмите кнопку ‘Esc‘и пишет : Wq для сохранения и выхода из файла.
к увидеть внесенные измененияКак и в предыдущем примере, для обновления изменений необходимо выполнить следующую команду:
source ~/.bashrc

Эти изменения будут отображаться немедленно. Мы можем видеть буквы entreunosyceros в приглашении вашей оболочки.
Если вы хотите иметь возможность настроить подсказку вашего компьютера по-своему, вы можете перейти на веб-сайт bashrcгенератор. В нем вы можете выбрать через ‘перетащить‘какие параметры вы хотите отображать в вашем терминале. Веб-сайт предоставит вам необходимый код, который вам нужно будет добавить в файл ~. / Bashrc. как мы только что видели в этой же статье.
предупреждение— В некоторых случаях это плохая практика. Например, если другие оболочки, такие как zsh, наследуют вашу текущую оболочку, это вызовет некоторые проблемы. Используйте его только для того, чтобы скрыть или изменить свое имя пользователя @ localhost, если вы используете одну оболочку. Помимо скрытия части user @ localhost в терминале, у этого совета нет работающего приложения и это может быть проблематично в некоторых конкретных случаях, даже если это очень круто и хорошо настроено.
Содержание статьи соответствует нашим принципам редакционная этика. Чтобы сообщить об ошибке, нажмите здесь.
Вы можете быть заинтересованы
By L. Collado-Torres.
If you are working at LIBD or with large data, it’s very likely that it won’t fit in your laptop and that you’ll be using the terminal to interact with a high performance computing cluster (like JHPCE) or server. Some small edits to your bash configuration file can make your terminal experience much more enjoyable and hopefully boost your productivity. The edits described below work for any OS. On Windows, I’m assuming that you are using git bash or a similar terminal program.
The way we can control our terminal appearance and some behavior is through the .bashrc file. That file typically gets read once when loading a new terminal window and that is where we can save some shortcuts we like to use, alter the colors of our terminal, change the behavior of the up and down arrow keys, etc.
.bashrc file
First, we need to learn where to locate this file. On all OS (Mac, Windows, Linux) machines/servers, the .bashrc file typically lives at ~/.bashrc. For my Mac for example that is /home/lcollado/.bashrc. For my Windows machine, that’s /c/Users/Leonardo/.bashrc. Now, the dot before the file makes it a hidden file. A quick search can help you find the options for your computer that lets you see these hidden files. From a terminal window, I typically use this bash command to show all the hidden files (that’s from the a option).
## List files in human readable format including hidden files
ls -lha
Initial files
You might have a ~/.bashrc and a ~/.bash_profile already. If not, lets create simple ones. You can use the touch bash command for make a new file (touch ~/.bashrc), or you could use this R code:
file.create('~/.bashrc')
file.create('~/.bash_profile')
Next open them with your text editor (say Notepad++, TextMate 2, RStudio, among others) and paste the following contents.
~/.bash_profile contents
# Get the aliases and functions
if [ -f ~/.bashrc ]; then
        . ~/.bashrc
fi

# In my Mac one I also have this:
if [ -f ~/.profile ]; then
        . ~/.profile
fi
Minimal ~/.bashrc contents
# Source global definitions
if [ -f /etc/bashrc ]; then
    . /etc/bashrc
fi
Control your bash history
Lets start adding features to our terminal experience by editing the ~/.bashrc file. I typically include comments # describing what the code is doing and where I learned how to do (X). The first part is controlling your bash history. I want to have a longer history than what is included by default and where duplicates are deleted.
# http://www.biostat.jhsph.edu/~afisher/ComputingClub/webfiles/KasperHansenPres/IntermediateUnix.pdf
# https://unix.stackexchange.com/questions/48713/how-can-i-remove-duplicates-in-my-bash-history-preserving-order
export HISTCONTROL=ignoreboth:erasedups
export HISTSIZE=10000
shopt -s histappend
shopt -s cmdhist
Change the up and down arrows
The next change will save you a lot of time! Plus it goes nicely with the bash history changes we just made. Normally, the up and down arrow let you select previous commands from your bash history (up) or select one of your latest commands (down, after having used up). The following changes make it so that the up arrow searches only commands that start with exactly the letters you had already typed.
Lets say that you just requested a compute node with qrsh and you have an empty line.

If you use the up arrow, you can navigate your command history. So far, this is the same as the default up arrow behavior.

Lets say that I want to change directory to one of my recent projects. So I type cd / in the terminal window (without hitting enter).
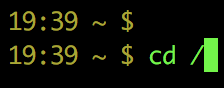
Next I use the up arrow, and it only finds for me commands that start with cd /, including this long one.

Did you like this? Well, add the following code to your ~/.bashrc file
# Auto-complete command from history
# http://lindesk.com/2009/04/customize-terminal-configuration-setting-bash-cli-power-user/
export INPUTRC=~/.inputrc
where ~/.inputrc file has the following contents:
#Page up/page down
"e[B": history-search-forward
"e[A": history-search-backward

$include /etc/inputrc
As an added benefit, the up and down arrows will now have this improved behavior when you run R inside a terminal, although it’s limited to your current R history: actually, I guess that you could change your .Rprofile to load the previous R history.
Interactive deleting of files
In a terminal, you normally delete files with rm, but you can make an alias (shortcut) so that when you are deleting files with rmi you will get asked to confirm whether you want to delete the file or not. This can be useful if you are using some patterns for finding the files that you are trying to delete but want to make sure that the pattern didn’t catch other files you want to keep.
# http://superuser.com/questions/384769/alias-rm-rm-i-considered-harmful
alias rmi='rm -i'
Change the command prompt
You can also control the command prompt. That is, the parts that are shown before you start typing in your terminal. I like keeping it short, so it only shows me the parent directory instead of the full path, plus a small version for the time (hh:mm) in a 12 hour clock. This is sometimes useful if I run some commands and later on want to get a quick idea if any of them took a while to run (specially if I was not looking at the terminal).
# Change command prompt
# http://www.cyberciti.biz/tips/howto-linux-unix-bash-shell-setup-prompt.html
# http://www.cyberciti.biz/faq/bash-shell-change-the-color-of-my-shell-prompt-under-linux-or-unix/
# https://bbs.archlinux.org/viewtopic.php?id=48910
# previous in enigma2: "[u@h W]$ "
# previously in mac: "h:W u$ "
export PS1="[e[0;33m]A W $ [e[m]"
Colors
You can change the colors of your terminal. For example, do you want directories to be shown in blue and/or bold font while executable files are shown in red. This goes in hand with the ls --color=auto shortcut to make sure that the colors are used (Mac: you might need brew install coreutils as described in this blog post). The following lines of my ~/.bashrc file include some old history of the colors and how I use to have other options.
# colors
# http://norbauer.com/notebooks/code/notes/ls-colors-and-terminal-app
# used BSD pattern ExGxFxDxBxEgEdxbxgxhxd on http://geoff.greer.fm/lscolors/
# that tool does not specify the colors, which I did by looking manually at
# http://blog.twistedcode.org/2008/04/lscolors-explained.html
# and the norbauer.com site previously mentioned
alias ls="ls --color=auto"
#export LS_COLORS="di=1;34;40:ln=1;36;40:so=1;35;40:pi=1;93;40:ex=1;31;40:bd=1;34;46:cd=1;34;43:su=0;41:sg=0;46:tw=0;47:ow=0;43"
## After switching to RStudio:
# https://askubuntu.com/questions/466198/how-do-i-change-the-color-for-directories-with-ls-in-the-console
export LS_COLORS="di=0;32:ln=0;36:so=0;35:pi=0;93:ex=0;31:bd=0;34;46:cd=0;34;43:su=0;41:sg=0;46:tw=0;47:ow=0;43:fi=0;33"
Mac extra lines:
# Uncomment below for Mac and comment the two previous commands
#export CLICOLOR=1
#export LSCOLORS="ExGxFxDxBxEgEdxbxgxhxd"
## Actually from https://superuser.com/questions/183876/how-do-i-get-ls-color-auto-to-work-on-mac-os-x
# brew install coreutils
# then change the aliast to use gls instead of ls
# that way I can use the same config file =)

alias ls="gls --color=auto"
I use the same LS_COLORS now on my Mac too, but you don’t need to.
UPDATE
We got this note from Mark Miller, admin of JHPCE:
One quick note on your page. You mention setting colors for the ls output, which is great. One thing we (and others) have found is that, for a directory on a Lustre filesystem (/dcl01 or /dcl02), using “ls –colors=auto” or “ls -al” on a directory with lots (thousands+) of files in it can be super slow. With these options, the ls command needs to iterate through each file in the directory, and query the lustre server for each and every file to retrieve information about the file in order to determine what color to display. So, if you’re regularly using directories on Lustre that have lots of files in them, and your “ls” command it taking too long, we recommend using “ls –color=none”. https://wikis.nyu.edu/display/NYUHPC/Lustre+FAQ https://groups.google.com/forum/#!topic/lustre-discuss-list/3afjd4j2Q-g
Shortcuts for main project directories
We’ve seen several aliases (shortcuts) already such as the one for ls --color=auto which is the one I use the most. But I also use aliases for changing to the root directories that I use the most.
alias labold="cd /dcl01/lieber/ajaffe/lab"
alias lab="cd /dcl01/ajaffe/data/lab"
Actually, we were supposed to just use the new disk here and I should have probably chosen better names to differentiate the two.
The next terminal window you open after editing the ~/.bashrc file will have all your new features enabled.

Source
Repeat this process
You can/should repeat this process for other ~/.bashrc files you interact with. In my case, that would be:
~/.bashrcin my Mac laptop~/.bashrcat my JHPCE home~/.bashrcin my Windows laptop
Acknowledgments
This blog post was made possible thanks to:
- BiocStyle (Oleś, Morgan, and Huber, 2018)
- blogdown (Xie, Hill, and Thomas, 2017)
- devtools (Wickham, Hester, and Chang, 2018)
- knitcitations (Boettiger, 2017)
Reproducibility
## Session info ----------------------------------------------------------------------------------------------------------## setting value
## version R version 3.5.1 Patched (2018-10-14 r75439)
## system x86_64, darwin15.6.0
## ui X11
## language (EN)
## collate en_US.UTF-8
## tz America/New_York
## date 2018-10-26## Packages --------------------------------------------------------------------------------------------------------------## package * version date source
## backports 1.1.2 2017-12-13 cran (@1.1.2)
## base * 3.5.1 2018-10-15 local
## bibtex 0.4.2 2017-06-30 CRAN (R 3.5.0)
## BiocStyle * 2.8.2 2018-05-30 Bioconductor
## blogdown 0.8 2018-07-15 CRAN (R 3.5.0)
## bookdown 0.7 2018-02-18 CRAN (R 3.5.0)
## colorout * 1.2-0 2018-05-03 Github (jalvesaq/colorout@c42088d)
## compiler 3.5.1 2018-10-15 local
## datasets * 3.5.1 2018-10-15 local
## devtools * 1.13.6 2018-06-27 cran (@1.13.6)
## digest 0.6.18 2018-10-10 CRAN (R 3.5.0)
## evaluate 0.12 2018-10-09 CRAN (R 3.5.0)
## graphics * 3.5.1 2018-10-15 local
## grDevices * 3.5.1 2018-10-15 local
## htmltools 0.3.6 2017-04-28 cran (@0.3.6)
## httr 1.3.1 2017-08-20 CRAN (R 3.5.0)
## jsonlite 1.5 2017-06-01 CRAN (R 3.5.0)
## knitcitations * 1.0.8 2017-07-04 CRAN (R 3.5.0)
## knitr 1.20 2018-02-20 cran (@1.20)
## lubridate 1.7.4 2018-04-11 CRAN (R 3.5.0)
## magrittr 1.5 2014-11-22 cran (@1.5)
## memoise 1.1.0 2017-04-21 CRAN (R 3.5.0)
## methods * 3.5.1 2018-10-15 local
## plyr 1.8.4 2016-06-08 cran (@1.8.4)
## R6 2.3.0 2018-10-04 CRAN (R 3.5.0)
## Rcpp 0.12.19 2018-10-01 CRAN (R 3.5.1)
## RefManageR 1.2.0 2018-04-25 CRAN (R 3.5.0)
## rmarkdown 1.10 2018-06-11 CRAN (R 3.5.0)
## rprojroot 1.3-2 2018-01-03 cran (@1.3-2)
## stats * 3.5.1 2018-10-15 local
## stringi 1.2.4 2018-07-20 CRAN (R 3.5.0)
## stringr 1.3.1 2018-05-10 CRAN (R 3.5.0)
## tools 3.5.1 2018-10-15 local
## utils * 3.5.1 2018-10-15 local
## withr 2.1.2 2018-03-15 CRAN (R 3.5.0)
## xfun 0.3 2018-07-06 CRAN (R 3.5.0)
## xml2 1.2.0 2018-01-24 CRAN (R 3.5.0)
## yaml 2.2.0 2018-07-25 CRAN (R 3.5.0)Файл bashrc в Linux – это файл конфигурации, содержащий конфигурации, относящиеся к системному терминалу. Этот файл запускается всякий раз, когда вы входите в систему Linux. Внося различные изменения в этот файл, вы можете легко настроить свой терминал Linux за секунды. Это включает в себя изменение цвета приглашения, экспериментирование со шрифтами, изменение имен пользователей, отображаемых в терминале, и т. д. Для этого конкретного обсуждения нас интересует метод редактирования файла bashrc для изменения цвета приглашение в системе Ubuntu 20.04.
Метод редактирования «bashrc» для изменения цвета приглашения в Ubuntu 20.04:
Наряду с предложением множества других параметров настройки терминала, файл bashrc в Linux также можно отредактировать, чтобы изменить цвет приглашения. Чтобы узнать, как это сделать, вам нужно будет выполнить следующие шаги. Однако мы хотели бы упомянуть заранее, что в этом методе мы сначала научим вас создавать резервную копию настроек по умолчанию, чтобы вы всегда могли восстановить их, когда захотите. После этого мы поделимся с вами методом изменения цвета приглашения, и для этого мы поделились довольно большим количеством примеров, чтобы вы могли увидеть, как будет выглядеть приглашение после изменения его цветов. Наконец, мы научили вас методу восстановления цвета приглашения по умолчанию в Ubuntu 20.04. Итак, давайте начнем со следующих шагов:
Шаг №1: Просмотрите файл «bashrc» в вашей системе Ubuntu 20.04:
Файл bashrc можно легко просмотреть в системе Ubuntu 20.04 с помощью любого текстового редактора (Nano, Vim) по вашему выбору. Здесь мы собираемся использовать для этой цели редактор nano, и мы откроем файл bashrc с помощью команды, показанной ниже:
Файл bashrc нашей системы Ubuntu 20.04 показан на следующем изображении:

В этом файле для нас важен раздел, в котором определены атрибуты переменной PS1. По сути, эта переменная позволяет вам настроить терминал несколькими способами, а также изменить цвет подсказки, о чем мы узнаем позже в этой статье.
Шаг № 2: Сделайте резервную копию соответствующей переменной этого файла:
Теперь, чтобы изменить цвет приглашения в Ubuntu 20.04, мы внесем некоторые изменения в переменную PS1. Однако перед этим настоятельно рекомендуется сделать резервную копию этой переменной, чтобы, если вы что-то испортили в течение всего этого процесса или даже если вы просто захотите вернуться к цвету приглашения по умолчанию, вы легко сможете сделать это. Для этого мы скопируем значение переменной PS1 в другую переменную. Вы можете присвоить этой переменной любое имя по вашему выбору. Этой цели будет служить показанная ниже команда:
Эта команда просто присвоит значение по умолчанию переменной PS1 переменной TEMP, откуда оно может быть восстановлено позже. Эта команда не будет генерировать никаких выходных данных после успешного выполнения.
Шаг № 3: Измените цвет приглашения Ubuntu 20.04 с зеленого на красный:
Теперь, когда мы сделали резервную копию нашей переменной PS1, мы можем легко изменить ее, чтобы изменить цвет нашего приглашения Ubuntu 20.04. Цвет нашего приглашения Ubuntu 20.04 по умолчанию – зеленый. На этом этапе мы просто попытаемся изменить этот цвет на красный. Для этого мы выполним следующую команду:
$ PS1=“[33[31m]u@h:w$”
Выполнение этой команды в терминале Ubuntu 20.04 также отразит эти изменения в вашем файле bashrc.
Как только вы нажмете клавишу Enter для запуска команды, как упомянуто выше, вы заметите, что цвет приглашения вашей системы изменился с зеленого на красный.
Шаг №4: Измените цвет приглашения Ubuntu 20.04 с красного на синий:
Вы видели, как можно изменить цвет приглашения системы Ubuntu 20.04 с зеленого на красный. Теперь вы увидите, как изменить цвет с красного на синий. Для этого вам нужно будет запустить прикрепленную команду в вашем терминале:
$ PS1=“[33[34m]u@h:w$”
Выполнение этой команды в терминале Ubuntu 20.04 также отразит эти изменения в вашем файле bashrc.
Как только вы нажмете клавишу Enter для запуска команды, как упомянуто выше, вы заметите, что цвет приглашения вашей системы изменился с красного на синий.
Шаг № 5: Измените цвет приглашения Ubuntu 20.04 с синего на белый:
К настоящему времени вы бы узнали, как изменить цвет приглашения вашей системы Ubuntu 20.04 с зеленого на красный и с красного на синий. Теперь вы увидите, как изменить его цвет с синего на белый. Для этого вам нужно будет запустить в своем терминале указанную ниже команду:
$ PS1=“[33[37m]u@h:w$”
Выполнение этой команды в терминале Ubuntu 20.04 также отразит эти изменения в вашем файле bashrc.
Как только вы нажмете клавишу Enter для запуска команды, как упомянуто выше, вы заметите, что цвет приглашения вашей системы изменился с синего на белый.
Шаг № 6: Восстановите исходный цвет приглашения Ubuntu 20.04:
Таким же образом вы можете изменить цвет вашего приглашения, используя другие цветовые коды. Итак, теперь мы научим вас, как восстановить исходный цвет приглашения Ubuntu 20.04. Вы помните, что мы сохранили значение по умолчанию переменной PS1 нашего файла bashrc в переменной с именем TEMP в начале этого метода. Единственная цель этого – создать резервную копию значения переменной PS1 по умолчанию, чтобы ее можно было восстановить позже. Для этого вам просто нужно выполнить следующую команду в терминале:
Выполнение этой команды в терминале Ubuntu 20.04 также отразит эти изменения в вашем файле bashrc.
Как только вы нажмете клавишу Enter для запуска команды, как упомянуто выше, вы заметите, что цвет приглашения вашей системы изменился с белого на цвет по умолчанию, то есть зеленый.
Заключение:
В этой статье подробно объясняется, как можно легко изменить цвет системного приглашения Ubuntu 20.04, просто внеся небольшие изменения в файл bashrc. Следуя тому же методу, вы также можете экспериментировать с разными цветами. Однако единственное, о чем вам нужно быть осторожным, – это перед тем, как приступить к изменению цвета вашего приглашения, и вы должны сделать резервную копию соответствующей переменной вашего файла bashrc. Это сделано для того, чтобы вы не потеряли какие-либо важные конфигурации, и вы всегда можете вернуться к конфигурациям по умолчанию, когда захотите.
Если вы нашли ошибку, пожалуйста, выделите фрагмент текста и нажмите Ctrl+Enter.
There are a number of hidden files tucked away in your home directory. If you run macOS or a popular Linux distribution, you’ll see a file named “.bashrc” up near the top of your hidden files. What is bashrc, and why is editing bashrc useful?
If you run a Unix-based or Unix-like operating system, you likely have bash installed as your default terminal. While many different shells exist, bash is both the most common and, likely, the most popular. If you don’t know what that means, bash interprets your typed input in the Terminal program and runs commands based on your input. It allows for some degree of customization using scripting, which is where bashrc comes in.

In order to load your preferences, bash runs the contents of the bashrc file at each launch. This shell script is found in each user’s home directory. It’s used to save and load your terminal preferences and environmental variables.
Terminal preferences can contain a number of different things. Most commonly, the bashrc file contains aliases that the user always wants available. Aliases allow the user to refer to commands by shorter or alternative names, and can be a huge time-saver for those that work in a terminal regularly.
How can I edit bashrc?

You can edit bashrc in any terminal text editor. We will use nano in the following examples.
To edit bashrc using nano, invoke the following command in Terminal:
If you’ve never edited your bashrc file before, you might find that it’s empty. That’s fine! If not, you can feel free to put your additions on any line.
Any changes you make to bashrc will be applied next time you launch terminal. If you want to apply them immediately, run the command below:
You can add to bashrc where ever you like, but feel free to use command (proceeded by #) to organize your code.
Edits in bashrc have to follow bash’s scripting format. If you don’t know how to script with bash, there are a number of resources you can use online. This guide represents a fairly comprehensive introduction into the aspects of bashrc that we couldn’t mention here.
Why should I edit bashrc?
There’s a couple of useful tricks you can do to make your terminal experience more efficient and user-friendly.
Bash Prompt
The bash prompt allows you to style up your terminal and have it to show prompts when you run a command. A customized bash prompt can indeed make your work on the terminal more productive and efficient.
Check out some of the useful and interesting bash prompts you can add to your bashrc.
Aliases

Aliases can also allow you to access a favored form of a command with a shorthand code. Let’s take the command ls as an example. By default, ls displays the contents of your directory. That’s useful, but it’s often more useful to know more about the directory, or know the hidden contents of the directory. As such, a common alias is ll, which is set to run ls -lha or something similar. That will display the most details about files, revealing hidden files and showing file sizes in “human readable” units instead of blocks.
You’ll need to format your aliases like so:
Type the text you want to replace on the left, and the command on the right between quotes. You can use to this to create shorter versions of command, guard against common typos, or force a command to always run with your favored flags. You can also circumvent annoying or easy-to-forget syntax with your own preferred shorthand. Here are some of the commonly used aliases you can add to your bashrc.
Functions

In addition to shorthand command names, you can combine multiple commands into a single operation using bash functions. They can get pretty complicated, but they generally follow this syntax:
function_name () {
    command_1
    command_2
}
The command below combines mkdir and cd. Typing md folder_name creates a directory named “folder_name” in your working directory and navigates into it immediately.
md () {
    mkdir -p $1
    cd $1
}
The $1 you see in the function represents the first argument, which is the text you type immediately after the function name.
Conclusion
Unlike some terminal customization tricks, messing with bashrc is fairly straight-forward and low risk. If you mess anything up, you can always delete the bashrc file completely and start over again. Try it out now and you will be amazed at your improved productivity.

Alexander Fox
Alexander Fox is a tech and science writer based in Philadelphia, PA with one cat, three Macs and more USB cables than he could ever use.
Subscribe to our newsletter!
Our latest tutorials delivered straight to your inbox