Contents
- Introduction
- What is swap?
- Why do I need swap?
- How much swap do I need?
- How do I add more swap?
- How do I add or modify a swap partition?
- How do I add a swap file?
- What is swappiness and how do I change it?
- What is the priority of swap containers?
- Should I reinstall with more swap?
- Why is my swap not being used?
- Empty Swap
Introduction
-
This FAQ is aimed at Linux novices.
- People always wonder how much swap they should create at install time, or after installing they may think, «have I made a large enough swap? Should I reinstall with a larger swap?»
- This FAQ will tell you how much swap you need and how to add more swap after installation.
- You will be given very simple answers (to prevent losing too much time reading this FAQ) and some explanations that may help you form your own opinion.
What is swap?
Swap space is the area on a hard disk. It is a part of your machine’s Virtual Memory, which is a combination of accessible physical memory (RAM) and the swap space. Swap holds memory pages that are temporarily inactive. Swap space is used when your operating system decides that it needs physical memory for active processes and the amount of available (unused) physical memory is insufficient. When this happens, inactive pages from the physical memory are then moved into the swap space, freeing up that physical memory for other uses. Note that the access time for swap is slower, depending on the speed of the hard drive. Do not consider it to be a complete replacement for the physical memory. Swap space can be a dedicated swap partition (recommended), a swap file, or a combination of swap partitions and swap file(s).
Why do I need swap?
Memory consuming programs Sometimes, a large program (like LibreOffice, Neverwinter Nights, or a video editor) make the entire system need extra memory. A significant number of the pages used by these large programs during its startup may only be used for initialization and then never used again. The system can swap out those pages and free the memory for other programs or even for the disk cache. In these cases, swap will be used to help the system handle any extra load.
Hibernation (suspend-to-disk) The hibernation feature (suspend-to-disk) writes out the contents of RAM to the swap partition before turning off the machine. Therefore, your swap partition should be at least as big as your RAM size. Although the latest versions of Ubuntu don’t support hibernation OOTB you may configure your system to allow Hibernation. In both alternatives (PM-UTILS or SYSTEMD) you may use a partition or a file.
Unforeseeable Circumstances Unforeseeable events can and will happen (a program going crazy, some action needing much more space than you thought, or any other unpredictable combination of events). In these cases, swap can give you an extra delay to figure out what happened, or to finish what you are working on.
Optimizing memory usage Since mechanical hard drives are considerably slower than RAM (SSD — Solid State Drive — storage is not as slow as physical drives, but still slower than RAM), when you need a file (be it a data file like a video, executables like Firefox, or libraries), the Linux kernel reads the file into RAM and keeps it there, so that the next time you need it, it is already in RAM and data access is much faster. The portions of RAM that accelerate disk read are called «cached memory.» You will notice that they make a huge difference in terms of responsiveness. The Linux kernel automatically moves RAM reserved by programs—but not really used—into swap, so that it can serve the better purpose of extending cached memory.
Optimizing Swap performance Because swap space uses a disk device, this can cause performance issues in any system that uses swap space significantly because the system itself may also be using the same disk device at the same time that it is required for swap operations. One way to reduce this problem is to have swap space on a different physical drive so that the competition for that resource is either reduced or eliminated.
How much swap do I need?
For less than 1GB of physical memory (RAM), it’s highly recommended that the swap space should, as a base minimum, be equal to the amount of RAM. Also, it’s recommended that the swap space is maximum twice the amount of RAM depending upon the amount of hard disk space available for the system because of diminishing returns.
For more modern systems (>1GB), your swap space should be at a minimum be equal to your physical memory (RAM) size «if you use hibernation», otherwise you need a minimum of round(sqrt(RAM)) and a maximum of twice the amount of RAM. The only downside to having more swap space than you will actually use, is the disk space you will be reserving for it.
The «diminishing returns» means that if you need more swap space than twice your RAM size, you’d better add more RAM as Hard Disk Drive (HDD) access is about 10³ slower then RAM access, so something that would take 1 second, suddenly takes more then 15 minutes! And still more than a minute on a fast Solid State Drive (SSD)…
Example Scenarios
(last 3 columns denote swap space)
        RAM   No hibernation    With Hibernation  Maximum
      256MB            256MB               512MB    512MB
      512MB            512MB              1024MB   1024MB
     1024MB           1024MB              2048MB   2048MB

        RAM   No hibernation    With Hibernation  Maximum
        1GB              1GB                 2GB      2GB
        2GB              1GB                 3GB      4GB
        3GB              2GB                 5GB      6GB
        4GB              2GB                 6GB      8GB
        5GB              2GB                 7GB     10GB
        6GB              2GB                 8GB     12GB
        8GB              3GB                11GB     16GB
       12GB              3GB                15GB     24GB
       16GB              4GB                20GB     32GB
       24GB              5GB                29GB     48GB
       32GB              6GB                38GB     64GB
       64GB              8GB                72GB    128GB
      128GB             11GB               139GB    256GB
      256GB             16GB               272GB    512GB
      512GB             23GB               535GB      1TB
        1TB             32GB              1056GB      2TB
        2TB             46GB              2094GB      4TB
        4TB             64GB              4160GB      8TB
        8TB             91GB              8283GB     16TB
How do I add more swap?
Swap is generally associated with a swap partition, perhaps because the user is prompted to create a swap partition at the time of installation. In fact, any file can be used as a swapping device, be it a partition or a conventional file. Swap can be added by increasing the size of the swap partition or by adding a swap file. Keep in mind that when creating a swap file that it may not necessarily be using contiguous disk blocks (as a swap partition will), and this could have a negative impact on performance as disk access times may be longer, and the more your system uses swap, the worse it will be. The Linux kernel also accesses swap disk block IO directly bypassing all caching, metadata and filesystem code, so a swap file should have no ill effect on the stability of your base filesystem. Since kernel 2.6.29 the swap system has automatically supported TRIM capable devices like SSDs.
The advantages of a swap file are many, but it is problematic for using the default swsusp hibernation method for powerless sleep. The best solution for maintaining hibernate capability after adding RAM is to increase the size of the swap partition.
How do I add or modify a swap partition?
Process to Increase Size of Swap Partition and use it for Hibernation
- Creating the swap partition
- Activating the swap partition
- Making the new swap partition work for hibernate (optional)
Creating the swap partition
- Boot to Ubuntu install CD and choose the option to run Ubuntu now
-
Go to system -> GParted Partition Editor
- Delete the swap partition and, if there is nothing else in it, the extended partition that holds it. (If by some miracle you’re able to resize your swap partition from here, I imagine your life will be a lot easier than mine.)
- Decrease the size of your primary partition by the amount you want your new swap to be (I made mine 2x RAM + 500MB just to be safe). The easiest way to do this is to fill in the amount of space you want swap to be in the «free space following» field
- In the free space that has now been created, choose new, type linux-swap and you can name the partition «swap» if you like
- Hit the *Apply* button (should be a check mark) to write the changes to disk
- When done, reboot back into Ubuntu
Activating the swap partition
(If your swap is on your primary hard drive, you don’t need to do anything here.) Now you need to find what partition your swap is on and what its UUID is. UUID?! you say? Well that’s the Universally Unique IDentifier for the partition so you can reference it even if it’s on a different mount point from boot-to-boot due to adding disks, etc.
-
Pull up a terminal and run gksu gparted & and enter your root password. The & lets this process run while still giving you access to the command line.
- Right-click on your swap partition and choose *Information*. You should see the **Path** and **UUID** listed there. Keep this open for further reference.
-
Run gksu gedit /etc/fstab & and look for the line that has *swap* in it. It should be the third column, separated by spaces or tabs. You can either use the path or the UUID to tell Linux where to find your swap partition. I recommend UUID because it’ll stay constant even if you move the partition around or the disk somehow becomes sdb instead of sda or something like that. Make the appropriate edits and save the file. Your line should look something like this if you used UUID (with your UUID instead, of course):
-
UUID=41e86209-3802-424b-9a9d-d7683142dab7 none swap sw 0 0
-
or this if you used path: /dev/sda2 none swap sw 0 0
-
- Save the file.
-
Enable the new swap partition with this command.
sudo swapon --all
OR
$ sudo swapon --all --verbose
swapon on /dev/sda2
swapon: /dev/sda2: found swap signature: version 1, page-size 4, same byte order
swapon: /dev/sda2: pagesize=4096, swapsize=2147483648, devsize=2147483648
-
Confirm that the swap partition exists.
$ cat /proc/swaps
Filename                                Type            Size    Used    Priority
/dev/sda2                               partition       2097148 0       -1
- Reboot to make sure the new swap gets activated properly at startup
Making the swap partition work for hibernate (optional)
‘INFO: This will not work for 12.04, resume from hibernate work differently in 12.04.‘
-
Pull up a Terminal again and run cat /proc/swaps and hopefully you see the path to your swap partition listed there. If not chances are something went wrong in the steps above. Here’s my output:
Filename                                Type            Size    Used    Priority
/dev/sda2                               partition       2676732 73380   -1
-
gksu gedit /etc/default/grub & to pull up the boot loader configuration
-
Look for the line GRUB_CMDLINE_LINUX=»» and make sure it looks like this (using your UUID of course) GRUB_CMDLINE_LINUX=»resume=UUID=41e86209-3802-424b-9a9d-d7683142dab7″ and save the file
-
sudo update-grub and wait for it to finish
-
gksu gedit /etc/initramfs-tools/conf.d/resume & and make sure its contents are resume=UUID=41e86209-3802-424b-9a9d-d7683142dab7 (with your UUID of course in place of mine). Save the file!
-
sudo update-initramfs -u
- Reboot!
Now you should be able to hibernate and resume!
How do I add a swap file?
Note: btrfs does not support swap files at the moment. See man swapon. and btrfs Faq
Create the Swap File:
We will create a 1 GiB file (/mnt/1GiB.swap) to use as swap:
sudo dd if=/dev/zero of=/mnt/1GiB.swap bs=1024 count=1048576
We need to set the swap file permissions to 600 to prevent other users from being able to read potentially sensitive information from the swap file.
sudo chmod 600 /mnt/1GiB.swap
Format the file as swap:
sudo mkswap /mnt/1GiB.swap
Enable use of Swap File
sudo swapon /mnt/1GiB.swap
The additional swap is now available and verified with: cat /proc/swaps
Enable Swap File at Bootup
Add the swap file details to /etc/fstab so it will be available at bootup:
echo '/mnt/1GiB.swap swap swap defaults 0 0' | sudo tee -a /etc/fstab
Example of making a swap file
This is an example of making and using a swap file on a computer with no swap partition.
$ sudo fallocate -l 1g /mnt/1GiB.swap
$ sudo chmod 600 /mnt/1GiB.swap
$ sudo mkswap /mnt/1GiB.swap
Setting up swapspace version 1, size = 1048576 kB
$ sudo swapon /mnt/1GiB.swap
$ cat /proc/swaps
Filename                                Type            Size    Used    Priority
/home/swapfile                          file            1048576 1048576 -1
$ echo '/mnt/4GiB.swap swap swap defaults 0 0' | sudo tee -a /etc/fstab
$ reboot
$ free -h
              total        used        free      shared  buff/cache   available
Mem:            15G        9.3G        454M        4.0G        5.8G        1.9G
Swap:          1.0G        1.0G          0B
Disable and Remove a Swap File
Disable the swap file from the running system and the delete it:
sudo swapoff /mnt/1Gib.swap
sudo rm /mnt/1Gib.swap
Remove the swap file details from fstab:
gksudo gedit /etc/fstab
Removing the swap file line
/mnt/1GiB.swap swap swap defaults 0 0
What is swappiness and how do I change it?
The swappiness parameter controls the tendency of the kernel to move processes out of physical memory and onto the swap disk. Because disks are much slower than RAM, this can lead to slower response times for system and applications if processes are too aggressively moved out of memory.
- swappiness can have a value of between 0 and 100
- swappiness=0 tells the kernel to avoid swapping processes out of physical memory for as long as possible
- swappiness=100 tells the kernel to aggressively swap processes out of physical memory and move them to swap cache
The default setting in Ubuntu is swappiness=60. Reducing the default value of swappiness will probably improve overall performance for a typical Ubuntu desktop installation. A value of swappiness=10 is recommended, but feel free to experiment. Note: Ubuntu server installations have different performance requirements to desktop systems, and the default value of 60 is likely more suitable.
To check the swappiness value
cat /proc/sys/vm/swappiness
To change the swappiness value A temporary change (lost on reboot) with a swappiness value of 10 can be made with
sudo sysctl vm.swappiness=10
To make a change permanent, edit the configuration file with your favorite editor:
gksudo gedit /etc/sysctl.conf
Search for vm.swappiness and change its value as desired. If vm.swappiness does not exist, add it to the end of the file like so:
vm.swappiness=10
Save the file and reboot.
What is the priority of swap containers?
The Linux kernel assigns priorities to all swap containers. To see the priorities that the Linux Kernel assigns to all the swap containers use this command.
cat /proc/swaps
Priorities can be changed by using the swapon command or defined in /etc/fstab. Consult the manual page of swapon for more info
man swapon
Should I reinstall with more swap?
Definitely not. With the 2.6 kernel, «a swap file is just as fast as a swap partition.» (Wikipedia:Paging, LKML).
Why is my swap not being used?
My swap is not being used! When I issue the free command, it shows something like this:
tom@tom:~$ free
             total       used       free     shared    buffers     cached
Mem:        515980     448664      67316          0      17872     246348
-/+ buffers/cache:     184444     331536
Swap:       674688          0     674688
Note: This regards mainly swap on hard disk partitions, but it could help anyway. In these examples /dev/hda8 is considered as swap.
Swap may not be needed
Start many memory consuming applications (e.g. Gimp, web browsers, LibreOffice etc) and then issue the free command again. Is swap being used now?
Ubuntu Desktop uses Swap to Hibernate (PC off, no power needed, program states saved). If Hibernation is important to you, have more swap space than ram + swap overflow.
Is there a swap partition at all?
Use this command to see all partitions
sudo parted --list
You should be able to see something like this in the output
5 236GB 256GB 20.0GB linux-swap(v1)
If not, you either need to create a swapfile or create a swap partition. To create a swap partition you can
- boot from your Ubuntu install CD, create a swap partition out of the free space on your hard disk and then interrupt your installation.
-
use Cfdisk.
Enabling a swap partition
In case you do have a swap partition, there are several ways of enabling it.
- Use the following command
cat /etc/fstab
- Ensure that there is a line link below. This enables swap on boot.
/dev/sdb5 none swap sw 0 0
- Then disable all swap, recreate it, then re-enable it with the following commands.
sudo swapoff -a
sudo /sbin/mkswap /dev/sdb5
sudo swapon -a
Empty Swap
Even if you have lots of RAM and even if you have a low swappiness value, it is possible that your computer swaps. This can hurt the multitasking performance of your desktop system.
You can use the following script to get the swap manually back into RAM:
- Place the script e.g. /usr/local/sbin:
gksudo gedit /usr/local/sbin/swap2ram.sh
- Copy-paste the script into the file:
-
#!/bin/sh mem=$(LC_ALL=C free | awk '/Mem:/ {print $4}') swap=$(LC_ALL=C free | awk '/Swap:/ {print $3}') if [ $mem -lt $swap ]; then echo "ERROR: not enough RAM to write swap back, nothing done" >&2 exit 1 fi swapoff -a && swapon -a - Save and close gedit
- Make the script executable:
sudo chmod +x /usr/local/sbin/swap2ram.sh
- Execute:
sudo /usr/local/sbin/swap2ram.sh
CategoryFaq
Сегодня мы будем говорить о файле подкачки в Linux. Расскажем для чего он нужен, как создать, изменить размер или удалить. В общем, все, что вам может понадобиться при работе со swap.
В операционной системе Linux, как и в других ОС, файл подкачки нужен для страховки оперативной памяти. Когда установленный объем ОЗУ заканчивается, используется именно выделенная область из файла подкачки. Это может понадобиться в двух случаях:
- Для того чтобы при полной занятости и, как следствие, отсутствия свободной оперативной памяти, компьютер не тормозил.
- Для распределения приоритетов (важным процессам отдается физическая оперативная память, а второстепенным файл подкачки Linux).
Сам по себе swap — это отдельный логический раздел вашего диска либо просто файл на системном разделе. Чаще всего он создается именно при установке операционной системы. Но создать swap linux можно и после завершения инсталляции ОС.
В последних версиях операционной системы Ubuntu Linux файл подкачки создается автоматически вне зависимости от того, хотите вы этого или нет. При этом его размер составляет около 1 Гб.
Как посмотреть swap в Linux
Прежде чем приступить к процессу добавления, настройки или удаление файла подкачки, необходимо проверить его наличие. Для этого проще всего использовать приведенную ниже команду. В нашем случае она выглядит так:
free -h
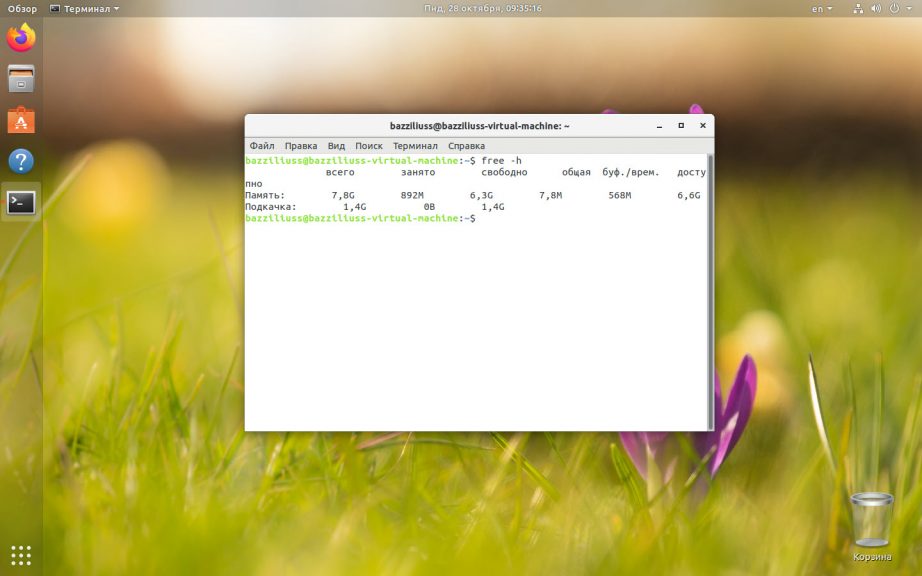
Используемая команда отображает размер файла подкачки вашей операционной системы. Однако, по ее результатам мы не можем определить – это файл подкачки или раздел подкачки. Поэтому будем использовать дополнительный другую команду, чтобы посмотреть swap linux. Вводим в терминал следующее:
swapon --show
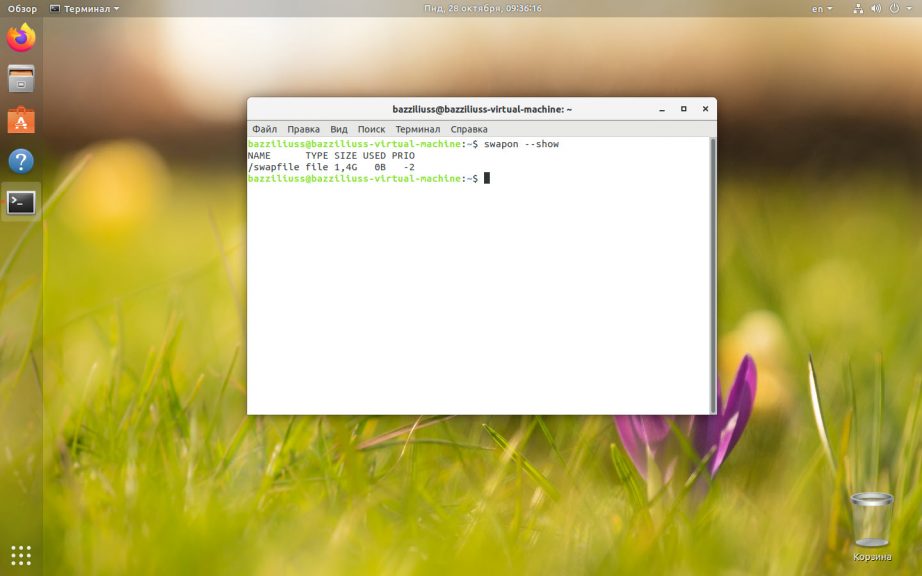
Как видите, в нашем случае под swap выделено 1.4 Гб и это файл. То есть, он находится не на отдельном разделе, а на том же диске, на котором установлена операционная система.
Если это будет отдельный логический том, то под надписью «TYPE» мы увидим слово «partition».
Если бы файл подкачки в вашей операционной системе отсутствовал, результат работы команды free —h выглядел бы примерно так:

То есть, вместо каких-либо данных о файле подкачки вы увидите нули.
Если вы удостоверились в том, что файл подкачки отсутствует, можно переходить к его созданию. Пример, приведенный ниже, будет показан с использованием операционной системы Ubuntu 18.04, но работать это должно и на других дистрибутивах Linux.
Шаг 1: Создаем swap файл
Давайте создадим файл подкачки для нашей Ubuntu. Для примера его размер составит 1 Гб. Запустите терминал и введите команду, приведенную ниже:
sudo fallocate -l 1G /swapfile
Для обеспечения безопасности файла обязательно устанавливаем на него нужные права.
sudo chmod 600 /swapfile
При этом вместо «swapfile» мы можем указать любое другое название.

Шаг 2: Создание файловой системы
Создание swap linux ещё не завершено. Теперь необходимо указать нашей операционной системе, что созданный объект должен использоваться как файл подкачки. Для этого мы будем использовать команду, приведенную ниже:
sudo mkswap /swapfile
Если все сделано верно, результат будет выглядеть так:

Шаг 3: Активируем файл подкачки
Хорошо, теперь наш Linux понимает, что это файл подкачки, но этого недостаточно. Нам также необходимо включить SWAP:
sudo swapon /swapfile

Давайте проверим, все ли мы сделали правильно:
swapon --show
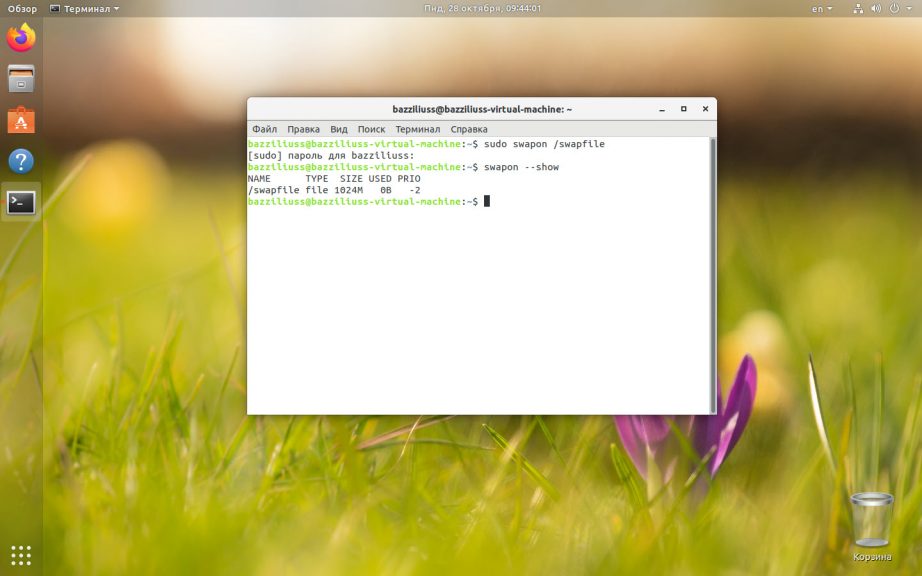
Отлично, операционная система распознала наш файл подкачки и начала его использовать. Мы видим тип в поле TYPE и размер в поле SIZE.
Шаг 4. Сохранение изменений после перезагрузки
Все операции, которые мы предприняли выше, временны. Как только компьютер будет перезагружен, они отменятся. Для того чтобы сделать изменения постоянными, нам необходимо дописать кое-какую информацию в /etc/fstab. Для этого поступаем так:
Прежде чем начать работать с файлом, о котором мы говорим, необходимо обязательно создать его резервную копию:
sudo cp /etc/fstab /etc/fstab.back

После этого можно переходить непосредственно к добавлению нужных нам данных. Нам надо добавить в файл такую строчку:
/swapfile none swap sw 0 0
Это реализуется через текстовый редактор, запущенный с правами суперпользователя, либо при помощи введенной в терминал команды:
echo '/swapfile none swap sw 0 0' | sudo tee -a /etc/fstab

Готово. Изменения сохранены и файл подкачки не сбросится после перезагрузки операционной системы.
Настройка swappiness
Дальше будет рассмотрена настройка swap linux. У файла подкачки существуют параметры, которые сообщают ОС, как часто его нужно использовать. Это явление называется «свопингом» и может иметь значение в пределах 0 — 100. Если это значение ближе к 100, ядро будет перемещать в раздел подкачки больше информации чтобы освободить память. При значениях ближе к нулю, система будет использовать подкачку только при крайней необходимости.
К примеру, в версии Ubuntu Linux для рабочего стола устанавливается параметр 60, а в серверных редакциях операционной системы — 1. Для того чтобы проверить, какой параметр используется в нашей ОС, вводим в терминал такую команду:
cat /proc/sys/vm/swappiness
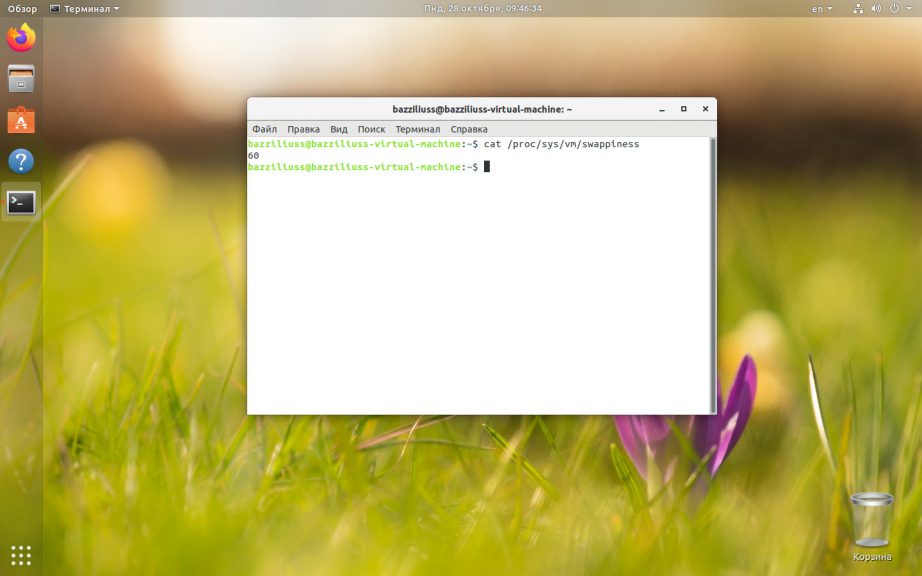
Как видите, в нашем случае «свопинг» установлен как 60. Если же вы хотите поменять swappiness, можете воспользоваться оператором, цифра в конце которого и будет новым значением:
sudo sysctl vm.swappiness=25

Как и в случае с конфигурацией файла подкачки, данный параметр изначально будет временным и обнулится при следующей перезагрузке. Для того чтобы сделать его постоянным, в самом конце файла /etc/sysctl.conf записываем значение vm.swappiness=25.
vi /etc/sysctl.conf
vm.swappiness=25
Для этого можно воспользоваться, например, текстовым редактором, запущенным с администраторскими полномочиями.
Размер swap файла в Linux
Существует сразу несколько вариантов, позволяющих увеличить файл подкачки linux или уменьшить его. Однако, прежде чем их рассмотреть, необходимо напомнить об одном очень важном моменте:
Когда вы полностью отключаете файл подкачки, ваша операционная система использует только ОЗУ и в случае ее нехватки это может привести к полной остановке работы компьютера. Система просто зависнет.
Для того чтобы этого не произошло, в тот момент, когда мы удаляем или изменяем основной файл подкачки, необходимо создать второй, временный swap. Если вы это сделали или уверены в том, что имеющейся оперативной памяти хватит, можно переходить непосредственно к процессу изменения размера файла подкачки. Для этого давайте сначала отключим его:
sudo swapoff /swapfile

Вторым этапом меняем размер файла подкачки, воспользовавшись командой, приведенной ниже. При этом размер вашего swap файла нужно указать вместо параметра 2G (2 гигабайта):
sudo fallocate -l 2G /swapfile
Теперь форматируем полученный файл в файловую систему swap:
sudo mkswap /swapfile
А затем включаем его обратно:
sudo swapon /swapfile
При этом операционная система Linux позволяет использовать сразу несколько swap.
Как удалить файл подкачки в Linux
Если по каким-то причинам файл подкачки вам не нужен, можете удалить его. Для этого сначала надо отключить swap linux:
sudo swapoff /swapfile

А потом удаляем:
sudo rm /swapfile

Не забудьте установить права на вновь созданный файл подкачки так, как мы описывали это выше.
В заключение
Надеемся теперь концепция файла подкачки в Linux ясна вам на 100%. Можете переходить к практике и проверять наличие swap на вашем компьютере или ноутбуке, его настройке, созданию или даже удалению. Если в результате у вас останутся какие-то вопросы, предложения или замечания, можете задать их нам, воспользовавшись формой комментирования ниже.

Статья распространяется под лицензией Creative Commons ShareAlike 4.0 при копировании материала ссылка на источник обязательна .
Содержание
SWAP – один из механизмов виртуальной памяти, при котором отдельные фрагменты памяти (обычно неактивные) перемещаются из ОЗУ во вторичное хранилище (отдельный раздел или файл), освобождая ОЗУ для загрузки других активных фрагментов памяти.
Более подробно о механизме своппинга можно прочитать в Википедии.
Дополнительно SWAP используется при организации режима сна (hibernation или suspend to disk). При этом в SWAP сохраняется образ оперативной памяти.
Размещение
SWAP может быть размещен на разделе диска, в файле или в RAM. Исторически в Linux SWAP размещался на разделе, но в современных дистрибутивах производительность SWAP-файла не уступает SWAP-разделу. Однако стандартный установщик Ubuntu (до версии 17.04) не умеет создавать SWAP-файл при установке и выдает предупреждение, если SWAP-раздел не определен при разметке диска. Начиная с версии 17.04, Ubuntu предлагает по умолчанию создавать SWAP в файле (объем определяется как 5% от свободного на диске места, но не более 2 Гб). Использование SWAP-файла имеет некоторые преимущества: он не занимает отдельный раздел, его легко создать, изменить его размер или удалить.
Дополнительно при выборе размещения SWAP нужно учитывать, что не все файловые системы позволяют использовать прямую адресацию блоков SWAP-файла. Так, к примеру, нельзя использовать SWAP в файле на разделе с файловой системой btrfs(по состоянию на середину 2017).
Безопасность
При работе с секретными/зашифрованными данными часть этих данных в процессе работы либо при гибернации может оказаться в SWAP в расшифрованном виде. В таких случаях рекомендуется шифровать не только данные, но и сам SWAP. Однако нужно учитывать, что у режима сна при шифровании SWAP могут возникнуть сложности.
Размер
В Интернете можно найти множество рекомендаций по определению размера SWAP, однако универсального ответа не существует.
При определении размера SWAP следует учесть следующие аспекты:
-
Каков размер оперативной памяти?
-
Какие приложения будут использоваться?
-
Будет ли вестись работа с секретными данными?
-
Нужен ли режим сна (suspend to disk)?
В зависимости от ответов на эти вопросы рекомендации по размеру SWAP будут значительно различаться.
Для машин с незначительным объемом памяти (меньше 2 Гб) рекомендуется создавать SWAP размером от 1,5 до 2-х размеров оперативной памяти. И стоит попробовать изменять vm.swappiness, но лучше поискать возможность увеличить объем оперативной памяти.
Для машин с объемом памяти 3-4 Гб нужно решить, будет ли использоваться suspend to disk. Если да, то нужно создавать SWAP размером на 10-15% больше размера оперативной памяти. Если же suspend to disk использоваться не будет, то можно создать SWAP небольшого размера (размером от половины до 1 объема оперативной памяти). Можно не создавать SWAP при установке системы, а при необходимости добавить его позже как файл.
На компьютерах с объемами оперативной памяти более 6Gb имеет смысл создать SWAP размером в половину от объема оперативной памяти. При этом, если вы хотите использовать гибернацию, следует оценить загрузку оперативной памяти в процессе работы и задать величину SWAP, исходя из этого. К примеру, если объем оперативной памяти составляет 16 ГБ, а рабочая загрузка не превышает в среднем 5-6 ГБ, величины SWAP-раздела в 8 ГБ вам хватит для гибернации. При таком подходе следует помнить, что при использовании ресурсоёмких программ (рендеринг изображения, компиляция огромных проектов и т.п.) оперативная память может заполняться полностью, а SWAP — использоваться в качестве подкачки. В таких ситуациях размер SWAP нужно выбирать индивидуально.
При работе с секретными (зашифрованными) данными стоит либо шифровать SWAP, либо рассмотреть вариант с отказом от SWAP вовсе (зависит от размера оперативной памяти). Стоит также рассмотреть вариант с шифрованием всего диска.
Создание SWAP на разделе диска
Разобравшись с требованиями к SWAP, можно приступить к его созданию или изменению.
Ядро Linux может работать с несколькими частями SWAP. Поэтому если вы решили, что созданного при установке системы SWAP-раздела недостаточно, то стоит создать дополнительный SWAP (выделить место под раздел или файл). Однако нужно учитывать, что для гибернации нужен непрерывный блок SWAP, который должен иметь размер больший, чем оперативная память.
К примеру, у нас есть раздел /dev/sdc2 (ваше имя раздела может отличаться). Создадим на нем необходимую структуру данных для работы SWAP:
sudo mkswap /dev/sdc2
Подключим раздел как SWAP:
sudo swapon /dev/sdc2
Проверить результат можно, посмотрев на вывод команды
sudo swapon -s
Сделаем автомонтирование SWAP-раздела при запуске системы. Узнаем UUID раздела:
sudo blkid
Теперь пропишем строку в /etc/fstab
echo "UUID=<UUID swap-раздела> swap swap defaults,pri=<Приоритет (от 0 до 32767)> 0 0"| sudo tee -a /etc/fstab
SWAP с динамически изменяемым размером
Если вы не хотите думать об объеме SWAP, имеет смысл воспользоваться утилитой swapspace (динамический менеджер подкачки). Эта утилита работает в фоновом режиме и динамически управляет подкачкой. При необходимости swapspace автоматически создаёт дополнительные файлы подкачки требуемого размера. Неиспользуемые файлы подкачки удаляются и не занимают место.
Однако, если вы работаете с секретными документами, не забудьте указать swapspace создавать SWAP-файлы на зашифрованном диске или внутри шифрованного контейнера 1).
Hibernate (suspend to disk, гибернация)
О настройке режима гибернации можно прочитать здесь.
Параметр vm.swappiness
Основной параметр, влияющий на работу системы со swap, — это vm.swappiness. Очень приблизительно этот параметр можно определить так: он задает процент свободной оперативной памяти, при котором начинается использование подкачки. Более точное определение смысла этой переменной можно уяснить из описания которое было дано в рассылке kernel.org — статья на английском.
Без особой необходимости трогать его не рекомендуется.
Скорректировать значение, применяемое при загрузке системы, можно, указав в файле /etc/sysctl.conf значение vm.swappiness. Пример:
echo "vm.swappiness=30"| sudo tee -a /etc/sysctl.conf
Мгновенно применить эту настройку можно с помощью следующей команды:
# sysctl -f
Актуальное значение, используемое ядром в настоящее время, можно просмотреть или изменить в /proc/sys/vm/swappiness.
# cat /proc/sys/vm/swappiness
# echo 10 > /proc/sys/vm/swappiness
Изменения в /proc/sys/vm/swappiness будут сброшены при следующей перезагрузке.
Значение vm.swappiness по умолчанию — 60.
Какое значение выбрать?
Маленькое значение vm.swappiness (минимальное значение: 0) будет заставлять ядро использовать больше оперативной памяти под память процессов (в ущерб буферам и кэшам), тогда как большое значение (максимальное значение: 100) будет выделять больше памяти под кэши и буфера (в ущерб памяти для процессов).
Нужно понимать: ни одно значение vm.swappiness не увеличит волшебным образом производительность компьютера многократно. Урезаете кеши — понижаете отзывчивость системы при работе с файлами, урезаете память процессов — снижаете отзывчивость системы при переключении задач.
Нужное вам значение, скорее всего, стоит подбирать экспериментально.
Смотрите также
Ссылки
Though for the most part Linux applications run just fine, it’s not uncommon to run into «Out of Memory» errors when using particularly performance-intensive programs. As you may have gathered, this occurs when your server does not have enough RAM to hold the application in memory. This can be remedied with Ubuntu swap space, which we’ll show you how to adjust today.
What is Swap Space in Linux?
Swap, which you may know as the paging file or page file on Windows, is space set aside by the operating system to temporarily hold information that it can’t hold in RAM. Rather than throw up errors and force you to close other applications, Ubuntu «swaps» some of the information that’s in memory to a hard drive for later use.
This is not ideal – there’s a reason that PC’s have RAM instead of just regular hard drives – but it’s better than data loss. Though hard drives have the advantage of offering non-volatile storage, they’re much slower than RAM. As a result, the overall experience is likely to be degraded if you use a system than runs out of memory frequently. Essentially, It’s always better to have more RAM than you need, but Swap Space can protect against out-of-memory exceptions in a pinch.
Generally, though, you should be careful using swap storage if your server or personal system is using a Solid State Drive (SSD). As SSDs have a limited amount of writes in its lifespan, constantly swapping out data from the SSD to RAM can quickly degrade the drive.
If it’s very rare that you exceed your RAM, this isn’t likely to cause major issues, but for systems with low memory and an SSD, it’s not recommended.
How to Check Swap Space in Linux
It’s always a good idea to check how much Ubuntu swap space (if any) your system has before adjusting it. You can do so with the following command:
sudo swapon --show
If the command returns nothing, it means you don’t currently have any swap space configured. If you want to verify this, type:
free -h
total        used        free      shared  buff/cache   available
Mem:          991Mi       221Mi        67Mi       0.0Ki       702Mi       753Mi
Swap:            0B          0B          0B
Now we can move onto the next step – making sure your hard drive has enough space to create a swap file. Enter:
df -h
The output will look something like this:
Filesystem      Size  Used Avail Use% Mounted on
/dev/root        25G  4.7G   20G  20% /
devtmpfs        494M     0  494M   0% /dev
tmpfs           496M  8.0K  496M   1% /dev/shm
tmpfs           100M  488K   99M   1% /run
tmpfs           5.0M     0  5.0M   0% /run/lock
tmpfs           496M     0  496M   0% /sys/fs/cgroup
/dev/sda15      105M  9.1M   96M   9% /boot/efi
/dev/loop0       72M   72M     0 100% /snap/lxd/16530
/dev/loop1       55M   55M     0 100% /snap/core18/1880
/dev/loop5       30M   30M     0 100% /snap/snapd/8542
/dev/loop6       56M   56M     0 100% /snap/core18/1885
/dev/loop2       72M   72M     0 100% /snap/lxd/16723
/dev/loop4       30M   30M     0 100% /snap/snapd/8790
tmpfs           100M     0  100M   0% /run/user/0
The column /dev/root, which is mounted on / is our drive in this scenario. You can see that 4.7 GB out of 20 has been used, or a total of 20%. That gives us plenty to play with, considering that our server has 1 GB of RAM and it’s unlikely to even double that.
Here’s a helpful table from the Ubuntu community help wiki:
| RAM | No hibernation | With Hibernation | Maximum |
|---|---|---|---|
| 256 MB | 256 MB | 256 MB | 512 MB |
| 512 MB | 512 MB | 1024 MB | 1024 MB |
| 1024 MB | 1024 MB | 2048 MB | 2048 MB |
| 1 GB | 1 GB | 2GB | 2GB |
| 2 GB | 1 GB | 3 GB | 4 GB |
| 3 GB | 2 GB | 5 GB | 6 GB |
| 4 GB | 2 GB | 6 GB | 8 GB |
| 5 GB | 2 GB | 7 GB | 10 GB |
| 6 GB | 2 GB | 8 GB | 12 GB |
| 8 GB | 3 GB | 11 GB | 16 GB |
| 12 GB | 3 GB | 15 GB | 24 GB |
| 16 GB | 4 GB | 20 GB | 32 GB |
| 24 GB | 5 GB | 29 GB | 48 GB |
| 32 GB | 6 GB | 38 GB | 64 GB |
| 64 GB | 8 GB | 72 GB | 128 GB |
| 128 GB | 11 GB | 139 GB | 256 GB |
Keep in mind that you’ll need a large page file if your system has hibernation enabled, as it writes the contents of the RAM to swap on shutdown.
How to Create a Swap File and Increase Swap Space
Now that we’ve verified it’s safe to proceed we can craft our swap file. There are a few ways to do this, but the easiest is via the fallocate program, which lets us allocate the exact size we want our swapfile to be.
As mentioned earlier, our server has 1 GB of RAM. We’re going to set our swapfile to 2 GB because we have plenty of free space, but 1 GB of swap would likely work just fine if we didn’t:
cd
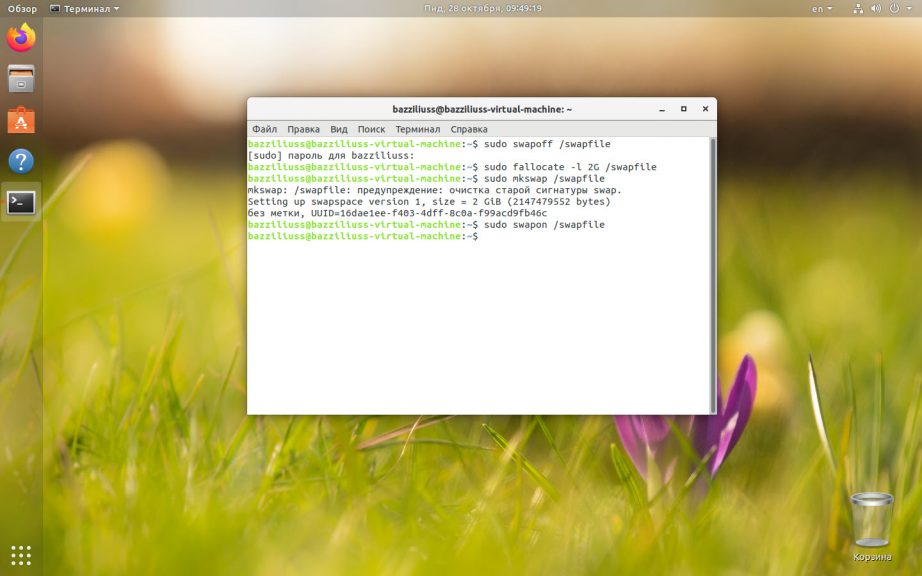
sudo fallocate -l 2G /swapfile
As we didn’t specify a folder, our swapfile will be placed in our root directory, which is what we want. The command won’t give any output, so you can make sure the swap space was actually reserved with:
ls -lh /swapfile
In our case, the command returns:
-rw-r--r-- 1 root root 2.0G Aug 15 12:47 /swapfile
However, though we have space reserved for our swapfile, our system hasn’t yet be told this is where we want to it store information when out of memory. Before we do so, we want to make sure nobody but root can modify the file. Otherwise, an attacker could potentially use the file to perform an attack or steal information. Set the permissions with:
sudo chmod 600 /swapfile
Now verify that change using the same command as earlier:
ls -lh /swapfile
The output should have changed from rw-r--r-- 1 root root to -rw------- 1 root root 2.0G Aug 15 12:47 /swapfile, indicating that now only root has the read and write flags enabled.
With that done, dedicate the file as swap space by entering:
sudo mkswap /swapfile
The output should say something like:
`Setting up swapspace version 1, size = 2 GiB (2147479552 bytes)
no label, UUID=f9429158-ec78-4dce-98c0-986167b47016`
Now we just need to enable the swap file:
sudo swapon /swapfile
And verify that it’s available via the check commands from earlier:
sudo swapon --show
NAME      TYPE SIZE USED PRIO
/swapfile file   2G   0B   -2
free -h
              total        used        free      shared  buff/cache   available
Mem:          991Mi       222Mi        28Mi       0.0Ki       740Mi       752Mi
Swap:         2.0Gi          0B       2.0Gi
How to Make a Swap File Permanent and Adjust its Settings
Though we’ve technically created out swap space now, the changes won’t persist across a reboot unless we take further action. We remedy this by adding the swap file to /etc/fstab, Unix’s system configuration file:
sudo cp /etc/fstab /etc/fstab.bak
echo '/swapfile none swap sw 0 0' | sudo tee -a /etc/fstab
The first command backed up our old fstab file, so if anything goes wrong you should roll back to that. Now we can talk about configuration. Here are some of the most commonly adjusted options and their purpose:
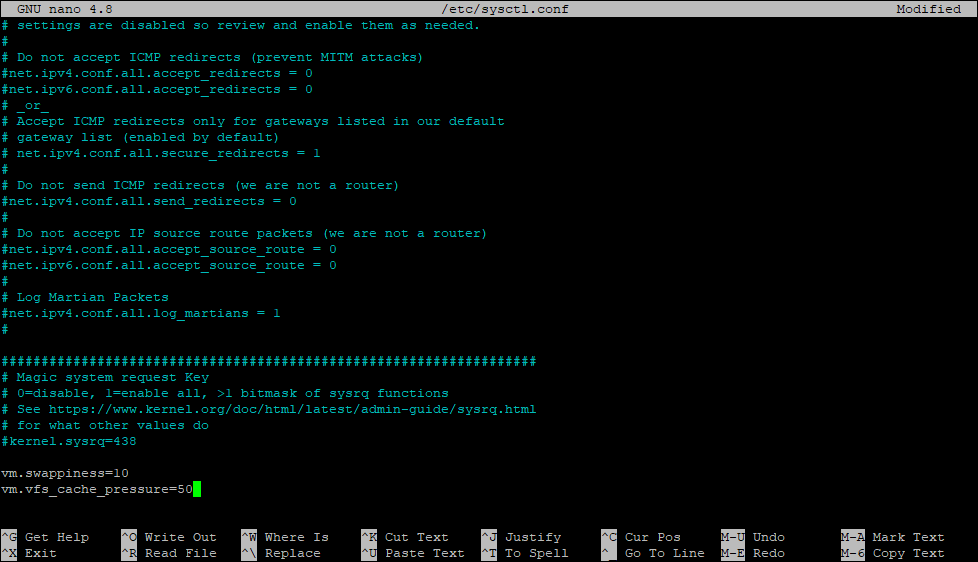
- Swappiness: How often your PC swaps data from RAM to your swap space. A value of 0 to 100, denoting the percentage of available RAM you want it to swap at.
- Cache pressure: How often the system caches inode and dentry (file system) data. This often performance intensive and worth caching. The 0 to 100 value signifies how much the system will choose to cache.
How to Change Swapiness
You can see your current swapiness value by entering:
cat /proc/sys/vm/swappiness
By default, your swapiness value is probably 60. For reference, at 1 the kernel won’t swap data out of memory unless it would experience serious issues otherwise. At 99, the system will try to keep memory space free by swapping information into memory quite aggressively. At 60, it’ll swap when the RAM reaches 40% capacity.
It’s ultimately up to you what you set this to, but a guideline is a low value like 10 for a desktop installation with a good amount of RAM. For a server with low RAM, 60 could be a passable default value, but it’s worth experimenting with. Change it via the command:
sudo sysctl vm.swappiness=10
Once you’re happy, you can force it to persist across a reboot by adding the line to /etc/sysctl.conf. Type sudo nano /etc/sysctl.conf and add vm.swappiness=10 to the bottom of the file.
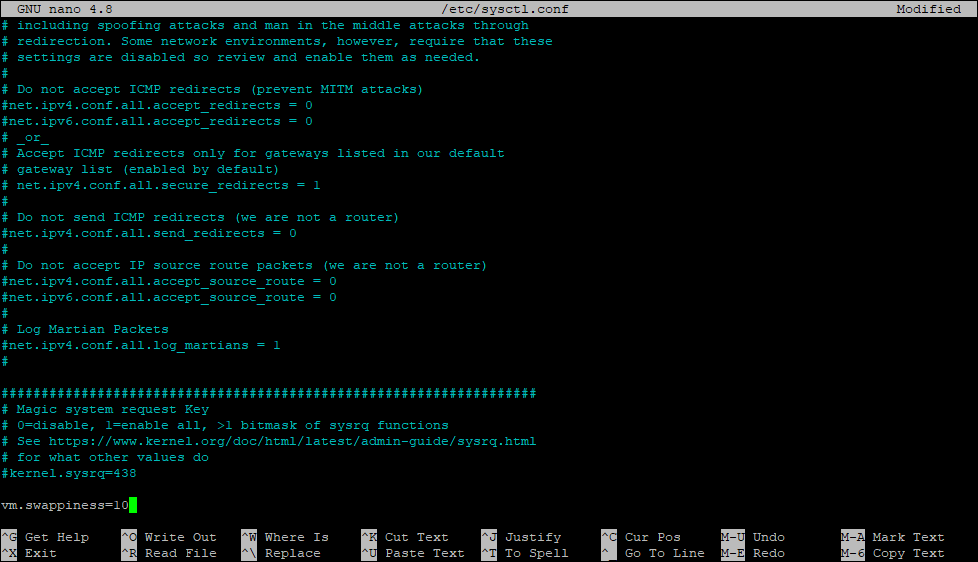
Press Crl+O to save, then Ctrl+X to exit.
Change your Cache Pressure Value
You can see your current cache pressure value by typing:
cat /proc/sys/vm/vfs_cache_pressure
The default will be 100, but 50 is generally a good number to start with. You can type sudo sysctl vm.vfs_cache_pressure=50 to set it for this boot.
To make the change permanent, add the vm.vfs_cache_pressure=50 to the bottom of your sysctl.conf with:
sudo nano /etc/sysctl.conf
Closing Words
Making these adjustments will almost always help your performance in Ubuntu 20.04 and prevent out of memory errors. Just make sure you aren’t too aggressive if you use an SSD or you could wear the hardware down slower.
However, it’s worth noting that even with these errors, with a low amount of RAM there’s only so much you can do. Tasks take far longer to complete on swap storage and you may still run into out of memory errors in some applications if you only have 1 GB. In these cases, it’s best to just upgrade your server. Jumping up a few gigabytes of RAM usually isn’t that expensive and can help a lot.
***Sign up to BitLaunch and grab a server with up to 32 GB of RAM for use with your Ubuntu swap space.
From the man mkswap it is recommended to use the dd command as demonstrated in @vanadium post.
If  you  don't  know  the  page  size  that  your  machine uses,
you may be able to look it up with
"cat /proc/cpuinfo"
(or you may not – the contents of this file depend on architecture and kernel version).

   To set up a swap file, it is necessary to create that file before
   initializing  it  with  mkswap,  e.g. using a command like

          # fallocate --length 8GiB swapfile

   Note  that  a  swap  file must not contain any holes.  Using cp(1) to
   create the file is not acceptable.
   Neither is use of fallocate(1) on file systems that support preallocated
   files, such as XFS or ext4,  or on  copy-on-write  filesystems like btrfs.

   It is recommended to use dd(1) and /dev/zero in these cases.
   Please read notes from swapon(8) before adding a swap file to copy-on-
   write filesystems.
And here the notes of man swapon
NOTES
       You should not use swapon on a file with holes.  This can be seen in
       the system log as

              swapon: swapfile has holes.

       The swap file implementation in the kernel expects to be able to write
       to the file directly, without the assistance  of the filesystem.  This
       is a problem on preallocated files (e.g.  fallocate(1)) on filesys‐
       tems like XFS or ext4, and on copy-on-write filesystems like btrfs.

       It is recommended to use dd(1) and /dev/zero to avoid holes on XFS
       and ext4.

       swapon may not work correctly when using a swap file with some
       versions of btrfs.  This is due to  btrfs being  a copy-on-write
       filesystem: the file location may not be static and corruption can
       result.
       Btrfs actively disallows the use of swap files on its filesystems
       by refusing to map the file.

       One possible workaround is to map the swap file to a loopback device.
       This will allow the filesystem to determine the mapping properly but
       may come with a performance impact.

       Swap over NFS may not work.
Как создать (удалить) файл подкачки (SWAP) в Linux (На примере Ubuntu 20.04 на бесплатном VPS — сервере от Oracle)
Ниже представлена моя «Шпаргалка» (CheatSheet) 
Как известно, уровень Oracle Always Free включает в себя всего 1 Гбайт оперативной памяти, чего зачастую вполне достаточно для одновременной работы нескольких сервисов. Но при запуске сборки контейнеров, или скриптов установки пакетов и их настройки, ваша виртуальная машина может просто зависнуть из-за нехватки оперативной памяти. Связано это с тем, что в установленной нами Ubuntu 20.04 отсутствует активный файл подкачки (swap).
Убедимся в этом, для чего ведём в терминале:
free -h

Проверяем, что у нас достаточно места для добавления раздела swap:
df -h
Мнений о необходимом объёме раздела swap множество ))) Мы будем придерживаться того, что этот объем должен быть равен или быть в два раза больше объема оперативной памяти вашей системы. Т.е. в нашем случае это будет объём 2 Гб. (Из практики известно, что иметь swap более 4 Гб зачастую бессмысленно).
Разместим файл нужного размера swapfile в директории root (/) с помощью программы fallocate:
sudo fallocate -l 2G /swapfile
Проверим, что сработало:
ls -lh /swapfile
Делаем файл подкачки доступным только для root:
sudo chmod 600 /swapfile
Проверим, что сработало:
ls -lh /swapfile
Говорим системе, что этот раздел у нас для файла подкачки:
sudo mkswap /swapfile
Включаем его:
sudo swapon /swapfile
Проверим, что всё ok:
sudo swapon --show
Следующие две команды позволят использовать файл подкачки не только для текущего сеанса, но и после перезагрузки системы.
Сделаем резервную копию конфигурационного файла fstab:
sudo cp /etc/fstab /etc/fstab.bak
Добавим в него информацию о файле подкачки:
echo '/swapfile none swap sw 0 0' | sudo tee -a /etc/fstab
Вот в принципе и В С Ё . . . )))
Ну можно ещё настроить swap, что бы ядро по возможности избегало использование файла подкачки.
Swappiness — это свойство ядра Linux, которое определяет, как часто система будет использовать пространство подкачки. Подкачка может иметь значение от 0 до 100.
Проверим текущее значение:
cat /proc/sys/vm/swappiness
60 — считается нормой для домашнего компьютера, но для сервера желательно это значение свести к минимуму, например — 10:
sudo sysctl vm.swappiness=10
Сохраним это значение и после перезапуска системы, для этого открываем файл /etc/sysctl.conf:
sudo nano /etc/sysctl.conf
Добавляем в конец эту строчку:
vm.swappiness = 10
Сохраняем и закрываем файл, нажав CTRL + X, Y, а затем ENTER.
Ну, а если по какой-то причине решите удалить файл подкачки, то нужно сделать следующее:
- Деактивируйте swap:
sudo swapoff -v /swapfile
- Удалите запись файла подкачки из /etc/fstab файла:
sudo nano /etc/fstab
Сохраняем и закрываем файл, нажав CTRL + X, Y, а затем ENTER.
- Удалите сам файл подкачки с помощью rmкоманды:
sudo rm /swapfile
На этом у меня В С Ё !!! )))