The website footer is an area that appears at the bottom of the page, below the website’s content. This section of the webpage typically contains the website logo, navigation menu, subscription form, map, links to social networks, and contact information for a company or organization. Footers can vary significantly in size, content, and style depending on their purpose and the type of website they are present on.
If you are using Elementor for designing your website, you can easily create your website footer in minutes with its handy widgets or premade footer blocks. Besides, you have many customization options to display useful information for your visitors.
In this blog, we’ll show you how to edit a footer in Elementor following two easy ways. Also, we are going to share a bonus part. Don’t miss it if you want to use free footer blocks for your website.
Let’s dive into the guide.
2 Different Methods to Edit Footer in Elementor
The header and the footer are common website elements that every website has. You can easily design and customize your website header using Elementor. But here we are focusing on how you can design a footer with Elementor.
If you want to design a custom header with Elementor, you can follow the below handy tutorials.
- How To Design A Custom Elementor Header In 2 Minutes
- How To Edit Your WordPress Header With Elementor
In this section, we are going to show you how to edit the footer in 2 possible ways using Elementor.
Method 1: Edit Footer Using Elementor Widgets
Method 2: Edit Footer Using Elementor Theme Builder
Choose a method that suits you.
Let’s get started:
Method 1: Edit Footer Using Elementor Widgets
Here, you’ll learn how to design and customize a footer from scratch using the Elementor widgets.
Step 1: Set Footer Structure
First, we need to add a structure to design our footer. You can do it by clicking the (+) icon. Follow the below image. here, we’ve added three columns.

After adding the footer structure, it’s time to change the section Layout and add a Background Color.

Step 2: Add Heading Widget
We are planning to add three different contents to the three different columns. Let’s add.
First, find the Heading widget from the Elementor widget gallery. Then drag & drop the widget into the left-side column.

In the Content area, you can manage the heading content. Here, you can manage the Title, Link, Size, HTML Tag, and Alignment of the heading.

You are able to customize the heading design by going to the Style section. You can change the Text Color, Typography, Text Stroke, Text Shadow, and Blend Mode of the heading.

We’ve also added another heading under the ‘Location‘ heading to write the company address following the above process. Similarly, you can manage and style the heading in your own way.

We’ve also added content to the other two columns. Here is the current look of the footer.

Step 3: Add Another Section
We want to add our social icons to the footer area. We’ve added another section and set its Layout & style. You can follow the below image to learn the process.

Step 4: Add Social Icons Widget
Find the Social Icons widget first. Then drag & drop the widget into the section.

In the Content area, you can manage your social icons content. Here, you can add or remove an Item, and set the Shape, Column, and Alignment of the social icon.
Go to the Style section to customize the icons in your own style.
Final Preview
We’ve added some content to the page. Let’s have a look at the current design of the footer.

Method 2: Edit Footer Using Elementor Theme Builder
At this moment, you’ve learned how to design and customize a footer using Elementor widgets. Now we are going to demonstrate how to use Elementor Theme Builder to create a footer. Make sure that you’ve installed and activated the Elementor pro version.
Let’s dive into it.
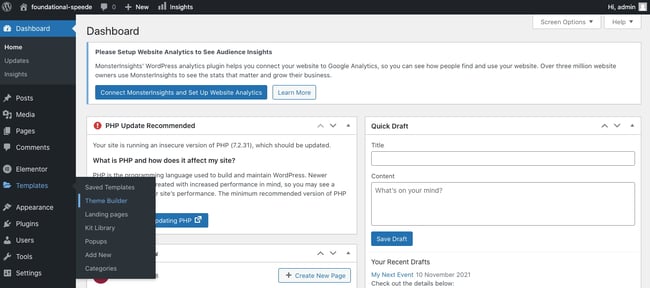
First, go to the Templates->Theme Builder area.

After that, you’ll get the option to add your footer. Here, you need to select the Site Parts->Footer from the left sidebar. Then click on the Add New button.

On the following popup, you’ll get all the Footer Blocks. Choose the suitable one and click on the Install button to install the block on your website.

That’s it.
Also, learn How To Design A Custom Elementor Header.
Bonus: Use Happy Addons Free Footer Blocks to Your Website
Happy Addons is one of the popular, fast-growing Elementor addons that come with pre-built templates and blocks for designing your website. With Happy Addons, you can easily add a footer to your website with its free blocks.

Read this handy article and learn how to use Happy Addons’ Template Library the right way.
FAQs on How to Edit Footer in Elementor
Still, you may have questions in your mind. In this section, we’ve answered some common questions regarding the Elementor footer.
1. How do I add a footer in an Elementor?
You can add a footer to your Elementor-powered website in two possible ways.
Method 1: Add Footer Using Elementor Widgets From Scratch
Method 1: Add Footer Using Elementor Theme Builder
2. How do I change the Elementor footer?
First, go to the Template->Theme Builder. Second, select the Footer label in the left sidebar to find your footer details. Finally, click on the Edit link to change or edit the specific footer.
3. Is Elementor offer free footer blocks?
No. You can get the ready-made footer blocks only in the Elementor Pro version.
Are You Ready to Design Your Website Footer
In this tutorial blog, we’ve shown how you can design and edit your website footer using Elementor. We’ve also introduced Happy Addons’ free footer blocks.
Apart from that, we’ve answered some common questions on the Elementor footer. If you are still stuck and need more help, you can ask your query in the comment box below.
If you like this blog share it on your social channels. Don’t forget to subscribe to our newsletter. It’s free.
Subscribe to our newsletter
Get latest news & updates on Elementor
9 февраля, 2021 12:02 пп
10 326 views
| Комментариев нет
Development
Эта серия мануалов покажет вам, как создать и настроить веб-сайт с помощью CSS, языка таблиц стилей, используемого для управления внешним видом сайтов. Вы можете выполнить все инструкции по порядку, чтобы создать тестовый веб-сайт и познакомиться с CSS, или вразброс использовать описанные здесь методы для оптимизации других проектов CSS.
Примечание: Найти все мануалы этой серии можно по тегу CSS-practice
Для работы с CSS вам нужно иметь базовые знания по HTML, стандартному языку разметки, который используется для отображения документов в браузере. Если ранее вы не работали с HTML, рекомендуем предварительно изучить первые десять руководств серии Создание веб-сайта с помощью HTML.
В последнем мануале этой серии по CSS мы поговорим о том, как создать статический футер и зафиксировать его (он будет оставаться в нижней части области просмотра, когда посетитель прокручивает страницу вниз).
Методы, которые использованы здесь, можно применить к любым другим проектам, разработанным на CSS и HTML.
Требования
Чтобы выполнить эти инструкции, вам следует подготовит среду согласно мануалу Подготовка проекта CSS и HTML с помощью Visual Studio Code.
В качестве контента для футера мы используем несколько значков социальных сетей. Если вы тоже хотите использовать эти значки, загрузите их и сохраните в папке images как:
- twitter.jpeg
- github.jpeg
- email.jpeg
Примечание: Чтобы загрузить изображение, перейдите по нужной вам ссылке, нажмите Ctrl и кликните левой кнопкой (на Mac) или правой кнопкой мыши (в Windows) по изображению, выберите «Сохранить изображение как» и сохраните его в своей папке images. Сохраните изображения с указанными именами.
После этого вы можете приступать к работе.
Создание класса для оформления футера
Сначала мы определим класс footer, добавив следующий фрагмент кода в конец файла styles.css:
. . .
/* Footer */
.footer {
position:fixed;
bottom:0;
left:0;
width:100%;
height: 90px;
background-color: #D0DAEE;
}
Сохраните файл styles.css. Как всегда, новый раздел кода начинается с комментария (/* Footer */). Затем мы определяем класс footer и объявляем несколько правил стиля. Первое правило объявляет параметр position со значением fixed, что означает, что элемент не будет перемещаться из указанного вами расположения, когда пользователь будет прокручивать страницу вниз. Это расположение задается следующими двумя объявлениями: bottom:0 и left:0 – 0 пикселей слева и 0 пикселей снизу области просмотра браузера.
Откорректировав эти значения, вы можете изменить расположение элемента на странице. Однако помните: любое значение, кроме нуля, должно включать суффикс px после числа. В наборе правил также указаны ширина, высота и цвет фона класса footer.
Добавление футера на страницу
Чтобы добавить контент для футера, мы создадим новый контейнер <div> и присвоим ему только что созданный класс footer. Вернитесь в файл index.html и вставьте следующий фрагмент кода после последнего закрывающего тега </div>:
. . .
<!--Section 7: Footer-->
<div class="footer">
</div>
Сохраните файл index.html и загрузите его в браузере.
Если вы не знаете, как открыть оффлайн-файл, обратитесь к нашему руководству Основы работы с html-элементами (раздел Просмотр оффлайн HTML-файла в браузере).
На экране будет пустой контейнер для футера, который остается на месте при прокрутке страницы вверх и вниз.
Теперь можно добавить контент – сделаем это в следующем разделе руководства.
Добавление и оформление контента футера
Следующим шагом будет добавление и стилизация элементов меню в левой части футера. Эти пункты меню можно использовать для ссылки на другие страницы вашего сайта. В настоящее время на нашем сайте есть только одна страница, поэтому вы можете использовать условные ссылки. Если позже вы создадите новые страницы для вашего сайта, вы сможете добавить в футер новые пункты меню и прикрепить правильные ссылки.
Читайте также: Добавление страниц сайта и ссылка на них с помощью HTML
Вернитесь к styles.css и добавьте следующий фрагмент кода в конец файла:
. . .
.footer-text-left {
font-size:25px;
padding-left:40px;
float:left;
word-spacing:20px;
}
a.menu:hover {
background-color:yellow;
font-size:20px;
}
Давайте подробно рассмотрим каждый из созданных нами наборов правил:
- Первый набор определяет класс footer-text-left, который будет использоваться для стилизации текста меню. Обратите внимание, свойство float имеет значение left – следовательно, текст, оформленный по этому классу, будет размещен в левой части страницы. Свойство word-spacing предоставляет дополнительное пространство между элементами меню. Однако если какой-либо из пунктов вашего меню состоит из более чем одного слова, вам нужно создать класс для стилизации пунктов меню (недостаточно просто изменить значение интервала между словами).
- Второй набор правил использует псевдокласс hover, чтобы сделать желтым цвет фона того текста, на который пользователь наводит курсор.
Теперь давайте пропишем в файле index.html пункты меню. Вставьте следующий выделенный фрагмент кода в контейнер footer, который вы создали ранее:
. . .
<div class="footer">
<p class="footer-text-left">
<a href="index.html" class="menu">home</a>
<a href="https://css.sammy-codes.com/about.html" class="menu">about</a>
<a href="https://css.sammy-codes.com/credits.html" class="menu">credits</a>
</p>
</div>
Этот фрагмент кода добавляет два элемента меню (about и credits), связывает эти элементы и стилизует текст с помощью только что созданных классов footer-text-left и a.menu.
Сохраните оба файла и перезагрузите веб-страницу в браузере. В левой части закрепленного футера появится три пункта меню: home, about и credits. При наведении на них фон будет менять свой цвет на желтый.
Добавление значков социальных сетей
Давайте добавим в наш футер значки социальных сетей, которые можно использовать для ссылки на свои учетные записи. Если вы хотите использовать значки для других соцсетей, вы можете найти их бесплатные логотипы в Интернете и загрузить их в папку images, а затем добавить на свою страницу. Откройте styles.css и вставьте следующие три набора правил в конец файла:
. . .
.footer-content-right {
padding-right:40px;
margin-top:20px;
float:right;
}
.icon-style {
height:40px;
margin-left:20px;
margin-top:5px;
}
.icon-style:hover {
background-color:yellow;
padding:5px;
}
Остановимся на этих правилах подробнее:
- Первый набор правил определяет класс footer-content-right и присваивает определенные значения его внутренним полям, внешним отступам и выравниванию (padding, margin и float соответственно). Этот набор правил нужен для стилизации элемента <div>, который будет содержать значки социальных сетей.
- Второй набор создает класс icon-style, который задает высоту и внешние поля для значков социальных сетей, учитывая их размер и расположение.
- Третий набор правил использует псевдокласс hover, что изменит цвет фона значка на желтый при наведении курсора.
Сохраните файл styles.css. Теперь давайте добавим значки в футер. Вернитесь в свой файл index.html и добавьте следующий фрагмент кода после последнего закрывающего тега </a>:
...
<div class="footer-content-right">
<a href="https://www.8host.com/blog/"><img src="images/github.jpeg" class="icon-style" alt="Github icon"></a>
<a href="https://www.8host.com/blog/"><img src="images/twitter.jpeg" class="icon-style" alt="Twitter icon"></a>
<a href="https://www.8host.com/blog/"><img src="images/email.jpeg" class="icon-style" alt="Emailicon"></a>
</div>
Примечание: Не забудьте заменить нашу ссылку в коде ссылками на свои соцсети. При необходимости откорректируйте пути к файлам.
Этот фрагмент кода создает контейнер <div>, которому присваивается класс footer-content-right. Внутри этого контейнера div находятся три значка социальных сетей, вставленные с помощью HTML-тега <img>; с помощью тега HTML <a> каждое изображение поддерживает ссылку на соответствующую соцсеть.
Также мы добавили атрибут alt – это альтернативный текст, описывающий каждый значок. При создании веб-сайтов альтернативный текст следует добавлять ко всем изображениям, чтобы обеспечить доступность сайта для людей, использующих скринридеры. Чтобы узнать больше об использовании альтернативного текста с HTML, читайте мануал Добавление изображения на веб-страницу с помощью HTML.
Сохраните файл index.html и перезагрузите его в браузере. Теперь на вашей странице должен быть зафиксированный футер, содержащий в правой части ссылки на ваши социальные сети. Ссылки должны менять цвет фона при наведении на них курсора.
Заключение
Мы добавили статический футер, который всегда отображается в нижней части области просмотра, когда посетитель прокручивает страницу вниз. Вы можете продолжить изучение возможностей CSS, изменив значения в созданных нами классах или добавив в файл index.html новый контент.
Поздравляем, работа над тестовым сайтом завершена! Теперь вы знаете, как стилизовать HTML-элементы с помощью определения классов и псевдоклассов CSS. Вы также ознакомились с несколькими вариантами верстки сайта, которые можно реализовать через различные HTML-элементы и CSSстили.
CSS можно изучать бесконечно, но описанные в этой серии методы обеспечат вам прочную основу для развития ваших навыков работы с CSS и подготовят вас к изучению других инструментов (таких как JavaScript) и фреймворков (как, к примеру, Tailwind). Также у вас теперь есть все файлы и папки, необходимые для развертывания готового веб-сайта в облаке.
Для практики попробуйте изменить что-нибудь на веб-сайте, который у вас получился. Вот пара идей, которые могут вас заинтересовать:
- Персонализируйте текстовый и графический контент на вашем сайте. Если вам нужно освежить в памяти, как работать с изображениями, читайте туториалы Добавление изображения на веб-страницу с помощью HTML или Стилизация изображений CSS.
- Создайте новые веб-страницы и ссылки. Сделать это вам поможет наше руководство Добавление страниц сайта с помощью HTML
- Добавьте фавикон с помощью этого мануала.
- Изучите блоковую модель CSS и научитесь работать с ее компонентами по статьям Блоковая модель CSS: настройка контента, внутренних полей, рамок и внешних отступов HTML-элементов и Создание плиточного макета с помощью CSS.
- Измените порядок разделов вашего тестового веб-сайта, отредактируйте классы для оформления этих разделов.
- Измените фоновое изображение <body>.
- Измените цвет фона, используемый в различных элементах <div>, поработайте над цветовой палитрой сайта.
Tags: CSS, CSS-practice, HTML
Responsive Footer Design makes any website much more perfect and beautiful. The footer section plays a big role in user satisfaction and the structure of the website.
In this article, I am going to show you how to create a Responsive Footer Design using only HTML and CSS.
In the meantime, I have shared with you one more type of footer design tutorial using Bootstrap. However, in this case, I did not use any bootstrap, only CSS and HTML are used here. If you are looking for good GRAPHIC DESIGN COMPANY then aplusdesign.com.my will be best for you.
A website html footer is an essential component of any website design. It serves as the bottom section of a webpage and usually contains information such as copyright information, links to important pages, and contact information. In this article, we will discuss how to create a website footer using HTML and CSS.
HTML is used to structure the content of a website, while CSS is used to style the content. The combination of these two technologies allows us to create beautiful and functional website footers.
If you want responsive footer design collection then you can see the below part of the article. There you will find some best and advanced designs. If you want a tutorial then follow the step by step tutorial below.
Simple Footer HTML CSS
There are many types of simple footer html css, some just basic information, and some social icons. In some cases, there are links, posts, images, and information. If you want to make footers for news, magazines, or other types of sites, then you can see another design made by me.
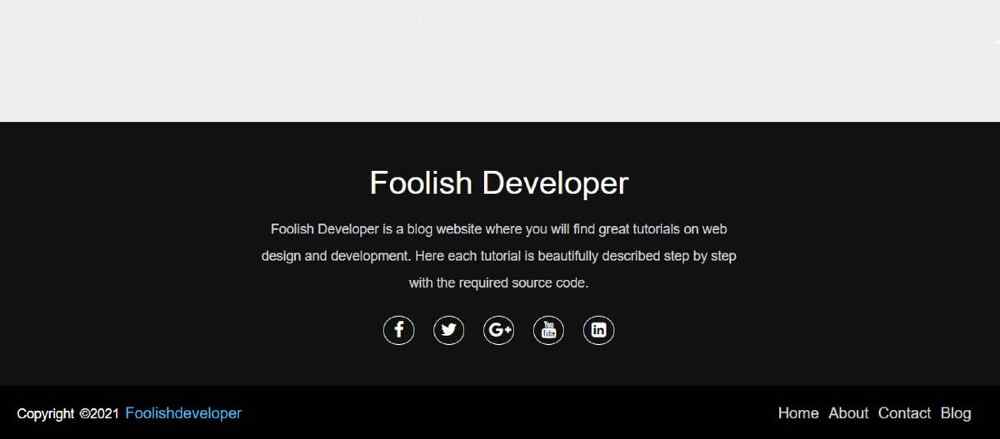
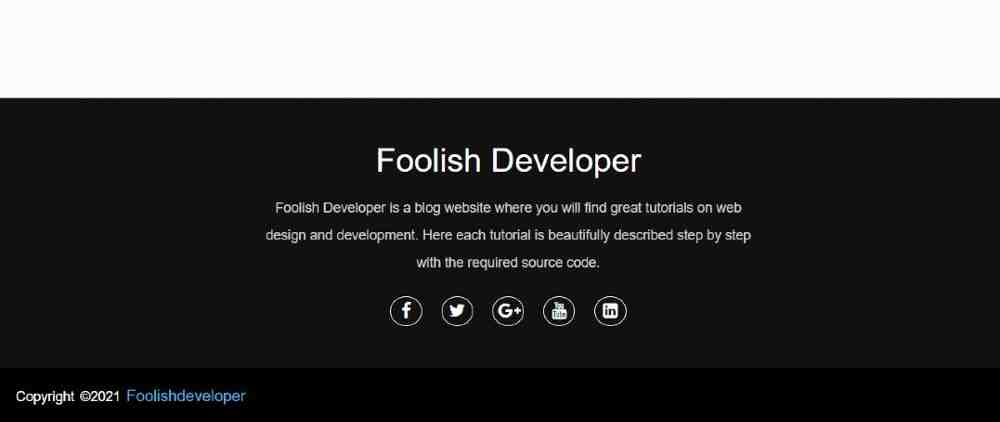
The design that I have shown in this tutorial is very simple and easy. Will be very suitable for different types of personal websites or business websites. It is a very simple and simple design with a heading, some basic description, social media icons, and a footer credit option.
To get started, we will create an HTML file and a CSS file. In the HTML file, we will define the structure of the responsive footer html css and its content. In the CSS file, we will style the footer to match the design of the rest of the website.
Responsive Footer Design with HTML CSS
To create a CSS Responsive Footer Design you need to have a basic idea about HTML and CSS. I have explained each step in full detail. Before sharing this Simple Responsive Footer Design tutorial, let me say something about this design (footer HTML CSS).
First I created a section at the bottom of the webpage whose background color I used black. First of all, I have used a heading or title in the section. Then I gave some basic descriptions. Below the description, I have added five social icons.
At the end of it all, I created a footer menu bar that has some menu items and a copyright section. The copyright section helps to give credit to the website and the menu items help to add links to some important pages.
Step 1: Design the web page to create a footer section
To create this Simple Responsive Footer Design I first designed the webpage using CSS code. background helped to add a background color to the web page. I have used font family here which has helped to determine the front of the text used here.
					*{
    margin: 0;
    padding: 0;
    box-sizing: border-box;
}
body{
    background: #fcfcfc;
    font-family: sans-serif;
}
Step 2: Basic structure of Responsive Footer Design
I have taken the help of HTML and CSS below to create the basic structure of this Simple Responsive Footer Design. I have created an area using HTML footer tags. Then I designed it with the help of CSS code. Here background color I used black and gave height auto.
The height will help to depend on the amount of content in the height of this photo design. You may be wondering how I put this section at the bottom of the webpage. To put it at the bottom of the web page, I used the value of bottom, top, right, zero, and position: absolute.
					footer{
    position: absolute;
    bottom: 0;
    left: 0;
    right: 0;
    background: #111;
    height: auto;
    width: 100vw;
    padding-top: 40px;
    color: #fff;
}

Step 3: Add all the information in HTML Footer Design
In this div below, I have added buttons for complete information of Simple Responsive Footer Design such as headings, descriptions, and social media.
					.footer-content{
    display: flex;
    align-items: center;
    justify-content: center;
    flex-direction: column;
    text-align: center;
}
1. Created a heading
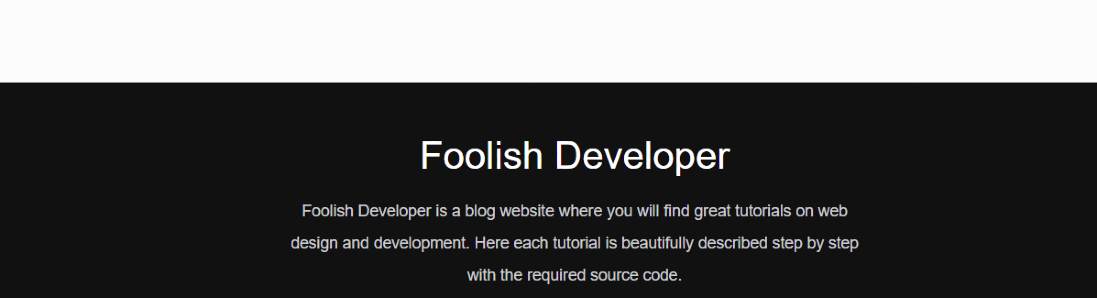
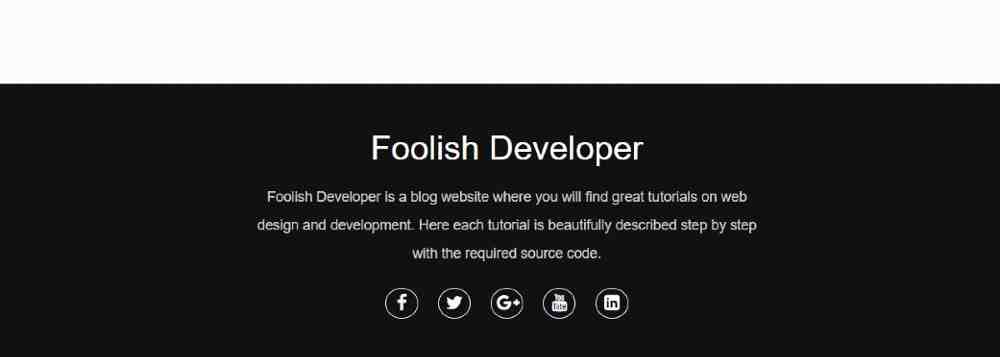
Using this HTML and CSS below I have created a heading in the HTML footer design. Font-size: 2.1rem has been used to increase the text size of this heading.
Foolish Developer
					.footer-content h3{
    font-size: 2.1rem;
    font-weight: 500;
    text-transform: capitalize;
    line-height: 3rem;
}

2. Added a description of Footer Design
Now I have added a description in the footer design using the following codes. Text font-size: 14px and color white used.
Foolish Developer — source code.
					.footer-content p{
    max-width: 500px;
    margin: 10px auto;
    line-height: 28px;
    font-size: 14px;
    color: #cacdd2;
}
3. create some social icons in HTML Footer Design
In this footer section HTML CSS I have added five social media icons. The following HTML and CSS codes have been used to create these social icons.
					.socials{
    list-style: none;
    display: flex;
    align-items: center;
    justify-content: center;
    margin: 1rem 0 3rem 0;
}
.socials li{
    margin: 0 10px;
}
.socials a{
    text-decoration: none;
    color: #fff;
    border: 1.1px solid white;
    padding: 5px;
    border-radius: 50%;
}
.socials a i{
    font-size: 1.1rem;
    width: 20px;
    transition: color .4s ease;
}
.socials a:hover i{
    color: aqua;
}
Step 4: Create a copyright section in Responsive Footer Design
The following codes have been used to create a copyright section within this Responsive Footer Design. If you look at the demo above, you will understand that there is a copyright section where there is a copyright link and some basic menu items.
					.footer-bottom{
    background: #000;
    width: 100vw;
    padding: 20px;
    padding-bottom: 40px;
    text-align: center;
}
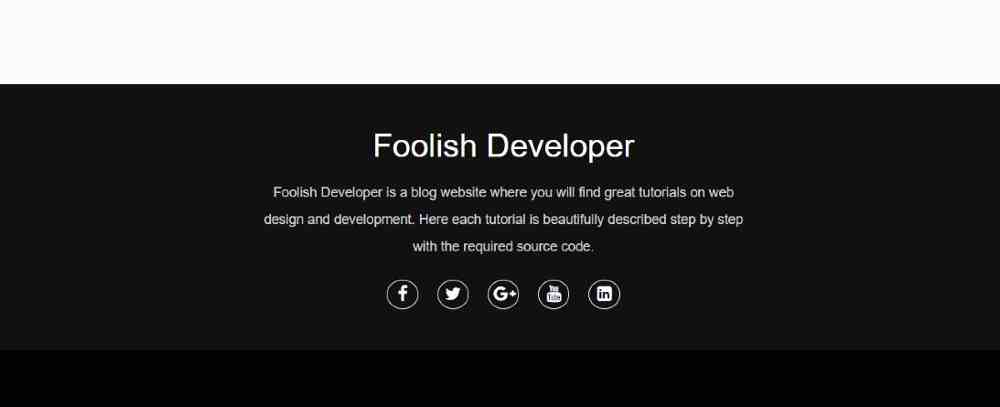
copyright ©2021 foolishdeveloper
					.footer-bottom p{
   float: left;
   font-size: 14px;
   word-spacing: 2px;
   text-transform: capitalize;
}
.footer-bottom p a{
  color:#44bae8;
  font-size: 16px;
  text-decoration: none;
}
.footer-bottom span{
    text-transform: uppercase;
    opacity: .4;
    font-weight: 200;
}
Step 5: Create a footer menu bar
Now I have created a menu bar in this Responsive Footer section. I took the help of basic HTML and CSS to create it. First I added the menu items with the help of HTML. Then with the help of CSS, I have designed the items in a beautiful way.
- Home
- About
- Contact
- Blog
					.footer-menu{
  float: right;
}

.footer-menu ul{
  display: flex;
}

.footer-menu ul li{
padding-right: 10px;
display: block;
}

.footer-menu ul li a{
  color: #cfd2d6;
  text-decoration: none;
}

.footer-menu ul li a:hover{
  color: #27bcda;
}
Step 6: Make the footer design responsive using CSS
Now is the time to make this CSS footer design fully responsive. Here I have used @media to make it responsive.
We just need to change some basics to make Footer Design responsive. First I gave a maximum width using @media which means the following codes will work for any display size.
					@media (max-width:500px) {
.footer-menu ul{
  display: flex;
  margin-top: 10px;
  margin-bottom: 20px;
}
}

Hope you learned from this tutorial how I designed this responsive footer using HTML and CSS. If you want to know better then you can see my already made bootstrap footer design. If there is any problem, you can definitely let me know by commenting.
Do you need to edit the footer area of your WordPress website? The footer area appears at the bottom of each page on your WordPress site.
There are several different ways website owners can use this space and make it more useful for their website visitors.
In this article, we will show you how to edit the footer in WordPress, step by step.
")
What is the Footer in WordPress?
The footer in WordPress is the bottom part of your website that appears after the main content area. It’s generally on every page of your WordPress website.
Many beginners overlook this area, but there are several ways you can make it more helpful for your visitors. You can even use your footer to boost your WordPress SEO and your business.
Here’s an example of our footer on WPBeginner that millions of readers see every month.

All top WordPress themes come with a footer widget area that’s easy to edit. You can improve this area by adding widgets, removing links, adding code, and even creating fully custom footers for different pages.
That being said, let’s take a look at how to easily edit the footer in WordPress. You can use the following links to jump to the section you want to read.
- Adding widgets in your footer
- Removing the ‘Powered by WordPress’ footer text
- Creating a custom footer for different WordPress pages
- Adding code to WordPress footer
Many of the best WordPress themes have widget areas in the footer.
You can use these widget areas to add text, images, or links to your privacy policy, legal disclaimers, and other important pages.
Adding text and images is quite simple. To do this, navigate to Appearance » Widgets and then click the ‘Plus’ add block icon in your ‘Footer Sidebar’ section.

To add a widget, simply click the block and it will automatically display. If you need more help, then see our guide on how to add and use widgets in WordPress.
Note that many themes will have multiple footer widget areas, and they may use them differently. After adding widgets, you can preview your website to make sure they appear where you want them to be.
Adding Links in WordPress Footer Widget Area
You may also want to add links to different pages, posts, and categories in your website footer area.
WordPress comes with an easy way to manage those links using navigation menus. Simply head over to the Appearance » Menus page and click on the ‘Create new menu’ link.

WordPress will ask you to provide a name for your new menu.
Enter a name that helps you easily identify this menu, then select the relevant footer location, and click on the ‘Create Menu’ button.

Your menu is now ready, and you can start adding links to it.
Simply select the pages, posts, or categories from the left-hand column to add them to your menu.

Once you are finished customizing your menu, click on the ‘Save Menu’ button to store your changes. For more details, see our guide on how to add a navigation menu in WordPress.
Your menu is now ready to be added to the WordPress footer widget area. Simply visit the Appearance » Widgets page in your WordPress admin panel.
Next, click the ‘Plus’ icon, search for ‘Menu’, then click the ‘Navigation Menu’ block.

After that, select your footer navigation menu from the ‘Select Menu’ drop-down, and give your widget a title if you like. The title will appear above the menu in your footer.
Then, click the ‘Update’ button to save your changes.

You can now visit your website to see your footer links in action. If you need another set of links, then simply repeat the same steps again.
2. Removing ‘Powered by WordPress’ Text from Your Footer
When you first install WordPress, your site may have a ‘Powered by WordPress’ link in a footer bar at the bottom of your site. This isn’t a widget, so it’s often not clear how to change it.

Some themes will alter this to their own text and links. If so, then you can normally change this text using the WordPress theme customizer. Simply go to Appearance » Customize in your WordPress admin panel.
Then, look for a heading called ‘Footer’, or something similar.

We’re using the Astra theme for this example. With Astra, you need to click on ‘Footer Builder’ in the theme customizer.
This brings you to a screen with customization options to change the footer text, add social media links, and more.
Simply click the ‘Copyright’ button to replace the footer text.

Then, you can delete the existing text and add your own message.
Once you’ve finished editing the footer, don’t forget to click the ‘Update’ or ‘Publish’ button at the top of the screen to make your changes live.

For more details, take a look at our in-depth guide on how to use the WordPress theme customizer.
Editing the Footer Text Manually
What if your theme doesn’t have the option to edit the footer text using the customizer?
In this case, you need to edit the footer.php file directly. It’s a template file in your WordPress theme folder and is responsible for displaying the footer area for that particular theme.
Editing the footer manually is an advanced option, and you’ll need to know PHP code in order to make changes to the file.
The easiest way to edit this file is by using an FTP client to connect with your WordPress hosting account. For more details, see our guide on how to use FTP to upload files to WordPress.
First, download yourfooter.phpfile, which can be found in your theme folder.

Then, you need to find the line of code in the file with the ‘Powered by WordPress’ text.
Next, simply delete or change that text, and upload your newfooter.phpfile.
It’s a good idea to make a copy of the file before making changes. That way, if you accidentally break anything, then you can easily upload the original file.
For more details, see our guide on how to remove the ‘Powered by WordPress’ footer links.
Many small business websites use landing pages to drive leads, make sales, and grow their email list.
Landing pages are slightly different than regular web pages since they have a single goal. See our guide on the difference between websites and landing pages to find out more.
You can create different WordPress footers to suit these individual pages, like your checkout page, thank you page, 404 page, home page, and more.
The best way to do this is with the SeedProd plugin. It’s the best drag and drop WordPress page builder used by over 1 million websites. It makes it easy to create high-converting pages without having to write any code.
The first thing you need to do is install and activate the plugin. For more details, see our guide on how to install a WordPress plugin.
Note: There is a free version of SeedProd available that you can use, but for this tutorial, we’ll show the Pro version since it can be used to create a variety of WordPress pages.
Upon activation, you need to go to SeedProd » Settings and enter your license key.

You can find this information under your account on the SeedProd website.
Next, you need to visit SeedProd » Pages and then click on ‘Add New Landing Page’ to build your first page.

On the next screen, you need to choose a template. SeedProd has dozens of professionally designed templates to choose from.
To select a template, simply over it and click the ‘Checkmark’ icon.

After that, you’ll be asked to give your page a name and URL.
Then, click the ‘Save and Start Editing the Page’ button.

This launches the drag and drop builder interface. You’ll see a live preview of the template you selected.
To change different elements, you can point and click to select any item on the page. Then, use the left-hand column to add new blocks, sections, and make changes.

Next, click on the ‘Sections’ tab in the left hand panel.
This brings up a menu of premade sections you can use to build your page.

Then, click the ‘Footer’ option.
This takes you to a section of different premade footer layouts. You can preview the footer section by clicking on the magnifying glass icon.
To add it to your page, click the ‘Plus’ icon.

After that, you can fully customize your footer with the drag and drop editor. For example, you can change the background color, add images, links, and more.

Once you’re done customizing your page, make sure to click the ‘Save’ drop-down arrow, and then the ‘Publish’ button to make your page live.
For more details on page customization, see our guide on how to create a custom page in WordPress.
Update: SeedProd is now a complete theme builder, which means you can easily design a custom WordPress theme without editing any code.
This also gives you the ability to redesign your WordPress footer across your entire website.
First, install and activate the SeedProd Pro plugin on your WordPress site. Then, go to SeedProd » Theme Builder from your WordPress dashboard. On this page, click the ‘Themes’ button.

This will open a window where you can select one of SeedProd’s 28+ pre-built themes that you can customize.
To select a theme, simply hover over it and click the checkmark button.

Once you choose a theme, SeedProd will automatically create all of the parts that make up your theme including the header, footer, homepage, sidebar, and more.
To edit the footer, click on the ‘Edit Design’ link.

Now you’ll be taken to SeedProd’s drag and drop theme builder where you can customize your footer.
You can delete any of the existing footer design by hovering over a block and clicking the trash icon. We’ll delete all of the existing blocks for this tutorial.

After deleting all of the blocks, you can pick a layout for your footer. We’ll choose the 3 columns.

Now you can start adding content to your footer by dragging blocks from the left side and dropping them into your footer.

In this example, we’ve added headings, text, social profiles, a navigation menu, and a newsletter optin form.
Once you’re happy with the footer design, click the ‘Save’ button and then click the drop-down arrow and hit the ‘Publish’ button.

You can then exit the visual editor and return to the theme builder dashboard.
After that, you can finish customizing the rest of your custom WordPress theme with SeedProd. For step-by-step instructions, you can follow our tutorial on how to easily create a custom WordPress theme.
Sometimes, you may need to add code snippets to your WordPress footer. This is often done to connect your site with external apps or plugins.
For example, you’ll need to add a script to your WordPress header or footer to add analytics tracking to your website. For more details, see our beginner’s guide on how to install Google Analytics in WordPress.
If you need to add additional code to your WordPress footer, then the easiest way to do this is using the WPCode plugin.
The first thing you need to do is activate and install the plugin. For more details, see our step by step guide on how to install a WordPress plugin.
Upon activation, go to Code Snippets » Header & Footer in your WordPress admin panel. Then, you can add your code into the ‘Footer’ box.

After that, click the ‘Save Changes’ button in the top-right corner of the screen before moving on.

For more help, take a look at our guide on how to add header and footer code in WordPress.
We hope this article helped you learn how to edit the footer in WordPress. You may also want to see our guide on how to get a free email domain and our picks on the best virtual business phone number apps.
If you liked this article, then please subscribe to our YouTube Channel for WordPress video tutorials. You can also find us on Twitter and Facebook.
Disclosure: Our content is reader-supported. This means if you click on some of our links, then we may earn a commission. See how WPBeginner is funded, why it matters, and how you can support us.
Editorial Staff at WPBeginner is a team of WordPress experts led by Syed Balkhi. We have been creating WordPress tutorials since 2009, and WPBeginner has become the largest free WordPress resource site in the industry.
The footer is the part of a document found at the bottom margin of each page. It usually contains information like the page number that appears throughout your document. Footers can also help keep documents organized and look more professional.
Corporate and academic standards typically call for more than just one footer in a document.
The cover page, the appendices, and other pages in different orientations can all have different footers.
MS Word offers more than one way to add different footers on each page.

- Using preset footer options
- By inserting section breaks
Method 1: Using the Preset Footer Options
Step 1: Open up a Word file.

Step 2: Access the footer section.
Once our document is opened, go to the Insert tab and click the footer drop-down menu. Then, select the Edit footer option found at the bottom of the menu.

Alternatively, you can double-click the bottom margin of your document to access the footer section.

Step 3: Access the footer design tools.
Now that the footer section is enabled, you’ll be directed to the Header & Footer Design tab. You’ll see two unticked checkboxes from the Options group: Different First Page and Odd & Even Pages checkboxes.

If you want the first page to have a different footer from the rest of your document, tick the Different First Page checkbox.

On the other hand, tick the checkbox next to Odd & Even Pages if you want the odd-numbered pages to have a different footer from the even-numbered pages.

Step 4: Add your content into your footer.
You can now start adding your text or object in the footer section. Once finished, simply double-click outside the footer section to go back to the main text.
You can also press the Close Header and Footer button.
Method 2: By Inserting Section Breaks
Section breaks mark the point at which a part of your document ends and another one starts. They help organize the different parts of your document to easily configure different footers for each page.
Here’s how you can create section breaks in your document.
Step 1: Open up an MS Word file.

Step 2: Create section breaks.
Once our document is ready, click at the start of the page that you want in a different footer. Then, move your cursor to the upper left part of your window and click the Layout tab. After that, click the Breaks drop-down menu. Finally, select the Next Page option in the selection.
For this example, we want the second paragraph with a different footer. So, we’ll insert section breaks before and after this paragraph. We’ll place our cursor right at the start of the second paragraph and insert the section break.

Now, place your cursor at the end of the section and repeat the process. You’ll notice that MS Word moved the section to a separate page.
Step 3: Access the footer section.
Now that our section is set up, go to the Insert tab and click the Footer drop-down menu. Then, select Edit Footer from the list of options.

Alternatively, you can simply double-click the bottom margin of the page to access the footer section.

Step 4: Unlink the section footer.
To make this successfully work, we’ll need to break the connection between the footer in the current section and the previous one. So, with your cursor still inside the footer section, click on the Link to Previous button found on the Header & Footer Design tab.

You can now insert your content in the footer section. Take note that you’ll have to repeat the same process for each page that you want to have a different footer.
To go back to the main text, simply double-click outside the footer or click on the Close Header and Footer button.
There you have it! You’ve just inserted section breaks to have a different footer on each page in MS Word.
Conclusion
We hope you’ve found this article helpful!
After installing WordPress, you’ll notice some WordPress branded copy at the bottom of your webpages that reads «Proudly powered by WordPress.» This is the default text that appears on all new WordPress websites in the footer.
What is a WordPress footer?
A WordPress footer is the section of your WordPress website that typically appears at the bottom of every web page after the main content. By default, it contains copyright that reads ‘Proudly powered by WordPress.’ The WordPress footer is usually designated in the footer.php template file.
To your visitors, the default text can seem unprofessional and even out of place. So, it makes sense not to display a default footer on your WordPress website. You’ll be relieved to know that you can remove it or edit it to your specifications should you choose to display more pertinent branded information like the logo, copyright notice, or a link to your privacy policy.
To learn what to put in a website footer, check out Website Footers: Best Design Practices & Examples.
A customized footer will help visitors identify with your brand. Read on to learn how to remove and/or edit the footer on your site.
Is It Legal to Remove “Proudly Powered By WordPress”?
In short: Yes. WordPress is open-source software. It’s designed to allow anyone to change the source code.
You have the ability to modify your default WordPress templates. You won’t be breaking any laws if you change your footer to fit your company’s brand.
But before you make any changes, you’ll want to backup your WordPress website. This proactive step ensures that you can quickly restore your site if you make a mistake. Whether you’re editing your footer or doing a full redesign, it’s a good habit to backup your site.
There are a few common methods to edit WordPress footers: removing the footer completely, changing the copyright area using the built-in Customizer, using a footer widget, revising the footer.php code, or using a theme builder. The method you choose will depend on the specific theme you’re using and what will work best for your goals.
Method 1: How to Remove WordPress Footer
If you simply want to remove the footer altogether, the easiest solution is using a plugin.
WordPress plugins extend the functionality of your site. It’s an easy solution when you want to make minor tweaks or major changes to your site. Plus, it requires no coding experience. Follow the steps below to edit your footer with a plugin.
1. Install and activate the Remove Footer Credit plugin.

Image Source
2. Go to Tools > Remove Footer Credit.
3. Enter the text or HTML you would like to remove in the first text field. Then, add your own footer text to the second text field.
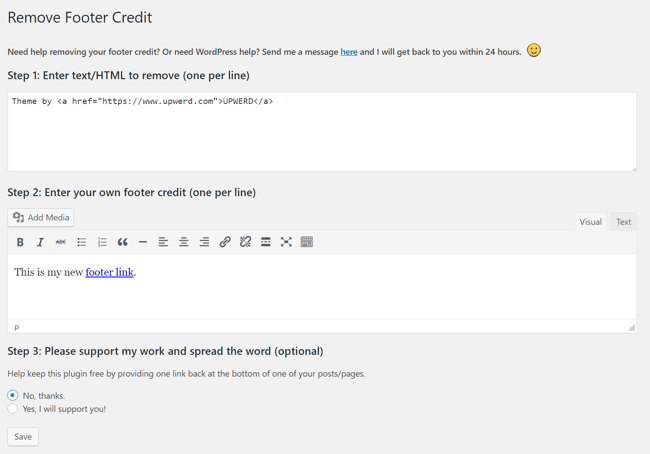
4. Click Save.
If the above option doesn’t work for you or you want to do some more advanced edits, read on for additional ways to make changes to the default branded footer.
Method 2: How to Change the Copyright Footer in WordPress
Most theme developers know that you’ll want to edit their default footers. So, they usually offer a built-in option in the theme to make changes.
Every WordPress theme is different. So, this setting may be available in different sections within the theme.
1. Log in to the WordPress dashboard.
2. Go to Appearance > Customise.
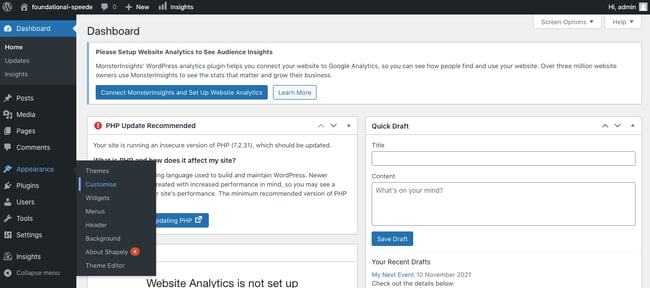
3. Look to see if you have a Footer option.
4. If you do, select Footer > Bottom Bar. From there, you’ll be able to disable the footer or put in your own text.
5. If you have the Copyright Area option. If you do, you can make changes to this footer as well.
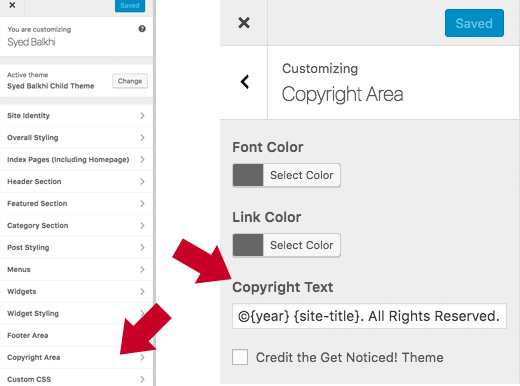
Image Source
If your theme does not have these presets built in, you’ll have to remove the default WordPress footer using another method. We’ve included other options below.
Method 3: How to Edit WordPress Footer Widgets
Some WordPress themes use widgets to add specific features, like footers.
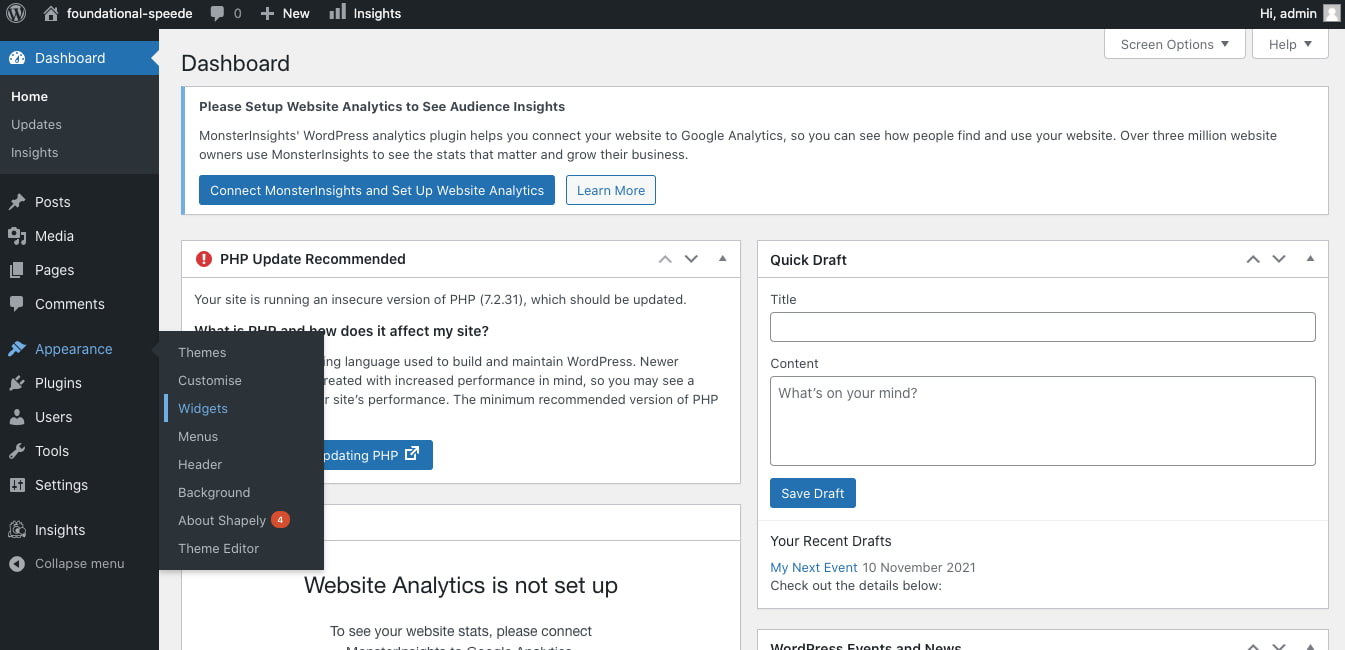
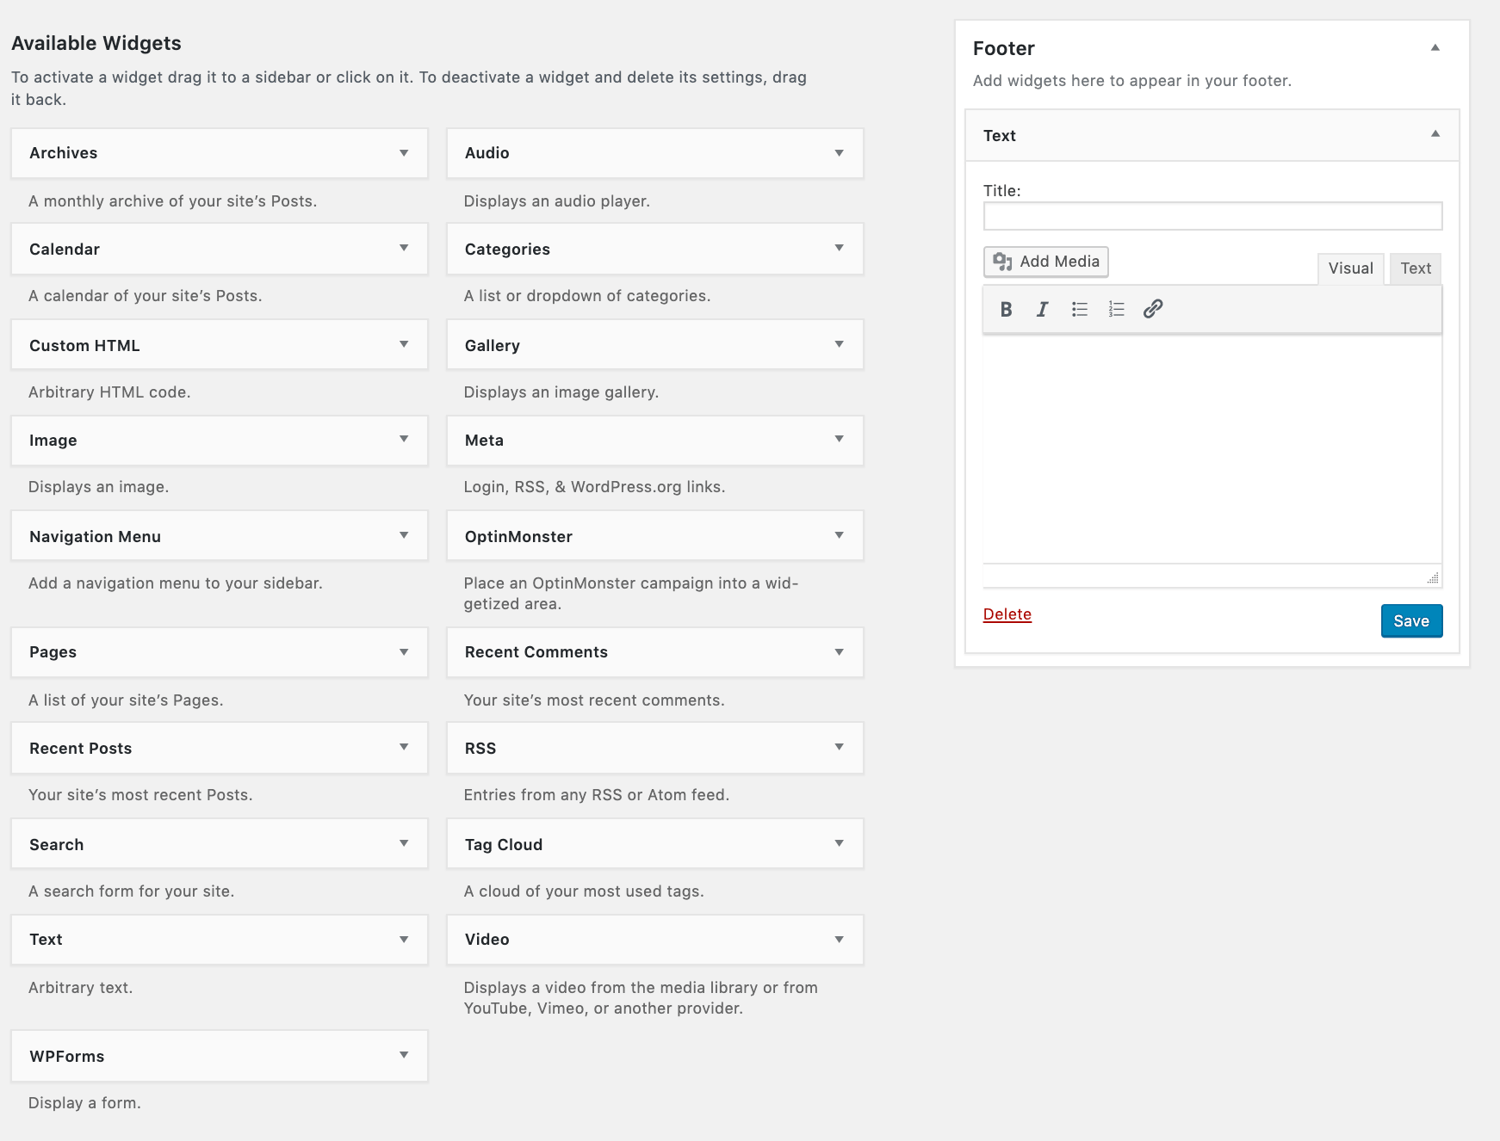
1. You can find your footer widget by going to Appearance > Widgets.
2. On the right, you’ll find the footer widget section, Footer.
3. From the list on the left, drag and drop the Text widget underneath the Footer.
4. Click the down arrow and then add your content in the text field.
Method 4: How to Edit WordPress Footer PHP File
The footer is defined in a WordPress template file as footer.php. You can edit the file by going to Appearance > Theme Editor. Then, follow the steps below.
1. Select the specific theme in the right-hand corner.
2. Locate the theme footer (footer.php) under Theme Files on the righthand side. You can use Crtl+F to find it if you’re having trouble.
3. Find this PHP code:
get_template_part( 'template-parts/footer/site', 'info' );
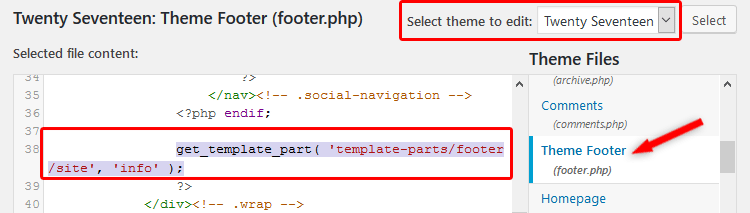 Image Source
4. Replace the PHP code with the code below and change “add text here” with your specific content.
//get_template_part( 'template-parts/footer/site', 'info' );
echo “add text here”;
?>
5. Press the Update File button.
The final result will look like this:

Method 5: How to Edit the WordPress Footer through Your Theme
Theme builders make it easy for you to tweak your website to match the look and feel of your brand. Most theme builders come with a built-in footer plugin.
For example, Jupiter X lets you customize your footer with the help of a drag-and-drop visual editor. You can add, modify, and remove the widgets in real time. There are also dozens of ready-made footer templates available if you’re in a hurry.
The Themify Builder is another intuitive page designer. You can remove the default copyright information and create custom footers with a few simple clicks.
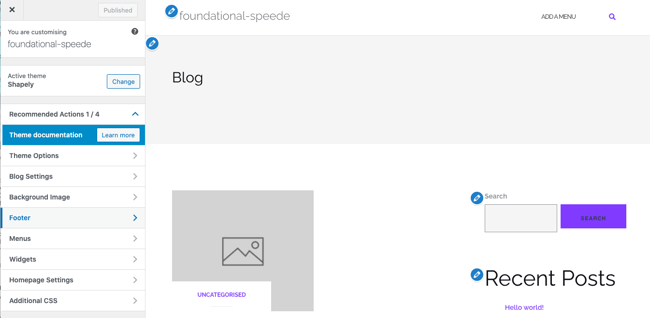
Elementor also offers dynamic templates to build beautiful pages with no coding skills. Let’s walk through the process of editing the WordPress footer with Elementor below.
1. Log in to your WordPress dashboard.
2. Click Templates > ThemeBuilder.
3. Click the plus icon next to Footer in the left panel.
4. You can either choose a premade footer block from the library, or exit out and create one from scratch. Here’s an example of a premade footer block:
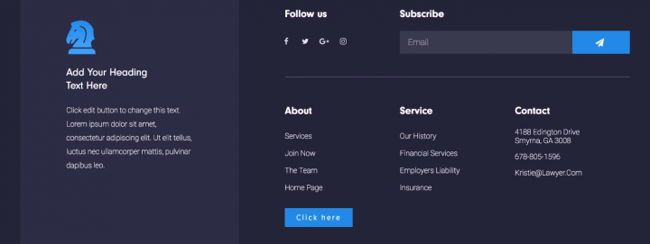
Image Source
5. When you’re ready, click Publish.
6. You can click Add Condition to choose where to publish the footer or stick with the default option (ie. the entire site).
Mistakes When Editing a Footer in WordPress
Editing any part of your website is a big deal. A harmless error can temporarily shut down your entire website. Here are a few common mistakes to avoid when editing your footer.
1. Using CSS to hide the links.
One method of removing the footer involves adding the following code snippet to the CSS editor.
.site-info{display: none;}
This method works simply by hiding the links in your footer. However, hiding links was a common trick used in black hat SEO (search engine optimization) to boost website rankings in search engines. Google sees this action as a violation of its website guidelines and may penalize your site as a result. So, we recommend avoiding this method altogether.
2. Not reading the license documentation.
Third-party themes may have stipulations in their license agreements that could restrict you from removing copyright notices. You’ll want your legal team to contact the theme developer with any questions or concerns.
Removing WordPress Branding from Your Footer
Editing your site footer removes unwanted copy and helps you create a customized look that your visitors will come to recognize each time they come in contact with your brand.
Editor’s note: This post was originally published in January 2020 and has been updated for comprehensiveness.


Hey friends, today in this blog, you’ll learn how to create a Fully Responsive Footer Section using only HTML & CSS. In the earlier blog, I have shared how to create a Responsive Dropdown Menu Bar using HTML & CSS and now it’s time to create a Responsive Footer.
You may have seen a footer on every website that you’ve visited because the footer on any website is now compulsory. Footer is always set on the bottom of the main page or last of the page. The latest version of HTML5 has introduced a separate tag for the footer and that is <footer>.
A few years ago, the footer is only used to giving copyright information but nowadays the footer is in trend and all websites have a big footer section with more information and social media accounts or icons.
In our footer, as you can see in the preview image, there are some categories of footer with some social media icons, short description, location info, and a contact form. This footer is fully responsive for all devices including mobile phones. On the pc, these footer categories are aligned horizontally but when you open it on small devices like mobile phones, each category of footer aligned vertically and it’ll automatically adjust its height and width according to the device height and width.
Video Tutorial of Responsive Footer Section
In the video, you’ve seen the responsive footer section and how it shows on mobile devices. I hope your all doubts and problems are solved after watching this video tutorial on the footer design. I think you’ve understood the basic codes of this footer design. To create this footer I used only HTML & CSS so if you’re a beginner then you can also easily understand the codes and can create this type of footer design.
You can use this responsive footer section code on your website or project after a few changes according to your requirements and you can also redesign this footer and take this to the next level. If you like this footer and want to get source codes then you can easily copy the codes from the given copy boxes or you can also download source files of this footer design. I believe this responsive footer code can help beginners to know CSS in depth.
You might like this:
- Sidebar Menu in HTML & CSS
- Responsive Navigation Menu Bar
- Responsive Drop-down Menu Bar
- Responsive Navbar with Search Box
Responsive Footer Section HTML & CSS [Source Codes]
To create this program [Responsive Footer Section]. First, you need to create two Files one HTML File and another one is CSS File. After creating these files just paste the following codes into your file. You can also download the source code files of this responsive footer design from the below download button.
First, create an HTML file with the name of index.html and paste the given codes in your HTML file. Remember, you’ve to create a file with .html extension.
<!DOCTYPE html>
<!-- Created By CodingNepal - www.codingnepalweb.com -->
<html lang="en" dir="ltr">
  <head>
    <meta charset="utf-8">
    <title>Responsive Footer Section | CodingNepal</title>
    <link rel="stylesheet" href="style.css">
    <link rel="stylesheet" href="https://cdnjs.cloudflare.com/ajax/libs/font-awesome/5.15.3/css/all.min.css"/>
    <meta name="viewport" content="width=device-width, initial-scale=1.0">
  </head>
  <body>
    <div class="content1">
      <div class="text">Fully Responsive Footer Section</div>
      <div class="p">HTML and CSS (Flexbox)</div>
    </div>
    <footer>
      <div class="main-content">
        <div class="left box">
          <h2>About us</h2>
          <div class="content">
            <p>CodinNepal is a YouTube channel where you can learn web designing, web development, ui/ux designing, html css tutorial, hover animation and effects, javascript and jquery tutorial and related so on.</p>
            <div class="social">
              <a href="https://facebook.com/coding.np"><span class="fab fa-facebook-f"></span></a>
              <a href="#"><span class="fab fa-twitter"></span></a>
              <a href="https://instagram.com/coding.np"><span class="fab fa-instagram"></span></a>
              <a href="https://youtube.com/c/codingnepal"><span class="fab fa-youtube"></span></a>
            </div>
          </div>
        </div>

        <div class="center box">
          <h2>Address</h2>
          <div class="content">
            <div class="place">
              <span class="fas fa-map-marker-alt"></span>
              <span class="text">Birendranagar, Surkhet</span>
            </div>
            <div class="phone">
              <span class="fas fa-phone-alt"></span>
              <span class="text">+089-765432100</span>
            </div>
            <div class="email">
              <span class="fas fa-envelope"></span>
              <span class="text">[email protected]</span>
            </div>
          </div>
        </div>

        <div class="right box">
          <h2>Contact us</h2>
          <div class="content">
            <form action="#">
              <div class="email">
                <div class="text">Email *</div>
                <input type="email" required>
              </div>
              <div class="msg">
                <div class="text">Message *</div>
                <textarea rows="2" cols="25" required></textarea>
              </div>
              <div class="btn">
                <button type="submit">Send</button>
              </div>
            </form>
          </div>
        </div>
      </div>
      <div class="bottom">
        <center>
          <span class="credit">Created By <a href="https://www.codingnepalweb.com">CodingNepal</a> | </span>
          <span class="far fa-copyright"></span><span> 2020 All rights reserved.</span>
        </center>
      </div>
    </footer>
  </body>
</html>
Second, create a CSS file with the name of style.css and paste the given codes in your CSS file. Remember, you’ve to create a file with .css extension.
@import url('https://fonts.googleapis.com/css?family=Poppins:400,500,600,700&display=swap');
*{
  margin: 0;
  padding: 0;
  color: #d9d9d9;
  box-sizing: border-box;
  font-family: 'Poppins', sans-serif;
}
.content1{
  position: relative;
  margin: 130px auto;
  text-align: center;
  padding: 0 20px;
}
.content1 .text{
  font-size: 2.5rem;
  font-weight: 600;
  color: #202020;
}
.content1 .p{
  font-size: 2.1875rem;
  font-weight: 600;
  color: #202020;
}
footer{
  position: fixed;
  bottom: 0px;
  width: 100%;
  background: #111;
}
.main-content{
  display: flex;
}
.main-content .box{
  flex-basis: 50%;
  padding: 10px 20px;
}
.box h2{
  font-size: 1.125rem;
  font-weight: 600;
  text-transform: uppercase;
}
.box .content{
  margin: 20px 0 0 0;
  position: relative;
}
.box .content:before{
  position: absolute;
  content: '';
  top: -10px;
  height: 2px;
  width: 100%;
  background: #1a1a1a;
}
.box .content:after{
  position: absolute;
  content: '';
  height: 2px;
  width: 15%;
  background: #f12020;
  top: -10px;
}
.left .content p{
  text-align: justify;
}
.left .content .social{
  margin: 20px 0 0 0;
}
.left .content .social a{
  padding: 0 2px;
}
.left .content .social a span{
  height: 40px;
  width: 40px;
  background: #1a1a1a;
  line-height: 40px;
  text-align: center;
  font-size: 18px;
  border-radius: 5px;
  transition: 0.3s;
}
.left .content .social a span:hover{
  background: #f12020;
}
.center .content .fas{
  font-size: 1.4375rem;
  background: #1a1a1a;
  height: 45px;
  width: 45px;
  line-height: 45px;
  text-align: center;
  border-radius: 50%;
  transition: 0.3s;
  cursor: pointer;
}
.center .content .fas:hover{
  background: #f12020;
}
.center .content .text{
  font-size: 1.0625rem;
  font-weight: 500;
  padding-left: 10px;
}
.center .content .phone{
  margin: 15px 0;
}
.right form .text{
  font-size: 1.0625rem;
  margin-bottom: 2px;
  color: #656565;
}
.right form .msg{
  margin-top: 10px;
}
.right form input, .right form textarea{
  width: 100%;
  font-size: 1.0625rem;
  background: #151515;
  padding-left: 10px;
  border: 1px solid #222222;
}
.right form input:focus,
.right form textarea:focus{
  outline-color: #3498db;
}
.right form input{
  height: 35px;
}
.right form .btn{
  margin-top: 10px;
}
.right form .btn button{
  height: 40px;
  width: 100%;
  border: none;
  outline: none;
  background: #f12020;
  font-size: 1.0625rem;
  font-weight: 500;
  cursor: pointer;
  transition: .3s;
}
.right form .btn button:hover{
  background: #000;
}
.bottom center{
  padding: 5px;
  font-size: 0.9375rem;
  background: #151515;
}
.bottom center span{
  color: #656565;
}
.bottom center a{
  color: #f12020;
  text-decoration: none;
}
.bottom center a:hover{
  text-decoration: underline;
}
@media screen and (max-width: 900px) {
  footer{
    position: relative;
    bottom: 0px;
  }
  .main-content{
    flex-wrap: wrap;
    flex-direction: column;
  }
  .main-content .box{
    margin: 5px 0;
  }
}
That’s all, now you’ve successfully created a Responsive Footer Section Design with HTML & CSS. If your code does not work or you’ve faced any error/problem then please download the source code files from the given download button. It’s free and a .zip file will be downloaded then you’ve to extract it.