Посмотрите мой видеоурок про то, как реализовать комментарии при создании темы WordPress с нуля.
Функция выводит полноценную форму для комментирования, которую можно использовать в теме сайта.
HTML полей и лейблы можно задать при помощи параметра $args функции, если же вам понадобится удалить одно из стандартных полей или добавить новое, воспользуйтесь фильтром comment_form_default_fields. Кроме того, каждое из полей проходит отдельно через фильтр comment_form_field_$name, где $name — это ID поля, задающийся в параметрах в массиве fields.
comment_form( $args = array(), $post_id = null )
Параметры
- $args
- (массив) Массив с параметрами полей.
- fields
- (массив) Содержит HTML стандартных полей формы (кроме поля комментария), можно передать свой произвольный HTML для каждого (какого-либо) поля, удалить одно из стандартных полей или добавить новое. Кроме того, если у вас нет возможности передать этот параметр в функцию, то можете отфильтровать его через comment_form_default_fields.
- author
- (строка) HTML поля автора комментария.
- (строка) HTML поля электронной почты.
- url
- (строка) HTML поля «Сайт».
- cookies
- (строка) HTML чекбокса согласия с принятием куков автора комментария (включается в Настройки > Обсуждение)
Чуть ниже вы найдёте примеры, как изменить лейбл любого из полей, как удалить поле с сайтом например и как добавить произвольное поле в форму комментирования.
- comment_field
- (строка) HTML поля комментирования.
- must_log_in
- (строка) HTML, который будет использоваться в качестве сообщения пользователю, если он не залогинен, а оставлять комментарии могут только залогиненные пользователи (настройка устанавливается в админке в Настройки > Обсуждение).
- logged_in_as
- (строка) HTML, отображающися для зарегистрированных пользователей «Вы вошли, как…».
- comment_notes_before
- (строка) Текст или HTML-код, который будет добавляться перед полями ввода для неавторизованных пользователей.
- comment_notes_after
- (строка) Текст или HTML-код, который будет добавляться после всех полей ввода (в том числе после поля комментария) и перед кнопкой отправки. По умолчанию это список тегов, разрешенных к использованию в тексте комментария.
- action
- (строка) Атрибут
actionформы, по умолчаниюsite_url( '/wp-comments-post.php' ). - id_form
- (строка) Атрибут id тега
<form>. По умолчаниюcommentform. - class_form
- (строка) CSS-класс формы. По умолчанию
comment-form. - class_container
- (строка) CSS-класс контейнера с id=»respond». По умолчанию
comment-respond - title_reply
- (строка) Заголовок формы.
- title_reply_to
- (строка) Заголовок формы при ответе на другой комментарий.
- title_reply_before
- (строка) Открывающий тег заголовка формы при ответе на другой коммент, по умолчанию
<h3 id="reply-title" class="comment-reply-title">. - title_reply_after
- (строка) Закрывающий тег заголовка формы при ответе на другой коммент, по умолчанию
</h3>. - cancel_reply_link
- (строка) Текст ссылки отмены ответа.
- cancel_reply_before
- (строка) Открывающий тег ссылки отмены ответа, по умолчанию
<small> - cancel_reply_after
- (строка) Закрывающий тег ссылки отмены ответа, по умолчанию
</small> - label_submit
- (строка) Текст кнопки отправки комментария.
- id_submit
- (строка) Атрибут id кнопки отправки формы. По умолчанию
submit. - name_submit
- (строка) Атрибут name кнопки отправки формы. По умолчанию
submit. - class_submit
- (строка) CSS-класс(ы) кнопки отправки формы. По умолчанию
submit. - submit_button
- (строка) HTML-шаблон кнопки отправки комментария, по умолчанию
<input name="%1$s" type="submit" id="%2$s" class="%3$s" value="%4$s" />. - submit_field
- (строка) HTML-шаблон тега-контейнера для кнопки отправки комментария, по умолчанию
<p class="form-submit">%1$s %2$s</p>. - type
- (строка) Установив значение данного параметра
html5, мы разрешим использовать разметку HTML5 в форме комментирования.
- $post_id
- (целое число) ID поста, для которого будем выводить форму комментирования, по умолчанию — текущий пост.
Несмотря на то, что функция имеет довольно большое количество параметров, её можно использовать и без них, например достаточно написать comment_form(), чтобы у вас вывелась рабочая форма комментариев на сайте. Однако, иногда бывает, что при помощи этой функции невозможно сделать форму комментов 1 в 1, как на заданном дизайне или вёрстке, тогда приходится использовать альтернативное решение.
А теперь попробуем изменить форму комментариев при помощи хуков.
Изменяем подписи полей формы
Данный фильтр позволяет нам изменить HTML любого из полей формы (кроме поля комментария), для изменения полей формы мы либо можем полностью передать новый HTML полей, либо воспользоваться функцией str_replace(). Давайте попробуем оба способа!
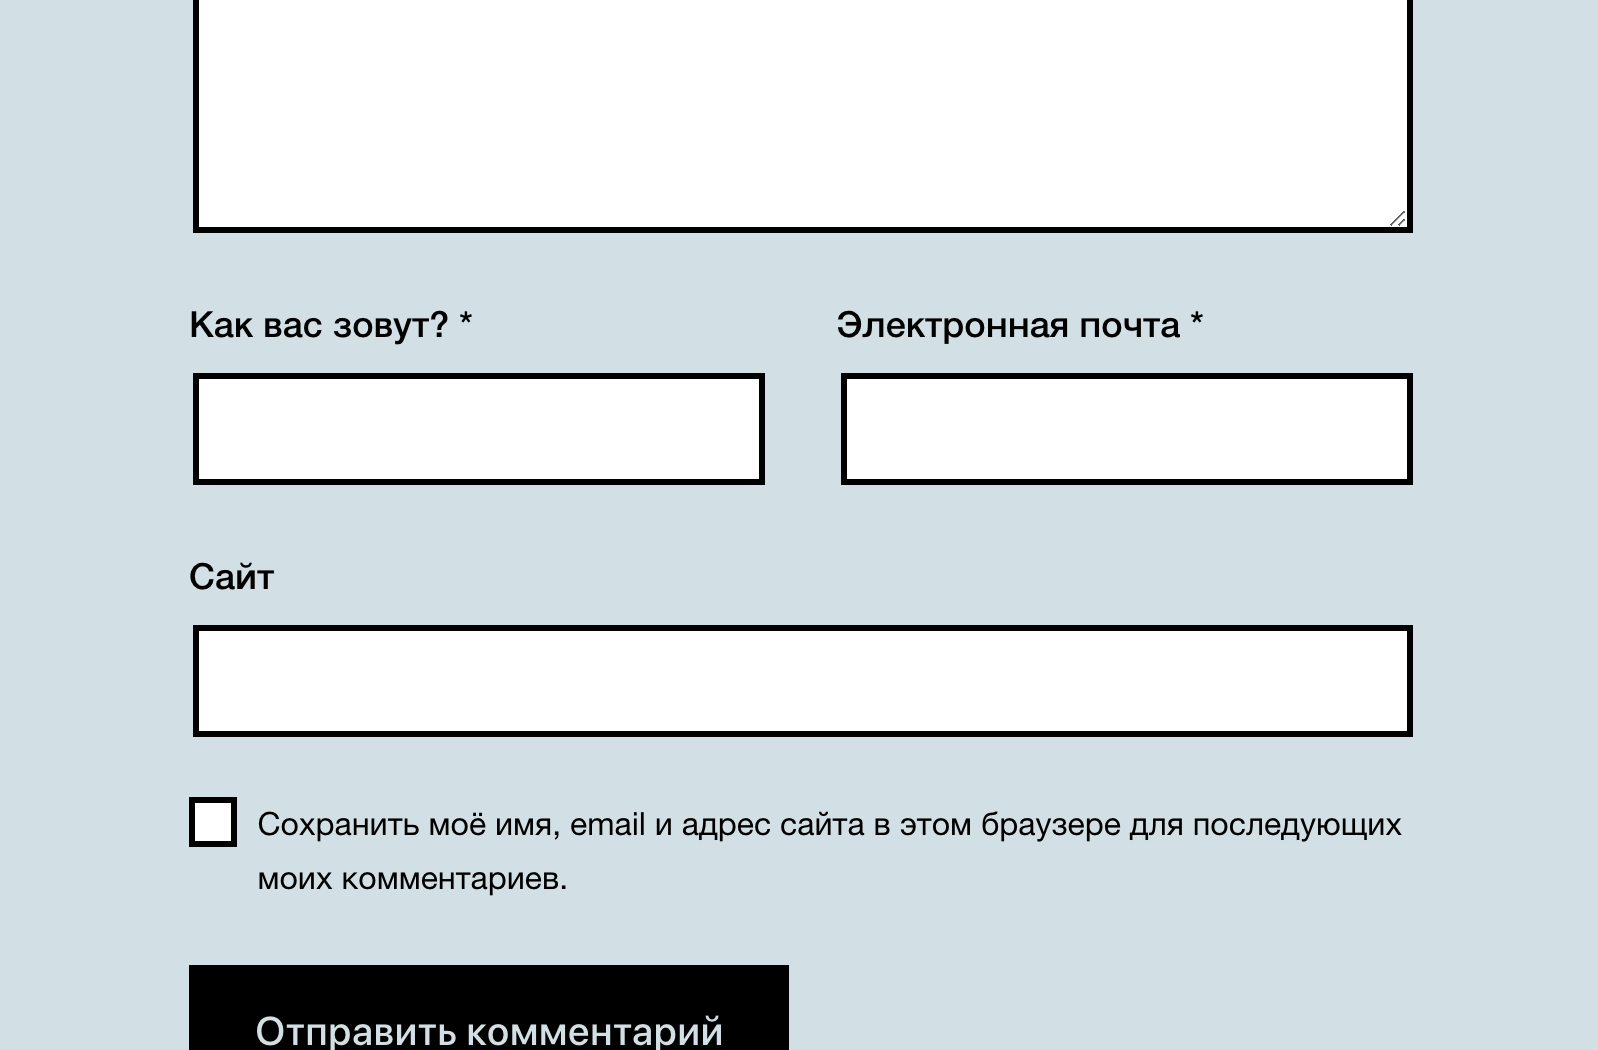
add_filter( 'comment_form_default_fields', 'truemisha_change_labels', 25 );

function truemisha_change_labels( $fields ){

	// можно подсмотреть исходный HTML через:
	//print_r( $fields );

	// 1. полностью перезадаём HTML поля
	$fields[ 'email'] = '<p class="comment-form-email"><label for="email">Электронная почта <span class="required">*</span></label> <input id="email" name="email" type="email" value="" size="30" maxlength="100" aria-describedby="email-notes" required="required"></p>';

	// 2. воспользуемся функция str_replace()
	$fields[ 'author' ] = str_replace( 'Имя', 'Как вас зовут?', $fields[ 'author' ] );

	// не забываем возвратить отфильтрованный (изменённый) результат
	return $fields;

}
Не знаете, куда вставлять код?
Результат на стандартной теме Twenty Twenty One:
Удаляем поле «Сайт»
Тут всё очень легко:
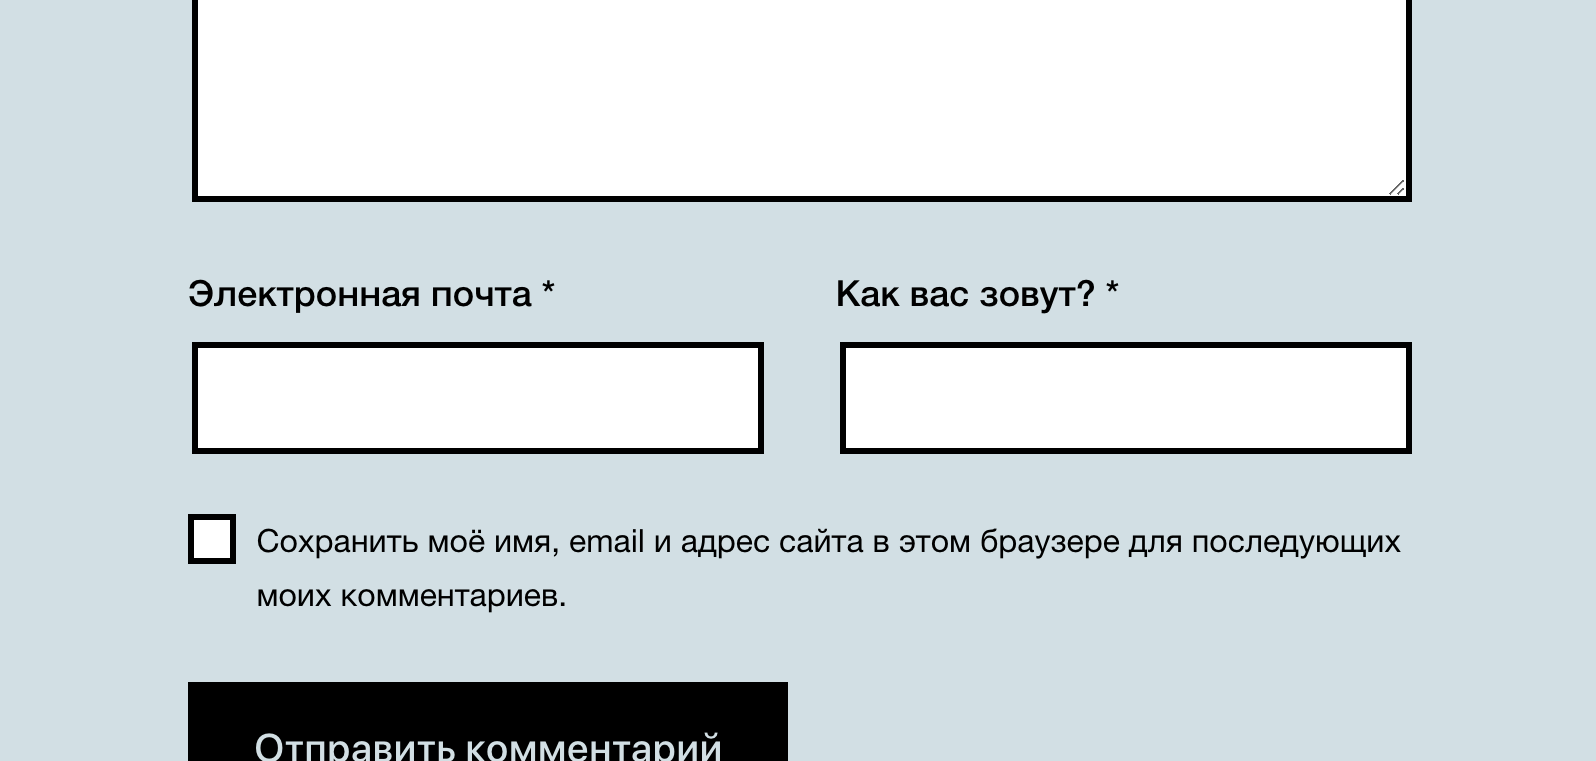
add_filter( 'comment_form_default_fields', 'truemisha_remove_url_field', 25 );

function truemisha_remove_url_field( $fields ) {
	unset( $fields[ 'url' ] );
	return $fields;
}
Не знаете, куда вставлять код?
Меняем поля местами
При помощи этого же хука comment_form_default_fields мы можем также и переставить поля местами, единственный большой минус в том, что мы не можем при помоши этого хука изменить положение поля ввода комментария, но можем например поменять местами поля «Имя» и «Email». Чтобы поменять положения поля ввода комментария вам понадобится воспользоваться этим примером.
Как нетрудно догадаться, тут всё сводится к сортировке массивов в PHP.
Но я вам вообще покажу, как это сделать через foreach().
add_action( 'comment_form_default_fields', 'truemisha_change_fields_order', 25 );

function truemisha_change_fields_order( $fields ) {

	// правила сортировки
	$order = array( 'email', 'author', 'url', 'cookies' ); // меняем Имя и Email

	// новый массив с изменённым порядком
	$new_fields = array();

	foreach( $order as $index ) {
		$new_fields[ $index ] = $fields[ $index ];
	}

	return $new_fields;

}
Не знаете, куда вставлять код?
Как добавить произвольное поле в форму комментирования WordPress?
Код ниже состоит из трёх этапов:
- Сначала мы добавляем поле при помощи уже знакомого хука
comment_form_defaults. - Можем провалидировать значение нашего нового поля любым способом, т.е. можем просто проверить, что поле не пустое, можем проверить, чтобы оно было определённой длины или через регулярные выражения. А можем вообще скипнуть второй шаг.
- Сохраняем значение поля в метаданные комментария при помощи add_comment_meta().
- Не забываем про очистку пользовательского ввода.
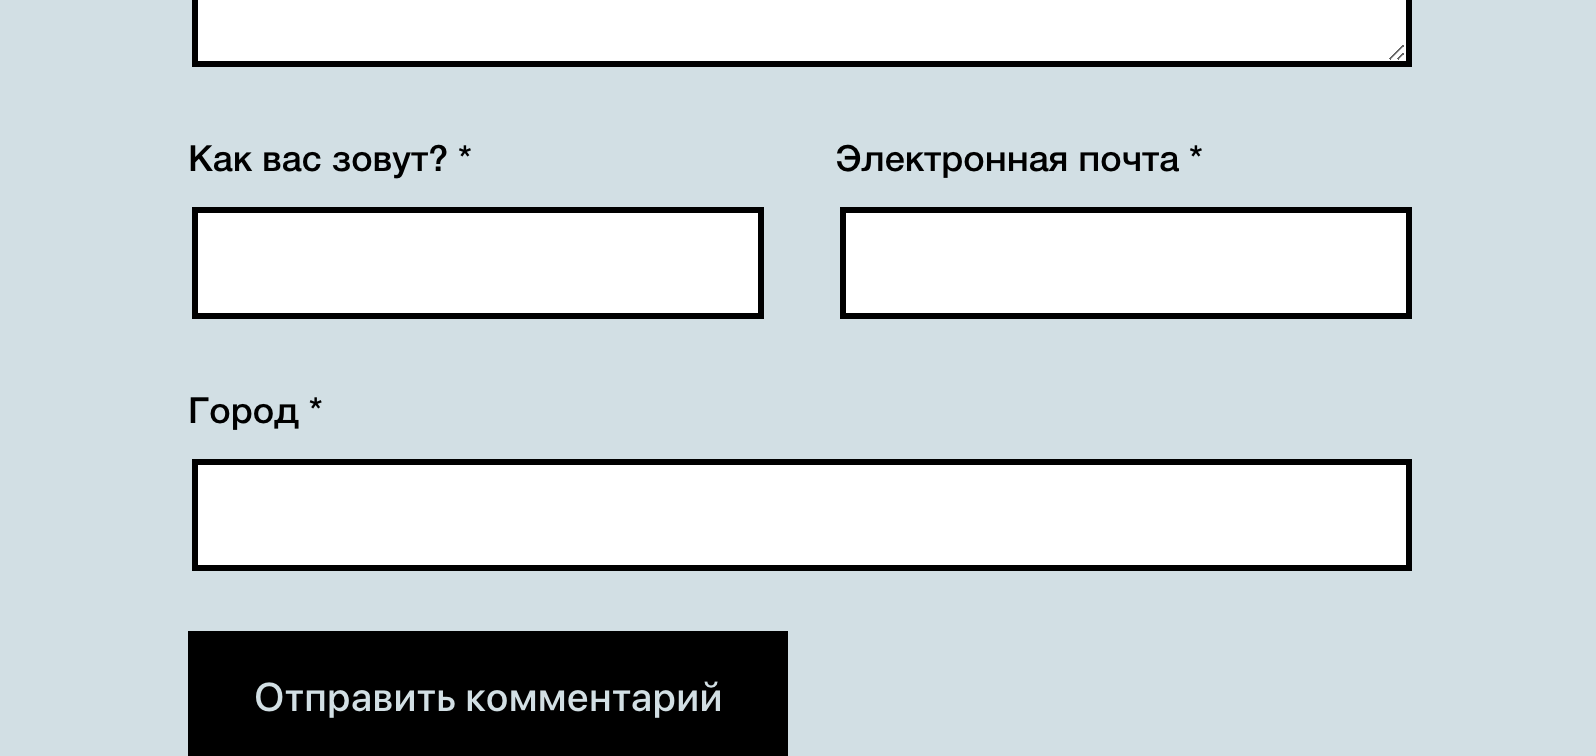
// 1. добавляем поле
add_filter( 'comment_form_defaults', 'truemisha_add_comment_field');
function truemisha_add_comment_field( $default ) {

	$default[ 'fields' ][ 'city' ] = '<p class="comment-form-city"><label for="city">Город <span class="required">*</span></label><input id="city" name="city" size="30" type="text" /></p>';
	return $default;

}

// 2. валидация поля (если нужно)
add_filter( 'pre_comment_on_post', 'truemisha_verify_comment' );
function truemisha_verify_comment( $commentdata ) {

	if ( empty( $_POST[ 'city' ] ) ) {
		wp_die( 'Укажите свой город!' );
	}
	return $commentdata;

}

// 3. сохраняем значение поля город в метаданные комментария
add_action( 'comment_post', 'truemisha_save_comment_field_data' );
function truemisha_save_comment_field_data( $comment_id ) {

	add_comment_meta( $comment_id, 'city', sanitize_text_field( $_POST[ 'city' ] ) );

}
Не знаете, куда вставлять код?
Фильтр, который применяется к каждому полю ввода уже после задействования фильтра comment_form_default_fields.
Используя этот фильтр мы можем так же изменить HTML любого из полей формы, и даже поля формы комментирования фильтром comment_form_field_comment (в коде кстати это отдельный фильтр, но в данный момент это не имеет для нас значения)!
При помощи хука comment_form_default_fields мы меняли подписи к полям чуть выше, однако тот фильтр-хук не давал нам возможности поменять лейбл к полю ввода комментария, так давайте поменяем его сейчас.
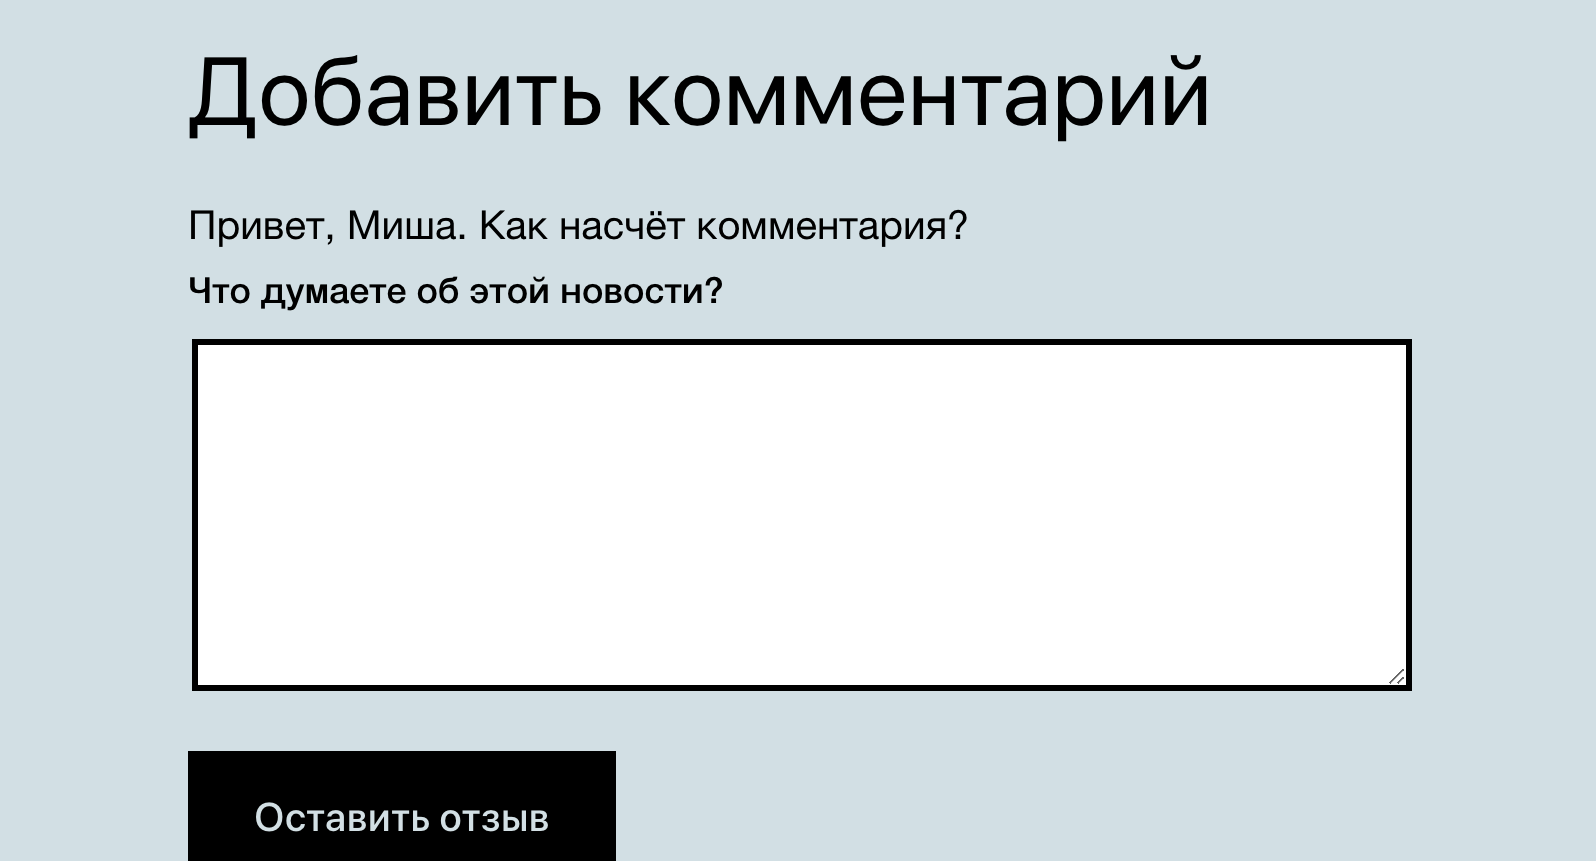
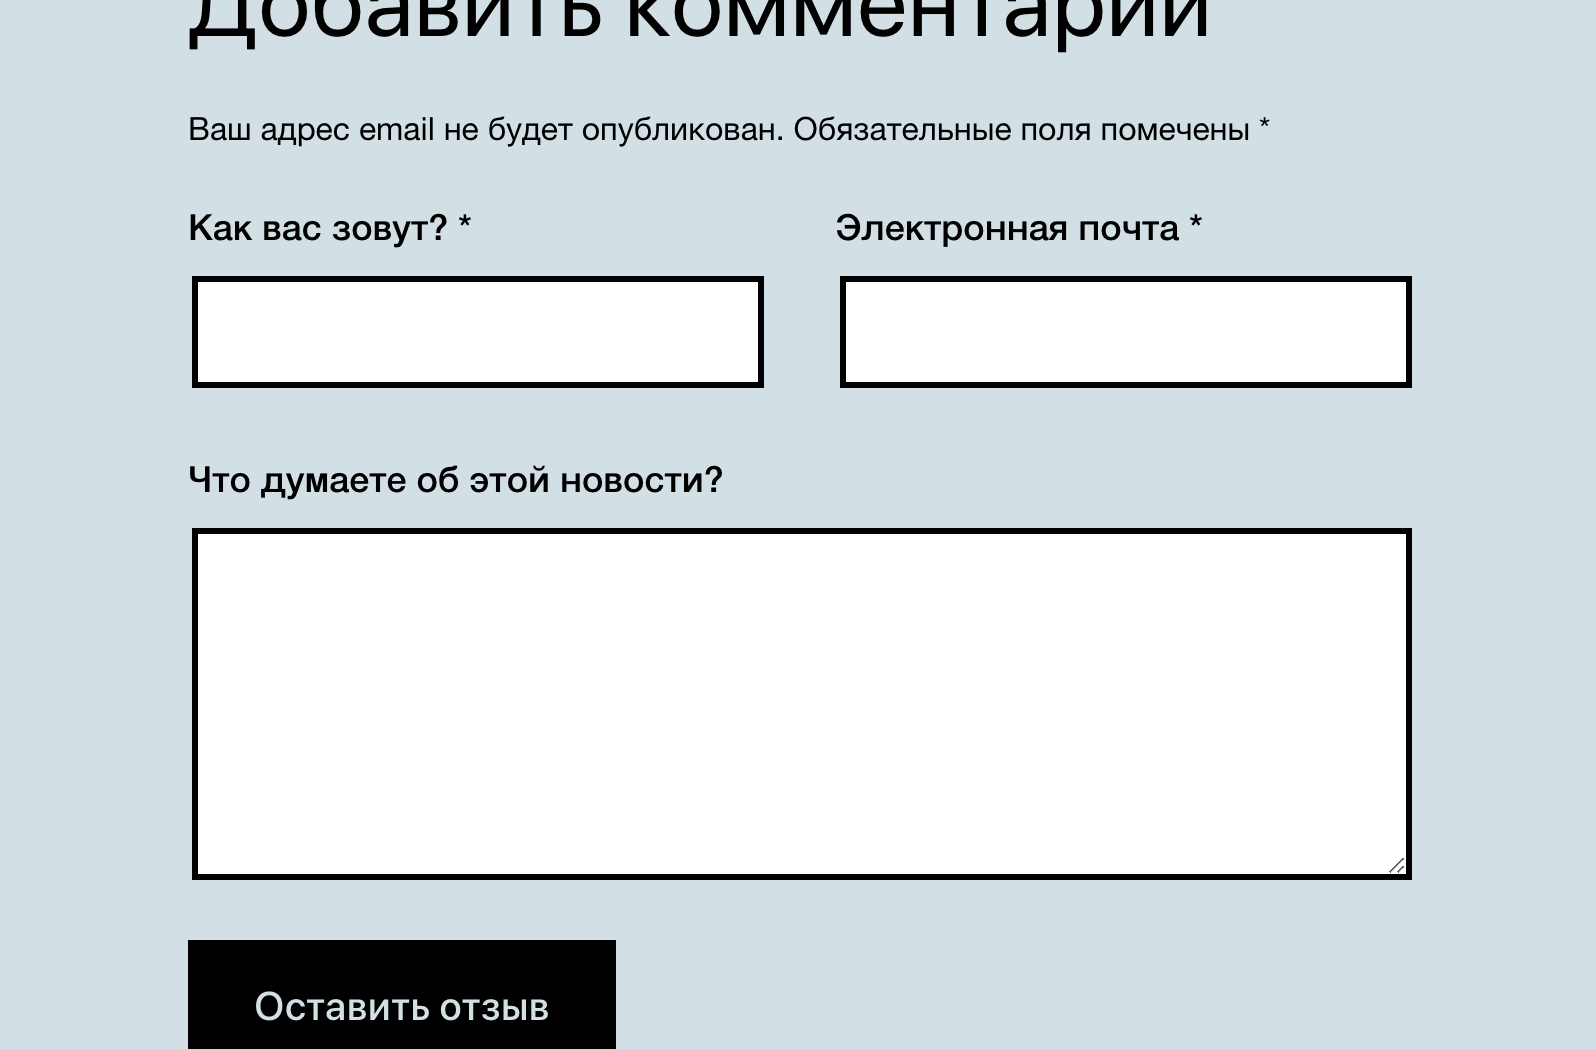
add_filter( 'comment_form_field_comment', 'truemisha_change_comment_label', 25 );

function truemisha_change_comment_label( $field ) {

	$field = str_replace( 'Комментарий', 'Что думаете об этой новости?', $field );
	return $field;

}
Не знаете, куда вставлять код?
Результат:

Напоминаю также про мой видеоурок про то, как реализовать комментарии при создании темы WordPress с нуля 😁
При помощи этого фильтр-хука вы можете отфильтровать любой из параметров, передающихся в функцию.
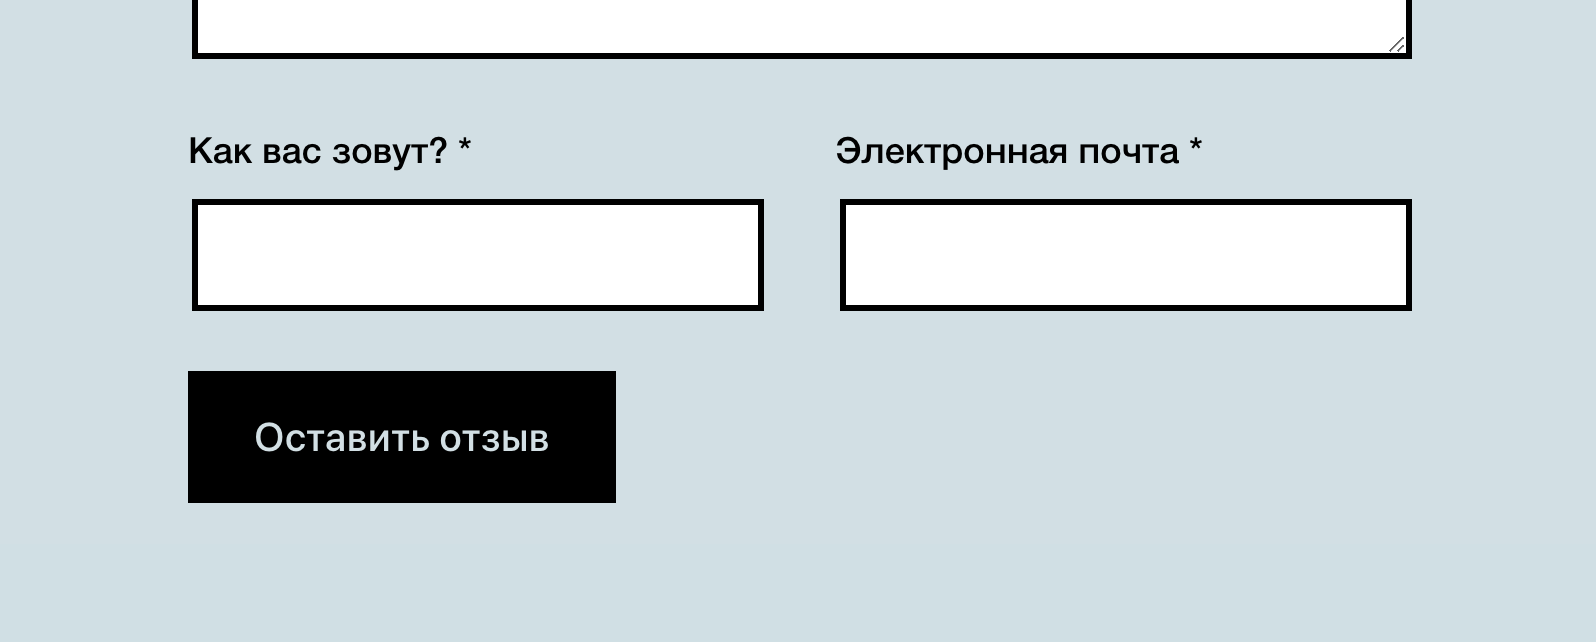
Как изменить текст кнопки на «Оставить отзыв»?
add_filter( 'comment_form_defaults', 'truemisha_comment_button_text', 25 );

function truemisha_comment_button_text( $args ) {

	$args[ 'label_submit' ] = 'Оставить отзыв';
	return $args;

}
Не знаете, куда вставлять код?
Другие хуки
В этом разделе я бы хотел познакомить вас с экшен-хуками, которые в основном позволяют вывести какой-то текст или HTML-код в определённой части формы комментария.
Этот экшн-хук позволяет вывести текст или HTML код вместо формы комментариев, когда комментарии к этой конкретной записи закрыты.
Например:
add_action( 'comment_form_comments_closed', 'truemisha_closed_comments_text', 25 );

function truemisha_closed_comments_text() {
	echo '<p><a href="#">Напишите нам</a>, если нужна личная консультация по уроку!</p>';
}
Не знаете, куда вставлять код?
При помощи этого хука вы можете вывести что-либо в самом начале форме комментария, перед тегом <div id="respond">.
Никаких параметров в хук не передаётся.
Экшн-хук comment_form_must_log_in_after позволяет вам вывести текст или HTML-тег после сообщения о необходимости регистрации, в случае, если комментарии могут оставлять только зарегистрированные пользователи (Настойки > Обсуждение) и если пользователь не авторизован (проверяется функцией is_user_logged_in()).
У хука нет параметров.
Экшн-хук без параметров, срабатывает сразу после открывающего тега <form>.
add_action( 'comment_form_top', 'truemisha_after_form_tag', 25 );

function truemisha_after_form_tag() {
	echo 'текст сразу после тега form';
}
Позволяет отфильтровать параметр функции logged_in_as, отличие от хука comment_form_defaults в том, что этот фильтр более приоритетный и позволяет отфильтровать не только стандартное значение параметра, но и то значение, которое было передано непосредственно в функцию.
add_filter( 'comment_form_logged_in', 'truemisha_logged_in_as_text', 25, 3 );

function truemisha_logged_in_as_text( $logged_in_as, $commenter, $user_identity ) {

	// $logged_in_as – текст/HTML по умолчанию
	// $commenter – куки комментатора, если включены (имя, емейл, сайт)
	// $user_identity – отображаемое имя пользователя

	return sprintf( 'Привет, %s! Как насчёт комментария?', $user_identity );

}
Не знаете, куда вставлять код?
Экшн-хук, позволяющий вывести текст или HTML-код непосредственно после сообщения в параметре logged_in_as (смотрите предыдущий хук).
Экшн-хук принимает практически такие же параметры, как и comment_form_logged_in, а именно $commenter, $user_identity.
Финишный хук, подготавливающий массив полей для формы комментария.
Помните, я говорил вам, что у вас не получится изменить порядок некоторых полей (поля формы комментария) хуком comment_form_default_fields, так вот, фильтр-хук comment_form_fields позволит вам это сделать. Появился он относительно недавно, в версии WordPress 4.4.0.
Например мы можем воспользоваться этим кодом:
add_action( 'comment_form_fields', 'truemisha_change_all_fields_order', 25 );

function truemisha_change_all_fields_order( $comment_fields ) {

 	// print_r( $comment_fields );
	// правила сортировки
	$order = array( 'author', 'email', 'comment' );

	// новый массив с изменённым порядком
	$new_fields = array();

	foreach( $order as $index ) {
		$new_fields[ $index ] = $comment_fields[ $index ];
	}

	return $new_fields;

}
Не знаете, куда вставлять код?
Этот фильтр-хук позволяет полностью изменить HTML кнопки отправки комментария.
Например:
add_filter( 'comment_form_submit_button', 'truemisha_comment_button', 25, 2 );

function truemisha_comment_button( $submit_button, $args ) {
	// $submit_button – исходный HTML кнопки
	// $args[ 'name_submit' ] – атрибут name кнопки
	// $args[ 'id_submit' ] – атрибут id кнопки
	// $args[ 'class_submit' ] – CSS-класс(ы)
	// $args[ 'label_submit' ] – текст кнопки

	// тут мы можем сгенерировать новый HTML кнопки и вернуть его
	return $submit_button;

}
Экшн-хук, выполняющийся в самом конце формы отправки комментария, перед закрывающимся тегом </form>.
Принимает только параметр $post_id с ID поста, к которому оставляется комментарий.
add_action( 'comment_form', 'truemisha_text_after_comment_form', 25 );

function truemisha_text_after_comment_form( $post_id ) {
	echo 'Вы оставляете коммент к посту с ID : ' . $post_id;
}
Экшн-хук в самом конце формы, после закрывающихся тегов </form> и </div> (который <div id="respond">).
Не принимает никаких параметров.
Также хочу ещё раз порекомендовать вам свой видеокурс по созданию темы WordPress на основе готовой вёрстки, вот ссылка.

Миша
Впервые познакомился с WordPress в 2009 году. Организатор и спикер на конференциях WordCamp. Преподаватель в школе Нетология.
Пишите, если нужна помощь с сайтом или разработка с нуля.
В WordPress есть несколько видов содержания, такие как записи, страницы, комментарии. WordPress является очень гибкой платформой, которая позволяет настраивать основные виды содержания так, как нужно для сайта. Можно поменять внешний вид и функционал. В данном уроке мы покажем, как изменить поведение и внешний вид комментариев на сайте под управлением WordPress.
Шаг 1. Разбираемся в функцией comment_form и ее аргументами
Рассмотрим функцию WordPress comment_form. Она отвечает за вывод формы комментариев, которая выводится на странице или записи. Вызов данной функции в основном можно встретить в файле comments.php в папке темы. Данный файл включается в различных местах, например, в файлах single.php и page.php, непосредственно или через вызов функции comments_template.
Описание функции можно найти в кодексе WordPress.
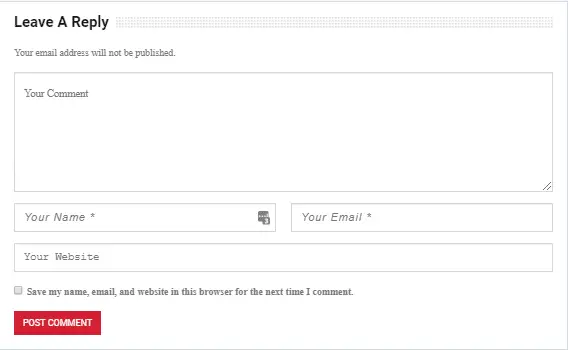
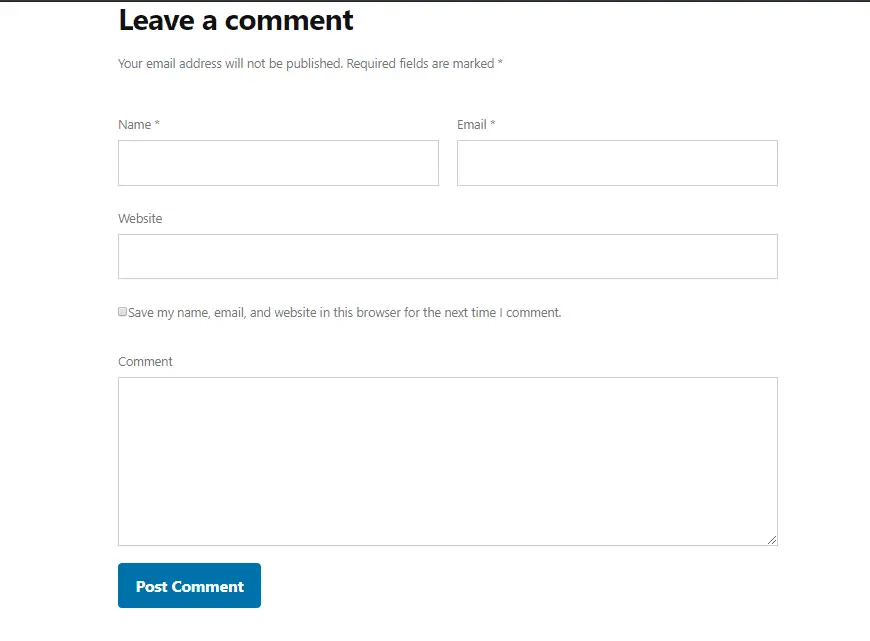
Если использовать функцию comment_form для вывода формы, то она будет выводиться с использованием параметров по умолчанию и будет содержать такие поля как имя, email (оба поля являются обязательными), веб сайт и содержание комментария. В теме по умолчанию Twenty Eleven форма будет выглядеть следующим образом.

Некоторые важные аргументы функции comment_form:
fields–с его помощью можно управлять выводом полей в форме комментария.comment_notes_beforeиcomment_notes_after– используются для вывода информации перед и после формы.title_reply– используется для изменения названия ответа, которое по умолчанию имеет значение ‘Leave a Reply’.label_submit– используется для изменения текста на кнопке отправки комментария.
Шаг 2. Настраиваем форму комментария с помощью функции comment_form
Теперь настроим нашу форму комментария с помощью передачи аргументов в функцию comment_form.
В случае, если нам нужно настроить поля в форме комментариев, нужно передать их список в функцию comment_form. По умолчанию для функции используется следующий список полей:
$fields =  array(
    'author' => '<p class="comment-form-author">' . '<label for="author">' . __( 'Name' ) . '</label> ' . ( $req ? '<span class="required">*</span>' : '' ) .
        '<input id="author" name="author" type="text" value="' . esc_attr( $commenter['comment_author'] ) . '" size="30"' . $aria_req . ' /></p>',
    'email'  => '<p class="comment-form-email"><label for="email">' . __( 'Email' ) . '</label> ' . ( $req ? '<span class="required">*</span>' : '' ) .
        '<input id="email" name="email" type="text" value="' . esc_attr(  $commenter['comment_author_email'] ) . '" size="30"' . $aria_req . ' /></p>',
    'url'    => '<p class="comment-form-url"><label for="url">' . __( 'Website' ) . '</label>' .
        '<input id="url" name="url" type="text" value="' . esc_attr( $commenter['comment_author_url'] ) . '" size="30" /></p>',
);
Если нам нужно удалить поле, например, website, нужно просто исключить его из массива и передать массив в функцию comment_form.
$commenter = wp_get_current_commenter();
$req = get_option( 'require_name_email' );
$aria_req = ( $req ? " aria-required='true'" : '' );
$fields =  array(
    'author' => '<p class="comment-form-author">' . '<label for="author">' . __( 'Name' ) . '</label> ' . ( $req ? '<span class="required">*</span>' : '' ) .
        '<input id="author" name="author" type="text" value="' . esc_attr( $commenter['comment_author'] ) . '" size="30"' . $aria_req . ' /></p>',
    'email'  => '<p class="comment-form-email"><label for="email">' . __( 'Email' ) . '</label> ' . ( $req ? '<span class="required">*</span>' : '' ) .
        '<input id="email" name="email" type="text" value="' . esc_attr(  $commenter['comment_author_email'] ) . '" size="30"' . $aria_req . ' /></p>',
);

$comments_args = array(
    'fields' =>  $fields
);

comment_form($comments_args);
Теперь форма комментария будет выглядеть следующим образом:

В дополнение также сменим название формы на ‘Please give us your valuable comment’, а надпись на кнопке на ‘Send My Comment’.
Для выполнения задачи передаем в функцию comment_form следующие аргументы:
$commenter = wp_get_current_commenter();
$req = get_option( 'require_name_email' );
$aria_req = ( $req ? " aria-required='true'" : '' );
$fields =  array(
    'author' => '<p class="comment-form-author">' . '<label for="author">' . __( 'Name' ) . '</label> ' . ( $req ? '<span class="required">*</span>' : '' ) .
        '<input id="author" name="author" type="text" value="' . esc_attr( $commenter['comment_author'] ) . '" size="30"' . $aria_req . ' /></p>',
    'email'  => '<p class="comment-form-email"><label for="email">' . __( 'Email' ) . '</label> ' . ( $req ? '<span class="required">*</span>' : '' ) .
        '<input id="email" name="email" type="text" value="' . esc_attr(  $commenter['comment_author_email'] ) . '" size="30"' . $aria_req . ' /></p>',
);

$comments_args = array(
    'fields' =>  $fields,
    'title_reply'=>'Please give us your valuable comment',
    'label_submit' => 'Send My Comment'
);

comment_form($comments_args);
Теперь форма комментария будет выглядеть следующим образом:

Шаг 3. Удаляем поля из формы с помощью крюка
Также форма комментария WordPress может быть изменена с помощью крюков и фильтров. Такая настройка может быть особенно полезна при работе с плагином, когда нужно настроить несколько элементов, но не изменять файлы темы. Фильтр для добавления иди удаления полей из формы — ‘comment_form_default_fields‘
Удалим поле адреса URL с помощью фильтра. Приведенный код можно использовать в плагине или в файле functions.php активной темы.
function remove_comment_fields($fields) {
    unset($fields['url']);
    return $fields;
}
add_filter('comment_form_default_fields','remove_comment_fields');
В данном случае мы добавили функцию remove_comment_fields к фильтру ‘comment_form_default_fields‘, которая удаляет поле url.
Шаг 4. Добавляем данные в форму комментария с помощью крюка
Мы можем добавить поля в форму с помощью фильтра ‘comment_form_default_fields‘. Добавим поле возраста автора с помощью фильтра и сохраним данное поле дополнительные данные и будем их выводить в комментарии.
Добавляем поле следующим образом:
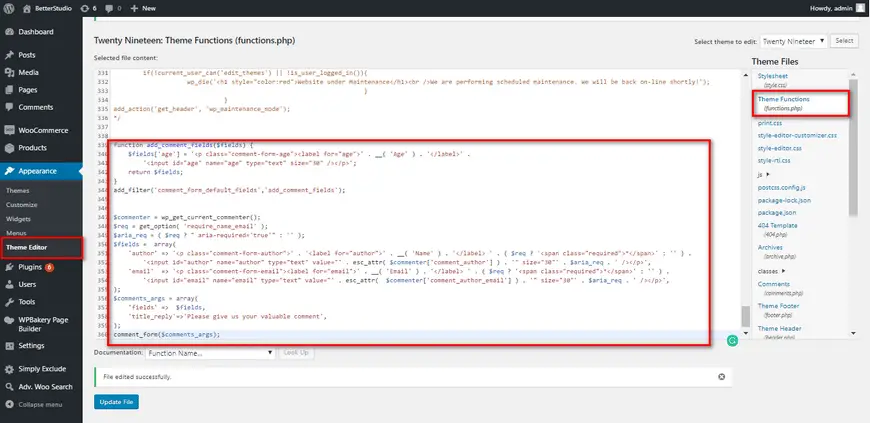
function add_comment_fields($fields) {

    $fields['age'] = '<p class="comment-form-age"><label for="age">' . __( 'Age' ) . '</label>' .
        '<input id="age" name="age" type="text" size="30" /></p>';
    return $fields;

}
add_filter('comment_form_default_fields','add_comment_fields');
Как только мы добавили поле в тему, то ему нужно задать стиль. Для темы по умолчанию Twenty Eleven добавим селектор #respond .comment-form-age label к другим меткам, таким как #respond .comment-form-url label и так далее:
#respond .comment-form-author label,
#respond .comment-form-email label,
#respond .comment-form-url label,
#respond .comment-form-age label,
#respond .comment-form-comment label {
    background: #eee;
    -webkit-box-shadow: 1px 2px 2px rgba(204,204,204,0.8);
    -moz-box-shadow: 1px 2px 2px rgba(204,204,204,0.8);
    box-shadow: 1px 2px 2px rgba(204,204,204,0.8);
    color: #555;
    display: inline-block;
    font-size: 13px;
    left: 4px;
    min-width: 60px;
    padding: 4px 10px;
    position: relative;
    top: 40px;
    z-index: 1;
}
Теперь наша форма комментария будет выглядеть следующим образом:

Теперь возраст хранится как дополнительная информация. Нужно использовать крюк в ‘comment_post‘:
function add_comment_meta_values($comment_id) {

    if(isset($_POST['age'])) {
        $age = wp_filter_nohtml_kses($_POST['age']);
        add_comment_meta($comment_id, 'age', $age, false);
    }

}
add_action ('comment_post', 'add_comment_meta_values', 1);
Как только данные сохранены, их можно выводить в комментарии следующим образом:
<?php echo "Comment authors age: ".get_comment_meta( $comment->comment_ID, 'age', true ); ?>

Шаг 5. Настройка комментариев для определенных типов записей
Иногда требуется использовать поля в комментариях только для определенных типов записей. Изменим код для вывода поля возраста только для записи типа book:
function add_comment_fields($fields) {

    if( is_singular( 'books' ) ) {

        $fields['age'] = '<p class="comment-form-age"><label for="age">' . __( 'Age' ) . '</label>' .
            '<input id="age" name="age" type="text" size="30" /></p>';
    }
    return $fields;

}
add_filter('comment_form_default_fields','add_comment_fields');
Шаг 6. Создаем возвратную функцию для вывода комментариев
Функция wp_list_comments используется для вывода комментариев в записях. В кодексе WordPress функция описана подробно.
wp_list_comments имеет аргумент ‘callback‘ в котором можно определить функцию, которая вызывается при выводе комментария.
В теме Twenty Eleven в файле comments.php можно найти строку:
wp_list_comments( array( 'callback' => 'twentyeleven_comment' ) );
Изменим ее на:
wp_list_comments( array( 'callback' => 'my_comments_callback' ) );
Функция my_comments_callback будет вызываться для каждой записи.
Шаг 7. Стилизация комментариев
Теперь мы немного изменим стиль комментария. Просто будем выводить содержание записи и поле возраста, которое было добавлено нами ранее. Мы также изменим цвет фона для комментариев.
Код функции ‘my_comments_callback‘:
function my_comments_callback( $comment, $args, $depth ) {
$GLOBALS['comment'] = $comment;
?>
<li <?php comment_class(); ?> id="li-comment-<?php comment_ID(); ?>">
<article id="comment-<?php comment_ID(); ?>" class="comment">
<div class="comment-content"><?php comment_text(); ?></div>
<p><?php echo "Comment authors age: ".get_comment_meta( $comment->comment_ID, 'age', true ); ?></p>
<div class="reply">
<?php comment_reply_link( array_merge( $args, array( 'reply_text' => __( 'Reply <span>↓</span>', 'twentyeleven' ), 'depth' => $depth, 'max_depth' => $args['max_depth'] ) ) ); ?>
</div>
</article>
</li>
<?php
}
Изменяем цвет фона следующим образом:
.commentlist > li.comment {

    background: #99ccff;
    border: 3px solid #ddd;
    -moz-border-radius: 3px;
    border-radius: 3px;
    margin: 0 0 1.625em;
    padding: 1.625em;
    position: relative;
}
Комментарии будут иметь следующий вид:

Заключение
Комментарии играют важную роль при построении сообщества пользователей сайта. В зависимости от функционала сайта комментарии также можно изменить. WordPress обеспечивает гибкую систему настройки и изменения функционала комментариев на вашем сайте.
A WordPress website consists of three main sections, posts, pages, and comments. By default, each section is in its most basic form.
Although in WordPress, you can customize every single file in your theme and change the structurebut we also sugWordPress provides you with the ability to customize every single file in your theme and change the structure, however, we suggest you also check out the WordPress comment plugins that are extremely useful when editing and customizing the WordPress comments.
The comment form underneath every post is of particular
importance. But first, this section must be appealing to readers and users.
Unfortunately, the default themes are not appealing to WordPress users.
If the comment form is appealing, users get encouraged to post their comments and join in on the discussion in the comment form below your posts.
In this article, we discuss how to customize the WordPress comment form by modifying the codes in your WordPress theme. In addition, we introduce plugins to make this section more appealing.
By using CSS classes, you can change how texts appear inside the input boxes. For example, in the code below, we change the font of author, email address and URL. Simply add the code to your style.css file:
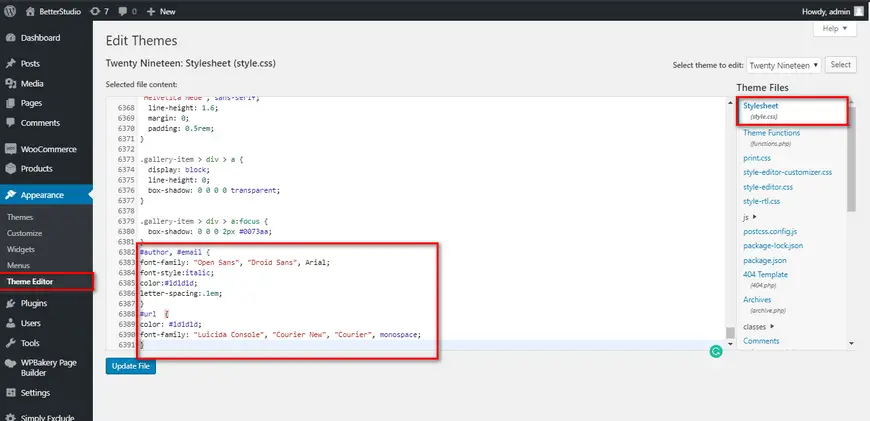
#author, #email {
font-family: "Open Sans", "Droid Sans", Arial;
font-style:italic;
color:#1d1d1d;
letter-spacing:.1em;
}
#url  {
color: #1d1d1d;
font-family: "Luicida Console", "Courier New", "Courier", monospace;
}
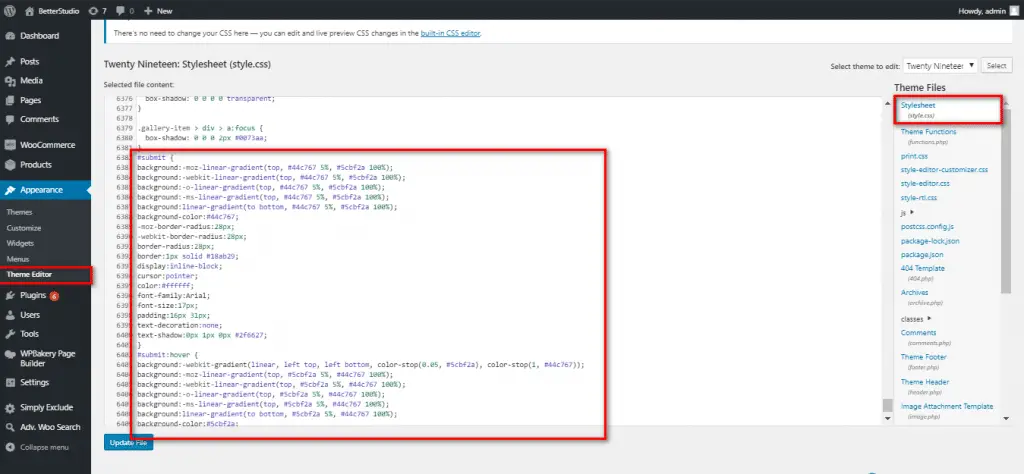
To change the appearance of the submit comment button in WordPress, use the code below in your style.css file:
#submit {
background:-moz-linear-gradient(top, #44c767 5%, #5cbf2a 100%);
background:-webkit-linear-gradient(top, #44c767 5%, #5cbf2a 100%);
background:-o-linear-gradient(top, #44c767 5%, #5cbf2a 100%);
background:-ms-linear-gradient(top, #44c767 5%, #5cbf2a 100%);
background:linear-gradient(to bottom, #44c767 5%, #5cbf2a 100%);
background-color:#44c767;
-moz-border-radius:28px;
-webkit-border-radius:28px;
border-radius:28px;
border:1px solid #18ab29;
display:inline-block;
cursor:pointer;
color:#ffffff;
font-family:Arial;
font-size:17px;
padding:16px 31px;
text-decoration:none;
text-shadow:0px 1px 0px #2f6627;
}
#submit:hover {
background:-webkit-gradient(linear, left top, left bottom, color-stop(0.05, #5cbf2a), color-stop(1, #44c767));
background:-moz-linear-gradient(top, #5cbf2a 5%, #44c767 100%);
background:-webkit-linear-gradient(top, #5cbf2a 5%, #44c767 100%);
background:-o-linear-gradient(top, #5cbf2a 5%, #44c767 100%);
background:-ms-linear-gradient(top, #5cbf2a 5%, #44c767 100%);
background:linear-gradient(to bottom, #5cbf2a 5%, #44c767 100%);
background-color:#5cbf2a;
}
#submit:active {
position:relative;
top:1px;
}
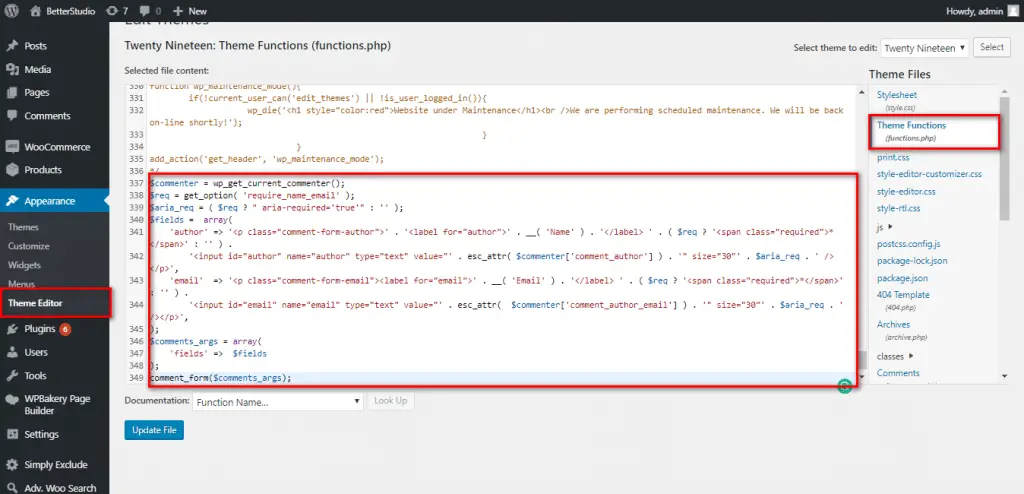
To change the name of the submit comment button in WordPress comment form, use the code below in the functions.php file or add it to the plugin you have to customize WordPress comment form:
$commenter = wp_get_current_commenter();
$req = get_option( 'require_name_email' );
$aria_req = ( $req ? " aria-required='true'" : '' );
$fields =  array(
    'author' => '<p class="comment-form-author">' . '<label for="author">' . __( 'Name' ) . '</label> ' . ( $req ? '<span class="required">*</span>' : '' ) .
        '<input id="author" name="author" type="text" value="' . esc_attr( $commenter['comment_author'] ) . '" size="30"' . $aria_req . ' /></p>',
    'email'  => '<p class="comment-form-email"><label for="email">' . __( 'Email' ) . '</label> ' . ( $req ? '<span class="required">*</span>' : '' ) .
        '<input id="email" name="email" type="text" value="' . esc_attr(  $commenter['comment_author_email'] ) . '" size="30"' . $aria_req . ' /></p>',
);
$comments_args = array(
    'fields' =>  $fields,
    'label_submit' => 'Send My Comment'
);
comment_form($comments_args);
The URL field in the WordPress comment form is very attractive to spammers.
By simply removing this field you can’t prevent spammers from posting comments on your website, but you stop a spammer from typing an inappropriate URL in the URL field.
In addition, by removing this field, posting a comment becomes much simpler for your users.
To remove the website URL field, copy the code below in your functions.php file:
$commenter = wp_get_current_commenter();
$req = get_option( 'require_name_email' );
$aria_req = ( $req ? " aria-required='true'" : '' );
$fields =  array(
    'author' => '<p class="comment-form-author">' . '<label for="author">' . __( 'Name' ) . '</label> ' . ( $req ? '<span class="required">*</span>' : '' ) .
        '<input id="author" name="author" type="text" value="' . esc_attr( $commenter['comment_author'] ) . '" size="30"' . $aria_req . ' /></p>',
    'email'  => '<p class="comment-form-email"><label for="email">' . __( 'Email' ) . '</label> ' . ( $req ? '<span class="required">*</span>' : '' ) .
        '<input id="email" name="email" type="text" value="' . esc_attr(  $commenter['comment_author_email'] ) . '" size="30"' . $aria_req . ' /></p>',
);
$comments_args = array(
    'fields' =>  $fields
);
comment_form($comments_args);
By using the comment_form_default_fields filter, you can add new fields to the WordPress comment form.
Using filters becomes handy when you want to customize comments form from plugins without manually changing the theme files.
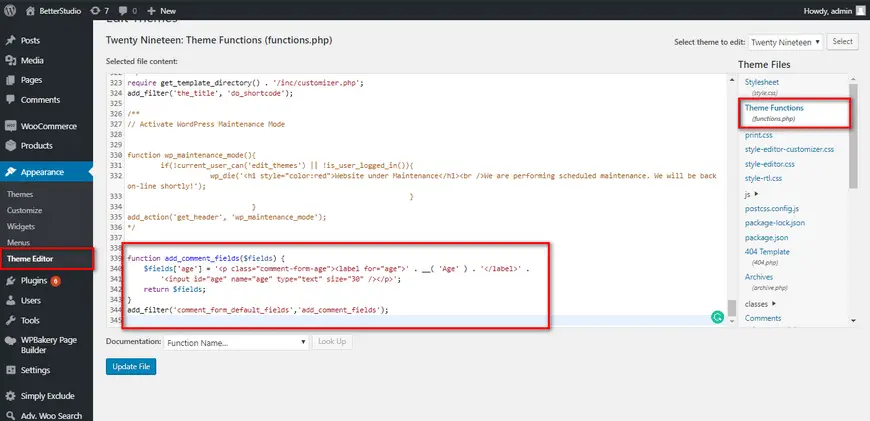
For example, in the code below we will add the age field to
the WordPress comment form:
function add_comment_fields($fields) {
    $fields['age'] = '<p class="comment-form-age"><label for="age">' . __( 'Age' ) . '</label>' .
        '<input id="age" name="age" type="text" size="30" /></p>';
    return $fields;
}
add_filter('comment_form_default_fields','add_comment_fields');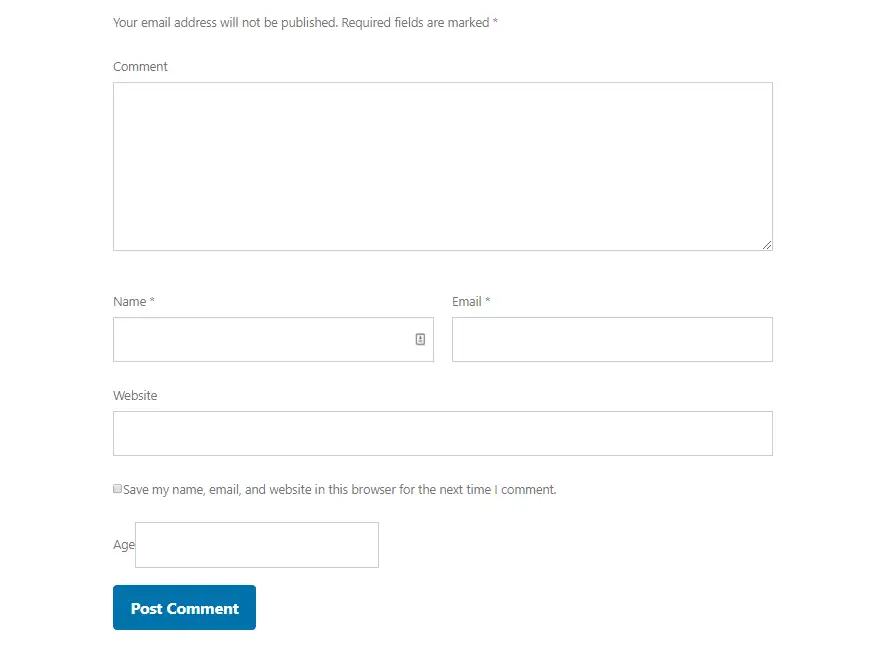
reCAPTCHA increases the security of your website and
prevents spammers from publishing comments on your website.
The Invisible reCAPTCHA plugin is one of the best plugins you can use to add reCAPTCHA to WordPress.
reCAPTCHA is a service supported by Google and it’s designed to separate bots from people. Only a person can answer its security questions and bots cannot bypass the reCAPTCHA security layers.
As you can probably tell, the Invisible reCAPTCHA plugin is an invisible plugin. It tracks your mouse pointer and IP address to identify if you are a human or a bot.
This plugin filters the comments form and prevents spammers from posting comments. This is one key feature of the Invisible reCAPTCHA plugin.
To add reCAPTCHA to the comment form, from the WordPress dashboard go to Plugins and Add New. Type in Invisible reCAPTCHA in the search box and then proceed to install and activate it. Follow the steps below to configure Invisible reCAPTHCAon your website
This service is supported by Google. Therefore, you need to create an account in Google reCAPTCHA:
- Open this link https://www.google.com/recaptcha/admin/create
- Enter the required information to connect reCAPTCHA to your account.
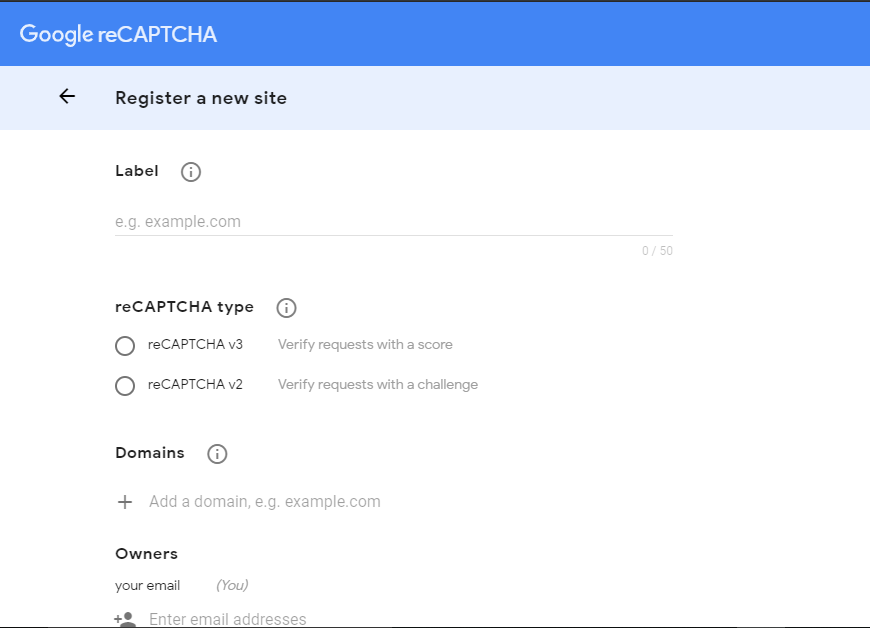
- Then register by clicking on the Submit.
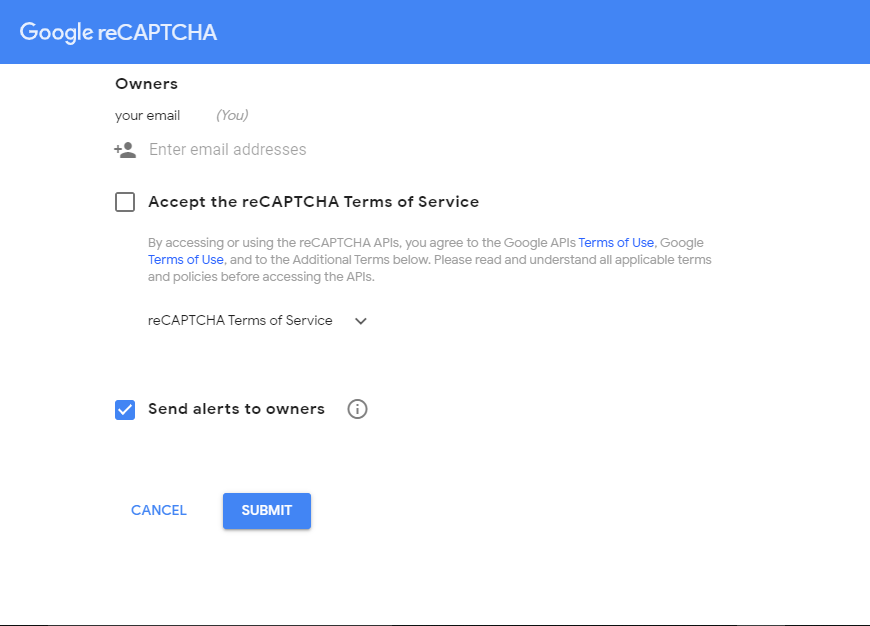
- Once the registration process is over, a Site key and Secret key will be displayed to you. Make sure you copy them in a notepad. You will need these keys to activate the plugin.
- In the next step, we need to activate the features we want. Go to WordPress dashboard and then Invisible reCAPTCHA Settings.
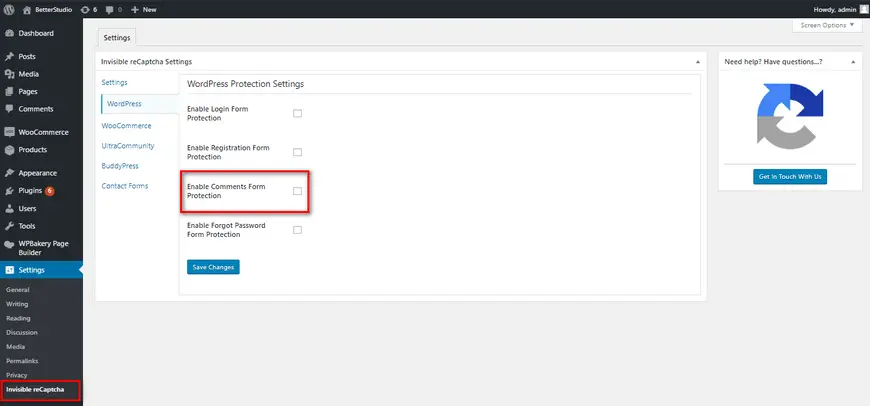
There are a few tabs in the settings. To enable reCAPTCHA in the comment section, you need to check “Enable Comments From Protection”.
Finally, save the changes.
Change the Title of Your Comment Section
To change the title above
the WordPress comments form, add the code below to the functions.php file or
the plugin you use to customize the WordPress comment form:
$commenter = wp_get_current_commenter();
$req = get_option( 'require_name_email' );
$aria_req = ( $req ? " aria-required='true'" : '' );
$fields =  array(
    'author' => '<p class="comment-form-author">' . '<label for="author">' . __( 'Name' ) . '</label> ' . ( $req ? '<span class="required">*</span>' : '' ) .
        '<input id="author" name="author" type="text" value="' . esc_attr( $commenter['comment_author'] ) . '" size="30"' . $aria_req . ' /></p>',
    'email'  => '<p class="comment-form-email"><label for="email">' . __( 'Email' ) . '</label> ' . ( $req ? '<span class="required">*</span>' : '' ) .
        '<input id="email" name="email" type="text" value="' . esc_attr(  $commenter['comment_author_email'] ) . '" size="30"' . $aria_req . ' /></p>',
);
$comments_args = array(
    'fields' =>  $fields,
    'title_reply'=>'Please give us your valuable comment',
);
comment_form($comments_args);
Move Text Field to the Bottom of the Form
By default, after WordPress version 4.4, in the comments section, the first field is the text field, then name, email and website URL.
In the previous versions, it was first name, email and website URL then the text field. If you want to use the older format in your website, simply copy the code below to the functions.php file or the plugin you are using to customize the WordPress comments form:
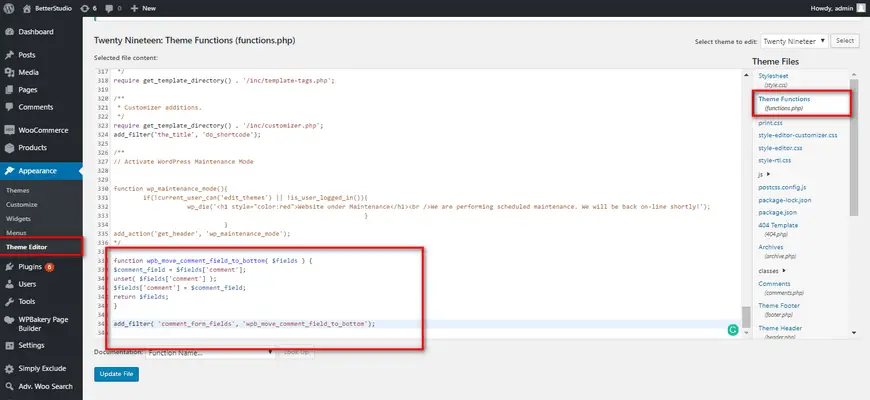
function wpb_move_comment_field_to_bottom( $fields ) {
$comment_field = $fields['comment'];
unset( $fields['comment'] );
$fields['comment'] = $comment_field;
return $fields;
}
This code simply moves
the text field to the bottom of the comments form.
When a user submits a comment on your website, he/she may want to get notifications about the replies.
If you consider a Subscribe checkbox in the comment section, users can check and get notifications in their email addresses.
To add this feature, you need to install and activate the Subscribe to Comments Reloaded plugin. In the Settings, click on Subscribe to Comments to configure the plugin.
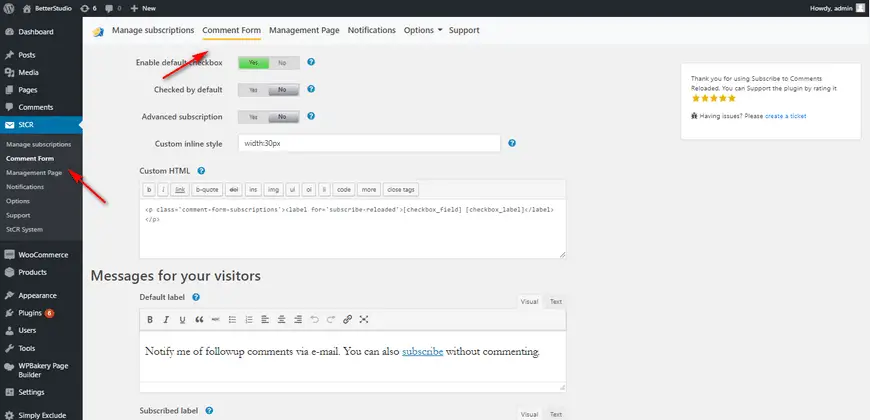
By configuring the
plugin, you enable the checkbox in the WordPress comment section. Keep in mind,
WordPress users don’t necessarily have to post a comment to subscribe to
comments and get email notifications.
Add Text Editor to WordPress Comment Section (Quicktags in Comments)
Quicktags are the options you see above the text field in the comment form. Quicktags are used to change the font and style of a text, you can use them to bold, add links and etc. to the text.
To add Quicktags, you need to install and activate the Comment Form Quicktags plugin.
Then, in the Settings click on discussions and look for the Quicktags and enable it. Finally, save your changes.
If you want to change the
CSS of your comment section, copy and paste the code below to the style.css
file:
/* ## Comments
--------------------------------------------- */
.comment-respond,
.entry-pings,
.entry-comments {
    color: #444;
    padding: 20px 45px 40px 45px;
    border: 1px solid #ccc;
    overflow: hidden;
    background: #fff;
    -webkit-box-shadow: 0px 0px 8px rgba(0,0,0,0.3);
    -moz-box-shadow: 0px 0px 8px rgba(0,0,0,0.3);
    box-shadow: 0px 0px 8px rgba(0,0,0,0.3);
    border-left: 4px solid #444;
}
.entry-comments h3{
    font-size: 30px;
    margin-bottom: 30px;
}
.comment-respond h3,
.entry-pings h3{
    font-size: 20px;
    margin-bottom: 30px;
}
.comment-respond {
    padding-bottom: 5%;
    margin: 20px 1px 20px 1px;
        border-left: none !important;
}
.comment-header {
    color: #adaeb3;
    font-size: 14px;
    margin-bottom: 20px;
}
.comment-header cite a {
    border: none;
    font-style: normal;
    font-size: 16px;
    font-weight: bold;
}
.comment-header .comment-meta a {
    border: none;
    color: #adaeb3;
}
li.comment {
    background-color: #fff;
    border-right: none;
}
.comment-content {
    clear: both;
    overflow: hidden;
}
.comment-list li {
    font-size: 14px;
    padding: 20px 30px 20px 50px;
}
.comment-list .children {
    margin-top: 40px;
    border: 1px solid #ccc;
}
.comment-list li li {
    background-color: #f5f5f6;
}
.comment-list li li li {
    background-color: #fff;
}
.comment-respond input[type="email"],
.comment-respond input[type="text"],
.comment-respond input[type="url"] {
    width: 50%;
}
.comment-respond label {
    display: block;
    margin-right: 12px;
}
.entry-comments .comment-author {
    margin-bottom: 0;
    position: relative;
}
.entry-comments .comment-author img {
    border-radius: 50%;
    border: 5px solid #fff;
    left: -80px;
    top: -5px;
    position: absolute;
    width: 60px;
}
.entry-pings .reply {
    display: none;
}
.bypostauthor {
}
.form-allowed-tags {
    background-color: #f5f5f5;
    font-size: 16px;
    padding: 24px;
}
.comment-reply-link{
    cursor: pointer;
    background-color: #444;
    border: none;
    border-radius: 3px;
    color: #fff;
    font-size: 12px;
    font-weight: 300;
    letter-spacing: 1px;
    padding: 4px 10px 4px;
    text-transform: uppercase;
    width: auto;
}
.comment-reply-link:hover{
    color: #fff;
}
.comment-notes{
    display:none;
}
Customize Comments for a Specific Post Type
You may want to add or remove fields from the WordPress comment form of a specific post type. For example, in the code below you can see the Age field in the Movies post type:
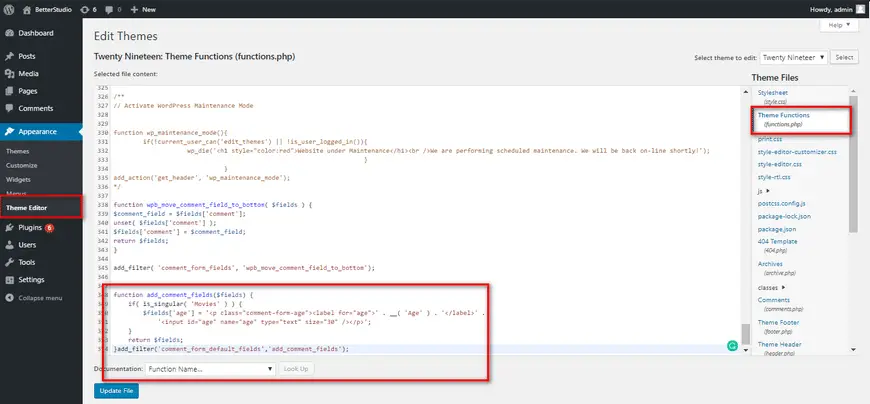
function add_comment_fields($fields) {
    if( is_singular( 'Movies' ) ) {
        $fields['age'] = '<p class="comment-form-age"><label for="age">' . __( 'Age' ) . '</label>' .
            '<input id="age" name="age" type="text" size="30" /></p>';
    }
    return $fields;
}add_filter('comment_form_default_fields','add_comment_fields');
As we mentioned before, the WordPress default themes are quite simple.
In addition, although the comments published below each post attracts and encourages visitors to look at the content of the website, some website admins prefer to disable the comment section to prevent spammers from posting a comment.
In any case, if you ever
wanted to have a comment section enabled in WordPress, there are many great
plugins that can help you customize the WordPress comment form. Let us
introduce some useful plugins in this genre:
JetPack
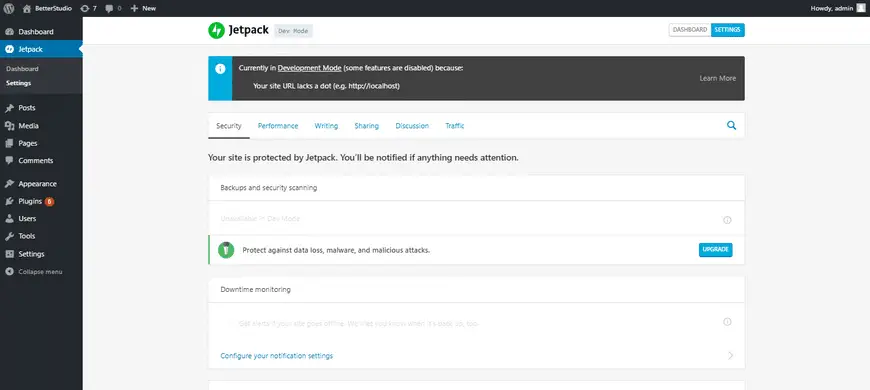
JetPack is more than a comment plugin. You have more than 20 modules in this plugin and the key feature of this plugin is the ability to use the old comments form.
Users can post comments without filling out each of the fields in the comment section, and also, they can use their social media accounts to submit a comment.
However, users aren’t required to use their social media accounts, they can always manually fill in the fields.
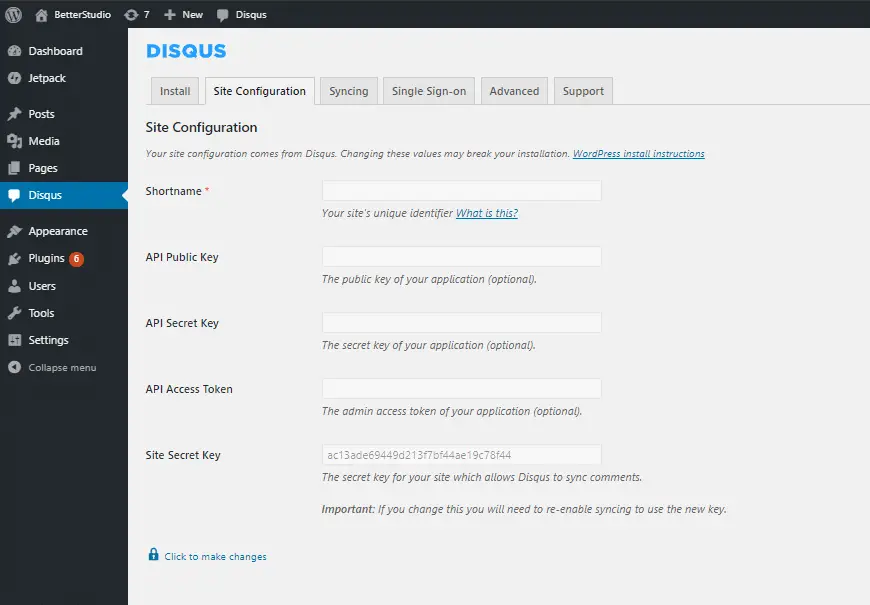
Disqus
The Disqus comment system is one of the popular plugins in the commenting genre. Although this plugin is very popular in the WordPress community, it comes with many disadvantages & advantages and has found many supporters and anti-Disqus amongst the WordPress users.
Below are some advantages of this plugin:
- It has a better design compared to the WordPress comment form.
- Users can sort comments based on newer and older. Also, they can suggest their favorite comments to others.
- It recommends other content from your website to users.
- If you have many comments on your website, it’s recommended to use the Disqus plugin to reduce the send & receive from the WordPress server.
- It synchronizes comments with your WordPress database. So you can go back to the WordPress default comment form whenever you want.
- With a Disqus account, users can comment on websites that use this plugin. Therefore, if users are on another website, as soon as they see the reply notification, they can go back to their comments.
The disadvantages of
Disqus:
- To comment, you need to have an account with Disqus. You didn’t have to register to post a comment in the old WordPress comment form.
- You need to disable ads. Otherwise, Disqus can use their links on other websites.
- Some users have noticed, after you leave the Disqus services, this plugin leaves its URL in the comment section.
The main reason for its
popularity is its friendly interface and the fact that it reduces the size of
your comments. Finally, we recommend paying extra attention to the privacy this
plugin requires before installing it on your website.
If you are planning to install this plugin on your website, we recommend downloading Disqus Conditional Load as well. This plugin increases the time required to load your comment section, therefore, your website loads faster.
Simple Comment Editing
Simple Comment Editing makes a simple change to the default WordPress comment form. It enables the ability to edit comments 5 minutes after posting them.
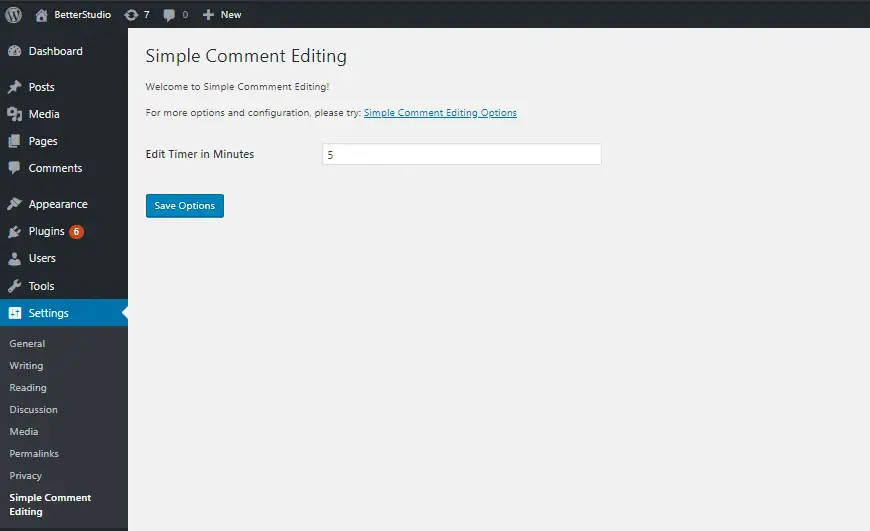
According to researchers, after publishing a comment, users notice they have made spelling mistakes. With this plugin, they have a second chance of publishing the same comment.
Lazy Load for Comments
Lazy Load for Comments doesn’t add any new features to your website, but it optimizes your website. If a website loads fast, its users are satisfied and happy.
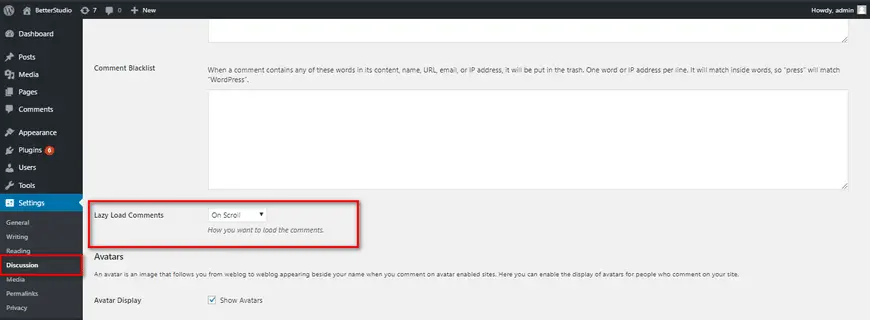
The Lazy Load for Comments plugin reduces the loading time of your comments.
The comment section always appears at the bottom of the page, therefore, by the time users are scrolling down the page or post, the comment section is loaded for them.
Conclusion
The comment section is
very important in any website. In simple words, you can build your community in
the comment section.
Even though the default WordPress comment form is not appealing to anyone, but luckily, this platform is very customizable and you can customize every section of it, even the comment section.
As a result, based on your website’s design you can customize WordPress comment form.
Встречаются задачи, когда нужно добавить произвольные поля в форму комментариев WordPress, например поле для ввода телефона, адреса, оценки, настроения и так далее. Тут-то нам и пригодятся знания о хуках в WordPress (событиях и фильтрах), которые позволят вмешаться в стандартный функционал движка и добавить новые поля в комментарии.
В этой статье мы добавим три новых поля в форму комментария WordPress:
- два текстовых поля: номер телефона и название комментария.
- и одно поле выбора — радио-кнопки для оценки текущей статьи.
А также, научимся сохранять их в метаполя комментария и выведем эти поля в админке, чтобы их можно было видеть и редактировать.
Как лучше создавать новые поля?
Расширить форму комментария можно, отредактировав оригинальную тему, создав дочернюю тему или создав плагин. Модифицировать оригинальную тему проще, чем создавать дочернюю, но тут есть серьезный недостаток: все усилия будут утеряны, если тему обновить. Но еще лучше создать плагин, потому что так настраиваемая форма комментариев будет работать на всех темах (за исключением тех, в которых форма комментариев добавляется нестандартно).
Пойдем по пути создания плагина для WordPress, к тому же делается это очень просто. Назовём плагин «Расширенные комментарии».
Создание плагина для расширения формы комментариев
Создадим в папке с плагинами новую папку с именем extend-comment, а внутри неё файл extend-comment.php. Теперь, чтобы WordPress увидел плагин, ему нужно указать специальные комментарии-заголовки:
<?php
/*
Plugin Name: Расширенные комментарии
Version: 1.0
Plugin URI: https://wp-kama.ru/?p=8342
Description: Плагин, добавляющий произвольные поля в форму комментариев.
Author: Campusboy
Author URI: https://wp-plus.ru/
*/
Заходим в раздел админки «Плагины» и видим наш плагин:

Его уже можно активировать, но на данный момент он «пустой» и никаких функций пока не выполняет…
Создание полей для неавторизованных пользователей
Подключимся к фильтру comment_form_default_fields и «дополним» массив с дефолтными полями WordPress (автор, email, url). В коде ниже мы заменяем код дефолтных полей формы и добавляем новое поле «Телефон».
add_filter('comment_form_default_fields', 'extend_comment_custom_default_fields');
function extend_comment_custom_default_fields($fields) {

	$commenter = wp_get_current_commenter();
	$req = get_option( 'require_name_email' );
	$aria_req = ( $req ? " aria-required='true'" : '' );

	$fields[ 'author' ] = '<p class="comment-form-author">'.
	  '<label for="author">' . __( 'Name' ) . '</label>'.
	  ( $req ? '<span class="required">*</span>' : '' ).
	  '<input id="author" name="author" type="text" value="'. esc_attr( $commenter['comment_author'] ) .
	  '" size="30" tabindex="1"' . $aria_req . ' /></p>';

	$fields[ 'email' ] = '<p class="comment-form-email">'.
	  '<label for="email">' . __( 'Email' ) . '</label>'.
	  ( $req ? '<span class="required">*</span>' : '' ).
	  '<input id="email" name="email" type="text" value="'. esc_attr( $commenter['comment_author_email'] ) .
	  '" size="30"  tabindex="2"' . $aria_req . ' /></p>';

	$fields[ 'url' ] = '<p class="comment-form-url">'.
	  '<label for="url">' . __( 'Website' ) . '</label>'.
	  '<input id="url" name="url" type="text" value="'. esc_attr( $commenter['comment_author_url'] ) .
	  '" size="30"  tabindex="3" /></p>';

	$fields[ 'phone' ] = '<p class="comment-form-phone">'.
	  '<label for="phone">' . __( 'Phone' ) . '</label>'.
	  '<input id="phone" name="phone" type="text" size="30"  tabindex="4" /></p>';

  return $fields;
}
Код прекрасно работает, но если не нужно изменять вид дефолтных полей, то его можно упростить, а именно, добавить только своё поле:
add_filter('comment_form_default_fields', 'extend_comment_default_fields');
function extend_comment_default_fields($fields) {

  $fields[ 'phone' ] = '<p class="comment-form-phone">'.
	'<label for="phone">' . __( 'Phone' ) . '</label>'.
	'<input id="phone" name="phone" type="text" size="30"/></p>';

  return $fields;
}
Данные поля отображаются, когда пользователь не зарегистрирован. Если пользователь авторизован, то ему отобразиться только поле ввода комментария.
Создание полей для всех пользователей
На следующем шаге мы добавим текстовое поле для заголовка комментария и список радио-кнопок для оценки статьи (рейтинг статьи в комментариях).
Эти поля не могут быть добавлены к полям по умолчанию, как сделано выше, потому что нужно дать возможно вводить их и зарегистрированным пользователям. Для этого используем событие comment_form_logged_in_after, которое срабатывает только для зарегистрированных пользователей. Подключившись к нему, мы добавим новые поля до поля ввода комментария.

А чтобы показать поля для незарегистрированных пользователей, используем событие comment_form_after_fields, которое отобразит наши поля ниже полей по умолчанию (автор, email, url).

Т.е. в результате нужно вывести поля в момент срабатывания одного из событий:
comment_form_logged_in_after или comment_form_after_fields.
// Добавляем поля для всех пользователей
add_action( 'comment_form_logged_in_after', 'extend_comment_custom_fields' );
add_action( 'comment_form_after_fields', 'extend_comment_custom_fields' );
function extend_comment_custom_fields() {

	echo '<p class="comment-form-title">'.
			  '<label for="title">' . __( 'Comment Title' ) . '</label>'.
			  '<input id="title" name="title" type="text" size="30"/></p>';

	echo '<p class="comment-form-rating">'.
			  '<label for="rating">'. __('Rating') . '<span class="required">*</span></label>
			  <span class="commentratingbox">';

	for( $i=1; $i <= 5; $i++ ){
		echo '
		<label class="commentrating" style="display:inline-block;">
			<input type="radio" name="rating" id="rating" value="'. $i .'"/> '. $i .'
		</label>';
	}

	echo'</span></p>';
}
Чтобы отобразить 5 радио-кнопок для рейтинга, запускаем цикл. Этот участок кода можно изменить под себя, к примеру вместо 5 указать 10.
Сохранение данных из полей во фронт-энде
Поля для формы комментариев добавлены, но они бесполезны, пока нет алгоритма сохранения данных. Чтобы реализовать этот механизм, используем хук comment_post. Предусмотрим сохранение только непустых данных, чтобы не загромождать базу данных пустыми строками.
Для добавления метаданных комментария используем функцию add_comment_meta().
add_action( 'comment_post', 'save_extend_comment_meta_data' );
function save_extend_comment_meta_data( $comment_id ){

	if( !empty( $_POST['phone'] ) ){
		$phone = sanitize_text_field($_POST['phone']);
		add_comment_meta( $comment_id, 'phone', $phone );
	}

	if( !empty( $_POST['title'] ) ){
		$title = sanitize_text_field($_POST['title']);
		add_comment_meta( $comment_id, 'title', $title );
	}

	if( !empty( $_POST['rating'] ) ){
		$rating = intval($_POST['rating']);
		add_comment_meta( $comment_id, 'rating', $rating );
	}

}
Обратите внимание, что для защиты мы очищаем поля через sanitize_text_field().
Теперь, после публикации комментария в базе появятся подобные строчки:

Проверка заполнения обязательных полей
Поле рейтинга мы сделали обязательным. Но сейчас комментарий публикуется, даже если это поле не заполнено. Реализуем механизм проверки. Для этого используем фильтр preprocess_comment и, если рейтинг не был выставлен, отобразим текст об ошибке, не добавляя комментарий в базу данных:
// Проверяем, заполнено ли поле "Рейтинг"
add_filter( 'preprocess_comment', 'verify_extend_comment_meta_data' );
function verify_extend_comment_meta_data( $commentdata ) {

	// ничего не делаем если это ответ на комментарий
	if ( isset( $_REQUEST['action'] ) && $_REQUEST['action'] === 'replyto-comment' ) {
		return $commentdata;
	}

	if ( empty( $_POST['rating'] ) || ! (int)$_POST['rating'] ) {
		wp_die( __( 'Error: You did not add a rating. Hit the Back button on your Web browser and resubmit your comment with a rating.' ) );
	}

	return $commentdata;
}
Отображение содержимого метаполей во фронт-энде
С добавлением метаданных разобрались. Теперь возникает вопрос: как получить и отобразить метаданные комментария в форме? Для получения метаданных будем использовать функцию get_comment_meta().
Изменить код формы и добавить туда нужные данные можно через фильтр comment_text.
Два варианта вывода рейтинга
Рассмотрим 2 варианта, как можно было бы отобразить рейтинг.
Звёзды рейтинга из собственных картинок
В первом варианте мы будет отображать изображения звёзд, которые должны быть в виде картинок в папке плагина:
add_filter( 'comment_text', 'modify_extend_comment');
function modify_extend_comment( $text ){

  $plugin_url_path = WP_PLUGIN_URL;

  if( $commenttitle = get_comment_meta( get_comment_ID(), 'title', true ) ) {
	$commenttitle = '<strong>' . esc_attr( $commenttitle ) . '</strong><br/>';
	$text = $commenttitle . $text;
  }

  if( $commentrating = get_comment_meta( get_comment_ID(), 'rating', true ) ) {
	$commentrating = '<p class="comment-rating">  <img src="'. $plugin_url_path .
	'/extend-comment/images/'. $commentrating . 'star.gif"/><br/>Rating: <strong>'. $commentrating .' / 5</strong></p>';
	$text = $text . $commentrating;
	return $text;
  } else {
	return $text;
  }
}
В коде мы:
-
Получаем ссылку на папку с комментариями.
-
Проверяем наличие заголовка комментария и, если есть, добавляем его перед основным содержимым комментария.
- Проверяем наличие рейтинга и, если есть, добавляем его после основного содержимого комментария.
Если, к примеру, пользователь поставил четверку, то путь к картинке будет: http://example.com/wp-content/plugins/extend-comment/images/4star.gif. Естественно, картинки должны существовать…
Звёзды рейтинга из иконочного шрифта Dashicons
Второй вариант по алгоритму такой же, но тут будем использовать родную функцию WordPress wp_star_rating(), которая сама добавит красивые иконки звёзд:
// Отображение содержимого метаполей во фронт-энде
add_filter( 'comment_text', 'modify_extend_comment');
function modify_extend_comment( $text ){
	global $post;

	if( $commenttitle = get_comment_meta( get_comment_ID(), 'title', true ) ) {
		$commenttitle = '<strong>' . esc_attr( $commenttitle ) . '</strong><br/>';
		$text = $commenttitle . $text;
	}

	if( $commentrating = get_comment_meta( get_comment_ID(), 'rating', true ) ) {

		$commentrating = wp_star_rating( array (
			'rating' => $commentrating,
			'echo'=> false
		));

		$text = $text . $commentrating;
	}

	return $text;
}
Во фронт-энде функция wp_star_rating() не работает, её надо подключить. Также нужно подключить шрифты ‘dashicons’.
Проверим, есть ли у записи комментарии и, если есть, подключим файл с функцией и шрифт:
add_action( 'wp_enqueue_scripts', 'check_count_extend_comments' );
function check_count_extend_comments(){
	global $post;

	if( isset($post) && (int)$post->comment_count > 0 ){
		require_once ABSPATH .'wp-admin/includes/template.php';
		add_action('wp_enqueue_scripts', function(){
			wp_enqueue_style('dashicons');
		});

		$stars_css = '
		.star-rating .star-full:before { content: "f155"; }
		.star-rating .star-empty:before { content: "f154"; }
		.star-rating .star {
			color: #0074A2;
			display: inline-block;
			font-family: dashicons;
			font-size: 20px;
			font-style: normal;
			font-weight: 400;
			height: 20px;
			line-height: 1;
			text-align: center;
			text-decoration: inherit;
			vertical-align: top;
			width: 20px;
		}
		';

		wp_add_inline_style( 'dashicons', $stars_css );
	}

}
Шрифт ‘dashicons’ имеет объем в 45,3Кб без gzip сжатия и 28.3Кб с включенным на сервере сжатием. А сколько будут занимать места ваши картинки? Какой из способов выбрать — решать вам.
Вывод метаполей в админке
На этом создание плагина можно было бы закончить, но что если надо будет изменить метаданные комментария? Поэтому продолжим дорабатывать плагин и добавим возможность изменять метаполя на странице редактирования комментариев в админке.
Для этого добавим метаполя на страницу редактирования комментария с помощью хука add_meta_boxes_comment и функции add_meta_box(). Другими словами, мы ждем действие add_meta_boxes_comment (начало отрисовки дефолтных полей) и с помощью add_meta_box() добавляем новые к имеющимся.
<?php
// Добавляем новый метабокс на страницу редактирования комментария
add_action( 'add_meta_boxes_comment', 'extend_comment_add_meta_box' );
function extend_comment_add_meta_box(){
	add_meta_box( 'title', __( 'Comment Metadata - Extend Comment' ), 'extend_comment_meta_box', 'comment', 'normal', 'high' );
}

// Отображаем наши поля
function extend_comment_meta_box( $comment ){
	$phone  = get_comment_meta( $comment->comment_ID, 'phone', true );
	$title  = get_comment_meta( $comment->comment_ID, 'title', true );
	$rating = get_comment_meta( $comment->comment_ID, 'rating', true );

	wp_nonce_field( 'extend_comment_update', 'extend_comment_update', false );
	?>
	<p>
		<label for="phone"><?php _e( 'Phone' ); ?></label>
		<input type="text" name="phone" value="<?php echo esc_attr( $phone ); ?>" class="widefat" />
	</p>
	<p>
		<label for="title"><?php _e( 'Comment Title' ); ?></label>
		<input type="text" name="title" value="<?php echo esc_attr( $title ); ?>" class="widefat" />
	</p>
	<p>
		<label for="rating"><?php _e( 'Rating: ' ); ?></label>
		<span class="commentratingbox">
		<?php
		for( $i=1; $i <= 5; $i++ ){
		  echo '
		  <span class="commentrating">
			<input type="radio" name="rating" id="rating" value="'. $i .'" '. checked( $i, $rating, 0 ) .'/>
		  </span>';
		}
		?>
		</span>
	</p>
	<?php
}
Этот код похож на тот, который выводил поля в форме комментаривания в посте, и выполняет следующие действия:
-
Получает данные метаполей.
-
wp_nonce_field() выводит проверочное (защитное, одноразовое) скрытое поле для формы, повышая безопасность.
-
Очищает содержимое метаполей с помощью esc_attr() и выводит на экран. Ничего не проверяет. Если данных нет, то поле будет пустое.
- При выводе радио-кнопок проверяет, какое значение было выбрано и помечает html атрибутом
checked='checked'с помощью функции checked().
Сохранение метаполей в админке
На этом шаге необходимо создать механизм сохранения измененных данных на странице редактирования комментария. Это очень похоже на процесс сохранения метаданных из формы комментариев во фронд-энде.
add_action( 'edit_comment', 'extend_comment_edit_meta_data' );
function extend_comment_edit_meta_data( $comment_id ) {
	if( ! isset( $_POST['extend_comment_update'] ) || ! wp_verify_nonce( $_POST['extend_comment_update'], 'extend_comment_update' ) )
	return;

	if( !empty($_POST['phone']) ){
		$phone = sanitize_text_field($_POST['phone']);
		update_comment_meta( $comment_id, 'phone', $phone );
	}
	else
		delete_comment_meta( $comment_id, 'phone');

	if( !empty($_POST['title']) ){
		$title = sanitize_text_field($_POST['title']);
		update_comment_meta( $comment_id, 'title', $title );
	}
	else
		delete_comment_meta( $comment_id, 'title');

	if( !empty($_POST['rating']) ){
		$rating = intval($_POST['rating']);
		update_comment_meta( $comment_id, 'rating', $rating );
	}
	else
		delete_comment_meta( $comment_id, 'rating');

}
Здесь мы подключимся к хуку edit_comment и делаем следующее:
-
Проверим nonce-код и если проверка не пройдет — остановим выполнение функции.
- Проверим переданные данные по каждому полю и если у какого-то поля его нет — удалим само метаполе, чтобы не занимало место в базе данных. Если поле есть обновляем его и незабываем очищать для безопасности.
Удаление плагина
Наш собственный плагин, расширяющий функционал формы комментирования готов!
Единственное, правилом хорошего тона считается удаление данных, создаваемые плагином, в данном случае — наших метаполей. Ведь если удалить плагин, то данные плагина останутся никому не нужными…
Мы уже рассказывали, как правильно удалить плагин WordPress, потому в корне плагина создадим файл uninstall.php и пропишем в него:
if( ! defined('WP_UNINSTALL_PLUGIN') ) exit;

global $wpdb;

$wpdb->query("DELETE FROM $wpdb->commentmeta WHERE meta_key IN ('phone', 'title', 'rating')");
Вывод среднего рейтинга
По просьбам в комментариях были добавлены две функции, которые можно использовать в своих шаблонах (объект поста должен присутствовать на тот момент).
/**
 * Возвращает средний рейтинг поста.
 *
 * @return string
 */
get_the_extend_comment_post_rating();

// Если было 3 оценки (4, 4, 3) , то выведет 3.6666666666666665
echo get_the_extend_comment_post_rating();

/**
 * Возвращает HTML блок со средним рейтингом в виде звездочек для текущего поста.
 *
 * @see wp_star_rating()
 *
 * @return string
 */
get_the_extend_comment_post_star_rating();

// Пусть оценки те же, что в примере выше.
echo get_the_extend_comment_post_star_rating();

// Выведет html код
<div class="star-rating">
	<span class="screen-reader-text">3,7 rating</span>
	<div class="star star-full" aria-hidden="true"></div>
	<div class="star star-full" aria-hidden="true"></div>
	<div class="star star-full" aria-hidden="true"></div>
	<div class="star star-half" aria-hidden="true"></div>
	<div class="star star-empty" aria-hidden="true"></div>
</div>

// Визуально как выглядят звёзды было показано выше.
Подведем итоги
В этой статье мы разобрались:
- Как добавить произвольные поля в форму комментариев WordPress.
- Как добавить или обновить метаданные для комментария.
- Как добавить новый метабокс на страницу редактирования комментария.
- Как вывести и сохранить значения метаполей на странице редактирования комментария.
- Как удалить метаданные комментария.
Данный плагин можно еще улучшать и дорабатывать — всё зависит от поставленных задач. Ну а пока мы научились изменять дефолтную форму комментирования WordPress и сделали её более привлекательной для пользователя.
![]()
Extend Comment
Плагин размещён на GitHub, поэтому можете оставлять свои пожелания и предлагать улучшения там. Или в комментариях к этой статье.
Скачано: 1117, размер: 16KB
В WordPress существуют разнообразные типы контента, такие как записи, страницы, комментарии и т.д. Все они участвуют в формировании базового фундамента WordPress. Система WordPress, представляющая собой легко трансформируемую под различные нужды платформу, позволяет вносить различные по сложности изменения в базовые типы контента. Пользователь всегда может скорректировать представление и функциональность этих типов. В данной статье мы остановимся на комментариях, расскажем, каким образом можно изменить их поведение и представление.
Содержание
- Функция comment_form и ее аргументы
- Изменяем форму для комментариев с помощью функции comment_form
- Удаление полей из комментариев с помощью хуков
- Добавляем дополнительные данные к комментариям с помощью хуков
- Изменение вида комментариев для определенных типов записей
- Создание callback-функции для отображения комментариев
- Стилизация комментариев
Давайте подробно остановимся на WordPress функции comment_form. Она отвечает за отображение формы комментариев, которая чаще всего выводится на отдельных страницах и в записях WordPress. Основной вызов данной функции происходит в файле comments.php, хранящемся в папке с вашей темой. Также подключение comments.php может быть выполнено в файлах single.php, page.php и т.д. Оно реализуется как напрямую, так и опосредованно — через вызов функции comments_template.
Если мы будем применять функцию comment_form для вывода на экран формы, то форма отобразится в стандартном виде, используя параметры, заданные по умолчанию. Этими параметрами будут выступать поля Name (Имя), Email (Электронный адрес), Website (Сайт), а также поле для ввода комментария. Первые два параметра являются обязательными. В стандартной теме Twenty Eleven форма имеет следующий вид:

Важными аргументами функции comment_form являются:
— fields. С помощью этого параметра вы можете фактически управлять, какие поля будут отображены в форме для комментариев.
— comment_notes_before и comment_notes_after. Параметры используются для вывода на экран некоторых примечаний до и после формы с комментариями.
— title_reply. Параметр позволяет менять заголовок ответа, который по умолчанию имеет вид ‘Leave a Reply’.
— label_submit. Данный параметр используется для изменения текста на кнопке, предназначенной для отправки комментария.
Изменяем форму для комментариев с помощью функции comment_form
Давайте теперь приступим к изменению нашей формы для комментариев. Мы будем передавать функции comment_form различные параметры.
В том случае, если мы хотим изменить поля для формы комментариев, нам понадобится отредактировать значение массива fields. Поля по умолчанию в функции comment_form выглядят следующим образом:
$fields =  array(
    'author' => '<p class="comment-form-author">' . '<label for="author">' . __( 'Name' ) . '</label> ' . ( $req ? '<span class="required">*</span>' : '' ) .
        '<input id="author" name="author" type="text" value="' . esc_attr( $commenter['comment_author'] ) . '" size="30"' . $aria_req . ' /></p>',
    'email'  => '<p class="comment-form-email"><label for="email">' . __( 'Email' ) . '</label> ' . ( $req ? '<span class="required">*</span>' : '' ) .
        '<input id="email" name="email" type="text" value="' . esc_attr(  $commenter['comment_author_email'] ) . '" size="30"' . $aria_req . ' /></p>',
    'url'    => '<p class="comment-form-url"><label for="url">' . __( 'Website' ) . '</label>' .
        '<input id="url" name="url" type="text" value="' . esc_attr( $commenter['comment_author_url'] ) . '" size="30" /></p>',
);
К примеру, если нам необходимо удалить поле website, мы должны создать массив fields без поля website и передать его в функцию comment_form, как показано в следующем примере:
$commenter = wp_get_current_commenter();
$req = get_option( 'require_name_email' );
$aria_req = ( $req ? " aria-required='true'" : '' );
$fields =  array(
    'author' => '<p class="comment-form-author">' . '<label for="author">' . __( 'Name' ) . '</label> ' . ( $req ? '<span class="required">*</span>' : '' ) .
        '<input id="author" name="author" type="text" value="' . esc_attr( $commenter['comment_author'] ) . '" size="30"' . $aria_req . ' /></p>',
    'email'  => '<p class="comment-form-email"><label for="email">' . __( 'Email' ) . '</label> ' . ( $req ? '<span class="required">*</span>' : '' ) .
        '<input id="email" name="email" type="text" value="' . esc_attr(  $commenter['comment_author_email'] ) . '" size="30"' . $aria_req . ' /></p>',
);

$comments_args = array(
    'fields' =>  $fields
);

comment_form($comments_args);
Теперь, если мы взглянем на форму комментариев, то она будет выглядеть следующим образом:

Вдобавок к этому давайте изменим заголовок ответа на «Please give us your valuable comment» и заголовок для кнопки отправки на «Send My Comment».
Чтобы достигнуть этого, мы будем передавать аргументы в функцию comment_form.
$commenter = wp_get_current_commenter();
$req = get_option( 'require_name_email' );
$aria_req = ( $req ? " aria-required='true'" : '' );
$fields =  array(
    'author' => '<p class="comment-form-author">' . '<label for="author">' . __( 'Name' ) . '</label> ' . ( $req ? '<span class="required">*</span>' : '' ) .
        '<input id="author" name="author" type="text" value="' . esc_attr( $commenter['comment_author'] ) . '" size="30"' . $aria_req . ' /></p>',
    'email'  => '<p class="comment-form-email"><label for="email">' . __( 'Email' ) . '</label> ' . ( $req ? '<span class="required">*</span>' : '' ) .
        '<input id="email" name="email" type="text" value="' . esc_attr(  $commenter['comment_author_email'] ) . '" size="30"' . $aria_req . ' /></p>',
);

$comments_args = array(
    'fields' =>  $fields,
    'title_reply'=>'Please give us your valuable comment',
    'label_submit' => 'Send My Comment'
);

comment_form($comments_args);
Теперь форма комментариев будет выглядеть следующим образом:

Удаление полей из комментариев с помощью хуков
Форма комментариев в WordPress может быть изменена при помощи хуков и фильтров. Внесение изменений посредством хуков/фильтров является довольно полезным шагом, особенно оправданным в том случае, когда вы вносите изменения через плагин и не имеете доступа к редактированию файлов темы. Фильтр, позволяющий добавлять или удалять поля ищ формы комментариев, носит название comment_form_default_fields.
Давайте удалим поле URL, используя этот фильтр. Код, который будет отвечать за удаление, вы можете поместить либо в файл плагина, если вы изменяете через плагин, либо в файл functions.php вашей темы.
Код будет выглядеть следующим образом:
function remove_comment_fields($fields) {
    unset($fields['url']);
    return $fields;
}
add_filter('comment_form_default_fields','remove_comment_fields');
Здесь мы подцепляем функцию remove_comment_fields к фильтру comment_form_default_fields и затем сбрасываем url, чтобы удалить поле website.
Добавляем дополнительные данные к комментариям с помощью хуков
Мы можем также добавить поля к форме комментариев через фильтр comment_form_default_fields. Давайте добавим поле с возрастом через этот фильтр, затем сохраним данные этого поля и отобразим их в комментариях.
Добавить новое поле можно следующим образом:
function add_comment_fields($fields) {

    $fields['age'] = '<p class="comment-form-age"><label for="age">' . __( 'Age' ) . '</label>' .
        '<input id="age" name="age" type="text" size="30" /></p>';
    return $fields;

}
add_filter('comment_form_default_fields','add_comment_fields');
Как только мы добавим новое поле, нам понадобится присвоить ему некоторые стили в зависимости от используемой темы. Так как я использую тему Twenty Eleven, то стилизация будет осуществляться при помощи объединения стилей #respond .comment-form-age label с существующими стилями для других полей:
#respond .comment-form-author label,
#respond .comment-form-email label,
#respond .comment-form-url label,
#respond .comment-form-age label,
#respond .comment-form-comment label {
    background: #eee;
    -webkit-box-shadow: 1px 2px 2px rgba(204,204,204,0.8);
    -moz-box-shadow: 1px 2px 2px rgba(204,204,204,0.8);
    box-shadow: 1px 2px 2px rgba(204,204,204,0.8);
    color: #555;
    display: inline-block;
    font-size: 13px;
    left: 4px;
    min-width: 60px;
    padding: 4px 10px;
    position: relative;
    top: 40px;
    z-index: 1;
}
Если взглянуть на форму, то она будет выглядеть следующим образом:

Теперь, когда возраст указан в метаданных комментария, мы должны соединиться с comment_post и занести возраст в метаданные age комментария:
function add_comment_meta_values($comment_id) {

    if(isset($_POST['age'])) {
        $age = wp_filter_nohtml_kses($_POST['age']);
        add_comment_meta($comment_id, 'age', $age, false);
    }

}
add_action ('comment_post', 'add_comment_meta_values', 1);
Теперь, когда метаданные сохранены, их можно вывести в комментарии:
<?php echo "Comment authors age: ".get_comment_meta( $comment->comment_ID, 'age', true ); ?>
Изменение вида комментариев для определенных типов записей
Иногда полезно варьировать поля формы для комментариев в зависимости от типов записей. Давайте немного изменим предыдущий код, чтобы вывести на экран поле с возрастом только при задании определенного типа записи (пусть она называется Book).
Код, позволяющий выводить возраст только для произвольного типа записей book, будет следующим:
function add_comment_fields($fields) {

    if( is_singular( 'books' ) ) {

        $fields['age'] = '<p class="comment-form-age"><label for="age">' . __( 'Age' ) . '</label>' .
            '<input id="age" name="age" type="text" size="30" /></p>';
    }
    return $fields;

}
add_filter('comment_form_default_fields','add_comment_fields');
Таким образом, поле добавляется только в том случае, если запись имеет тип ‘Books’.
Создание callback-функции для отображения комментариев
Функция wp_list_comments используется для вывода на экран комментариев к записи. Вы можете прочитать про данную функцию в кодексе WordPress: http://codex.wordpress.org/Function_Reference/wp_list_comment.
Функция wp_list_comments обладает аргументом callback, в котором можно определить функцию, вызываемую для вывода комментария. В теме Twenty Eleven в файле comments.php вы можете увидеть следующую строку:
wp_list_comments( array( 'callback' => 'twentyeleven_comment' ) );
Мы изменим ее на
wp_list_comments( array( 'callback' => 'my_comments_callback' ) );
Таким образом, функция my_comments_callback будет вызываться для каждой записи.
Стилизация комментариев
Теперь мы стилизуем наши записи несколько иначе. Мы просто хотим вывести на экран содержимое записи и поле с возрастом комментатора. Также мы изменим цвет бэкграунда для комментариев.
Код для функции my_comments_callback будет выглядеть следующим образом:
function my_comments_callback( $comment, $args, $depth ) {
$GLOBALS['comment'] = $comment;
?>
<li <?php comment_class(); ?> id="li-comment-<?php comment_ID(); ?>">
<article id="comment-<?php comment_ID(); ?>" class="comment">
<div class="comment-content"><?php comment_text(); ?></div>
<p><?php echo "Comment authors age: ".get_comment_meta( $comment->comment_ID, 'age', true ); ?></p>
<div class="reply">
<?php comment_reply_link( array_merge( $args, array( 'reply_text' => __( 'Reply <span>↓</span>', 'twentyeleven' ), 'depth' => $depth, 'max_depth' => $args['max_depth'] ) ) ); ?>
</div>
</article>
</li>
<?php
}
Мы также изменим цвет бэкграунда в стилях:
.commentlist > li.comment {

    background: #99ccff;
    border: 3px solid #ddd;
    -moz-border-radius: 3px;
    border-radius: 3px;
    margin: 0 0 1.625em;
    padding: 1.625em;
    position: relative;
}
Теперь, если мы взглянем на комментарии, мы увидим следующее:

http://wp.tutsplus.com/tutorials/creative-coding/customizing-comments-in-wordpress-functionality-and-appearance/
comment_form() outputs a complete commenting form for use within a WordPress template.
Most strings and form fields may be controlled through the $args array passed into the function, while you may also choose to use the comment_form_default_fields filter to modify the array of default fields if you’d just like to add a new one or remove a single field.
All fields are also individually passed through a filter of the form comment_form_field_$name where $name is the key used in the array of fields.
The WordPress 3.0+ function – comment_form() has 2 parameters that can be optionally modified to your liking.
Here is the example arguments that can be used:
<?php comment_form($args, $post_id); ?>
$args:This contains our options for our strings and fields within the form and etc.$post_id:Post ID is used to generate the form, if null it will use the current post.
I’ve today modified comment form and added some CSS and noticed very big difference in my comment form.
Would like to share my changes with you.
Let’s get started:
Method-1) Using functions.php file – only for Genesis
- Go to
Appearance - Click
Editor - Open
functions.phpfile and put below code.
This is what I do have on Crunchify as I’m using Genesis WordPress framework theme.
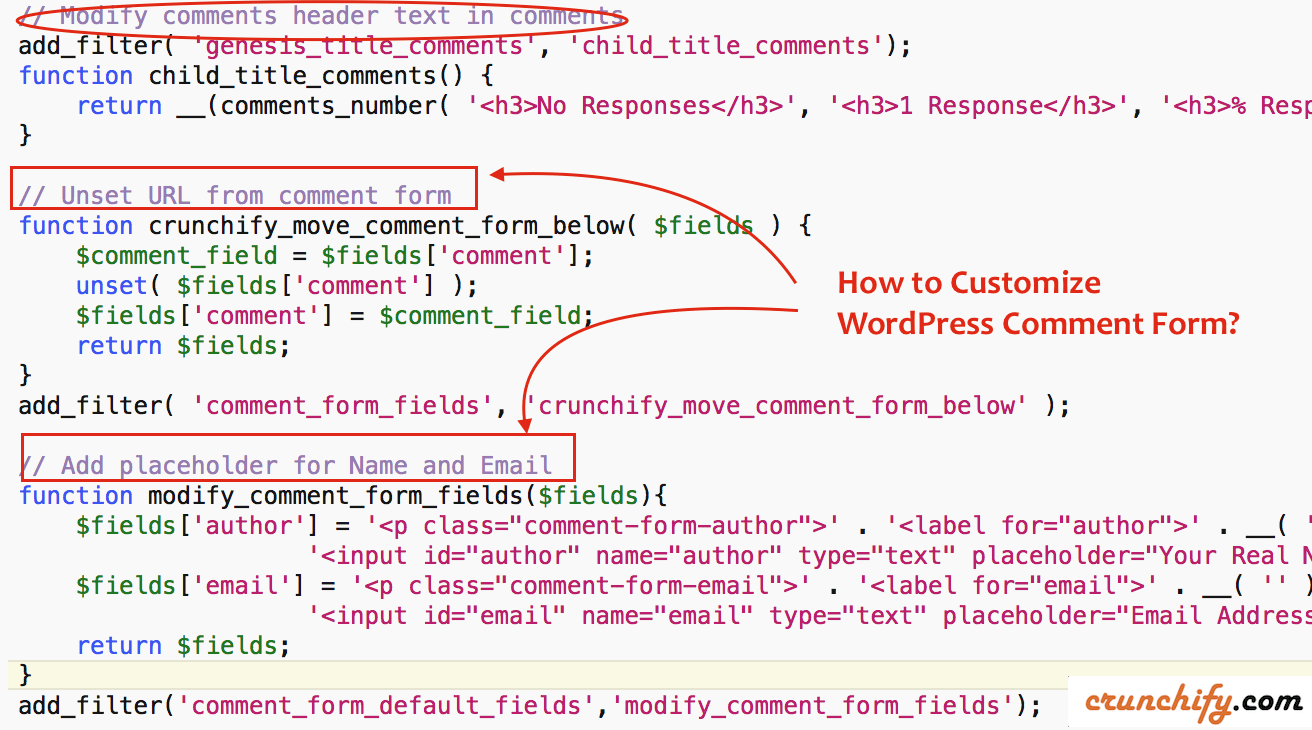
// Modify comments header text in comments
add_filter( 'genesis_title_comments', 'child_title_comments');
function child_title_comments() {
    return __(comments_number( '<h3>No Responses</h3>', '<h3>1 Response</h3>', '<h3>% Responses...</h3>' ), 'genesis');
}

// Unset URL from comment form
function crunchify_move_comment_form_below( $fields ) {
    $comment_field = $fields['comment'];
    unset( $fields['comment'] );
    $fields['comment'] = $comment_field;
    return $fields;
}
add_filter( 'comment_form_fields', 'crunchify_move_comment_form_below' );

// Add placeholder for Name and Email
function modify_comment_form_fields($fields){
    $fields['author'] = '<p class="comment-form-author">' . '<input id="author" placeholder="Your Name (No Keywords)" name="author" type="text" value="' .
                esc_attr( $commenter['comment_author'] ) . '" size="30"' . $aria_req . ' />'.
                '<label for="author">' . __( 'Your Name' ) . '</label> ' .
                ( $req ? '<span class="required">*</span>' : '' )  .
                '</p>';
    $fields['email'] = '<p class="comment-form-email">' . '<input id="email" placeholder="your-real-email@example.com" name="email" type="text" value="' . esc_attr(  $commenter['comment_author_email'] ) .
                '" size="30"' . $aria_req . ' />'  .
                '<label for="email">' . __( 'Your Email' ) . '</label> ' .
                ( $req ? '<span class="required">*</span>' : '' )
                 .
                '</p>';
    $fields['url'] = '<p class="comment-form-url">' .
             '<input id="url" name="url" placeholder="http://your-site-name.com" type="text" value="' . esc_attr( $commenter['comment_author_url'] ) . '" size="30" /> ' .
            '<label for="url">' . __( 'Website', 'domainreference' ) . '</label>' .
               '</p>';

    return $fields;
}
add_filter('comment_form_default_fields','modify_comment_form_fields');
Method-2) For any other WordPress theme
Just open comments.php file and replace $args with below code to beautify comment code with placeholders.
$args = array(
    'fields' => apply_filters(
        'comment_form_default_fields', array(
            'author' =>'<p class="comment-form-author">' . '<input id="author" placeholder="Your Name (No Keywords)" name="author" type="text" value="' .
                esc_attr( $commenter['comment_author'] ) . '" size="30"' . $aria_req . ' />'.
                '<label for="author">' . __( 'Your Name' ) . '</label> ' .
                ( $req ? '<span class="required">*</span>' : '' )  .
                '</p>'
                ,
            'email'  => '<p class="comment-form-email">' . '<input id="email" placeholder="your-real-email@example.com" name="email" type="text" value="' . esc_attr(  $commenter['comment_author_email'] ) .
                '" size="30"' . $aria_req . ' />'  .
                '<label for="email">' . __( 'Your Email' ) . '</label> ' .
                ( $req ? '<span class="required">*</span>' : '' )
                 .
                '</p>',
            'url'    => '<p class="comment-form-url">' .
             '<input id="url" name="url" placeholder="http://your-site-name.com" type="text" value="' . esc_attr( $commenter['comment_author_url'] ) . '" size="30" /> ' .
            '<label for="url">' . __( 'Website', 'domainreference' ) . '</label>' .
               '</p>'
        )
    ),
    'comment_field' => '<p class="comment-form-comment">' .
        '<label for="comment">' . __( 'Let us know what you have to say:' ) . '</label>' .
        '<textarea id="comment" name="comment" placeholder="Express your thoughts, idea or write a feedback by clicking here & start an awesome comment" cols="45" rows="8" aria-required="true"></textarea>' .
        '</p>',
    'comment_notes_after' => '',
    'title_reply' => '<div class="crunchify-text"> <h5>Please Post Your Comments & Reviews</h5></div>'
);
To customize comment form, you can use any HTML tags/elements as you can see I’ve placed extra placeholder html tag above.
Comment form – Before:

Comment form – After:

There are number of different ways you could modify comment form. Just keep adding different texts and html Styles to modify it.
Now what? Do you want to modify CSS with below look and feel?

If you want to modify CSS of your comment form then here is a handy code which you could add to your theme’s style.css file.
/* ## Comments
--------------------------------------------- */
.comment-respond,
.entry-pings,
.entry-comments {
    color: #444;
    padding: 20px 45px 40px 45px;
    border: 1px solid #ccc;
    overflow: hidden;
    background: #fff;
    -webkit-box-shadow: 0px 0px 8px rgba(0,0,0,0.3);
    -moz-box-shadow: 0px 0px 8px rgba(0,0,0,0.3);
    box-shadow: 0px 0px 8px rgba(0,0,0,0.3);
    border-left: 4px solid #444;
}
.entry-comments h3{
    font-size: 30px;
    margin-bottom: 30px;
}
.comment-respond h3,
.entry-pings h3{
    font-size: 20px;
    margin-bottom: 30px;
}
.comment-respond {
    padding-bottom: 5%;
    margin: 20px 1px 20px 1px;
        border-left: none !important;
}
.comment-header {
    color: #adaeb3;
    font-size: 14px;
    margin-bottom: 20px;
}
.comment-header cite a {
    border: none;
    font-style: normal;
    font-size: 16px;
    font-weight: bold;
}
.comment-header .comment-meta a {
    border: none;
    color: #adaeb3;
}
li.comment {
    background-color: #fff;
    border-right: none;
}
.comment-content {
    clear: both;
    overflow: hidden;
}
.comment-list li {
    font-size: 14px;
    padding: 20px 30px 20px 50px;
}
.comment-list .children {
    margin-top: 40px;
    border: 1px solid #ccc;
}
.comment-list li li {
    background-color: #f5f5f6;
}
.comment-list li li li {
    background-color: #fff;
}
.comment-respond input[type="email"],
.comment-respond input[type="text"],
.comment-respond input[type="url"] {
    width: 50%;
}
.comment-respond label {
    display: block;
    margin-right: 12px;
}
.entry-comments .comment-author {
    margin-bottom: 0;
    position: relative;
}
.entry-comments .comment-author img {
    border-radius: 50%;
    border: 5px solid #fff;
    left: -80px;
    top: -5px;
    position: absolute;
    width: 60px;
}
.entry-pings .reply {
    display: none;
}
.bypostauthor {
}
.form-allowed-tags {
    background-color: #f5f5f5;
    font-size: 16px;
    padding: 24px;
}
.comment-reply-link{
    cursor: pointer;
    background-color: #444;
    border: none;
    border-radius: 3px;
    color: #fff;
    font-size: 12px;
    font-weight: 300;
    letter-spacing: 1px;
    padding: 4px 10px 4px;
    text-transform: uppercase;
    width: auto;
}
.comment-reply-link:hover{
    color: #fff;
}
.comment-notes{
    display:none;
}
We are using currently Disqus comment plugin. So far we like it & will continue to use it.
Join the Discussion
If you liked this article, then please share it on social media. Still have any questions about an article, leave us a comment.
Share:

I’m an Engineer by profession, Blogger by passion & Founder of Crunchify, LLC, the largest free blogging & technical resource site for beginners. Love SEO, SaaS, #webperf, WordPress, Java. With over 16 millions+ pageviews/month, Crunchify has changed the life of over thousands of individual around the globe teaching Java & Web Tech for FREE.
Reader Interactions
Do you want to change the style of the WordPress comment form on your website?
Comments play an important role in building user engagement on a website. A good-looking user-friendly comment form encourages users to participate in the discussion.
In this article, we’ll show you how to easily style the WordPress comment form to boost engagement on your website.

Before Getting Started
WordPress themes control the appearance of your website. Each WordPress theme comes with several files including template files, functions file, JavaScripts, and stylesheets.
Stylesheets contain the CSS rules for all elements used by your WordPress theme. You can add your own custom CSS to override your theme’s style rules.
If you haven’t done this before, then see our article on how to add custom CSS in WordPress for beginners.
Apart from CSS, you may also need to add some functions to modify the default appearance of your WordPress comment form. If you haven’t done this before, then please see our article on how to copy and paste code in WordPress.
That being said, let’s take a look at how to style the WordPress comment form.
Since this is a fairly comprehensive guide, we have created a table of content for easy navigation:
- Style WordPress Comments Using SeedProd Theme Builder
- Change WordPress Comments with Default CSS Classes
- Adding Social Login to WordPress Comment Form
- Adding Comment Policy Text in WordPress Comment Form
- Moving Comment Text Field to Bottom
- Removing Website (URL) Field from WordPress Comment Form
- Adding Subscribe to Comments Checkbox in WordPress
- Add Custom Fields to WordPress Comment Form
Styling WordPress Comment Form Using SeedProd Theme Builder
This method requires SeedProd which is the best WordPress page and theme builder plugin on the market.
It is recommended for beginners with no coding experience. However, the downside of this method is that it will replace your existing WordPress theme with a custom theme.
First, you need to install and activate the SeedProd plugin. For more details, see our step-by-step guide on how to install a WordPress plugin.
Note: You’ll need at least the PRO plan to access the theme builder feature.
Upon activation, you’ll need to create templates for your custom WordPress theme. SeedProd allows you to easily generate these templates using one of their built-in themes.
For detailed instructions, see our tutorial on how to create a custom WordPress theme without coding.
Once you have generated your theme templates, you need to edit Single Post template.

This will load the single post preview in the SeedProd theme builder interface. You’ll notice the comment form block at the bottom of the preview.

Simply click on the comment form and you will see its properties in the left panel.
From here, you can add a comment note or privacy policy, you can also switch to the Advanced tab to edit comment form style without writing any CSS code.

Once you are finished, don’t forget to click on the Save button to publish your changes.
SeedProd makes it super easy to change the style of any element on your website without writing code.
However, it is a theme builder and you may already be using a WordPress theme that you like. In that case, the following tips will help you manually change comment form styles in WordPress.
Inside most WordPress themes there is a template called comments.php. This file is used to display comments and comment forms on your blog posts. The WordPress comment form is generated by using the function: <?php comment_form(); ?>.
By default, this function generates your comment form with three text fields (Name, Email, and Website), a textarea field for the comment text, a checkbox for GDPR compliance, and the submit button.
You can easily modify each of these fields by simply tweaking the default CSS classes. Below is a list of the default CSS classes that WordPress adds to each comment form.
#respond { }
#reply-title { }
#cancel-comment-reply-link { }
#commentform { }
#author { }
#email { }
#url { }
#comment
#submit
.comment-notes { }
.required { }
.comment-form-author { }
.comment-form-email { }
.comment-form-url { }
.comment-form-comment { }
.comment-form-cookies-consent { }
.form-allowed-tags { }
.form-submit
By simply tweaking these CSS classes, you can completely change the look and feel of your WordPress comment form.
Let’s go ahead and try to change a few things, so you can get a good idea on how this works.
First, we will start by highlighting the active form field. Highlighting the currently active field makes your form more accessible for people with special needs, and it also makes your comment form look nicer on smaller devices.
#respond {
background: #fbfbfb;
padding:0 10px 0 10px;
}

/* Highlight active form field */

#respond input[type=text], textarea {
  -webkit-transition: all 0.30s ease-in-out;
  -moz-transition: all 0.30s ease-in-out;
  -ms-transition: all 0.30s ease-in-out;
  -o-transition: all 0.30s ease-in-out;
  outline: none;
  padding: 3px 0px 3px 3px;
  margin: 5px 1px 3px 0px;
  border: 1px solid #DDDDDD;
}

#respond input[type=text]:focus,
input[type=email]:focus,
input[type=url]:focus,
textarea:focus {
box-shadow: 0 0 5px rgba(81, 203, 238, 1);
margin: 5px 1px 3px 0px;
border: 2px solid rgba(81, 203, 238, 1);
}
This is how our form looked like in the WordPress Twenty Sixteen theme after the changes:

Using these classes, you can change the behavior of how text appears inside input boxes. We will go ahead and change the text style of the author name and the URL fields.
#author, #email {
font-family: "Open Sans", "Droid Sans", Arial;
font-style:italic;
color:#1d1d1d;
letter-spacing:.1em;
}

#url  {
color: #1d1d1d;
font-family: "Luicida Console", "Courier New", "Courier", monospace;
}
If you take a close look in the screenshot below, the name and email field font is different than the website URL.

You can also change the style of the WordPress comment form submit button. Instead of using the default submit button, let’s give it some CSS3 gradient and box-shadow.
#submit {
background:-moz-linear-gradient(top, #44c767 5%, #5cbf2a 100%);
background:-webkit-linear-gradient(top, #44c767 5%, #5cbf2a 100%);
background:-o-linear-gradient(top, #44c767 5%, #5cbf2a 100%);
background:-ms-linear-gradient(top, #44c767 5%, #5cbf2a 100%);
background:linear-gradient(to bottom, #44c767 5%, #5cbf2a 100%);
background-color:#44c767;
-moz-border-radius:28px;
-webkit-border-radius:28px;
border-radius:28px;
border:1px solid #18ab29;
display:inline-block;
cursor:pointer;
color:#ffffff;
font-family:Arial;
font-size:17px;
padding:16px 31px;
text-decoration:none;
text-shadow:0px 1px 0px #2f6627;
}

#submit:hover {
background:-webkit-gradient(linear, left top, left bottom, color-stop(0.05, #5cbf2a), color-stop(1, #44c767));
background:-moz-linear-gradient(top, #5cbf2a 5%, #44c767 100%);
background:-webkit-linear-gradient(top, #5cbf2a 5%, #44c767 100%);
background:-o-linear-gradient(top, #5cbf2a 5%, #44c767 100%);
background:-ms-linear-gradient(top, #5cbf2a 5%, #44c767 100%);
background:linear-gradient(to bottom, #5cbf2a 5%, #44c767 100%);
background-color:#5cbf2a;
}
#submit:active {
position:relative;
top:1px;
}

Taking WordPress Comment Forms to the Next Level
You might be thinking that was too basic. Well, we have to start there, so everyone can follow along.
You can take your WordPress comment form to the next level by rearranging form fields, adding social login, comment subscriptions, comment guidelines, quicktags, and more.
Let’s start with adding social logins to WordPress comments.
The first thing you need to do is install and activate the Super Socializer plugin. For more details, see our step by step guide on how to install a WordPress plugin.
Upon activation, you need to visit Super Socializer » Social Login and then check the box that says ‘Enable Social Login’.

This brings up the social login options panel. First, click the ‘Advanced Configuration’. tab
Then, make sure the ‘Enable at comment form’ box is checked.

Next, click the ‘Basic Configuration’ tab. Here, you can choose the social networks you want to add by checking the boxes in the ‘Select Social Networks’ section.

Below this, the plugin will require API keys in order to connect with social platforms. Simply click on the ‘Question Mark’ icon to bring up the instructions on how to get this for each platform.

Once you’re done, click the ‘Save Changes’ button to save your social login settings.
You can now visit your website to see the social login buttons above your comment form.

We love all of our users, and we really appreciate them taking a few minutes to leave a comment on our site. However, to create a healthy discussion environment it is important to moderate comments.
To have full transparency, we created a comment policy page, but you can’t just put this link in the footer.
We wanted to have our comment policy be prominent and visible for all users who are leaving a comment. This is why we decided to add the comment policy in our WordPress comment form.
If you want to add a comment policy page, then the first thing you need to do is create a WordPress page and define your comment policy (you can steal ours and modify it to meet your needs).
After that, you can add the following code in your theme’s functions.php file or a site-specific plugin.
function wpbeginner_comment_text_before($arg) {
    $arg['comment_notes_before'] .= '<p class="comment-policy"">We are glad you have chosen to leave a comment. Please keep in mind that comments are moderated according to our <a href="http://www.example.com/comment-policy-page/">comment policy</a>.</p>';
    return $arg;
}

add_filter('comment_form_defaults', 'wpbeginner_comment_text_before');
The above code will replace the default comment form before notes with this text. We have also added a CSS class in the code, so that we can highlight the notice using CSS. Here is the sample CSS we used:
p.comment-policy {
    border: 1px solid #ffd499;
    background-color: #fff4e5;
    border-radius: 5px;
    padding: 10px;
    margin: 10px 0px 10px 0px;
    font-size: small;
    font-style: italic;
}
This is how it looked on our test site:

If you want to display the link after the comment text area, then use the following code.
function wpbeginner_comment_text_after($arg) {
    $arg['comment_notes_after'] .= '<p class="comment-policy"">We are glad you have chosen to leave a comment. Please keep in mind that comments are moderated according to our <a href="http://www.example.com/comment-policy-page/">comment policy</a>.</p>';
    return $arg;
}

add_filter('comment_form_defaults', 'wpbeginner_comment_text_after');
Don’t forget to change the URL accordingly, so it goes to your comment policy page rather than example.com.
By default, the WordPress comment form displays the comment text area first and then the name, email, and website fields. This change was introduced in WordPress 4.4.
Before that, WordPress websites displayed name, email, and website fields first, and then the comment text box. We felt that our users are used to seeing the comment form in that order, so we still use the old field order on WPBeginner.
If you want to do that, then all you need to do is add the following code to your theme’s functions.php file or a site-specific plugin.
function wpb_move_comment_field_to_bottom( $fields ) {
$comment_field = $fields['comment'];
unset( $fields['comment'] );
$fields['comment'] = $comment_field;
return $fields;
}

add_filter( 'comment_form_fields', 'wpb_move_comment_field_to_bottom');
This code simply moves the comment text area field to the bottom.

Remove Website (URL) Field from WordPress Comment Form
The website field in the comment form attracts a lot of spammers. While removing it won’t stop spammers or even reduce spam comments, it will certainly save you from accidentally approving a comment with bad author website link.
It will also reduce a field from the comment form, making it easier and more user-friendly. For more on this topic, see our article on removing website url field from WordPress comment form
To remove URL field from comment form, simply add the following code to your functions.php file or a site-specific plugin.
function wpbeginner_remove_comment_url($arg) {
    $arg['url'] = '';
    return $arg;
}
add_filter('comment_form_default_fields', 'wpbeginner_remove_comment_url');

When users leave a comment on your website, they might want to follow up on that thread to see if someone has replied to their comment. By adding a subscribe to comments checkbox, you enable users to receive instant notifications whenever a new comment appears on the post.
To add this checkbox, the first thing you need to do is install and activate Subscribe to Comments Reloaded plugin. Upon activation, you need to visit StCR » Comment Form page to configure the plugin settings.
For detailed step-by-step instructions, see our article on how to allow users to subscribe to comments in WordPress.

Want to add extra fields to your WordPress comment form? For instance, an optional field where users can add their Twitter handle?
Simply install and activate the WordPress Comments Fields plugin. Upon activation, go to the ‘Comments Fields’ page and switch to the ‘Comment Fields’ tab.

Simply drag and drop a custom field and give it a title, description, and data name.
Once you are done adding the fields, don’t forget to click on the Save all changes button.
You can now view your comment form to see the custom fields in actions.

The custom fields are then displayed in comment moderation and below the comment content.

For more details, see our tutorial on how to add custom fields to the comment form in WordPress.
We hope this article helped you learn how to style WordPress comment form to make it more fun for your users. You may also want to see our tips to get more comments on your WordPress blog posts.
If you liked this article, then please subscribe to our YouTube Channel for WordPress video tutorials. You can also find us on Twitter and Facebook.
Disclosure: Our content is reader-supported. This means if you click on some of our links, then we may earn a commission. See how WPBeginner is funded, why it matters, and how you can support us.
Editorial Staff at WPBeginner is a team of WordPress experts led by Syed Balkhi. We have been creating WordPress tutorials since 2009, and WPBeginner has become the largest free WordPress resource site in the industry.