
Один из ключевых файлов темы WordPress, который отвечает за подключение стилей, встроенных функций и скриптов. Благодаря ему происходит передача всех необходимых данных для поочередного запуска модулей и структуры сайта браузеру. Не требует постоянной настройки.
Что такое хедер сайта?
Прямой перевод – «шапка». Находится в верхней части, может быть оформлена по общему стилю или индивидуально. Основные элементы:
- название;
- слоган;
- логотип компании;
- контактные данные;
- навигация
Используя правильную компоновку навигационных элементов, привлекательный дизайн и краткую информацию о деятельности сайта, можно значительно улучшить поведенческие факторы, включая первое впечатление посетителей. Header.php находится в корневой директории выбранного шаблона.
Для улучшения работы сайта – “Как правильно обновить и подключить jQuery в ВордПресс”
Содержимое header WordPress

Добавление метатегов в хедер осуществляется при помощи текстового редактора (рекомендуется Notepad++). В их список входят: head, title, meta, script, link. Как пример, рассмотрим наиболее полный файл без лишних элементов. Дальнейшее внедрение дополнительного функционала зависит от потребностей отдельного заказчика.
Редакция сайта рекомендует – “Как добавить функции WordPress в пользовательский файл PHP”
Кодовая часть
Необходимо добавить следующие строки в верхнюю часть functions.php:
| define(“THEME_DIR”, get_template_directory_uri()); /*— REMOVE GENERATOR META TAG —*/ remove_action(‘wp_head’, ‘wp_generator’); // ENQUEUE STYLES function enqueue_styles() { /** REGISTER css/screen.css **/ wp_register_style( ‘screen-style’, THEME_DIR . ‘/css_path/screen.css’, array(), ‘1’, ‘all’ ); wp_enqueue_style( ‘screen-style’ ); /** REGISTER HTML5 Shim **/ wp_register_script (‘html5-shim’, ‘http://html5shim.googlecode.com/svn/trunk/html5.js’, array(‘jquery’ ), ‘1’, false ); wp_enqueue_script( ‘html5-shim’ ); /** REGISTER HTML5 OtherScript.js **/ wp_register_script( ‘custom-script’, THEME_DIR . ‘/js_path/customscript.js’, array( ‘jquery’ ), ‘1’, false ); wp_enqueue_script( ‘custom-script’ ); |
В header.php следует прописать код:
| <!doctype html> <html <?php language_attributes(); ?> class=”no-js no-svg”> <head> <!–=== META TAGS ===–> <meta http-equiv=”X-UA-Compatible” content=”IE=edge,chrome=1″> <meta charset=”<?php bloginfo( ‘charset’ ); ?>” /> <meta name=”description” content=”description”> <meta name=”keywords” content=”keywords”> <meta name=”author” content=”Your Name”> <meta name=”viewport” content=”width=device-width, initial-scale=1, maximum-scale=1″> <!–=== LINK TAGS ===–> <link rel=”shortcut icon” href=”<?php echo THEME_DIR; ?>/path/favicon.ico” /> <link rel=”alternate” type=”application/rss+xml” title=”<?php bloginfo(‘name’); ?> RSS2 Feed” href=”<?php bloginfo(‘rss2_url’); ?>” /> <link rel=”pingback” href=”<?php bloginfo(‘pingback_url’); ?>” /> <!–=== TITLE ===–> <title><?php wp_title(); ?> – <?php bloginfo( ‘name’ ); ?></title> <!–=== WP_HEAD() ===–> <?php wp_head(); ?> |
Подробно рассмотрев пример, указанный выше, разделим его на несколько важных элементов, обязательных в файле:
- doctype; (Тип документа)
- языковые атрибуты (ранее использовались условия для браузеров старых версий, однако современный вариант упускает этот момент);
- список метатегов;
- фавикон, RSS, пингбек;
- заголовок;
- при необходимости функции «wp_enqueue_script» и «wp_enqueue_style».
Важно: В сети можно встретить рекомендации добавлять комментарии к строкам, ведь – это сократит время поиска нужных кодов. На самом деле, с точки зрения поисковой эффективности – это мусор на который можно сократить страницу. Мы рекомендуем не злоупотреблять комментариями и прибегать к ним в крайних случаях.
Рекомендуем к прочтению –“Актуальность скриптов WordPress в 2020 году”
Работа с function.php
Указанный ранее код уже помещен в функциональный файл. Некоторые элементы позволяют нам сократить затраты ресурсов сервера на обработку запросов путем создания константы THEME_DIR. Это изложено в первой строке, где сохраняется директория шаблона. Является важным элементом оптимизации темы. Некоторые вебмастера идут сложным путем, вызывая повторные запросы через «get_template_directory_uri()».
Следующая строка избавляет от генератора метатегов, который демонстрирует текущую версию шаблона пользователям (включая злоумышленников).
| /*— REMOVE GENERATOR META TAG —*/; remove_action(‘wp_head’, ‘wp_generator’); |
Добавление CSS
Теперь необходимо добавить тег link в header.php – для этого создается функция:
| // ENQUEUE STYLES; function enqueue_styles() { /** REGISTER css/screen.cs **/ wp_register_style( ‘screen-style’, THEME_DIR . ‘/css_path/screen.css’, array(), ‘1’, ‘all’ ); wp_enqueue_style( ‘screen-style’ ); |
Используются «wp_enqueue_script» и «wp_enqueue_style» согласно рекомендациям руководства по WordPress. Очередность действий:
- Создание «enqueue_styles».
- Вызов «add_action», если происходит событие «wp_enqueue_scripts».
Содержит внутри строки:
| /** REGISTER css/screen.cs **/; wp_register_style( ‘screen-style’, THEME_DIR . ‘/css_path/screen.css’, array(), ‘1’, ‘all’ ); wp_enqueue_style( ‘screen-style’ ); |
Для регистрации таблицы стилей используется «wp_register_style», она требует список параметров:
- Выбор доступного имени.
- Указание пути к файлу (в данной ситуации используется константа THEME_DIR).
- Вписываются условия, необходимые файлы для предварительной загрузки, название стилей.
- используемая версия.
- Медиа-атрибут тега link.
Далее, вызывается «wp_enqueue_style» и передается имя стиля, который будет применен. Для добавления нескольких образцов в header WordPress можно повторно копировать строки, а также изменять имеющиеся параметры.
Советуем к прочтению – “Как добавить страницу администратора, не добавляя ее в меню”
Добавление скриптов
Применяя данный код происходит добавление скриптов:
| // ENQUEUE SCRIPTS; function enqueue_scripts() { /** REGISTER HTML5 Shim **/ wp_register_script (‘html5-shim’, ‘http://html5shim.googlecode.com/svn/trunk/html5.js’, array(‘jquery’ ), ‘1’, false ); wp_enqueue_script( ‘html5-shim’ ); wp_register_script( ‘custom-script’, THEME_DIR . ‘/js_path/customscript.js’, array( ‘jquery’ ), ‘1’, false ); wp_enqueue_script( ‘custom-script’ ); |
Процесс аналогичен подключению стилей, но используются другие функции («wp_register_script» и «wp_enqueue_script»). Для первой необходимы схожие параметры, как для «wp_register_style» – отличается лишь 5 пункт, в котором определяется, будет ли добавлен вызов через «wp_head» (значение fals) или «wp_footer» (значение true).
Через «wp_enqueue_script» указывается имя скрипта для интеграции. Для большего количества образцов необходимо повторно скопировать код, изменить параметры, имя и директорию.
Header WordPress
Стандартный файл содержит набор тегов и функций, используемых по умолчанию. Рассмотрим их особенности и функционал.
<html>
Устанавливаются языковые атрибуты или добавляются классы в соответствии с версией браузера (больше не применяется).
| <html <?php language_attributes(); ?> class=”no-js no-svg”> |
Добавление метатегов в хедер является важной операцией, поскольку браузеру передается важная информация для правильного отображения темы.
Строка отключающая использование браузером Quirks Mode – данный режим плохо сказывается на разметке:
| <meta http-equiv=”X-UA-Compatible” content=”IE=edge,chrome=1″> |
Указание кодировки для правильного отображения шрифтов:
| <meta charset=”<?php bloginfo( ‘charset’ ); ?>” /> |
Параметры, улучшающие SEO-показатели ресурса (описание, ключевые слова):
| <meta name=”description” content=”description”>
<meta name=”keywords” content=”keywords”> |
<link>
Добавление favicon для сайта:
| <link rel=”shortcut icon” href=”<?php echo THEME_DIR; ?>/path/favicon.ico” /> |
Ссылка RSS-ленты:
| <link rel=”alternate” type=”application/rss+xml” title=”<?php bloginfo(‘name’); ?> RSS2 Feed” href=”<?php bloginfo(‘rss2_url’); ?>” /> |
Ссылка пингбек:
| <link rel=”pingback” href=”<?php bloginfo(‘pingback_url’); ?>” /> |
<title>
Высокая важность. Изменяет стандартный заголовок, улучшая SEO-параметры:
| <title><?php wp_title(); ?> – <?php bloginfo( ‘name’ ); ?></title> |
Список стандартных и наиболее применяемых функций:
- wp_head WordPress – используется для добавления кода из плагинов, скриптов, библиотек;
- get_header WordPress – выполняет подключение файла шаблона (для каждой страницы отдельное имя).
Заключение
Таким образом осуществляется настройка header WordPress. Файл требует вмешательства только на начальном этапе подготовки темы. Повторное использование необходимо при подключении дополнительных функций, скриптов или таблиц стилей. Рассмотрены основные теги и их предназначение. Разработчики постоянно модернизируют платформу для минимизации человеческих действий в редактировании подобных файлов. Для безопасности, не рекомендуется использовать сторонние и непроверенные скрипты.
Для расширения ваших знаний – “Настройка файла robots.txt для WordPress”
Обратно пишу тебе разлюбезный читатель, поскольку выдалась свободная минутка. И одолела меня непреодолимая тяга, поведать о том —
Как легко изменить шапку сайта
Тем паче, обещал я это в прошлой своей статье — Как установить шаблон на WordPress.
Пардоньте, за такой вот сплагиаченный слог приветствия, из фильма «Белое солнце пустыни», не смог удержаться. Надеюсь никто не в обиде.
Сегодня, как уже всем стало понятно, речь пойдет о том, как же можно изменить стандартную шапку блога. Т.е. о том, как вставить новую картинку в верхнюю часть нашего сайта, которая называется Хедер (Header).
Для экспериментов, опять буду использовать клон своего блога, размещенный на локальном сервере.
Итак, поехали.
В первую очередь необходимо зайти в админ панель и немножко изменить код, в двух файлах, которые отвечают за отображение хедера и за стили. Файлы эти называются: header.php и style.css соответственно.
Зачем же, что-то менять? Да еще и в коде. Спросите вы. Отвечаю! Вся беда в том, что функционал шаблона GreenChilli, позволяет вставить картинку размером, всего лишь 286×50 px. Это, как вы понимаете, очень маленький размер, который не совсем соответствует идее блога.
Заходим в админку, переходим к меню «Внешний вид», следом к меню «Редактор» и наблюдаем перед глазами, окно редактора. Ищем справа файл header.php, кнопаем на него, и видим тот самый код, в который сейчас будем вносить изменения. Я выделил кусочек кода, который отвечает за саму картинку в шапке и за вывод формы поиска справа. Как видим этот код заключен между тегами
<div id=»header»> </div>
Использование атрибута id говорит о том, что стилевой идентификатор, в данном случае header, должен быть в единственном экземпляре. Это я так решил поумничать.
Внешний вид идентификатора header, т.е. нашей шапки, заключенного в теги <div> </div > прописывается в файле стилей — style.css

Код, который отвечает за вывод формы поиска, мы трогать не будем, а вот все остальное безжалостно удалим. Так же необходимо удалить скобочку вот здесь <?php }
Жмем на кнопку «Обновить файл»
Небольшой совет, дорогой читатель, перед тем вносить какие-либо изменения в код, сохраняй редактируемый файл. Сколько раз бывало уже, наудаляеш чего-нибудь, а шаблон потом раз, и перекосило.

Итак, давайте посмотрим, что у нас получилось.

Вот это белое поле вверху, и будет место для нашей новой шапки. Единственно, что мне не сильно нравится, это форма поиска с правой стороны. Удалять ее не будем, а просто спрячем.
Возвращаемся опять в редактор, выбираем файл style.css, ищем в этом файле вот такой блок.

И после открывающей скобочки вставляем следующую строчку – visibility: hidden; Нажимаем «Обновить»
В результате код должен выглядеть вот так.

Все! Место для новой шапки подготовлено. Осталось только, ее нарисовать и вставить.
Советую скачать очень удобную программку. Которая в дальнейшем, очень пригодится и которая называется PicPick. Функций у нее много, но что потребуется в данный момент, так это линейка. Качаем программку, устанавливаем.

Измеряем линейкой это белое поле и у нас получается 960 на 114 px.
Теперь необходимо подготовить красивую картинку такого точно размера, вставить там свою фотографию, нарисовать логотип, написать имя сайта, и т.д., и т.п. Я ограничился малым, тем, что сделал синий фон, написал название сайта, сделал небольшой логотипчик и придумал слоган.
Как делать картинку в Фотошопе или в другом графическом редакторе, я расскажу в позже. В принципе, ничего мега сложного в этом нет. Я думаю справится любой, у кого есть хоть какой-то, малейший опыт работы в этой программе.
Итак, картинка готова. Называем ее ну, например, header.jpg, и заливаем на хостинг по FTP. Причем заливаем по адресу ….wp-content/themes/greenchilli/images
Далее опять открываем редактор. Открываем файл стилей, ищем вот такой блок:

И после открывающей скобки вставляем вот такой вот код:
background: url (‘…/greenchilli/images/header.jpg’);
В результате должно получиться так:

Нажимаем “Обновить», переходим по адресу блога в браузере и любуемся новой симпатичной шапочкой.
Пожалуйста подписывайтесь на новые статьи. Никакого спама, только полезная информация.
Вот и все! Таким вот образом мы разобрались с тем как изменить шапку сайта нашего любимого WordPress. Если остались вопросы, пишите в комментариях, всегда буду рад помочь.
Topics
- Custom Header
- What are Custom Headers?
- Add Custom Header Support to your Theme
- Flexible Header Image
- Header text
- Examples
- Set a custom header image
- Use flexible headers
- Displaying Custom Header
- Backwards Compatibility
- Function Reference
Custom headers allow site owners to upload their own “title” image to their site, which can be placed at the top of certain pages. These can be customized and cropped by the user through a visual editor in the Appearance > Header section of the admin panel. You may also place text beneath or on top of the header. To support fluid layouts and responsive design, these headers may also be flexible. Headers are placed into a theme using get_custom_header(), but they must first be added to your functions.php file using add_theme_support(). Custom headers are optional.
To set up a basic, flexible, custom header with text you would include the following code:
<?php
function themename_custom_header_setup() {
	$args = array(
		'default-image'      => get_template_directory_uri() . 'img/default-image.jpg',
		'default-text-color' => '000',
		'width'              => 1000,
		'height'             => 250,
		'flex-width'         => true,
		'flex-height'        => true,
	);
	add_theme_support( 'custom-header', $args );
}
add_action( 'after_setup_theme', 'themename_custom_header_setup' );
The after_setup_theme hook is used so that custom headers are registered after the theme is loaded.
When you enable Custom Headers in your theme, users can change their header image using the WordPress theme Customizer. This gives users more control and flexibility over the look of their site.
To enable Custom Headers in your theme, add the following to your functions.php file:
add_theme_support( 'custom-header' );When enabling Custom Headers, you can configure several other options by passing along arguments to the add_theme_support() function.
You can pass specific configuration options to the add_theme_support function using an array:
<?php
function themename_custom_header_setup() {
	$defaults = array(
		// Default Header Image to display.
		'default-image'          => get_template_directory_uri() . '/images/headers/default.jpg',
		// Display the header text along with the image.
		'header-text'            => false,
		// Header text color default.
		'default-text-color'     => '000',
		// Header image width (in pixels).
		'width'                  => 1000,
		// Header image height (in pixels).
		'height'                 => 198,
		// Header image random rotation default.
		'random-default'         => false,
		// Enable upload of image file in admin.
		'uploads'                => false,
		// Function to be called in theme head section.
		'wp-head-callback'       => 'wphead_cb',
		// Function to be called in preview page head section.
		'admin-head-callback'    => 'adminhead_cb',
		// Function to produce preview markup in the admin screen.
		'admin-preview-callback' => 'adminpreview_cb',
	);
}
add_action( 'after_setup_theme', 'themename_custom_header_setup' );
If flex-height or flex-width are not included in the array, height and width will be fixed sizes. If flex-height and flex-width are included, height and width will be used as suggested dimensions instead.
By default, the user will have the option of whether or not to display header text over the image. There is no option to force the header text on the user, but if you want to remove the header text completely, you can set ‘header-text’ to ‘false’ in the arguments. This will remove the header text and the option to toggle it.
When the user first installs your theme, you can include a default header that will be selected before they choose their own header. This allows users to set up your theme more quickly and use your default image until they’re ready to upload their own.
Set a default header image 980px width and 60px height:
<?php
$header_info = array(
	'width'         => 980,
	'height'        => 60,
	'default-image' => get_template_directory_uri() . '/images/sunset.jpg',
);
add_theme_support( 'custom-header', $header_info );

$header_images = array(
	'sunset' => array(
		'url'           => get_template_directory_uri() . '/images/sunset.jpg',
		'thumbnail_url' => get_template_directory_uri() . '/images/sunset_thumbnail.jpg',
		'description'   => 'Sunset',
	),
	'flower' => array(
		'url'           => get_template_directory_uri() . '/images/flower.jpg',
		'thumbnail_url' => get_template_directory_uri() . '/images/flower_thumbnail.jpg',
		'description'   => 'Flower',
	),
);
register_default_headers( $header_images );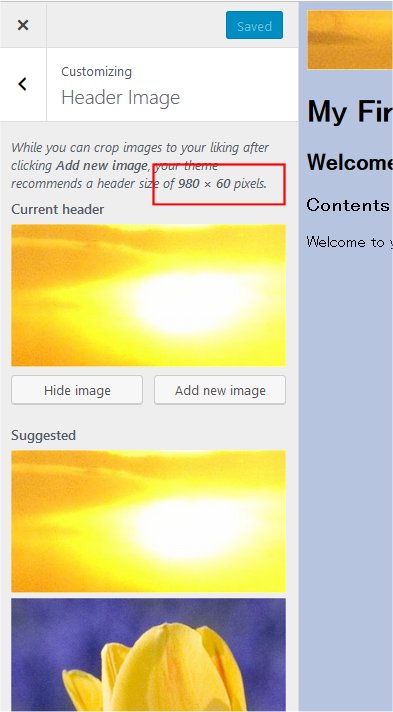
Do not forget to call register_default_headers() to register a default image. In this example, sunset.jpg is the default image and flower.jpg is an alternative selection in Customizer.
From Administration Screen, Click Appearance > Header to display Header Image menu in Customizer. Notice that width and height specified in add_theme_support() is displayed as recommended size, and flower.jpg is shown as selectable option.
By default, the user will have to crop any images they upload to fit in the width and height you specify. However, you can let users upload images of any height and width by specifying ‘flex-width’ and ‘flex-height’ as true. This will let the user skip the cropping step when they upload a new photo.
Set flexible headers:
<?php
$args = array(
	'flex-width'    => true,
	'width'         => 980,
	'flex-height'   => true,
	'height'        => 200,
	'default-image' => get_template_directory_uri() . '/images/header.jpg',
);
add_theme_support( 'custom-header', $args );
update your header.php file to:
<img alt="" src="<?php header_image(); ?>" width="<?php echo absint( get_custom_header()->width ); ?>" height="<?php echo absint( get_custom_header()->height ); ?>">To display the custom header, function get_header_image() retrieves the header image. get_custom_header() gets the custom header data.
E.g. below shows how custom header images can be used to display the header in the theme. The below code goes into header.php file.
<?php if ( get_header_image() ) : ?>
	<div id="site-header">
		<a href="<?php echo esc_url( home_url( '/' ) ); ?>" rel="home">
			<img src="<?php header_image(); ?>" width="<?php echo absint( get_custom_header()->width ); ?>" height="<?php echo absint( get_custom_header()->height ); ?>" alt="<?php echo esc_attr( get_bloginfo( 'name', 'display' ) ); ?>">
		</a>
	</div>
<?php endif; ?>
Custom Headers are supported in WordPress 3.4 and above. If you’d like your theme to support WordPress installations that are older than 3.4, you can use the following code instead of add_theme_support( ‘custom-header’);
<?php
global $wp_version;
if ( version_compare( $wp_version, '3.4', '>=' ) ) :
	add_theme_support( 'custom-header' );
else :
	add_custom_image_header( $wp_head_callback, $admin_head_callback );
endif;- header_image() Display header image URL.
- get_header_image() Retrieve header image for custom header.
- get_custom_header() Get the header image data.
- get_random_header_image() Retrieve header image for custom header.
- add_theme_support() Registers theme support for a given feature.
- register_default_headers() Registers a selection of default headers to be displayed by the Customizer.
In this article, we’ll show you how to edit a header in WordPress. It’s easier than you might think, so let’s get started!
The header is one of the important elements of any website because it is the first online information that users see on the browser. That’s why it’s very important to customize it for that first impression.
Before that, let’s take a look at what a header is and why it’s important to customize a header.
What is a Header And Why Customize it?
The header is a universal element that can be found on every page and post on any website, and it often serves as your visitor’s first impression. It doesn’t matter if your website is a blog, an online store, a digital wallet, or entirely something else – the WordPress header is extremely important.
The key to building trust and success is giving your visitors a good first impression through a header. Most commonly the header can contain:
- Logo
- Menu
- Search Bar
- Buttons
- Language switcher
- Shopping cart
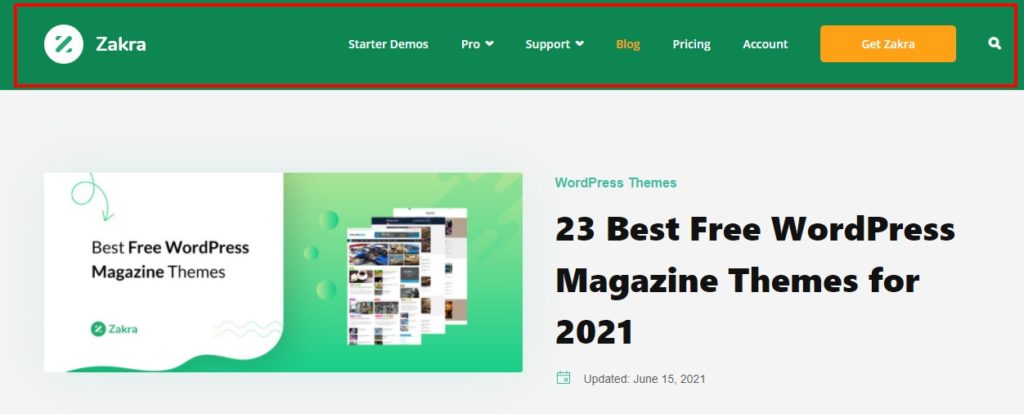
On the Zakra blog page, the header looks like this:
When you’re about to edit a header in WordPress, there is one thing you shouldn’t overlook. The header is not only the first thing your visitor notices, it’s also one of the most frequently used areas of your website. But what should you keep an eye on? Below are the things you should note down while you edit a header in WordPress.
- Choose the right font and color for the best readability
- Consider the type of your website: a header for a blog and a header for an eCommerce website look different
- Don’t forget that the UX is very important: The header should make it easier to find your way around your website.
- Create menu suitable for your website.
Now you know the importance of editing a header and what can be done to achieve that awesome header. Now let’s see how we can actually edit a header in WordPress.
There are several ways to edit a header in WordPress. Here, we’ve outlined 3 beginner-friendly ways that you can follow:
- Edit a Header in WordPress Through WordPress Live Customizer
- Customize the Header in WordPress using a Header Plugin
- Edit your WordPress theme’s header.php files
The customization options may vary depending on the theme you’ve installed, but most of the processes are common to the majority of WordPress themes. For this tutorial, we’ll be using the Zakra theme.

If you need help with installing a theme, check out our article on ‘How to Install a WordPress Theme?’.
Now let’s take a look at all 3 methods to change WordPress header style.
1) Edit a Header in WordPress Through WordPress Live Customizer
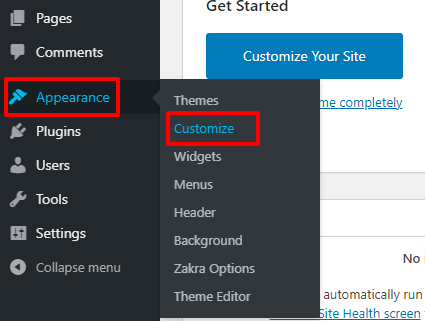
First, you need to log into your WordPress dashboard. To change the basic header settings, click Appearance and select the Customize tab.
Now you’ll reach to WordPress Customizer page which lets you edit and customize the overall appearance of your website. Also, you can edit the header with a live preview which means you can see the changes in real-time.
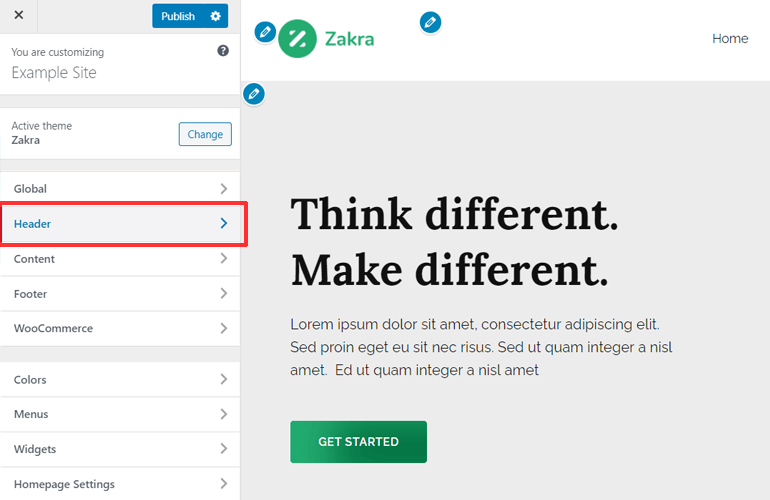
On the left is the customizer’s navigation menu. The right side is for the live preview of your website. On the Customizer’s menu, click on the Header Tab.
Now you’ll be redirected to the header, click the Header Area. A few options will be listed on your screen including widgets, copyright, background color, style, layout, etc.
i) How to change the logo on the header
To change the logo of the header, go to Header>>Site Identity. Inside the site identity tab, you can customize the site logo, site icon, site title, and tagline.

Now, to upload your website’s logo, simply click on the Select Logo or Change Logo button. The logo is an image. To change or add it, you must prepare a logo first and save it. You can use photo editing software like photoshop, check out the logo maker sites available on the internet, or hire a designer from different platforms like Fiverr or Upwork.

The next step is to crop your image. Crop it as needed and hit the Crop Image button. Hit the Publish button on the top to finally apply this change to your website.
ii) Adding Images and Videos in Header
If you want to add, remove or edit the current image or video that contains on the header, then click on Header Media under the Header section.
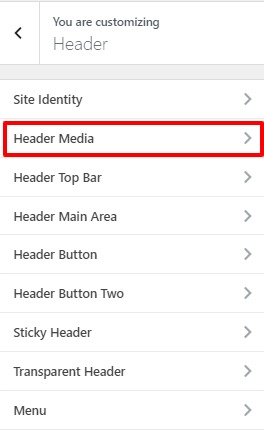
There you can see few options to edit your header area. You can also change the settings for header visibility with which you get to decide to display the header media on a particular page only.
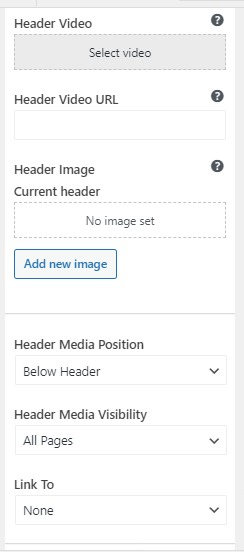
To add an image to the header, simply click on Add New Image. Now you’ll be redirected to your media library, you can either upload a new image or drag and drop your image in your media library.
Select the image you want to keep in your header. You can crop the image and your image will be uploaded in the header section.
You can see your image on your WordPress Customizer now. That’s how your website will look with that image.

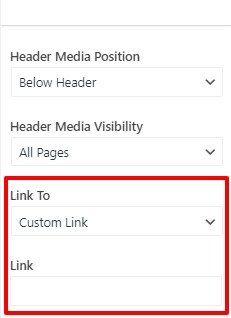
You can also link your image to any page of your website. Not only that, by setting the custom link you can link your header image to any website.
The processing of adding a video to the header is pretty much similar to adding an image. Click on “Select Video” and select the video file you want to upload. But remember that you can only upload a video that is less than 8MB.
But what if you want to upload a video that is more than 8MB? That’s where another option comes to the rescue. Just below the Header Video option, you can see the “Header Video URL” option.
You can upload your video to platforms like YouTube or Vimeo and copy the link from there and paste the link into the box under the Header Video section.
As soon as you paste the link you can see your video on your header. At last, just click on the Publish button.
iii) Styling a Header Menu
You can give a little bit of style to your header in WordPress by changing the placement of the menu, background image, background color, enabling or disabling the search icon in the header.
To do so you should click on Header>>Header Main Media. There you can see various options to customize the Header.
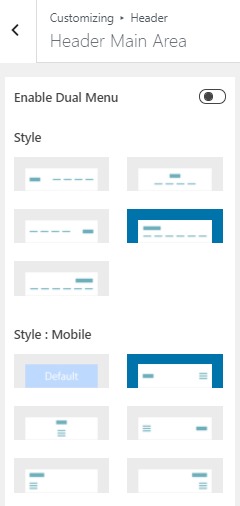
Then, look for the field that you want to modify, you can experiment with the menu styles, background image, background color and see the changes on the live preview. Once you’re happy with the changes, don’t forget to click on Publish to save your changes.
2) Customize the Header in WordPress using a Header Plugin
An easier way to customize the header is using a WordPress header plugin. This method is recommended for those who are beginners and not comfortable editing the site’s files directly.
There are a handful of plugins tools available, you can choose the right one based on your experience and the edits you need on your header. We would like to recommend a free and very popular plugin Insert Headers and Footers.
To install this WordPress plugin, log into your dashboard first. Once you’re on the dashboard, go to Plugins >> Add New.
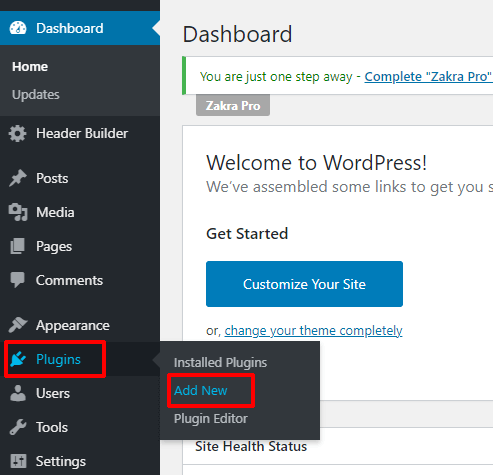
You will see the plugin repository of WordPress. On the search bar, type Insert Headers and Footers. Once the result appears, click on Install Now.

After you install it, click on Activate to activate this plugin. Insert Header and Footer plugin is successfully installed.
Wanna know more about WordPress plugins? Then head over to our article on “Best WordPress Plugins and Tools“.
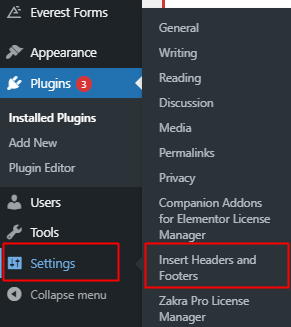
Once the plugin is activated on your site, you can locate it under Settings > Insert Headers and Footer:
Next, within the Header section, click on add code for anything you want to add or remove from your header:
Any scripts you fill here will automatically be added to the ‘head’ tag of your WordPress site. When you’re done, click on the Save changes button.
3) Edit your WordPress theme’s header.php files
This method looks very intimidating if you’re not familiar with WordPress hooks, HTML and CSS, and PHP.
So if you’re not familiar with those, we don’t recommend you mess around in here because of one wrong move, and your whole site can crash down.
Do it only if you know what you’re doing and make sure you’ve got a way to revert back to the working copy of the site breaks.
From the Appearance>>Theme Editor section you can edit the code of any of the themes that you have installed on your WordPress.
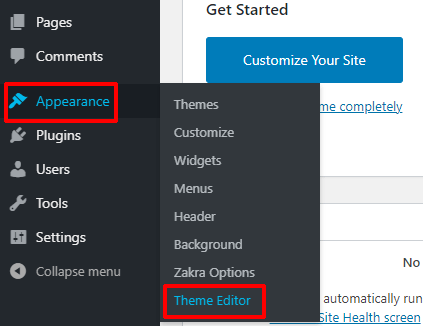
But today we want to edit the header only, so find a file on the Theme Files on the right side that says header.php.
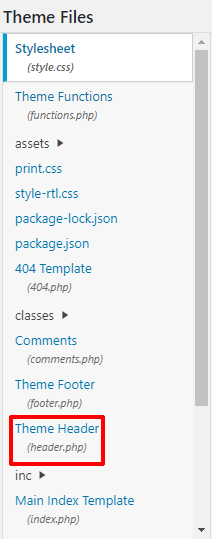
Selecting it’ll open the content of the header.php file in the window and from there you’ll be able to edit what you need from the code.
Once you’ve your changes made, click on the Update file. If no problem is detected your changes will be published in your theme.

And that’s where we edit the header.php file in WordPress.
Extra Tips to Edit a Header in WordPress
- Use shortcodes in the header as text widgets. These can help you add buttons or other clickable actions in the header.
- Keep the header clean and away from distractions. An attractive header is one with more spaces. There shouldn’t be lots of items in your header.
- Your header should be easy to use and elements should be visible at a glance.
- Don’t use excessive SEO keywords to fill your header.
Wrapping It Up!
The header in WordPress must be attractive because that’s the first thing users who visit your website will notice before browsing your page. WordPress gives you infinite options to customize and add functionalities to the header of your website but we recommend that you take these tips into account.
Knowing how to edit the header in WordPress is really easy if you’ve got a well-functioning WordPress theme such as Zakra. Just follow these instructions and you’ll have a customized header. Along with the header, editing the footer is as much important.
That’s it for today’s beginner guide on how to edit a header in WordPress. Follow us on Twitter and Facebook to keep updated with our new articles.