Translation(s): English — Italiano — Русский
Переименование компьютера
Эта страница объясняет, как изменить hostname системы (т.е. переименовать компьютер/сервер)
Смотрите также: hostname(1).
Contents
-
Переименование компьютера
-
Базовые сетевые настройки
- systemd
-
Специфические приложения
- avahi
- CUPS
- ejabberd
- Exim
- Mailname
- Сообщение дня
- OpenSSH
- Самоподписанный SSL сертификат
- ssmtp
- sysklogd
- fail2ban
- lvm
-
Скрипт, который может вам помочь
- Опасный скрипт
- Улучшенный вариант скрипта
- Другой вариант скрипта
- Смотрите также
-
Базовые сетевые настройки
Базовые сетевые настройки
-
Обновить /etc/hostname
-
Обновить /etc/hosts, так локальный адрес(адреса) разрешается с новым именем системы.
- Перезагрузить конфигурацию сети. У вас есть два варианта:
- Обновить конфигурационные файлы
 Это временно отключит вашу систему от сети (ssh, обычно, удерживает связь при кратковременных разъединениях) Это может окончательно отсоединить вашу систему от сети потому что сеть может не восстановить соединение; для гарантированного применения настроек лучше перезагрузить систему, это больше даст гарантии от возможных ошибок.
- Обновить конфигурационные файлы
invoke-rc.d hostname.sh start
invoke-rc.d networking force-reload
invoke-rc.d network-manager force-reload
ToDo: is it useful to reload network-manager?
-
или ленивый способ: Перезагрузить систему.
systemd
В версиях Debian с установленным systemd, можно использовать команду «hostnamectl set-hostname mymachine». Этот инструмент зависит от dbus поэтому обязательно установите его в первую очередь.
Специфические приложения
avahi
Avahi использует так называемые публикации (объявления) локальным службам. Если вы изменяли файлы /etc/avahi/* вы должны выполнить:
invoke-rc.d avahi-daemon force-reload
CUPS
CUPS это Common Unix Printing System.
Нужно настроить файл /etc/printcap.
Вы должны поменять hostname в любой такой линии: Kyocera_TASKalfa_3050ci|Kyocera TASKalfa 3050ci:rm=debian:rp=Kyocera_TASKalfa_3050ci:
Вы должны перезапустить службу, чтобы изменения вступили в силу.
ejabberd
Обратитесь к оф. документации https://docs.ejabberd.im/.
Exim
Перенастроить Exim (это затронет /etc/exim4/update-exim4.conf.conf и /etc/mailname):
dpkg-reconfigure exim4-config
Или настроить вручную /etc/exim4/update-exim4.conf.conf (hostname=). После этого надо перезапустить службу.
Mailname
Перенастроить Exim (см. выше) или настроить вручную /etc/mailname. После этого не надо перезапускать службу.
Сообщение дня
Настроить /etc/motd. После этого не надо перезапускать службу.
OpenSSH
Настроить /etc/ssh/ssh_host_rsa_key.pub, /etc/ssh/ssh_host_dsa_key.pub, /etc/ssh/ssh_host_ed25519_key.pub и /etc/ssh/ssh_host_ecdsa_key.pub (root@hostname в конце). После этого надо перезапустить службу.
Самоподписанный SSL сертификат
Пересоздать самоподписанный сертификат, созданный пакетом the ssl-cert используя правильный hostname вашего компьютера.
make-ssl-cert generate-default-snakeoil --force-overwrite
После этого надо перезапустить службу использующие это, например apache2.
ssmtp
Легковесная программа Ssmtp, для отправки только через SMTP.
Настроить /etc/ssmtp/ssmtp.conf (hostname=, и т. д.). После этого не надо перезапускать службу.
sysklogd
Перезапустите службу sysklogd.
fail2ban
fail2ban scan logs to detect connection failures and can ban IP on too many failures.
The hostname may be in the sender mail address in /etc/fail2ban/jail.local. You need to reload the service.
lvm
Logical Volume Manager (LVM) is a device mapper target that provides logical volume management.
Hostname появляется в резервной копии конфигурационного файла /etc/lvm/backup/<your Volume Group>.
Скрипт, который может вам помочь
Опасный скрипт
Вы должны понимать, что данный скрипт может быть опасен для вашей системы. Вы должны проверить наличие всех файлов grep -rl «$old» /etc, которые должны быть модифицированы перед запуском этого скрипта:
   1 #!/bin/bash
   2 #
   3 usage() {
   4    echo "usage : $0 <new hostname>"
   5    exit 1
   6 }
   7
   8 [ "$1" ] || usage
   9
  10 old=$(hostname)
  11 new=$1
  12
  13 grep "$old" /etc/ -rl 2>/dev/null |
  14 while read file
  15 do
  16       sed "s:$old:$new:g" "$file" > "$file.tmp"
  17       mv -f "$file.tmp" "$file"
  18 done
Улучшенный вариант скрипта
Этот скрипт будет делать тоже самое, что и скрипт выше, но он будет спрашивать о каждом файле, который надо изменить, прежде чем он отредактирует файл.
   1 #!/bin/bash
   2 #
   3
   4 # Fetching new and old hostname
   5 OLD_HOSTNAME=$(hostname)
   6 NEW_HOSTNAME=$1
   7
   8 WHIPTAIL_TITLE="Changing hostname"
   9 WHIPTAIL_BACKTITLE="ShrimpDev <dev@csoellinger.at>"
  10 WHIPTAIL_TEXT="Below you will find a checklist with all files where we found your old hostname "${OLD_HOSTNAME}" inside /etcnnPlease check which files we should update to your new hostname "${NEW_HOSTNAME}""
  11
  12 not_root() {
  13     echo "ERROR: You have to be root to execute this script"
  14     exit 1
  15 }
  16
  17 usage() {
  18     echo "usage : $0 <new hostname> [Optional:--backup/Set backup mode on] [Optional:--debug/Set debug mode on]"
  19     exit 1
  20 }
  21
  22 # Check if user is root
  23 [ $EUID != 0 ] && not_root
  24
  25 # Check if we have at least one parameter
  26 [ "$1" ] || usage
  27
  28 [ "$1" == "--backup" ] && usage
  29 [ "$1" == "--debug" ] && usage
  30
  31 DEBUG="NO"
  32 BACKUP="NO"
  33
  34 if [ "$2" == "--debug" ] || [ "$3" == "--debug" ]; then
  35     DEBUG="YES"
  36 fi
  37
  38 if [ "$2" == "--backup" ] || [ "$3" == "--backup" ]; then
  39     BACKUP="YES"
  40 fi
  41
  42 [ "$DEBUG" == "YES" ] && echo "DEBUG (NO FILES WILL BE CHANGED)"
  43 [ "$BACKUP" == "YES" ] && echo "BACKUP MODE ON"
  44
  45 # Grep all possible targets
  46 TARGETS=($(grep "$OLD_HOSTNAME" /etc/ -rl))
  47 let TARGETSLENGTH=${#TARGETS[@]}
  48
  49 CHECKLIST=()
  50 for ((i=0; i<${#TARGETS[@]}; i++)); do
  51     CHECKLIST+=("${TARGETS[$i]}" "" "ON")
  52 done
  53
  54 CHECKLIST_RESULT=$(whiptail --clear --fb --title "$WHIPTAIL_TITLE" --backtitle "$WHIPTAIL_BACKTITLE" --checklist "$WHIPTAIL_TEXT" 30 80 $TARGETSLENGTH "${CHECKLIST[@]}" 3>&2 2>&1 1>&3)
  55 CHECKLIST_RESULT=${CHECKLIST_RESULT//"/}
  56 CHECKLIST_RESULT_ARR=(`echo $CHECKLIST_RESULT | tr ' ' 'n'`)
  57
  58 clear
  59
  60 for CHECKLIST_ITEM in "${CHECKLIST_RESULT_ARR[@]}"; do
  61     echo "sed "s:${OLD_HOSTNAME}:${NEW_HOSTNAME}:g" "${CHECKLIST_ITEM}" > "${CHECKLIST_ITEM}.tmp""
  62     [ "$DEBUG" == "NO" ] && sed "s:$OLD_HOSTNAME:$NEW_HOSTNAME:g" "$CHECKLIST_ITEM" > "$CHECKLIST_ITEM.tmp"
  63
  64     if [ "$2" == "--backup" ]; then
  65         echo "cp "${CHECKLIST_ITEM}" "${CHECKLIST_ITEM}.BCK""
  66         [ "$DEBUG" == "NO" ] && cp "$CHECKLIST_ITEM" "$CHECKLIST_ITEM.BCK"
  67     fi
  68
  69     echo "mv -f "${CHECKLIST_ITEM}.tmp" "${CHECKLIST_ITEM}""
  70     [ "$DEBUG" == "NO" ] && mv -f "$CHECKLIST_ITEM.tmp" "$CHECKLIST_ITEM"
  71
  72     echo ""
  73 done
  74
  75 exit 0
Другой вариант скрипта
#!/bin/bash
#
usage() {
   echo "usage : $0 <new hostname>"
   exit 1
}

[ "$1" ] || usage

old=$(hostname)
new=$1

for file in
   /etc/exim4/update-exim4.conf.conf
   /etc/printcap
   /etc/hostname
   /etc/hosts
   /etc/ssh/ssh_host_rsa_key.pub
   /etc/ssh/ssh_host_dsa_key.pub
   /etc/motd
   /etc/ssmtp/ssmtp.conf
do
   [ -f $file ] && sed -i.old -e "s:$old:$new:g" $file
done
Смотрите также
-
hostname(1), hostname(7)
Имя хоста задается во время установки операционной системы Debian или, если вы запускаете виртуальную машину, оно динамически назначается экземпляру при запуске.
Прежде чем продолжить
Чтобы иметь возможность изменить системное имя хоста, вам необходимо войти в систему как пользователь root или пользователь с привилегиями sudo .
Показать текущее имя хоста
В Debian 10 и всех других используемых дистрибутивах Linux systemd вы можете изменить и отобразить имя хоста данной системы с помощью hostnamectl инструмента.
Чтобы просмотреть текущее имя хоста системы, введите hostnamectl без каких-либо опций:
hostnamectl
В выходных данных будет показано текущее имя хоста системы, в данном примере это host.baks.dev .
   Static hostname: host.baks.dev
         Icon name: computer-vm
           Chassis: vm
        Machine ID: 70a3f06298014fd9ac42e5dc1de1034a
           Boot ID: 1dc8b9af89a4426b99cb348f6d483757
    Virtualization: oracle
  Operating System: Debian GNU/Linux 10 (buster)
            Kernel: Linux 4.19.0-5-amd64
      Architecture: x86-64
Измените имя хоста системы
Имя хоста — это метка, которая идентифицирует машину в сети. Вы не должны устанавливать одно и то же имя хоста на двух разных машинах в одной сети. В FQDN качестве имени хоста системы рекомендуется использовать полное доменное имя ( ).
При изменении имени хоста системы в Debian 10 необходимо выполнить два шага. Сначала установите новое имя хоста с помощью hostnamectl set-hostname команды, за которой следует желаемое имя хоста, а затем обновите /etc/hosts файл с новым именем хоста.
Например, чтобы изменить системное имя хоста на arya.example.com , вы должны сделать следующие шаги:
-
Сначала установите новое имя хоста, запустив:
sudo hostnamectl set-hostname arya.example.com
Командаhostnamectlне производит вывода. В случае успеха возвращается 0, в противном случае — ненулевой код ошибки. -
Во-вторых, откройте
/etc/hostsфайл и замените старое имя хоста новым./ etc / hosts
127.0.0.1   localhost
127.0.0.1   arya.example.com arya

# The following lines are desirable for IPv6 capable hosts
::1     localhost ip6-localhost ip6-loopback
ff02::1 ip6-allnodes
ff02::2 ip6-allrouters
Проверить изменение
Чтобы убедиться, что имя хоста было успешно изменено, еще раз используйте hostnamectl команду:
hostnamectl Новое имя хоста системы будет напечатано в командной строке.
   Static hostname: arya.example.com
         Icon name: computer-vm
           Chassis: vm
        Machine ID: 70a3f06298014fd9ac42e5dc1de1034a
           Boot ID: 1dc8b9af89a4426b99cb348f6d483757
    Virtualization: oracle
  Operating System: Debian GNU/Linux 10 (buster)
            Kernel: Linux 4.19.0-5-amd64
      Architecture: x86-64
Заключение
Изменение имени хоста системы в Debian 10 Buster — простая задача, состоящая всего из двух простых шагов.
Introduction
A hostname is a label used to identify your system on a network. You can change your hostname in Debian 10 (Buster) by using the hostname command or editing system files.
In this tutorial, we will cover different methods you can use to change the hostname in Debian 10.

Prerequisites
- A system running Debian 10 (Buster)
- An account with sudo level privileges
- Access to the terminal window/command line
Check the Current Hostname
Use the following command to check the current hostname:
hostnameThe output displays the current hostname as plain text:

The first method involves using the hostname command to change the system name. The hostname command is used to obtain and change the system’s hostname.
It is important to note that any changes made using the hostname command are temporary. Unless you use the permanent method of changing the hostname outlined below, it will revert back to its original value after the next system reboot.
Follow the steps below to change the hostname:
1. Changing the hostname requires a user with sudo/root permissions. To switch to the root user, enter:
sudo -s2. Use the hostname command to set up a new hostname:
hostname [name]Where:
[name]: The new hostname you want to set up.
In this example, we are using phoenixNAP as the new hostname:
hostname phoenixNAP3. Check if the new hostname is set up correctly:
hostname
Change the Hostname Permanently
There are two ways to permanently change your hostname in Debian 10:
- Using the
hostnamectlcommand; - Editing the hostname file.
Regardless of the method you use, you also need to edit the system’s hosts file to match the changes in hostname.
To change the hostname permanently:
1. As the root user, open the hostname file:
sudo nano /etc/hostnameThe first line of the hostname file lists the current hostname. Replace it with the new name you want to set up:

Press Ctrl+X to exit the file, then type Y and press Enter to save the changes.
Another method of setting a new permanent hostname is by using the hostnamectl command:
hostnamectl set-hostname [name]2. Open the hosts file:
sudo nano /etc/hosts3. In the hosts file, find all the instances of the old hostname and replace them with the new one:
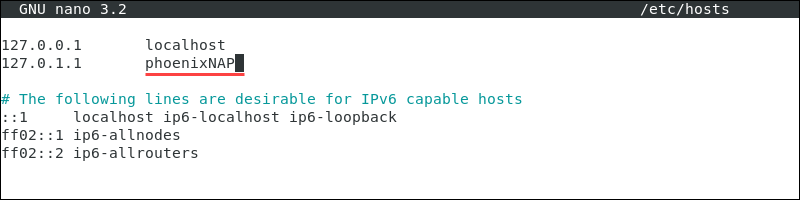
Press Ctrl+X, and then type Y and press Enter to exit the file and save the changes you made.
4. Restart the hostname.sh shell script for the changes to take effect:
invoke-rc.d hostname.sh startHostname Format Restrictions
By default, static hostnames follow the same restrictions as Internet domain names:
- They have a minimum length of 2 and maximum length of 63 characters.
- They support letters from a to z, numbers from 0 to 9, and hyphens (—).
- They can’t start or end with a hyphen, or have two or more consecutive hyphens.
Using the hostname command with a special character produces the following error:

Pretty hostnames are high-level hostnames assigned to users or admins. These hostnames can contain special characters and are assigned using the hostnamectl command with the --pretty option:
hostnamectl set-hostname "[name]" --prettyNote: When adding a pretty hostname, the name you want to assign must be surrounded by double quotation marks.
For example, if we want to set phoenixNAP’s test system as the pretty hostname:
hostnamectl set-hostname "phoenixNAP's test system" --pretty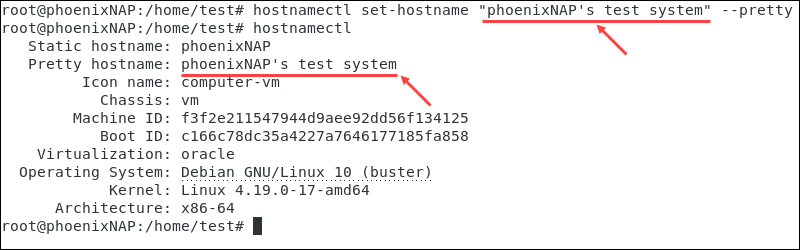
Verify the Hostname Change
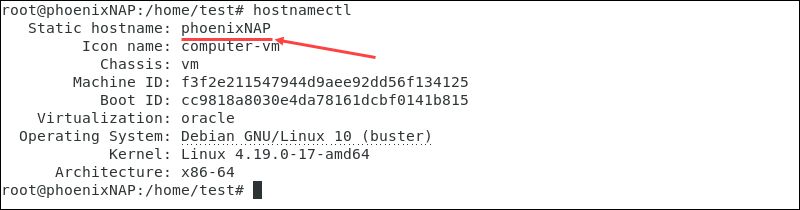
Verify the new hostname by running the following command:
hostnamectlThe output lists the new hostname in the Static hostname section:
Conclusion
After reading this tutorial, you should be able to change the hostname in Debian 10 using commands or editing system files.
The other day I upgraded my Debian 10 buster system to Debian 11 bullseye. The upgrade was smooth and easy! Now, I want to update the old hostname in Debian 11 system. In this brief guide, let me explain how to set or change hostname in Debian 11 bullseye system from commandline.
View hostname in Debian
A hostname is a label assigned to a Computer in order to identify it from on LAN or WAN. A typical hostname consists of alphanumeric and special characters. We can use at most 253 characters in hostname and it shouldn’t start with a hyphen or a dot.
Finding hostname in Debian Linux is easy!
To display the hostname of a Debian system, simply enter hostname command in the Terminal:
$ hostname
debian10
To show the fully qualified domain name (FQDN), use -f flag.
$ hostname -f
You can also use --fqdn flag to view the fully qualified domain name:
$ hostname --fqdn
All of the aforementioned commands displays the hostname only. If you want to display more details, such as hostname, chassis type, machine id, operating system details, kernel and architecture, use hostnamectl command:
$ hostnamectl
Sample output:
   Static hostname: debian10
         Icon name: computer-vm
           Chassis: vm
        Machine ID: aa47d2d8352c404898f47e00562730d3
           Boot ID: 9a12f2136ba74df5bd378bc837869e9b
    Virtualization: kvm
  Operating System: Debian GNU/Linux 11 (bullseye)
            Kernel: Linux 5.10.0-8-amd64
      Architecture: x86-64
As you see in the above outputs, my Debian system’s hostname is debian10, but the operating system version is Debian 11. I already upgraded it to Debian 11, but haven’t changed the hostname yet. Let us change its hostname now.
Set or change hostname in Debian 11
We can set or change the hostname in couple ways. Here, I have listed 6 different methods to set hostname in Debian 11 busllseye.
Method 1 — Using hostname command
To quickly change or set hostname in a Debian 11 system, simply run:
$ sudo hostname debian11
This will set the hostname as debian11. Replace debian11 with a hostname of your choice.
To view the changes in the hostname, use one of the above commands:
$ hostname
debian11
Please note that this command will only set the hostname temporarily. The changes will be gone after system reboot.
If you want to permanently set or change hostname, use any one of the following methods.
Method 2 — Using hostnamectl command
This is the standard and most commonly used method to permanently set hostname in Debian and other Linux distributions.
To set permanently set or change hostname in Debian bullseye using hostnaectl command, run:
$ sudo hostnamectl set-hostname debian11
Log out and log in again to view the changes in hostname.
$ hostnamectl
   Static hostname: debian11
         Icon name: computer-vm
           Chassis: vm
        Machine ID: aa47d2d8352c404898f47e00562730d3
           Boot ID: 9a12f2136ba74df5bd378bc837869e9b
    Virtualization: kvm
  Operating System: Debian GNU/Linux 11 (bullseye)
            Kernel: Linux 5.10.0-8-amd64
      Architecture: x86-64
If you want to view only the hostname, use --static flag.
$ hostnamectl --static
debian11
Heads Up: You will keep getting a warning message like below, whenever you use sudo command after changing the hostname.
sudo: unable to resolve host debian11: Name or service not known
To get rid of this warning, edit the /etc/hosts file:
Add/update the hostname in it.
Save and close the file. Log out and log back in to take effect the changes.
Method 3 — Using nmcli command
To set hostname using nmcli command in Debian, run:
$ sudo nmcli general hostname debian11
Replace debian11 in the above command with your own hostname. Log out and log back in to apply the changes in hostname.
Method 4 — Using sysctl command
To change or set hostname in Debian using sysctl command, run:
$ sudo sysctl kernel.hostname=debian11
Log out and log in again to apply the changes.
Method 5 — Add or update hostname in /etc/hostname file
Edit /etc/hostname file in your preferred editor:
$ sudo nano /etc/hostname
and add/update hostname in it:
Save the file and close it. Log out and log in again to update the hostname.
Method 6 — Update hostname in /proc/sys/kernel/hostname file
Open /proc/sys/kernel/hostname file in a text editor and add/update the hostname in it.
Alternatively, you can append the new hostname in /proc/sys/kernel/hostname file using the following one-liner command:
$ sudo sh -c "echo 'debian11' > /proc/sys/kernel/hostname"
In this guide, we have learned 6 possible ways to set, change and update hostname in Debian 11 bullseye from command line. Hope this helps.
A hostname is basically your computer’s name by which it is recognized on the network. The hostname should be unique to avoid conflicts.
When you install Debian, you are asked to create a user name and a computer name. That is the hostname of your system,
The easiest way to know the hostname of your system is to open a terminal on the system or log in via SSH on the remote Linux system.
In terminal, you’ll notice that the prompt is usually in the fashion of [email protected]
If it doesn’t show you that, you can always use the hostname command:
hostnameNow that you know your computer’s name and don’t like it, you can change it easily. In this tutorial, I’ll show you several ways of changing hostname of a Debian system.
Change hostname in Debian
I am going to show you two command line ways of changing the hostname in Debian Linux. The method should work on both Debian 9 and Debian 10.
Method 1: Use systemd for changing hostname in Debian
The first and preferred method for changing the hostname in Debian is to use the systemd command hostnamectl.
It’s a simple, single command and you don’t even need to restart your system for the changes to be taken in affect.
hostnamectl set-hostname new_hostnameOnce you have done this, verify that the hostname change has been successful with the hostname or hostnamectl command:
hostnamectl
   Static hostname: raspberrypi
         Icon name: computer
        Machine ID: 0035faf761f945b8923fc7d54632a941
           Boot ID: c487a76d67a34fd28a5f608aff19281c
  Operating System: Raspbian GNU/Linux 10 (buster)
            Kernel: Linux 4.19.29-v7l+
      Architecture: arm
Exit the shell to see that [email protected] displays the new hostame.
Method 2: Change hostname in Debian using /etc/hosts
The etc directory in Linux contains the various configuration files. A couple of them relate to hostname. You can modify these files to change the hostname of your system.
First, use a command line text editor like Emacs or Vim to edit this file:
vim /etc/hostname
You’ll find just the old hostname here. Delete it and replace it with the new hostname.
It’s not done yet. You have to modify one more file. Go to /etc/hosts file and edit it. Here, replace your old hostname with the new one.
127.0.0.1       localhost
127.0.0.1       new_hostname

# The following lines are desirable for IPv6 capable hosts
::1     ip6-localhost ip6-loopback
fe00::0 ip6-localnet
ff00::0 ip6-mcastprefix
ff02::1 ip6-allnodes
ff02::2 ip6-allrouters
ff02::3 ip6-allhosts
Save and close the file and then verify it using the hostname or hostnamectl command. That’s it. If you won’t do this step, you’ll encounter “sudo: unable to resolve host” warning message every time you run sudo.
So, you just learn to change the hostname of your Debian server. Personally, I prefer the first method because it’s less of a hassle. How about you? Which method of changing hostname would you prefer?

Creator of Linux Handbook and It’s FOSS. An ardent Linux user & open source promoter. Huge fan of classic detective mysteries from Agatha Christie and Sherlock Holmes to Columbo & Ellery Queen.
Имя компьютера или имя хоста системы используется для идентификации компьютера или сервера в сети. Это может быть локальная сеть (LAN) или Интернет. При установке ОС вас попросят задать имя компьютера или имя хоста, и оно должно быть уникальным, чтобы избежать конфликтов. Позже, когда вы захотите изменить имя компьютера, вам придется выполнить несколько команд или внести изменения в некоторые файлы конфигурации, чтобы добиться этого.
В этой статье мы расскажем о трех способах изменения имени компьютера, также известного как имя хоста, как через графический интерфейс пользователя, так и через командную строку.

Мы выполнили команды и процедуры, упомянутые в этой статье, на Debian 10 и Debian 11.
Содержание
- Через имя хоста и файл hosts
- С помощью команды hostnamectl
- Через графический интерфейс
Через имя хоста и файл hosts
Имя компьютера или имя хоста также можно изменить с помощью команды hostname. Чтобы просмотреть текущее имя хоста, просто введите hostname в терминале:
Теперь, чтобы изменить имя компьютера, используйте следующий синтаксис команды:
sudo hostname new_hostnameЗамените new_hostname на то, которое вы хотите установить для своей системы.
Это также временный способ изменения имени компьютера. Существует также способ изменить имя компьютера навсегда. Для этого нам придётся отредактировать два разных конфигурационных файла /etc/hostname и /etc/hosts.
Сначала отредактируйте файл /etc/hostname, введя следующую команду в Терминале:
В нем будет указано имя вашего компьютера. Измените имя компьютера на новое, а затем нажмите Ctrl+O и Ctrl+X для сохранения и выхода из файла одновременно.
Затем отредактируйте файл /etc/hosts следующим образом:
Вы увидите имя компьютера, указанное напротив IP: 127.0.1.1.
Отредактируйте файл /etc/hosts
Измените имя этого компьютера на новое имя, затем сохраните и выйдите из файла, используя Ctrl+O и Ctrl+X одновременно. Теперь имя компьютера, которое вы только что задали, останется постоянным даже после перезагрузки системы.
С помощью команды hostnamectl
Существует еще одна команда hostnamectl, с помощью которой вы можете изменить имя вашего компьютера.
Теперь просто введите hostnamectl в терминале. Она отобразит подробную информацию о вашей системе, включая имя компьютера или имя хоста.
Чтобы изменить имя хоста компьютера с помощью команды hostnamectl, используйте следующий синтаксис:
hostnamectl set-hostname "new_hostname"Замените new_hostname на то, которое вы хотите установить для своей системы.
Снова запустите команду hostnamectl, теперь вы увидите новое имя хоста, которое вы установили с помощью команды hostnamectl.
Через графический интерфейс
Чтобы изменить имя хоста через графический интерфейс, нажмите на стрелку вниз в правом верхнем углу рабочего стола Debian. В появившемся выпадающем меню нажмите на значок Настройки, как показано ниже, чтобы запустить утилиту Настройки.
Также вы можете открыть утилиту Настройки из системного меню Dash. Нажмите клавишу super на клавиатуре, затем в строке поиска введите настройки. Когда утилита появится, нажмите на нее, чтобы открыть.
Теперь перейдите на вкладку Подробности из левой панели. Вы увидите имя устройства или имя хоста в представлении О компьютере, как показано ниже:
Таким образом, имя хоста будет изменен
Изменение имени хоста с помощью этого метода не является постоянным. Оно вернется к старому имени, когда вы перезагрузите систему.