Hostname (имя компьютера, имя хоста) задается во время установки системы Linux. Hostname определяет название компьютера и используется преимущественно для идентификации компьютера в сети. Нельзя назначать два одинаковых Hostname для компьютеров в одной сети.
Просмотр текущего Hostname
Чтобы показать текущий Hostname можно использовать команду hostname без параметров:
hostnameТакже Hostname можно отобразить командой hostnamectl:
hostnamectlСмотрите также: Как узнать имя компьютера (hostname) в Linux.
Как изменить Hostname
Рассмотрим, как изменить Hostname двумя разными способами.
Способ 1. Используем команду hostnamectl
Во многих systemd-based дистрибутивах (например, в Ubuntu Linux) есть утилита hostnamectl.
Воспользуемся командой hostnamectl, чтобы установить новое значение Hostname равным pingvinus. Используется аргумент set-hostname:
sudo hostnamectl set-hostname pingvinusСпособ 2. Редактируем файлы /etc/hostname и /etc/hosts
Еще один способ изменения Hostname — это ручное редактирование файла /etc/hostname и файла /etc/hosts.
Сначала выполните команду (вместо pingvinus укажите свое значение):
sudo hostname pingvinusОтредактируем файл /etc/hostname для редактирования в редакторе nano, выполняем команду:
sudo nano /etc/hostnameИзмените текущее значение в файле на новое. Сохраните изменения и закройте файл. Это можно сделать, нажав Ctrl+C, затем Y и Enter.
Hostname прописывается также в файле /etc/hosts, поэтому нужно изменить его значение в этом файле. Откроем файл:
sudo nano /etc/hostsНайдите строку вида «127.0.0.1 ваш_hostname» и впишите новое имя хоста. Сохраните изменения и закройте файл.
Проверка результата
Чтобы проверить, изменилось ли значение Hostname, откройте новое окно терминала и введите команду:
hostnameКак временно изменить Hostname
Чтобы изменить Hostname в текущей работающей системе Linux, но до первой перезагрузки, можно использовать просто команду hostname, указав ей новое значение имени хоста:
hostname новое_имяЛайков: +1
Войдите, чтобы ставить лайкимне нравится
Смотрите также
- Запуск программ через дискретную видео-карту из меню в openSUSE GNOME
- Видео: Установка и настройка VirtualBox для новичков
- Как узнать версию Linux
- Установка ROSA Fresh R11
- Установка и использование PIP в Linux
- Включаем NumLock при старте
- Установка Xfce в Ubuntu и немного впечатлений
- «Пара» слов о Solus 4.2 под KDE
- Буфер обмена в Linux (копирование и вставка)
- Как узнать IP адрес, используя командную строку Linux
 Имя компьютера, в полном соответствии с известной поговоркой, как и имя лодки способно влиять на многое, прежде всего на удобство работы и восприятия. А неудачное имя способно только запутывать и заставлять каждый раз тратить дополнительное время. При этом очень хорошо, если у вас будет принята некоторая политика присвоения имен хостам, и вы будете ее придерживаться. А сегодня мы рассмотрим способы управления именем хоста и дополнительной информацией о нем, которые нам предоставляет systemd в виде утилиты hostnamectl.
Научиться настраивать MikroTik с нуля или систематизировать уже имеющиеся знания можно на углубленном курсе по администрированию MikroTik. Автор курса, сертифицированный тренер MikroTik Дмитрий Скоромнов, лично проверяет лабораторные работы и контролирует прогресс каждого своего студента. В три раза больше информации, чем в вендорской программе MTCNA, более 20 часов практики и доступ навсегда.
Можно по-разному относиться к systemd, но нельзя не признать, что он дает администратору простые и удобные инструменты, которые всегда одинаково работают вне зависимости от дистрибутива. Один из них — hostnamectl, но это не просто еще одна утилита, а удобный и информативный инструмент.
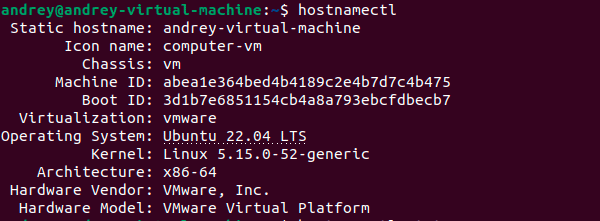
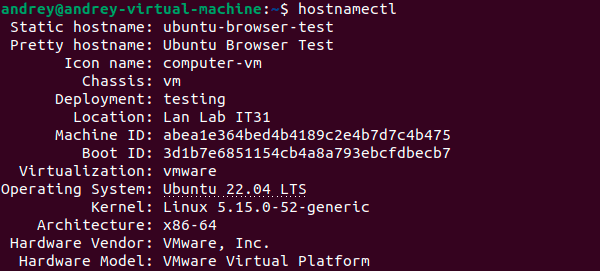
Если вы первый раз оказались в незнакомой системе, то просто запустите:
hostnamectlИ вы, кроме имени узла, получите массу полезной информации: версия ОС, версия ядра, архитектура, разрядность, а для виртуальных машин их тип и систему виртуализации. В целом здесь есть ответы на все первоначальные вопросы, которые возникают в новой системе.
 При этом вам не нужно угадывать какая именно система перед вами и мучительно вспоминать команды, позволяющие посмотреть ее версию. В любой системе использующей systemd вывод будет выглядеть одинаковым. И только уже хотя бы поэтому о hostnamectl нужно знать.
Но перейдем к основному назначению данной утилиты, а именно управление именем хоста. В Linux поддерживается три возможных имени узла:
- Красивое (pretty) — это имя задается пользователем и может содержать пробелы и специальные символы, например «My Notebook Asus».
- Статичное (static) — задается администратором во время установки системы, может содержать только ASCII-символы без пробелов и точек, либо несколько групп символов через точки, если имя указано в формате FQDN. Максимальная длина — 64 символа.
- Временное (transient) — резервный вариант, получаемый при конфигурировании сети (например, node12345678), используется только в том случае, если не указано статическое имя.
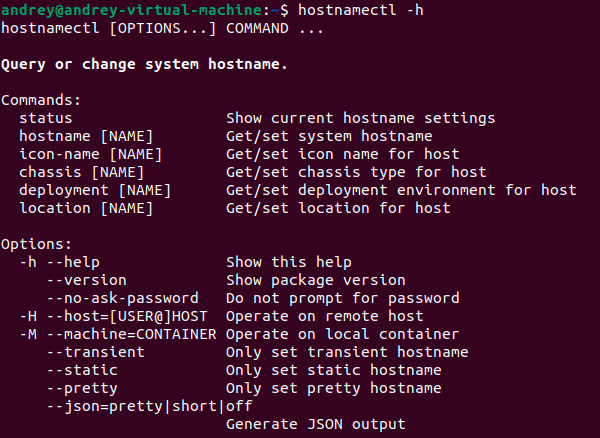
У утилиты есть ряд доступных команд, чтобы ознакомиться с ними наберите:
hostnamectl -h В ответ на экран будет выведена короткая, но исчерпывающая справка по использованию данного инструмента.
 Начнем с команды status, это команда по умолчанию, если вы ничего не указали, то подразумевается, что вы хотите выполнить status, так приведенная нами в самом начале команда:
hostnamectl На самом деле вызывает:
hostnamectl statusТакже мы можем указать, какое именно имя нас интересует:
hostnamectl status --prettyИли просто:
hostnamectl --prettyПо умолчанию в системе установлено статическое имя и аналогичное ему временное.
 Остальные команды позволяют получать или устанавливать определенные параметры. Если вызвать команду без указания параметра, то она покажет текущее значение, если параметр указать — то он будет установлен. Так, например, для получения имени хоста используйте:
hostnamectl hostnameДля установки:
hostnamectl hostname newhostnameТакже допускается запись:
hostnamectl set-hostname newhostnameПоследний вариант часто используется в инструкциях и документации, так как позволяет понять суть производимых действий без дополнительных пояснений.
При установке имени без использования дополнительных опций будут изменены все три имени, например, мы можем использовать такой вариант:
hostnamectl set-hostname "Ubuntu Browser Test"В этом случае красивое имя будет установлено именно так, как мы указали, а статическое будет сформировано на его основе в наиболее близкой по содержанию форме.
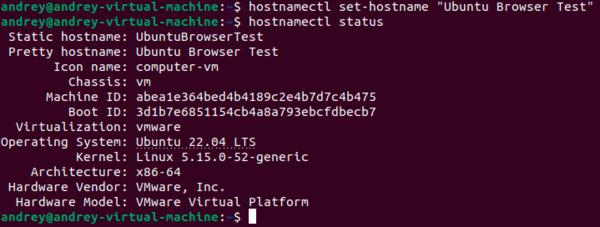 Как видим, с красивым именем все хорошо, только вот статическое нам категорически не нравится. Давайте исправим именно его, для этого просто укажем команде дополнительную опцию:
hostnamectl set-hostname ubuntu-browser-test --staticА что, если мы еще захотим изменить и временное, но в этом случае система пояснит нам, что так как у нас уже задано статическое имя, то временное использоваться не будет.
Кроме имени хоста мы можем еще указать icon-name — специальное значение, согласно принятой спецификации, на основании которой многие графические утилиты будут автоматически выводить значок для системы.
Следующая необязательная опция — chassis, позволяет указать тип шасси, что влияет на отображение узла в некоторых графических приложениях или доступные способы взаимодействия с ним, допустимы следующие параметры: desktop, laptop, convertible, server, tablet, handset, watch, embedded, плюс два дополнительных типа для виртуальных машин vm и container.
Однако практической необходимости менять эти опции нет. Гораздо интереснее и полезнее использовать следующие две команды.
Так команда deployment позволяет указать среду развертывания данного узла, рекомендуемые значения: development, integration, staging, production, но вы можете указать и свое значение, обязательное условие — это должно быть одно слово, не содержащее недопустимых символов.
Например, мы указали:
hostnamectl deployment testingСледующая команда — location — позволяет задать размещение узла в любой произвольной форме, можете написать туда все, что хотите, включая адрес, место размещения в стойке и т.д. и т.п.
hostnamectl location "Lan Lab IT31"Вся указанная информация будет доступна при выполнении команды status.
 Это удобно, так как позволяет быстро понять в каком контуре развернута данная машина и где именно она расположена. Мы рекомендуем использовать данные опции, так как это позволяет быстро получить дополнительную информацию и избежать дополнительных вопросов или досадных ошибок, например, перепутав тестовый сервер с рабочим.
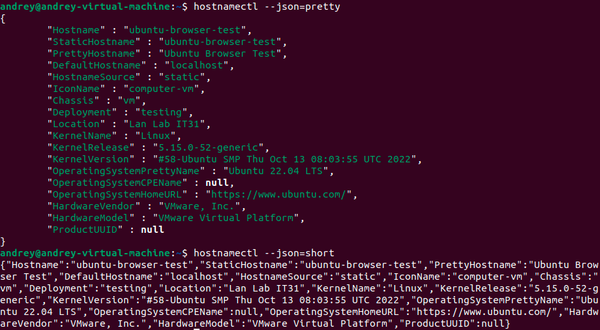
И, наконец, еще одна интересная опция —json, которая позволяет вывести результат в формате JSON, что удобно для последующей машинной обработки. У опции есть два параметра pretty и short, в первом случае выводится человекочитаемый формат, во втором — короткий.
 На этом наша статья подходит к концу, как видим, hostnamectl — это мощный и удобный инструмент, возможности которого не сводятся только к изменению имени хоста и каждый системный администратор, работающий с современным Linux должен знать и уметь пользоваться этим инструментом.
Научиться настраивать MikroTik с нуля или систематизировать уже имеющиеся знания можно на углубленном курсе по администрированию MikroTik. Автор курса, сертифицированный тренер MikroTik Дмитрий Скоромнов, лично проверяет лабораторные работы и контролирует прогресс каждого своего студента. В три раза больше информации, чем в вендорской программе MTCNA, более 20 часов практики и доступ навсегда.
Contents
- Introduction
- Requirements
-
Basics
- Setting/changing the hostname
- Finding your network interface
- Disable network managers and/or wicd
- Configuring an interface
- Setting up a second IP address or Virtual IP address
- Howto set MTU for a connection
- Setting up DNS
-
Wireless
- ndiswrapper
- Configure your wireless interface
- WPA supplicant
-
Configure laptops for multiple locations
- Map your physical interfaces to logical interfaces
- Define tests to select networks
- Result
- Bonus script
-
See also
- Ubuntu resources
- External resources
Introduction
You can configure a network interface from the command line. You can configure your network client hosts with the command line by using commands to change your current settings or by editing a number of system files. This has several advantages over network managers in the GUI.
This guide had been developed for Ubuntu and Debian, other distributions can use a similar setup, but be aware that file locations may differ.
Requirements
An editor. This guide will use vi, but you can replace it with any other editor of your liking, gedit, nano, gvim, pico, emacs..
Have a working internet connection during the installation. We need to install packages and those are fetched from the online repositories.
Backup any files we touch. Just easier to recover when you have a backup.
Read this guide in full before actually configuring your network.
Basics
Setting/changing the hostname
The hostname command allows you to directly query, or set, the hostname from the command line.
You can see your current hostname by running hostname. To set the hostname directly you can run hostname newname as root. If you do this however, make sure you change the /etc/hosts file first. This is needed because otherwise you will need to boot into single user mode and change your hostname in /etc/hosts. This is because sudo requires DNS lookups in certain cases and it cannot resolve your newly set hostname.. To circumvent this you need to add the new name to the hosts file prior to setting the hostname and remove it once that action has succeeded.
sudo vi /etc/hosts
127.0.1.1 ubuntu newname
Set the hostname to newname.
sudo hostname newname
# or
echo newname | sudo tee /etc/hostname
Now you can remove the old hostname
sudo vi /etc/hosts
127.0.1.1 newname
When your system boots it will automatically read the hostname from the file /etc/hostname. You can add hostname and IP addresses to the file /etc/hosts for static lookups.
Finding your network interface
When setting up your network you will need to know the network interface cards on your computer. The interface name of cards for different vendors may be different, which is why this step is needed.
ls /sys/class/net
# or
ip addr
This will list the interface names for all NICs on your computer. It will probably include eth0 (hardwired NIC), lo (loopback interface for the localhost), and something for your wireless card (like wifi0, or wlan0).
Disable network managers and/or wicd
Configuring your network via the CLI will likely interfere with Network Manager or wicd. To counter this, disable the startup script of either application or completely remove the packages. Be aware that the rest of this guide will require packages which need to be installed from the online repositories.
## Network manager
# Stop the current process
sudo /etc/init.d/NetworkManager stop
# Start: sudo /etc/init.d/NetworkManager start

# The inofficial way:
sudo chmod -x /etc/init.d/NetworkManager
# Reverse: sudo chmod +x /etc/init.d/NetworkManager
# The official way:
sudo update-rc.d -f NetworkManager remove
# Reverse: sudo update-rc.d -f NetworkManager defaults 50

# Or remove the network manager package.
sudo aptitude purge network-manager
# Reverse: sudo aptitude install network-manager

## wicd
# Stop the current process
sudo /etc/init.d/wicd stop
# Start: sudo /etc/init.d/wicd start

# The inofficial way:
sudo chmod -x /etc/init.d/wicd
# Reverse: sudo chmod +x /etc/init.d/wicd

# The official way:
sudo update-rc.d -f wicd remove
# Reverse: sudo update-rc.d -f wicd defaults 20

# Or remove the wicd package.
sudo aptitude purge network-manager
# Reverse: sudo aptitude install network-manager
Note: At some point Ubuntu started using upstart instead of the /sbin/init/ daemon. Thus if the first command above does not stop Network Manager, try this.
sudo stop network-manager
Configuring an interface
- Word of wisdom
-
We will use eth0 in this example, your interface can be named differently, see Finding your network interface.
If you have disabled the either wicd or the network manager you probably don’t have a network connection anymore. Connect via a regular UTP cable to your router, and assuming you have DHCP enabled do the following:
sudo ip link set dev eth0 down
sudo dhclient eth0
This will bring your eth0 up by using DHCP. Your network is now configured (for the time being).
If you don’t have DHCP enabled configure your network by issueing the commands below, the gateway address is the IP address of your router. And your IP should be in the same range as the router is.
sudo ip addr add 192.168.1.14/24 dev eth0
sudo ip link set dev eth0 up
sudo ip route add default via 192.168.1.1
These commands configure your interface but these changes will not survive a reboot, since the information is not stored anyhwere. This is where the interfaces file comes in handy. To configure a interface permanently you’ll need to edit the interfaces file, /etc/network/interfaces.
sudo vi /etc/network/interfaces
## To configure a dynamic IP address
auto eth0
iface eth0 inet dhcp

## Or configure a static IP
auto eth0
iface eth0 inet static
  address 192.168.1.14
  gateway 192.168.1.1
  netmask 255.255.255.0
  network 192.168.1.0
  broadcast 192.168.1.255
For these settings to take effect you need to restart your networking services.
sudo /etc/init.d/networking restart
Setting up a second IP address or Virtual IP address
If you need to set up a second ip address you need to edit the /etc/network/interfaces.
sudo vi /etc/network/interfaces
auto eth0:1
iface eth0:1 inet static
  address 192.168.1.24
  netmask 255.255.255.0
  network 192.168.1.1
  broadcast 192.168.1.255
  gateway 192.168.1.1
For these new settings to take effect you need to restart networking services using the following command
sudo /etc/init.d/networking restart
Howto set MTU for a connection
You can set the MTU for an interface, you could do this by using the mtu keyword in the interface file or by using the ip link command.
iface eth0 inet dhcp
  # via mtu keyword
  mtu 1492
  # Via ip link command
  pre-up /sbin/ip link set $IFACE mtu 1492
The above example sets the MTU for device eth0 to 1492, the usual MTU for a PPPoE ISP connection. This however is only needed if connections seem to hang otherwise (with the default of 1500).
This tip was found on http://glasnost.beeznest.org/articles/290.
Setting up DNS
To cause your machine to consult with a particular server for name lookups you simply add their addresses to /etc/resolv.conf.
For example a machine which should perform lookups from the DNS server at IP address 192.168.1.1 would have a resolv.conf file looking like this
sudo vi /etc/resolv.conf
enter the following details
search example.com
domain example.com
nameserver 192.168.1.1
Wireless
We will not use un-encrypted wireless connections, but will make use of WEP/WPA/WPA2. Deviations from security/encryption method is an exercise left for the user. We also assume the network SSID is being broadcast.
Enabling wireless networking on your PC is pretty straight forward. If your network card is supported out of the box, then there are very little issues. If your card is not supported out of the box, you may need to use ndiswrapper, which will require the Windows drivers fo your card.
ndiswrapper
* Install a Windows driver with ndiswrapper for Dapper or ndiswrapper for 8.04 and up
# Ubuntu 6.06 (Dapper) and earlier
sudo aptitude install ndiswrapper-utils
# Ubuntu 8.04 and up (Hardy/Intrepid/Jaunty/Karmic)
sudo aptitude install ndiswrapper-utils-1.9

# All versions
sudo ndiswrapper -i /path/to/windows/driver.inf
sudo ndiswrapper -m
- More information about ndiswrapper
-
https://help.ubuntu.com/community/WifiDocs/Driver/Ndiswrapper
ndiswrapper --help
man ndiswrapper
Configure your wireless interface
In the examples I will use wlan0 as your wireless card, this could be different on your machine! I will do the examples with a dynamic IP address (DHCP), the same principles applies to staticly configured IP’s.
Open the interfaces file
sudo vi /etc/network/interfaces
auto wlan0
iface wlan0 inet dhcp
pre-up  /etc/init.d/wpa.sh start
post-down /etc/init.d/wpa.sh stop
The pre-up command is run before the interface goes up. The post-down command is run after the interface goes down. There are also post-up and pre-down commands. E.g. You could use post-up to mount disks after an interface goes up. In this case we start wpa_supplicant before we enable the interface and we stop wpa_supplicant after we bring the interface down.
WPA supplicant
- Before you start
-
") Before proceeding any further, it might be worthwhile to check whether your Wi-Fi Card is supported. Please see the wpa_supplicant website for more details. This will save you lots of time and frustration.
Before proceeding any further, it might be worthwhile to check whether your Wi-Fi Card is supported. Please see the wpa_supplicant website for more details. This will save you lots of time and frustration.
Install wpa_supplicant
sudo aptitude install wpasupplicant
Creating the password
You probably have given your wireless network a name (the ESSID or SSID), in this example we will use ubuntuwifi for our wireless network, our password will be OpenSesame. The SSID and password needs to be configured on your wireless router, how to do that is up to the reader. If you have problems coming up with a password, please have a look here.
If you are using WEP encryption (which is not advised) you may skip this step.
$ wpa_passphrase ubuntuwifi OpenSesame
network={
        ssid="ubuntuwifi"
        #psk="OpenSesame"
        psk=24f87a7583001eb7cea2394bbdb04eb2d3641f0b907dd31bd286be628c1841f8
}
Adding your network
Open the /etc/wpa_supplicant file and define your network.
sudo vi /etc/wpa_supplicant.conf
#
#  Please see /usr/share/doc/wpasupplicant/wpa_supplicant.conf.gz
#  for more complete configuration parameters.
#
ctrl_interface=/var/run/wpa_supplicant
ctrl_interface_group=0

eapol_version=2
ap_scan=1
fast_reauth=1
country=NL

### Associate with any open access point
###  Scans/ESSID changes can be done with wpa_cli
network={
  ssid=""
  key_mgmt=NONE
  priority=1
}

# WEP
network={
  ssid="ubuntuwifi"
  scan_ssid=1
  key_mgmt=NONE
  wep_key0="OpenSesame"
  wep_key1="OpenOtherSesame"
  # Use the correct key..
  wep_tx_keyidx=0
  priority=5
}

# WPA/WPA2
network={
  ssid="ubuntuwifi"
  scan_ssid=1
  psk=24f87a7583001eb7cea2394bbdb04eb2d3641f0b907dd31bd286be628c1841f8
  priority=5
  ## The configuration items listed below do not need to be set, the defaults are
  ## pretty 'let us do it for you'.
  ## See /usr/share/doc/wpasupplicant/wpa_supplicant.conf.gz for more information.
  # key_mgmt=WPA-PSK
  # proto=WPA RSN
  # pairwise=CCMP TKIP
  # group=CCMP TKIP
}
Please beware, if you use WPA, remove the WEP section and vice versa.
The priority in this file determines to which network you will connect if more then 2 configured networks are available. This will always be the network with the highest priority.
WPA start script
Create the WPA startup script /etc/init.d/wpa.sh
sudo vi /etc/init.d/wpa.sh
#!/bin/bash
### BEGIN INIT INFO
# Provides:          wpa
# Required-Start:    $network $syslog $local_fs
# Required-Stop:     $network $syslog $local_fs
# Default-Start:     2 3 4 5
# Default-Stop:      0 1 6
# Short-Description: Start/stop script for wpa supplicant
# Description:       Custom start/stop script for wpa_supplicant.
### END INIT INFO

SELF=`basename $0`
WPA=wpa_supplicant
PROGRAM=/sbin/${WPA}
CONF=/etc/${WPA}.conf
INTERFACE=wlan0
DRIVER=wext
DAEMONMODE="-B"
LOGFILE=/var/log/$WPA.log

function start() {

    # TODO: Support multiple interfaces and drivers
    OPTIONS="-c $CONF -i $INTERFACE -D $DRIVER $DAEMONMODE"

    ## You can remove this if you are running 8.10 and up.
    # Ubuntu 8.10 and up doesn't need the -w anymore..
    # And the logfile option is not valid on 8.04 and lower
    local ver=$(lsb_release -sr | sed -e 's/.//g');
    [ $ver -lt 810 ] && OPTIONS="$OPTIONS -w" && LOGFILE=""
    ##

    # Log to a file
    [ -n "$LOGFILE" ] && OPTIONS="$OPTIONS -f $LOGFILE"

    echo " * Starting wpa supplicant"
    eval $PROGRAM $OPTIONS
}

function stop() {
    echo " * Stopping wpa supplicant"
    wpa_cli -i $INTERFACE terminate
    #pkill $PROGRAM ## alternative method
}

function debug() {
    stop
    DAEMONMODE="-ddd"
    start
}

function restart() {
    stop
    start
}

function status() {
    pgrep -lf $PROGRAM
}

function usage() {
    echo "Usage: $SELF <start|stop|status|debug>"
    return 2
}

case $1 in
    start|stop|debug|restart|status) $1 ;;
    *) usage ;;
esac
Make the start script executable.
sudo chmod +x /etc/init.d/wpa.sh
You can now start WPA supplicant as a service or in debugging mode:
# Service
/etc/init.d/wpa.sh start
# Debugging
/etc/init.d/wpa.sh debug
Make sure the script gets run on boot and stopped at shutdown
sudo update-rc.d wpa.sh defaults
With wpa_cli you can make changes to your wpa_supplicant config file and reload these changes:
sudo wpa_cli
Enter help to see what you can do with wpa_cli. Some of the options are: reconfigure, disconnect, reconnect, reassociate. These options speak for themself.
For more information about wpa_supplicant, please have a look at their respective manpages:
man wpa_supplicant
man wpa_supplicant.conf
man wpa_cli
man wpa_gui # Only when you have installed the wpagui package
gzip -dc /usr/share/doc/wpasupplicant/wpa_supplicant.conf.gz | less
Now that you have setup everything, you can try to connect to your network by restarting networking
sudo /etc/init.d/networking restart
You could also reboot your machine if you prefer that.
Configure laptops for multiple locations
When you have a laptop you don’t want to configure it to only be able to have a internet connection at only one location. You probably go to work and use a wired connection, you goto to coffeeshop and use the wifi hotspot overthere and at home you have another network configuration. That is exactly what we are going to configure now.
Guessnet, ifplugd and wpa_supplicant
Install guessnet and ifplugd
sudo aptitude install guessnet ifplugd
Configure ifplugd. Define which interfaces need to be hotplug and adjust the arguments. You should remove the -q.
sudo vi /etc/default/ifplugd
# Just an example
INTERFACES="eth0 wlan0"
#ARGS="-q -f -u0 -d10 -w -I"
ARGS="-f -u0 -d10 -w -I"
# Override ARGS for a particular interface
# This is for an Intel Corporation PRO/Wireless 3945ABG [Golan] Network Connection (rev 02)
ARGS_wlan0="-F -u0 -d10 -w -I"
SUSPEND_ACTION=stop
Some cards do not really play well with the defaults of Ubuntu, adjust where needed.
- More information for ifplugd
-
See ifplugd for more information. And their respective man pages
man ifplugd
man ifplugd.conf
You will need the wpa.sh script mentioned earlier in this guide and you will need to make sure it will be started and stopped:
# Start wpa_supplicant at boot
sudo ln -s /etc/init.d/wpa.sh /etc/rc2.d/S19wpa
sudo ln -s /etc/init.d/wpa.sh /etc/rc3.d/S19wpa

# Kill wpa_supplicant at shutdown
sudo ln -s /etc/init.d/wpa.sh /etc/rc5.d/K21wpa
sudo ln -s /etc/init.d/wpa.sh /etc/rc6.d/K21wpa
Map your physical interfaces to logical interfaces
First, we are going to make a mapping for eth0 and wlan0 and said which mapped interface could be used for each physical interface:
mapping eth0
  # Tell ifupdown to use guessnet to determine which network we can use
  script guessnet-ifupdown
  # Default location
  map default: missing-cable
  # How verbose we are
  map verbose: false
  map debug: false
  # Our different networks, order decides which network is picked
  # if two or more networks are available at the same time.
  map officelan homelan aruba missing-cable

mapping wlan0
  script guessnet-ifupdown
  map default: missing-cable
  map verbose: false
  map debug: false
  map workwifi homewifi wifi-open missing-cable
Normally ifupdown configures the interfaces, but now we’ve told it to use guessnet to determine the network being used.
Define tests to select networks
As you will see with the officelan, homelan and aruba examples below we will execute tests to see wheter a peer is present based on the MAC address. The simplest solution for this is to check whether your gateway is present. You can find out the MAC address of your gateway by running the ip neigh command. You need to be connected with your network for this.
$ ip neigh
192.168.1.254 dev eth0 lladdr 00:24:17:47:xx:xx
This my default gateway, has IP address 192.168.1.254 and 00:24:17:47:xx:xx as a MAC address. This gives us the needed information to define the test.
test peer address 192.168.1.254 mac 00:24:17:47:xx:xx source 192.168.1.14
You don’t need to specify the source IP address, but in certain cases this is required. I always add it so I don’t have to worry about it in case I do need it.
So let’s define our fixed networks using the peer tests:
# Work
# Obfuscated some details about my work enviroment
iface officelan inet static
  # Test to see if our gateway is present with MAC address 00:00:xx:xx:xx:xx
  # from source address 194.134.x.x
  test peer address 194.134.x.x mac 00:00:xx:xx:xx:xx source 194.134.x.x
  address 194.134.x.x
  netmask 255.255.255.0
  gateway 194.134.x.x
  # Set our DNS, this is used by the resolvconf package
  dns-domain euronet.nl
  dns-search euronet.nl orange.nl wanadoo.nl online.nl euro.net
  dns-nameservers 194.134.5.5 194.134.0.97
  # (post|pre)-(up|down) actions, which are optional
  # Mount samba shares at work after we brought the interface up
  post-up /home/my_user/bin/mount_smb start
  # And disable to mounts before we shut the interface down
  pre-down /home/my_user/bin/mount_smb stop
  # Which interface has preference, eth0 or wlan0, this is needed if you
  # are connected via both interfaces.
  metric 1

# One happy island (very nice weather ;))
iface aruba inet dhcp
  test peer address 192.168.1.1 mac 00:08:5C:89:xx:xx source 192.168.1.4
  dns-domain opperschaap.net
  dns-search opperschaap.net euronet.nl wanadoo.nl online.nl euro.net

# Home
iface homelan inet static
  test peer address 192.168.1.254 mac 00:24:17:47:xx:xx source 192.168.1.14
  address 192.168.1.14
  netmask 255.255.255.0
  gateway 192.168.1.1
  dns-domain opperschaap.net
  dns-search opperschaap.net euronet.nl wanadoo.nl online.nl euro.net
  dns-nameservers 194.134.5.5 194.134.0.97
  # At home, wireless has precedence over our fixed network
  metric 2
For wireless networks you can also use the peer test, but there is a simpler way to see if you can connect to a wireless network. Test to see if the ESSID is present:
  test wireless essid ubuntuwifi
  # In case of spaces in the ESSID
  test wireless essid "ubuntu wifi"
- Spaces in the ESSID
- In older versions of guessnet you didn’t need to use quotes around the ESSID, but later versions do require it.
# Wifi at work
iface workwifi inet dhcp
  # Use this if we can find Online Wireless network
  test wireless essid "Online Wireless"
  dns-domain euronet.nl
  dns-search euronet.nl orange.nl wanadoo.nl online.nl sf6800.euronet.nl euro.net
  dns-nameservers 194.134.5.5 194.134.0.97
  # This interface has a lesser precedence over eth0
  metric 2

# Wifi at home
iface homewifi inet static
  test wireless essid ubuntuwifi
  address 192.168.1.114
  netmask 255.255.255.0
  gateway 192.168.1.1
  dns-domain opperschaap.net
  dns-search opperschaap.net euronet.nl wanadoo.nl online.nl
  dns-nameservers 194.134.5.5 194.134.0.97
  # This interface is used in case we are both connected via wifi and
  # wired LAN
  metric 1

# Connect to any open network
iface wifi-open inet dhcp
  # Any ESSID is valid
  wireless-essid any
  # Is the wireless work open? Yes, then use this mapping
  test wireless open
  # Set the DNS
  dns-domain opperschaap.net
  dns-search opperschaap.net euronet.nl wanadoo.nl online.nl
  dns-nameservers 194.134.5.5 194.134.0.97
To see what kind of other test you can run to determine which network you are in, please have a look at the manpage of guessnet.
man guessnet
Use of metrics
Some of you might have noticed a metric statement for some of the interfaces. I do this because when you are connected via both wireless and wired networks, some things may go «bad» with the routing table. When you define a metric for these two interfaces you will tell the routing table which interface has preference over the other. The lowest metric has priority over the higher metric.
Or as I explained in a ubuntuforum post: The problem is that without the metric you will have 2 interfaces used for the same destinations. It will use either interface, which causes problems with the routing table.
By setting a metric you can avoid this, since the higher metric is more «expensive» to use. So the OS will use the interfaces with the lowest metric if it needs to route traffic. In case the lower metric interface is shutdown it will use the higher metric interface since it is the only interface which can be used to route traffic towards that particular network/destination.
See also http://en.wikipedia.org/wiki/Metrics_%28networking%29
The problem could also be solved by adding static routes, but that is used mostly to make sure specific networks/hosts are routed via a different interface then the default. You then force only those hosts to use link B even though normally the OS would use link A.
Result
When we put all the configuration segments together you will get a interfaces file which looks like this
auto lo
iface lo inet loopback
address 127.0.0.1
netmask 255.0.0.0

mapping eth0
  script guessnet-ifupdown
  map default: missing-cable
  map verbose: false
  map debug: false
  map officelan homelan aruba missing-cable

mapping wlan0
  script guessnet-ifupdown
  map default: missing-cable
  map verbose: false
  map debug: false
  map workwifi homewifi wifi-open missing-cable

# Work
iface officelan inet static
  test peer address 194.134.x.x mac 00:00:xx:xx:xx:xx source 194.134.x.x
  address 194.134.x.x
  netmask 255.255.255.0
  gateway 194.134.x.x
  dns-domain euronet.nl
  dns-search euronet.nl orange.nl wanadoo.nl online.nl euro.net
  dns-nameservers 194.134.5.5 194.134.0.97
  post-up /home/my_user/bin/mount_smb start
  pre-down /home/my_user/bin/mount_smb stop
  metric 1

# One happy island (very nice weather ;))
iface aruba inet dhcp
  test peer address 192.168.1.1 mac 00:08:5C:89:xx:xx source 192.168.1.4
  dns-domain opperschaap.net
  dns-search opperschaap.net euronet.nl wanadoo.nl online.nl euro.net

# Home
iface homelan inet static
  test peer address 192.168.1.254 mac 00:24:17:47:xx:xx source 192.168.1.14
  address 192.168.1.14
  netmask 255.255.255.0
  gateway 192.168.1.1
  dns-domain opperschaap.net
  dns-search opperschaap.net euronet.nl wanadoo.nl online.nl euro.net
  dns-nameservers 194.134.5.5 194.134.0.97
  metric 2

# Wifi at work
iface workwifi inet dhcp
  # Use this if we can find Online Wireless network
  test wireless essid "Online Wireless"
  dns-domain euronet.nl
  dns-search euronet.nl orange.nl wanadoo.nl online.nl sf6800.euronet.nl euro.net
  dns-nameservers 194.134.5.5 194.134.0.97
  # This interface has a lesser precedence over eth0
  metric 2

# Wifi at home
iface homewifi inet static
  test wireless essid ubuntuwifi
  address 192.168.1.114
  netmask 255.255.255.0
  gateway 192.168.1.1
  dns-domain opperschaap.net
  dns-search opperschaap.net euronet.nl wanadoo.nl online.nl
  dns-nameservers 194.134.5.5 194.134.0.97
  # This interface is used in case we are both connected via wifi and
  # wired LAN
  metric 1

# Connect to any open network
iface wifi-open inet dhcp
  # Any ESSID is valid
  wireless-essid any
  # Is the wireless work open? Yes, then use this mapping
  test wireless open
  # Set the DNS
  dns-domain opperschaap.net
  dns-search opperschaap.net euronet.nl wanadoo.nl online.nl
  dns-nameservers 194.134.5.5 194.134.0.97
You can now test if it all works like intended.
/etc/init.d/networking stop
/etc/init.d/wpa.sh stop
/etc/init.d/ifplugd stop
If you enter ip addr you will only see the lo interface being active.
1: lo: <LOOPBACK,UP,LOWER_UP> mtu 16436 qdisc noqueue state UNKNOWN
2: eth0: <BROADCAST,MULTICAST> mtu 1500 qdisc pfifo_fast state DOWN qlen 1000
And start all the required daemons:
/etc/init.d/ifplugd start
/etc/init.d/wpa.sh start
/etc/init.d/networking start
And now you will see your interfaces configured properly
$ ip a
1: lo: <LOOPBACK,UP,LOWER_UP> mtu 16436 qdisc noqueue state UNKNOWN
2: eth0: <BROADCAST,MULTICAST,UP,LOWER_UP> mtu 1500 qdisc pfifo_fast state UP qlen 1000
Done.
Bonus script
This script will be a stop/start script for your complete network, which can be used when you want to enable networking after you have suspended your laptop or for other reasons
INT="eth0 wlan0"

stop() {
    /etc/init.d/networking stop
    /etc/init.d/wpa.sh stop
    /etc/init.d/ifplugd stop
    for i in $INT ; do
        ip link set dev "$i" down &>/dev/null
    done

}

start() {
    /etc/init.d/ifplugd start
    /etc/init.d/wpa.sh start
    /etc/init.d/networking start
}

restart() {
    stop
    sleep 5
    start
}

$1
See also
Ubuntu resources
-
http://ubuntuforums.org/showthread.php?t=124153 — This guide on the Ubuntu forums.
-
http://ubuntuforums.org/showthread.php?t=1055393 — Setting hostname gone wrong.
External resources
-
http://www.linuxhomenetworking.com/wiki/index.php/Quick_HOWTO_:_Ch03_:_Linux_Networking — networking for Linux explained
-
http://wiki.debian.org/WPA — Debian wiki and configuring WPA
-
http://www.aaron-spettl.de/ubuntu/dynamische-netzwerkkonfiguration.php — This guide in German
-
http://vollink.com/gary/deb_wifi.html — Debian and Wireless networking (broken link)
-
http://wiki.fok.nl/index.php/Dig/linux/wireless — This guide in Dutch, rewrite of the Ubuntu forums thread (Dutch)
CategoryNetworking CategoryWireless CategoryCommandLine
NetworkConfigurationCommandLine/Automatic (last edited 2015-07-18 12:02:04 by peter-hentrich)
In this quick tutorial, I’ll show you how to change hostname on Ubuntu, Debian and other Linux distributions.
The hostname is basically your computer’s name. It can be used to identify and communicate your system on the same network.
Some Linux distributions and cloud service providers let you choose the hostname while installing. Some will automatically create one for you but you’ll always have a computer name.
If you don’t like the one you’ve got, you can use the following systemd command to change hostname on major Linux distributions:
hostnamectl set-hostname new_host_nameRead the rest of the article to learn more about hostname and ways to change it.
Before you see various ways to change the hostname, you should first know what’s a hostname!
What is a hostname in Linux?
A hostname is a name assigned to a “host” i.e. a computer on a network. The hostname is basically just your computer’s name. It’s used to identify your computer on the network.
You can see the hostname in the terminal using the hostname command.
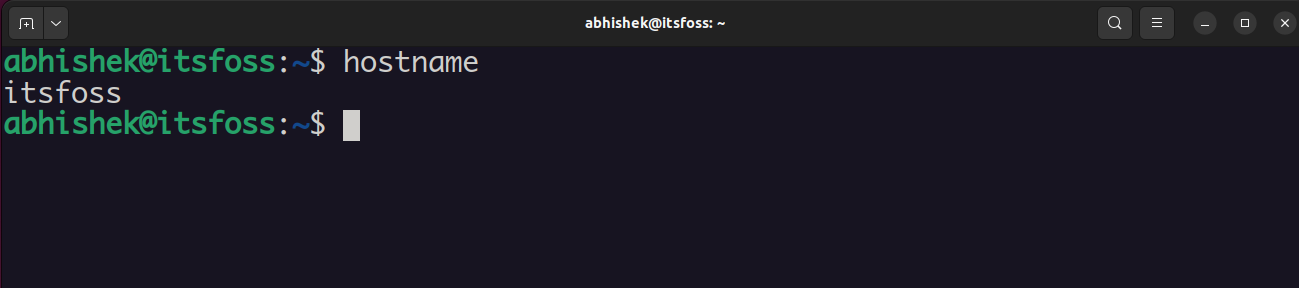
As you can see in the above screenshot, the username is abhishek while the hostname is itsfoss.
When you install Ubuntu, it asks you to choose a name for your computer. That’s the “hostname” for your system.
If at any point in time you feel like your computer doesn’t have a fancy or relevant name, you can easily change the hostname in Linux.
Note that you shouldn’t use the same hostname on two different computers on the same network, as this can cause problems. This hostname is supposed to uniquely identify a computer on a network.
There are two ways to change the hostname in Ubuntu:
- Change hostname in command Line
- Change hostname using GUI Way
Here I am assuming you have Ubuntu on your system, but you can try the same command line trick on Linux Mint and some other Debian distributions as they use the same configuration as Ubuntu.
Change hostname in Ubuntu & other Linux using command line
If you want to change the hostname in Ubuntu or any other Debian based Linux distribution, you can use the typical Linux way to do that, which is using the command line.
Now, there are several commands for changing the hostname in Linux. I’ll show you two such methods here.
Method 1: Change hostname using systemd tools
If your Linux system uses systemd, you can use the tools provided by systemd to change the hostname. To check your current hostname and some other information, use the command:
 Static hostname: itsfoss-ubuntu
       Icon name: computer-vm
         Chassis: vm
      Machine ID: xxxxxxxxxxxxxxxxxxxxxxxxxxxxxxxx
         Boot ID: xxxxxxxxxxxxxxxxxxxxxxxxxxxxxxxx
  Virtualization: kvm
Operating System: Ubuntu 22.04.1 LTS
          Kernel: Linux 5.15.0-47-generic
    Architecture: x86-64
 Hardware Vendor: QEMU
  Hardware Model: Standard PC _Q35 + ICH9, 2009_
To change the hostname, you can use this option with the hostnamectl command:
hostnamectl set-hostname <new_hostname>Of course, replace the <new_hostname> with your new hostname in the above command.
Method 2: Change hostname with hostname command
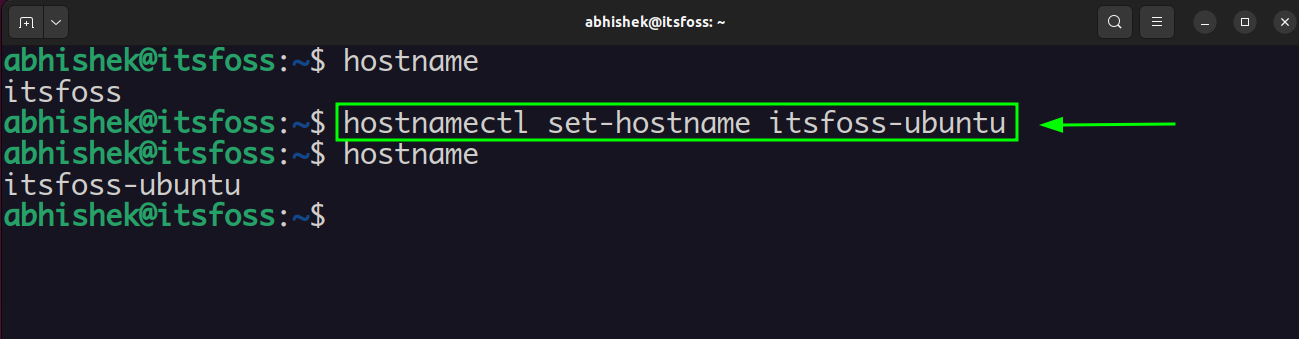
Open a terminal and use the command below to change the hostname. Replace <new_hostname> with the new hostname you want to use:
sudo hostname <new_hostname>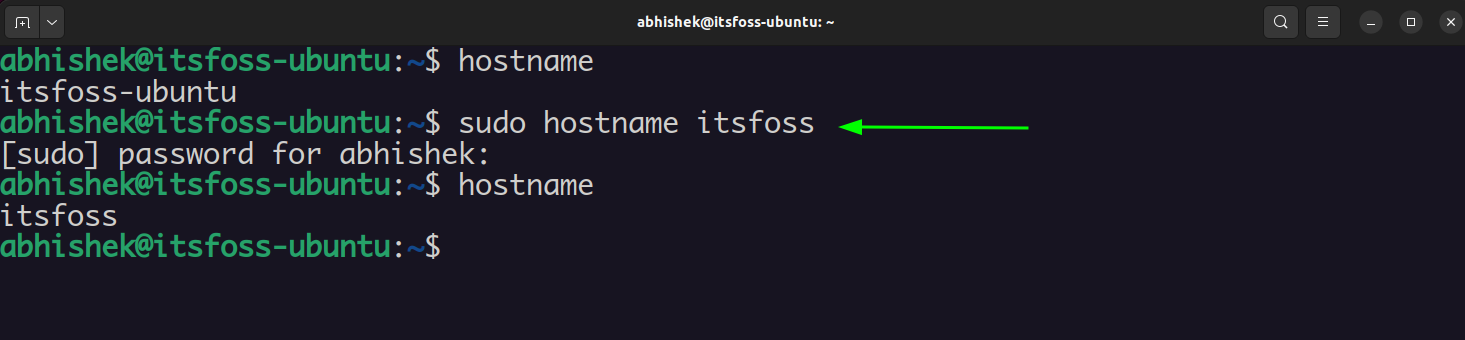
Now if you use the command hostname, you’ll see that your hostname has been changed.
But the changes you just made are not permanent. If you reboot your system, the old hostname will be back.
To change your hostname permanently, you’ll also need to edit your /etc/hostname and /etc/hosts file, which is where Ubuntu, Mint and other Debian-based distributions store the hostname.
Since you are in terminal, you need to use a command line based text editor to edit these files like Vi or Vim. Ubuntu has Nano editor installed by default so you can use that as well.
I am going to use nano here. You’ll only see one line here and that contains your system’s hostname. Change it to the hostname you want and save the file.
sudo nano /etc/hostnameYou must also edit the /etc/hosts file in the similar fashion and replace all the occurrences of your old hostname with the new hostname.
sudo nano /etc/hostsThis is important otherwise you’ll start seeing “sudo: unable to resolve host” error.

That’s it. You are done!
Though I used Ubuntu here, you can use these methods to change hostname in Debian or most other distributions.
Change hostname in Ubuntu Using GUI
The beginner-friendly Linux distribution Ubuntu often provides the graphical way of doing things.
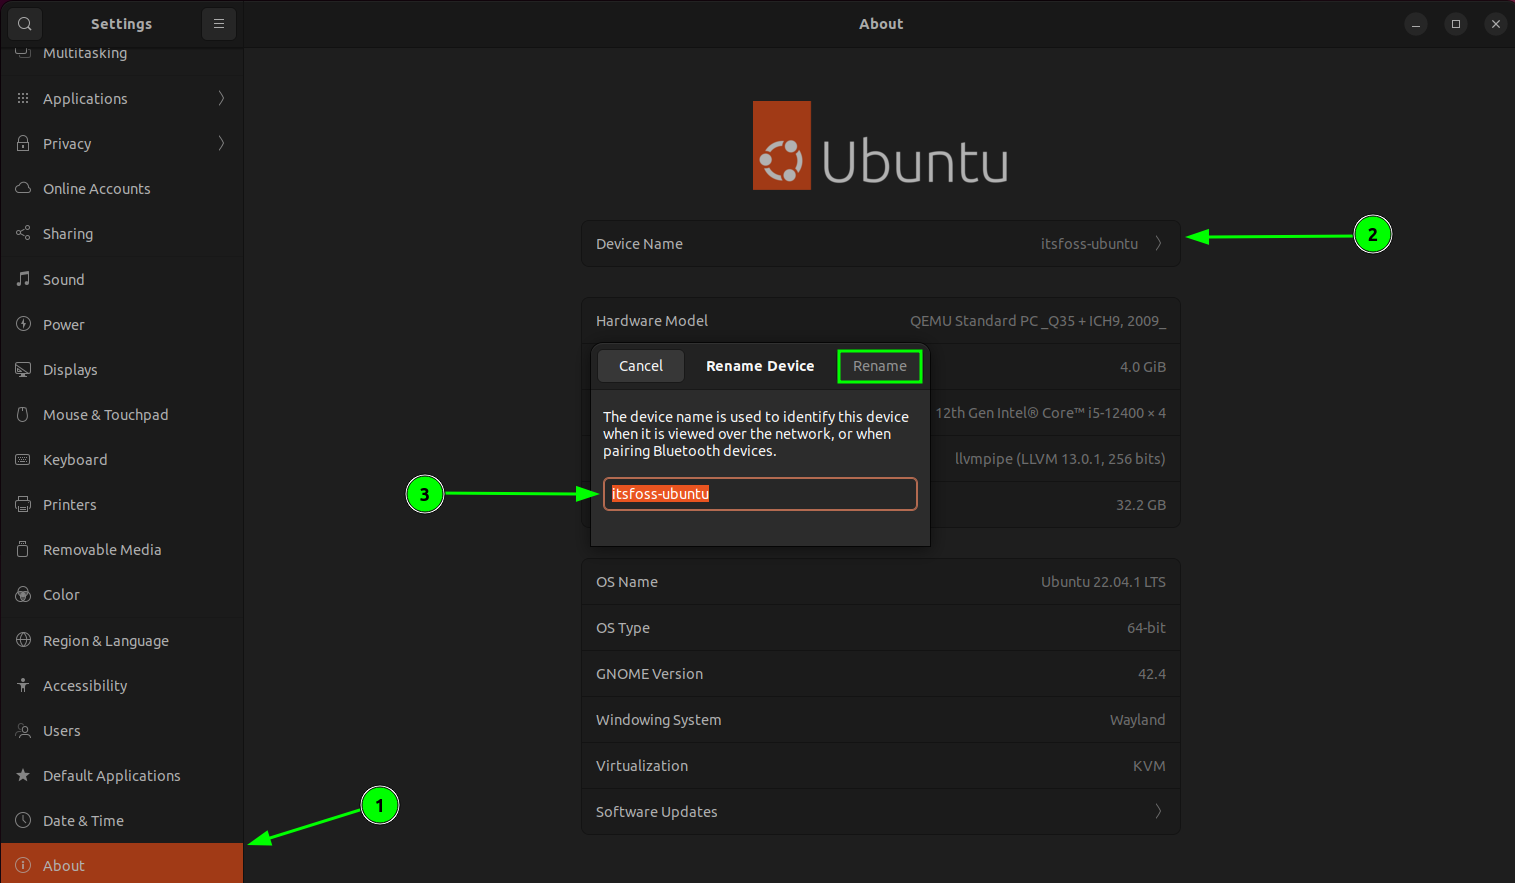
To change the hostname in Ubuntu 22.04 or any other Linux distribution using GNOME desktop, just go to the System Settings and click on About.
In here, you’ll see the ‘Device name’ field that is editable. This ‘Device name’ is your system’s hostname. Change it to whatever you want. The changes you make here are permanent.
It’s the same process pretty much in any other desktop environment.
Bonus Tip: Mandatory rules for hostnames
There are some rules specified for hostname:
- hostname can only contain letters, digits, and the hyphen character, and the period character
- hostname must begin and end with a letter or number
- hostname must be between 2 and 63 characters long
If your proposed hostname doesn’t follow the rules, you may see an error like this:
hostname: the specified hostname is invalid
In the end…
I hope this article helped you to change hostname on Ubuntu and other Linux distributions. Feel free to provide your feedback.
In this quick tutorial, I’ll show you how to change hostname on Ubuntu, Debian and other Linux distributions.
The hostname is basically your computer’s name. It can be used to identify and communicate your system on the same network.
Some Linux distributions and cloud service providers let you choose the hostname while installing. Some will automatically create one for you but you’ll always have a computer name.
If you don’t like the one you’ve got, you can use the following systemd command to change hostname on major Linux distributions:
hostnamectl set-hostname new_host_nameRead the rest of the article to learn more about hostname and ways to change it.
Before you see various ways to change the hostname, you should first know what’s a hostname!
What is a hostname in Linux?
A hostname is a name assigned to a “host” i.e. a computer on a network. The hostname is basically just your computer’s name. It’s used to identify your computer on the network.
You can see the hostname in the terminal using the hostname command.
As you can see in the above screenshot, the username is abhishek while the hostname is itsfoss.
When you install Ubuntu, it asks you to choose a name for your computer. That’s the “hostname” for your system.
If at any point in time you feel like your computer doesn’t have a fancy or relevant name, you can easily change the hostname in Linux.
Note that you shouldn’t use the same hostname on two different computers on the same network, as this can cause problems. This hostname is supposed to uniquely identify a computer on a network.
There are two ways to change the hostname in Ubuntu:
- Change hostname in command Line
- Change hostname using GUI Way
Here I am assuming you have Ubuntu on your system, but you can try the same command line trick on Linux Mint and some other Debian distributions as they use the same configuration as Ubuntu.
Change hostname in Ubuntu & other Linux using command line
If you want to change the hostname in Ubuntu or any other Debian based Linux distribution, you can use the typical Linux way to do that, which is using the command line.
Now, there are several commands for changing the hostname in Linux. I’ll show you two such methods here.
Method 1: Change hostname using systemd tools
If your Linux system uses systemd, you can use the tools provided by systemd to change the hostname. To check your current hostname and some other information, use the command:
 Static hostname: itsfoss-ubuntu
       Icon name: computer-vm
         Chassis: vm
      Machine ID: xxxxxxxxxxxxxxxxxxxxxxxxxxxxxxxx
         Boot ID: xxxxxxxxxxxxxxxxxxxxxxxxxxxxxxxx
  Virtualization: kvm
Operating System: Ubuntu 22.04.1 LTS
          Kernel: Linux 5.15.0-47-generic
    Architecture: x86-64
 Hardware Vendor: QEMU
  Hardware Model: Standard PC _Q35 + ICH9, 2009_
To change the hostname, you can use this option with the hostnamectl command:
hostnamectl set-hostname <new_hostname>Of course, replace the <new_hostname> with your new hostname in the above command.
Method 2: Change hostname with hostname command
Open a terminal and use the command below to change the hostname. Replace <new_hostname> with the new hostname you want to use:
sudo hostname <new_hostname>Now if you use the command hostname, you’ll see that your hostname has been changed.
But the changes you just made are not permanent. If you reboot your system, the old hostname will be back.
To change your hostname permanently, you’ll also need to edit your /etc/hostname and /etc/hosts file, which is where Ubuntu, Mint and other Debian-based distributions store the hostname.
Since you are in terminal, you need to use a command line based text editor to edit these files like Vi or Vim. Ubuntu has Nano editor installed by default so you can use that as well.
I am going to use nano here. You’ll only see one line here and that contains your system’s hostname. Change it to the hostname you want and save the file.
sudo nano /etc/hostnameYou must also edit the /etc/hosts file in the similar fashion and replace all the occurrences of your old hostname with the new hostname.
sudo nano /etc/hostsThis is important otherwise you’ll start seeing “sudo: unable to resolve host” error.
That’s it. You are done!
Though I used Ubuntu here, you can use these methods to change hostname in Debian or most other distributions.
Change hostname in Ubuntu Using GUI
The beginner-friendly Linux distribution Ubuntu often provides the graphical way of doing things.
To change the hostname in Ubuntu 22.04 or any other Linux distribution using GNOME desktop, just go to the System Settings and click on About.
In here, you’ll see the ‘Device name’ field that is editable. This ‘Device name’ is your system’s hostname. Change it to whatever you want. The changes you make here are permanent.
It’s the same process pretty much in any other desktop environment.
Bonus Tip: Mandatory rules for hostnames
There are some rules specified for hostname:
- hostname can only contain letters, digits, and the hyphen character, and the period character
- hostname must begin and end with a letter or number
- hostname must be between 2 and 63 characters long
If your proposed hostname doesn’t follow the rules, you may see an error like this:
hostname: the specified hostname is invalidIn the end…
I hope this article helped you to change hostname on Ubuntu and other Linux distributions. Feel free to provide your feedback.
A hostname is a human-readable string that helps people refer to a computer by a familiar name, rather than by a number or unwieldy descriptors like, «the third one from the bottom of the second-to-last rack.» Often, a hostname is set during the installation process, but there are times when it needs to be changed. On Linux, there are many ways to set a hostname, and this article aims to cover them all.
Before exploring the tools related to hostnames, though, you must understand the different contexts in which the term is used. There are potentially two designators of a system’s hostname: the computer’s administrator (a laptop’s owner, or a server’s root user) and the network (depending on protocols and settings). This factor can lead to confusion, because you might look at your computer’s hostname and see one value, only to find that the same computer is referred to as something different over the network.
There’s a historical reason for this situation. Long ago, before DNS, hosts on a network had to be defined locally in the file /etc/hosts. If there were 31 hosts on a network and a new one was added, then 32 hosts had to update their /etc/hosts file to reflect the correct IP address and corresponding hostname for each of their neighbors. This process didn’t scale well for bigger networked systems such as the World Wide Web (the Internet), and so DNS was invented, and the concept of hostnames largely was abstracted away from local computers to instead be managed by the network.
Today, the important hostname is the one the network uses. The hostname value in /etc/hosts is often set to localhost by default.
With this context in mind, here are all the different ways to manipulate a hostname on Linux.
[ Free download: Advanced Linux commands cheat sheet. ]
Change all three names with hostnamectl
The hostnamectl command from systemd can manipulate three varieties of hostnames:
- Transient: Received from network configuration.
- Static: Provided by the kernel.
- Pretty: Provided by the user.
A transient hostname can change as needed to avoid name collisions. For instance, if you name your computer penguin but there’s already another host with that name on the network, your network hostname becomes penguin-1.
Static and pretty hostnames are a little like local variables: They’re used for activities occurring on the local machine, mostly as a convenience for the user, along with applications that need to know whether they’re running locally or remotely (for example, over a forwarded X session).
When invoked without any arguments, hostnamectl returns the static and pretty names, plus some system information:
$ hostnamectl
   Static hostname: penguin
   Pretty hostname: Penguin VM
         Icon name: computer-vm
           Chassis: vm
        Machine ID: 418d9ce8ead44bbfb6970c0d356b89bf
           Boot ID: fb3a310237ef41f88b1c62c26f19065a
    Virtualization: kvm
  Operating System: Fedora 30 (Workstation Edition)
       CPE OS Name: cpe:/o:fedoraproject:fedora:30
            Kernel: Linux 5.0.9-301.fc30.x86_64
      Architecture: x86-64
$ sudo hostnamectl set-hostname --pretty "Web dev test environment"
$ sudo hostnamectl set-hostname --static webdev-test-env
$ hostnamectl
   Static hostname: webdev-test-env
   Pretty hostname: Web dev test environment
   [...]
Change the static and pretty names in the GUI with GNOME Settings
If you want to set the static and pretty names in a desktop application, use GNOME Settings. To launch GNOME Settings, go to the Activities menu in the upper left corner of your GNOME desktop. Type Settings into the search field, or click the Show Applications icon on the left dock and find Settings in the application icons as shown below:

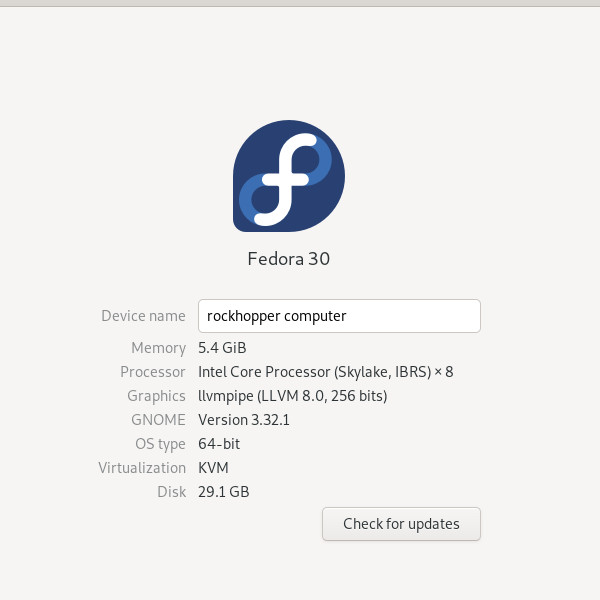
$ hostnamectl
   Static hostname: rockhopper-computer
   Pretty hostname: rockhopper computer
   [...]
Change the static name with cockpit
Fedora, CentOS, and RHEL systems feature a web console application called Cockpit for monitoring and configuring local and remote machines. Using Cockpit, you can change the static hostname for your own machine, or any machine you administer (as long as it has Cockpit enabled).
First, install and enable Cockpit:
$ sudo dnf install cockpit
[...]
$ sudo systemctl enable --now cockpit
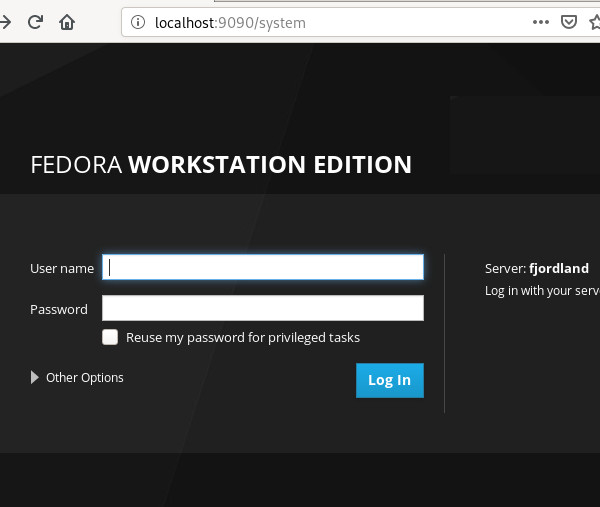
In the web console, click the System tab in the left column. Click the entry for Host name and edit the Pretty Host Name and (static) Real Host Name:
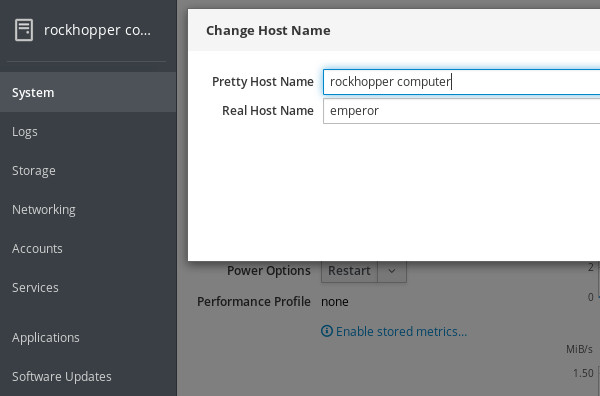
$ sudo echo "galapagos" > /etc/hostname
$ hostnamectl
   Static hostname: snares
   Pretty hostname: rockhopper web console computer
   [...]
Change the static name in the hostname file
You can also set the static hostname manually by editing /etc/hostname. This file contains exactly one line by default. If you have not changed the hostname yet, then that line probably reads localhost.localdomain. If you have used hostnamectl to change the hostname already, then this file reflects that change.
Editing this file manually is not necessarily recommended, because it doesn’t update all the other hostname values the way hostnamectl does. For example:
$ sudo echo "galapagos" > /etc/hostname
$ hostnamectl
   Static hostname: galapagos
   Pretty hostname: rockhopper computer
   Transient hostname: rockhopper-computer
   [...]
Change the static name with nmcli
Another way to change a static hostname is through the command line interface for Network Manager, nmcli:
$ sudo nmcli general hostname emperor
$ hostnamectl
   Static hostname: emperor
   Pretty hostname: rockhopper computer
   Transient hostname: rockhopper-computer
   [...]
Change the transient name with sysctl
The sysctl command allows you to configure kernel parameters while Linux is running (that is, instead of at boot time). Your computer’s transient hostname is a kernel parameter, so you can modify it with this command:
$ sudo sysctl kernel.hostname=humboldt
$ hostnamectl
   Static hostname: emperor
   Pretty hostname: rockhopper computer
   Transient hostname: humboldt
   [...]
Change the transient name with hostname
The hostname command from the util-linux package is a simple tool to query and set the transient hostname.
To query your current hostname:
$ hostname
humboldt
$ sudo hostname fjordland
$ hostnamectl
   Static hostname: emperor
   Pretty hostname: rockhopper computer
Transient hostname: fjordland
Be careful with /etc/hosts
The /etc/hosts file is mostly historic, although it is used by some applications and protocols, and can be a useful method for creating shortcuts to hosts you use often. You can use it to set a hostname, but usually, you’re just creating an alias to localhost at IP address 127.0.0.1 (your computer’s network loopback address).
For example, if you change /etc/hosts from the default entries like this:
$ cat /etc/hosts
127.0.0.1   magellanic magellanic.localdomain magellanic magellanic.localdomain4
::1         magellanic magellanic.localdomain magellanic magellanic.localdomain6
$ ping -c 1 localhost
PING localhost(magellanic (::1)) 56 data bytes
64 bytes from magellanic (::1): icmp_seq=1 ttl=64 time=0.182 ms
[...]
$ ping -c 1 magellanic
PING magellanic(magellanic (::1)) 56 data bytes
64 bytes from magellanic (::1): icmp_seq=1 ttl=64 time=0.181 ms
[...]
$ hostnamectl
   Static hostname: emperor
   Pretty hostname: rockhopper computer
   Transient hostname: fjordland
Follow the conformity convention
As you can tell from the iterations within this article, a computer’s hostname can get confusing should you use too many methods to set it, or if you change it frequently. While nothing enforces uniformity across hostname types, it’s a convention to keep everything the same on each computer.
Choose a memorable name and use it for your pretty name. Let the static and transient names be derived from that. Just as importantly, in a large network, choose meaningful names. For instance, all upper management computers may be named after a D&D monster, while all computers in the IT department may be named after a famous starship, and so on. Using a naming schema helps avoid name collisions and provides context to an otherwise dizzying list of network hosts.
Как установить или изменить имя хоста в Linux
How to Set or Change Hostname in Linux
Это руководство проведет вас через процесс изменения имени хоста в Linux без необходимости перезапуска системы. Инструкции должны работать на любом современном дистрибутиве Linux, который использует systemd.

По умолчанию системное имя хоста задается в процессе установки, или, если вы создаете виртуальную машину, оно динамически назначается экземпляру при запуске, но в некоторых случаях вам необходимо изменить его.
Что такое имя хоста
Имя хоста — это метка, назначенная машине, которая идентифицирует машину в сети. Каждое устройство в сети должно иметь уникальное имя хоста.
Имя хоста может быть простой строкой, содержащей буквенно-цифровые символы, точки и дефисы. Если устройство подключено к Интернету (например, к веб-серверу или почтовому серверу), рекомендуется использовать полное доменное имя (FQDN) в качестве имени хоста системы. FQDN состоит из двух частей, имени хоста и имени домена.
Отображение текущего имени хоста
В системах Linux, использующих systemd, эту hostnamectl команду можно использовать для запроса и изменения имени хоста и соответствующих настроек на данном компьютере.
Чтобы просмотреть текущее имя хоста, вызовите hostnamectl команду без аргументов:
hostnamectl
Имя хоста системы выделено на рисунке ниже:

Изменение имени хоста
Чтобы изменить имя хоста, вызовите hostnamectl команду с set-hostname аргументом, за которым следует новое имя хоста. Только root или пользователь с привилегиями sudo может изменить имя хоста системы.
Например, чтобы изменить системное имя хоста mail.linuxize.com, вы должны использовать следующую команду:
sudo hostnamectl set-hostname mail.linuxize.com
Команда hostnamectl не производит вывод. В случае успеха 0 возвращается ненулевой код ошибки в противном случае.
Наконец, чтобы убедиться, что имя хоста было успешно изменено, еще раз используйте hostnamectl команду:
hostnamectlНовое имя хоста системы и некоторая дополнительная системная информация, такая как версия ядра, будут отображаться на терминале.
   Static hostname: mail.linuxize.com
         Icon name: computer-vm
           Chassis: vm
        Machine ID: 70a3f06298014fd9ac42e5dc1de1034a
           Boot ID: 6d45a1a8d436418e97519da01ea61c1b
    Virtualization: oracle
  Operating System: Debian GNU/Linux 10 (buster)
            Kernel: Linux 4.19.0-5-amd64
      Architecture: x86-64
Вывод
В этом уроке мы показали, как изменить имя хоста вашей системы Linux. В зависимости от вашего дистрибутива Linux и типа виртуализации могут потребоваться дополнительные шаги для завершения процесса.
Для инструкций, относящихся к дистрибутиву, просмотрите следующие статьи:
Имя хоста задается во время установки операционной системы или динамически назначается виртуальной машине при ее создании.
В этом руководстве объясняется, как установить или изменить имя хоста в Ubuntu 20.04 без перезагрузки системы.
Общие сведения об именах хостов
Имя хоста — это метка, которая идентифицирует устройство в сети. У вас не должно быть двух или более машин с одинаковым именем хоста в одной сети.
В Ubuntu вы можете редактировать системное имя хоста и соответствующие настройки с помощью команды hostnamectl . Этот инструмент распознает три разных класса имен хостов:
static— традиционное имя хоста. Он хранится в/etc/hostnameи может быть установлен пользователем.-
pretty— описательное имя хоста UTF8 в свободной форме, используемое для представления пользователю. Например,Linuxize's laptop. -
transient— динамическое имя хоста, поддерживаемое ядром. Серверы DHCP или mDNS могут изменять временное имя хоста во время выполнения. По умолчанию это то же самое, что иstaticимя хоста.
Рекомендуется использовать полное доменное имя ( FQDN ), например host.example.com как для static и для transient имен.
Только root или пользователи с привилегиями sudo могут изменять системное имя хоста.
Отображение текущего имени хоста
Чтобы просмотреть текущее имя хоста, вызовите команду hostnamectl без аргументов:
hostnamectl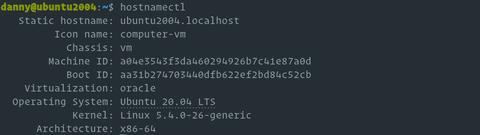
В этом примере текущее имя хоста установлено на ubuntu2004.localdomain .
Изменение имени хоста системы
Изменение имени хоста системы — простой процесс. Синтаксис следующий:
sudo hostnamectl set-hostname host.example.comsudo hostnamectl set-hostname "Your Pretty HostName" --prettysudo hostnamectl set-hostname host.example.com --staticsudo hostnamectl set-hostname host.example.com --transient
Например, чтобы изменить статическое имя хоста системы на neptune.linuxize.com , вы должны использовать следующую команду:
sudo hostnamectl set-hostname neptune.linuxize.comПри желании вы также можете установить красивое имя хоста:
sudo hostnamectl set-hostname "Linuxize's laptop" --prettyhostnamectl не производит вывода. В случае успеха возвращается 0, в противном случае — ненулевой код ошибки.
Статическое имя хоста хранится в /etc/hostname , а красивое имя хоста хранится в /etc/machine-info .
Вы не должны использовать одно и то же имя хоста на двух разных машинах в одной сети.
В большинстве систем имя хоста отображается на 127.0.0.1 в /etc/hosts . Откройте файл и измените старое имя хоста на новое.
/etc/hosts
127.0.0.1   localhost
127.0.0.1   neptune.linuxize.com

# The following lines are desirable for IPv6 capable hosts
::1     localhost ip6-localhost ip6-loopback
ff02::1 ip6-allnodes
ff02::2 ip6-allrouters
Если вы используете Ubuntu в облачном экземпляре и установлен пакет cloud-init , вам также необходимо отредактировать файл /etc/cloud/cloud.cfg . Этот пакет обычно устанавливается по умолчанию в образах, предоставляемых поставщиками облачных услуг, и используется для обработки инициализации экземпляров облака.
Если файл существует в вашей системе, откройте его:
sudo vim /etc/cloud/cloud.cfgНайдите preserve_hostname и измените значение с false на true :
/etc/cloud/cloud.cfg
# This will cause the set+update hostname module to not operate (if true)
preserve_hostname: true
Сохраните файл и закройте редактор.
Проверить изменение
Чтобы убедиться, что имя хоста было полностью изменено, введите команду hostnamectl :
hostnamectlВаше новое имя хоста будет напечатано на терминале:
   Static hostname: neptune.linuxize.com
   Pretty hostname: Linuxize's desktop
         Icon name: computer-vm
           Chassis: vm
        Machine ID: a04e3543f3da460294926b7c41e87a0d
           Boot ID: aa31b274703440dfb622ef2bd84c52cb
    Virtualization: oracle
  Operating System: Ubuntu 20.04 LTS
            Kernel: Linux 5.4.0-26-generic
      Architecture: x86-64
Выводы
Мы показали вам, как легко изменить имя хоста при установке Ubuntu 20.04 без перезагрузки компьютера.
Существует ряд причин, по которым вам может потребоваться изменить имя хоста. Чаще всего это когда имя хоста устанавливается автоматически при создании экземпляра.
Не стесняйтесь оставлять комментарии, если у вас есть вопросы.
Имя компьютера или по-другому, имя хоста устанавливается во время установки системы. Оно используется для идентификации компьютера в локальной сети, например, передается службой NetBIOS как имя сервера Samba, а также вы будете постоянно видеть его в терминале перед приглашением ввода команды.
Если вы задали не такое имя как хотите во время установки, то изменить имя компьютера Ubuntu не так уж сложно, но графических инструментов для этого в системе придумано не было, поэтому придется делать все через терминал.
Требования к имени компьютера
Вы можете использовать практически любое имя компьютера, но для него есть некоторые ограничения. Не желательно использовать два одинаковых имени компьютера в одной локальной сети, иначе могут возникнуть проблемы с различными интернет-сервисами и самая очевидная — вы не сможете понять где какой компьютер.
Второе ограничение — имя компьютера может содержать только буквы английского алфавита от a до z, цифры от 0 до 9, а также символы дефиса и точки. Начинаться и заканчиваться имя должно только буквой или цифрой, а не символом подчеркивания. Имя хоста регистронезависимо, поэтому COMPUTER и computer будут означать одно и то же. По длине стоит ограничение от 2 до 69 символов, но этого вполне достаточно.
Как изменить имя компьютера
Посмотреть текущее имя компьютера можно выполнив команду hostnamectl без параметров:
hostnamectl
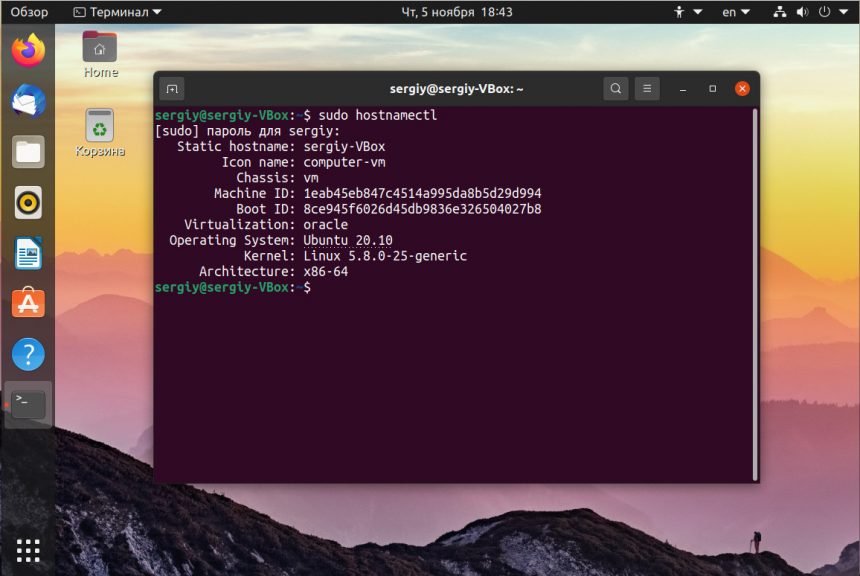
Изменить имя хоста Ubuntu можно несколькими способами. Самый простой способ установить имя компьютера, которое сохранится только до перезагрузки можно использовать команду hostname, которой в параметре нужно передать новое имя. Например:
sudo hostname losst-pc
Но после перезагрузки все вернется как было раньше. Чтобы сделать изменения постоянными нужно изменить содержимое двух файлов. /etc/hostname и /etc/hosts:
sudo vi /etc/hostname

Удалите старое имя из этого файла и пропишите новое. Затем сохраните изменения.
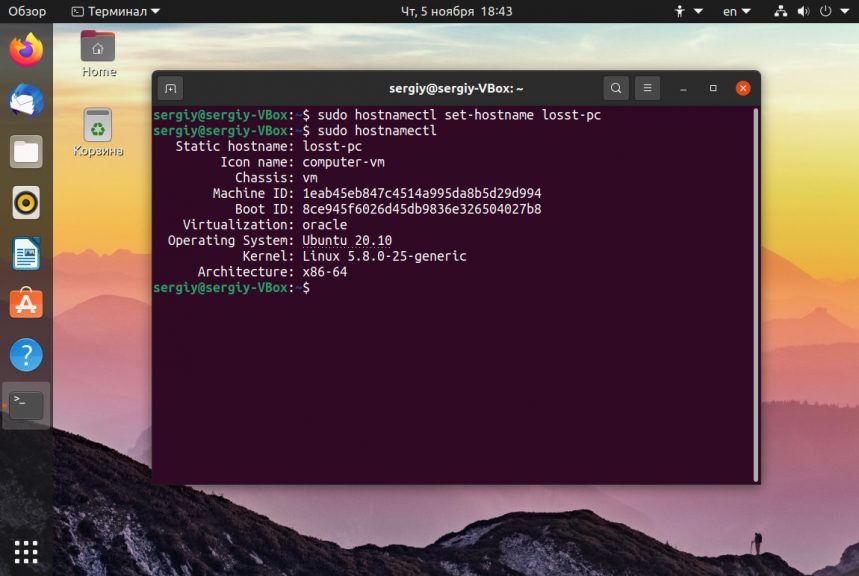
В современных версиях Ubuntu вы можете использовать команду hostnamectl, в отличие от первого варианта изменения сохранятся после перезагрузки:
sudo hostnamectl set-hostname новое_имя
Затем откройте второй файл:
sudo vi /etc/hosts
Здесь немного сложнее, найдите строку:
127.0.0.1 старое_имя
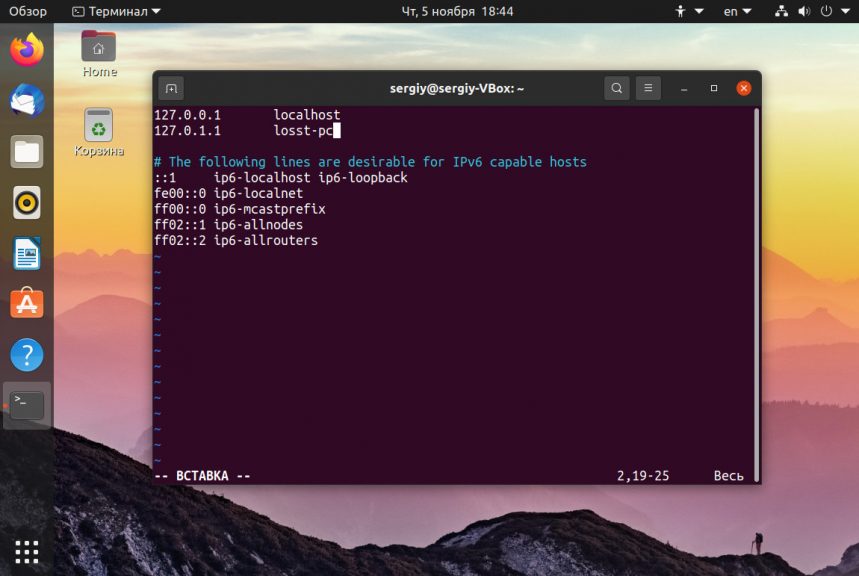
И замените старое имя на новое, после этого необходимо перезагрузить компьютер. Если вы не хотите перезагружать систему, то вы можете просто перезагрузить сервис управления входом пользователей:
systemctl restart systemd-logind.service
Теперь все должно работать правильно. Но это не единственный способ сменить имя хоста в Ubuntu.
Не меняется имя компьютера
Если вы поменяли имя компьютера, а после перезагрузки восстанавливается все как было, например, какое-то там dhcpcd0-pc, то, скорее всего, виноват NetworkManager. Здесь решение либо удалить эту программу, либо изменить имя хоста Ubuntu с помощью NetworkManager. Для этого выполните:
sudo vi /etc/NetworkManager/NetworkManager.conf
И добавьте в файл такие строки:
[keyfile]

hostname=имя_компьютера

Теперь после перезагрузки NetworkManager поменяет имя хоста Ubuntu на правильное и больше проблем с этим не будет.
Выводы
Вот и все, теперь вы знаете как сменить имя компьютера Ubuntu. Для этого есть вполне достаточно способов, чтобы вы могли выбрать именно то, что нужно. Если у вас остались вопросы, спрашивайте в комментариях!

Статья распространяется под лицензией Creative Commons ShareAlike 4.0 при копировании материала ссылка на источник обязательна .
Об авторе
![]()
Основатель и администратор сайта losst.ru, увлекаюсь открытым программным обеспечением и операционной системой Linux. В качестве основной ОС сейчас использую Ubuntu. Кроме Linux, интересуюсь всем, что связано с информационными технологиями и современной наукой.