Когда вы приобретаете новую компьютерную систему или устанавливаете новую виртуальную машину в уже существующей компьютерной системе, у системы будет имя хоста или имя устройства по умолчанию. В Oracle Linux 8 вы можете изменить имя хоста сервера в соответствии с вашими предпочтениями. В этой статье показаны два наиболее эффективных метода изменения имени хоста системы Oracle Linux 8.
Способы изменения имени хоста в Oracle Linux 8
Есть два метода, которые вы можете использовать для изменения имени хоста вашей системы Oracle Linux 8:
- Метод GUI (графический интерфейс пользователя)
- Метод CLI (интерфейс командной строки)
В следующих разделах показано, как изменить имя хоста вашего сервера с помощью каждого из этих методов.
Метод I: Метод с графическим интерфейсом
Чтобы изменить имя хоста вашей системы Oracle Linux 8 с помощью метода графического интерфейса пользователя, выполните следующие пять быстрых шагов.
Шаг 1. Проверьте текущее имя хоста
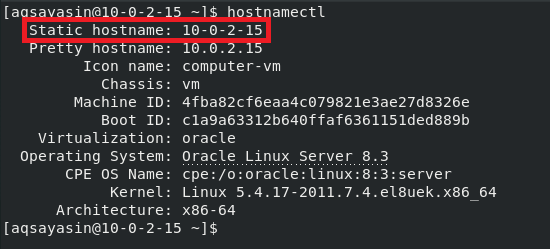
Прежде чем пытаться изменить имя хоста вашей системы Oracle Linux 8, вы должны сначала проверить текущее имя хоста, чтобы после изменения имени хоста вы могли легко проверить, произошли ли изменения. Чтобы проверить текущее имя хоста вашей системы Oracle Linux 8, запустите терминал, а затем выполните в терминале следующую команду:
Команда hostnamectl отображает имя хоста вашей системы, а также некоторые другие детали, связанные с системой, например информацию об ее архитектуре, ядре, операционной системе и т. д. Текущее имя хоста моей системы Oracle Linux 8 – 10.0.2.15.
Шаг 2. Доступ к настройкам системы
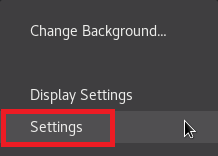
Теперь мы изменим имя хоста, которое мы нашли на предыдущем шаге. Для этого нам сначала нужно получить доступ к системным настройкам Oracle Linux 8. Просто щелкните правой кнопкой мыши в любом месте рабочего стола Oracle Linux 8 и выберите параметр «Параметры» в появившемся раскрывающемся меню.
Шаг 3. Доступ к сведениям о системе
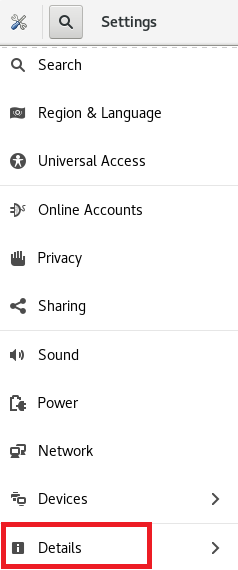
После того, как вы выберете опцию «Настройки» в раскрывающемся меню, на вашем экране появится окно «Системные настройки Oracle Linux 8». Используйте полосу прокрутки на самой левой панели этого окна, чтобы прокрутить вниз и найти вкладку «Подробности». Эта вкладка соответствует сведениям о системе Oracle Linux 8; просто щелкните эту вкладку, чтобы получить доступ к сведениям о системе.
Шаг 4. Измените имя хоста
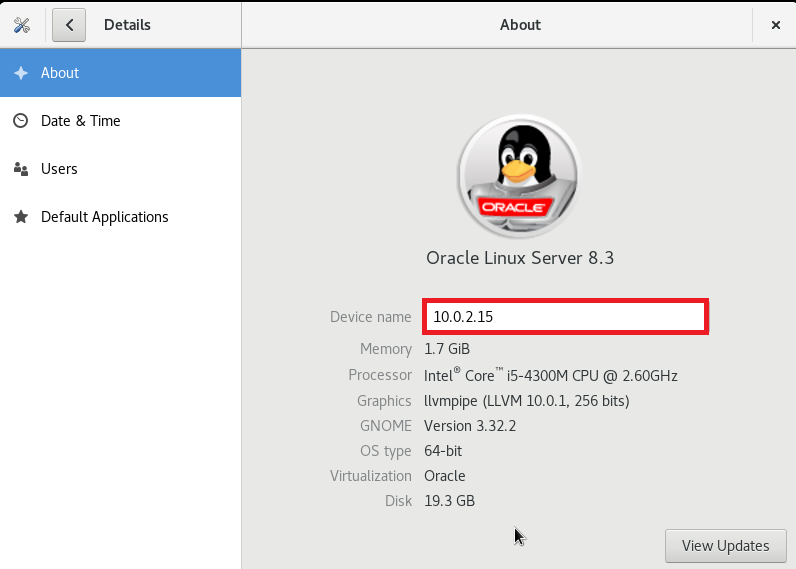
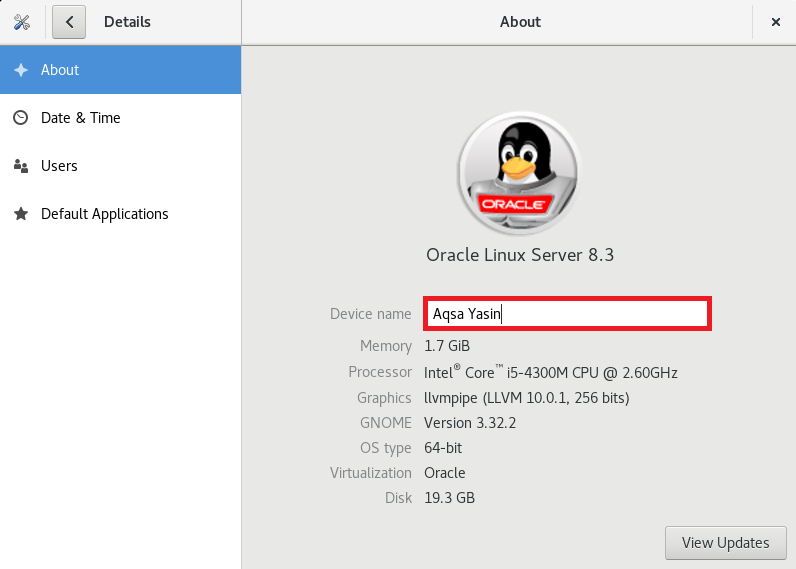
Щелкнув вкладку «Подробности» в окне «Параметры системы Oracle Linux 8», вы сможете увидеть все основные сведения, относящиеся к системе, такие как память, процессор, тип ОС и т. д. Здесь вы также увидите поле, которое соответствует имени устройства, как показано на следующем изображении. Имя устройства – это фактически имя хоста вашей системы Oracle Linux 8.
В текстовом поле, соответствующем тегу имени устройства, введите любое имя хоста по вашему выбору. Мы решили изменить имя устройства или имя хоста с 10.0.2.15 на Andrey Ex. После внесения этих изменений закройте окно системных настроек Oracle Linux 8, и изменение имени хоста должно быть завершено.
Шаг 5. Убедитесь, что имя хоста изменилось
К настоящему времени имя хоста нашей системы Oracle Linux 8 должно было быть успешно изменено. Однако всякий раз, когда вы пытаетесь изменить настройки системы, всегда рекомендуется проверять, произошли ли желаемые изменения. Чтобы проверить, было ли изменено имя хоста вашей системы Oracle Linux 8, снова выполните следующую команду:
Нам успешно удалось изменить имя хоста нашей системы Oracle Linux 8 с 10.0.2.15 на Andrey Ex. Вы можете выбрать любое другое имя хоста по вашему выбору.
Метод II: метод командной строки
Чтобы изменить имя хоста вашей системы Oracle Linux 8 с помощью терминала, выполните следующие два простых шага.
Шаг 1. Измените имя хоста
Перед выполнением этого шага вы можете проверить свое текущее имя хоста, как мы это делали в методе № 1, с помощью команды hostnamectl. После проверки текущего имени хоста вы можете изменить имя хоста, выполнив следующую команду в терминале Oracle Linux 8:
$ hostnamectl set-hostname NewHostname
Здесь замените NewHostname любым именем, которое вы хотите использовать в качестве нового имени хоста. Мы изменили имя хоста на AndreyEx.
Если эта команда выполняется без ошибок, то она не будет отображать никаких сообщений в терминале.
Шаг 2: проверьте, изменилось ли имя хоста
После изменения имени хоста вашей системы Oracle Linux 8 через терминал вы можете легко проверить его, выполнив следующую команду:
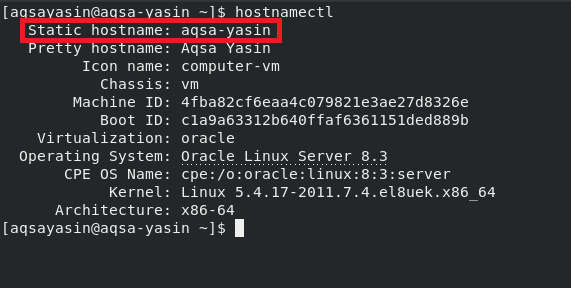
Как показано на следующем изображении, наше статическое имя хоста теперь является Andrey, поэтому было подтверждено, что нам удалось успешно изменить имя хоста нашей системы Oracle Linux 8.
Заключение
В этой статье мы представили вам как метод на основе графического интерфейса пользователя, так и метод на основе интерфейса командной строки для изменения имени хоста вашей системы Oracle Linux 8. Вы можете выбрать наиболее удобный для вас метод. Следуя любому из этих методов, вы можете изменять имя хоста вашей системы Oracle Linux 8 столько раз, сколько захотите. Если вы допустили ошибку при присвоении имени своему устройству, вы можете исправить ее, как только поймете это, следуя методам, описанным в этой статье.
Если вы нашли ошибку, пожалуйста, выделите фрагмент текста и нажмите Ctrl+Enter.
How to change Hostname or IP address on Oracle Server
Scenario:
You want to change Hostname or IP Address or DNS configuration
on server where Oracle is running on ASM.
The steps have been written for an installation that
splits the ownership of the “Grid Infrastructure” and the database between a
user named ORAGRID and a user named ORADB respectively. Make sure you run below
given commands from right user.
Environment:
Operating System – Redhat Enterprise Linux 6.4
Database Version – Oracle 11.2.0.4
Databases – 7 DB Instances
Step 1:
Check existing configured resources with Oracle home
[oragrid@litms####
~]$ crs_stat -t
Name Type Target State
Host
————————————————————
ora.ASMDATA.dg
ora….up.type ONLINE ONLINE litm…-new
ora….ER.lsnr
ora….er.type ONLINE ONLINE litm…-new
ora….DATA.dg
ora….up.type ONLINE ONLINE litm…-new
ora….2FRA.dg
ora….up.type ONLINE ONLINE litm…-new
ora….DATA.dg
ora….up.type ONLINE ONLINE litm…-new
ora….4FRA.dg
ora….up.type ONLINE ONLINE litm…-new
ora….DATA.dg
ora….up.type ONLINE ONLINE litm…-new
ora….6FRA.dg
ora….up.type ONLINE ONLINE litm…-new
ora….DATA.dg
ora….up.type ONLINE ONLINE litm…-new
ora….8FRA.dg
ora….up.type ONLINE ONLINE litm…-new
ora….DATA.dg
ora….up.type ONLINE ONLINE litm…-new
ora….0FRA.dg
ora….up.type ONLINE ONLINE litm…-new
ora….DATA.dg
ora….up.type ONLINE ONLINE litm…-new
ora….1FRA.dg
ora….up.type ONLINE ONLINE litm…-new
ora….DATA.dg
ora….up.type ONLINE ONLINE litm…-new
ora….2FRA.dg
ora….up.type ONLINE ONLINE litm…-new
ora.asm ora.asm.type ONLINE
ONLINE litm…-new
ora.cssd ora.cssd.type ONLINE
ONLINE litm…-new
ora.diskmon ora….on.type OFFLINE OFFLINE
ora.evmd ora.evm.type ONLINE
ONLINE litm…-new
ora.ons ora.ons.type OFFLINE
OFFLINE
ora.rpst02.db ora….se.type ONLINE ONLINE
litm…-new
Step 2:
Before start with the Oracle Restart process you must
stop the listener:
[oragrid@litms#### ~]$ lsnrctl stop listener
LSNRCTL for Linux: Version 11.2.0.4.0 — Production on
19-DEC-2014 09:50:57
Copyright (c) 1991, 2013, Oracle. All rights reserved.
Connecting to
(DESCRIPTION=(ADDRESS=(PROTOCOL=IPC)(KEY=EXTPROC1521)))
The command completed successfully
Step 3:
Confirm if listener is stopped
[oragrid@litms#### ~]$ crs_stat -t
Name
Type Target State
Host
————————————————————
ora.ASMDATA.dg ora….up.type ONLINE ONLINE
litm…-new
ora….ER.lsnr ora….er.type OFFLINE OFFLINE
ora….DATA.dg ora….up.type ONLINE ONLINE
litm…-new
ora….2FRA.dg ora….up.type ONLINE ONLINE
litm…-new
ora….DATA.dg ora….up.type ONLINE ONLINE
litm…-new
ora….4FRA.dg ora….up.type ONLINE ONLINE
litm…-new
ora….DATA.dg ora….up.type ONLINE ONLINE
litm…-new
ora….6FRA.dg ora….up.type ONLINE ONLINE
litm…-new
ora….DATA.dg ora….up.type ONLINE ONLINE
litm…-new
ora….8FRA.dg ora….up.type ONLINE ONLINE
litm…-new
ora….DATA.dg ora….up.type ONLINE ONLINE
litm…-new
ora….0FRA.dg ora….up.type ONLINE ONLINE
litm…-new
ora….DATA.dg ora….up.type ONLINE ONLINE
litm…-new
ora….1FRA.dg ora….up.type ONLINE ONLINE
litm…-new
ora….DATA.dg ora….up.type ONLINE ONLINE
litm…-new
ora….2FRA.dg ora….up.type ONLINE ONLINE
litm…-new
ora.asm
ora.asm.type ONLINE ONLINE
litm…-new
ora.cssd
ora.cssd.type ONLINE ONLINE
litm…-new
ora.diskmon
ora….on.type OFFLINE OFFLINE
ora.evmd
ora.evm.type ONLINE ONLINE
litm…-new
ora.ons
ora.ons.type OFFLINE OFFLINE
ora.rpst02.db
ora….se.type ONLINE
ONLINE litm…-new
Step 4:
Set ORACLE_HOME as grid home
Execute below command to remove the existing oracle grid
infra configuration.
[root@litms#### ~]# $ORACLE_HOME/perl/bin/perl -I $ORACLE_HOME/perl/lib -I
$ORACLE_HOME/crs/install $ORACLE_HOME/crs/install/roothas.pl -deconfig
Using configuration parameter file:
/u01/app/grid/product/11.2.0.4/crs/install/crsconfig_params
CRS resources for listeners are still configured
PRKO-2573 : ONS daemon is already stopped.
CRS-2529: Unable to act on ‘ora.cssd’ because that would
require stopping or relocating ‘ora.asm’, but the force option was not
specified
CRS-4000: Command Stop failed, or completed with errors.
CRS-2586: Deletion of a running resource ‘ora.cssd’
requires the force option
CRS-4000: Command Delete failed, or completed with
errors.
CRS-2791: Starting shutdown of Oracle High Availability
Services-managed resources on ‘litmsj614-new’
CRS-2673: Attempting to stop ‘ora.ASMDATA.dg’ on
‘litmsj614-new’
CRS-2673: Attempting to stop ‘ora.RPST04DATA.dg’ on
‘litmsj614-new’
CRS-2673: Attempting to stop ‘ora.RPST04FRA.dg’ on
‘litmsj614-new’
CRS-2673: Attempting to stop ‘ora.RPST06DATA.dg’ on
‘litmsj614-new’
CRS-2673: Attempting to stop ‘ora.RPST06FRA.dg’ on
‘litmsj614-new’
CRS-2673: Attempting to stop ‘ora.RPST08DATA.dg’ on
‘litmsj614-new’
CRS-2673: Attempting to stop ‘ora.RPST08FRA.dg’ on
‘litmsj614-new’
CRS-2673: Attempting to stop ‘ora.RPST10DATA.dg’ on
‘litmsj614-new’
CRS-2673: Attempting to stop ‘ora.RPST10FRA.dg’ on
‘litmsj614-new’
CRS-2673: Attempting to stop ‘ora.RPST11DATA.dg’ on
‘litmsj614-new’
CRS-2673: Attempting to stop ‘ora.RPST11FRA.dg’ on
‘litmsj614-new’
CRS-2673: Attempting to stop ‘ora.RPST12DATA.dg’ on
‘litmsj614-new’
CRS-2673: Attempting to stop ‘ora.RPST12FRA.dg’ on
‘litmsj614-new’
CRS-2673: Attempting to stop ‘ora.rpst02.db’ on
‘litmsj614-new’
CRS-2677: Stop of ‘ora.RPST11FRA.dg’ on ‘litmsj614-new’
succeeded
CRS-2677: Stop of ‘ora.RPST11DATA.dg’ on ‘litmsj614-new’
succeeded
CRS-2677: Stop of ‘ora.ASMDATA.dg’ on ‘litmsj614-new’
succeeded
CRS-2677: Stop of ‘ora.rpst02.db’ on ‘litmsj614-new’
succeeded
CRS-2673: Attempting to stop ‘ora.RPST02DATA.dg’ on
‘litmsj614-new’
CRS-2673: Attempting to stop ‘ora.RPST02FRA.dg’ on ‘litmsj614-new’
CRS-2677: Stop of ‘ora.RPST02FRA.dg’ on ‘litmsj614-new’
succeeded
CRS-5017: The resource action «ora.RPST12DATA.dg
stop» encountered the following error:
ORA-01013: user requested cancel of current operation
. For details refer to «(:CLSN00108:)» in
«/u01/app/grid/product/11.2.0.4/log/litmsj614-new/agent/ohasd/oraagent_oragrid/oraagent_oragrid.log».
CRS-5017: The resource action «ora.RPST10FRA.dg
stop» encountered the following error:
ORA-01013: user requested cancel of current operation
. For details refer to «(:CLSN00108:)» in
«/u01/app/grid/product/11.2.0.4/log/litmsj614-new/agent/ohasd/oraagent_oragrid/oraagent_oragrid.log».
CRS-5017: The resource action «ora.RPST12FRA.dg
stop» encountered the following error:
ORA-01013: user requested cancel of current operation
. For details refer to «(:CLSN00108:)» in
«/u01/app/grid/product/11.2.0.4/log/litmsj614-new/agent/ohasd/oraagent_oragrid/oraagent_oragrid.log».
CRS-5022: Stop of resource «ora.RPST10DATA.dg»
failed: current state is «UNKNOWN»
CRS-2675: Stop of ‘ora.RPST10DATA.dg’ on ‘litmsj614-new’
failed
CRS-2679: Attempting to clean ‘ora.RPST10DATA.dg’ on
‘litmsj614-new’
CRS-5022: Stop of resource «ora.RPST04DATA.dg»
failed: current state is «UNKNOWN»
CRS-2675: Stop of ‘ora.RPST04DATA.dg’ on ‘litmsj614-new’
failed
CRS-2679: Attempting to clean ‘ora.RPST04DATA.dg’ on
‘litmsj614-new’
CRS-5022: Stop of resource «ora.RPST06DATA.dg»
failed: current state is «UNKNOWN»
CRS-2675: Stop of ‘ora.RPST06DATA.dg’ on ‘litmsj614-new’
failed
CRS-2679: Attempting to clean ‘ora.RPST06DATA.dg’ on
‘litmsj614-new’
CRS-5022: Stop of resource «ora.RPST04FRA.dg»
failed: current state is «UNKNOWN»
CRS-2675: Stop of ‘ora.RPST04FRA.dg’ on ‘litmsj614-new’
failed
CRS-2679: Attempting to clean ‘ora.RPST04FRA.dg’ on
‘litmsj614-new’
CRS-5022: Stop of resource «ora.RPST06FRA.dg»
failed: current state is «UNKNOWN»
CRS-2675: Stop of ‘ora.RPST06FRA.dg’ on ‘litmsj614-new’
failed
CRS-2679: Attempting to clean ‘ora.RPST06FRA.dg’ on
‘litmsj614-new’
CRS-5022: Stop of resource «ora.RPST08FRA.dg»
failed: current state is «UNKNOWN»
CRS-2675: Stop of ‘ora.RPST08FRA.dg’ on ‘litmsj614-new’
failed
CRS-2679: Attempting to clean ‘ora.RPST08FRA.dg’ on
‘litmsj614-new’
CRS-5022: Stop of resource «ora.RPST08DATA.dg»
failed: current state is «UNKNOWN»
CRS-2675: Stop of ‘ora.RPST08DATA.dg’ on ‘litmsj614-new’
failed
CRS-2679: Attempting to clean ‘ora.RPST08DATA.dg’ on
‘litmsj614-new’
CRS-2681: Clean of ‘ora.RPST10DATA.dg’ on ‘litmsj614-new’
succeeded
CRS-2681: Clean of ‘ora.RPST04DATA.dg’ on ‘litmsj614-new’
succeeded
CRS-2681: Clean of ‘ora.RPST06DATA.dg’ on ‘litmsj614-new’
succeeded
CRS-2681: Clean of ‘ora.RPST04FRA.dg’ on ‘litmsj614-new’
succeeded
CRS-2681: Clean of ‘ora.RPST06FRA.dg’ on ‘litmsj614-new’
succeeded
CRS-2681: Clean of ‘ora.RPST08DATA.dg’ on ‘litmsj614-new’
succeeded
CRS-2681: Clean of ‘ora.RPST08FRA.dg’ on ‘litmsj614-new’
succeeded
CRS-2675: Stop of ‘ora.RPST10FRA.dg’ on ‘litmsj614-new’
failed
CRS-2679: Attempting to clean ‘ora.RPST10FRA.dg’ on
‘litmsj614-new’
CRS-2675: Stop of ‘ora.RPST12FRA.dg’ on ‘litmsj614-new’
failed
CRS-2679: Attempting to clean ‘ora.RPST12FRA.dg’ on
‘litmsj614-new’
CRS-2675: Stop of ‘ora.RPST12DATA.dg’ on ‘litmsj614-new’
failed
CRS-2679: Attempting to clean ‘ora.RPST12DATA.dg’ on
‘litmsj614-new’
CRS-2681: Clean of ‘ora.RPST12FRA.dg’ on ‘litmsj614-new’
succeeded
CRS-2681: Clean of ‘ora.RPST12DATA.dg’ on ‘litmsj614-new’
succeeded
CRS-2681: Clean of ‘ora.RPST10FRA.dg’ on ‘litmsj614-new’
succeeded
CRS-2677: Stop of ‘ora.RPST02DATA.dg’ on ‘litmsj614-new’
succeeded
CRS-2679: Attempting to clean ‘ora.RPST02DATA.dg’ on
‘litmsj614-new’
CRS-2681: Clean of ‘ora.RPST02DATA.dg’ on ‘litmsj614-new’
succeeded
CRS-2673: Attempting to stop ‘ora.asm’ on ‘litmsj614-new’
CRS-2675: Stop of ‘ora.asm’ on ‘litmsj614-new’ failed
CRS-2679: Attempting to clean ‘ora.asm’ on
‘litmsj614-new’
CRS-2681: Clean of ‘ora.asm’ on ‘litmsj614-new’ succeeded
CRS-2673: Attempting to stop ‘ora.cssd’ on
‘litmsj614-new’
CRS-2677: Stop of ‘ora.cssd’ on ‘litmsj614-new’ succeeded
CRS-2673: Attempting to stop ‘ora.evmd’ on
‘litmsj614-new’
CRS-2677: Stop of ‘ora.evmd’ on ‘litmsj614-new’ succeeded
CRS-2793: Shutdown of Oracle High Availability
Services-managed resources on ‘litmsj614-new’ has completed
CRS-4133: Oracle High
Availability Services has been stopped.
Can’t exec «/usr/bin/lsb_release»: No such file
or directory at /u01/app/grid/product/11.2.0.4/lib/osds_acfslib.pm line 542.
Use of uninitialized value $LSB_RELEASE in split at
/u01/app/grid/product/11.2.0.4/lib/osds_acfslib.pm line 547.
Can’t exec «/usr/bin/lsb_release»: No such file
or directory at /u01/app/grid/product/11.2.0.4/lib/osds_acfslib.pm line 542.
Use of uninitialized value $LSB_RELEASE in split at
/u01/app/grid/product/11.2.0.4/lib/osds_acfslib.pm line 547.
Can’t exec «/usr/bin/lsb_release»: No such file
or directory at /u01/app/grid/product/11.2.0.4/lib/osds_acfslib.pm line 542.
Use of uninitialized value $LSB_RELEASE in split at
/u01/app/grid/product/11.2.0.4/lib/osds_acfslib.pm line 547.
Can’t exec «/usr/bin/lsb_release»: No such file
or directory at /u01/app/grid/product/11.2.0.4/lib/osds_acfslib.pm line 542.
Use of uninitialized value $LSB_RELEASE in split at
/u01/app/grid/product/11.2.0.4/lib/osds_acfslib.pm line 547.
Can’t exec «/usr/bin/lsb_release»: No such file
or directory at /u01/app/grid/product/11.2.0.4/lib/osds_acfslib.pm line 542.
Use of uninitialized value $LSB_RELEASE in split at
/u01/app/grid/product/11.2.0.4/lib/osds_acfslib.pm line 547.
Can’t exec «/usr/bin/lsb_release»: No such file
or directory at /u01/app/grid/product/11.2.0.4/lib/osds_acfslib.pm line 542.
Use of uninitialized value $LSB_RELEASE in split at
/u01/app/grid/product/11.2.0.4/lib/osds_acfslib.pm line 547.
Successfully deconfigured Oracle Restart stack
Step 5:
After removing oracle configuration you can change the
hostname of your Server
Edit /etc/sysconfig/network file
NETWORKING=yes
HOSTNAME=<New Hostname>
cat /etc/hosts
127.0.0.1 localhost localhost.localdomain localhost4
localhost4.localdomain4
::1 localhost localhost.localdomain localhost6
localhost6.localdomain6
192.168.50.4 <New Hostname>
Edit network adapters IP Address configuration i.e. ifcfg-ethX
[root@### ~]# cat
/etc/sysconfig/network-scripts/ifcfg-eth0
DEVICE=»eth0″
HWADDR=»##:##:4C:02:A3:02″
ONBOOT=»yes»
IPADDR=<New IP Address>
NETMASK=255.255.255.0
GATEWAY=192.168.50.1
Step 6:
Edit Listener.ora file with new Hostname
Step 7:
Set ORACLE_HOME as grid home.
Execute below command to recreate grid infra
configuration:
[root@litms####~]# $ORACLE_HOME/perl/bin/perl -I
$ORACLE_HOME/perl/lib -I $ORACLE_HOME/crs/install
$ORACLE_HOME/crs/install/roothas.pl
Using configuration parameter file:
/u01/app/grid/product/11.2.0.4/crs/install/crsconfig_params
LOCAL ADD MODE
Creating OCR keys for user ‘oragrid’, privgrp
‘oinstall’..
Operation successful.
LOCAL ONLY MODE
Successfully accumulated necessary OCR keys.
Creating OCR keys for user ‘root’, privgrp ‘root’..
Operation successful.
CRS-4664: Node litmsj614 successfully pinned.
Adding Clusterware entries to upstart
litmsj614
2014/12/19 10:51:46
/u01/app/grid/product/11.2.0.4/cdata/litmsj614/backup_20141219_105146.olr
Successfully configured Oracle Grid Infrastructure
for a Standalone Server
Step 8:
Add Listener and
start it
[oragrid@litms### ~]$ srvctl add listener
[oragrid@litms#### ~]$ srvctl start listener
Step 9:
Create ASM and add Disks, and mount all diskgroups
manually
[oragrid@litms#### disks]$ srvctl add asm -d
‘/dev/oracleasm/disks/*’
[oragrid@litms#### disks]$ srvctl start asm
[oragrid@litmsj614 disks]$ sqlplus / as sysasm
SQL*Plus: Release 11.2.0.4.0 Production on Fri Dec 19
10:58:39 2014
Copyright (c) 1982, 2013, Oracle. All rights reserved.
Connected to:
Oracle Database 11g Enterprise Edition Release 11.2.0.4.0
— 64bit Production
With the Automatic Storage Management option
SQL> alter diskgroup rpst02data mount;
SQL> alter diskgroup rpst04data mount;
SQL> alter diskgroup rpst06data mount;
SQL> alter diskgroup rpst08data mount;
SQL> alter diskgroup rpst10data mount;
SQL> alter diskgroup rpst12data mount;
SQL> alter diskgroup rpst11data mount;
alter diskgroup rpst02fra mount;
alter diskgroup rpst04fra mount;
alter diskgroup rpst06fra mount;
alter diskgroup rpst08fra mount;
alter diskgroup rpst10fra mount;
alter diskgroup rpst12fra mount;
alter diskgroup rpst11fra mount;
Check Status of all mounted diskgroup, like below:
[oragrid@litms#### disks]$ srvctl status diskgroup -g
rpst02data
Disk Group rpst02data is running on litmsj614
Step 10:
Configure all databases with SRVCTL (Oracle Restart), Configure
and Start your database:
[oragrid@litms#### disks]$ srvctl add database -d RPST02
-o $ORACLE_HOME -n RPST02 -p
+rpst02data/rpst02/parameterfile/spfile.279.850066205 -a RPST02DATA,RPST02FRA
[oragrid@litms#### disks]$ srvctl config database -d
DB11G
Database unique name: RPST02
Database name: RPST02
Oracle home: /u01/app/grid/product/11.2.0.4
Oracle user: oragrid
Spfile:
+rpst02data/rpst02/parameterfile/spfile.279.850066205a
Domain:
Start options: open
Stop options: immediate
Database role: PRIMARY
Management policy: AUTOMATIC
Database instance: RPST02
Disk Groups: RPST02DATA,RPST02FRA
Services:
[oragrid@litms#### disks]$ srvctl start database -d DB11G
Содержание
- Learn How to Localize Your Installation on Oracle Linux
- Introduction
- Objectives
- Prerequisites
- Update the System Hostname
- Update the System Locale and Language
- Update the System Date and Time
- For More Information
- More Learning Resources
- Oracle Linux 7: How to Change System «hostname» (Doc ID 2312768.1)
- Applies to:
- Solution
- To view full details, sign in with your My Oracle Support account.
- Don’t have a My Oracle Support account? Click to get started!
- How to Change the Hostname in Oracle Linux 8
- Methods of Changing the Hostname in Oracle Linux 8
- Method I: The GUI Method
- Step 1: Check Current Hostname
- Step 2: Access System Settings
- Step 3: Access System Details
- Step 4: Change Hostname
- Step 5: Verify that Hostname Has Changed
- Method II: The Command-Line Method
- Step 1: Change Hostname
- Step 2: Verify Whether Hostname Has Changed
- Conclusion
- About the author
- Aqsa Yasin
- Как изменить имя хоста в Oracle Linux 8
- Способы изменения имени хоста в Oracle Linux 8
- Метод I: Метод с графическим интерфейсом
- Шаг 1. Проверьте текущее имя хоста
- Шаг 2. Доступ к настройкам системы
- Шаг 3. Доступ к сведениям о системе
- Шаг 4. Измените имя хоста
- Шаг 5. Убедитесь, что имя хоста изменилось
- Метод II: метод командной строки
- Шаг 1. Измените имя хоста
- Шаг 2: проверьте, изменилось ли имя хоста
- Заключение
Learn How to Localize Your Installation on Oracle Linux
Introduction
Many Oracle Linux systems are installed without a desktop environment. However, multiple ways of using the command line are available to configure base system settings, such as the system hostname.
This tutorial describes how to configure the system hostname, locale, language, and date and time from the command line. This tutorial is targeted at users of Oracle Linux 8 or later.
Objectives
Upon completion of this Lab you will be able to:
- Set the system host name
- Set the system locale and system language
- Set the system date, time and time zone
Prerequisites
- Any system with Oracle Linux 8
Update the System Hostname
Note: When using the free lab environment, see Oracle Linux Lab Basics for connection and other usage instructions.
In other distributions, configuring the system hostname typically involves editing system files, such as /etc/hostname and /etc/hosts , running the hostname command to set the hostname, and rebooting the system. With Oracle Linux, the process is simplified through the hostnamectl command.
Review the static and transient hostnames for your Oracle Linux 8 system:
Note: The static hostname is the default host name for the system and is configured in the /etc/hostname file. The transient hostname represents the name that is set for the system by services such as DHCP or mDNS after a system boot. If the transient hostname is not set, the system uses the static hostname.
Set the static hostname:
You can also set a “pretty” hostname for your own reference:
Note: A pretty hostname is a friendly free-form system name that is displayed in user interface environments. Normally, the transient hostname and the pretty hostname are identical. However, with the hostnamectl command, you can set different values for each.
Update the System Locale and Language
Use the localectl command to set the default system locale and language settings. The command handles the generation of locale information and sets the default values for users when they log into the system, either throught the command line or on a desktop environment. The command can also be used to set default keyboard mappings for both the command line and the desktop environment.
Review the current system locale:
List every locale that is available:
Set the locale to British English and UTF-8 encoding:
Note: The system locale defines the language and character set encoding used for presentation of information on a terminal and on many GUI applications as well. Locale options are usually listed in the following format LANGUAGE_COUNTRY.CODESET[@MODIFIERS] . The LANGUAGE is an ISO 639 language code, for example en for English; COUNTRY is an ISO 3166 country code, for example GB for Great Britain and the United Kingdom; CODESET is the character set or encoding, for example utf-8 . Thus, in this example, the locale is en_GB.utf8 .
List every keymap that is available. Press the q key to exit:
Set the keymap to British English:
Test that the changes have been applied by typing into the terminal window. If you are using a US English qwerty keyboard, then the “ and @ keys should have swapped places.
You can now change the locale settings for your system to reflect your own localization preferences.
Note: A locale can also be configured for a specific sessions or user. For session-based configurations, set the LANG environment variable. For user-based configurations, set the LANG variable on the user’s profile or shell configuration. Thus, the environment variable is set each time a user logs into the system.
Update the System Date and Time
Use the timedatectl command to set the system date and time. The command updates the real time clock (RTC), also known as the hardware clock, as well as the system clock that is maintained by the system kernel.
Review the current system date and time configuration:
List all system time zones. Press the q key to exit:
Search for your time zone, using underscores for compound names. For example, to find Pacific Daylight Time (PDT):
Set your time zone:
Manually set the day and time:
Note: If the NTP service is set to active, your system’s date and time are automatically synchronized with the configured NTP server. In that scenario, you cannot directly modify the date or time on your system.
For More Information
Learn how to use chrony to synchronize the system date and time over the network: https://docs.oracle.com/en/learn/config_chrony_linux_8/
The video demonstration and tutorial provided at https://www.youtube.com/watch?v=q8VlYiF5sx8 is also useful if you need more information on configuring the date and time from the command line interface.
More Learning Resources
Explore other labs on docs.oracle.com/learn or access more free learning content on the Oracle Learning YouTube channel. Additionally, visit education.oracle.com/learning-explorer to become an Oracle Learning Explorer.
For product documentation, visit Oracle Help Center.
Learn How to Localize Your Installation on Oracle Linux
Copyright © 2021, Oracle and/or its affiliates.
Источник
Oracle Linux 7: How to Change System «hostname» (Doc ID 2312768.1)
Last updated on OCTOBER 11, 2022
Applies to:
The following documentation explains how to change system hostname in Oracle Linux 7В
There are three classes of hostname:В static, pretty, and transient.
Static: is the traditional hostname, which can be chosen by the user, and is stored in the /etc/hostname file.
Transient: is a dynamic host name maintained by the kernel. It is initialized to the static host name by default, whose value defaults to “localhost”. It can be changed by DHCP or mDNS at runtime.
Pretty: is a free-form UTF8 host name for presentation to the user. For example: «user’s server»В
Solution
To view full details, sign in with your My Oracle Support account.
Don’t have a My Oracle Support account? Click to get started!
In this Document
Method 1:В using the NetworkManager text user interface tool ‘nmtui’
Method 2: usingВ the NetworkManager command line tool ‘nmcli’В
Method 3: using ‘hostnamectl’ tool
My Oracle Support provides customers with access to over a million knowledge articles and a vibrant support community of peers and Oracle experts.
Oracle offers a comprehensive and fully integrated stack of cloud applications and platform services. For more information about Oracle (NYSE:ORCL), visit oracle.com. пїЅ Oracle | Contact and Chat | Support | Communities | Connect with us |  |
|  |
|  | Legal Notices | Terms of Use
Источник
How to Change the Hostname in Oracle Linux 8
Methods of Changing the Hostname in Oracle Linux 8
There are two methods that you can use to change the hostname of your Oracle Linux 8 system:
- The GUI (Graphical User Interface) Method
- The CLI (Command-Line Interface) Method
The following sections show you how to change your server’s hostname using each of these methods.
Method I: The GUI Method
To change the hostname of your Oracle Linux 8 system using the GUI method, perform the following five quick steps.
Step 1: Check Current Hostname
Before attempting to change the hostname of your Oracle Linux 8 system, you should first check the current hostname so that after changing the hostname, you can easily verify whether the changes have taken place. To check the current hostname of your Oracle Linux 8 system, launch the terminal, then execute the following command in the terminal:

The hostnamectl command displays the hostname of your system, as well as some other system-related details, such as information about its architecture, kernel, operating system, and more. The current hostname of my Oracle Linux 8 system is 10.0.2.15, as you can see in the following image:
Step 2: Access System Settings
Now, we will change the hostname that we found in the previous step. For that, we will first need to access the Oracle Linux 8 System Settings. Simply right-click anywhere on your Oracle Linux 8 desktop and select the Settings option from the drop-down menu that appears. This step is highlighted in the following image:
Step 3: Access System Details
After you click on the Settings option from the drop-down menu, the Oracle Linux 8 System Settings window will appear on your screen. Use the scrollbar in the leftmost pane of this window to scroll down and locate the Details tab, as highlighted in the image below. This tab corresponds to the Oracle Linux 8 System Details; simply click on this tab to access the System Details.
Step 4: Change Hostname
When you click on the Details tab in the Oracle Linux 8 System Settings window, you will be able to see all the basic system-related details, such as memory, processor, OS type, etc. Here, you will also see a field that corresponds to the Device Name, as highlighted in the following image. The Device Name is, in fact, the hostname of your Oracle Linux 8 system.
In the text field corresponding to the Device Name tag, type any hostname of your choice. We elected to change our Device Name or hostname from 10.0.2.15 to Aqsa Yasin, as highlighted in the image below. After making these changes, close your Oracle Linux 8 System Settings window and the hostname change should be complete.
Step 5: Verify that Hostname Has Changed
By now, the hostname of our Oracle Linux 8 system should have been changed successfully. However, whenever you attempt to change your system settings, it is always recommended to verify whether the desired changes have taken place. To verify whether the hostname of your Oracle Linux 8 system has been changed, run the following command again:

As you can see in the highlighted part of the output of this command, we have successfully managed to change the hostname of our Oracle Linux 8 system from 10.0.2.15 to Aqsa Yasin. You may choose any other hostname of your choice.
Method II: The Command-Line Method
To change the hostname of your Oracle Linux 8 system using the terminal, perform the following two easy steps.
Step 1: Change Hostname
Before performing this step, you can choose to check your current hostname as we did in Method # 1 using the hostnamectl command. After checking the current hostname, you can change the hostname by running the following command in your Oracle Linux 8 terminal:
Here, replace NewHostname with whichever name you want to be the new hostname. We changed the hostname to Aqsa, as shown in the image below:

If this command is executed without any errors, then it will not display any messages in the terminal, as shown in the following image:

Step 2: Verify Whether Hostname Has Changed
After changing the hostname of your Oracle Linux 8 system through its terminal, you can now easily verify it by running the following command:

As highlighted in the following image, our Static hostname is now Aqsa, so it has been verified that we have successfully managed to change the hostname of our Oracle Linux 8 system.

Conclusion
In this article, we presented to you both the GUI-based method and the CLI-based method for changing the hostname of your Oracle Linux 8 system. You may choose to follow whichever method is most convenient for you. By following either of these methods, you can change the hostname of your Oracle Linux 8 system as many times as you would like. If you make a mistake while naming your device, you can correct it as soon as you realize it by following the methods provided in this article.

Aqsa Yasin
I am a self-motivated information technology professional with a passion for writing. I am a technical writer and love to write for all Linux flavors and Windows.
Источник
Как изменить имя хоста в Oracle Linux 8
Главное меню » Oracle Linux » Как изменить имя хоста в Oracle Linux 8
Способы изменения имени хоста в Oracle Linux 8
Есть два метода, которые вы можете использовать для изменения имени хоста вашей системы Oracle Linux 8:
- Метод GUI (графический интерфейс пользователя)
- Метод CLI (интерфейс командной строки)
В следующих разделах показано, как изменить имя хоста вашего сервера с помощью каждого из этих методов.
Метод I: Метод с графическим интерфейсом
Чтобы изменить имя хоста вашей системы Oracle Linux 8 с помощью метода графического интерфейса пользователя, выполните следующие пять быстрых шагов.
Шаг 1. Проверьте текущее имя хоста
Прежде чем пытаться изменить имя хоста вашей системы Oracle Linux 8, вы должны сначала проверить текущее имя хоста, чтобы после изменения имени хоста вы могли легко проверить, произошли ли изменения. Чтобы проверить текущее имя хоста вашей системы Oracle Linux 8, запустите терминал, а затем выполните в терминале следующую команду:
Команда hostnamectl отображает имя хоста вашей системы, а также некоторые другие детали, связанные с системой, например информацию об ее архитектуре, ядре, операционной системе и т. д. Текущее имя хоста моей системы Oracle Linux 8 — 10.0.2.15.
Шаг 2. Доступ к настройкам системы
Теперь мы изменим имя хоста, которое мы нашли на предыдущем шаге. Для этого нам сначала нужно получить доступ к системным настройкам Oracle Linux 8. Просто щелкните правой кнопкой мыши в любом месте рабочего стола Oracle Linux 8 и выберите параметр «Параметры» в появившемся раскрывающемся меню.
Шаг 3. Доступ к сведениям о системе
После того, как вы выберете опцию «Настройки» в раскрывающемся меню, на вашем экране появится окно «Системные настройки Oracle Linux 8». Используйте полосу прокрутки на самой левой панели этого окна, чтобы прокрутить вниз и найти вкладку «Подробности». Эта вкладка соответствует сведениям о системе Oracle Linux 8; просто щелкните эту вкладку, чтобы получить доступ к сведениям о системе.
Шаг 4. Измените имя хоста
Щелкнув вкладку «Подробности» в окне «Параметры системы Oracle Linux 8», вы сможете увидеть все основные сведения, относящиеся к системе, такие как память, процессор, тип ОС и т. д. Здесь вы также увидите поле, которое соответствует имени устройства, как показано на следующем изображении. Имя устройства — это фактически имя хоста вашей системы Oracle Linux 8.
В текстовом поле, соответствующем тегу имени устройства, введите любое имя хоста по вашему выбору. Мы решили изменить имя устройства или имя хоста с 10.0.2.15 на Andrey Ex. После внесения этих изменений закройте окно системных настроек Oracle Linux 8, и изменение имени хоста должно быть завершено.
Шаг 5. Убедитесь, что имя хоста изменилось
К настоящему времени имя хоста нашей системы Oracle Linux 8 должно было быть успешно изменено. Однако всякий раз, когда вы пытаетесь изменить настройки системы, всегда рекомендуется проверять, произошли ли желаемые изменения. Чтобы проверить, было ли изменено имя хоста вашей системы Oracle Linux 8, снова выполните следующую команду:
Нам успешно удалось изменить имя хоста нашей системы Oracle Linux 8 с 10.0.2.15 на Andrey Ex. Вы можете выбрать любое другое имя хоста по вашему выбору.
Метод II: метод командной строки
Чтобы изменить имя хоста вашей системы Oracle Linux 8 с помощью терминала, выполните следующие два простых шага.
Шаг 1. Измените имя хоста
Перед выполнением этого шага вы можете проверить свое текущее имя хоста, как мы это делали в методе № 1, с помощью команды hostnamectl. После проверки текущего имени хоста вы можете изменить имя хоста, выполнив следующую команду в терминале Oracle Linux 8:
Здесь замените NewHostname любым именем, которое вы хотите использовать в качестве нового имени хоста. Мы изменили имя хоста на AndreyEx.
Если эта команда выполняется без ошибок, то она не будет отображать никаких сообщений в терминале.
Шаг 2: проверьте, изменилось ли имя хоста
После изменения имени хоста вашей системы Oracle Linux 8 через терминал вы можете легко проверить его, выполнив следующую команду:
Как показано на следующем изображении, наше статическое имя хоста теперь является Andrey, поэтому было подтверждено, что нам удалось успешно изменить имя хоста нашей системы Oracle Linux 8.
Заключение
В этой статье мы представили вам как метод на основе графического интерфейса пользователя, так и метод на основе интерфейса командной строки для изменения имени хоста вашей системы Oracle Linux 8. Вы можете выбрать наиболее удобный для вас метод. Следуя любому из этих методов, вы можете изменять имя хоста вашей системы Oracle Linux 8 столько раз, сколько захотите. Если вы допустили ошибку при присвоении имени своему устройству, вы можете исправить ее, как только поймете это, следуя методам, описанным в этой статье.
Если вы нашли ошибку, пожалуйста, выделите фрагмент текста и нажмите Ctrl+Enter.
Источник
So I realize it seems like I’m posting a bunch of stuff on Oracle and little on .NET, but it’s all related to a large Smart Client application we’re developing for our client, using Oracle 10g; thus, it’s relative J
In a geographically-diverse team structure, it can be quite difficult to manage the development environment used by each team member (especially when you have little control over the workstation configuration of your offshore team.) Thus, for many of our engagements we heavily leverage virtualization – specifically Virtual PC 2007 – to help minimize the cost of environment setup and configuration.
One of the challenges we’ve faced with leveraging Virtual PC, specifically a shared image, is the unique naming of virtual machines. Now, in many cases it is acceptable to keep the virtual machine name the same across developer environments; however, for our purposes, unique machine names are required based on the following:
- TFS Workspace names rely on machine name for unique naming (in combination with username)
- Using our host VPN connection and Internet Connection Sharing (ICS), we provide our guest VPN access; although through NAT, the machine name (NetBIOS) still passes through when accessing corporate network resources, thus causing issues with the same
- When using local network access directly on the guest, name conflicts occur; furthermore, two guest machines have issues accessing each other due to similar NetBIOS naming issues as outlined above (we often communicate guest-to-guest from different developer environments)
For all intents and purposes, this is a trivial matter. However, when dealing with Oracle, reliance on the installation-time hostname – at least from my experience and research – is critical. Thus, changing the hostname can cause problems.
Consequently, we’ve learned to deal with this process by following the steps outlined below.
Step 1 – Create Hosts Entry for Old Hostname
Locate your hosts file, typically located at %WINDIR%system32driversetchosts and add an entry for the old (current) hostname.
#
# HOSTS file
#
win2k3r2 172.16.10.10
Note the IP address – this is the address of a Loopback Adapter installed on the guest machine. As outlined by the Oracle Installer, a Loopback Adapter is required on systems that do not have a static IP address (as do virtual machines using NAT, etc.)
Step 2 – Uninstall Enterprise Manager Console
Because there are configuration settings stored with Enterprise Manager Console that reference the hostname, the same must be uninstalled.
emca -deconfig dbcontrol db -repos drop
Note, before executing this command, ensure that the Oracle instance is running – it has to be in order for Enterprise Manager Configuration Assistance to drop the repository and de-configure the Console.
Step 3 – Stop All Oracle Services
Once the uninstall of Enterprise Manage Console has completed, stop all Oracle Services on the guest machine.
- iSQL*Plus Service – typically named Oracle<OracleHomeName>iSQL*Plus
- Oracle Listener Service – typically named Oracle<OracleHomeName>TNSListener
- Oracle Database Instance Service – typically named OracleServer<SID>
Step 4 – Update listener.ora and tnsnames.ora
Once all the Oracle services have stopped, update the listener.ora and tnsnames.ora files, located in %ORACLE_HOME%networkadmin to reflect the desired (new) hostname.
LISTENER =
(DESCRIPTION_LIST =
(DESCRIPTION =
(ADDRESS = (PROTOCOL = IPC)(KEY = EXTPROC1))
(ADDRESS = (PROTOCOL = TCP)(HOST = win2k3r2)(PORT = 1521))
)
)
DEVBOX =
(DESCRIPTION =
(ADDRESS = (PROTOCOL = TCP)(HOST = win2k3r2)(PORT = 1521))
(CONNECT_DATA =
(SERVER = DEDICATED)
(SERVICE_NAME = devbox)
)
)
Step 5 – Rename Host and Restart
Now, rename the computer and restart the guest machine.
Step 6 – Ensure Oracle Instance is Running
Once the guest machine has started up, log in and ensure the Oracle instance is running using the following command line (typically required, unless the instance, not the Windows Service, is configured to auto-start.)
oradim -startup –sid devbox
Step 7 – Reinstall Enterprise Manager Console
After ensuring the Oracle instance is running, reinstall Enterprise Manager Console using the following command line:
emca -config dbcontrol db -repos create
Step 8 – Validate Enterprise Manager Console Installation
Lastly, after the successful installation of Enterprise Manager Console, validate the installation by navigating to the logon page – typically http://<hostname>:1158/em/.
At this point, you should be crankin’ away with your Oracle instance running as it should! We spent a lot of time working on this issue, so hopefully this post helps you out in some way – I wished there was an article like this when I was scouring OTN with no results!
Thanks to Mike Huffine for the initial pointers.
CHANGE HOST NAME FOR 11G
|
4 people like this. Be the first of your friends. |
One mistake can lead to a lot of work. When you’ve installed Oracle Database 11g, you can’t change the Windows Hostname without reinstalling Oracle Enterprise Manager.
These are the steps:
1. Change the %ORACLE_HOME%networkadminlistener.ora file from an IP number to machine name.
2. Change the %ORACLE_HOME%networkadmintnsnames.ora file from an IP number to a machine name.
3. Change the C:WINDOWSSystem32driversetchosts file by adding this line beneath the default localhost line (for the new Hostname value):
127.0.0.1 localhost
172.16.113.128 mclaughlin11g mclaughlin11g.techtinker.com
4. Change the Windows hostname by navigating: Start > Control Panel > System (classic view) from the random assignment of VMWare Fusion.
5. Reboot the machine, and then drop the em configuration with the following commands:
C:Data> set ORACLE_SID=orcl
C:Data> emca -deconfig dbcontrol db -repos drop
6. You’ll receive the following prompts, enter the Oracle SID and Port number without double quotes but you must enter all passwords with double quotes (at least in Oracle Database 11g):
STARTED EMCA at Jul 13, 2008 8:26:42 AM
EM Configuration Assistant, Version 11.1.0.5.0 Production
Copyright (c) 2003, 2005, Oracle. All rights reserved.
Enter the following information:
Database SID: orcl
Listener port number: 1521
Password for SYS user:
Password for SYSMAN user:
Password for SYSMAN user:
Do you wish to continue? [yes(Y)/no(N)]: y
7. You should then drop the SYSMAN user manually because it doesn’t happen without your assistance (or, it didn’t happen when I did it). If you don’t drop the SYSMAN schema, you’ll raise an error when you try to recreate it:
CONFIG: ORA—20001: SYSMAN already EXISTS..
ORA—06512: at line 17
oracle.sysman.assistants.util.sqlEngine.SQLFatalErrorException: ORA—20001: SYSMAN already EXISTS..
ORA—06512: at line 17
The Java stack trace will look like this, more or less based on version and release:
at oracle.sysman.assistants.util.sqlEngine.SQLEngine.executeImpl(SQLEngine.java:1530)
at oracle.sysman.assistants.util.sqlEngine.SQLEngine.executeScript(SQLEngine.java:880)
at oracle.sysman.assistants.util.sqlEngine.SQLPlusEngine.executeScript(SQLPlusEngine.java
at oracle.sysman.assistants.util.sqlEngine.SQLPlusEngine.executeScript(SQLPlusEngine.java
at oracle.sysman.emcp.EMReposConfig.createRepository(EMReposConfig.java:492)
at oracle.sysman.emcp.EMReposConfig.invoke(EMReposConfig.java:218)
at oracle.sysman.emcp.EMReposConfig.invoke(EMReposConfig.java:147)
at oracle.sysman.emcp.EMConfig.perform(EMConfig.java:222)
at oracle.sysman.emcp.EMConfigAssistant.invokeEMCA(EMConfigAssistant.java:535)
at oracle.sysman.emcp.EMConfigAssistant.performConfiguration(EMConfigAssistant.java:1215)
at oracle.sysman.emcp.EMConfigAssistant.statusMain(EMConfigAssistant.java:519)
at oracle.sysman.emcp.EMConfigAssistant.main(EMConfigAssistant.java:468)
Drop the user and dependent on version a few other objects, like:
DROP USER sysman CASCADE;
DROP PUBLIC SYNONYM setemviewusercontext;
DROP ROLE mgmt_user;
DROP PUBLIC SYNONYM mgmt_target_blackouts;
DROP USER mgmt_view;
8. You can then create the em environment with the following syntax:
C:Data> emca -config dbcontrol db -repos create
9. Again, you’ll receive the following prompts, enter the Oracle SID and Port number without double quotes but you must enter all passwords with double quotes (at least in Oracle Database 11g):
STARTED EMCA at Jul 13, 2008 8:28:48 AM
EM Configuration Assistant, Version 11.1.0.5.0 Production
Copyright (c) 2003, 2005, Oracle. ALL rights reserved.
Enter the following information:
DATABASE SID: orcl
Listener port NUMBER: 1521
Password FOR SYS USER:
Password FOR DBSNMP USER:
Password FOR SYSMAN USER:
Password FOR SYSMAN USER: Email address FOR notifications (optional):
Outgoing Mail (SMTP) server FOR notifications (optional):
——————————————————————
You have specified the following settings
DATABASE ORACLE_HOME ……………. C:appAdministratorproduct11.1.0db_1
LOCAL hostname ……………. mclaughlin11g
Listener port NUMBER ……………. 1521
DATABASE SID ……………. orcl
Email address FOR notifications ……………
Outgoing Mail (SMTP) server FOR notifications ……………
——————————————————————
Do you wish TO continue? [yes(Y)/no(N)]: y
A note to me, remember haste makes waste. I’m just glad that rebuilding the MarkLogic server was easy.