I am currently working on an assignment for creating an HTML file using python. I understand how to read an HTML file into python and then edit and save it.
table_file = open('abhi.html', 'w')
table_file.write('<!DOCTYPE html><html><body>')
table_file.close()
The problem with the above piece is it’s just replacing the whole HTML file and putting the string inside write(). How can I edit the file and the same time keep it’s content intact. I mean, writing something like this, but inside the body tags
<link rel="icon" type="image/png" href="img/tor.png">
I need the link to automatically go in between the opening and closing body tags.
![]()
Dharman♦
29.3k21 gold badges80 silver badges131 bronze badges
asked Feb 12, 2016 at 5:08
![]()
2
You probably want to read up on BeautifulSoup:
import bs4

# load the file
with open("existing_file.html") as inf:
    txt = inf.read()
    soup = bs4.BeautifulSoup(txt)

# create new link
new_link = soup.new_tag("link", rel="icon", type="image/png", href="img/tor.png")
# insert it into the document
soup.head.append(new_link)

# save the file again
with open("existing_file.html", "w") as outf:
    outf.write(str(soup))
Given a file like
<html>
<head>
  <title>Test</title>
</head>
<body>
  <p>What's up, Doc?</p>
</body>
</html>
this produces
<html>
<head>
<title>Test</title>
<link href="img/tor.png" rel="icon" type="image/png"/></head>
<body>
<p>What's up, Doc?</p>
</body>
</html>
(note: it has munched the whitespace, but gotten the html structure correct).
answered Feb 12, 2016 at 5:28
![]()
Hugh BothwellHugh Bothwell
54.5k8 gold badges84 silver badges98 bronze badges
1
BeautifulSoup in Python helps in scraping the information from web pages made of HTML or XML. Not only it involves scraping data but also involves searching, modifying, and iterating the parse tree. In this article, we will discuss modifying the content directly on the HTML web page using BeautifulSoup.
Syntax:
old_text=soup.find(“#Widget”, {“id”:”#Id name of widget in which you want to edit”})
new_text=old_text.find(text=re.compile(‘#Text which you want to edit’)).replace_with(‘#New text which you want to replace with’)
Terms Used:
- Widget: Here, widget stands for the particular widget in which the text you wish to replace from the website is currently stored.
- Id Name: Here, Id Name stands for the name you have given to the Id of the particular widget in which text is stored.
Example:
For instance, consider this simple page source.
HTML
<!DOCTYPE html>
<html>
<head>
My First Heading
</head>
<body>
<p id="para">
Geeks For Geeks
</p>
</body>
</html>
Once you have created a driver, you can replace the text ‘Geeks For Geeks‘ with ‘Vinayak Rai‘ using –
old_text=soup.find(“p”, {“id”:”para”})
new_text=old_text.find(text=re.compile(‘Geeks For Geeks’)).replace_with(‘Vinayak Rai’)
Step-by-step Approach:
Step 1: First, import the libraries Beautiful Soup, os and re.
from bs4 import BeautifulSoup as bs
import os
import re
Step 2: Now, remove the last segment of the path.
base=os.path.dirname(os.path.abspath(__file__))
Step 3: Then, open the HTML file in which you wish to make a change.
html=open(os.path.join(base, ‘#Name of HTML file in which you want to edit’))
Step 4: Moreover, parse the HTML file in Beautiful Soup.
soup=bs(html, ‘html.parser’)
Step 5: Further, give the appropriate location of the text which you wish to replace.
old_text=soup.find(“#Widget Name”, {“id”:”#Id name of widget in which you want to edit”})
Step 6: Next, replace the already stored text with the new text you wish to assign.
new_text=old_text.find(text=re.compile(‘#Text which you want to edit’)).replace_with(‘#New Text which you want to replace with’)
Step 7: Finally, alter the HTML file to see the changes done in the previous step.
with open(“#Name of HTML file in which you want to store the edited text”, “wb”) as f_output:
f_output.write(soup.prettify(“utf-8”))
Implementation:
Python
from bs4 import BeautifulSoup as bs
import os
import re
base = os.path.dirname(os.path.abspath(__file__))
html = open(os.path.join(base, 'gfg.html'))
soup = bs(html, 'html.parser')
old_text = soup.find("p", {"id": "para"})
new_text = old_text.find(text=re.compile(
'Geeks For Geeks')).replace_with('Vinayak Rai')
with open("gfg.html", "wb") as f_output:
f_output.write(soup.prettify("utf-8"))
Output:


Здравствуйте. есть необходимость в изменении данных на сайте для скриншота. Хочу попробовать сделать с помощью редактирования кода элемента на странице. Можете подсказать бибилотеки или другие способы реализовать это.
Надо: скрипт открывает сайт с одними данными, а на выходе выдаёт скрин с другими числовыми данными, которые сгенерированны по особым настройкам.
-
Вопрос заданболее двух лет назад
-
2527 просмотров
Легко делается Селениумом:
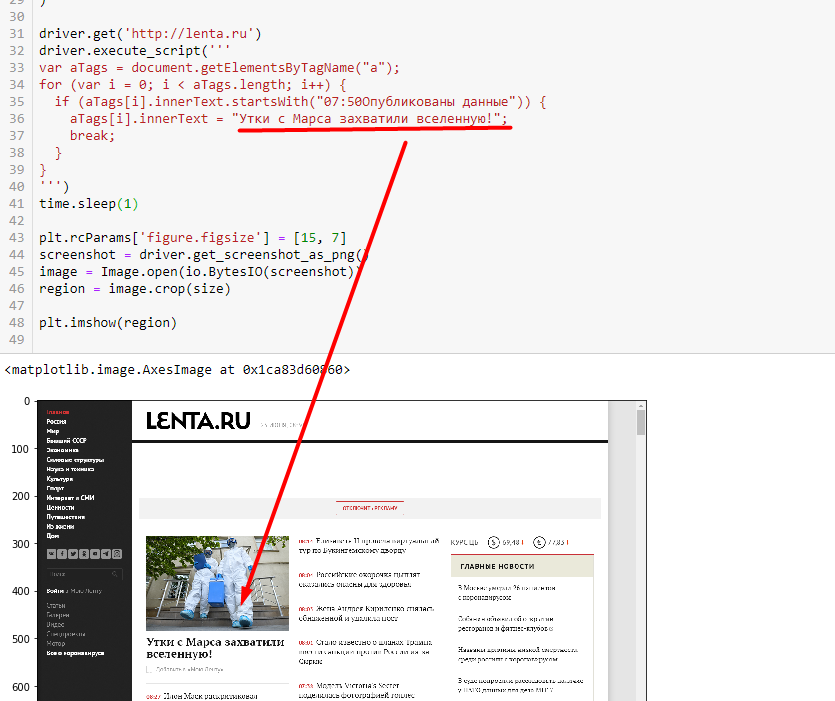
driver.get('http://lenta.ru')
driver.execute_script('''
var aTags = document.getElementsByTagName("a");
for (var i = 0; i < aTags.length; i++) {
  if (aTags[i].innerText.startsWith("07:50Опубликованы данные")) {
    aTags[i].innerText = "Утки с Марса захватили вселенную!";
    break;
  }
}
''')
time.sleep(1)

screenshot = driver.get_screenshot_as_png()
Я взял пример посложней. В вашем случае наверняка селектор можно выбрать попроще
начну отвечать:
Для начала необходимо импортировать библиотеку для отправки запросов (import requests) и BeautifulSoup для анализа и ориентирования по HTML коду, который вы получите от requests.
Дальше используя BeautifulSoup вы находите то место в коде, которое нужно менять и подставляете туда свои значения.
Сужу по себе, и большая часть времени уйдет на работу с BeautifulSoup.
Пара строк кода, чтобы было от чего отталкиваться…
import requests
from bs4 import BeautifulSoup

url = 'https://www.nhc.noaa.gov/cyclones/'
r = requests.get(url)
html = BeautifulSoup(r.content, 'html.parser')
cyclones_section = html.find("div", id="cyclones_stormTable")  # это секция, где идут перечисления активных циклонов
cyclones_results = cyclones_section.select("table > tr:nth-of-type(3) > td > table > tr > td:nth-of-type(1)") # так выглядит поиск нужного куска кода в HTML
Пригласить эксперта
Используешь какой-нибудь фреймворк для того, чтобы можно было добавить в окно хост браузера. Например, Qt.
Загружаешь страницу в браузер и меняешь, либо доступом к DOM, либо через выполнение скриптов. QtWebEngine это позволяет. Затем делаешь снимок.
-
Показать ещё
Загружается…
10 февр. 2023, в 13:27
2000 руб./за проект
10 февр. 2023, в 13:18
150000 руб./за проект
10 февр. 2023, в 13:05
3000 руб./за проект
Минуточку внимания
BeautifulSoup is the most preferred library by the majority of developers when they need to parse and retrieve information from HTML/XML documents. Its simple API helps developers complete tasks faster. Apart from parsing HTML/XML documents and searching for information, the API of BeautifulSoup also provides many other methods which can be used to modify the HTML document itself. We can modify the text of tags, add new tags, change existing tag names, add attributes to tags, remove tags, etc. These tasks will result in modification of contents and structure of HTML/XML document. We can easily handle these kinds of tasks using the simple API of BeautifulSoup which will handle any possible problem which can arise from modification. We just need to work with the API of BeautifulSoup to modify the document. We have already covered a tutorial on how to use BeautifulSoup to parse HTML documents where we have covered the majority of the API of it. Please feel free to check that tutorial as well.
- BeautifulSoup: Detailed Guide to Parse & Search HTML Web Pages
As a part of this tutorial, we’ll be primarily concentrating on how to use the API of BeautifulSoup to modify the parsed HTML document. Below we have listed important sections of the tutorial to give an overview of the material covered.
Important Sections Of Tutorial
- Create Soup Object to Easily Parse HTML of Web Page
- How to Change HTML Tag Name?
- How to Modify Text of HTML Tag?
- Replace Existing Text using ‘.string’ Attribute.
- Add Text using append() Method
- Add List of Strings using extend() Method
- How to Add New Attributes to HTML Tag?
- How to Modify existing Attribute’s value for HTML Tag?
- How to Create New HTML Tag and Add it in HTML Document (soup)?
- Add New Tag using ‘append()’ Method
- Add New Tag using ‘insert()’ Method
- Insert Tag using ‘insert_before()’ and ‘insert_after()’ Methods
- How to Clear Contents of a HTML Tag?
- How to Remove Tag from HTML Document (soup)?
- How to Replace a Tag with Another Tag in HTML Document (soup)?
- How to Wrap HTML Tag inside Another HTML Tag?
- How to Replace HTML Tag with it’s Contents (Unwrap HTML Tag)?
import bs4

print("BeautifulSoup Version : {}".format(bs4.__version__))
BeautifulSoup Version : 4.10.0
1. Create Soup Object to Easily Parse HTML of Web Page 
In this section, we have created a simple HTML document with a few tags. This will make things easier to understand when we add new tags, remove tags, modify attributes, etc.
We’ll be creating a BeautifulSoup object by giving this HTML document as string to BeautifulSoup() constructor. The second argument to the constructor is a string specifying a backend that it’ll use to parse the HTML document. This BeautifulSoup object has parsed HTML and various methods that we’ll use to modify HTML documents.
If you want to know in detail about BeautifulSoup object then please feel free to check our below tutorial.
- BeautifulSoup: Detailed Guide to Parse & Search HTML Web Pages
sample_html= '''<html>
<head>
    <title>CoderzColumn : Developed for Developers by Developers for the betterment of Development.</title>
    <script src="static/script1.js"></script>
    <script src="static/script2.js"></script>
    <link rel="stylesheet" href="static/stylesheet.css" type="text/css" />
</head>
<body>
    <p id='start'>Welcome to CoderzColumn</p>
    <p id='main_para'>We regularly publish tutorials on various topics
    (Python, Machine learning, Data Visualization, Digital Marketing, etc.) regularly explaining
    how to use various Python libraries.</p>
    <p id='sub_para'>Below are list of Important Sections of Our Website : </p>
        <ul>
            <li><a href='https://coderzcolumn.com/blogs'>Blogs</a></li>
            <li><a href='https://coderzcolumn.com/tutorials'>Tutorials</a></li>
            <li><a href='https://coderzcolumn.com/about'>About</a></li>
            <li><a href='https://coderzcolumn.com/contact-us'>Contact US</a></li>
        </ul>
    <p id='end'>Please feel free to send us mail @ coderzcolumn07@gmail.com if you need any
    information about any article or want us to publish article on particular topic.</p>
</body>
</html>'''
from bs4 import BeautifulSoup

soup = BeautifulSoup(sample_html, 'html.parser')

print(soup)
<html>
<head>
<title>CoderzColumn : Developed for Developers by Developers for the betterment of Development.</title>
<script src="static/script1.js"></script>
<script src="static/script2.js"></script>
<link href="static/stylesheet.css" rel="stylesheet" type="text/css"/>
</head>
<body>
<p id="start">Welcome to CoderzColumn</p>
<p id="main_para">We regularly publish tutorials on various topics
    (Python, Machine learning, Data Visualization, Digital Marketing, etc.) regularly explaining
    how to use various Python libraries.</p>
<p id="sub_para">Below are list of Important Sections of Our Website : </p>
<ul>
<li><a href="https://coderzcolumn.com/blogs">Blogs</a></li>
<li><a href="https://coderzcolumn.com/tutorials">Tutorials</a></li>
<li><a href="https://coderzcolumn.com/about">About</a></li>
<li><a href="https://coderzcolumn.com/contact-us">Contact US</a></li>
</ul>
<p id="end">Please feel free to send us mail @ coderzcolumn07@gmail.com if you need any
    information about any article or want us to publish article on particular topic.</p>
</body>
</html>
2. How to Change HTML Tag Name? 
In this section, we’ll explain how we can change the name of the HTML tag. All Tag object in beautifulsoup has a property named name which holds the name of the HTML tag. We can assign a new value to this name property and it’ll change the HTML tag name.
Below we have first created a copy of our original BeautifulSoup object. We have then explained modification on this new object. We’ll be following this for every section where we’ll create a copy of the original BeautifulSoup object and explain modifications on the copied object.
We have modified the name of a few HTML tags in copied BeautifulSoup object.
Please make a NOTE that we’ll be using various methods available through BeautifulSoup to find tags in it. These methods are explained in detail in our first tutorial on BeautifulSoup hence we have not included their description here.
import copy

soup_new = copy.deepcopy(soup)
main_para = soup_new.find(id="main_para")

print(type(main_para))

main_para
<class 'bs4.element.Tag'>
<p id="main_para">We regularly publish tutorials on various topics
    (Python, Machine learning, Data Visualization, Digital Marketing, etc.) regularly explaining
    how to use various Python libraries.</p>
<div id="main_para">We regularly publish tutorials on various topics
    (Python, Machine learning, Data Visualization, Digital Marketing, etc.) regularly explaining
    how to use various Python libraries.</div>
soup_new.find(id="main_para")
<div id="main_para">We regularly publish tutorials on various topics
    (Python, Machine learning, Data Visualization, Digital Marketing, etc.) regularly explaining
    how to use various Python libraries.</div>
<ul>
<li><a href="https://coderzcolumn.com/blogs">Blogs</a></li>
<li><a href="https://coderzcolumn.com/tutorials">Tutorials</a></li>
<li><a href="https://coderzcolumn.com/about">About</a></li>
<li><a href="https://coderzcolumn.com/contact-us">Contact US</a></li>
</ul>
<ul>
<li><link href="https://coderzcolumn.com/blogs">Blogs</link></li>
<li><a href="https://coderzcolumn.com/tutorials">Tutorials</a></li>
<li><a href="https://coderzcolumn.com/about">About</a></li>
<li><a href="https://coderzcolumn.com/contact-us">Contact US</a></li>
</ul>
3. How to Modify Text of HTML Tag? 
In this section, we’ll explain how we can modify the text store between the start and end of a particular HTML tag. The text within the tag is stored as NavigableString object. There are different ways to modify it.
- Using ‘.string’ property of Tag object.
- Using append() method of Tag object.
- Using extend() method of Tag object.
We’ll explain all three ways of modifying text below with simple examples.
Replace Existing Text using ‘.string’ Attribute.
We can replace the existing text of HTML Tag by setting a new string value to ‘.string’ property of Tag object. It’ll replace any existing string with this new string value.
import copy

soup_new = copy.deepcopy(soup)
first_link = soup_new.a

first_link
<a href="https://coderzcolumn.com/blogs">Blogs</a>
first_link.string = "Blogs (143)"

first_link.string
p_start = soup_new.find(id="start")

p_start
<p id="start">Welcome to CoderzColumn</p>
p_start.string = "Welcome to CoderzColumn, Have a Great Learning Experience."
<p id="start">Welcome to CoderzColumn, Have a Great Learning Experience.</p>
soup_new.find(id="start")
<p id="start">Welcome to CoderzColumn, Have a Great Learning Experience.</p>
Add Text using append() Method
The append() method is available through Tag object which accepts a string and appends that string to the existing string of HTML Tag. It works like append() method of python list.
import copy

soup_new = copy.deepcopy(soup)
p_start = soup_new.p

p_start
<p id="start">Welcome to CoderzColumn</p>
p_start.append(", Have a Great Learning Experience.")
(<p id="start">Welcome to CoderzColumn, Have a Great Learning Experience.</p>,
 <p id="start">Welcome to CoderzColumn, Have a Great Learning Experience.</p>)
Add List of Strings using extend() Method
The extend() method accepts a list of strings and appends all strings to the end of an existing string of HTML tags. It works exactly like extend() method of the python list.
import copy

soup_new = copy.deepcopy(soup)
p_start = soup_new.p

p_start
<p id="start">Welcome to CoderzColumn</p>
p_start.extend([", ", "Have a Great", " Learning Experience", "."])
(<p id="start">Welcome to CoderzColumn, Have a Great Learning Experience.</p>,
 <p id="start">Welcome to CoderzColumn, Have a Great Learning Experience.</p>)
4. How to Add New Attributes to HTML Tag? 
We can retrieve the value of any attribute of an HTML tag by treating Tag object like a python dictionary. We can use the same approach to add a new attribute to the HTML tag as well.
import copy

soup_new = copy.deepcopy(soup)
p_start = soup_new.p

p_start
<p id="start">Welcome to CoderzColumn</p>
p_start["name"] = "Welcome Paragraph"
(<p id="start" name="Welcome Paragraph">Welcome to CoderzColumn</p>,
 <p id="start" name="Welcome Paragraph">Welcome to CoderzColumn</p>)
<a href="https://coderzcolumn.com/blogs">Blogs</a>
link["target"] = "_blank"
(<a href="https://coderzcolumn.com/blogs" target="_blank">Blogs</a>,
 <a href="https://coderzcolumn.com/blogs" target="_blank">Blogs</a>)
5. How to Modify existing Attribute’s value for HTML Tag? 
We can easily modify the value of any existing attribute of an HTML tag by treating Tag object as a dictionary-like object. We can set a new value by assigning a new value to an attribute by giving the attribute name as the key to Tag object.
import copy

soup_new = copy.deepcopy(soup)
<a href="https://coderzcolumn.com/blogs">Blogs</a>
link["href"] = "https://coderzcolumn.com/blogs_latest"
(<a href="https://coderzcolumn.com/blogs_latest">Blogs</a>,
 <a href="https://coderzcolumn.com/blogs_latest">Blogs</a>)
p_end = soup_new.find(id="end")

p_end
<p id="end">Please feel free to send us mail @ coderzcolumn07@gmail.com if you need any
    information about any article or want us to publish article on particular topic.</p>
p_end["name"] = "End Paragraph"
<p id="end" name="End Paragraph">Please feel free to send us mail @ coderzcolumn07@gmail.com if you need any
    information about any article or want us to publish article on particular topic.</p>
<p id="end" name="End Paragraph">Please feel free to send us mail @ coderzcolumn07@gmail.com if you need any
    information about any article or want us to publish article on particular topic.</p>
6. How to Create New HTML Tag and Add it in HTML Document (soup)? 
In this section, we’ll explain how we can create a new HTML tag and add it to BeautifulSoup object. The standard way to create a new tag is by using new_tag() method of BeautifulSoup object. We need to provide an HTML tag name as a string to this method in order to create a new tag. It’ll create a new Tag object and return it. We can then use various methods of BeautifulSoup object to add this Tag object in the HTML document. We can also provide attributes of tag followed by tag name to new_tag() method.
Below are list of methods available from BeautifulSoup and Tag objects that let us add new Tag to HTML document.
- append()
- insert()
- insert_before()
- insert_after()
Add New Tag using ‘append()’ Method
In this section, we have explained how we can use append() method to add new Tag to HTML document. We have created a few ‘li’ HTML tags and added them to our existing unordered list tag.
import copy

soup_new = copy.deepcopy(soup)
unordered_list = soup_new.ul

unordered_list
<ul>
<li><a href="https://coderzcolumn.com/blogs">Blogs</a></li>
<li><a href="https://coderzcolumn.com/tutorials">Tutorials</a></li>
<li><a href="https://coderzcolumn.com/about">About</a></li>
<li><a href="https://coderzcolumn.com/contact-us">Contact US</a></li>
</ul>
new_option = soup_new.new_tag("li")

new_option
unordered_list.append(new_option)
<ul>
<li><a href="https://coderzcolumn.com/blogs">Blogs</a></li>
<li><a href="https://coderzcolumn.com/tutorials">Tutorials</a></li>
<li><a href="https://coderzcolumn.com/about">About</a></li>
<li><a href="https://coderzcolumn.com/contact-us">Contact US</a></li>
<li></li></ul>
<ul>
<li><a href="https://coderzcolumn.com/blogs">Blogs</a></li>
<li><a href="https://coderzcolumn.com/tutorials">Tutorials</a></li>
<li><a href="https://coderzcolumn.com/about">About</a></li>
<li><a href="https://coderzcolumn.com/contact-us">Contact US</a></li>
<li></li></ul>
new_option = soup_new.new_tag("li")

new_option
#new_link = soup_new.new_tag("a", attrs={'href':"https://coderzcolumn.com/privacy_policy"})
new_link = soup_new.new_tag("a", href="https://coderzcolumn.com/privacy_policy")

new_link.string = "Privacy Policy"

new_link
<a href="https://coderzcolumn.com/privacy_policy">Privacy Policy</a>
new_option.append(new_link)

new_option
<li><a href="https://coderzcolumn.com/privacy_policy">Privacy Policy</a></li>
soup_new.ul.append("n")
soup_new.ul.append(new_option)
soup_new.ul.append("n")
<ul>
<li><a href="https://coderzcolumn.com/blogs">Blogs</a></li>
<li><a href="https://coderzcolumn.com/tutorials">Tutorials</a></li>
<li><a href="https://coderzcolumn.com/about">About</a></li>
<li><a href="https://coderzcolumn.com/contact-us">Contact US</a></li>
<li></li>
<li><a href="https://coderzcolumn.com/privacy_policy">Privacy Policy</a></li>
</ul>
Add New Tag using ‘insert()’ Method
In this section, we have explained how we can insert a new tag using insert() method. We need to provide an index of tag as the first argument to insert() method followed by Tag object to insert an object at a particular location in an HTML document.
import copy

soup_new = copy.deepcopy(soup)
<a href="https://coderzcolumn.com/blogs">Blogs</a>
<a href="https://coderzcolumn.com/blogs">Blogs (143)</a>
unordered_list = soup_new.ul

unordered_list
<ul>
<li><a href="https://coderzcolumn.com/blogs">Blogs</a></li>
<li><a href="https://coderzcolumn.com/tutorials">Tutorials</a></li>
<li><a href="https://coderzcolumn.com/about">About</a></li>
<li><a href="https://coderzcolumn.com/contact-us">Contact US</a></li>
</ul>
new_option = soup_new.new_tag("li")

new_link = soup_new.new_tag("a", href="https://coderzcolumn.com/privacy_policy")

new_link.string = "Privacy Policy"

new_option.append(new_link)

new_option
<li><a href="https://coderzcolumn.com/privacy_policy">Privacy Policy</a></li>
unordered_list.insert(0, "n")
unordered_list.insert(0, new_option)
unordered_list.insert(0, "n")
<ul>
<li><a href="https://coderzcolumn.com/privacy_policy">Privacy Policy</a></li>

<li><a href="https://coderzcolumn.com/blogs">Blogs</a></li>
<li><a href="https://coderzcolumn.com/tutorials">Tutorials</a></li>
<li><a href="https://coderzcolumn.com/about">About</a></li>
<li><a href="https://coderzcolumn.com/contact-us">Contact US</a></li>
</ul>
Insert Tag using ‘insert_before()’ and ‘insert_after()’ Methods
The insert_before() and insert_after() methods works like insert() method. They let us insert HTML tag before and after specified HTML tag. Below we have explained with simple examples how we can use them to add tags to HTML document.
import copy

soup_new = copy.deepcopy(soup)
p_inter1 = soup_new.new_tag("p", id="intermediate_para1")

p_inter1.string = "We have more than 250 Tutorials on Python."

p_inter1
<p id="intermediate_para1">We have more than 250 Tutorials on Python.</p>
soup_new.ul.insert_before(p_inter1)
soup_new.find(id="intermediate_para1")
<p id="intermediate_para1">We have more than 250 Tutorials on Python.</p>
p_inter2 = soup_new.new_tag("p", id="intermediate_para2")

p_inter2.string = "We have more than 50 Tutorials on Digital marketing."

p_inter2
<p id="intermediate_para2">We have more than 50 Tutorials on Digital marketing.</p>
soup_new.ul.insert_after(p_inter2)
soup_new.find(id="intermediate_para2")
<p id="intermediate_para2">We have more than 50 Tutorials on Digital marketing.</p>
[<p id="start">Welcome to CoderzColumn</p>,
 <p id="main_para">We regularly publish tutorials on various topics
     (Python, Machine learning, Data Visualization, Digital Marketing, etc.) regularly explaining
     how to use various Python libraries.</p>,
 <p id="sub_para">Below are list of Important Sections of Our Website : </p>,
 <p id="intermediate_para1">We have more than 250 Tutorials on Python.</p>,
 <p id="intermediate_para2">We have more than 50 Tutorials on Digital marketing.</p>,
 <p id="end">Please feel free to send us mail @ coderzcolumn07@gmail.com if you need any
     information about any article or want us to publish article on particular topic.</p>]
bold = soup_new.new_tag("b")

bold.string = " (143)"

bold
<a href="https://coderzcolumn.com/blogs">Blogs</a>
soup_new.a.string.insert_after(bold)
<a href="https://coderzcolumn.com/blogs">Blogs<b> (143)</b></a>
italic = soup_new.new_tag("i")

italic.string = "All "

italic
soup_new.a.contents[0].insert_before(italic)
<a href="https://coderzcolumn.com/blogs"><i>All </i>Blogs<b> (143)</b></a>
7. How to Clear Contents of a HTML Tag? 
The Tag and BeautifulSoup objects provide a method named clear() which can be used to create text content as well as all subtags of the given tag. The method will delete all sub-tags and text of the HTML tag on which it is called.
Below we have explained with a few simple examples what are the uses of clear() method.
import copy

soup_new = copy.deepcopy(soup)
<ul>
<li><a href="https://coderzcolumn.com/blogs">Blogs</a></li>
<li><a href="https://coderzcolumn.com/tutorials">Tutorials</a></li>
<li><a href="https://coderzcolumn.com/about">About</a></li>
<li><a href="https://coderzcolumn.com/contact-us">Contact US</a></li>
</ul>
p_end = soup_new.find(id="end")

p_end
<p id="end">Please feel free to send us mail @ coderzcolumn07@gmail.com if you need any
    information about any article or want us to publish article on particular topic.</p>
8. How to Remove Tag from HTML Document (soup)? 
In this section, we have explained how we can remove a particular HTML tag from BeautifulSoup object. The Tag object provides a method named extract() which when called returns that Tag object removing it from main BeautifulSoup object containing whole HTML document. We can call extract() method on any Tag object and it’ll be removed from the soup object and returned.
Below we have explained a few examples demonstrating how extract() method works. We need to call extract() method on Tag object that we want to remove from the soup object.
import copy

soup_new = copy.deepcopy(soup)
<ul>
<li><a href="https://coderzcolumn.com/blogs">Blogs</a></li>
<li><a href="https://coderzcolumn.com/tutorials">Tutorials</a></li>
<li><a href="https://coderzcolumn.com/about">About</a></li>
<li><a href="https://coderzcolumn.com/contact-us">Contact US</a></li>
</ul>
<a href="https://coderzcolumn.com/blogs">Blogs</a>
<ul>
<li></li>
<li><a href="https://coderzcolumn.com/tutorials">Tutorials</a></li>
<li><a href="https://coderzcolumn.com/about">About</a></li>
<li><a href="https://coderzcolumn.com/contact-us">Contact US</a></li>
</ul>
<p id="start">Welcome to CoderzColumn</p>
soup_new.p.string.extract()
'Welcome to CoderzColumn'
<ul>
<li></li>
<li><a href="https://coderzcolumn.com/tutorials">Tutorials</a></li>
<li><a href="https://coderzcolumn.com/about">About</a></li>
<li><a href="https://coderzcolumn.com/contact-us">Contact US</a></li>
</ul>
soup_new.li.parent.extract()
<ul>
<li></li>
<li><a href="https://coderzcolumn.com/tutorials">Tutorials</a></li>
<li><a href="https://coderzcolumn.com/about">About</a></li>
<li><a href="https://coderzcolumn.com/contact-us">Contact US</a></li>
</ul>
<body>
<p id="start"></p>
<p id="main_para">We regularly publish tutorials on various topics
    (Python, Machine learning, Data Visualization, Digital Marketing, etc.) regularly explaining
    how to use various Python libraries.</p>
<p id="sub_para">Below are list of Important Sections of Our Website : </p>

<p id="end">Please feel free to send us mail @ coderzcolumn07@gmail.com if you need any
    information about any article or want us to publish article on particular topic.</p>
</body>
9. How to Replace a Tag with Another Tag in HTML Document (soup) ? 
In this section, we have explained how we can replace one HTML tag with another in an HTML document. The Tag object has a method named replace_with() which can replace whatever is given to it with the Tag object in the main BeautifulSoup object. We can provide a string to replace_with() and it’ll replace the original HTML tag with that string. We can provide another Tag object to replace_with() and it’ll replace original HTML tag with this new tag represented through Tag object. We need to call replace_with() on Tag object that we want to replace in BeautifulSoup object.
Below we have explained with a few examples how we can use replace_with() to replace a particular HTML tag from a document.
import copy

soup_new = copy.deepcopy(soup)
<ul>
<li><a href="https://coderzcolumn.com/blogs">Blogs</a></li>
<li><a href="https://coderzcolumn.com/tutorials">Tutorials</a></li>
<li><a href="https://coderzcolumn.com/about">About</a></li>
<li><a href="https://coderzcolumn.com/contact-us">Contact US</a></li>
</ul>
first_link = soup_new.find("a")

first_link
<a href="https://coderzcolumn.com/blogs">Blogs</a>
first_link.replace_with("Blogs")
<a href="https://coderzcolumn.com/blogs">Blogs</a>
<ul>
<li>Blogs</li>
<li><a href="https://coderzcolumn.com/tutorials">Tutorials</a></li>
<li><a href="https://coderzcolumn.com/about">About</a></li>
<li><a href="https://coderzcolumn.com/contact-us">Contact US</a></li>
</ul>
soup_new.ul.li.string, type(soup_new.ul.li.string)
('Blogs', bs4.element.NavigableString)
new_link_tag = soup_new.new_tag("link", href="https://coderzcolumn.com/blogs")

new_link_tag
<link href="https://coderzcolumn.com/blogs"/>
soup_new.ul.li.string.replace_with(new_link_tag)
<ul>
<li><link href="https://coderzcolumn.com/blogs"/></li>
<li><a href="https://coderzcolumn.com/tutorials">Tutorials</a></li>
<li><a href="https://coderzcolumn.com/about">About</a></li>
<li><a href="https://coderzcolumn.com/contact-us">Contact US</a></li>
</ul>
10. How to Wrap HTML Tag inside Another HTML Tag? 
In this section, we have explained how we can wrap one HTML tag inside of another new HTML tag. The Tag object provides a method named wrap() which accepts another Tag object and wraps main Tag object inside of this provided Tag object. We can need to call wrap() method on Tag object which we want to wrap into another Tag object that we provided to wrap() method.
Below we have explained with examples how we can wrap one HTML tag inside of another using wrap() method.
import copy

soup_new = copy.deepcopy(soup)
<ul>
<li><a href="https://coderzcolumn.com/blogs">Blogs</a></li>
<li><a href="https://coderzcolumn.com/tutorials">Tutorials</a></li>
<li><a href="https://coderzcolumn.com/about">About</a></li>
<li><a href="https://coderzcolumn.com/contact-us">Contact US</a></li>
</ul>
bold = soup_new.new_tag("b")

bold
soup_new.ul.li.a.wrap(bold)
<b><a href="https://coderzcolumn.com/blogs">Blogs</a></b>
<ul>
<li><b><a href="https://coderzcolumn.com/blogs">Blogs</a></b></li>
<li><a href="https://coderzcolumn.com/tutorials">Tutorials</a></li>
<li><a href="https://coderzcolumn.com/about">About</a></li>
<li><a href="https://coderzcolumn.com/contact-us">Contact US</a></li>
</ul>
italic = soup_new.new_tag("i")

italic
soup_new.ul.li.a.string.wrap(italic)
<ul>
<li><b><a href="https://coderzcolumn.com/blogs"><i>Blogs</i></a></b></li>
<li><a href="https://coderzcolumn.com/tutorials">Tutorials</a></li>
<li><a href="https://coderzcolumn.com/about">About</a></li>
<li><a href="https://coderzcolumn.com/contact-us">Contact US</a></li>
</ul>
11. How to Replace HTML Tag with it’s Contents (Unwrap HTML Tag) ? 
In this section, we have explained how we can replace the HTML tag with its content in an HTML document. The Tag object provides us with method named unwrap() that let us replace the Tag with it’s contents inside of BeautifulSoup object. We can call unwrap() method on any Tag object and it’ll replace that Tag object with it’s content inside of BeautifulSoup object. This method is kind of the opposite of wrap() method we explained in the previous section.
Below we have explained with a few simple examples how we can use unwrap() method.
import copy

soup_new = copy.deepcopy(soup)
<ul>
<li><a href="https://coderzcolumn.com/blogs">Blogs</a></li>
<li><a href="https://coderzcolumn.com/tutorials">Tutorials</a></li>
<li><a href="https://coderzcolumn.com/about">About</a></li>
<li><a href="https://coderzcolumn.com/contact-us">Contact US</a></li>
</ul>
soup_new.ul.li.a.unwrap()
<a href="https://coderzcolumn.com/blogs"></a>
<ul>
<li>Blogs</li>
<li><a href="https://coderzcolumn.com/tutorials">Tutorials</a></li>
<li><a href="https://coderzcolumn.com/about">About</a></li>
<li><a href="https://coderzcolumn.com/contact-us">Contact US</a></li>
</ul>
<ul>
Blogs
<li><a href="https://coderzcolumn.com/tutorials">Tutorials</a></li>
<li><a href="https://coderzcolumn.com/about">About</a></li>
<li><a href="https://coderzcolumn.com/contact-us">Contact US</a></li>
</ul>
This ends our small tutorial explaining how we can modify the contents of an HTML document parsed as BeautifulSoup object. Please feel free to let us know your views in the comments section.
References
- BeautifulSoup Document
- BeautifulSoup: Detailed Guide to Parse & Search HTML Web Pages
I want to delete everything from my html file and add <!DOCTYPE html><html><body>.
Here is my code so far:
with open('table.html', 'w'): pass
table_file = open('table.html', 'w')
table_file.write('<!DOCTYPE html><html><body>')
After i run my code, table.html is now empty. Why?
How can I fix that?
asked Sep 30, 2013 at 10:56
![]()
MichaelMichael
14.9k35 gold badges92 silver badges143 bronze badges
2
It looks like you’re not closing the file and the first line is doing nothing, so you could do 2 things.
Either skip the first line and close the file in the end:
table_file = open('table.html', 'w')
table_file.write('<!DOCTYPE html><html><body>')
table_file.close()
or if you want to use the with statement do it like this:
with open('table.html', 'w') as table_file:
  table_file.write('<!DOCTYPE html><html><body>')
  # Write anything else you need here...
![]()
mavroprovato
7,8275 gold badges36 silver badges52 bronze badges
answered Sep 30, 2013 at 10:59
![]()
LipisLipis
21.1k20 gold badges93 silver badges119 bronze badges
2
with open('table.html', 'w'): pass
   table_file = open('table.html', 'w')
   table_file.write('<!DOCTYPE html><html><body>')
This would open the file table.html two time’s and your not closing your file properly too.
If your using with then :
with open('table.html', 'w') as table_file:
   table_file.write('<!DOCTYPE html><html><body>')
with closes the file automatically after the scope.
Else you have to manually close the file like this:
table_file = open('table.html', 'w')
table_file.write('<!DOCTYPE html><html><body>')
table_file.close()
and you don’t have to use the with operator.
I’m not sure what you’re trying to achieve with the with open('table.html', 'w'): pass. Try the following.
with open('table.html', 'w') as table_file:
    table_file.write('<!DOCTYPE html><html><body>')
You’re currently not closing the file, so the changes aren’t being written to disk.
answered Sep 30, 2013 at 10:59
![]()
TimTim
11.4k4 gold badges41 silver badges43 bronze badges
2
Данная статья это вводный учебник по библиотеке BeautifulSoup Python. Примеры из данной статьи помогут вам понять как находить HTML теги, обходить элементы из HTML документа, менять содержимое тегов и парсить веб-страницы.
Причина использования python в этом руководстве довольно очевидна: python очень гибкий и имеет большую поддержку сообщества. Даже если вы новичок, пытающийся научиться веб-скрейпингу с помощью python, эта статья будет очень полезна для вас. Это длинное руководство, поэтому пристегните ремни и давайте начнем.
Прежде чем приступить к веб-скрейпингу в Python, давайте поймем важность HTTP заголовков при парсинге любой веб-страницы. Мы подробно рассмотрим HTTP заголовки. Возможно, я ошибаюсь, но когда я начинал программировать, меня очень пугали HTTP заголовки. Но вскоре я понял, что использовать заголовки при составлении HTTP-запросов очень просто.
HTTP-заголовки (необходимое для веб-скрейпинга в python)
В этом разделе я расскажу о концепции заголовков на некоторых примерах и поделюсь ссылками, чтобы вы могли узнать больше о заголовках в деталях. Итак, давайте перейдем к делу.
Возможно, вы уже знаете, что когда вы выполняете вызовы к API, вы передаете часть информации в «конверте». Допустим, один человек является клиентом, а другой — сервером, и конверт передается в виде API, что и является способом коммуникации.
Содержимое конверта — это данные, которые передаются от одного человека к другому, но вы также можете знать, что когда такие коммуникации происходят в реальной жизни, на верхней части конверта также указывается адрес, по которому эти данные должны быть переданы. Но наряду с этим адресом есть и другой адрес, который используется, когда письмо не получено получателем.
Это просто аналогия, но я пытаюсь объяснить вам, что заголовки тоже выполняют подобную роль.
HTTP Заголовки — это своего рода индикаторы метаданных о том, из чего состоит ответ или запрос. Чтобы понять это, позвольте мне классифицировать заголовки. Итак, в основном их можно разделить на четыре различные категории.
- Заголовки запроса;
- Заголовки ответа;
- Заголовки полезной нагрузки (payload);
- Заголовки представления (определенного типа, Content-Type)
Это не означает, что заголовок запроса не может быть заголовком ответа и наоборот. Давайте разберемся, что на самом деле означает каждый из этих заголовков.
Заголовки запроса
Это пара ключ-значение, как и другие заголовки, и они отправляются клиентом, который запрашивает данные. Они посылаются для того, чтобы сервер мог понять, как он должен отправить ответ. Он также помогает серверу определить отправителя запроса.
Примерами заголовков запроса являются:
- Host: www.python-scripts.com
- User-Agent: Mozilla/5.0 (Windows NT 10.0; Win64; x64) AppleWebKit/537.36 (KHTML, like Gecko) Chrome/74.0.3729.169 Safari/537.36
- Referer: localhost
- Connection: close
- Accept-Language: ru
- Accept-Encoding; gzip
Помните, что заголовок Content-Type не является заголовком запроса, это заголовок представления. Мы поговорим об этом подробнее, но я просто хотел как можно скорее устранить эту путаницу из вашего сознания.
Из приведенного выше списка заголовков-образцов, Host и User-Agent содержат информацию о том, кто посылает запрос.
Accept-Language говорит серверу, что это язык, на котором я могу понять ваш ответ, и аналогично Accept-Encoding говорит серверу, что даже если у вас сжатые данные, я могу их понять.
Заголовки ответа
Они похожи на заголовки запроса, но передача происходит в обратном порядке. На самом деле, эти заголовки посылаются сервером клиенту. Они объясняют клиенту, что делать с ответом. Он предоставляет дополнительную информацию об отправленных данных.
Пример заголовков ответа:
- Connection: keep-alive
- Date: Mon, 08 Nov 2022
- Server: nginx
- Content-Type: text/html
- Transfer-Encoding: chunked
- Etag: W/”0815”
Etag — это заголовок ответа, который используется для указания версии и кэша. Date сообщает клиенту дату, когда ответ был отправлен от сервера к клиенту. Но опять же Content-Type или Content-Encoding — это заголовки представления, которые мы рассмотрим чуть позже.
Заголовки представления
Заголовки представления указывают на тип переданных данных. Данные, отправленные с сервера к клиенту, могут быть в любом формате, например JSON, HTML, XML, chunked (если размер данных огромен) и т. д. Сервер также сообщает клиенту о диапазоне содержимого.
Примеры заголовков представления:
- Content-Type: text/html
- Content-Encoding: gzip
- Content-Length: 3523
- Content-Range: bytes 50–1000/*
- Content-Location: /docs/fo.xml
Content-Location сообщает клиенту об альтернативном расположении ресурса или данных, которые доступны клиенту для получения информации. Это может быть URL, где хранится данный конкретный ресурс.
Помимо этих заголовков, могут быть и другие заголовки, такие как Trailer, Transfer-Encoding, Etag, if-Not-Match, Authorizations и т.д.
Теперь, что если вы разрабатываете API и хотите определить свои собственные заголовки? Можете ли вы это сделать? Вы совершенно спокойно можете это сделать. Таким же образом, как вы определяете структуру запроса и ответа вашего API, вы можете реализовать собственные заголовки, которые будете принимать вы или сервер.
Примером собственного заголовка может быть заголовок Authorization. Этот заголовок может иметь любое значение. Далее, сервер может использовать это значение для идентификации клиента или для любых других логических операций.
Данная статья это вводный учебник по библиотеке BeautifulSoup Python. Примеры из данной статьи помогут вам понять как находить HTML теги, обходить элементы из HTML документа, менять содержимое тегов и парсить веб-страницы.
BeautifulSoup — это Python библиотека для разбора HTML и XML документов. Она часто используется для веб-скрейпинга. BeautifulSoup преобразует сложный HTML-документ в сложное дерево объектов Python, таких как тег, навигационная строка или комментарий.
Установка BeautifulSoup
Мы используем команду pip для установки необходимых модулей.
Нам необходимо установить модуль lxml, который используется BeautifulSoup.
BeautifulSoup устанавливается с помощью вышеуказанной команды.
HTML файл с которым мы будем работать
В примерах мы будем использовать следующий HTML-файл:
|
1 2 3 4 5 6 7 8 9 10 11 12 13 14 15 16 17 18 19 20 21 22 23 24 25 26 27 28 29 30 |
<!DOCTYPE html> <html> <head> <title>Заголовок</title> <meta charset=«utf-8»> </head> <body> <h2>Операционные системы</h2> <ul id=«mylist» style=«width:150px»> <li>Solaris</li> <li>FreeBSD</li> <li>Debian</li> <li>NetBSD</li> <li>Windows</li> </ul> <p> FreeBSD — это передовая компьютерная операционная система, используемая для современных серверов, настольных компьютеров и встроенных платформ. </p> <p> Debian — это Unix—подобная компьютерная операционная система, которая полностью состоит из свободного программного обеспечения. </p> </body> </html> |
Открываем HTML файл через BeautifulSoup
В первом примере мы используем модуль BeautifulSoup для получения трех тегов.
|
from bs4 import BeautifulSoup with open(‘index.html’, ‘r’) as f: contents = f.read() soup = BeautifulSoup(contents, ‘lxml’) print(soup.h2) print(soup.head) print(soup.li) |
Пример кода выводит HTML-код трех тегов.
|
from bs4 import BeautifulSoup |
Мы импортируем класс BeautifulSoup из модуля bs4. BeautifulSoup — это основной класс для выполнения парсинга по HTML документу.
|
with open(‘index.html’, ‘r’) as f: contents = f.read() |
Мы открываем файл index.html и читаем его содержимое с помощью метода read().
|
soup = BeautifulSoup(contents, ‘lxml’) |
Создается объект BeautifulSoup, HTML-данные передаются конструктору. Второй параметр определяет синтаксический анализатор.
|
print(soup.h2) print(soup.head) |
Здесь мы выводим HTML-код двух тегов: <h2> и <head>.
Имеется несколько элементов <li>, данная строка выведет первый из них.
Полученный результат после выполнения скрипта:
|
<h2>Операционные системы</h2> <head> <title>Заголовок</title> <meta charset=«utf-8»/> </head> <li>Solaris</li> |
Приватные прокси для смены IP в библиотеке Requests
Наша зада на данный момент это открыть страницу сайта под другим IP адресом. Для этого нам нужно купить приватные прокси и получить логин и пароль для подключения к прокси. Лучше всего использовать именно приватные прокси, так как это гарантирует безопасность и быстродействие прокси.
|
1 2 3 4 5 6 7 8 9 10 11 12 13 14 15 16 17 18 19 20 21 |
import requests username = ‘user’ password = ‘pass’ ip = ‘1.1.1.1’ port = 8080 # Настройка proxy proxies = { ‘http’: f‘http://{username}:{password}@{ip}:{port}’, ‘https’: f‘http://{username}:{password}@{ip}:{port}’, } # API возвращает наш IP url = ‘https://api.ipify.org?format=json’ # Выполняем запрос response = requests.post(url, proxies=proxies) # Мы обращаемся к API, так что ответ будет в JSON. print(response.json()) |
Как результат мы получим IP-адрес от приватных прокси которых мы купили. Есть proxy для которых не нужно указывать логин и пароль, но в случае приватных прокси — их указывать нужно.
Манипуляция тегами через BeautifulSoup
Атрибут name тега дает его название, а атрибут text — его текстовое содержание.
|
from bs4 import BeautifulSoup # Открываем HTML файл для чтения. with open(‘index.html’, ‘r’) as f: contents = f.read() soup = BeautifulSoup(contents, ‘lxml’) print(f‘HTML: {soup.h2}, имя: {soup.h2.name}, содержимое: {soup.h2.text}’) |
В приведенном примере кода выводится HTML, имя и содержимое из тега <h2>.
Полученный результат:
|
HTML: <h2>Операционные системы</h2>, имя: h2, содержимое: Операционные системы |
Обход HTML-дерева используя BeautifulSoup
С помощью метода recursiveChildGenerator мы обходим HTML-документ.
|
from bs4 import BeautifulSoup with open(‘index.html’, ‘r’) as f: contents = f.read() soup = BeautifulSoup(contents, ‘lxml’) for child in soup.recursiveChildGenerator(): if child.name: print(child.name) |
Пример пробегает по дереву документа и печатает имена всех HTML-тегов.
Полученный результат:
|
html head title meta body h2 ul li li li li li p p |
В HTML-документе у нас есть эти теги.
Обход дочерних элементов
С помощью атрибута children мы можем получить дочерние элементы тега.
|
from bs4 import BeautifulSoup with open(‘index.html’, ‘r’) as f: contents = f.read() soup = BeautifulSoup(contents, ‘lxml’) root = soup.html root_childs = [e.name for e in root.children if e.name is not None] print(root_childs) |
Обход потомков элемента
С помощью атрибута descendants мы получаем всех потомков (детей всех уровней) тега.
|
from bs4 import BeautifulSoup with open(‘index.html’, ‘r’) as f: contents = f.read() soup = BeautifulSoup(contents, ‘lxml’) root = soup.body root_childs = [e.name for e in root.descendants if e.name is not None] print(root_childs) |
Пример извлекает все потомки тега <body>.
Полученный результат:
|
[‘h2’, ‘ul’, ‘li’, ‘li’, ‘li’, ‘li’, ‘li’, ‘p’, ‘p’] |
Это все потомки тега <body>.
Открываем сайт для парсинга через Requests + BeautifulSoup
Requests — это простая HTTP библиотека для Python. Она предоставляет методы для доступа к веб-ресурсам через HTTP запросы.
|
from bs4 import BeautifulSoup import requests as req resp = req.get(‘http://webcode.me’) soup = BeautifulSoup(resp.text, ‘lxml’) print(soup.title) print(soup.title.text) print(soup.title.parent) |
Этот пример извлекает заголовок из простой веб-страницы. Он также выводит информацию о родительском тега <title>.
|
resp = req.get(‘http://webcode.me’) soup = BeautifulSoup(resp.text, ‘lxml’) |
Мы получаем HTML исходный код страницы.
|
print(soup.title) print(soup.title.text) print(soup.title.parent) |
Мы получаем HTML-код заголовка <title>, его текст и HTML-код его родителя.
Полученный результат:
|
<title>My html page</title> My html page <head> <meta charset=«utf-8»/> <meta content=«width=device-width, initial-scale=1.0» name=«viewport»/> <link href=«format.css» rel=«stylesheet»/> <title>My html page</title> </head> |
Красивое структурирование HTML кода
С помощью метода prettify мы можем «красиво» структурировать исходный HTML-код.
|
from bs4 import BeautifulSoup import requests as req resp = req.get(‘http://webcode.me’) soup = BeautifulSoup(resp.text, ‘lxml’) print(soup.prettify()) |
Полученный результат:
|
1 2 3 4 5 6 7 8 9 10 11 12 13 14 15 16 17 18 |
<!DOCTYPE html> <html lang=«en»> <head> <meta charset=«utf-8»/> <meta content=«width=device-width, initial-scale=1.0» name=«viewport»/> <title> My html page </title> </head> <body> <p> Today is a beautiful day. We go swimming and fishing. </p> <p> Hello there. How are you? </p> </body> </html> |
Поиск HTML-элементов по ID
С помощью метода find мы можем находить элементы по различным признакам, включая id элемента.
|
from bs4 import BeautifulSoup with open(‘index.html’, ‘r’) as f: contents = f.read() soup = BeautifulSoup(contents, ‘lxml’) print( soup.find(‘ul’, {‘id’: ‘mylist’}) ) |
Данный пример кода находит тег ul, который имеет id mylist.
Поиск всех HTML-элементов по названию
С помощью метода find_all мы можем найти все элементы, которые соответствуют некоторым критериям.
|
from bs4 import BeautifulSoup with open(‘index.html’, ‘r’) as f: contents = f.read() soup = BeautifulSoup(contents, ‘lxml’) for tag in soup.find_all(‘li’): print(f‘{tag.name}: {tag.text}’) |
Пример кода находит и выводит все теги li.
|
li: Solaris li: FreeBSD li: Debian li: NetBSD li: Windows |
Метод find_all может принимать список с названиями элементов для поиска.
|
from bs4 import BeautifulSoup with open(‘index.html’, ‘r’) as f: contents = f.read() soup = BeautifulSoup(contents, ‘lxml’) tags = soup.find_all([‘h2’, ‘p’]) for tag in tags: print(‘ ‘.join(tag.text.split())) |
Пример находит все элементы <h2> и <p> и выводит их содержимое.
Метод find_all также может принимать функцию, которая определяет, какие элементы должны быть возвращены.
|
from bs4 import BeautifulSoup def myfun(tag): return tag.is_empty_element with open(‘index.html’, ‘r’) as f: contents = f.read() soup = BeautifulSoup(contents, ‘lxml’) tags = soup.find_all(myfun) print(tags) |
В примере выводятся пустые элементы.
|
[<meta charset=«utf-8»/>] |
Единственным пустым элементом в документе является <meta>.
Также можно найти элементы с помощью регулярных выражений.
|
import re from bs4 import BeautifulSoup with open(‘index.html’, ‘r’) as f: contents = f.read() soup = BeautifulSoup(contents, ‘lxml’) strings = soup.find_all(string=re.compile(‘BSD’)) for txt in strings: print(‘ ‘.join(txt.split())) |
Пример выводит содержимое элементов, которые содержат строку BSD.
|
FreeBSD NetBSD FreeBSD is an advanced computer operating system used to power modern servers, desktops, and embedded platforms. |
Поиск HTML-элементов по CSS-селектору
С помощью методов select и select_one мы можем использовать некоторые селекторы CSS для поиска элементов.
|
from bs4 import BeautifulSoup with open(‘index.html’, ‘r’) as f: contents = f.read() soup = BeautifulSoup(contents, ‘lxml’) print(soup.select(‘li:nth-of-type(3)’)) |
В этом примере используется CSS селектор для вывода HTML кода третьего элемента <li>.
Это третий элемент <li>.
Символ # используется в CSS для выбора тегов по их id-атрибутам.
|
from bs4 import BeautifulSoup with open(‘index.html’, ‘r’) as f: contents = f.read() soup = BeautifulSoup(contents, ‘lxml’) print( soup.select_one(‘#mylist’) ) |
В примере выводится элемент, имеющий идентификатор mylist.
|
<ul id=«mylist» style=«width:150px»> <li>Solaris</li> <li>FreeBSD</li> <li>Debian</li> <li>NetBSD</li> <li>Windows</li> </ul> |
Создание и добавление тега в тело другого тега
Метод append добавляет новый тег в HTML-документ.
|
from bs4 import BeautifulSoup with open(‘index.html’, ‘r’) as f: contents = f.read() soup = BeautifulSoup(contents, ‘lxml’) newtag = soup.new_tag(‘li’) newtag.string = ‘OpenBSD’ ultag = soup.ul ultag.append(newtag) print( ultag.prettify() ) |
В этом примере добавляется новый тег <li>.
|
newtag = soup.new_tag(‘li’) newtag.string = ‘OpenBSD’ |
Сначала мы создаем новый тег с помощью метода new_tag.
Получаем ссылку на тег <ul>.
Мы добавляем только что созданный тег в тело тега <ul>.
Выводим содержимое тега в «красивом» оформлении HTML кода.
Вставка тега в определенном месте
Метод insert вставляет тег в заданное место.
|
from bs4 import BeautifulSoup with open(‘index.html’, ‘r’) as f: contents = f.read() soup = BeautifulSoup(contents, ‘lxml’) newtag = soup.new_tag(‘li’) newtag.string = ‘OpenBSD’ ultag = soup.ul ultag.insert(2, newtag) print( ultag.prettify() ) |
В этом примере созданный тег <li> вставляется на третью позицию в тело тега <ul>.
Замена текста в HTML элементе
Метод replace_with заменяет текст внутри элемента.
|
from bs4 import BeautifulSoup with open(‘index.html’, ‘r’) as f: contents = f.read() soup = BeautifulSoup(contents, ‘lxml’) tag = soup.find(text=‘Windows’) tag.replace_with(‘OpenBSD’) print( soup.ul.prettify() ) |
В этом примере конкретный элемент найден с помощью метода find, а его содержимое заменено с помощью метода replace_with.
Удаление HTML элемента
Метод decompose удаляет тег из HTML-документа и уничтожает его.
|
from bs4 import BeautifulSoup with open(‘index.html’, ‘r’) as f: contents = f.read() soup = BeautifulSoup(contents, ‘lxml’) ptag2 = soup.select_one(‘p:nth-of-type(2)’) ptag2.decompose() print( soup.body.prettify() ) |
В данном примере удаляется второй элемент <p>.
В этом учебнике мы работали с Python библиотекой BeautifulSoup.

Являюсь администратором нескольких порталов по обучению языков программирования Python, Golang и Kotlin. В составе небольшой команды единомышленников, мы занимаемся популяризацией языков программирования на русскоязычную аудиторию. Большая часть статей была адаптирована нами на русский язык и распространяется бесплатно.
E-mail: vasile.buldumac@ati.utm.md
Образование
Universitatea Tehnică a Moldovei (utm.md)
- 2014 — 2018 Технический Университет Молдовы, ИТ-Инженер. Тема дипломной работы «Автоматизация покупки и продажи криптовалюты используя технический анализ»
- 2018 — 2020 Технический Университет Молдовы, Магистр, Магистерская диссертация «Идентификация человека в киберпространстве по фотографии лица»
Цель: Создание полноценного сайта с простых шаблонов
-
Создание простых страниц на HTML
-
Изменение ссылок внутри проекта
-
Введение динамических и статических элементов страницы
В этой части курса мы научимся выводить полноценные html-страницы. Так как, мы хотим создать шаблон страниц, а не просто одну страницу, мы должны прибегнуть к полноценной вёрстке на Python. Для этого, в папке нашего приложения blog, нужно создать папку templates. Название папки зарезервировано плагином Django, так как Django каждый раз собирает наши файлы и с нуля отрисовывает страницу. При сборке сайта, джанго обращается к папкам и файлам с конкретными названиями.

Теперь, в папке templates, нам нужно создать ещё одну папку, которая точно также называется, как и приложение, то есть в нашем случае – blog.
Почему именно так? Дело в том, что Django собирает все папки в единую папку templates. Сейчас у нас одно приложение – blog, но если бы у нас было бы ещё несколько приложений, то в папке templates был бы хаос из файлов. Несмотря на то, что у нас одно приложение, мы будем писать сайт с правилами хорошего тона в программировании.
Теперь в папке blog, создадим файлы home.html и contacts.html

Как мы видим, файлы у нас не пусты.
Настроим PyCharm. Нам потребуется плагин для работы с html-файлами. Плагин называется – Emmet.
Переходим в IDE по следующей ветке: File -> Settings

В панели поиска напишем название нашего плагина


Обычно, он установлен по умолчанию и находится во вкладке Editor. Если его у вас нет, нажмите кнопку Install в появляющемся после запроса окне.
Как мы видим, плагин будет реагировать на кнопку “Tab”. Это нам и нужно. Нажимаем ОК и возвращаемся к файлам html.

Весь текст набрался самостоятельно
Не меняем ничего, кроме двух пунктов.
-
1.
Удалим в поле
<title>слово “Documents” -
2.
В теле введём заголовок
<h2>
Результат (contacts.html):
<meta name=«viewport« content=«width=device-width, user-scalable=no, initial-scale=1.0, maximum-scale=1.0, minimum-scale=1.0«>
<meta http-equiv=«X-UA-Compatible« content=«ie=edge«>
<h2>Контакты работают иначе</h2>
Теперь, чтобы шаблоны были доступны, необходимо в главном файле настройки проекта – settings.py в установленных приложениях (INSTALLED_APPS) ввести наше приложение – blog.
Сделаем тоже самое для главной страницы.
<meta name=«viewport« content=«width=device-width, user-scalable=no, initial-scale=1.0, maximum-scale=1.0, minimum-scale=1.0«>
<meta http-equiv=«X-UA-Compatible« content=«ie=edge«>
<h2>Ура! Главная страница поменялась</h2>
Переходим к файлу настроек и вписываем туда строку:
Таким образом, мы вводим приложение blog, сведения о котором хранятся в файле apps и обращаемся к функции BlogConfig.
‘django.contrib.contenttypes’,
‘django.contrib.sessions’,
‘django.contrib.messages’,
‘django.contrib.staticfiles’,
Взглянем на файл apps.py в проекте сайта.
from django.apps import AppConfig
class BlogConfig(AppConfig):
Остался последний шаг – настроить vievs.py. Сейчас там прописаны функции – HttpResponse, то есть ответы через http. Это неправильно. Сайт будет работать на html вёрстке и нам нужно не выдавать http ответы, а обращаться к html шаблонам. Исправляем:
from django.shortcuts import render
from django.http import HttpResponse
return render(request, ‘blog/home.html’)
return render(request, ‘blog/contacts.html’)
Обратите внимание на сигналы PyCharm:

Строка с импортом библиотеки HttpResponse стала серой. Это знак того, что мы не использовали в фале программы эту библиотеку. Её можно удалить.
Помимо прочего, появилось зелёные ярлычки слева. Это знак, что мы обращаемся к нашему html-файлу. Если навести на него курсор, отобразиться имя файла, а если кликнуть по нему, мы перейдём в этот файл.

Запускаем сервер и проверяем как всё работает:


Создаём html-страницы с динамическими данными
Создаём html-страницы с динамическими данными
Теперь научимся передавать динамические данные. Это – заготовка под базы данных, которыми мы потом будем пользоваться.
Перейдём в файл views.py.
Написав немного кода, я изменил файл так:
from django.shortcuts import render
‘title’: ‘Первая запись’,
‘text’: ‘Много-много текста’,
‘title’: ‘Вторая запись’,
‘text’: ‘Снова много-много текста’,
‘title’: ‘Главная страница’
return render(request, ‘blog/home.html’, data)
return render(request, ‘blog/contacts.html’)
Построчно разберём что к чему. Создан список news, состоящий из 2 записей. Каждая запись – это словарь. В каждом словаре по 4 элемента. В функции отрисовки главной страницы, я добавил переменную data, которая создаёт словарь news и вызывает в него созданный список новостей. Плюс к этому, в data мы вызывает ещё один объект – заголовок страницы (title). В самом же рендере, мы добавили переменную в конце и вызываем её.
Теперь перейдём в html-файл нашей главной страницы (home.html)
Снова написав немного кода, получаем следующее:
<meta name=«viewport« content=«width=device-width, user-scalable=no, initial-scale=1.0, maximum-scale=1.0, minimum-scale=1.0«>
<meta http-equiv=«X-UA-Compatible« content=«ie=edge«>
<title>{{ title }}</title>
<h1>{{ post.title }}</h1>
{% if post.author == ‘Валерий’ %}
<p>Автор: {{ post.author }}</p>
<p>Дата: {{ post.date }}</p>
В поле мы вызываем нужную нам строку – «Главная страница». В теле мы используем 2 конструкции:
Так как, мы пишем вёрстку на Python в html-файле, конструкции используются при помощи такой конфигурации: {% %}
Если бы мы писали тот же код, но на чистом питоне, выглядел бы он так:
if post.author == ‘Валерий’:
print(‘Автор: ‘, post.author)
print(‘Дата: ‘, post.data)
Посмотрите основные отличия:
-
Отсутствие двоеточий после for и if, но наличие конструкции endfor и endif
-
Добавлена разметка html, то есть <p>, <h2> и т.п.
-
Отсутствие кавычек и слова «print»
Запустим сервер и посмотрим на результат:

Подредактируем ещё немного файл views.py. Допустим, нам нужно вывести только заголовок (title), а остаток кода не менять и не выводить все новости (data). В таком случае, сделаем следующую конструкцию:
return render(request, ‘blog/contacts.html’, {‘title’: ‘Страничка про МИИГАиК’})
А в файл contacts.html выглядит теперь так:
<meta name=«viewport« content=«width=device-width, user-scalable=no, initial-scale=1.0, maximum-scale=1.0, minimum-scale=1.0«>
<meta http-equiv=«X-UA-Compatible« content=«ie=edge«>
<title>{{ title }}</title>
<h2>Контакты работают иначе</h2>

Теперь давайте сравним 2 файла home.html и contacts.html. Что в них отличается?
Единственный блок, который у них отличается – тело, а «шапка» (верхняя часть сайта) и «подвал» (нижняя часть сайта) остаются одинаковыми. Конечно, нам не будет интересно переписывать один и тот же код на каждой странице. Давайте исправим это неудобство.
Создадим рядом с файлами home.html и contacts.html файл main.html и пишем в него следующий код:
<meta name=«viewport« content=«width=device-width, user-scalable=no, initial-scale=1.0, maximum-scale=1.0, minimum-scale=1.0«>
<meta http-equiv=«X-UA-Compatible« content=«ie=edge«>
<title>{{ title }}</title>
То есть, мы можем скопировать весь код с любого из html-файла и в теле сайта записать блочную конструкцию:
Перейдём в файл contacts.html и перепишем его таким образом:
{% extends ‘blog/main.html’ %}
<h2>Контакты работают иначе</h2>
{% endblock main_section %}
То есть, мы обращаемся к файлу blog/main.html и из него берём всё, что было до блока, пишем блок (тело страницы) и забираем всё, что нужно после. Повторяем операцию с файлом home.html.
{% extends ‘blog/main.html’ %}
<h1>{{ post.title }}</h1>
{% if post.author == ‘Валерий’ %}
<p>Автор: {{ post.author }}</p>
<p>Дата: {{ post.date }}</p>
{% endblock main_section %}
Проверяем и видим тоже самое. Давайте теперь напишем какую-нибудь глобальную фразу в main.html. Например, так:
<meta name=«viewport« content=«width=device-width, user-scalable=no, initial-scale=1.0, maximum-scale=1.0, minimum-scale=1.0«>
<meta http-equiv=«X-UA-Compatible« content=«ie=edge«>
<title>{{ title }}</title>
<h1>МИИГАиК — лучший ВУЗ!</h1>


Теперь эта фраза нас преследует везде и на каждой странице. Сейчас это изменение можно убрать, так как нам ещё предстоит много работы со станицами.
513 / 145 / 27
Регистрация: 18.04.2015
Сообщений: 1,872
Записей в блоге: 15
08.02.2019, 12:43
[ТС]
10
m0nte-cr1st0, да, все правильно.
Сначала преобразовываем .split(), а затем уже работаем со строкой
Кликните здесь для просмотра всего текста
| Python | ||
|
| Python | ||
|
Так, увидеть измененную страницу не получается. Я понимаю, что пытаюсь передавать объект открытого файла,
и очевидно, нужно в функции get_html создать переменную, которая будет содержать «всю измененную страницу.
Как? =) Ведь за пределами блока with файл закрыт.
Добавлено через 38 минут
* * *
При таком раскладе
Кликните здесь для просмотра всего текста
| Python | ||
|
результатом работы функции возвращается не отредактированный текст
Добавлено через 56 минут
проще говоря — после выполнения функции, нужен новый файл с изменениями проведенными в цикле
Добавлено через 1 час 21 минуту
https://www.cyberforum.ru/pyth… 20740.html вот похожая тема
0
Я действительно новичок в Python. В настоящее время я работаю над назначением для создания HTML файла с использованием python. Я понимаю, как читать HTML файл в python, а затем редактировать и сохранять его.
table_file = open('abhi.html', 'w')
table_file.write('<!DOCTYPE html><html><body>')
table_file.close()
Проблема с вышеприведенной частью заключается в том, что она просто заменяет весь HTML файл и помещает строку в write(). Как я могу отредактировать файл и сохранить его содержимое без изменений. Я имею в виду, пишу что-то вроде этого, но внутри тегов тела
<link rel="icon" type="image/png" href="img/tor.png">
Мне нужна ссылка, чтобы автоматически перейти между открытием и закрытием тегов тела.
12 фев. 2016, в 06:23
Поделиться
Источник
2 ответа
Вероятно, вы хотите прочитать на BeautifulSoup:
import bs4

# load the file
with open("existing_file.html") as inf:
    txt = inf.read()
    soup = bs4.BeautifulSoup(txt)

# create new link
new_link = soup.new_tag("link", rel="icon", type="image/png", href="img/tor.png")
# insert it into the document
soup.head.append(new_link)

# save the file again
with open("existing_file.html", "w") as outf:
    outf.write(str(soup))
Учитывая такой файл, как
<html>
<head>
  <title>Test</title>
</head>
<body>
  <p>What up, Doc?</p>
</body>
</html>
это производит
<html>
<head>
<title>Test</title>
<link href="img/tor.png" rel="icon" type="image/png"/></head>
<body>
<p>What up, Doc?</p>
</body>
</html>
(обратите внимание: он перепутал пробел, но получил правильную структуру html).
Hugh Bothwell
12 фев. 2016, в 06:36
Поделиться
Ещё вопросы
- 1Проверка периода времени
- 1Приложение не может выполнить вход с помощью Office 365 API при развертывании для тестирования
- 0Функция маршрутизации и перенаправления ZF2 в контроллере
- 1Как мне зашифровать App.config для Azure WebJob?
- 0Добавьте другую функцию jQuery к каждой кнопке в том же классе
- 0Расчет вероятности испытаний C ++ Бернулли
- 0Как применить темы к HTML внутри метода append ()
- 0Как предотвратить создание нового rand () после cin в c?
- 0Что я делаю неправильно, загружая этот массив JS?
- 1Python не может сравнивать даты в датах [дубликаты]
- 0ImageMagick: составное изображение за секунду
- 0angular — как я могу разобрать параметры запроса из отдельной строки
- 0Как установить значение высоты div динамически?
- 0Странный сегфо с tinyxml2
- 1Есть ли способ перехватить отмененные запросы, используя хар-прокси?
- 0Allegro al_load_ttf_font не может найти файл
- 0Как получить обновленные данные ($ scope) после изменения местоположения с помощью $ window.location
- 0С ++ Шаблонный Функтор
- 0Компилятор Intel: что означает ошибка «неизвестный тип в IL-обходе»?
- 0Не могу найти строку char * в моем коде
- 1производительность и объем памяти функций стрелок
- 0Как произвести следующую последовательность чисел через php для оператора
- 0Создайте границу для элемента наложения как дочерний элемент родителя с динамической шириной и высотой
- 1Как расположить кнопки в JFrame в Java?
- 0Показывать окно оповещения, когда пользователь выбирает неприемлемый файл в плагине danialfarid / ng-file-upload
- 1Как заставить JTabbedPane не перехватывать привязку клавиш Ctrl + Tab?
- 1Как сделать границу вокруг ттк.OptionMenu
- 1Как получить доступ к элементам родительской формы из дочерней формы?
- 1Vue.js: передача внешней переменной компоненту через инициализацию?
- 0LNK2019: неразрешенный внешний символ в функции
- 1Лучший способ создавать XML во время выполнения
- 1Получить один индекс из мультииндексированного фрейма данных
- 0Смешивание отформатированных входных экстракторов с getline приводит к слипанию отображения cout
- 1EventWaithandle против while (true) Thread.Sleep
- 0Выравнивание текста в верхнем правом углу ячейки таблицы без CSS?
- 0Фильтровать модель, когда есть нумерация страниц
- 0Диалог JQuery UI отключен в IE10
- 0Вызов определенной функции из библиотеки Windows
- 0загрузить представление в div с помощью jquery
- 0Директива AngularJS: контроллер или ссылка?
- 0Компилятор Clang ++ — аналог для Python
- 0Проблема с функцией ftp_put (). получать предупреждение. Как это исправить?
- 0нет ошибки вызова соответствующей функции
- 0Получение изменений базы данных Mysql и загрузка файлов
- 0Как обновить общую длину поля в таблице для базы данных MYSQL для всех таблиц?
- 0C ++ функция, которая заполняет массив
- 1Невозможно получить открытые сеансы, кроме текущего клиента, в веб-сокете Java.
- 0проблема с выбором данных из базы данных
- 1Логи Python не сохраняются
- 0Проверка подлинности AngularJS и Rails
