![]()
Apache (сейчас Apache 2) до сих пор является WEB-сервером по умолчанию и большинство хостингов ставит его единственным HTTP-сервером. Однако, с появлением NGiNX ситуация поменялась, и на 80-м порту предполагается наличие более шустрого NGiNX тогда, как более навороченный Apache ставится уже за ним с тем, чтобы обрабатывать сложные запросы по сборке динамических страниц «на лету». А вся статика (типа картинок, JavaScript и CSS-файлов) отдаётся быстро и сразу NGiNX’ом. Так как порт 80 для всех браузеров до сих пор остался портом для http-запросов, то на этом порту на сервере должен стоять NGiNX, а Apache, как правило, вешается на дополнительный для http порт 8080. В этой статье рассмотрим, как поменять настройки Apache на сервере так, чтобы он отвечал с порта 8080, освободив 80-й порт для NGiNX.
ports.conf — основной файл конфигурации портов WEB-сервера Apache
В предыдущей статье было подробно разобрано, как найти директорию на сервере с файлами конфигурации Apache на удалённом сервере. В этой же директории должен располагаться файл ports.conf, в котором прописаны порты, с которыми работает Apache.
Содержимое файла ports.conf по умолчанию
Файл ports.conf имеет следующее содержимое сразу после установки Apache на сервер:
# If you just change the port or add more ports here, you will likely also
# have to change the VirtualHost statement in
# /etc/apache2/sites-enabled/000-default.conf

Listen 80

<IfModule ssl_module>
	Listen 443
</IfModule>

<IfModule mod_gnutls.c>
	Listen 443
</IfModule>

# vim: syntax=apache ts=4 sw=4 sts=4 sr noet
Как видим, Апач действительно слушает 80-й порт при http-запросе, а при https-запросе — порт 443.
Меняем http-порт 80 Apache на 8080
Для того, чтобы Apache перестал занимать 80-й порт, а стал отвечать с 8080-порта,
- в файле
ports.confнужно- поменять строку
Listen 80 - на строку
Listen 8080
- поменять строку
- перезапустить Apache командой
apachectl -k restart
Проверяем смену http-порта Apache на 8080
Если раньше сайт отвечал на запрос в браузере:
http://mysite.ru/то после описанных выше манипуляций, сайт по этому запросу становится недоступным. Для того, чтобы увидеть сайт, нужно обратиться к порту 8080 на сервере, указав это в явном виде в строке запроса браузера:
http://mysite.ru:8080/Резюме
Таким образом можно освободить 80-й порт, перепрописав его для Apache на порт 8080.
Если на сервере несколько сайтов, то для каждого виртуального хоста в папке /etc/apache2/sites-available нужно прописать порт 8080 вместо 80:
<VirtualHost 127.0.0.1:8080>И, конечно, перезагрузить Апач.
Если NGiNX ещё не установлен, остановим Apache командой
P.S.
Перед перезагрузкой Апача полезно проверять на косячность правок его конфигов командой apachectl stop. Включим после того, как установим NGiNX.
[email protected]:~# apachectl -t
Syntax OK
Так должна выглядеть проверка синтаксиса конфигурации Apache.
После этого можно перезагрузить NGiNX и убедиться в правильности работы обоих серверов на портах 80 и 8080 (читать по → этой ссылке).
Заберите ссылку на статью к себе, чтобы потом легко её найти!
Выберите, то, чем пользуетесь чаще всего:
The Apache HTTP server is one of the internet’s most popular web servers today, thanks to its versatility, consistency, and a plethora of features, some of which are actually not available on other web servers, such as Nginx’s competitor. Some of Apache’s most significant features include the ability to load and run various types of modules and special configurations at runtime, without actually stopping the server or, worse, compiling the program whenever most of the new module is installed, and the special role played by .htaccess files that can modify web server configurations specific to webroot directories.
- By default, the Apache webserver is instructed to listen and bind on port 80.0 for incoming connections. If you opt for a TLS setup, the server listens on port 443 for stable connections.
- You need to add a new statement containing the new port for future bindings in order to instruct the Apache webserver to connect and listen to web traffic on ports other than normal web ports.
- The configuration file that needs to be changed on a Debian/Ubuntu-based device is /etc/apache2/ports.conf and update /etc/httpd/conf/httpd.conf on RHEL/CentOS-based distributions.
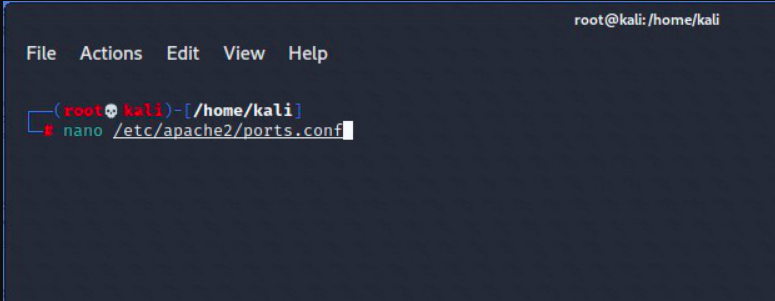
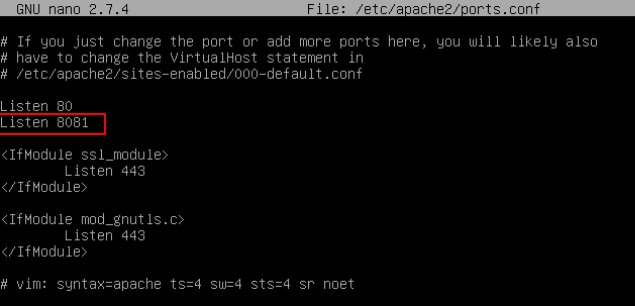
With a console text editor, open a file unique to your own distribution and add a new port comment, as seen in the excerpt below.
nano /etc/apache2/ports.conf [On Debian/Ubuntu]

Before port 8081
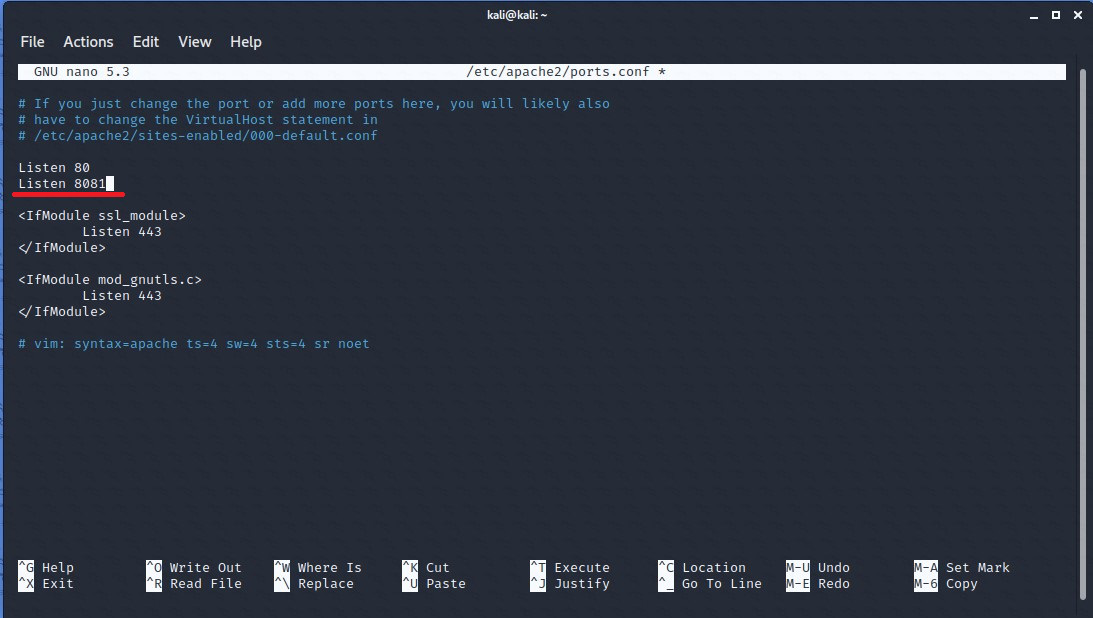
In this example, the Apache HTTP server will be configured to listen to the connections on port 8081. Make sure that you apply the statement below to this file after the directive instructing the webserver to listen on port 80, as seen in the image below.
Listen 8081
After port 8081
After you have added the above line, to start the binding method, unique to your own vhost requirements, you need to build or change an Apache virtual host in the Debian/Ubuntu-based distribution.
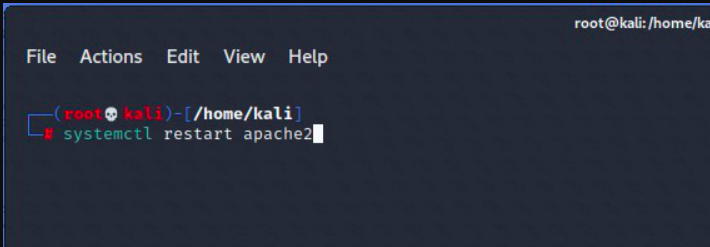
Finally, to implement the changes and connect Apache to a new port, restart the daemon.
# systemctl restart apache2
Then use the netstat or ss command to search the local network sockets table.
# netstat -tlpn| grep apache

OR
# ss -tlpn| grep apache

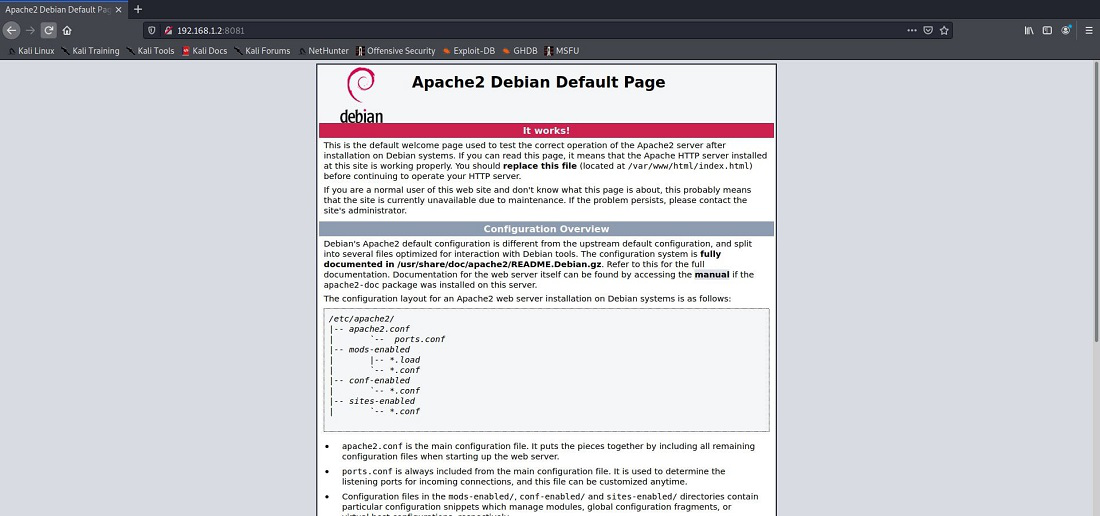
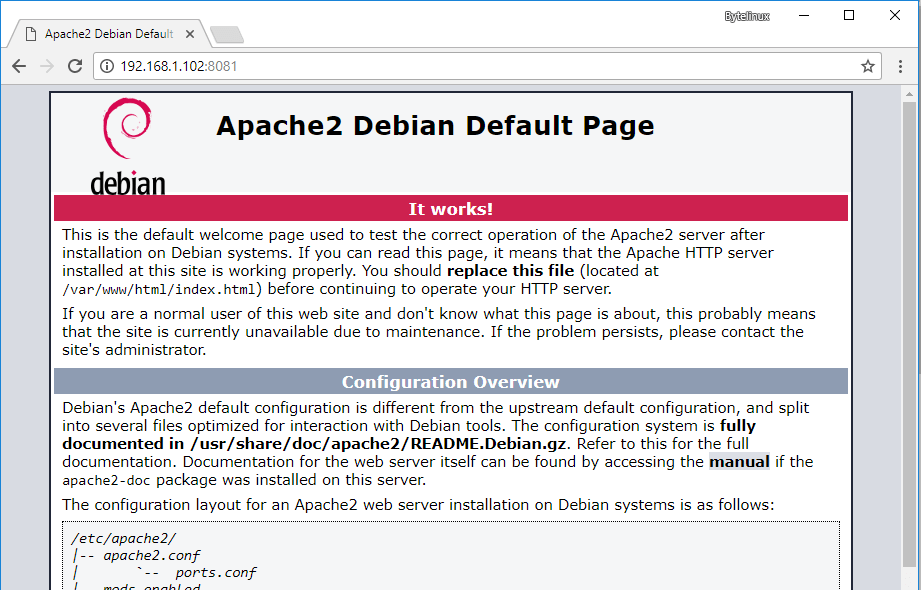
You can also open a window and navigate to the IP address or domain name on port 8081 of your computer. The default Apache page in the browser should be shown. If you are unable to access the webpage, however, go back to the server console and make sure that the correct firewall rules are configured to allow port traffic.
http://server.ip:8081
The Apache HTTP server is one of the internet’s most popular web servers today, thanks to its versatility, consistency, and a plethora of features, some of which are actually not available on other web servers, such as Nginx’s competitor. Some of Apache’s most significant features include the ability to load and run various types of modules and special configurations at runtime, without actually stopping the server or, worse, compiling the program whenever most of the new module is installed, and the special role played by .htaccess files that can modify web server configurations specific to webroot directories.
- By default, the Apache webserver is instructed to listen and bind on port 80.0 for incoming connections. If you opt for a TLS setup, the server listens on port 443 for stable connections.
- You need to add a new statement containing the new port for future bindings in order to instruct the Apache webserver to connect and listen to web traffic on ports other than normal web ports.
- The configuration file that needs to be changed on a Debian/Ubuntu-based device is /etc/apache2/ports.conf and update /etc/httpd/conf/httpd.conf on RHEL/CentOS-based distributions.
With a console text editor, open a file unique to your own distribution and add a new port comment, as seen in the excerpt below.
nano /etc/apache2/ports.conf [On Debian/Ubuntu]
Before port 8081
In this example, the Apache HTTP server will be configured to listen to the connections on port 8081. Make sure that you apply the statement below to this file after the directive instructing the webserver to listen on port 80, as seen in the image below.
Listen 8081
After port 8081
After you have added the above line, to start the binding method, unique to your own vhost requirements, you need to build or change an Apache virtual host in the Debian/Ubuntu-based distribution.
Finally, to implement the changes and connect Apache to a new port, restart the daemon.
# systemctl restart apache2
Then use the netstat or ss command to search the local network sockets table.
# netstat -tlpn| grep apache
OR
# ss -tlpn| grep apache
You can also open a window and navigate to the IP address or domain name on port 8081 of your computer. The default Apache page in the browser should be shown. If you are unable to access the webpage, however, go back to the server console and make sure that the correct firewall rules are configured to allow port traffic.
http://server.ip:8081
Apache HTTP server is one of the most used web server in internet today, do to its flexibility, stability and a pleiad of features, some of which are not for the moment present in other web servers, such a rival Nginx.
Some of the most important features of Apache include the ability to load and run different types of modules and special configurations at runtime, without actually stopping the server or, worse, compiling the software each time a new module most be added and the special role played by .htaccess files, which can alter web server configurations specific to webroot directories.
By default, Apache web server is instructed to listen for incoming connection and bind on port 80. If you opt for the TLS configuration, the server will listen for secure connections on port 443.
In order to instruct Apache web server to bind and listen for web traffic on other ports than the standard web ports, you need to add a new statement containing the newly port for future bindings.
In Debian/Ubuntu based system, the configuration file that needs modified is /etc/apache2/ports.conf file and on RHEL/CentOS based distributions edit /etc/httpd/conf/httpd.conf file.
Open the file specific to your own distribution with a console text editor and add the new port statement as shown in the below excerpt.
# nano /etc/apache2/ports.conf     [On Debian/Ubuntu]
# nano /etc/httpd/conf/httpd.conf  [On RHEL/CentOS]
In this example we’ll configure Apache HTTP server to listen on connections on port 8081. Make sure you add the below statement in this file, after the directive that instructs the web server to listen on port 80, as illustrated in the below image.
Listen 8081

After you’ve added the above line, you need to create or alter an Apache virtual host in Debian/Ubuntu based distribution in order to start the binding process, specific to your own vhost requirements.
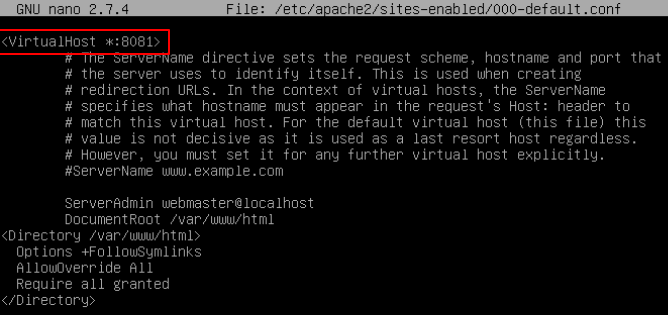
In CentOS/RHEL distributions, the change is applied directly into default virtual host. In the below sample, we’ll modify the default virtual host of the web server and instruct Apache to listen for web traffic from 80 port to 8081 port.
Open and edit 000-default.conf file and change the port to 8081 as shown in the below image.
# nano /etc/apache2/sites-enabled/000-default.conf
Finally, to apply changes and make Apache bind on the new port, restart the daemon and check local network sockets table using netstat or ss command. Port 8081 in listening should be displayed in your server network table.
# systemctl restart apache2
# netstat -tlpn| grep apache
# ss -tlpn| grep apache

You can also, open a browser and navigate to your server IP address or domain name on port 8081. The Apache default page should be displayed in browser. However, if you cannot browse the webpage, return to server console and make sure the proper firewall rules are setup to allow the port traffic.
http://server.ip:8081
On CentOS/RHEL based Linux distribution install policycoreutils package in order to add the required SELinux rules for Apache to bind on the new port and restart Apache HTTP server to apply changes.
# yum install policycoreutils
Add Selinux rules for port 8081.
# semanage port -a -t http_port_t -p tcp 8081
# semanage port -m -t http_port_t -p tcp 8081
Restart Apache web server
# systemctl restart httpd.service
Execute netstat or ss command to check if the new port successfully binds and listen for incoming traffic.
# netstat -tlpn| grep httpd
# ss -tlpn| grep httpd
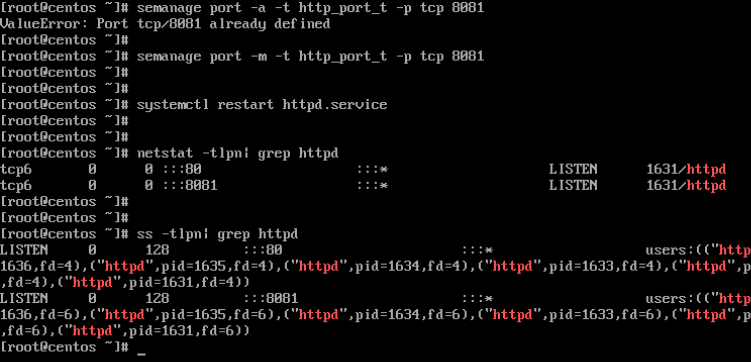
Open a browser and navigate to your server IP address or domain name on port 8081 to check is the new web port is reachable in your network.The Apache default page should be displayed in browser
http://server.ip:8081
If you cannot navigate to the above address, make sure you add the proper firewall rules in your server Firewall table.
If You Appreciate What We Do Here On TecMint, You Should Consider:
TecMint is the fastest growing and most trusted community site for any kind of Linux Articles, Guides and Books on the web. Millions of people visit TecMint! to search or browse the thousands of published articles available FREELY to all.
If you like what you are reading, please consider buying us a coffee ( or 2 ) as a token of appreciation.

We are thankful for your never ending support.
Зачем менять порт веб-сервера
Если какая-либо программа использует порт, то другой процесс уже не может использовать этот же самый порт. К примеру, если на вашем компьютере порт 80 уже занят, то Apache просто не запустится).
Ещё одной причиной, почему может возникнуть желание поменять порт — сделать ваш сервер менее заметным. К примеру, если вы не предприняли мер по защите, то любой в вашей локальной или глобальной сети может подключиться к вашему веб-серверу. Если скрипты содержат уязвимости или просто плохо настроены, то постороннее лицо может лазить по вашим локальным сайтам и, в случае удачной атаки, даже лазить по всему вашему компьютеру. Если поменять порт со стандартного 80 на какой-нибудь необычный, то сервер будет чуть труднее найти. Хотя сканеры портов всё равно смогут это сделать.
Итак, по умолчанию Apache использует 80 порт, это определяется директивой:
Listen 80
в конфигурационном файле httpd.conf.
Чтобы изменить порт, откройте этот файл и вместо 80 впишите любой другой незанятый в вашей системе:
Listen 48855
Для кого не подойдёт смена порта
Если ваш сайт предназначен быть публичным сервером и сайты должны быть доступны другим пользователям, то смена порта нежелательна, поскольку они смогут перейти на ваш сайт только по специальному адресу.
Как открыть сайт на нестандартном порту
Чтобы открыть сайт на нестандартных портах (не на 80 или 443), добавьте через двоеточие к адресу сайта порт, который прослушивает сервер:http://localhost:48855

Также можно делать ссылки такого вида: http://localhost:48855. Они являются работающими и вы можете перенаправить посетителя с одной страницы или сайта на другой, работающий на нестандартном порте.
Связанные статьи:
- Apache Forwarding — проброска портов веб-сервера (100%)
- Apache для Windows (52.4%)
- Как запустить Apache на Windows (52.4%)
- Документация по Apache на русском языке (52.4%)
- Как подключить PHP к Apache на Windows (52.4%)
- Для чего нужен веб-сервер Apache (RANDOM — 52.4%)
Изменение порта Tomcat HTTP на 80
1. обзор
По умолчанию Apache Tomcat работает на порту8080. В некоторых случаях этот порт уже может быть занят другим процессом, или в требованиях может быть указано, что мы должны использовать другой порт.
В этой быстрой статье мы покажем, как изменить HTTP-порт сервера Apache Tomcat. В наших примерах мы будем использовать порт80, хотя процесс одинаков для любого порта.
2. Конфигурация Apache Tomcat
Первым шагом в этом процессе является изменение конфигурации Apache Tomcat.
Сначала мы находим файл<TOMCAT_HOME>/conf/server.xml на нашем сервере. Затем мы находим строку, которая настраивает порт коннектора HTTP:
И меняем порт на80:
3. Изменения в системе Linux и Unix
В системах Linux и Unixport numbers below 1024 are privileged ports and are reserved for programs running as root. Если мы работаем на порту1024 или выше, то мы можем пропустить оставшуюся часть этого раздела и перейти непосредственно к запуску / перезапуску нашего сервера, как описано в разделе 4.
If we have root or sudo access, мы можем просто запустить процесс Tomcat как root, используя команду:
But if we do not have root or sudo access, нам нужно будет установить и настроитьauthbind, как описано ниже.
Note: when using a non-privileged port (1024 или выше), мы можем пропустить оставшуюся часть этого раздела и перейти непосредственно к запуску / перезапуску нашего сервера.
3.1. Установить пакетauthbind
For Linux-based systems: загрузите и установите пакетauthbind:
sudo apt-get install authbindСначалаFor MacOS systems:, загрузитеauthbind для MacOS изhere и разверните пакет. Затем перейдите в расширенный каталог для сборки и установки:
$ cd MacOSX-authbind
$ make
$ sudo make install
3.2. Включитьauthbind в Apache Tomcat
Откройте файл<TOMCAT_HOME>/conf/server.xml и раскомментируйте следующую строку:
3.3. Включить чтение и выполнение для порта
Теперь нам нужно выполнить несколько команд, чтобы разрешить чтение и выполнение для порта.
Вот пример использования Tomcat версии 8.x:
sudo touch /byport/80
sudo chmod 500 /byport/80
sudo chown tomcat8 /byport/80
Примечание: если используется Tomcat версии 6 или 7, то в последней команде мы будем использоватьtomcat6 илиtomcat7 соответственно вместоtomcat8.
3.4. Использование более старых версийauthbind
Если вы используете более старыйauthbind (version lower than 2.0.0), который не поддерживает IPv6, нам нужно будет сделать IPv4 значением по умолчанию.
Если у нас уже есть файл<TOMCAT_HOME>/bin/setenv.sh, замените:
с этой строкой:
exec authbind --deep "$PRGDIR"/"$EXECUTABLE" start "[email protected]"и затем добавьте следующую строку:
export CATALINA_OPTS="$CATALINA_OPTS -Djava.net.preferIPv4Stack=true"Если у нас еще нет файла<TOMCAT_HOME>/bin/setenv.sh, создайте его, используя:
exec authbind --deep "$PRGDIR"/"$EXECUTABLE" start "[email protected]"
export CATALINA_OPTS="$CATALINA_OPTS -Djava.net.preferIPv4Stack=true"
4. Перезагрузите сервер
Теперь, когда мы внесли все необходимые изменения в нашу конфигурацию, мы можем запустить или перезапустить сервер Tomcat и получить к нему доступ через порт80.
5. Заключение
В этой статье мы показали, как изменить порт Apache Tomcat с8080 по умолчанию на порт80. Стоит отметить, что этот процесс одинаков для версий Tomcat6.x,7.x и8.x.
Table of Contents
- 1. Why change Apache Port
-
2. Checking port availability
- 2.1. NetStat command on windows
- 2.2. XAMPP’s in-built NetStat tool
- 2.3. Windows Resource Monitor
-
3. Changing Apache HTTP port
- 3.1. HTTP Listen Port
- 3.2. HTTP ServerName and Port
-
4. Changing Apache HTTPS (SSL) Port
- 4.1. HTTPS Listen Port
- 4.2. HTTPS ServerName and Port
- 4.3. VirtualHost Directive for httpd-ssl
-
5. Changing Ports for VirtualHosts
- 5.1. HTTP Virtual Host URL
- 5.2. HTTPS (SSL) Virtual Host URL
- 6. Changing HTTP/HTTPS in XAMPP Panel
1. Why change Apache Port
By Default, Apache runs HTTP on port 80 and SSL on port 443 in XAMPP. Generally, you may need to change the port number for the following reasons :
- For customized network design.
- For security purposes.
- For resolving port conflicts with other applications.
For example, users commonly report a conflict between Skype and Apache both using port 80.
2. Checking port availability
Before you proceed, you should make sure that you have an available port and that the port you are choosing is free and not already occupied. Here is a list of a couple of tools you can use to find the status of ports on your localhost.
2.1. NetStat command on windows
On windows, you can use ‘netstat’ command to list active networks (incoming and outgoing) connections and listening ports. You can use the command with the following switches to print port status for your localhost:
netstat -ano- “a” will display all connections and listening ports.
- “o” will show the owning process ID that is related to each of the connections.
- “n” will show the addresses and port numbers as numerals.

2.2. XAMPP’s in-built NetStat tool
If you prefer, you can use the ‘NetStat’ tool built inside the XAMPP itself. Behind the scene, it probably uses the same windows command and the output is almost the same as the native ‘NetStat’ command in windows.
2.3. Windows Resource Monitor
The third option if you prefer is the windows ‘Resource Monitor’. You can launch the ‘Resource Monitor’ via the ‘Task Manager’ as shown in the below screenshot. Once you have launched ‘Resource Monitor’, you can view the port availability status under the ‘Listening Ports’ tab.
3. Changing Apache HTTP port
Edit the ‘httpd.conf’ file usually located inside “XAMPPapacheconf” on windows and make the following changes.
3.1. HTTP Listen Port
Current configuration
Listen 80
New configuration
Listen 8081
3.2. HTTP ServerName and Port
Current configuration
ServerName localhost:80
New configuration
ServerName localhost:8081
4. Changing Apache HTTPS (SSL) Port
Edit the ‘http-ssl.conf’ file usually located inside “XAMPPapacheconfextra” on windows and make the following changes
4.1. HTTPS Listen Port
Current configuration
Listen 443
New configuration
Listen 8082
4.2. HTTPS ServerName and Port
Current configuration
ServerName www.example.com:443
New configuration
ServerName www.example.com:8082
4.3. VirtualHost Directive for httpd-ssl
Current configuration
VirtualHost default:443
New configuration
VirtualHost default:8082
5. Changing Ports for VirtualHosts
Edit the ‘httpd-vhosts.conf’ file usually located inside “XAMPPapacheconfextra” on windows and make the following changes:
5.1. HTTP Virtual Host URL
Current configuration
VirtualHost *: 80
New configuration
VirtualHost *: 8081
5.2. HTTPS (SSL) Virtual Host URL
Current configuration
VirtualHost *: 443
New configuration
VirtualHost *: 8082
6. Changing HTTP/HTTPS in XAMPP Panel
Now, we need to also update the above port numbers in XAMPP configuration, so that both XAMPP and Apache are able to communicate over the right port numbers. For this, do the following:
Launch XAMPP Configuration from XAMPP Control Panel
From the ‘Configuration of Control Panel’ window click ‘Service and Port Settings to launch ‘Service Setting’
On the ‘Service Settings’ window, enter Main Port and SSL Port number as set in previous steps. In our example here these would be Main Port: 8081 and SSL Port 8082.
Make HTTP and HTTPS port changes Click Save to save service settings
RESTART THE APACHE SERVICE! DONE!
Tushar Sharmahttps://www.automationdojos.com
Hi! This is Tushar, the author of ‘Automation Dojos’. A passionate IT professional with a big appetite for learning, I enjoy technical content creation and curation. Hope you are having a good time! Don’t forget to subscribe and stay in touch. Wishing you happy learning!