Теоретические выкладки, о структуре файлов WooCommerce и о том, как правильно изменять WooCommerce через хуки. Вводное видео, о том как работают хуки в WooCommerce, какими инструментами пользоваться и правильно изменять файлы.
-
-
Бесплатные редакторы -
Дочерняя тема -
Специальный плагин -
Включение поддержки WooCommerce в теме -
Отключение стилей WooCommerce -
Загрузка файлов CSS и JavaScript WooCommerce только на страницах магазина
-
Инструменты
Для правки кода требуется использовать редакторы кода. Так как в них есть подсветка кода и очень удобно вносить правки или писать код с нуля.
В видео весь код правится через PhpStorm это не просто редактор, а целая система. Очень крутая, но платная. Хотя можно скачать или триальную версию, или пользоваться бетой совершенно бесплатно.
к содержанию
Бесплатные редакторы
- Notepad++
- Sublime Text
- Atom
- Brackets
- Visual Studio Code
Пользоваться можно любым, главное, чтобы удобно было. Рекомендую VS Code — при правильной настройке будет не хуже PhpStorm
к содержанию
Как правильно добавлять код
Существует два способа:
- через дочернюю тему
- через специальный плагин
Все это делается для того, что бы при обновлении темы все ваши изменения сохранились.
Дочерняя тема
Дочернюю тему можно сделать самостоятельно или использовать плагин. Как сделать самостоятельно смотрите в видео
Еще удобно дочернюю тему сделать через плагин. Например, плагин Child Theme Configurator позволит прямо из админки создать дочернюю тему. После использования плагин можно удалить.
к содержанию
Специальный плагин
Другой способ вносить изменения использовать специальные плагины. Например, плагин Code Snippets позволяет делать подобные вставки. Или можно использовать пустой плагин. Об использовании пустого плагина, можно узнать в этой статье.
Всегда внимательно копируйте код сниппетов и делайте бекапы, не ленитесь.
к содержанию
Нигде) Расписанной документации как таковой нет. Можно посмотреть то, что есть на официальном сайте
- Документация для разработчиков
- API WooCommerce
Без поллитры в ней не разобраться)
Предпочитаю смотреть код WooCommerce на GitHub, а если установить расширение Octotree для браузера Хром, то становится очень удобно просматривать файлы.
К тому же, на GitHub есть еще Wiki по WooCommerce, в которой подробно расписаны некоторые моменты. Это бывает полезно.
к содержанию
Как работают хуки в WordPress
Хуки или события и фильтры — это основная событийная модель работы WordPress. Не забываем, что WooCommerce — это плагин для WordPress. Для внесения изменений в WooCommerce чаще всего используются фильтыы и события.
Хуки — это важно! От понимания того, как работаю хуки будет зависеть понимание всей дальнейшей информации как этого курса, так и любых других связанных с разработкой на WordPress и WooCommerce.
Небольшое видео, для понимя работы хуков
По теме хуков еще рекомендую почитать статьи:
- Как работают хуки в WordPress — сайт wp-kama.ru (основной спрвочник по WP на русском)
- Хуки: фильтры и действия. Подробное руководство — сайт misha.blog (много базовой информации по WP)
к содержанию
Как изменять (переопределять) файлы WooCommerce
Для безопасного изменения или переопределения файлов, отвечающих за вывод контента WooCommerce, достаточно скопировать файлы из папки /templates/ самого плагина в папку /woocommerce/ вашей темы или дочерней темы. Если в вашей дочерней теме нет папки /woocommerce/, то создайте ее. Теперь для внесения изменений достаточно скопировать нужный файл.
Полный путь к папке шаблонов из корня сайта /wp-content/plugins/woocommerce/templates/
Пример: чтобы переопределить уведомление о заказе администратора, скопируйте: wp-content/plugins /woocommerce/templates/emails/admin-new-order.php в wp-content/themes/yourtheme /woocommerce/emails/admin-new-order.php
Скопированный файл будет переопределять файл шаблона WooCommerce по умолчанию.
Предупреждение: не редактируйте эти файлы в самом ядре плагине, так как они перезаписываются в процессе обновления, и любые настройки будут потеряны.
Источник: Template structure & Overriding templates via a theme
к содержанию
Примеры использования хуков
Включение поддержки WooCommerce в теме
Поддержка в теме включается только на хуке after_setup_theme. Это важно!
Базовое включение поддержки WooCommerce
/**
 * @snippet       Включение поддержки WooCommerce в теме
 * @how-to-woo    https://wpruse.ru/courses/how-to-change-woocommerce/
 * @sourcecode    https://wpruse.ru/?p=3439
 * @testedwith    WooCommerce 3.6
 */
add_action( 'after_setup_theme', 'mywoo_add_woocommerce_support' );
function mywoo_add_woocommerce_support() {
    add_theme_support( 'woocommerce' );
}
Включение поддержки WooCommerce с передачей
/**
 * @snippet       Включение поддержки WooCommerce в теме с настройками
 * @how-to-woo    https://wpruse.ru/courses/how-to-change-woocommerce/
 * @sourcecode    https://wpruse.ru/?p=3439
 * @testedwith    WooCommerce 3.6
 */
add_action( 'after_setup_theme', 'mywoo_add_woocommerce_support' );
function mywoo_add_woocommerce_support() {
    add_theme_support( 'woocommerce', array(
        'thumbnail_image_width' => 150,
        'single_image_width'    => 300,

        'product_grid'          => array(
            'default_rows'    => 3,
            'min_rows'        => 2,
            'max_rows'        => 8,
            'default_columns' => 4,
            'min_columns'     => 2,
            'max_columns'     => 5,
        ),
    ) );
}
Это установка значений по умолчанию
thumbnail_image_widthиsingle_image_width— размер изображенийproduct_grid— параметры сетки вывода товаров на страницах архивов
Подключение zoom, swipe, lightbox
/**
 * @snippet       Включение поддержки zoom, swipe, lightbox WooCommerce в теме
 * @how-to-woo    https://wpruse.ru/courses/how-to-change-woocommerce/
 * @sourcecode    https://wpruse.ru/?p=3439
 * @testedwith    WooCommerce 3.6
 */
add_theme_support( 'wc-product-gallery-zoom' );
add_theme_support( 'wc-product-gallery-lightbox' );
add_theme_support( 'wc-product-gallery-slider' );
к содержанию
Отключение стилей WooCommerce
/**
 * @snippet       Полное отключение стилей WooCommerce
 * @how-to-woo    https://wpruse.ru/courses/how-to-change-woocommerce/
 * @sourcecode    https://wpruse.ru/?p=3439
 * @testedwith    WooCommerce 3.6
 */
add_filter( 'woocommerce_enqueue_styles', '__return_empty_array' );
/**
* @snippet Частичное отключение стилей
* @how-to-woo https://wpruse.ru/courses/how-to-change-woocommerce/
* @sourcecode https://wpruse.ru/?p=3439
* @testedwith WooCommerce 3.6
*/
add_filter( 'woocommerce_enqueue_styles', 'woocust_dequeue_styles' );
function woocust_dequeue_styles( $enqueue_styles ) {
unset( $enqueue_styles['woocommerce-general'] ); // Отключение основных стилей
unset( $enqueue_styles['woocommerce-layout'] ); // Отключение сетки
unset( $enqueue_styles['woocommerce-smallscreen'] ); // Отключение адаптивности
return $enqueue_styles;
}к содержанию
Загрузка файлов CSS и JavaScript WooCommerce только на страницах магазина
/**
 * @snippet       Подключение стилей и скриптов только на страницах магазина
 * @how-to-woo    https://wpruse.ru/courses/how-to-change-woocommerce/
 * @sourcecode    https://wpruse.ru/?p=3439
 * @testedwith    WooCommerce 3.6
 */
add_action( 'wp_enqueue_scripts', 'woocust_manage_woocommerce_styles', 99 );
function woocust_manage_woocommerce_styles() {

	if ( function_exists( 'is_woocommerce' ) ) {
		if ( ! is_woocommerce() && ! is_cart() && ! is_checkout() && ! is_account_page() ) {
			wp_dequeue_style( 'woocommerce-layout' );
			wp_dequeue_style( 'woocommerce-smallscreen' );
			wp_dequeue_style( 'woocommerce-general' );
			wp_dequeue_style( 'evolution-woostyles' );
			wp_dequeue_script( 'wc_price_slider' );
			wp_dequeue_script( 'wc-single-product' );
			wp_dequeue_script( 'wc-add-to-cart' );
			wp_dequeue_script( 'wc-cart-fragments' );
			wp_dequeue_script( 'wc-checkout' );
			wp_dequeue_script( 'wc-add-to-cart-variation' );
			wp_dequeue_script( 'wc-single-product' );
			wp_dequeue_script( 'wc-cart' );
			wp_dequeue_script( 'wc-chosen' );
			wp_dequeue_script( 'woocommerce' );
			wp_dequeue_script( 'prettyPhoto' );
			wp_dequeue_script( 'prettyPhoto-init' );
			wp_dequeue_script( 'jquery-blockui' );
			wp_dequeue_script( 'jquery-placeholder' );
			wp_dequeue_script( 'fancybox' );
			wp_dequeue_script( 'jqueryui' );
		}
	}
}
к содержанию
Заключение
Это вводная часть. В ней разобрали какими инструментами пользоваться, как вносить код и некоторые другие вещи.
Как изменять WooCommerce через хуки смотрите в видео выше по таймкоду 8:32. С этого времени как раз начинаются примеры кода.
Удачи в изменении WooCommerce! Вопросы, предложения пишите в комментариях, и не забудьте расшарить эту статью в соцсетях! Вам это ничего не стоит, а меня будет мотивировать)
5
3
голоса
Рейтинг статьи
Содержание
- Карта хуков страницы товара в WooCommerce
- События (actions) и хуки страницы товара в WooCommerce срабатывающие по умолчанию
- События до начала вывода информации о товаре
- События в левой колонке
- Правая колонка
- Вкладки (tabs) и сопутствующие товары
- События в блоке отзывов и после вывода основного контента
- Заключение
Каждый владелец или разработчик интернет-магазина на WordPress, пытается подстроить его под свои нужды. В этом руководстве мы будет редактировать страницу товара в WooCommerce. Задача это не тривиальная и есть всего два правильных метода:
- Модифицировать саму страницу, опираясь на официальное руководство.
- Использовать, доступные для страницы товары, хуки.
Если вы когда-либо работали с кодом WordPress сайта, то наверняка, много раз встречали слово «Хук» или «Зацепка», а если вы разработчик, то использование хуков должно стать вашим основным методом.
Плагин WooCommerce, как и сам WordPress, имеет огромное количество предопределенных функций. С помощью хуков вы можете кардинально изменить поведение этих функций и заменить существующее значение, тем самым настроив WooCommerce в соответствии с вашими потребностями!
В рамках этого руководства и опираясь на то, что 99% посетители этой страницы являются разработчиками, мы не будет описывать все преимущества работы хуками по сравнению с шаблонами, а будем редактировать страницу товара и рассмотрим все доступные для этой страницы WooCommerce хуки.
На карте показаны все доступные для редактирования страницы товара хуки. Актуально если у вас WooCommerce версии 4.4+.
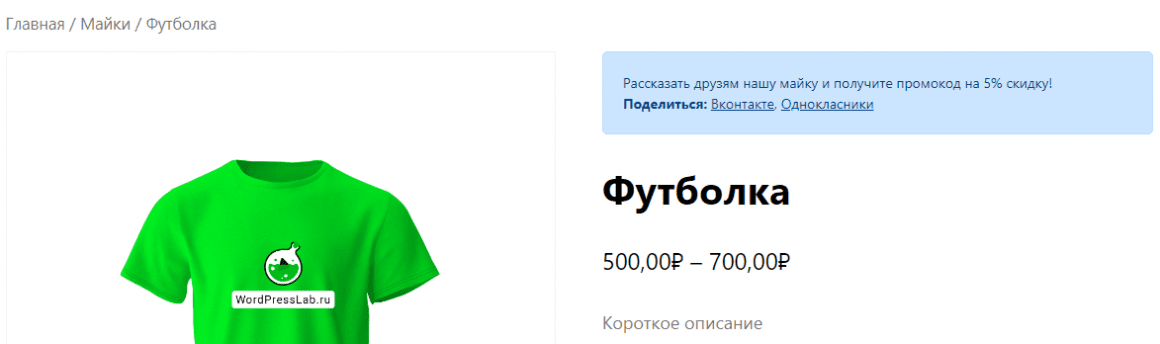
Магазин → Майки → Футболка
woocommerce_sidebar
woocommerce_output_all_notices
woocommerce_before_single_product_summary
woocommerce_before_single_product_summary
Распродажа↓
woocommerce_show_product_sale_flash
woocommerce_show_product_images

Дополнительные изображения ↓
woocommerce_show_product_thumbnails
woocommerce_single_product_summary
Название товара ↓
woocommerce_template_single_title
★★★★★(2 отзыва клиентов)↓
woocommerce_template_single_rating
500,00₽ – 700,00₽ ↓
woocommerce_template_single_price
Короткое описание товара ↓
woocommerce_template_single_excerpt
woocommerce_before_add_to_cart_form
woocommerce_before_add_to_cart_button
woocommerce_template_single_add_to_cart
woocommerce_simple_add_to_cart
woocommerce_grouped_add_to_cart
woocommerce_variable_add_to_cart
woocommerce_external_add_to_cart
woocommerce_before_variations_form
Атрибут:
↻ Очистить
woocommerce_before_add_to_cart_button
woocommerce_before_single_variation
woocommerce_single_variation
Мужская футболка с логотипом
500,00₽
☻XXX в наличии
woocommerce_single_variation_add_to_cart_button
woocommerce_before_quantity_input_field
woocommerce_after_quantity_input_field
В корзину
woocommerce_after_single_variation
woocommerce_after_add_to_cart_button
woocommerce_after_variations_form
woocommerce_after_add_to_cart_form
woocommerce_product_meta_start
Артикул: Ф1
Категория:Название
Метки:Один,Два
woocommerce_product_meta_end
woocommerce_share
woocommerce_after_single_product_summary
woocommerce_output_product_data_tabs
woocommerce_product_additional_information
| Вес | 0.5 kg |
|---|---|
| Размер |
M, L, XL |
| Цвет |
Красный, Зеленый, Синий |
woocommerce_review_before
 ↓
↓
woocommerce_review_display_gravatar
woocommerce_review_before_comment_meta
★★★★★ ↓
woocommerce_review_display_rating
woocommerce_review_meta
(проверенный владелец) 21.08.2020 ↓
woocommerce_review_before_comment_text
woocommerce_review_comment_text
Спасибо огромное, товар отличный! ↓
woocommerce_review_display_comment_text
woocommerce_review_after_comment_text
woocommerce_product_after_tabs
woocommerce_after_single_product_summary
Возможно Вас также заинтересует… ↓
woocommerce_upsell_display
woocommerce_output_related_products

В корзину

В корзину

В корзину

В корзину
woocommerce_after_single_product
woocommerce_after_main_content
События, помеченные синим и зеленым цветом можно хукать, а вот помеченные желтым – нет. Но это не значит, что на эти события нельзя повлиять. Их можно переписать, удалить или заменить своими собственными событиями.
В качестве примера давайте выведем дополнительный HTML в woocommerce_single_product_summary:
add_action( 'woocommerce_single_product_summary', 'wpbl_exmaple_hook', 20);
function wpbl_exmaple_hook(){
	echo '<div class="wbpl_share">Рассказать друзьям нашу майку и получите купон на 5% скидку!<br><strong>Поделиться:</strong> <a href="https://vk.com/share.php?url=https://wordpresslab.ru/">Вконтакте</a>, <a href="https://connect.ok.ru/offer?url=https://wordpresslab.ru/">Одноклассники</a></div>';
}
И в результате получим:

Как видно из кода, использовался приоритет равный 20, если значение изменить, то можно поменять позицию.
Указав для хука приоритет, равный 10, мы сдвинем наш блок под заголовок товара:

А установив значение 0, блок будет самым первым:

Двигаемся дальше и давайте рассмотрим все хуки, которые могут пригодится при редактировании страницы товара в WooCommerce.
События (actions) и хуки страницы товара в WooCommerce срабатывающие по умолчанию
Давайте рассмотрим события (actions), которые вы можете отключить или модифицировать используя файл functions.php.
Как вы уже поняли, WooCommerce использует свои собственные события, например, woocommerce_before_single_product_summary, используются для вывода базовой информации о товаре, состоящей из нескольких отдельных частей, которые можно модифицировать или удалять. И так с каждым, отдельно взятым, информационным блоком!
Давайте рассмотрим весь список!
События до начала вывода информации о товаре
// Первое событие - это вывод хлебных крошек:
add_action( 'woocommerce_before_main_content', 'woocommerce_breadcrumb', 20, 0 );

// Второе событие вывод боковой панели (Sidebar):
add_action( 'woocommerce_sidebar', 'woocommerce_get_sidebar', 10 );

//  И последнее зарегистрированные событие в этом блоке - это создание области для отображения ошибок:
add_action( 'woocommerce_before_single_product', 'woocommerce_output_all_notices', 10 );
В качестве примера, давайте изменим отображение и работу хлебных крошек, сейчас у нас они выглядят так:
Давайте их хукнем ?
/**
 * Меняем вывод хлебных крошек
 */
add_filter( 'woocommerce_breadcrumb_defaults', 'wpbl_breadcrumbs' );
function wpbl_breadcrumbs() {
	return array(
		'delimiter' => ' → ', // Меняем разделитель
		'wrap_before' => '<nav class="woocommerce-breadcrumb wpbl_custom" itemprop="breadcrumb">', // Добавляем CSS класс wpbl_custom
		'wrap_after' => '</nav>',
		'before' => '<span>',
		'after' => '</span>',
		'home' => _x( 'Магазин', 'breadcrumb', 'woocommerce' ) // Меняем "Главная" на "Магазин"
	);
}

/**
 * При нажатии на ссылку "Магазин" покупатель перейдет на страницу магазина, а не на главную страницу сайта.
 */
add_filter( 'woocommerce_breadcrumb_home_url', 'wpbl_breadcrumb_home_url' );
function wpbl_breadcrumb_home_url() {
    return wc_get_page_permalink( 'shop' );
}
И чуть-чуть стилизуем добавленный CSS класс wpbl_custom:
.wpbl_custom span {
	padding: 0px 3px
}
.wpbl_custom > span > a {
	border-bottom: 1px dashed #999;
	color: #333 !important;
}
.wpbl_custom span:last-child {
	padding: 5px 7px;
	border-radius: 3px;
	margin-left: 7px;
	background-color: #dff0d8;
	border-color: #d0e9c6;
	color: #3c763d;
}
В итоге наши хлебные крошки будут выглядеть более презентабельно:

События в левой колонке
// Первым событием будет вывод значка "Распродажа"
add_action( 'woocommerce_before_single_product_summary', 'woocommerce_show_product_sale_flash', 10 );

// Второе событие отвечает за отображение товара
add_action( 'woocommerce_before_single_product_summary', 'woocommerce_show_product_images', 20 );

// Последнее зарегистрированное событие выводит галерею дополнительных изображений
add_action( 'woocommerce_product_thumbnails', 'woocommerce_show_product_thumbnails', 20 );
Для примера давайте добавим HTML блок под галерею изображений:
add_action( 'woocommerce_product_thumbnails', 'wpbl_thumbs', 30  );
function wpbl_thumbs() {
    echo '<div class="wpbl_woo_need_help"><em>А вы знали, что мы можем помочь вам с выбором совершенно бесплатно? Звоните из любой точки России - <strong>8(800)123-45-67</strong></em></div>';
}
И как результат:

На этом этапе, скорее всего уже понятен принцип работы с хуками в WooCommerce.
Дальше просто перечислим оставшиеся события, а если будет нужно дополним статью примерами.
Правая колонка
События и хуки страницы товара в WooCommerce в правой колонке:
/**
 * Права колонка. Базовая информация о товаре
**/

// Вывод заголовка товара
add_action( 'woocommerce_single_product_summary', 'woocommerce_template_single_title', 5 );

// Вывод рейтинга
add_action( 'woocommerce_single_product_summary', 'woocommerce_template_single_rating', 10 );

// Отображение цены
add_action( 'woocommerce_single_product_summary', 'woocommerce_template_single_price', 10 );

// Короткое описание
add_action( 'woocommerce_single_product_summary', 'woocommerce_template_single_excerpt', 20 );


/**
 * Права колонка. Процесс добавления в корзину
**/

// Событие срабатывает до отображение формы
do_action( 'woocommerce_before_add_to_cart_form' );

// Событие ДО кнопки "В корзину"
do_action( 'woocommerce_before_add_to_cart_button' );

// Запуск событие по добавлению простого товара в корзину.
add_action( 'woocommerce_single_product_summary', 'woocommerce_template_single_add_to_cart', 30 );

// Выводит область добавления "Простого" товара в корзину
add_action( 'woocommerce_simple_add_to_cart', 'woocommerce_simple_add_to_cart', 30 );

// Выводит область добавления "Сгруппированного" товара в корзину
add_action( 'woocommerce_grouped_add_to_cart', 'woocommerce_grouped_add_to_cart', 30 );

// Выводит область добавления "Вариативного" товара в корзину
add_action( 'woocommerce_variable_add_to_cart', 'woocommerce_variable_add_to_cart', 30 );

// Выводит область добавления "Внешнего/Партнёрского" товара в корзину
add_action( 'woocommerce_external_add_to_cart', 'woocommerce_external_add_to_cart', 30 );

// Отображает информацию о выбранной вариации
add_action( 'woocommerce_single_variation', 'woocommerce_single_variation', 10 );

// Выводит область добавления "Вариации" в корзину
add_action( 'woocommerce_single_variation', 'woocommerce_single_variation_add_to_cart_button', 20 );

// Событие ДО вывода поля кол-во
do_action( 'woocommerce_before_quantity_input_field' );

// Событие ПОСЛЕ вывода поля кол-во
do_action( 'woocommerce_after_quantity_input_field' );

// Событие ПОСЛЕ кнопки "В корзину"
do_action( 'woocommerce_after_add_to_cart_button' );

// Событие ПОСЛЕ формы  добавления товара в корзину
do_action( 'woocommerce_after_add_to_cart_form' );

/**
 * Права колонка. Мета данные
**/

// События отображения мета данных товара
add_action( 'woocommerce_single_product_summary', 'woocommerce_template_single_meta', 40 );
do_action( 'woocommerce_product_meta_start' );
do_action( 'woocommerce_product_meta_end' );
Вот так сейчас у нас выглядит страница товара, давайте посмотрим, что можно сделать с событиями для которых нет хуков (помеченные желтым):

Допустим мы хотим, чтобы рейтинг товара отображался выше заголовка. В этом случае нам нужно удалить стандартное событие вывода рейтинга, а затем добавить новое, но с другим приоритетом:
// Удаляем вызываемое по умолчанию событие
remove_action('woocommerce_single_product_summary','woocommerce_template_single_rating', 10);

//// Добавляем новое событие, меняя приоритет
add_action( 'woocommerce_single_product_summary', 'woocommerce_template_single_rating', 0 );
И как ожидалось:

Вкладки (tabs) и сопутствующие товары
// Событие вывода табов
add_action( 'woocommerce_after_single_product_summary', 'woocommerce_output_product_data_tabs', 10 );

// Вывод атрибутов товара
add_action( 'woocommerce_product_additional_information', 'wc_display_product_attributes', 10 );

// Событие срабатывает после вывода табов
do_action( 'woocommerce_product_after_tabs' );

// Событие вывода Апсейл товаров
add_action( 'woocommerce_after_single_product_summary', 'woocommerce_upsell_display', 15 );

// Событие вывода похожих товаров
add_action( 'woocommerce_after_single_product_summary', 'woocommerce_output_related_products', 20 );
Как вы уже поняли, можно полностью поменять внешний вид ваших товарных страниц в WooCommerce.
Но, что еще можно сделать с событиями, у которых нет хуков? Ответ простой – сами события можно удалить, а на их место поставить что-то своё!
Вот так сейчас выглядит страница простого товара в нашем экспериментальном WooCommerce магазине:

Давайте кардинально изменим положение блока похожих товаров и изменим их количество:
// Меняем кол-во вывода похожих товаров
add_filter( 'woocommerce_output_related_products_args', 'wplb_rp', 20 );
function wplb_rp( $args ) {
	$args[ 'posts_per_page' ] = 3; // Сколько выводить
	$args[ 'columns' ] = 3; // Сколько колонок использовать
	return $args;
}

// Удаляем событие по умолчанию
remove_action( 'woocommerce_after_single_product_summary', 'woocommerce_output_related_products', 20 );

// Создаем свое событие и меняем местоположение похожих товаров
add_action( 'woocommerce_share', 'woocommerce_output_related_products', 100 );
И как результат:

Тут стоит сказать что, использовав фильтр, мы изменили так же CSS класс списка похожих товаров. Было – ul.columns-4, а стало ul.columns-3, если в вашей теме этот класс не описан то вот:
@media (min-width: 1120px) {
	.wc-col-4.woocommerce ul.products.columns-3 li.product,
	.columns-4.woocommerce ul.products.columns-3 li.product {
		flex: 0 0 33%;
		max-width: 33%;
	}
}
Не забудьте прописать стили для мобильных устройств!
События в блоке отзывов и после вывода основного контента
Работа с стольными событиями на странице товара ничем не отличается от вышеописанных методов. Давайте просто перечислим и укажем приоритеты.
// Отображает граватар авторов обзора
add_action( 'woocommerce_review_before', 'woocommerce_review_display_gravatar', 10 );

// Вывод рейтинга
add_action( 'woocommerce_review_before_comment_meta', 'woocommerce_review_display_rating', 10 );

// Отображение мета данные авторов обзора (имя, дата отзыва...)
add_action( 'woocommerce_review_meta', 'woocommerce_review_display_meta', 10 );

// Срабатывает до вывода комментария
do_action( 'woocommerce_review_before_comment_text', $comment );

// Вывод текста комментария
add_action( 'woocommerce_review_comment_text', 'woocommerce_review_display_comment_text', 10 );

// Срабатывает после вывода комментария
do_action( 'woocommerce_review_after_comment_text', $comment );
// Событие срабатывает после вывода информации о товаре
do_action( 'woocommerce_after_single_product' );

// Событие после вывода всего тела контента
do_action( 'woocommerce_after_main_content' );
Заключение
События и хуки – это классно, это здорово. Благодаря им можно полностью изменить страница товара в WooCommerce не трогая шаблонов. Так же, как вы понимаете, можно удалить все события которые срабатывают по умолчанию и собрать страница с чистого листа, используя свою собственную разметку, функции и логику.
Если у вас есть вопросы – спрашивайте в комментариях.
Спасибо.
Похожие Темы
- WordPress для разработчиков
Like many WordPress plugins, WooCommerce provides a range of actions and filters through which developers can extend and modify the platform.
Often, when writing new code or revising existing code, there is a desire to add new hooks—but this should always be done with thoughtfulness and care. This document aims to provide high level guidance on the matter.
Practices we generally allow, support and encourage include:
- Using existing hooks (or other alternatives) in preference to adding new hooks
- Adding lifecycle hooks
- Optional escape hooks
- Modifying the inputs and outputs of global rendering functions
- Preferring the passing of objects over IDs
On the flip side, there are several practices we discourage:
- Tying lifecycle hooks to methods of execution
- Using filters as feature flags
- Placing filter hooks inside templates and data-stores
- Enumeration values within hook names
Beyond those items, we generally otherwise adhere to WordPress coding standards. In regards to hooks, that specifically means following the:
- Documentation standards for hooks
- Guidance on Dynamic hook names
Please note that we provide example code throughout this guide to help illustrate some of the principles, however to keep things concise we usually omit unnecessary detail, including doc blocks (in practice, though, hooks should always be accompanied by docblocks!).
Prefer existing hooks (or other alternatives)
Hooks come with a long-term obligation: the last thing we want is to add a new hook that developers come to depend on, only to strip it away again. However, this can lead to difficulties when the time comes to refactor a piece of code that contains hooks, sometimes delaying meaningful change or limiting how easily we can implement a change without compromising on backwards compatibility commitments.
For those reasons, we always prefer that—wherever reasonable—an existing hook or alternative approach in preference to adding a new hook.
Adding lifecycle hooks
Lifecycle hooks can be used to communicate that a lifecycle event is about to start, or that it has concluded. Examples of such events include:
- Main product loop
- Dispatching emails
- Rendering a template
- Product or order status changes
In general, lifecycle hooks:
- Come in pairs (‘before’ and ‘after’)
- Are always actions, never filters
- The ‘before’ hook will generally always provide callbacks with the arguments array, if there is one
- The ‘after’ hook will generally also provide callbacks with the function’s return value, if there is one
Note that lifecycle hooks primarily exist to let other systems observe, rather than to modify the result. Of course, this does not stop the function author from additionally providing a filter hook that serves this function.
Example, noting that it is the process of fetching the promotions which we view as the “lifecycle event”, and not the function itself:
function woocommerce_get_current_promotions( ...$args ) {
    /* Any initial prep, then first lifecycle hook... */
    do_action( 'woocommerce_before_get_current_promotions', $args );
    /* ...Do actual work, then final lifecycle hook... */
    do_action( 'woocommerce_after_get_current_promotions', $result, $args );
    /* ...Return the result, optionally via a filter... */
    return apply_filters( 'woocommerce_get_current_promotions', $result, $args );
}
Escape hooks
In some cases it may be appropriate to support short-circuiting of functions or methods. This is what we call an escape hook, and can be useful as a means of overriding code when a better way of doing so is not available.
- Escape hooks are always filters
- They should always supply null as the initial filterable value
- If the value is changed to a non-null value, then the function should exit early by returning that new value
For type-safety, care should be taken to ensure that, if a function is short-circuited, the return type matches the function signature and/or return type stated in the function docblock.
Example:
function get_product_metrics( $args ): array {
    $pre = apply_filters( 'pre_woocommerce_get_product_metrics', null, $args );

    if ( $pre !== null ) {
        return (array) $pre;
    }

    /* ...Default logic... */
    return $metrics;
}
Modifying function input and output (global rendering functions)
In the case of global rendering or formatting functions (so-called “template tags”), where it is not readily possible to implement better alternatives, it is permissible to add filters for both the function arguments and the function’s return value.
This should be done sparingly, and only where necessary. Remember that while providing opportunities for other components to perform extensive customization, it can potentially derail other components which expect unmodified output.
Example:
function woocommerce_format_sale_price( ...$args ): string {
    /* Prep to fill in any missing $args values... */
    $args = (array) apply_filters( 'woocommerce_format_sale_price_args', $args );
    /* ...Actual work to determine the $price string... */
    return (string) apply_filters( 'woocommerce_format_sale_price', $price, $args );
}
Prefer passing objects over IDs
Some actions or filters provide an object ID (such as a product ID) as their primary value, while others will provide the actual object itself (such as a product object). For consistency, it is preferred that objects be passed.
Example:
function get_featured_product_for_current_customer( ) {
    /* ...Logic to find the featured product for this customer… */

    return apply_filters(
        'woocommerce_featured_product_for_current_customer',
        $product, /* WC_Product */
        $customer
    );
}
Tying lifecycle hooks to methods of execution
There can sometimes be multiple paths leading to the same action. For instance, an order can be updated via the REST API, or through the admin environment, or on the frontend. It may additionally happen via ajax, or via a regular request.
It is important however not to tie hooks for high level processes to specific execution paths. For example an action that fires when an order is created must not only be fired when this happens in the admin environment via an ajax request.
Instead, prefer a more generic hook that passes context about the method of execution to the callback.
Example of what we wish to avoid:
/**
 * Pretend this function is only called following an ajax request
 * (perhaps it is itself hooked in using a `wp_ajax_*` action).
 */
function on_ajax_order_creation() {
    /* Avoid this! */
    do_action( 'woocommerce_on_order_creation' );
}
Using filters as feature flags
It is sometimes tempting to use a filter as a sort of feature flag, that enables or disables a piece of functionality. This should be avoided! Prefer using an option:
- Options persist in the database.
- Options are already filterable (ideal for a temporary override).
Example of what we wish to avoid:
/* Avoid this */
$super_products_enabled = (bool) apply_filters( 'woocommerce_super_products_are_enabled', true );

/* Prefer this */
$super_products_enabled = get_option( 'woocommerce_super_products_are_enabled', 'no' ) === 'yes';
Placement of filter hooks
Filters should not be placed inside templates—only actions. If it is important that a value used within a template be filterable, then the relevant logic should be moved to whichever function or method decides to load the template—the result being passed in as a template variable.
It is also preferred that filter hooks not be placed inside data-store classes, as this can reduce the integrity of those components: since, by design, they are replaceable by custom implementations—the risk of accidentally breaking those custom stores is higher.
Enumeration values inside hook names
Though there is a case for dynamic hook names (where part of the hook name is created using a variable), a good rule of thumb is to avoid this if the variable contains what might be considered an enumeration value.
This might for instance include a case where an error code forms part of the hook name.
Example (of what we wish to avoid):
if ( is_wp_error( $result ) ) {
    /* Avoid this */
    $error_code = $result->get_error_code();
    do_action( "woocommerce_foo_bar_{$error_code}_problem", $intermediate_result );

    /* Prefer this */
    do_action( 'woocommerce_foo_bar_problem', $result );
}
The primary reason for avoiding this is that the more values there are in the enumeration set, the more filters developers have to include in their code.
Summary
This document is a high level guide to the inclusion and placement of hooks, not an exhaustive list. There will occasionally be exceptions, and there may be good rules and methodologies we are missing: if you have suggestions or ideas for improvement, please reach out!
Hooks in WordPress essentially allow you to change or add code without editing core files. They are used extensively throughout WordPress and WooCommerce and are very useful for developers.
There are two types of hook: actions and filters.
- Action Hooks allow you to insert custom code at various points (wherever the hook is run).
- Filter Hooks allow you to manipulate and return a variable which it passes (for instance a product price).
Note: This is a Developer level documentation. We are unable to provide support for customizations under our Support Policy. If you are unfamiliar with code/templates and resolving potential conflicts, select a WooExpert or Developer for assistance.
If you use a hook to add or manipulate code, you can add your custom code in a variety of ways:
- To a custom child theme’s
functions.phpfile. - Using a plugin such as Code Snippets.
To execute your own code, you hook in by using the action hook do_action('action_name');. Here is where to place your code:
add_action( 'action_name', 'your_function_name' );

function your_function_name() {
// Your code
}
Filter hooks are called throughout are code using apply_filter( 'filter_name', $variable );. To manipulate the passed variable, you can do something like the following:
add_filter( 'filter_name', 'your_function_name' );

function your_function_name( $variable ) {
// Your code
return $variable;
}
With filters, you must return a value.
To learn more about options for using hooks and filters see our Snippet doc section.
In the example below, both action hooks and filter hooks are used. This tutorial teaches you how to change and add fields to the checkout.
- Actions are used to:
- Add a new field to the checkout
- Add that new field to the order
- Filters are used to:
- Override the labels and placeholders of existing fields
- Make an existing field optional while it used to be required
- Remove existing fields
Customizing checkout fields using actions and filters
For a comprehensive view of the WooCommerce API, see the API Documentation.
For details on what the action hooks and filters do, reference the WooCommerce Hooks Reference.

Do you want to learn how to use WooCommerce hooks? You’re in the right place! In this guide, we will show you how to use action and filter hooks. Besides, we will provide you with many examples that you can apply to your WooCommerce store!
When you install WooCommerce on your website, you have access to a long list of new hooks that extend your possibilities to develop a customized solution. WooCommerce hooks work the same as native WordPress hooks and allow you to execute custom scripts on any WooCommerce page.
Similar to WordPress hooks, there are two types of WooCommerce hooks: action or filter. The action hook allows you to insert some script, while the filter hooks receive original data and return it with some kind of modification.
Syntax of WooCommerce hooks
WooCommerce hooks follow the same syntax as WordPress hooks.
Action hook
add_action(‘name_of_the_action_hook’,’your_action_hook_funcion’);
Filter hook
add_filter(‘name_of_the_filter_hook’,’your_filter_hook_funcion’);
After declaring the hook, you have to add your scripts in the function:
function your_action_hook_funcion(){
# your code here
}
Filter hooks must return some data in a parameter of the function:
function your_filter_hook_function($data){
# your code that modifies $data
return $data;
}
To see a WooCommerce hook in action, paste the following code in the functions.php file of your Child Theme:
add_action( 'woocommerce_product_meta_start', 'quadlayers_woocommerce_hooks');
function quadlayers_woocommerce_hooks() {
echo '<img src="https://kokohai.com/wp-content/uploads/2020/02/logo-kokohai-tienda-de-merchandising-de-anime-y-maga-e1584570981420.png">'; // Change to desired image url
}
This is the most basic example, where you are adding an image to all product pages. The image will be displayed under the Add to cart button, before metadata of the product.
As you can see, the name of the hook, woocommerce_product_meta_start, is self-explanatory and tells you exactly where this hook allows you to insert your code.
List of WooCommerce hooks
There are more than one thousand WooCommerce hooks. Here, we’ll list the most popular ones so you get familiar with the most common and well-known hooks.
We’ve divided the list into sections according to the page they are related to. The name of the hooks are self-explanatory so you won’t have problems understanding what they do.
-
Cart
- woocommerce_before_cart
- woocommerce_before_cart_table
- woocommerce_before_cart_contents
- woocommerce_cart_contents
- woocommerce_after_cart_contents
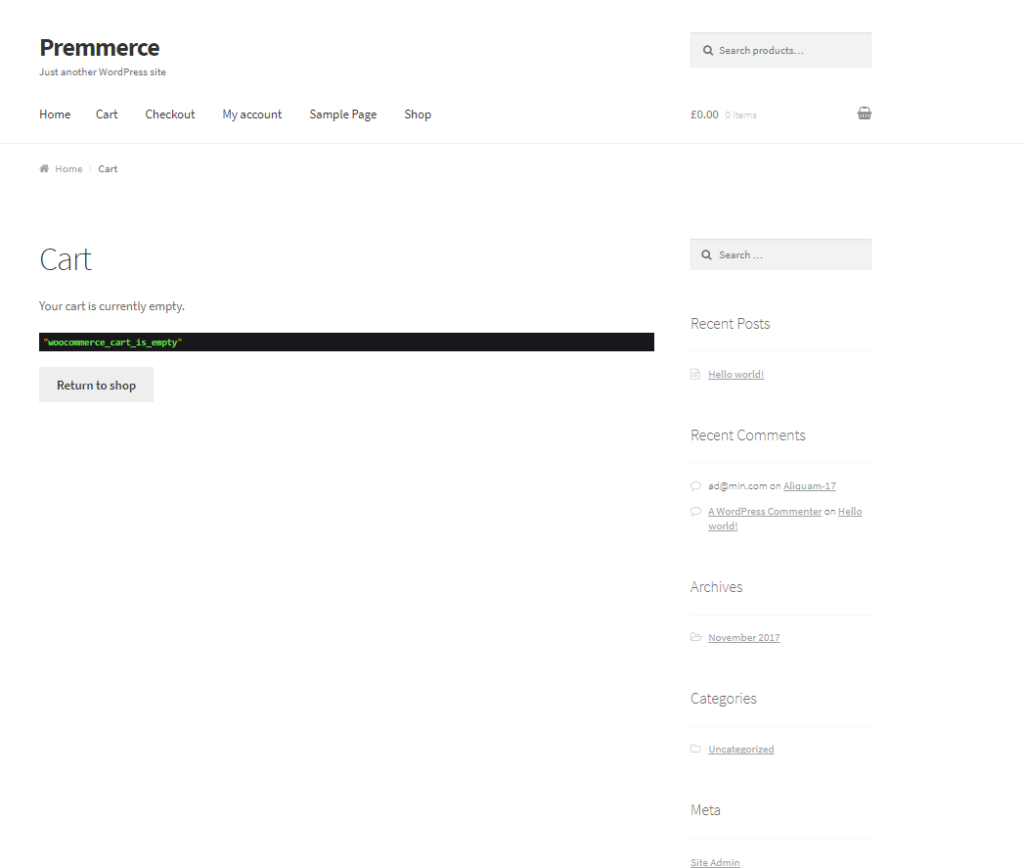
- woocommerce_cart_is_empty
- woocommerce_cart_totals_before_shipping
- woocommerce_cart_totals_after_shipping
- woocommerce_cart_totals_before_order_total
- woocommerce_cart_totals_after_order_total
- woocommerce_after_shipping_rate
- woocommerce_before_shipping_calculator
- woocommerce_proceed_to_checkout
- woocommerce_after_cart_totals
- woocommerce_after_cart
-
Checkout
- woocommerce_before_checkout_form
- woocommerce_checkout_before_customer_details
- woocommerce_before_checkout_billing_form
- woocommerce_checkout_shipping
- woocommerce_checkout_after_order_review
- woocommerce_checkout_after_customer_details
- woocommerce_checkout_before_order_review
- woocommerce_review_order_before_cart_contents
- woocommerce_review_order_after_cart_contents
- woocommerce_review_order_before_shipping
- woocommerce_review_order_after_shipping
- woocommerce_review_order_after_order_total
- woocommerce_checkout_order_review
- woocommerce_review_order_after_submit
- woocommerce_review_order_after_payment
- woocommerce_after_checkout_form
- woocommerce_thankyou
- For more information about checkout hooks, you can check out our full guide about WooCommerce Checkout Hooks.
-
Products
- woocommerce_before_main_content
- woocommerce_after_main_content
- woocommerce_before_single_product_summary
- woocommerce_after_single_product_summary
- woocommerce_before_single_product
- woocommerce_after_single_product
- woocommerce_single_product_summary
- woocommerce_product_meta_start
- woocommerce_product_meta_end
- woocommerce_review_before
- woocommerce_review_before_comment_meta
- woocommerce_review_before_comment_text
- woocommerce_review_comment_text
- woocommerce_review_after_comment_text
-
Taxonomies
- woocommerce_archive_description
- woocommerce_shop_loop
- woocommerce_before_shop_loop
- woocommerce_after_shop_loop
- woocommerce_after_shop_loop_item
- woocommerce_after_shop_loop_item_title
- woocommerce_shop_loop_item_title
-
Account
- woocommerce_before_account_navigation
- woocommerce_after_account_navigation
- woocommerce_before_edit_account_address_form
- woocommerce_account_content
- woocommerce_before_my_account
- woocommerce_after_my_account
-
Mini Cart
- woocommerce_before_mini_cart
- woocommerce_before_mini_cart_contents
- woocommerce_mini_cart_contents
- woocommerce_widget_shopping_cart_before_buttons
- woocommerce_widget_shopping_cart_buttons
- woocommerce_after_mini_cart
-
Email
- woocommerce_email_after_order_table
- woocommerce_email_before_order_table
- woocommerce_email_customer_details
- woocommerce_email_footer
- woocommerce_email_header
- woocommerce_email_order_details
-
Global
- pre_get_product_search_form
- woocommerce_breadcrumb
- woocommerce_no_products_found
To find the full list of WooCommerce hooks, you can have a look at the official WC documentation.
Useful examples of WooCommerce Hooks
Now, let’s have a look at some examples of useful things you can do with WooCommerce hooks.
NOTE: Before you start, we recommend you create a child theme. If you’re not familiar with them, you can check out our guide on how to create a child theme and the list of the best child theme plugins.
If you’re just starting with hooks, you can simply copy these scripts and paste them in the functions.php file of your child theme. Then, as you feel more comfortable, you can edit the scripts and create a different logics.
Add a description to the Shop Page
By default, the Shop Page doesn’t show the description. However, you can enable it using the woocommerce_archive_description hook as follows:

function quadlayers_shop_description() {
$description = '<p>Welcome to my shop, please be generous and buy many things, thank you.</p>';
echo $description;
}

add_action('woocommerce_archive_description', 'quadlayers_shop_description');
Add information note after Add to Cart button
WooCommerce cart hooks allow you to insert custom scripts in many sections of the cart page. Here, we’ll show you how to add a text after the Add to cart button.
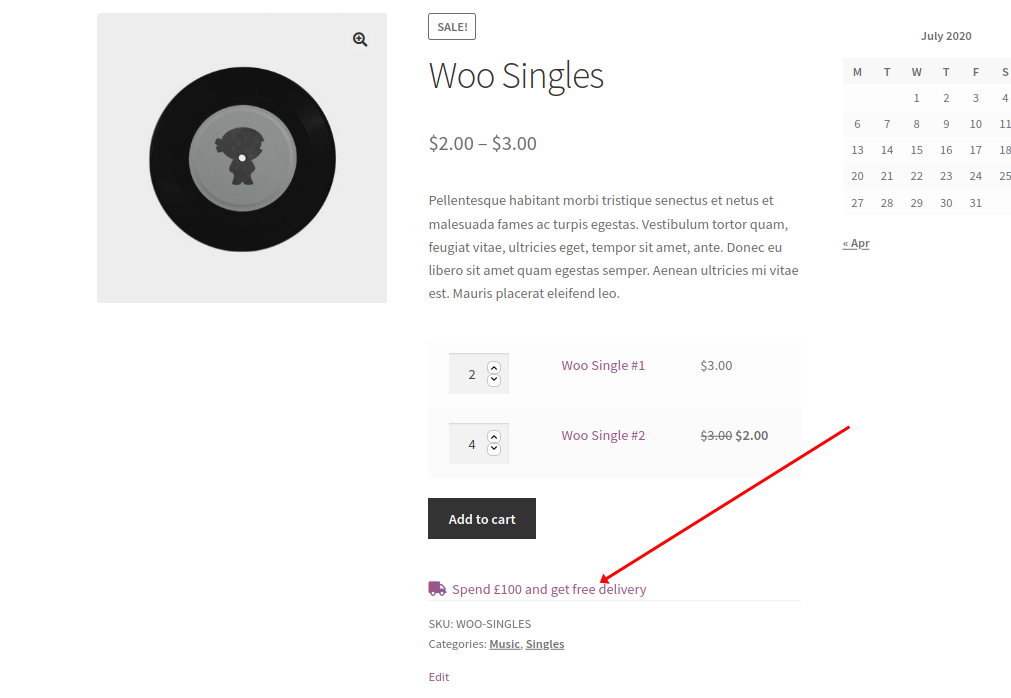
This script will print a custom text after the Add to Cart button.
add_action( 'woocommerce_after_add_to_cart_form', 'quadlayers_after_addtocart_button' );
function quadlayers_after_addtocart_button() {
	// NOTE: replace your category slugs for 'music' && replace /delivery-costs/ for a valid url
	if ( is_product() && has_term( array( 'music' ), 'product_cat' ) ) {
		echo '<div style="clear: both"></div><div style="margin-top: 10px">;<a href="/delivery-costs/" target="_blank" rel="noopener"><i class="fa fa-truck" aria-hidden="true"></i>  Spend $ 100 and get free delivery;</a></div>
'; } }
You can use this to promote discounts that require minimum spending or free delivery for example.
Code explanation
- The hook
woocommerce_after_add_to_cart_formprints the HTML code after the button. - We check if the current page is a product page and if it has our specified category.
- Use category slug within an array. This way, you can check several categories.
- Echoed content allows HTML tags, variables, and anything else within the PHP scope.
Add text to a specific product taxonomy
Now, let’s see how to use WooCommerce hooks to display a message in products with a specific tag. For example, we’ll show a message offering a discount for certain products.
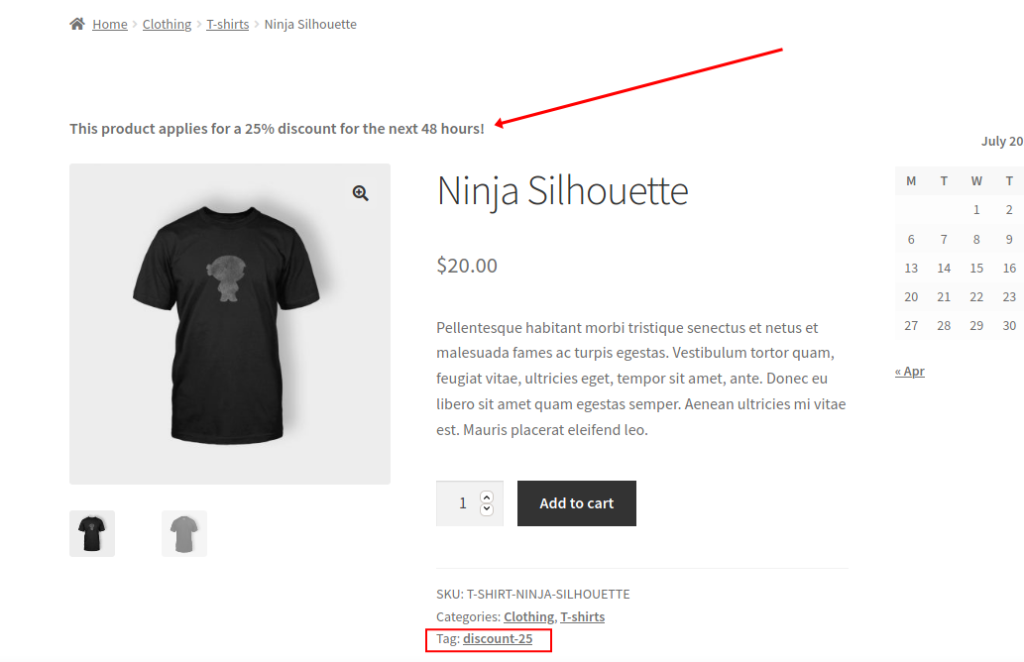
Remember to tag the product first.
add_action( 'woocommerce_before_single_product', 'my_product_notice_function' );
function my_product_notice_function() {
if ( is_product() && has_term( ‘discount-25’,'product_tag' ) ) {
echo '<p><strong>This product applies for a 25% discount for the next 48 hours!</strong></p>';
}
}
Code explanation
-
- We use
woocommerce_before_single_producthook to display a message on the top of the product page. - Inside the function, we use a conditional on
is_product()to make sure that it’s a product page. - And
has_term()checks if the current product has the “discount-25” tag. - Then, print your message in the if statement.
- We use
Block purchase from logged out users
WooCommerce hooks allow you to disable the Add to cart button on product pages for logged out users. This can be useful for products or offers only available for subscribers or members. To complete the example, we will add a second hook to display a message when the purchase button is disabled.
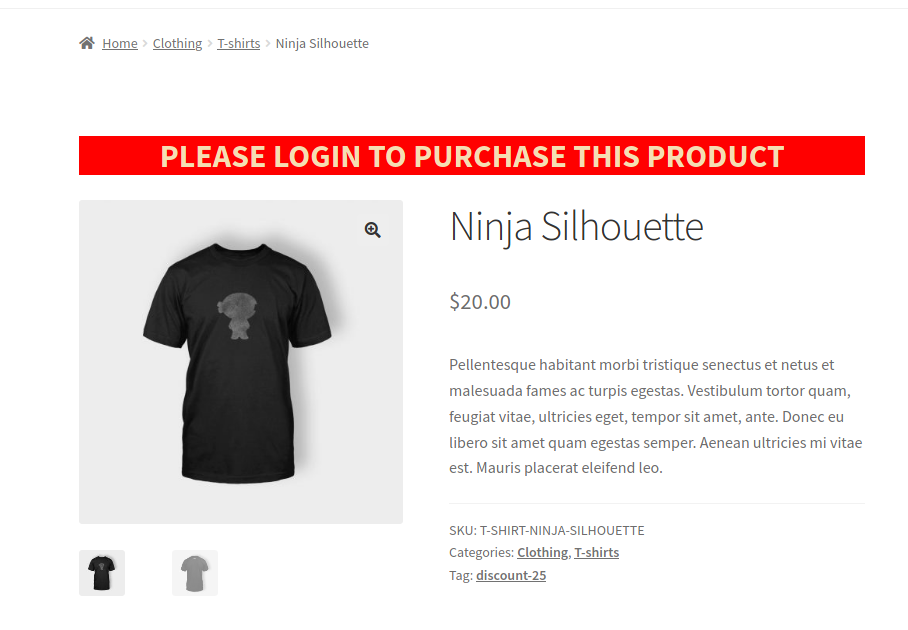
The woocommerce_is_purchasable filter hook will block the purchase and the woocommerce_before_single_productaction hook will display the message.
add_action( 'woocommerce_before_single_product', 'quadlayers_add_message');
add_filter( 'woocommerce_is_purchasable', 'quadlayers_block_admin_purchase' );
function quadlayers_block_admin_purchase($block) {
if ( is_user_logged_in() ):return true;
else:return false;
endif;
}

function quadlayers_add_message( ){
if ( !is_user_logged_in() ):echo '<H2 style="margin-bottom:25px; text-align:center; background-color:red; font-weight:bold; color:wheat;">PLEASE LOGIN TO PURCHASE THIS PRODUCT</h2>';
endif;
}
Code explanation
- We use the action hook to print a message and the filter hook to disable the Add to cart button.
- The
woocommerce_is_purchasablefilter hook will be true if the user is logged in and false if they’re logged out. - We also use a conditional if() statement to apply the conditions only to logged out users in both functions (Add to cart button disabled and the message).
- Finally, we’ve added some CSS styling to the message, enclosed in an H2 HTML tag.
How to make the most of WooCommerce Hooks?
In conclusion, WooCommerce hooks are great tools to customize your site. There are hundreds of hooks to use and they all follow the same syntax. So, we encourage you to check out the examples and get some inspiration to apply the hooks you need on your site.
Hooks allow you to improve any area of your store: from the checkout to the cart to the product pages, taxonomies, and much more! So, if you want to make the most of them, go ahead, play around, and let us know how that goes. If you want more detailed information about checkout hooks, you can have a look at our checkout hooks guide.
Finally, don’t hesitate to contact us if you have any questions. We’ll do our best to help you out!
Хуки WooCommerce, несомненно, важны, и их правильное размещение помогает расширить функциональность магазина без внесения изменений в основной код темы магазина.
В данной статье мы предоставим полный список хуков WooCommerce и опишем основные области применения, а также покажем примеры размещения областей для хуков, чтобы вам в дальнейшем было проще их использовать.
Для начала пару слов о WooCommerce Хуках. Они построены по тому же принципу, что и все остальные WordPress Хуки и служат в первую очередь для разметки всех страниц для последующего быстрого использования Действий и Фильтров.
Основная область применения хуков — это возможность создания независимых плагинов и расширений, которые не меняют основной код WordPress, WooCommerce и других плагинов, к которым применяются, и таким образом не влияют на дальнейшее обновление и стабильную работу.
В целом WooCommerce очень красиво размеченный с помощью хуков, что позволяет легко расширять его возможности. Ниже мы рассмотрим все области, которые размечены на данный момент хуками.
WooCommerce Global Hooks
К глобальным мы отнесли три хуки, которые отражаются на основных страницах и позволяют их широко дополнить. Среди них:
pre_get_product_search_form
Позволяет добавить информацию над основным поиском по продуктам.

woocommerce_breadcrumb
Позволяет отобразить информацию над ссылками breadcrumbs.

woocommerce_no_products_found
Позволяет отобразить необходимую информацию на странице поиска, если не найдено ни одного товара.

WooCommmerce Cart Hooks
В целом страница корзины в WooCommerce очень хорошо размечена. Для удобства мы разделили на три группы все хуки, которые используются на странице Cart.
Хуки, которые отображаются перед списком товаров в корзине
К ним относятся следующие:
- woocommerce_before_cart
- woocommerce_before_cart_table
- woocommerce_before_cart_contents
- woocommerce_cart_contents
- woocommerce_after_cart_contents

Хуки, которые отображаются после списка товаров в корзине
К ним относятся следующие хуки:
- woocommerce_cart_coupon
- woocommerce_cart_actions
- woocommerce_after_cart_table
- woocommerce_cart_collaterals
- woocommerce_before_cart_totals

Хуки, которые отражаются в итоге заказа
К ним относятся следующие хуки:
- woocommerce_cart_totals_before_shipping
- woocommerce_cart_totals_after_shipping
- woocommerce_cart_totals_before_order_total
- woocommerce_cart_totals_after_order_total
- woocommerce_after_shipping_rate
- woocommerce_before_shipping_calculator
- woocommerce_proceed_to_checkout
- woocommerce_after_cart_totals
- woocommerce_after_cart

В случае, если в корзине нет товаров
В этом случае вы можете использовать следующий хук:
woocommerce_cart_is_empty

WooCommerce Checkout Hooks
Поскольку страница Checkout на WooCommerce очень функциональная, мы также решили разделить все хуки, которые здесь используются, на несколько категорий.
Хуки, которые используются перед формой контактных данных
К ним относятся следующие хуки:
- woocommerce_before_checkout_form
- woocommerce_checkout_before_customer_details
- woocommerce_checkout_billing
- woocommerce_before_checkout_billing_form

Хуки, которые используются для разметки Billing details
К ним относятся следующие хуки:
- woocommerce_after_checkout_billing_form
- woocommerce_checkout_shipping
- woocommerce_before_order_notes
- woocommerce_after_order_notes
- woocommerce_checkout_after_order_review

Хуки, которые используются перед итогом товаров в заказе
К ним относятся следующие хуки:
- woocommerce_checkout_after_customer_details
- woocommerce_checkout_before_order_review
- woocommerce_review_order_before_cart_contents
- woocommerce_review_order_after_cart_contents
- woocommerce_review_order_before_shipping
- woocommerce_review_order_after_shipping
- woocommerce_review_order_before_order_total
- woocommerce_review_order_after_order_total

Хуки, которые отображаются в конце формы заказа
К ним относятся следующие хуки:
- woocommerce_checkout_order_review
- woocommerce_review_order_before_payment
- woocommerce_review_order_before_submit
- woocommerce_review_order_after_submit
- woocommerce_review_order_after_payment
- woocommerce_after_checkout_form

Хуки, которые отображаются в списке товаров в заказе
К ним относятся следующие хуки:
- woocommerce_order_items_table
- woocommerce_order_item_meta_start
- woocommerce_order_item_meta_end
- woocommerce_order_details_after_order_table
- woocommerce_thankyou

WooCommerce Product Hooks
В данном разделе рассмотрим все хуки, которые используются на странице товара. Здесь также есть большое количество возможных хуков, поэтому мы их разбили на несколько категорий по назначению.
Хуки, которые отражаются сначала и в конце страницы товара
К ним относятся следующие хуки:
- woocommerce_before_main_content
- woocommerce_after_main_content

Хуки, которые отображаются перед началом и в конце описания товара
К ним относятся следующие хуки:
- woocommerce_before_single_product_summary
- woocommerce_after_single_product_summary

Хуки, которые отображаются перед началом и в конце карточки товара
К ним относятся следующие хуки:
- woocommerce_before_single_product
- woocommerce_after_single_product

Хуки, которые отражаются непосредственно в кратком описании товара
К ним относятся следующие хуки:
- woocommerce_single_product_summary
- woocommerce_product_meta_start
- woocommerce_product_meta_end
- woocommerce_share

Хуки, которые отображаются среди списка комментариев
К ним относятся следующие хуки:
- woocommerce_review_before
- woocommerce_review_before_comment_meta
- woocommerce_review_meta
- woocommerce_review_before_comment_text
- woocommerce_review_comment_text
- woocommerce_review_after_comment_text

WooCommerce Category Hooks
WooCommerce имеет также достаточно хуков для работы с категориями товаров. Ниже мы рассмотрим их с кратким описанием и скринами.
woocommerce_archive_description
Отображается сразу под заголовком категории.

woocommerce_shop_loop
Отображается перед карточкой товара в списке.

woocommerce_before_shop_loop
Отображается перед списком товаров в категории.

woocommerce_after_shop_loop
Отображается после списка товаров в категории.

woocommerce_after_shop_loop_item
Отражается в конце описания каждой карточки товара в списке.

Хуки, которые дополнительно размечают карточку товара в списке.
К ним относятся следующие хуки:
- woocommerce_after_shop_loop_item_title
- woocommerce_shop_loop_item_title
- woocommerce_before_shop_loop_item_title

WooCommerce My Account Hooks
Эти хуки служат для детальной разметки страницы My Account. Мы также выделили две категории таких хуков.
Основные хуки для разметки страницы Мой Аккаунт
К ним относятся следующие:
- woocommerce_before_account_navigation
- woocommerce_after_account_navigation
- woocommerce_account_navigation
- woocommerce_before_edit_account_address_form
- woocommerce_after_edit_account_address_form
- woocommerce_account_content

Дополнительные хуки для разметки страницы Мой аккаунт
К ним относятся следующие:
- woocommerce_account_dashboard
- woocommerce_before_my_account
- woocommerce_after_my_account

WooCommerce Mini Cart Hooks
Данные хуки служат для разметки мини-корзины, которая отображается в сайдбаре, если использовать дополнительные настройки отображения WooCommerce.
К ним относятся следующие:
- woocommerce_before_mini_cart
- woocommerce_before_mini_cart_contents
- woocommerce_mini_cart_contents
- woocommerce_widget_shopping_cart_before_buttons
- woocommerce_widget_shopping_cart_buttons
- woocommerce_after_mini_cart

WooCommerce Email Hooks
Служат для разметки писем, которые направляются пользователям после покупки, и содержат список товаров.
К ним относятся следующие:
- woocommerce_email_after_order_table
- woocommerce_email_before_order_table
- woocommerce_email_customer_details
- woocommerce_email_footer
- woocommerce_email_header
- woocommerce_email_order_details
- woocommerce_email_order_meta

Другие хуки
Выше мы описали основные хуки, которые используются для разметки и расширения основного функционала WooCommerce.
Однако существует еще ряд хуков, которые используются в меньшей степени. Мы предоставляем полный список ниже:
- woocommerce_after_account_downloads
- woocommerce_after_account_orders
- woocommerce_after_account_payment_methods
- woocommerce_before_account_download
- woocommerce_before_account_order
- woocommerce_before_account_orders_paginatio
- woocommerce_before_account_payment_method
- woocommerce_edit_account_for
- woocommerce_edit_account_form_en
- woocommerce_edit_account_form_star
- woocommerce_resetpassword_for
- woocommerce_after_available_downloads
- woocommerce_after_checkout_registration_form
- woocommerce_after_checkout_shipping_form
- woocommerce_after_edit_account_form
- woocommerce_after_subcategor
- woocommerce_after_subcategory_titl
- woocommerce_auth_page_foote
- woocommerce_auth_page_heade
- woocommerce_available_download_en
- woocommerce_available_download_star
- woocommerce_before_available_download
- woocommerce_before_checkout_registration_for
- woocommerce_before_checkout_shipping_for
- woocommerce_before_edit_account_for
- woocommerce_before_subcategor
- woocommerce_before_subcategory_titl
- woocommerce_cart_has_error
- woocommerce_checkout_after_terms_and_condition
- woocommerce_checkout_before_terms_and_condition
- woocommerce_lostpassword_for
- woocommerce_order_details_after_customer_detail
- woocommerce_pay_order_after_submi
- woocommerce_pay_order_before_submi
- woocommerce_product_thumbnail
- woocommerce_shop_loop_subcategory_titl
- woocommerce_view_order
В случае, если вам нужно дополнительное объяснение по любому хуку, оставляйте комментарии, мы с радостью объясним дополнительно и расширим материал.
Блог
Делимся с Вами своими знаниями и новостями
#Cruelten » Блог » Web » Работаем с хуками (hooks) в WooCommerce
12.09.2018

Каждый из тех, кто установил себе на сайт на платформе WordPress плагин WooCommerce обязательно столкнется с таким понятием, как Хуки (Hooks). В этой статье я бы хотел остановиться на них более подробно. Но основной своей задачей ставлю краткое изложение вопроса по существу. Итак, хуки, это некие функции, которые заложены внутри плагина WooCommerce и работают по умолчанию. Но что делать, если мы хотим внести изменения в отображение товара или категории. Для этого и существует возможность работы с хуками напрямик. Более подробно о том, как работать с хуками я рассказал в своем видео, оно в конце этой статьи. А пока пару важных моментов.
Хук это некая оболочка для функций, которые выводит те или иные элементы на сайте. Полный список хуков WooCommerce можно посмотреть здесь. Как я и говорил, каждый хук содержит в себе любое количество функций, которые по умолчанию заданы в файлах плагина WooCommerce. Найти их можно по адресу: ваш_сайт/wp-content/plugins/woocommerce/includes. Также список файлов с нужными нам хуками есть и по этому адресу. В своем видео я подробно остановился на этом, поэтому должно быть все понятно.
Важным составляющим всех хуков является их переопределение в Вашей теме сайта, а также удаление их, используя Ваш стандартный файл functions.php. Для этого существует всего 2 функции. Вот они.
remove_action('woocommerce_before_main_content', 'woocommerce_breadcrumb', 20 );
add_action( 'woocommerce_before_main_content', 'my_functions', 20 );
Первая из этих функций ищет хук woocommerce_before_main_content и удаляет в нем функцию woocommerce_breadcrumb. А вторая функция добавляет к хуку woocommerce_before_main_content функцию my_functions. То есть благодаря этой конструкции мы удаляем функцию по умолчанию, которая заложена в самом WooCommerce и определяем свою функцию my_functions, в которой можем написать все, что угодно. Надеюсь я помог Вам хоть немного понять, что такое Хуки в WooCommerce. Если же все-таки есть какие-то вопросы — задавайте комментарии, а также смотрите видео.
Свяжитесь с нами уже сейчас
- +7 (906) 272-38-19
Telegram / WhatsApp - info@cruelten.ru
- Cruelten
- Cruelten
Вы привыкли видеть здесь форму обратной связи. Ведь так? Ее делают почти все. Но исследуя поведение людей, мы пришли к выводу, что форма совершенно не нужна. В любом случае все сводится к обсуждению Вашего проекта в WhatsApp или Telegram. А зачем нам тратить Ваше время на заполнение различных форм? Поэтому, пишите в Telegram или в WhatsApp.
You’ve installed WooCommerce on your ecommerce site. Congrats! Now, it’s time to customize your store…but you have no clue how to do that. Well, there’s an easy and effective way you can tweak your online store without any hassle: WooCommerce hooks.
By using WooCommerce hooks, you don’t have to worry about juggling multiple plugins to customize your store or add new features to it. But before we jump in on how to use this amazing functionality, what exactly are WooCommerce hooks?
What are WooCommerce hooks?
WooCommerce hooks are functions that allow you to insert, modify, or change data and features in specific locations on your store. With WooCommerce hooks, you can easily tweak how your store looks and add new features using custom code.
For context, hooks are like sockets in WooCommerce, where you can plug in your own custom code. Instead of writing custom code from scratch, WooCommerce provides a long list of hooks that you can copy to create custom looks and functionalities. You can add colors and custom checkout and cart pages to your WooCommerce store. Not only that, but you can also remove or modify functions that you don’t like.
Say you want to make a specific change to the shopping cart that notifies prospective customers that they haven’t selected any items yet. All you need to do is add in this custom code: woocommerce_cart_is_empty
Source
WooCommerce hooks are written in PHP language. For the layman, PHP is defined as an open-source scripting language that’s generally used by web developers to create custom pages or functions. Even though you’re not a developer, you can still leverage it to make fundamental changes to your store.
WooCommerce hooks work just like WordPress hooks. The only major difference is that WooCommerce hooks only work within the WooCommerce ecosystem while WordPress hooks work on WordPress-powered websites.
That being said, you can use WooCommerce hooks to design a store that’s personalized around your business needs and strengthens your customers’ shopping experience.

What are the types of WooCommerce hooks?
There are two major types of WooCommerce hooks: action and filter. While both are important in helping you create a custom WooCommerce store, they perform different functions. Action hooks allow you to run custom functions on your store, while filter hooks come in handy to help you make certain changes to your store.
What is an action hook?
Action hooks allow you to add data and change how WooCommerce operates by default. They also come in handy for plugging in additional features and extending your store’s functionality beyond its default capacity.
In simple terms, action hooks allow you to add new functions to your store. Here are some of the things you can add to your WooCommerce store using action hooks:
- Extra widgets
- New categories
- New field to checkout
- Shipping rates
- Form for lost password
- A message thanking customers after they’ve ordered something
An action hook syntax looks exactly like this: do_action('action_name');
What is a filter hook?
Filter hooks allow you to modify existing data in WooCommerce during execution. Data here can be a simple text, HTML element, or PHP variable. Filter hooks allow you, as an ecommerce store owner, to modify the default behavior of a specific function. This implies that you can reconfigure or alter how an existing page, text, or PHP variable looks or functions.
You can use filter hooks to:
- Change a text string (words, letters, numbers, and characters)
- Prevent a post from going to the trash when it’s deleted
- Change your checkout button to another color
A filter hook syntax looks exactly like this: apply_filter( 'filter_name', $variable
What are the benefits of using WooCommerce hooks?
Instead of modifying your WooCommerce plugin or theme directly, you can use hooks to effortlessly customize your store’s styling and functionalities. The best part is that WooCommerce hooks keep your custom codes independent of your theme. What this means is that any designs made on your store using WooCommerce hooks will run even if you change your theme or update your plugin.
The reverse is the case if you’re editing directly in your plugin or parent’s theme functions.php. You risk losing all the custom styling you made once you update or change the theme you’re using. And if you don’t update your theme, you make your website vulnerable to attacks.
Using default WooCommerce plugins and templates to edit your store will give you limited customization options. It’s often difficult to find a plugin that offers all the solutions you need. Because of that, ecommerce owners might find themselves using multiple plugins that aren’t compatible with each other.
3 Real-life examples of WooCommerce hooks in action
If you’re wondering how to use hooks to customize your WooCommerce store, we’ve got you covered. We’ve created a demo WooCommerce store, and we’ll be using the Code Snippets plugin to add WooCommerce hooks to it.
But wait, didn’t we just say hooks are better than plugins? Technically, Code Snippets is a plugin that allows you to modify your WooCommerce store without having to install multiple plugins that can make your site slower.
The Code Snippets plugin lets you add PHP code snippets to your site. Snippets are small chunks of reusable PHP codes. You can use the plugin to make simple changes in your store using action and filter hooks.
Using the Code Snippets plugin makes it very easy to add hooks to your store. It has a clean graphic interface that allows you to add and manage snippets without any hassle. Each snippet has its entry, thereby working like mini-plugins. There’s also a fail-safe feature that lets you deactivate a single snippet on your site if you don’t have any need for it again.
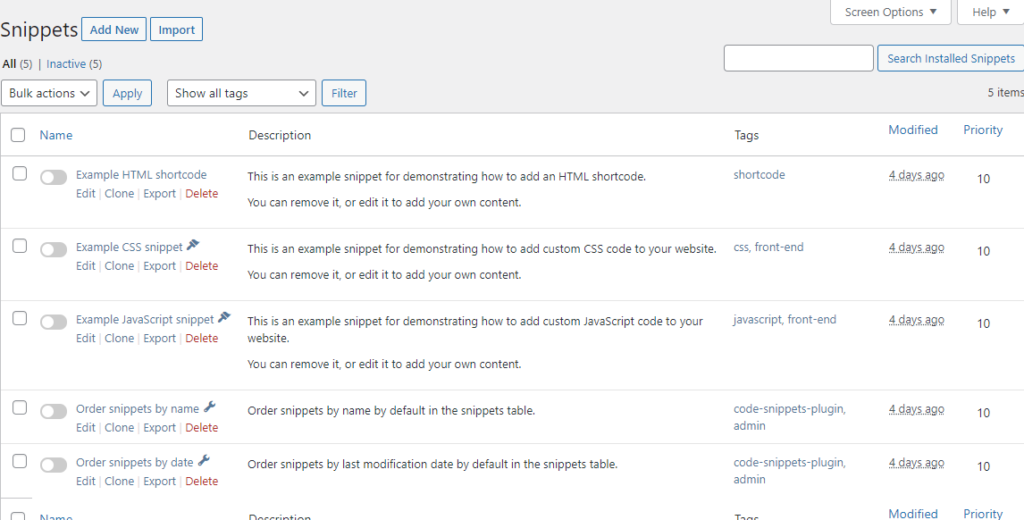
Example of a code snippet interface
Code Snippets is ideal for making minor tweaks to your store with hooks. It is less complicated—especially for someone without high-level web development knowledge.
You can follow this process to add WooCommerce hooks to your store using Code Snippets.
- Install and activate the Code Snippet plugin
- Head to Snippets and then click Add New
- Add a name for your snippet and paste the snippet in the code area.
- Choose where to run the snippet.
Here are three ways you can use Code Snippets to implement WooCommerce hooks in your store:

Login to purchase
Here, we’ll be using a code snippet to activate an action hook that prompts customers to log in before purchasing a product. Although this feature isn’t advisable to add to all of your products, it may be ideal for exclusive members-only products.
To add this feature to your WooCommerce store, add the code below to your snippet and activate it when you’re done.
add_action( 'woocommerce_before_single_product', 'quadlayers_add_message');
add_filter( 'woocommerce_is_purchasable', 'quadlayers_block_admin_purchase' );
function quadlayers_block_admin_purchase($block) {
if ( is_user_logged_in() ):return true;
else:return false;
endif;
}

function quadlayers_add_message( ){
if ( !is_user_logged_in() ):echo '<H2 style="margin-bottom:25px; text-align:center; background-color:red; font-weight:bold; color:wheat;">PLEASE LOGIN TO PURCHASE THIS PRODUCT</h2>';
endif;
}

Once this is done, you’ll see text highlighted on the product page that nudges the customer to log in so they can make a purchase.

Add credit card logos
Here, we will be using another action hook that lets us add trusted credit card logos on our checkout page. Adding credit card logos to your store helps give your store a sense of legitimacy. It also informs customers about the type of credit cards you accept and the ones you don’t.
To add credit card logos to your store, you can use the code below:
// Display payment methods on shopping cart page
add_action( 'woocommerce_after_cart_totals', 'available_payment_methods' );
function available_payment_methods() {
echo '<div class="payment-methods-cart-page">
<img src="https://ecommerce.acone.net/wp-content/uploads/2021/05/payment-2.png"></img>
</div>
<div class="payment-methods-message">We accept the following payment methods</div>';
}
![]()
Once you’re done, you’ll be able to see the icons on the checkout page:
![]()
Add share icons
Adding share buttons to your WooCommerce store makes it easy for customers to let their friends and family know about your products on social media channels. This sharing leads to more eyeballs on your products which likely leads to more sales.
By default, our theme has share icons. If your theme doesn’t include share buttons, here is how you can include them on your products page using action hooks.
Create a new snippet and add the code below to it:
// Remove them from under short description
remove_action( 'woocommerce_single_product_summary', 'woocommerce_template_single_sharing', 50 );// Rea
dabove product tabs
add_action( 'woocommerce_after_single_product_summary' , 'woocommerce_template_single_sharing', 5 );
![]()
Once this is done, you’ll be able to see the new share icons we added below using action hooks:

Use WooCommerce hooks to test out store ideas
Now that you know all you need to create your ideal ecommerce store try experimenting with different hooks to modify your store for a better user experience. When experimenting, make sure you test changes on a staging version. Once you’ve got things working properly, you can move the changes over to the live version.
In this article, we are going to list down a few of the custom hooks that can be used to overwrite a few of the default theme behavior with the Astra theme. It is always recommended to add the custom hooks to your theme’s child theme. If you are not sure what a child theme is, please read this article. If you are not sure how to insert the custom hooks to the function.php file of the child theme, click here.
Table Of Contents
- Astra theme custom hooks
- Changing the WooCommerce Shop sidebar widget tag
- Changing the WooCommerce Single Product Sidebar Widget tag
- Hide the quantity of the shopping cart when the cart is empty.
- Changing the default “Shopping Cart” text to a custom text on mobile view
- Disable Cart Count Display
- Change the Header Cart title
- Adding custom classes for Header Cart Menu section
- Disable the WooCommerce Default Header Cart Icon
- Disable the WooCommerce Integration
- Disable the WooCommerce Shop Parent Category on Shop Page
- Changing the “Out of stock” title
- Astra Add on plugin hooks
- Changing the text “No more products to show”
- Change the WooCommerce Cart URL redirect
- Filter to change the “Load More” label
- Custom Actions
- Open a product page in new Window
- Display the in-stock value just before the Add to cart button
- Adding custom snippet before the product summary on the Shop page
- Adding custom snippet after the product summary on the Shop page
- Add continue shopping button on cart and checkout pages
- Display SKU field in the product loop
- Add custom fields after the title on the Shop page archive
- Add custom fields before the title on the Shop page archive
- Add custom fields after the title on the Single Product page
- Add custom fields before the title on the Single Product page
Astra theme custom hooks
Changing the WooCommerce Shop sidebar widget tag
The following custom hook will change the shop sidebar widget title tag to H4. This function is normally used to change the heading tag of the widget title to avoid duplicate headings which in turn increases the SEO score of a webpage or blog.To use this code, simply copy it and paste it at the bottom of the function.php file of your child theme.
add_filter( 'astra_woocommerce_shop_sidebar_init', 'widget_title_tag', 10, 1 );

function widget_title_tag( $atts ) {
    $atts['before_title'] = '<h4 class="widget-title">';
    $atts['after_title'] = '</h4>';

    return $atts;
}

Hello! My name is Sujay and I’m CEO of Astra.
We’re on a mission to help small businesses grow online with affordable software products and the education you need to succeed.
Leave a comment below if you want to join the conversation, or click here if you would like personal help or to engage with our team privately.
Changing the WooCommerce Single Product Sidebar Widget tag
The following custom hook will change the single product sidebar widget title tag to H4. This function is normally used to change the heading tag of the widget title to avoid duplicate headings which in turn increases the SEO score of a webpage or blog. To use this code, simply copy it and paste it at the bottom of the function.php file of your child theme.
add_filter( 'astra_woocommerce_single_sidebar_init', 'widget_title_tag', 10, 1 );

function widget_title_tag( $atts ) {
    $atts['before_title'] = '<h4 class="widget-title">';
    $atts['after_title'] = '</h4>';

    return $atts;
}
Hide the quantity of the shopping cart when the cart is empty.
This custom function will hide the quantity of the items when the cart is empty. Ideally without the code, the cart will display “0” when it is empty; however, when you add the following code to the function.php file of your child theme, the display will be blank. Here is a complete article about the same.
add_filter('astra_woo_header_cart_total', 'remove_cart_count');
function remove_cart_count( $default){
    if(0 == WC()->cart->get_cart_contents_count()){
        return false;
    }else{
        return $default;
    }
}
This is how it will be displayed on the front end of the website:

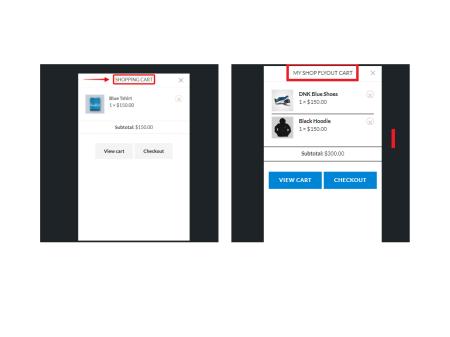
Changing the default “Shopping Cart” text to a custom text on mobile view
By default the WooCommerce have named the cart as the shopping cart. To change this text there are no options inside the theme or the plugin.This custom hook will let you change the shopping cart text to anything that you would like to. Just replace the text “My Shop Flyout Cart” to any text that you would like to set up.
add_filter( 'astra_header_cart_flyout_shopping_cart_text', function() {

    return 'My Shop Flyout Cart';

}
To know more about this, please visit this article. Here is an example of before and after effects of using this code:
Disable Cart Count Display
This custom function will disable the cart count display on your WooCommerce website.
add_filter( 'astra_header_cart_count', '__return_false' );Change the Header Cart title
This custom function will allow you to change the cart title in the header to any text that you would like to. Replace the text “My Shop Cart” to anything that you would like to change the cart title to.
dd_filter( 'astra_header_cart_title', function() {

    return 'My Shop Cart';

} );
Here is a comparison of before and after images.

Adding custom classes for Header Cart Menu section
This custom function will add a custom class to the cart menu section inside the header.
add_filter( 'astra_cart_in_menu_class', function( $args ){

    $args = array_merge($args, array('custom-class-name-1', 'custom-class-name-2'));

    return $args;

} );
Disable the WooCommerce Default Header Cart Icon
This custom function will hide the cart icon from the header of your ecommerce website in the Astra theme.
add_filter( 'astra_woo_default_header_cart_icon', '__return_false' );![]()
Disable the WooCommerce Integration
The Astra Theme comes with out-of-the-box customization options for the WooCommerce plugin. You can use these to customize the Shop, Cart, and Checkout Pages as well as Single Products. Contrary, to use the default WooCommerce pages and options for your website, you need to use custom code. Thus, you can learn how to do it with this document. To know more on how it changes the site, click here.
add_filter( 'astra_enable_woocommerce_integration', '__return_false' );Disable the WooCommerce Shop Parent Category on Shop Page
This custom function will hide the parent category from the shop page of your ecommerce site.
add_filter( 'astra_woo_shop_parent_category', '__return_false' );
Here is an example of how it works.
Changing the “Out of stock” title
This custom function will allow you to change the text of the “out of stock” for any item to any custom text of your choice. To know more about this filter, please visit this article.
add_filter( 'astra_woo_shop_out_of_stock_string', function() {

    return 'My Out of stock label';

} );
Astra Add on plugin hooks
Changing the text “No more products to show”
This custom hook will let you change the text of the default message “No more products to show” to any custom text of your choice when your visitors reach the end of a product search. This is a premium feature and only works when the Astra Addon plugin is installed. All you need to do is to change the “My No more products to show label” in the code below to any text of your choice and add the code to the function.php file of your astra child theme.
add_filter( 'astra_shop_no_more_product_text', function() {

    return 'My No more products to show label';

} );
Change the WooCommerce Cart URL redirect
This custom filter will let you change the default WooCommerce cart url redirect to any page of your choice. If you have built a custom cart page and would like your visitors to be redirected to this page instead of the default cart page of the woocommerce, this is the filter for you.
All you have to do is replace the url “https://my_add_to_cart_redirect_url” to your custom url in the code mentioned below and add this to the function.php file of your Astra child theme.
add_filter( 'astra_woocommerce_add_to_cart_redirect', function() {

    return 'https://my_add_to_cart_redirect_url'; // e.g: http://<yoursite_url>/cart/

} );
Filter to change the “Load More” label
This custom filter will let you change the “Load More” labels on your ecommerce website. All you have to do is to replace the text “My Load More label” in the code mentioned below and add this to the function.php file of the Astra Child theme.
add_filter( 'astra_load_more_text', function() {

    return 'My Load More label';

} );
Custom Actions
These custom action codes will let you have more control on how your ecommerce page looks like in the frontend.
Open a product page in new Window
The following custom code will let you open the product page in a new window always.
remove_action( 'woocommerce_before_shop_loop_item','woocommerce_template_loop_product_link_open', 10 );

add_action( 'woocommerce_before_shop_loop_item', 'ami_function_open_new_tab', 10 );

function ami_function_open_new_tab() {

    echo '<a target="_blank" href="' . get_the_permalink() . '" class="woocommerce-LoopProduct-link">';

}
See it in action below
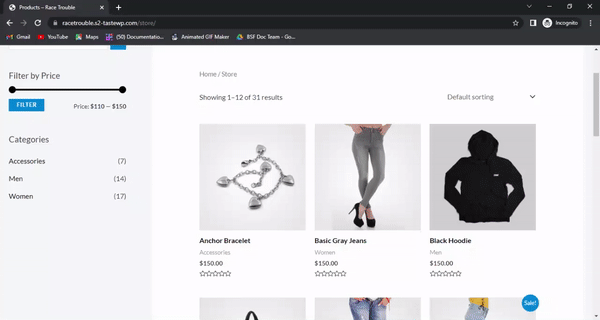
Display the in-stock value just before the Add to cart button
The following custom code will display the value of the in-stock items just before the add to cart button on the shop page of your ecommerce store.
add_action( 'astra_woo_shop_add_to_cart_before', 'astra_custom_code', 10 );

function astra_custom_code() {

   global $product;

   echo wc_get_stock_html( $product );

}
Here is how it looks like in the front-end
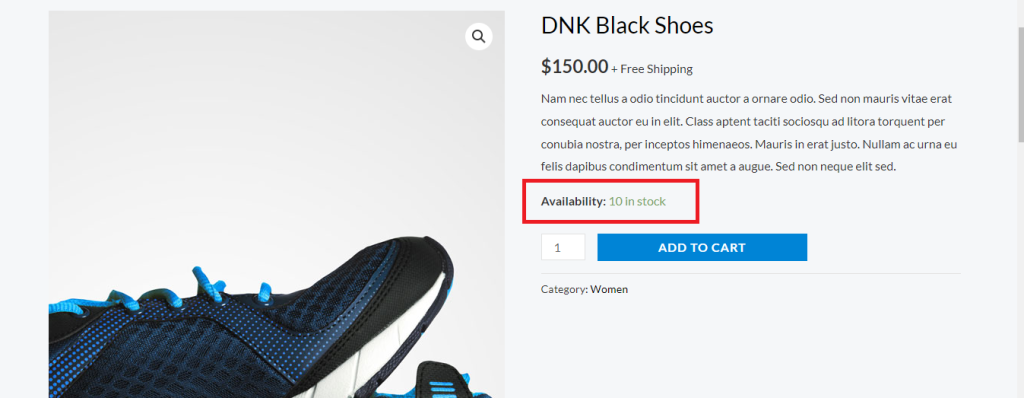
Adding custom snippet before the product summary on the Shop page
This custom filter lets you add a custom text snippet before the product summary on the shop page.
add_action( 'astra_woo_shop_before_summary_wrap', 'astra_custom_code', 10 );

function astra_custom_code() {

   echo '<div>

    Add here your custom snippet that needs to be added before the product summary on the Shop page.

   </div>';

}
Here is how it looks in the front end
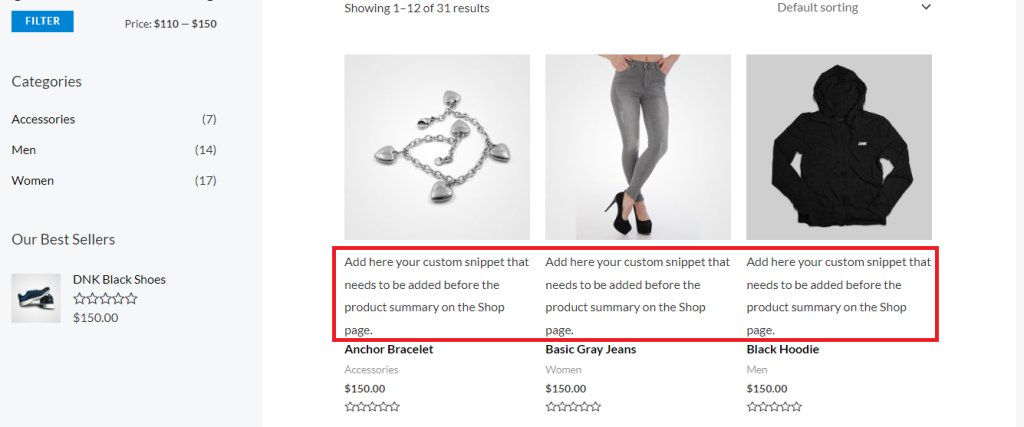
Adding custom snippet after the product summary on the Shop page
This custom filter lets you add a custom text snippet after the product summary on the shop page.
add_action( 'astra_woo_shop_after_summary_wrap', 'astra_custom_code', 10 );

function astra_custom_code() {

   echo '<div>

    Add here your custom snippet that needs to be added After the product summary on Shop page.

   </div>';

}
Here is how it looks at the front end:

Add continue shopping button on cart and checkout pages
This custom code lets you add a continue shopping button on your cart and checkout page so that the customer can continue to browse more products and add them to cart.
/**

* Add Continue Shopping Button on Cart (& checkout) Page

*/


add_action( 'woocommerce_after_cart_table', 'woo_add_continue_shopping_button_to_cart' );


function woo_add_continue_shopping_button_to_cart() {

 $shop_page_url = get_permalink( woocommerce_get_page_id( 'shop' ) );


 echo '<div class="">';

 echo ' <a href="'.$shop_page_url.'" class="button">Continue Shopping</a>';

 echo '</div>';

}


add_action( 'woocommerce_before_checkout_form', 'woo_add_continue_shopping_button_to_checkout' );


function woo_add_continue_shopping_button_to_checkout() {

 $shop_page_url = get_permalink( wc_get_page_id( 'shop' ) );


 echo '<div class="woocommerce-message">';

 echo ' <a href="'.$shop_page_url.'" class="button">Continue Shopping</a> Not finished shopping ?';

 echo '</div>';

}
Here is how it looks in the front end:
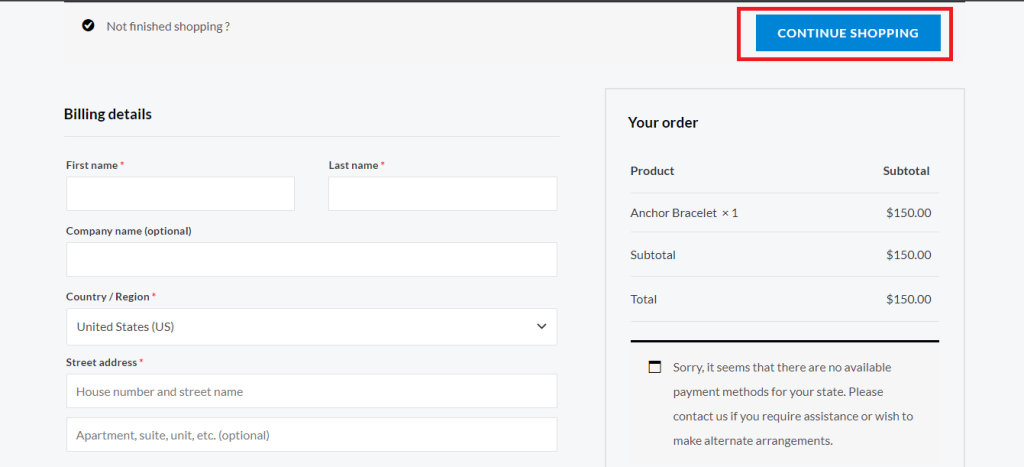
Display SKU field in the product loop
This custom code displays the SKU in the product loop.
add_action( 'woocommerce_after_shop_loop_item_title', 'woocommerce_after_shop_loop_item_sku_in_cart', 20, 1);
function woocommerce_after_shop_loop_item_sku_in_cart( $template ) {
global $product;
$sku = $product->get_sku();
echo "<p style='color: #444;'>" ."SKU Number: " . $sku . "</p>";
}Add custom fields after the title on the Shop page archive
This custom code will let you add the custom fields after the product title on the shop page i.e. the product summary on the Shop page.
add_action( 'astra_woo_shop_title_after

', 'astra_custom_code', 10 );

function astra_custom_code() {

   echo '<div>

    Add custom fields after the title on the Shop page archive i.e. the product summary on Shop page.

   </div>';

}
Add custom fields before the title on the Shop page archive
This custom code will let you add the custom fields before the product title on the shop page i.e. the product summary on the Shop page.
add_action( 'astra_woo_shop_title_before', 'astra_custom_code', 10 );

function astra_custom_code() {

   echo '<div>

    Add custom fields before the title on the Shop page archive i.e. the product summary on Shop page.

   </div>';

}
Add custom fields after the title on the Single Product page
This custom code will let you add a custom text after the product title on the single product page.
add_action( 'astra_woo_single_title_after', 'astra_custom_code', 10 );

function astra_custom_code() {

   echo '<div>

    Add custom fields/snippet after the title on the Single Product page.

   </div>';

}
Add custom fields before the title on the Single Product page
This custom code will let you add a custom text before the product title on the single product page.
add_action( 'astra_woo_single_title_before', 'astra_custom_code', 10 );

function astra_custom_code() {

   echo '<div>

    Add custom fields/snippets before the title on the Single Product page.

   </div>';

}Урок 3
Хуки: фильтры и действия. Подробное руководство
Содержание
- Разбор фильтра
- Пример фильтр
- Разбор действия
- Пример действия
- Параметры и приоритеты
- Отключение хуков
Хук (hook) — в переводе означает крючок.
Где-то в самом коде ядра WordPress или в плагине WooCommerce (да и в любом плагине) или даже в теме есть крючки, на которые мы можем повесить свой код, никак не затрагивая при этом основные файлы WordPress или же файлы плагина. Тем самым вы сможете спокойно обновлять плагины и движок, а ваш код, подвешенный на эти крючки будет находиться где-то в отдельном месте.
Наши хуки будут делиться на два вида: фильтры и действия.
- Фильтры позволят вам изменить значения каких-либо переменных перед их возвратом функциями.
- Действия позволят вам выполнить какой угодно код там, где висит «крючок».
Чтобы скачать плагин, который получился в процессе этого урока, нужно купить курс.
Пошаговый разбор работы фильтра
Задача фильтра — дополнительно изменить значение какой-либо переменной при помощи произвольной функции, не затрагивая при этом основные файлы движка или плагинов.
Делается это в принципе при помощи двух функций — apply_filters() и add_filter().
- Всё начинается с того, что где-то в коде движка WordPress или плагина находится переменная, на которую в последствии нужно будет воздействовать фильтром. На эту переменную вешается функция apply_filters(), и результат действия функции обычно присваивается самой же переменной. Кроме того, тут же задаётся и название фильтра. Например это может выглядит так:
$x = apply_filters( 'misha_filter', $x );
- После этого мы уже можем воздействовать на эту переменную извне при помощи add_filter(). Для этого например в файле
functions.phpили в нашем собственном плагине, который мы разрабатываем на протяжении этого курса, мы создаём функцию с произвольным названием, аргумент функции — переменная$x, внутри функции выполняем с ней все необходимые действия и в конце концов возвращаем результативную переменную. Затем, рядом с функцией вызываем add_filter(), в которой в качестве параметров указываем название фильтра и название нашей произвольной функции. Меньше слов, больше дела — вот как это может выглядеть:
add_filter( 'misha_filter', 'misha_function' );

function misha_function( $x ) {
	$x = '<strong>' . $x . '</strong>'; // если переменная текстовая, мы просто сделали текст жирным шрифтом
	return $x; // возвращаем
}
Или вот так начиная с версии PHP 5.3
add_filter( 'misha_filter', function( $x ) {
	$x = '<strong>' . $x . '</strong>'; // если переменная текстовая, мы просто сделали текст жирным шрифтом
	return $x; // возвращаем
} );
Но у анонимной функции есть минус – такой хук невозможно будет отключить.
- Стоп! Прежде, чем читать пост дальше, рекомендую опробовать всё это у себя. Вам не обязательно писать для этого плагин — просто в теме, например в
header.phpвыведите переменную$xи перед выводом примените к ней фильтр, а в файлеfunctions.phpэтот фильтр и наложите.
Пример с фильтром the_content
Скажите, то содержимое поста, которое находится у вас в редакторе в админке и то, которое выводится на сайте одно и то же или отличается?
Вероятно, это одна из тех вещей, которая фильтруется больше всего – при помощи фильтра the_content на содержимое поста накладываются функции wpautop(), wptexturize(), применяются шорткоды. Кроме того, пользователь тоже мог нагуглить какие-нибудь хуки и с их помощью, скажем, выводить кнопки социальных сетей под постом.

Чтобы посмотреть наглядно, попробуйте вставить этот код в удобное место в теме, в footer.php или в произвольный шаблон страницы:
$my_post = get_post( 5 ); // вместо 5 укажите ID интересующей вас записи
echo $my_post->post_content; // выводим содержимое поста как оно есть в базе данных
$filtered = apply_filters( 'the_content', $my_post->post_content ); // применяем фильтры
echo $filtered; // выводим, смотрим, что получилось
Пошаговый разбор работы хука действия
Задача хука действия — в определенном месте в коде дать возможность выполнить вспомогательную функцию извне, не изменяя при этом самого кода.
Делается всё это так же, как и в случае с фильтрами, двумя функциями — do_action() и add_action()
- Всё начинается с того, что где-то в коде есть место, в котором потенциально нужно будет выполнить дополнительный код. Это место мы обозначим функцией do_action(), в качестве параметра которой укажем название «крючка». Это будет выглядеть очень просто:
do_action( 'misha_hook' );
- Теперь на этот «крючок» мы уже можем повесить функцию, которая будет находиться например в
functions.phpвашем темы или в отдельном плагине. То есть открываемfunctions.php, создаём там произвольную функцию, затем рядом с ней (не в ней!) выполняем функцию add_action(), в которой указываем название хука и название произвольной функции.
add_action( 'misha_hook', 'misha_function2' );

function misha_function2(){
	echo 'Привет, мир!';
}
Ну разве не простой механизм?
Пример с использованием хука wp_head в WordPress
Просто wp_head это первое, что пришло мне сейчас в голову. Итак, прежде всего откройте страницу вашего сайта, откройте её и в виде HTML-кода в браузере. А теперь зайдите в файл header.php и быстрым нажатием клавиши удалите оттуда функцию wp_head() (она и запускает хук). После этого посмотрите, как сильно изменится ваша страница — исчезнут стили, скрипты, возможно какой-то произвольный код, который вы вручную добавляли через этот хук.
Параметры и приоритеты
Приоритеты
Про приоритеты рассказать гораздо проще, поэтому начну с них. Как вы уже поняли, на один и тот же хук («крючок») имеется возможность повесить довольно много функций. Но ведь иногда эти функции изменяют значение одной и той же переменной, а это значит, что если поменять их местами, то и значение переменной будет другим.
Покажу простейший пример с использованием анонимных функций (вам нужна версия PHP 5.3.0 или выше) и хуков действий. Если вы вставите этот код куда-нибудь на сайте, то привязанные к хуку функции будут выполняться в порядке подключения в коде
add_action( 'misha_priority', function(){ echo 'A'; } );
add_action( 'misha_priority', function(){ echo 'Б'; } );
add_action( 'misha_priority', function(){ echo 'В'; } );

// сам хук
do_action( 'misha_priority' ); // будет выведено АБВ
А теперь внимание — функции add_action() и add_filter() третьим параметров поддерживают указание приоритета, с учетом этого видоизменим наш код.
add_action( 'misha_priority', function(){ echo 'A'; }, 9999 );
add_action( 'misha_priority', function(){ echo 'Б'; }, 5 );
add_action( 'misha_priority', function(){ echo 'В'; }, 10 ); // 10 - значение по умолчанию, поэтому его можно и не указывать

// сам хук
do_action( 'misha_priority' ); // будет выведено БВА
Как видите, чем выше значение приоритета, тем позднее функция будет подключена к хуку и выполнена.
Передача дополнительных аргументов в функцию
Чего ещё не хватает для полного счастья — передачи в подвешенные на хук функции дополнительных параметров. И эта возможность тоже предусмотрена.
Всё начинается с того, что в функциях do_action() или apply_filters() указываются один или несколько параметров.
do_action( 'misha_action', $param1, $param2, $param3 );
После этого, четвёртым параметром функции add_action() или add_filter() соответственно вы можете решить, сколько из них можно передать непосредственно в функцию.
add_action( 'misha_action', 'misha_function_1', 10, 3 ); // 3 - количество параметров, можно указать и 2, тогда функция misha_function() примет только два параметра, единицу можно не указывать, так как это значение по умолчанию

function misha_function_1( $param1, $param2, $param3 ) {

 	...

}
Отключение хуков и действий
Всего для этих целей в WordPress существует 4 функции:
- remove_filter() — для отключения конкретной функции с фильтра.
- remove_action() — для удаления конкретной функции с хука действия.
- remove_all_filters() — для полной очистки хука фильтра.
- remove_all_actions() — для полной очистки хука действия.
Пример для WooCommerce, удаляющий опции сортировки со страницы «Магазин» и категорий товаров:
remove_action( 'woocommerce_before_shop_loop', 'woocommerce_catalog_ordering', 30 );
Подробнее – на видео.
Купить курс
- 11 видеоуроков
- Можно скачать готовый код после каждого урока
- Уроки актуальны под последние версии WooCommerce
- Можно начать проходить курс сразу же после оплаты
- Доступ навсегда
- Единоразовый платёж
7000 р4200 р
Скидка 40% до 17 февраля