Содержание
- Способ 1: Назначение приложения по умолчанию
- Способ 2: Сторонние программы
- Способ 3: Замена иконки EXE-файла
- Вопросы и ответы
Способ 1: Назначение приложения по умолчанию
За исключением исполняемых, файлы в Windows не имеют собственных иконок, а используют иконки программ, которые назначены для открытия данных файлов по умолчанию. Соответственно, вы можете установить для файла иконку другой программы, изменив ассоциацию формата.
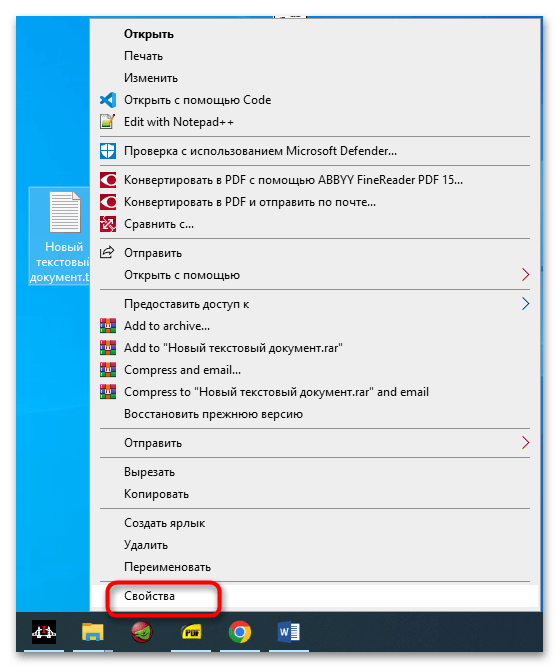
- Откройте свойства файла, для чего кликните по нему правой кнопкой мыши и выберите из контекстного меню одноименную опцию.
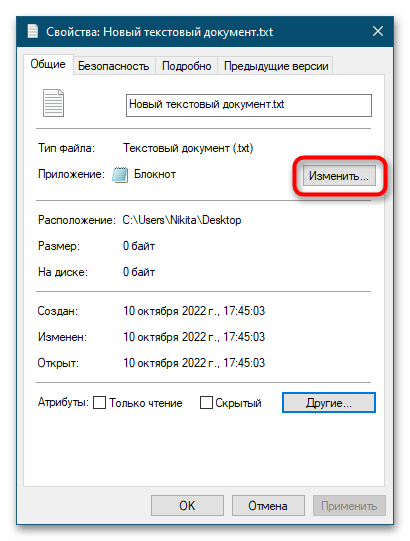
- Нажмите кнопку «Изменить» — это откроет меню выбора альтернативной программы.
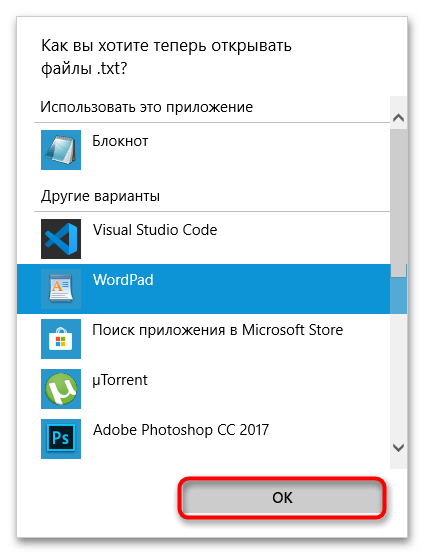
- Выберите из списка программу, иконку которой хотите установить для данного файла, и нажмите «OK».
- В предыдущем окне свойств файла нажмите «OK».

В результате файл и все файлы с тем же расширением получат значок выбранной для их просмотра программы. Впрочем, просматривать эти файлы вы по-прежнему сможете с помощью любого другого приложения, воспользовавшись опцией его контекстного меню «Открыть с помощью».
Способ 2: Сторонние программы
Основными недостатками предыдущего способа является изменения программы по умолчанию и использование только тех иконок, которые имеют назначаемые программы. Обойти эти ограничения можно с помощью стороннего софта, например утилиты FileTypesMan.
Скачать FileTypesMan с официального сайта
- Скачайте архив с утилитой со страницы разработчика и распакуйте. Там же можно скачать русификатор, который необходимо поместить в папку с исполняемым файлом FileTypesMan.
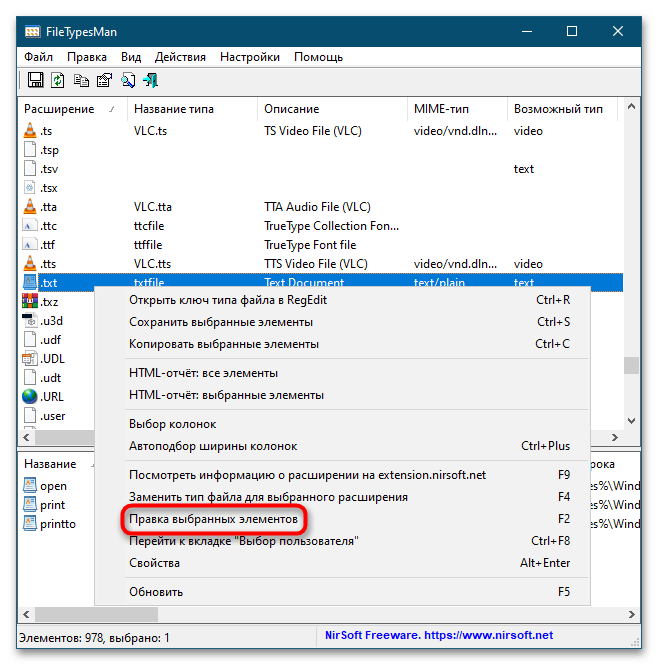
- Запустите приложение от имени администратора и найдите в списке формат файла, иконку которого хотите заменить. Кликните по ней правой кнопкой мыши и выберите в меню опцию «Правка выбранных элементов».
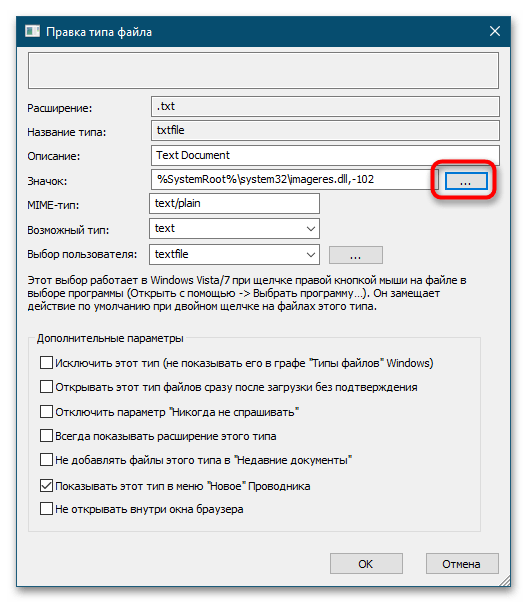
- Откроется окошко правки типа файла, нажмите в нём кнопку с троеточием напротив поля «Значок».
- В открывшемся системном окошке «Смена значка» выберите подходящий значок и нажмите «OK». Также вы можете нажать «Обзор» и указать путь к произвольной иконке в формате ICO (их, кстати, можно скачать отдельно на сайтах с кастомизацией Windows).
- Сохраните настройки и завершите работу FileTypesMan.


В результате все файлы с выбранным расширением получат новую иконку, причем это изменение никак не повлияет на ассоциацию формата с открывающим его по умолчанию приложением.
Способ 3: Замена иконки EXE-файла
В отличие от других типов, исполняемые файлы EXE содержат иконку внутри контейнера, поэтому, хотя эти файлы имеют одно расширение, значки у них могут быть разные. Правда, заменить их средствами операционной системы нельзя, для этого вам понадобится стороннее приложение Resource Hacker.
Скачать Resource Hacker

- Скачайте программу с сайта разработчика, установите и запустите.
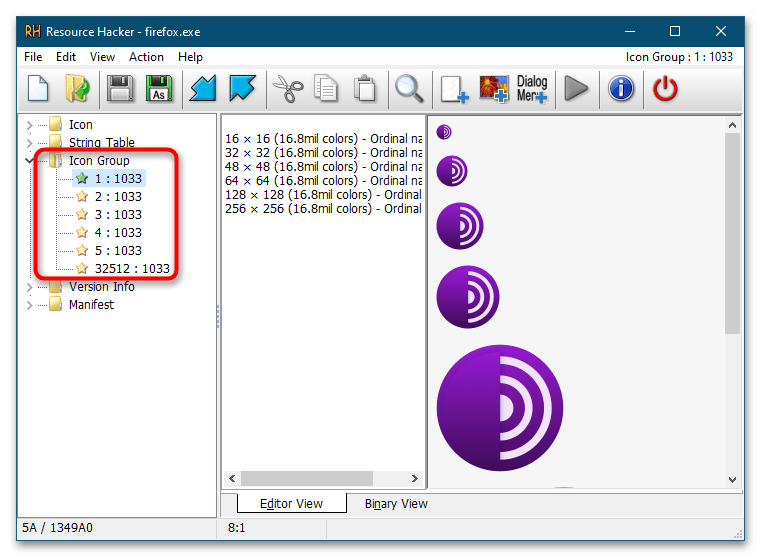
- Перетащите исполняемый файл, иконку которого хотите заменить, в рабочее окно Resource Hacker. В правой колонке отыщите текущий значок файла, он может располагаться в папке «Icon» либо «Icon Group».
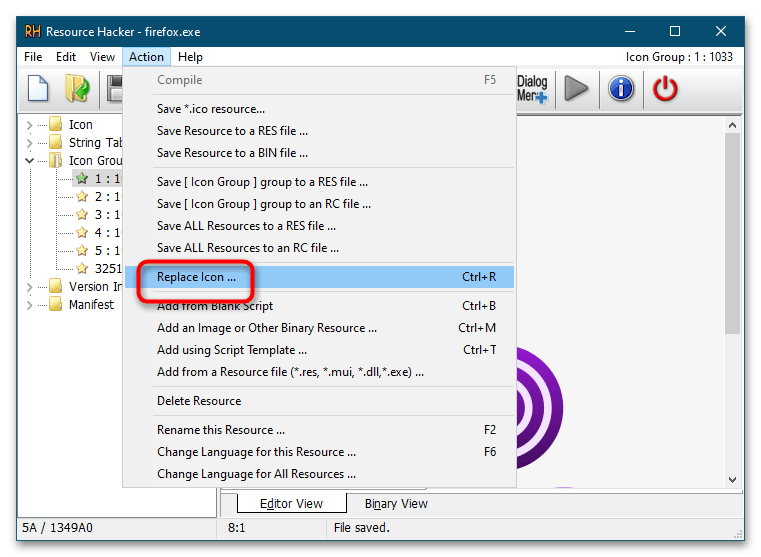
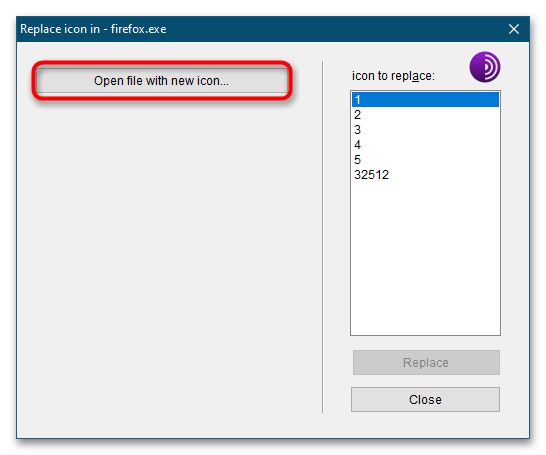
- Выделите соответствующую значку запись мышкой и выберите в меню «Action» опцию «Replace Icon…».
- Убедитесь, что в открывшемся окошке выбран нужный значок, нажмите кнопку «Open file with new icon…» и укажите путь к файлу иконки в формате ICO либо же файлу, содержащему иконки, например EXE, DLL и RES.
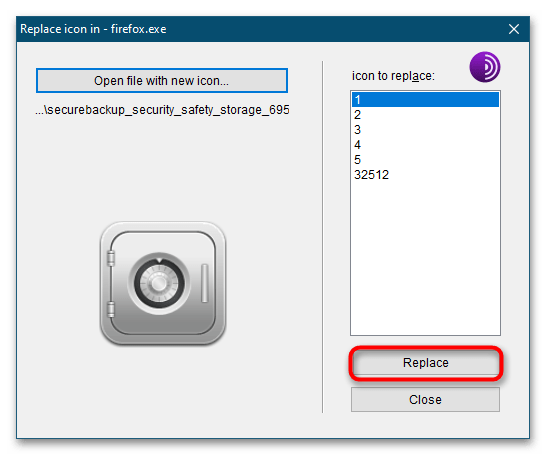
- Когда новая иконка отобразится в окне замены, нажмите кнопку «Replace».
- Сохраните отредактированный файл, для чего в главном меню программы выберите «File» → «Save as …» и укажите место сохранения файла.

К сожалению, возможности смены иконки файла в Windows ограничены, исключения составляют лишь EXE и ярлыки, которые с точки зрения файловой системы также являются файлами. Для ярлыков можно установить любой значок, во всех остальных случаях измененный вид станет применяться ко всем файлам с определенным расширением.
Еще статьи по данной теме:
Помогла ли Вам статья?
Обложка альбома — это изображение, которое отображается на заднем плане, когда мы воспроизводим песню или альбом в нашем музыкальном проигрывателе. Иногда это изображение может быть встроено в MP3 или нет. Но нам не о чем беспокоиться, так как можно будет добавить один, а также изменить существующий несколькими способами, и все они будут совершенно простыми и доступными.

Содержание
- Почему у музыкального файла нет обложки альбома?
- Как скачать обложку альбома
- Добавление обложек альбомов в MP3 в Windows 10
- Windows Media Player
- Музыка Groove
- VLC Media Player
Почему у музыкального файла нет обложки альбома?
Как правило, файлы MP3 получаются путем копирования наших аудио-компакт-дисков, когда мы переносим их на компьютер. В процессе копирования программа, которую мы используем, будет распаковывать файл вместе со всей содержащейся в нем информацией, такой как имя исполнителя, название альбома, жанр, номер трека, год выпуска и прочая найденная информация. в теге метаданных, как и в обложке альбома. Благодаря этому мы получаем, что он будет отображаться, когда мы воспроизводим файл на нашем ПК, на нашем мобильном или другом совместимом устройстве.
Однако иногда изображения, включенные в файл, неправильно встроен в нашем MP3-файле. Это может произойти из-за ошибки во время извлечения или из-за того, что они не были включены в исходный файл. В этих случаях мы увидим, что при их воспроизведении изображение не отображается, поэтому нам придется искать обложки и вставлять их в каждый файл MP3. Это то, что мы можем делать по-разному, как мы увидим ниже.
Как скачать обложку альбома
В том случае, если мы не знаем, где взять обложки какого-либо альбома, мы можем использовать бесплатное приложение под названием Альбом Art Downloader что мы можем скачать с здесь. Его главная особенность в том, что это способен искать обложки на специализированных музыкальных веб-сайтах, таких как «Amazon», «CDCoverHideout», «CDCoverIsland», «Discogs», «Album Art Exchange», «Cover-Paradies» и других. Благодаря этому мы можем найти практически любой альбом, независимо от исполнителя и музыкального стиля.
Запустив программу, мы можем искать, используя разделы «Исполнитель» и «Альбом», которые расположены вверху. В правом столбце мы можем увидеть все источники, из которых будет осуществляться поиск, и выбрать все или только те, которые нас больше всего интересуют.
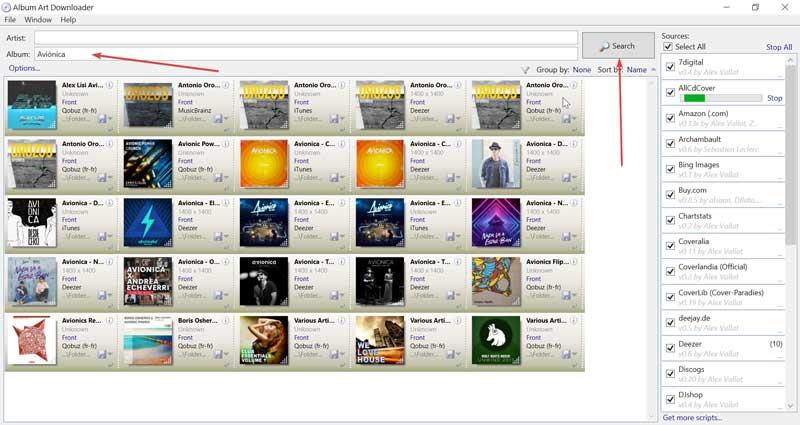
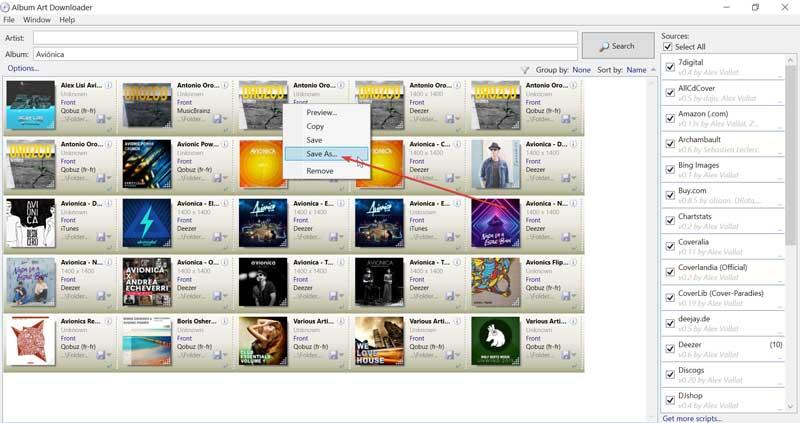
После того, как мы ввели имя исполнителя или название альбома, который хотим найти, нажмите на Кнопка «Поиск» и программа покажет нам все найденные совпадения. Теперь нам нужно только скачать желаемую обложку, для чего нам нужно только щелкнуть по ней, чтобы она загрузилась по установленному пути. Мы также можем щелкнуть правой кнопкой мыши, и появится контекстное меню с несколькими параметрами, такими как предварительный просмотр, выбор пути загрузки (Сохранить как), копирование в буфер обмена или удаление.
Windows 10 по умолчанию включает два приложения для воспроизведения звука, такие как Windows Media Player и Groove Music. Мы также можем использовать один из самых популярных мультимедийных плееров, таких как VLC. На всех этих платформах мы можем добавить обложку альбома за несколько шагов.
Windows Media Player
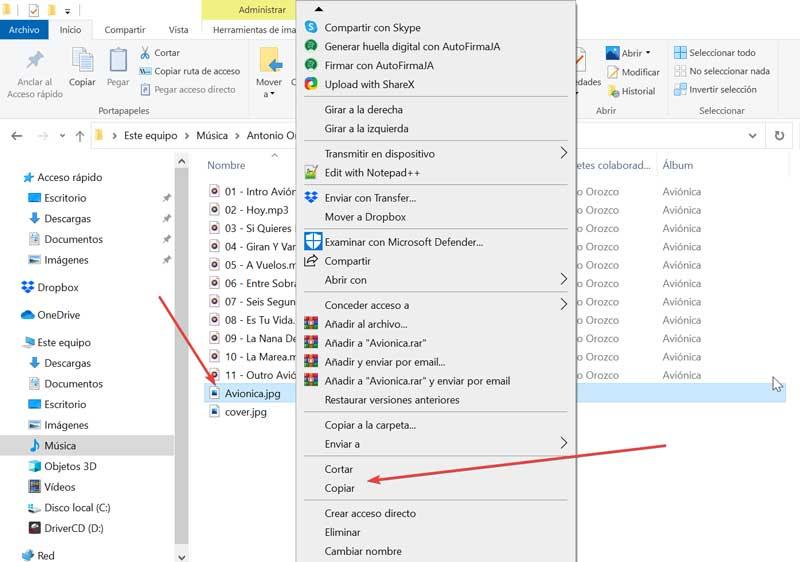
Это классика Microsoft мультимедийный проигрыватель для Windows, с помощью которого можно воспроизводить как аудио, так и видео. С его помощью мы можем легко добавлять обложки к нашим MP3. Но сначала необходимо, чтобы у нас было изображение обложки в папке, где находятся файлы, которые мы хотим добавить. Оказавшись в папке, нажмите на изображение правой кнопкой и нажмите «Копировать».
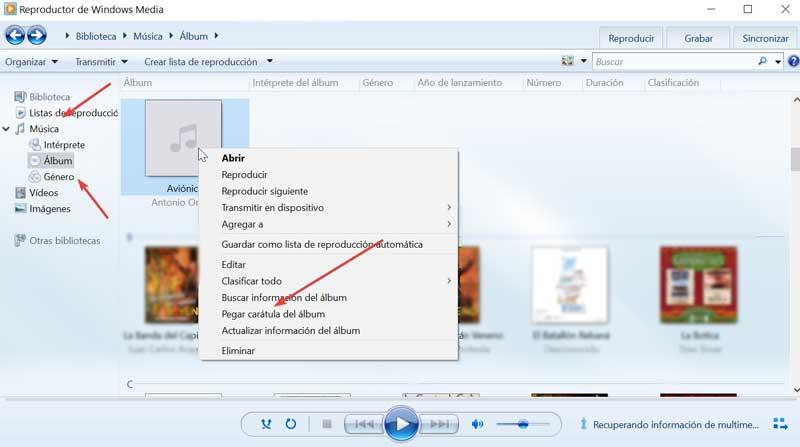
Затем мы должны открыть приложение, набрав «Windows Media Player» в строке поиска рядом с меню «Пуск». После открытия в левом столбце мы выбираем «Музыка» и «Альбомы», чтобы показать нам все альбомы, которые он распознает, и их эскизы. Помещаем себя в папку нужного альбома и щелкаем по ней правой кнопкой — появится выпадающее меню. Здесь мы выберем вариант «Вставить обложку альбома» . Таким образом мы заменим общий эскиз папки на правильную обложку альбома.
Музыка Groove
Перед нами новое приложение, разработанное Microsoft для воспроизведения музыки в разных форматах. Отсюда мы можем быстро добавлять альбомы в файлы MP3. Для этого мы должны получить доступ к приложению, набрав «Groove Music» в поле поиска в меню «Пуск» и щелкнув по нему.
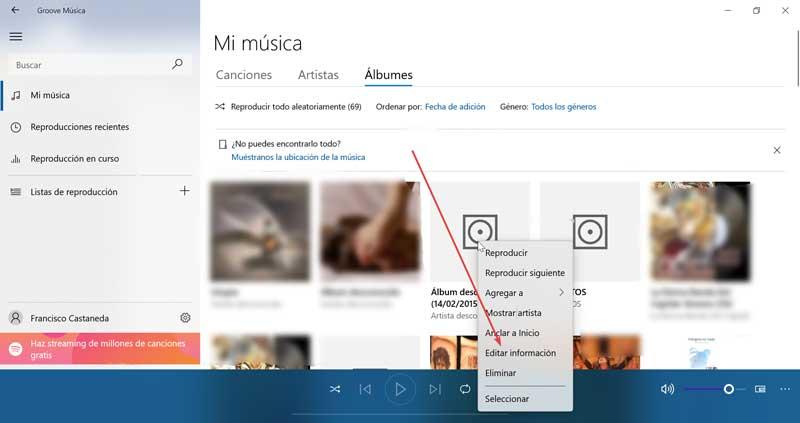
Оказавшись в приложении, мы должны перейти в раздел «Альбомы», который мы находим вверху. Это заставит его показать нам все альбомы, обнаруженные приложением на нашем компьютере. Если мы увидим, в каком альбоме нет эскиза обложки, появится рамка с точкой в центре. В этом случае мы нажимаем на него правой кнопкой и появляется небольшое выпадающее меню, в котором мы нажимаем на «Редактировать информацию» .
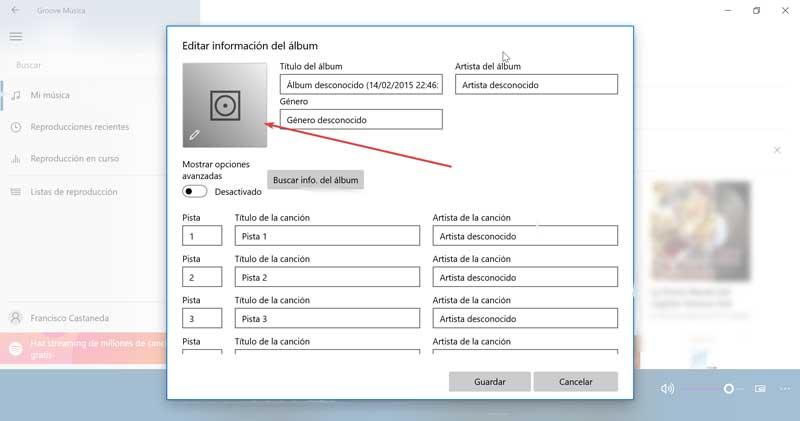
Это откроет новое окно, в котором мы сможем редактировать все данные как папки, так и аудиофайлов, которые ее составляют. Здесь мы увидим, как в левом верхнем углу мы находим коробка, где должна быть крышка , вместе со значком в виде карандаша. Затем мы нажимаем, и появляется проводник Windows, откуда мы можем выбрать изображение обложки, чтобы оно оставалось добавленным.
VLC Media Player
Без сомнения, перед нами самый полный и популярный мультимедийный проигрыватель на рынке, который мы можем бесплатно скачать с эту ссылку . С его помощью у нас также будет возможность поддерживать порядок в нашей музыкальной библиотеке, добавляя обложки альбомов. Для этого мы должны запустить программу, набрав «vlc» в строке поиска меню «Пуск» и выбрав ее позже.
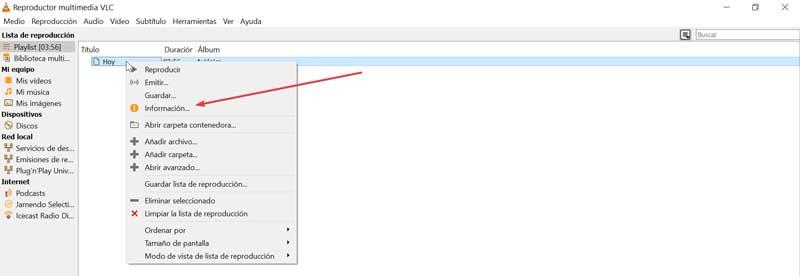
После открытия мы должны добавить файл MP3 в наш список воспроизведения. Для этого мы можем перетащить курсор в интерфейс или с помощью вкладок «Медиа» и «Открыть файл». После того, как мы добавили файл, мы нажимаем на него с правая кнопка и откроется выпадающий список, в котором мы нажмем на «Информация» .
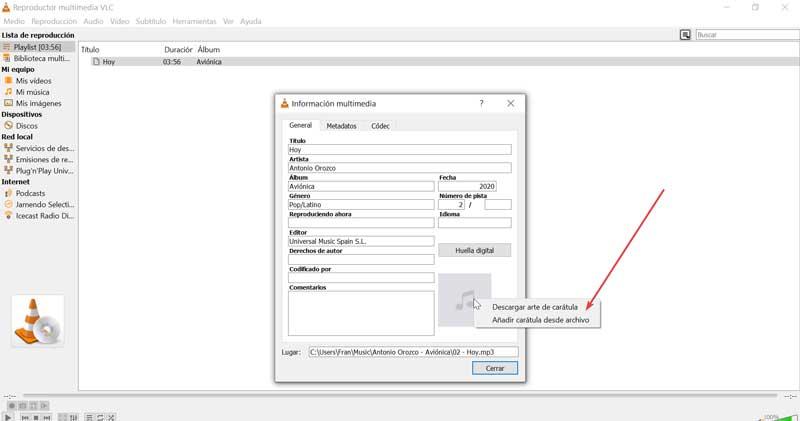
Затем откроется новое окно мультимедийной информации, в котором мы сможем увидеть все встроенные метаданные этого файла. Отсюда мы можем изменить любое из его полей. В правом нижнем углу мы увидим квадрат, где обложка альбома должен отображаться. Здесь мы должны щелкнуть правой кнопкой, и появятся два варианта на выбор: «Загрузить обложку» или «Добавить обложку файла» . Если обложка загружена, мы выбираем второй вариант, который откроет Проводник окно для выбора изображения. Как только крышка будет добавлена, мы можем закрыть окно.
- Печать
Страницы: [1] 2 Все Вниз

Тема: Как установить иконки? (Прочитано 100843 раз)
0 Пользователей и 3 Гостей просматривают эту тему.
1. Распаковываем архив с иконками, копируем файл .dll в папку %AIMP%Icons (например, C:Program Files (x86)AIMPIcons)
2. Запускаем АИМП от имени администратора (правой кнопкой мыши по ярлыку АИМПа >> запуск от имени администратора).
3. Открываем Настройки Ассоциация с файлами и выбираем нужный набор иконок:

4. Не забываем выставить ассоциации файлов.
Решение возможных проблем:
1. Чтобы иконки появились в Total Commander — необходимо его перезапустить.
2. Иногда после применения новых иконок значок на файле не соответствует расширению, либо значок вовсе отсутствует. Решение:
1) Закрываем АИМП;
2) Запускаем АИМП от имени администратора (правой кнопкой мыши по ярлыку АИМПа >> запуск от имени администратора);
3) Настройки Ассоциация с файлами Добавить в список программ по умолчанию — снимаем галочку, Применить;
4) Настройки Ассоциация с файлами Добавить в список программ по умолчанию — возвращаем галочку, Применить.
3. Для очистки кэша иконок в Проводнике нужно запустить файл icon-cache-clean.bat (в аттаче), предварительно нужно закрыть АИМП.
« Последнее редактирование: Ноября 24, 2017, 09:43:59 от Soolo »

Записан
В ТС всё равно не меняются… ТС 8.0в6
Записан
Возможно косяк в системе как и у меня. Только у меня они вообще не ставятся.
Записан
Thanks my friend. I got it !
Записан
Я скачал кучу иконок везде три группы размеров, вставил их в aimp3 но они маленькие вопрс как изменить их размер?
Записан
Я скачал кучу иконок везде три группы размеров, вставил их в aimp3 но они маленькие вопрс как изменить их размер?
где вы хотите менять размер? (скриншот покажите)
Записан
Разобрался вопрос снимается. У меня в свойствах папок вид установлен списком или таблицей, поэтому аудио файлы и отображаются маленькими иконками. 
Записан
У меня на Windows8 тоже ничего не поменялось. Делал все как положено.
Записан
запишите видео, хочется посмотреть
Записан
Иконки не меняются, делал все положено как в инструкции. Где Ассоциация с файлами они не меняются пишет что нужны права админа. И хоть с ними захожу все равно ни чего не меняется.Что тогда делать?
Записан
Иконки не меняются, делал все положено как в инструкции. Где Ассоциация с файлами они не меняются пишет что нужны права админа. И хоть с ними захожу все равно ни чего не меняется.Что тогда делать?
Выполните пункт 2, и затем все изменения будут доступны.
Не получается — записывайте видео
Записан
Этот способ не работает. Наверное в последней версии AIMP что то по другому сделано.
Я открыл адрес C:Usersмое_имяAppDataRoamingAIMP3 , напихаол обложек в папку Skins, тут всё нормально, но вот не было там папки Icons.
Я в наглую её создал и запихал туда файлы .dll и это не сработало. Не знаю что делать. Может кто нибудь напишет актуальную инструкцию на сей день?
Записан
Я открыл адрес C:Usersмое_имяAppDataRoamingAIMP3 , напихаол обложек в папку Skins, тут всё нормально, но вот не было там папки Icons.
Папка Icons здесь — C:Program FilesAIMP3Icons.
Записан
Как установить иконки скачанные с гном сайта ? .
Для Fedora 13 окружение GNOME — расширение tar.gz — например -icons.tar.gz — как и куда распаковать и установить какой командой ?
чтоб потом Из апплета Внешний вид их можно былобы выбрать и задействовать ? .
архивчик этот если распокавать то в там в блокноте написано — Installation:
Untar archive to /.icons
Спасибо .
Записан
Как установить иконки скачанные с гном сайта ? .
Для Fedora 13 окружение GNOME — расширение tar.gz — например -icons.tar.gz — как и куда распаковать и установить какой командой ?
Форумом ошиблись. Это форум плеера AIMP, а не Федоры
Записан
- Печать
Страницы: [1] 2 Все Вверх
![]()
Download Article
The easiest ways to find and change MP3 album art on any version of Windows
![]()
Download Article
- How to Find MP3 Album Art
- Using Groove Music
- Using Windows Media Player
- Using VLC Media Player
- Using iTunes
- Using Mp3tag
- Using an Online Editor
- Q&A
- Tips
- Warnings
|
|
|
|
|
|
|
|
|
Are you missing album art from some of your audio files? If you’re using Windows, there are several easy ways to find and add the proper album covers to your MP3 files. Many tools, including VLC Media Player, iTunes, Mp3tag, & Windows Media Player can automatically locate album art and add it to your MP3 files. You can also download album covers from Discogs and MusicBrainz to manually add the images to your MP3 files. This guide will walk you through the best tools for adding and replacing album art to MP3 files in Windows 10 & 11.
Things You Should Know
- Music players like VLC, iTunes, & Windows Media Player can automatically download & change MP3 album art for you.
- If you have a large MP3 collection, iTunes will be the fastest tool for automatically updating all missing or incorrect album art.
- If you can’t update MP3 art automatically, you can download album covers from Discogs and MusicBrainz and change the art manually.
-
1
Depending on the tool you use to listen to or manage your MP3s, you might be able to find album art automatically. If you don’t want to search the web for album art, our sections on using VLC Media Player, iTunes, Windows Media Player, and MP3tag (an MP3 tag management tool) will be most helpful. iTunes can even scan your entire MP3 library at once and update all of your album covers.
-

2
If you can’t (or don’t want to) get album art automatically, there are places to find and download album covers online. If you have rarer MP3s or you’re using Groove Music or an online tag editor), you can replace your album art manually. These sites are great places to download album JPEG & PNG album covers for even the rarest of MP3s:
- Discogs: On Discogs, you’ll often find several options for album art, including covers from different editions of albums.
- MusicBrainz: This site is home to all sorts of music metadata, not just album art. After downloading the images you want for your MP3s, explore the site to find other information you may be missing from your MP3 metadata.
- Album Art Exchange: This site has lots of high-quality album covers, so if you’re looking for higher-resolution quality, make it your first stop.
- You can also search Google and filter the search results to show only images. You may also want to try searching Amazon.com or other retailers that sell CDs.

Advertisement
-
1
Open Groove Music (Windows 10) or Groove Media Player (Windows 11). You can open Groove quickly by pressing Windows key + S, typing Groove, and clicking Groove Music (Windows 10) or Media Player (Windows 11).
-
2
Open your Music Library. If you see tabs for Songs, Albums, and Artists at the top of the screen, you can skip this step. If not, click the three lines at the top-left corner and choose Music library.
-
3
Click the Albums tab. This option is near the top of the Groove window. You should now see all of your albums.
- If your albums aren’t listed, you’ll just need to add their folder to Groove. Click the three-line menu, click the Settings gear, and then click the button next to «Music library locations to add the folder that contains your MP3 files.
-
4
Select an album. Click an album that you want to edit.
- You cannot edit album artwork for individual songs in Groove Music.
-
5
Click the three dots and select Edit info. You’ll see the three-dot icon at the top-right corner of the album’s page. Doing so will open the «Edit Album Info» window for your album.
- For songs that don’t have an album listed (or «Unknown Albums»), there will not be an «Edit info» button. Instead, you’ll have to right-click a song, select Edit Info, enter something into the «Album Title» field, and then Save.
-
6
Click the current album art. It’s a square image in the upper-left corner of the «Edit Album Info» window.
- If there isn’t any album art associated with the album, the album art square will be blank with a pencil icon in the lower-left corner.
-
7
Select your new image and click Open. Click the photo that you downloaded earlier, or any existing image on your computer, and then click Open to add the image.
- If the File Explorer window opens to a different folder than the one in which your preferred art is, first click the folder that you want to use on the left side of the window.
-
8
Click Save. This is at the bottom of the «Edit Album Info» window. Your album will now display its new artwork.


Advertisement
-
1
Open Windows Media Player. If you’re using an older version of Windows or just prefer Windows Media Player, you can use this tool to change your MP3 album art. To launch the app, press the Windows key on your keyboard, type windows media, and then click Windows Media Player.
- You’ll have the option to search for new album art online or select an image you downloaded to your PC.
-
2
Click Library. This tab is in the upper-left corner of the window.
-
3
Click the Music tab. It’s on the upper-left side of the Windows Media Player window.
-
4
Right-click the cover of the album art you want to update. Scroll down through your library until you find the album that you want to edit, then right-click it to bring up a menu.
- Albums that don’t have art will have an image of a musical note on a grey background.
- If you use a trackpad instead of a mouse, use two fingers to tap the trackpad or press the bottom-right side of the trackpad.
-
5
Click Update album info on the menu. Doing so will search online for the album’s art. If album art is available, it will download and replace the existing album cover.
- It may take a few moments for the new album cover to show up.
- If this doesn’t result in the correct album cover, continue with this method to replace the album cover with album art you downloaded.
-
6
Open the album art you downloaded from the web. If you couldn’t automatically update the album art, you can easily use the image you found online as your new art. Start by locating the downloaded image on your computer and double-clicking to open it.
- Downloaded images are typically in your Downloads or Pictures folder.
-
7
Right-click the picture and select Copy. This copies the album art to your clipboard.
-
8
Return to Windows Media Player and right-click the album cover. You’ll see a menu with several options, including the option to paste the copied album cover.
-
9
Click Paste album art. It’s in the middle of the drop-down menu. You should see the art appear on the album’s cover.
- It may take a few seconds for the album art to update.
- If you don’t see Paste album art, try downloading and copying a smaller version of the art.


Advertisement
-
1
Open VLC Media Player. VLC makes it pretty easy to automatically find and download album cover art for your MP3 files. If you’ve already installed VLC, you’ll find it in your Windows menu. If not, you can download this free media playback and management app from https://www.videolan.org/vlc/index.html.
-
2
Open the song or album you want to edit. If you just need to change the album art for a single MP3 file, you can open it using Media > Open File. To open multiple files at once, use Media > Open Multiple Files instead.
- Alternatively, you can open an entire folder using Media > Open Folder.
-
3
Switch to Playlist mode. This will make it easier to view and edit the album art. To do this, just click the View menu and select Playlist. Now you’ll see the song(s) you’ve opened in playlist format.
-
4
Select the song you want to edit. If you want to change the cover art for more than one song, hold down the Ctrl key as you click each track name.
- If you’re selecting multiple songs, make sure you choose songs from the same album.
-
5
Right-click the selected song(s) and click Information. This displays media information about the track, including the current album art at the bottom-right corner. If there is no album art yet, you’ll see a traffic cone icon.
-
6
Right-click the current album art (or traffic cone) and select Download cover art. This feature queries MusicBrainz to locate the correct album art for the selected track.
- If you are not able to find album art this way, try clicking the Fingerprint button to identify the track first.[1]
- If you still can’t find the right album art, you can download album art manually. Once you find the correct album cover, right-click the current art or traffic cone again, select Add cover art from file, and select replacement art.
- If you are not able to find album art this way, try clicking the Fingerprint button to identify the track first.[1]
-
7
Click Save Metadata to save your changes. Your new MP3 cover art is now embedded into the selected file(s).


Advertisement
-
1
Open iTunes on your PC. If you use iTunes to manage your MP3 library, you’ll find it very easy to update your album art. With iTunes, you can change the album art for individual files or multiple files at once.
- If you don’t have iTunes, you can install it from the Microsoft Store or https://www.apple.com/itunes.
-
2
Retrieve all album art manually (optional). If you want iTunes to attempt to find, download, and replace all of your album art with the most up-to-date versions, you can run this really quick option. If you downloaded album art already, you can skip this step.
- Click the File menu.
- Click Library.
- Click Get Album Artwork.
-
3
Select Music from the drop-down menu. You’ll see this menu in the upper-left corner of the iTunes window.
-
4
Click the Library tab. It’s at the top of the window to the left of «For You.»
-
5
Select the song(s) or album you want to edit.
- If you want to select one or more songs to edit, click the Songs tab in the left panel under «Library,» then select the song(s). To select more than one song at once, hold down the Ctrl key as you click multiple songs.
- To select an entire album, click Albums in the left panel under «Library,» then click the album you want to edit.
-
6
Click the Edit menu and select Album info or Song info. The menu option you’ll see will depend on whether you selected an album or song.[2]
-
7
Click the Artwork tab. You’ll see this at the top of the window just below the current album artwork.
-
8
Click the Add Artwork button. Now you’ll be prompted to select a file from your computer to replace the current album art.
-
9
Select your new album art and click Open. Your new album art now appears in the upper-left corner.
-
10
Click OK to save your changes. Your changes are now saved permanently.


Advertisement
-
1
Download and install Mp3Tag. Mp3tag isn’t a music player—it’s a useful free program you can use to tag and organize your MP3 collection. Mp3tag has a feature that will automatically scan for and download cover art (and any ID3 tags you’re missing) from sources like Discogs and MusicBrainz. We’ll show you how to do this, as well as manually replace album art with images you’ve downloaded. To download and install Mp3tag:
- Go to https://www.mp3tag.de/en/download.html in your web browser.
- Click the mp3tagv318setup.exe link for your version of Windows at the center of the page.
- If you’re not sure whether you need the 32-bit or 64-bit version, here’s how to check.
- As newer versions are released, this file and link name may change.
- Double-click the MP3tag setup file.
- Click through the MP3tag setup wizard until you’ve installed MP3Tag.
-
2
Open MP3tag. Click the new Mp3tag icon in your Start menu, or press the Windows key on your keyboard and type mp3tag to find it.
-
3
Add your music to Mp3tag. When you first open Mp3tag, there won’t be any music to edit. You can either add your entire library or just the albums you want to edit. To add music:
- Click the File menu.
- Click Add directory.
- Select the folder you want to add.
- Click Select Folder.
-
4
Select an album or song(s). If you just want to edit one song, click the song once to select it.
- Alternatively, you can select an entire album at once by holding down Ctrl while clicking each song on the album.
-
5
Locate the album art automatically (optional). If you want Mp3tag to locate the proper album art for you, it’s easy now that you’ve selected the song(s) or album:
- Click the Tag Sources menu.
- Click Cover Art.
- Click MusicBrainz (or, if you have a Discogs account, you can choose Discogs. You’ll be prompted to log in to your account before you can search the database with Mp3tag).
- Click Next to search.
- If more than one album or release matches your search, you’ll see several results. You can click a result and then Preview to see the album art in your browser, or just select an album and choose Next.
- Click OK to accept the new album art.
-
6
Right-click the cover art. If you want to use an image you downloaded from the web, you can continue with this method. While your files are selected, you’ll find this box in the lower-left side of the window.
- If there isn’t any cover art for your selected song(s), this box will be blank.
- If your computer uses a trackpad instead of a mouse, use two fingers to tap the trackpad or press the
-
7
Click Add cover…. It’s at the top of the menu. A File Explorer window will open.
-
8
Select an image and click Open. Go to the location of the photo you want to use, then click the photo. Once you click Open, you’ll see your new album art in place of the old cover.
-
9
Click the «Save» icon. This floppy disc icon is in the upper-left corner of the window. Your changes are now saved permanently to the file.


Advertisement
-
1
Go to http://tagmp3.net/change-album-art.php in your web browser. If you just need the cover art for a few songs, an online MP3 tag editor like TagMP3 is a great option.
- Online MP3 editors won’t be ideal if you want to get cover art for multiple albums or larger files, as you’ll have to upload and then re-download the files later.
- This tool won’t automatically search the web for cover art, so you’ll need to make sure you’ve downloaded some artwork.
-
2
Click Choose Files. You’ll find this button in the middle of the window.
-
3
Select an MP3 file and click Open. Go to the location of an MP3 file to which you want to assign artwork, then click the MP3 file.
- If you want to edit the cover art for multiple different songs, hold down Ctrl while clicking each song you want to use.
-
4
Select new cover art for your MP3 file. Click the Browse button next to «Choose new album art / picture» to select the album cover you downloaded from the web. When you click Open, the new album cover will appear.
- If you selected multiple songs, scroll down to do the same for all songs on the page.
-
5
Scroll down and click Done! Generate New Files. Once the tagging is complete, your files will be available for download.
- Click each file name to download the new file with its newly-embedded album art.


Advertisement
Add New Question
-
Question
It doesn’t have that Paste Album Art menu on my windows media player; I can only find the album info. What should I do?

Leave your image viewer open when you go to paste the album art. For some reason, once you close the image viewer, the art leaves your clipboard and the option to paste it goes away, too.
-
Question
Why aren’t all my songs joined with their album art when I paste art?
The album art and file art don’t alter each other. You need to change all of them separately.
-
Question
What do I do with Windows 8?
It’s the same process; it depends on which version of Windows Media Player you have.
See more answers
Ask a Question
200 characters left
Include your email address to get a message when this question is answered.
Submit
Advertisement
Thanks for submitting a tip for review!
Advertisement
-
Windows Media Player is no longer supported by Microsoft, so attempting to update automatically the artwork won’t work for every album.
Advertisement
About This Article
Article SummaryX
1. Download album art from the internet.
2. Open Groove Music.
3. Click My Music.
4. Click Albums.
5. Click an album.
6. Click Edit info.
7. Click the album art.
8. Select the new art and click Open.
9. Click Save.
Did this summary help you?
Thanks to all authors for creating a page that has been read 1,545,921 times.
Is this article up to date?
![]()
Download Article
The easiest ways to find and change MP3 album art on any version of Windows
![]()
Download Article
- How to Find MP3 Album Art
- Using Groove Music
- Using Windows Media Player
- Using VLC Media Player
- Using iTunes
- Using Mp3tag
- Using an Online Editor
- Q&A
- Tips
- Warnings
|
|
|
|
|
|
|
|
|
Are you missing album art from some of your audio files? If you’re using Windows, there are several easy ways to find and add the proper album covers to your MP3 files. Many tools, including VLC Media Player, iTunes, Mp3tag, & Windows Media Player can automatically locate album art and add it to your MP3 files. You can also download album covers from Discogs and MusicBrainz to manually add the images to your MP3 files. This guide will walk you through the best tools for adding and replacing album art to MP3 files in Windows 10 & 11.
Things You Should Know
- Music players like VLC, iTunes, & Windows Media Player can automatically download & change MP3 album art for you.
- If you have a large MP3 collection, iTunes will be the fastest tool for automatically updating all missing or incorrect album art.
- If you can’t update MP3 art automatically, you can download album covers from Discogs and MusicBrainz and change the art manually.
-
1
Depending on the tool you use to listen to or manage your MP3s, you might be able to find album art automatically. If you don’t want to search the web for album art, our sections on using VLC Media Player, iTunes, Windows Media Player, and MP3tag (an MP3 tag management tool) will be most helpful. iTunes can even scan your entire MP3 library at once and update all of your album covers.
-
2
If you can’t (or don’t want to) get album art automatically, there are places to find and download album covers online. If you have rarer MP3s or you’re using Groove Music or an online tag editor), you can replace your album art manually. These sites are great places to download album JPEG & PNG album covers for even the rarest of MP3s:
- Discogs: On Discogs, you’ll often find several options for album art, including covers from different editions of albums.
- MusicBrainz: This site is home to all sorts of music metadata, not just album art. After downloading the images you want for your MP3s, explore the site to find other information you may be missing from your MP3 metadata.
- Album Art Exchange: This site has lots of high-quality album covers, so if you’re looking for higher-resolution quality, make it your first stop.
- You can also search Google and filter the search results to show only images. You may also want to try searching Amazon.com or other retailers that sell CDs.
Advertisement
-
1
Open Groove Music (Windows 10) or Groove Media Player (Windows 11). You can open Groove quickly by pressing Windows key + S, typing Groove, and clicking Groove Music (Windows 10) or Media Player (Windows 11).
-
2
Open your Music Library. If you see tabs for Songs, Albums, and Artists at the top of the screen, you can skip this step. If not, click the three lines at the top-left corner and choose Music library.
-
3
Click the Albums tab. This option is near the top of the Groove window. You should now see all of your albums.
- If your albums aren’t listed, you’ll just need to add their folder to Groove. Click the three-line menu, click the Settings gear, and then click the button next to «Music library locations to add the folder that contains your MP3 files.
-
4
Select an album. Click an album that you want to edit.
- You cannot edit album artwork for individual songs in Groove Music.
-
5
Click the three dots and select Edit info. You’ll see the three-dot icon at the top-right corner of the album’s page. Doing so will open the «Edit Album Info» window for your album.
- For songs that don’t have an album listed (or «Unknown Albums»), there will not be an «Edit info» button. Instead, you’ll have to right-click a song, select Edit Info, enter something into the «Album Title» field, and then Save.
-
6
Click the current album art. It’s a square image in the upper-left corner of the «Edit Album Info» window.
- If there isn’t any album art associated with the album, the album art square will be blank with a pencil icon in the lower-left corner.
-
7
Select your new image and click Open. Click the photo that you downloaded earlier, or any existing image on your computer, and then click Open to add the image.
- If the File Explorer window opens to a different folder than the one in which your preferred art is, first click the folder that you want to use on the left side of the window.
-
8
Click Save. This is at the bottom of the «Edit Album Info» window. Your album will now display its new artwork.
Advertisement
-
1
Open Windows Media Player. If you’re using an older version of Windows or just prefer Windows Media Player, you can use this tool to change your MP3 album art. To launch the app, press the Windows key on your keyboard, type windows media, and then click Windows Media Player.
- You’ll have the option to search for new album art online or select an image you downloaded to your PC.
-
2
Click Library. This tab is in the upper-left corner of the window.
-
3
Click the Music tab. It’s on the upper-left side of the Windows Media Player window.
-
4
Right-click the cover of the album art you want to update. Scroll down through your library until you find the album that you want to edit, then right-click it to bring up a menu.
- Albums that don’t have art will have an image of a musical note on a grey background.
- If you use a trackpad instead of a mouse, use two fingers to tap the trackpad or press the bottom-right side of the trackpad.
-
5
Click Update album info on the menu. Doing so will search online for the album’s art. If album art is available, it will download and replace the existing album cover.
- It may take a few moments for the new album cover to show up.
- If this doesn’t result in the correct album cover, continue with this method to replace the album cover with album art you downloaded.
-
6
Open the album art you downloaded from the web. If you couldn’t automatically update the album art, you can easily use the image you found online as your new art. Start by locating the downloaded image on your computer and double-clicking to open it.
- Downloaded images are typically in your Downloads or Pictures folder.
-
7
Right-click the picture and select Copy. This copies the album art to your clipboard.
-
8
Return to Windows Media Player and right-click the album cover. You’ll see a menu with several options, including the option to paste the copied album cover.
-
9
Click Paste album art. It’s in the middle of the drop-down menu. You should see the art appear on the album’s cover.
- It may take a few seconds for the album art to update.
- If you don’t see Paste album art, try downloading and copying a smaller version of the art.
Advertisement
-
1
Open VLC Media Player. VLC makes it pretty easy to automatically find and download album cover art for your MP3 files. If you’ve already installed VLC, you’ll find it in your Windows menu. If not, you can download this free media playback and management app from https://www.videolan.org/vlc/index.html.
-
2
Open the song or album you want to edit. If you just need to change the album art for a single MP3 file, you can open it using Media > Open File. To open multiple files at once, use Media > Open Multiple Files instead.
- Alternatively, you can open an entire folder using Media > Open Folder.
-
3
Switch to Playlist mode. This will make it easier to view and edit the album art. To do this, just click the View menu and select Playlist. Now you’ll see the song(s) you’ve opened in playlist format.
-
4
Select the song you want to edit. If you want to change the cover art for more than one song, hold down the Ctrl key as you click each track name.
- If you’re selecting multiple songs, make sure you choose songs from the same album.
-
5
Right-click the selected song(s) and click Information. This displays media information about the track, including the current album art at the bottom-right corner. If there is no album art yet, you’ll see a traffic cone icon.
-
6
Right-click the current album art (or traffic cone) and select Download cover art. This feature queries MusicBrainz to locate the correct album art for the selected track.
- If you are not able to find album art this way, try clicking the Fingerprint button to identify the track first.[1]
- If you still can’t find the right album art, you can download album art manually. Once you find the correct album cover, right-click the current art or traffic cone again, select Add cover art from file, and select replacement art.
- If you are not able to find album art this way, try clicking the Fingerprint button to identify the track first.[1]
-
7
Click Save Metadata to save your changes. Your new MP3 cover art is now embedded into the selected file(s).
Advertisement
-
1
Open iTunes on your PC. If you use iTunes to manage your MP3 library, you’ll find it very easy to update your album art. With iTunes, you can change the album art for individual files or multiple files at once.
- If you don’t have iTunes, you can install it from the Microsoft Store or https://www.apple.com/itunes.
-
2
Retrieve all album art manually (optional). If you want iTunes to attempt to find, download, and replace all of your album art with the most up-to-date versions, you can run this really quick option. If you downloaded album art already, you can skip this step.
- Click the File menu.
- Click Library.
- Click Get Album Artwork.
-
3
Select Music from the drop-down menu. You’ll see this menu in the upper-left corner of the iTunes window.
-
4
Click the Library tab. It’s at the top of the window to the left of «For You.»
-
5
Select the song(s) or album you want to edit.
- If you want to select one or more songs to edit, click the Songs tab in the left panel under «Library,» then select the song(s). To select more than one song at once, hold down the Ctrl key as you click multiple songs.
- To select an entire album, click Albums in the left panel under «Library,» then click the album you want to edit.
-
6
Click the Edit menu and select Album info or Song info. The menu option you’ll see will depend on whether you selected an album or song.[2]
-
7
Click the Artwork tab. You’ll see this at the top of the window just below the current album artwork.
-
8
Click the Add Artwork button. Now you’ll be prompted to select a file from your computer to replace the current album art.
-
9
Select your new album art and click Open. Your new album art now appears in the upper-left corner.
-
10
Click OK to save your changes. Your changes are now saved permanently.
Advertisement
-
1
Download and install Mp3Tag. Mp3tag isn’t a music player—it’s a useful free program you can use to tag and organize your MP3 collection. Mp3tag has a feature that will automatically scan for and download cover art (and any ID3 tags you’re missing) from sources like Discogs and MusicBrainz. We’ll show you how to do this, as well as manually replace album art with images you’ve downloaded. To download and install Mp3tag:
- Go to https://www.mp3tag.de/en/download.html in your web browser.
- Click the mp3tagv318setup.exe link for your version of Windows at the center of the page.
- If you’re not sure whether you need the 32-bit or 64-bit version, here’s how to check.
- As newer versions are released, this file and link name may change.
- Double-click the MP3tag setup file.
- Click through the MP3tag setup wizard until you’ve installed MP3Tag.
-
2
Open MP3tag. Click the new Mp3tag icon in your Start menu, or press the Windows key on your keyboard and type mp3tag to find it.
-
3
Add your music to Mp3tag. When you first open Mp3tag, there won’t be any music to edit. You can either add your entire library or just the albums you want to edit. To add music:
- Click the File menu.
- Click Add directory.
- Select the folder you want to add.
- Click Select Folder.
-
4
Select an album or song(s). If you just want to edit one song, click the song once to select it.
- Alternatively, you can select an entire album at once by holding down Ctrl while clicking each song on the album.
-
5
Locate the album art automatically (optional). If you want Mp3tag to locate the proper album art for you, it’s easy now that you’ve selected the song(s) or album:
- Click the Tag Sources menu.
- Click Cover Art.
- Click MusicBrainz (or, if you have a Discogs account, you can choose Discogs. You’ll be prompted to log in to your account before you can search the database with Mp3tag).
- Click Next to search.
- If more than one album or release matches your search, you’ll see several results. You can click a result and then Preview to see the album art in your browser, or just select an album and choose Next.
- Click OK to accept the new album art.
-
6
Right-click the cover art. If you want to use an image you downloaded from the web, you can continue with this method. While your files are selected, you’ll find this box in the lower-left side of the window.
- If there isn’t any cover art for your selected song(s), this box will be blank.
- If your computer uses a trackpad instead of a mouse, use two fingers to tap the trackpad or press the
-
7
Click Add cover…. It’s at the top of the menu. A File Explorer window will open.
-
8
Select an image and click Open. Go to the location of the photo you want to use, then click the photo. Once you click Open, you’ll see your new album art in place of the old cover.
-
9
Click the «Save» icon. This floppy disc icon is in the upper-left corner of the window. Your changes are now saved permanently to the file.
Advertisement
-
1
Go to http://tagmp3.net/change-album-art.php in your web browser. If you just need the cover art for a few songs, an online MP3 tag editor like TagMP3 is a great option.
- Online MP3 editors won’t be ideal if you want to get cover art for multiple albums or larger files, as you’ll have to upload and then re-download the files later.
- This tool won’t automatically search the web for cover art, so you’ll need to make sure you’ve downloaded some artwork.
-
2
Click Choose Files. You’ll find this button in the middle of the window.
-
3
Select an MP3 file and click Open. Go to the location of an MP3 file to which you want to assign artwork, then click the MP3 file.
- If you want to edit the cover art for multiple different songs, hold down Ctrl while clicking each song you want to use.
-
4
Select new cover art for your MP3 file. Click the Browse button next to «Choose new album art / picture» to select the album cover you downloaded from the web. When you click Open, the new album cover will appear.
- If you selected multiple songs, scroll down to do the same for all songs on the page.
-
5
Scroll down and click Done! Generate New Files. Once the tagging is complete, your files will be available for download.
- Click each file name to download the new file with its newly-embedded album art.
Advertisement
Add New Question
-
Question
It doesn’t have that Paste Album Art menu on my windows media player; I can only find the album info. What should I do?
Leave your image viewer open when you go to paste the album art. For some reason, once you close the image viewer, the art leaves your clipboard and the option to paste it goes away, too.
-
Question
Why aren’t all my songs joined with their album art when I paste art?
The album art and file art don’t alter each other. You need to change all of them separately.
-
Question
What do I do with Windows 8?
It’s the same process; it depends on which version of Windows Media Player you have.
See more answers
Ask a Question
200 characters left
Include your email address to get a message when this question is answered.
Submit
Advertisement
Thanks for submitting a tip for review!
Advertisement
-
Windows Media Player is no longer supported by Microsoft, so attempting to update automatically the artwork won’t work for every album.
Advertisement
About This Article
Article SummaryX
1. Download album art from the internet.
2. Open Groove Music.
3. Click My Music.
4. Click Albums.
5. Click an album.
6. Click Edit info.
7. Click the album art.
8. Select the new art and click Open.
9. Click Save.
Did this summary help you?
Thanks to all authors for creating a page that has been read 1,545,921 times.
Is this article up to date?

В последние годы появление музыкальных онлайн-платформ, таких как Spotify и Amazon Prime Music, поставило под угрозу важность архаичных музыкальных форматов, таких как MP3. Несмотря на внезапный всплеск онлайн-музыкальных приложений, MP3 выжили, и многие пользователи по-прежнему предпочитают слушать музыку, которую они загрузили на свои ПК.
Хотя качество звука в файлах MP3 не является проблемой, их эстетический вид остается минимальным. Если вы хотите сделать музыку более увлекательной и художественной, вот руководство, которое поможет вам понять, как добавить обложку альбома в MP3 в Windows 10.
Почему в файлах MP3 нет обложек альбомов?
Хотя файлы MP3 широко используются и распространяются, правда в том, что они обычно нарушают авторские права на музыку исполнителя. Файлы MP3, загруженные из Интернета, не приносят дохода артисту и, следовательно, не имеют «метаданных», определяющих такие характеристики, как название альбома или обложка альбома.
Поэтому, хотя у таких приложений, как Spotify и Apple Music, есть последние обложки, их аналоги в формате MP3 иногда остаются бесплодными с загруженной музыкой. Тем не менее, нет причин, по которым вы не можете добавить обложку к своим MP3-файлам и улучшить весь свой музыкальный опыт.
Метод 1: добавить обложку альбома с помощью проигрывателя Windows Media
Проигрыватель Windows Media был идеальным выбором для любых носителей в Windows 10. Несмотря на то, что он был заменен на Groove, простая в использовании установка делает его одним из самых эффективных проигрывателей на платформе. Вот как можно добавить обложку альбома в MP3 с помощью проигрывателя Windows Media:
1. В меню «Пуск» компьютера найдите приложение. Проигрыватель Windows Media и апрель.
2. Существует вероятность того, что в приложении не отразятся никакие медиа. Чтобы исправить это, нажмите «Организовать» в верхнем левом углу, затем нажмите «Управление библиотеками»> «Музыка».
3. Появится окно с названием «Расположение музыкальной библиотеки». Здесь нажмите «Добавить», а затем найдите папки, в которых хранится ваша локальная музыка.
4. После выполнения этих шагов музыка из этих папок появится в вашей библиотеке.
5. Теперь найдите изображение, которое хотите добавить в качестве обложки альбома, и скопируйте его в буфер обмена.
6. Вернитесь в приложение Window Media Player и под панелью «Музыка» слева выберите «Альбомы».
7. Щелкните правой кнопкой мыши конкретный альбом и в отображаемой группе параметров выберите «Вставить обложку альбома».
8. Обложка альбома будет обновлена с учетом метаданных вашего MP3, улучшая ваше восприятие музыки.
Метод 2: добавить обложку альбома с помощью Groove Music
Поскольку проигрыватель Windows Media становится более или менее избыточным, Groove Music взял на себя роль основного программного обеспечения для воспроизведения звука в Windows 10.
Приложение имеет более «крутой» вид и представляет собой немного более продвинутый музыкальный проигрыватель с точки зрения организации и коллекций. Тем не менее, вот как вы можете добавить обложку к своим файлам MP3 с помощью Groove Music.
1. В меню «Пуск» откройтеПриложение Groove Music.
2. Если вы не можете найти файлы MP3 в столбце «Моя музыка», вам необходимо вручную попросить Groove выполнить поиск ваших файлов.
3. В левом нижнем углу приложения щелкните значок «Настройки».
4. На панели настроек нажмите «Выбрать, где искать музыку» в разделе «Музыка на этом компьютере».
5. В появившемся небольшом окне щелкните значок «Плюс», чтобы добавить музыку. Просмотрите файлы на вашем компьютере и выберите папки, содержащие вашу музыку.
6. После добавления музыки выберите опцию «Моя музыка» на левой панели и нажмите «Альбомы».
7. Все ваши альбомы будут отображаться в квадратных квадратах. Щелкните правой кнопкой мыши альбом по вашему выбору и выберите опцию «Редактировать информацию».
8. Появится новое окно, в котором обложка альбома будет отображаться в левом углу с небольшой опцией редактирования рядом с ней. Щелкните значок карандаша, чтобы отредактировать изображение.
9. В следующем открывшемся окне просмотрите файлы вашего ПК и выберите изображение, которое вы хотите применить в качестве обложки альбома.
10. После нанесения изображения нажмите «Сохранить», чтобы добавить новую обложку альбома к файлам MP3.
Метод 3: вставьте обложку альбома с помощью VLC Media Player
Медиаплеер VLC — одно из старейших на рынке программного обеспечения, связанного с мультимедиа. Несмотря на конкуренцию со стороны Groove Music и Windows Media Player, VLC по-прежнему очень популярен и становится лучше с каждым обновлением.
Если вы все еще используете классический медиаплеер VLC и хотите добавить обложку альбома в свои MP3-файлы, считайте, что вам повезло.
1. Откройте медиаплеер VLC и в верхнем левом углу сначала нажмите «Просмотр», затем выберите «Список воспроизведения».
2. Откройте медиа-библиотеку и добавьте, если вы еще не добавили файлы, щелкните правой кнопкой мыши и выберите «Добавить файл».
3. После того, как вы добавили свои любимые файлы MP3, щелкните их правой кнопкой мыши и выберите «Информация».
4. Откроется небольшое информационное окно, содержащее данные файла MP3. Обложка временного альбома будет расположена в правом нижнем углу окна.
5. Щелкните правой кнопкой мыши обложку альбома, и появятся два варианта. Вы можете выбрать «Загрузить обложку», и плеер будет искать подходящую обложку альбома в Интернете. Или вы можете выбрать «Добавить обложку из файла», чтобы выбрать загруженное изображение в качестве обложки альбома.
6. Найдите и выберите изображение, которое вы предпочитаете, и обложка альбома будет обновлена соответствующим образом.
Благодаря этому вы смогли встроить обложку в свои любимые файлы MP3, чтобы улучшить качество воспроизведения музыки на вашем компьютере.
Мы надеемся, что это руководство было для вас полезным и что вы смогли добавить обложку альбома в MP3 в Windows 10. Если у вас все еще есть вопросы по этой статье, не стесняйтесь задавать их в разделе комментариев.