Мы предполагаем, что вы немного знакомы с Docker и знаете основы, такие как запуск контейнеров докеров и т. д.
Что именно изменяет образ докера?
Образ контейнера строится по слоям (или это набор слоев), каждая инструкция Dockerfile создает слой изображения. Например, рассмотрим следующий файл Dockerfile:
FROM alpine:latest

RUN apk add --no-cache python3

ENTRYPOINT ["python3", "-c", "print('Hello World')"]
Поскольку существует всего три команды Dockerfile, образ, созданный из этого Dockerfile, будет содержать в общей сложности три слоя.
Вы можете убедиться в этом, построив образ:
docker image built -t dummy:0.1 .
А затем с помощью команды docker image history на построенном образе.
articles/Modify a Docker Image on modify-docker-images [?] took 12s ❯ docker image history dummy:0.1 IMAGE CREATED CREATED BY SIZE COMMENT b997f897c2db 10 seconds ago /bin/sh -c #(nop) ENTRYPOINT ["python3" "-c… 0B ee217b9fe4f7 10 seconds ago /bin/sh -c apk add --no-cache python3 43.6MB 28f6e2705743 35 hours ago /bin/sh -c #(nop) CMD ["/bin/sh"] 0B <missing> 35 hours ago /bin/sh -c #(nop) ADD file:80bf8bd014071345b… 5.61MB
Игнорируйте последний слой <missing>.
Каждый из этих слоев доступен только для чтения. Это полезно, потому что, поскольку эти слои доступны только для чтения, ни один процесс, связанный с запущенным экземпляром этого изображения, не сможет изменять содержимое этого изображения, поэтому эти слои могут использоваться многими контейнерами без необходимости сохранения копия для каждого экземпляра. Но для того, чтобы процессы контейнеров могли выполнять чтение/запись, при создании контейнеров поверх существующих слоев RO добавляется еще один слой, который доступен для записи и не используется другими контейнерами.
Обратной стороной этого слоя r/w является то, что изменения, сделанные в этом слое, не являются постоянными, хотя вы можете использовать тома для сохранения некоторых данных, иногда вам может потребоваться/вы захотите добавить слой перед каким-либо существующим слоем или удалить слой из изображение или просто замените слой. Это причины, по которым можно изменить существующее изображение docker.
В этой статье я собираюсь рассмотреть все упомянутые выше случаи, используя разные методы.
Способы изменения образа докера
Есть два способа изменить образ докера.
- Через Dockerfiles.
- Используя команду docker container commit.
Мы объясним оба метода, а в конце добавим, какой вариант использования лучше подходит для этого метода в контексте.
Изменение образа докера через Dockerfile
Изменение образа докера по сути означает изменение слоев изображения. Теперь, поскольку каждая команда Dockerfile представляет один слой изображения, изменение каждой строки файла Dockerfile также изменит соответствующий образ.
Поэтому, если вы добавляете слой к изображению, вы можете просто добавить к нему еще одну инструкцию Dockerfile, чтобы удалить одну, вы удалили бы строку, а для изменения слоя вы бы изменили строку соответствующим образом.
Есть два способа использовать Dockerfile для изменения изображения.
- Используя образ, который вы хотите изменить, как базовый образ, и создайте дочерний образ.
- Изменение фактического файла Dockerfile образа, который вы хотите изменить.
Позвольте нам объяснить, какой метод следует использовать, когда и как.
1. Использование изображения в качестве базового.
Это когда вы берете изображение, которое хотите изменить, и добавляете к нему слои для создания нового дочернего изображения. Если образ не создается с нуля, каждое изображение является модификацией одного и того же родительского базового образа.
Рассмотрим предыдущий файл Dockerfile. Скажите, почему построение образа из этого образа названо dummy:0.1. А если мы захотели использовать Perl вместо Python3 для печати «Hello World», но мы не хотим удалять Python3, мы могли бы просто использовать изображение dummy:0.1 в качестве базового изображения (поскольку Python3 уже существует) и строить из этого, как показано ниже
FROM dummy:0.1

RUN apk add --no-cache perl

ENTRYPOINT ["perl", "-e", "print "Hello Worldn""]
Здесь мы строим поверх dummy:0.1, добавляя к нему больше слоев, как считаем нужным.
Этот метод не будет очень полезным, если вы собираетесь изменить или удалить какой-либо существующий слой. Для этого вам нужно следовать следующему методу.
2. Изменение образа Dockerfile.
Поскольку существующие слои изображения доступны только для чтения, вы не можете напрямую изменять их с помощью нового файла Dockerfile. С помощью команды FROM в Dockerfile вы берете какое-то изображение в качестве основы и строите на нем или добавляете к нему слои.
Некоторые задачи могут потребовать от нас изменения существующего уровня, хотя вы можете сделать это, используя предыдущий метод с кучей противоречивых RUNинструкций (например, удаление файлов, удаление/замена пакетов, добавленных на каком-то предыдущем уровне), это не идеальное решение или что мы бы порекомендовали. Потому что он добавляет дополнительные слои и значительно увеличивает размер изображения.
Лучшим способом было бы не использовать образ в качестве базового, а изменить фактический файл Dockerfile этого образа. Вернемся к предыдущему Dockerfile, что, если бы мне не пришлось хранить Python3 в этом образе и заменить пакет Python3 и команду на Perl?
Следуя предыдущему методу, нам пришлось бы создать новый Dockerfile, например:
FROM dummy:0.1

RUN apk del python3 && apk add --no-cache perl

ENTRYPOINT ["perl", "-e", "print "Hello Worldn""]
При построении, в этом изображении будет всего пять слоев.
articles/Modify a Docker Image on modify-docker-images [?] took 3s ❯ docker image history dummy:0.2 IMAGE CREATED CREATED BY SIZE COMMENT 2792036ddc91 10 seconds ago /bin/sh -c #(nop) ENTRYPOINT ["perl" "-e" "… 0B b1b2ec1cf869 11 seconds ago /bin/sh -c apk del python3 && apk add --no-c… 34.6MB ecb8694b5294 3 hours ago /bin/sh -c #(nop) ENTRYPOINT ["python3" "-c… 0B 8017025d71f9 3 hours ago /bin/sh -c apk add --no-cache python3 && … 43.6MB 28f6e2705743 38 hours ago /bin/sh -c #(nop) CMD ["/bin/sh"] 0B <missing> 38 hours ago /bin/sh -c #(nop) ADD file:80bf8bd014071345b… 5.61MB
Также размер изображения составляет 83,8 МБ.
articles/Modify a Docker Image on modify-docker-images [?] ❯ docker images REPOSITORY TAG IMAGE ID CREATED SIZE dummy 0.2 2792036ddc91 19 seconds ago 83.8MB
Теперь вместо этого возьмите исходный файл Dockerfile и измените файлы Python3 на Perl следующим образом
FROM alpine:latest

RUN apk add --no-cache perl

ENTRYPOINT ["perl", "-e", "print "Hello Worldn""]
Количество слоев уменьшилось до 3, а размер теперь составляет 40,2 МБ.
articles/Modify a Docker Image on modify-docker-images [?] took 3s ❯ docker image history dummy:0.3 IMAGE CREATED CREATED BY SIZE COMMENT f35cd94c92bd 9 seconds ago /bin/sh -c #(nop) ENTRYPOINT ["perl" "-e" "… 0B 053a6a6ba221 9 seconds ago /bin/sh -c apk add --no-cache perl 34.6MB 28f6e2705743 38 hours ago /bin/sh -c #(nop) CMD ["/bin/sh"] 0B <missing> 38 hours ago /bin/sh -c #(nop) ADD file:80bf8bd014071345b… 5.61MB articles/Modify a Docker Image on modify-docker-images [?] ❯ docker images REPOSITORY TAG IMAGE ID CREATED SIZE dummy 0.3 f35cd94c92bd 29 seconds ago 40.2MB
Изображение успешно изменено.
Предыдущий метод более полезен, когда вы собираетесь просто добавить слои поверх существующих, но не очень полезен при попытке изменить существующие слои, например удалить один, заменить один, изменить порядок существующих и так далее. Вот где сияет этот метод.
Метод 2: изменение образа с помощью фиксации докера
Есть еще один метод, с помощью которого вы можете сделать снимок работающего контейнера и превратить его в собственный образ.
Давайте создадим идентичный образ dummy:0.1, но на этот раз без использования Dockerfile. Поскольку мы использовали базу alpine:latestкак dummy:0.1, разверните контейнер с этим изображением.
docker run --rm --name alpine -ti alpine ash
Теперь внутри контейнера, добавьте пакет Python3, apk add –no-cache python3. После этого откройте новое окно терминала и выполните следующую команду (или что-то подобное)
docker container commit --change='ENTRYPOINT ["python3", "-c", "print("Hello World")"]' alpine dummy:0.4
С помощью флага –change мы добавляю к новому образу dummy:04 инструкцию Dockerfile (в данном случае инструкцию ENTRYPOINT).
С помощью команды docker container commit вы в основном конвертируете внешний слой r/w в слой ar/o, добавляете его к существующим слоям изображения и создаете новое изображение. Этот метод более интуитивно понятен/интерактивен, поэтому вы можете использовать его вместо Dockerfiles, но понимаете, что это не очень воспроизводимо. Также те же правила применяются к удалению или изменению любых существующих слоев, добавление слоя только для того, чтобы что-то удалить или изменить что-то, сделанное на предыдущем слое, не лучшая идея, по крайней мере, в большинстве случаев.
На этом статья завершается. Мы надеемся, что это статья была полезна для вас, если у вас есть какие-либо вопросы, оставьте комментарий ниже.
Если вы нашли ошибку, пожалуйста, выделите фрагмент текста и нажмите Ctrl+Enter.
I presume you are a tad bit familiar with Docker and know basics like running docker containers etc.
In previous articles we have discussed updating docker container and writing docker files.
What exactly is modifying a docker image?
A container image is built in layers (or it is a collection of layers), each Dockerfile instruction creates a layer of the image. For example, consider the following Dockerfile:
FROM alpine:latest

RUN apk add --no-cache python3

ENTRYPOINT ["python3", "-c", "print('Hello World')"]
Since there are a total of three Dockerfile commands, the image built from this Dockerfile, will contain a total of three layers.
You can confirm that by building the image:
docker image built -t dummy:0.1 .
And then using the command docker image history on the built image.
articles/Modify a Docker Image on modify-docker-images [?] took 12s
❯ docker image history dummy:0.1
IMAGE CREATED CREATED BY SIZE COMMENT
b997f897c2db 10 seconds ago /bin/sh -c #(nop) ENTRYPOINT ["python3" "-c… 0B
ee217b9fe4f7 10 seconds ago /bin/sh -c apk add --no-cache python3 43.6MB
28f6e2705743 35 hours ago /bin/sh -c #(nop) CMD ["/bin/sh"] 0B
<missing> 35 hours ago /bin/sh -c #(nop) ADD file:80bf8bd014071345b… 5.61MB
Ignore the last ‘<missing>’ layer.
Each of these layers is read-only. This is beneficial because since these layers are read-only, no process associated with a running instance of this image is going to be able to modify the contents of this image, therefore, these layers can be shared by many containers without having to keep a copy for each instance. But for the containers’ processes to be able to perform r/w, another layer is added on top of the existing RO layers when creating the containers, this is writable and not shared by other containers.
The downside of this r/w layer is that changes made in this layer is not persistent, although you can use volumes to persist some data, sometimes you may need/want to add a layer before some existing layer, or delete a layer from an image or simply replace a layer. These are the reasons one might want to modify an existing docker image.
In this article, I’m going to cover all the cases I mentioned above, using different methods.
Methods of modifying a docker image
There are two ways you can modify a docker image.
- Through Dockerfiles.
- Using the command
docker container commit.
I’ll explain both methods, and at the end, I’ll also add which use case would be better for the method in context.
Method 1: Modifying docker image through the Dockerfile
Modifying a docker image essentially means modifying the layers of an image. Now since each Dockerfile command represents one layer of the image, modifying each line of a Dockerfile will change the respective image as well.
So if you were to add a layer to the image, you can simply add another Dockerfile instruction to it, to remove one you would remove a line and to change a layer, you would change the line accordingly.
There are two ways you can use a Dockerfile to modify an image.
- Using the image that you want to modify as a base image and build a child image.
- Modifying the actual Dockerfile of the image you want to change.
Let me explain which method should be used when, and how.
1. Using an image as a base image
This is when you take the image you want to modify, and add layers to it to build a new child image. Unless an image is built from scratch, every image is a modification to the same parent base image.
Consider the previous Dockerfile. Say the image build from that image is named dummy:0.1. Now if I were to think that I now need to use Perl instead of Python3 to print «Hello World», but I also don’t want to remove Python3, I could just use the dummy:0.1 image as the base image (since Python3 is already there) and build from that like the following
FROM dummy:0.1

RUN apk add --no-cache perl

ENTRYPOINT ["perl", "-e", "print "Hello Worldn""]
Here I’m building on top of dummy:0.1, adding more layers to it as I see fit.
This method is not going to be much helpful if your intention is to change or delete some existing layer. For that, you need to follow the next method.
2. Modifying the image’s Dockerfile
Since the existing layers of an image are read-only, you cannot directly modify them through a new Dockerfile. With the FROM command in a Dockerfile, you take some image as a base and build on it, or add layers to it.
Some tasks may require us to alter an existing layer, although you can do that using the previous method with a bunch of contradictory RUN instructions (like deleting files, removing/replacing packages added in some previous layer), it isn’t an ideal solution or what I’d recommend. Because it adds additional layers and increases the image size by quite a lot.
A better method would be to not use the image as a base image, but change that image’s actual Dockerfile. Consider again the previous Dockerfile, what if I did not have to keep Python3 in that image, and replace the Python3 package and the command with the Perl ones?
If following the previous method I’d have had to create a new Dockerfile like so —
FROM dummy:0.1

RUN apk del python3 && apk add --no-cache perl

ENTRYPOINT ["perl", "-e", "print "Hello Worldn""]
If built, there is going to be a total of five layers in this image.
articles/Modify a Docker Image on modify-docker-images [?] took 3s
❯ docker image history dummy:0.2
IMAGE CREATED CREATED BY SIZE COMMENT
2792036ddc91 10 seconds ago /bin/sh -c #(nop) ENTRYPOINT ["perl" "-e" "… 0B
b1b2ec1cf869 11 seconds ago /bin/sh -c apk del python3 && apk add --no-c… 34.6MB
ecb8694b5294 3 hours ago /bin/sh -c #(nop) ENTRYPOINT ["python3" "-c… 0B
8017025d71f9 3 hours ago /bin/sh -c apk add --no-cache python3 && … 43.6MB
28f6e2705743 38 hours ago /bin/sh -c #(nop) CMD ["/bin/sh"] 0B
<missing> 38 hours ago /bin/sh -c #(nop) ADD file:80bf8bd014071345b… 5.61MB
Also, the size of the image is 83.8 MB.
articles/Modify a Docker Image on modify-docker-images [?]
❯ docker images
REPOSITORY TAG IMAGE ID CREATED SIZE
dummy 0.2 2792036ddc91 19 seconds ago 83.8MB
Now instead of doing that, take the initial Dockerfile, and change the Python3 ones to Perl like so
FROM alpine:latest

RUN apk add --no-cache perl

ENTRYPOINT ["perl", "-e", "print "Hello Worldn""]
The number of layers has reduced to 3, and the size now is 40.2 MB.
articles/Modify a Docker Image on modify-docker-images [?] took 3s
❯ docker image history dummy:0.3
IMAGE CREATED CREATED BY SIZE COMMENT
f35cd94c92bd 9 seconds ago /bin/sh -c #(nop) ENTRYPOINT ["perl" "-e" "… 0B
053a6a6ba221 9 seconds ago /bin/sh -c apk add --no-cache perl 34.6MB
28f6e2705743 38 hours ago /bin/sh -c #(nop) CMD ["/bin/sh"] 0B
<missing> 38 hours ago /bin/sh -c #(nop) ADD file:80bf8bd014071345b… 5.61MB
articles/Modify a Docker Image on modify-docker-images [?]
❯ docker images
REPOSITORY TAG IMAGE ID CREATED SIZE
dummy 0.3 f35cd94c92bd 29 seconds ago 40.2MB
Image successfully changed.
The previous method is more useful when you’re going to just add layers on top of the existing ones, but isn’t much helpful when trying to modify the existing layers like delete one, replace one, reorder the existing ones and so on. That is where this method shines.
Method 2: Modifying image using docker commit
There’s this another method where you can take a snapshot of a running container, and turn that into an image of its own.
Let’s build a dummy:0.1 identical image, but this time without using a Dockerfile. Since I used alpine:latest as dummy:0.1‘s base, spin up a container of that image.
docker run --rm --name alpine -ti alpine ash
Now inside the container, add the Python3 package, apk add --no-cache python3. Once done, open a new terminal window and run the following command (or something similar)
docker container commit --change='ENTRYPOINT ["python3", "-c", "print("Hello World")"]' alpine dummy:0.4
With the --change flag I’m adding a Dockerfile instruction to the new dummy:04 image (in this case, the ENTRYPOINT instruction).
With the docker container commit command, you basically convert the outermost r/w layer to a r/o layer, append that to the existing image’s layers and create a new image. This method is more intuitive/interactive so you may want to use this instead of Dockerfiles, but do understand that this isn’t very reproducible. Also the same rules apply to removing or altering any existing layers, adding a layer just to remove something or alter something done in a previous layer is not the best idea, at least in most of the cases.
That concludes this article. I hope this one was helpful to you, if you have any question, do comment down below.
I have recently started working on docker. I have downloaded a docker image and I want to change it in a way so that I can copy a folder with its contents from my local into that image or may be edit any file in the image.
I thought if I can extract the image somehow, do the changes and then create one image. Not sure if it will work like that. I tried looking for options but couldn’t find a promising solution to it.
The current Dockerfile for the image is somewhat like this:
FROM abc/def
MAINTAINER Humpty Dumpty <@hd>


RUN sudo apt-get install -y vim

ADD . /home/humpty-dumpty
WORKDIR /home/humpty-dumpty
RUN cd lib && make

CMD ["bash"]
Note:- I am looking for an easy and clean way to change the existing image only and not to create a new image with the changes.
asked Apr 14, 2017 at 16:27
![]()
qwertyqwerty
2,3623 gold badges27 silver badges55 bronze badges
As an existing docker image cannot be changed what I did was that I created a dockerfile for a new docker image based on my original docker image for its contents and modified it to include test folder from local in the new image.
This link was helpful Build your own image — Docker Documentation
FROM abc/def:latest
The above line in docker file tells Docker which image your image is based on. So, the contents from parent image are copied to new image
Finally, for including the test folder on local drive I added below command in my docker file
COPY test /home/humpty-dumpty/test
and the test folder was added in that new image.
Below is the dockerfile used to create the new image from the existing one.
FROM abc/def:latest

# Extras
RUN sudo apt-get install -y vim

# copies local folder into the image
COPY test /home/humpty-dumpty/test
Update:- For editing a file in the running docker image, we can open that file using vim editor installed through the above docker file
vim <filename>
Now, the vim commands can be used to edit and save the file.
answered Apr 14, 2017 at 18:05
![]()
qwertyqwerty
2,3623 gold badges27 silver badges55 bronze badges
You don’t change existing images, images are marked with a checksum and are considered read-only. Containers that use an image point to the same files on the filesystem, adding on their on RW layer for the container, and therefore depend on the image being unchanged. Layer caching also adds to this dependency.
Because of the layered filesystem and caching, creating a new image with just your one folder addition will only add a layer with that addition, and not a full copy of a new image. Therefore, the easy/clean/correct way is to create a new image using a Dockerfile.
answered Apr 14, 2017 at 16:40
![]()
BMitchBMitch
214k40 gold badges456 silver badges428 bronze badges
2
First of all, I will not recommend messing with other image. It would be better if you can create your own. Moving forward, You can use copy command to add folder from host machine to the docker image.
COPY <src> <dest>
The only caveat is <src> path must be inside the context of the build; you cannot COPY ../something /something, because the first step of a docker build is to send the context directory (and subdirectories) to the docker daemon.
FROM abc/def
MAINTAINER Humpty Dumpty <@hd>


RUN sudo apt-get install -y vim

// Make sure you already have /home/humpty-dumpty directory
// if not create one
RUN mkdir -p /home/humpty-dumpty


COPY test /home/humpty-dumpty/ // This will add test directory to home/humpty-dumpty
WORKDIR /home/humpty-dumpty
RUN cd lib && make

CMD ["bash"]
answered Apr 14, 2017 at 16:44
![]()
RahulRahul
2,0281 gold badge20 silver badges36 bronze badges
I think you can use the docker cp command to make changes to the container which is build from your docker image and then commit the changes.
Here is a reference,
Guide for docker cp:
https://docs.docker.com/engine/reference/commandline/cp/
Guide for docker commit: https://docs.docker.com/engine/reference/commandline/container_commit/
Remember, docker image is a ready only so you cannot make any changes to that. The only way is to modify your docker file and recreate the image but in that case you lose the data(if not mounted on docker volume ). But you can make changes to container which is not ready only.
answered Apr 14, 2017 at 17:32
![]()
В этом руководстве обсуждается, как изменить стандартный образ Docker, скачанныйй из публичного репозитория Docker-хаб.
Для примера мы скачаем последний образ CentOS, добавим тестовый каталог «test_dir» и создадим в нем тестовый файл «test_fiel».
Добавление каталога и файла образ Docker
1. Первый шаг – скачать последний образ CentOS с docker hub.
# docker pull centos
Using default tag: latest
latest: Pulling from library/centos
d9aaf4d82f24: Pull complete
Digest: sha256:4565fe2dd7f4770e825d4bd9c761a81b26e49cc9e3c9631c58cfc3188be9505a
Status: Downloaded newer image for centos:latest
# docker images
REPOSITORY          TAG                 IMAGE ID            CREATED             SIZE
centos              latest              d123f4e55e12        2 weeks ago         197MB
2. Как только образ CentOS будет загружен, мы запустим Docker контейнер, основанный на этом образе с именем «centos_test».
# docker run -it --name="centos_test" centos:latest /bin/bash
[root@e121d03b20dc /]#
3. Теперь давайте создадим новый каталог «test_dir» с файлом «test_file».
Также добавим случайный текст в файл test_file.
[root@e121d03b20dc /]# mkdir test_dir
[root@e121d03b20dc /]# cd test_dir
[root@e121d03b20dc test_dir]# echo "Случайный текст" > test_file
[root@e121d03b20dc test_dir]# cat test_file
This is a sample text
[root@e121d03b20dc test_dir]# ls -lrt
total 4
-rw-r--r--. 1 root root 22 Nov 19 16:12 test_file
4. Следующий шаг – создать новый образ с помощью команды docker commit, используя только что созданный контейнер Docker.
Команда «docker commit» запускается с хоста docker, а не из самого контейнера docker.
# docker commit -m="This a test image" centos_test new_centos_image
sha256:93603e53ff5329b314da097e3e5607b60cd1ce126f48cae542c083c715f069f7
где:
- –m = «Thi is test image»: это сообщение о коммите.
- centos_test: имя контейнера, из которого вы создаете образ.
- new_centos_image: имя нового созданного образа.
5. После выполнения вышеуказанной команды вы увидите новый образ «centos_image» в списке образов докеров, доступных локально в системе.
# docker images
REPOSITORY          TAG                 IMAGE ID            CREATED             SIZE
new_centos_image    latest              93603e53ff53        52 seconds ago      197MB
centos              latest              d123f4e55e12        2 weeks ago         197MB
Тестирование нового образа Docker
Теперь мы проверим вновь созданный образ, запустив на нем новый контейнер.
Мы должны быть в состоянии перечислить каталог и файл, созданные в новом контейнере.
1. Создайте новый контейнер из вновь созданного образа
# docker images
REPOSITORY          TAG                 IMAGE ID            CREATED             SIZE
new_centos_image    latest              93603e53ff53        11 minutes ago      197MB
centos              latest              d123f4e55e12        2 weeks ago         197MB
# docker run -it --name="image_testing" new_centos_image:latest /bin/bash
[root@24bd49cd0e0e /]#
2. Проверьте каталог и файл, который мы создали ранее.
[root@24bd49cd0e0e /]# ls -lrt test_dir
total 4
-rw-r--r--. 1 root root 22 Nov 19 17:09 test_file
[root@24bd49cd0e0e /]# cd test_dir
[root@24bd49cd0e0e test_dir]# cat test_file
Случайный текст
In this article, we will look at the process of creating image, running into container and modifying image and finally distributing the image using public repository and file-based approach.
Background
As part of Software development process, sometimes we need to configure containerize solution and create iterative improvement. In this process, a docker image is started with base image, and phase wise improvement is made by adding all the needed component to the image before finalizing the package. In that case, we start with bare metal image and continuously add additional layer in the process and pass the intermediate product to as different version. In this process, we must create image from a container after modifying the image and then pass the image along for further modification. In this article, we are going to look at the process of creating image, running into container and modifying image and finally distributing the image using public repository and file-based approach.
In addition to a will to go through this technical jargon, the following is needed to do hands on.
- A Docker Hub account – A free registry account can be created at https://hub.docker.com/
- Docker – Docker Desktop available at https://www.docker.com/products/docker-desktopcan be installed.
- Terminal (e.g. PowerShell) — Any terminal can be used to execute docker command. In the example, we will be using PowerShell. In the PowerShell, $ is used to define a variable and # is used to start a comment
The command and example in these articles were made on Windows 10 machine with Windows PowerShell and Docker version 20.10.2.
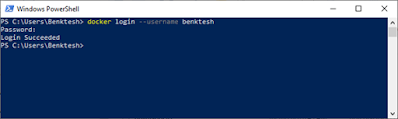
Login to Docker Hub
Once the docker starts, we can login to the docker using DockerId. DockerID can be used as username while authenticating to a Docker registry for docker images. Docker client can be asked to connect to the registry to download or upload images. Docker Hub is one of the registries. An account can be created at https://hub.docker.com/.
Let’s start a PowerShell or Terminal window and log on using:
docker login --username benktesh #password will be entered in the prompt
When the above command is run and user is authenticated, a successful login prompt show.
Create Docker Image
Docker image can be created from scratch or we can use a publicly available image to get started. Here we are going to get an Ubuntu 18.04 image from Docker Hub with a pull command. Note that images can be created from the scratch. Please Creating Docker Image for an illusration about creating image.
Docker pull ubuntu:18.04

After the image has been pulled, we can verify that the image exists by executing image ls command.
Docker image ls
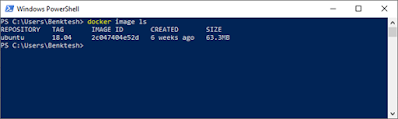
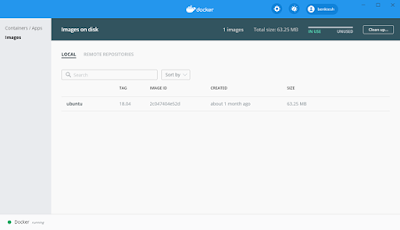
At the same time, if the docker desktop is installed, the list of images shows the existence of the image.
Run Image as Container
So far in the process, we have downloaded an image of Ubuntu 18.04 locally. This is similar to a situation we have got a Virtual Machine but is not running. To run this image, we need to run inside a container. The image can be run as container with the following command by specifying a name of the container suchas ‘ubuntu_container’ based on image ‘ubuntu’ with tag ’18.04’ as below:
docker run -d --name ubuntu_container -i -t ubuntu:18.04
--name argument is defining the name of the container and ubuntu:1804 is represent repository:tag information of the image. Argument -d ensures the container runs in detached mode. The above command can be made reusable by using variables. For example, in the PowerShell, we can define a variable for container name and image and use it.
$container = "ubuntu_container" #defines variable for container name

$image = "ubuntuL18:04" #defines a variable for image label
After such variables are defined, the command can use the variables as below:
docker run -d --name $container -i -t $image
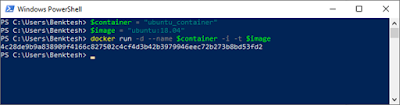
The above command returns runs a container and returns the id of the container. We can check to see what is inside the container. To do this, we can open a bash shell in the container by executing
docker exec -it $container bash
which opens the bash prompt where we can execute cat /etc/os-release command to find out the release information on of the Ubuntu image that is running in the container. The result showed that we are running Version 18.04.5 (Bionic Beaver) of Ubuntu.

We verified that we Ubuntu 1804 is locally running as a container. Issuing exit command gets us out of the bash.
Modify Docker Image
After we have container running, we do ‘stuffs’ on it. For example, we add more layers and application to the container to make it more useful. For example, we could add one application and distribute the image with application to customers or provide it as a value-added image for later use. To mimic this, we are going to modify this container and create a new image out of this container and save to docker repository for public distribution.
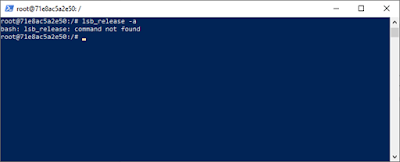
For illustration, in the current container when we execute lsb_release -a, the response is that ‘command not found’ that means the container does not provide features for lsb_release. Next, we will update this container by adding lsb_release and make it re-usable for all the applications.
As part of the modification, we will update the base version, and install lsb_release package and mark the modification complete. We will first update the Ubuntu with apt update. Then we will install the lsb-core using apt install lsb-core. After the install completes, we can execute lsb_release -a to find the latest information about the Ubuntu.
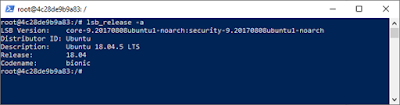
We can now see that lsb_release -a is available. So essentially, we have made small update to the base Ubuntu image.
Like we installed lsb-core, applications can be installed in this image as part of the containerized solutions. To this document, we consider that we have now updated our image that can be reused by others thus is ready for distribution.
Create a New Image From Modified Container for Distribution
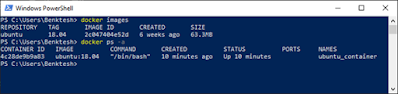
So far, we have got one image which is Ubuntu 18.04 that was pulled from the docker repository. We created a container and updated the images and installed lsb-core into that container. We inspect the status of images by executing docker images and status of container executing docker ps -a to see the list of images and containers, respectively. Note that ps stands for process status.
We can create a new image out of the currently running container image which includes the updates we have made by executing docker commit $container which returns sha256 string of the created image id. Executing docker images shows the newly created image with id of returned sha256. At this time, we have created a new image based on the updated container image.
We can tag the newly created image by providing an appropriate name. We will create a variable to store a new name ‘ubuntu_modified:18.04”
$newImage = "ubuntu_modified:18.04"
We will now commit to create a new image named ‘ubuntu_modified:18:04’.
docker commit $container $newImage
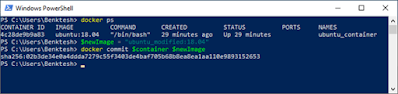
The command returns a sha hash to indicate the id of the newly created image. This image can be seen with docker images command

In the list we can see the newly created image named ‘ubuntu_modified’ with image id matching the sha256 identified and shows the time of creation. Note the size of the image – for new container – which is larger than the original image because we had installed new update to the image.
Now that we have created a fresh image out of the modified container, the older container can be removed. Frist we will stop the container and then remove it.
docker stop $container
docker rm $container
We will verify that the container indeed is removed by running docker ps command.

Now that we have deleted old container, we are going to create a new container named “modified_container” from the modified image. We can now run another container with newly created image. Let us create a new variable for new container
$newContainer = "modified_container"
Start a new container with:
docker run -d --name $newContainer -i -t $newImage
Open a bash shell on the newly created container.
docker exec -it $newContainer bash
After we execute lsb_release -acommand, note that the command returned the result without having to need for an update. Executing exit will get us out of the bash.

As before, lets stop and remove the newly created container as we do not need it.
docker stop $newContainer
docker rm $newContainer
Distributing Docker Image
Now that we have container image created, we are ready for distribution of the image. There are two ways to distribute the image. We can distribute it by pushing the image to public or private repository. For illustration, we are going to use Docker Hub Repository (https://hub.docker.com/repositories) to place the image for distribution.
Distribute using repository
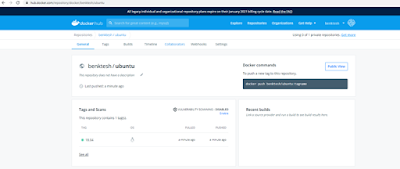
First, we will tag the image to add the repository information. The docker.io is default repository. We will create a variable $repositoryTag to have a value of benktesh/ubuntu:1804 and tag the latest image and execute docker push command
$repositoryTag = "benktesh/ubuntu:18.04"
docker tag $newImage $repositoryTag
docker push $repositoryTag

and a simple docker push will the content to the outside world as it is publicly available in the repository which we can verify by going to the Docker Hub at navigating to benktesh/ubuntu(https://hub.docker.com/repository/docker/benktesh/ubuntu).
Now the file is in repository docker pull command can be used to get an image for further use.
Distribute by Creating Tar File
Another way is to create a tar file from either image or container. Here We are going to look at option where docker image can be saved as tar file.
docker save -o ubuntu.tar $repositoryTag
Command above creates a file ubuntu.tar with a tag defined in variable $repositoryTag which can distributed. The tar file can be loaded into docker to generate image with simple docker command as below:
docker load -i ubuntu.tar
Now the file is loaded, it can be used.
Conclusion
In this post, we illustrated how to create a docker image by using a base image from public repository, run that image in a container, and update the container with necessary installs and upgrades and then create an updated image from the containerized image modification. We also showed how to push the image to registry for distribution and looked at file-based approach to save and load images tar file.
Related Articles
- Set up development environment for Azure Kubernetes Service (AKS) deployment
Create a Docker image of an application - Deploy an application image to Kubernetes
Store image to the Azure Container Registry (ACR) - Deploy application image to Azure Kubernetes Service (AKS)
Azure Kubernetes Service (AKS) Deployment Recipes
In this article, we will look at the process of creating image, running into container and modifying image and finally distributing the image using public repository and file-based approach.
Background
As part of Software development process, sometimes we need to configure containerize solution and create iterative improvement. In this process, a docker image is started with base image, and phase wise improvement is made by adding all the needed component to the image before finalizing the package. In that case, we start with bare metal image and continuously add additional layer in the process and pass the intermediate product to as different version. In this process, we must create image from a container after modifying the image and then pass the image along for further modification. In this article, we are going to look at the process of creating image, running into container and modifying image and finally distributing the image using public repository and file-based approach.
In addition to a will to go through this technical jargon, the following is needed to do hands on.
- A Docker Hub account – A free registry account can be created at https://hub.docker.com/
- Docker – Docker Desktop available at https://www.docker.com/products/docker-desktopcan be installed.
- Terminal (e.g. PowerShell) — Any terminal can be used to execute docker command. In the example, we will be using PowerShell. In the PowerShell, $ is used to define a variable and # is used to start a comment
The command and example in these articles were made on Windows 10 machine with Windows PowerShell and Docker version 20.10.2.
Login to Docker Hub
Once the docker starts, we can login to the docker using DockerId. DockerID can be used as username while authenticating to a Docker registry for docker images. Docker client can be asked to connect to the registry to download or upload images. Docker Hub is one of the registries. An account can be created at https://hub.docker.com/.
Let’s start a PowerShell or Terminal window and log on using:
docker login --username benktesh #password will be entered in the prompt
When the above command is run and user is authenticated, a successful login prompt show.
Create Docker Image
Docker image can be created from scratch or we can use a publicly available image to get started. Here we are going to get an Ubuntu 18.04 image from Docker Hub with a pull command. Note that images can be created from the scratch. Please Creating Docker Image for an illusration about creating image.
Docker pull ubuntu:18.04
After the image has been pulled, we can verify that the image exists by executing image ls command.
Docker image ls
At the same time, if the docker desktop is installed, the list of images shows the existence of the image.
Run Image as Container
So far in the process, we have downloaded an image of Ubuntu 18.04 locally. This is similar to a situation we have got a Virtual Machine but is not running. To run this image, we need to run inside a container. The image can be run as container with the following command by specifying a name of the container suchas ‘ubuntu_container’ based on image ‘ubuntu’ with tag ’18.04’ as below:
docker run -d --name ubuntu_container -i -t ubuntu:18.04
--name argument is defining the name of the container and ubuntu:1804 is represent repository:tag information of the image. Argument -d ensures the container runs in detached mode. The above command can be made reusable by using variables. For example, in the PowerShell, we can define a variable for container name and image and use it.
$container = "ubuntu_container" #defines variable for container name

$image = "ubuntuL18:04" #defines a variable for image label
After such variables are defined, the command can use the variables as below:
docker run -d --name $container -i -t $image
The above command returns runs a container and returns the id of the container. We can check to see what is inside the container. To do this, we can open a bash shell in the container by executing
docker exec -it $container bash
which opens the bash prompt where we can execute cat /etc/os-release command to find out the release information on of the Ubuntu image that is running in the container. The result showed that we are running Version 18.04.5 (Bionic Beaver) of Ubuntu.
We verified that we Ubuntu 1804 is locally running as a container. Issuing exit command gets us out of the bash.
Modify Docker Image
After we have container running, we do ‘stuffs’ on it. For example, we add more layers and application to the container to make it more useful. For example, we could add one application and distribute the image with application to customers or provide it as a value-added image for later use. To mimic this, we are going to modify this container and create a new image out of this container and save to docker repository for public distribution.
For illustration, in the current container when we execute lsb_release -a, the response is that ‘command not found’ that means the container does not provide features for lsb_release. Next, we will update this container by adding lsb_release and make it re-usable for all the applications.
As part of the modification, we will update the base version, and install lsb_release package and mark the modification complete. We will first update the Ubuntu with apt update. Then we will install the lsb-core using apt install lsb-core. After the install completes, we can execute lsb_release -a to find the latest information about the Ubuntu.
We can now see that lsb_release -a is available. So essentially, we have made small update to the base Ubuntu image.
Like we installed lsb-core, applications can be installed in this image as part of the containerized solutions. To this document, we consider that we have now updated our image that can be reused by others thus is ready for distribution.
Create a New Image From Modified Container for Distribution
So far, we have got one image which is Ubuntu 18.04 that was pulled from the docker repository. We created a container and updated the images and installed lsb-core into that container. We inspect the status of images by executing docker images and status of container executing docker ps -a to see the list of images and containers, respectively. Note that ps stands for process status.
We can create a new image out of the currently running container image which includes the updates we have made by executing docker commit $container which returns sha256 string of the created image id. Executing docker images shows the newly created image with id of returned sha256. At this time, we have created a new image based on the updated container image.
We can tag the newly created image by providing an appropriate name. We will create a variable to store a new name ‘ubuntu_modified:18.04”
$newImage = "ubuntu_modified:18.04"
We will now commit to create a new image named ‘ubuntu_modified:18:04’.
docker commit $container $newImage
The command returns a sha hash to indicate the id of the newly created image. This image can be seen with docker images command
In the list we can see the newly created image named ‘ubuntu_modified’ with image id matching the sha256 identified and shows the time of creation. Note the size of the image – for new container – which is larger than the original image because we had installed new update to the image.
Now that we have created a fresh image out of the modified container, the older container can be removed. Frist we will stop the container and then remove it.
docker stop $container
docker rm $container
We will verify that the container indeed is removed by running docker ps command.
Now that we have deleted old container, we are going to create a new container named “modified_container” from the modified image. We can now run another container with newly created image. Let us create a new variable for new container
$newContainer = "modified_container"
Start a new container with:
docker run -d --name $newContainer -i -t $newImage
Open a bash shell on the newly created container.
docker exec -it $newContainer bash
After we execute lsb_release -acommand, note that the command returned the result without having to need for an update. Executing exit will get us out of the bash.
As before, lets stop and remove the newly created container as we do not need it.
docker stop $newContainer
docker rm $newContainer
Distributing Docker Image
Now that we have container image created, we are ready for distribution of the image. There are two ways to distribute the image. We can distribute it by pushing the image to public or private repository. For illustration, we are going to use Docker Hub Repository (https://hub.docker.com/repositories) to place the image for distribution.
Distribute using repository
First, we will tag the image to add the repository information. The docker.io is default repository. We will create a variable $repositoryTag to have a value of benktesh/ubuntu:1804 and tag the latest image and execute docker push command
$repositoryTag = "benktesh/ubuntu:18.04"
docker tag $newImage $repositoryTag
docker push $repositoryTag
and a simple docker push will the content to the outside world as it is publicly available in the repository which we can verify by going to the Docker Hub at navigating to benktesh/ubuntu(https://hub.docker.com/repository/docker/benktesh/ubuntu).
Now the file is in repository docker pull command can be used to get an image for further use.
Distribute by Creating Tar File
Another way is to create a tar file from either image or container. Here We are going to look at option where docker image can be saved as tar file.
docker save -o ubuntu.tar $repositoryTag
Command above creates a file ubuntu.tar with a tag defined in variable $repositoryTag which can distributed. The tar file can be loaded into docker to generate image with simple docker command as below:
docker load -i ubuntu.tar
Now the file is loaded, it can be used.
Conclusion
In this post, we illustrated how to create a docker image by using a base image from public repository, run that image in a container, and update the container with necessary installs and upgrades and then create an updated image from the containerized image modification. We also showed how to push the image to registry for distribution and looked at file-based approach to save and load images tar file.
Related Articles
- Set up development environment for Azure Kubernetes Service (AKS) deployment
Create a Docker image of an application - Deploy an application image to Kubernetes
Store image to the Azure Container Registry (ACR) - Deploy application image to Azure Kubernetes Service (AKS)
Azure Kubernetes Service (AKS) Deployment Recipes
A hallmark of Docker containers is immutability. At any time, you can destroy and recreate containers to re-establish the initial state. Using the docker commit command, you can commit new changes to a container image, but it’s not relatively as straightforward as you’d expect.
Let’s explore how to commit changes to a new container image with the docker commit command!
When to Commit Changes to a New Container Image
Containers are built to be immutable (not changed) so why then would you want to commit changes to a container? There are a few reasons.
- During the development of a new containerized service to quickly test changes.
- Perform fast bug fixing of a production service without needing to fix the source image first.
- Use
committo snapshot an image and export the image to a new server.
Though these may not cover all potential scenarios, these are a few that make using docker commit a perfect use case.
Committing Changes to a Simple Image
For a seemingly simple command, this command does a lot.
Below is a simple example commit command. Using a running container ID, d3fdd3517e0a in this example, a new image is created in a repo called myrepository and named changedimage.
The original image is tagged as version2, which is not necessary, but useful for keeping track of changes between similarly named images.
Both
myrepositoryandchangedimageare arbitrarily chosen, but these would typically reflect properly labeled resources such ascustomimages/alpine-linux.
docker commit d3fdd3517e0a myrepository/changedimage:version2Docker containers are a series of read-only images with a read-write layer on top. In the above example, Docker pauses the running container. This pause is to prevent accidental data corruption while Docker creates the image
Since this pause could cause service interruptions, you may use
--pause=false. This could corrupt data, as writes may not be completed successfully.
Additionally, the commit operation omits data contained in volumes mounted within the container. Since volumes are not part of the file system itself of the container, Docker ignores them.
Once the commit operation completes, Docker then creates a new layer with the changes from the original image under the new container image name.
Prerequisites
The only prerequisite in this tutorial is Docker itself. This can be installed via the Docker Desktop software in Windows or installed via a package in Linux.
Related: Deploying Your First Docker Container in Windows
Commiting Changes to a New Docker Container Image
Let’s now look at some common scenarios that the docker commit command may be handy for.
First, pull down an Alpine Linux container image from the public Docker repository. Alpine is known for its slim containers, as noted by the ~5MB size.
# Pull the latest Alpine Linux image
docker pull alpine
# List all Docker images
docker images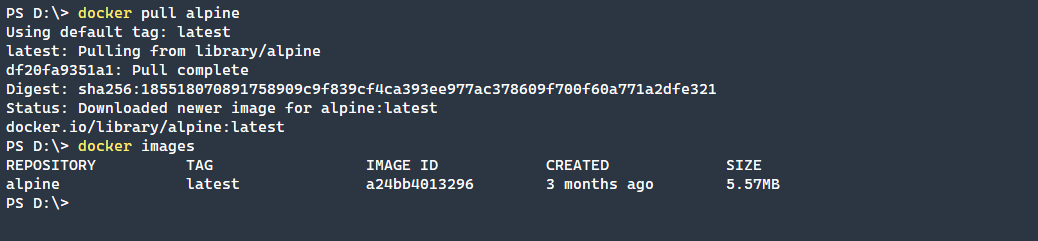
Container Development and Testing
The primary use case for docker commit is the development of a new container image. This image may ultimately be used as the base for other images, or as the production container itself.
In the example snippet below, Docker is:
- Running the previously pulled
alpineimage - Opening an interactive shell to install a package
- Installing the htop package
# Open an interactive shell to the Docker Alpine Linux container
docker run -it a24bb4013296 bin/sh
# Install the HTOP package
apk add htop
You can see below that the package is correctly installed in the container by running the htop command.

Once you’ve installed the package on the new “layer”, you should now commit that change to the original base image. To do that:
- Run
docker ps -ato locate the container ID. - Using the container ID, commit the content of the current layer to a new base image.
In the example below, the new image is named alpine-htop and tagged version1. The image is tagged for ease of tracking docker image versions that are similarly named.
# List all Docker containers regardless of status, -a or --all to show every container
docker ps -a
# Commit the layer to a new image named alpine-htop and tagged version1
docker commit b57e066d5bfa alpine-htop:version1
# List all images available
docker images
Bug Fixing in Production Images
Often you may have a production service that has some error. There may be a known fix and you could apply a fix quicker than modifying the existing configurations and re-deploying. Using docker commit, you can quickly apply the fix, and then work in the background to update the other necessary components.
This example snippet below demonstrates installing NGINX into an Alpine Linux Docker image.
# First List the available images
docker images
# Run an interactive session for the alpine-htop image
docker run -it a24bb4013296 bin/sh
# Install the NGINX package
apk add nginx
# Create the location for the NGINX PID file
mkdir /run/nginx
# Verify that NGINX is installed
nginx -v
# Run NGINX
/usr/sbin/nginx
# Verify that NGINX is properly running
ps | grep nginx
# Kill the NGINX process
kill 18
# Verify that the NGINX process is no longer active
ps | grep nginx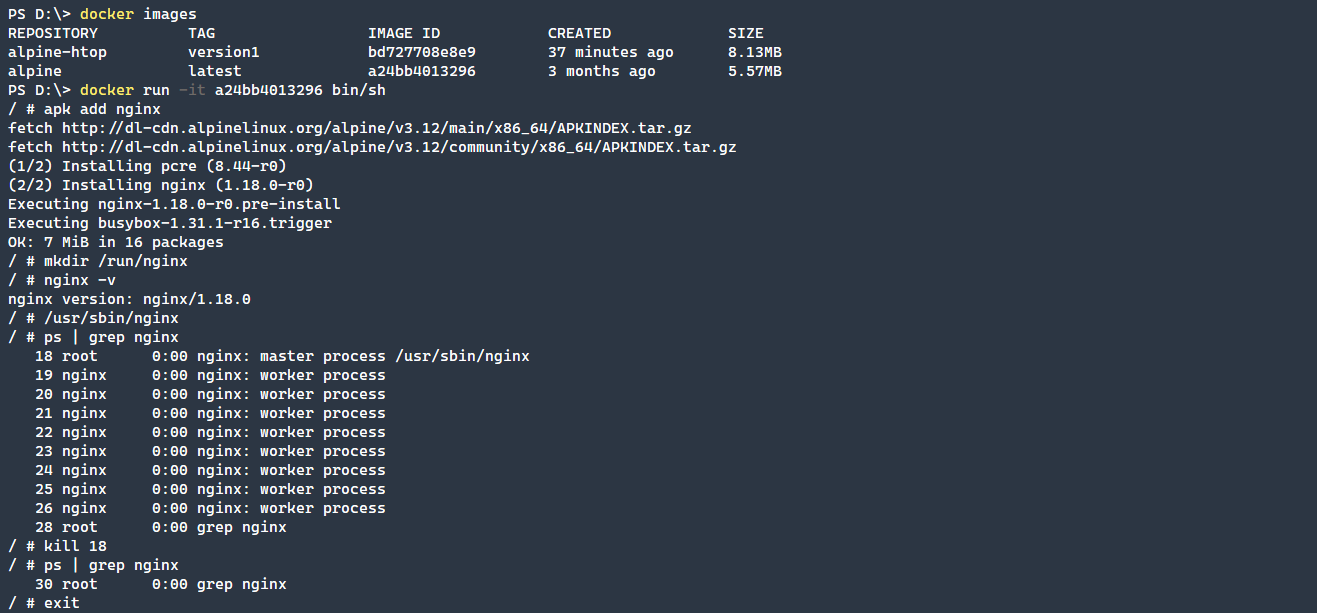
Commit the new NGINX container created above into a new image named alpine-nginx and with the tag, version1. Tagging the image is a best practice, to help differentiate different versions of the same image.
# List all Docker containers regardless of status, -a or --all to show every container
docker ps -a
# Commit the changes to a new image named alpine-nginx
docker commit 37043139525c alpine-nginx:version1
# Verify that the new image was created
docker images
Not every executable will be able to be run in the background, and NGINX is no different. To properly run this container, with NGINX running in the background, pass in the -g 'daemon off;' option to NGINX.
# Run the NGINX container in the background
docker run -d f6b46a3b76be /usr/sbin/nginx -g 'daemon off;'
# Verify that the container is running
docker ps -a
Finally, use the --change switch to expose port 80. By utilizing the --change parameter, the EXPOSE 80 command will be written to the DockerFile of the container. Once this change has been made, start the new container. After the new container has been started proceed to stop the previous container that was incorrectly run without the exposed port. This will help to gracefully transition the non-working container to the working container.
# List all running containers
docker ps -a
# Commit the changes to a new image with an exposed port 80
docker commit --change "EXPOSE 80" c649c813d985 alpine-nginx:version2
# List the running containres
docker ps -a
# List all Docker images
docker images
# Run the newly created image
docker run -d c71f0f9cef7b /usr/sbin/nginx -g 'daemon off;'
# List running containers
docker ps -a
# Stop the prior container without the exposed port 80
docker stop c649c813d985
# List running containers
docker ps -a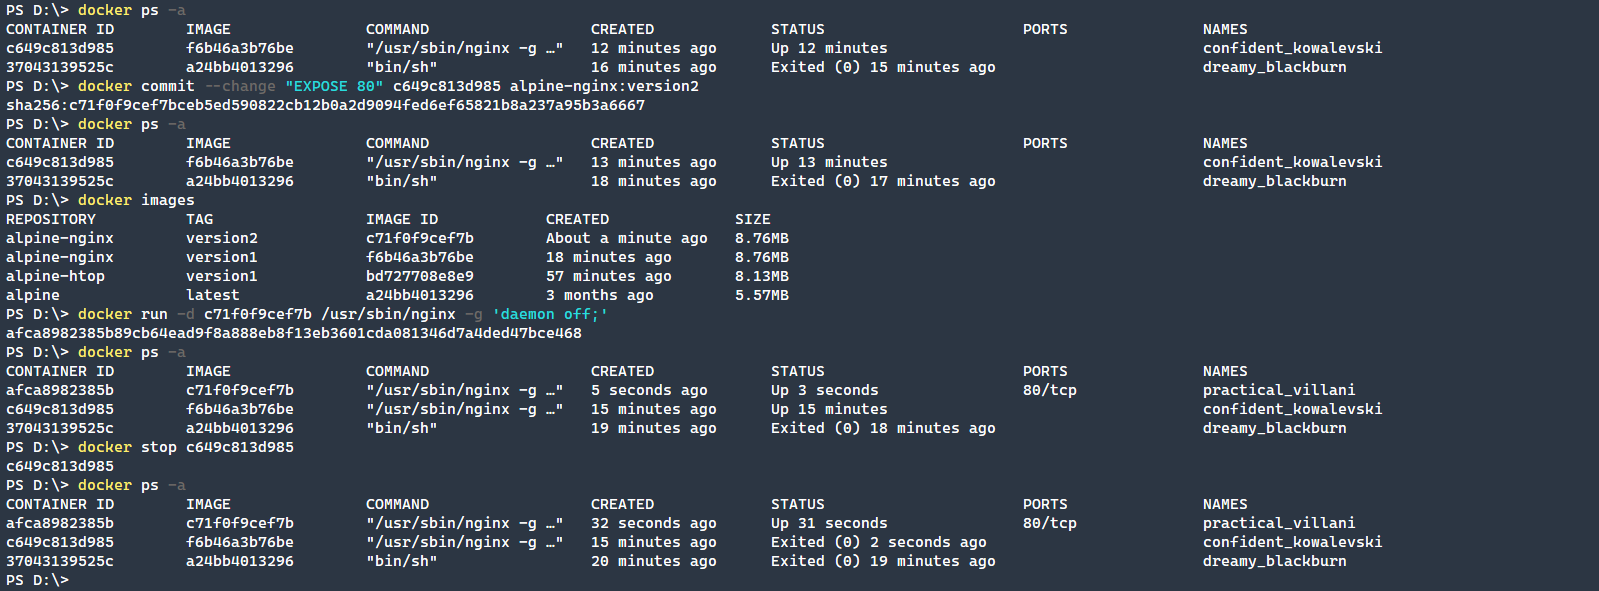
Snapshotting a Docker Image
Finally, what about a scenario where you may need to snapshot, a point in time image, of a running container to move the container over to a new server? The docker commit command works well to do that, as you can see below.
The commands below create a running container that we will stop and commit to a new alpine-nginx version.
# List running Docker containers
docker ps -a
# Create a new running Docker NGINX container
docker run -d c71f0f9cef7b
# List running Docker containers
docker ps -a
# Stop the Docker container
docker stop 7ff99f2bcf6b
# Create a new alpine-nginx version to export
docker commit 7ff99f2bcf6b alpine-nginx:version3
# List the Docker images available
docker images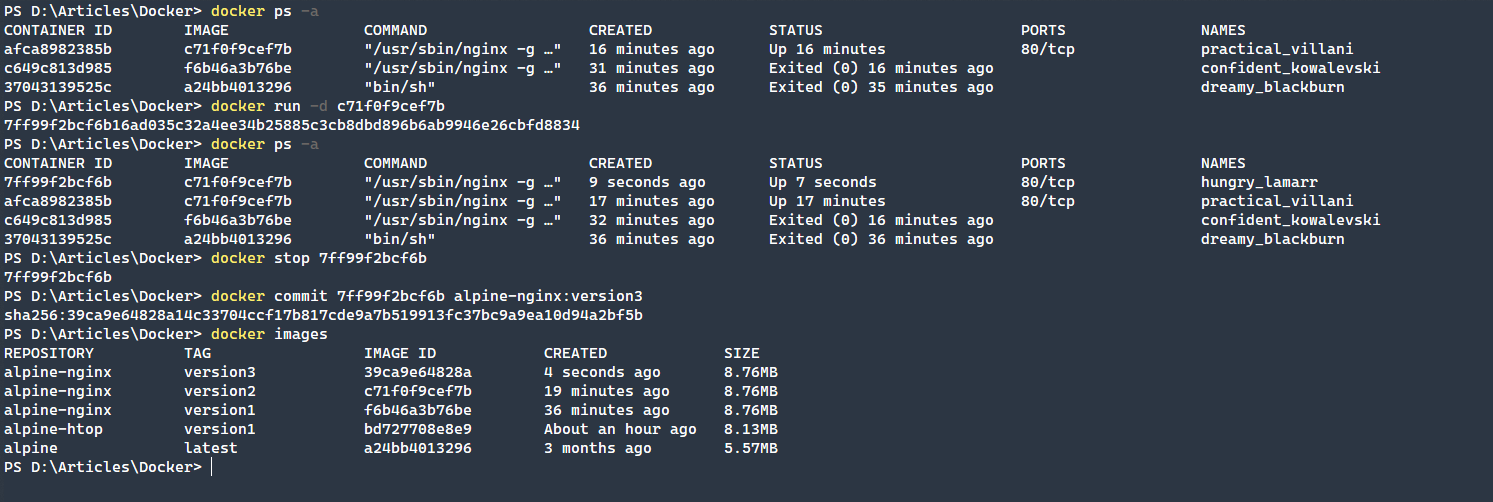
Export the Docker image to a file. In this example, the export file is named export.tar, but name the file according to your needs. Finally, import the export.tar file back into Docker, demonstrating the end-to-end process.
Make sure to export using the format
repo:tagif you want those labels to be maintained when re-importing the image.
# Save the image to a file on the local disk
docker save -o export.tar alpine-nginx:version3
# Verify that the image exists
ls
# Remove the just exported Docker image
docker rmi 39ca9e64828a
# List Docker images and verify that the image is removed
docker images
# Load the Docker image back in
docker load -i export.tar
# List Docker images and show that the image has been loaded back in
docker images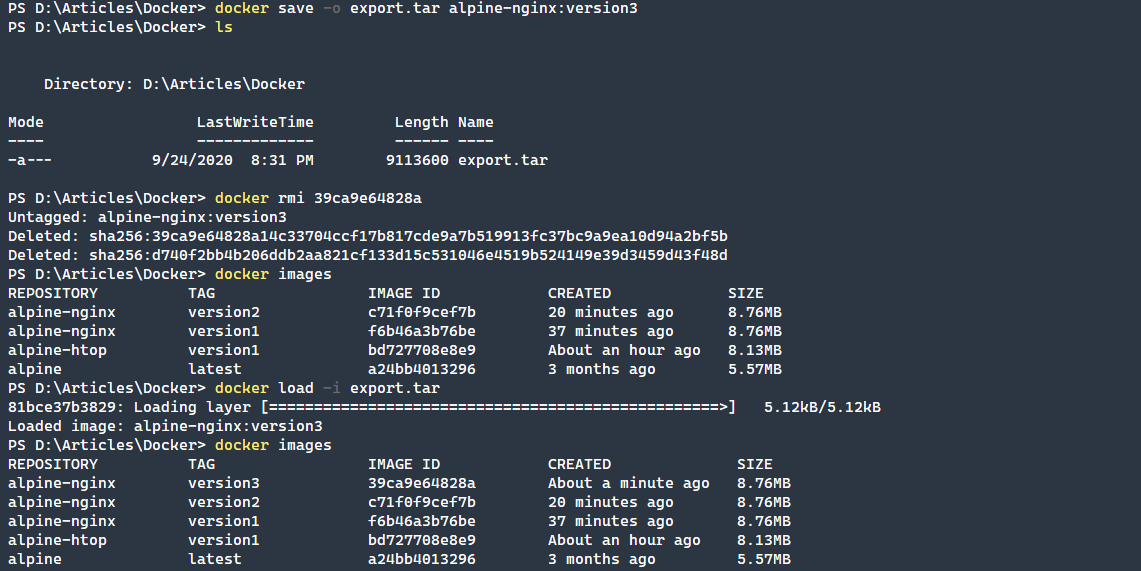
Additional Options for Docker Commit Command
Leveraging the additional options available to the commit command, many different scenarios are supported.
Pausing the Container
To not pause the container while it is running, you can pass in the --pause=false command to disable the pausing feature. This is often used when backing up a production service and pausing that service would be detrimental.
The pause command also has a shorthand of -p that may be quicker to use. Be aware though that by bypassing the pausing of the container, you are risking data corruption, if there is a filesystem write occurring, which could cause incomplete or corrupt data to be written.
Leaving a Commit Message
Familiar to many developers is that of providing a right commit message. Just like in using source control, you ideally want to give a useful message that explains why a new version of the container was committed.
This can be done by using the --message="message to commit" command. As before, there is a shorthand version of this command, -m. To see the list of Docker commit messages, use the docker history command.
Defining the Author
To properly denote who is creating the change, you can provide an author value that will give some additional context to who is making the change. This can be used via the --author="Jane Author ([email protected])". This command can also be used via the shorthand of -a. Using docker inspect you will be able to retrieve a JSON listing of container information, including labels such as author.
Applying DockerFile Changes in Parallel
Finally, the most complicated command that can be used in the docker commit command is the change parameter. This parameter applies changes in the container to the DockerFile at the same time as the commit.
You can use the change parameter by passing instructions to the Dockerfile like so, --change="ENV TEST true". This command puts the text, ENV TEST true into the DockerFile. Now when the container starts again, the changes that you designate here would be already applied.
Instead of the
--changename, you can take a shortcut and use the-calias.
With this command, you can also chain multiple --change parameters together. This allows you to easily add multiple changes to a DockerFile in one commit command.
Change Parameter Options
You can only use a few commands with the change parameter as shown below.
CMD– The CMD instruction takes the form of CMD ["executable","parameter1","parameter2"]. This is the preferred method, but keep in mind that only oneCMDcan exist in a DockerFile at a time. The lastCMDwill be the one that takes effect. The primary purpose ofCMDis to provide default execution commands for a container upon creation.ENTRYPOINT– Similar to the CMD command, ENTRYPOINT uses the syntax ofENTRYPOINT ["executable","parameter1","parameter2"]. This syntax begs the question of why use ENTRYPOINT over CMD?The ENTRYPOINT command run an executable as the primary process of
PID 1. This action then allows you to shut down the process usingdocker stopgracefully. Additionally, you can useCMDwith this by leaving off theexecutableportion which passes those parameters into theENTRYPOINTexecutable.ENV– Since most applications consume environmental variables, the ENV command lets you set these simply in the key-value format ofENV key=value. Access these key=value variables as standard Linux environmental variables.EXPOSE– The EXPOSE command exposes a port and optional protocol outside of the container. This command maps ports within the container to the outside of the container and allows containers to interact with outside resources such as a web server serving content.LABEL– The LABEL command adds metadata to a container. You can add metadata by using the format,LABEL version="2.0"to view the additional metadata use the docker image inspect command.ONBUILD– The ONBUILD command adds an instruction to execute later when the image is used as a base for another container build. This parameter uses the ADD and RUN commands to add content with the ADD command or RUN an executable.USER-The USER command sets the user name (or UID) and optionally the user group (or GID) to use when running the image. This looks likeUSER myuser:mygroupin practice.- VOLUME – With most containers, it’s necessary to access data in some way. The VOLUME command will create a mount point with a specified name that marks it as holding an externally mounted volume. This is commonly used like so,
VOLUME ["/data"]. WORKDIR– Finally, the WORKDIR command sets the working directory the CMD or ENTRYPOINT commands. This is used like so,WORKDIR /path/to/directory. WORKDIR is useful when you need to start an executable but the location is not in the default PATH environmental variable.
Conclusion
The docker commit command is surprisingly complex. Though there is a simple syntax, with the ability to add DockerFile changes while using the commit command, you can quickly make changes that persist upon the next creation of the container via the DockerFile.
This command may not be necessary for all situations, but for fast troubleshooting and to snapshot containers that can be easily moved across servers, the commit command quickly becomes very useful!