Contents
- Introduction
- Requirements
-
Basics
- Setting/changing the hostname
- Finding your network interface
- Disable network managers and/or wicd
- Configuring an interface
- Setting up a second IP address or Virtual IP address
- Howto set MTU for a connection
- Setting up DNS
-
Wireless
- ndiswrapper
- Configure your wireless interface
- WPA supplicant
-
Configure laptops for multiple locations
- Map your physical interfaces to logical interfaces
- Define tests to select networks
- Result
- Bonus script
-
See also
- Ubuntu resources
- External resources
Introduction
You can configure a network interface from the command line. You can configure your network client hosts with the command line by using commands to change your current settings or by editing a number of system files. This has several advantages over network managers in the GUI.
This guide had been developed for Ubuntu and Debian, other distributions can use a similar setup, but be aware that file locations may differ.
Requirements
An editor. This guide will use vi, but you can replace it with any other editor of your liking, gedit, nano, gvim, pico, emacs..
Have a working internet connection during the installation. We need to install packages and those are fetched from the online repositories.
Backup any files we touch. Just easier to recover when you have a backup.
Read this guide in full before actually configuring your network.
Basics
Setting/changing the hostname
The hostname command allows you to directly query, or set, the hostname from the command line.
You can see your current hostname by running hostname. To set the hostname directly you can run hostname newname as root. If you do this however, make sure you change the /etc/hosts file first. This is needed because otherwise you will need to boot into single user mode and change your hostname in /etc/hosts. This is because sudo requires DNS lookups in certain cases and it cannot resolve your newly set hostname.. To circumvent this you need to add the new name to the hosts file prior to setting the hostname and remove it once that action has succeeded.
sudo vi /etc/hosts
127.0.1.1 ubuntu newname
Set the hostname to newname.
sudo hostname newname
# or
echo newname | sudo tee /etc/hostname
Now you can remove the old hostname
sudo vi /etc/hosts
127.0.1.1 newname
When your system boots it will automatically read the hostname from the file /etc/hostname. You can add hostname and IP addresses to the file /etc/hosts for static lookups.
Finding your network interface
When setting up your network you will need to know the network interface cards on your computer. The interface name of cards for different vendors may be different, which is why this step is needed.
ls /sys/class/net
# or
ip addr
This will list the interface names for all NICs on your computer. It will probably include eth0 (hardwired NIC), lo (loopback interface for the localhost), and something for your wireless card (like wifi0, or wlan0).
Disable network managers and/or wicd
Configuring your network via the CLI will likely interfere with Network Manager or wicd. To counter this, disable the startup script of either application or completely remove the packages. Be aware that the rest of this guide will require packages which need to be installed from the online repositories.
## Network manager
# Stop the current process
sudo /etc/init.d/NetworkManager stop
# Start: sudo /etc/init.d/NetworkManager start

# The inofficial way:
sudo chmod -x /etc/init.d/NetworkManager
# Reverse: sudo chmod +x /etc/init.d/NetworkManager
# The official way:
sudo update-rc.d -f NetworkManager remove
# Reverse: sudo update-rc.d -f NetworkManager defaults 50

# Or remove the network manager package.
sudo aptitude purge network-manager
# Reverse: sudo aptitude install network-manager

## wicd
# Stop the current process
sudo /etc/init.d/wicd stop
# Start: sudo /etc/init.d/wicd start

# The inofficial way:
sudo chmod -x /etc/init.d/wicd
# Reverse: sudo chmod +x /etc/init.d/wicd

# The official way:
sudo update-rc.d -f wicd remove
# Reverse: sudo update-rc.d -f wicd defaults 20

# Or remove the wicd package.
sudo aptitude purge network-manager
# Reverse: sudo aptitude install network-manager
Note: At some point Ubuntu started using upstart instead of the /sbin/init/ daemon. Thus if the first command above does not stop Network Manager, try this.
sudo stop network-manager
Configuring an interface
- Word of wisdom
-
We will use eth0 in this example, your interface can be named differently, see Finding your network interface.
If you have disabled the either wicd or the network manager you probably don’t have a network connection anymore. Connect via a regular UTP cable to your router, and assuming you have DHCP enabled do the following:
sudo ip link set dev eth0 down
sudo dhclient eth0
This will bring your eth0 up by using DHCP. Your network is now configured (for the time being).
If you don’t have DHCP enabled configure your network by issueing the commands below, the gateway address is the IP address of your router. And your IP should be in the same range as the router is.
sudo ip addr add 192.168.1.14/24 dev eth0
sudo ip link set dev eth0 up
sudo ip route add default via 192.168.1.1
These commands configure your interface but these changes will not survive a reboot, since the information is not stored anyhwere. This is where the interfaces file comes in handy. To configure a interface permanently you’ll need to edit the interfaces file, /etc/network/interfaces.
sudo vi /etc/network/interfaces
## To configure a dynamic IP address
auto eth0
iface eth0 inet dhcp

## Or configure a static IP
auto eth0
iface eth0 inet static
  address 192.168.1.14
  gateway 192.168.1.1
  netmask 255.255.255.0
  network 192.168.1.0
  broadcast 192.168.1.255
For these settings to take effect you need to restart your networking services.
sudo /etc/init.d/networking restart
Setting up a second IP address or Virtual IP address
If you need to set up a second ip address you need to edit the /etc/network/interfaces.
sudo vi /etc/network/interfaces
auto eth0:1
iface eth0:1 inet static
  address 192.168.1.24
  netmask 255.255.255.0
  network 192.168.1.1
  broadcast 192.168.1.255
  gateway 192.168.1.1
For these new settings to take effect you need to restart networking services using the following command
sudo /etc/init.d/networking restart
Howto set MTU for a connection
You can set the MTU for an interface, you could do this by using the mtu keyword in the interface file or by using the ip link command.
iface eth0 inet dhcp
  # via mtu keyword
  mtu 1492
  # Via ip link command
  pre-up /sbin/ip link set $IFACE mtu 1492
The above example sets the MTU for device eth0 to 1492, the usual MTU for a PPPoE ISP connection. This however is only needed if connections seem to hang otherwise (with the default of 1500).
This tip was found on http://glasnost.beeznest.org/articles/290.
Setting up DNS
To cause your machine to consult with a particular server for name lookups you simply add their addresses to /etc/resolv.conf.
For example a machine which should perform lookups from the DNS server at IP address 192.168.1.1 would have a resolv.conf file looking like this
sudo vi /etc/resolv.conf
enter the following details
search example.com
domain example.com
nameserver 192.168.1.1
Wireless
We will not use un-encrypted wireless connections, but will make use of WEP/WPA/WPA2. Deviations from security/encryption method is an exercise left for the user. We also assume the network SSID is being broadcast.
Enabling wireless networking on your PC is pretty straight forward. If your network card is supported out of the box, then there are very little issues. If your card is not supported out of the box, you may need to use ndiswrapper, which will require the Windows drivers fo your card.
ndiswrapper
* Install a Windows driver with ndiswrapper for Dapper or ndiswrapper for 8.04 and up
# Ubuntu 6.06 (Dapper) and earlier
sudo aptitude install ndiswrapper-utils
# Ubuntu 8.04 and up (Hardy/Intrepid/Jaunty/Karmic)
sudo aptitude install ndiswrapper-utils-1.9

# All versions
sudo ndiswrapper -i /path/to/windows/driver.inf
sudo ndiswrapper -m
- More information about ndiswrapper
-
https://help.ubuntu.com/community/WifiDocs/Driver/Ndiswrapper
ndiswrapper --help
man ndiswrapper
Configure your wireless interface
In the examples I will use wlan0 as your wireless card, this could be different on your machine! I will do the examples with a dynamic IP address (DHCP), the same principles applies to staticly configured IP’s.
Open the interfaces file
sudo vi /etc/network/interfaces
auto wlan0
iface wlan0 inet dhcp
pre-up  /etc/init.d/wpa.sh start
post-down /etc/init.d/wpa.sh stop
The pre-up command is run before the interface goes up. The post-down command is run after the interface goes down. There are also post-up and pre-down commands. E.g. You could use post-up to mount disks after an interface goes up. In this case we start wpa_supplicant before we enable the interface and we stop wpa_supplicant after we bring the interface down.
WPA supplicant
- Before you start
-
") Before proceeding any further, it might be worthwhile to check whether your Wi-Fi Card is supported. Please see the wpa_supplicant website for more details. This will save you lots of time and frustration.
Before proceeding any further, it might be worthwhile to check whether your Wi-Fi Card is supported. Please see the wpa_supplicant website for more details. This will save you lots of time and frustration.
Install wpa_supplicant
sudo aptitude install wpasupplicant
Creating the password
You probably have given your wireless network a name (the ESSID or SSID), in this example we will use ubuntuwifi for our wireless network, our password will be OpenSesame. The SSID and password needs to be configured on your wireless router, how to do that is up to the reader. If you have problems coming up with a password, please have a look here.
If you are using WEP encryption (which is not advised) you may skip this step.
$ wpa_passphrase ubuntuwifi OpenSesame
network={
        ssid="ubuntuwifi"
        #psk="OpenSesame"
        psk=24f87a7583001eb7cea2394bbdb04eb2d3641f0b907dd31bd286be628c1841f8
}
Adding your network
Open the /etc/wpa_supplicant file and define your network.
sudo vi /etc/wpa_supplicant.conf
#
#  Please see /usr/share/doc/wpasupplicant/wpa_supplicant.conf.gz
#  for more complete configuration parameters.
#
ctrl_interface=/var/run/wpa_supplicant
ctrl_interface_group=0

eapol_version=2
ap_scan=1
fast_reauth=1
country=NL

### Associate with any open access point
###  Scans/ESSID changes can be done with wpa_cli
network={
  ssid=""
  key_mgmt=NONE
  priority=1
}

# WEP
network={
  ssid="ubuntuwifi"
  scan_ssid=1
  key_mgmt=NONE
  wep_key0="OpenSesame"
  wep_key1="OpenOtherSesame"
  # Use the correct key..
  wep_tx_keyidx=0
  priority=5
}

# WPA/WPA2
network={
  ssid="ubuntuwifi"
  scan_ssid=1
  psk=24f87a7583001eb7cea2394bbdb04eb2d3641f0b907dd31bd286be628c1841f8
  priority=5
  ## The configuration items listed below do not need to be set, the defaults are
  ## pretty 'let us do it for you'.
  ## See /usr/share/doc/wpasupplicant/wpa_supplicant.conf.gz for more information.
  # key_mgmt=WPA-PSK
  # proto=WPA RSN
  # pairwise=CCMP TKIP
  # group=CCMP TKIP
}
Please beware, if you use WPA, remove the WEP section and vice versa.
The priority in this file determines to which network you will connect if more then 2 configured networks are available. This will always be the network with the highest priority.
WPA start script
Create the WPA startup script /etc/init.d/wpa.sh
sudo vi /etc/init.d/wpa.sh
#!/bin/bash
### BEGIN INIT INFO
# Provides:          wpa
# Required-Start:    $network $syslog $local_fs
# Required-Stop:     $network $syslog $local_fs
# Default-Start:     2 3 4 5
# Default-Stop:      0 1 6
# Short-Description: Start/stop script for wpa supplicant
# Description:       Custom start/stop script for wpa_supplicant.
### END INIT INFO

SELF=`basename $0`
WPA=wpa_supplicant
PROGRAM=/sbin/${WPA}
CONF=/etc/${WPA}.conf
INTERFACE=wlan0
DRIVER=wext
DAEMONMODE="-B"
LOGFILE=/var/log/$WPA.log

function start() {

    # TODO: Support multiple interfaces and drivers
    OPTIONS="-c $CONF -i $INTERFACE -D $DRIVER $DAEMONMODE"

    ## You can remove this if you are running 8.10 and up.
    # Ubuntu 8.10 and up doesn't need the -w anymore..
    # And the logfile option is not valid on 8.04 and lower
    local ver=$(lsb_release -sr | sed -e 's/.//g');
    [ $ver -lt 810 ] && OPTIONS="$OPTIONS -w" && LOGFILE=""
    ##

    # Log to a file
    [ -n "$LOGFILE" ] && OPTIONS="$OPTIONS -f $LOGFILE"

    echo " * Starting wpa supplicant"
    eval $PROGRAM $OPTIONS
}

function stop() {
    echo " * Stopping wpa supplicant"
    wpa_cli -i $INTERFACE terminate
    #pkill $PROGRAM ## alternative method
}

function debug() {
    stop
    DAEMONMODE="-ddd"
    start
}

function restart() {
    stop
    start
}

function status() {
    pgrep -lf $PROGRAM
}

function usage() {
    echo "Usage: $SELF <start|stop|status|debug>"
    return 2
}

case $1 in
    start|stop|debug|restart|status) $1 ;;
    *) usage ;;
esac
Make the start script executable.
sudo chmod +x /etc/init.d/wpa.sh
You can now start WPA supplicant as a service or in debugging mode:
# Service
/etc/init.d/wpa.sh start
# Debugging
/etc/init.d/wpa.sh debug
Make sure the script gets run on boot and stopped at shutdown
sudo update-rc.d wpa.sh defaults
With wpa_cli you can make changes to your wpa_supplicant config file and reload these changes:
sudo wpa_cli
Enter help to see what you can do with wpa_cli. Some of the options are: reconfigure, disconnect, reconnect, reassociate. These options speak for themself.
For more information about wpa_supplicant, please have a look at their respective manpages:
man wpa_supplicant
man wpa_supplicant.conf
man wpa_cli
man wpa_gui # Only when you have installed the wpagui package
gzip -dc /usr/share/doc/wpasupplicant/wpa_supplicant.conf.gz | less
Now that you have setup everything, you can try to connect to your network by restarting networking
sudo /etc/init.d/networking restart
You could also reboot your machine if you prefer that.
Configure laptops for multiple locations
When you have a laptop you don’t want to configure it to only be able to have a internet connection at only one location. You probably go to work and use a wired connection, you goto to coffeeshop and use the wifi hotspot overthere and at home you have another network configuration. That is exactly what we are going to configure now.
Guessnet, ifplugd and wpa_supplicant
Install guessnet and ifplugd
sudo aptitude install guessnet ifplugd
Configure ifplugd. Define which interfaces need to be hotplug and adjust the arguments. You should remove the -q.
sudo vi /etc/default/ifplugd
# Just an example
INTERFACES="eth0 wlan0"
#ARGS="-q -f -u0 -d10 -w -I"
ARGS="-f -u0 -d10 -w -I"
# Override ARGS for a particular interface
# This is for an Intel Corporation PRO/Wireless 3945ABG [Golan] Network Connection (rev 02)
ARGS_wlan0="-F -u0 -d10 -w -I"
SUSPEND_ACTION=stop
Some cards do not really play well with the defaults of Ubuntu, adjust where needed.
- More information for ifplugd
-
See ifplugd for more information. And their respective man pages
man ifplugd
man ifplugd.conf
You will need the wpa.sh script mentioned earlier in this guide and you will need to make sure it will be started and stopped:
# Start wpa_supplicant at boot
sudo ln -s /etc/init.d/wpa.sh /etc/rc2.d/S19wpa
sudo ln -s /etc/init.d/wpa.sh /etc/rc3.d/S19wpa

# Kill wpa_supplicant at shutdown
sudo ln -s /etc/init.d/wpa.sh /etc/rc5.d/K21wpa
sudo ln -s /etc/init.d/wpa.sh /etc/rc6.d/K21wpa
Map your physical interfaces to logical interfaces
First, we are going to make a mapping for eth0 and wlan0 and said which mapped interface could be used for each physical interface:
mapping eth0
  # Tell ifupdown to use guessnet to determine which network we can use
  script guessnet-ifupdown
  # Default location
  map default: missing-cable
  # How verbose we are
  map verbose: false
  map debug: false
  # Our different networks, order decides which network is picked
  # if two or more networks are available at the same time.
  map officelan homelan aruba missing-cable

mapping wlan0
  script guessnet-ifupdown
  map default: missing-cable
  map verbose: false
  map debug: false
  map workwifi homewifi wifi-open missing-cable
Normally ifupdown configures the interfaces, but now we’ve told it to use guessnet to determine the network being used.
Define tests to select networks
As you will see with the officelan, homelan and aruba examples below we will execute tests to see wheter a peer is present based on the MAC address. The simplest solution for this is to check whether your gateway is present. You can find out the MAC address of your gateway by running the ip neigh command. You need to be connected with your network for this.
$ ip neigh
192.168.1.254 dev eth0 lladdr 00:24:17:47:xx:xx
This my default gateway, has IP address 192.168.1.254 and 00:24:17:47:xx:xx as a MAC address. This gives us the needed information to define the test.
test peer address 192.168.1.254 mac 00:24:17:47:xx:xx source 192.168.1.14
You don’t need to specify the source IP address, but in certain cases this is required. I always add it so I don’t have to worry about it in case I do need it.
So let’s define our fixed networks using the peer tests:
# Work
# Obfuscated some details about my work enviroment
iface officelan inet static
  # Test to see if our gateway is present with MAC address 00:00:xx:xx:xx:xx
  # from source address 194.134.x.x
  test peer address 194.134.x.x mac 00:00:xx:xx:xx:xx source 194.134.x.x
  address 194.134.x.x
  netmask 255.255.255.0
  gateway 194.134.x.x
  # Set our DNS, this is used by the resolvconf package
  dns-domain euronet.nl
  dns-search euronet.nl orange.nl wanadoo.nl online.nl euro.net
  dns-nameservers 194.134.5.5 194.134.0.97
  # (post|pre)-(up|down) actions, which are optional
  # Mount samba shares at work after we brought the interface up
  post-up /home/my_user/bin/mount_smb start
  # And disable to mounts before we shut the interface down
  pre-down /home/my_user/bin/mount_smb stop
  # Which interface has preference, eth0 or wlan0, this is needed if you
  # are connected via both interfaces.
  metric 1

# One happy island (very nice weather ;))
iface aruba inet dhcp
  test peer address 192.168.1.1 mac 00:08:5C:89:xx:xx source 192.168.1.4
  dns-domain opperschaap.net
  dns-search opperschaap.net euronet.nl wanadoo.nl online.nl euro.net

# Home
iface homelan inet static
  test peer address 192.168.1.254 mac 00:24:17:47:xx:xx source 192.168.1.14
  address 192.168.1.14
  netmask 255.255.255.0
  gateway 192.168.1.1
  dns-domain opperschaap.net
  dns-search opperschaap.net euronet.nl wanadoo.nl online.nl euro.net
  dns-nameservers 194.134.5.5 194.134.0.97
  # At home, wireless has precedence over our fixed network
  metric 2
For wireless networks you can also use the peer test, but there is a simpler way to see if you can connect to a wireless network. Test to see if the ESSID is present:
  test wireless essid ubuntuwifi
  # In case of spaces in the ESSID
  test wireless essid "ubuntu wifi"
- Spaces in the ESSID
- In older versions of guessnet you didn’t need to use quotes around the ESSID, but later versions do require it.
# Wifi at work
iface workwifi inet dhcp
  # Use this if we can find Online Wireless network
  test wireless essid "Online Wireless"
  dns-domain euronet.nl
  dns-search euronet.nl orange.nl wanadoo.nl online.nl sf6800.euronet.nl euro.net
  dns-nameservers 194.134.5.5 194.134.0.97
  # This interface has a lesser precedence over eth0
  metric 2

# Wifi at home
iface homewifi inet static
  test wireless essid ubuntuwifi
  address 192.168.1.114
  netmask 255.255.255.0
  gateway 192.168.1.1
  dns-domain opperschaap.net
  dns-search opperschaap.net euronet.nl wanadoo.nl online.nl
  dns-nameservers 194.134.5.5 194.134.0.97
  # This interface is used in case we are both connected via wifi and
  # wired LAN
  metric 1

# Connect to any open network
iface wifi-open inet dhcp
  # Any ESSID is valid
  wireless-essid any
  # Is the wireless work open? Yes, then use this mapping
  test wireless open
  # Set the DNS
  dns-domain opperschaap.net
  dns-search opperschaap.net euronet.nl wanadoo.nl online.nl
  dns-nameservers 194.134.5.5 194.134.0.97
To see what kind of other test you can run to determine which network you are in, please have a look at the manpage of guessnet.
man guessnet
Use of metrics
Some of you might have noticed a metric statement for some of the interfaces. I do this because when you are connected via both wireless and wired networks, some things may go «bad» with the routing table. When you define a metric for these two interfaces you will tell the routing table which interface has preference over the other. The lowest metric has priority over the higher metric.
Or as I explained in a ubuntuforum post: The problem is that without the metric you will have 2 interfaces used for the same destinations. It will use either interface, which causes problems with the routing table.
By setting a metric you can avoid this, since the higher metric is more «expensive» to use. So the OS will use the interfaces with the lowest metric if it needs to route traffic. In case the lower metric interface is shutdown it will use the higher metric interface since it is the only interface which can be used to route traffic towards that particular network/destination.
See also http://en.wikipedia.org/wiki/Metrics_%28networking%29
The problem could also be solved by adding static routes, but that is used mostly to make sure specific networks/hosts are routed via a different interface then the default. You then force only those hosts to use link B even though normally the OS would use link A.
Result
When we put all the configuration segments together you will get a interfaces file which looks like this
auto lo
iface lo inet loopback
address 127.0.0.1
netmask 255.0.0.0

mapping eth0
  script guessnet-ifupdown
  map default: missing-cable
  map verbose: false
  map debug: false
  map officelan homelan aruba missing-cable

mapping wlan0
  script guessnet-ifupdown
  map default: missing-cable
  map verbose: false
  map debug: false
  map workwifi homewifi wifi-open missing-cable

# Work
iface officelan inet static
  test peer address 194.134.x.x mac 00:00:xx:xx:xx:xx source 194.134.x.x
  address 194.134.x.x
  netmask 255.255.255.0
  gateway 194.134.x.x
  dns-domain euronet.nl
  dns-search euronet.nl orange.nl wanadoo.nl online.nl euro.net
  dns-nameservers 194.134.5.5 194.134.0.97
  post-up /home/my_user/bin/mount_smb start
  pre-down /home/my_user/bin/mount_smb stop
  metric 1

# One happy island (very nice weather ;))
iface aruba inet dhcp
  test peer address 192.168.1.1 mac 00:08:5C:89:xx:xx source 192.168.1.4
  dns-domain opperschaap.net
  dns-search opperschaap.net euronet.nl wanadoo.nl online.nl euro.net

# Home
iface homelan inet static
  test peer address 192.168.1.254 mac 00:24:17:47:xx:xx source 192.168.1.14
  address 192.168.1.14
  netmask 255.255.255.0
  gateway 192.168.1.1
  dns-domain opperschaap.net
  dns-search opperschaap.net euronet.nl wanadoo.nl online.nl euro.net
  dns-nameservers 194.134.5.5 194.134.0.97
  metric 2

# Wifi at work
iface workwifi inet dhcp
  # Use this if we can find Online Wireless network
  test wireless essid "Online Wireless"
  dns-domain euronet.nl
  dns-search euronet.nl orange.nl wanadoo.nl online.nl sf6800.euronet.nl euro.net
  dns-nameservers 194.134.5.5 194.134.0.97
  # This interface has a lesser precedence over eth0
  metric 2

# Wifi at home
iface homewifi inet static
  test wireless essid ubuntuwifi
  address 192.168.1.114
  netmask 255.255.255.0
  gateway 192.168.1.1
  dns-domain opperschaap.net
  dns-search opperschaap.net euronet.nl wanadoo.nl online.nl
  dns-nameservers 194.134.5.5 194.134.0.97
  # This interface is used in case we are both connected via wifi and
  # wired LAN
  metric 1

# Connect to any open network
iface wifi-open inet dhcp
  # Any ESSID is valid
  wireless-essid any
  # Is the wireless work open? Yes, then use this mapping
  test wireless open
  # Set the DNS
  dns-domain opperschaap.net
  dns-search opperschaap.net euronet.nl wanadoo.nl online.nl
  dns-nameservers 194.134.5.5 194.134.0.97
You can now test if it all works like intended.
/etc/init.d/networking stop
/etc/init.d/wpa.sh stop
/etc/init.d/ifplugd stop
If you enter ip addr you will only see the lo interface being active.
1: lo: <LOOPBACK,UP,LOWER_UP> mtu 16436 qdisc noqueue state UNKNOWN
2: eth0: <BROADCAST,MULTICAST> mtu 1500 qdisc pfifo_fast state DOWN qlen 1000
And start all the required daemons:
/etc/init.d/ifplugd start
/etc/init.d/wpa.sh start
/etc/init.d/networking start
And now you will see your interfaces configured properly
$ ip a
1: lo: <LOOPBACK,UP,LOWER_UP> mtu 16436 qdisc noqueue state UNKNOWN
2: eth0: <BROADCAST,MULTICAST,UP,LOWER_UP> mtu 1500 qdisc pfifo_fast state UP qlen 1000
Done.
Bonus script
This script will be a stop/start script for your complete network, which can be used when you want to enable networking after you have suspended your laptop or for other reasons
INT="eth0 wlan0"

stop() {
    /etc/init.d/networking stop
    /etc/init.d/wpa.sh stop
    /etc/init.d/ifplugd stop
    for i in $INT ; do
        ip link set dev "$i" down &>/dev/null
    done

}

start() {
    /etc/init.d/ifplugd start
    /etc/init.d/wpa.sh start
    /etc/init.d/networking start
}

restart() {
    stop
    sleep 5
    start
}

$1
See also
Ubuntu resources
-
http://ubuntuforums.org/showthread.php?t=124153 — This guide on the Ubuntu forums.
-
http://ubuntuforums.org/showthread.php?t=1055393 — Setting hostname gone wrong.
External resources
-
http://www.linuxhomenetworking.com/wiki/index.php/Quick_HOWTO_:_Ch03_:_Linux_Networking — networking for Linux explained
-
http://wiki.debian.org/WPA — Debian wiki and configuring WPA
-
http://www.aaron-spettl.de/ubuntu/dynamische-netzwerkkonfiguration.php — This guide in German
-
http://vollink.com/gary/deb_wifi.html — Debian and Wireless networking (broken link)
-
http://wiki.fok.nl/index.php/Dig/linux/wireless — This guide in Dutch, rewrite of the Ubuntu forums thread (Dutch)
CategoryNetworking CategoryWireless CategoryCommandLine
NetworkConfigurationCommandLine/Automatic (last edited 2015-07-18 12:02:04 by peter-hentrich)
Имя устройства помогает идентифицировать его внутри сети. Называя устройство, можно вложить в его имя какую-то смысловую нагрузку, что позволит лучше запомнить его имя. Или же по имени опознать его функционал. Это относится как к компьютерам пользователей, принтерам, так и к серверам и прочим устройствам. В процессе установки Ubuntu Server 20.04, как и любой другой версии этой ОС, вам предлагается дать ему имя. Но что делать если вы хотите изменить имя уже после установки? В Ubuntu Server 20.04 — изменение имени сервера происходит следующим образом:
-
Узнаем текущую информацию о сервере
hostnamectl
Эта команда покажет нам текущую информацию о системе. Так же посмотреть под каким пользователем вы авторизованы в системе и на каком сервере, можно посмотреть прямо в командной строке.
 Как видно, наш сервер называется ag-raw-server-32gb.
 -
Изменяем текущее имя сервера
С помощью этой же утилиты, мы изменим постоянное имя сервера
sudo hostnamectl set-hostname adminguide-new-name-server
Как теперь можно увидеть, Static hostname изменился, в то время как в командной строке у нас всё еще старое имя сервера. После перезагрузки новое имя полностью вступит в силу. НО есть несколько подводных камней -
Настройка в файле cloud.cfg
Если у вас используется cloud.cfg, то после перезагрузки, название сервера может вернуться к тому, что было указано при установке. Поэтому вам необходимо отключить это в файле /etc/cloud/cloud.cfg
sudo nano /etc/cloud/cloud.cfg
Открыв файл для редактирования, нужно найти строку preserve_hostname, и значение false, заменить на true. Тогда после перезагрузки, у вас сохранится новое имя сервера. -
Запись в файле hosts
В определенных конфигурациях, например в случае установки на сервер, роли Active Directory Domain Controller, для корректной работы, критично чтобы сервер резолвился по своему имени. Поэтому, если у нас например:
IP адрес сервера: 192.168.1.100
домен где находится сервер: adminguide.lan
Имя сервера: adminguide-new-name-server
То в файле hosts, нам надо добавить строку:
192.168.1.100 adminguide-new-name-server.adminguide.lan adminguide-new-name-server
После сохранения изменений, по команде ping adminguide-new-name-server сервер должен начать пинговать свой адрес 192.168.1.100
Чтобы открыть файл hosts на редактирование, необходимо использовать команду
sudo nano /etc/hosts
 Как видно, наш сервер называется ag-raw-server-32gb.
 Как теперь можно увидеть, Static hostname изменился, в то время как в командной строке у нас всё еще старое имя сервера. После перезагрузки новое имя полностью вступит в силу. НО есть несколько подводных камней
 Открыв файл для редактирования, нужно найти строку preserve_hostname, и значение false, заменить на true. Тогда после перезагрузки, у вас сохранится новое имя сервера.
Related
Имя хоста задается во время установки операционной системы или динамически назначается виртуальной машине при ее создании.
В этом руководстве объясняется, как установить или изменить имя хоста в Ubuntu 20.04 без перезагрузки системы.
Общие сведения об именах хостов
Имя хоста — это метка, которая идентифицирует устройство в сети. У вас не должно быть двух или более машин с одинаковым именем хоста в одной сети.
В Ubuntu вы можете редактировать системное имя хоста и соответствующие настройки с помощью команды hostnamectl . Этот инструмент распознает три разных класса имен хостов:
static— традиционное имя хоста. Он хранится в/etc/hostnameи может быть установлен пользователем.-
pretty— описательное имя хоста UTF8 в свободной форме, используемое для представления пользователю. Например,Linuxize's laptop. -
transient— динамическое имя хоста, поддерживаемое ядром. Серверы DHCP или mDNS могут изменять временное имя хоста во время выполнения. По умолчанию это то же самое, что иstaticимя хоста.
Рекомендуется использовать полное доменное имя ( FQDN ), например host.example.com как для static и для transient имен.
Только root или пользователи с привилегиями sudo могут изменять системное имя хоста.
Отображение текущего имени хоста
Чтобы просмотреть текущее имя хоста, вызовите команду hostnamectl без аргументов:
hostnamectl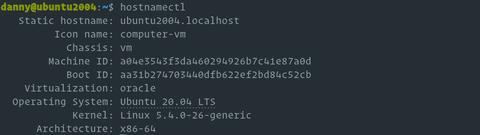
В этом примере текущее имя хоста установлено на ubuntu2004.localdomain .
Изменение имени хоста системы
Изменение имени хоста системы — простой процесс. Синтаксис следующий:
sudo hostnamectl set-hostname host.example.comsudo hostnamectl set-hostname "Your Pretty HostName" --prettysudo hostnamectl set-hostname host.example.com --staticsudo hostnamectl set-hostname host.example.com --transient
Например, чтобы изменить статическое имя хоста системы на neptune.linuxize.com , вы должны использовать следующую команду:
sudo hostnamectl set-hostname neptune.linuxize.comПри желании вы также можете установить красивое имя хоста:
sudo hostnamectl set-hostname "Linuxize's laptop" --prettyhostnamectl не производит вывода. В случае успеха возвращается 0, в противном случае — ненулевой код ошибки.
Статическое имя хоста хранится в /etc/hostname , а красивое имя хоста хранится в /etc/machine-info .
Вы не должны использовать одно и то же имя хоста на двух разных машинах в одной сети.
В большинстве систем имя хоста отображается на 127.0.0.1 в /etc/hosts . Откройте файл и измените старое имя хоста на новое.
/etc/hosts
127.0.0.1   localhost
127.0.0.1   neptune.linuxize.com

# The following lines are desirable for IPv6 capable hosts
::1     localhost ip6-localhost ip6-loopback
ff02::1 ip6-allnodes
ff02::2 ip6-allrouters
Если вы используете Ubuntu в облачном экземпляре и установлен пакет cloud-init , вам также необходимо отредактировать файл /etc/cloud/cloud.cfg . Этот пакет обычно устанавливается по умолчанию в образах, предоставляемых поставщиками облачных услуг, и используется для обработки инициализации экземпляров облака.
Если файл существует в вашей системе, откройте его:
sudo vim /etc/cloud/cloud.cfgНайдите preserve_hostname и измените значение с false на true :
/etc/cloud/cloud.cfg
# This will cause the set+update hostname module to not operate (if true)
preserve_hostname: true
Сохраните файл и закройте редактор.
Проверить изменение
Чтобы убедиться, что имя хоста было полностью изменено, введите команду hostnamectl :
hostnamectlВаше новое имя хоста будет напечатано на терминале:
   Static hostname: neptune.linuxize.com
   Pretty hostname: Linuxize's desktop
         Icon name: computer-vm
           Chassis: vm
        Machine ID: a04e3543f3da460294926b7c41e87a0d
           Boot ID: aa31b274703440dfb622ef2bd84c52cb
    Virtualization: oracle
  Operating System: Ubuntu 20.04 LTS
            Kernel: Linux 5.4.0-26-generic
      Architecture: x86-64
Выводы
Мы показали вам, как легко изменить имя хоста при установке Ubuntu 20.04 без перезагрузки компьютера.
Существует ряд причин, по которым вам может потребоваться изменить имя хоста. Чаще всего это когда имя хоста устанавливается автоматически при создании экземпляра.
Не стесняйтесь оставлять комментарии, если у вас есть вопросы.
Имя хоста устанавливается во время установки операционной системы Ubuntu или, если вы запускаете виртуальную машину, оно динамически назначается экземпляру при запуске.
Метод, описанный в этом руководстве, будет работать без перезапуска системы.
Хотя это руководство написано для Ubuntu 18.04, те же инструкции применимы для Ubuntu 16.04 и любого дистрибутива на основе Ubuntu, включая Linux Mint и Elementary OS.
Введение
Прежде чем продолжить это руководство, убедитесь, что вы вошли в систему как пользователь с привилегиями sudo .
Имя хоста — это метка, которая идентифицирует машину в сети. Вы не должны использовать одно и то же имя хоста на двух разных машинах в одной сети.
Показать текущее имя хоста
Чтобы просмотреть текущее имя хоста, введите следующую команду:
hostnamectl 
Как вы можете видеть на изображении выше, текущее имя хоста установлено на ubuntu1804.localdomain .
Изменить имя хоста
Следующие шаги описывают, как изменить имя хоста в Ubuntu 18.04.
1. Измените имя хоста с помощью hostnamectl
В Ubuntu 18.04 мы можем изменить имя хоста системы и соответствующие настройки с помощью команды hostnamectl .
Например, чтобы изменить статическое имя хоста системы на linuxize , вы должны использовать следующую команду:
sudo hostnamectl set-hostname linuxize
Команда hostnamectl не производит вывода. В случае успеха возвращается 0, в противном случае — ненулевой код ошибки.
2. Отредактируйте /etc/hosts файл
Откройте /etc/hosts файл и измените старое имя хоста на новое.
/ etc / hosts
127.0.0.1   localhost
127.0.0.1   linuxize

# The following lines are desirable for IPv6 capable hosts
::1     localhost ip6-localhost ip6-loopback
ff02::1 ip6-allnodes
ff02::2 ip6-allrouters
3. Отредактируйте cloud.cfg файл
Если cloud-init пакет установлен, вам также необходимо отредактировать cloud.cfg файл. Этот пакет обычно устанавливается по умолчанию в образах, предоставляемых поставщиками облачных услуг, такими как AWS, и используется для обработки инициализации экземпляров облака.
Чтобы проверить, установлен ли пакет, выполните следующую ls команду :
ls -l /etc/cloud/cloud.cfg
Если вы видите следующий вывод, это означает, что пакет не установлен и никаких дальнейших действий не требуется.
ls: cannot access '/etc/cloud/cloud.cfg': No such file or directory
Если пакет установлен, вывод будет выглядеть следующим образом:
-rw-r--r-- 1 root root 3169 Apr 27 09:30 /etc/cloud/cloud.cfg
В этом случае вам нужно будет открыть /etc/cloud/cloud.cfg файл:
sudo vim /etc/cloud/cloud.cfg
Найдите preserve_hostname и измените значение с false на true :
# This will cause the set+update hostname module to not operate (if true)
preserve_hostname: true
Сохраните файл и закройте редактор.
Проверить изменение
Чтобы убедиться, что имя хоста было успешно изменено, еще раз используйте hostnamectl команду:
hostnamectl Static hostname: linuxize
Icon name: computer-vm
Chassis: vm
Machine ID: 6f17445f53074505a008c9abd8ed64a5
Boot ID: 1c769ab73b924a188c5caeaf8c72e0f4
Virtualization: kvm
Operating System: Ubuntu 18.04 LTS
Kernel: Linux 4.15.0-22-generic
Architecture: x86-64
Вы должны увидеть ваше новое имя сервера, напечатанное на консоли.
Вывод
В этом руководстве мы показали вам, как легко изменить имя хоста сервера Ubuntu без перезагрузки компьютера.
В этом руководстве мы покажем вам, как изменить имя хоста в Ubuntu 20.04 LTS. Для тех из вас, кто не знал, имя хоста — это метка, используемая для идентификации машины, которая поможет вам легко отличить сервер от другого. Имя хоста должно быть полностью определенным доменным именем (FQDN) и должно указывать на IP-адрес сервера, чтобы вы могли получить доступ к серверу с его помощью.
В этой статье предполагается, что у вас есть хотя бы базовые знания Linux, вы знаете, как использовать оболочку, и, что наиболее важно, вы размещаете свой сайт на собственном VPS. Установка довольно проста и предполагает, что вы работаете с учетной записью root, в противном случае вам может потребоваться добавить sudo к командам для получения привилегий root. Если вы готовы, откройте свой терминал и следуйте инструкциям по этому руководству, и менее чем через 10 минут вы измените свое имя хоста на сервере Ubuntu 20.04 LTS.
Изменить имя хоста в Ubuntu 20.04 LTS Focal Fossa
Шаг 1. Сначала я проверю текущее имя хоста, запустив «hostnamectl status» в оболочке вашего сервера:
hostnamectl
Вывод в моей системе:
Static hostname: chedelics
         Icon name: ubuntu-laptop
           Chassis: laptop
        Machine ID: 2381ec6bc9meilana1c843f3mariaea2
           Boot ID: 29intan594944feramona0759229ef0
  Operating System: Ubuntu 20.04 (Focal Fossa)
            Kernel: Linux 5.40.0-43-generic
      Architecture: x86-64
Шаг 2. Измените имя хоста в Ubuntu 20.04.
Изменение имени хоста системы — простой процесс. Синтаксис следующий:
[root@infoit ~]# sudo hostnamectl set-hostname host.example.com
Например, чтобы изменить статическое имя хоста системы на meilana.infoit.com.ua, вы должны использовать следующую команду:
[root@infoit ~]# sudo hostnamectl set-hostname meilana.infoit.com.ua
Еще раз проверьте имя хоста (закройте сеанс и откройте новый сеанс с помощью консоли):
[root@infoit ~]# hostnamectl status
Вывод:
Static hostname: meilana.infoit.com.ua
         Icon name: ubuntu-laptop
           Chassis: laptop
        Machine ID: 2381ec6bc9meilana1c843f3mariaea2
           Boot ID: 29intan594944feramona0759229ef0
  Operating System: Ubuntu 20.04 (Focal Fossa)
            Kernel: Linux 5.40.0-43-generic
      Architecture: x86-64
В каждой из этих конфигураций вам необходимо убедиться, что ваше имя хоста соответствует стандартам для FQDN (полных доменных имен). Буквы ASCII a — z, цифры 0 — 9 и дефис (‘-‘) являются единственными допустимыми символами (однако первый символ не может быть дефисом). Вы также можете счесть необходимым (или полезным) включить доменное имя, и в этом случае вы также можете использовать точки (точки) для разделения имени хоста и имени домена (и домена верхнего уровня).
Для дополнительных параметров команды вы можете добавить флаг в конце.--help
# hostnamectl --help
hostnamectl [OPTIONS...] COMMAND ...

Query or change system hostname.

  -h --help              Show this help
     --version           Show package version
     --no-ask-password   Do not prompt for password
  -H --host=[USER@]HOST  Operate on remote host
  -M --machine=CONTAINER Operate on local container
     --transient         Only set transient hostname
     --static            Only set static hostname
     --pretty            Only set pretty hostname

Commands:
  status                 Show current hostname settings
  set-hostname NAME      Set system hostname
  set-icon-name NAME     Set icon name for host
  set-chassis NAME       Set chassis type for host
  set-deployment NAME    Set deployment environment for host
  set-location NAME      Set location for host
Поздравления! Вы успешно изменили имя хоста . Благодарим за использование этого руководства, как изменить и установить имя хоста в системе Ubuntu 20.04 LTS Focal Fossa. Для получения дополнительной помощи или полезной информации мы рекомендуем вам посетить официальный сайт Ubuntu .
Introduction
A hostname is a user-generated custom name which identifies a computer system in a network. In Ubuntu 20.04, users assign a hostname to the machine during OS setup.
You may decide to change your computer’s hostname for several reasons. For example, no two computers on a network can have the same hostname and, if you find yourself in this situation, you will have to change the hostname to avoid a network conflict.
In this tutorial, you will learn how to change a hostname on Ubuntu 20.04 using the Linux command line or GUI.
Prerequisites
- Ubuntu 20.04 installed
- An account with sudo privileges
- Access to the command line for non-GUI methods
How to Check Current Hostname on Ubuntu 20.04
To check the current hostname of your Ubuntu system, use one of two available commands.
- The
hostnamecommand displays only the hostname itself.

- The other command,
hostnamectl, displays additional information about your computer system.
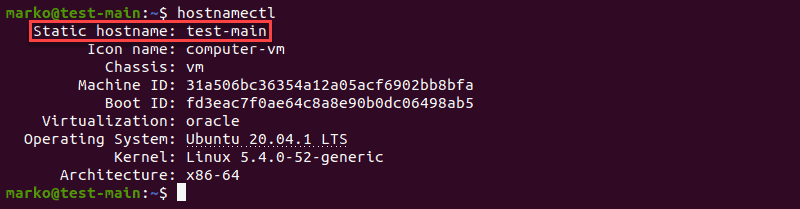
The Static hostname line displays your machine’s hostname.
Note: Valid hostnames are between 2 and 64 characters in length. They can contain only letters, numbers, periods, and hyphens, but must begin and end with letters and numbers only.
Temporarily Change Hostname on Ubuntu 20.04
Use the hostname command to make a temporary change to your computer’s hostname.
In the terminal, type the following, replacing new-hostname with the name you choose:
sudo hostname new-hostnameIf successful, this step will not provide any output. To confirm the result of the process, check the current system hostname:

Change Hostname on Ubuntu 20.04 (No Reboot Required)
If you wish to permanently change the hostname without rebooting your computer, use the hostnamectl command.
Step 1: Use set-hostname to Change the Hostname
Type the following command:
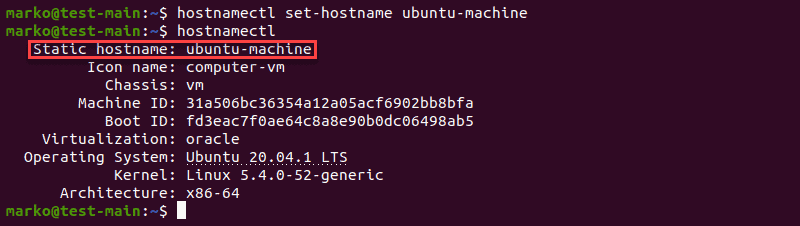
hostnamectl set-hostname new-hostnameUse your own hostname choice instead of new-hostname.
Step 2: Use hostnamectl to Confirm the Change
Just like the hostname command, if successful, hostnamectl set-hostname does not produce any output. Therefore, use hostnamectl to check the result.
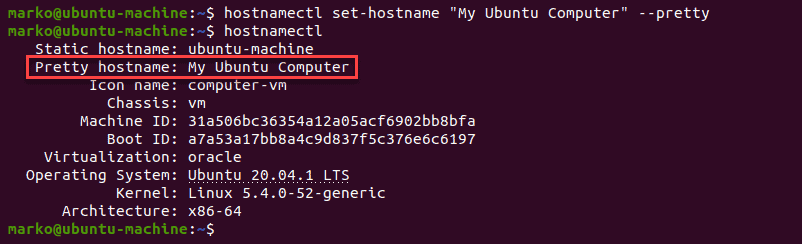
Step 3: Change the Pretty Hostname (Optional)
A “pretty” hostname is the hostname presented to the user, not to another computer on a network. A computer system identifies another computer only by its static hostname.
Note: The pretty hostname does not have the naming limitations of its static counterpart – any UTF-8 value is permitted.
To change a machine’s “pretty” hostname, use the same hostnamectl command with the --pretty option:
hostnamectl set-hostname "new-hostname" --prettyReplace new-hostname with your own UTF-8 value.
After checking the result with hostnamectl, you will notice an additional line in the output, listing the computer’s “pretty” hostname.
Note: The “pretty” hostname is stored in /etc/machine-info. Updating this file is another way to perform this optional step.
Change Hostname on Ubuntu 20.04 – Alternative Method (Reboot Required)
Another way to permanently change the hostname is by editing two configuration files:
- /etc/hostname
- /etc/hosts
The changes take effect immediately after system reboot.
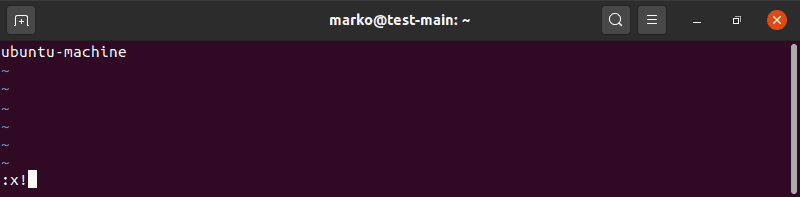
Step 1: Open /etc/hostname and Change the Hostname
Edit the file with a text editor of your choice. In this example, we will be using the Vim editor:
sudo vi /etc/hostnameThe /etc/hostname file contains only the current hostname. Replace it with your new choice.
Save the file and exit.
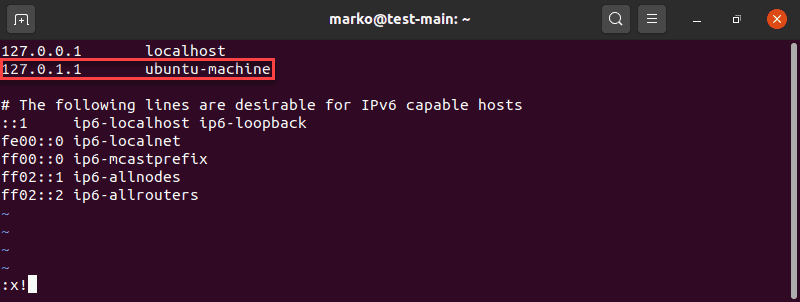
Step 2: Open /etc/hosts and Change the Hostname
Now edit the /etc/hosts file in the same way.
sudo vi /etc/hostsThe file /etc/hosts maps hostnames to IP addresses. Look for the hostname you wish to change and simply replace it with your new choice.
Save the edits and exit.
Step 3: Reboot the System
Reboot your computer to apply the changes:
sudo systemctl rebootNote: If you use the Cloud-Init package (cloud-init) to run a cloud instance of Ubuntu, you need to perform another step before rebooting. Go to /etc/cloud/cloud.cfg file and make sure the line preserve_hostname is set to TRUE.
The Ubuntu GUI also provides a way to edit the system hostname:
1. First, navigate to Settings > About.
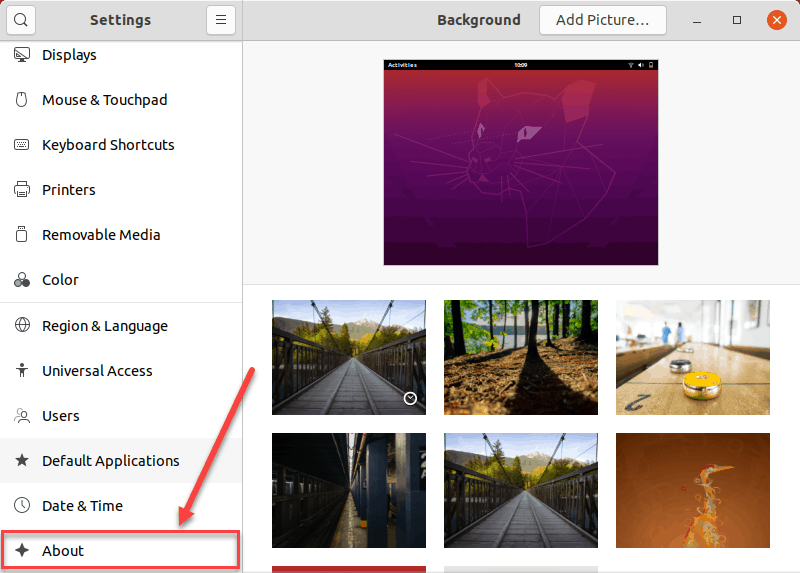
2. Now, locate the Device Name field.
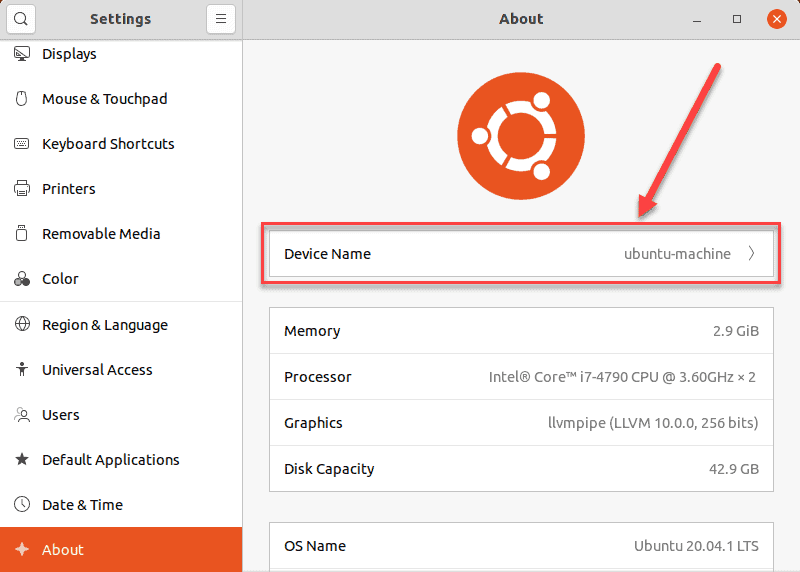
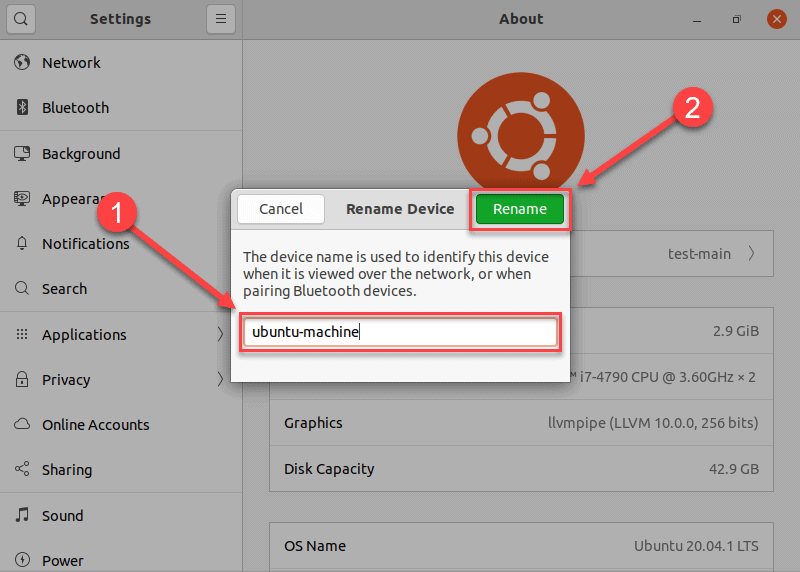
3 Clicking the Device Name field opens the Rename Device dialogue box.
4. In the Rename Device dialogue box, replace the current hostname with a new one and confirm your choice by clicking the Rename button. This action permanently changes the hostname.
Conclusion
This article presented three methods in which you can change the hostname on your Ubuntu 20.04 machine, using the command line or GUI. All the methods are simple and straightforward, so you can choose whichever one fits your use case best.
При установке Ubuntu на домашний ПК или ноутбук установщик попросит вас выбрать имя для вашего компьютера, так называемый «hostname». При заказе VPS/VDS в 99% он генерируется автоматически. Если вы чувствуете, что ваш сервер имеет нестандартное название в виде технического домена или набора каких-то непонятых символов, вы можете легко изменить имя хоста в Linux.
Есть два способа сделать это: с помощью графического интерфейса пользователя и через командную строку. Если вы заказали VPS/VDS и это не KVM, и у вас не установлен удаленный рабочий доступ, то у вас не будет возможности использовать графический интерфейс. Именно поэтому мы рассмотрим изменение hostname с помощью командной строки.
Что такое hostname в ОС Linux?
Имя хоста (hostname) является именем для «хозяина» компьютера в сети. Оно указывается только для компьютера и используется для его идентификации в сети.
Имя хоста выглядит так:
[root@hoster-ru-notes ]# hostname

hoster-ru-notes
Как вы можете видеть выше, имя пользователя — root, в то время как имя хоста — hoster-ru-notes.
Это имя хоста должно однозначно идентифицировать компьютер в сети. Есть некоторые правила, установленные для имени хоста. Оно может содержать только буквы, цифры и символы дефиса. А также должно начинаться и заканчиваться буквой или цифрой и быть длиной от 2 до 63 символов.
Вы можете изменить имя хоста на то, которое вы хотите, но вы не должны использовать одно и то же имя хоста на двух разных компьютерах в сети, так как это может вызвать проблемы. (Правило актуально как для обычных ПК и офисных сетей, так и серверов/VPS).
Изменение hostname в Ubuntu (командная строка)
Если вы хотите изменить имя хоста в Ubuntu или любом другом дистрибутиве, основанном на Debian, вы можете использовать обычный терминальный редактор vim.
Откройте терминал. Для редактирования имени хоста необходимо изменить файл /etc/hostname. Его расположение одинаково во всех дистрибутивах Debian.
Выполните следующую команду:
sudo vim /etc/hostnameДалее замените указанный в файле hostname на тот, что хотите вы.
Надеемся, что эта статья помогла вам разобраться, как изменить имя хоста в Ubuntu.