![]()
Download Article
![]()
Download Article
- Using the Settings Menu
- Using the Control Panel
|
Naming your PC is a great way to manage your home network properly. Setting up a PC name helps you to identify traffic on your network and know where content, like videos, are streaming from. With Windows 10, it is now easier than ever to rename your PC.
-

1
Open the Settings menu. In Windows 10, there is a simplified Settings menu that is very easy to understand. Click Start >> Settings to open it. You should see a series of 13 different categories available to you.
-
2
Open the System Settings menu. From the list given, click the System option. You should see a new page with a series of 11 different menu options down the left-hand side of the window. Click About. It should be the very last option on the bottom.
Advertisement
-
3
Rename your PC. On the new page, you should see the Rename PC button at the very top. Click this button once and a small box should pop up. This box should contain an input box, with the current PC name listed above it. Enter a name that identifies the PC here.
- For instance, if the PC you are renaming is being used to stream media, like movies and music, to other devices in your home, something like Home-Media or Media-Server may be a good name. The name that you choose will also be the name discovered in Bluetooth.
- Note: Your PC name can contain letters, hyphens, and numbers, but no spaces.
-
4
Restart the PC. Once you have entered a new name, click the Next button and wait a moment. If the PC name is approved, then you will be asked if you would like to restart your PC in order for the changes to take effect. Click the Restart now button, and after the PC restarts, it will be renamed.
- If you want to skip the restart process, click Restart Later instead.


Advertisement
-
1
Open the Control Panel. Press and hold the Windows key and hit R. A small box will open in the lower left-hand corner of your screen. There should be an input box inside it. Type in control and hit Enter on your keyboard.
-
2
Open the System settings. You should now be looking at the Control Panel and a series of 8 different options. Click the System and Security option in the upper left-hand corner of the window to open the System settings.
-
3
View the current PC name. You should now be looking at a series of 11 or so different menu options. The third option down should be System, and under it, in blue, should be an option that says See the name of this computer. Click this and a new page should appear. On this page there is basic information about the PC split up into four different subheadings.
-
4
Look for Computer name, domain, and workgroup settings. The very first option under the heading should say Computer name: and display the current name of the PC to the right of it. To the left of the name of the PC there should be a blue Change settings button. Click this to continue.
-
5
Rename the PC. There should be a small window that opens with a series of five different tabs at the top. The current tab that is open is the one you want. There should be a button labeled Change inside the white box at the very bottom. Click this button. Another, even smaller, window will pop up with the top input box highlighted. The title above the input box will say Computer name. Enter a new name for your PC inside this box. Once you are done, click the OK button in the lower right-hand corner of the window.
-
6
Restart the PC. You will be told that you will need to restart the PC before changes can take effect, and that you should save and close all programs before the restart begins. Click OK, then click the Close button in the other window. You will then be given two different buttons to choose from. Select Restart Now to restart, and after restarting, the PC will be renamed.
- You can select Restart Later if you want to continue what you’re doing for now.


Advertisement
Ask a Question
200 characters left
Include your email address to get a message when this question is answered.
Submit
Advertisement
Thanks for submitting a tip for review!
About This Article
Thanks to all authors for creating a page that has been read 81,679 times.
Is this article up to date?
![]()
Download Article
![]()
Download Article
- Using the Settings Menu
- Using the Control Panel
|
Naming your PC is a great way to manage your home network properly. Setting up a PC name helps you to identify traffic on your network and know where content, like videos, are streaming from. With Windows 10, it is now easier than ever to rename your PC.
-
1
Open the Settings menu. In Windows 10, there is a simplified Settings menu that is very easy to understand. Click Start >> Settings to open it. You should see a series of 13 different categories available to you.
-
2
Open the System Settings menu. From the list given, click the System option. You should see a new page with a series of 11 different menu options down the left-hand side of the window. Click About. It should be the very last option on the bottom.
Advertisement
-
3
Rename your PC. On the new page, you should see the Rename PC button at the very top. Click this button once and a small box should pop up. This box should contain an input box, with the current PC name listed above it. Enter a name that identifies the PC here.
- For instance, if the PC you are renaming is being used to stream media, like movies and music, to other devices in your home, something like Home-Media or Media-Server may be a good name. The name that you choose will also be the name discovered in Bluetooth.
- Note: Your PC name can contain letters, hyphens, and numbers, but no spaces.
-
4
Restart the PC. Once you have entered a new name, click the Next button and wait a moment. If the PC name is approved, then you will be asked if you would like to restart your PC in order for the changes to take effect. Click the Restart now button, and after the PC restarts, it will be renamed.
- If you want to skip the restart process, click Restart Later instead.
Advertisement
-
1
Open the Control Panel. Press and hold the Windows key and hit R. A small box will open in the lower left-hand corner of your screen. There should be an input box inside it. Type in control and hit Enter on your keyboard.
-
2
Open the System settings. You should now be looking at the Control Panel and a series of 8 different options. Click the System and Security option in the upper left-hand corner of the window to open the System settings.
-
3
View the current PC name. You should now be looking at a series of 11 or so different menu options. The third option down should be System, and under it, in blue, should be an option that says See the name of this computer. Click this and a new page should appear. On this page there is basic information about the PC split up into four different subheadings.
-
4
Look for Computer name, domain, and workgroup settings. The very first option under the heading should say Computer name: and display the current name of the PC to the right of it. To the left of the name of the PC there should be a blue Change settings button. Click this to continue.
-
5
Rename the PC. There should be a small window that opens with a series of five different tabs at the top. The current tab that is open is the one you want. There should be a button labeled Change inside the white box at the very bottom. Click this button. Another, even smaller, window will pop up with the top input box highlighted. The title above the input box will say Computer name. Enter a new name for your PC inside this box. Once you are done, click the OK button in the lower right-hand corner of the window.
-
6
Restart the PC. You will be told that you will need to restart the PC before changes can take effect, and that you should save and close all programs before the restart begins. Click OK, then click the Close button in the other window. You will then be given two different buttons to choose from. Select Restart Now to restart, and after restarting, the PC will be renamed.
- You can select Restart Later if you want to continue what you’re doing for now.
Advertisement
Ask a Question
200 characters left
Include your email address to get a message when this question is answered.
Submit
Advertisement
Thanks for submitting a tip for review!
About This Article
Thanks to all authors for creating a page that has been read 81,679 times.
Is this article up to date?
Обновлено 31.07.2019
![]() Добрый день! Уважаемые читатели и гости одного из популярных IT блогов рунета Pyatilistnik.org. В прошлый раз мы с вами научились интегрировать драйвера Windows в установочный дистрибутив, тем самым вшив свежие драйвера USB 3.0. Сегодня я хочу вам показать все известные мне методы, как переименовать компьютер Windows 10. Вы легко сможете выбрать нужный вам метод, под определенные обстоятельства и изменить имя компьютера в своей Windows 10.
Добрый день! Уважаемые читатели и гости одного из популярных IT блогов рунета Pyatilistnik.org. В прошлый раз мы с вами научились интегрировать драйвера Windows в установочный дистрибутив, тем самым вшив свежие драйвера USB 3.0. Сегодня я хочу вам показать все известные мне методы, как переименовать компьютер Windows 10. Вы легко сможете выбрать нужный вам метод, под определенные обстоятельства и изменить имя компьютера в своей Windows 10.
Нужно ли менять имя компьютера?
Когда вы устанавливаете Windows 10, то у вас после всех дополнительных настроек будет автоматически сформировано имя вашего ПК. Оно будет иметь кракозяброподобный вид, что-то вроде этого DESCTOP-193QATJ

Вроде бы ничего страшного, и для большинства людей это ни на что не влияет, так как они и не вспоминают об этом. Но так как компьютеры все больше и больше завязываются с всевозможными внешними сервисами, количество устройств в рядовой семье и доме становится все больше и больше, что ставит вопрос более удобного обнаружения, запоминания имени компьютера более остро. Простая ситуация вы хотите постримить видео с компьютера на телевизор, естественно по локальной сети, или хотите расшарить папку с файлами в вашей домашней или локальной сети, вариантов много, и логично, что использование красивого и легко запоминаемого имени лучше, нежели DESCTOP-193QATJ.
Если мы говорим про доменную сеть на предприятии, то там вообще более жесткие правила и есть специальные стандарты по именованию серверов, рабочих станций, точек доступа. У каждой компании это своя система, и призвана она для упрощения администрирования, со стороны инженеров, которые легко могут понимать, место расположение рабочей станции, принадлежность ее к отделу и многое другое, так же и с серверами.
Методы смены имени компьютера
Существует как минимум четыре способа позволяющие вам изменить имя устройства в системе Windows 10:
- Через параметры Windows 10
- С использованием окна «Изменение имени компьютера или домена»
- Через командную строку
- Через командлеты PowerShell
Изменение имени в свойствах системы
Это классический метод переименовать компьютер Windows 10, да и вообще любую систему Windows, он будет работать везде, разве, что кроме Core версии. Чтобы это реализовать, нам необходимо попасть в настройку «Система». Самый быстрый метод это сделать, это нажать Windows ![]() + R и ввести в окне «Выполнить» вот такой код control /name Microsoft.System в итоге у вас появится вот такое окно.
+ R и ввести в окне «Выполнить» вот такой код control /name Microsoft.System в итоге у вас появится вот такое окно.
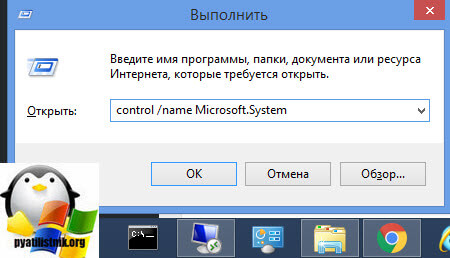
в котором нужно будет нажать «Изменить параметры», тем самым вызвав окно «Свойства системы», где вы и можете производить смену имени устройства.
Кстати открыть сразу окно со свойствами системы можно так же из окна выполнить, вбив там sysdm.cpl
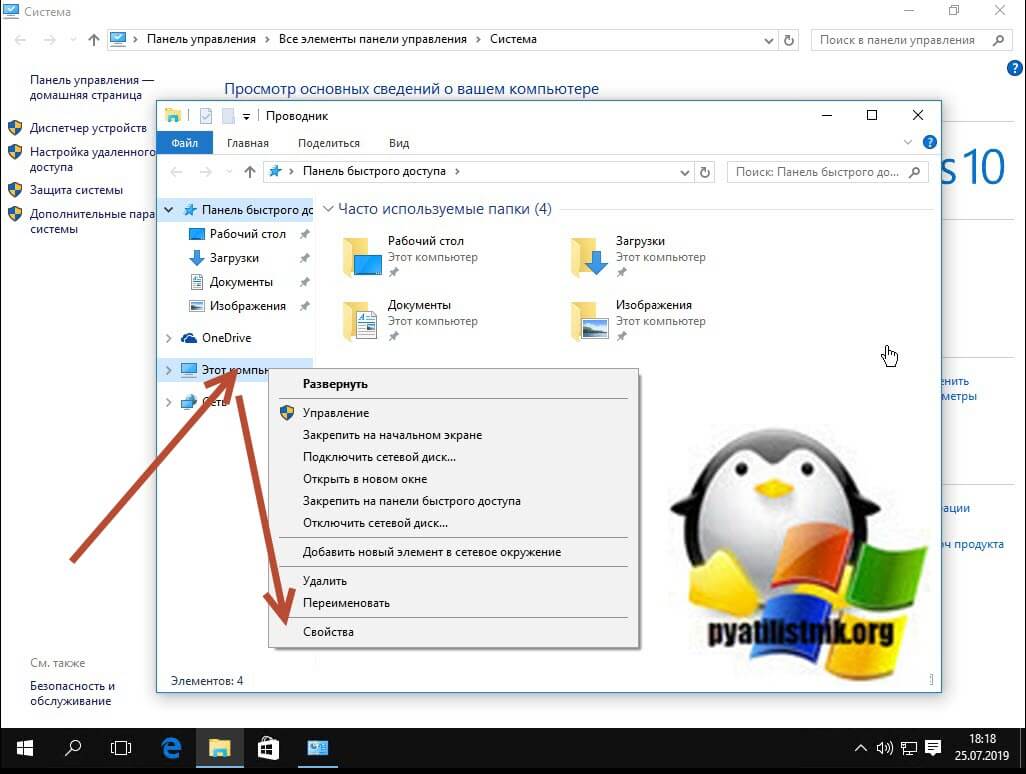
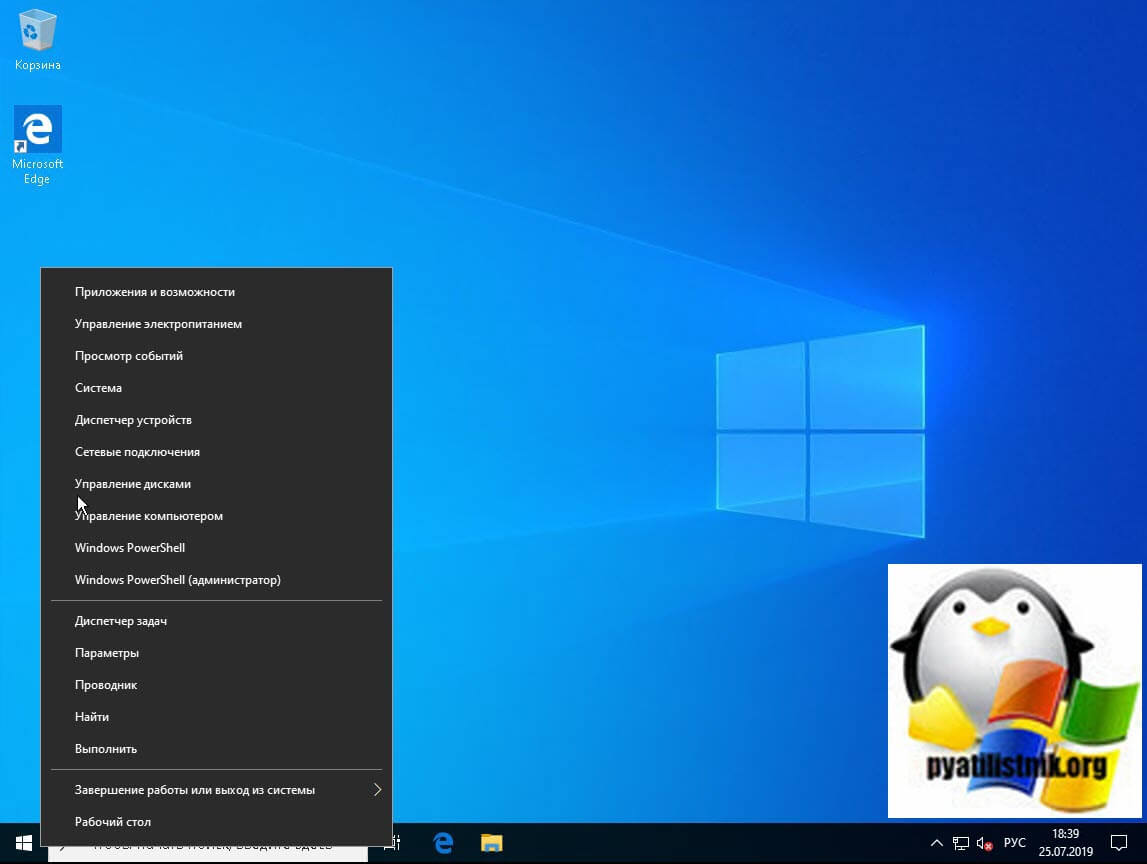
Еще одним метод открыть окошко свойств системы, это щелкнуть по значку «Этот компьютер» правым кликом и выбрать из контекстного меню пункт «Свойства».
В окне свойств системы находясь на вкладке «Имя компьютера» нажмите кнопку «Изменить».
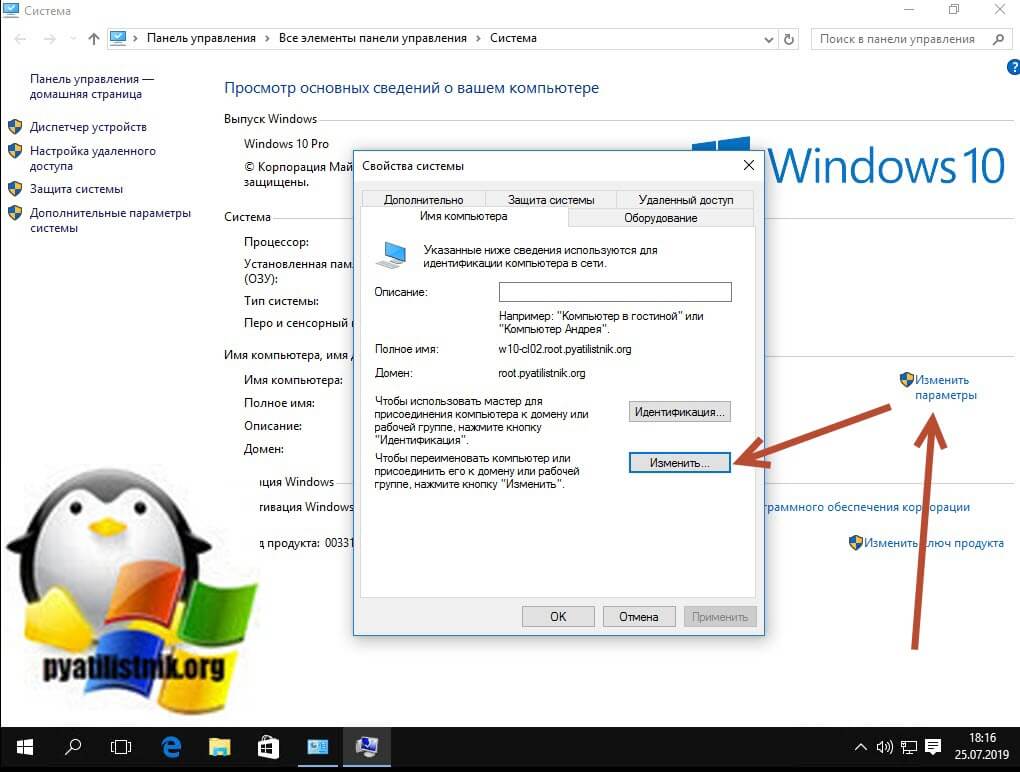
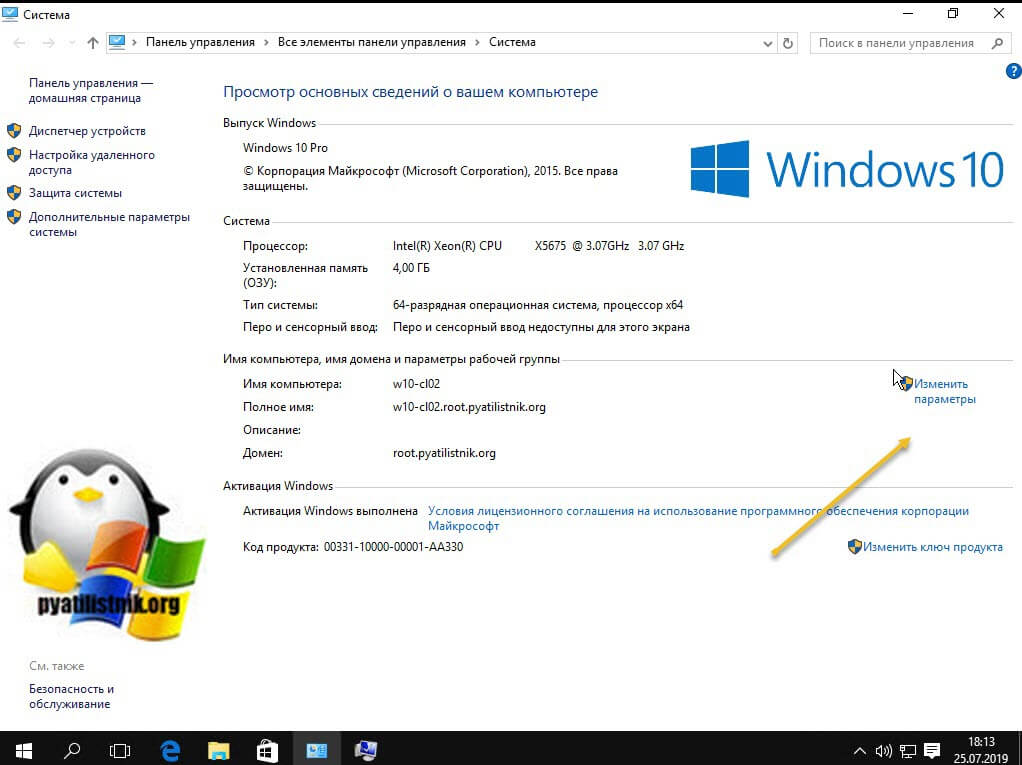
В итоге это откроет окно «Изменение имени компьютера или домена». В соответствующем поле задаем новое имя устройства и нажимаем «OK». В моем примере это будет имя pyatilistnik01

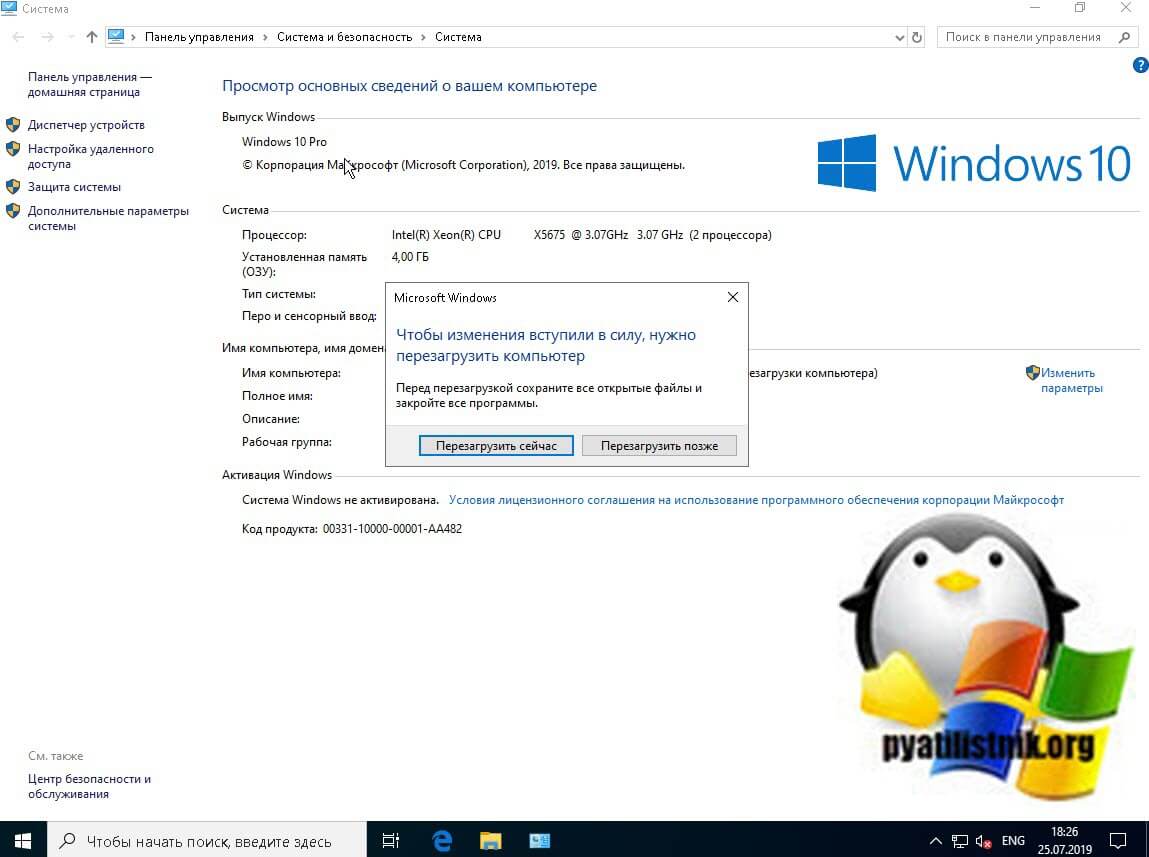
Вас уведомят, что для того чтобы все настройки применились вам необходимо перезагрузить компьютер, с чем мы и соглашаемся.

Кстати вы можете отложить перезагрузку и выполнить ее тогда. когда вам необходимо.
Хочу отметить, что по умолчанию в Windows есть ограничение на количество символов в имени и оно равно 15 символам, более подробно можете почитать на Microsoft https://support.microsoft.com/ru-ru/help/909264/naming-conventions-in-active-directory-for-computers-domains-sites-and
Вот так вот будет выглядеть ошибка при превышении количества символов в имени компьютера Windows 10:
[info]Длина имени NetBIOS для этого компьютера ограничена 15 байтами, в этом случае это 15 символов. Имя NteBIOS будет укорочено до, что может вызывать конфликт при разрешении имен NetBIOS[/info]

Изменение имени компьютера в параметрах Windows 10
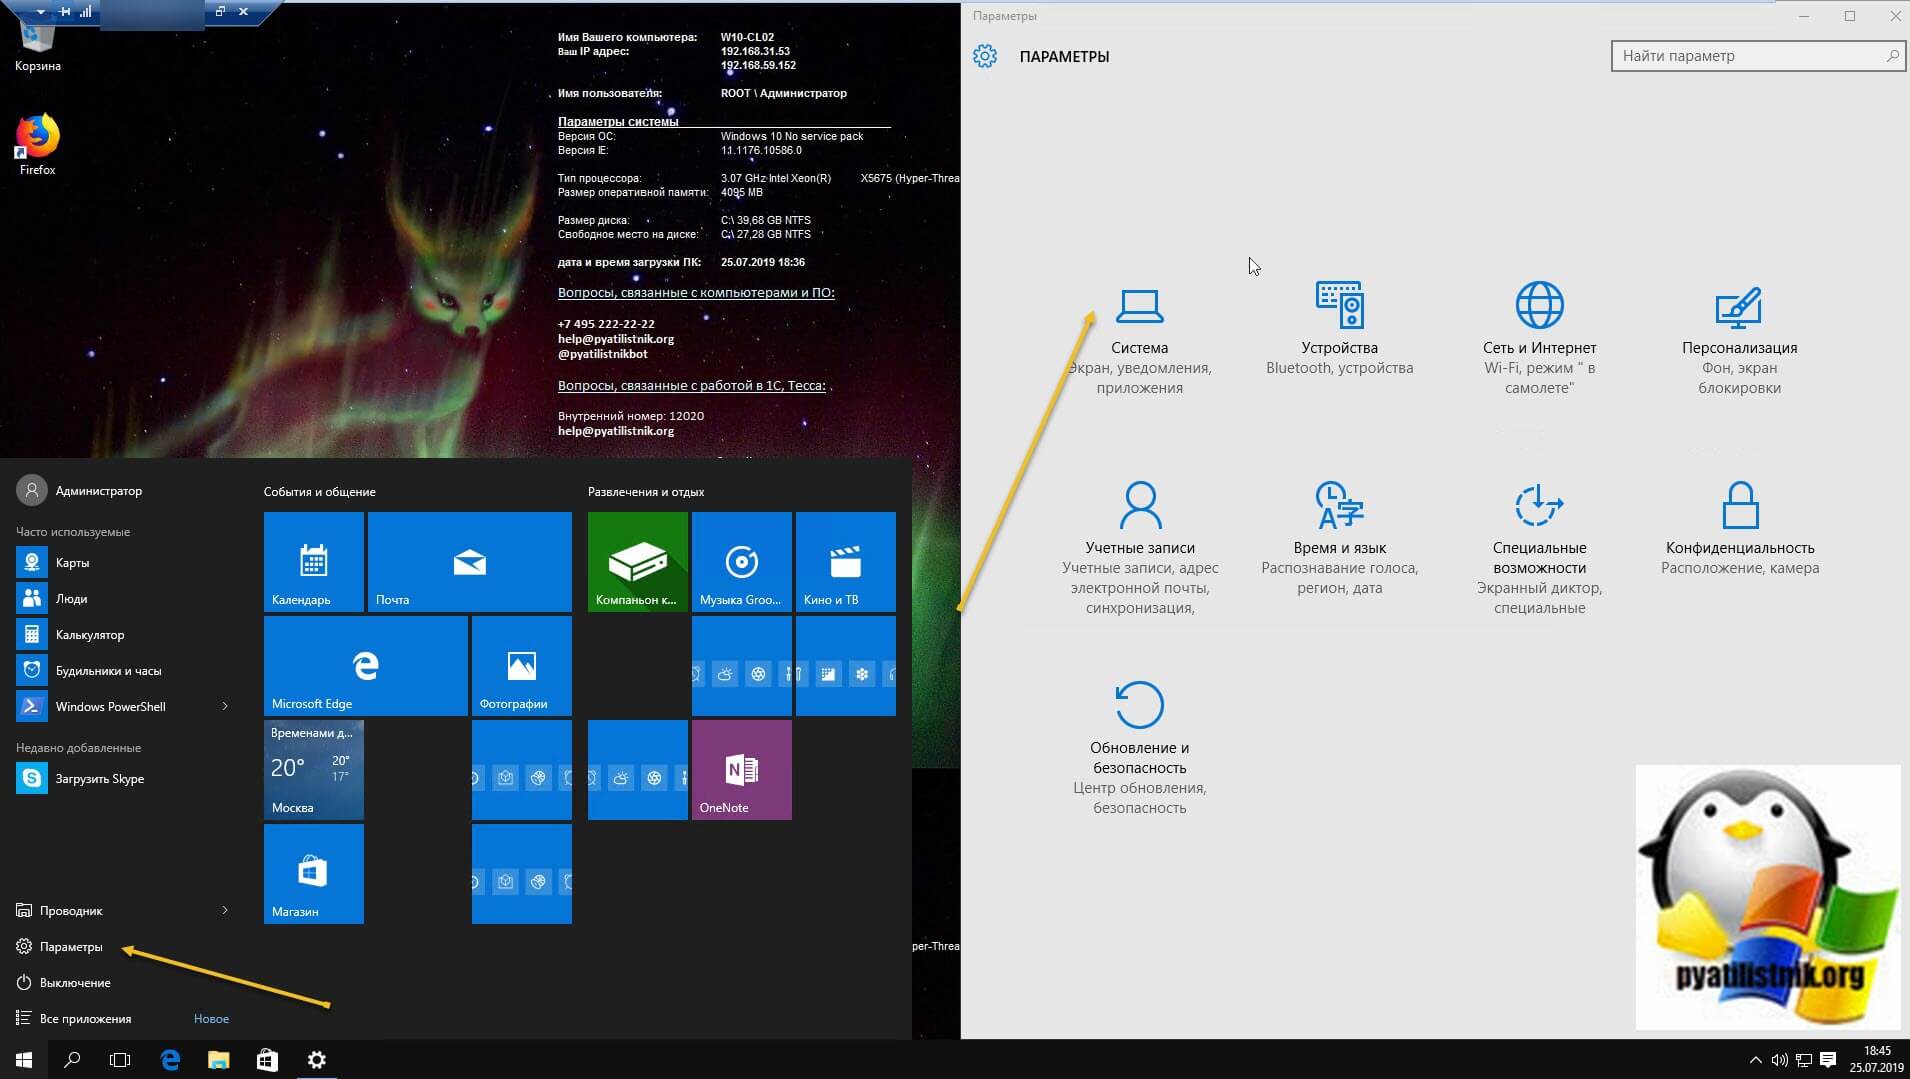
Windows 10 принесла и альтернативный, графический метод изменения имени устройства, который с каждым новым выпуском все более настаивающе просит вас использовать именно его. Суть метода заключается в использовании параметров Windows. Чтобы вам их открыть, вы можете щелкнуть правым кликом мыши по кнопке «Пуск» и выбрать пункт «система».
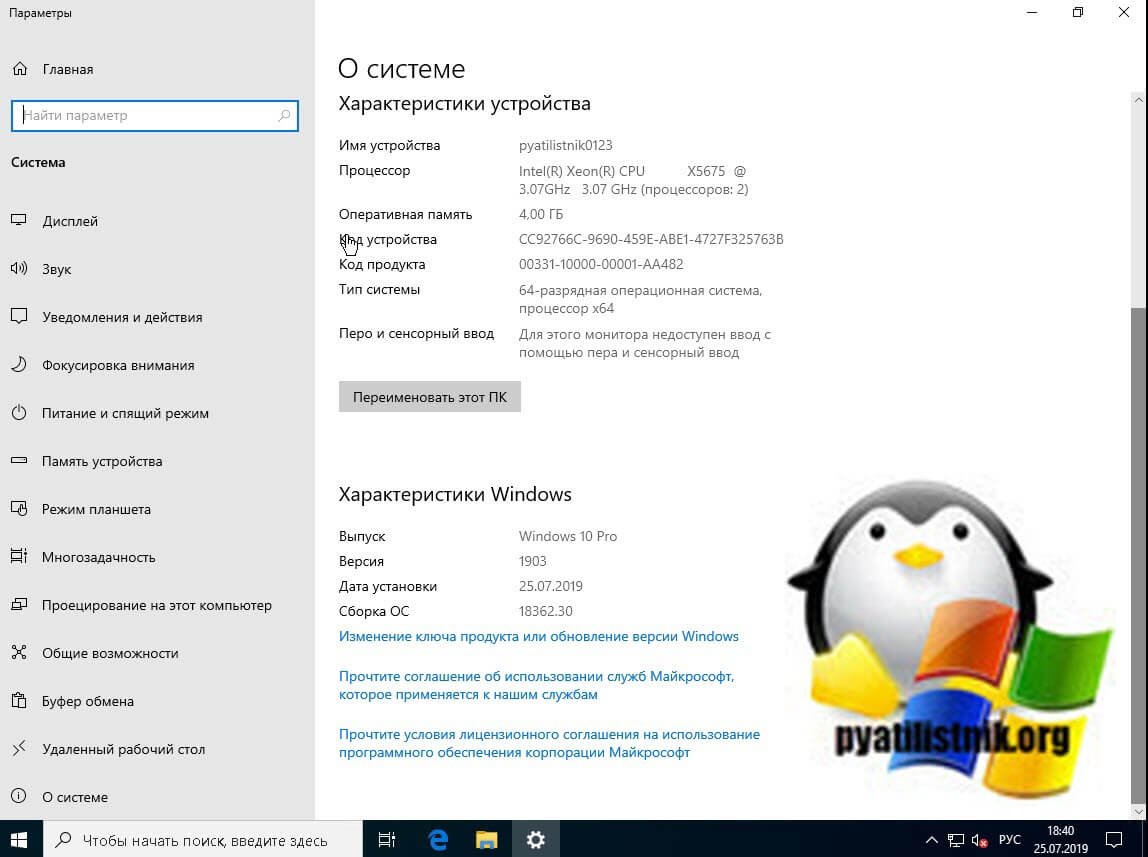
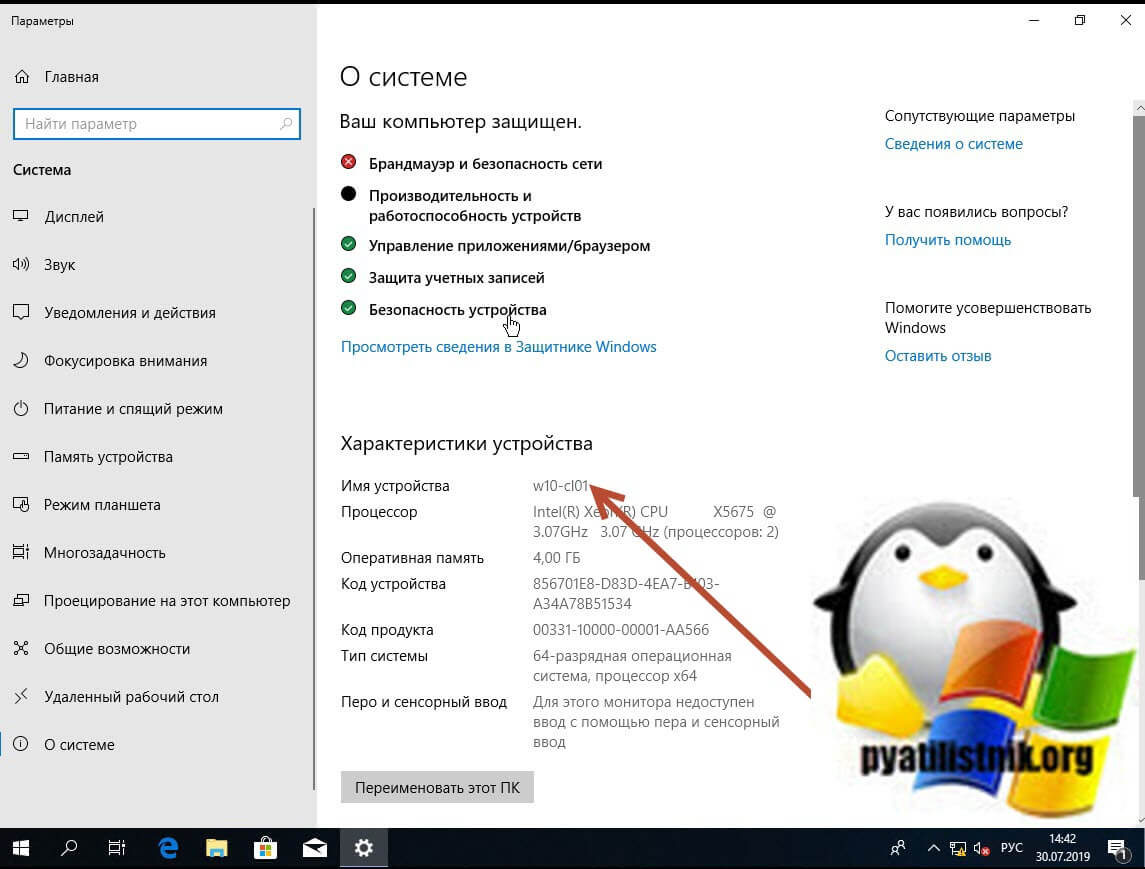
У вас откроется окно «О системе», где вы обнаружите соответствующий пункт, так в Windows 1903 он выглядит вот так, тут чтобы переименовать имя компьютера достаточно нажать кнопку «Переименовать этот ПК»
Если вы используете версию Windows 10 по старее, то у вас окно может выглядеть вот так, где кнопка уже называется «Переименование компьютера»

Кстати попасть в окно «О системе» вы можете и вот таким методом, нажать одновременно Windows![]() + I или в кнопке пуск «Параметры». После чего выбрать пункт «система»
+ I или в кнопке пуск «Параметры». После чего выбрать пункт «система»
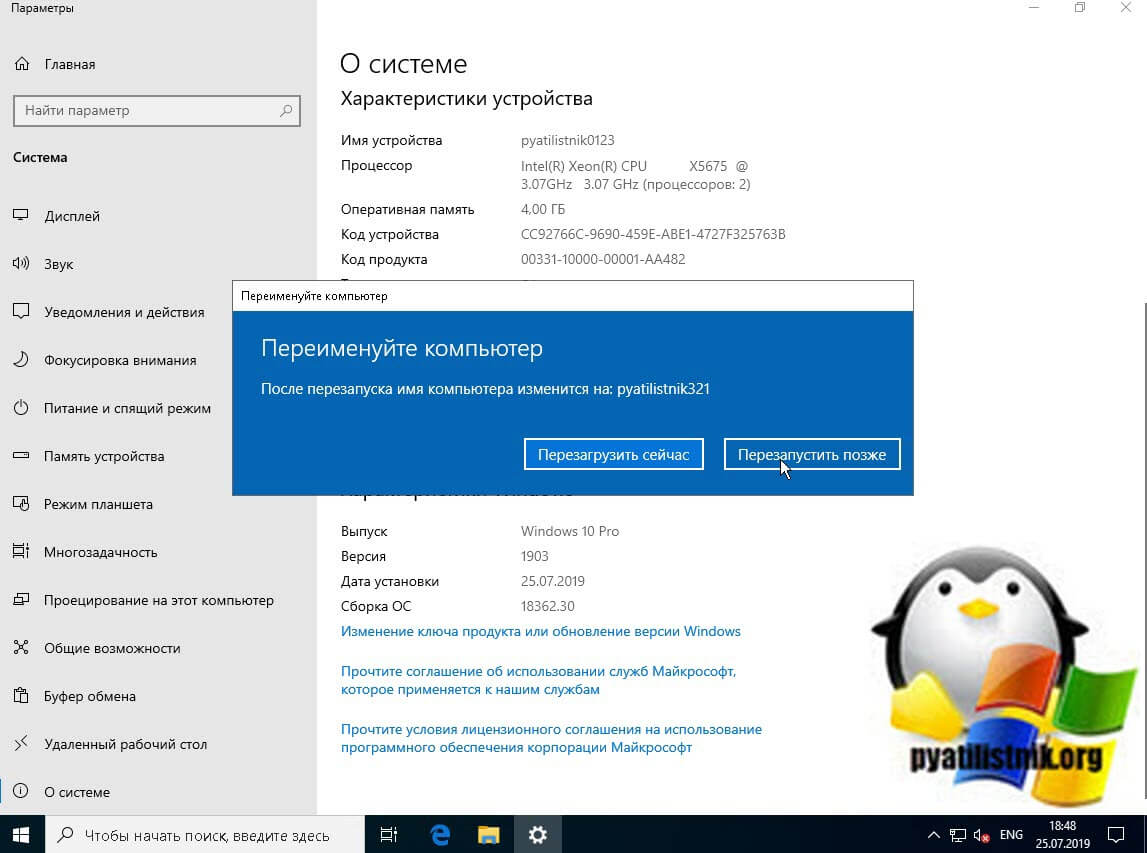
Далее у вас откроется окно «Переименуйте компьютер». в соответствующее поле вбиваем нужное значение, помним про лимит в 15 символов.
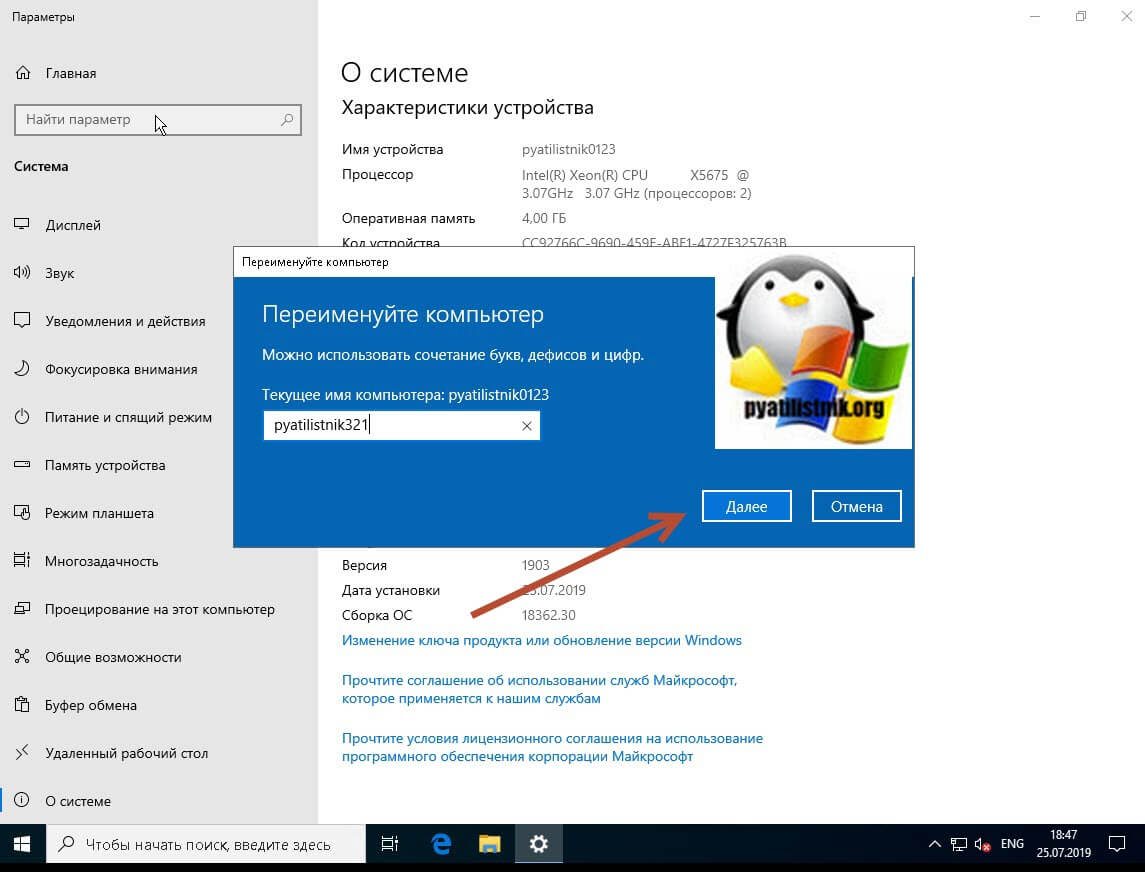
Чтобы изменения вступили в силу, перезагружаем систему.
Как переименовать имя компьютера в windows 10 через PowerShell
Одним из удобных методов переименовать имя хоста в Windows 10 является оболочка PowerShell, в которой присутствует командлет Rename-Computer.
Командой hostname я вывожу текущее имя моего хоста, в моем примере это w10-cl01.
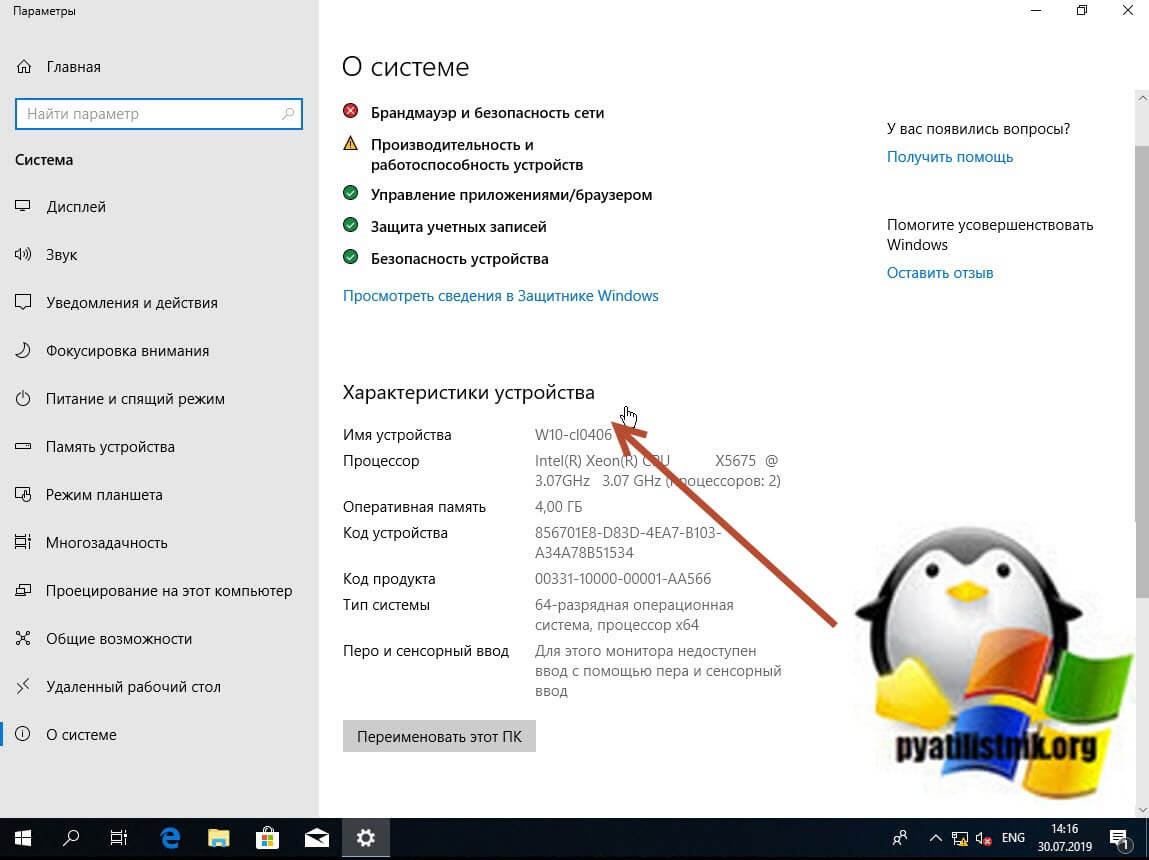
Rename-Computer -NewName W10-cl0406
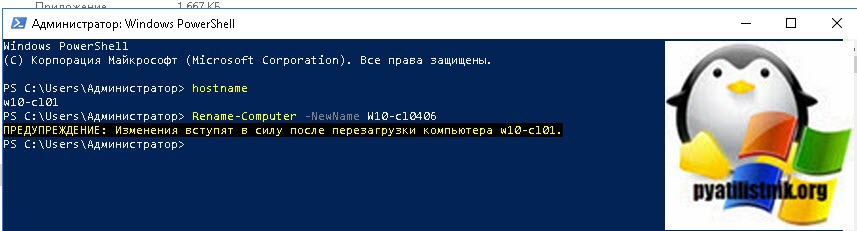
Все изменения будут применены после перезагрузки вашей системы, можно тут же ввести Restart-Computer. Как видим все получилось и мы имеем новое имя.

Как изменить имя компьютера windows 10 через командную строку
Командная строка это наверное самый старый и востребованный инструмент. который используют системные администраторы и продвинутые пользователи, PowerShell пока не всесилен. Чтобы воспользоваться cmd введите в нем команду:
wmic computersystem where name=»%computername%» call rename name=»w10-cl01″
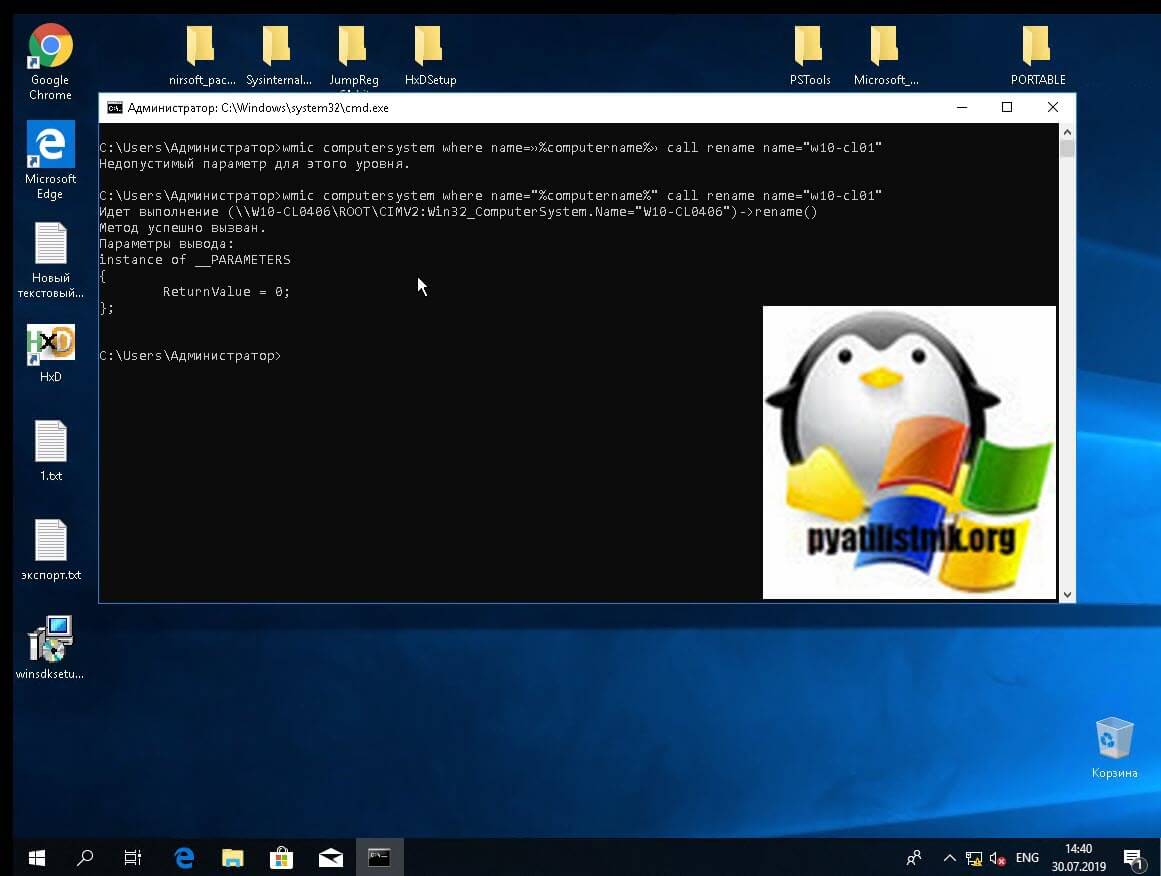
Перезагрузить можете тут же через командную строку выполнив shutdown -r -t 0. В итоге вижу, что успешно выполнилось и нужное имя хоста задано.
Как изменить имя компьютера через реестр Windows
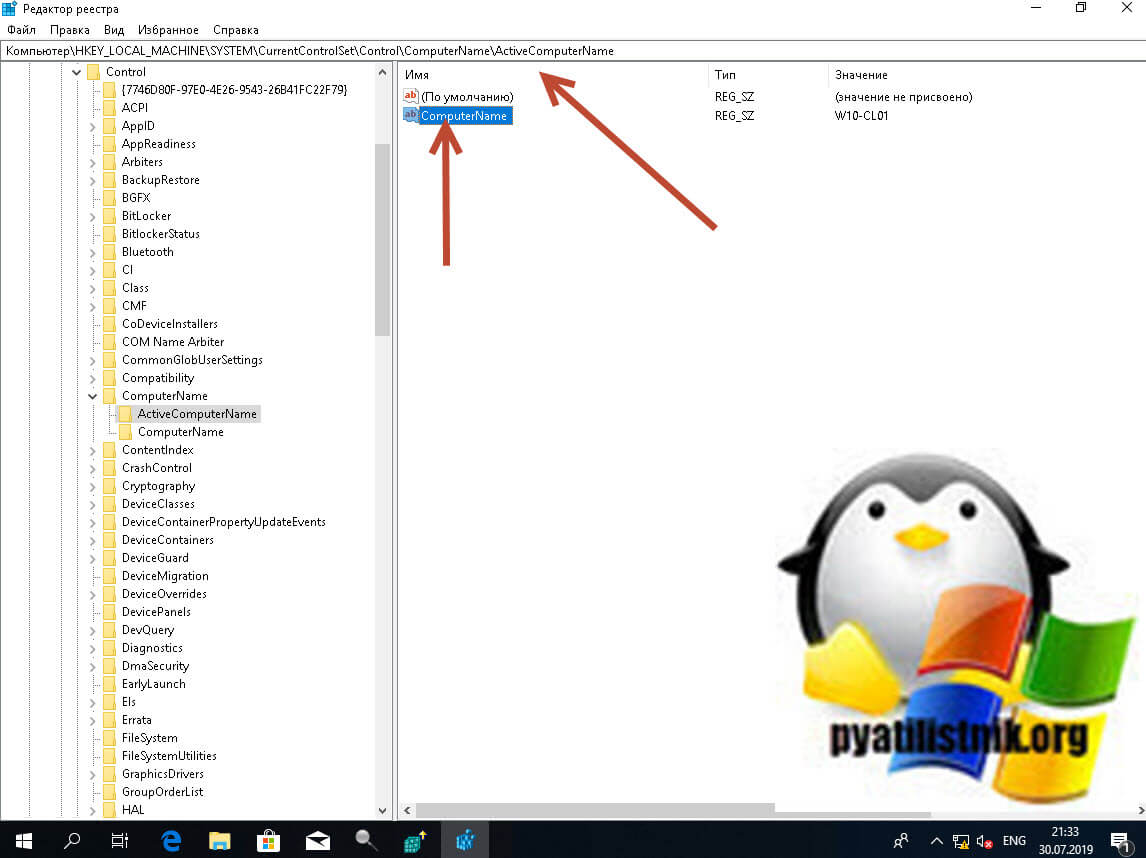
Если вы хотите экзотики и легкого мазохизма, то можете попробовать выполнить изменение имени вашей системы через реестр Windows. Для этого вам придется воспользоваться утилитами поиска по нему, о которых я уже рассказывал. Я буду использовать Registry Finder, нас будут интересовать две ветки:
- HKEY_LOCAL_MACHINESYSTEMCurrentControlSetControl ComputerNameComputerName
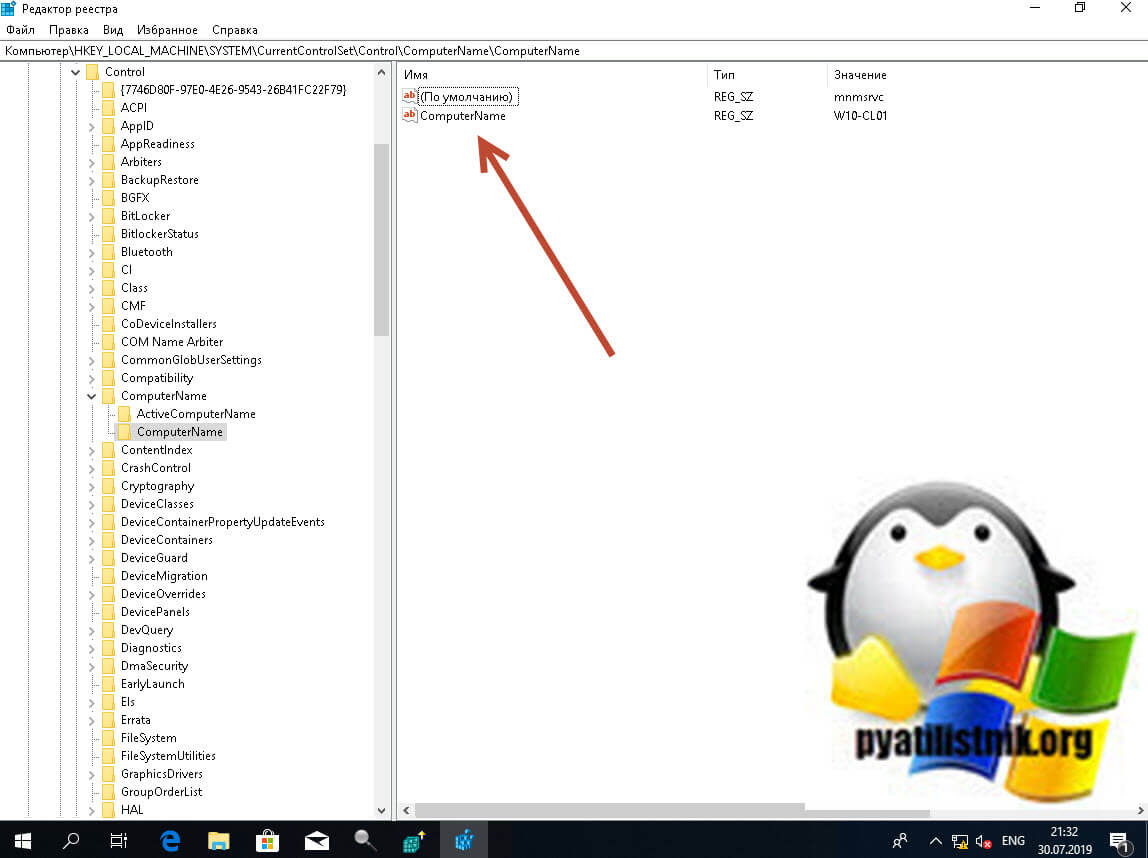
- HKEY_LOCAL_MACHINESYSTEMCurrentControlSetControl ComputerNameActiveComputerName
- HKEY_LOCAL_MACHINESYSTEMCurrentControlSetServices TcpipParametersHostname и NV Hostname
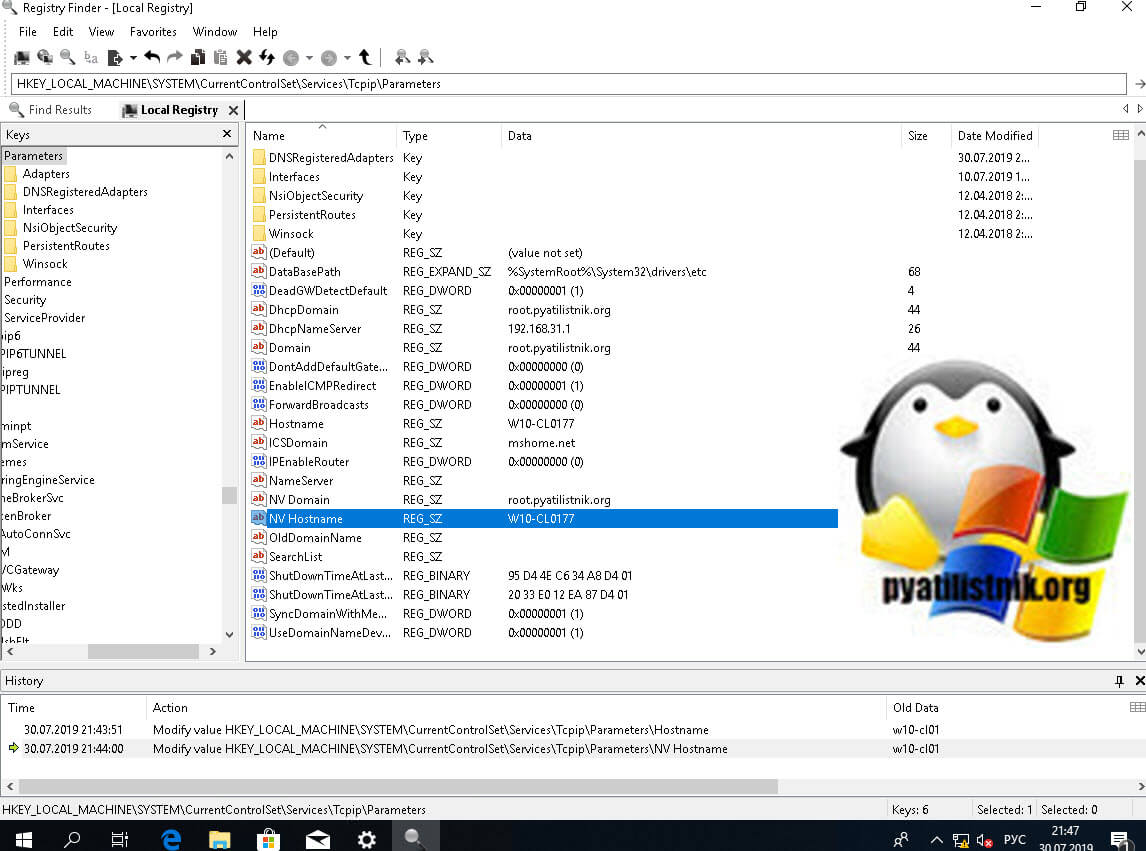
Вообще ключей содержащих имя вашего компьютера очень много, но менять нужно исключительно те два, что я описал выше, после манипуляций обязательная перезагрузка системы.
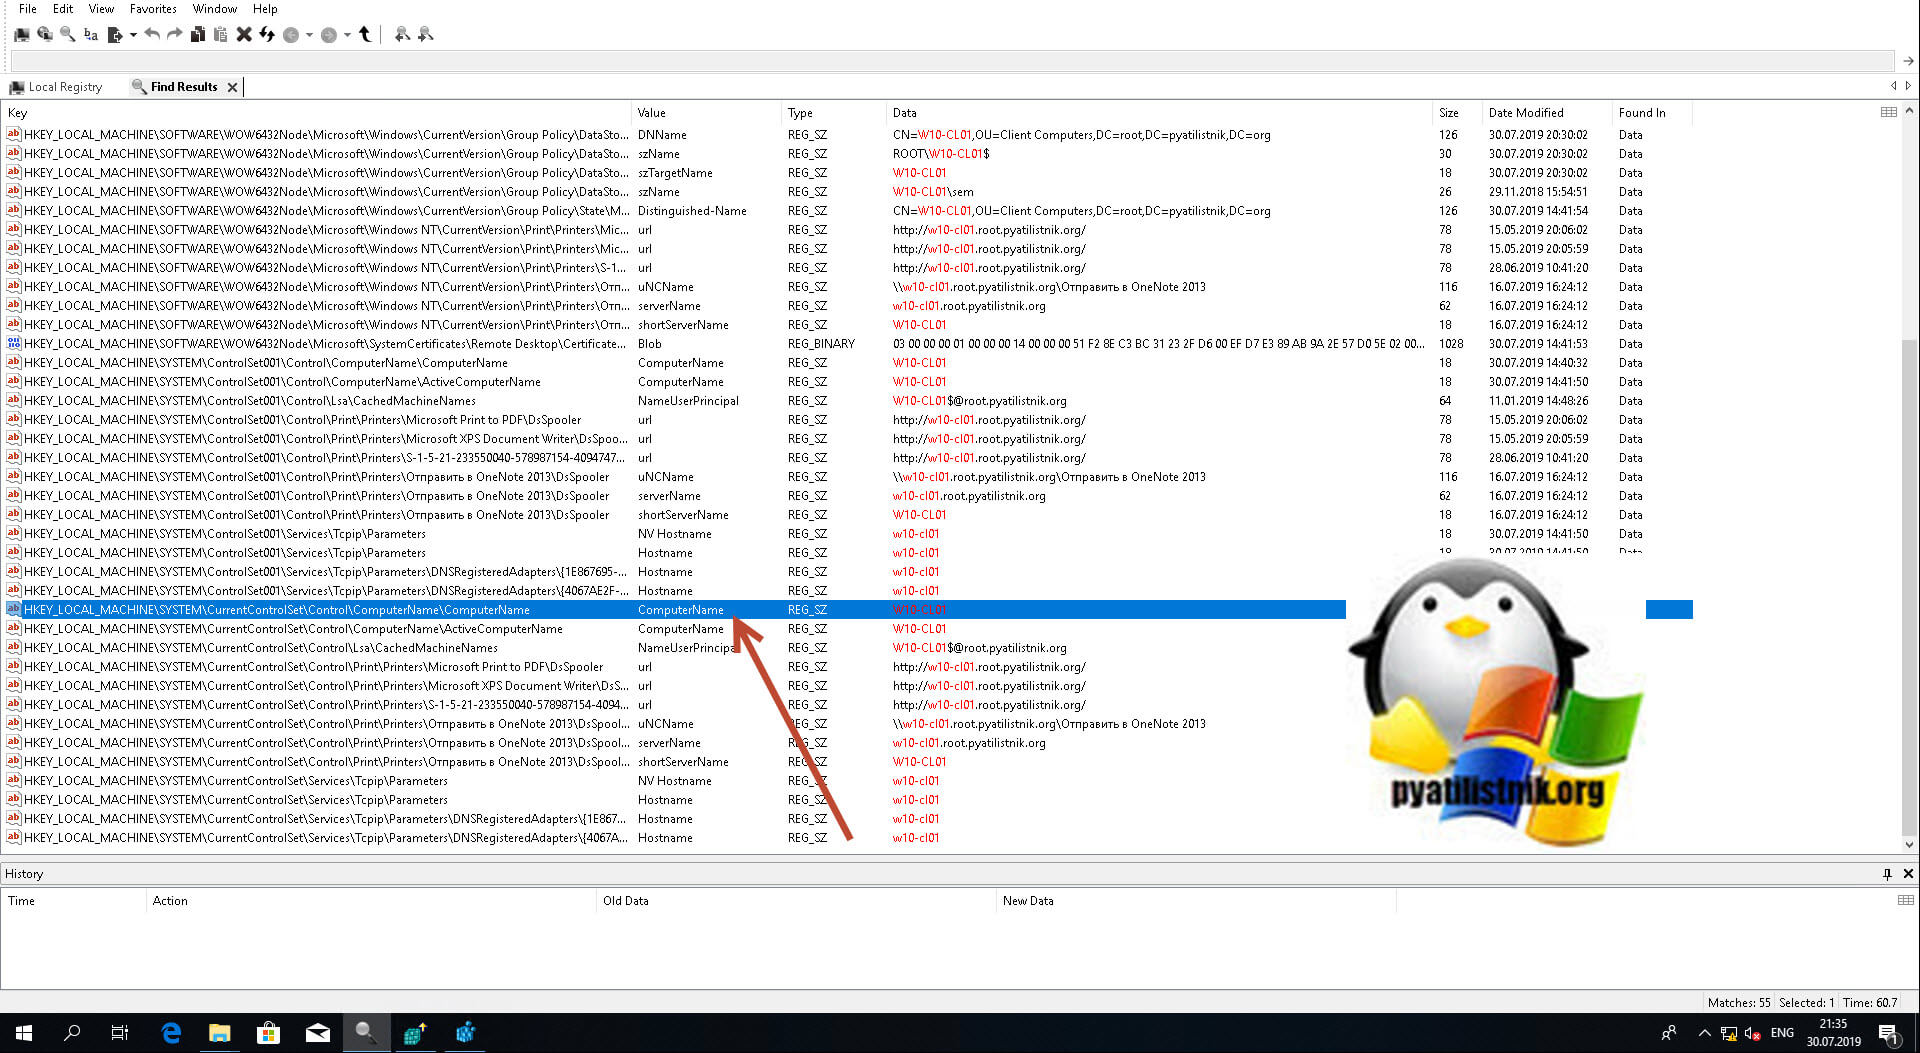
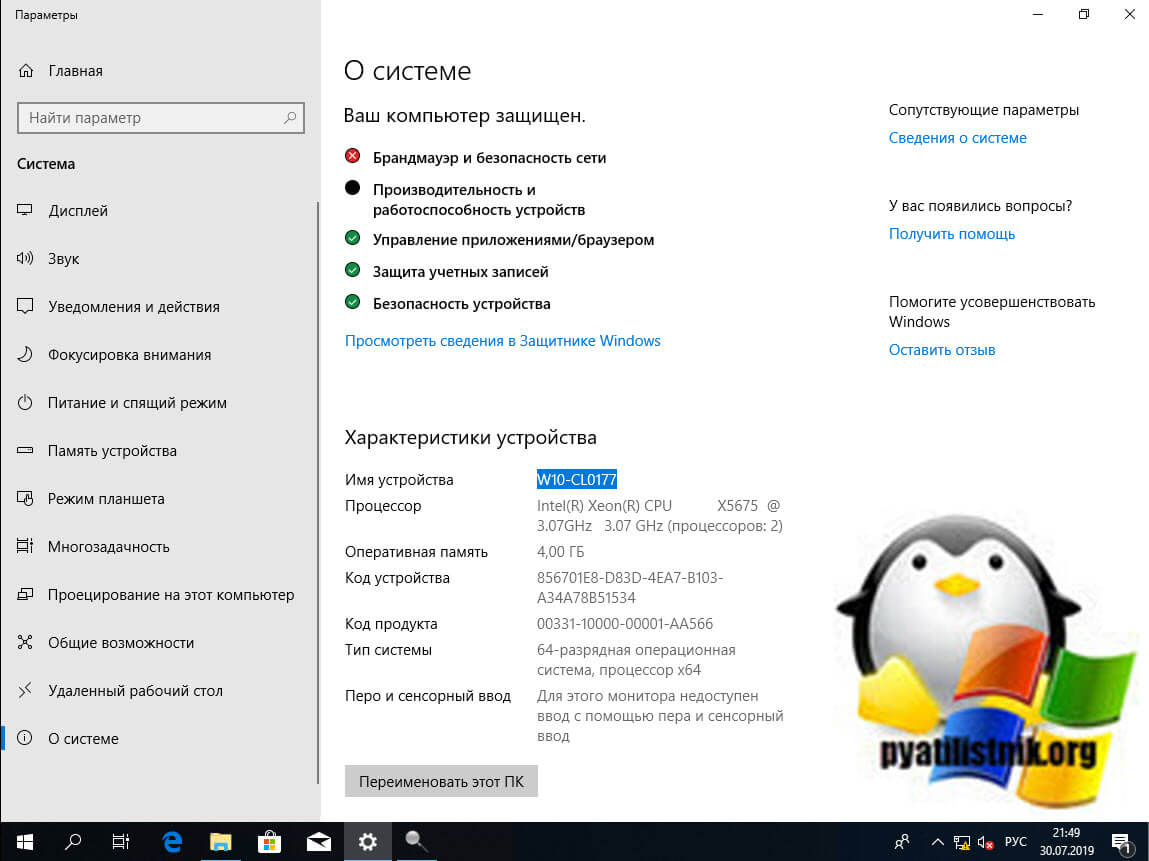
Проверяю результат и вижу, то что нужно W10-CL0177.
Переименовывание Windows 10 через утилиту Netdom
Netdom — это серверная утилита командной строки, через которую я вам ранее показывал, как задавать имя для Windows Server, если вы ее отдельно скачаете в вашу Windows 10, то так же сможете выполнить переименовывание системы, синтаксис там такой:
netdom renamecomputer cinquefoil /Newname новое имя
Вот такие вот рабочие и главное разнообразные методы, позволяющие вам задать нужное имя вашему компьютеру или ноутбуку. С вами был Иван Семин, автор и создатель IT портала Pyatilistnik.org.